1
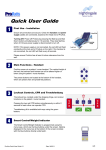
ProAxisplus Electric Profiling Bed
Technical Manual
QP: 18 ISSUE DATE: 13/11/06
ISSUE STATUS: 2.0
1
ProAxisplus Electric Profiling Bed
Technical Manual
Table of Contents
Page
Manufacturer’s Details
General Operation of the ProAxis plus Bed
Handset Functions
Lockout Functions
3
4
5
Advanced Maintenance Procedures
Shutdown Procedure
Splitting the Bed
Removing & Replacing Motors
Removing & Replacing the Batteries
Main Board Replacement
Wiring Loom
6
7
8
9
10
11
Trouble Shooting Guide
12
QP: 18 ISSUE DATE: 13/11/06
ISSUE STATUS: 2.0
2
ProAxisplus Electric Profiling Bed
Technical Manual
Manufacturer’s Details
Name:
Address:
Nightingale Care Beds Ltd
Unit 20 Abenbury Way
Wrexham Industrial Estate
Wrexham
LL13 9UZ, UK
Telephone: +44 (0) 1978 661699
Facsimile: +44 (0) 1978 661705
E-Mail: [email protected]
Website: www.nightingalebeds.co.uk
QP: 18 ISSUE DATE: 13/11/06
ISSUE STATUS: 2.0
3
ProAxisplus Electric Profiling Bed
Technical Manual
General Operation of the
ProAxis Plus Bed
Warning
This technical manual covers only
the general functions of the ProAxis
Plus it is in no way a substitute for
the user manual.
HANDSET FUNCTIONS
Variable Height
The variable height is operated by
the nurse/patient pendant or optional
weight indicator. Press the bed up
key and the bed will raise, release at
the desired height. Press the bed
down key and the bed will lower,
release at the desired height.
Head Section
The head section is operated by the
nurse/patient pendant or the optional
weight indicator. Press the head
section up key to raise the head
section, release at the desired
height.
Press the head section down key to
lower the head section, release at
the desired height. When raising the
head section the foot section will
begin to lower, at 30º the foot section
will lower at an increased rate. The
foot section can then be adjusted as
required. When the head section is
lowered the foot section will not raise
automatically, use the foot up key to
raise
QP: 18 ISSUE DATE: 13/11/06
Foot Section
The foot section is operated by the
nurse/patient pendant or the optional
weight indicator. Press the foot down
key and the foot section will lower,
release at the desired height. Press
the foot up key and the foot section
will raise, release at the desired
height.
Preset Chair
Preset chair is operated by the
nurse/patient pendant or optional
weight indicator. Pressing the preset
chair key will raise the head section
to its full height and lower the foot
section to its lowest height, there will
be a 3 second delay before the tilt
function is activated to place the bed
in the final chair position. This
function can be used from any
position, and is halted by releasing
the key.
Preset Flat
Preset flat is operated by the
nurse/patient pendant or the optional
weight indicator. Pressing the preset
flat key will remove any frame tilt
then lower the head section, raise
the foot section and lower the bed to
its minimum height.
ISSUE STATUS: 2.0
4
ProAxisplus Electric Profiling Bed
Technical Manual
LOCKOUT FUNCTIONS
The lockout panels are located on
the side of the bed, centrally under
the sleep surface, there is a lockout
on both sides. These panels control
lockout, trendelenburg and CPR
functions.
Lockout
The lockout function is controlled by
the central blue keys. To lockout a
function press the relevant key
(head, foot, height) the LED will
illuminate red to indicate lockout is
activated. Press the key again and
the LED will e xtinguish to indicate
that function is restored.
Trendelenburg
CPR
The fully automated CPR function is
designed to level the sleep surface
and lower the bed as quickly as
possible without manual effort.
The function is activated by pressing
the red CPR keys together or one
after the other within 3 seconds.
Once activated, the bed will level
from any position without further user
input. The function can be stopped
by pressing either of the red CPR
keys after 2 seconds of operation. All
the Lockout panel LED’s will flash
during CPR operation and no other
function is available whilst these are
illuminated.
Please note that CPR will override
any function of the bed, therefore
even if a lockout is activated the bed
will still level.
The trendelenburg feature is
controlled by the green keys. To
operate trendelenburg (head down)
press the head down key until the
desired angle of tilt is reached (max
13º) the green LED will illuminate
whilst the function key is pressed. To
remove the tilt, press the opposite
function key until the bed stops
moving and the green LED flashes.
At this point release the key and the
bed will be level. Reverse
Trendelenberg is achieved in the
same way but using the reverse
Trendelenberg key (foot down).
Please note the bed can also be
leveled by using the Preset Flat key
on the nurse/patient pendant or the
optional weight indicator.
QP: 18 ISSUE DATE: 13/11/06
ISSUE STATUS: 2.0
5
ProAxisplus Electric Profiling Bed
Technical Manual
Advanced Maintenance
Procedures
ProAxis has been designed as a
modular system; it is therefore
relatively simple to replace
component parts if faulty or
damaged. All parts requiring
replacement should be substituted
for new items, under no
circumstances should parts be
repaired or modified.
The bed frame is a stressed item and
has been manufactured to a high
standard, if at any time the frame is
damaged i.e. dented or bent then the
frame should not be used until the
manufacturer has inspected and
passed the item as safe.
are listed in the relevant manuals,
but at the time of issue they are
ProAxis – 39 stone (248kg), ProAxis
Plus – 50 stone (318kg).
SHUTDOWN PROCEDURE
The following procedures require that
the system is shut down before any
work is undertaken. To shut the
system down, disconnect the power
supply at the jack plug, then press
The actuators are run directly from a
24v dc system that is kept fully
charged from a mains power supply
outputting at 36v dc.
The charging system is integral to
the control board. If the system is
disconnected from the mains supply
it will still function directly from the
batteries. If the system is not
reconnected to the mains supply the
system will shut down at 50% charge
to prevent damage to the batteries.
the bed up and bed down buttons on
the nurse/patient hand pendant
simultaneously until the green LED’s
stop flashing. It is now safe to
continue.
To restore operation to the bed
simply reconnect the power supply
jack plug.
When the power is reconnected it will
only take approx 20 minutes before
the system can be used again.
The actuators are software controlled
and incorporate a “soft start” feature
to prevent jarring, also the system
can detect an overload situation and
will not operate if excess weight is
placed on the bed. Maximum weights
QP: 18 ISSUE DATE: 13/11/06
ISSUE STATUS: 2.0
6
ProAxisplus Electric Profiling Bed
Technical Manual
THE FOLLOWING PROCEEDURE
REQUIRES 3 PEOPLE
SPLITTING THE BED
To split the bed for easier
installations and to replace the lift
actuators firstly remove the head and
foot panels, cot sides, and the sleep
surface covers. Use the CPR
function to place the bed at 600mm.
Disconnect the bed from the power
supply and put the system to sleep
by pressing and holding the UP and
DOWN buttons on the handset
simultaneously for 10 seconds until
lights are extinguished. Apply the
brakes.
Detach the connectors to the lift
motors (MR2, MR3) (diagram 1)
these are of a plug and socket type
with a threaded collar to secure.
Loose cables should be secured.
the pins; this may require the use of
a suitable drift. Once the pins have
been removed the top frame should
be slid towards the foot end, this will
release the roller bearings from their
retaining channel and the top frame
will be free, (diagram 3) retain the
nylon runner blocks for re-insertion
upon rebuild.
Ensure the top frame is not damaged
when it is put down.
Diagram 2
Diagram 1
Diagram 3
Remove circlips from outside of
bearing pins (see diagram 2) with the
plastic spacer and put to one side.
With one person at the head and one
at the foot taking the weight of the
bed, the third person should remove
QP: 18 ISSUE DATE: 13/11/06
Safety Note:- The bed should NOT
be lifted by the head section, please
use the main frame only. This is due
to the clutch mechanism in the head
motor, which can cause the head
section to rise whilst lifting.
ISSUE STATUS: 2.0
7
ProAxisplus Electric Profiling Bed
Technical Manual
Even though the frame is now in two
halves care must be taken when
carrying, health and safety
regulations should be complied with.
Rejoining the two halves is a reversal
of the splitting procedure, with
attention being paid to re -inserting
the nylon runner blocks the plastic
spacer and the fitting of the circlip.
With the bed back together the
power supply should be reconnected to activate the control
system. The bed should be operated
several times up and down to ensure
smooth operation, recheck all fittings.
REMOVING AND REPLACING
MOTORS
To remove or replace a lift actuator,
firstly follow the procedure to split the
bed frame.
Once the frame is split simply
remove nut from each of the actuator
attachment bolts and whilst taking
the weight of the actuator remove the
bolts. Ensure the actuator is replaced
with the correct type (Linak 340208
200mm stroke) and it is in the correct
orientation. (See diagram 4).
Reassembly is a reversal of the
above procedure; please ensure the
nuts are tightened up to the shoulder
on the bolts.
Diagram 4
To remove the head actuator. If
possible raise the backrest into the
fully up position with the handset.
Place the system in sleep mode as
described in 1. above. Disconnect
the actuator cable (MR1). Remove
the nuts from each of the actuator
attachment bolts and whilst
supporting the head section remove
the LOWER bolt. Support the
actuator and remove the top bolt, the
actuator is now free.
Ensure the actuator is replaced with
the correct type (Linak 340208
200mm stroke) and it is in the correct
orientation. (See diagram 4).
Reassembly is a reversal of the
above procedure; please ensure the
bots are securely tightened.
Diagram 4
QP: 18 ISSUE DATE: 13/11/06
ISSUE STATUS: 2.0
8
ProAxisplus Electric Profiling Bed
Technical Manual
To remove the foot actuator, use the
CPR function to ensure the bed
frame is level. Remove the foot
panel, cot sides, and then the foot
section cover. Place the system into
sleep mode as described above.
Disconnect the actuator (MR4) cable.
Remove the nuts off the actuator
attachment bolts, then supporting the
foot end remove the bolt nearest the
centre of the bed. Gently lower the
foot end, and then supporting the
actuator remove the other bolt.
Ensure the actuator is replaced with
the correct type (Linak 340207
150mm stroke) and it is in the correct
orientation (diagram 5). Reassembly
is a reversal of the above procedure;
please ensure nuts are tightened
against the shoulder of the bolt.
should be changed. This is achieved
by placing the system in sleep mode
as described above, then removing
the four screws securing the lid of
the control box.
Remove the battery connection
cables, noting their position, and
then loosen the battery securing
plate whilst supporting the same.
Remove the batteries and replace
with new identical units.
Diagram 5
Diagram 6
REMOVING AND REPLACING
THE BATTERIES
Please ensure that any used
batteries are disposed of in
accordance with local legislation.
Reconnect wiring in the same order
as removal. It is imperative that this
is done correctly, as reversing the
polarity will result in the main board
shorting out and permanent damage
occurring (diagram 6).
It is recommended that the batteries
are replaces on a five yearly basis to
ensure optimum performance. The
efficiency of the batteries can be
determined by measuring the
conductance, fully charged a reading
of at least 180 Siemens should be
recorded. If after a 4 hour charge
cycle the conductance is less than
135 Siemens then the batteries
QP: 18 ISSUE DATE: 13/11/06
ISSUE STATUS: 2.0
9
ProAxisplus Electric Profiling Bed
Technical Manual
Diagrammatic view of circuit board
layout with used connections labeled.
MAIN BOARD
REPLACEMENT
The main control has no user
serviceable parts and must be
replaced with a new unit if problems
occur.
To replace the board shut the system
down as explained in the shut down
procedure, then remove all the
connectors from the board except for
the temperature sensor plug.
Remove the 4 securing screws and
remove the board carefully from the
control box.
Replacing the board is
straightforward, ensure the motor
connectors (MR1-4) are on top of the
board and in the correct order of
assembly, also ensuring the comms
and power input connections are at
the bottom of the board. Secure the
board with the 4 screws and plug in
all of the connections, use diagram 7
to ensure the correct connections are
made. All plugs used have guides
and cannot be connected incorrectly.
With the new board connected,
reconnect the power supply jack and
check all operations of the bed, once
satisfied replace the control box
cover.
Diagram 7
QP: 18 ISSUE DATE: 13/11/06
ISSUE STATUS: 2.0
10
ProAxisplus Electric Profiling Bed
Technical Manual
WIRING LOOM
ProAxis Plus utilizes a wiring loom
that is sectional and can be replaced
as such, this speeds diagnosis and
replacement. All connectors have a
male and female half secured by a
twist collar.
Diagnostic LED and weight indicator
interface.
Control Box looms.
Actuator
loom
If a problem with any of the looms
occurs it is most likely due to
damage through misuse, as such it is
advisable to change any damaged
parts for new items.
If however no damage is evident,
problems can be isolated to faulty
connections. A simple continuity
check should be done to isolate the
wiring responsible, and then check
the corresponding connection at the
plug to ascertain where the problem
lies. Disconnect the male and female
parts of the connection and check
that non of the connection pins have
been displaced, if this is evident then
the pins can be gently pulled
outwards with a pair of long nose
pliers. If the connection pins are bent
or splayed then a replacement loom
should be fitted.
Occurrences of loom damage are
rare, and will be evident by erratic
movement of the bed, I.E. when bed
up is pressed on the hand pendant
the bed will appear to tilt. This will
indicate a fault on the loom to the
motor that does not move.
Actuator Connections
Hand Pendant Loom.
QP: 18 ISSUE DATE: 13/11/06
ISSUE STATUS: 2.0
11
ProAxisplus Electric Profiling Bed
Technical Manual
Trouble Shooting Guide
ProAxis Plus utilizes a Diagnostic
LED (RED) located at the foot of the
bed on the right hand side. This will
indicate the majority of problems that
may occur to ease rectification.
Please use the following guides to
diagnose and solve potential
problems.
QP: 18 ISSUE DATE: 13/11/06
ISSUE STATUS: 2.0
12
ProAxisplus Electric Profiling Bed
Technical Manual
QP: 18 ISSUE DATE: 13/11/06
ISSUE STATUS: 2.0
13