1
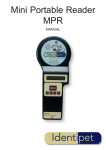
Mini Portable Reader
(MPR)
Model HS 5900L F
TABLE OF CONTENTS
Chapter 1: Mini Portable Reader (MPR) Basics
1.1
1.2
1.3
Preparing for Operation
Installing/Changing Batteries
Scanning with the Mini Portable Reader
Chapter 2: How To Use The Quick Access Function
1
1
1
2
2
2.1
Deleting The Last ID Code Scanned
3
2.2
The Memory Free Function
3
Chapter 3: Menu Structure
4
Chapter 4: How To Store Tag ID Codes
5
4.1
Storing Tag ID Codes In Reader Memory
Chapter 5: How To Manage Files and Transfer Data
5
5
5.1
How To Create A New File
6
5.2
How To Upload Files To Your Computer Or Printer
6
5.3
How To Download A Computer File To Your Reader
7
5.4
How To Delete A File
8
Chapter 6: How To Turn The Beeper On/Off
9
Chapter 7: How To Use The Search Mode
9
Chapter 8: Operating Errors
10
8.1
Description
10
8.2
Error Messages
10
General Information
The Mini Portable Reader is a compact, battery-powered unit that reads radio
frequency (RF) identification (ID) tags. Its simplified menu-based design, providing
prompts on a 16-character LCD, allows for easy operation.
The device allows you to read and display tag ID codes, store tag ID codes by file or
print barcode labels as tag ID codes are scanned. Tag ID codes that have been stored
in the reader can later be sent via the serial port to your computer or printer. Contact
your computer dealer to obtain an appropriate communications package for use with
your computer and the Mini Portable Reader.
You can read approximately 300 tag ID codes before you need to replace the batteries.
The memory reader is non-volatile, so tag ID codes are not lost when you change the
batteries. The device can store 1,000 tag ID codes.
Mini Portable Reader Basics
1.1
Preparing For Operation
1) Remove the Mini Portable Reader from the shipping package.
2) Turn the Mini Portable Reader ON by pressing the ON/OFF button located on
the keypad.
(The scanner was shipped with two nine-volt batteries pre-installed)
The Mini Portable Reader shuts down automatically when left unused for one minute.
This feature prolongs the life of the batteries (the reader will “beep” twice before
shutting itself off). The reader will have a reduced read range when the battery level
drops below approximately 25 percent. The reader may be shut Off manually by
pressing the ON/OFF button.
1.2
Installing/Changing Batteries
The Mini Portable Reader was shipped with two nine-volt batteries already installed.
To change batteries:
1) Turn the Mini Portable Reader face down on a flat surface.
2) Remove the two screws to the battery compartment and remove the battery
compartment door.
3) Snap one nine-volt battery into each slot, making sure that the female and male
connectors are properly aligned.
4) Replace the battery compartment door, insert the two screws and tighten firmly.
1
1.3
Scanning With The Mini Portable Reader
When you first turn on your Mini Portable Reader it will be in the “Tag Read Mode” and
will display the following message: READY nn
Where “nn” will be, a two digit number representing the file into which you will store ID
numbers when the STORE capability is turned on. If the STORE capability is not
turned on, the display will be: READY -- -TO SCAN FOR AN ID TAG:
1) Hold down the READ button until you have read a tag ID code.
2) When a tag is read, the Mini Portable Reader will beep (if the Beeper is turned on
– See section 6), and display the number.
Example: (with STORE turned OFF) 221967254B
Example: (with STORE turned ON) 221967254B
004
(The “004” indicates that this is the 4 code to be stored in the file)
th
3) If no tag ID code is read, the LCD display message will be: NO ID FOUND
4) To scan successive ID codes – simply press the READ button again.
When you scan an ID code, the number will stay on the display until the reader shuts
itself off (in approximately one minute), or until you press the READ button again.
When a tag is read, the ID number can be automatically transferred to your computer.
In order for the number to be automatically transferred, your computer must be
connected to the Mini Portable Reader and must be running compatible software which
is in the read-to-receive mode.
You may also connect a portable barcode printer to the Mini Portable Reader computer
port to print barcode labels with the tag ID code number.
2
2.
How To Use The Quick Access Function
When you are scanning ID codes with STORE turned on, you can quickly delete the last
ID code scanned from memory using the Quick Access mode.
2.1
Deleting The Last ID Code Scanned
To get to the Quick Access feature, when the display reads READY nn immediately
after you have scanned an ID code, or with an ID code tag number in the display, press
the OPTION key once to access the DELETE LAST ID function. If you press the
OPTION key a second time, you will reach a screen that says MEMORY FREE: press it a
third time to return to the READY state.
The DELETE LAST ID function will not display if the STORE mode is not turned ON,
or if you have not scanned any tags since turning the Mini Portable Reader’s
power on.
If you wish to delete the last ID number when DELETE LAST ID is displayed, press the
SELECT key, which will give you the delete confirmation message – PUSH MENU
SELECT. To actually delete the ID number, press the MENU and the SELECT keys
simultaneously. You will see the message DELETING… while the deletion is taking
place, then the message FINISHED! will display momentarily. The display will then
move on to the MEMORY FREE function.
2.2
The Memory Free Function
The Memory Free function is a diagnostic tool used by Mini Portable Reader service
personnel to determine the memory address of stored ID codes. The information is
not relevant to everyday operation of your Mini Portable Reader.
3
3.
Menu Structure
The Mini Portable Reader has three primary menus for selecting operating options and
a “Quick Access” function for deleting ID code numbers. These menus are organized
as shown in Table 1 on page ??.
From the Tag Read Mode (when you are in Tag Read Mode the display reads READY
nn), press the MENU key to move from one primary menu to the next. Press the
OPTION key to access the “Quick Access” function. Press the SELECT key to move the
submenus under each primary menu. When you want to exit a particular submenu,
press the OPTION key once to return to the primary menu function where you started.
Pressing the MENU key repeatedly will then cycle you through the remaining primary
menu options.
Use the SCAN MODES MENU to turn the STORE, CONTINUOUS, PRINT BARCODE or
SEARCH capability on or off. Refer to the following section in this manual for details.
Use the FILE MANAGEMENT menu to create a new file, upload the entire memory or
specific file numbers to a computer or printer, download a file from a computer to the
Mini Portable Reader memory, or delete all or selected files. Please refer to Section 5
for more information on these features.
Use the UTILITIES MENU to turn your beeper on or off. Please refer to Section 6 for
additional information on this feature.
If you see an error message on the display, please refer to Section 8 for information.
4
4.
How to Store Tag ID Codes
Use the SCAN MODES MENU to turn on or off the STORE capability for adding tag ID
codes to the reader memory and to access the PRINT BARCODE feature.
4.1
Storing Tag ID Codes In Reader Memory
Use this mode when you wish to scan a tag ID code and store it in the Mini Portable
Reader’s memory. You might use this mode when you are loading or transferring
animals or reading animal ID codes in the field, and you want to store ID codes in the
reader’s memory until you get back to your computer or printer.
When STORE is on, tag ID codes are displayed and then stored in a designated file. To
add a new file, see Section 5. You can create and use up to 99 files. The first file you
use will automatically be number 1. At least one code must be stored within a file
number in order to create a memory, but no more than 399 tag ID codes in one file.
You may wish to write down into which file you store a group of tag ID codes (e.g. by
herd or date).
5.
How To Manage Files & Transfer Data
The FILE MANAGEMENT menu allows you access to functions to add and delete files
and control the transfer of data to or from a computer. To access these functions from
FILE MANAGEMENT, press the SELECT key to access the first feature ADD A FILE?,
then press the MENU key successively to cycle to the other three features in
succession: UPLOAD FILES, DOWNLOAD A FILE and DELETE FILES: a fourth press of
the MENU key will return you to the first function ADD A FILE?. You may also press
the OPTION key from any of these functions to return to FILE MANAGEMENT directly,
or to jump from any display item to the next higher item in the menu hierarchy.
5
5.1
How To Create A New File
Use the ADD A FILE? Function when you want to store the next tags you scan in a file
separate from tags you’ve already scanned. To start the new file when ADD A FILE? is
displayed, press the SELECT key. If the last file opened is still empty, the unit will not
allow you to create another new file.
Note: If you have created 99 files without deleting any, when you reach file #99 the
reader will not accept any additional files. If you attempt to scan tag ID codes in an
additional file, you will ERASE THE DATA in the last file and start a new file beginning
with the last tag ID that was scanned.
If a new file is successfully started, all new tags will go into this new file until you
either turn off the STORE option or create a new file.
5.2
How To Upload Files To Your Computer Or Printer
Use the UPLOAD FILES function when you want to copy tag numbers to a computer or
send them to a printer from the reader’s memory. Sending tag numbers with this
function will not erase them: to delete the numbers from memory, you will need to use
the function DELETE FILES separately.
Before beginning to upload, connect the reader to your computer with a suitable cable.
To begin the upload process when UPLOAD FILES is displayed, press the SELECT key. If
the reader’s memory is empty (no tags have been scanned with the STORE option on),
the display will remain at UPLOAD FILES. If one or more files do contain data, the unit
will allow you to specify whether you want to upload all files or just on particular file.
TO UPLOAD ALL FILES
1) Press the SELECT key at the UPLOAD FILES display
2) Then press the SELECT key again at the UPLOAD ALL FILES display.
IF YOU WANT TO UPLOAD ONLY A PARTICULAR FILE
1) Press the MENU key at the UPLOAD FILES display and the number of the
most recently created file will be displayed, i.e. UPLOAD #11
2) Press the MENU key repeatedly until the reader display has cycled down to the
file number you want to upload.
3) When you have reached the desired files(s), press SELECT key to send the
file(s) to your computer.
6
After pressing the SELECT key to upload your selection, UPLOAD FILE #11 or
UPLOAD ALL FILES, you will see the message FILE UPLOADING display briefly during
the time the data is being sent by the reader to your computer. When the uploading is
complete, the message FINISHED! will display momentarily, then the display will
return to the UPLOAD FILES function.
NOTE:
The FINISHED! message means only that the reader has sent the requested files; it
does not guarantee that the computer has received them properly. You should verify
that your computer has saved the files successfully before deleting the corresponding
files on the reader.
5.3
How To Download a Computer File To Your Reader
Use the DOWNLOAD A FILE function to copy a batch of tag ID codes from your
computer into the reader’s memory. The tag ID code numbers downloaded will be
placed into the most recently opened file.
TO DOWNLOAD A FILE:
1) Cycle to the DOWNLOAD A FILE selection in FILE MANAGEMENT.
2) Press the SELECT key.
3) If the maximum number of 99 files have already been opened and the last one
has data in it, the unit will reject your attempt to download with the message
FILE SPACE FULL! which will display momentarily; the display will then revert
to the function DOWNLOAD FILE.
If the reader can receive data, the message RCV READY - #nn is displayed,
where “nn” is the number of the file into which the downloaded data will be
stored.
4) When the reader begins receiving data from the host computer, the message
RECEIVING FILE… will display and will remain until the data reception is
finished.
5) If the file transfer is completed successfully, the message FINISHED! will be
displayed momentarily. The display will then return to the DOWNLOAD A FILE
selection.
7
6) If the amount of data transferred from the host exceeds the reader’s memory
capacity, downloading will be stopped and the message FILE FULL will
momentarily display. The display will then return to the DOWNLOAD A FILE
selection.
NOTES:
A. When a command is entered on the computer that the MPR does not recognize, the
reader will send back the message “Z” to your computer. This will not affect the
memory of your computer.
B. If the command “X” is entered via your computer, it will ERASE THE MEMORY IN THE MINI
PORTABLE READER.
C. If the command “T” is entered via your computer, it will LOCK UP THE MINI PORTABLE
READER. To return your reader to normal operating mode you must turn the unit off.
5.4
How To Delete Files
Use the DELETE FILES function to free up memory space by deleting files of ID tag
numbers that you no longer need.
TO DELETE A FILE:
1) Cycle to the DELETE FILES selection in FILE MANAGEMENT.
2) Press the SELECT key. If one or more files contain data, the unit will allow you
to specify whether you want to delete all files or just one particular file.
3) If you want to delete only a particular file, at the DELETE ALL FILES display,
press the MENU key and the number of the most recently created file will be
displayed DELETE FILE #nn. Press the MENU key repeatedly until the reader
display has cycled down to the file number you want to delete. Note: after the
message DELETE FILE #01 appears, the next MENU key press will return you
to DELETE ALL FILES.
4) After you have reached your desired selection, DELETE ALL FILES or DELETE
FILE #nn, press the SELECT key, which will yield the delete confirmation
message PUSH MENU + SELECT.
5) To delete the data in the file(s), press the MENU and SELECT keys
simultaneously. You will see the message DELETING… while the deletion is
taking place, then the message FINISHED! will display momentarily.
6) If you have deleted all files, the display will return to DELETE FILES. If you
have just deleted only one file and more files remain, the display will return to
DELETE ALL FILES.
8
6.
How To Turn The Beeper On/Off
The UTILITIES MENU item gives you access to a function which lets you turn the
beeper on and off. When the beeper is on, the Mini Portable Reader emits an audible
beep every time a tag ID code is read.
TO TURN THE BEEPER ON AND OFF:
1) At the UTILITIES MENU display, press the SELECT key once.
2) To toggle the beeper between ON and OFF, press the SELECT key.
3) Press the OPTION key once to return to the UTILITIES MENU display.
4) Press the MENU key once to return to READY nn.
7.
How To Use The Search Mode
The SEARCH mode gives you the capability to search for a specific ID code within the
files you have created. When the SEARCH mode is activated, if, while you are
scanning ID codes, the beeper sounds twice, you have scanned a code that is currently
stored in the unit’s memory within the file you selected in the SEARCH mode.
To use the SEARCH mode with the Mini Portable Reader, you must have both STORE
and SEARCH activated.
TO USE THE SEARCH MODE:
1) From the READY nn display, press the MENU key once to cycle the SCAN
MODES MENU display.
2) Press the SELECT key once. The display will read STORE ON.
3) Press the MENU key three times. The display will read SEARCH OFF.
4) Press the SELECT key once. The display will read SEARCH #01. This
indicates that as you scan ID codes, the SEARCH will be in File #1 for matching
ID codes that have previously been scanned. The reader will beep twice if a
matching ID code is found in File #1. Press the SELECT key to cycle to the File
# you wish to search.
5) Press the OPTION key once to return to the SCAN MODES MENU display.
6) Press the MENU key three times to return to READY nn.
7) Repeat the above steps to begin a new search in a different file number.
9
8.
Operating Errors
8.1
Description
The operating errors described below are errors that can occur during operation of the
Mini Portable Reader. These errors cause an error message to be displayed and at the
same time the reader sounds three beeps. Fix each error condition as described
below. All messages are displayed for about 1 second.
8.2
Error Messages
LOW BATTERY - This message is a warning that the battery has been discharged
down to about 25% of its capacity and should be replaced soon. After this message,
the left-most character of the display will blink until the battery has been replaced.
MEMORY ERROR - A memory error has occurred. Depending on the problem, a file or
all of the memory may be unusable. If possible, dump the memory to a computer or
printer to maintain a record. This message indicates an error in the file – if this
message occurs again after switching the reader off and then on again, please consult
your distributor.
MEMORY FULL - There is no more room in the memory to store tag ID codes. You will
need to clear ID codes which are no longer used to make room in the reader’s memory
for additional ID codes to be stored. If necessary, send some ID codes to your
computer or printer and then clear them from the reader’s memory.
SHUTDOWN - This message is displayed just before the system shuts down due to a
low battery. The memory maintains stored information even when the battery is fully
discharged.
SYSTEM RESET - If there is a memory error on power-up, all stored ID codes and
menu selections established by the user are lost and the system is reset (options
return to default settings). You will need to reselect any options you had previously
set. Static shock to the reader could cause this condition.
10