1
User’s
Manual
DPharp
PROFIBUS PA
Communication Type
(EJXA, EJAE)
IM 01C25T04-01EN
IM 01C25T04-01EN
3rd Edition
i
DPharp
PROFIBUS PA Communication Type
IM 01C25T04-01EN 3rd Edition
CONTENTS
1.
2.
Introduction................................................................................................ 1-1
1.1
Safe Use of This Product ................................................................................. 1-2
1.2
Warranty.............................................................................................................. 1-3
1.3
ATEX Documentation........................................................................................ 1-4
Handling Cautions..................................................................................... 2-1
2.1
3.
Installation of an Explosion-Protected Instrument........................................ 2-1
2.1.1
FM approval........................................................................................ 2-1
2.1.2
CSA Certification................................................................................. 2-2
2.1.3
ATEX Certification............................................................................... 2-3
2.1.4
IECEx Certification.............................................................................. 2-7
About PROFIBUS PA................................................................................. 3-1
3.1
Outline................................................................................................................. 3-1
3.2
Internal Structure of DPharp............................................................................. 3-1
3.2.1
4.
5.
Function Block.................................................................................... 3-1
3.3
Logical Structure of Each Block...................................................................... 3-1
3.4
Wiring System Configuration........................................................................... 3-1
Getting Started........................................................................................... 4-1
4.1
Connection of Devices...................................................................................... 4-1
4.2
Bus Power ON.................................................................................................... 4-2
4.3
Confirmation of Device Information................................................................ 4-2
4.4
Master Settings.................................................................................................. 4-3
4.5
Integration of GSD file and IDENT Number..................................................... 4-4
4.6
Bus Address Setup............................................................................................ 4-4
Parameter Setting...................................................................................... 5-1
5.1
5.2
Easy Setup.......................................................................................................... 5-1
5.1.1
Tag Number, Descriptor, Message and Installation Date................... 5-1
5.1.2
Pressure Range (Scale In) and Pressure Unit................................... 5-1
5.1.3
Output Mode (Characterization Type) ............................................... 5-2
5.1.4
Output Scale (Out Scale) and Unit..................................................... 5-2
5.1.5
Damping time constant (Filter Time Const)........................................ 5-2
Calibration.......................................................................................................... 5-2
5.2.1
Pressure Calibration........................................................................... 5-3
3rd Edition: Oct. 2014 (YK)
All Rights Reserved, Copyright © 2013, Yokogawa Electric Corporation
IM 01C25T04-01EN
ii
5.3
5.4
5.5
Input Signal Setup.............................................................................................. 5-5
5.3.1
Low Flow Cut Off................................................................................. 5-5
5.3.2
Primary Value Scale (Scale Out) and Primary Value Unit.................. 5-5
5.3.3
Signal Characterizer........................................................................... 5-6
5.3.4
Calculate Coefficient (For flow rate calculation)................................. 5-7
Output Signal Setup........................................................................................ 5-10
5.4.1
Fail Safe Mode.................................................................................. 5-10
5.4.2
Channel............................................................................................. 5-10
5.4.3
Totalizer............................................................................................. 5-10
Local Display.................................................................................................... 5-11
5.5.1 6.
Explanation of Basic Items...................................................................... 6-1
6.1
Outline................................................................................................................. 6-1
6.2
SENSOR Transducer Block.............................................................................. 6-1
6.3
6.4
6.5
7.
Procedure to Set the Integral Indicator............................................. 5-11
6.2.1
Functional Block.................................................................................. 6-1
6.2.2
Target Mode........................................................................................ 6-2
6.2.3
Basic Parameter of SENSOR Transducer Block................................ 6-2
LCD Transducer Block...................................................................................... 6-2
6.3.1
Outline of the Functions...................................................................... 6-2
6.3.2
Target Mode........................................................................................ 6-2
6.3.3
Display Contents of the Integral Indicator........................................... 6-2
6.3.4
Example Displays of the Integral Indicator......................................... 6-3
6.3.5
Units That Can Be Displayed on the LCD by the Automatic Link
Function.............................................................................................. 6-4
AI Function Block............................................................................................... 6-6
6.4.1
Function Blocks................................................................................... 6-6
6.4.2
Target Mode........................................................................................ 6-7
6.4.3
Basic Parameter of AI function block.................................................. 6-7
Totalizer Function Block................................................................................... 6-7
6.5.1
Functional Block.................................................................................. 6-7
6.5.2
Target Mode........................................................................................ 6-7
6.5.3
Totalizer Value Set (SET_TOT).......................................................... 6-8
6.5.4
Mode (MODE_TOT)........................................................................... 6-8
6.5.5
Fail Safe Mode (FAIL_TOT)................................................................ 6-8
In-Process Operation................................................................................ 7-1
7.1
Mode Transition................................................................................................. 7-1
7.2
Generation of Alarm........................................................................................... 7-1
7.2.1
Indication of Alarm.............................................................................. 7-1
7.2.2 Status of Each Parameter in Failure Mode......................................... 7-1
7.2.3
Alarm Mask Function.......................................................................... 7-2
IM 01C25T04-01EN
iii
7.3
8.
9.
10.
Simulation Function.......................................................................................... 7-2
7.3.1
Sensor Transducer Block.................................................................... 7-3
7.3.2
AI Function Blocks.............................................................................. 7-3
7.3.3
Physical Block..................................................................................... 7-3
7.4
Write lock (Write-protect) function................................................................... 7-4
7.5
Local Operation Interface................................................................................. 7-4
7.5.1
Zero Point Adjustment........................................................................ 7-5
7.5.2
Ident Number Configuration............................................................... 7-5
7.5.3
Bus Address Configuration................................................................. 7-5
Diagnostic Information............................................................................. 8-1
8.1
Device Status...................................................................................................... 8-1
8.2
Status of Each Parameter in Failure Mode...................................................... 8-5
Parameter Lists......................................................................................... 9-1
9.1
Physical Block.................................................................................................... 9-1
9.2
SENSOR Transducer Block.............................................................................. 9-3
9.3
LCD Transducer Block...................................................................................... 9-6
9.4
AI Function Block............................................................................................... 9-8
9.5
Totalizer Function Block................................................................................... 9-9
General Specifications........................................................................... 10-1
10.1
Standard Specifications.................................................................................. 10-1
10.2
Optional Specifications................................................................................... 10-2
10.3
Optional Specifications (For Explosion Protected type)............................. 10-2
Appendix 1. List of DTM Menu......................................................................A1-1
A1.1
Parameter Table.............................................................................................. A1-1
Appendix 2. List of PDM (EDD) Menu...........................................................A2-1
A2.1
Menu Bar.......................................................................................................... A2-1
A2.2
Parameter Table.............................................................................................. A2-7
Revision Information
IM 01C25T04-01EN
1.
1-1
<1. Introduction>
Introduction
This manual is for the DPharp EJX/EJA Series
Differential Pressure/Pressure Transmitter
PROFIBUS PA Communication Type "transmitter".
The PROFIBUS PA communication type is based
on the same silicon resonant sensing technology
used in the BRAIN/HART communication type,
and is similar to the communication types in terms
of basic performance and operation. This manual
describes only those topics that are required for
operation of the PROFIBUS PA communication
type. For information on the installation, wiring, and
maintenance of transmitters, refer to the user’s
manual for each model.
Regarding This Manual
• This manual should be provided to the end
user.
• The contents of this manual are subject to
change without prior notice.
• All rights reserved. No part of this manual may
be reproduced in any form without Yokogawa’s
written permission.
• Yokogawa makes no warranty of any kind with
regard to this manual, including, but not limited
to, implied warranty of merchantability and
fitness for a particular purpose.
• If any question arises or errors are found, or if
any information is missing from this manual,
please inform the nearest Yokogawa sales
office.
• The following safety symbols are used in this
manual:
WARNING
Indicates a potentially hazardous situation which,
if not avoided, could result in death or serious
injury.
CAUTION
Indicates a potentially hazardous situation which,
if not avoided, may result in minor or moderate
injury. It may also be used to alert against unsafe
practices.
IMPORTANT
Indicates that operating the hardware or software
in this manner may damage it or lead to system
failure.
NOTE
Draws attention to information essential for
understanding the operation and features.
• The specifications covered by this manual are
limited to those for the standard type under the
specified model number break-down and do not
cover custom-made instruments.
• Please note that changes in the specifications,
construction, or component parts of the
instrument may not immediately be reflected
in this manual at the time of change, provided
that postponement of revisions will not cause
difficulty to the user from a functional or
performance standpoint.
IM 01C25T04-01EN
1.1 Safe Use of This Product
For the safety of the operator and to protect the
instrument and the system, please be sure to follow
this manual’s safety instructions when handling this
instrument. If these instructions are not heeded,
the protection provided by this instrument may be
impaired. In this case, Yokogawa cannot guarantee
that the instrument can be safely operated. Please
pay special attention to the following points:
(a) Installation
• This instrument may only be installed by an
engineer or technician who has an expert
knowledge of this device. Operators are not
allowed to carry out installation unless they
meet this condition.
• With high process temperatures, care must
be taken not to burn yourself by touching the
instrument or its casing.
• Never loosen the process connector nuts when
the instrument is installed in a process. This can
lead to a sudden, explosive release of process
fluids.
• When draining condensate from the pressure
detector section, take appropriate precautions
to prevent the inhalation of harmful vapors and
the contact of toxic process fluids with the skin
or eyes.
• When removing the instrument from a
hazardous process, avoid contact with the fluid
and the interior of the meter.
1-2
<1. Introduction>
(c) Operation
• Wait 5 min. after the power is turned off, before
opening the covers.
(d) Maintenance
• Please carry out only the maintenance
procedures described in this manual. If you
require further assistance, please contact the
nearest Yokogawa office.
• Care should be taken to prevent the build up of
dust or other materials on the display glass and
the name plate. To clean these surfaces, use a
soft, dry cloth.
(e) Explosion Protected Type Instrument
• Users of explosion proof instruments should
refer first to section 2.1 (Installation of an
Explosion Protected Instrument) of this manual.
• The use of this instrument is restricted to those
who have received appropriate training in the
device.
• Take care not to create sparks when accessing
the instrument or peripheral devices in a
hazardous location.
(f) Modification
• Yokogawa will not be liable for malfunctions or
damage resulting from any modification made
to this instrument by the customer.
• All installation shall comply with local installation
requirements and the local electrical code.
(b) Wiring
• The instrument must be installed by an
engineer or technician who has an expert
knowledge of this instrument. Operators are not
permitted to carry out wiring unless they meet
this condition.
• Before connecting the power cables, please
confirm that there is no current flowing through
the cables and that the power supply to the
instrument is switched off.
IM 01C25T04-01EN
<1. Introduction>
1-3
1.2 Warranty
• The warranty shall cover the period noted on
the quotation presented to the purchaser at the
time of purchase. Problems occurring during
the warranty period shall basically be repaired
free of charge.
• If any problems are experienced with this
instrument, the customer should contact the
Yokogawa representative from which this
instrument was purchased or the nearest
Yokogawa office.
• If a problem arises with this instrument,
please inform us of the nature of the problem
and the circumstances under which it
developed, including the model specification
and serial number. Any diagrams, data and
other information you can include in your
communication will also be helpful.
• The party responsible for the cost of fixing the
problem shall be determined by Yokogawa
following an investigation conducted by
Yokogawa.
• The purchaser shall bear the responsibility for
repair costs, even during the warranty period, if
the malfunction is due to:
- Improper and/or inadequate maintenance by
the purchaser.
- Malfunction or damage due to a failure
to handle, use, or store the instrument in
accordance with the design specifications.
- Use of the product in question in a location
not conforming to the standards specified by
Yokogawa, or due to improper maintenance
of the installation location.
- Failure or damage due to modification or
repair by any party except Yokogawa or an
approved representative of Yokogawa.
- Malfunction or damage from improper
relocation of the product in question after
delivery.
- Reason of force majeure such as fires,
earthquakes, storms/floods, thunder/
lightening, or other natural disasters, or
disturbances, riots, warfare, or radioactive
contamination.
IM 01C25T04-01EN
<1. Introduction>
1-4
1.3 ATEX Documentation
This is only applicable to the countries in European Union.
GB
DK
SK
CZ
I
LT
E
LV
NL
EST
PL
SF
SLO
P
H
F
BG
D
RO
S
M
GR
IM 01C25T04-01EN
2.
<2. Handling Cautions>
2-1
Handling Cautions
2.1 Installation of an ExplosionProtected Instrument
2.1.1 FM approval
If a customer makes a repair or modification to
an intrinsically safe or explosionproof instrument
and the instrument is not restored to its original
condition, its intrinsically safe or explosionproof
construction may be compromised and the
instrument may be hazardous to operate. Please
contact Yokogawa before making any repair or
modification to an instrument.
Caution for FM Explosionproof type
CAUTION
This instrument has been tested and certified
as being intrinsically safe or explosionproof.
Please note that severe restrictions apply to this
instrument’s construction, installation, external
wiring, maintenance and repair. A failure to abide
by these restrictions could make the instrument a
hazard to operate.
WARNING
Maintaining the safety of explosionproof
equipment requires great care during mounting,
wiring, and piping. Safety requirements also
place restrictions on maintenance and repair.
Please read the following sections very carefully.
WARNING
The range setting switch must not be used in a
hazardous area.
IMPORTANT
All the blind plugs which accompany the
transmitters upon shipment from the factory are
certified by the applicable agency in combination
with the transmitters. The plugs which are
marked with the symbols “◊ Ex” on their surfaces
are certified only in combination with the
transmitters.
a. FM Explosionproof Type
Note 1. The transmitters with optional code /FF1
are applicable for use in hazardous
locations:
• Applicable Standard:
FM3600, FM3615, FM3810,
ANSI/NEMA 250
• Explosionproof for Class I, Division 1,
Groups B, C and D.
• Dust-ignitionproof for Class II/III, Division 1,
Groups E, F and G.
• Enclosure rating: NEMA 4X.
• Temperature Class: T6
• Ambient Temperature: –40 to 60°C
• Supply Voltage: 32V dc max.
• Current Draw: 15 mA dc
Note 2. Wiring
• All wiring shall comply with National Electrical
Code ANSI/NFPA70 and Local Electrical
Codes.
• When installed in Division 1, “FACTORY
SEALED, CONDUIT SEAL NOT
REQUIRED.”
Note 3. Operation
• Keep the “WARNING” nameplate attached to
the transmitter.
WARNING: OPEN CIRCUIT BEFORE
REMOVING COVER.
FACTORY SEALED, CONDUIT SEAL NOT
REQUIRED.
INSTALL IN ACCORDANCE WITH THE
USERS MANUAL IM 01C25.
• Take care not to generate mechanical
sparking when accessing the instrument and
peripheral devices in a hazardous location.
Note 4. Maintenance and Repair
• The instrument modification or parts
replacement by other than authorized
representative of Yokogawa Electric
Corporation is prohibited and will void
Factory Mutual Explosionproof Approval.
IM 01C25T04-01EN
2.1.2 CSA Certification
a. CSA Explosionproof Type
Caution for CSA explosionproof type.
Note 1. The transmitters with optional code /CF1
are applicable for use in hazardous
locations:
Certificate: 2014354
• Applicable Standard:
C22.2 No.0, C22.2 No.0.4, C22.2 No.0.5,
C22.2 No.25, C22.2 No.30, 22.2 No.94,
C22.2 No.61010-1-04, C22.2 No.60079-0,
C22.2 No.60079-1
• Explosion-proof for Class I, Groups B, C and
D.
• Dustignition-proof for Class II/III, Groups E, F
and G.
• Enclosure: NEMA 4X, IP66/IP67
• Temperature Code: T6...T4
• Ex d IIC T6...T4
• Enclosure: IP66 and IP67
• Maximum Process Temperature:
120°C (T4), 100°C (T5), 85°C (T6)
• Ambient Temperature:
–50* to 75°C (T4), –50* to 80°C (T5),
–50* to 75°C (T6)
* –15°C when /HE is specified.
• Supply Voltage: 32 V dc max.
• Output Signal: 15 mA dc
Note 2. Wiring
• All wiring shall comply with Canadian
Electrical Code Part I and Local Electrical
Codes.
• In hazardous location, wiring shall be in
conduit as shown in the figure.
• WARNING:
A SEAL SHALL BE INSTALLED WITHIN
50cm OF THE ENCLOSURE.
UN SCELLEMENT DOIT ÊTRE INSTALLÉ À
MOINS DE 50cm DU BOÎTIER.
• WARNING:
WHEN INSTALLED IN CL.I, DIV 2, SEAL
NOT REQUIRED.
UNE FOIS INSTALLÉ DANS CL I, DIV 2,
AUCUN JOINT N'EST REQUIS.
2-2
<2. Handling Cautions>
Note 3. Operation
• WARNING:
AFTER DE-ENERGIZING, DELAY 5
MINUTES BEFORE OPENING.
APRÉS POWER-OFF, ATTENDRE 5
MINUTES AVANT D'OUVRIR.
• WARNING:
WHEN AMBIENT TEMPERATURE ≥ 65°C,
USE THE HEAT-RESISTING CABLES ≥
90°C.
QUAND LA TEMPÉRATURE AMBIANTE
≥ 65°C, UTILISEZ DES CÂBLES
RÉSISTANTES Á LA CHALEUR ≥ 90°C.
• Take care not to generate mechanical
sparking when accessing to the instrument
and peripheral devices in a hazardous
location.
Note 4. Maintenance and Repair
• The instrument modification or parts
replacement by other than authorized
representative of Yokogawa Electric
Corporation and Yokogawa Corporation of
America is prohibited and will void Canadian
Standards Explosionproof Certification.
Non-Hazardous Hazardous Locations Division 1
Locations
Non-hazardous
Location
Equipment
32 V DC Max.
15 mA DC
Signal
50 cm Max.
Sealing Fitting
Conduit
Transmitters
Non-Hazardous Hazardous Locations Division 2
Locations
Non-hazardous
Location
Equipment
32 V DC Max.
15 mA DC
Signal
Sealing Fitting
Transmitters
F0201.ai
IM 01C25T04-01EN
2.1.3 ATEX Certification
(1) Technical Data
a. ATEX Flameproof Type
Caution for ATEX flameproof type
Note 1. The transmitters with optional code /KF22
for potentially explosive atmospheres:
• No. KEMA 07ATEX0109X
• Applicable Standard:
EN 60079-0:2009, EN 60079-1:2007,
EN 60079-31:2009
• Type of Protection and Marking Code:
Ex d IIC T6...T4Gb, Ex tb IIIC T85°C Db
• Group: II
• Category: 2G, 2D
• Enclosure: IP66 / IP67
• Temperature Class for gas-proof:
T6, T5, and T4
• Ambient Temperature for gas-proof:
–50 to 75°C (T6), –50 to 80°C (T5),
and –50 to 75°C (T4)
• Maximum Process Temperature (Tp.) for
gas-proof:
85°C (T6), 100°C (T5), and 120°C (T4)
• Maximum Surface Temperature for dust-
proof:
T85°C (Tamb.: –30* to 75°C, Tp.: 85°C)
* –15°C when /HE is specified.
Note 2. Electrical Data
• Supply voltage: 32 V dc max.
Output current: 15 mA dc
Note 3. Installation
• All wiring shall comply with local installation
requirements.
• Cable glands, adapters and/or blanking
elements with a suitable IP rating shall
be of Ex d IIC/Ex tb IIIC certified by ATEX
and shall be installed so as to maintain the
specific degree of protection (IP Code) of the
equipment.
2-3
<2. Handling Cautions>
Note 4. Operation
• Keep the “WARNING” label attached to the
transmitter.
WARNING: AFTER DE-ENERGIZING,
DELAY 5 MINUTES BEFORE OPENING.
WHEN THE AMBIENT TEMP.≥65°C, USE
HEAT-RESISTING CABLE AND CABLE
GLAND≥90°C.
• Take care not to generate mechanical
sparking when accessing the instrument and
peripheral devices in hazardous location.
Note 5. Special Conditions for Safe Use
WARNING
• Electrostatic charge may cause an explosion
hazard. Avoid any actions that cause the
generation of electrostatic charge, such as
rubbing with a dry cloth on coating face of
the product.
• In the case where the enclosure of the
Pressure Transmitter is made of aluminium,
if it is mounted in an area where the use of
category 2D apparatus is required, it shall
be installed in such a way that the risk from
electrostatic discharges and propagating
brush discharges caused by rapid flow of
dust is avoided.
• The instrument modification or parts
replacement by other than an authorized
Representative of Yokogawa Electric
Corporation is prohibited and will void the
certification.
IM 01C25T04-01EN
b. ATEX Intrinsically Safe Ex ia
Caution for ATEX Intrinsically safe type.
Note 1. EJX/EJA-E series pressure transmitters
with optional code /KS26 for potentially
explosive atmospheres:
• No. KEMA 04ATEX1116 X
• Applicable Standard: EN 60079-0:2009,
EN 60079-11:2007/EN 60079-11:2012,
EN 60079-26:2007, EN 60079-27:2008,
EN 61241-11:2006
Note 2. Ratings
Type of Protection and Marking Code:
Ex ia IIC/IIB T4 Ga
Ex ia IIIC T85°C T100°C T120°C Db
Group: II
Category: 1G, 2D
Ambient Temperature for EPL Ga: –40 to 60°C
Ambient Temperature for EPL Db: –30* to 60°C
* –15°C when /HE is specified.
Maximum Process Temperature (Tp.): 120°C
Maximum Surface Temperature for EPL Db.
T85°C (Tp.: 80°C)
T100°C (Tp.: 100°C)
T120°C (Tp.: 120°C)
Ambient Humidity:
0 to 100% (No condensation)
Degree of Protection of the Enclosure:
IP66 / IP67
Electrical Data
• When combined with Trapezoidal and
Rectangular output characteristic FISCO
model IIC barrier
Ui = 17.5 V, Ii = 380 mA, Pi = 5.32 W,
Ci = 3.52 nF, Li = 0 μH
• When combined with Linear characteristic
barrier
Ui = 24 V, Ii = 250 mA, Pi = 1.2 W,
Ci = 3.52 nF, Li = 0 μH
• When combined with Trapezoidal or
Rectangular output characteristic FISCO
model IIB barrier
Ui = 17.5 V, Ii = 460 mA, Pi = 5.32 W,
Ci = 3.52 nF, Li = 0 μH
2-4
<2. Handling Cautions>
Note 3. Installation
• All wiring shall comply with local installation
requirements. (Refer to the installation
diagram)
Note 4. Maintenance and Repair
• The instrument modification or parts
replacement by other than authorized
representative of Yokogawa Electric
Corporation is prohibited and will void
DEKRA Intrinsically safe Certification.
Note 5. Special Conditions for Safe Use
WARNING
• In the case where the enclosure of the
Pressure Transmitter is made of aluminium,
if it is mounted in an area where the use of
category 1 G apparatus is required, it must
be installed such, that even in the event of
rare incidents, ignition sources due to impact
and friction sparks are excluded.
• Electrostatic charge may cause an explosion
hazard. Avoid any actions that cause the
generation of electrostatic charge, such as
rubbing with a dry cloth on coating face of
the product.
• In the case where the enclosure of the
Pressure Transmitter is made of aluminum,
if it is mounted in an area where the use of
category 2D apparatus is required, it shall
be installed in such a way that the risk from
electrostatic discharges and propagating
brush discharges caused by rapid flow of
dust is avoided.
• To satisfy IP66 or IP67, apply waterproof
glands to the electrical connection port.
• When the lightning protector option is
specified, the apparatus is not capable
of withstanding the 500V insulation test
required by EN60079-11.
This must be taken into account when
installing the apparatus.
IM 01C25T04-01EN
c. ATEX Intrinsically Safe Ex ic
Note 6. Installation Instructions
[Installation Diagram]
Caution for ATEX Intrinsically safe Ex ic
Terminator
+
Pressure
− SUPPLY Transmitter
+
−
Transmitter
+
−
Transmitter
−
+
Safety Barrier
+
−
The transmitters with option code /KN26 for
potentially explosive atmospheres:
• Applicable Standard:
EN 60079-0:2009/EN 60079-0:2012,
EN 60079-11:2012
• Type of Protection and Marking Code:
II 3G Ex ic IIC T4 Gc
• Ambient Temperature: –30* to +60°C
* –15°C when /HE is specified.
• Maximum Process Temperature: 120°C
• Ambient Humidity:
0 to 100% (No condensation)
• IP Code: IP66
• Ambient pollution degree: 2
• Overvoltage category: I
Hazardous Location
Terminator
2-5
<2. Handling Cautions>
Non-Hazardous Location
F0202.ai
• In the rating 1(*1), the output current of the
barrier must be limited by a resistor ‘Ra’ such
that Io = Uo/Ra.
• In the rating 2(*2), the output of the barrier
must be the characteristics of the trapezoid
or the rectangle and this transmitter can be
connected to Fieldbus equipment which are
in according to the FISCO model.
• The terminators may be built in by a barrier.
• More than one transmitter may be connected
to the power supply line.
• The terminator and the safety barrier shall be
certified.
Electrical data:
Maximum Input Voltage Ui: 24 V
Maximum Input Current Ii: 250 mA
*1:
Maximum Input Power Pi: 1.2 W
Rating 1
Maximum Internal Capacitance Ci: 3.52 nF
Maximum Internal Inductance Li: 0 μH
or
Maximum Input Voltage Ui: 17.5 V
Maximum Input Current Ii: 380 mA
Maximum Input Power Pi: 5.32 W
Maximum Internal Capacitance Ci: 3.52 nF
Maximum Internal Inductance Li: 0 μH
*2:
or
Rating 2
Maximum Input Voltage Ui: 17.5 V
Maximum Input Current Ii: 460 mA
Maximum Input Power Pi: 5.32 W
Maximum Internal Capacitance Ci: 3.52 nF
Maximum Internal Inductance Li: 0 μH
Note 1. Electrical Data
Ui = 32 V
Ci = 3.52 nF
Li = 0 µH
Note 2. Installation
• All wiring shall comply with local installation
requirements. (refer to the control drawing)
• When installing the transmitter in “ic”
FISCO system or FNICO system, follow the
installation requirements of each system.
• Cable glands, adapters and/or blanking
elements shall be of Ex “n”, Ex “e” or Ex “d”
and shall be installed so as to maintain the
specified degree of protection (IP Code) of
the transmitters.
Note 3. Maintenance and Repair
• The instrument modification or parts
replacement by other than authorized
representative of Yokogawa Electric
Corporation is prohibited and will void ATEX
intrinsically safe.
[Control drawing]
Hazardous Area
Transmitter
+
–
Nonhazardous Area
Associated
Apparatus
F0203.ai
• Above drawing shows the installation of
Entity system.
When installing the transmitters in “ic”
FISCO system or FNICO system, follow the
installation requirements of each system.
IM 01C25T04-01EN
2-6
<2. Handling Cautions>
(4) Operation
Note 4. Specific Conditions of Use
WARNING
WARNING
• Electrostatic charge may cause an explosion
hazard. Avoid any actions that cause the
gerenation of eletrostatic charge, such as
rubbing with a dry cloth on coating face of
the product.
• When the lightning protector option is
specified, the apparatus is not capable
of withstanding the 500V insulation test
required by EN60079-11. This must be taken
into account when installing the apparatus.
(2) Electrical Connection
A mark indicating the electrical connection type is
stamped near the electrical connection port. These
marks are as follows.
Screw Size
Marking
ANSI 1/2 NPT female
A*1 or
N or
(5) Maintenance and Repair
WARNING
The instrument modification or part replacement
by other than an authorized Representative of
Yokogawa Electric Corporation is prohibited and
will void the certification.
(6) Name Plate
M
ISO M20 × 1.5 female
• OPEN CIRCUIT BEFORE REMOVING
COVER. INSTALL IN ACCORDANCE WITH
THIS USER’S MANUAL
• Take care not to generate mechanical
sparking when accessing the instrument and
peripheral devices in a hazardous location.
W
Name plate
*1: Not applicable for option code /KF22.
Tag plate for flameproof type
Location of the mark
No. KEMA 07ATEX0109 X
Ex d IIC T6...T4 Gb, Ex tb IIIC T85°C Db
Enlcosure : IP66, IP67
TEMP. CLASS
T6 T5
T4
MAX PROCESS TEMP.(Tp.)
85 100 120 °C
Tamb.
-50 to 75
80
75 °C
T85°C(Tamb.:-30(-15) to 75°C, Tp.:85°C)(for Dust)
F0204.ai
(3) Installation
D
*3
WARNING
WARNING
• All wiring shall comply with local installation
requirements and the local electrical code.
• There is no need for a conduit seal in
Division 1 and Division 2 hazardous
locations because this product is sealed at
the factory.
AFTER DE-ENERGIZING, DELAY 5 MINUTES
BEFORE OPENING.
WHEN THE AMBIENT TEMP. ≥ 65°C,
USE THE HEAT-RESISTING CABLE AND CABLE GLAND ≥ 90°C
POTENTIAL ELECTROSTATIC CHARGING HAZARD
Tag plate for intrinsically safe Ex ia
No. KEMA 04ATEX1116 X
Ex ia IIC/IIB T4 Ga Ta:-40 to 60°C
Ex ia IIIC T85°C T100°C T120°C Db Ta:-30(-15) to 60°C
MAX PROCESS TEMP.(Tp.):120°C
T85°C(Tp.:80°C), T100°C(Tp.:100°C), T120°C(Tp.:120°C)
Enclosure: IP66/IP67
FISCO field device(IIC/IIB)
Entity parameters Ui=24V, Ii=250mA, Pi=1.2W, Ci=3.52nF, Li=0μH
D
*3
WARNING
POTENTIAL ELECTROSTATIC CHARGING HAZARD - SEE USER'S MANUAL.
Tag plate for intrinsically safe Ex ic
Ex ic IIC T4 Gc
IP66
Tamb -30(-15) TO 60°C
MAX. PROCESS TEMP. 120°C
Ui=32V, Ci=3.52nF, Li=0µH
WARNING
POTENTIAL ELECTROSTATIC CHARGING HAZARD - SEE USER'S MANUAL.
F0205.ai
IM 01C25T04-01EN
STYLE: Style code.
SUFFIX: Specified suffix code.
SUPPLY: Supply voltage.
OUTPUT: Output signal.
MWP: Maximum working pressure.
CAL RNG: Specified calibration range.
NO.: Serial number and year of production*1.
TOKYO 180-8750 JAPAN:
The manufacturer name and the address*2.
*1: The first digit in the final three numbers of the serial
number appearing after “NO.” on the name plate indicates
the year of production. The following is an example of a
serial number for a product that was produced in 2010:
91K819857
032
The year 2010
*2: *3:
2-7
<2. Handling Cautions>
“180-8750” is the Zip code for the following address.
2-9-32 Nakacho, Musashino-shi, Tokyo Japan
The identification number of Notified Body.
2.1.4 IECEx Certification
a. IECEx Flameproof Type
Caution for IECEx flameproof type.
Note 1. The transmitters with optional code /SF2
are applicable for use in hazardous
locations:
• No. IECEx CSA 07.0008
• Applicable Standard:
IEC60079-0:2011, IEC60079-1:2007-4
• Flameproof for Zone 1, Ex d IIC T6...T4 Gb
• Enclosure: IP66 and IP67
• Maximum Process Temperature:
120°C (T4), 100°C (T5), 85°C (T6)
• Ambient Temperature:
–50 to 75°C (T4), –50 to 80°C (T5),
–50 to 75°C (T6)
• Supply Voltage: 32 V dc max.
• Output Signal: 15 mA dc
Note 2. Wiring
• In hazardous locations, the cable entry
devices shall be of a certified flameproof
type, suitable for the conditions of use and
correctly installed.
• Unused apertures shall be closed with
suitable flameproof certified blanking
elements.
• WARNING:
WHEN THE AMBIENT TEMP.≥65°C, USE
HEAT-RESISTING CABLE AND CABLE
GLAND ≥90°C.
• Take care not to generate mechanical
sparking when accessing to the instrument
and peripheral devices in a hazardous
location.
• Electrostatic charge may cause an explosion
hazard. Avoid any actions that cause the
generation of electrostatic charge, such as
rubbing with a dry cloth on coating face of the
product.
Note 4. Maintenance and Repair
• The instrument modification or parts
replacement by other than authorized
representative of Yokogawa Electric
Corporation is prohibited and will void IECEx
Certification.
• Electrical Connection
A mark indicating the electrical connection
type is stamped near the electrical
connection port. These marks are as follows.
Screw Size
Marking
M
ISO M20 × 1.5 female
ANSI 1/2 NPT female
A*1 or
N or
W
*1: Not applicable for option code /KF22.
Location of the mark
F0204.ai
Note 3. Operation
• WARNING:
AFTER DE-ENERGIZING, DELAY 5
MINUTES BEFORE OPENING.
IM 01C25T04-01EN
About PROFIBUS PA
3.1 Outline
PROFIBUS PA is a widely used bi-directional
digital communication protocol that enables the
implementation of technologically advanced
process control systems. The DPharp EJX/EJA
Series PROFIBUS PA communication type meets
the specifications of PROFIBUS Nutzerorganisation
e.V. and is interoperable with devices from
Yokogawa and other manufacturers.
3.2 Internal Structure of DPharp
3.2.1 Function Block
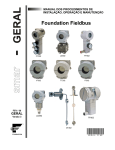
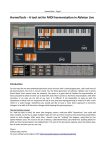
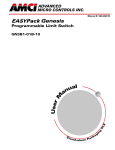
3.3 Logical Structure of Each
Block
DPharp
PROFIBUS PA
LCD
Block tag
Sensor
input
The transmitter contains five function blocks that
share the following functions:
(2) SENSOR Transducer block
• Converts sensor output to pressure, static
pressure, and capsule temperature signals, and
transfers to the AI function blocks.
• Carries out square root signal characterize
extraction.
• Flow rate calculation.
(3) LCD Transducer block
• Controls the display of the integral indicator.
SENSOR
Transducer block
Totalizer function
block
AI function
block
AI function
block
AI function
block
Block tag
Block tag
Parameters
Parameters
Output
OUT
Physical block
Block tag
Parameters
(1) Physical block
• Manages the status of transmitter hardware.
LCD
Transducer block
Parameters
Sensor
3.
3-1
<3. About PROFIBUS PA>
F0301.ai
Figure 3.1
Logical Structure of Each Block
Setting of various parameters, Bus addresses, and
TAG is required before starting operation.
3.4 Wiring System Configuration
The number of devices that can be connected to
a single bus and the cable length vary depending
on system design. When constructing systems,
both the basic and overall design must be carefully
considered to achieve optimal performance.
(4) AI (Analog Input) function block
• Condition raw data from the Transducer block.
• Output differential pressure, static pressure
and capsule temperature signals setting via the
channel.
• Carry out scaling, damping and square root
extraction.
(5) Totalizer function block
• Execute totalizer management of signal from AI
function block.
• Output totalized signal.
IM 01C25T04-01EN
4.
4-1
<4. Getting Started>
Getting Started
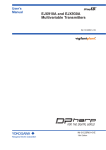
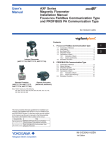
PROFIBUS PA is fully dependent upon digital
communication protocol and differs in operation
from conventional 4 to 20 mA transmission.
HMI
• DP/PA Couplers:
PROFIBUS PA requires DP/PA couplers which
convert the RS-485 signals to the IEC 61158-2
signal level and power the field devices via the
PROFIBUS PA.
• Cable:
Class 2 Master
FieldMate (FDT/DTM)
PDM (EDD), etc.
Refer to Table 4.1.
Class 1 Master
I/O CARD, PLC, etc.
Table 4.1
PROFIBUS-DP
DP/PA
Coupler
PROFIBUS-DP devices
PROFIBUS-PA (31.25 kbps)
PROFIBUS-PA devices (DPharp)
Figure 4.1
F0401.ai
Profibus System Construction
PROFIBUS PA Cables and
Transmissible Length
Type of cable
Type A: Individuallyshielded twisted pair
cable
Type B: Overallshielded twisted pair
cable
Type C: Unshielded
twisted pair cable
Type D: Overallshielded non-twisted
cable
Cable
specifications
Max. length
of cable
(reference
value)
#18AWG
(0.82 mm2)
1,900 m
#22AWG
(0.32 mm2)
1,200 m
#26AWG
(0.13 mm2)
400 m
#16AWG
(1.25 mm2)
200 m
Note: Yokogawa recommends the use of Type A.
Usage of Type B and D is restricted.
Yokogawa does not recommend the use of Type C.
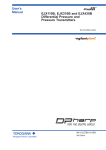
4.1 Connection of Devices
The following are required for use with PROFIBUS
PA devices:
• Power supply:
PROFIBUS PA requires a dedicated power supply.
It is recommended that current capacity be well
over the total value of the maximum current
consumed by all devices.
Power is supplied by a DP/PA coupler.
Terminal
Terminal
• Terminators:
PROFIBUS PA requires two terminators.
A terminator shall be located at each end of the
trunk cable.
• Field devices:
1
SUPPLY
+
–
1
2
2
Power supply and output terminals
Ground terminal
F0402.ai
Figure 4.2 Wiring Diagram
Connect the PROFIBUS PA communication type
field device. Two or more transmitters or other field
devices can be connected.
IM 01C25T04-01EN
4.2 Bus Power ON
4.3 Confirmation of Device
Information
Turn on the power of the host and the bus.
For models with the integral indicator code “E”, the
display shows all segments in the LCD and then
changes to the displays shown below sequentially.
P
SP
T
F
All segments display
P
SP
4-2
<4. Getting Started>
T
F
P
SP
T
SP
T
(1) Software Revision
(a) Confirmation by the name plate
Software Revision is marked on the name plate.
Refer to Figure 4.3.
F
(b) Confirmation by parameter
Software Revision can be confirmed from
Physical Block parameter Software Revision
(SOFTWARE_REVISION).
Model name (3 s)
P
Software Revision, Device Revision and Ident
Number can be confirmed by following procedure.
F
• Procedure to call up the display
DTM
Communication Protocol (3 s)
P
SP
T
EDD
Device Revision (3 s)
(2) Device Revision
F
Ident Number (3 s)
Physical Block → Identification →
Software Revision
Identification → Device → Software
Revision
F0403.ai
Either “EJX” or “EJA” is displayed on the “Model
name” display depends on the model of transmitter.
NOTE
LCD display can be set to all segments display
only by changing the following parameter.
LCD Tranceducer Block Power On Information
(POWER_ON_INFO)
1:ON(Default)
Show all segments display, Model name,
Communication Protocol, Device Revision and
Ident Number when powering on.
0:OFF
Show all segments display when powering on.
(a) Confirmation by the name plate
Device Revision is marked on the name plate.
Refer to Figure 4.3.
(b) Confirmation by parameter
Device Revision can be confirmed from
parameter Device Revision Compatibility or
Device Revision. (DEV_REV_COMP, DEV_
REV)
• Procedure to call up the display
DTM
EDD
→ Device Revision
Compatibility
→Device Revision
[Menu] → Query Device → Query
Device PB →
[Menu] → View → Device Status
→ General → Physical Block →
Compatibility of Device Revision
Device Revision
• Procedure to call up the display
DTM, EDD
ON
OFF
Local Display → Power On Information
Enable the power on information
Disable the power on information
IM 01C25T04-01EN
4-3
<4. Getting Started>
(3) Ident Number
4.4 Master Settings
Refer to section 4.5 for explanation of Ident
Number.
To activate PROFIBUS PA, the following bus
parameters must be set for the master.
(a) Confirmation by the name plate
Device specific Ident Number and Profile Ident
number is marked on the name plate. Profile
Ident Number is inside [ ]. (9700 to 02(9720),
9740 to 42(9742))
Refer to Figure 4.3.
(b) Confirmation from integral indicator (When the
integral indicator code “E”)
Please refer to section 4.2.
(c) Confirmation by parameter
Ident Number can be confirmed from Physical
Block parameter Ident Number (IDENT_
NUMBER).
• Procedure to call up the display
DTM
EDD
Physical Block → Identification → ID No.
Identification → Device → ID No.
SW: X.XX [ X . . . X ]
Device Revision
Device Revision Compatibility
Software Revision
ID: XXXX [ 9700-02, 9740-42 ]
Profile Ident Number
Device Specific Ident Number
(EJX: 4581 EJA: 4580)
F0404.ai
Figure 4.3
Name Plate
Table 4.2
Bus Parameters
Description and
Settings
Transmission Transmission The transmission rate of
rate
Rate
PROFIBUS PA matches
that of the segment
coupler.
e.g P+F: 93.75 kbps,
Siemens: 45.45 kbps
TSL
Slot Time
The maximum time a
master station must
wait for the complete
reception of the first
octet of a response (11
bits).
e.g: 4095
min TSDR
Min. Station
Sets the minimum time
Delay Timer at which a slave can
send the first bit of a
response back.
max TSDR
Max. Station Sets the maximum time
Delay Time
at which a slave can
send the first bit of a
response back.
TQUI
Quiet Time
Controls the time at
which the bus electronics
or software of the sender
is set to receive mode
after a message is sent.
TSET
Setup Time
Sets the maximum
allowable time for
parameter setting and
response by the slave.
HSA
Highest
Sets the highest station
Station
address in the network.
Address
G
Gap update
Sets the number of
factor
token cycles after which
the master will search for
a new master.
max. retry
Max Retry
Sets the number
limit
Limit
of retries that are
performed after a
receiver does not
respond to a message.
Symbol
Parameter
IM 01C25T04-01EN
4.5 Integration of GSD file and
IDENT Number
The GSD file and Ident number are necessary
for PROFIBUS communication. Before starting
communication, the device must be specified by the
GSD file in the host system and the Ident number of
the device.
The PROFIBUS device has a profile Ident number
and a device-specific Ident number. There are GSD
files which correspond to each number. The profile
GSD file is a general-purpose file which is defined
by the kind and number of function blocks of the
device. This file helps improve the compatibility
among devices.
By setting the PROFIBUS Ident Number (IDENT_
NUMBER_SELECTOR) parameter of the physical
block or the Ident number at the Local Operation
Interface, the Ident number will be linked with the
corresponding GSD file. For the setting at the Local
Operation Interface, see Chapter 7.5.
Table 4.3
Device specific ID GSD file
Model Name
EJXA
EJAE
Table 4.4
Profile ID
AI ×1
AI ×2
AI ×3
AI ×1+TOT
AI ×2+TOT
AI ×3+TOT
4-4
<4. Getting Started>
Device specific
Ident Number
0x4581
0x4580
Device Specific
GSD file
YEC4581.gsd
YEC4580.gsd
Profile ID GSD file
Profile Ident
Number
0x9700
0x9701
0x9702
0x9740
0x9741
0x9742
Profile GSD file
pa139700.gsd
pa139701.gsd
pa139702.gsd
pa139740.gsd
pa139741.gsd
pa139742.gsd
4.6 Bus Address Setup
This section describes the procedure to set
Bus Address in the transmitter. Every device in
PROFIBUS must be assigned a unique address
in the range of 0(0x00) to 126(0x7e). If it is not
specified at the time of order, 126(0x7e) is the
factory default. Do not change to 0, 1 or 2 as these
are used by master devices.
There are two ways to set Bus Address: by using
communication tools or by Local Operation
Interface. Refer to chapter 7.5 for setting procedure
by using Local Operation Interface. Below is an
example of changing Bus Address from 5 to 20 by
using DTM works.
1. In the FieldMate window, click [Segment
Viewer] → [User Defined Connection] and click
[New FDT Project ...].
2. In the DTM Works window, click [Topology] →
[Add].
3. In the Catalog window, click [PROFIBUS DPV1]
of Protocol → [PROFIdtm DPV1] and click
[Add] button.
4. In the DTM Works window, click [Device] →
[Connect].
5. In the DTM Works window, click [Device] →
[Additional Functions] → [Set Device Station
Address...].
6. Enter [Old Address] to 5 and [New Address] to
20 and click [Set] button.
“New address successfully set” is displayed in
the State field.
7. Click [Close] button and exit DTM works
8. When changing a parameter after changing
the Address, click [View] → [Update] in the
FieldMate window.
IM 01C25T04-01EN
5-1
<5. Parameter Setting>
5.
Parameter Setting
5.1 Easy Setup
5.1.2 Pressure Range (Scale In) and
Pressure Unit
IMPORTANT
Sensor Transducer Block Target Mode need to be
changed to Out of Service (O/S) before changing
range values and pressure unit.
After setting and sending data with the
configuration tool, wait 30 seconds before
turning off the transmitter. If it is turned off
too soon, the setting will not be stored in the
transmitter.
DTM, EDD
Easy Setup → Sensor Transducer Block
→ Target Mode
(1) Pressure Range (Scale In)
5.1.1 Tag Number, Descriptor, Message
and Installation Date
If there are specified when ordering, the desired Tag
No. is set and shipped. Tag No. can be checked as
follow.
• Procedure to call up the display
DTM, EDD
Easy Setup → TAG
When Tag No. is changed, input them based on the
following limitation.
Item
TAG
Descriptor
Message
Installation Date
Sensor Calibration
Date
Manufacture Date
Limitations
Up to 32 characters or numbers
Up to 32 characters or numbers
Up to 32 characters or numbers
Up to 16 characters or numbers
yyyy/mm/dd/ hh:mm:ss
- yyyy: years (4 digits)
- mm: month (2 digits)
- dd: days (2 digits)
- hh: hours (2 digits)
- mm: minutes (2 digits)
- ss: seconds (2 digits)
• Procedure to call up the display
DTM
LRV
URV
EDD
→ LRV
→ URV
Easy Setup → Sensor Transducer Block
→ Scale In →
Scale In:Lower Value
Scale In:Upper Value
Easy Setup → Sensor Transducer Block
→ Measuring Range – Scale In →
Lower Value
Upper Value
(2) Pressure Unit
The unit parameter is set at the factory before
shipment if specified at the time of order. Follow the
procedure below to change the unit parameter.
• Procedure to call up the display
DTM
EDD
SP
!
"
#
$
%
&
'
(
)
*
+
,
-
.
/
0
1
2
3
4
5
6
7
8
9
:
;
<
=
>
?
@
A
B
C
D
E
F
G
H
I
J
K
L
M
N
O
P
Q
R
S
T
U
V
W
X
Y
Z
[
\
]
^
_
`
a
b
c
d
e
f
g
h
i
j
k
l
m
n
o
p
q
r
s
t
u
v
w
x
y
z
{
|
}
~
*: SP shows one-byte space
The range values are factory-set as specified by
the customer. To change the range, follow the steps
below.
Easy Setup → Sensor Transducer Block
→ Pressure Unit
Easy Setup → Sensor Transducer Block
→ Measuring Range – Scale In →
Pressure Unit
Available pressure units are shown below.
µPa
mPa
Pa
hPa
kPa
MPa
GPa
mbar
bar
torr
atm
psi
gf/cm2
kgf/cm2
inH2O
inH2O (4 deg C)
inH2O (68 deg C)
mmH2O
mmH2O (4 deg C)
mmH2O (68 deg C)
ffH2O
ffH2O (4 deg C)
ffH2O (68 deg C)
inHg
inHg (0 deg C)
mmHg
mmHg (0 deg C)
µPaa
µPag
mPaa
mPag
Paa
Pag
hPaa
hPag
kPaa
kPag
MPaa
MPag
GPaa
GPag
psia
psig
gf/cm2a
gf/cm2g
kgf/cm2a
kgf/cm2g
IM 01C25T04-01EN
<5. Parameter Setting>
5.1.3 Output Mode (Characterization Type)
The Output Mode (Characterization Type) is set
as specified in the order when the instrument is
shipped. Follow the procedure below to change
the Output Mode. Sensor Transducer Block Target
Mode need to be changed to Out of Service (O/S)
before changing Output Mode(Characterization
Type).
DTM, EDD
Easy Setup → Sensor Transducer Block
→ Target Mode
• Procedure to call up the display
DTM, EDD
→ Linear
→ User defined
(table)
→ Square root
Easy Setup → Sensor
Transducer Block →
Characterization Type →
Linear output
Signal Characterizer
Analog Input 1 Function Block Target Mode need
to be changed to Out of Service (O/S) before
changing Output Scale(Out Scale) and Output
Scale Unit.
DTM
EDD
Easy Setup → Analog Input 1 → Target
Mode
Easy Setup → Function Block 1 – Analog
Input → Target Mode
(1) Output Scale (Out Scale)
• Procedure to call up the display
The Out Scale is factory-set as specified by the
customer. To change the range, follow the steps
below.
DTM
→ LRV
→ URV
EDD
→ LRV
→ URV
• Procedure to call up the display
DTM
EDD
Easy Setup → Analog Input 1 →
Out Scale:Lower Value
Out Scale:Upper Value
Easy Setup → Function Block 1 – Analog
Input → Output Scale
Lower Value
Upper Value
(2) Out Scale Unit
The unit parameter is set at the factory before
shipment if specified at the time of order. Follow the
procedure below to change the unit parameter.
Easy Setup → Analog Input 1 → Out
Scale:Unit
Easy Setup → Function Block 1 – Analog
Input → Output Scale → Unit
5.1.5 Damping time constant (Filter Time
Const)
The damping time constant is set at the factory
before shipment if specified at the time of order with
option code /CD. Follow the procedure below to
change the damping time constant. Target Mode of
Analog Input 1 Function Block need to be changed
to Out of Service (O/S).
DTM
EDD
Square root output
5.1.4 Output Scale (Out Scale) and Unit
5-2
Easy Setup → Analog Input 1 → Target
Mode
Easy Setup → Function Block 1 – Analog
Input 1 → Target Mode
• Procedure to call up the display
DTM
EDD
Easy Setup → Analog Input 1 → Filter
Time Const
Easy Setup → Function Block 1 – Analog
Input 1 → Filter Time Const
5.2 Calibration
The transmitter is factory characterized, Factory
characterization is the process of comparing a
known pressure input with the output of each
transmitter sensor module over the entire pressure
and temperature operating range. During the
characterization process, this comparison
information is stored in the transmitter EEPROM. In
operation, the transmitter uses this factory-stored
curve to produce process variable output (PV), in
engineering units, dependent on the pressure input.
The calibration procedure allows you to adjust
for local conditions, changing how the transmitter
calculates process variables. There are two ways
to calibrate: zero point adjustment typically used to
compensate for mounting position effects or zero
shifts caused by static pressure. A full calibration is
a two-point process, in which two accurate endpoint pressures are applied (equal to or greater
than the range value), and all output is linearized
between them.
IM 01C25T04-01EN
5.2.1 Pressure Calibration
(1) Zero Point Adjustment
DPharp span: 0 to 25.00 kPa
Actual level: 13.50 kPa
Transmitter output: 13.83 kPa
Zero Point Adjustment can be performed in several
ways. Choose the optimum method in accordance
with the circumstances specified to the application
employed.
25.00 kPa
Actual level
13.50 kPa
a.Auto zero adjustment (Lower Calibration
Point)
Lower Calibration Point carries out the zero
adjustment and automatically sets the applied “0”
input values to the output value of “0”, keeping the
span constant. Use this setting when the LRV is
known to be “0”. Calibration
Target Mode need to be changed to Out of Service
(O/S) before zeroing by Lower Calibration Point.
DTM
EDD
Zero Point Adjustment → Target Mode
[Menu] → Device → Zero Point
Adjustment → Target Mode
• Procedure to call up the display
DTM
EDD
→ Set Zero
(Method)
Zero Point Adjustment
[Menu] → Device → Zero Point
Adjustment →
Adjust the lower point
b.Manual zero adjustment (Lower Calibration
Deviation)
This zero adjustment calibrates the transmitter
output corresponding to the reference pressure.
For Tank level measurement for example, enter the
actual tank level data which have determined by
glass gauge or other level measuring instrument.
• Procedure to call up the display
DTM
5-3
<5. Parameter Setting>
Calibration → Pressure
Calibration → Calibration →
EDD
[Menu] → Device → Sensor
Calibration → Pressure
Calibration → Calibration →
→ Lower Calibration Adjust the lower point
Deviation
0.00 kPa
DPharp
F0501.ai
c.Zero Point Adjustment by using adjustment
Screw
Follow the procedure below to enable or inhibit zero
point adjustment by means of the external zeropoint adjustment screw on the transmitter. Local
Operation setting need to be changed to “Enabled”
before adjustment.
• Procedure to call up the display
DTM
Physical Block → Configuration →
Local Operation →
EDD
Identification → Device → Local
Operation →
→ Enabled
Enable the external zero point
adjustment
→ Disenabled Disenable the external zero point
adjustment
(2) Full Adjustment
The full adjustment is a two-point adjustment,
and the lower point adjustment should always be
performed before the upper point adjustment in
order to maintain the pitch between the zero and
100% points within the calibration range.
In the manual method, the reference pressure
should also be applied to the transmitter at both
the lower and upper points. Without the reference
pressure, Lower calibration deviation and Upper
calibration deviation may not represent the correct
value for each adjustment points.
IM 01C25T04-01EN
a.Auto Adjustment
Applying reference pressure of 0% and 100% of the
measurement range to the transmitter, adjust the
lower and upper points automatically.
• Procedure to call up the display
DTM
Calibration → Pressure
Calibration → Calibration →
EDD
[Menu] → Device → Sensor
Calibration → Pressure
Calibration → Calibration →
→ Lower Calibration Auto adjustment for 0% point
Point
→ Upper Calibration Auto adjustment for 100% point
Point
b.Manual Adjustment
Using the example below, follow the steps to
perform the full sensor trim by manually. Suppose
that Lower Calibration Deviation and Upper
Calibration Deviation represent the previously
adjusted values.
Example: For the range of 1000 to 3000 mmH2O
Lower Calibration Deviation: −4.0 mmH2O
Upper Calibration Deviation: −3.0 mmH2O
<1> Call up the Lower Calibration Deviation
• Procedure to call up the display
DTM
Calibration → Pressure
Calibration → Calibration →
EDD
[Menu] → Device → Sensor
Calibration → Pressure
Calibration → Calibration →
→ Lower Calibration Adjust the lower point
Deviation
<2> Suppose that a standard pressure of 1000
mmH2O is applied and the value of the output
signal is 994 mmH2O. Correct for this output
error of 6 mmH2O by adding 6 mmH2O to
Lower Calibration Deviation.
−4.0+6.0=+2.0
5-4
<5. Parameter Setting>
<4> Call up the Upper Calibration Deviation
• Procedure to call up the display
DTM
Calibration → Pressure
Calibration → Calibration →
EDD
[Menu] → Device → Sensor
Calibration → Pressure
Calibration → Calibration →
→ Upper Calibration Adjust the upper point
Deviation
<5> Suppose that a standard pressure of 3000
mmH2O is applied and the value of the output
is 3015.0. Firstly, obtain the slope error for the
span as follows.
Slope Error=
3000−3015/3000×(3000-1000)=−10
Then correct this slope error of −10 by adding
−10 to Upper Calibration Deviation.
−3.0+(−10)=−13
<6> Enter the correction value of “-13” to the Upper
Calibration Deviation.
(3) Static Pressure Calibration
For the transmitter, full sensor calibration of the
static pressure is performed in the same way as
with the differential pressure.
• Procedure to call up the display
DTM
EDD
→ SP Lower
Calibration Point
→ SP Upper
Calibration Point
→ SP Lower
Calibration
Deviation
→ SP Upper
Calibration
Deviation
Calibration → Static Pressure
Calibration → Calibration →
[Menu] → Device → Sensor
Calibration → Static Pressure
Calibration → Calibration →
Auto adjustment for 0% point
Auto adjustment for 100% point
Manual adjustment for 0% point
Manual adjustment for 100%
point
<3> Enter the correction value of “2” to the Lower
Calibration Deviation.
IM 01C25T04-01EN
(4) Reset Adjustment to Factory Setting
The Clear Calibration method can reset the
adjustment to the initial calibrated values that were
set. The amount of the adjustment performed with
the external zero-adjustment screw is returned the
initial setting as well.
<Example>
Low cut: 20.00%
Output
22%
20%
• Procedure to call up the display
Calibration →
[Menu] → Device → Sensor
Calibration → Clear Calibration
→ Clear Calibration Reset adjustment to factory setting
(Method)
Hysteresis fixed at 10%
of the cut point
10%
DTM
EDD
5.3 Input Signal Setup
5.3.1 Low Flow Cut Off
Low cut mode can be used to stabilize the output
signal near the zero point. Note that this function is
only available when Output Mode (Characterization
Type) is “Square root”.
Example: Low cut at 20%
Output
Input
F0503.ai
5.3.2 Primary Value Scale (Scale Out) and
Primary Value Unit
Primary value is measured value available to the
function block. Sensor Transducer Block Target
Mode needs to be changed to Out of Service (O/S)
before changing primary value scale and primary
value unit.
DTM
EDD
To change the Output Scale, follow the steps below.
• Procedure to call up the display
DTM
20
0
Input
→ LRV
→ URV
EDD
50
(%)
F0502.ai
Low Flow Cut Off
Follow the procedure below to change the low
cut point. Sensor Transducer Block Target Mode
needs to be changed to Out of Service (O/S) before
changing low cut point.
DTM
EDD
Input → Target Mode
Input → Sensor Transducer Block →
Target Mode
• Procedure to call up the display
DTM, EDD
Input → Target Mode
Input → Sensor Transducer Block →
Target Mode
(1) Output Scale (Scale Out)
(%)
50
Figure 5.1
5-5
<5. Parameter Setting>
Input → Sensor Transducer Block →
Characterization → Low Flow Cut Off
→ LRV
→ URV
Input → Sensor Transducer Block →
Primary Value →
Scale Out:Lower Value
Scale Out:Upper Value
Input → Sensor Transducer Block →
Measured Value – Primary Value →
Lower Value
Upper Value
(2) Primary Value Unit
Follow the procedure below to change the unit
parameter.
• Procedure to call up the display
DTM
EDD
Input → Sensor Transducer Block →
Primary Value → Primary Value Unit
Input → Sensor Transducer Block →
Measured Value – Primary Value → Unit
The low cut point has hysteresis so that the output
around the point is behaved as below figure.
(Hysteresis for the cut point: 10% of the cut point)
IM 01C25T04-01EN
5.3.3 Signal Characterizer
Below is the example of performing the signal
characterizer as shown in Figure 5.2. Target Mode
of Sensor Transducer Block need to be changed
to Out of Service (O/S) before setting linearization
table. In order to use signal characterizer,
“User defined (table)” must be chosen for
Characterization Type. Refer to subsection 5.1.3 for
changing Characterization Type.
Y
100%
<2>Enter Lower and Upper Scale In / Out value.
Refer to subsection 5.1.2 and 5.3.2 for
procedure. For this case, scales should be
entered shown as below.
Scale In: Lower Value → 0
Scale In: Upper Value → 100
Scale out: Lower Value → 0
Scale unt: Upper Calue → 100
<3>Enter Coordinate No. and X, Y value
• Procedure to call up the display
DTM
EDD
20%
0%
40%
100%
X
F0504.ai
Figure 5.2
<1>Configuration of new linearization table can be
performed in “Query Device” in “Device” menu
in top section of tool window.
• Procedure to call up the display
DTM
EDD
→ Operation Mode
Table 5.1
5-6
<5. Parameter Setting>
[Device] → Configuration →
Characterization → Table
Coordinate →
[Device] → Characterization →
Linearization →
Select the transaction of the user
defined table
Operation Mode
Code
Description
0
Not initialized.
1
New operation characteristic, first value.
3
Last value, end of transmission, check table, or
swap the old curve with the new curve.
4
Delete point of table.
5
Insert point defined.
6
Replace point of table.
Select “1: New operation characteristic, first value”
for new operation.
→ Coordinate No.
→ X Y value couple
-X
→ X Y value couple
-Y
[Device] → Configuration →
Characterization → Table
Coordinate →
[Device] → Characterization →
Linearization →
Number of coordinate
Input value of linearization table
Output value of linearization table
X_i=(PrV–ScaleIn_L)/(ScaleIn_U–ScaleIn_L)
Y_i=X_i×{(ScaleOut_U–ScaleOut_L)+ScaleOut_L}
(i=1 to 31)
PrV: Pressure Value
ScaleIn_L: Scale In:Lower Value
ScaleIn_U: Scale In:Upper Value
ScaleOut_L: Scale Out:Lower Value
ScaleOut_U: Scale Out:Upper Value
For this case, Coordinate No. and X/ Y values
should be entered shown as below.
Coordinate No.: 1
X Y value couple – X : 0.0
X Y value couple – Y : 0.0
Coordinate No.: 2
X Y value couple – X : 0.4
X Y value couple – Y : 0.2
Coordinate No.: 3
X Y value couple – X : 1.0
X Y value couple – Y : 1.0
<4>To definite linearization table, select Code: 3 in
Operation Mode shown in procedure <1> and
update linearization table.
IM 01C25T04-01EN
<5>To confirm entered coordinate.
• Procedure to call up the display
DTM
EDD
[Device] → Configuration →
Characterization → Table Data
[Device] → Characterization →
Linearization Table
5.3.4 Calculate Coefficient (For flow rate
calculation)
Calculate Coefficient is constant mainly for
calculation of flow rate output signal. Follow
below procedure to set the Calculate Coefficient.
Sensor Transducer Block Target Mode needs to
be changed to Out of Service (O/S) before enters
Calculate Coefficient.
DTM
EDD
Input → Target Mode
Input → Sensor Transducer Block →
Target Mode
• Procedure to call up the display
DTM, EDD
5-7
<5. Parameter Setting>
Input → Sensor Transducer Block →
Calculated Value → Calculate Coefficient
There are two methods for the calculation of the
Calculate Coefficient (below Kfactor).
Method 1:Calculating the Kfactor by flow
parameters
Method 2:Calculating the Kfactor by means of the
flow condition
Method 1. Calculating the Kfactor by flow
parameters.
<1>Selection of the flow equation
Select the desired operational expression
according to the fluid type and the flow unit
category shown in Table 5.2.
<2>Confirming the unit
The unit to be used in this calculation is as
follows:
Differential pressure: Pa
Static Pressure: kPa abs
Temperature: K
The dimension of the pressure unit Pa are
M•L-1•S-2
Where M: mass (Kg)
L: Length (m)
S: Time (second)
<3>Preparation of flow parameters for Kfactor
calculation
Each parameter must be expressed in the
following units.
d: m,
ρb and ρnorm: Kg/m3
C, β, ε and K has no dimensions
<4>Calculation of the unit conversion coefficient Nc
The flow rate value does not change
automatically when a flow unit parameter is set
for the transmitter, and is always output as Kg/s
(mass flow). M3/s (volume flow), Nm3/s (Normal
volume flow.)
In order to obtain a value in your designated
unit, it is necessary to set Nc.
Nc is a conversion coefficient for the flow and
DP unit that is designated to be used.
<5>Selection of the Kfactor equation and
calculation Select the Kfactor expression
according to the unit category shown in Table
5.2.
Calculate the Kfactor using the parameters and
the expression.
<6>Enter Kfactor as shown in beginning of this
section.
IMPORTANT
If either the setting of flow unit or differential
pressure unit is changed, Kfactor and Nc must
be recalculated.
Table 5.2
Flow Operational Expression
Flow unit Category
Kfactor
Mass Flow
Kfactor = /4×Nc×C/ 1–β4 ×ε×d2× 2×ρb
Normal · Standard
Volume Flow
Kfactor = /4×Nc×C/ 1–β4 ×ε×d2× 2×ρb /ρnorm
Volume Flow
Kfactor = /4×Nc×C/ 1–β4 ×ε×d2× 2/ρb
Flow
Qm, Qv or Qv_norm = Kfactor × ∆P
T0501.ai
IM 01C25T04-01EN
Table 5.3
#
1
2
3
4
5
6
7
8
<5. Parameter Setting>
5-8
Symbols
Symbol
Nc
Kfactor
C
ε
β
d
ρb
ρnorm
Description
Unit convert factor
Basic flow Calculation factor
Discharge Coefficient
Expansion Factor
Diameter Ratio
Diameter of orifice
Base Density on Tb, SPb Condition
Density on Normal, Standard condition
Example 1: Calculation of Nc
(1) When flow unit is changed.
Nc= (Kg/s) /(Mass Flow unit in use)
Table 5.4
Example of Calculated Nc by Flow Unit
Flow unit
kg/s
kg/h
lb/s
lb/h
Calculation of Nc
(kg/s) / (kg/s) = (1kg/1s) / (1kg/1s)
(kg/s) / (kg/h) = (1kg/1s) / (1kg/3600s)
(kg/s) / (lb/s) = (1kg/1s) / (0.4535924kg/1s)
(kg/s) / (lb/h) = (1kg/1s) / (0.4535924kg/3600s)
Nc
1
3600
2.204623
7936.648
(2) When differential pressure unit is changed.
Nc = (Differential pressure unit)/(Pa)
Table 5.5
Example of Calculated Nc by Differential Pressure Unit
∆p unit
Calculation of Nc
Nc
Pa
(Pa) / (Pa) = (1Pa) / (1Pa)
1 =1
kPa
kPa/Pa = 1000Pa / 1Pa
1000 = 31.62278
inH2O@68degF
inH2O@68degF / Pa = 248.6406Pa / 1Pa
248.6406 = 15.76834
T0502.ai
(3) When both flow unit and differential pressure unit are changed.
Nc =(Kg/s)/(Mass Flow unit of use) × (Differential pressure unit of use)/(Pa)
Example 2: Calculation of Kfactor
Qm unit = kg/s, Differential pressure unit = kPa
Kfactor =
/4 × Nc × C/ 1− β4 × ε × d2 × 2×ρb
= 0.7853982 × 31.62278 × 0.6043 / 1−0.1296 × 0.984 × 0.031622 × 2×1.250380
= 0.02502868
0.02503
IM 01C25T04-01EN
5-9
<5. Parameter Setting>
Table 5.6
Flow Parameter of Example
Description
Value
Symbol
C
0.6043
Discharge coefficient Orifice Corner Taps [ISO5167-1 1991] ReD 1×10⁶
ε
0.984
Expansion factor β=0.6, ∆ρ=50,000 Pa, SP=1,000,000 Pa abs, κ=1.399502
β
0.6
Diameter ratio
d
0.03162 m
Bore of orifice
D
0.0527 m
Pipe diameter
ρb
1.250380 kg/m3
Base Density on Tb, SPb Condition (NITROGEN 101,325 Pa abs 273.15 K)
0.7853982
/4
Unit convert factor when DP unit is kPa
31.62278
Nc
kPa/Pa = 1000Pa / 1Pa =31.62278
T0503.ai
Example 3: Calculation of Qm
∆p = 50kPa,
Qm(kg/s) = Kfactor × ∆p
= 0.02503 × 50
= 0.1770 (kg/s)
Method 2. Calculating the Kfactor from differential pressure and flow rate in normal condition
(1) The flow rate and the differential pressure are calculated using the unit set to the transmitter.
(2) Calculation of the Kfactor
Calculate the Kfactor by using the flow rate and the differential pressure.
Kfactor can be calculated from equation shown in below.
Kfactor = [Qm / (∆p)] / [(ScaleOut_U − ScaleOut_L) + ScaleOut_L]
(3) Enter kfactor as shown in beginning of this section.
IMPORTANT
If either the setting of flow unit or differential
pressure unit is changed, Kfactor must be
recalculated.
Example: Kfactor Calculation
Table 5.7
Flow Condition Example
Symbol
Qm
Δp
ScaleOut_U
ScaleOut_L
Value
0.3795 kg/s
50 kPa
100 kPa
0 kPa
Description
Flow rate in normal condition
Differential pressure
Upper valur of ScaleOut
Lower value of ScaleOut
Kfactor = [Qm / (∆p)] / [(ScaleOut_U − ScaleOut_L) + ScaleOut_L]
= (0.3795 / 50) / [(100 − 0) + 0]
= 0.005367
IM 01C25T04-01EN
<5. Parameter Setting>
5.4 Output Signal Setup
5.4.1 Fail Safe Mode
Fail Safe Mode defines the Output Value and
Status (Quality) when status of input signal to AI
function block or Totalizer function block is BAD.
This function is valid only when Actual Mode of
AI function block or Totalizer function block is in
“AUTO”
• Procedure to call up the display
(AI function block)
DTM
EDD
Output → Analog Input (1-3) → Fail Safe
Mode
Output → Function Block (1-3) – Analog
Input → Fail Safe Mode → Fail Safe
Mode
• Procedure to call up the display
(Totalizer function block)
DTM
EDD
Output → Totalizer → Fail Safe Mode
Output → Function Block 4 – Totalizer →
Fail Safe Mode
5.4.2 Channel
Channel is the parameter to select the signal which
is calculated in SENSOR Transducer Block. Target
Mode of each Function Block need to be changed
to Out of Service (O/S).
DTM
EDD
5-10
5.4.3 Totalizer
This section shows procedure to set Signal Totalizer
function. Refer to subsection 5.4.2 for Channel
setting of Totalizer Function Block. Follow below
procedure to set signal totalizer function.
<1>Set Totalizer Value Set
• Procedure to call up the display
DTM
EDD
→ Totalize
→ Reset
→ Preset
Output → Totalizer → Totalizer
Value Set →
Output → Function Block 4 –
Totalizer → Totalizer Value →
Normal operation of the totalizer
Assign value 0 to totalizer
Assign value of present value to
totalizer
<2>Set Mode
• Procedure to call up the display
DTM
EDD
→ Pos. and neg.
value
→ Positive value
only
→ Negative value
only
→ Hold Count
Output → Totalizer → Mode →
Output → Function Block 4 –
Totalizer → Mode →
True arithmetic integration of the
incoming rate values
Totalization of positive incoming
rate value only
Totalization of negative incoming
rate value only
Totalization stopped
Output → Analog Input (1-3), Totalizer →
Target Mode
Output → Function Block (1-3) – Analog
Input, Function Block 4 - Totalizer →
Target Mode
• Procedure to call up the display
DTM
Output → Analog Input (1-3),
Totalizer → Channel →
EDD
Output → Function Block (1-3)
– Analog Input, Function Block 4 Totalizer → Channel →
→ Pressure Value
Row pressure value before
scaling
→ Primary Value
Differential pressure value
→ Calculated Value Calculated value
→ Static Pressure
Static pressure value of high
(H)
pressure side
→ Static Pressure
Static pressure value of low
(L)
pressure side
→ Capsule
Capsule temperature value
Temperature
→ Amplifier
Amplifier temperature value
Temperature
IM 01C25T04-01EN
<5. Parameter Setting>
5-11
5.5 Local Display
5.5.1 Procedure to Set the Integral Indicator
Select from Parameter Displays (1-4)
(Display Selection)
Specify parameters to be displayed
(Parameter Selection)
Specify whether DISPLAY1, DISPLAY2, DISPLAY3, or
DISPLAY4 should be displayed.
Select parameters to be displayed.
Select items to be displayed in the lower text field
(Information Selection)
Specify whether tag, parameter, unit, or status should be
displayed.
Set the display contents for the block tag to be displayed in
the lower text field
(Display Tag)
Written as by 6 characters or 6 characters plus “/”,“.”.(*1)
Select whether the unit to be displayed in the lower text field
should be set to automatic or on a customized basis
(Unit Selection)
CUSTOM is
selected
AUTO is
selected
Set the display contents
of the unit
(Display unit)
Set an exponent
(Exponent Mode)
Perform ON/OFF setting of the bar graph
(Bar Graph)
Set the display period
(Display Cycle)
Written as by 6 characters or 6 characters plus “/”,“.”.(*1)
Example display of exponent setting:
The LCD value for exponent setting when the actual
pressure value is 23.4568 kPa and the decimal point
selected is 2.
Corresponding
decimal point
Exponent
2
2
2
2
Engineering Unit
Eng. Unit @ 1/10
Eng. Unit @ 1/100
Eng. Unit @ 1/1000
LCD value
(kPa)
23.46
2.35
0.23
0.02
Time unit: 400ms; When the value set is “7”, the same
display continues for about 2.8 seconds.
F0505.ai
*1:
Combination of up to 6 characters of alphanumeric and the symbols of [/], [.] and [ ] (space) are available.
If the other characters are specified, space will be displayed.
The symbols of [/] and [.] cannot be specified on the head of a string.
Figure 5.3
Procedures to Set the Built-in Display
IM 01C25T04-01EN
5-12
<5. Parameter Setting>
a.Display Selection
e.Unit Selection
A cycle of up to four displays can be shown by
assigning variables to the parameters at Display
Selection.
Select whether unit to be displayed in the lower
text field should be automatically selected or
customized by user in parameter Unit Selection.
Select “Auto” if you want to have unit chosen from
specified units and “Custom” for engineering unit
which you can input freely.
• Procedure to call up the display
DTM, EDD
Local Display → Display Selections →
Display Selection
• Procedure to call up the display
b.Parameter Selection
At Parameter Selection, select the variable that
will display on the integral indicator.
• Procedure to call up the display
DTM, EDD
→ Display1
→ Display2
→ Display3
→ Display4
Local Display → Display (1-4) Selections
→ Parameter Selection (1-4)
“on” or “off”
“on” or “off”
“on” or “off”
“on” or “off”
Set Parameter Selection 2, Parameter Selection
3 and Parameter Selection 4 in the same way if
necessary.
In addition to the above item, “Not used” is also
displayed as a selection item.
c.Information Selection
Information Selection parameter specifies
whether Display tag, Parameter, Unit or Status
should be displayed on bottom part of integral
indicator.
• Procedure to call up the display
DTM, EDD
Local Display → Display Selections
→ Information Selection
→ TAG
“on” or “off”
→ PARAMETER “on” or “off”
→ UNIT
“on” or “off”
→ STATUS
“on” or “off”
d.Display Tag
At Display Tag parameter, user can set display tag
of up to 6 alphanumeric characters, slash (/) and
period (.).
• Procedure to call up the display
DTM, EDD
Local Display → Display (1-4) Setup →
Display Tag (1-4)
DTM, EDD
→ Auto
→ Custom
Local Display → Display (1-4) Setup →
Unit Selection (1-4)
Select unit from the list
Input engineering unit by user
f. Display Unit
Display Unit parameter allows the engineering unit
to be displayed. Up to 6 alphanumeric characters
and one slash (/) and one period (.) can be input at
Display Unit; only the first six are displayed on the
integral indicator.
• Procedure to call up the display
DTM, EDD
Local Display → Display (1-4) Setup →
Display Unit (1-4)
Note that following symbols are not available.
#%&<>*:+-,‘()
The integral indicator shows “------“ when these
symbols or more than two slashes are entered.
g.Exponent Mode
User can change the position of decimal point
which is shown on the integral indicator. Select from
0, 1, 2, 3 or 4.
• Procedure to call up the display
DTM, EDD
Local Display → Display (1-4) Setup →
Exponent Mode (1-4)
Example of exponent setting:
The LCD value for exponent setting when the actual
pressure value is 23.4568kPa and the decimal point
is selected ‘2’.
Corresponding
decimal point
2
2
2
2
Exponent
Engineering Unit
Eng. Unit@1/10
Eng. Unit@1/100
Eng. Unit@1/1000
LCD value
(kPa)
23.46
2.35
0.23
0.02
IM 01C25T04-01EN
<5. Parameter Setting>
5-13
h.Bar Graph
ON/OFF setting of Bar Graph in upper field of
integral indicator can be performed by Bar Graph
parameter.
• Procedure to call up the display
DTM, EDD
→ Enable
→ Disable
Local Display → Bar Graph →
Enable to indicate bar graph
Disable to indicate bar graph
i. Display Cycle
Displaying period can be set from Display Cycle
parameter.
• Procedure to call up the display
DTM, EDD
→
Recommend
→ 1-10
Local Display → Display Cycle →
Display cycle: 2.8 s
Update period of process value is 400 ms
Display cycle:
400 ms × (Number selected)
IM 01C25T04-01EN
6-1
<6. Explanation of Basic Items>
6.
Explanation of Basic Items
6.1 Outline
6.2 SENSOR Transducer Block
This chapter describes brief explanation of the
SENSOR transducer block, the LCD transducer
block, the AI function block, and the Totalizer
function block.
The SENSOR transducer block is in between the
sensor and the AI function blocks. It calculates
pressure/differential pressure, static pressure,
and capsule temperature from sensor signals.
Then it performs damping and range checks for
the measured values of these three variables and
sends signals to the AI function block.
Actual mode
Many parameters require a change of the mode
of the function block to O/S (Out of Service) when
their data is changed. To change the mode of the
function block, its Target Mode (TARGET_MODE)
needs to be changed. The Actual Mode (MODE_
BLK) is comprised of the three sub-parameters
below:
(1) Actual (Actual mode):
Indicates the current operating condition.
(2) Permit (Permitted mode):
Indicates the operating condition that the block
is allowed to take.
(3) Normal (Normal mode):
Indicates the operating condition that the block
will usually take.
Pressure
Raw Value Unit
Sensor
signals
Pressure
Raw Value
Pressure Value Unit
Disable
Pressure
Value
Scale
In
Enable
Simulation
Value
Simulation
6.2.1 Functional Block
Figure 6.1 presents the functional block of the
SENSOR transducer. The calculated values
of pressure/differential pressure, H-side static
pressure, L-side static pressure, and capsule
temperature are assigned to PRIMARY_VALUE,
STATIC_PRESSURE_HIGH_VALUE, STATIC_
PRESSURE_LOW_VALUE, TEMPERATURE_
VALUE and, AMP_TEMP_VAL respectively.
Measured values output to the AI function blocks or
Totalizer function block are selected by the Channel
parameter of those blocks.
Characterization
Type
Linear
Primary Value Unit
Primary
Value
Scale
Out
Channel
User defined
(table)
Square root
Low Flow Cut Off
Calculate
Coefficient
Totlizer
Calculate Value Unit
Calculate Value
Static Pressure Unit
Static Pressure High Side Value
Static Pressure Low Side Value
Analog
Input 1
Analog
Input 2
Analog
Input 3
Temperature Unit
Capsule Temperature
Amplifier Temperature
F0601.ai
Figure 6.1
SENSOR Transducer Functional Block
IM 01C25T04-01EN
6.2.2 Target Mode
The Block modes permitted for the SENSOR
transducer block are Automatic (Auto) and Out of
Service (O/S). The mode must be set to Auto under
normal operating conditions, and to O/S when
making changes to an important parameter. For
parameters that can only be changed in the Auto
and O/S modes, refer to the parameter list for the
SENSOR Transducer block.
6.2.3 Basic Parameter of SENSOR
Transducer Block
Scale In (SCALE_IN)
Scale In is the input conversion of pressure using
high and low scale. The related unit is the pressure
unit. Refer to 5.1.2 for configurations.
Primary Value (PRIMARY_VALUE)
This parameter contains the measured value and
status available to the function block.
Calculate Coefficient (CALCULATE_COEF)
6.3 LCD Transducer Block
6.3.1 Outline of the Functions
The LCD transducer block controls alarms and
measured values that are displayed on the integral
indicator. It displays not only OUT signals from the
AI blocks, but also I/O signals of the Installed blocks
on the integral indicator.
6.3.2 Target Mode
The Target modes permitted for the LCD transducer
block are Automatic (Auto) and Out of Service (O/
S). Settings can be changed in the AUTO mode for
this block, except the Block tag parameter.
6.3.3 Display Contents of the Integral
Indicator
The components of the integral indicator are the bar
graph, the title field, the center field for numerical
values, the lower text field, and auxiliary characters.
The contents and meanings of these components
are as follows:
40.000
37.000
Coefficient for calculating Calculate Value
(CALCULATE_VALUE). Calculate Coefficient can
be considered as Kfactor for flow rate calculation.
Refer to Subsection 5.3.4 for Kfactor calculation.
Calculated Value (CALUCULATE_VALUE)
Calculation result of (Primary Value) × (Calculate
Coefficient)
Calculated Value Unit (CALCULATE_UNIT)
Unit for Calculate Value.
6-2
<6. Explanation of Basic Items>
F0602.ai
Figure 6.2
Screen Display of the integral indicator
Characterization Type (LIN_TYPE)
Characterization type of output signal can be select
from Linear, user defind (table) or Square root. user
defind (table) is used to compensate the output for
non-linear applications. For the measured pressure,
a maximum of 31 coordinates can be specified
between 0 – 100%. Please refer 5.1.3 to for more
information.
Low Flow Cut Off (LOW_FLOW_CUTOFF)
This is the point in percent of flow until the output
of the flow function is set to Zero. It is used for
suppressing low flow values. Refer to 5.3.1 for
detail.
IM 01C25T04-01EN
<6. Explanation of Basic Items>
Component name
Bar graph
Center field for
numerical values
Lower text field
Title field
Auxiliary characters
6-3
Contents
Shows the value displayed in the center field for numerical values scaled in terms of
percentage.
Presents values of inputs and outputs.
While the alarm is on, the alarm number alternates with the displayed value here.
Displays tag, parameter name, unit, and signal status. While the alarm is on, the alarm contents
alternate.
Depicts the type of the value displayed on the center field for numerical value.
P
Flashes when pressure/differential pressure is displayed.
SP
Flashes when static pressure is displayed.
T
Flashes when temperature is displayed.
F
Flashes when flow rate is displayed.
%
Flashes when the center field for numerical values displays a % value.
Flashes when square root display is selected.
Key mark Flashes when Write Protect is selected.
×10,
Used when the calculated value displayed in the center field for numerical values is
×100,
rounded.
×1000
6.3.4 Example Displays of the Integral Indicator
Example display of AI1 OUT
(1) Pressure Value
Block tag
(2) Pressure Value
(3) Pressure Value
Parameter name
Unit
(4) Pressure Value
Status
F0603.ai
Example display during mechanical failure alarm
Alarm number and
Error Massage (Capsule error)
Table 6.1
F0604.ai
Parameters to be displayed on LCD
Block Name
AI1
AI2
AI3
TOTALIZER
SENSOR TRANSDUCER
Parameter
OUT
OUT
OUT
TOTAL
SECONDARY_VALUE_1
PRIMARY_VALUE
CALCULATE_VALUE
STATIC_PRESSURE_HIGH_VALUE
STATIC_PRESSURE_LOW_VALUE
TEMPERATURE_VALUE
AMP_TEMP_VAL
Parameter Selection(1 to 4)
(PARAMETER_SEL(1 to 4))
AI1 OUT
AI2 OUT
AI3 OUT
TOTAL
Pressure Value
Primary Value
Calculated Value
Static Pressure (H)
Static Pressure (L)
Capsule Temperature
Amplifier Temperature
DISPLAY
OUT
OUT
OUT
TOTAL
SV1
PV
CAL.VAL
SP.HI
SP.LO
CAP.TMP
AMP.TMP
IM 01C25T04-01EN
6-4
<6. Explanation of Basic Items>
6.3.5 Units That Can Be Displayed on the LCD by the Automatic Link Function
Index
1000
1001
1002
1010
1011
1012
1013
1018
1019
1020
1034
1035
1036
1037
1038
1039
1040
1041
1042
1043
1044
1045
1046
1047
1048
1049
1050
1051
1052
1088
1089
1090
1091
1092
1094
1097
1101
1103
1104
1105
1130
1131
1132
1133
1134
1135
1136
1137
1138
1139
1140
1141
Unit
K
°C
°F
m
km
cm
mm
ft
in
yd
m3
dm3
cm3
mm3
L
cL
mL
hL
in3
ft3
yd3
mile3
pint
quart
gal
ImpGal
bushel
bbl
bbl (liq)
kg
g
mg
Mg
t
lb
kg/m3
g/m3
kg/L
g/mL
g/L
Pa
Gpa
MPa
kPa
mPa
μPa
hPa
bar
mbar
torr
atm
lbf/in2
psi
Display
Kelvin
degC
degF
m
km
cm
mm
ft
in
yd
m3
dm3
cm3
mm3
L
cl
ml
hl
in3
ft3
yd3
mile3
pint
quart
gal
ImpGal
bushel
bbl
bblliq
kg
g
mg
Mg
t
lb
kg/m3
g/m3
kg/L
g/ml
g/L
Pa
Gpa
MPa
kPa
mPa
uPa
hPa
bar
mbar
torr
atm
psi
Index
1142
1143
1144
1145
1146
1149
1150
1151
1152
1153
1154
1155
1156
1157
1158
1318
1319
1320
1321
1322
1323
1324
1325
1326
1327
1328
1329
1330
1331
1332
1333
1334
1335
1336
1337
1338
1339
1340
1341
1342
1347
1348
1349
1350
1351
1352
1353
1354
1355
1356
1357
Unit
lbf/in2a
psia
lbf/in2g
psig
gf/cm2
kgf/cm2
inH2O
mmH2O
mmH2O (4°C)
mmH2O (68°F)
ftH2O
ftH2O (4°C)
ftH2O (68°F)
inHg
inHg (0°C)
mmHg
mmHg (0°C)
g/s
g/min
g/h
g/d
kg/s
kg/min
kg/h
kg/d
t/s
t/min
t/h
t/d
lb/s
lb/min
lb/h
lb/d
STon/s
STon/min
STon/h
STon/d
LTon/s
LTon/min
LTon/h
LTon/d
%
m3/s
m3/min
m3/h
m3/d
L/s
L/min
L/h
L/d
ML/d
ft3/s
ft3/min
Display
psia
psig
g/cm2
kg/cm2
inH2O
mmH2O
mmH2O
mmH2O
ftH2O
ftH2O
ftH2O
inHg
inHg
mmHg
mmHg
g/s
g/min
g/h
g/d
kg/s
kg/min
kg/h
kg/d
t/s
t/min
t/h
t/d
lb/s
lb/min
lb/h
lb/d
STon/s
STon/mi
STon/h
STon/d
LTon/s
LTon/mi
LTon/h
LTon/d
%
m3/s
m3/min
m3/h
m3/d
L/s
L/min
L/h
L/d
ML/d
ft3/s
ft3/min
IM 01C25T04-01EN
Index
1358
1359
1360
1361
1362
1363
1364
1365
1366
1371
1372
1373
1374
1448
1449
1450
1451
1452
1453
1454
1455
1456
1457
1458
1459
1460
1461
1462
1479
1480
1481
1482
1483
1484
1485
1486
1487
1488
1489
1490
1491
1492
1493
1494
1495
1496
1497
1498
1499
1500
1501
1502
1503
1504
1505
6-5
<6. Explanation of Basic Items>
Unit
ft3/h
ft3/d
ft3/min std.
ft3/h std.
gal/s
gal/min
gal/h
gal/d
Mgal/d
bbl/s
bbl/min
bbl/h
bbl/d
μgal/s
mgal/s
kgal/s
Mgal/s
μgal/min
mgal/min
kgal/min
Mgal/min
μgal/h
mgal/h
kgal/h
Mgal/h
μgal/d
mgal/d
kgal/d
μbbl/s
mbbl/s
kbbl/s
Mbbl/s
μbbl/min
mbbl/min
kbbl/min
Mbbl/min
μbbl/h
mbbl/h
kbbl/h
Mbbl/h
μbbl/d
mbbl/d
kbbl/d
Mbbl/d
μm3/s
mm3/s
km3/s
Mm3/s
μm3/min
mm3/min
km3/min
Mm3/min
μm3/h
mm3/h
km3/h
Display
ft3/h
ft3/d
SCFM
SCFH
gal/s
gal/min
gal/h
gal/d
Mgal/d
bbl/s
bbl/min
bbl/h
bbl/d
ugal/s
mgal/s
kgal/s
Mgal/s
ugal/mi
mgal/mi
kgal/mi
Mgal/mi
ugal/h
mgal/h
kgal/h
Mgal/h
ugal/d
mgal/d
kgal/d
ubbl/s
mbbl/s
kbbl/s
Mbbl/s
ubbl/mi
mbbl/mi
kbbl/mi
Mbbl/mi
ubbl/h
mbbl/h
kbbl/h
Mbbl/h
ubbl/d
mbbl/d
kbbl/d
Mbbl/d
um3/s
mm3/s
km3/s
Mm3/s
um3/min
mm3/min
km3/min
Mm3/min
um3/h
mm3/h
km3/h
Index
1506
1507
1508
1509
1510
1511
1512
1513
1514
1517
1518
1519
1520
1563
1564
1565
1566
1577
1578
1579
1610
1611
1612
1613
1614
1615
1616
1617
1618
1619
1620
1621
1622
1623
1624
1625
1626
1627
Unit
Mm3/h
μm3/d
mm3/d
km3/d
Mm3/d
cm3/s
cm3/min
cm3/h
cm3/d
kL
kL/min
kL/h
kL/d
ml/min
mg/dm3
mg/L
mg/m³
ml/s
ml/h
ml/d
Paa
Pag
GPaa
GPag
MPaa
MPag
kPaa
kPag
mPaa
mPa g
µPaa
µPag
hPaa
hPag
gf/cm2a
gf/cm2g
kgf/cm2a
kgf/cm2g
Display
Mm3/h
um3/d
mm3/d
km3/d
Mm3/d
cm3/s
cm3/min
cm3/h
cm3/d
kL
kL/min
kL/h
kL/d
ml/min
mg/dm3
mg/L
mg/m3
ml/s
ml/h
ml/d
Paa
Pag
GPaa
GPag
MPaa
MPag
kPaa
kPag
mPaa
mPag
uPaa
uPag
hPaa
hPag
gf/cm2a
g/cm2g
kg/cm2a
kg/cm2g
IM 01C25T04-01EN
6-6
<6. Explanation of Basic Items>
6.4 AI Function Block
The AI function block is a unit of the software.
During execution, it incorporates data from the
SENSOR transducer block. After execution, it
updates analog outputs and processes newly
generated alarms. AI function blocks can provide
a discrete output which shows the status of LO,
LO_LO, HI, or HI_HI. In terms of function, there is
no difference between the three AI function blocks
provided in DPharp.
6.4.1 Function Blocks
The AI function block, via the Channel, incorporates
analog signals from the transducer block, performs
scaling processing, filtering, signal linearization,
fail safe control and alarm processing before
outputting. It has the function to generate a discrete
output. Figure 6.3 presents the AI function block.
Simulate.Enable
MODE_BLK. Actual
Simulate
Value, Status
Scaling
PV_SCALE
Linearization
LIN_TYPE
Scaling
OUT_SCALE
Filter
PV_FTIME
Limit Check
HI, HI_HI
LO, LO_LO
Fail
Safe
AUTO
PV from TB
OUT
Value, Status
OUT
OUT
Value, Status
MAN
OS
F0605.ai
Figure 6.3
Diagram of the AI Functional Block
IM 01C25T04-01EN
6.4.2 Target Mode
The Target modes permitted for the AI function
block are Automatic (Auto), Manual (Man), and
Out of Service (O/S). When the Target mode of PB
(Physical Block) is Out of Service (O/S), Actual is
Out of Service (O/S) even if Automatic (Auto) or
Manual (Man) is written to Target.
6.4.3 Basic Parameter of AI function block
Output Value (OUT)
The function block parameter OUT contains the
current measurement value in a vendor specific
or configuration adjusted engineering unit and the
belonging status in Auto Mode. Also contains the
value and status set by an operator in Man Mode.
Simulation (SIMULATE)
Simulation parameter is to simulation mainly for
checking arbitrarily set the value and input status
from SENSROR Transducer block.
PV Scale (PV_SCALE)
Conversion of the process variable into percent
using the high and low scale values.
Linearization type (LIN_TYPE)
Linearization type of output signal can be select
from Linear or Square root. Linearization type of
AI function block can apply to have different output
mode for display and output signal. (For example,
Display mode: Square root, Output mode: Linear)
Out Scale (OUT_SCALE)
Scale of the process variable. This parameter
contains the values of the lower limit and upper limit
effective range, the code number of the engineering
unit of process variable and the useful number of
digits on the right hand side of the decimal point.
Filter Time Const (PV_FTIME)
Damping time of the process variable.
6-7
<6. Explanation of Basic Items>
Table 6.2
Fail Safe Mode (Classic Status)
Fail Safe Mode
Output Value and Status (Quality)
Default value is value Fail Safe Default value
used as output
Status UNCERTAIN - Substitute Value
value
value
Last stored valid OUT value
Storing last valid
output value
Status UNCERTAIN - Last Usable Value
The calculated
value wrong calculated value
output value is
Status BAD - *(* as calculated)
incorrect
Table 6.3
Fail Safe Mode (Condensed Status)
Fail Safe Mode
Output Value and Status (Quality)
Default value is value Fail Safe Default value
used as output Status BAD - Passivated, Constant *1
value
UNCERTAIN - Substitute Set *2
UNCERTAIN - Process Related *3
UNCERTAIN - Substitute Set *4
Storing last valid value Last stored valid OUT value
output value
Status BAD - Passivated, Constant *1
UNCERTAIN - Substitute Set *2
UNCERTAIN - Process Related *3
UNCERTAIN - Substitute Set *4
The calculated
value wrong calculated value
output value is
Status BAD - Passivated, Constant *1
incorrect
BAD - Maintenance Alarm *2
BAD - Process Related *3
BAD -Function Check *4
*1:
*2:
*3:
*4:
When input status = BAD - Passivated
When input status = BAD - Maintenance Alarm
When input status = BAD - Process Related
When input status = BAD - Function Check
6.5 Totalizer Function Block
6.5.1 Functional Block
The Totalizer function block, incorporates
analog signal from SENSOR transducer block,
performs integrate a rate or another quantity to
the corresponding integral. And also, this function
block can be tailored for different applications or
determines the fail-safe behavior.
6.5.2 Target Mode
The Target Mode permitted for the Totalizer function
block are Automatic (Auto), Manual (Man), and Out
of Service (O/S).
Fail Safe Mode (FSAFE_TYPE)
Fail Safe Mode is parameter used to define the
reaction of the device, if a BAD status of signal to
AI function block (OUT.Status and OUT.Value) is
detected. This is available only when Target Mode
of AI function block is in “Auto”. Refer to 5.4.1 for
configuration.
IM 01C25T04-01EN
6-8
<6. Explanation of Basic Items>
6.5.3 Totalizer Value Set (SET_TOT)
6.5.5 Fail Safe Mode (FAIL_TOT)
Reset of the internal value of the function block
algorithm to 0 or set this value to which configured
in Preset Value (PRESET_VALUE). This parameter
affects the current totalized value immediately. This
function is level sensitive. While this is set to Reset
or Preset, the status of the totalized value shall be
UNCERTAIN-initial value. The parameter Totalized
Value (TOTAL) is affected if the block is in Auto
Mode.
Fail safe mode of the Totalizer function block. This
parameter governs the behavior of the function
block during the occurrence of input values with
BAD status. The following selections are possible.
Totalized
Value
0.0
UNCERTAIN-init
value
PRESET_TOT
UNCERTAIN-init
value
Run; Totalization is continued using the input values
despite the BAD status. The status is ignored.
Hold; Totalization is stopped during occurrence of
BAD status of incoming values.
Memory; Totalization is continued based on the last
incoming value with GOOD status before the first
occurrence of BAD status.
0.0
SET_TOT
Time
2
1
0
Time
F0606.ai
The following selections of this function block
parameter are possible.
0: Totalize: Normal operation of the Totalizer
1: Reset; Assign value 0 to Totalizer
2: Preset; Assign value of Present Value to
Totalizer
Table 6.4
FAIL_TOT mode
TOTAL Value and Status(Quality) *1
Run
value Totalization is continued using the
input values
Status UNCERTAIN - Non Specific
Hold
value Totalization is stopped
Status UNCERTAIN - Last Usable Value
Memory
value Totalization is continued based on
the last incoming value with GOOD
status
Status UNCERTAIN - Non Specific
*1:
When SET_TOT=TOTALIZE & MODE_TOT<>HOLD,
input status <> out of serivce
Table 6.5
6.5.4 Mode (MODE_TOT)
This parameter governs the behavior of the
totalization. The following selections are possible:
Pos. and neg. values; True arithmetic integration of
the incoming rate values.
Positive values only; Totalization of positive
incoming rate values only.
Negative values only; Totalization of negative
incoming rate values only.
Fail Safe Mode (Classic Status)
Fail Safe Mode (Condensed Status)
FAIL_TOT mode
TOTAL Value and Status(Quality) *1
Run
value Totalization is continued using the
input values
Status BAD - *(* same as input)
Hold
value Totalization is stopped
Status BAD - *(* same as input)
Memory
value Totalization is continued based on
the last incoming value with GOOD
status
Status UNCERTAIN - Substitute set
*1:
When SET_TOT=TOTALIZE & MODE_TOT<>HOLD,
input status <> BAD - Passivated
Hold Count; Totalization stopped.
MODE_BLK. Actual
PV from TB
(CHANNEL)
Fail safe
handling
FAIL_TOT
Totalize mode
handling
MODE_TOT
Value, Status
Totalize start /
reset /preset
handling
SET_TOT
Totalization
Limit Check
HI, HI_HI
LO, LO_LO
TOTAL
TOTAL
AUTO
TOTAL
Value, Status
MAN
OS
F0607.ai
Figure 6.4
Totalizer Function Block
IM 01C25T04-01EN
7.
<7. In-Process Operation>
7-1
In-Process Operation
This chapter describes the procedure performed
when changing the operation of the function block
of the transmitter in process.
7.1 Mode Transition
When the function block mode is changed to Out_
Of_Service, the function block pauses.
When the function block mode is changed to
Manual, the function block suspends updating of
output values. In this case alone, it is possible to
write a value to the OUT parameter of the block for
output.
7.2 Generation of Alarm
7.2.1 Indication of Alarm
When the self-diagnostics function indicates that a
device is faulty, a diagnostic message (DIAGNOSIS
or DIAGNOSIS_EXTENSION) is issued from the
physical block. When a diagnostic message is
detected in each function block or a diagnostic
message in the process value (process alarm) is
detected, a diagnostic message is issued from
each block. If an LCD indicator is installed, the error
number is displayed as AL.XX.
If two or more alarms are issued, multiple error
numbers are displayed.
For details of ALARM, refer to Section 8.2.
7.2.2 Status of Each Parameter in Failure
Mode
Status has Classic Status and Condensed Status.
Classic Status is a conventional alarm and does
not support the NAMUR NE107. Condensed Status
is an alarm which was added to PA Profile 3.01 or
later and supports the NAMUR NE107.
The following standard categories of instrument
diagnostics are defined for the NAMUR NE-107.
F (Failed):
An alarm category that indicates a failure has
occurred in the instrument or in its peripheral
devices.
C (Check Function):
An alarm category that indicates that a detected
failure is a temporary event.
S (Off Specification):
An alarm category that indicates that the
detected failure was caused by the
instrument being used outside of its range
or because a discrepancy has occurred
between the set value and measured
value. The alarm was caused either by the
instrument or process state.
M (Maintenance):
An alarm category for a detected failure that
has a low level of urgency but is a failure
that could develop into a problem causing
restrictions in instrument functionality in
some environments.
Classic Status and Condensed Status can be
switched by using the Condensed Status/Diagnosis
(PB.COND_STATUS_DIAG) parameter.
F0701.ai
Figure 7.1
Error Identification on Indicator
• Procedure to call up the display
DTM
EDD
[Menu] → Device → Configulation →
Query Device → Query Device PB →
Condensed Status/Diagnosis
[Menu] → Device → Query Device →
Phsical Block → Index 33-51 →
Condensed Status/Diagnosis
IM 01C25T04-01EN
7-2
<7. In-Process Operation>
7.2.3 Alarm Mask Function
Table 7.1 shows the parameters related
to the masking of alarms. Users can mask
DIAGNOSIS_EXTENSION by setting the Diagnosis
Mask Extension RW (DIAGNOSIS_MASK_
EXTENSION_RW) parameter. DIAGNOSIS_
EXTENSION displays the results of masking.
For details of DIAGNOSIS_EXTENSION, see Table
8.3.
The DIAGNOSIS_MASK and DIAGNOSIS_MASK_
EXTENSION are a read-only parameter to display
bits which are supported by the device.
• Procedure to call up the display
DTM
[Menu] → Device → Configuration →
Query Device → Query Device PB →
[Menu] → Device → Query Device →
Physical Block → Index60 - →
Diagnosis Mask Extension RW
EDD
Table 7.1
Mask parameter of alarm in the physical block
Index
Parameters
31
DIAGNOSIS_MASK
Description
Supported bit of DIAGNOSIS
Valid Range
Read Only
32
Supported bit of DIAGNOSIS_EXTENSION
Read Only
62
DIAGNOSIS_MASK_
EXTENSION
DIAGNOSIS_MASK_
EXTENSION_RW
Set masked DIAGNOSIS_EXTENSION.
0: Off,
When DIAGNOSIS_MASK_EXTENSION_RW-bit is ON and its
1: On
alarm or warning occurs, its DIAGNOSIS_EXTENSION-bit is ON.
7.3 Simulation Function
Initial Value
0x00, 0x98, 0x0f,
0x80
0xff, 0x3c, 0x37,
0xf2, 0x00, 0x00
0xff, 0x3c, 0x33,
0xf0, 0x00, 0x00
Amplifier Assembly
It is possible to conduct testing for the downstream
function blocks or alarm processes. Following
description is how to use and how to set parameters
of this function.
A SIMULATE_ENABLE switch is mounted in
the transmitter amplifier. This is to prevent the
accidental operation of this function. When this is
switched on, simulation is enabled. (See Figure7.2.)
To initiate the same action from a remote terminal,
if REMOTE LOOP TEST SWITCH is written to the
SIM_ENABLE_MSG parameter (index 51) of the
physical block, the resulting action is the same as is
taken when the above switch is on. In the simulation
status, an alarm is generated from the physical
block, and other device alarms will be masked;
for this reason the simulation must be disabled
immediately after using this function.
SIMULATE_ENABLE
1
2
O
N
"OFF" during operation
Write lock switch
F0702.ai
Figure 7.2
SIMULATE_ENABLE Switch Position
IM 01C25T04-01EN
7-3
<7. In-Process Operation>
7.3.1 Sensor Transducer Block
7.3.2 AI Function Blocks
It is necessary to set parameters as shown in
Table 7.2 when the simulation function is used.
When SIMULATE MODE in SENSOR Transducer
block described at Table 7.2 is set to “1: Pressure
Value”, the sensor transducer block uses the
simulation value instead of the pressure value
“SECONDARY_VALUE_1” before carrying out
scaling and linearization.
When the parameters are set in the transducer
block, it is necessary to set parameters as shown in
Table 7.3 in the AI function blocks. When Simulate_
Enabled in AI function blocks described at Table 7.3
is set to “1: Enabled”, the each AI function block that
set this parameter uses the simulation value instead
of the data from the transducer block.
• Procedure to call up the display
DTM
Diag and Service → Sensor Transducer
Block →
[Menu] → Device → Simulation →
Sensor Transducer Block →
Simulation (Pressure) →
EDD
• Procedure to call up the display
DTM
EDD
Table 7.3
Table 7.2
Simulation parameters in the
transducer block
Index
Parameters
Description
118
SIMULATE_
MODE
119
SIMULATE_
VALUE
Select “1:
Pressure
Value” when
the simulation
function is used.
Set the value
to be simulated
instead of
SECONDARY_
VALUE_1.
Valid
Initial
Range
Value
0:Off
0:Off
1:Pressure
Value
None
Value: 0
Status:
Bad
Diag and Service → Analog Input (1-3)
→
[Menu] → Device → Simulation →
Function Block (1-3) - Analog Input →
Simulation (Measured Value) →
Simulation parameters in the AI block
SubParameters
Description
Index
1
Simulate_
Set the data
Status
status to be
simulated.
2
Simulate_
Set the value of
Value
the data to be
simulated.
3
Simulate_
Controls the
Enabled
simulation
function of this
block.
Valid
Initial
Range
Value
Unsigned8 0
Float
0
0:
0:
Disabled, Disabled
1: Enabled
7.3.3 Physical Block
It is necessary to set alarm parameters as shown in
the Physical block when the simulation function is
used.
• Procedure to call up the display
DTM
EDD
Table 7.4 Alarm parameters as simulation function in the physical block
Index
Parameters
60
DIAGNOSIS_SIM_
MODE
61
Diag and Service → Physical Block →
[Menu] → Device → Simulation →
Physical Block →
Simulation (Diagnosis Extension) →
DIAGNOSIS_SIM_
EXTENSION
Description
When the hardware simulation jumper is on, DIAGNOSIS_SIM_
MODE is set to enable, and the bits are set to “on”, the alarms (or
warnings) can be modified.
Definition of supported DIAGNOSIS_EXTENSION informationbits for testing alarms and warnings can be modified.
Valid Range
0: Disabled,
1: Enabled
Initial Value
0: Disabled
0: Off,
1: On
0x00, 0x00, 0x00,
0x00, 0x00, 0x00
IM 01C25T04-01EN
7.4 Write lock (Write-protect)
function
7.5 Local Operation Interface
The transmitter is provided with a write lock (writeprotect) function to restrict write operations to
blocks and prevent inadvertent writing of parameter
data. To enable this function, use the write lock
switch (Hard W Lock) or the WRITE_LOCKING
(Physical block index 34) (Soft W Lock).
The CPU assembly of the transmitter is provided
with a write lock switch (switch 2 in Figure 7.3).
Setting switch 2 to On activates the write lock
function.
When the write lock switch is disabled, set 0
(protected) for WRITE_LOCKING (index 34) of the
physical block to enable the write lock function.
• Procedure to call up the display
DTM
EDD
→ On
→ Off
Physical Block → Configulation → Write
Locking →
[Menu] → Device → Write Locking →
Write lock enabled
Write lock disabled
These parameters and issue shall control the
parameter access as defined in Table 7.5.
Table 7.5 Access protection
HARDWARE_WRITE_
PROTECTION
0 (unprotected)
—
2 (protected, no manual
operation permitted)
WRITE_LOCKING
2457 (unprotected)
0 (protected)
—
Remote
access
possible
YES
NO
NO
Amplifier Assembly
1
2
O
N
O
N
WARNING
The local operation switch on LCD must not
be used in the hazardous area. When it is
necessary to use the switch, operate it in a nonhazardous location.
IMPORTANT
Do not turn off the power to the transmitter
immediately after performing parameter setting.
Powering off within 30 seconds of performing
this procedure will return the parameter to its
previous setting.
The zero point can be adjusted and the Ident
number and Bus address can be set by using
the push button below the LCD display and the
adjustment screw on the main body. Before the
setting, check the following items at the Local
Operation Interface.
• The Write Locking (WRITE_LOCKING)
parameter and the hardware write lock switch
are both turned off and disabled. For the
procedure, see Chapter 7.4. When the Write
Locking (WRITE_LOCKING) parameter is
enabled, the key mark appears on the LCD
display, which indicates that no settings can be
made except for zero point adjustment.
• The Local Operation (LOCAL_OP_ENA)
parameter is enabled.
• The TEST screen is disabled.
• Communication is set to aperiodic. Even during
periodic communication, zero point adjustment
is possible.
• The degree of adjustment depends on the
speed of turning the adjustment screw. Turn the
screw slowly for fine tuning and turn the screw
fast for quick tuning.
SIMULATE_ENABLE switch
"ON" : Write lock enable
WRITE LOCK
Figure 7.3
7-4
<7. In-Process Operation>
F0703.ai
Write lock Switch
External Adjustment
screw cover
F0704.ai
Figure 7.4
External Adjustment Screw
IM 01C25T04-01EN
Integral indicator
Note 1: Use a thin bar which has a
blunt tip, e.g., a hexagonal
wrench, to press the Local
operation switch.
Note 2: The switch is located in
either lower right or lower left
portion of the LCD indicator.
Local operation switch
(Push-button)
Figure 7.5
F0705.ai
Local Operation Switch
Turn the external
adjustment screw
Adjust the zero
Display the
point
process value
Press the button
below the LCD display
(to change the screen)
Turn the external
adjustment screw
Select the
Ident number
Display the
Ident number
Automatic
transition
Press the button
below the LCD display
(to request writing)
Automatic
transition
7.5.2 Ident Number Configuration
When the push button below the LCD display
is pressed while the process value screen is
displayed, the screen changes to the Ident number
setting screen. A four-digit value is displayed in the
middle of the screen and “IDENT” is shown below
it. Turn the external adjustment screw to select a
desired number and press the button below the
LCD display to set the number. When the number is
successfully set, “SAVED” will appear at the bottom
of the screen. If the setting is impossible or fails,
“FAILED” will appear. In this case, turn the external
adjustment screw to select a number to be set and
press the button below the LCD display again to set
the number.
P
SP
T
F
P
SP
T
F
P
SP
T
F
F0707.ai
Figure 7.7
Turn the external
adjustment screw
Select the
Address
Display the
Address
the value to zero. Turning the screw clockwise
increases the output and turning it counterclockwise
decreases the output. Zero point adjustment can be
performed with a resolution of 0.01% of the setting
range.
Write
Press the button
below the LCD display
(to change the screen)
Setting screen of Ident Number
Configuration
7.5.3 Bus Address Configuration
Press the button
below the LCD display
(to request setting)
Write
F0706.ai
Figure 7.6
7-5
<7. In-Process Operation>
Setting flow of Local Operation
Interface
7.5.1 Zero Point Adjustment
While the process value screen is displayed, the
zero point can be adjusted by using the external
adjustment screw. The Local Operation (LOCAL_
OP_ENA) parameter can be used to enable or
disable the zero point adjustment with the external
adjustment screw. To use the external adjustment
screw, set the parameter to “Enabled” (default
setting is “Enabled”). For the setting procedure,
see subsection 5.2.1. Turn the external adjustment
screw with a flathead screwdriver to adjust
When the push button below the LCD display
on the screen is pressed while the Ident number
setting screen is displayed, the screen changes
to the Bus Address setting screen. A number from
0 to 125 is displayed in the middle of the screen
(the default is 126), and “ADDRS” is shown at the
bottom of the screen. Turn the external adjustment
screw to select an address to be set and press the
button below the LCD display to set the address.
When the address is successfully set, “SAVED” will
appear at the bottom of the screen and restart. If the
setting is impossible or fails, “FAILED” will appear.
In this case, turn the external adjustment screw
to select a number to be set and press the button
below the LCD display again to set the address.
P
SP
T
F
P
SP
T
F
P
SP
T
F
F0708.ai
Figure 7.8
Setting screen of Bus Address
Configuration
IM 01C25T04-01EN
8.
<8. Diagnostic Information>
8-1
Diagnostic Information
8.1 Device Status
Diagnostic information and failures are indicated
by using parameter Diagnosis and Diagnosis
Extension in the Physical Block.
DIAGNOSIS has Classic DIAGNOSIS and
Condensed DIAGNOSIS. Classic DIAGNOSIS
is a conventional alarm and does not support the
NAMUR NE107. Condensed DIAGNOSIS is an
alarm which was added to PA Profile 3.01 or later
and supports the NAMUR NE107. For switching the
two statuses, see subsection 7.2.2.
Contents of condensed DIAGNOSIS and classic
DIAGNOSIS are listed in Table 8.1 and 8.2.
Contents of DIAGNOSIS EXTENSION is listed in
Table 8.3.
IM 01C25T04-01EN
Table 8.1
Octet Bit
1
2
3
Description
4
DIA_COLDSTART *1 Restart (cold startup) carried out.
5
DIA_
MAINTENANCE *2
reserved *2
IDENT_NUMBER_
VIOLATION *2
0
2
3
*1: *2: DIAGNOSIS
Mnemonic
Reserved for use within the PNO
Reserved *2
Reserved for use within the PNO
Reserved *2
DIA_WARMSTART*1 New start-up (warm startup) carried out.
1
4
Contents of Condensed DIAGNOSIS
0-7
0-3
3
6
7
4-7
0-6
7
8-2
<8. Diagnostic Information>
DIA_
MAINTENANCE_
ALARM
DIA_
MAINTENANCE_
DEMANDED *2
DIA_FUNCTION_
CHECK
DIA_INV_PRO_
COND
Reserved *2
Reserved *2
EXTENSION_
AVAILABLE
Maintenance required
Remarks
----Should be set after power-on or after
FACTORY_RESET = 2506 has been
executed.
Should be set after FACTORY_RESET = 1
has been executed.
---
--Set to 1 (one), if the Ident_Number of the
--running cyclic data transfer and the value
of Physical Block IDENT_NUMBER_
SELECTOR parameter do not correspond.
If IDENT_NUMBER_SELECTOR = 127
(adaption mode) then the DIAGNOSIS bit
IDENT_NUMBER_VIOLATION is cleared
/ not set.
Failure of the device or armature
Pressure Sensor Failure (AL.01)
Capsule Temp Sensor Failure (AL.01)
Capsule EEPROM Failure (AL.01)
AMP EEPROM Failure (AL.02)
AMP Temp Sensor Failure (AL.02)
CPU Board Failure 1 (AL.02)
CPU Board Failure 3,4 (AL.02)
CPU Board Failure 5 (AL.02)
Maintenance demanded
--Device is in function check mode or in
simulation or under local control e.g.
maintenance
----M
---
C
F
M
Diff Pressure Span /Zero Trim Error (AL.50)
Static Pressure Span/Zero Trim Error (AL.51)
STB Configuration Error (AL.60)
TOT in Man Mode (AL.72)
FB Simulation Active (AL.72, 90, 91, 92, 93,
94, 95 )
STB Simulation Active (AL.96)
PB Simulation Active (AL.97)
Diff Pressure Outside Range Limit (AL.10)
Static Pressure Outside Range Limit (AL.11)
Capsule Temp Outside Range Limit (AL.12)
AMP Temp Outside Range Limit (AL.13)
The process conditions do not allow to
return valid values. (Set if a value has the
quality Uncertain - Process related, no
maintenance or Bad - Process related, no
maintenance
Reserved for use within the PNO
--Reserved for use within the PNO
--0: There is no more information available
--1: More diagnosis information is available in
DIAGNOSIS_EXTENSION
NAMUR
NE107
Category
-----
C
S
-------
The indication will be automatically restart after 10 s.
Not available for EJX and EJA-E series.
IM 01C25T04-01EN
Table 8.2
<8. Diagnostic Information>
Contents of Classic DIAGNOSIS
0
DIAGNOSIS
Mnemonic
DIA_HW_ELECTR
Hardware failure of the electronic
1
DIA_HW_MECH
Hardware failure mechanics
2
3
4
DIA_TEMP_MOTOR *2
DIA_TEMP_ELECTR *2
DIA_MEM_CHKSUM
Motor- temperature too high
Electronic temperature too high
Memory error
5
6
7
0
DIA_MEASUREMENT *2
DIA_NOT_INIT *2
DIA_INIT_ERR *2
DIA_ZERO_ERR
Failure in measurement
Device not initialized (No self calibration)
Self calibration failed
Zero point error (limit position)
1
2
3
DIA_SUPPLY *2
DIA_CONF_INVAL *2
DIA_WARMSTART *1
Power supply failed (electrical, pneumatic)
Configuration not valid
New start-up (warm startup) carried out.
4
DIA_COLDSTART *1
Restart (cold startup) carried out.
5
6
7
DIA_MAINTAINANCE *2
DIA_CHARACT *2
IDENT_NUMBER_
VIOLATION *2
3
4
0-7
0-6
7
Reserved *2
Reserved *2
EXTENSION_AVAILABLE
Maintenance required
Characterization invalid
Set to 1 (one), if the Ident_Number of the
running cyclic data transfer and the value of
Physical Block IDENT_NUMBER_SELECTOR
parameter do not correspond. If IDENT_
NUMBER_SELECTOR = 127 (adaption mode)
then the DIAGNOSIS bit IDENT_NUMBER_
VIOLATION is cleared / not set.
Reserved for use within the PNO
--Reserved for use within the PNO
--More diagnosis information is available
---
*1: *2: The indication will be automatically restart after 10 s.
Not available for EJX and EJA-E series.
Octet Bit
1
2
8-3
Description
Remarks
AMP Temp Sensor Failure (AL.02)
CPU Board Failure 1 (AL.02)
CPU Board Failure 3,4 (AL.02)
CPU Board Failure 5 (AL.02)
Pressure Sensor Failure (AL.01)
Capsule Temp Sensor Failure (AL.01)
----Capsule EEPROM Failure (AL.01)
AMP EEPROM Failure (AL.02)
------Diff Pressure Zero Trim Error (AL.50)
Static Pressure Zero Trim Error (AL.51)
----Should be set after power-on or after
FACTORY_RESET = 2506 has been
executed.
Should be set after FACTORY_RESET = 1
has been executed.
-------
IM 01C25T04-01EN
Table 8.3
Contents of DIAGNOSIS_EXTENSION
Octet Bit
Category
1
2
0
1
2
3
4
5
6
7
2
Pressure Sensor Failure (AL.01)
Capsule Temp Sensor Failure (AL.01)
Capsule EEPROM Failure (AL.01)
AMP Temp Sensor Failure (AL.02)
AMP EEPROM Failure (AL.02)
CPU Board Failure 3,4 (AL.02)
CPU Board Failure 5 (AL.02)
CPU Board Failure 1 (AL.02)
Process Alarm Diff Pressure Outside Range Limit (AL.10)
4
5
0
1
2
4
4
5
1
4
5
6
7
*1: Display Message
System Alarm
3
3
8-4
<8. Diagnostic Information>
Static Pressure Outside Range Limit
(AL.11)
Capsule Temp Outside Range Limit
(AL.12)
AMP Temp Outside Range Limit (AL.13)
Diff Pressure Span /Zero Trim Error
(AL.50)
Static Pressure Span/Zero Trim Error
(AL.51)
STB Configuration Error (AL.60)
FB Simulation Active
(AL.72, 90, 91, 92, 93, 94, 95 )
Description
Pressure sensor problem
Capsule temperature sensor problem
Capsule memory problem
Amplifier temperature sensor problem
Amplifier memory problem
Amplifier memory problem
Amplifier memory problem
Amplifier memory problem
Input Pressure is outside measurement
range limit of capsule
Static Pressure exceeds limit
Capsule Temerature is out of range
Amplifier Temerature is out of range
Trimming range error for differential
pressure span
Trimming range error for static pressure
span
Setting of Sensor TB is abnormal
Warning
Simulation function of AI1 block is active
Simulation function of AI2 block is active
Simulation function of AI3 block is active
AI1 in MAN mode
AI2 in MAN mode
AI3 in MAN mode
Totalizer block in MAN mode
STB Simulation Active (AL.96)
Simulation function of Sensor TB is active
Mode Alarm
Mode Check
PB in O/S mode
(AL.40, 41, 43, 44, 45, 72)
Sensor TB in O/S mode
AI1 in O/S mode
AI2 in O/S mode
AI3 in O/S mode
Process Alarm AI1 Upper/Lower Limit Alarm (AL.30)
AI1 Hi Hi Alarm occurs
AI1 Lo Lo Alarm occurs
AI2 Upper/Lower Limit Alarm (AL.31)
AI2 Hi Hi Alarm occurs
AI2 Lo Lo Alarm occurs
AI3 Upper/Lower Limit Alarm(AL.32)
AI3 Hi Hi Alarm occurs
AI3 Lo Lo Alarm occurs
Totalizer Upper/Lower Limit Alarm (AL.33) TOT Hi Hi Alarm occurs
TOT Lo Lo Alarm occurs
Setting Alarm
NAMUR
Default
NE107
Mask*1
Category
F
1
F
1
F
1
F
1
F
1
F
1
F
1
F
1
S
1
S
1
S
1
S
1
C
1
C
1
C
0
C
1
C
1
C
0
---
1
---
1
---
1
---
1
Default value of DIAGNOSIS_MASK_EXTENSION_RW.
IM 01C25T04-01EN
8-5
<8. Diagnostic Information>
8.2 Status of Each Parameter in Failure Mode
Following tables summarize the value of parameters when LCD display indicates an Alarm.
Table 8.4
ALARM
Display
Action of each parameters in failure mode related Sensor Transducer block (Condensed status)
Cause of
Alarm
AL.01
CAP.
ERR
Pressure
Sensor
problem
Capsule
Temperature
Sensor
problem
Capsule
memory
problem
AL.02
Amplifier
AMP.
Temperature
ERR
Sensor
problem
Amplifier
memory
problem
Amplifier
problem
AL.10
Input Pressure
PRESS is outside
measurement
range limit of
capsule
AL.11
Static Pressure
ST.PRSS exceeds limit
AL.12
Capsule
CAP.
Temerature is
TMP
out of range
AL.13
AMP.
TMP
AL.30
HI.HI
LO.LO
AL.31
HI.HI
LO.LO
AL.32
HI.HI
LO.LO
AL.33
HI.HI
LO.LO
Amplifier
Temperature is
out of range
SENSOR Transducer block
Pressure Value
Static Pressure Value Capsule Temp
Amplifier Temperature NAMUR
NE107
Primary Value
Category
Calculated Value
Value
Status
Value
Status
Value
Status
Value
Status
Measured BAD:
Measured BAD:
Measured BAD:
Measured BAD:
Value
Maintenance Value
Maintenance Value
Maintenance Value
Maintenance
Alarm, more
Alarm, more
Alarm, more
Alarm, more
diagnosis
diagnosis
diagnosis
diagnosis
available
available
available
available
Hold
Value
Hold
Value
Measured
Value
Measured
Value
Hold
Value
Hold
Value
F
Hold
Value
Measured UNCERTAIN: Measured
Value
Process
Value
related, no
maintenance
UNCERTAIN: Measured GOOD (NC): Measured GOOD (NC):
Process
Value
OK
Value
OK
related, no
maintenance
GOOD (NC):
OK
UNCERTAIN:
Process
related, no
maintenance
GOOD (NC):
OK
GOOD (NC):
OK
S
UNCERTAIN:
Process
related, no
maintenance
Hi_Hi or Lo_Lo Measured GOOD (NC): Measured GOOD (NC): Measured GOOD (NC): Measured GOOD (NC):
Alarm occurs Value
OK
Value
OK
Value
OK
Value
OK
in AI1 Function
block
Hi_Hi or Lo_Lo
Alarm occurs
in AI2 Function
block
Hi_Hi or Lo_Lo
Alarm occurs
in AI3 Function
block
Hi_Hi or Lo_Lo
Alarm occurs
in Totalizer
Function block
---
IM 01C25T04-01EN
ALARM
Display
AL.40
PB O/S
AL.41
STB O/S
AL.43
AI O/S
AL.44
AI O/S
AL.45
AI O/S
AL.72
TOT O/S
AL.50
P.SDEV
P.ZDEV
AL.51
SP.SDEV
SP.ZDEV
AL.79
LCD.
RNG
AL.90
AI SIM
AL.91
AI SIM
AL.92
AI SIM
Pressure Value
Cause of
Primary Value
Alarm
Calculated Value
Value
Status
Physical block Measured BAD:
is O/S mode
Value
passivated
(diagnostis
SENSOR
alerts
Transducer
inhibited)
block is O/S
Constant
mode
AI1 function
GOOD (NC):
block is O/S
OK
mode
AI2 function
block is O/S
mode
AI3 function
block is O/S
mode
Totalizer
function block
is O/S mode
Trimming
Measured BAD:
range error
Value
Function
for differential
Check / Local
pressure span
override,
value not
usable
Trimming
GOOD (NC):
range error for
OK
static pressure
span
8-6
<8. Diagnostic Information>
SENSOR Transducer block
Static Pressure Value Capsule Temp
Amplifier Temperature NAMUR
Value
Status
Measured BAD:
Value
passivated
(diagnostis
alerts
inhibited)
Constant
Value
Status
Measured BAD:
Value
passivated
(diagnostis
alerts
inhibited)
Constant
GOOD (NC):
OK
Value
Status
Measured BAD:
Value
passivated
(diagnostis
alerts
inhibited)
Constant
GOOD (NC):
OK
NE107
Category
GOOD (NC):
OK
---
Measured GOOD (NC): Measured GOOD (NC): Measured GOOD (NC):
Value
OK
Value
OK
Value
OK
BAD:
Function
Check / Local
override,
value not
usable
Displayed
Measured GOOD (NC): Measured GOOD (NC): Measured GOOD (NC): Measured GOOD (NC):
value exceeds Value
OK
Value
OK
Value
OK
Value
OK
limit or LCD
configuration
error
Simulation
Measured GOOD (NC): Measured GOOD (NC): Measured GOOD (NC): Measured GOOD (NC):
function of AI1 Value
OK
Value
OK
Value
OK
Value
OK
block is active
Simulation
function of AI2
block is active
Simulation
function of AI3
block is active
C
---
C
IM 01C25T04-01EN
ALARM
Display
Cause of
Alarm
AL.93
AI MAN
AL.94
AI MAN
AL.95
AI MAN
AL.96
STB.SIM
AI1 block is
MAN mode
AI2 block is
MAN mode
AI3 block is
MAN mode
Simulation
function of
Sensor TB is
active
AL.97
PB SIM
AL.72
TOT
MAN
AL.60
STB.
CFG
8-7
<8. Diagnostic Information>
SENSOR Transducer block
Pressure Value
Static Pressure Value Capsule Temp
Amplifier Temperature NAMUR
NE107
Primary Value
Category
Calculated Value
Value
Status
Value
Status
Value
Status
Value
Status
Measured GOOD (NC): Measured GOOD (NC): Measured GOOD (NC): Measured GOOD (NC):
Value
OK
Value
OK
Value
OK
Value
OK
[Simulation
start]
UNCERTAIN:
Simulated
value, start
[Simulation
finished
(<10s)]
UNCERTAIN:
Simulated
value, end
GOOD (NC):
OK
C
Simulation
function of
Physical block
is active
Totalizer
Functiion block
is MAN mode
SENSOR
Measured GOOD (NC): Measured GOOD (NC): Measured GOOD (NC): Measured GOOD (NC):
Transducer
Value
OK
Value
OK
Value
OK
Value
OK
block
configuration
Error
C
IM 01C25T04-01EN
Table 8.5
ALARM
Display
Action of each parameters in failure mode related Sensor Transducer block (Classic status)
Cause of
Alarm
AL.01
CAP.
ERR
Pressure
Sensor
problem
Capsule
Temperature
Sensor
problem
Capsule
memory
problem
AL.02
Amplifier
AMP.
Temperature
ERR
Sensor
problem
Amplifier
memory
problem
Amplifier
problem
AL.10
Input Pressure
PRESS is outside
measurement
range limit of
capsule"
AL.11
Static
ST.PRSS Pressure
exceeds limit
AL.12
CAP.
TMP
Capsule
Temerature is
out of range
AL.13
AMP.
TMP
Amplifier
Temperature
is out of range
AL.30
HI.HI
LO.LO
Hi_Hi or
Lo_Lo Alarm
occurs in AI1
Function block
Hi_Hi or
Lo_Lo Alarm
occurs in AI2
Function block
Hi_Hi or
Lo_Lo Alarm
occurs in AI3
Function block
Hi_Hi or
Lo_Lo Alarm
occurs in
Totalizer
Function block
AL.31
HI.HI
LO.LO
AL.32
HI.HI
LO.LO
AL.33
HI.HI
LO.LO
8-8
<8. Diagnostic Information>
SENSOR Transducer block
NAMUR
Pressure Value
Primary Value
Static Pressure Value Capsule Temp
Amplifier Temperature NE107
Category
Calculated Value
Value
Status
Value
Status
Value
Status
Value
Status
Measured BAD: Sensor Measured BAD: Sensor Measured BAD: Sensor Measured BAD: Sensor
Value
Failure
Value
Failure
Value
Failure
Value
Failure
Hold
Value
BAD: device
failure
BAD: device
failure
BAD: device
failure
BAD: device
failure
Measured BAD: Sensor Measured BAD: Sensor
Value
Failure
Value
Failure
BAD: Sensor
Failure
BAD: Sensor
Failure
Hold
Value
BAD: device
failure
BAD: device
failure
Hold
Value
Hold
Value
BAD: device
failure
Hold
Value
F
BAD: device
failure
Measured UNCERTAIN: Measured UNCERTAIN: Measured GOOD (NC): Measured GOOD (NC):
Value
sensor
Value
sub normal
Value
OK
Value
OK
conversion
not accurate
UNCERTAIN:
sub normal
GOOD (NC):
OK
UNCERTAIN:
sensor
conversion
not accurate
UNCERTAIN:
sub normal
GOOD (NC):
OK
UNCERTAIN:
sensor
conversion
not accurate
GOOD (NC):
OK
S
UNCERTAIN:
sensor
conversion
not accurate
Measured GOOD (NC): Measured GOOD (NC): Measured GOOD (NC): Measured GOOD (NC):
Value
OK
Value
OK
Value
OK
Value
OK
---
IM 01C25T04-01EN
8-9
<8. Diagnostic Information>
SENSOR Transducer block
ALARM
Display
AL.40
PB O/S
AL.41
STB O/S
AL.43
AI O/S
AL.44
AI O/S
AL.45
AI O/S
AL.72
TOT O/S
AL.50
P.SDEV
P.ZDEV
AL.51
SP.SDEV
SP.ZDEV
AL.79
LCD.
RNG
AL.90
AI SIM
AL.91
AI SIM
AL.92
AI SIM
AL.93
AI MAN
AL.94
AI MAN
AL.95
AI MAN
AL.96
STB.SIM
AL.97
PB SIM
AL.72
TOT
MAN
AL.60
STB.
CFG
Pressure Value
Cause of
Primary Value
Alarm
Calculated Value
Value
Status
Physical block Measured BAD: non
is O/S mode Value
specific
SENSOR
BAD: out of
Transducer
service
block is O/S
mode
AI1 function
GOOD (NC):
block is O/S
OK
mode
AI2 function
block is O/S
mode
AI3 function
block is O/S
mode
Totalizer
function block
is O/S mode
Trimming
Measured UNCERTAIN:
range error
Value
engineering
for differential
unit violation
pressure span
Trimming
GOOD (NC):
range error for
OK
static pressure
span
Displayed
Measured GOOD (NC):
value exceeds Value
OK
limit or LCD
configuration
error
Simulation
Measured GOOD (NC):
function of AI1 Value
OK
block is active
Simulation
function of AI2
block is active
Simulation
function of AI3
block is active
AI1 block is
Measured GOOD (NC):
MAN mode
Value
OK
AI2 block is
MAN mode
AI3 block is
MAN mode
Simulation
UNCERTAIN:
function of
Simulated
Sensor TB is
Value
active
Simulation
GOOD (NC):
function of
OK
Physical block
is active
Totalizer
Functiion
block is MAN
mode
SENSOR
Measured GOOD (NC):
Transducer
Value
OK
block
configuration
Error
Static Pressure Value
Capsule Temp
Amplifier Temperature
Value
Status
Measured BAD: non
Value
specific
BAD: out of
service
Value
Status
Measured BAD: non
Value
specific
BAD: out of
service
Value
Status
Measured BAD: non
Value
specific
BAD: out of
service
GOOD (NC):
OK
GOOD (NC):
OK
NAMUR
NE107
Category
GOOD (NC):
OK
---
Measured GOOD (NC): Measured GOOD (NC): Measured GOOD (NC):
Value
OK
Value
OK
Value
OK
C
UNCERTAIN:
engineering
unit violation
Measured GOOD (NC): Measured GOOD (NC): Measured GOOD (NC):
Value
OK
Value
OK
Value
OK
---
Measured GOOD (NC): Measured GOOD (NC): Measured GOOD (NC):
Value
OK
Value
OK
Value
OK
C
Measured GOOD (NC): Measured GOOD (NC): Measured GOOD (NC):
Value
OK
Value
OK
Value
OK
C
Measured GOOD (NC): Measured GOOD (NC): Measured GOOD (NC):
Value
OK
Value
OK
Value
OK
C
IM 01C25T04-01EN
Table 8.6
ALARM
Display
AL.01
CAP.
ERR
Action of each parameters in failure mode related Function blocks (Condensed status)
Cause of
Alarm
Pressure
Sensor
problem
Capsule
Temperature
Sensor
problem
Capsule
memory
problem
AL.02
Amplifier
AMP.
Temperature
ERR
Sensor
problem
Amplifier
memory
problem
Amplifier
problem
AL.10
Input Pressure
PRESS is outside
measurement
range limit of
capsule
AL.11
Static Pressure
ST.PRSS exceeds limit
AL.12
Capsule
CAP.
Temerature is
TMP
out of range
AL.13
Amplifier
AMP.
Temperature is
TMP
out of range
AL.30
Hi_Hi or Lo_Lo
HI.HI
Alarm occurs
LO.LO
in AI1 Function
block
AL.31
HI.HI
LO.LO
AL.32
HI.HI
LO.LO
AL.33
HI.HI
LO.LO
8-10
<8. Diagnostic Information>
AI1 Output Value (Channel = Primary Value)
FSAFE_TYPE FSAFE_TYPE FSAFE_TYPE
=0
=1
=2
UNCERTAIN: UNCERTAIN: BAD:
Substitute Set Substitute Set Maintenance
Alarm, more
diagnosis
available
Totalizer Value (Channel = Calculate Value) NAMUR
FSAFE_TYPE FSAFE_TYPE FSAFE_TYPE NE107
Category
=0
=1
=2
BAD:
BAD:
UNCERTAIN:
Maintenance
Maintenance
Substitute Set
Alarm, more
Alarm, more
ok limit
diagnosis
diagnosis
available ok
available Const
limit
limit
F
UNCERTAIN:
Process
related, no
maintenance
UNCERTAIN:
Process
related, no
maintenance
UNCERTAIN:
Process
related, no
maintenance
UNCERTAIN:
Process
related, no
maintenance
UNCERTAIN:
Process
related, no
maintenance
UNCERTAIN:
Process
related, no
maintenance
S
GOOD (NC):
OK
GOOD(NC):
Active Critical
Alarm High
limited or Low
Limited
Hi_Hi or Lo_Lo GOOD (NC):
Alarm occurs OK
in AI2 Function
block
Hi_Hi or Lo_Lo
Alarm occurs
in AI3 Function
block
Hi_Hi or Lo_Lo
Alarm occurs
in Totalizer
Function block
GOOD (NC):
OK
GOOD (NC):
OK
GOOD (NC):
OK
GOOD (NC):
OK
GOOD (NC):
OK
GOOD(NC):
Active Critical
Alarm High
limited or Low
Limited
GOOD (NC):
OK
GOOD(NC):
Active Critical
Alarm High
limited or Low
Limited
GOOD (NC):
OK
GOOD (NC):
OK
GOOD (NC):
OK
GOOD (NC):
OK
---
GOOD(NC):
Active Critical
Alarm High
limited or Low
Limited
GOOD(NC):
Active Critical
Alarm High
limited or Low
Limited
GOOD(NC):
Active Critical
Alarm High
limited or Low
Limited
IM 01C25T04-01EN
AI1 Output Value (Channel = Primary Value)
FSAFE_TYPE FSAFE_TYPE FSAFE_TYPE
=0
=1
=2
AL.40
Physical block BAD:
BAD:
BAD:
PB O/S is O/S mode
passivated
passivated
passivated
(diagnostis
(diagnostis
(diagnostis
AL.41
SENSOR
alerts inhibited) alerts inhibited) alerts inhibited)
STB O/S Transducer
Constant
Constant
Constant
block is O/S
mode
AL.43
AI1 function
AI O/S
block is O/S
mode
AL.44
AI2 function
GOOD (NC):
GOOD (NC):
GOOD (NC):
AI O/S
block is O/S
OK
OK
OK
mode
AL.45
AI3 function
AI O/S
block is O/S
mode
AL.72
Totalizer
TOT O/S function block
is O/S mode
ALARM
Display
AL.50
P.SDEV
P.ZDEV
Cause of
Alarm
Trimming
UNCERTAIN:
range error
Substitute Set
for differential
pressure span
AL.92
AI SIM
UNCERTAIN:
Substitute Set
Totalizer Value (Channel = Calculate Value) NAMUR
FSAFE_TYPE FSAFE_TYPE FSAFE_TYPE NE107
Category
=0
=1
=2
BAD:
BAD:
BAD:
passivated
passivated
passivated
Constant
Constant
Constant
GOOD (NC):
OK
GOOD (NC):
OK
GOOD (NC):
OK
---
BAD:
passivated
(diagnostis
alerts inhibited)
Constant
BAD:
Function
Check / Local
override, value
not usable ok
limit
GOOD (NC):
OK
BAD:
passivated
(diagnostis
alerts inhibited)
Constant
BAD:
Function
Check / Local
override, value
not usable
Const limit
GOOD (NC):
OK
BAD:
passivated
(diagnostis
alerts inhibited)
Constant
UNCERTAIN:
Substitute Set
ok limit
GOOD (NC):
OK
GOOD (NC):
OK
BAD:
Function
Check / Local
override,
value not
usable
GOOD (NC):
OK
GOOD (NC):
OK
GOOD (NC):
OK
GOOD (NC):
OK
GOOD (NC):
OK
GOOD (NC):
OK
GOOD (NC):
OK
[Simulation
start]
UNCERTAIN:
Simulated
value, start
Simulation
start]
UNCERTAIN:
Simulated
value, start
[Simulation
start]
UNCERTAIN:
Simulated
value, start
GOOD (NC):
OK
GOOD (NC):
OK
GOOD (NC):
OK
[Simulation
finished
(<10s)]
UNCERTAIN:
Simulated
value, end
[Simulation
finished
(<10s)]
UNCERTAIN:
Simulated
value, end
[Simulation
finished
(<10s)]
UNCERTAIN:
Simulated
value, end
[Simulation
finished
(10s<20s)]
GOOD(NC):
update event
Simulation
GOOD (NC):
function of AI2 OK
block is active
Simulation
function of AI3
block is active
[Simulation
finished
(10s<20s)]
GOOD(NC):
update event
GOOD (NC):
OK
[Simulation
finished
(10s<20s)]
GOOD(NC):
update event
GOOD (NC):
OK
AL.51
Trimming
SP.SDEV range error for
SP.ZDEV static pressure
span
AL.79
Displayed
LCD.
value exceeds
RNG
limit or LCD
configuration
error
AL.90
Simulation
AI SIM
function of AI1
block is active
AL.91
AI SIM
8-11
<8. Diagnostic Information>
C
GOOD (NC):
OK
---
C
IM 01C25T04-01EN
ALARM
Display
AL.93
AI MAN
AL.94
AI MAN
AL.95
AI MAN
AL.96
STB.SIM
AL.97
PB SIM
AL.72
TOT
MAN
AL.60
STB.
CFG
8-12
<8. Diagnostic Information>
Cause of
Alarm
AI1 block is
MAN mode
AI2 block is
MAN mode
AI3 block is
MAN mode
Simulation
function of
Sensor TB is
active
AI1 Output Value (Channel = Primary Value)
FSAFE_TYPE FSAFE_TYPE FSAFE_TYPE
=0
=1
=2
[Simulation
[Simulation
[Simulation
start]
start]
start]
UNCERTAIN: UNCERTAIN: UNCERTAIN:
Simulated
Simulated
Simulated
value, start
value, start
value, start
[Simulation
finished
(<10s)]
UNCERTAIN:
Simulated
value, end
[Simulation
finished
(<10s)]
UNCERTAIN:
Simulated
value, end
[Simulation
finished
(<10s)]
UNCERTAIN:
Simulated
value, end
[Simulation
finished
(10s<20s)]
GOOD(NC):
update event
GOOD (NC):
OK
[Simulation
finished
(10s<20s)]
GOOD(NC):
update event
GOOD (NC):
OK
[Simulation
finished
(10s<20s)]
GOOD(NC):
update event
GOOD (NC):
OK
[Simulation
start]
UNCERTAIN:
Simulated
value, start
[Simulation
start]
UNCERTAIN:
Simulated
value, start
[Simulation
start]
UNCERTAIN:
Simulated
value, start
[Simulation
start]
UNCERTAIN:
Simulated
value, start
[Simulation
start]
UNCERTAIN:
Simulated
value, start
[Simulation
start]
UNCERTAIN:
Simulated
value, start
[Simulation
finished
(<10s)]
UNCERTAIN:
Simulated
value, end
GOOD (NC):
OK
[Simulation
finished
(<10s)]
UNCERTAIN:
Simulated
value, end
GOOD (NC):
OK
[Simulation
finished
(<10s)]
UNCERTAIN:
Simulated
value, end
GOOD (NC):
OK
[Simulation
finished
(<10s)]
UNCERTAIN:
Simulated
value, end
GOOD (NC):
OK
[Simulation
finished
(<10s)]
UNCERTAIN:
Simulated
value, end
GOOD (NC):
OK
[Simulation
finished
(<10s)]
UNCERTAIN:
Simulated
value, end
GOOD (NC):
OK
GOOD (NC):
OK
GOOD (NC):
OK
[Simulation
start]
UNCERTAIN:
Simulated
value, start
[Simulation
start]
UNCERTAIN:
Simulated
value, start
[Simulation
start]
UNCERTAIN:
Simulated
value, start
[Simulation
finished
(<10s)]
UNCERTAIN:
Simulated
value, end
[Simulation
finished
(<10s)]
UNCERTAIN:
Simulated
value, end
[Simulation
finished
(<10s)]
UNCERTAIN:
Simulated
value, end
[Simulation
finished
(10s<20s)]
GOOD(NC):
update event
GOOD (NC):
OK
[Simulation
finished
(10s<20s)]
GOOD(NC):
update event
GOOD (NC):
OK
[Simulation
finished
(10s<20s)]
GOOD(NC):
update event
GOOD (NC):
OK
Simulation
function of
Physical block
is active
Totalizer
GOOD (NC):
Functiion block OK
is MAN mode
SENSOR
Transducer
block
configuration
Error
Totalizer Value (Channel = Calculate Value) NAMUR
FSAFE_TYPE FSAFE_TYPE FSAFE_TYPE NE107
Category
=0
=1
=2
GOOD (NC):
GOOD (NC):
GOOD (NC):
OK
OK
OK
GOOD (NC):
OK
GOOD (NC):
OK
GOOD (NC):
OK
C
C
C
IM 01C25T04-01EN
<8. Diagnostic Information>
Table 8.7
Action of each parameters in failure mode related Function blocks (Classic status)
ALARM
Display
AL.01
CAP.
ERR
Cause of
Alarm
Pressure
Sensor
problem
Capsule
Temperature
Sensor
problem
Capsule
memory
problem
AL.02
Amplifier
AMP.
Temperature
ERR
Sensor
problem
Amplifier
memory
problem
Amplifier
problem
AL.10
Input Pressure
PRESS is outside
measurement
range limit of
capsule
AL.11
Static Pressure
ST.PRSS exceeds limit
AL.12
Capsule
CAP.
Temerature is
TMP
out of range
AL.13
Amplifier
AMP.
Temperature is
TMP
out of range
AL.30
Hi_Hi or Lo_Lo
HI.HI
Alarm occurs
LO.LO
in AI1 Function
block
AL.31
HI.HI
LO.LO
AL.32
HI.HI
LO.LO
AL.33
HI.HI
LO.LO
AI1 Output Value (Channel = Primary Value)
FSAFE_TYPE FSAFE_TYPE FSAFE_TYPE
=0
=1
=2
UNCERTAIN: UNCERTAIN: BAD:
Substitute
Last Usable
Sensor Failure
Value
Value
8-13
Totalizer Value (Channel = Calculate Value) NAMUR
FSAFE_TYPE FSAFE_TYPE FSAFE_TYPE NE107
Category
=0
=1
=2
UNCERTAIN: UNCERTAIN: UNCERTAIN:
Non specific ok Last Usable
Non specific ok
limit
Value const
limit
limit
BAD:
Device Failure
F
BAD:
Sensor Failure
BAD: Device
Failure
UNCERTAIN:
sensor
conversion not
accuratre
UNCERTAIN:
Sensor
Conversion not
Accurate
UNCERTAIN:
Sensor
Conversion not
Accurate
UNCERTAIN:
sensor
conversion not
accurate
UNCERTAIN:
sensor
conversion not
accurate
UNCERTAIN:
sensor
conversion not
accurate
UNCERTAIN:
Subnormal
UNCERTAIN:
Subnormal
UNCERTAIN:
Subnormal
UNCERTAIN:
sub normal
UNCERTAIN:
sub normal
UNCERTAIN:
sub normal
GOOD (NC):
OK
GOOD (NC):
OK
GOOD (NC):
OK
GOOD (NC):
OK
GOOD (NC):
OK
GOOD (NC):
OK
GOOD(NC):
Active Critical
Alarm
High limited or
Low Limited
GOOD (NC):
OK
GOOD(NC):
GOOD (NC):
Active Critical OK
Alarm
High limited or
Low Limited
GOOD (NC):
OK
GOOD (NC):
OK
GOOD (NC):
OK
GOOD(NC):
Active Critical
Alarm
High limited or
Low Limited
Hi_Hi or Lo_Lo GOOD (NC):
Alarm occurs OK
in AI2 Function
block
Hi_Hi or Lo_Lo
Alarm occurs
in AI3 Function
block
Hi_Hi or Lo_Lo
Alarm occurs
in Totalizer
Function block
S
---
GOOD(NC):
Active Critical
Alarm
High limited or
Low Limited
GOOD(NC):
Active Critical
Alarm
High limited or
Low Limited
GOOD(NC):
Active Critical
Alarm
High limited or
Low Limited
IM 01C25T04-01EN
ALARM
Display
AL.40
PB O/S
AL.41
STB O/S
AL.43
AI O/S
AL.44
AI O/S
AL.45
AI O/S
AL.72
TOT O/S
AL.50
P.SDEV
P.ZDEV
AL.51
SP.SDEV
SP.ZDEV
AL.79
LCD.
RNG
AL.90
AI SIM
AL.91
AI SIM
AL.92
AI SIM
AL.93
AI MAN
AL.94
AI MAN
AL.95
AI MAN
AL.96
STB.SIM
AL.97
PB SIM
AL.72
TOT
MAN
AL.60
STB.
CFG
8-14
<8. Diagnostic Information>
AI1 Output Value (Channel = Primary Value)
FSAFE_TYPE FSAFE_TYPE FSAFE_TYPE
=0
=1
=2
Physical block BAD:
BAD:
BAD:
is O/S mode
Out of Service Out of Service Out of Service
SENSOR
UNCERTAIN: UNCERTAIN: BAD:
Transducer
Substitute
Last Usable
Non-specific
block is O/S
Value
Value
mode
AI1 function
BAD:
BAD:
BAD:
block is O/S
Out of Service Out of Service Out of Service
mode
Constant
AI2 function
GOOD (NC):
GOOD (NC):
GOOD (NC):
block is O/S
OK
OK
OK
mode
AI3 function
block is O/S
mode
Totalizer
function block
is O/S mode
Trimming
UNCERTAIN: UNCERTAIN: UNCERTAIN:
range error
Engineering
Engineering
Engineering
for differential Unit Range
Unit Range
Unit Range
pressure span Violation
Violation
Violation
Trimming
GOOD (NC):
GOOD (NC):
GOOD (NC):
range error
OK
OK
OK
for static
pressure span
Displayed
GOOD (NC):
GOOD (NC):
GOOD (NC):
value exceeds OK
OK
OK
limit or LCD
configuration
error
Simulation
UNCERTAIN: UNCERTAIN: UNCERTAIN:
function of AI1 Simulated
Simulated
Simulated
block is active Value
Value
Value
Simulation
GOOD (NC):
GOOD (NC):
GOOD (NC):
function of AI2 OK
OK
OK
block is active
Simulation
function of AI3
block is active
AI1 block is
UNCERTAIN: UNCERTAIN: UNCERTAIN:
MAN mode
Simulated
Simulated
Simulated
Value Constant Value Constant Value Constant
AI2 block is
GOOD (NC):
GOOD (NC):
GOOD (NC):
MAN mode
OK
OK
OK
AI3 block is
MAN mode
Simulation
UNCERTAIN: UNCERTAIN: UNCERTAIN:
function of
Simulated
Simulated
Simulated
Sensor TB is
Value
Value
Value
active
Simulation
GOOD (NC):
GOOD (NC):
GOOD (NC):
function of
OK
OK
OK
Physical block
is active
Totalizer
GOOD (NC):
GOOD (NC):
GOOD (NC):
Functiion block OK
OK
OK
is MAN mode
SENSOR
GOOD (NC):
GOOD (NC):
GOOD (NC):
Transducer
OK
OK
OK
block
configuration
Error
Cause of
Alarm
Totalizer Value (Channel = Calculate Value) NAMUR
FSAFE_TYPE FSAFE_TYPE FSAFE_TYPE NE107
Category
=0
=1
=2
UNCERTAIN: UNCERTAIN: UNCERTAIN:
Non specific ok Last Usable
Non specific ok
limit
Value const
limit
limit
GOOD (NC):
OK
GOOD (NC):
OK
GOOD (NC):
OK
---
BAD:
BAD:
BAD:
Out of Service Out of Service Out of Service
UNCERTAIN:
engineering
unit violation
UNCERTAIN:
engineering
unit violation
UNCERTAIN:
engineering
unit violation
GOOD (NC):
OK
GOOD (NC):
OK
GOOD (NC):
OK
GOOD (NC):
OK
GOOD (NC):
OK
GOOD (NC):
OK
GOOD (NC):
OK
GOOD (NC):
OK
GOOD (NC):
OK
C
---
C
GOOD (NC):
OK
GOOD (NC):
OK
GOOD (NC):
OK
UNCERTAIN:
Simulated
Value
UNCERTAIN:
Simulated
Value
UNCERTAIN:
Simulated
Value
GOOD (NC):
OK
GOOD (NC):
OK
GOOD (NC):
OK
UNCERTAIN:
Simulated
Value Constant
GOOD (NC):
OK
UNCERTAIN:
Simulated
Value Constant
GOOD (NC):
OK
UNCERTAIN:
Simulated
Value Constant
GOOD (NC):
OK
C
C
IM 01C25T04-01EN
9.
Note:
O/S:
MAN:
AUTO:
—:
9-1
<9. Parameter Lists>
Parameter Lists
The Write Mode column contains the modes in which each parameter is write enabled.
Write enabled in O/S mode.
Write enabled in Man mode and O/S mode.
Write enabled in Auto mode, Man mode, and O/S mode.
Read only.
9.1 Physical Block
Relative
Index
Index
Write
Mode
Parameter
Initial Value
0
1
16
17
BLOCK_OBJECT
ST_REV
—
—
—
—
2
18
TAG_DESC
AUTO
PT1001
3
19
STRATEGY
AUTO
0
4
20
ALERT_KEY
AUTO
0
5
21
TARGET_MODE
AUTO
AUTO
6
22
MODE_BLK
AUTO
—
7
8
23
24
—
—
—
9
25
10
11
26
27
ALARM_SUM
SOFTWARE_
REVISION
HARDWARE_
REVISION
DEVICE_MAN_ID
DEVICE_ID
12
13
28
29
DEVICE_SER_NUM
DIAGNOSIS
—
—
14
30
—
15
31
DIAGNOSIS_
EXTENSION
DIAGNOSIS_MASK
16
32
DIAGNOSIS_MASK_
EXTENSION
—
17
33
—
18
34
DEVICE_
CERTIFICATION
WRITE_LOCKING
AUTO
Off
19
35
FACTORY_RESET
AUTO
1: Factory Reset
20
36
DESCRIPTOR
AUTO
21
37
DEVICE_MESSAGE
AUTO
—
—
—
—
Explanation
Information on this block such as Profile, Profile Rev, etc.
The revision level of the static data associated with the
function block. The revision value will be incremented each
time a static parameter value in the block is changed.
The user description of the intended application of the
block.
The strategy field can be used to identify grouping of block.
This data is not checked or processed by the block.
The identification number of the plant unit. This information
may be used in the host for sorting alarms, etc.
Set the Target of block mode to Auto or O/S according to the
write mode of the parameter to be set or changed.
The mode parameter is a structured parameter composed
of the actual mode, the normal mode, and the permitted
mode.
The current alarm status associated with the function block.
Revision number of the software of the field device.
Revision number of the hardware of the field device.
Yokogawa
EJX: EJX
EJA: EJA
0x00, 0x00, 0x00,
0x00
0x00, 0x00, 0x00,
0x00, 0x00, 0x00
Condensed Status:
0x00, 0x98, 0x0F,
0x80
0xff, 0x3c, 0x37,
0xf2, 0x00, 0x00
Identification code of the manufacturer of the field device.
Manufacturer specific identification of the field device.
Serial number of field device.
Detailed information of the devices, bitwise coded. More
than one message possible at once.
Additional manufacture-specific information of the device,
bitwise coded.
Definition of supported DIAGNOSIS informatiion-bits.
0: not supported
1: supported
Difinition of supported DIAGNOSIS_EXTENSION
information-bits.
0: not supported
1: supported
Not used for the trasnmitter.
If set, no writes from anywhere are allowed, except for
to clear WRITE_LOCK. Block inputs will continue to be
updated.
0: on(Locked)
2457: off(Not Locked)
Allows a manual restart to be initiated.
1: Factory Reset (Resetting device for default values. The
Bus Address setting remains the same.)
2506: Warm start (Warm start of the device. All
parameterization remains unchanged.)
2712: Reset Address to '126' (Reset the Bus Address
only.)
User difinition text (a string) to describe the device within
the application.
User difinable MESSAGE (a string) to describe the device
within the application or in the plant.
IM 01C25T04-01EN
Relative
Index
Index
22
38
23
39
24
40
25
<9. Parameter Lists>
Parameter
DEVICE_INSTAL_
DATE
LOCAL_OP_ENA
Write
Mode
AUTO
Initial Value
9-2
Explanation
Date of installation of the device.
AUTO
1: Enabled
IDENT_NUMBER_
SELECTOR
AUTO
127: Adaptation
Mode
41
HW_WRITE_
PROTECTION
—
0
26
42
FEATURE
—
—
27
43
COND_STATUS_
DIAG
AUTO
Condensed Status
and Diagnosis
information is
provided
33
34
35
36
37
38
39
40
41
42
43
44
49
50
51
52
53
54
55
56
57
58
59
60
SOFT_DESC
SET_ADDRESS
SIM_ENABLE_MSG
DEVICE_STATUS_1
DEVICE_STATUS_2
DEVICE_STATUS_3
DEVICE_STATUS_4
DEVICE_STATUS_5
DEVICE_STATUS_6
DEVICE_STATUS_7
DEVICE_STATUS_8
DIAGNOSIS_SIM_
MODE
—
AUTO
AUTO
AUTO
AUTO
AUTO
AUTO
AUTO
AUTO
AUTO
AUTO
AUTO
“2.40 - 4581 - 1.01”
0
45
61
DIAGNOSIS_SIM_
EXTENSION
AUTO
0x00, 0x00, 0x00,
0x00
46
62
DIAGNOSIS_MASK_
EXTENSION_RW
AUTO
0xff, 0x3c, 0x33,
0xf0, 0x00, 0x00
47
63
—
0
48
64
65
66
67
68
69
70
71
64
80
81
82
83
84
85
86
87
SI_CONTROL_
CODES
IDENT_NUMBER
PRIVATE_1
PRIVATE_2
PRIVATE_3
PRIVATE_4
PRIVATE_5
PRIVATE_6
PRIVATE_7
PRIVATE_8
—
—
—
—
—
—
—
—
—
—
—
—
—
—
—
—
—
—
0x00000000
0x00000000
0x00000000
0x00000000
0x00000000
0x00000000
0x00000000
0x00000000
0: Disabled
Local operation enable.
0: Disabled
1: Enabled
The parameter to select Ident number.
0:Profile specific (Transmitter 3 AI)
1:Manufacturer specific (Ident number of DEVICE_ID)
127: Adaptation Mode
128: Profile specific 2 (Transmitter 1 AI)
129: Profile specific 3 (Transmitter 12 AI)
130: Profile specific 4 (Transmitter 1 AI+TOT)
131: Profile specific 5 (Transmitter 2 AI+TOT)
132: Profile specific 6 (Transmitter 3 AI+TOT)
140: Manufacturer specific (If EJA, Ident number of EJX)
Indicates the position of a write blocking mechanism which
can not be modified by remote access which protects
parameter modification of a device.
0:Unprotected
2:Protected
Indicates optional feature implemented in the device and
the status of these features which indicates if the feature is
supported or not supported.
Indicates the mode of a device that can be configured for
stats and diagnostic behavior.
0: Status and Diagnosis
1: Condensed Status and Diagnosis information is
provided
Yokogawa internal use only
For Bus address set up
Software switch for simulation function
Device status
Device status
Device status
Device status
Device status
Device status
Device status
Device status
For testing alarms and warnings can be modified. Switch to
enable or disable alarm simulation. When this parameter is
set to enable and the hardware simulation jumper is on, all
of alarms and warnings in DIAGNOSIS_EXTENSION can
be modified with DIAGNOSIS_SIM_EXTENSION.
0: Disabled
1: Enabled
For testing alarms and warnings can be modified. When
the hardware simulation jumper is on, DIAGNOSIS_SIM_
MODE is set to enable, and the bits are set to “on”, the
arlarms (or warnings) can be modified. (0x000000000000)
Set masked DIAGNOSIS_EXTENSION.
When DIAGNOSIS_MASK_EXTENSION_RW-bit is
ON and its alarm or warning occurs, its DIAGNOSIS_
EXTENSION-bit is ON.
A parameter for switching to make the instrument
compatible with SI units.
Ident number of the device
Not used for the transmitter
Not used for the transmitter
Not used for the transmitter
Not used for the transmitter
Not used for the transmitter
Not used for the transmitter
Not used for the transmitter
Not used for the transmitter
IM 01C25T04-01EN
Relative
Index
Index
72
73
74
88
89
90
<9. Parameter Lists>
Write
Mode
Parameter
PRIVATE_9
PRIVATE_10
PRIVATE_11
—
—
—
Initial Value
—
—
—
9-3
Explanation
Not used for the transmitter
Not used for the transmitter
Not used for the transmitter
9.2 SENSOR Transducer Block
Relative
Index
Index
Write
Mode
Parameter
Initial Value
0
16
BLOCK_OBJECT
—
—
1
17
ST_REV
—
0
2
18
TAG_DESC
AUTO
Space
3
19
STRATEGY
AUTO
0
4
20
ALERT_KEY
AUTO
0
5
21
TARGET_MODE
AUTO
AUTO
6
22
MODE_BLK
—
AUTO
7
8
23
24
ALARM_SUM
SENSOR_VALUE
—
—
—
0
9
10
11
12
13
14
25
26
27
28
29
30
SENSOR_HI_LIM
SENSOR_LO_LIM
CAL_POINT_HI
CAL_POINT_LO
CAL_MIN_SPAN
SENSOR_UNIT
—
—
O/S
O/S
—
O/S
100
-100
100
0
0.5
1133: kPa
15
16
17
31
32
33
—
—
—
—
126: Resonant
0
18
19
34
35
—
O/S
—
kPa
20
36
TRIMMED_VALUE
SENSOR_TYPE
SENSOR_SERIAL_
NUMBER
PRIMARY_VALUE
PRIMARY_VALUE_
UNIT
PRIMARY_VALUE_
TYPE
O/S
0: Pressure
21
37
O/S
Unknown
22
38
O/S
Unknown
24
40
SENSOR_
DIAPHRAGM_
MATERIAL
SENSOR_FILL_
FLUID
SENSOR_O_RING_
MATERIAL
O/S
Unknown
Explanation
Information on this block such as Block Tag, DD Revision,
Executiion Time etc.
The revision level of the static data associated with the
function block. The revision value will be incremented each
time a static parameter value in the block is changed.
The user description of the intended application of the
block.
The strategy field can be used to identify grouping of blocks.
This data is not checked or processed by the block.
The identification number of the plant unit. This information
may be used in the host for sorting alarms, etc.
Set the Target of block mode (MODE_BLK) to Auto or O/S
according to the write Mode of the parameter to be set or
changed.
The mode parameter is a structured parameter composed
of the actual mode, the normal mode, and the permitted
mode.
The current alarm status associated with the function block
Raw sensor value. The uncalibrated measurement value
from the sensor.
Sensor upper limit value.
Sensor lower limit value.
The highest calibrated value.
The lowest calibrated value.
The minimum calibration span value allowed.
Engineering unit's index code for the calibration value.
SENSOR_UNIT must be a subset of the interchangeable
part of the Pressure unit. Please refer to ordering instruction
for the acceptable units.
Sensor value after the trim processing.
The type of sensor
The serial number of sensor
Measured value and status available to the Function Block.
Engineering unit code for the primary value according to
PRIMARY_VALUE_TYPE.
This parameter contains the application of the pressure
device.
0: Pressure
1: Flow
2: Level
3: Volume
128:differential pressure
129:gauge pressure
130:absolute pressure
253: Special
Index code for the material of the diaphragm, which comes
in contact with the process media.
Index code for the fill fluid inside the sensor. The index code
is manufacturer specific.
Index code for the material of the o-ring between the
diaphragm and process connection.
IM 01C25T04-01EN
Relative
Index
Index
9-4
<9. Parameter Lists>
Parameter
Write
Mode
O/S
Unknown
Initial Value
Explanation
25
41
PROCESS_
CONNECTION_TYPE
Index code for the material of the process connection. The
coding is in accordance to the Material Codes given in
teneral Requirements.
Material code for the type of process connection. The index
code is manufacturer specific.
26
42
O/S
Unknown
27
43
PROCESS_
CONNECTION_
MATERIAL
TEMPERATURE
—
—
28
44
O/S
1001: deg C
29
45
—
—
Pressure value and status available to the Function Block.
30
46
O/S
kPa
Pressure unit of the SECONDARY_VALUE_1
33
49
TEMPERATURE_
UNIT
SECONDARY_
VALUE_1
SECONDARY_
VALUE_1_UNIT
LIN_TYPE
Temperature with the associated status used within the
transducer.
The unit of the temperature.
O/S
0: Linear
34
50
SCALE_IN
AUTO
—
35
51
SCALE_OUT
AUTO
36
52
LOW_FLOW_
CUTOFF
O/S
38
54
39
55
TAB_ACTUAL_
NUMBER
TAB_ENTRY
40
41
42
56
57
58
TAB_MAX_NUMBER
TAB_MIN_NUMBER
TAB_OP_CODE
43
44
59
59
60
75
60
76
61
62
77
78
TAB_STATUS
TAB_X_Y_VALUE
PRIMARY_VALUE_
URL
PRIMARY_VALUE_
LRL
SENSOR_SN
SENSOR_CAL_
METHOD
63
64
65
79
80
81
SENSOR_CAL_LOC O/S
SENSOR_CAL_DATE O/S
SENSOR_CAL_WHO O/S
66
82
67
83
68
69
70
84
85
86
STATIC_PRESSURE_
HIGH_VALUE
STATIC_PRESSURE_
UNIT
CAL_DEVIATION_HI
CAL_DEVIATION_LO
PRIMARY_VALUE_
FTIME
—
O/S
—
0
100
Type of linearization
0: Linear
1: Linearization table
10: Square root
This is the input conversion using the high and low scale.
The related unit is the SECONDARY_VALUE_1_UNIT.
Output conversion of the linearized value using the high and
low scale. The related unit is the PRIMARY_VALUE_UNIT.
It is in accordance to the table of units codes given in the
general requirements.
This is the point in percent of flow until the output of the flow
function is set to zero. It is used for suppressing low flow
values.
The actual numbers of entries in the table. It shall be
calculated after the transmission of the table is finished.
This parameter identifies which element of the table is in the
TAB_X_Y_VALUE parameter currently
Maximum size of the table in the device
Minimum size of the table in the device
The modification of a table in a device influences the
measurement or actuation algorithms of the device. This
parameter is to control the transaction of the table.
Result of plausibility check in the device
One value couple of the table
Upper limit of primary value
—
-100
Lower limit of primary value
—
O/S
—
Serial number of sensor
103: Factory trim
The method of the last sensor calibration
standard calibration 100= volumetric
101= static weight
102= dynamic weight
103= factory trim standard calibration
104= user trim standard calibration
105= factory trim special calibration
106= user trim special calibration
255= other
Space
Set/indicate the location of the last sensor calibration
—
Set/indicate the date of the last sensor calibration
Space
Set/indicate the name of the person responsible for the last
sensor calibration
—
O/S
kPa
Unit of static pressure
O/S
O/S
O/S
0
0
2
Deviation value for span adjustment
Deviation value for zero adjustment
Damping time constant for primary value
0
0
O/S
0
O/S
31
2
0: not initialized
IM 01C25T04-01EN
Relative
Index
Index
71
87
72
88
73
74
75
76
77
78
89
90
91
92
93
94
79
95
80
81
9-5
<9. Parameter Lists>
Write
Mode
Parameter
STATIC_PRESSURE_ —
LOW_VALUE
SP_VALUE_TYPE
O/S
Initial Value
Explanation
—
—
—
O/S
O/S
—
O/S
O/S
0
Deviation value for span adjustment of static pressure
96
97
SP_VALUE_URL
SP_VALUE_LRL
CAL_SP_POINT_HI
CAL_SP_POINT_LO
CAL_SP_MIN_SPAN
CAL_SP_
DEVIATION_HI
CAL_SP_
DEVIATION_LO
SP_VALUE_FTIME
ATM_PRESS
109: absolute
pressure
25000
0
25000
0
500
0
Select the type of measurement for static pressure,
absolute or gauge
Upper limit of static pressure value
Lower limit of static pressure value
The highest calibrated value for static pressure
The lowest calibrated value for static pressure
The minimum calibrated span allowed for static pressure
Deviation value for zero adjustment of static pressure
O/S
O/S
2
101.325
82
98
CLEAR_CAL
O/S
0
83
99
—
130
84
100
—
-50
Lower limit of temperature value
85
86
87
88
101
102
103
104
TEMPERATURE_
VALUE_URL
TEMPERATURE_
VALUE_LRL
AMP_TEMP_VAL
AMP_TEMP_URL
AMP_TEMP_LRL
CALCULATE_VALUE
Damping time constant for static pressure
Atmoshpere pressure value used to obtain gauge pressure
value from absolute pressure
Reset zero and span adjustment to factory calibrated
values for pressure, static pressure and or all
Upper limit of temperature value
—
—
—
—
—
95
-50
—
89
90
105
106
CALCULATE_UNIT
CALCULATE_COEF
O/S
O/S
1347 (m3/s)
1
91
92
93
94
95
107
108
109
110
111
—
—
O/S
O/S
O/S
Space
Space
0, 0, 0, 0, 0, 0
Unknown
Unknown
96
97
98
112
113
114
O/S
O/S
O/S
Unknown
Unknown
Unknown
Flange size for remote seal
Number of remote seal
Type of fill fluid in remote seal
99
100
101
102
103
115
116
117
118
119
MODEL
SPECIAL_ORDER_ID
MANUFAC_DATE
D_VENT_PLUG
REM_SEAL_ISOL_
MTL
FLANGE_SIZE
REM_SEAL_NUM
REM_SEAL_FILL_
FLUID
REM_SEAL_TYPE
AUTO_RECOVERY
MS_CODE
SIMULATE_MODE
SIMULATE_VALUE
Value of amplifier temperature
Upper limit of amplifier temperature value
Lower limit of amplifier temperature value
Calculation result of (Primary Value) × (Calculate
Coefficient)
Unit of CALCULATE_VALUE
Coefficient for calculating Calculate Value (CALCULATE_
VALUE). Calculate Coefficient can be considered as
K-factor for flow rate calculation.
The model code
Identification number of special order
Date of production
material of drain or vent plug
Material of isolating diaphragm for remote seal
O/S
O/S
AUTO
AUTO
AUTO
Unknown
1 (ON)
—
0
—
141
142
158
159
160
161
162
163
164
165
173
174
175
157
158
174
175
176
177
178
179
180
181
189
190
191
CURVE_X
CURVE_Y
TEST_KEY1
TEST_KEY2
TEST_KEY3
TEST_1
TEST_2
TEST_3
TEST_4
TEST_5
TEST_13
TEST_14
TEST_15
AUTO
AUTO
—
—
—
—
—
—
—
—
—
—
—
—
—
—
—
—
—
—
—
—
—
—
—
—
Type of remote seal
Permission of auto recovery from sensor errors
Model suffix and code
Mode of simulation
Value written by an operator to simulate Transducer Block
value
Parameter for signal charactrization
Parameter for signal charactrization
Not used for the transmitter
Not used for the transmitter
Not used for the transmitter
Not used for the transmitter
Not used for the transmitter
Not used for the transmitter
Not used for the transmitter
Not used for the transmitter
Not used for the transmitter
Not used for the transmitter
Not used for the transmitter
IM 01C25T04-01EN
Relative
Index
Index
176
177
178
179
180
181
182
183
184
185
186
187
188
189
190
191
192
193
194
195
196
197
198
199
200
201
202
203
204
205
206
207
<9. Parameter Lists>
Write
Mode
Parameter
TEST_16
TEST_17
TEST_18
TEST_19
TEST_20
TEST_21
TEST_22
TEST_23
TEST_24
TEST_25
TEST_26
TEST_27
TEST_28
TEST_29
TEST_30
TEST_31
—
—
—
—
—
—
—
—
—
—
—
—
—
—
—
—
Initial Value
—
—
—
—
—
—
—
—
—
—
—
—
—
—
—
—
9-6
Explanation
Not used for the transmitter
Not used for the transmitter
Not used for the transmitter
Not used for the transmitter
Not used for the transmitter
Not used for the transmitter
Not used for the transmitter
Not used for the transmitter
Not used for the transmitter
Not used for the transmitter
Not used for the transmitter
Not used for the transmitter
Not used for the transmitter
Not used for the transmitter
Not used for the transmitter
Not used for the transmitter
9.3 LCD Transducer Block
Relative
Index
Index
Write
Mode
Parameter
Valid
Range
—
Initial Value
0
16
BLOCK_OBJECT
—
—
1
17
ST_REV
—
0
2
18
TAG_DESC
AUTO
Space
3
19
STRATEGY
AUTO
0-65535
0
4
20
ALERT_KEY
AUTO
0-255
0
5
21
TARGET_MODE
AUTO
6
22
MODE_BLK
—
—
AUTO
7
23
ALARM_SUM
—
—
—
8
24
DISPLAY_SEL
AUTO
0x00-0x0F 0x01
(DISPLAY1
ON)
9
25
INFO_SEL
AUTO
0x00-0x0F 0x06
10
26
BLOCK_TAG1
—
—
AI1
11
27
PARAMETER_SEL1
AUTO
—
12
28
DISPLAY_TAG1
AUTO
0x010A: AI1.
OUT
Space
AUTO
Explanation
Information on this block such as Block Tag, DD
Revision, Executiion Time etc.
The revision level of the static data associated
with the function block. The revision value will be
incremented each time a static parameter value in
the block is changed.
The user description of the intended application of
the block.
The strategy field can be used to identify grouping
of blocks. This data is not checked or processed by
the block.
The identification number of the plant unit. This
information may be used in the host for sorting
alarms, etc.
Set the Target of block mode (MODE_BLK) to Auto,
Man or O/S according to the write Mode of the
parameter to be set or changed.
The mode parameter is a structured parameter
composed of the actual mode, the normal mode,
and the permitted mode.
The current alarm status associated with the
function block
Selection of display 1 to 4 to be shown on LCD
Bit0=1:DISPLAY1 ON
Bit1=1:DISPLAY2 ON
Bit2=1:DISPLAY3 ON
Bit3=1:DISPLAY4 ON
Selection of items to be displayed
Bit0=1:TAG ON
Bit1=1:PARAMETER ON
Bit2=1:UNIT ON
Bit3=1:STATUS ON
Block tag which includes a parameter to be
displayed on display1
Selection of a parameter to be displayed on
display1. Select a parameter from Table
Name of block tag to be displayed on display1; up to
six alphanumeric plus a slash[/] and a period [.]
IM 01C25T04-01EN
<9. Parameter Lists>
13
29
UNIT_SEL1
Write
Mode
AUTO
14
30
DISPLAY_UNIT1
AUTO
15
31
EXP_MODE1
AUTO
16
32
BLOCK_TAG2
—
17
33
PARAMETER_SEL2
AUTO
18
34
DISPLAY_TAG2
AUTO
19
35
UNIT_SEL2
AUTO
20
36
DISPLAY_UNIT2
AUTO
21
37
EXP_MODE2
AUTO
22
38
BLOCK_TAG3
—
23
39
PARAMETER_SEL3
AUTO
24
40
DISPLAY_TAG3
AUTO
25
41
UNIT_SEL3
AUTO
26
42
DISPLAY_UNIT3
AUTO
27
43
EXP_MODE3
AUTO
28
44
BLOCK_TAG4
—
29
45
PARAMETER_SEL4
AUTO
30
46
DISPLAY_TAG4
AUTO
31
47
UNIT_SEL4
AUTO
32
48
DISPLAY_UNIT4
AUTO
33
49
EXP_MODE4
AUTO
0-3
34
50
BAR_GRAPH_
SELECT
AUTO
0-1
35
36
37
38
51
52
53
54
DISPLAY_CYCLE
POWER_ON_INFO
LCD_TEST
SW_TEST
AUTO
AUTO
—
—
0-1
—
—
Relative
Index
Index
Parameter
Valid
Range
0-1
Initial Value
Space
Space
0-3
0: Engineering
Unit
STB
0x0512:
Primary Value
Space
0-1
0: Auto
Space
0-3
0: Engineering
Unit
STB
0x0542: Static
Pressure(H)
Space
0-1
0: Auto
Space
0-3
0: Engineering
Unit
STB
0x051B:
Capsule
Temperature
Space
0-1
9-7
Explanation
Selection of unit to be displayed. The unit of the
parameter which is selected at PARAMETER SEL1
will be displayed when "Auto" is selected; userspecified unit at DISPLAY UNIT1 will be displayed
when "Custom" is selected.
User specified unit to be displayed on display1,
which will be available when "Custom" is selected at
UNIT SEL1.
Selection of the displayed value in exponent such as
x1, x10, x100 and x1000.
Block tag which includes a parameter to be
displayed on display2
Selection of a parameter to be displayed on
display2. Select a parameter from Table
Name of block tag to be displayed on display2; up to
six alphanumeric plus a slash[/] and a period [.]
Selection of unit to be displayed. The unit of the
parameter which is selected at PARAMETER SEL2
will be displayed when "Auto" is selected; userspecified unit at DISPLAY UNIT2 will be displayed
when "Custom" is selected.
User specified unit to be displayed on display2,
which will be available when "Custom" is selected at
UNIT SEL2.
Selection of the displayed value in exponent such as
x1, x10, x100 and x1000.
Block tag which includes a parameter to be
displayed on display3
Selection of a parameter to be displayed on
display3. Select a parameter from Table
Name of block tag to be displayed on display3; up to
six alphanumeric plus a slash[/] and a period [.]
Selection of unit to be displayed. The unit of the
parameter which is selected at PARAMETER SEL3
will be displayed when "Auto" is selected; userspecified unit at DISPLAY UNIT3 will be displayed
when "Custom" is selected.
User specified unit to be displayed on display3,
which will be available when "Custom" is selected at
UNIT SEL3.
Selection of the displayed value in exponent such as
x1, x10, x100 and x1000.
Block tag which includes a parameter to be
displayed on display4
Selection of a parameter to be displayed on
display4. Select a parameter from Table
Name of block tag to be displayed on display4; up to
six alphanumeric plus a slash[/] and a period [.]
0: Auto
Selection of unit to be displayed. The unit of the
parameter which is selected at PARAMETER SEL4
will be displayed when "Auto" is selected; userspecified unit at DISPLAY UNIT4 will be displayed
when "Custom" is selected.
Space
User specified unit to be displayed on display4,
which will be available when "Custom" is selected at
UNIT SEL4.
0: Engineering Selection of the displayed value in exponent such as
Unit
x1, x10, x100 and x1000.
1: Enable
Selection of bar graph indicator
0: Disable
1: Enable
0: 2.8 s
Duration of display cycle. (Time unit: 1=400 ms)
1: ON
Display when powering on.
—
Not used for the transmitter
—
Not used for the transmitter
IM 01C25T04-01EN
<9. Parameter Lists>
9-8
9.4 AI Function Block
Relative
Index
Index
Write
Mode
Parameter
Initial Value
0
16
BLOCK_OBJECT
—
—
1
17
ST_REV
—
0
2
18
TAG_DESC
AUTO
Space
3
19
STRATEGY
AUTO
0
4
20
ALERT_KEY
AUTO
0
5
21
TARGET_MODE
AUTO
AUTO
6
22
MODE_BLK
—
AUTO
7
8
23
24
ALARM_SUM
BATCH
—
AUTO
—
—
10
26
OUT
MAN
—
11
27
PV_SCALE
O/S
—
12
28
OUT_SCALE
O/S
—
13
29
LIN_TYPE
O/S
0
14
30
CHANNEL
O/S
16
32
PV_FTIME
AUTO
AI1:
Primary Value
AI2:
Static Pressure
(H)
AI3:
Capsule
Temperature
0.000
17
18
33
34
FSAFE_TYPE
FSAFE_VALUE
AUTO
AUTO
1
0
19
35
ALARM_HYS
AUTO
0.5
21
23
25
27
30
31
32
33
34
37
39
41
43
46
47
48
49
50
HI_HI_LIM
HI_LIM
LO_LIM
LO_LO_LIM
HI_HI_ALM
HI_ALM
LO_ALM
LO_LO_ALM
SIMULATE
AUTO
AUTO
AUTO
AUTO
—
—
—
—
AUTO
+1.#INF
+1.#INF
-1.#INF
-1.#INF
—
—
—
—
Disabled
35
51
OUT_UNIT_TEXT
—
—
Explanation
Information on this block such as Block Tag, DD Revision,
Executiion Time etc.
The revision level of the static data associated with the
function block. The revision value will be incremented each
time a static parameter value in the block is changed.
The user description of the intended application of the
block.
The strategy field can be used to identify grouping of blocks.
This data is not checked or processed by the block.
The identification number of the plant unit. This information
may be used in the host for sorting alarms, etc.
Set the Target of block mode (MODE_BLK) to Auto, Man or
O/S according to the write Mode of the parameter to be set
or changed.
The mode parameter is a structured parameter composed
of the actual mode, the normal mode, and the permitted
mode.
The current alarm status associated with the function block
This parameter is intended to be used in Batch applications
in line with IEC 61512.
This parameter contains the current measurement
value from Transducer Block or configuration adjusted
engineering unit and the belonging state in AUTO MODE.
OUT contains the value and status set by an operator in
MAN MODE.
Conversion of the Process Variable into percent using the
high and low scale value.
Scale of the Process Variable. This parameter contains the
values of the lower limit and upper limit effective range, the
code number of the engineering unit of Process Variable
and the number of digits to the right of the decimal point.
Type of linearization.
0: no linearization
10: Square root
Reference to the active Transducer Block which provides
the measurement value to the Functiion Blocks.
Time constant of a signal exponential filter for the PV, in
seconds.
Defines reaction of device, if a fault is detected.
Defaut value for the OUT parameter, if sensor or sensor
electronic fault is detected. The unit of this parameter is the
same as that for the OUT one.
Amount the PV must return within the alarm limits before
the alarm condition clears. Alarm Hysteresis is expressed in
engineering unit.
Value for upper limit alarms.
Value for upper limit warnings.
Value for lower limit warnings.
Value for lower limit alarms.
State of the upper limit of alarms.
State of the upper limit of warnings.
State of the lower limit of warnings.
State of the lower limit of alarms.
For commissioning and test purposes the input value from
the Transducer Block in the Analog input Function Block AIFB can be modified. That means that the Transducer and
AI-FB will be disconnected.
Not used for the transmitter
IM 01C25T04-01EN
<9. Parameter Lists>
9-9
9.5 Totalizer Function Block
Relative
Index
Index
Write
Mode
Parameter
Initial Value
0
1
16
17
BLOCK_OBJECT
ST_REV
—
—
—
0
2
18
TAG_DESC
AUTO
Space
3
19
STRATEGY
AUTO
0
4
20
ALERT_KEY
AUTO
0
5
21
TARGET_MODE
AUTO
AUTO
6
22
MODE_BLK
—
AUTO
7
8
23
24
ALARM_SUM
BATCH
—
AUTO
—
—
9
25
TOTAL
MAN
—
10
11
26
27
UNIT_TOT
CHANNEL
AUTO
O/S
12
28
SET_TOT
AUTO
1034: m3
0x0158: Calculate
Value
0: TOTALIZE
13
14
29
30
MODE_TOT
FAIL_TOT
AUTO
AUTO
3: HOLD
0: RUN
15
31
PRESET_TOT
AUTO
0
16
32
ALARM_HYS
AUTO
0
17
18
19
20
21
22
23
24
33
34
35
36
37
38
39
40
HI_HI_LIM
HI_LIM
LO_LIM
LO_LO_LIM
HI_HI_ALM
HI_ALM
LO_ALM
LO_LO_ALM
AUTO
AUTO
AUTO
AUTO
—
—
—
—
+1.#INF
+1.#INF
-1.#INF
-1.#INF
—
—
—
—
Explanition
Information on this block such as Profile, Profile Rev, etc.
The revision level of the static data associated with the
function block. The revision vsalue will be incremented each
time a static parameter value in the block is changed
The user description of the intended application of the
block.
The strategy field can be used to identify grouping of block.
This data is not checked or processed by the block.
The identification number of the plant unit. This information
may be used in the host for sorting alarms, etc.
Set the Target of block mode to Auto or O/S according to the
write mode of the parameter to be set or changed
The mode parameter is a structured parameter composed
of the actual mode, the normal mode, and the permitted
mode.
The current alarm status associated with the function block
This parameter is intended to be used in Batch application
according to IEX 61512-1.
This parameter contains the integrated quantity of the rate
parameter provided by CHANNEL and the associated
status.
Unit of the totalized quantity.
Reference to the active Transducer Block, which provides
the measurement value to the Function Block.
Reset of the internal value of the FB algorithm to 0 or set
this value to PRESET_TOT.
This parameter governs the behavior of the totalization.
Fail-safe mode of the Totalizaer Function Block. This
parameter governs the behavior of the Function Block
during the occurrence of input value with BAD status.
This value is used as present for the internal value of the FB
algorithm. The value gets effective if using the SET_TOT
function.
Amount the PV must return within the alarm limits before
the alarm condition clears. Alarm Hysteresis is expressed in
engineering unit.
Value for upper limit alarms.
Value for upper limit warnings.
Value for lower limit warnings.
Value for lower limit alarms.
State of the upper limit of alarms.
State of the upper limit of warnings.
State of the lower limit of warnings.
State of the lower limit of alarms.
IM 01C25T04-01EN
<10. General Specifications>
10-1
10. General Specifications
10.1 Standard Specifications
For items other than those described below,
refer to each User’s Manual.
Applicable Model:
All DPharp EJX/EJA series.
Output:
Digital communication signal based on
PROFIBUS PA protocol.
Supply Voltage:
9 to 32 V DC for general use, flameproof type,
intrinsically safe (Ex ic), or nonincendive
9 to 24 V DC for intrinsically safe type Entity
model
9 to 17.5 V DC for intrinsically safe type FISCO
model
Communication Requirements:
Supply Voltage: 9 to 32 V DC
Current Draw: 15 mA (max)
Update Period:
Differential Pressure: 100 ms
Static Pressure: 100 ms
Capsule Temperature: 1 s
Amplifier Temperature: 1 s
Integral Indicator (LCD display):
5-digit Numerical Display, 6-digit Unit Display
and Bar graph. The indicator is configurable
to display one or up to four of the I/O signals
periodically.
Functional Specifications:
Functional specifications for PROFIBUS
communication conform to the PROFIBUS-PA
ver 3.02
Function Block:
Three AI blocks, One Totalizer block.
IM 01C25T04-01EN
<10. General Specifications>
10-2
10.2 Optional Specifications
For items other than those described below, refer to each User’s Manual.
Item
Data configuration at factory
Software Damping
Description
Code
CD
10.3 Optional Specifications (For Explosion Protected type)
Item
Factory Mutual (FM)
ATEX
Canadian Standards
Association (CSA)
IECEx Scheme
Description
FM Explosionproof *1
FM Intrinsically safe and Nonincendive *1
ATEX Flameproof *1
ATEX Intrinsically safe [Ex ia]*1
ATEX Intrinsically safe [Ex ic]*1
CSA Explosionproof *1
CSA Intrinsically safe *1
IECEx Flameproof *1
IECEx Intrinsically safe *1
Code
FF1
—
KF22
KS26
KN26
CF1
—
SF2
—
Contact Yokogawa representative for the codes indicated as ‘-’.
*1: Applicable for Electrical connection code 2, 4, 7, 9, C and D .
< Factory Setting >
Tag Number (Tag plate)
Software Tag (TAG)
Bus Address
Output Mode (Characterization Type)
Calibration Range (Scale In Lower/Upper Value)
Calibration Range Unit
Output Scale (Out Scale Lower/Upper Value)
Software Damping (Filter Time Const) *1
*1: As specified in order
‘PT1001’ unless otherwise both Tag Number and Software Tag
specified in order
‘0x7E(126)’ unless otherwise specified in order
‘Linear’ unless otherwise specified in order
As specified in order
Selected from mmH2O, mmH2O(68°F), mmHg, Pa, hPa, kPa,
MPa, mbar, bar, gf/cm2, kgf/cm2, inH2O, inH2O(68°F), inHg, ftH2O,
ftH2O(68°F) or psi. (Only one unit can be specified)
‘0 to 100%’ unless otherwise specified.
‘2 s’ or as specified in order
To specify this item, /CD option is required.
IM 01C25T04-01EN
<Appendix 1. List of DTM Menu>
A1-1
Appendix 1. List of DTM Menu
A1.1 Parameter Table
• Process Variables
• Pressure Raw Value
• Pressure Value
• Primary Value
• Calculated Value
• Static Pressure High Side Value
• Static Pressure Low Side Value
• Capsule Temperature
• Amplifier Temperature
• AI1 Output Value
• AI2 Output Value
• AI3 Output Value
• Totalizer Value
FA0101.ai
• Device Status
• Process Variables
• Pressure Value
• Primary Value
• Calculated Value
• Static Pressure High side Value
• Static Pressure Low side Value
• Capsule Temperature
• Amplifier Temperature
• AI1 Output Value
• AI2 Output Value
• AI3 Output Value
• Totalizer Value
• Diagnostic List
• Diagnosis Status
• Hardware Failure
• Transducer Status
• Configuration
FA0102.ai
• Diag and Service
• Simulation Enable
Message
• Physical Block
• Target Mode
• Diagnosis Simulation Mode
• Diagnosis Simulation Extension
• Sensor Transducer Block
• Target Mode
• Simulation
• Simulation Value
• Analog Input 1
• Target Mode
• Simulation
• Simulation Value
• Analog Input 2
A
• Analog Input 3
A
A
FA0103.ai
IM 01C25T04-01EN
• Easy Setup
<Appendix 1. List of DTM Menu>
• TAG
• Descriptor
• Message
• Installation Date
• Sensor Transducer Block
• Target Mode
• Actual Mode
• Pressure unit
• Scale In:Lower Value
• Scale In:Upper Value
• Characterization Type
• Analog Input 1
• Target Mode
• Actual Mode
• Channel
• Filter Time Const
• Out Scale:Lower Value
• Out Scale:Upper Value
• Out Scale:Unit
• Out Scale:Decimal Point
A1-2
FA0104.ai
• Zero Point Adjustment
• Target Mode
• Pressure Raw Value Unit
• Sensor Lower Limit
• Sensor Upper Limit
• Set Zero (Method)
• Pressure Trimmed Value
• Pressure Trimmed Value
FA0105.ai
IM 01C25T04-01EN
• Calibration
A1-3
<Appendix 1. List of DTM Menu>
• Target Mode
• Pressure Calibration
• Static Pressure Calibration
• Clear Calibration
• Calibration Information
• Pressure Raw Value Unit
• Sensor Lower limit
• Sensor Upper limit
• Calibration Span Min
• Calibration
• Lower Calibration Point
• Upper Calibration Point
• Lower Calibration Deviation
• Upper Calibration Deviation
• Pressure Trimmed Value
• Pressure Trimmed Value
• Static Pressure Unit
• Static Pressure Value LRL
• Static Pressure Value URL
• SP Calibration Span Min
• Calibration
• SP Lower Calibration Point
• SP Upper Calibration Point
• SP Lower Calibration
Deviation
• SP Upper Calibration
Deviation
• Static Pressure Trimmed
Value
• Static Pressure High Side
Value
• Clear Calibration (Method)
• Pressure - Calibrated
Value
• Lower Calibration Point
• Upper Calibration Point
• Lower Calibration Deviation
• Upper Calibration Deviation
• Static Pressure - Calibrated
Value
• SP Lower Calibration Point
• SP Upper Calibration Point
• SP Lower Calibration
Deviation
• SP Upper Calibration
Deviation
• Sensor Calibration Method
• Sensor Calibration
Location
• Sensor Calibration
Executor
FA0106.ai
• Physical Block
• Static Revision No
• Target Mode
• Actual Mode
• Identification
• TAG
• Descriptor
• Message
• Manufacturer
• Product Designation
• Device Serial Num
• Software Revision
• Hardware Revision
• Profile Revision
• PROFIBUS Ident Number
• ID No.
• Installation Date
• Software Description
• Diagnosis
• Diagnosis
• Diagnosis
• Diagnosis Extension
• Device Status
• Device Status
• Configuration
• HW Write Protection
• Write Locking
• Local Operation
• Factory Reset
FA0107.ai
IM 01C25T04-01EN
• Input
A1-4
<Appendix 1. List of DTM Menu>
• Static Revision No
• Target Mode
• Actual Mode
• Device Information
• Model
• Special Order ID
• Serial Number
• Model Suffix Code 1
• Model Suffix Code 2
• Model Suffix Code 3
• Mechanical Construction
• Sensor Transducer Block
• Transmitter Type
• Sensor Limit
• Module Fill Fluid
• Isolator Material
• O Ring Material
• Remote Seal Number
• Remote Seal Type
• Remote Seal Isolator Material
• Remote Seal Fill Fluid
• Process Connection Type
• Process Connection Material
• Drain Vent Plug
• Flange Size
• Pressure Raw Value Unit
• Sensor Lower Limit
• Sensor Upper Limit
• Scale In
• Pressure Unit
• Scale In:Lower Value
• Scale In:Upper Value
• Characterization
• Characterization Type
• Low Flow Cut Off
• Min Number of Coordinates
• Max Number of Coordinates
• Number of Coordinates
• Primary Value
• Primary Value Unit
• Scale Out:Lower Value
• Scale Out:Upper Value
• Calculated Value
• Calculated Value Unit
• Calculated Coefficient
• Capsule Temperature
• Temperature Unit
• Capsule Temperature LRL
• Capsule Temperature URL
• Amplifier Temperature
• Amplifier Temperature LRL
• Amplifier Temperature URL
• Static Pressure
• Static Pressure Unit
• Static Pressure Value LRL
• Static Pressure Value URL
FA0108.ai
IM 01C25T04-01EN
• Output
A1-5
<Appendix 1. List of DTM Menu>
• Analog Input 1
• Analog Input 2
• Analog Input 3
• Totalizer
• Static Revision No.
• Target Mode
• Actual Mode
• Channel
• Simulation
• Simulation Value
• Fail Safe Mode
• Fail Safe Default Value
• Output Value
• Filter Time Const
• Out unit text
• Batch Information
B
• Batch ID
• Batch Unit
• Batch Operation
• Batch Phase
• PV Scale
• Lower Value
• Upper Value
• Characterization
• Characterization Type
• Output Scale
• Lower Value
• Upper Value
• Unit
• Decimal Point
• Warning and Alarm
• Lower Limit Alarm
• Lower Limit Warning
• Upper Limit Warning
• Upper Limit Alarm
• Limit Hysteresis
• Lower Limit Alarm Status
• Lower Limit Warning Status
• Upper Limit Warning Status
• Upper Limit Alarm Status
B
B
• Static Revision No.
• Target Mode
• Actual Mode
• Channel
• Totalizer Unit
• Totalizer Value
• Totalizer Value Set
• Mode
• Preset Value
• Fail Safe Mode
• Batch Information
• Warning and Alarm
• Batch ID
• Batch Unit
• Batch Operation
• Batch Phase
• Lower Limit Alarm
• Lower Limit Warning
• Upper Limit Warning
• Upper Limit Alarm
• Limit Hysteresis
• Lower Limit Alarm Status
• Lower Limit Warning Status
• Upper Limit Warning Status
• Upper Limit Alarm Status
FA0109.ai
IM 01C25T04-01EN
• Local Display
<Appendix 1. List of DTM Menu>
• Static Revision No.
• Target Mode
• Actual Mode
• Bar Graph
• Display Cycle
• Power On Information
• Display Selections
A1-6
• Display Selection
• Information Selection
• Display 1 Setup
• Parameter Selection 1
• Display Tag 1
• Unit Selection 1
• Display Unit 1
• Exponent Mode 1
• Display 2 Setup
• Parameter Selection 2
• Display Tag 2
• Unit Selection 2
• Display Unit 2
• Exponent Mode 2
• Display 3 Setup
• Parameter Selection 3
• Display Tag 3
• Unit Selection 3
• Display Unit 3
• Exponent Mode 3
• Display 4 Setup
• Parameter Selection 4
• Display Tag 4
• Unit Selection 4
• Display Unit 4
• Exponent Mode 4
FA0110.ai
IM 01C25T04-01EN
<Appendix 2. List of PDM (EDD) Menu>
A2-1
Appendix 2. List of PDM (EDD) Menu
A2.1 Menu Bar
Menu Bar
• File
C
• Device
D
• View
E
• Options
F
• Help
G
C
• Save
• Delete
• Value comparison...
• Export..
• Import..
• Print
• Print Preview
• Printer Setup
• Page Setup
• Labeling Fields..
• Rename
• Object Properties
• Exit
D
• Communication Path
• Download to Device
• Upload to PC/PG
• Update Diagnostics Status
• Set Address...
• Simulation
• Target Mode
• Zero Point Adjustment
• Sensor Calibration
• Characterization
• Master Reset
• Write Locking
• Status Select
• Query Device
E
1
2
3
4
5
6
7
8
9
• Display
• Y t diagram
• Alarm States
• Device Status
• Tool Bar
• Status Bar
• Update
10
11
12
13
F
• Settings..
• Display Subentries
• HART Server
• Start LifeList
• Show Change Log..
• Manage Device Catalog
• Calibration Log
G
• Contents
• Context-Sensitive Help
• Help on Device Parameters..
• Document Manager
• Using Help
• About
FA0201.ai
IM 01C25T04-01EN
A2-2
<Appendix 2. List of PDM (EDD) Menu>
1
• Simulation
• Simulation Enable
Message
• Physical Block
• Sensor Transducer Block
• Function Block 1 - Analog
Input
• Simulation (Diagnosis
Extension)
• Diagnosis Simulation Mode
• Diagnosis Simulation
Extension
• Simulation (Output)
• Target Mode
• Actual Mode
• Diagnosis Extension
• Diagnosis
• Simulation (Pressure)
• Simulation
• Simulation Value
• Simulation (Output)
• Target Mode
• Actual Mode
• Pressure Value
• Simulation (Measured
Value)
• Simulation
• Simulation Value
• Simulation (Output)
• Target Mode
• Actual Mode
• Output Value
1-1
• Function Block 2 - Analog
Input
• Function Block 3 - Analog
Input
1-1
1-1
FA0211.ai
2
• Target Mode
• Physical Block
• Target Mode
• Actual Mode
• Sensor Transducer Block
• LCD Transducer Block
• Function Block 1 - Analog
Input
• Function Block 2 - Analog
Input
• Function Block 3 - Analog
Input
• Function Block 4 - Totalizer
2-1
2-1
FA0212.ai
3
• Zero Point Adjustment
• Target Mode
• Pressure Raw Value Unit
• Sensor Lower Limit
• Sensor Upper Limit
• Zero Point Adjustment
• Pressure Trimmed Value
FA0213.ai
IM 01C25T04-01EN
<Appendix 2. List of PDM (EDD) Menu>
A2-3
4
• Sensor Calibration
• Pressure Calibration
• Target Mode
• Pressure Raw Value Unit
• Sensor Lower Limit
• Sensor Upper Limit
• Calibration Span Min
• Calibration
• Pressure Trimmed Value
• Static Pressure Calibration
• Target Mode
• Static Pressure Unit
• Static Pressure Value LRL
• Static Pressure Value URL
• SP Calibration Span Min
• Calibration
• Static Pressure Trimmed
Value
• Clear Calibration
• Target Mode
• Pressure - Calibrated
Value
• Static Pressure Calibrated Value
• Clear Calibration
• Calibration Information
• Target Mode
• Sensor Calibration Method
• Sensor Calibration
Location
• Sensor Calibration Date
• Sensor Calibration
Executor
• Lower Calibration Point
• Upper Calibration Point
• Lower Calibration Deviation
• Upper Calibration Deviation
• Execute - Auto, Lower Point
• Execute - Auto, Upper Point
• Execute - Manual, Lower
Point
• Execute - Manual, Upper
Point
• SP Lower Calibration Point
• SP Upper Calibration Point
• SP Lower Calibration
Deviation
• SP Upper Calibration
Deviation
• Execute - Auto, SP Lower
Point
• Execute - Auto, SP Upper
Point
• Execute - Manual, SP Lower
Point
• Execute - Manual, SP Upper
Point
• Lower Calibration Point
• Upper Calibration Point
• Lower Calibration Deviation
• Upper Calibration Deviation
• SP Lower Calibration Point
• SP Upper Calibration Point
• SP Lower Calibration
Deviation
• SP Upper Calibration
Deviation
FA0214.ai
IM 01C25T04-01EN
<Appendix 2. List of PDM (EDD) Menu>
A2-4
5
• Characterization
• Characterization
• Target Mode
• Actual Mode
• Characterization Type
• Low Flow Cut Off
• Linearization
• Min Number of Coordinates
• Max Number of Coordinates
• Number of Coordinates
• Operation Mode
• Coordinate No.
• X Y value couple - X
• X Y value couple - Y
• Status (Characterization)
• Linearization Table
• X_1 … X_31
• Y_1 … Y_31
FA0215.ai
6
• Master Reset
• Diagnosis
• Factory Reset
• Warm start
• Reset Address to '126'
FA0216.ai
7
• Write Locking
• Write Locking
• HW Write Protection
FA0217.ai
8
• Status Select
• Condensed Status/Diagnosis
FA0218.ai
9
• Query Device
• Physical Block
• Sensor Transducer Block
• LCD Transducer Block
• Function Block 1 - Analog Input
• Function Block 2 - Analog Input
• Function Block 3 - Analog Input
• Function Block 4 - Totalizer
FA0219.ai
IM 01C25T04-01EN
<Appendix 2. List of PDM (EDD) Menu>
A2-5
10
• Display
• Sensor Value
• Pressure Raw Value
• Pressure Value
• Measured Value _ Primary Value
• Calculated Value
• Static Pressure High Side Value
• Static Pressure Low Side Value
• Capsule Temperature
• Amplifier Temperature
• Value and Status
• Pressure Value
• Primary Value
• Calculated Value
• Static Pressure High Side Value
• Static Pressure Low Side Value
• Capsule Temperature
• Amplifier Temperature
• Function Block 1 - Analog
Input
• Output Value
• Output
• Input
• Function Block 2 - Analog
Input
• Function Block 3 - Analog
Input
• Function Block 4 - Totalizer
10-1
10-1
10-1
• Totalizer Value
• Output
• Input
FA0220.ai
11
• Y t diagram
• Pressure Value
• Measured Value _ Primary Value
• AI1 Output Value
FA0221.ai
IM 01C25T04-01EN
12
• Alarm States
A2-6
<Appendix 2. List of PDM (EDD) Menu>
• Function Block 1 - Analog
Input
• Function Block 2 - Analog
Input
• Function Block 3 - Analog
Input
• Function Block 4 - Totalizer
• Overview
• Alarm Summary
• Upper Limit Alarm
• Upper Limit Warning
• Lower Limit Warning
• Lower Limit Alarm
12-1
12-1
12-1
12-1
FA0222.ai
13
• Device Status
• General
• General
• TAG
• Manufacturer
• Product Designation
• Device Serial Num
• Software Revision
• Hardware Revision
• Installation Date
• Write Locking
• HW Write Protection
• Local Operation
13-1
• Physical Block
• Sensor Transducer Block
• LCD Transducer Block
• Function Block 1 - Analog
Input
• Function Block 2 - Analog
Input
• Function Block 3 - Analog
Input
• Function Block 4 Totalizer
• Diagnosis
• Block Object
• Parent Class
• Class
• Device Revision
• Device Revision Compatibility
• DD Revision
• Profile
• Profile Revision
• Static Revision No.
• Actual Mode
13-1
• Diagnosis
• Diagnosis
• Diagnosis Extension
• Device Status
• Device Status 1 … 8
FA0223.ai
IM 01C25T04-01EN
A2-7
<Appendix 2. List of PDM (EDD) Menu>
A2.2 Parameter Table
• Easy Setup
• TAG
• Descriptor
• Message
• Installation Date
• Sensor Transducer Block
• Function Block 1
- Analog Input 1
• Target Mode
• Actual Mode
• Characterization Type
• Measuring Range
- Scale In
• Pressure Unit
• Lower Value
• Upper Value
• Target Mode
• Actual Mode
• Channel
• Filter Time Const
• Output scale
• Lower Value
• Upper Value
• Unit
• Decimal Point
FA0202.ai
• Identification
• Operation Unit
• TAG
• Descriptor
• Message
• Device
• Manufacturer
• Product designation
• Device Serial Num
• Software Revision
• Hardware Revision
• Profile Revision
• Static Revision No.
• PROFIBUS Ident Number
• ID No.
• Installation Date
• Software Description
• Local Operation
FA0203.ai
• Information
• Device
• Mechanical Construction
• Model
• Special Order ID
• Serial Number
• Model Suffix Code 1
• Model Suffix Code 2
• Model Suffix Code 3
• Manufacture Date
• Sensor
• Module Fill Fluid
• Isolator Material
• O Ring Material
• Remote Seal
• Remote Seal Number
• Remote Seal Type
• Remote Seal Isolator Material
• Remote Seal Fill Fluid
• Process Connection
• Process Connection Type
• Process Connection Material
• Drain Vent Plug
• Flange Size
FA0204.ai
IM 01C25T04-01EN
• Input
A2-8
<Appendix 2. List of PDM (EDD) Menu>
• Sensor Transducer Block
• Static Revision No.
• Target Mode
• Actual Mode
• Transmitter Type
• Measuring Limit - Sensor
Limit
• Measuring Range - Scale
In
• Pressure Raw Value Unit
• Sensor Lower Limit
• Senfor Upper Limit
• Pressure Unit
• Lower Value
• Upper Value
• Characterization
• Characterization Type
• Low Flow Cut Off
• Min Number of Coordinates
• Max Number of Coordinates
• Number of Coordinate
• Measured Value - Primary
Value
• Unit
• Lower Value
• Upper Value
• Calculated Value
• Calculated Value Unit
• Calculated Coefficient
• Capsule Temperature
• Temperature Unit
• Capsule Temperature LRL
• Capsule Temperature URL
• Amplifier Temperature
• Amplifier Temperature LRL
• Amplifier Temperature URL
• Static Pressure
• Static Pressure Unit
• Static Pressure Value LRL
• Static Pressure Value URL
FA0205.ai
IM 01C25T04-01EN
• Output
A2-9
<Appendix 2. List of PDM (EDD) Menu>
• Function Block 1
- Analog Input
• Batch ID
• Batch Unit
• Batch Operation
• Batch Phase
• Process Value Scale
• Lower Value
• Upper Value
• Characterization
• Characterization Type
• Output Scale
• Lower Value
• Upper Value
• Output Limits
• Lower Limit Alarm
• Lower Limit Warning
• Upper Limit Warning
• Upper Limit Alarm
• Limit Hysteresis
• Fail Safe Mode
• Fail Safe Mode
• Fail Safe Default Value
• Human Interface
• Decimal Point
• Function Block 2
- Analog Input
H
• Function Block 3
- Analog Input
H
• Function Block 4
- Totalizer
H
• Static Revision No.
• Target Mode
• Actual Mode
• Channel
• Unit
• Out unit text
• Batch Information
• Static Revision No.
• Target Mode
• Actual Mode
• Channel
• Unit (Totalizer)
• Totalizer Value
• Mode
• Preset Value
• Fail Safe Mode
• Batch Information
• Output Limits
• Batch ID
• Batch Unit
• Batch Operation
• Batch Phase
• Lower Limit Alarm
• Lower Limit Warning
• Upper Limit Warning
• Upper Limit Alarm
• Limit Hysteresis
FA0206.ai
IM 01C25T04-01EN
• Sensor Calibration
<Appendix 2. List of PDM (EDD) Menu>
• Pressure Calibration
• Lower Calibration Point
• Upper Calibration Point
• Calibration Span Min
• Lower Calibration Deviation
• Upper Calibration Deviation
• Static Pressure Calibration
• SP Lower Calibration Point
• SP Upper Calibration Point
• SP Calibration Span Min
• SP Lower Calibration Deviation
• SP Upper Calibration Deviation
A2-10
FA0207.ai
• Local Display
• Bar Graph
• Display Cycle
• Power On Information
• Display Selections
• Display Selection
• Information Selection
• Display 1 Setup
• Parameter Selection 1
• Display Tag 1
• Unit Selection 1
• Display Unit 1
• Exponent Mode 1
• Display 2 Setup
• Parameter Selection 2
• Display Tag 2
• Unit Selection 2
• Display Unit 2
• Exponent Mode 2
• Display 3 Setup
• Parameter Selection 3
• Display Tag 3
• Unit Selection 3
• Display Unit 3
• Exponent Mode 3
• Display 4 Setup
• Parameter Selection 4
• Display Tag 4
• Unit Selection 4
• Display Unit 4
• Exponent Mode 4
FA0208.ai
IM 01C25T04-01EN
• Target Mode
<Appendix 2. List of PDM (EDD) Menu>
• Physical Block
• Target Mode
• Actual Mode
A2-11
I
• Sensor Transducer Block
• LCD Transducer Block
• Function Block 1 - Analog Input
• Function Block 2 - Analog Input
I
• Function Block 3 - Analog Input
• Function Block 4 - Totalizer
FA0209.ai
IM 01C25T04-01EN
i
Revision Information
Title
:
Manual No. :
DPharp
PROFIBUS PA Communication Type
(EJXA, EJAE)
IM 01C25T04-01EN
Edition
Date
Page
Revised Item
1st
May 2013
—
New publication
2nd
June 2014
4-1
Change terminal drawing.
3rd
Oct. 2014
2-3
2-7
2.1.3
2.1.4
Revise description in “Note3 Installation.”
Add EPL code. Revise applicable standard.
Add note for electro static charge. Add electrical connection.
IM 01C25T04-01EN