1
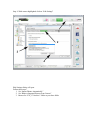
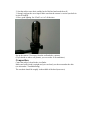
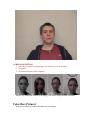
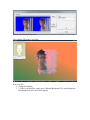
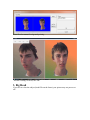
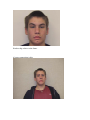
Face2Face System – V2
Tutorial
2010
©
Abalone LLC 2010
Information
September 2010
Author’s copyright holder of the Face2Face program is Abalone LLC of Moss Beach, California..
Publishing copyright holder of the Face2Face program is Abalone LLC of Moss Beach, California.©
AbaloneLLC 2009.
Copying, merchandizing, public exhibiting or other commercial utilization of the software without
licence is strictly prohibited.
The Face2Face User’s Manual is under global author and publishing copyright.
© 2009 AbaloneLLC. This User’s Manual was written and edited by Laslo Vespremi, Abalone LLC.
Copying, extraction or translation to another language is forbidden without the written approval of
the holder of this right.
Abalone LLC.
190 Arbor Lane
Moss Beach, California, USA
Tel.:
(1) 650 302-0894
Web:
www.abalonellc.com
E-mail:
[email protected]
Distributor:
Abalone LLC
190 Arbor Lane,
Moss Beach CA 94038
USA
Web:
www.abalonellc.com
E-mail:
[email protected]
ABALONE LLC IS IN NO CASE RESPONSIBLE FOR THE DIRECT OR INDIRECT DAMAGES
ARISING FROM THE USAGE OF THE FACE2FACE PROGRAM OR THE FACE2FACE USER’S
MANUAL.
Abalone LLC and the Face2Face are the registered trademarks of Abalone LLC
Windows is the trademark of Microsoft.
The manual and illustrations were made using the Microsoft Word and Adobe Photoshop
Overview
Face2Face is a software/hardware system that shows young adults at risk how crystal
meth abuse will change their faces after 6 month, 1 year or 3 years of abuse.
This is accomplished in three steps:
1. Capture a 3D face using the stereo camera
2. Software uses two images to create a 3D head
3. By clicking on one of the three “age” buttons software changes the shape and
texture of the 3D head to show crystal meth caused deterioration
The whole process may take 2 minutes: 1 minute for photography and 1 minute for the
software to build 3D head (time dependent on the speed of the computer used).
The “before” and “after” images are shown side-by-side and can be printed via the
“Print” command. To preserve privacy images are erased from camera and computer
after use.
System requirements
Required hardware
WIN: Face2Face runs with the following minimal hardware:
A Windows-based personal computer or laptop with the following
minimal requirements:
Pentium III or IV 2 GHz (faster chips will run software faster)
2 GB RAM internal memory
True Colour video card
Screen of a resolution 1024x768
250 MB free disk space
Needed system software
Face2Face runs under the following system software:
Windows 2000, Windows XP, Windows VISTA , and W7 operating
systems.
To read pdf manuals Adobe Acrobat is recommended
To watch “How-to” videos Windows Media player is recommended:
What is New in Version 2?
1. Ability to also take pictures with open smile/show teeth decay
2. Improved, more realistic scars on face
Operation (Part 1)
The following chapter deals with the very simple operation of the system.
1. Install Software
Simply drag the folder called “F2F_V2” from the CD to your desktop.
Also, please install the Fujifilm FinePix software (c0omes with the camera).
This is all the installation you need.
2. Test Face2Face software
Double-click on the F2F icon. The software launches.
Open the “Preference” dialog under the File menu.
Set preference dialog as shown:
1.
2.
3.
4.
5.
Choose “Automatically (Loads with latest time stamp)
Browse for F2F_V2 on your desktop and choose the “Archive” folder
Set “Background elimination” on automatic
Check “Remember my selection”
Click OK
Now, choose “Next” from the File menu and the 3D process starts. Face2Face will
find the MPO file with the latest time stamp and convert it into a 3D head in about 1
minute. (You only have two sample MPO in the Archive folder at this point, it will
convert the second file). This is what you will see:
The guide in the upper left corner instructs you to place a dot in the left eye corner,
followed by the right eye corner and the chin.
NOTE: After you placed the first dot, you can zoom in via the middle mouse
button or rotate the head via the right mouse button.
NOTE: This is a picture with “Open Smile” Check (click on) the box “Open
Smile” Move the points describing the teeth area in place as shown.
When finished click OK.
In a few seconds, you’ll see a split screen with a dialog box.
The left screen is the “Now” picture, the right screen will show the changes meth
abuse causes. Go ahead and click on the 3 year button. In a few seconds the change
will take place. Feel free to rotate the head (with the right mouse button). To move
the image around, use the left mouse button. Zoom in and out is the middle mouse
button.
NOTE: Using the second picture (DSCF0039.MPO) also gives you an idea of the
speed of your laptop. On an average F2F makes 20,000 calculations to create the
3D head. Processing this picture takes about 45 second on an Intel Duo laptop
with 2.4 Mz clock speed. As long as you picture appears around 1 minute, your
computer is up to the task.
Finepix software steup.
Follow this steps:
Install the FinePix Viewer software (comes on CD)
Once software is installed, you need to restart your computer.
Launch FinePix Viewer.
Go to “Settings (shown below)
Open “Save Image Settings).
Now Browse for your Archive button (Desktop/F2F_V2/Archive)
Make sure you also click “Delete images from camera”
This setting will put the new images in a folder inside the Archive folder with today’s
date as the folder name.
Every new day you should navigate to this folder as your default folder. As you are
taking more pictures that day, you do not need to navigate again – Command-N will
automatically look in this folder.
Alternative Software: MyFinePix Studio
There is now a newer version of the factory FinePix software called MyFinePix Studio.
It is downloadable at:
http://www.fujifilm.com/products/digital_cameras/myfinepix_studio
Once the software is installed, there’s a slightly different way to set up the automatic
transfer of MPO files as well as the auto-erasure, which erases all images after the
transfer.
Step 1. Click on the “Settings” tab
Step 2. Click on “Device Detection”
Step 3. Select your camera (Fuji W1 or W3)
Step 4. With camera highlighted click on “Edit Settings”
Edit Settings dialog will open.
Follow these steps:
1. Set “Import Photos Automatically”
2. Set “Remove Imported Pictures from Camera”
3. Browse for “F2F_V2/Archive” folder as your base folder
Click OK and quit MyFinePix Studio.
NOTE: At this point you are ready to take pictures. We recommend that you
call Abalone at (650) 302-0894 for training before taking the first pictures.
Operation (Part 2)
Hardware Setup
Face2Face system consists of a hardware and a software component. Required hardware
includes the Fuji FinePix W1 camera and a computer.
Camera
Fuji Finepix W1 camera
The Fuji Finepix W1 camera is a stereo camera that features two side-by-side optics
offset by about 3 inches. The camera takes two slightly offset images and creates a file in
the MPO format. The image can be viewed in the camera monitor in stereo 3D without
stereo glasses.
3. Take Picture
Use all factory default settings on the Fuji Camera. This ensures that you get the
optimal picture each time.
A few hints:
1. Use monochrome background behind the head (white wall or similar). Avoid
reflective surfaces such as whiteboard.
2. Seat the subject on a chair, and the back of his/her head touch the wall.
3. Strongly suggest the use a tripod. Make sure that the camera is vertical (use built in
leveler if needed).
4. Have good lighting. Set “Flash” on “on” all the time.
Set up the camera 3 feet away from the wall and take a picture.
(If you decide to take a self-portrait, you can set the 10 second timer).
Composition
Center the subject’s head in the viewfinder.
Make sure her/his head is upright and you can clearly see the areas under the chin
(see also under “Troubleshooting)
The crosshair should be roughly in the middle of the head (nose area).
OTHER SUGGESTIONS:
1. Ask subject to move out hair (bangs) etc from face as far as possible.
2. No glasses
3. No external objects (clock, calendar)
Before you connect the camera to the laptop, you need to set up the auto-download.
Take More Pictures!
Now you are all set to connect the camera to your laptop.
Once you connected via USB, turn on your camera via the arrow button next to Menu
OK (on the back of your camera, upper right corner).
Set your camera height so that the lens is in level with the subject’s nose. Make sure
that behind the face you are photographing there are not extraneous objects (best seat
your subject against a light-colored wall).
1. Take a picture.
2. Turn off camera (by closing the lens protector lid).
3. Connect camera to a USB-port on your laptop.
4. Turn camera back on (pressing the “arrow” symbol next to “Menu OK” for 5
seconds. (The camera light will come back).
5. You may also hear an audible beep on your laptop as the camera is recognized
and the laptop starts to download the picture to the F2F/Archive folder). This will
also erase the MPO image from your camera.
Operating the Face2Face Software
Go to your F2F folder and double click on the F2F application. This will launch
Face2Face.
1. After a brief view of the Face2Face splash screen, a gray window opens.
2. Go to File menu and choose “Next” (or just type Control-N).
3. If your Preferences are set right (see chapter above), the software will find the
MPO with the latest time stamp in your Archive folder and start to process it. A
progress bar appears and will show your progress.
4. With this new camera/system the processing time will be around 1 minute
(depending on your computer’s speed) – much faster than the 3 minutes with the
earlier dual-camera system.
5. After processing finished, the 3D portrait will appear with the dot dialog. From
here follow the process outlined above in the “Test Face2Face Software” chapter.
NOTE: Once you finished aging the subject, you can also print the screen to an
inkjet printer. Use the “Print” button (Control-P) to select printer and page setup.
Additional Notes/Trouble Shooting
TroubleShooting:
1. To make sure your portrait is in focus, you may want to press the exposure button
halfway down (this will focus the camera on the face) before taking the picture by
depressing the button all the way.
2. Avoid shiny backgrounds
3. Try to minimize the area from the neck down. Avoid including too much of the
shoulders or upper torso.
4. Keep camera level with subject (level with the nose of the subject).
5. Avoid extreme light conditions. Try to use the system indoors under artificial
light conditions such as a classroom. (see more below).
6. If not satisfied with the result, try again.
1. Overexposure
Face2Face is designed to function best under indoor controlled lighting situations such as
a classroom. Extreme lighting, such as direct sunlight hitting a part of the face may cause
either missing part of the face that was overexposed or processing error.
Here’s an example of strong overhead exposure
This result in part of the 3D mesh missing. You can see it if you choose the manual
background elimination in the Preference dialog:
The resulting 3D is also missing part of the head:
How to Avoid Overexposure?
Best is to choose indoor lighting conditions with no direct sunlight. If this is not possible,
set the camera to manual exposure control. This is described in the FinePix Manual page
29 and 31.
2. Blurry Image
Another possible distortion is more that happens with bad light is more severe.
In this case the head is “wavy” and distorted.
The cause is distorted background due to bad/uneven lighting
Observe the missing background
The resulting 3D image is very bad:
How to avoid?
1. Change the lighting
2. 2. If this is not possible, simply go to “Manual Background” by unchecking auto
background (see more in the next chapter).
Same file after manual background painting
..and the resulting 3D mesh, now OK.
3. Big Head
If you are too close the subject (head fills out the frame) your picture may not process at
all!
Head too big relative to the frame.
A better composition is this.
4. Bad Profile
Bad profile is mostly caused by the incorrect angle of the head. That is, when
someone tilts his/her head forward, this creates an “undercut” - an area that is hidden
to the camera. This in turn distorts the profile as the software tries to mend the
missing surface.
The solution is to have the head turned slightly backward and avoid undercuts.