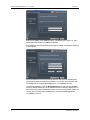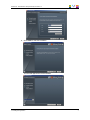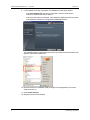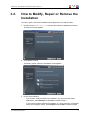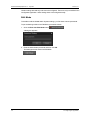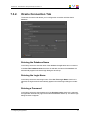
1
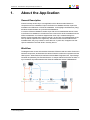
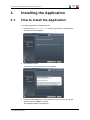
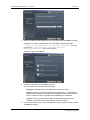
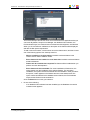
USER MANUAL
Deep Archive Sync
Version 1.4 - July 2013
IP2Archive - User Manual - Deep Archive Sync Version 1.4
Copyright
EVS Broadcast Equipment S.A.– Copyright © 2003-2013. All rights reserved.
Disclaimer
The information in this manual is furnished for informational use only and subject to
change without notice. While every effort has been made to ensure that the information
contained in this user manual is accurate, up-to-date and reliable, EVS Broadcast
Equipment cannot be held responsible for inaccuracies or errors that may appear in this
publication.
Improvement Requests
Your comments will help us improve the quality of the user documentation. Do not
hesitate to send improvement requests, or report any error or inaccuracy on this user
manual by e-mail to [email protected].
Regional Contacts
The address and phone number of the EVS headquarters are usually mentioned in the
Help > About menu in the user interface.
You will find the full list of addresses and phone numbers of local offices either at the end
of this user manual (for manuals on hardware products) or at the following page on the
EVS website: http://www.evs.com/contacts.
User Manuals on EVS Website
The latest version of the user manual, if any, and other user manuals on EVS products
can be found on the EVS download center, on the following webpage:
http://www.evs.com/downloadcenter.
I
EVS Broadcast Equipment S.A. - July 2013
II
Issue 1.4.D
IP2Archive - User Manual - Deep Archive Sync Version 1.4
Table of Contents
TABLE OF CONTENTS
III
WHAT'S NEW
V
1.
ABOUT THE APPLICATION
1
2.
ABOUT CLIP ARCHIVE METADATA
2
3.
INSTALLING THE APPLICATION
3
3.1. How to Install the Application
3
3.2. How to Modify, Repair or Remove the Installation
9
4.
STARTING THE APPLICATION
4.1. After Installation
13
4.2. After Configuration
13
4.3. Main Window Overview
15
5.
SYNCHRONIZING CLIP ARCHIVE METADATA
5.1. Synchronization Workflows
17
17
5.1.1. Overview
17
5.1.2. Synchronizing IPDirector Clip Archive Metadata
17
5.1.3. Synchronizing IP2Archive Clip Archive Metadata
18
5.1.4. Removing Clip Archive Metadata From IPDirector
18
5.2. Interface
19
5.2.1. Deep Archive Tab
19
5.2.2. IPDirector Tab
21
5.3. Searching for Clips
22
5.3.1. Searching for Clips in IP2Archive
22
5.3.2. Searching for Clips in IPDirector
25
5.3.3. Search Results
26
5.4. Comparing and Synchronizing Clip Archive Metadata
Table of Contents
13
28
5.4.1. Requesting the Comparison
28
5.4.2. Sync Dialog Box
28
5.4.3. Comparison Grid
30
5.4.4. Synchronizing the Clip Archive Metadata
33
5.5. Removing Clip Archive Metadata
33
5.6. Checking the Status of the Low-Resolution File
34
5.6.1. Requesting the Check
34
5.6.2. Synchronize IPDirector Lores Window
34
III
EVS Broadcast Equipment S.A. - July 2013
6.
MANAGING GRIDS AND GRID DATA
36
6.1. About Managing Grids and Grid Data
36
6.2. Adjusting the Width of a Grid Column
36
6.3. Sorting Grid Data
37
6.4. Manipulating Grid Columns
38
6.4.1. Adjusting the Width of a Grid Column
38
6.4.2. Reordering Grid Columns
39
6.4.3. Removing a Grid Column
40
6.4.4. Adding a Grid Column
41
6.4.5. Hiding and Showing Grid Columns
42
6.5. Filtering Grid Data
43
6.5.1. Filtering by Values From a Column
43
6.5.2. Filtering by Criteria
44
6.6. Printing and Exporting Grid Data
47
6.6.1. Print and Export Toolbar
47
6.6.2. Printing Grid Data
47
6.6.3. Exporting Grid Data
47
7.
CONFIGURING THE APPLICATION
49
7.1. Settings Window
49
7.2. Global Settings
51
7.2.1. Overview Global Settings Subcategories
51
7.2.2. MAD Tab
51
7.3. System Settings
IV
Issue 1.4.D
52
7.3.1. Overview System Settings Subcategories
52
7.3.2. Oracle Connection Tab
53
7.3.3. E-Mail Options Tab
56
7.3.4. Global Password Tab
57
7.3.5. Error Handling Tab
57
7.3.6. IPDirector API Tab
58
7.3.7. IP2Archive Bins Tab
60
7.3.8. IP2Archive Metadata Tab
60
7.3.9. DIVA Tab
61
Table of Contents
IP2Archive - User Manual - Deep Archive Sync Version 1.4
What's New
In the Deep Archive Sync user manual the icon
has been added on the left margin to
highlight information on new and updated features.
The changes linked to new features in version 1.4.6.0 are listed below.
Online help is now available.
An option has been added to set the maximum number of clips retrieved from
IPDirector.
•
See section "MAD Tab" on page 51.
A Date field has been added to the search fields.
•
See section "Search Criteria" on page 22.
An advanced search setting has been added.
•
See section "IPDirector API Tab" on page 58.
Columns can be reordered, hidden, added and removed.
See section "Manipulating Grid Columns" on page 38.
What's New
V
EVS Broadcast Equipment S.A. - July 2013
Issue 1.4.D
VI
What's New
IP2Archive - User Manual - Deep Archive Sync Version 1.4
1.
About the Application
General Description
IP2Archive Deep Archive Sync is an application which allows an administrator to
compare the archive metadata of clips in the IP2Archive database with the clip archive
metadata in the IPDirector or DIVArchive database. It will highlight the differences (if any)
and allow the administrator to synchronize the databases.
In case the IPDirector database contains clips with archive metadata that are not known
in the IP2Archive database, it will allow the user to remove this archive metadata from the
IPDirector database. It sometimes happens that a new clip is created starting from
another clip (for example when creating a subclip). In this case, the metadata fields of the
new clip will be copied from the original clip. Since the Archive Process fields are also
metadata fields, they may contain incorrect data now. In particular, it happens a lot that
clips are marked as 'archived' while in fact they are not.
Workflow
The diagram below shows the interactions between IPDirector and the various IP2Archive
software components, and between the various IP2Archive software components and the
HSM system. When IP2Archive interfaces with XenData's Digital Archive, Tape Storage
Controller is replaced by File Transfer Daemon. In setups without DIVArchive as HSM, no
synchronization is possible between the IP2Archive database and the HSM database.
1. About the Application
1
EVS Broadcast Equipment S.A. - July 2013
2.
Issue 1.4.D
About Clip Archive Metadata
In IPDirector archive metadata is added to clips by means of specific user fields. They
allow a user to monitor the archive progress and status of each clip. The following user
fields have been defined in IPDirector:
•
Archive Status
•
Archive Progress
•
Archive Progress Message
•
Archive LTO Tape
•
Archive Group
•
Archive Date
Deep Archive Sync will check the values in these fields for each clip in the IP2Archive
database and compare them with the values in the IPDirector database and in the DIVA
database.
2
2. About Clip Archive Metadata
IP2Archive - User Manual - Deep Archive Sync Version 1.4
3.
Installing the Application
3.1.
How to Install the Application
To install the application, proceed as follows:
1. Double-click the IP2Archive.exe to launch the IP2Archive Setup Wizard.
The Welcome screen appears.
2. Click Next to continue.
The End-User License Agreement screen appears.
3. Read the license agreement on using IP2Archive in your country. Accept the
agreement and click Next to continue.
The Installation Folder screen appears.
3. Installing the Application
3
EVS Broadcast Equipment S.A. - July 2013
Issue 1.4.D
4. Select the folder where the application has to be installed and click Next to continue.
By default, the IP2Archive applications will be installed in the following folder:
C:\Program Files\EVS Broadcast Equipment\IP2Archive\(for 32-bit
machines) or C:\Program Files (x86)\EVS Broadcast
Equipment\IP2Archive\ (for 64-bit machines).
The Setup Type screen appears.
5. Choose a setup type and click Next to continue.
You can choose one of the following setup types:
◦
Complete: Installs all IP2Archive applications. Continue to step 7.
◦
Typical: Installs the most common IP2Archive applications, i.e. the database
client software, the Deep Archive Manager, Configurator and the EVS Software
Player. Continue to step 7. By default, this installation type is selected.
◦
Custom: Allows you to select the IP2Archive applications that have to be
installed. The Custom Setup screen appears. Continue to step 6.
6. In the Custom Setup screen, select the applications that you want to install, and then
click Next to continue.
4
3. Installing the Application
IP2Archive - User Manual - Deep Archive Sync Version 1.4
The Custom Setup screen shows a tree view of the IP2Archive applications that you
can install. By default, Deep Archive Manager, the database client software, the
EVS Software Player, the IP2Archive documentation and Configurator are selected.
When you click a feature or subfeature, a description of the feature will be displayed
and also the disk space requirements.
To add or remove a feature, click the arrow next to the feature name, and then choose
one of the following options from the drop-down list:
◦
Will be installed on local hard drive: Installs the selected feature in the
location shown under Installation Folder.
◦
Entire feature will be installed on local hard disk: Installs the selected feature
and all subfeatures.
◦
Feature will be installed when required:The feature will be installed when you
perform an action that requires it.
◦
Entire feature will be unavailable: For a new installation of IP2Archive, this
option passes over the installation of the selected feature. For an existing
installation, this option removes the feature from the installation. After you select
this option, a red X appears on the feature tree next to the feature name.This
option cannot be selected for the database client software, the EVS Software
Player and the IP2Archive documentation.
Click the Reset button to undo your selection.
7. Do one of the following:
◦
3. Installing the Application
If no database client software has been installed yet, the Database Connection
Creation screen appears.
5
EVS Broadcast Equipment S.A. - July 2013
Issue 1.4.D
Enter the IP address of the database server. The default port number, i.e. 1521,
has already been entered. Click Next to continue.
◦
If the database client software has already been installed, the Database Selection
screen appears.
Select the database name from the drop-down list and enter the username and
password necessary to log onto the database. You can test the connection with
the database by clicking the Test Login button. Click Next to continue.
To add a new database, click the New Database button and enter the database
name (by default IP2A.EVS), the IP address and port number (by default 1521) of
the machine that hosts the database, and the service name (by default TOM). You
can test the connection with the database by clicking the Test Login button.
Click Next to continue.
6
3. Installing the Application
IP2Archive - User Manual - Deep Archive Sync Version 1.4
8. Click Install to start the installation.
The selected applications will be installed.
3. Installing the Application
7
EVS Broadcast Equipment S.A. - July 2013
Issue 1.4.D
9. If the installation has been completed, click Finish to exit the Setup Wizard.
◦
If the View Readme File check box is selected, a text file containing the
IP2Archive release notes will be opened.
◦
If the second check box is selected, the Configurator application will be launched.
This application will allow to configure the installed applications.
The installed IP2Archive applications and a link to the IP2Archive documentation will
appear in the Windows Start menu.
10. Open the IP2Archive installation folder, and right-click the application you want to
create a shortcut to.
11. Click Create Shortcut.
12. Drag the shortcut to the Desktop.
8
3. Installing the Application
IP2Archive - User Manual - Deep Archive Sync Version 1.4
3.2.
How to Modify, Repair or Remove the
Installation
To modify, repair or remove the installation of the application, proceed as follows:
1. Double-click the IP2Archive.exe to launch the IP2Archive Maintenance Wizard.
The Welcome screen appears.
2. Click Next to continue.
The Modify, Repair or Remove Installation screen appears.
3. Do one of the following:
◦
If you want to modify the IP2Archive installation, e.g. add or remove certain
applications, select Modify and click Next. Continue to step 4.
◦
If you want to repair the IP2Archive installation, e.g. fixing missing or corrupt files,
shortcuts and registry entries, select Repair and click Next. Continue to step 6.
3. Installing the Application
9
EVS Broadcast Equipment S.A. - July 2013
◦
Issue 1.4.D
If you want to remove the IP2Archive installation, select Remove and click Next.
Continue to step 7.
4. In the Custom Setup screen, select the applications that you want to (de)install.
The Custom Setup screen shows a tree view of the IP2Archive applications that you
can install and deinstall. By default, Deep Archive Manager, the database client
software, the EVS Software Player, the IP2Archive documentation and Configurator
are selected. When you click a feature or subfeature, a description of the feature will
be displayed and also the disk space requirements.
To add or remove a feature, click the arrow next to the feature name, and then choose
one of the following options from the drop-down list:
◦
Will be installed on local hard drive: Installs the selected feature in the
location shown under Installation Folder.
◦
Entire feature will be installed on local hard disk: Installs the selected feature
and all subfeatures.
◦
Feature will be installed when required:The feature will be installed when you
perform an action that requires it.
◦
Entire feature will be unavailable: For a new installation of IP2Archive, this
option passes over the installation of the selected feature. For an existing
installation, this option removes the feature from the installation. After you select
this option, a red X appears on the feature tree next to the feature name.This
option cannot be selected for the database client software, the EVS Software
Player and the IP2Archive documentation.
Click the Reset button to undo your selection. Click Next to continue.
5. Click Install to start the installation.
10
3. Installing the Application
IP2Archive - User Manual - Deep Archive Sync Version 1.4
Any features that you have added in the Custom Setup screen will be installed. Any
features that you have removed will be uninstalled. The installed features that you
haven't modified will be skipped. Continue to step 8.
6. Click Repair to repair the installation of EVS IP2Archive. Continue to step 8.
7. Click Remove to remove IP2Archive from your computer.
3. Installing the Application
11
EVS Broadcast Equipment S.A. - July 2013
Issue 1.4.D
8. Click Finish to exit the Setup Wizard.
12
3. Installing the Application
IP2Archive - User Manual - Deep Archive Sync Version 1.4
4.
Starting the Application
4.1.
After Installation
Double-click the Deep Archive Sync icon
on your desktop to start the application.
You can also start the application by double-clicking the executable file (.exe) in the
installation folder.
The splash screen appears.
The application logs into the database. Then, the Settings window appears allowing you to
configure the application.
See section "Settings Window" on page 49.
4.2.
After Configuration
Double-click the IP2Archive Deep Archive Sync icon
on your desktop to start the
application. You can also start the application by double-clicking the executable file (.exe)
in the installation folder.
The splash screen appears. The application logs into the database.
Then, a Login dialog box appears.
4. Starting the Application
13
EVS Broadcast Equipment S.A. - July 2013
Issue 1.4.D
To be able to log into the application, you need to belong to a user group that has a role
which allows to use the application.
Enter your username and password and click Login. The main window of the application
opens.
You get an error notification if:
•
you have entered a wrong username or password.
•
you have omitted your username.
•
you have insufficient user rights.
•
your user account has expired.
Warning
If you have lost your password, a new password will have to be set in
the Configurator. Contact your system administrator.
14
4. Starting the Application
IP2Archive - User Manual - Deep Archive Sync Version 1.4
4.3.
Main Window Overview
General Description
The main window allows you to search for clips in a particular database, request a clip
archive metadata comparison with another database and start the synchronization
between the two databases.
Illustration
The main window contains the areas highlighted on the screenshot below:
Area Description
The table below describes the various parts of the main window:
Part
Name
Description
1.
Menu bar
The menu bar contains three menus: File, Settings and Help.
2.
Deep Archive
tab &
IPDirector tab
These tabs allow you to search for clips, request a clip archive
metadata comparison between two databases and
synchronize the metadata.
Menu Bar
The menu bar contains three menus: File, Settings and Help.
The File menu contains only one command: Exit. It is used to exit the application. Click
the File menu or use the keyboard shortcut keys ALT + F or F10 + F to open it. Click Exit
or use the keyboard shortcut key X to exit the application.
4. Starting the Application
15
EVS Broadcast Equipment S.A. - July 2013
Issue 1.4.D
The Settings menu doesn’t contain any commands. It immediately gives access to the
application settings. Click the Settings menu or use the keyboard shortcut keys ALT + S
or F10 + S to access the settings.
The Help menu contains the following commands: About and Help.
With the About command the application splash screen can be opened. The splash
screen displays the application software version, the name of the database the application
is logged on to and the login name used.
With the Help command you can open the application help file. Click the Help menu or
use the keyboard shortcut keys ALT + H or F10 + H to open it.
Click About or use the keyboard shortcut key A to open the splash screen.
Click Help or use the keyboard shortcut key H to open the application help file.
Deep Archive and IPDirector Tab
The Deep Archive tab allows you to search for clips in the IP2Archive database and
compare their archive metadata with the archive metadata in the IPDirector or DIVA
database See section "Deep Archive Tab" on page 19.
In the IPDirector tab you can search for clips in the IPDirector database that have archive
metadata but that are unknown in the IP2Archive database. You can remove this archive
metadata from the IPDirector database. See section "IPDirector Tab" on page 21.
16
4. Starting the Application
IP2Archive - User Manual - Deep Archive Sync Version 1.4
5.
Synchronizing Clip Archive
Metadata
5.1.
Synchronization Workflows
5.1.1.
Overview
Three synchronization workflows can be performed in Deep Archive Sync:
5.1.2.
•
The user synchronizes the archive metadata of clips in the IPDirector database with
the archive metadata of these clips in the IP2Archive database.
•
The user synchronizes the archive metadata of clips in the IP2Archive database with
the archive metadata of these clips in the DIVA database.
•
The user removes in the IPDirector database the archive metadata of clips that are not
found in the IP2Archive database.
Synchronizing IPDirector Clip Archive
Metadata
To synchronize the clip archive metadata in the IPDirector database with the clip archive
metadata in the IP2Archive database, the following workflow has to be followed:
1. The user searches in the Deep Archive tab for clips in the IP2Archive database whose
archive metadata has to be compared with the archive metadata of these clips in the
IPDirector database.
2. The user requests a comparison. Deep Archive Sync performs a comparison through
the IPDirector API.
3. The user selects the clips whose archive metadata has to be and can be
synchronized, and he initiates the synchronization process. The IPDirector clip
archive metadata is updated with the metadata in the IP2Archive database. The
content of the archive and restore bins in IPDirector is also synchronized.
5. Synchronizing Clip Archive Metadata
17
EVS Broadcast Equipment S.A. - July 2013
5.1.3.
Issue 1.4.D
Synchronizing IP2Archive Clip Archive
Metadata
To synchronize the clip archive metadata in the IP2Archive database with the clip archive
metadata in the DIVA database, the following workflow has to be followed:
1. The user searches in the Deep Archive tab for clips in the IP2Archive database whose
archive metadata has to be compared with the archive metadata of these clips in the
DIVA database.
2. The user requests a comparison. Deep Archive Sync performs a comparison through
the DIVA API.
3. The user selects the clips whose archive metadata has to be and can be
synchronized, and he initiates the synchronization process. The archive metadata in
the IP2Archive database is updated with the archive metadata in the DIVA database.
5.1.4.
Removing Clip Archive Metadata From
IPDirector
To remove the archive metadata in the IPDirector database of clips that are not known in
the IP2Archive database, proceed as follows:
1. The user searches in the IPDirector tab for clips in the IPDirector database that have
archive metadata.
2. Deep Archive Sync checks if these clips exist in the IP2Archive database or not. The
clips that do not exist are returned.
3. The user requests to remove the archive metadata of these clips in the IPDirector
database. The archive metadata is removed from the IPDirector database.
18
5. Synchronizing Clip Archive Metadata
IP2Archive - User Manual - Deep Archive Sync Version 1.4
5.2.
Interface
5.2.1.
Deep Archive Tab
General Description
The Deep Archive tab allows you to search for clips in the IP2Archive database and
request a comparison between their archive metadata and the archive metadata of these
clips in the IPDirector or in the DIVA database. It also allows you to start the
synchronization process.
Illustration
The Deep Archive tab contains the areas highlighted on the screenshot below:
Area Description
The table below describes the various parts of the Deep Archive tab:
Part
Name
Description
1.
Search Bar
The Search bar allows you to search for clips in the
IP2Archive database using one or more search
criteria.
2.
Compare Buttons
The Compare buttons allow you to compare the clip
archive metadata in the IP2Archive database with
the clip archive metadata in the IPDirector or in the
DIVA database.
3.
Check Lores Button
The Check Lores button allows you to check the
5. Synchronizing Clip Archive Metadata
19
EVS Broadcast Equipment S.A. - July 2013
Part
Name
Issue 1.4.D
Description
IPDirector database the existence of the lowresolution file for particular clips.
4.
Search Results Pane
The Search Results pane displays the clips that
correspond to the search that was performed.
Note
Depending on your user rights, the Compare buttons will be available or not.
20
5. Synchronizing Clip Archive Metadata
IP2Archive - User Manual - Deep Archive Sync Version 1.4
5.2.2.
IPDirector Tab
General Description
The IPDirector tab allows you to search for clips in the IPDirector database that have
archive metadata but that are unknown in the IP2Archive database, and to remove this
archive metadata from the IPDirector database.
Illustration
The IPDirector tab contains the areas highlighted on the screenshot below:
Area Description
The table below describes the various parts of the IPDirector tab:
Part
1.
Name
Description
Search Button, Remove
Metadata for Selected
Clips Button
The Search button allows you to search for
clips in the IPDirector database.
The Remove Metadata for Selected Clips
button allows you to start the removal of the
archive metadata of the selected clips from the
IPDirector database.
2.
Search Results pane
This pane displays the clips that have archive
metadata, but that do not exist in the
IP2Archive database.
Note
Depending on your user rights, this tab will be available or not.
5. Synchronizing Clip Archive Metadata
21
EVS Broadcast Equipment S.A. - July 2013
Issue 1.4.D
5.3.
Searching for Clips
5.3.1.
Searching for Clips in IP2Archive
Search Criteria
The search bar in the Deep Archive tab allows a user to search for clips in the IP2Archive
database using a number of search criteria.
Clips can be searched by:
•
their VarID
•
their filename
•
their clipname
•
their video format
•
their origin
•
their content type
•
the date or period their archive status was last updated in Deep Archive Manager
•
their archive status.
The search criteria can be combined to narrow down the search results. To start a search,
the user has to click the Search button
.
How to Search for Clips
Searching by VarID
To search for clips in a particular tab using the clip VarID, proceed as follows:
1. (Optional) Select the VarId check box.
2. Enter (part of) the VarID in the field next to the VarId check box. The check box will
be automatically selected.
3. Click
to start the search.
The clips whose VarID matches (part of) the VarID you entered are displayed.
Searching by Filename
To search for clips by their filename, proceed as follows:
22
5. Synchronizing Clip Archive Metadata
IP2Archive - User Manual - Deep Archive Sync Version 1.4
1. (Optional) Select the Filename check box.
2. Enter (part of) the filename in the field next to the Filename check box. The check box
will be automatically selected.
3. Click
to start the search.
The clips whose filename matches (part of) the filename you entered are displayed.
Searching by Clipname
To search for clips by clipname, proceed as follows:
1. (Optional) Select the Clipname check box.
2. Enter (part of) the clipname in the field next to the Clipname check box. The check
box will be automatically selected.
3. Click
to start the search.
The clips whose clipname matches (part of) the clipname you entered are displayed.
Searching by Video Format
To search for clips in the IP2Archive database by video format, proceed as follows:
1. (Optional) Select the Video Formats check box.
2. From the drop-down list select the desired video format. Multiple formats can be
selected. The Video Formats check box will be automatically selected.
3. Click the Search button
to start the search.
Searching by Origin
To search for clips in the IP2Archive database by their origin, proceed as follows:
1. (Optional) Select the Origins check box.
2. From the drop-down list select the desired origin. Multiple origins can be selected. The
Origins check box will be automatically selected.
3. Click the Search button
to start the search.
Searching by Content Type
To search for clips in the IP2Archive database by their content type, proceed as follows:
5. Synchronizing Clip Archive Metadata
23
EVS Broadcast Equipment S.A. - July 2013
Issue 1.4.D
1. (Optional) Select the Content Types check box.
2. From the drop-down list select the desired content type. Multiple content types can be
selected. The Content Types check box will be automatically selected.
3. Click the Search button
to start the search.
Searching by Update Period
To search for clips in the IP2Archive database by the date or period their archive status
was last updated in Deep Archive Manager, proceed as follows:
1. Select the check box next to the Date Updated From box.
2. In the Date Updated From box, do one of the following:
◦
Enter the desired start date. Proceed to step 4.
◦
Click the downward pointing arrow to open a date picker.
Proceed to step 3.
3. Do one of the following:
◦
Select the desired year, month and day.
◦
Click Clear to clear the currently selected date and select a new date.
◦
Click Today to select the current date.
4. In the To box, enter an end date for the period or select a date from the date picker.
To display the clips whose archive status was last updated on a particular day, enter
the same date as the one you entered in the Date Updated From box.
5. Click
to start the search.
A warning message appears indicating the number of clips found. If there are a lot of
results, the loading can take some time.
24
5. Synchronizing Clip Archive Metadata
IP2Archive - User Manual - Deep Archive Sync Version 1.4
6. Click Yes to continue or No to cancel the search operation.
Searching by Archive Status
To search for clips in the IP2Archive database by archive status, proceed as follows:
1. (Optional) Select the Statuses check box.
2. Open the drop-down list and select the desired archive statuses from the list. The
Statuses check box will be automatically selected.
3. Click
to start the search.
A warning message appears indicating the number of clips found. If there are a lot of
results, the loading can take some time.
4. Click Yes to continue or No to cancel the search operation.
The clips are displayed in the Search Results pane.
5.3.2.
Searching for Clips in IPDirector
To search for clips in the IPDirector database with clip archive metadata that does not
exist in the IP2Archive database, click the Search button
5. Synchronizing Clip Archive Metadata
in the IPDirector tab.
25
EVS Broadcast Equipment S.A. - July 2013
5.3.3.
Issue 1.4.D
Search Results
Deep Archive Tab
The Search Results pane in the Deep Archive tab displays the clips that correspond to the
search query performed in the search bar.
The following clip data is displayed:
26
Data
Description
VarID
A 32-character ID with variable length and format. It is automatically
assigned by IPDirector to new clips. It is mainly used to ensure
redundancy on the system.
Clipname
The name of the clip.
Filename
Name and extension of the corresponding high-resolution video file.
Location
Location of the high-resolution video file.
Status
Archive status of the clip.
Status
Message
Automatically generated status message.
Date
Updated
Date the archive status was last modified in Deep Archive Manager.
Tape
ID of the LTO tape the high-resolution file of the clip was stored on.
Progress
Progress bar indicating the progress of the archive, purge, restore or
remove hi-res process.
Progress
Message
Textual description of the progress.
Type
Clip content type.
Origins
Source via which the clip was entered in the deep archive system.
Hires
Indicates if the high-resolution video file is present on the nearline storage
5. Synchronizing Clip Archive Metadata
IP2Archive - User Manual - Deep Archive Sync Version 1.4
Data
Description
Online
or not. A green icon ( ) indicates that the high-resolution file is online. If
the high-resolution file is offline, i.e. not available on the nearline storage,
the cell is empty.
Creation
Date
Date and time the clip appeared in Deep Archive Manager as archive
candidate.
The data in the grid can be sorted and filtered. See section "Managing Grids and Grid
Data" on page 36
IPDirector Tab
The Search Results pane in the IPDirector tab displays the clips from the IPDirector tab
that have archive metadata but that do not exist in the IP2Archive database.
The following clip data is displayed:
Data
Description
VarIds
A 32-character ID with variable length and format. It is
automatically assigned by IPDirector to new clips. It is mainly
used to ensure redundancy on the system.
Archive Status
Archive status of the clip.
Archive Status
Message
Automatically generated archive status message.
Status Date
Date the archive status was last modified in Deep Archive
Manager.
Archive LTO Tape
ID of the LTO tape the high-resolution file of the clip was stored
on.
Archive Group
Tape group the clip belongs to.
Archive Date
Date the clip was archived.
Archive Progress
Progress bar indicating the progress of the archive, purge,
restore or remove hi-res process.
Archive Progress
Message
Textual description of the progress.
Error
Error message indicating that the clip was not found in the
IP2Archive database.
5. Synchronizing Clip Archive Metadata
27
EVS Broadcast Equipment S.A. - July 2013
Issue 1.4.D
5.4.
Comparing and Synchronizing Clip
Archive Metadata
5.4.1.
Requesting the Comparison
Once you have searched for the desired clips in the Deep Archive tab, you can request
Deep Archive Sync to compare the archive metadata of these clips in the IP2Archive
database with the metadata in the IPDirector database or in the DIVA database.
Click the Compare With IPDirector button
or the Compare With DIVA button
to do this.
A dialog box appears displaying the ID and filename of the clips whose archive metadata
is being compared. It also displays the remaining items and the progress of the process.
Note
If IP2Archive interfaces with XenData or SGL, the Compare With DIVA button
will be grayed out. You won't be able to compare and synchronize the metadata.
5.4.2.
Sync Dialog Box
General Description
The IPDirector or DIVA Sync dialog box appears as soon as Deep Archive Sync has
completed its comparison process. It displays the clip archive metadata originating from
the IP2Archive database next to the clip archive metadata originating from the IPDirector
or the DIVA database. It highlights the clips with metadata discrepancies. It allows you to
start the synchronization process for the clips you select.
28
5. Synchronizing Clip Archive Metadata
IP2Archive - User Manual - Deep Archive Sync Version 1.4
Illustration
The Sync dialog box contains the areas highlighted on the screenshot below:
Area Description
The table below describes the various parts of the Sync dialog box:
Part
Name
Description
1.
Comparison Grid
The Comparison grid displays the clip archive
metadata originating from the IP2Archive
database next to the clip archive metadata
originating from the IPDirector or the DIVA
database.
2.
Preview, Print and
Export Buttons
The data displayed in the Comparison grid can be
printed and exported to Excel. The Print Preview
button is used to open a print preview. The Print
button is used to print the content of the grid. The
Export to Excel button is used to export the data
in the grid to Excel.
3.
Close Button
The Close button is used to exit the Comparison
window.
4
Synchronize Buttons
The Select all Clips that can be Synchronized
button allows you to select all clips in the grid that
can be synchronized.
The Synchronize Selected Clips button allows
you to start the synchronization of the data of the
selected clips in the grid.
5. Synchronizing Clip Archive Metadata
29
EVS Broadcast Equipment S.A. - July 2013
5.4.3.
Issue 1.4.D
Comparison Grid
Introduction
In the Comparison grid the clip archive metadata in the IP2Archive database is compared
with the clip archive metadata in the IPDirector or in the DIVA database.
Clip Data Compared With the IPDirector Database
The Comparison grid in the IPDirector Sync dialog box displays the following data:
30
Data
Description
VarID
A 32-character ID with variable length and format. It is
automatically assigned by IPDirector to new clips. It is mainly
used to ensure redundancy on the system.
Sync Status
Synchronization status of the clip. The clip can have one of the
following statuses:
• In sync: The archive metadata of the clip has been
synchronized.
• Sync candidate: The archive metadata of the clip has to be
synchronized.
• Unable to sync: The archive metadata of the clip cannot be
synchronized.
Status Deep
Archive
Archive status of the clip in the IP2Archive database.
Status IPDirector
Archive status of the clip in the IPDirector database.
5. Synchronizing Clip Archive Metadata
IP2Archive - User Manual - Deep Archive Sync Version 1.4
Data
Description
Status Message
Deep Archive
Status message linked to the clip in the IP2Archive database.
Status Message
IPDirector
Status message linked to the clip in the IPDirector database.
Tape Deep
Archive
ID of the LTO tape in the IP2Archive database.
Tape IPDirector
ID of the LTO tape in the IPDirector database.
Group Deep
Archive
Name of the group the LTO tape belongs to in the IP2Archive
database.
Group IPDirector
Name of the group the LTO tape belongs to in the IPDirector
database.
Deep Archive
Progress
Progress bar indicating the progress of the archive, purge, restore
or remove hi-res proces as stored in the IP2Archive database.
Progress
IPDirector
Progress bar indicating the progress of the archive, purge, restore
or remove hi-res proces as stored in the IPDirector database.
Deep Archive
Progress
Message
Textual description of the progress as stored in the IP2Archive
database.
IPDirector
Progress
Message
Textual description of the progress as stored in the IPDirector
database.
Bins Deep
Archive
Name of the IPDirector archive or restore bin in which the clip is
located as stored in the IP2Archive database.
Bins IPDirector
Name of the IPDirector archive or restore bin in which the clip is
located as stored in the IPDirector database.
Error
An error message that indicates what the difference is between
the data in the IP2Archive database and the IPDirector database.
The following error messages can be displayed:
• ‘No metadata found’
• ‘Clips not found’
• 'Archive states do not match'
• 'Status messages do not match'
• 'LTO tape ids do not match'
• 'Progress messages do not match'
• 'Progresses do not match'
• 'Group names do not match'
5. Synchronizing Clip Archive Metadata
31
EVS Broadcast Equipment S.A. - July 2013
Issue 1.4.D
Clip Data Compared With the DIVA Database
The Comparison grid in the IPDirector Sync dialog box displays the following data:
Data
Description
Compared
Check box indicating if the data of the clip has been compared or
not.
In Sync
Check box indicating if the data of the clip is synchronized with
the DIVA database.
VarID
A 32-character ID with variable length and format. It is
automatically assigned by IPDirector to new clips. It is mainly
used to ensure redundancy on the system.
Category
Category in DIVA the clip belongs to.
Status Deep
Archive
Archive status of the clip in the IP2Archive database.
Status DIVA
Archive status of the clip in the DIVA database.
Tape Deep
Archive
ID of the LTO tape in the IP2Archive database.
Tape DIVA
ID of the LTO tape in the DIVA database.
Progress Deep
Archive
Progress bar indicating the progress of the archive, purge, restore
or remove hi-res proces as stored in the IP2Archive database.
Progress DIVA
Progress bar indicating the progress of the archive, purge, restore
or remove hi-res proces as stored in the DIVA database.
Progress
Message
Deep Archive
Textual description of the progress as stored in the IP2Archive
database.
Progress
Message DIVA
Textual description of the progress as stored in the DIVA
database.
Error
An error message that indicates what the difference is between
the data in the IP2Archive database and the DIVA database. The
following error messages can be displayed:
• 'Archive states do not match'
• 'LTO tape ids do not match'
• 'Progresses do not match'
• 'Progress messages do not match'
• 'Clips that are in progress or in error cannot be synchronized'
Color Codes
The Comparison grid uses color codes to indicate the synchronization status of each clip.
Three colors are used:
•
32
Green: Indicates that the archive metadata of the clip is in sync.
5. Synchronizing Clip Archive Metadata
IP2Archive - User Manual - Deep Archive Sync Version 1.4
5.4.4.
•
Orange: Indicates that the archive metadata of the clip is not in sync. It can be
synchronized.
•
Red: Indicates that the archive metadata of the clip is not in sync. It cannot be
synchronized.
Synchronizing the Clip Archive Metadata
To synchronize the clip archive metadata, proceed as follows:
1. Click
to select the clips the archive metadata of which you want to synchronize.
If you click
2. Click
before selecting any clips, an error message will appear.
to start the synchronization process.
◦
If you are synchronizing the data between IPDirector and IP2Archive, then
depending on the settings,a dialog box might appear asking if you also want to
synchronize the content of the archive and restore bins in IPDirector. See section
"MAD Tab" on page 51. Continue to step 3.
◦
If you are synchronizing the data between IP2Archive and DIVA, then the
synchronization is performed.
3. Click the Yes, Both Bins And Metadata button if you want Deep Archive Sync to
both synchronize the clip archive metadata and the content of the archive and restore
bins in IPDirector. Click the No, Metadata Only button if you only want the clip
archive metadata to be synchronized.
The synchronization is performed.
5.5.
Removing Clip Archive Metadata
After you have searched for the clips in the IPDirector database that have clip archive
metadata that does not exist in the IP2Archive database (See section "Searching for Clips
in IPDirector" on page 25.), you can remove this clip archive metadata in the IPDirector
database.
To remove the archive metadata of clips, click the Synchronize button
in the
IPDirector tab. If nothing is selected, the Synchronize button remains unavailable.
5. Synchronizing Clip Archive Metadata
33
EVS Broadcast Equipment S.A. - July 2013
Issue 1.4.D
5.6.
Checking the Status of the LowResolution File
5.6.1.
Requesting the Check
Once you have searched for the desired clips in the Deep Archive tab, you can request
Deep Archive Sync to check in the IPDirector database if a low-resolution file exists for
the clips in questions.
Click the Check if Lores Exists in IPDirector button
to start the check.
A dialog box appears displaying the ID and filename of the clips. It also displays the
remaining clips to be checked and the progress of the process.
Once the check has been completed, the Synchronize IPDirector Lores dialog box
appears.
5.6.2.
Synchronize IPDirector Lores Window
The Synchronize IPDirector Lores window displays if the low-resolution video file of a
particular clip is available online or not.
34
5. Synchronizing Clip Archive Metadata
IP2Archive - User Manual - Deep Archive Sync Version 1.4
The following information is displayed:
Column
Description
Clip Found
If the low-resolution file is found to be online, this check box will be
automatically selected.
VarID
VarID of the clip.
XT
The icon
appears when the clip is available on the XT server.
Hires
The icon
appears when the high-resolution video file is online.
Lores
The icon
appears when the low-resolution video file is online.
Status
Archive status of the clip.
Required
Action
One or more actions that have to be performed to get the low-resolution
video file online again. The following messages can appear here:
• Generate lores (in case the high-resolution file is online)
• Restore hires, then generate lores (in case the high-resolution file is
not online, but has been archived to LTO).
• Synchronize hires, then restore hires, then generate lores (in case
the high-resolution file has been removed in IPDirector but is still
online in the IP2Archive database).
• Unable to restore (in case the high-resolution and low-resolution file
are not online, no clip is available on the XT server and the clip was
not archived on LTO tape).
Error
Error message that appears when the low-resolution file is not found
online. By default, 'No clips found' is displayed.
Click the Close button
5. Synchronizing Clip Archive Metadata
to exit the dialog box.
35
EVS Broadcast Equipment S.A. - July 2013
Issue 1.4.D
6.
Managing Grids and Grid Data
6.1.
About Managing Grids and Grid Data
In the application most of the data is displayed in grids. Each grid consists of a number of
columns containing specific information.
The application provides you a number of functions that allow you to organize the display
of data in the grids to be clearer and more comprehensible. This will enable you to find
back information much faster.
It is possible to:
•
sort and filter data
•
widen and narrow columns.
The data of the grids can be printed and/or exported to Excel for reporting purposes.
6.2.
Adjusting the Width of a Grid Column
To manually adjust the width of a particular column, drag the right or left border of the
column header until the column has the desired width.
To manually change the width of a column to fit its contents, double-click the boundary on
the right side of the column header.
If you hold your cursor over a column header border, it will change into a double-headed
arrow.
To automatically adjust the width of a column to fit its contents, right-click the column
header, and then select the Best Fit option from the context menu.
To automatically adjust the width of all columns to fit their contents, right-click the column
header, and then select the Best Fit (all columns) option from the context menu.
36
6. Managing Grids and Grid Data
IP2Archive - User Manual - Deep Archive Sync Version 1.4
6.3.
Sorting Grid Data
Every grid can be sorted according to the values in one of the columns. You can sort text
(from A-Z or from Z-A) and numbers (from low to high or from high to low).
To sort the data in a particular column, click the column header once to sort the data in
ascending order. Click again to sort the data in descending order. An arrow next to the
column header indicates the sorting method.
sorted in ascending order
sorted in descending order
6. Managing Grids and Grid Data
37
EVS Broadcast Equipment S.A. - July 2013
Issue 1.4.D
6.4.
Manipulating Grid Columns
6.4.1.
Adjusting the Width of a Grid Column
To manually adjust the width of a particular column, drag the right or left border of the
column header until the column has the desired width.
To manually change the width of a column to fit its contents, double-click the boundary on
the right side of the column header.
If you hold your cursor over a column header border, it will change into a double-headed
arrow.
To automatically adjust the width of a column to fit its contents, right-click the column
header, and then select the Best Fit option from the context menu.
To automatically adjust the width of all columns to fit their contents, right-click the column
header, and then select the Best Fit (all columns) option from the context menu.
38
6. Managing Grids and Grid Data
IP2Archive - User Manual - Deep Archive Sync Version 1.4
6.4.2.
Reordering Grid Columns
If you want the information in a grid to be displayed in a different order, you can change the
position of the columns. There are two ways to reorder columns.
To reorder a column, proceed as follows:
1. Click the header of the column you want to move and hold down your left mouse
button.
2. Drag the column header to the desired position in the grid.
Two arrows will indicate where it is possible to insert the column.
A black prohibition sign will indicate where the column cannot be inserted.
3. Release the left mouse button to insert the column.
You can also reorder the columns of a grid by using the Show/Hide/Move button:
1. Click
on the left side of the first column header.
A drop-down list containing the headers of the grid columns appears. The column
headers are listed in the order in which the columns are displayed in the grid. The first
header in the list is the leftmost field in the grid. The columns that are visible in the grid
are selected.
The headers in the screenshot below can differ from the headers available in your
application.
2. Select a header and drag it to the desired position in the list. Green arrows will appear
indicating where you can insert the grid.
6. Managing Grids and Grid Data
39
EVS Broadcast Equipment S.A. - July 2013
6.4.3.
Issue 1.4.D
Removing a Grid Column
If you want less information to be displayed in a grid, you can remove some columns. To
remove a column from a grid, right-click its header and then select the option Remove
This Column from the context menu.
The removed column will be added to the dialog box containing the columns that can be
added to the grid. In a later stage, the removed column can be added again to the grid.
40
6. Managing Grids and Grid Data
IP2Archive - User Manual - Deep Archive Sync Version 1.4
6.4.4.
Adding a Grid Column
If you want more information to be displayed in a grid, you can add some extra, predefined
columns. To add a column to a grid, proceed as follows:
1. Right-click the header of a column, and then select the option Field Chooser from the
context menu.
A dialog box appears with a list of predefined columns you can add to the grid. Note
that the column headers shown in the screenshot below can differ from the ones
displayed in your application.
2. From the list, select the header of the column you want to add to the grid.
3. Drag the column header to the desired position in the grid.
Two green arrows will appear indicating where you can insert the column.
A black prohibition sign or cross will appear if you try to insert the column in a location
where it cannot be inserted.
4. Release the left mouse button to insert the column.
6. Managing Grids and Grid Data
41
EVS Broadcast Equipment S.A. - July 2013
6.4.5.
Issue 1.4.D
Hiding and Showing Grid Columns
In each grid you can select the columns you want to be shown and deselect the columns
you want to be hidden. A filter button is provided in the top left corner of the grid.
If you click it, a drop-down list will appear with the available columns.
42
6. Managing Grids and Grid Data
IP2Archive - User Manual - Deep Archive Sync Version 1.4
6.5.
Filtering Grid Data
You can filter the data in a grid by using two types of filters: by one or more values from a
particular column or by simple or complex criteria.
6.5.1.
Filtering by Values From a Column
To filter the data in a particular grid by one or more values from a particular column,
proceed as follows:
1. Hold your cursor over the header of the column by whose values you want to filter the
grid, and then click the filter button.
A drop-down list opens containing all the column values.
2. Select the desired values.
Only the records that contain one of the selected values are displayed in the grid. At
the bottom of the grid a filter bar appears displaying the applied filter.
3. In the filter bar, do one of the following:
◦
Clear the check box next to the filter
the filter again.
◦
Click
to undo the filter and close the filter bar.
◦
Click
to open a drop-down list containing previously applied filters.
◦
Click Customize to create a complex filter.
6. Managing Grids and Grid Data
to undo it. Select the check box to apply
43
EVS Broadcast Equipment S.A. - July 2013
6.5.2.
Issue 1.4.D
Filtering by Criteria
Filters by criteria can be simple or complex:
•
Simple filters consist of one or two criteria and one Boolean operator (AND or OR).
•
Complex filters consist of more than two criteria and more than one Boolean operator
(AND, OR, NOT AND and NOT OR).
How to Create a Simple Filter
To create a simple filter, proceed as follows:
1. Hold your cursor over the header of the desired column, and then click the filter button
appearing in the right corner.
2. From the drop-down list, select the option (Custom…).
The Custom Filter dialog box appears. Here you can enter the criterion or the two
criteria you want to filter the values of the selected column by.
3. Select the desired comparison operator from the first drop-down list.
A comparison operator is used in comparison criteria to compare two values.
Operators include: ‘equals’, ‘does not equal’, ‘is less than’, ‘is less than or equal to’, ‘is
greater than’, ‘is greater than or equal to’, ‘like’, ‘not like’, ‘is blank’ and ‘is not blank’.
For example, if you want to filter the values of a column by text that includes a certain
word, character or sign, you have to select the comparison operator ‘like’.
4. Enter text in the field next to the first drop-down list.
For example, if you want to filter by text that includes the letter ‘S’, type %S%.
The % wildcard can substitute for zero or more characters. The _ character can
substitute for exactly one character.
5. If you want to add a second filter criterion, select the desired Boolean operator. Select:
44
◦
AND, if both criteria have to be true;
◦
OR, if at least one of the criteria or both have to be true.
6. Managing Grids and Grid Data
IP2Archive - User Manual - Deep Archive Sync Version 1.4
6. Select the desired comparison operator from the second drop-down list, and then enter
text in the field at the right.
7. Click OK to apply the filter.
Only the values matching the entered criterion or criteria will be displayed.
How to Create a Complex Filter
To create a complex filter, proceed as follows:
1. Apply a simple filter to a grid or filter a grid by selecting one or more values from a list
of values. See above.
At the bottom of the grid a filter bar appears.
2. In the filter bar, click the Customize button.
A dialog box appears that allows you to create complex filters. The criteria of the
active filter are displayed in a tree structure. Here you can add extra criteria and
change the existing criteria.
3. Do one of the following:
•
•
To add a new criterion, do one of the following:
◦
click the Press the Button to Add a New Condition button;
◦
click the Filter button and select Add Condition;
◦
click
next to a criterion and select Add Condition.
To change a criterion, do one of the following:
◦
click a column header (green and underlined text) and select another value from
the list;
◦
click a comparison operator (dark red and underlined text) and select another
value from the list: ‘equals’, ‘does not equal’, ‘is less than’, ‘is less than or equal
to’, ‘is greater than’, ‘is greater than or equal to’, ‘like’, ‘not like’, ‘is blank’, ‘is not
blank’, ‘between’, ‘not between’, ‘in’, ‘not in’;
◦
click the dark blue text on the right of the comparison operator and enter another
value.
6. Managing Grids and Grid Data
45
EVS Broadcast Equipment S.A. - July 2013
Issue 1.4.D
•
To delete a criterion, click the
Remove Row.
•
To add a group of criteria, do one of the following:
•
button to the left of the criterion and select the option
◦
click
next to a random criterion and select Add Group;
◦
click the Filter button and select Add Group.
To delete all criteria, click the Filter button and select the option Clear All.
4. Do one of the following:
◦
To open an existing complex filter, click Open;
◦
To save the current filter, click Save As;
◦
To confirm the changes and close the dialog box, click OK;
◦
To undo the changes, click Cancel.
◦
To apply the changes, click Apply.
At the bottom of the grid a bar appears which displays the components of the complex
filter. Note that if you have already created a custom filter in the past, you can reapply
it by clicking the current filter or the downward pointing arrow. A drop-down list
containing previous filters appears.
46
6. Managing Grids and Grid Data
IP2Archive - User Manual - Deep Archive Sync Version 1.4
6.6.
Printing and Exporting Grid Data
6.6.1.
Print and Export Toolbar
A toolbar is provided containing buttons that allow you to print or export to Excel the data
displayed in the grid. The table below describes each button.
Button
Description
This button allows you to preview the grid data before printing.
This button allows you to print the grid data.
This button allows you to export the grid data to Excel.
6.6.2.
Printing Grid Data
To print the data of a particular grid, proceed as follows:
1. Click the Print button
above the grid whose data you want to print.
A Print dialog box appears.
2. Click Print to print the grid data.
6.6.3.
Exporting Grid Data
To export the data of a particular grid to Excel, proceed as follows:
1. Click the Excel Export button
Excel.
above the grid whose data you want to export to
An Excel file is generated. The suggested Excel file name contains the current date
and name of the tab of which you want to export the data. You can still modify this
name.
2. Browse for the folder where you want to save the Excel file.
3. Enter a name in the File Name field or use the default name, and then click Save to
save the file.
If the folder contains an Excel file with the same file name, a warning message will
appear asking you if you want to replace the existing file. Click Yes to continue and
No to cancel the operation.
6. Managing Grids and Grid Data
47
EVS Broadcast Equipment S.A. - July 2013
Issue 1.4.D
Once you have saved the file, a message box appears asking you if you want to open
the newly generated Excel file. Click Yes to open the file and No to cancel the
operation.
48
6. Managing Grids and Grid Data
IP2Archive - User Manual - Deep Archive Sync Version 1.4
7.
Configuring the Application
7.1.
Settings Window
Opening the Settings Window
The Settings window allows you to configure your application. The first time the
application is launched after it has been installed, the Settings window opens
automatically.
The Settings window can also be accessed through the Settings menu in the main
window.
Overview Setup Categories
The settings can be divided into three setup categories. In the Settings window, a tab is
provided for each setup category. The table below briefly describes each setup category:
Setup Category
Description
User Settings
These settings can be configured by each individual user.
Global Settings
These settings can only be configured by the system
administrator and by an eventual superuser.
System Settings
These settings configure the general functioning of the
application. They can only be configured by the system
administrator.
Currently, only the System Settings tab contains settings. The User Settings and Global
Settings tab are still empty. They do not contain any settings.
7. Configuring the Application
49
EVS Broadcast Equipment S.A. - July 2013
Issue 1.4.D
Certain settings are read-only and cannot be configured. These can only be modified in the
Configurator application. Other settings have to be configured locally.
Edit Mode
To be able to edit the Global and/or System settings, you first have to enter a password.
To put the Settings window into Edit Mode, proceed as follows:
1. Click the Enter Into Edit Mode button
.
A dialog box appears.
2. Enter the administrator password and then click OK.
The Settings window enters into Edit Mode.
50
7. Configuring the Application
IP2Archive - User Manual - Deep Archive Sync Version 1.4
7.2.
Global Settings
7.2.1.
Overview Global Settings Subcategories
The Global settings are divided into the following subcategories:
•
7.2.2.
MAD
MAD Tab
In the MAD tab you can configure the synchronization of the content of the IPDirector
archive and restore process bins by Deep Archive Sync.
The following options are available:
•
If you select the option Always Synchronize Bins in IPDirector, Deep Archive
Sync will also automatically update the content of the bins in IPDirector when
synchronizing the IPDirector clip metadata.
•
If you select the option Never Synchronize Bins, Deep Archive Sync will not update
the content of the bins in IPDirector.
•
If you select the option Ask Each Time if Bins Should Be Synchronized in
IPDirector , the user will have to confirm each time the synchronization of the content
of the bins in IPDirector.
In the IPDirector group box you can specify a maximum number of clips to retrieve when
searching in the IPDirector database. This to avoid that too much clips will be retrieved.
By default, this is set to 10000.
7. Configuring the Application
51
EVS Broadcast Equipment S.A. - July 2013
Issue 1.4.D
7.3.
System Settings
7.3.1.
Overview System Settings Subcategories
The System settings are divided into the following subcategories:
•
Directories
•
MAD Options
•
Oracle Connection
•
E-Mail Options
•
Global Password
•
Error Handling
•
IPDirector API
•
IPDirector Bins
•
IPDirector Metadata
•
DIVA
For each subcategory a tab is provided. The Directories and MAD Options tab do not
contain settings.
52
7. Configuring the Application
IP2Archive - User Manual - Deep Archive Sync Version 1.4
7.3.2.
Oracle Connection Tab
The Oracle Connection tab allows you to configure the connection with the Oracle
database.
Entering the Database Name
In this field you have to enter the name of the database the application has to connect to.
If the Use This Database Name check box is selected, the name of the database will
automatically appear in the Oracle login dialog box at start-up.
Entering the Login Name
In this field you have to enter a login name. If the Use This Login Name check box is
selected, the login name will automatically appear in the Oracle login dialog box at startup.
Entering a Password
In this field you have to enter a password. If the Use Auto Login check box is selected,
the application automatically logs into the selected database at start-up. The Oracle login
dialog box does not appear.
7. Configuring the Application
53
EVS Broadcast Equipment S.A. - July 2013
Issue 1.4.D
Activating Version Control
If the Use Version Control check box is selected, the software version of the application
is checked each time it logs into the database. This check box should always be
selected!!
If the software version is outdated, the following warning message appears in the splash
screen highlighted in red: ‘Obsolete – A newer version exists. May not be used anymore.’
Click the OK button to close the splash screen and update your software version.
By clicking the Application History button, you can open a chronological list of all
software versions of the application. To get more details about each version (creation
date, name of programmer, status, additional remarks), you have to click + next to the
version number.
Activating Keep Alive
If the option Keep Connection Alive is selected, a message is sent to the database at
regular time intervals to avoid idle connections from being closed by the firewall. These
intervals can be set by you.
If the option Try to Reconnect if Keep Alive Fails is selected, the application will try a
number of times to reconnect with the database.
If the option Report Status in Database Everytime Keep Alive Timer Triggers is
selected, the status of the connection is reported in the database each time the Keep
Alive Timer sends a trigger to send a Keep Connection Alive message.
If the option Report Status of Tasks is selected, the status of the tasks (ok or not ok) is
reported to the database.
Testing the Oracle Connection
The Test Oracle button allows you to check the validity of the database name, login and
username you entered.
If these data are valid, then the following message appears next to the Test Oracle
button: ‘OK’.
If the login name or password is invalid, then a message box appears with the following
message: ‘ORA-01017: invalid username/password; logon denied’.
If the database name is invalid, then a message box appears with the following message:
‘ORA-12154:TNS: could not resolve the connect identifier specified’.
If you omit the password, then a message box appears with the following message:
‘ORA-01005: null password given; logon denied’.
If you don’t enter a database name, login and username, then a message box appears
with the following message: ‘ORA-12560: TNS: protocol adapter error’.
If the Use Version Control check box is selected, you can also check the software
version of the application by clicking the Test Oracle button. If the software version is up-
54
7. Configuring the Application
IP2Archive - User Manual - Deep Archive Sync Version 1.4
to-date, then the following message appears: ‘Actual – The Actual Version’. If the
software version is outdated, then the following message appears: ‘Unknown Version
Application! Please contact the EDP department.’
If you close the Settings window without testing the validity of the database name, login
and username you just entered, then a message box appears.
If you click Yes, then the Settings window is closed and the original values are restored. If
you click Cancel, then the Settings window doesn’t close and you can test the values by
clicking the Test Oracle button.
If you change the current database settings, test the connection and then close the
Settings window, a message box will appear.
If you click Yes, the application is stopped and closed. A manual restart will be required.
Click Cancel to continue.
7. Configuring the Application
55
EVS Broadcast Equipment S.A. - July 2013
7.3.3.
Issue 1.4.D
E-Mail Options Tab
In case the application is capable of sending e-mail messages, the E-Mail Options tab will
allow you to configure an e-mail account, enter the e-mail address of the default sender
and recipients, and enter a default e-mail subject. If the application is not capable of
sending e-mail messages, the settings in this tab cannot be used.
To be able to configure the e-mail account, you have to select the Send E-Mail check
box. The fields in the Mail System Settings and Mail Message Settings group box become
available.
Configuring an E-Mail Account
In the Mail System Settings group box you have to enter the IP address and port number
of the SMTP server and specify a timeout. In the SMTP Login group box you can enter a
user name and password.
Configuring a Default E-Mail Message
The Mail Message Settings group box contains two tabs: Internal Mail Settings and
External Mail Settings.
The Internal Mail Settings tab can be used to configure a default e-mail message that will
be sent to the EVS developers and the customer when an error occurs.
The External Mail Settings tab can be used to configure a default e-mail message that will
be sent to the customer to notify him about an error. In each tab you have to enter the
sender’s email address, the email address of the various recipients and a subject. It
should be noted that this tab is not always used.
When you insert multiple e-mail addresses in any of the header fields, make sure you
separate them by a comma.
To test the settings and manually send an e-mail message, click the Send Mail button.
56
7. Configuring the Application
IP2Archive - User Manual - Deep Archive Sync Version 1.4
For the new settings to take effect, close and restart the application. Check the TOM.ini
file in the installation folder of the application for the e-mail addresses and subject entered
here.
7.3.4.
Global Password Tab
The Global Password tab allows you to set a password that the superuser(s) has/have to
enter to be able to edit the Global settings of the application, if any. To apply the
password, you have to click the Apply button.
7.3.5.
Error Handling Tab
The Error Handling tab is used to configure the error handling by the application. This tab
will only be used by the EVS administrator.
7. Configuring the Application
57
EVS Broadcast Equipment S.A. - July 2013
Issue 1.4.D
Handling Unhandled Errors
If the Save the Screen Dump check box is selected, a screenshot is taken of an
unhandled error message and stored in the database and in a folder on the computer
where the application is installed. In the Not Logged Error(s) panel, errors can be typed for
which no log was created. By default, this check box is selected.
Handling Handled Errors
If the Save the Unforced Error Log’s check box is selected, the log of the error is saved
in the database and in a folder on the computer where the application is installed. By
default, this check box is selected.
If the Save the Screendump check box is selected, a screenshot is taken of the error
message and stored in the database and saved in the same folder as where the error log is
kept. By default, this check box is selected.
7.3.6.
IPDirector API Tab
The IPDirector API tab contains the settings that configure the connection with the
IPDirector SOAP API.
Most of these settings are read-only. They can only be configured in the Configurator
application.
If your setup has multiple IPDirectors, you have to select the right IPDirector from the
IPDirector field. The corresponding API connection settings will appear. If your setup has
only one IPDirector, it will be automatically selected.
The IPDirector API Settings group box contains the data the application needs to be able
to communicate with the IPDirector API:
•
58
API Host: The IP address or hostname of the server that hosts the IPDirector API.
7. Configuring the Application
IP2Archive - User Manual - Deep Archive Sync Version 1.4
•
Login: The login necessary to log into the IPDirector API.
•
Password: The password necessary to log into the IPDirector API.
•
WSDL: The path to the IPDirector API .wsdl file. This path is is automatically
calculated on the basis of the IP address of the server that hosts the IPDirector API.
A Test button is provided allowing you to test the connection with the IPDirector API. If all
data is correct, the message ‘Connected’ will appear. Otherwise, the message
‘Connection Failed’ will appear.
The Cmnd. Timeout field contains the number of seconds the application will wait while
IPDirector attempts to execute a command, before canceling the attempt and generate an
error. By default, a time interval of 10 seconds is set.
By default, the API maintains a session for 1 hour. After a period of no activity, the
session expires automatically. The Token Keep Alive field contains a time interval after
which the session timeout is reset to prevent the session from timing out. By default, this
is after 10 minutes.
If the option Extended Log Enabled is selected, additional information will be inserted in
the application logs. For example, the API messages and parameters sent by the SOAP
API client (= the application). By default, this option is not selected.
If the option Trace Enabled is selected, even more detailed information will be inserted in
the application logs. For example, the entire SOAP messages sent between the
SOAP API client (= the application) and the SOAP API server (= IPDirector API). By
default, this option is not selected.
If in IPDirector the archive or restore process bins have been deleted and recreated, or if
another metadata profile has been selected, or if the name of metadata userfields has
been modified, the Refresh button in the IPDirector Data group box enables you to
retrieve the updated data without leaving the settings. Once the updated data is imported,
you still have to select the right metadata profile, bins and metadata userfields.
Deep Archive Sync searches the IPDirector database for clips using IPDirector API calls.
Multiple API calls are necessary to be able to retrieve all clips. In the Advanced Search
tab you specify the maximum number of clips that should be returned with each IPDirector
API call. By default, this is set to 100 clips.
7. Configuring the Application
59
EVS Broadcast Equipment S.A. - July 2013
7.3.7.
Issue 1.4.D
IP2Archive Bins Tab
Deep Archive Sync will check the status of the clips in the archive and restore process
bins in IPDirector. If the status of these clips changes because of the synchronization
process, it will move the clips to the bin that corresponds to their new status.
This tab displays the archive and restore process bins in IPDirector that are scanned by
Deep Archive Sync.
These settings are read-only. They can only be configured in the Configurator application.
7.3.8.
IP2Archive Metadata Tab
Deep Archive Sync will compare and synchronize the archive metadata of particular clips
in the IP2Archive database with the archive metadata of these clips in the IPDirector or
DIVArchive database. This archive metadata is linked to these clips in IPDirector by
means of specific userfields. For example, Archive Status, Archive Progress, etc. The
userfields are linked to one or more metadata profiles.
The IP2Archive Metadata tab displays the name of the IPDirector metadata profile and the
name of the userfields whose content Deep Archive Sync has to update. The type of each
userfield is also displayed, for example text, combo box, date.
The metadata profile and the userfields cannot be changed. They have been configured in
the Configurator application.
60
7. Configuring the Application
IP2Archive - User Manual - Deep Archive Sync Version 1.4
7.3.9.
DIVA Tab
The DIVA tab contains the settings that configure the connection with the DIVA API.
These settings are read-only and can only be modified in the Configurator application.
In the Manager field, the name of the DIVA Manager is selected Deep Archive Sync has
to communicate with through the DIVA API.
In the API Connection group box the IP address and port number of the machine on which
the DIVA API is running are displayed.
A Test button is provided to test the connection with the DIVA API.
7. Configuring the Application
61
EVS Broadcast Equipment S.A. - July 2013
62
Issue 1.4.D
7. Configuring the Application
Corporate
+32 4 361 7000
North & Latin America
+1 973 575 7811
EVS Headquarters
Liège Science Park
16, rue Bois St Jean
B-4102 Seraing
Belgium
To learn more about EVS go to www.evs.com
Asia & Pacific
+852 2914 2501
Other regional offices
www.evs.com/contact
EVS Broadcast Equipment is continuously adapting and improving its products in accordance with the ever changing
requirements of the Broadcast Industry.
The data contained herein is therefore subject to change without prior notice. Companies and product names are
trademarks or registered trademarks of their respective companies.