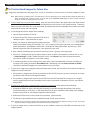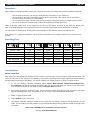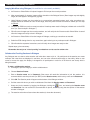
1
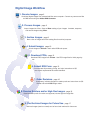
IMAGE PROCESSING
Systems, Workflows, and Procedures for Managing Scans and Digital Images
Name:_________________________________________________________
Title(s)/Location:_________________________________________________
QG CSR:_________________________________________________________
iFicient User Name:__________________________________________________
iFicient Password:___________________________________________________
EOS User Name:____________________________________________________
EOS Password:_____________________________________________________
r.140528
SIM/QG Image Processing User Manual
page 2
Table of Contents
Workflow Overview . . . . . . . . . . . . . . . . . . . . . . . . . . . . . . . . . . . . . . . . . . . . . . . . . . . . . . . . . . . . . . . . . . . . . . . . .
Digital Image Workflow . . . . . . . . . . . . . . . . . . . . . . . . . . . . . . . . . . . . . . . . . . . . . . . . . . . . . . . . . . . . . . . . . . . . . . .
Initial Software Setup for iView MediaPro and Adobe DNG Converter . . . . . . . . . . . . . . . . . . . . . . . . . . . . . . . . .
iView MediaPro . . . . . . . . . . . . . . . . . . . . . . . . . . . . . . . . . . . . . . . . . . . . . . . . . . . . . . . . . . . . . . . . . . . . . . . . . . . .
Adobe DNG Converter . . . . . . . . . . . . . . . . . . . . . . . . . . . . . . . . . . . . . . . . . . . . . . . . . . . . . . . . . . . . . . . . . . . . . .
1. Receive Images. . . . . . . . . . . . . . . . . . . . . . . . . . . . . . . . . . . . . . . . . . . . . . . . . . . . . . . . . . . . . . . . . . . . . . . . . . .
2. Process Images. . . . . . . . . . . . . . . . . . . . . . . . . . . . . . . . . . . . . . . . . . . . . . . . . . . . . . . . . . . . . . . . . . . . . . . . . . .
3. Archive Images. . . . . . . . . . . . . . . . . . . . . . . . . . . . . . . . . . . . . . . . . . . . . . . . . . . . . . . . . . . . . . . . . . . . . . . . . . . .
Timesaving Tips . . . . . . . . . . . . . . . . . . . . . . . . . . . . . . . . . . . . . . . . . . . . . . . . . . . . . . . . . . . . . . . . . . . . . . . . . . .
4. Submit Images to QG. . . . . . . . . . . . . . . . . . . . . . . . . . . . . . . . . . . . . . . . . . . . . . . . . . . . . . . . . . . . . . . . . . . . . . .
Internal Submission to iFicient via Mass Transit . . . . . . . . . . . . . . . . . . . . . . . . . . . . . . . . . . . . . . . . . . . . . . . . . .
Remote Submission via iFicient . . . . . . . . . . . . . . . . . . . . . . . . . . . . . . . . . . . . . . . . . . . . . . . . . . . . . . . . . . . . . . .
5. Download FPOs from iFicient. . . . . . . . . . . . . . . . . . . . . . . . . . . . . . . . . . . . . . . . . . . . . . . . . . . . . . . . .
6. Submit Image Orders with EOS. . . . . . . . . . . . . . . . . . . . . . . . . . . . . . . . . . . . . . . . . . . . . . . . . . . . . . . . . . . . . .
Connecting to EOS . . . . . . . . . . . . . . . . . . . . . . . . . . . . . . . . . . . . . . . . . . . . . . . . . . . . . . . . . . . . . . . . . . . . . . . .
Creating Digital Image Orders . . . . . . . . . . . . . . . . . . . . . . . . . . . . . . . . . . . . . . . . . . . . . . . . . . . . . . . . . . . . . . . .
Creating Scan Orders . . . . . . . . . . . . . . . . . . . . . . . . . . . . . . . . . . . . . . . . . . . . . . . . . . . . . . . . . . . . . . . . . . . . . . .
Reporting . . . . . . . . . . . . . . . . . . . . . . . . . . . . . . . . . . . . . . . . . . . . . . . . . . . . . . . . . . . . . . . . . . . . . . . . . . . . . . . .
7. Order Revisions . . . . . . . . . . . . . . . . . . . . . . . . . . . . . . . . . . . . . . . . . . . . . . . . . . . . . . . . . . . . . . . . . . . . . . . . . . .
8. Receive Scatters and/or High-Res Images. . . . . . . . . . . . . . . . . . . . . . . . . . . . . . . . . . . . . . . . . . . . . . . . . . . . .
9. Find Archived Images for Future Use. . . . . . . . . . . . . . . . . . . . . . . . . . . . . . . . . . . . . . . . . . . . . . . . . . . . . . . . . .
Image Guidelines . . . . . . . . . . . . . . . . . . . . . . . . . . . . . . . . . . . . . . . . . . . . . . . . . . . . . . . . . . . . . . . . . . . . . . . . . . . .
Filenames . . . . . . . . . . . . . . . . . . . . . . . . . . . . . . . . . . . . . . . . . . . . . . . . . . . . . . . . . . . . . . . . . . . . . . . . . . . . . . . .
Images . . . . . . . . . . . . . . . . . . . . . . . . . . . . . . . . . . . . . . . . . . . . . . . . . . . . . . . . . . . . . . . . . . . . . . . . . . . . . . . . . .
Scatter Proofs . . . . . . . . . . . . . . . . . . . . . . . . . . . . . . . . . . . . . . . . . . . . . . . . . . . . . . . . . . . . . . . . . . . . . . . . . . . .
Submission . . . . . . . . . . . . . . . . . . . . . . . . . . . . . . . . . . . . . . . . . . . . . . . . . . . . . . . . . . . . . . . . . . . . . . . . . . . . . .
System Work . . . . . . . . . . . . . . . . . . . . . . . . . . . . . . . . . . . . . . . . . . . . . . . . . . . . . . . . . . . . . . . . . . . . . . . . . . . . .
Scan Sizing Chart . . . . . . . . . . . . . . . . . . . . . . . . . . . . . . . . . . . . . . . . . . . . . . . . . . . . . . . . . . . . . . . . . . . . . . . . . .
Color Guidelines . . . . . . . . . . . . . . . . . . . . . . . . . . . . . . . . . . . . . . . . . . . . . . . . . . . . . . . . . . . . . . . . . . . . . . . . . . .
Virtual Proofing with Dalim Dialogue . . . . . . . . . . . . . . . . . . . . . . . . . . . . . . . . . . . . . . . . . . . . . . . . . . . . . . . . . . . .
Monitor Profile . . . . . . . . . . . . . . . . . . . . . . . . . . . . . . . . . . . . . . . . . . . . . . . . . . . . . . . . . . . . . . . . . . . . . . . . . . . .
Document Profile & Proofing . . . . . . . . . . . . . . . . . . . . . . . . . . . . . . . . . . . . . . . . . . . . . . . . . . . . . . . . . . . . . . . . .
Imaging Workflow using Dialogue (this workflow is not currently available.) . . . . . . . . . . . . . . . . . . . . . . . . . . . . .
Collaborative Proofing Sessions in Dialogue . . . . . . . . . . . . . . . . . . . . . . . . . . . . . . . . . . . . . . . . . . . . . . . . . . . . .
Appendix B — Image Workflow Chart . . . . . . . . . . . . . . . . . . . . . . . . . . . . . . . . . . . . . . . . . . . . . . . . . . . . . . . . . .
Notes . . . . . . . . . . . . . . . . . . . . . . . . . . . . . . . . . . . . . . . . . . . . . . . . . . . . . . . . . . . . . . . . . . . . . . . . . . . . . . . . . . . . .
Support Contacts . . . . . . . . . . . . . . . . . . . . . . . . . . . . . . . . . . . . . . . . . . . . . . . . . . . . . . . . . . . . . . . . . . . . . . . . . . .
2
3
4
4
4
5
5
8
8
10
10
11
12
13
13
13
15
16
16
16
17
18
18
18
18
18
19
19
19
20
20
20
21
21
22
23
24
Workflow Overview
SIM Art and Edit Operations manage the receipt of images from all external and internal sources. These images, whether
digitals or scans, are submitted by Art/Edit Ops to QuadGraphics Premedia via Photo Portal to EOS and Ificient - a web
based image asset management system.
After “submitting to production” in the Photo Portal, every image is fed into the iFicient system - an online portal that
creates and distributes FPO image files. SIM staff access iFicient, download FPO images, and use them to construct
layouts.
QG is contracted by SIM to perform the CMYK conversion of every image file, along with retouching, image manipulation,
masking, etc. All ordering and communication concerning image files is done through the EOS system - an online
portal that enables the creation and submission of image orders from SIM to QG. EOS receives image file information
from iFicient, allowing simple order entry and submission. High resolution images and Epson proofs can also be
requested via EOS. High res image files are returned to SIM staff via Mass Transit. Epson proofs are printed on the
local Epson printer.
Digital Image Workflow
1. Receive Images.
page 5
Download digital images from camera/card/disc onto computer. Convert any camera raw files
to DNG format using the Adobe DNG Converter.
2. Process Images.
page 5
Import images into iView. Save an iView catalog of your images. Annotate, sequence,
and rename images using iView.
3. Archive Images.
page 8
Burn a disc of images and iView catalog files for archival purposes.
4. Submit Images.
page 10
Submit images to iFicient in their native RGB color space.
5. Download FPOs.
page 12
Download FPO images from iFicient. Use FPO image files for initial page layout.
6. Submit EOS Form.
page 13
Communicate all processing, sizing, and color instructions to QG
once layout requirements have been identified.
7. Order Revisions.
page 16
If necessary, indicate changes on scatter proofs and return them to QG.
Revise and submit EOS image orders.
8. Receive Scatters and/or High-Res Images.
page 16
Receive scatter proofs for review and approval; receive high-res image files.
9. Find Archived Images for Future Use.
page 17
Archived images (used or unused) can be found and retreived for future use.
SIM/QG Image Processing User Manual
page 4
Initial Software Setup for iView MediaPro and Adobe DNG Converter
Initial setup needs to be done first, and only once.
iView MediaPro
All iView screenshots are taken from version 3. Differences in screen
views are noted in text.
1. Launch iView MediaPro.
Windows - double-click iView MediaPro.exe in the Program Files
folder on your hard drive.
Mac - double-click iView MediaPro.app in the Applications folder
on your hard drive.
2. Configure Preferences.
Windows - Select File>Preferences>General.
Mac - Select iView MediaPro>Preferences>General.
Set your preferences to match the screenshot on right.
Note: Field Names preference is only available in v.3
Adobe DNG Converter
1. If you do not have the DNG Converter installed, complete step 1. Otherwise, skip to step 2.
Windows • From the desktop, click the Start button and choose Run.
• Type the following link into the Open field:
ftp://manufacturingprm:[email protected]/prmshare/Adobe_DNG/
• Click OK. A new window will appear displaying the contents of the Adobe_DNG folder.
• While viewing the contents of the Adobe_DNG folder, drag the file Adobe DNG Converter.exe to the
Desktop.
Mac • From the Desktop menu, select Go>Connect to Server...
• Type the following link into the Server Address field
ftp://manufacturingprm:[email protected]//ftp/prmshare/Adobe_DNG/
• Click the Connect button. A server called Adobe_DNG containing 4 files will appear.
• While viewing the contents of the Adobe_DNG server, drag the file Adobe DNG Converter.app to the
Applications folder on the main hard drive. This may require admin access. If you do not have admin access,
you may drag the file to the Desktop instead.
2. Launch the Adobe DNG Converter.
Windows - double-click Adobe DNG Converter.exe (on your Desktop, or possibly in Program Files.)
Mac - double-click Adobe DNG Converter.app (in your Applications folder, or possibly on your Desktop.)
SIM/QG Image Processing User Manual
page 5
3. Configure Preferences.
In the application window, under #4, click Change Preferences.
Set your preferences to match the screenshot on right.
Note: The DNG Converter is frequently updated by Adobe in order to support
new cameras and their files. If you are receiving images from a new
camera model, they may not be supported by your current version
of the DNG Converter. If this occurs, intall the latest version per the
instructions above. Contact the Help Desk for installation help.
1. Receive Images.
a. Download all images from your camera/card/disc to your hard
drive. Place all images in a single, easily accessible folder
Note: If you will not be processing your images immediately burn a backup
CD or DVD of all images.
Note:steps 1.b - 1.g are for dealing with Raw files. If ONLY JPG files were
downloaded to your computer, skip to step 2.a.
b. Launch the Adobe DNG Converter.
c. In the application window, under #1, click Select Folder and
select the folder of images you downloaded in step 1.a.
d. In the application window, under #2, Select Save in Same
Location.
e. The default settings for #3 and #4 should be correct, and should
match this screenshot:
f. Click Convert.
g. When the conversion is complete, Click Quit.
2. Process Images.
a. Launch iView MediaPro.
b. Create a new catalog by selecting File>New.
c. Import images by dragging and dropping a folder containing images (see step 1.a) onto the iView catalog
window.
d. Save your catalog (File>Save As) to the ***iView Catalogs*** folder on your desktop or local server. (You may
need to create this folder if it does not already exist.) The name of the catalog should correspond with the final
filename (Title-Issue-Story) if known. For example: EPCP-061100-PLUGS.ivc. This will allow you to find archived
images in the future. If the Title-Issue-Story name is not known, save the catalog anyway and rename it correctly
later.
Note: Some users may want to include multiple stories in one catalog if they are part of the same shoot. If this is the case,
it is not necessary to include the story name in the catalog name, although some descriptive name should be included.
For example: EPCP-061100-tech.ivc.
e. Delete all original Camera Raw files (if any.) Raw files were converted to DNG format in steps 1.b - 1.g above,
therefore all original Raw files are duplicates. It is easy to locate and select all Raw files if you sort by file type
in the List tab of the iView window. When this step is complete, the catalog should only contain JPG and/or
DNG files.
page 6
SIM/QG Image Processing User Manual
f. Delete all poorly exposed, poorly composed, or otherwise bad images that will
NEVER be used. To delete a file, right-click (Windows) - or Control-click (Mac) and select Move to Trash.
Note: Multiple images can be selected by holding down the Control key (Windows) - or
Command key (Mac) - while clicking images. All selected images can then be deleted
simultaneously.
g. Annotate images by first clicking the Info button in the upper left of the iView
window and opening the Annotations header. Select the images to which you
want to add metadata, then input the appropriate information into the fields. While
entering the information, hit the Tab key to jump to the next field. Click the ✔ button
when finished. Please note the required fields below.
Note: Multiple images can be selected by holding down Control (Windows) - or Command
(Mac) - while clicking images. Metadata will then be attached to all of the selected
images simultaneously.
REQUIRED METADATA FIELDS
These tables show SIM
DISC Field
Description
IPTC
Field Name
metadata fields. These rec-
Photographer name
required and recommended
ommendations are taken
from the DISC (Digital Image
Submission Criteria) workgroup, of which SIM is a
member. The IPTC field
names correspond to the
fields that should be used
in iView MediaPro 3. IPTC
field names may not exactly
match the field names used
Data Description
Example
Creator
An entity responsible for taking
the photograph. (Last, First)
Van Horne, Eric Q. Jr.
Photographer contact info
Creator: Address
Creator: E-Mail (etc.)
Contact info for the
photographer
[email protected]
Photo Credit
Provider
Photographer/Agency (official
photo credit as it will appear in
publication)
Jane Smith/SIM
Copyright
Copyright Notice
If copyrighted, indicates who
holds the copyright
Jane Smith/SIM
Location of Shoot
Location
Geographic location of shoot
Times Square
City of Shoot
City
City of shoot
New York City
State of Shoot
State
State/Province of the shoot
New York
in earlier versions of iView.
Country of Shoot
Country
Country of the shoot
United States
Date of Shoot
Date Created
Date of the shoot in
DD/MM/YYYY format
21/07/2006
should instead use field
Subject
Title
A short description of the
subject of the image
“Ayers Rock” or
“Ford Mustang”
Users of these versions
names that most closely
match the examples on the
right. Metadata is completely
RECOMMENDED METADATA FIELDS
DISC Field
Description
IPTC
Field Name
Provider/Source
• Note: to customize your
display the required fields,
searchable in iView (and in
the Mac Finder) so that the
more metadata a file con-
Data Description
Example
Provider
The source and contact information
for the provider of the photograph
(agency, company, person) if other
than the photographer
Acme Pictures
Agency/25 Greenwich
Street, New York, NY
10021
Caption
Headline
Complete description of the photo
as it might appear in the publication
“The greatest mountain
bike ever made”
Keywords
Keywords
Keywords from list provided by
publication or stock agency
“diesel truck/engine/
horsepower”
Special Instructions
Instructions
Special instructions, includes
intended image use size
Do not crop; full page
Job Identifier
Job Identifier
Number or name issued by the
publication, used to identify this job
EPCP-061100-PLUGS
tains, the easier it becomes
to quickly find and organize.
annotations panel to only
or to add your own custom
field names, see the 'iView
Media Pro Tips' section on
page 8.
SIM/QG Image Processing User Manual
h. Synchronize Metadata. Once all metadata has been entered
for all images, select all files (Edit>Select All) and select
Action>Synchronize. Choose Export annotations to original
files, and click OK. This will embed all metadata into the selected
image files. (This step may not be necessary using iView 2.x for
Windows; in these cases, iView will automatically synchronize and
embed metadata.)
i.
Organize Images into Story and Outtakes folders. Click on the
Organize button at the top of the window. Notice that your folder
of images appears in the Catalog Folders section in the lower
left. Right-click (Windows) - or Control-click (Mac) - on this folder
and select Create Sub-Folder (see screenshot on right.) Name
this new folder according to the proper file naming convention
(i.e. EPCP-061100-PLUGS). This is your Story folder. Repeat this
process to create a folder named Outtakes. Drag all images that
will run in the story into the Story folder. Once this is done, select all
remaining images and drag them to the Outtakes folder. Outtakes
are images that weren't selected for the story, but which may be
used in the future.
j.
Sequence Images in the Story folder (if necessary.) If images for
more than one story are contained in the same catalog, create
numerous Story folders, each named with the final Title-IssueStory name. Click on the small circle to the right of the Story folder
to display only the images within that folder. From either the List
or Thumbnail view tabs, you can drag and drop the images into
sequence (top to bottom, left to right) as needed. All sequencing
should be completed before you go to the next step.
k. Rename Images in the Story folder. Once all images within the
Story folder are in proper sequence, click on the small circle to
the right of the Story folder to display only the images within the
folder. Select all images within the folder (Edit>Select All) and
select Action>Batch Rename from the menu bar.
-Version 3: match the screenshot shown to the right.
-Earlier versions: match the screenshot below.
Be sure to input the appropriate magazine abbreviation, issue
date and story slug, (per the file naming convention) followed by a
hyphen (for example, EPCP-061100-PLUGS-) in the first field. This
should match the name you assigned to the Story folder above.
Click Rename.
page 7
page 8
SIM/QG Image Processing User Manual
l.
Save your catalog (File>Save). Make sure to save it in the ***iView Catalogs*** folder on your hard drive
or local server. The name of the catalog should correspond with the final file name and convention
(i.e. EPCP-061100-PLUGS.)
Note: Some users may need to include multiple stories in one catalog. If this is the case, it is not necessary to include the
story name in the catalog name, although some descriptive name should be included.
For example: EPCP-061100-tech.ivc.
3. Archive Images.
a. Insert a blank CD or DVD and name it the same name as the
iView catalog (i.e, EPCP-061100-PLUGS). If you are using an older
version of Windows, you must launch your burning software and
prepare a disc by following that program's instructions.
b. Burn a disc containing all images and the iView catalog. With
your catalog open in iView MediaPro, click the house icon in the
upper left to show all images. Select Edit>Select All to select all
images. Select Make>Backup/CD ROM and match the settings
shown to the right. Be sure to check the box to Include media
catalog, so that your iView catalog file will be included on the
disc. Navigate the Destination pull down to the CD you have
prepared for burning. Click Backup.
Timesaving Tips
1. File Information and Image Resolution. Select an image in your catalog. Click the Info button in the upper
left of the iView window and open the Media Info header. This panel contains all the info about the selected file,
including File Type and Image Resolution. This information can be used to calculate the actual printing resolution
and dimensions (also called the “effective resolution”) of an image. The simplest way to do this is to use this formula:
pixel dimension / 300 = printing dimension in inches.
Example: an image is 1800 pixels x 1200 pixels:
1800 / 300 = 6 inches
1200 / 300 = 4 inches
Therefore the printing dimension of the image is 6 inches x 4 inches. Remember that images should not be scaled
to less than 80% or more than 120% when used in a layout. For more information, see Custom Enlargements in
step 6.d, below.
2. iView: Metadata templates. It is possible to save commonly used sets
of metadata as templates. Metadata templates are useful for saving
and applying a group of frequently used annotations, such as creator
information (author, copyright, contact information, etc.). Templates
can be easily saved and applied via the pencil icon in the Annotations
section of the Info panel (see right).
3. iView: Custom Metadata. Custom annotation fields can be created
for tagging specific sets of information. This can be used to quickly
and specifically organize and locate images by customized metadata tags (for example, creating a field named
“Auto Maker” and tagging images as “Ford” would allow you to quickly find all images tagged as “Ford.”) The builtin IPTC fields must be used where applicable (in many cases the keywords field is sufficient,) but custom metadata
fields allow for deeper levels of specificity in tagging. To add custom fields, simply select Edit>Custom Fields.
Enter a custom field name, and click Add. When finished, be sure to click Save As Default to ensure that the fields
will be available 'globally' (i.e. every time you quit and restart iView, or make a new catalog.) Custom Fields will
appear at the bottom of the Annotations section of the Info panel.
SIM/QG Image Processing User Manual
page 9
4. iView: Customize Display. The information displayed by iView
can be customized so that only relevant information is shown.
For example, the Annotations section can be configured to
display only the SIM required metadata fields, and any custom
fields you have created. To customize the list of annotations
that are displayed, click the small list icon in the upper right of
the Info panel (see right), and select Show/Hide Fields. Fields
can be unchecked to be removed from the display. It is best to
use the default (all) fields initially, until you have an idea which
fields are not needed. Be sure to keep the required fields visible.
Note: In earlier versions, click the list icon and uncheck the fields you wish to hide. The customized display can be
saved as the default setting, or as a selectable configuration. To do so, click the list icon and select either Save as
Default or Save this configuration as... respectively.
Note: the Save this configuration as... option is only available in iView 3.
5. iView: Transfer Images. Using the Action>Transfer To Folder command, images can be copied or moved from
one folder on your computer to another. This can be useful in making duplicate//backup folders of images, or in
transferring a set of images to a mounted server from within iView. Be sure to Action>Sync Annotations before
transferring images.
6. DNG & Raw files: Image Adjustments. It is possible to make non-destructive adjustments to DNG and Raw images
prior to submission. To do this, you must have the latest version of the Adobe Camera Raw plug-in installed for
Photoshop (available for ftp download from the Adobe_DNG folder, as listed on page 4.) With the plug-in installed,
open a Raw or DNG file with Photoshop. The Camera Raw interface will appear, allowing you to make adjustments to
white balance, exposure, tint, contrast etc. When ready, click Save and choose Digital Negative as the format. Your
adjustments will be saved non-destructively into the resulting DNG file, while maintaining the integrity and maximum
flexibility of the original digital capture. This DNG file can be submitted as usual, and your adjustments will be used
during the conversion process.
SIM/QG Image Processing User Manual
page 10
4. Submit Images to QG.
Internal Submission to iFicient via Mass Transit
Mass Transit is a file delivery application that enables quick and easy transfer of images to and from QG Premedia.
For image submission, image files are first copied into a hotfolder on the local Mass Transit server,
then Mass Transit automatically transmits the files into the iFicient system. iFicient only accepts DNG, JPG, TIF, EPS,
and certain types of Canon camera raw files. DNG and JPG are the preferred formats. Layered files and PSD files
are not acceptable.
Steps 4.a and 4.b are for initial setup and need only be done once. The steps below apply to users in any SIM office.
For instructions on remote submission, please see page 11.
a. Connect to the Mass Transit Server
• Windows - From the Desktop, select Start>Run.
At the prompt, enter the server address listed on the cover page and hit enter.
If prompted, enter the User Name/Password for your title, as listed on the cover page.
Open (double click) the Volume, as listed on the cover page.
The server will be connected to your computer and will appear on your desktop.
If you have trouble connecting, please email [email protected]
• Mac - From the Desktop (Finder) menu select Go>Connect to Server (or press Command+K.)
In the server address window, enter the server address listed on the cover page and click Connect.
You will be prompted with a log-in window. Enter the User Name/Password for your title, as listed on the
cover page.
When prompted, select the appropriate Volume as listed on the cover page and click OK.
The server will be connected to your computer and will appear on your Desktop.
If you have trouble connecting, please email [email protected]
b. Create Desktop Shortcut
• Windows - Open (double-click) the server mounted on your desktop and navigate to the release folder for
your title (i.e. the Output To Image_PUBCODE folder.)
Right-click and drag the Output To Image_PUBCODE folder to your Desktop, and select the Make
Shortcut option when you release the mouse button.
If you work on multiple titles, repeat the above process for each.
• Mac - Open (double-click) the server mounted on your desktop and navigate to the release folder for your
title (i.e. the Output To Image_PUBCODE folder.)
Hold Command (apple key) AND Option, and click and drag the Output To Image_PUBCODE folder to your
Desktop. This will create an alias (shortcut) folder to the Mass Transit server.
If you work on multiple titles, repeat the above process for each.
SIM/QG Image Processing User Manual
page 11
c. Submit Images
• The shortcut folders created in the previous step are your connection to the Mass Transit server. Images
that are dropped in these folders will be copied to the server and added to iFicient. Before uploading
images, the images and the Story folder must be sequenced and named according to the naming
convention, and each image must have the correct file extension (.jpg, .dng, etc. See section 2.)
Remember that images must be submitted in their native RGB color space and CMYK conversions must be
done by QG.
Once the images are sequenced and named correctly, drag the Story folder containing your images and
drop it onto the shortcut folder. If you have more than one shortcut folder, be sure to drop the images on the
correct one for the title you are working on.
Depending on where you are located, you may or may not have to enter your log-in information to access the
server. If you forget your password, email [email protected].
Remote Submission via iFicient
It may sometimes be necessary to submit images to iFicient when out of the office. This is possible through the iFicient
web interface, following the steps below. All that is required is a broadband internet connection.
Note: If you do not already have remote upload access, you can request access in advance by emailing
[email protected]. Please allow at least 72 hours for your access to be configured.
Note: Your connection speed will determine the speed of files uploading to iFicient. Modem connections
will result in slow upload speeds, and are not recommended.
d. If you need to upload more than one image, compress them into a single .sit or .zip archive.
e. Connect to iFicient by launching your web browser and entering:
• http://laxinet2.qg.com/
f. Click the LOGIN icon in the upper right of the page to log in, and enter your User Name/Password information
and click Log In. (If you do not know your log-in info, please contact your
QG CSR.)
g. To upload images, click the Upload icon (upward pointing arrow).
h. Click the Browse button to locate the image (or archive of images, as in
step 4.d above) on your computer. Once the file is selected in the resulting
window, click Open. (Remember that the images and the Story folder
must be sequenced and named according to the naming convention, and
each image must have the correct file extension. See section 2.)
i.
Click Upload. A status bar will show the progress of the upload. Once the upload is complete, the system will
return to the Upload folder. Image(s) should be available for download within one hour.
SIM/QG Image Processing User Manual
page 12
5. Download FPOs from iFicient.
iFicient is a web-based automated image processing system that receives and processes digital images. When images
are submitted, iFicient creates downloadable FPO image files which are properly sized to 300 dpi for use in your page
layout. If changes are made to an image by QG (resizing, custom enlargements, etc.), you must download and use the
most recent FPO or high-res image in your layout. FPO files must never be resized (i.e. in Photoshop) or renamed.
a. Once your images have been submitted, Connect to iFicient by launching your web browser and entering:
• http://laxinet2.qg.com/
b. Click the LOGIN icon in the upper right of the page. Enter your User Name/Password information and click Log
In. (If you do not know your log-in info, please email the contacts listed in the back of this manual.
c. Once logged in you will see:
• Processed folder: contains high-res CMYK images that have been
converted by QG. Scans performed by QG will also be placed in this
folder.
• Any other loose folders contain images that have not yet been
processed by QG.
• Note: mousing-over any button in the interface will show a description of its
function.
d. To select low-res FPO images for download, click on the shopping cart
icon next to the story. A new window showing the contents of the shopping cart will display.
e. Click on the Download FPO icon (downward pointing dotted arrow) to download the FPOs for the selected
story. The folder of images will download to your computer to the location set in your browser preferences.
iFicient compresses the files before transfer to increase speed and avoid file corruption. After download, you
may need to double-click these compressed files to open them.
f. Complete the initial page layout using the FPO image files. This will allow you to identify any sizing or system
work changes prior to EOS submission (section 7). Remember that FPO images files should never be re-named.
FPOs must never be re-sized in photoshop, and should not be scaled to less than 80% or more than 120% when
used in a layout.
SIM/QG Image Processing User Manual
page 13
6. Submit Image Orders with EOS.
EOS is a web based Electronic Ordering System used to facilitate tracking and communication of image orders to QG.
A database entry is created automatically in EOS for every image submitted to iFicient. Image orders can then be
completed online and submitted electronically to QG. EOS forms must be submitted as soon as layout requirements have
been identified (at least 48 hours prior to page release.)
It is important to know that QG will not begin work on images until instructions are provided by the art director (via EOS
order submission). iFicient will only provide a low-res FPO for placement. It is recommended that art directors check
iFicient periodically for loose images (i.e. images not in processed folder.)
Connecting to EOS
a. Connect to EOS by launching your web browser and entering:
• http://lafp2.qg.com
• Bookmark (Control+D, Windows or Command+D, Mac) this address for future use.
b. Enter your User Name/Password and click Login.
Creating Digital Image Orders
c. The EOS system is designed to automatically
receive digital image orders from the iFicient
system.
Image received from iFicient are
automatically placed into the Pending Orders
section. To create orders for digital images, click
on the Pending Orders button.
d. You are presented with a list of pending orders
grouped by story name. Depending on your
access level you may see your orders or your
group's orders. All images submitted to iFicient
will appear as pending orders.
SIM/QG Image Processing User Manual
page 14
e. Select the story you wish to submit by clicking the link for that story.
f. You are presented with the list of pending images with thumbnails for the selected story. Complete the order
data for each image as necessary. Note that there are several global links at the top of the list to allow you apply
instructions to all images within the list.
• Comments: provide specific color or scanning instructions for an image. Be as specific as possible on
how you want your final image to look. Include instructions for color, contrast, brightness, sharpness, drop
shadows, clipping paths, special effects, etc. Examples of specific instructions include: 'open shadow
areas,' 'keep highlights,' 'saturate color,' 'match color across images' etc. If no instructions are provided,
images will be converted to CMYK, balanced, and sharpened.
• Hi Res: request a high resolution image by clicking the Hi Res check box. Note the link at the top of the
page will toggle this check box for all images in the order.
• Size: for digital images, enter the percentage that your FPO has been scaled to in your layout, if less than
80% or over 120%. You may estimate this number, but you should always err on the high side if you do so.
For scans, you must enter the percentage for the size of the scan. See the table at the end of this document
for size percentages based on column width.
• Silo: Select the desired 'silhouette' to be performed on an image. It is only possible to select one option.
Include specific instructions for the silo in the comments box.
None: No silo will be performed.
Path: silo will be performed with a vector path. This allows a very sharp silo at any resolution.
Alpha: silo will be performed with an alpha mask. This allows a softer, sometimes more natural silo.
Drop BKG: 'background' pixels will be 'erased' to white.
• Correction: check this box to provide specific color or scanning instructions for an image. Include your
instructions in the comments box. Be as specific as possible on how you want your final image to look.
Note the link at the top of the page will toggle this check box for all images in the order.
• Scatter: check this box to receive an Epson proof of the image to verify color accuracy, retouching, etc.
Scatters should be requested for covers, article openers, and color critical images. Note the link at the top
of the page will toggle this check box for all images in the order.
• Materials: Select the supplied image format. It is only possible to select one option.
TX: transparencies.
Reflective: printed paper.
Digital: digital file.
• Select: check this box to 'select' an image. Only selected images will be submitted when the Submit
Selected button is clicked.
SIM/QG Image Processing User Manual
page 15
g. Once you are ready to submit the order, click the Submit Selected button at the top of the screen. Remember
that only “selected” images will be submitted.
h. Your images will remain in a “submitted” status and be visible in your pending orders list until QG “accepts”
the order and begins processing your images. You may edit your orders at any time until QG has accepted the
images. The status of each order is always shown on the right side of the order detail. When orders are
“accepted” by QG, they cannot be modified until they are registered as “completed.” “Completed” orders can be
revised as needed. To revise image orders, please see section 7, below.
Creating Scan Orders
i.
Because scan orders do not go through the iFicient interface, you will need to generate scan orders manually.
Follow the steps below to create scan orders.
j.
From the Home screen, select Create Order. You will be presented with the scan order creation screen:
• Title Code: select your magazine title code
• Issue Code: enter the six-digit issue code.
• Story Name: enter the story name. Story name must match the story title on your layout document.
• Create: Enter the number of image orders you wish to create.
• Image Sequence: Enter a comma delimited list of image sequence numbers. Leave blank for automatic
sequencing.
Note: If the number of scan records exceeds the sequence numbers provided, automatic sequencing will begin with the
next highest number. If the number of scan records is less than the sequence numbers provided, EOS will use the
sequence numbers in order until the number of scan records is met and will ignore any further sequencing.
SIM/QG Image Processing User Manual
page 16
k. Click the Create Records button and the system will generate your image records. Once created your image
records are handled identically to digital images and are accessible from the Pending Orders button.
l.
Once you have entered your instructions for the scans and submitted those orders, the system recognizes
them as scans and presents you with a scan order form, which must be printed and sent to QG along with your
originals.
Reporting
Reporting in the system is based on log in permissions and functions using a request/email interface. There are three
reports available in the system; the consolidated volume report, the daily volume report and the Issue Detail report.
To retrieve a report, follow the instructions below.
m. From the Home screen select the report button. Select the report you wish to generate.
n. For the consolidated and daily volume reports, enter the date range for the report, select the output file type and
select the submit button.
o. For the issue detail report, select the title and issue, the output type and select the submit button.
p. The requested report will be generated and emailed to you.
7. Order Revisions
If you have received your images or proofs and feel that they need additional work, you may send revision instructions to
QG. It is not necessary to send files through iFicient a second time. Follow the steps below to request revisions.
a. Login to EOS per the instructions in section 6. From the Home screen select the Work in Progress button.
You are presented with a list of active image orders. Click the story you wish to revise.
b. Per the instructions in section 6.f, fill-in your revised order information, select the images which need revision,
and click the Revise Selected button at the top-right of the screen. Your revisions will appear in your pending
orders list and are then treated identically to normal submissions.
Note: Only “Completed” orders can be revised. Orders that show a status of “In Progress” cannot be revised, as they are
currently being processed by QG.
8. Receive Scatters and/or High-Res Images.
Scatter proofs allow proofing to occur up-front in the imaging cycle and help to reduce revisions and achieve accurate
color. Scatters will automatically be printed and sent to the Art Director for every cover image. Additionally, scatters can
be requested for all article openers, scans, and color critical images.
For late image submissions, within 48 hours of the edit deadline, do not ask for a scatter. Rather, review the image on the
final composed page proof.
a. When you receive a scatter proof, review it in a light booth. If changes are required, mark-up the proof with clear
instructions.
b. If a scatter proof requires changes, follow the instructions for order revisions in section 6. Be sure to return the
marked-up scatter proof to your QG CSR.
Note: In most cases, revised scatter proofs are not needed; rather, it is recommended you review the revised image on the
composed page proof. However, if a revised scatter is needed, be sure to check the Scatter box on your revised order.
c. If a scatter proof does NOT require changes, the image is approved by default, and no further action is required.
Simply keep your proof for future reference. If a high-res file was requested for the proofed image, inform your
QG CSR (via email or phone) that color is approved in order for the high-res file to be released.
d. When reviewing revised scatter proofs, (or composed page proofs with corrected images,) be sure to compare
the revised proof against the previous proof, to verify that the revisions are satisfactory.
Note: SIM Prepress is available to assist with review of scatters or final page proofs when needed. This can be done in
person (in a Southern California office) or remotely via virtual proofing.
page 17
SIM/QG Image Processing User Manual
9. Find Archived Images for Future Use.
After images are submitted with final layout files, it may be necessary to find and pick-up archived images for future
use.
Note: When picking-up images from a non-SCA title for use in an SCA title (or vice versa) be aware that SCA paper has a
290% ink density limit. Because of this, you must pick-up the ORIGINAL (RGB) image, so that it can be converted
using the correct ink density specs for your title.
a. To find image files in an open iView catalog, enter text into the find field in the upper-right of the iView window
and hit the enter key. All images that match the selected text will be shown in the catalog window. Filenames,
dates, keywords, EXIF data, etc. are all searchable. Remember that the more metadata a file contains, the easier
it becomes to quickly find and organize.
b. To find image files across multiple iView catalogs:
1. Launch iView and select Find>Find...
2. At the top of the Find window, choose to Find items in:
catalogs in folder... (see screenshot on right.)
3. Refine your search by selecting search parameters and
entering your search criteria in the field(s). The + and - buttons in the upper-right allow you to add/subtract
search parameters. All metadata is searchable, including EXIF data (capture date, aperture, etc.), IPTC
fields and keywords, file info (dimensions, color space etc.) and more.
4. Note: Search parameters can be saved for future use via the
button in the upper-right.
5. Click Find. A dialog will ask you to select a folder in which to search (for example, an archive disc or your
***iView Catalogs*** folder.) Select the folder or disc, click Choose, and iView will begin the search.
Your search results will appear in a new iView catalog.
6. To locate image files on your computer from within iView, right-click (Windows) or Control-click (Mac) on
an image in the catalog, and select Show Media File. Alternatively, use the Action>Transfer to Folder
command to duplicate image(s) into a new location on your hard drive.
c. To pick-up an image from a magazine that has already been printed, the Art Director must retrieve the high-res
images from the archival DVD:
1. If the picked-up images were previously submitted to QG via EOS, they can be used in the layout, and must
be collected and included upon page submission.
2. If the picked-up images were archived, but an EOS form was NOT submitted for conversion, the images
must be renamed (with the new issue date per the naming convention), submitted to iFicient, and ordered
through EOS.
d. To pick-up an image from a magazine that is currently in production, these steps must be followed:
1. Complete an EOS scan order, indicating the filename(s) of the NEW image(s) (according to the naming
convention) at the top of the form. In the notes section of the form, indicate the filename(s) of the image(s)
that are to be picked-up, including the magazine and issue date.
2. Submit the EOS form as per the normal scan procedure. (see section 6.)
3. The file will be processed and will be available through iFicient within 48 hours.
Note: Specific color corrections may have been requested by the original art director that may not suit your title. You should
request a scatter for images picked up from titles currently in production.
e. To pick-up images from an archival DVD that is not yet available, contact your QG CSR with filenames of the
images needed.
SIM/QG Image Processing User Manual
page 18
Image Guidelines
Filenames
Images
• All images must be named according to the filename convention:
(Pub Code)-(Issue Code in YYMM## format)-(Story Title)-(# sequence)
for example: MTRP-080100-COVER-1 or EPCP-081100-PLUGS-3
• All images selected for use on a cover should be slugged 'COVER' in the filename and scan order form.
This will ensure that a scatter proof is provided, and make cover images easy to identify during production
and in image archives.
• If any work is done on a high-res cover image, save a layered PSD file (to allow for possible future
manipulation) and release it with the final files.
• Cover image resolution should be 300 dpi, and must not be reduced/enlarged by more than 10%. If
a change greater than 10% is needed, you must request that QG perform the reduction/enlargement
(preferably at time of image submission.)
• FPO images must never be re-named or re-sized (i.e. in photoshop.) FPOs can only be scaled up/down in
page layout.
• Interior image (non-cover image) resolution should be 300 dpi, and must not be reduced/enlarged in page
layout by more than 20%. If a percentage change greater than 120% or less than 80% is needed, you must
request that prepress perform the reduction/enlargement (preferably at time of image submission) and use
the resulting FPO from iFicient.
• When using high-res files, the high-res file must be collected and submitted with the final page layout.
• ICC profiles in high-res images from a prepress should be left intact and should not be changed or removed.
When opening a high-res image received from prepress, always select the Use Embedded Profile option if
asked.
• When transforming images (scale, rotate, skew, etc.) be aware that Photoshop reinterprets the pixel data and
this may cause fuzziness or stair-stepped lines (particularly in low-angle diagonals.)
Scatter Proofs
• All cover images will receive a scatter proof prior to release of the high-res file. Although the scatter will
be provided automatically by QG, it should also be requested via EOS. Any color adjustments or system
work should be performed during the change cycle, prior to submission of page to prepress. Once color is
approved, the high-res file (if requested) will be released.
• For late image submissions, do not ask for a scatter. Review the image on the final composed page proof
and make appropriate color corrections at that time.
Submission
• Cover images should be submitted to prepress for manipulation and conversion to CMYK as soon as
they are chosen. Page submissions containing RGB images layered with other design elements are not
acceptable.
• It is advisable to select two or three possible cover images and submit them for conversion and proof,
especially if there are initial concerns about image quality. This will allow for flexibility in cover design and
direction in case the quality of the favored image is poor.
For more information on SIM design and image guidelines, please see the SIM Art Guidelines document, available for
download at http://procedures.sourceinterlinkmedia.com/ Art Directors are responsible to follow the workflows and
guidelines set forth in the Art Guidelines document
PRIMEDIA
page 19
SIM/QG Image Processing User Manual
System Work
EOS Policies & Procedures
When system work (clipping paths, cloning, etc.) needs to be done on an image, there are three possible workflows:
• QG can perform the work. Be sure to include specific instructions on your EOS form.
• You can perform the work on the RGB image file prior to submission, then submit the corrected file to
iFicient for color conversion and FPO creation.
• You can submit an image, request a high-res file, and then perform the work on the high-res file yourself.
Be sure to include the corrected-high res file when submitting the final layout files.
Appendix-A
When
performing system work on an image that will print on SCA paper, be aware of the 290% ink density limit.
After
completing
theC
system
you must check
that no pixels
in your
exceed 290% total ink density.
SCAN
SIZING
HARTwork,
- CONVERTING
COLUMN
WIDTH
TOimage
PERCENTAGE
Final scan
must be
in percentage
terms. Below is a chart that can be used to convert column widths
For instructions
onsizes
checking
inkcommunicated
density, please
visit http://ads.sourceinterlinkmedia.com/inkdensity.html
into percentages. Below that are two charts to easily determine the column size in millimters, decimal inches and various
If any part of your image exceeds 290%, inform QG upon submission of the image so that they can correct the ink
density. page sizes in pixels (for digital images). Any questions regarding scan sizing should be addressed to the Color/Scanning
Supervisor.
Scan Sizing Chart
Size/Orientation of
Original
1 Col.
2 Col.
Full Page
4 Col.
5 Col.
Spread
35mm - Horiz
35mm - Vert
2-1/4"-Long Horiz
2-1/4"-Long Vert
2-1/4" Square
4x5 Reflective - H
4x5 Reflective - V
200%
310%
125%
170%
170%
55%
70%
385%
585%
240%
330%
330%
105%
130%
585%
900%
365%
505%
505%
160%
200%
760%
1160%
475%
650%
650%
205%
255%
950%
1440%
595%
810%
810%
255%
320%
1200%
1740%
715%
975%
975%
310%
385%
____________________________________________________________________________________________________
Color Guidelines
Monitor Calibration
Mac users can easily adjust their displays to show relatively accurate color using the Display Calibrator Assistant. The
colors you perceive on your display can be altered by many factors, including ambient light, brightness/contrast settings,
Column
Measurements
Pixel
Sizes and
for angle
digital
images
and
the position
of the
display. You should calibrate your display
regularly to
ensure consistent color.
(Based on 7.75x10.5 trim)
(Based on 7.75 x 10.5 trim size)
a. To use the Display Calibrator Assistant, select Apple Menu>System Preferences>Displays>Color.
Pixels @
Pixels @
Columns M i l l i m e t e r s
Inches
Final
Size
Click Calibrate.
The Display Calibrator Assistant walks you through calibrating your display. If you wish to do a
133LPI
150LPI
1
66
2.6
more detailed calibration of your display, select the Expert Mode checkbox.
Spread (15.5"x10.5")
2926 x 4522
3300 x 5100
2
132
5.17
As you
walkx through
calibration
steps, 2550
use thex sliders
Fullb.
page
(7.75"
10.5") the
2261
x 2926
3300 to match the brightness and neutrality of the Apple
3
200
7.875
Logo to the background color. It may help to “blur your eyes” while making
these adjustments.
2 column (width)
1507
1700
4
263
10.35
1/2c.pgSelect
-H (7.75"
x 5.5")
1650 x 2550
a Target
Gamma1463
of 2.2.x 2261
5
328
12.92
1 column (width)
753
850
6
394
15.5
d. Select 6500ºK as your white point.
e. The Display Calibrator Assistant creates a color profile for your display, based on the adjustments you just
made. For consistency and easy reference, it is recommended that monitor profiles be named according to this
convention:
(date, format: YYMMDD)(user last name)(white point set in step d).icc
example: 070130smith5500.icc
page 20
SIM/QG Image Processing User Manual
f. When the calibration is completed, your profile is automatically saved in (home folder)/Library/ColorSync/Profiles/
and is automatically activated and used by the system. Although this calibration will yeild fairly consistent color,
it should not be considered 100% accurate. Calibrated Epson proofs must continue to be used for reviewing
color. For a true “virtual proofing” environment, only certain monitors can be used, along with much stricter
calibration methods, controlled lighting conditions, etc.
Virtual Proofing with Dalim Dialogue
Monitor Profile
a. Verify that your monitor is correctly calibrated and profiled according to the instructions above.
Verify that the correct monitor profile is selected in Apple Menu>System Preferences>Displays>Color.
b. Launch your web browser and enter the Dalim Dialogue server URL:
http://172.23.253.33:8080/Dialog/index.html
Type in your login and password and hit Return.
c. Click on the ‘Monitor Profiles’ icon.
(6th from left.)
d. Click Browse to locate your ICC Monitor Profile (as noted in step 1), select it, and click Upload.
On a Mac, Monitor Profiles are typically located in:
(Hard Drive)/Library/Color Sync/Profiles/
or
(Hard Drive)/Users/<User.Name>/Library/Color Sync/Profiles
e. Select your profile in the list, and click Set As Current.
Document Profile & Proofing
a. Click on the ‘Jobs’ icon.
(2nd from left)
b. Navigate through the folders to locate the document to be proofed, and click on the file name.
c. The proof will launch in a new window. If you are asked whether to trust an applet, click Yes.
d. In the Dialogue proofing window, select
Window>Preferences... and match your settings
to this screenshot: Dialogue will remember your
settings, so this only needs to be done once.
Click OK when finished.
e. Select View>ICC Profiles...
and verify your color settings:
• Monitor Profile: should show your most
recent Monitor Profile, as uploaded in the
steps above.
• Document Profile: should be set to inherit.
• Simulation Profile: must be set to the paper profile that the file will print on (see chart on page 23)
You must set this for each proof that you view in Dialogue! For example, if your magazine prints on
SWOP A paper, you must select the SWOP A profile. Note that most magazines use different paper for
covers and guts.
• Rendering Intent: must be set to Relative Colorimetric.
f. Proof and review the document.
SIM/QG Image Processing User Manual
page 21
Imaging Workflow using Dialogue (this workflow is not currently available.)
a. Art Director or Photo Editor will upload images to iFicient per the normal procedure.
b. After approximately 15 minutes, images will be viewable on the Dialogue Server. (Raw images may take slightly
longer, and will appear in Dialogue as .jpg files)
c. Using Dialogue, images can be marked up to communicate requested system work, color corrections etc.
Images cannot be reviewed for color in this stage, since they have not been converted to CMYK yet. This step
is optional.
d. Complete an EOS form per the normal procedure. If markups were made in Dialogue, indicate such on the EOS
form. (i.e. “See markups in Dialogue.”)
e. QG will convert images per the normal procedure, and will notify the Art Director and/or Photo Editor via email
when the images are ready to view in Dialogue.
f. Art Director or Photo Editor will review images in Dialogue, marking up corrections as needed.
g. Submit an EOS change form for any corrections, again referring to any markups made in Dialogue.
h. QG will make the requested corrections, and will notify when images are ready to view.
Repeat steps g-h as necessary.
Remember that only true “virtual proofing” workstations can be used to review color.
Collaborative Proofing Sessions in Dialogue
Any Dialogue user can start a review session and invite other users to join in. All participants in the session can create
markups and notes that are displayed in real-time, and can also communicate through a chat utility. When a user
moves or zooms the page, the display is changed for all participants in order for all of them to see clearly what is
being discussed.
To start a collaborative session:
a. In Dialogue, open the image you wish to collaborate on.
b. Choose Session>Create.
c. Enter a Session name and a Password. Other users will need this information to join the session. It is
recommended to use the pub code (i.e. SRFP) as the Session name, and the story name as the Password.
d. Click OK. The Session panel will appear at the bottom of the Dialogue window.
e. Call the users with whom you wish to collaborate. Give them the Session name and Password.
f. Users can join the session by logging into Dialogue, clicking the
icon, and entering the Session name
and Password. You can continue to communicate via phone, and/or by using the chat portion of the session
window in Dialogue.
g. The session ends when all users leave the session (or close the document.)
page 22
SIM/QG Image Processing User Manual
IMAGE WORKFLOW
ORANGE = SIM
Appendix B — Image Workflow Chart
BLUE = QWP
Digital images received by
SIM from internal/external
sources.
Images selected, renamed
and numbered according to
standard SIM naming
convention.
Selected images submitted to
QWP via Mass Transit.
Analog images
received at SIM from
external sources.
Image FPOs automatically
created and posted for
download via Ificient.
EOS scan order forms
created, filled out as needed,
and printed as hard copies.
Hard copy EOS scan order
forms and analog images sent
to QWP.
Image files automatically
populate EOS with an order
form for each image.
Images scanned.
EOS image order forms filled
out as needed.
Image FPOs automatically
created and posted for
download via Ificient.
Images converted to CMYK
and processed according to
EOS order instructions.
Epson 'scatter' proofs printed
at SIM location (if requested
on EOS order.)
Hi res image files returned to
SIM via Mass Transit (if
requested on EOS order.)
Epson proofs received and
reviewed by SIM staff.
Page
Processing
WFL
YES
Image OK?
NO
EOS order "revised", and
correction instructions noted.
SIM/QG Image Processing User Manual
Notes
page 23
page 24
SIM/QG Image Processing User Manual
Support Contacts
SIM Prepress is responsible for general oversight
of image color and quality, workflow and guideline
compliance, and all training. Please contact the
personnel below for any of the following reasons:
•
New employee training and setup
•
Change in title assignments
•
Questions on image/proof color or quality
•
Any other questions relating to image workflow
QG Premedia is responsible for technical administration
of Mass Transit, EOS, and iFicient, image processing,
and proofing.
For questions related to specific images in the day to
day workflow, please contact your QG CSR and/or color
manager.
Richard Carlson
PreMedia Specialist
949-705-3452 - Irvine Office
[email protected]
Brian Allen
Prepress Manager
310-531-9074 - El Segundo Office
424-675-1443 - Mobile
[email protected]
The internal SIM Help Desk is responsible for technical
administration of all SIM computers and software.
Non-emergency tickets should be self-created using the
web site: http://helpdesk.sourceinterlink.com
Emergency\Critical tickets should be called in.
If you are not connected to the network or can’t
access a computer, you should also call in the issue
at: 1-866-266-8989.
The HelpDesk can also be contacted via email at:
[email protected]
For manuals and instructional videos covering SIM prepress systems and related topics, please visit
http://procedures.sourceinterlinkmedia.com/