1
Learning with Etoys: Imagine Invent
Inspire
Published : 2012-12-14
License : GPLv2+
Table of Contents
Learning With Etoys
1 Dedication
2 Introduction
3 Camouflage
4 Illusions
5 Inspired by Calder's Mobiles:
6 Inventing Poetry in Motion
7 Ratios
8 Geoboards and Puzzling Polygons
9 Motion: Follow the Bee
10 Animation: Workout
11 Tossing The Coin
12 Decorate your Tree: Another Way to Animate
13 Water Cycle
14 Training Your Robot
15 Fractions
2
3
5
11
19
24
29
32
42
45
49
53
57
60
70
Appendix
16 Getting Help
17 Quick Tips
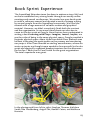
18 Book Sprint Experience
74
79
83
LEARNING WITH ETOYS
1
Dedication
We would like to dedicate this book to those who started Etoys on
the way to being an exciting and stimulating environment where
children of all ages can create: Alan Kay, Scott Wallace, Dan
Ingalls, T ed Kaehler, John Maloney, Andreas Raab.
We would like to thank Viewpoints Research Institute and the Office
of Math, Science, and T echnology Education (MST E) at the
University of Illinois Urbana-Champaign for their support of Etoys.
We would like to thank Google and Flossmanuals for making it
possible for our group to meet and create this book.
Our deepest thanks goes to our community of developers,
translaters, educators, supporters and teachers, who are the
lifeblood of the ongoing journey of Etoys.
2
Introduction
Etoys is a tile based programming environment for children that
was built on Squeak by a team headed by Alan Kay. The child friendly
design of the interface was influenced by the education theorist Seymour
Papert, who many consider the driving force behind the use of computers in
education. If you can use a mouse you can use Etoys.
A vision of Alan Kay and Seymour Papert is that all students should have the
opportunity to imagine the future by exploring with the computer today. In many
parts of the world that is now a reality. Their vision took on a global
perspective in 2006 when Etoys was included on the XO machines in the
OLPC project, that now number over 2.4 million around the world.
All school children should have the opportunity to engage with computers in
the most meaningful way. Learning to think and using the computer to discover
and work with powerful ideas is the knowledge of true value. The community of
Etoys users is working toward the dream of having all students become
computer literate.
This book only covers a small portion of those items. As you and your
students learn some of the basic techniques, you will find more and more uses
for them. The process of learning Etoys is just that, a process; the learning is
on-going even though projects are begun and finished. Students will enjoy
becoming experts and sharing their knowledge with others in the classroom.
Imagine t his: A group of learners want to visualize what they Imagine so
they go to Etoys to Invent their dreams and Inspire each other by building on
their various Etoys projects. Today's learners need this kind of experience to
be prepared for the future.
Etoys is supported by a large group of volunteers from all around the globe. If
you would like to volunteer, or would like to reach one of the current volunteers,
there are two websites you can visit:
http://www.squeakland.org/resources/community/
which contains links to Etoys groups around the globe and
< http://www.squeakland.org/contact/
where you can join the Etoys user mailing list. Please do join us.
How to Use this Book
This book is designed to lead the teacher on a learning path to Etoys. To
begin you will need to go to http://squeakland.org and download Etoys. If you
need help in downloading the software you can find further directions in the
chapter titled Get t ing Help.
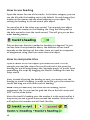
When you open Etoys you will see the following window:
3
This book's chapters are arranged in a sequential way so that the Etoys
knowledge needed builds from one chapter to the next. Idea, tools, tiles and
techniques used in each chapter are listed at the beginning of the chapter. If,
when looking through a chapter, you find things listed that are not explained in
that chapter, you should look back over previous chapters to find when they
were first introduced. At the end of each chapter there will be a section called
"More Inspirations" which includes ways to enhance the project in the chapter
and/or links to similar projects you might want to explore.
Throughout the chapters, there will be references to the built-in Quick Guide
help. The Quick Guides are accessed by clicking the question mark icon on
the far left side of the Navigation Bar at the top of all Etoys windows.
In Appendix A, Get t ing Help, there is more information on vocabulary and
user tools which you may find helpful as you navigate through the book. Here
you will also find links to online sites that have a wealth of information and
sample projects.
In Appendix B, Quick T ips, you will find helpful information on loading and
saving projects and other useful general knowledge.
4
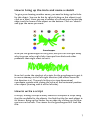
Camouflage
Camouflage is found everywhere in nature, as it is the tendency for
many animals to stop still when alarmed. T his project will help
students to see a plausible explanation of why animals “freeze”
when threatened. Can you Imagine how animals behave when in
danger? T o get an understanding of this, you will Invent an animal
and it's environment, so that it can camouflage and describe it's
behavior and watch. Let this project Inspire you to create puzzles
or moving illustrations.
In this project we use:
Halo, Naming, Painting T ool, Scripting, increase by
Project
(original idea by Alan Kay)
First, open a new project. You can do so by opening Etoys and
clicking on the lilac cloud that says "Make a new project". Now you
have the whole Etoys world at your disposal. Let’s start with
painting some grass and then a grasshopper, using the same shade
of green for both.
5
How to paint
T o paint objects in Etoys, there is the painting tool in the navigation
bar at the top of your window. Click on the icon shown above and
you will get a new sheet of paper and the tools to paint on it.
Every time you click on the icon, you will open a new sheet and
start a new painting. You need to make two paintings here, one for
the grasshopper and one for the grass. Make sure you quit the
painting tool when you finish a drawing.
You can find out how to use all the elements of the painting tool in
the Etoys Quick Guides - Paint T ools and get an overview in the
Getting Help chapter of this book.
T he drawings you made are in fact objects you can pick up and
move around. T hey will be called "sketch" until you give it another
name.
6
How to bring up the Halo and name a sketch
T o give your drawing another name, you need to bring up the Halo
for this object. You can do this by right-clicking on this object (cmdclick on a Mac). Now you see a number of colored icons around the
object and the name of the object on the bottom. Click on "sketch"
and type the name you want.
Now put the grasshopper in the grass, and you can see right away
why its green color might help it escape from birds and other
predators that might want to eat it.
Now let’s write the simplest of scripts for the grasshopper to get it
to move sideways in the left-right direction (the official name for
this direction is x). T he world in Etoys is a two-dimensional
coordinate system with x being the value of the horizontal position
of an object (starting with 0 at the left side).
How to write a script
In Etoys, writing a script actually means to compose a script using
the tiles available for the objects. You find the tiles for each object in
it's Viewer. Bring up the Viewer for an object by clicking on the blue
eye icon on the halo. T he viewer for the grasshopper will look like
this:
7
You'll see the "Grasshopper's x tile" under the heading "basic" (which
stands for category basic) in the upper half of the viewer.
8
Drag the tile onto the Etoys world, using the white arrow, and it
will create a script editor around it the moment you drop it. If that
doesn't happen, try again and make sure, you grab it at the white
arrow shown in the image above.
Now you can change the command to let it perform the action you
want. Clicking on the white arrow in the command tile will bring up
a menu of operations where you choose "increase by" to move the
grasshopper from left to right. You can change the value for
"increase by" by clicking on the number and typing in another one.
Find more help in the Quick Guides - Script T iles - X and Y T iles.
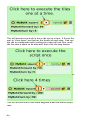
Now run the script by clicking on the clock in the top line of the
script editor. T he script will repeatedly execute the command until
you click the clock again to stop it.
All of a sudden you can see where the grasshopper is, and so can
most other animals. Now you have a little insight into why animal
vision is almost always better at detecting motion than in seeing
fine details – and also, why animals might want to keep still when
threatened.
When you are finished, you'll want to save your work for later use
or to show it to your friends and family. You can also make different
versions based on the ideas you have.
How to save and load
T he button you see above is the "publish" button. Find it in the
navigation bar and click it. A dialogue box will open. It asks you to
put in a name for your project (to make it easier to find it again
later). You can put in your name in the author field, a description and
other information if you want. Click "Ok" and you will get another
dialog box where you can choose the destination for your project.
T he default location is the Etoys folder on your computer. It is
strongly recommended to save all your projects there, because this
is the folder which will be presented by default when you are going
to load a project.
9
T o get a project out of your folder, click the "find" button on the
navigator bar. It will present all the projects you have saved so far
in your Etoys folder. Select the one you want and click "Ok". T he
new project will open in Etoys. T o get back to the previous project,
use the white arrows in the navigator bar.
For more information about loading and saving from different
locations etc., look at the Quick Guides Navigator Bar - Keep Find
Projects.
More Inspiration
If a creature like a grasshopper lived in a desert environment, what
color would you expect it to be? Can you create a project for that?
With the things you learned in this chapter, you can do many
wonderful paintings with moving objects in it.
Or you can create a puzzle as you can see here in Avigail Snir's
projects for students from 1st grade and up
http://etoysillinois.org/library?sl=760
10
Illusions
Can you Imagine that what you see is not what is there? Illusions
furnish many examples of “the world is not as it seems”, and many
of them are quite startling when done dynamically. When we look
at a scene, we think we are seeing the lights and shades and colors
accurately, but in fact, both our lower level and higher level mental
mechanisms are reformulating what our retina senses. For example,
the apparent brightness of a gray tone is quite conditioned by the
brightness of the background around it. We can show this both
statically and dynamically. Invent some illusions using the
computer in this chapter and let them Inspire you to challenge
your senses in different ways.
In this project we use:
supplies bin, rectangle, coloring, writing a script, increase by,
heading, composting tiles
Project
In this project we use ready-made Etoys objects which you can find
in the supplies bin, change their color and write a script to move
them. So let's start with the supplies.
11
How to use the Supplies Bin
First, find the Supplies icon on the Navigation Bar and click it. T his
will open the Supplies bin, which provides you with a variety of
ready-made objects to use in your projects. Also, there is the Object
Catalog in the Supplies, which you can drag out to find many more
objects to use.
For this project, we'll use the rectangle, which you can find directly
in the Supplies. Drag it out on your screen.
We want to change the color of the rectangle to be a neutral gray.
How to use the rectangle
T o change the color of your rectangle, bring up the halo of the
rectangle. You might notice, that you get a purple icon here. It is
only available for certain objects and can be used to change the
color of an object. Clicking the purple halo icon transforms your
cursor into an eyedropper. Move it over the color you want and
click to choose this color. Choose a neutral gray.
T he rectangle still has a black border, for our project we need to
remove it. You can do this by bringing up the halo for the rectangle,
clicking on the white menu icon and then changing the border color
to the same color as the body of the rectangle.
12
When you have finished this, copy the rectangle, using the green
icon of the halo. Now you have two gray rectangles.
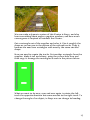
T o create the contrast illusion, you need to get another rectangle
out of the supplies. Change it's size to become bigger using the
yellow halo icon. Click on the yellow icon and hold it while moving
the mouse until it is the size you want.
Color the big rectangle black. T hen copy it and change the color of
the copy to white. Now move the two smaller gray rectangles: one
onto the black rectangle and one onto the white one as you can see
in the picture below.
You can already see that the right hand rectangle on the white
background looks darker than the copied rectangle with the same
gray color on the black background. T his is called the Mach
Illusion, and it serves to help animals to see things that are almost
the same color (because it makes the difference more apparent).
When clicking on the big rectangles, it can happen that they stick
to your mouse and suddenly are in front of the smaller ones. T o find
the smaller rectangles again, just move the bigger one away to find
the rectangle underneath.
We can also make a dynamic version that seems to change colors,
and also proves that the two squares are the same color. T o do
that, we write a script that moves the rectangle from the black
background over to the one on the white background.
13
Get the halo for the gray Rectangle on the black background
(named Rectangle1 in the example project) and click on the blue eye
to open the Viewer. In the viewer, you'll see the tile "Rectangle1's
x".
Drag the tile onto the Etoys world, using the white arrow, and it
will create a Script Editor around it the moment you drop it. If that
doesn't happen, try again and make sure, you grab it at the white
arrow.
Now you can change the command to let it perform the action you
want. T he world in Etoys is a two-dimensional coordinate system
with x being the value of the horizontal position of an object
(starting with 0 at the left side). In order to move the left gray
rectangle towards the right one, we need to increase it's x value.
Clicking on the arrow in the command tile will bring up a menu of
operations where you choose "increase by".
T he value in the tile means how many pixels the rectangle's x will
increase in each run of the script. Choose "1" to let it move slowly.
You can change the value by clicking on it and typing in the number
you want.
Start the script and watch how the rectangle moves over from the
black to the white side and finally reaches the other gray rectangle.
You'll see that it has indeed the same color.
Now let's do another kind of illusion.
T he basic idea is that the same sized object placed on a picture of
railroad tracks will look larger when placed higher where the
tracks appear narrower. T he mental calculation is that things of a
certain visual angle in a context that whispers “farther away” are
perceived to be larger. Here are two rectangles placed on a picture
of railroad tracks.
14
We can make a dynamic version of this illusion in Etoys, and also
learn something about angles, negative numbers, and how much
convergence is required to manifest the illusion.
Get a rectangle out of the supplies and color it. Give it roughly the
shape as you can see in the picture of the railroad tracks. Copy it,
because we need two rectangles with exactly the same size and
shape.
Now we need to create the tracks. Get another rectangle from the
supplies. Make it tall and skinny, using the yellow halo icon and
then copy it. Arrange the rectangles as seen in the picture below.
What we want to do now, over and over again, is rotate the left
track the opposite direction but same amount as the right track. T o
change the angle of an object, in Etoys we can change its heading.
15
How to use heading
Open the viewer for one of the tracks. In the basic category you can
see the tile with the heading set to 0 by default. Go and change that
number in the viewer and see what happens to your object. T ry
setting the heading to 90 and watch your object.
You can also do it the other way around. T urn around your object
and watch the number in the heading tile. Drag the blue spiral on
the halo around to turn the track around. T his will give you an idea
what heading means.
Did you discover that the number for heading is in degrees? As you
can see from the explanation above, the direction of one track
depends on the direction of the other. Here we need to composite
an assignment using tiles from more than one object.
How to composite tiles
Open a viewer for all the objects you need tiles from. For our
example we need the viewer for track1 and track2. We want the
heading for track1 being always the "opposite angle" of track2. Start
assembling the script by dragging the track1's heading tile onto the
Etoys world.
Now, instead of setting the heading to zero, you want to set the
heading to track2's heading. In order to do this, go to the viewer for
track2 and drag out a tile with track2's heading.
Note: here you need only the value for the heading, not an
assignment tile. So you need to grab the tile on the left corner and
NOT on the white arrow.
Move the track2's heading over the number 0 in the script and let it
drop once you see a green frame around the number. Now the tile
will replace the number and will look like this:
16
T his would cause the heading of track1 be exactly the same as
track2 whenever you turn track2 around. We want it to be in the
opposite direction but same angle, so we need to make some
additions to the assignment. You can achieve this by multiplying the
direction of track2 by -1 and so get as a result the number of the
opposite direction but same angle.
Click on the green arrow at the end of the assignment to extend the
assignment. Now it looks like this:
Click on the "+" to change the operation to "*" and then click on the
"1" and change it to -1. T he final script should look like this:
Click on the clock to set the script ticking and then use the blue
spiral on the halo of track2 to turn track2 around. Watch how
track1 changes it's direction accordingly.
17
We see that the “enlarge effect” is similar to that in the picture of
the railroad tracks, and that there is very little effect when the
Etoys “tracks” are rotated outwards
More Inspiration
T ry out more illusions like the ones you can find here:
http://www.scientificpsychic.com/graphics/
Now that you know how to composite tiles, try the Steering T he
Car project from the Etoys gallery of projects.
18
Inspired by Calder's Mobiles:
Imagine Art in motion. It can be found in dance, in music and in
sculptures that are affected by machines, or wind or touch.
Alexander Calder created many mobiles; some were suspended and
some that were anchored to the ground. T he shapes in a mobile are
suspended from wire. In this project students Invent mobiles by
painting shapes that appear to be suspended from wire and using
script commands make the mobile move when it is touched. Calder
may Inspire them to be first computer mobilest.
In this project we use:
Paint T ools, Halo Handles, T ext, Width Length,T ests
Category,Normal T icking, Button Fires a Script
T he project also uses the Scripting category of tiles and they will be
explained in the lesson.
The Project
http://etoysillinois.org/library?sl=2137
19
T o begin, open Etoys and click on the cloud that says Make a
Project:
Be inventive; use the Paint Tools to be an artist and paint shapes
with your favorite colors. Be sure to make them look like they hang
from a wire.
T o quit the paint tool when you finish drawing click on Keep.
Now let's make this painting move like Calder's mobiles. We will
use many of the Halo Handles useful tools. Click on the small aqua
color dot that looks like an eye, to open a set of script tiles in a new
pane.
Change the name of your sketch to "mobile". Look in the new pane,
the Viewer, and you will see all the tiles for the sketch you just
named are now called "mobile".
We can make the mobile's dimensions change to make it look like it
moves in space. T he first script will make the mobile shrink; the
second one will make it grow. Click on Basic and select the More
Geometry category.
20
Drag out the "width" tile and drop it in an empty part of the
window. T he new box around the tile is called a Script Editor. T he
tile shows us how wide the mobile is but we can make the size
change by clicking on the small black arrow to open a menu of
options.
Choose decrease by, rename the script, and experiment with the
number to see how different numbers work. Click the exclamation
mark to run the script one time. Use the same set of steps to make
a script that increases the width. Give each script a meaningful
name. You will have two scripts that look like these, but you might
have different numbers. T he green circle with the clock is a button
that starts and stops the script.
Now let's make a reset script. Drag out the "width" tile and the
"length" tile and put them in one script. Remember what your
mobile looked like before you started experimenting with it and
adjust the width and length in the tiles to resize it. When it looks
right, change the name of the script to Reset.
21
One last thing to do with the reset script is to select its white Menu
option: button to fire a script. T he little button is smaller but does
the same work as the script. It will look like this small aqua one but
you can change the size, the label and the letter style. Experiment
with the options in the button's white menu. My finished button
looks like this big orange one.
T he next step is to make a script that will start and stop the shrink
and grow scripts. T his example uses a test statement to cause one
script to work if the mobile is under the mouse and if it is not under
the mouse the other script will be ticking. T he test is found in the
Test category in the Viewer.
T here are no Quick Guides for the Scripting tiles but they are useful
for this project, and many other projects. In the Scripting category
find tiles with "start" and "pause". T he tile ends with the words "
empty script" but, if you have been naming your scripts as you
created them, clicking on the words "empty script" will open a
menu that lists all of your scripts . . . by name.
T he finished script looks like this. Name this script too.
T he last script for this project is one that controls when the motion
script starts. Click on the white menu in the top of the motion
script and choose: button to fire a script. Make the new button
look like your Reset button and change its label using its white
menu.
Now let's give the project a title. Open Supplies in the Navigator
Bar and drag out a copy of the Text. T ext is a box that you type into
and fill with the information or directions for your project. Just like
in word documents, the text's font, color and style can be changed.
T here are three special icons in the Halo for T ext: pale green pale
pink and brown.
22
Experiment with your text's options until you like the way it looks
and then think about where in your project window is the best place
for it. Do you want it near the buttons or above the mobile, or
someplace altogether different? Your project shows the results of
all the decisions that you have made.
As the author of an interactive art work you have a responsibility to
the people who visit your project to make it ready for them. T hrow
away trash cans and other objects you do not want visitors to see.
Correctly spelled words make a good impression. Click on the little
tabs that open Viewer panes and collapse them so they are out of
view of visitors. If everything looks right, Save the project and share
it.
More Inspirations
Are you inspired to learn more about Alexander Calder? Look at
images of his work in books or on the internet.
Etoys projects inspired by other famous artists are available. Here
are links to two sets of projects you might enjoy.
Kandinsky Inspired: http://etoysillinois.org/library?
tags=Kandinsky%20Inspired
Miró Inspired: http://etoysillinois.org/library?
tags=Mir%C3%B3%20Inspired
Alexander Calder (July 22, 1898 – November 11, 1976) was an
American sculptor best known as the originator of the mobile, a
type of kinetic sculpture the delicately balanced or suspended
components of which move in response to motor power or air
currents; by contrast, Calder’s stationary sculptures are called
stabiles. He also produced numerous wire figures, notably for a vast
miniature circus. http://en.wikipedia.org/wiki/Alexander_Calder
23
Inventing Poetry in Motion
Imagine poetry illustrated and enriched with motion. Haiku is a
small poetry form that is fun to use for Etoys projects. As you write
your poem, be Inventive and imagine how your poem can be
illustrated and made into a dynamic project. A poem that appeals to
the eyes, the mind and a sense of humor may Inspire your reader to
be creative too.
In this project we use:
Paint T ools, Halo Handles, T ext, Digital Images, X and Y, Hide and
Show, T ests Category, Normal T icking, Button Fires a Script
T he project also uses the Scripting category of tiles and they will be
explained in the lesson.
Project
You may want to go to: http://etoysillinois.org/library?sl=2138 and
view this project before beginning your own. T he twinkling lights
make the magic. T he Haiku is by the author.
24
T o begin, open Etoys and click on the cloud that says Make a
Project.
Click on Supplies in the Navigator Bar and drag out a "T ext". T ext
color, style and size can be modified by using the three icons across
the lower edge of the text's halo. T ry different fonts and sizes,
choose a color with the magenta (eye drop) icon in the halo.
T his project exercises your skills as an artist, a poet and a
programmer. Like other artists, you are inventing a world where
your ideas rule. Writing a Haiku takes a little specialized knowledge
that you will need to think about before writing a poem. You could
use a poem written by someone else, just be sure to give them
credit as the author.
T he project shown uses a digital image from the internet and the
photographer's name is part of the project. Knowing how to find
images on the internet and how to invent an object that connects
the poem and the image is part of the fun of this project. One of the
special features in Haiku is that the words match the image created.
If you have never written a Haiku, here is some basic information:
Haiku in English is a development of the Japanese haiku poetic
form in the English language. Contemporary haiku are written in
many languages.
It is impossible to single out any current style, format, or subject
matter as definitive. Some of the more common practices in English
include:
Use of three lines of up to 17 syllables
Use of a season word (kigo)
Use of a cut or kire (sometimes indicated by a punctuation
mark) to compare two images implicitly
You can read more about it here:
http://en.wikipedia.org/wiki/Haiku_in_English
T he poem in this project is:
San Francisco bridge
strides across the bay tonight
strings of lights head home
25
Once your poem is finished and edited to look the way you want,
the next step is to select a Digital Image. Use a photograph you
took or one you find on the internet. After you find an image you
like, save it to a folder on your computer and then drag the photo
from your folder into the open Etoys window. T he size of the photo
can be adjusted, bigger or smaller, by using the yellow Halo icon.
Hold down the Shift key while dragging the yellow handle so the
proportions will stay the same. Always give credit to the artist,
author or photographer of materials you use in a project, even to
yourself. Credits for the photo used in this project: Golden Gate
Bridge Rich Niewiroski Jr. http://www.projectrich.com/gallery
T he photo is a layer in the project and it should be the background.
T o make it stay in place, use the photo's halo white menu icon (top,
second from left). Select all three options: be locked, resist being
picked up, resist being deleted.
T his poem's emphasis on the journey home led to using Paint Tools
to make a drawing of little golden dots representing car headlights
(named "string of lights"). T he Paint T ools are also used to paint a
set of small dots to represent the lights of homes (named
"homes").
26
T he string of lights on the bridge has the script below to make
them travel: "x and y" are tiles in the Basic category. Drag both tiles
and put them in one script. Click the small black arrow in each tile
to open a menu of options that includes: increase by. Experiment
with the numbers that make your drawing move at the best angle
for your project's photograph. Name the script.
Open the T ests Category for the string of lights and put a test in
your script. T his project uses the "x" location to control when the
car lights stop moving. T hey stop when x is greater than 1165. Open
the homes viewer to find the "homes show" tile. T his tile is located
in the miscellaneous category.
T he lights of the homes "Hide and Show" tiles are in the same script
for the car's lights. T here is no need for a separate script.
T he reset script will position the car's string of lights at a starting
location that uses the "x and y" tiles. T he reset script also is used to
hide the home's lights. Since this project now has two scripts, you
should name each script to indicate what they control. In this case
"travel" and "reset"
As the author of an interactive art work you have a responsibility to
the people who visit your project to make it ready for them. T hrow
away trash cans and other objects you do not want visitors to see.
Correctly spelled words make a good impression. Click on the little
tabs that open Viewer panes and collapse them so they are out of
view of visitors. If everything looks right, save the project and share
it.
27
More Inspirations
Photographs can be a source of inspiration for more Haiku, or
sometimes a word or phase will lead to new ways to express
yourself.
EtoysIllinois.org has a set of Haiku projects you may enjoy:
http://etoysillinois.org/library?tags=Haiku
28
Ratios
Can you Imagine the gears turning in your mind as you read this?
T ry to imagine little gear's cogs meshing with a big gear's cogs.
What does that look like? You can Invent your own system of
gears. Inspire your classmates with your knowledge of gears.
In this project we use:
text, book, buttons, test , Start Script, Stop Script, turn by, color
sees
Project
Begin by downloading the project from
http://etoysillinois.org/library?sl=2141.
Ratios are important in studying gears. T he teeth of one gear fit into
the teeth of another gear. When one gear turns the other gear
turns as well. Your students can explore what happens when the
gears have different numbers of teeth. Ratios are often used to
make comparisons.
29
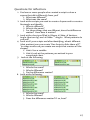
T o start, they should
1. click on the purple "Gears" flap at the bottom of the project
to open it
2. click on any gear and drag it into the yellow Gear T est Area,
then click again to droo it into the yellow Gear T est Area
3. repeat for a second gear
4. put a tooth on one gear into a space between teeth on the
other gear
5. count the teeth in each gear and record in their notebook
T o change the speed of the gears, they click on the Gear Speed
number at the upper right of the Gear T est Area. It will be
highlighted in darker green. T hen type the new speed and press
enter. You can also use the up and down arrows to change the gear
speed. Have students set up a ratio to compare the number of teeth
on the smaller gear to the number on the larger gear. T hen they
should:
1.
2.
3.
4.
5.
record the ratio in their notebook
predict which gear will move faster
record their prediction
explain why they think this
click start and count how many times the smaller gear turns
when the other gear turns one complete turn
6. click stop and reset when through
7. calculate the ratio of the number of turns for the smaller gear
to the number for the larger
8. record the ratio in their notebook
T hey should repeat their experiment with other sets of two gears.
T here are six possibilities. Have them can list them. T o do this
methodically, they should start with the blue gear and list all
combinations with it, then green and then red. You can give them
this hint if they are stuck. T hen they should record your results for
the other five sets of gears.
Have them organize their data in a table to help them see
relationships between the data for different gear sets. Ask them to
ponder the following questions:
1. What relationship can you find between the two ratios (teeth
and turns) for each set?
2. Does the smaller or larger gear turn faster?
3. Can you explain your data?
30
Have your students try three gears, they will notice that one of the
gears may turn the wrong way. Note that there are four different
combinations of three gears. Have them try to write them down
the combinations and test all the possibilities. Have them see if the
can fix the problem by looking at my script. T hey can see my script
by clicking the bottom yellow viewer tab at the upper right and
dragging the "T estArea run" tile out onto the workspace. Challenge
them to struggle to redesign the script to make all the gears
always turn the correct direction.T his will require more tests.
More Inspiration
Have your students
1. think of some other uses of ratios - ratios are used by
engineers and scientists
2. look in their text books or on the Internet for ratio
applications
3. best of all think of some applications where they, their family
or friends find ratios useful
4. think up an idea for an application of gears
5. search the Internet for information about their idea - someone
may have thought of it
6. make a presentation to the class using their data,
observations, ideas and thoughts
31
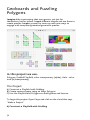
Geoboards and Puzzling
Polygons
Imagine kids constructing their own games, not just for
themselves, but for others. Invent different shapes and use them to
create puzzles. Inspire yourself to come up with new ways to
engage with computer generated geometric puzzles.
In this project we use:
Polygon, Gridded Playfield, color transparency (alpha), Halo - color
icon (w/transparency)
The Project
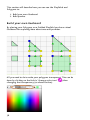
A) Construct a Playfield with Gridding.
B) Create various shapes using an Etoys Polygon.
C) Use the Playfield and Polygons to build games and lessons.
T o begin this project: Open Etoys and click on the cloud that says
"Make a Project"
A) Construct a Playfield with Gridding
32
1. Get a playfield from the Supplies
2. From the white menu icon in the Playfield Halo select
<playfield options...>
33
3. From the playfield options menu check <grid visible when
gridding> and <use gridding>
4. Your playfield will now show gridlines
5.
34
5.
6. Click on <set grid spacing> to specify the <grid origin> and <grid
spacing>.
7. T he first dialog box allows you to specify the location of the
origin within the playfield, for now 0@0 (which is the center of
the playfield) is fine, simply click <Accept(s)>
35
8. T he next dialog box allows you to specify the size of the grid
in width (as measured along the X axis) and length (as
measured along the y axis). For now enter 40@40 (40 wide
and 40 long) then click <Accept(s)>
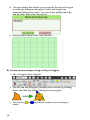
9. Your playfield should now look like this:
B) Create various shapes using an Etoys Polygon
1. Get a Polygon from Supplies
2. You can see the polygon's handles (aka vertices) by holding
down the shift key while clicking on the polygon
3. T he circles (
move.
36
or
) represent veritces you can drag to
4.
5.
6.
7.
8.
9.
10.
move.
1. T he blue circle ( ) represents the "current vertex at
cursor", don't worry about that for now, but if you want
to play with it open the viewer and go to
the polygon category. T hen change the x at cursor, y
at cursor and vertex cursor. Watch what happens and
see if you can figure it out. T his could be good for
someone who finishes early.
T he green triangles ( )allow you to create new vertices
Play around by moving the vertices ( or ), click and drag
to move the vertices.
T ry to create a square.
Can you create a rectangle? What other shapes can you
make?
Now try creating a square by picking up the polygon and
placing it inside a Gridded Playfield. Is it easier to make a
square?
T ry to create a triangle. Notice what happens when you
position one vertice almost exactly on top of another.
Click to open the white menu icon in the Polygon's halo.
Uncheck "closed" and see what happens
C) Use the Playfield and Polygons you created to build games
and lessons
37
T his section will describe how you can use the Playfields and
Polygons to:
1. Build your own Geoboard
2. Build puzzles
Build your own Geoboard
By placing your Polygons on a Gridded Playfield you have virtual
Geoboard for exploring ideas about area and permiter.
All you need to do is make your polygons transparent. T his can be
done by clicking on the Halo's "change color icon" ( ) then
changing the transparency (as shown below)
38
You can also change the transparency using the alpha tile in the
color category of the Polygon viewer
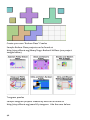
More Inspiration
Using these two simple tools: polygon and gridded playfield you
can:
Build your own puzzles:
Pentominoes
39
Create your own "Broken Glass" Puzzles
Sample Broken Glass projects can be found at:
http://etoysillinois.org/library?tags=Broken%20Glass (see project
images below).
T angram puzzles
Sample tangram projects created by kids can be found at:
http://etoysillinois.org/search?q=tangram. Like the ones below:
40
To learn more about certain objects or techniques
used in this project check the folowing Quick
Guides:
Halo -> Menu T ools
Object Catalog -> Polygon
Books -> (all items) Useful if you want to make a number of puzzles
and put them in a book
Menus -> Grid and Snap to Grid
41
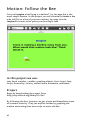
Motion: Follow the Bee
Can you Imagine a bee flying in a beeline? T ry, because this is the
most simple motion. In this project you will eventually Invent a bee
who will fly on a line of your own making. You may even be
Inspired to create other paths your bee might take.
In this project we use:
text, book, watcher, variable, graphing objects, Start Script, Stop
Script, forward by, turn by, mouse down, animation, arithmetic
Project
Begin by downloading the project from
http://etoysillinois.org/library?sl=2142.
By following the bee, learners can get a basic and kinesthetic sense
of constant velocity. T hey can explore further by graphing the
motion and writing their own script to move the bee.
42
T hey will start by exploring the motion of an existing bee. Bees, like
all objects, have a position in space. If they are moving they have a
velocity. Students will learn about these concepts and understand
them more deeply by recording and graphing data regarding the
bee's motion. After analyzing their graphs, they will invent the
motion of their imagined bee. Finally, they will look at each others'
projects and inspire each other by suggesting improvements. T hey
can take their project and challenge friends and family to fly their
bee straight.
Vocabulary the students will need:
Position (page 2) is where you are in space. In this activity we will be
interested in the back and forth position of the bee. We often call
that the x direction when its horizontal. If your students click on the
bee, the bee will stick to the cursor - click again and the cursor let's
go. T hey can move the bee back and forth. T hey should notice the x
value change in the Bee's x watcher for a kinesthetic and visual
input.
Velocity (page 3) is how fast you move through space.
On page 3, learners should click on the bee to start it moving, and
click on the green background below the text to pause the bee.
Next they should change the velocity in the "bee's v" watcher to
explore different velocities. T hey should try negative ones. By using
the two watchers on this page, challenge them to get the bee back
when she gets to the edge.
On page 4 they should record the data (time, position) in and two
column chart, as the bee moves across the page. T hey should not
change the velocity. T hey again click the bee to start and click the
green below the text to pause and record data - click the bee to
continue. Each pair of data points should be a time from the "Bee4's
t" watcher and the position from "Bee4's x" watcher. T hey should
record at least 10 points. T o start over and record new data, set the
time and position to zero.
On page 5, students will plot their data. Once they have completed
the plot, you should put them in small groups to discuss the
following questions:
1. What should your horizontal and vertical axes represent to get all
of your data points on the graph?
43
2. Describe the pattern of the data plotted on the graph.
3. What is special about the pattern of the data plotted on your
graph?
4. Why do you think the data have the pattern you observed?
Here is where your students invent. Have them create a script to
have the bee move similar to the way she moved on pages 3 and 4.
T o get them started have them go to page 8 where they will find
the following the directions:
Take tiles from the holder on the right and drop them into
the Script Editor at the left to make the bee move like it did
on pages 3 and 4. You may need more than one tile in
some cases. There are several ways that work. Find as
many as you can. Check out Script Tiles in help at the
upper left. Enable pen trails to better see the path of the
bee.
More Inspirations
Next your learners should create another script to make the bee
follow their plot line. T hey can think out of the pink box above. Give
them an opportunity to explore each others' scripts, suggest
improvements and provide inspiration. Let them imagine, invent and
bee inspired from the task above to create new scripts to fly the bee
differently.
44
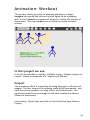
Animation: Workout
T his project shows one way to animate and object in Etoys.
Imagine you would like to teach a stick figure to do a jumping
jack. You will Invent a sequence of images to create the illusion of
movement. T his may Inspire you to create an entire workout
routine.
In this project we use:
A set of painted objects, Holder, Holder's cursor, "Holder's player at
cursor", create a composite tile, "object look like-dot".
Project
T he animation effect is created by iterating through a collection of
images. T he first image is the opening state of the movement, and
each one in the sequence is a step closer to the final state. T he
rapid movement from one image to the next creates the desired
illusion of movement.
Instructions: Open Etoys and click on the cloud that says Make a
Project
45
1. Create the set of images you need for the change you wish to
illustrate. Images can be painted, imported, or a combination of the
two.
Important: when painting, make each of the images a different
object, using a different paint window. Also, the objects in the
supply bin do not work for this purpose, so do not use them.
2. Drag a Holder from Supplies and then drag and drop your images
into the holder in the order you wish them to appear.
3. Paint a new object that will later change to look like those in the
holder. A simple colored spot will do. Rename this "spot" to be
more descriptive and meaningful to you so that when you look at
the scripts, you know what they are referring to. In this example I
used "Sam" (which is better than Sketch4).
4. Open the spot's (Sam's) viewer and open its graphics category.
T o do that, hold down the cursor on the word "basic" in the viewer
and then move down the list and click to select "graphics" from the
names that appear.
5. Drag the tile: "Sam look like dot" out of the viewer and drop it. A
scriptor will open.
6. Open the holder's viewer.
46
7. Select the viewer's "collections" category (see #4 above) and find
the tile "Holder’s player at cursor". Drag and drop it to replace the
box in the script where the word "dot" is (A green frame around the
word "dot" will let you know you are in the right place). By doing
this you have just told the spot of color (Sam) to look like the image
in the holder where the cursor is currently located. T his will be the
image in the boxed frame.
8. In the Holder's viewer, drag the tile: by its white assignment
arrow and drop in into the script.
Hold down the cursor on the word "cursor" in the script and choose
"increase". Make sure the increase numerical value is 1. Change the
name of the script to "workOut".
T he script looks like this:
Click on the clock to make your animation run.
T o change the speed of the animation, (the pace of the script's
ticking), hold down the cursor on the clock icon and choose a
different number of ticks per second.
T o make the holder invisible, (to "collapse" it), get its halo and click
the circle (collapse icon) on its upper left.
T his project, Simple Animation, can be found at:
http://etoysillinois.org/library?sl=2131
More Inspiration
An animation of flying geese at: http://etoysillinois.org/library?
sl=2133
An animated overhand knot can be found at:
http://etoysillinois.org/library?sl=475
An animated blue guy using still camera shots at:
http://etoysillinois.org/library?sl=2134
A small fantasy for two food cans at:
http://etoysillinois.org/library?sl=2135
47
T he visualize the life cycle of bacteria at:
http://etoysillinois.org/library?sl=1842
48
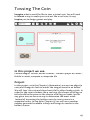
Tossing The Coin
Imagine what it would be like to toss a virtual coin. You will need
to Invent a way to make your coin act like a real coin. It may
Inspire you to design games and play.
In this project we use:
Painted images, Holder, holder's viewer, "Holder's player at cursor";
Holder's cursor; compose a composite tile
Project
In this project, as in the Chapter 9 (Animation), we use one object (a
coin) and change its look to mirror the images stored in an holder.
We will 'toss' the coin and show how it falls; either heads or tails. In
order for the coin to behave like a real one, the chance of falling on
tails should be the same as the chance of falling on heads, but for
any given toss we have no way to determine the exact result.
Instead of increasing the holder cursor by one to move in a
sequential order, (as we did in Chapter 9), we will use a random
number generator available in Etoys and assign its results to the
holder's cursor.
49
Instructions: Open Etoys and click on the cloud that says Make a
Project.
1. Paint or import images of the 2 sides of a coin. Name these
objects Head and T ail.
Put them in a holder (you find a holder in Supplies).
.
2. Paint an object (a small blue spot will do); name it coin.
3. Paint an object that will later change its look to mirror those of
the images in the holder. A simple colored spot will do. Give this
spot the name of the object it is going to mirror, e.g. "coin".
4. Open the spot's (coin's) viewer and open its graphics category. T o
do that, hold down the cursor on the word "basic" in the viewer and
then move down the list and click to select "graphics" from the
names that appear.
5. Drag the tile: "coin look like dot" out of the viewer and drop it. A
Script Editor will open.
6. Open the holder's viewer.
7. Select the "collections" category (see #4 above) and find the tile
"holder’s player at cursor". Drag and drop it to replace the box in
the script where the word "dot" is (A green frame around the word
"dot" will let you know you are in the right place). By doing this you
have just told the spot of color (coin) to look like the image in the
holder where the cursor is currently located. T his will be the image
in the boxed frame.
8. In the Holder's viewer, drag the tile: by its white assignment
arrow and drop in into the script.
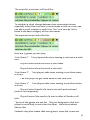
T o simulate a tossing, randomly assign the holder's cursor a
number from the group {1,2} by using random(2) function. You can
find information about the use of the random function in the Quick
Guides under Scripting T iles.
Name the script: CoinT oss1
50
T he script for a coin toss will look like:
T o simulate a visual change between two consecutive tosses,
especially when there are two or more heads or tails in a row, one
can add a small rotation to each toss. T he "coin turn by" tile is
found in the basic category of the coin viewer.
T he improved script looks like this:
Here are 3 games you can play:
Coin Game 1*
turn.
T wo players take turns tossing a coin twice at each
Player A wins when the result is two heads
Player B wins when the result is two tails.
Coin Game 2*
in a turn.
T wo players take turns tossing a coin three times
T he first player to get three heads in one turn wins.
Coin Game 3*
in a turn
T wo players take turns tossing a coin three times
Player A wins if result of a turn is two tails and one head
(order is not important).
tails.
Player B wins if the result of a turn is either all heads or all
* Some of the games are not fair. T hey are designed so that one
player is more likely to win than the other. Have the students
discuss this.
Student's may also create their own games, some fair, some not.
51
T his project, Coins T oss, can be found at:
http://etoysillinois.org/library?sl=2132
More Inspiration:
T his project could enable you to create visualizations for other
events for which we know the probability of change. T his type of
event could include dice throwing events, simulations of infection
disease spread and other questions of chance such as the probability
of pulling a pair of matching socks out of a drawer.
Here is a project that uses a holder and a random number generator
to simulate a Number-Cube throw and added games: Coins and Dice
Games http://etoysillinois.org/library?sl=1531
Here is a project to illustrate and solve a probability question: T ale
of T wo Sons http://etoysillinois.org/library?sl=1952&viewProject
52
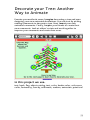
Decorate your Tree: Another
Way to Animate
Exercise your aesthetic sense. Imagine decorating a tree and even
designing your own animated decorations. You can start by picking
existing ornaments to decorate a tree. Next Invent your own
animated ornaments. Finally, Inspire your friends to create their
own ornaments. Look at others' scripts and work together to
improve your ornaments and create new ones.
In this project we use:
text, book, flap, object catalog, test, color, border color, color sees
color, forward by, turn by, arithmetic, random, animation, paint tool
53
Project
Begin by downloading the project from
http://etoysillinois.org/library?sl=2140. T he project can be used in
classrooms with English, Spanish and German speaking students. If
you are teaching a foreign language, you can use this project
because you can easily change between languages. Click the flag
near the middle of the navigation bar at the top for a drop down
menu to change languages.
Learners should look at the already decorated tree on the first page
and imagine how they would decorate their tree. Send them to the
next page to learn how to decorate your own. T he existing
ornaments are in the Decorations flap at the bottom of the project.
Click on the flap to open it. Click on an ornament and it will stick to
the cursor. Drag the ornament to the desired position and click to
let it go. New ornaments can be drawn using the Paint T ools.
If the newly created ornaments are dropped into the open
Decorations flap, then duplicates can be dragged out as needed. A
flap is closed by clicking the flap. T o re-size the Decoration bin, drag
the flap up or down. It's time to imagine and decorate the tree on
page 4 - or draw your own tree on page 5 to decorate.
As an aside, your students might want to create their own flaps - it's
fun. Drag an Object Catalog out of the Supplies.
54
T he Object Catalog has a lot of fun things to explore in addition to
creating flaps. Each of the buttons, like Basic outlined in red above,
gets you to a different category of objects. T o find the flap object,
click the Scripting button.
Drag the Flap object out onto the world and it will attach to the
bottom edge. You can put things into this flap and close it up to get
them out of the way, but they won't be duplicated. T o change the
flap's property, get the flap's Halo and select the white Menu
button. T here are many options, like cling to edge (to move the flap
to the right, left or top), change tab wording (to rename the flap
tab), and make the flap a parts bin. Selecting this box means that
any object (including an object with scripts) put into the flap will be
duplicated when you drag it out. Note that you can also get a Flap
from the Supplies bin.
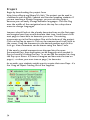
Now it's time to invent animated ornaments. T o create ornaments
that flash, go to pages 6 and 7 for an overview. Start with a Circle,
Curve, Ellipse, Polygon, Curve, Rectangle, RoundRect, Star or
T riangle object from the Graphics category of the Object Catalog.
T he objects mentioned above all have a "color" category with red,
green and blue tiles that tell how much of each color is in the
object. By making the values of red, green and blue random the
round ornament color flashes. Create a script for your object and
go to the "color" category in the viewer. Drag out a tile for each
color and the border. Be sure the red box surrounds the color and
the number at the right. In a similar fashion, drag out a tile for the
border color from the "fill & border" category. Your Script Editor
should be similar to the image below.
55
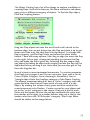
T o make the red tiles value random, click on the gold box icon
second from the right at the top of the Script Editor and drag a
random tile on top of the number value in the red tile. Change the
number in the random function to see the effect. Do the same for
the green and blue tiles.
If you make the border color the color of the flashing star, the
border flashes. You can get a tile for the star's color from its viewer
or it's halo to drop on the border color tile's color value. Look under
Halo Handles and Script T iles in Help to reinforce and learn more.
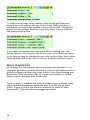
More Inspiration
Go to page 8 to see another way to animate your ornament. T he
tiles used have been covered previously. Have your students work in
groups to figure out how this script works. From their thinking and
discussions, they should be able to inspire one another to create
better ways to animate their ornaments.
T hen on page 9, students are led to another way to animate. have
them continue discussions about the new way and inspire each
other. Pages 10 and 11 are blank for students to work on their
inspirations. T hey can add more pages as needed.
56
Water Cycle
Have you ever thought about the concept of a cycle? I'll bet you
can Imagine words that you think represent cycles. T hat's a good
way to start understanding a new concept. From there go on to the
water cycle. You could Invent a simulation for parts of the water
cycle to deepen your understanding. Inspire your classmates by
showing them your simulations and critiquing theirs.
In this project we use:
text, holder, book, Holders Cursor, Forward by, Start Script, Stop
Script, T est, Look Like, increase by, arithmetic , animation
Project
Begin by downloading the project from
http://etoysillinois.org/library?sl=2139.
It is very likely learners will come across the water cycle. T hey can
explore the water cycle in an interactive way and animate water
raining from a cloud, the condensation process and another part of
the water cycle.
57
T o develop a deep understanding of a new concept like cycle, it can
be helpful to come up with examples of the new concept and look
for a common thread. Have your students access their imaginations
and come up with examples of cycles. As they imagine harder and
probe their minds, they should eventually come up with several
parts of the water cycle. A picture containing parts of the water
cycle with no captions is available for them to look at and extract
parts of the water cycle. T his takes some imagination.
A cycle is an action that repeats itself. Have your learners break up
into small groups and brainstorm to come up with words or
phrases that contain the word cycle and have them record their
phrases in the Etoys project book (page 1).
After the learners have had time, ask them to report what phrases
they have. T hen click on the right arrow at the top of the book to
proceed to the next page to see if they came up with phrases
(words) like bicycle, tricycle, motorcycle, recycle, life cycle,
business cycle.
Have students show their words to other groups and discuss what
makes them cycles. Have them record a final definition of cycle. A
cycle has parts that go round and round and repeat themselves. Did
they come up with that?
If any of your groups came up with water cycle, they are good.
Have them look at the drawing and write down things that are
actions involving water. T hey can go to page 4 if they are stuck
where they will find that water forming clouds is a water action.
Ask them to find more water actions and record their answer.
Water forms clouds when it evaporates from bodies of water. When
the clouds produce rain or snow, the water is returned. T hat's part
of the water cycle. Have the learners discuss how the actions they
identified are part of the water cycle.
Here are some of the parts of the water cycle: evaporation,
condensation, precipitation, runoff, infiltration, ground water flow,
evapotranspiration, snow and ground water storage. It is a good
exercise for learners to look up names they don't know. How many
of these did your students identify?
58
Evaporation occurs when hotter molecules near the water's surface
gain enough energy to break free from the liquid and enter the air as
water vapor. Heat provides the energy needed. T he dots represent
water vapor, but they are way too big. You can't see water vapor in
the air. Have your students play with the script on page 7 to view
the animation and understand how the script works so they can
invent their own and develop an even deeper understanding of the
water cycle.
T hey should try an animation showing water raining from a cloud
(precipitation) and create it on page 9 of the Etoys project. Finally,
they should make an animation showing another part of the water
cycle and create it on page 11 of the Etoys project. As they work on
these animations they should be able to inspire one another with
their great ideas.
On page 15 of the Etoys project, there is a more complete picture of
the water cycle. Have your students discuss the various actions of
water in the water cycle and how this picture represents a cycle.
More Inspiration
Have you ever seen dew on grass in the morning? T hat is water
vapor condensing out of the air onto the grass because it was cold
enough overnight. Clouds are made the same way, except the
water vapor condenses on tiny, invisible particles in the cooler air
high above. As more water vapor condenses on the same drop, the
droplet finally becomes visible. Have your learners work in groups
to inspire each other to animate condensation. T his is harder to do
so inspirational ideas from each group member will result in a
better project. Have them put the project they invent on page 14 of
the Etoys Water Cycles project.
59
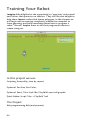
Training Your Robot
Imagine kids delighted at the opportunity to "program" and control
each other, their parents or a teacher. T hey will use that delight to
help them Invent a robot that draws polygons. In this chapter we
will begin with an exercise completely outside the computer to
learn geometry and build knowledge about how to program a
robot. T his will Inspire them to use their programed robots to
create string art.
In this project we use:
Scripting, forward by, turn by, repeat
Optional: Pen Size, Pen Color,
Optional: Paint, T iles: look like, Playfield's pen trail graphic
Quick Guides: Script T iles -> Playfield T rail
The Project
Kids programming Kids (and parents)
60
T he following activity can be done having kids program each other
and/or having them program their parents or teacher. An example
of how to do this can be
found http://drtechniko.com/2012/04/09/how-to-train-your-robot/
Below is a sample worksheet.
T ry this with the kids, having them program each other to:
walk a square
walk a rectangle
61
walk a rectangle
go from one part of the room to another and pick up
something
Notes and observations on how this worked can be found
at http://mrstevesscience.blogspot.com/2012/05/how-to-train-yourrobot.html which contains a video of Seymour Papert using this
technique with kids.
From Programming each other to Programming
Etoys
Once the kids have programmed each other, now we will try and
transfer some of that knowledge to programming a Robot to
constructing Polygons in Etoys. T his project will begin with a prebuilt template which should be downloaded
at: http://etoysillinois.org/library?sl=2144. T he project can be used in
classrooms with English and Spanish speaking students.
Open the project in Etoys.
In this project kids are provided with just three scripting tiles with
which they can create all the shapes:
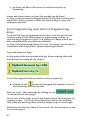
On the first page the kids are asked to draw a square by:
clicking on the
icons and changing the numeric values in
the forward by and turn by tiles
Kids can "reset" their drawings by clicking on the
at the bottom of each page.
On the rest of the pages we will ask them to draw the polygons, by
creating scripts. T o create the scripts they click on the scripting
tiles in the box and drag them into the empty script on each page.
While they do this have them fill in a chart like the one below or the
one in the project:
62
Some kids will be able to start quickly on their own and others will
get stuck. T he following are some tips to help kids when they get
stuck.
Learning to Debug:
T he goal is to get kids to "Just Do It" and start trying things on their
own. T hey inevitably will get stuck and have to debug their
programs. T his is good, one of the skills we are teaching is
debugging and persitistence. Below are some sample problems kids
have run into and suggestions on how you can help them.
If their robot disspears off the screen (which will happen) have
them click on the
button.
Have them explain their code to someone else. Often even with
very experienced programmers, once they start explaining the
problem to someone else they figure out the problem for
themselves, then thank you for being brilliant and such a great help.
Its up to you if you want to let them know they really solved it for
themselves and they are the brilliant ones :)
Have them read their code out loud EXACT LY AS WRIT T EN. We
often get confused between what we intended the robot to do and
exactly what we told it to do. T o quote an old Chicago politician
"Print what I meant, Not what I said!!!"
As they read the code aloud, walk through what the robot will do
based on that specific instruction AS WRIT T EN either in their minds
eye, on a piece of paper with a pencil or with some other object like
a toy car.
Ask them to step away from the computer and walk the shape.
T hen ask them to say out loud specifically what they are doing at
each step using "forward by" and "turn". T his can help them
become more aware of their body knowledge and help them
transfer that to their program.
Also ask them to try the following:
63
T his will executes each tile in the script one at a time. It forces the
user to "slow down" and look at the results of each step. One can
use this in combination with reading the code out loud. One reads
the line that is about to be executed, then click the step button.
or
T his will allow them to see what happens when the whole script
runs.
64
You may want to change the script speed, it can open new insights
and help visualize what the script is doing.
T o change the speed (in # of ticks per second, or # of times the
script runs each second) simply click on clock in the script and hold
the mouse down:
A pop up will appear and you can select your speed.
65
66
Questions for reflection:
1. Find one or more people who created a script to draw a
square that did it differently from you?
1. What was different?
2. What was the same?
2. Look at the scripts you used to create a Square and to create a
Rectangle and identify:
1. What is different?
2. What is the same?
3. For those things that are different, does that difference
matter? How does it matter?
3. Look at the chart you filled in (Shape, # Sides, # Vertices,
Angle (aka turn by) and <# Sides> * <Angle>. What patterns do
you see?
4. Look at all your scripts and after identifying, what's different
(that matters) can you create "One Script to Rule them all?"
In other words can you create one script that creates all the
shapes?
1. Hint1: Use a variable
2. Hint2: Look at the patterns you noticed in your
completed chart.
5. Look at the following:
1. What's the same?
2. What's different?
3. Do the differences matter?
6. Look at the following:
1. What's the same?
2. What's different?
3. Does the differences matter? If so, how?
67
3. Does the differences matter? If so, how?
7. Look at the following:
1. What's the same?
2. What's different?
3. Does the differences matter? If so, how?
8. Look at the following:
1. What's the same?
2. What's different?
3. Does the differences matter? If so, how?
9. Look at the following:
1. What's the same?
2. What's different?
3. Does the differences matter? If so, how?
10. Look at the following:
1. What's the same?
2. What's different?
3. Does the differences matter? If so, how?
Inspire
Besides regular polygons, here are some shapes people have
created using pen trails, forward, turn by, repeat and pen color:
Also see if you can create the 39 shapes below from Barry Newell's
T urtle
Confusion http://constructingmodernknowledge.com/tcbook.pdf.
Make a poster of these shapes and hang them in your class.
68
69
Fractions
Imagine a fraction. Does it raise the hair on the back of your neck?
Visualizing fractions makes them easier to understand. Invent
visualizations of fractions and Inspire others to understand
fractions more deeply.
In this project we use:
text, sector, viewer, Sector's angle, Sector's radius, T ext's numeric
value, variable
The Project
Begin by downloading the project from
http://etoysillinois.org/library?sl=2143.
70
T he focus of this project is visualizing fractions. T he sector object
allows creation of a slice of pie that represents any fraction of the
pie desired. On page 2 of the book you click the sector tool at the
upper left to create a slice of pie. T hen check the "sector" category
in the sector's viewer to change the angle and radius of the slice
(see help at the upper left to review the Viewer under Halo). After
visualizing fractions with the sector tool, students move on to page
3 for the invention part of the project. T hey should create fractions
using the text tool from the supplies bin. They may just write the
fractions in a single text box, but they will realize later that, to
program, they must really have two text boxes, one for the numerator
and one for the denominator.
On page 4 the students are asked to create a script that shows a
visualization for any fraction they enter into a numerator and
denominator of the fractions shown. T here are many ways to do
this. T hey should work on page 5. There is a solution on page 6, but
don't have your students look until they have made a good attempt.
They may struggle with this, but they will be learning.
On page 6 there is one solution to the task. Enter any numbers into
the numerator and denominator of the fraction to see its
visualization. Keep the fraction less than 1. Why? Discuss with them
why the fraction must be less than 1. T he maximum fraction the
sector object can visualize is the whole circle and that represents 1.
After students have written their own scripts they should compare
them. Finally, your students should open a Viewer on the sector
object and drag out my script. Have your students group and try to
understand my solution. T hen they should compare their solutions
with mine.
NOT ES:
T he numerator and denominator are text objects. T hey can have
variables of type numeric. T he script gets the numerator and
denominator needed to create a fraction. T he fraction of 360
degrees (value 1 for the whole of the pie) is visualized by the sector
object. T he sector is a visualization of the fraction.
Now (pages 7 and 8) have your learners create a script to show a
visualization of adding two fractions. Work in groups. Listening to
and learning from each others' views is a valuable skill. T hey should
be reminded of this as they work. After a fair attempt they can look
at my solution on page 9.
71
On page 9 students should enter any number into the numerators
and denominators of the fractions for a the visualization of addition.
T hey should keep sum of the fractions less than 1. Why? Again
discuss this point with your learners. Again, you should have your
students open Viewers to analyze my scripts. Have your students
group and try to understand my solution. T hen they should
compare their solutions with mine.
More Inspiration
Write scripts to visualize mixed fractions that are greater than 1.
Write scripts to visualize subtraction, multiplication and division.
72
APPENDIX
73
Getting Help
T o begin using Etoys you will need to go to http://squeakland.org
and download the software. If your school does not allow a direct
download to the machines, there is an option to download Etoys
to Go and have it on a USB drive. It is a free and open source
application. A copy of the license to use the software is provided
below for you to show the technology person in your school.
For additional help to download the software you may go to the
Etoys Reference Manual at:
http://www.gosargon.com/EtoysReferenceManualV0.8.pdf. T he
information starts on page 10.
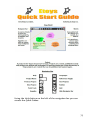
User Information Help:
T he Etoys Quick Start Guide below shows the names of many
commonly used objects and tools:
74
Using the Help button on the left of the navigation bar you can
access the Quick Guides:
75
T he Quick Guides will further explain all of the topics below:
Halo Icons
The colored icons that surround an object allow for
manipulation and change to that object. Every object has a set
of Halo Icons. Right click on any thing to reveal its icons. Each
icon is supplied with a balloon describing its function. Halo is
also a category in the Quick Guides .
76
77
Additional Resources:
Squeakland: http://squeakland.org T his is the home site for Etoys.
T here is a link to download the software at the top of the page.
Etoys Illinois: http://etoysillinois.org Here you will find sample
projects done by students and links to many resources. You may
want to spend sometime making yourself familiar with all this site
has to offer.
Explore and Learn: http://www.pcs.cnu.edu/~rcaton/squeak.html
Here you will find projects created by Randy Caton for grades k-14.
How to Videos: http://www.youtube.com/playlist?
list=PLFDD4D8876FC2E6FC Here you will find 18 short videos on
common topics.
Minute with Mr. Steve:
https://www.youtube.com/user/sthomastt?feature=mhee
Etoys Users
Manual: http://www.gosargon.com/EtoysReferenceManualV0.8.pdf
T his is a 108 page .pdf file of the full user's manual.
78
Quick Tips
Loading, Saving, Quitting
When you open Etoys, three clouds suggest places to start:
"Gallery of Projects" will take you to a selection of twenty-two
projects that you can view and explore to learn some of the many
things you can do with Etoys.
"T utorials and Demos" will take you to three projects that will help
you get started with learning Etoys.
"Make a Project" will bring you to a blank Etoys project page, where
you can create and manipulate your own objects.
Loading
T o load an existing project into your Etoys application, click the
find-icon in the navigation bar.
If you click and hold the mouse button for several seconds, there
will be a menu with more options for loading projects. T hese
options differ in the places where you will look for the project and
in the kind of files you can open. T he first option "find a project" is
the same that happens if you just click on the icon. It will open the
default Etoys folder on your computer (or the folder on your USB
drive if you are using Etoys-T o-Go) to load your project. Here you
can also choose "My Squeakland" and "Squeakland Showcase" to
open a project directly from the Squeakland website. Keep in mind
that you need internet access to do this!
T he second option "find a project (more places)" lets you search
throughout your whole directory structure.
T he third option "find any file" allows you to load images into your
project. T he currently supported formats are .jpg and .png.
79
Saving
Once you have a project, you'll want to save it so that you can work
on it again and pick up where you left off. Saving a project is
different on the XO than it is on a Macintosh or Windows computer.
Saving to an XO
If you click the X on the top right corner of the menu bar, your XO
will automatically save to the Journal. You will know it's saving
because you'll see a stick figure doing jumping jacks.
T o retrieve a saved file from the XO, click on the folder with the
arrow pointing up. Choose the project you want to work on and it
will load into Etoys. (It's a good idea to name your projects so that
when you go back to work on them, you can distinguish them from
one another.
Saving to a Macintosh or a Windows computer
Near the right corner of your Navigation Bar, you'll see the "Publish
(save)" icon.
When you are ready to save a project, click on the Publish icon, and
you will see a screen waiting for you to "describe this project." You
need to fill in a project name, and can optionally add a description,
your name, and tags, too, then click OK.
T he next screen you see shows options where you will be saving
the project. You have two choices of places to save your project.
Choose one and then click "save" to finish saving.
If you save to "Etoys" you are saving to your local computer, or to
your USB drive if using Etoys to Go. It's a good idea to save locally
until you feel you are ready to share your project. If you save to "My
Squeakland" you will be saving to the Squeakland website, where
you can choose to make your project public so that others can view
it. You will need to create a Squeakland account if you want to save
to My Squeakland. Login, and click "Save" to upload your project to
the Squeakland website. Don't worry, Squeakland doesn't sell or
rent your information.
80
Whether you choose to save to "My Squeakland" or to "Etoys" you
will be able to retrieve and edit your project to make changes.
Quitting Altogether
T o quit Etoys, simply click on the X on the top right of the
navigation bar. You will be prompted with "Are you sure you want to
quit Etoys?" Select Yes, and your Etoys window will disappear.
Caution, clicking on the X does not automatically save your work.
Using Viewers:
T o open a viewer for an object: Open the halo for this object and
click the "Open a Viewer for me" (eye-like) icon.
Each viewer has a small tab with the object image on its left side. A
click on the tab will change the flap of the viewer status: from open
to close; from close to open. T he tab stays visible most of the
times.
If you lost sight of the Viewer's tab, go back to this object's halo
and reopen the Viewer from there.
Adding a tile to a script:
T he tip of the cursor is the precise point of contact between the
cursor arrow and any object in the Etoys world. T his is useful when
opening Halos and dragging tiles into their proper place in the
script. If you are trying to place a tile somewhere and you cannot
get the bright green "insertion place" to appear, it is probably
because the tip of the cursor arrow is not positioned in the correct
place.
T he best way to drag non-assignment tiles is by their upper left
corner.
81
Trash Can
Drag objects into the T rash Can to discard them. Double click on
the T rash Can to open it and retrieve discarded objects from its
inventory. If you don't make the T rash Can disappear, and don't
explicitly empty the trash, you will be able to recover accidentally
discarded objects.
Retrieving "lost" objects
When you can not find an object, one easy place to get information
about it is in the Players object in the Supplies.
Drag the "Players" object from the Supplies into the world. It will
open a list of all objects and a menu icon at the left of each items
on the list. Click the menu icon of the lost object to get the needed
information.
82
Book Sprint Experience
T he Squeakland Education team has been in existence since 2005 and
we have established very strong bonds through our weekly online
meetings and annual conferences. We started our own book sprint
to write a reference manual and devoted a week of intense writing
by several people from the Squeakland community. We filled the
manual with a huge amount of valuable written and graphical
material. However, we didn't completely finish both the content
and the organization. So we were elated about our selection to
come to the doc sprint at Google. Now that we have participated in
writing a book Learning with Etoys: Imagine, Invent, Inspire, we
see the value of being in the same physical space. Google provided a
fantastic physical space. Adam Hyde from booki Floss Manuals was
brilliant in focusing the participants on the process and monitoring
our project. Allen Gunn directed an sizzling unconference, where we
wrote up topics we thought were needed to be successful in the doc
sprint and magically organized breakout sessions for the afternoon fun fun fun. T hank you to Carol Smith for the great organization.
T he total experience was great.
In the photograph from left to right: Stephen T homas, Kathleen
Smith, Rita Freudenberg, Avigail Snir, Randall Caton, and Kathleen
Harness
83
84
Made with Booki
Visit http://software.booki.cc