Download Cobalt CacheQube - Front Street Networks
Transcript
Cobalt CacheQube User Manual ©1998 Cobalt Networks, Inc. All rights reserved. Cobalt Networks and Cobalt CacheQube are trademarks of Cobalt Networks, Inc. All other company, brand, and product names may be registered trademarks or trademarks of their respective companies and are hereby recognized. This publication and the information herein is furnished AS IS, subject to change without notice, and should not be construed as a commitment by Cobalt Networks, Inc. Furthermore, Cobalt Networks, Inc., assumes no responsibility or liability for any errors or inaccuracies, makes no warranty of any kind (express, implied or statutory) with respect to this publication, and expressly disclaims any and all warranties of merchantability, fitness for particular purposes and noninfringement of third-party right. The majority of the software used within the Cobalt CacheQube can be freely distributed under the terms of the BSD copyright or the GNU General Public License. However, some applications remain the property of their owners, and require their permission to redistribute. For a complete listing of the software used within the Cobalt CacheQube, and the terms under which it can be distributed, refer to the Cobalt web site at www.cobaltnet.com. For reference, the BSD copyright and the GNU General Public License are reproduced at the back of this manual. Cobalt Networks, Inc. 440 Clyde Ave., Bldg. B Mountain View, CA 94043 Phone (888) 70-COBALT (650) 930-2500 Fax (650) 930-2501 www.cobaltnet.com Important Safeguards For your protection, please read all these instructions regarding your Cobalt CacheQube and retain for future reference. 1. Read Instructions All the safety and operating instructions should be read and understood before the appliance is operated. 2. Ventilation The bottom vents and fan opening on the Cobalt CacheQube are provided for ventilation and reliable operation of the product and to protect it from overheating. These openings must not be blocked or covered. This product should not be placed in a built-in installation unless proper ventilation is provided. 3. Lithium Battery The lithium battery on the system board provides power for the real-time clock and CMOS RAM. The battery has an estimated useful life expectancy of 5 to 10 years. If your system no longer keeps accurate time and date settings, it may be time to change the battery. Contact Cobalt for service information. No user serviceable parts inside. ! Caution: There is a danger of explosion if the battery is incorrectly replaced. Do not attempt to replace the battery yourself. 4. Electrical Shock To reduce the risk of electrical shock, do not disassemble this product. Instead, take it to a qualified service person when service or repair work is required. Opening or removing covers may expose you to dangerous voltage or other risks. Incorrect reassembly can cause electric shock when this product is subsequently used. Browsers Both Netscape Navigator® and Microsoft® Internet Explorer have bugs that can cause intermittent, unexplained failures. When using a web browser to interact with your Cobalt CacheQube, you may occasionally experience a browser failure. Released product versions of the browsers are usually more reliable than beta versions, and later versions seem to work the most reliably. A browser program failure, although annoying, will not adversely affect your Cobalt CacheQube’s data. Regulations and Information NOTE: This equipment has been tested and found to comply with the limits for a Class A digital device, pursuant to Part 15 of the FCC Rules. These limits are designed to provide reasonable protection against harmful interference in a commercial environment. This equipment generates, uses and can radiate radio frequency energy and, if not installed and used in accordance with the instructions, may cause harmful interference to radio communications. Operation of this equipment in a residential area is likely to cause harmful interference, in which case the user will be required to correct the interference at his/her expense. This equipment is in compliance with Underwriters Laboratories (UL) and is UL listed. Contents 1 Introduction Product Overview 1 2 Front View 2 Back View 3 How to Use This Guide 4 Organization of This Guide 4 Requirements 4 Other Information 5 2 Setting Up the Cobalt CacheQube 7 Phase 1: Configuring the Network 7 Connecting the Power Supply 8 Powering On the Cobalt CacheQube 8 Using the LCD Console During Setup 9 Configuring Network Settings Phase 2: Setting Up With the Browser 3 Cobalt CacheQube Administration 10 14 19 Cache Setup 19 Cache Statistics 20 Update Software 23 CPU Usage 23 Network Usage 23 Appendix A: Using the LCD Console 25 Changing the Network Configuration 25 Rebooting 26 Powering Down 27 Resetting the Network Configuration 28 Resetting the Admin Password 28 i Appendix B: Cobalt CacheQube Technical Specifications 31 Appendix C: Example Network Topologies 35 ii Chapter 1 Introduction The Cobalt CacheQube is a dedicated World Wide Web caching device — it stores documents that have been retrieved from the Web. Once a document has been retrieved from the Web, users can obtain it from the Cobalt CacheQube without having to access the Web again. This reduces the communication load on the Wide Area Network (WAN) and helps users obtain Web documents much more quickly. The Cobalt CacheQube can operate in several modes: • Traditional Proxy Caching mode. Client Web browsers are configured explicitly to request documents from the Cobalt CacheQube. The browsers can be configured to do this by either individual users or a central manager of browser configuration files. • Transparent Caching mode. All client network traffic is automatically routed through the Cobalt CacheQube. Software on the Cobalt CacheQube detects users’ requests for Web documents (HTTP requests), which are then handled by the caching software. No browser configuration is necessary. • Clustering. Several Cobalt CacheQubes are configured in a cluster. The Cluster Master receives clients' HTTP (HyperText Transfer Protocol) requests by either of the two methods described above. Each request is forwarded dynamically to one of the Cluster Slaves. The Cluster Slave retrieves the document, either from its cache or from the document's original server. The Cluster Slave returns the document to the Cluster Master, which forwards it on to the requestor. Because the work of managing cached documents is divided evenly among Cluster Slaves, clustering allows for a greater volume of HTTP traffic. 1 
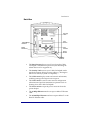
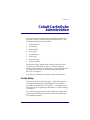
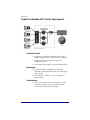
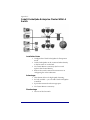
Chapter 1 Product Overview Front View Power On Indicator The indicator light bar glows green when the Cobalt CacheQube is powered on. 2 Introduction Back View Security Latch 10/100 Mbps Ethernet LCD Screen Reset Password LCD Console Power Socket 10 Mbps Ethernet • The Reset Password port is used if you forget the Cobalt CacheQube’s administrator password. (See “Resetting the Admin Password” in Appendix A.) • The Security Latch secures your Cobalt CacheQube with a standard computer-locking security cable (e.g., Kensington Microsaver Security System or compatible). • The LCD Screen displays status and network information, including messages that require user response. • The LCD Console is used to enter network configuration information and perform maintenance operations such as shutting down the Cobalt CacheQube. • The Power Socket accepts the power connector from the power adaptor. • The 10 Mbps Ethernet interface accepts a 10Base-T Ethernet cable. • The 10/100 Mbps Ethernet interface accepts a 10Base-T or 100 Base-TX Ethernet cable. 3 Chapter 1 How to Use This Guide This guide describes how to configure and operate the Cobalt CacheQube. You should be familiar with TCP/IP networking concepts and know how to use either the Netscape Navigator® or the Microsoft® Internet Explorer Web browser. Organization of This Guide Chapter 1, “Introduction,” includes an overview of the Cobalt CacheQube’s features and describes this guide. Chapter 2, “Setting Up the Cobalt CacheQube,” explains installation and configuration. Chapter 3, “Cobalt CacheQube Administration,” describes how to maintain the Cobalt CacheQube and how to view the statistics that describe its ongoing operation. Appendix A, “Using the LCD Console,” describes how to use the Cobalt CacheQube’s LCD console functions — configuring (and resetting) the Cobalt CacheQube’s network settings, rebooting, and powering down. Appendix B, “Cobalt CacheQube Technical Specifications,” contains the product specifications and functional information. Appendix C, “Example Network Topologies,” shows examples of how the Cobalt CacheQube can be used within a network. Requirements 4 • The Cobalt CacheQube operates in a TCP/IP network on 10Base-T or 100Base-T Ethernet. To use Transparent Caching mode, you need 10Base-T (for the 10 Mbps Ethernet interface). • You need a Web browser that supports frames and JavaScript™; Netscape Navigator or Microsoft Internet Explorer, versions 3.0 or later, will work. • You need to get an IP address and netmask for each configured Ethernet interface and a gateway address from your network administrator. To use Transparent Caching, you should either be, or work closely with, the network administrator to perform the appropriate setup procedure, as described in Chapter 2, “Setting Up the Cobalt CacheQube.” Introduction Other Information You can get the latest information about the Cobalt CacheQube at http://www.cobaltnet.com/ , in the Support section of the website. There you can view a list of Frequently Asked Questions with Answers. You can also send e-mail to [email protected]. Cobalt Networks provides telephone technical support at no charge for the first 30 days. If you’re in the United States, call (888) 70-COBALT or (888) 702-6225. From outside the United States, call +1-650-930-2500. 5 Chapter 1 6 Chapter 2 Setting Up the Cobalt CacheQube This chapter explains how to configure the Cobalt CacheQube for your network. If it has been configured previously for a different network, refer to “Changing the Network Configuration,” in Appendix A. The configuration process occurs in two phases. • “Phase 1: Configuring the Network,” explains how to install the Cobalt CacheQube on your network. • “Phase 2: Setting Up With the Browser,” includes the configuration steps you need to perform after the Cobalt CacheQube is up and running on the network. Phase 1: Configuring the Network Before configuring the Cobalt CacheQube’s network settings, determine which of the network interfaces you need to use: • To use Transparent Caching, you need to use both network interfaces (NET1 and NET2, shown in the next figure). Client computers need to be accessible via one interface, and the external Internet must be accessible via the other interface. • To use only Traditional Proxy Caching, you can use either (or both) of the interfaces. If you have a 100 Mbps Ethernet network, it’s best to use the NET2 (10/100 Mbps) interface. If you have a 10 Mbps Ethernet network, you can use either (or both) of the interfaces. Once you’ve determined which of the Cobalt CacheQube's network interface(s) to use, connect the interface(s) to your network with twisted-pair Ethernet cabling (see the following diagram). 7 Chapter 2 Power NET2 NET1 Connecting the Power Supply Connect the small round end of the power supply cord into the 12V DC power socket. Connect the other end of the power supply cord to an electrical outlet. Powering On the Cobalt CacheQube Turn on the power by pressing the On/Off switch on the back panel. The hard disk “spins up” and the fan turns on. The light bar on the front blinks a few times and then glows steadily. Status messages appear on the LCD screen as the Cobalt CacheQube completes its boot process. ! Caution: It is important to follow the proper power-down procedure before turning off the Cobalt CacheQube. Refer to “Powering Down” in Appendix A. 8 Setting Up the CacheQube Using the LCD Console During Setup LCD Screen On Off Select Control Buttons Enter During startup, the LCD console displays status information relating to the boot process itself. During setup, it’s used to enter network configuration information for the Cobalt CacheQube. After setup, the LCD console is used to change network configuration information, to reboot, and to power down the system. The LCD screen displays two lines. The top line of the LCD presents instructions on data to enter, and the bottom line displays the data already entered. You use the control buttons immediately below the LCD screen to enter the required network information manually. Here’s how the control buttons work: The Left button moves the cursor left between the digits displayed in the LCD screen. The Right button moves the cursor right between the digits displayed in the LCD screen. The Up button increments the digit located at the cursor position. The Down button decrements the digit located at the cursor position. Select The Select button selects the next option. Enter The Enter button accepts the information entered. Refer to Appendix A, “Using the LCD Console,” for more information. 9 Chapter 2 Configuring Network Settings Now that you’ve made the network and power connections, you’re ready to configure the network settings. This section explains how to enter the following network information using the LCD console: • IP address and subnet mask for the onboard Ethernet interface,”NET1.” (The NET1 connector is near the lowerright corner of the back panel, next to the power connector.) • IP address and subnet mask for the 10/100 Mbps Ethernet interface, “NET2” (the connector on the left side of the Cobalt CacheQube's back panel, in the expansion card slot). • Gateway IP address and connecting interface. To configure the Ethernet interfaces, you need to know the IP address and netmask for the interface(s) you want to use, as well as the IP address of the gateway you’ll be using to connect to the outside Internet. If you’re not the network administrator, you need to obtain this information from your network administrator. Note: To determine which Ethernet interface(s) you need to use, see the first paragraphs of “Phase 1: Configuring the Network,” earlier in this chapter. After the Cobalt CacheQube is turned on and ready to have its network configuration entered, the following message appears on the LCD screen: SELECT: SETUP NET1 To Begin Configuring NET1 Press the Enter button, then follow the numbered steps listed below (in “Steps for Configuring NET1 or NET2”) to configure NET1. To Begin Configuring NET2 If you don’t want to use NET1, press the Select button until you see: SELECT: SETUP NET2 10 Setting Up the CacheQube Press the Enter button, then follow the numbered steps listed below (in “Steps for Configuring NET1 or NET2”) to configure NET2. To Begin Configuring Both NET1 and NET2 First configure NET1, following the numbered steps listed below. When you’re done, the following message appears: SELECT: SETUP NET2 Press Enter and repeat the steps below to configure NET2. Steps for Configuring NET1 or NET2 1. Follow the instructions above to select the interface you want to configure (NET1 or NET2). You’ll see the message: ENTER IP ADDR: 000.000.000.000 2. Using the Left, Right, Up, and Down keys, set the digits in the second line of the display so that this number matches the IP address for this interface. To set the digit that’s currently selected, use the Up and Down keys. To select a different digit, use the Left and Right keys. 3. When the number on the display matches the correct IP address for this interface, press the Enter button. Note: If a message appears indicating that the IP address is invalid, re-enter the IP address, using the Left, Right, Up, and Down keys. Then press Enter again. When you’ve entered a valid IP address, the next message appears: ENTER NETMASK: 000.000.000.000 4. Using the Left, Right, Up, and Down keys, set the digits in the second line of the display so that this number matches the subnet mask for this interface. 11 Chapter 2 Note: If you see a message indicating that the netmask is invalid, re-enter it, using the Left, Right, Up, and Down keys. Then press Enter again. When you’ve entered a valid subnet mask, the following prompt appears: [S]AVE/ [C]ANCEL 5. If you want to re-enter the IP address or subnet mask, use the Left and Right keys to select Cancel (this option leaves the system unchanged). Otherwise, select Save to save your settings. 6. When you’ve made your choice, press Enter. This returns you to a menu that gives you the following options: SETUP NET1 SETUP NET2 SETUP GATEWAY SETUP GATEWAY is available only if you’ve already configured NET1 or NET2. Press Select to scroll among the menu options; press Enter to select an option. Configuring the Gateway After you've configured the Ethernet interface(s), you should configure the gateway address. The gateway is a network device, typically a router or a firewall, that the Cobalt CacheQube uses to communicate with the Internet. If you’re not the network administrator, you’ll need to obtain your network's gateway address from your network administrator. To configure the gateway: 1. Press the Select button until you see: SELECT: SETUP GATEWAY 2. Press the Enter button. The following message appears: ENTER GATEWAY: 000.000.000.000 12 Setting Up the CacheQube 3. Using the Left, Right, Up, and Down keys, set the digits in the number displayed so that it matches the IP address of your gateway. 4. Press Enter. Note: If the gateway IP address you entered is invalid, repeat steps 3 and 4 to re-enter it. The following prompt appears: NET[1] NET[2] 5. Using the Left and Right keys, select the appropriate interface to use for connecting to the gateway. (The LCD screen’s cursor indicates which interface is currently selected.) If you’re using only one interface, choose that one. If you're using both interfaces (for example, for Transparent Caching), select the interface through which the Cobalt CacheQube will communicate with the gateway to the external Internet. 6. Press Enter when you've selected the right interface. The following prompt appears: [S]AVE/ [C]ANCEL 7. Use the Left and Right keys to choose Save or Cancel, and then press Enter. If you choose Cancel, the gateway information you entered is ignored. If you choose Save, the gateway address you entered is tested to ensure that the host exists on the network. If the host exists, the gateway information is saved. If the Cobalt CacheQube can’t reach the gateway you entered, the ENTER GATEWAY prompt reappears. At this point, you should fix the gateway address. After you’ve entered a valid gateway, the SELECT prompt reappears. If you need to change any of the configuration settings, you can press the Select button and make the changes, as explained above. When you’re satisfied with the settings, choose FINISHED and then press Enter. The Cobalt CacheQube will continue its startup process. The remaining configuration steps will be done through a Web browser. 13 Chapter 2 Any time you need to change the settings described above, see “Changing the Network Configuration” in Appendix A. It explains how to return to this interface once the system is up and running. Appendix A also describes other options available from the LCD panel interface. Phase 2: Setting Up With the Browser After you've configured the Cobalt CacheQube's network interfaces and gateway, you can complete the configuration procedure using a Web browser. You need to use a browser that supports frames and JavaScript (for example, you can use Netscape Navigator or Microsoft Internet Explorer, versions 3.0 or later). Once the setup process is complete, the Cobalt CacheQube can be managed from any browser-enabled computer on the network. To begin browser-based configuration: 1. Launch the Web browser on any computer connected to the network. 2. Be sure to enable JavaScript in your browser, if you normally disable it. 3. To access the Cobalt CacheQube, enter its IP address (or its hostname) into the browser’s URL field. For example: 4. Press the Return key on the computer keyboard. A Welcome page appears, with the Cobalt logo at the top and a Start button at the bottom. 5. Click the Start button to begin the Setup Wizard configuration process. A second browser window opens to the Setup Wizard. The Setup Wizard guides you through several configuration screens, each of which requires you to enter some information. After entering the requested information, click the NEXT button to move to the next screen in the Setup Wizard. You can return to earlier screens by clicking the Setup Wizard's BACK button. All of the Setup Wizard configuration options can be accessed from the 14 Setting Up the CacheQube Cobalt CacheQube's normal Web interface, so you can come back and change any setting at any time after finishing the Setup Wizard. The Setup Wizard presents the following four steps, each with its individual screen: Network Integration, Cache Settings, Administrator Setup, and Time Setup. It’s a good idea to read through the descriptions of these screens before you begin, to make sure you have all the required information. 1. Network Integration The Network Integration screen allows you to configure network-related settings that aren’t configured via the LCD interface, including: • Hostname • Domain name • Primary DNS server address • Secondary DNS server address The Hostname, Domain name, and Primary DNS Server Address must be entered. If you are not the network administrator, you can obtain the correct values for these fields from your network administrator. For informational purposes, the Network Integration page displays your configured Gateway along with the IP address, netmask, and Ethernet (MAC) address for the two Ethernet interfaces. These fields can be configured only through the LCD panel interface. When you’ve entered the required information, click NEXT to move to the next screen. 2. Cache Settings The Cache Settings screen allows you to configure the Cobalt CacheQube's caching software. The most important setting on this page is the first one — the check-box for Enable Transparent Caching. Click this check box if you want to enable Transparent Caching mode. The next setting, Refresh Frequency, determines how often the Cobalt CacheQube's caching software will refresh cached Web pages. A refresh occurs when the caching software decides that a requested document (that’s in the cache) should be checked 15 Chapter 2 against its original server to ensure that it’s up to date. The Refresh Frequency setting determines how long cached documents are allowed to stay in the cache without being refreshed. A lower setting indicates less time — lower settings decrease the likelihood that out-of-date documents will be obtained from the cache. Higher settings increase this likelihood, but also save bandwidth and improve response time. With a value of 5 for Refresh Frequency, the likelihood that any particular document will be out of date when retrieved from the cache is under 1%. This probability decreases further with lower values of Refresh Frequency. The third setting, Maximum Size of Cacheable Documents, specifies the largest possible cached document. This setting can prevent exceedingly large documents from evicting many small documents from the cache. The fourth setting, Disk Space for Log Files, controls how much of the Cobalt CacheQube's disk space is devoted to storing log files. One log file is generated each day — it’s used to generate the information in the Cache Statistics section of the Web interface. It’s a good idea to set a large value for this (several hundred megabytes), enough for a month or two of log files. You may need to increase this setting if users at your site generate heavy HTTP traffic. Click NEXT to move to the next Setup Wizard screen. 3. Administrator Setup The Cobalt CacheQube has an Administrator user for performing normal administrative and maintenance tasks. These tasks are performed via the Web interface. You must authenticate yourself as user admin before you can access the administrative functions. The Administrator Setup page lets you specify the admin password, enter a full name for the admin user, and specify an email address that the Cobalt CacheQube can use to notify the Administrator of any problems that might arise. The only required field on this screen is the Password for admin. If you forget or want to reset the admin password, see “Resetting the Admin Password” in Appendix A, which describes the procedure for resetting it. Click the NEXT button to move to the next screen. 16 Setting Up the CacheQube 4. Time Setup The last Setup Wizard screen is Time Setup, where you enter time and time zone information. When you’re finished, click NEXT. At this point, if the Cobalt CacheQube has been configured with a functional gateway and a functional DNS server, you can register via e-mail, using the form displayed in the Setup Wizard. Otherwise, use the printed registration card that came in the box. It’s a good idea to register your Cobalt CacheQube, so that you can be notified about software updates, new product information, special promotions, and so on. Click FINISH to finish the Setup Wizard configuration. Once this is complete, your Cobalt CacheQube is ready for operation. 17 Chapter 2 18 Chapter 3 Cobalt CacheQube Administration This chapter describes the Cobalt CacheQube's administrative functions, which are available through the Web interface. This interface includes the following items: • Network Setup • Cache Setup • Admin Setup • Time Setup • Cache Statistics • CPU Usage • Network Usage • Update Software The Network Setup, Admin Setup, and Time Setup functions work exactly as described for steps 1, 3, and 4 in the Setup Wizard. For information on these options, see the descriptions of the Setup Wizard screens in “Phase 2: Setting Up With the Browser” in Chapter 2. The options not described in Chapter 2 are described below. Cache Setup Four options on the Cache Setup page — Enable Transparent Caching, Refresh Frequency, Maximum Size of Cacheable Documents, and Disk Space for Log Files — also appear in the Setup Wizard. These options are described in “2. Cache Settings” in Chapter 2. The Cache Setup page presents some additional configuration options that aren’t in the Setup Wizard. This section describes these additional options. 19 Chapter 3 Empty Cache Now. If, for some reason, you need to empty the Cobalt CacheQube's disk cache of documents, click this button. In normal usage, this feature isn’t necessary because the caching software manages its own disk storage by removing old, infrequently-requested documents when the available disk space is low. Cache Cluster Settings. This option lets you configure the Cobalt CacheQube as a Cluster Master. To do this, you simply enter the host names (or IP addresses) of Cluster Slaves in the fields marked “Cluster Slave 1,” “Cluster Slave 2,” etc. Make sure that the specified Cluster Slaves are on the network and are up and running. No other configuration of the Cluster Slaves is necessary. For optimal performance, the Cluster Slaves should be configured for Traditional Proxy Caching only (that is, do not enable Transparent Caching on the Cluster Slaves). The Cluster Master can operate in Traditional Proxy mode; in this mode, all clients should be configured to send HTTP requests to the Cluster Master. The Cluster Master can also operate in Transparent Caching mode, in which case client network traffic should be routed through the Cluster Master. Inter-Cache Protocol (ICP) Settings. The Inter-Cache Protocol (ICP) is an Internet standard used to create cache hierarchies. The ICP Configuration option allows you to configure ICP peer hosts for the Cobalt CacheQube. You might want to configure ICP if, for example, your Internet Service Provider (ISP) operates an ICP-compliant cache with which you want to peer. On the IPC Configuration page, each peer requires you to specify the following information: the peer host name, an indication of whether the peer is a “parent” or a “sibling” (in ICP terminology), and HTTP and ICP port numbers to use for the specified peer. Optionally, you can configure the peer to be “Proxy-only,” in which case documents retrieved from this peer will be returned to clients but won’t be stored locally by the Cluster Master. Cache Clustering can be used in conjunction with ICP in the following way: Configure the Cluster Master as described in “Cache Cluster Settings,” above, but do not configure any ICP peers for it. On the Cluster Slaves, configure the desired ICP peers, as described above in “Inter-Cache Protocol (ICP) Settings.” 20 CacheQube Administration Cache Statistics The Cobalt CacheQube's caching software records information on all HTTP requests it receives. Statistics are calculated nightly from this data and are available on a daily basis for the preceding two months, assuming that enough disk space has been allocated to store two months of log files. (The amount of disk space devoted to log file storage can be configured from the Cache Settings page, described in “2. Cache Settings” in Chapter 2.) The Cache Statistics page displays a calendar showing the current month and the previous month. Days for which statistics are available are clickable on the calendar. Also, “Stats for Yesterday” is a quick link to yesterday's statistics page (it displays the same information as the page linked from the clickable calendar). After each day of operation, the Cobalt CacheQube computes the following statistics: • Number of cache hits. A cache hit is a request in which the requested document was delivered from the cache — the document didn’t have to be downloaded from the original server. • Number of cache misses. A cache miss is a request in which the requested document was not in the cache and had to be retrieved from the original server. • Total number of documents sent to clients • Cache hit rate. This number refers to the ratio of cache hits to total cache requests. • Number of bytes sent to clients from cache hits • Number of bytes sent to clients from cache misses • Total number of bytes sent to clients • Bandwidth savings. This number reflects the amount of client HTTP traffic that did not result in documents being downloaded from the Internet, which results in saved bandwidth. • Average cache hit latency. This is the average (mean) amount of time (in seconds) it took the Cobalt CacheQube to deliver a document from its cache to a client. • Average cache miss latency. This is the average amount of time it took the Cobalt CacheQube to deliver a document that had to be requested from the original server. 21 Chapter 3 • Weighted average request latency. This is the average cache hit latency multipled by the cache hit rate, plus the average cache miss latency multiplied by the cache miss rate. • Request speedup. This number quantifies the Cobalt CacheQube's performance improvement in terms of userperceived latency. It is the difference between cache miss latency and weighted average request latency, expressed as a percentage of weighted average request latency. The Cache Statistics page also includes a link to a page that allows you to access Detailed Statistics. The Detailed Statistics page lets you view HTTP traffic statistics for individual clients (users) and individual HTTP servers. A calendar allows you to specify the precise time periods (over the last two months) for which you want to see usage statistics. The following options are available: • All clients. This option returns a one-line summary of usage (documents requested and bytes requested) for all clients that utilized the Cobalt CacheQube. • A specific client. For a specified client host name or IP address, this option returns a list of servers accessed by this client. • All servers. This option returns a one-line summary of requests made and bytes retrieved from all HTTP servers from which the Cobalt CacheQube requested documents on behalf of users. • Specific server. For a specified server host name or IP address, this option returns a list of clients who made requests for documents from the specified server. All of the above options return both a count of requests made (for clients) or of documents returned (for servers) and a sum of bytes transferred (bytes to clients or bytes from servers). Each of the above options can be sorted by number of documents or by number of bytes. Finally, you can specify the number of sites to be displayed by each of the above options. Note that the Detailed Statistics output can take some time to generate, depending on the size and complexity of the log files. The log file complexity is determined by the number of requests made by clients to the Cobalt CacheQube, the number of unique clients that made requests, and the number of unique servers that delivered documents. 22 CacheQube Administration Update Software From time to time, Cobalt may issue updates to critical software that runs on its products. Updates can be obtained from the Cobalt Web page (www.cobaltnet.com), or from the Cobalt FTP site (ftp.cobaltnet.com). Updates come in the form of a “Package” file with a “.pkg” file name suffix. The Update Software page in the Web interface allows you to install new packages on the Cobalt CacheQube. To install a package, enter the filename of the .pkg file you want to install. The “Browse...” button lets you find the file on the computer running your Web browser. Once you've entered the name of the package file you want to install, enter the admin password and click the “Install a ‘.pkg’ Package” button. (The admin password is required as a security precaution.) CPU Usage The CPU Usage page displays a graphical representation of the load on the Cobalt CacheQube's processor. (The quantity graphed is the load average, as calculated by the Linux kernel.) Load average provides a rough estimate of the load that browsing clients are placing on the Cobalt CacheQube. The CPU Usage graph requires Java to be present and enabled in your Web browser. Network Usage The Network Usage page shows statistics for network packets sent and received on the Cobalt CacheQube's two Ethernet interfaces. If an interface is unused, the statistics will be 0 for that interface. Packets are counted in the following categories: • Good. A packet was received or sent without error. • Error. Some kind of send/receive error occurred that’s not covered by the categories below. • Dropped. A packet was ignored (dropped) by the operating system because of temporary lack of buffer memory. • Collisions. The Cobalt CacheQube attempted to transmit a packet while another host was in the process of transmitting 23 Chapter 3 a packet. A high rate of collisions relative to packets sent indicates a potentially overloaded network. 24 Appendix A Using the LCD Console During startup, the LCD screen displays status information relating to the boot process itself. During setup, the LCD console is used to enter network configuration information. Once the Cobalt CacheQube is running, the LCD console also serves multiple purposes: • Change network configuration information — useful if the Cobalt CacheQube’s location is changed. • Reboot the system. • Power down — necessary if you need to unplug the Cobalt CacheQube’s power. • Reset network — resets all IP addresses, netmasks, and other network information. This is useful if incorrect data has been entered and you want to start again. IMPORTANT: Follow the proper power-down procedure before turning off the Cobalt CacheQube. You access each of these functions by holding down the Select button for approximately two seconds. This causes the LCD screen to enter its function mode. Then, press the Select button until the function you want appears on the LCD screen. To cancel the LCD’s function mode, select the EXIT function, press the Enter button, then select [Y]ES. Changing the Network Configuration To change an Ethernet interface’s IP address or netmask, or to change the Cobalt CacheQube’s gateway: 1. From the LCD console, hold down the Select button down for approximately 2 seconds. 25 Appendix A The LCD screen displays: SELECT: SETUP NETWORK 2. Press the Enter button. 3. Press Select to cycle among the options in the network configuration menu: SETUP NET1 SETUP NET2 SETUP GATEWAY FINISHED 4. Press Enter to select the option you want. See “Phase 1: Network Configuration” in Chapter 2 for detailed instructions on setting these options. SETUP NET1 lets you configure the IP address and netmask for the 10 Mbps Ethernet interface (near the lower-right corner on the back panel). SETUP NET2 lets you configure the IP address and netmask for the 10/100 Mbps Ethernet interface (on the left side of the back panel). SETUP GATEWAY allows you to configure the Cobalt CacheQube's gateway address to the Internet. Choosing FINISHED brings you back to the main LCD menu. To exit the main LCD menu: 1. Press Select until EXIT appears. 2. Press Enter. 3. Choose [Y]ES. 4. Press Enter again. The hostname and IP address will appear on the LCD. Rebooting To reboot the Cobalt CacheQube: 1. 26 From the LCD console, hold down the Select button for approximately 2 seconds. Using the LCD Console The LCD screen displays: SELECT: SETUP NETWORK 2. Press the Select button once until REBOOT appears in the LCD display: SELECT: REBOOT 3. Press the Enter button. 4. Using the control keys, toggle the cursor between [Y]ES and [N]O and select [Y]ES to reboot the system. 5. Press Enter again to accept [Y]ES. The Cobalt CacheQube will reboot. Powering Down ! Caution: To prevent the potential loss of data, it is important to follow the proper power-down procedure before turning off the Cobalt CacheQube. To select the power-down application: 1. From the LCD console, hold down the Select button for approximately 2 seconds. The LCD screen displays: SELECT: SETUP NETWORK 2. Press the Select button twice until power down appears in the LCD display: SELECT: POWER DOWN 3. Press the Enter button to choose the power-down application. 4. Using the control keys, toggle the cursor between [Y]ES and [N]O and select [Y]ES to power down the system. 27 Appendix A 5. When the Cobalt CacheQube is ready to be turned off, the LCD displays: PLEASE SWITCH POWER OFF NOW 6. Press the On/Off button to turn off the Cobalt CacheQube. Resetting the Network Configuration The Reset Network function resets the Hostname, IP Address, Netmask, Gateway, and DNS information to that of a new, unconfigured system. This function may be useful if you’re moving the Cobalt CacheQube to a new network. To reset the Cobalt CacheQube to a factory-fresh network state, perform the following steps: 1. From the LCD console, hold down the Select button for approximately 2 seconds. The LCD screen will display: SELECT: SETUP NETWORK 2. Press the Select button three times until RESET NETWORK appears in the LCD display: SELECT: RESET NETWORK 3. 4. Press the Enter button. Using the control keys, toggle the cursor between [Y]ES and [N]O and select [Y]ES to reset the network configuration. 5. Press Enter when the cursor highlights [Y]ES. After resetting, the Cobalt CacheQube powers down and the LCD displays: PLEASE SWITCH POWER OFF NOW Resetting the Admin Password If you forget the Administrator password, here’s how to reset it: 28 Using the LCD Console 1. Push a paper clip into the Reset Admin Password port (directly under the On/Off switch on the back panel) and hold for approximately 2 seconds. The LCD screen displays RESETTING ADMIN PASSWORD. ! Caution: After you’ve cleared the password, be sure to set a new one as soon as possible (as described below) to prevent unauthorized access to the Administrator functions. 2. In your Web browser, enter the URL http://IP address/ IP address is the Cobalt CacheQube’s assigned IP address. 3. Go to the Administrator Setup screen. If you’re prompted for a username or password, enter admin as the username, and enter any name or word for the password. 4. Enter a new password in the Password field on the Administrator Setup screen. 5. Click Save Changes to save the new password. 29 Appendix A 30 Appendix B Cobalt CacheQube Technical Specifications Caching Features Caches HTTP, FTP, and Gopher traffic (including Java™ applets) Configurable for both Transparent Caching and Traditional Proxy Caching mode Supports HTTP/1.1 persistent connections (keep-alives) DNS caching Cobalt InstaCache Cluster support for scalability ICP Support Supports SSL tunneling and cookies Persistent cache across reboots Log files compatible with Harvest, Squid, and CERN Proxy standards Performance Supports 1 to 2 T1 or E1 lines Supports 200 simultaneous requests Scalability through Cobalt InstaCache Clustering Built-in support for Level 4 switch (e.g. Alteon's ACEDirector ) for scalability and failover protection Stores metadata and hot objects in RAM for fast cache lookups 31 Appendix B System Management Browser-based Management Interface Compatible with Netscape Navigator or Microsoft Internet Explorer, versions 3.0 or later Setup Wizard guides administrator through initial setup Password protection for browser-based management interface Online ActiveAssist real-time help Advanced management via remote login (telnet) Performance and Usage Reporting and Logging Detailed event logging and Web-based statistical reporting (see “Cache Statistics” in Chapter 3) Complete log files available for download and processing through FTP Auto log rotation SNMP agent Active Monitor Real-time pro-active system maintenance daemons E-mail and pager alerts Cache Configuration Settings User-definable content refresh frequency User-definable maximum cacheable object size Miscellaneous Automatic system restart (after power outage and restore) Browser-based software upgrade Year 2000 compliant 32 Product Specifications Hardware 4.5 GB disk cache capacity (approximately 400,000 cached objects) 64 MB of memory Dual Ethernet network interface (10 Mbps and 10/100 Mbps autonegotiation, full duplex) 110-240V, 50/60Hz 25 watts maximum power consumption Physical Specifications Dimensions: 7.25 in. x 7.25 in. x 7.75 in. (18.4 cm x 18.4 cm x 19.7 cm) Weight: 6.25 lbs. (2.8 kg) Power requirements: Input rating 110-240V, 50/60 Hz Maximum power consumption: 25 W Operating environment: 39o to 108oF (5oto 40oC), 10% to 80% humidity (non-condensing) LEDs: Power, Network Activity, Link Regulatory approval: FCC Class A, CE, CSA, C/UL, VCCI-A 33 Appendix B 34 Appendix C Example Network Topologies This appendix shows how the Cobalt CacheQube can be used in a variety of ways in different network environments. It illustrates the connections among the network components and gives configuration details for each setup. 35 Appendix C Cobalt CacheQube in Traditional Mode Installation Notes • • Configure the Cobalt CacheQube for Traditional Proxy mode (that is, leave Transparent mode off). Configure clients’ browsers to use the Cobalt CacheQube as the HTTP Proxy. Instructions for Internet Explorer Version 4 1. Choose Internet Options from the View menu. 2. Click the Connection tab. 3. Check “Access the Internet using a proxy server.” 4. Click the Advanced button. 5. Under HTTP/Address of proxy to use, enter the Cobalt CacheQube’s hostname or IP address. 6. Under HTTP/Port, enter 3128. Instructions for Netscape Navigator Version 4 1. Choose Preferences from the Edit menu. 2. In the Category list, click Advanced and Proxies. 3. Choose Manual Proxy Configuration. 4. Click View. 5. Under HTTP/Address of proxy server to use, enter the Cobalt CacheQube’s hostname or IP addess. 6. Under HTTP/Port, enter 3128. Advantage If the Cobalt CacheQube fails, the outside network is still accessible (contrast with Transparent mode, next page). Disadvantage Requires changes to the clients’ browser configuration. 36 Example Network Topologies Cobalt CacheQube in Transparent Mode Installation Notes • • To avoid changes to the clients’ configuration, assign the existing gateway address used by the clients to the Cobalt CacheQube’s NET2 interface. Create a new subnet containing two hosts: the router (assign it a new address) and the NET1 interface. Make sure that the IP addresses you assign to NET1 and the router are on a subnet different from the clients’ network. This is necessary for the Cobalt CacheQube to pass traffic through from the clients to the router. Advantage No special configuration for the client machines is necessary. Disadvantage If the Cobalt CacheQube fails, the clients cannot access the outside network until the Cobalt CacheQube comes back on-line. 37 Appendix C Cobalt CacheQube for Workgroups Installation Notes • • You can configure the Cobalt CacheQube for either Transparent mode or Traditional Proxy mode. Follow the instructions given in “Phase 1: Configuring the Network” in Chapter 2 to set up the mode you choose. Advantage You can separate network traffic into workgroups. 38 Example Network Topologies Cobalt CacheQube ISP Deployment Installation Note Configure the Cobalt CacheQube for Transparent mode. Advantage You can keep quick-to-access copies of remote documents, saving bandwidth and speeding up page access for users. Disadvantage For large ISPs, one Cobalt CacheQube may not be enough. (In this case, Clustered Cobalt CacheQubes can be used.) 39 Appendix C Cobalt CacheQube ISP Cluster Deployment Installation Notes • • • Configure one Cobalt CacheQube as the Cluster Master, as explained in “Cache Setup” in Chapter 3. Configure the Cluster Master to operate in Transparent mode. The Cluster Slaves require no special configuration. Advantages • • Clustered Cobalt CacheQubes provide highavailability and high-speed cache access and larger cache storage. This solution is scalable — you can add up to 5 Cluster Slaves. Disadvantage • 40 You can’t have more than 5 Cluster Slaves; if you want more capacity, you can use the L4 switch solution (described on the next page). Example Network Topologies Cobalt CacheQube ISP Cluster With L4 Switch Installation Notes • • • • Configure the Cobalt CacheQubes for Transparent mode. No Cluster Master is needed (the L4 switch replaces the Cluster Master). Cobalt CacheQubes can be connected either directly to the L4 switch or via a hub. Refer to the L4 switch’s manual for instructions on configuring the cache redirection. Advantages • • • No Cluster Master is needed. This solution is scalable — you can have dozens of Cobalt CacheQubes per switch. This is the fastest caching solution. Disadvantage • The cost of the L4 switch. 41 Appendix C Cobalt CacheQube Cluster in Traditional Mode Installation Notes • • Configure one Cobalt CacheQube as the Cluster Master, as explained in “Cache Setup” in Chapter 3. No special configuration is necessary for the Cluster Slaves. Advantages • • Distributed caching allows for faster response time and more storage space. Clustered Cobalt CacheQubes are scalable — you can add more Cluster Slaves as needed. Disadvantage • 42 This solution requires modification to the client browser configuration Example Network Topologies Cobalt CacheQube Cluster in Transparent Mode Installation Notes • • • Configure the Cluster Master for Transparent mode. Configure the Cluster Slaves for Traditional Proxy mode. Enter the Cluster Slave information into the Cluster Master configuration Advantage No client-side configuration is necessary. Disadvantage If the Cluster Master fails, the clients cannot access the outside network until the Cluster Master comes back online. 43 Appendix C Cobalt CacheQube Enterprise Cluster With L4 Switch Installation Notes • • • • Configure the Cobalt CacheQubes for Transparent mode. Cobalt CacheQubes can be connected either directly to the L4 switch or via the hub. No Cluster Master is necessary (the L4 switch replaces the Cluster Master). Refer to the switch’s manual for instructions on configuring the cache redirection. Advantages • • • • This solution allows for high-speed clustering. It’s fully scalable — you can add Cobalt CacheQubes as needed. It provides increased cache storage space. No Cluster Master is necessary. Disadvantage • 44 The cost of the L4 switch. THE BSD COPYRIGHT Copyright ©1991, 1992, 1993, 1994 The Regents of the University of California. All rights reserved. Redistribution and use in source and binary forms, with or without modification, are permitted provided that the following conditions are met: 1. Redistributions of source code must retain the above copyright notice, this list of conditions and the following disclaimer. 2. Redistributions in binary form must reproduce the above copyright notice, this list of conditions and the following disclaimer in the documentation and/or other materials provided with the distribution. 3. All advertising materials mentioning features or use of this software must display the following acknowledgment: This product includes software developed by the University of California, Berkeley and its contributors. 4. Neither the name of the University nor the names of its contributors may be used to endorse or promote products derived from this software without specific prior written permission. THIS SOFTWARE IS PROVIDED BY THE REGENTS AND CONTRIBUTORS “AS IS'” AND ANY EXPRESS OR IMPLIED WARRANTIES, INCLUDING, BUT NOT LIMITED TO, THE IMPLIED WARRANTIES OF MERCHANTABILITY AND FITNESS FOR A PARTICULAR PURPOSE ARE DISCLAIMED. IN NO EVENT SHALL THE REGENTS OR CONTRIBUTORS BE LIABLE FOR ANY DIRECT, INDIRECT, INCIDENTAL, SPECIAL, EXEMPLARY, OR CONSEQUENTIAL DAMAGES (INCLUDING, BUT NOT LIMITED TO, PROCUREMENT OF SUBSTITUTE GOODS OR SERVICES; LOSS OF USE, DATA, OR PROFITS; OR BUSINESS INTERRUPTION) HOWEVER CAUSED AND ON ANY THEORY OF LIABILITY, WHETHER IN CONTRACT, STRICT LIABILITY, OR TORT (INCLUDING NEGLIGENCE OR OTHERWISE) ARISING IN ANY WAY OUT OF THE USE OF THIS SOFTWARE, EVEN IF ADVISED OF THE POSSIBILITY OF SUCH DAMAGE. GNU GENERAL PUBLIC LICENSE Copyright (C) 1989, 1991 Free Software Foundation, Inc. 675 Mass Ave., Cambridge, MA 02139, USA TERMS AND CONDITIONS FOR COPYING, DISTRIBUTION AND MODIFICATION This License applies to any program or other work which contains a notice placed by the copyright holder saying it may be distributed under the terms of this General Public License. The “Program”, below, refers to any such program or work, and a “work based on the Program” means either the Program or any derivative work under copyright law: that is to say, a work containing the Program or a portion of it, either verbatim or with modifications and/or translated into another language. (Hereinafter, translation is included without limitation in the term “modification”.) Each licensee is addressed as “you”. Activities other than copying, distribution and modification are not covered by this License; they are outside its scope. The act of running the Program is not restricted, and the output from the Program is covered only if its contents constitute a work based on the Program (independent of having been made by running the Program). Whether that is true depends on what the Program does. You may copy and distribute verbatim copies of the Program's source code as you receive it, in any medium, provided that you conspicuously and appropriately publish on each copy an appropriate copyright notice and disclaimer of warranty; keep intact all the notices that refer to this License and to the absence of any warranty; and give any other recipients of the Program a copy of this License along with the Program. You may charge a fee for the physical act of transferring a copy, and you may at your option offer warranty protection in exchange for a fee. You may modify your copy or copies of the Program or any portion of it, thus forming a work based on the Program, and copy and distribute such modifications or work under the terms of Section 1 above, provided that you also meet all of these conditions: 1.You must cause the modified files to carry prominent notices stating that you changed the files and the date of any change. 2.You must cause any work that you distribute or publish, that in whole or in part contains or is derived from the Program or any part thereof, to be licensed as a whole at no charge to all third parties under the terms of this License. 3.If the modified program normally reads commands interactively when run, you must cause it, when started running for such interactive use in the most ordinary way, to print or display an announcement including an appropriate copyright notice and a notice that there is no warranty (or else, saying that you provide a warranty) and that users may redistribute the program under these conditions, and telling the user how to view a copy of this License. (Exception: if the Program itself is interactive but does not normally print such an announcement, your work based on the Program is not required to print an announcement.) These requirements apply to the modified work as a whole. If identifiable sections of that work are not derived from the Program, and can be reasonably considered independent and separate works in themselves, then this License, and its terms, do not apply to those sections when you distribute them as separate works. But when you distribute the same sections as part of a whole which is a work based on the Program, the distribution of the whole must be on the terms of this License, whose permissions for other licensees extend to the entire whole, and thus to each and every part regardless of who wrote it. Thus, it is not the intent of this section to claim rights or contest your rights to work written entirely by you; rather, the intent is to exercise the right to control the distribution of derivative or collective works based on the Program. In addition, mere aggregation of another work not based on the Program with the Program (or with a work based on the Program) on a volume of a storage or distribution medium does not bring the other work under the scope of this License. You may copy and distribute the Program (or a work based on it, under Section 2) in object code or executable form under the terms of Sections 1 and 2 above provided that you also do one of the following: 1.Accompany it with the complete corresponding machine readable source code, which must be distributed under the terms of Sections 1 and 2 above on a medium customarily used for software interchange; or, 2.Accompany it with a written offer, valid for at least three years, to give any third party, for a charge no more than your cost of physically performing source distribution, a complete machine-readable copy of the corresponding source code, to be distributed under the terms of Sections 1 and 2 above on a medium customarily used for software interchange; or, 3.Accompany it with the information you received as to the offer to distribute corresponding source code. (This alternative is allowed only for noncommercial distribution and only if you received the program in object code or executable form with such an offer, in accord with Subsection b above.) The source code for a work means the preferred form of the work for making modifications to it. For an executable work, complete source code means all the source code for all modules it contains, plus any associated interface definition files, plus the scripts used to control compilation and installation of the executable. However, as a special exception, the source code distributed need not include anything that is normally distributed (in either source or binary form) with the major components (compiler, kernel, and so on) of the operating system on which the executable runs, unless that component itself accompanies the executable. If distribution of executable or object code is made by offering access to copy from a designated place, then offering equivalent access to copy the source code from the same place counts as distribution of the source code, even though third parties are not compelled to copy the source along with the object code. You may not copy, modify, sublicense, or distribute the Program except as expressly provided under this License. Any attempt otherwise to copy, modify, sublicense or distribute the Program is void, and will automatically terminate your rights under this License. However, parties who have received copies, or rights, from you under this License will not have their licenses terminated so long as such parties remain in full compliance. You are not required to accept this License, since you have not signed it. However, nothing else grants you permission to modify or distribute the Program or its derivative works. These actions are prohibited by law if you do not accept this License. Therefore, by modifying or distributing the Program (or any work based on the Program), you indicate your acceptance of this License to do so, and all its terms and conditions for copying, distributing or modifying the Program or works based on it. Each time you redistribute the Program (or any work based on the Program), the recipient automatically receives a license from the original licensor to copy, distribute or modify the Program subject to these terms and conditions. You may not impose any further restrictions on the recipients' exercise of the rights granted herein. You are not responsible for enforcing compliance by third parties to this License. If, as a consequence of a court judgment or allegation of patent infringement or for any other reason (not limited to patent issues), conditions are imposed on you (whether by court order, agreement or otherwise) that contradict the conditions of this License, they do not excuse you from the conditions of this License. If you cannot distribute so as to satisfy simultaneously your obligations under this License and any other pertinent obligations, then as a consequence you may not distribute the Program at all. For example, if a patent license would not permit royalty-free redistribution of the Program by all those who receive copies directly or indirectly through you, then the only way you could satisfy both it and this License would be to refrain entirely from distribution of the Program. If any portion of this section is held invalid or unenforceable under any particular circumstance, the balance of the section is intended to apply and the section as a whole is intended to apply in other circumstances. It is not the purpose of this section to induce you to infringe any patents or other property right claims or to contest validity of any such claims; this section has the sole purpose of protecting the integrity of the free software distribution system, which is implemented by public license practices. Many people have made generous contributions to the wide range of software distributed through that system in reliance on consistent application of that system; it is up to the author/donor to decide if he or she is willing to distribute software through any other system and a licensee cannot impose that choice. This section is intended to make thoroughly clear what is believed to be a consequence of the rest of this License. If the distribution and/or use of the Program is restricted in certain countries either by patents or by copyrighted interfaces, the original copyright holder who places the Program under this License may add an explicit geographical distribution limitation excluding those countries, so that distribution is permitted only in or among countries not thus excluded. In such case, this License incorporates the limitation as if written in the body of this License. The Free Software Foundation may publish revised and/or new versions of the General Public License from time to time. Such new versions will be similar in spirit to the present version, but may differ in detail to address new problems or concerns. Each version is given a distinguishing version number. If the Program specifies a version number of this License which applies to it and “any later version”, you have the option of following the terms and conditions either of that version or of any later version published by the Free Software Foundation. If the Program does not specify a version number of this License, you may choose any version ever published by the Free Software Foundation. If you wish to incorporate parts of the Program into other free programs whose distribution conditions are different, write to the author to ask for permission. For software which is copyrighted by the Free Software Foundation, write to the Free Software Foundation; we sometimes make exceptions for this. Our decision will be guided by the two goals of preserving the free status of all derivatives of our free software and of promoting the sharing and reuse of software generally. NO WARRANTY BECAUSE THE PROGRAM IS LICENSED FREE OF CHARGE, THERE IS NO WARRANTY FOR THE PROGRAM, TO THE EXTENT PERMITTED BY APPLICABLE LAW. EXCEPT WHEN OTHERWISE STATED IN WRITING THE COPYRIGHT HOLDERS AND/OR OTHER PARTIES PROVIDE THE PROGRAM “AS IS” WITHOUT WARRANTY OF ANY KIND, EITHER EXPRESSED OR IMPLIED, INCLUDING, BUT NOT LIMITED TO, THE IMPLIED WARRANTIES OF MERCHANTABILITY AND FITNESS FOR A PARTICULAR PURPOSE. THE ENTIRE RISK AS TO THE QUALITY AND PERFORMANCE OF THE PROGRAM IS WITH YOU. SHOULD THE PROGRAM PROVE DEFECTIVE, YOU ASSUME THE COST OF ALL NECESSARY SERVICING, REPAIR OR CORRECTION. IN NO EVENT UNLESS REQUIRED BY APPLICABLE LAW OR AGREED TO IN WRITING WILL ANY COPYRIGHT HOLDER, OR ANY OTHER PARTY WHO MAY MODIFY AND/OR REDISTRIBUTE THE PROGRAM AS PERMITTED ABOVE, BE LIABLE TO YOU FOR DAMAGES, INCLUDING ANY GENERAL, SPECIAL, INCIDENTAL OR CONSEQUENTIAL DAMAGES ARISING OUT OF THE USE OR INABILITY TO USE THE PROGRAM (INCLUDING BUT NOT LIMITED TO LOSS OF DATA OR DATA BEING RENDERED INACCURATE OR LOSSES SUSTAINED BY YOU OR THIRD PARTIES OR A FAILURE OF THE PROGRAM TO OPERATE WITH ANY OTHER PROGRAMS), EVEN IF SUCH HOLDER OR OTHER PARTY HAS BEEN ADVISED OF THE POSSIBILITY OF SUCH DAMAGES.