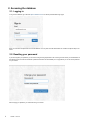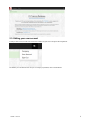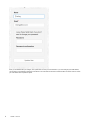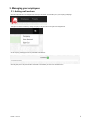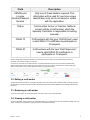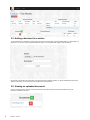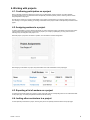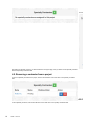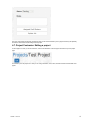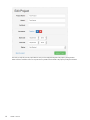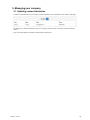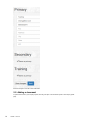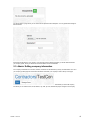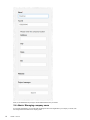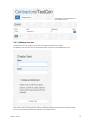
1
Contractor Manual
Welcome to the C3 Training Database for Construction Career Collaborative! This software is where you keep track of your employees'
training and safety credentials, project participation and assignments, license documents, and more. Your company should already be an
accredited employer or project participant to use the database.
If you're not already signed up for C3, head to http://www.constructioncareercollaborative.com for more information!
Table of Contents
1. Registration
2. Accessing the database
2.1. Logging in
2.2. Resetting your password
2.3. Editing your user account
3. Managing your employees
3.1. Adding craft workers
3.2. Editing a craft worker
3.3. Removing a craft worker
3.4. Viewing a craft worker
3.5. Adding a document to a worker
3.6. Viewing an uploaded document
4. Working with projects
4.1. Confirming participation on a project
4.2. Assigning workers to a project
4.3. Exporting a list of workers on a project
4.4. Inviting other contractors to a project
4.5. Removing a contractor from a project
4.6. Editing a contractor's project status
4.7. Project Contractor: Editing a project
5. Managing your company
5.1. Updating contact information
5.2. Adding a document
5.3. Admin: Editing company information
5.4. Admin: Managing company users
5.4.1. Adding a new user
5.4.2. Deleting a user
6. Help and contact
1. Registration
To obtain an account with the C3 Training Database, please contact Construction Career Collaborative and request access. A user
confirmation email will be sent to an email address that you provide.
Click the confirmation link in the email to get to the Confirm Your Account page. You will be asked to confirm your name, and set a password
for your account. Once this is complete, you can log in and access the application.
Version 1 10.9.15
1
2. Accessing the database
2.1. Logging in
To log in to the database, go to the URL https://c3td.etszone.net. You will be presented with a login page.
Enter your username and password to access the database. You may also check the "Remember me" checkbox to skip this step in the
future.
2.2. Resetting your password
If you have forgotten your password, you can reset it using the "Forgot password?" link on the login screen. Enter your email address on
the following screen to be sent an email with a password reset link. This link will take you to a page where you can set a new password
for your account.
After changing your password, you will be able to log in to the site.
2
Version 1 10.9.15
2.3. Editing your user account
To edit your user account, click the 'user account' link located in the gear menu to the right of the navigation bar.
This will take you to the edit user form. Here you can change your password, name or email address.
Version 1 10.9.15
3
When you are satisfied with your changes, click "Update User" to save your new information. If you have changed your email address,
you will receive a reconfirmation email at the new address. You must follow the instructions contained within the email in order to confirm
your new address and complete the update.
4
Version 1 10.9.15
3. Managing your employees
3.1. Adding craft workers
Click the employees tab in the navigation bar at the top of the screen. This will take you to your company profile page.
This page can also be accessed by clicking 'Company' in the gear menu to the right of the navigation bar.
On the company profile page, there is a panel titled 'Craft Workers'.
Click the green plus in this panel to add a craft worker. This will take you to the new craft worker form.
Version 1 10.9.15
5
6
Version 1 10.9.15
Field
Description
SSN/Drivers
License
Number/Passport
Number
Only one of these fields is required. This
information will be used for one-time unique
identification only and is not saved or visible
with the application.
Status
Can be either 'Active' or 'Inactive'. Reflects
current activity of craft worker, which the
Specialty Contractor is responsible for setting
manually.
OSHA 10
Craft workers with the type 'Craft Worker' need
a valid OSHA 10 certification to participate on
C3 projects.
OSHA 30
Craft workers with the type 'Field Supervisor'
need a valid OSHA 30 certification to
participate on C3 projects.
Please note that required fields are indicated by a red asterisk on the form. When you are finished entering the worker's
information, click submit to create the craft worker.
If there are any errors with the provided information, you will be redirected back to the form, and a warning message will be
displayed at the top of the form, explaining the error. If there are no errors, you will be redirected to the company profile page,
where you will be able to see the newly added craft worker in the craft workers table.
3.2. Editing a craft worker
To edit a craft worker's information, click the blue edit button in the action column of the craft workers table. You will be presented
with the same form as above, but with the worker data already filled out. Note that the SSN/Driver License/Passport fields will not
be present.
3.3. Removing a craft worker
To remove a craft worker, click the red trash button in the action column of the craft workers table.
3.4. Viewing a craft worker
To view a craft worker, click their name in the craft workers table. Here you will be able to see all the information relating to the craft
worker, including training information, project assignments, and uploaded documents.
Version 1 10.9.15
7
3.5. Adding a document to a worker
To add a document to a craft worker, click the green plus on the documents panel on the craft worker profile. You will be taken to a
page where you can select a file to upload and add a description. You may upload either images or PDF documents.
Click submit to add the file to the craft worker. If the document was successfully uploaded, you will be redirected back to that craft
worker's profile, where you will see the document added to the documents table.
3.6. Viewing an uploaded document
From the craft worker profile, click the name of the document to view the document. Click the red trash button next to the
description to delete the document.
8
Version 1 10.9.15
4. Working with projects
4.1. Confirming participation on a project
When a Specialty Contractor is added to a C3 project by a C3 Administrator, project Contractor, or another Specialty
Contractor employing them, an email will be sent to the Specialty Contractor's primary contact, containing a link to confirm
their participation on the project.
Click this link to confirm your company's participation on the project. This will change your company's status on the project
from 'Pending' to 'In Progress', allowing you to assign craft workers to the project, as well as invite Specialty Contractors to the
project.
4.2. Assigning workers to a project
To assign craft workers to a project, edit the craft worker you wish to add to the project. At the bottom of the form there will be
a section called project assignments, which lists all the projects your company is participating on, along with a check box
indicating if they are assigned to that project or not.
Select the project or projects for the worker in question, and click submit to save the assignments.
After assigning a craft worker to a project, they will be listed on the craft workers table on the project page.
4.3. Exporting a list of workers on a project
To export a list of all craft workers on a project to a CSV or Excel file, click the corresponding button on the craft workers table
on the project page. You will be prompted to download the file after clicking.
4.4. Inviting other contractors to a project
To invite Specialty Contractors to a project, click the green plus on the specialty contractors table on the project page.
Version 1 10.9.15
9
This will take you to a
After adding the specialty contractor, you will be redirected to the project page, where you will the see the Specialty Contractor
listed in the specialty contractors table.
4.5. Removing a contractor from a project
To remove a Specialty Contractor from a project, click the red trash button next to their name on the specialty contractors
table.
4.6. Editing a
To edit a Specialty Contractor, click the blue edit button next to their name on the specialty contractors table.
10
Version 1 10.9.15
From here, there will be an assigned craft workers button on the form that will take you to a page that lists only that Specialty
Contractor's craft workers that are assigned to that project.
4.7. Project Contractor: Editing a project
To edit a project on which you are the contractor, click the blue edit button under the project name at the top of the project
page.
This will take you to the project form. Here you can change the status, name, owner, architect and start and end dates of the
project.
Version 1 10.9.15
11
From here you may edit your own project status or view your own employees assigned to the project by clicking the blue
button next to the contractor's name. You may also remove yourself as the contractor of the project by clicking the red button.
12
Version 1 10.9.15
5. Managing your company
5.1. Updating contact information
To edit the contact information for your company, click the edit button on the contacts table on the company profile page.
This will take you to the edit contacts form. Here you can specify a primary contact, a secondary contact and a training
contact.
If one of the contact fields is not needed, check the 'same as primary' box.
Version 1 10.9.15
13
Click save changes to save the contact information.
5.2. Adding a document
To upload a document to your company's profile, click the green plus on the documents panel on the company profile
page.
14
Version 1 10.9.15
You will be taken to a page where you can select a file to upload and add a description. You may upload either images or
PDF documents.
Click submit to add the file to your company. If the document was successfully uploaded, you will be redirected back to
your company profile, where you will see the document added to the documents table.
5.3. Admin: Editing company information
Your company's information such as name, address, or website can be edited at any time by an administrator user. Go to
your company's profile page and click the blue edit button underneath your company's name at the top of the page.
This will take you to the edit company
form where you can edit the name, tax ID, address, city, state, zip code, website and project manager for the company.
Version 1 10.9.15
15
When you are satisfied with any changes, click the submit button to save your entries.
5.4. Admin: Managing company users
As a company administrator, you have the ability to manage the other users registered for your company. To do this, click
the 'manage users' link located on the company profile.
16
Version 1 10.9.15
This will take you to a list of all users on
your company's account.
5.4.1. Adding a new user
To add a new user for your company, click the green 'new' button at the bottom left of the page.
This will take you the user form where you will be asked to specify a name and an email address for the user.
There is also a check box for giving the user company administrator privileges. This allows the user to edit the company
account, as well as create, edit and remove other users on the company account.
Version 1 10.9.15
17
When you have entered the user's information, click the "Create user" button. This will send them a confirmation email to
complete the sign-up process.
5.4.2. Deleting a user
To delete a company user, click the red trash button on the appropriate row on the company user list. Note that you
cannot delete your own user account.
6. Help and contact
If you run in to any trouble using the database, or you need help with a particular function, please contact your company
administrator or C3 representative. Thanks for being a part of C3, and happy crafting!
18
Version 1 10.9.15