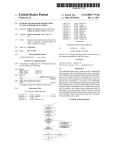
1
UNIVERSITY OF CINCINNATI
06/07/2005
Date:___________________
Shinde Vishal V.
I, _________________________________________________________,
hereby submit this work as part of the requirements for the degree of:
Master of Science
in:
Mechanical Engineering
It is entitled:
Development of Active Fiber Sensors and a Data Acquisition Module for a
Structural Neural System
This work and its defense approved by:
Dr. Mark Schulz
Chair: _______________________________
Dr. Vesselin Shanov
_______________________________
Dr. David Thompson
_______________________________
_______________________________
_______________________________
Development of a Data Acquisition System and
Piezoelectric Sensors for an Experimental Structural
Neural System
Thesis submitted to the faculty of the University of Cincinnati in partial fulfillment of the
requirements for the degree of
Masters of Science
in
Mechanical Engineering
Dr. Mark Schulz, Advisor
Dr. David Thompson Co-Advisor
Dr. Vesselin Shanov
June 7, 2005
Cincinnati, Ohio
ii
Abstract
This thesis develops a data acquisition system and long piezoelectric sensors for a
technique of structural health monitoring based on a structural neural system and
continuous sensors. The structural neural system uses distributed sensing and parallel
signal processing in real time to monitor large structures like an aircraft for damage. The
structural neural system consists of piezoceramic nerves and electronic logic circuits and
was tested on an aluminum plate that was fatigue loaded using a mechanical testing
machine. The testing indicated that the SNS analog processor using conventional
monolithic piezoceramic sensors was able to detect the acoustic emissions using
continuous fiber sensors. The acoustic emission level in aluminum was small but
detectable. A higher sensitivity of the neural system was needed. Therefore, further
sensor development was undertaken including fabricating piezoelectric active fiber
continuous sensors. The testing in this thesis indicates that the continuous sensor can be
closer to the damage site, and is more sensitive than conventional discrete sensors. In this
thesis a data acquisition system was developed using LabVIEW and single fiber
continuous sensors were developed for the structural neural system. The testing indicates
that the structural neural system will be able to continuously monitor a structure and
provide a long-term history of the health of the structure.
iii
iv
Acknowledgement
The work for this thesis was carried out in the Smart Structures and BioNanotechnology Lab of the Department of Mechanical Engineering at University of
Cincinnati.
The supervisor of the work was Dr. Mark Schulz. I am grateful for his invaluable
support. I also want to thank the committee members, Dr. David Thompson and
Shannov Vesselin. I have worked for 2 years in the group of Dr Schulz, who has not
only given me excellent guidance but also helped in meeting the innovative and
challenging requirements of my thesis
Team work made the topic of the thesis both "magnetic" and "stimulating". Goutham
Kirikera deserves my warmest thanks for many discussions and friendship. I want to
thank my lab-members YeoHeung Yun, Atul Miskin, Sourabh Datta and Ramanand
I wish to express my gratitude to Prasad Kadam for reviewing the manuscript of this
thesis.
I am very grateful for the love and support of my parents and my roommates, Nitin
and Prasad.
v
ABSTRACT.....................................................................................................................III
CHAPTER 1
INTRODUCTION................................................................................. 1
1.1
Structural Health Monitoring.............................................................................. 1
1.1.1 Active structural health monitoring .................................................................... 1
1.1.2 Passive structural health monitoring................................................................... 1
1.2
Piezoceramic Material .......................................................................................... 4
1.3
Interdigitated Electrode Monolithic Ceramics .................................................. 5
1.4
Piezoelectric Active fiber composite.................................................................... 6
1.5
The Macro fiber composite .................................................................................. 7
1.6
Continuous Sensors............................................................................................... 8
1.7
Objective of the Research..................................................................................... 9
CHAPTER 2
ACTIVE FIBER COMPOSITES ...................................................... 11
2.1
Modeling Active Fiber Composite Sensors....................................................... 12
2.2
Design of Active Fiber Composites.................................................................... 15
2.3
Fiber Material ..................................................................................................... 15
2.4
Fiber cross section............................................................................................... 17
2.5
Composite thickness............................................................................................ 18
2.6
Matrix Material................................................................................................... 18
2.7
Electroding........................................................................................................... 19
2.8
Summary.............................................................................................................. 21
CHAPTER 3
3.1
MANUFACTURING OF ACTIVE FIBER SENSORS .................. 22
Mold ..................................................................................................................... 24
3.2
Manufacturing process....................................................................................... 27
3.2.1 Casting .............................................................................................................. 27
vi
3.2.2
3.2.3
3.2.4
3.2.5
Curing ............................................................................................................... 30
Electroding........................................................................................................ 30
Field Installation Procedure .............................................................................. 33
Poling ................................................................................................................ 37
CHAPTER 4
THE DATA ACQUISITION SYSTEM ............................................ 41
4.1
Hardware Design ................................................................................................ 42
4.1.1 Signal Type ....................................................................................................... 42
4.1.2 Voltage range .................................................................................................... 43
4.1.3 Resolution ......................................................................................................... 43
4.1.4 Number of Input channels................................................................................. 43
4.1.5 Simultaneous sampling ..................................................................................... 43
4.1.6 Sampling rate .................................................................................................... 44
4.2
Software Design................................................................................................... 45
4.2.1 Prior Work ........................................................................................................ 45
4.2.2 Limitations of Prior Solutions........................................................................... 46
4.2.3 Problem Statement ............................................................................................ 46
4.2.4 Specifications.................................................................................................... 46
4.2.5 Development of the LabVIEW system ............................................................. 50
4.3
Testing and Debugging ....................................................................................... 52
4.3.1 Finding Errors ................................................................................................... 53
4.3.2 Execution Highlighting..................................................................................... 53
4.3.3 Single-Stepping................................................................................................. 53
4.3.4 Probes................................................................................................................ 53
4.3.5 Breakpoints ....................................................................................................... 53
CHAPTER 5
EXPERIMENTATION ...................................................................... 56
5.1
Testing the SNS on a Riveted Aluminum Plate using Lead Breaks............... 56
5.2
Capacitance effect of the sensor......................................................................... 59
5.3
Pulse Excitation................................................................................................... 61
5.4
Dynamic Testing of an aluminum plate ............................................................ 63
5.5
Fatigue Testing of a Riveted Aluminum Joint ................................................. 63
5.6
Monitoring AE on an Aluminum Plate using the SNS .................................... 66
CHAPTER 6
6.1
SENSOR CHARACTERIZATION .................................................. 69
Low frequency response of the sensor .............................................................. 70
vii
6.2
High frequency response of the sensor (Lead Break)...................................... 73
6.3
High frequency response of the sensors in a series connection (Lead Break)76
6.4
High frequency response of the sensors for a parallel connection (Lead
Break) 78
6.5
AFC actuation ..................................................................................................... 80
6.6
Power Harvesting................................................................................................ 82
6.7
Calculating the d31 coefficient ............................................................................ 84
CHAPTER 7
CONCLUSION ................................................................................... 87
CHAPTER 8
FUTURE WORK ................................................................................ 88
8.1
Data acquisition system ...................................................................................... 88
8.2
Active Fiber Sensor............................................................................................. 89
REFERENCES................................................................................................................ 90
APPENDIX A .................................................................................................................. 99
LabVIEW Code Description.......................................................................................... 99
APPENDIX B ................................................................................................................ 103
Matlab® Script ............................................................................................................... 103
APPENDIX C ................................................................................................................ 105
PCI 6110E Board Specifications.................................................................................. 105
APPENDIX D ................................................................................................................ 109
Specification of Silver conductive epoxy..................................................................... 109
viii
Table of Figures
Figure 1.1 Monolithic PZT patch [9]
5
Figure 1.2 Interdigital Electrode Monolithic Ceramic [15]
6
Figure 1.3 Piezoelectric Active Fiber Composites [9]
7
Figure 1.4 Components of Macro Fiber Composites [K. Wilikie, 14]
8
Figure 2.1 Flowchart of Active Fiber Sensor Design
15
Figure 2.2 Types of PZT fibers
17
Figure 3.1 Void formation in AFC preform
23
Figure 3.2 AFC casting Mold
25
Figure 3.3 Injector Assembly
26
Figure 3.4 PZT fiber size 165.1mm × 0.75mm × 0.25mm [23]
28
Figure 3.5 Curing for the AFC Sensor
30
Figure 3.6 Structure Integrated electroding
32
ix
Figure 3.7 Stand-alone Electroding
32
Figure 3.8 Sensor field installation procedure
34
Figure 3.9 Weiss domains; (a) Before poling; (b) During Poling; (c) After Poling
37
Figure 3.10 Poling setup (a)Poling fixture (b) Entire Poling Setup
39
Figure 3.11 Poling Wiring Diagram
39
Figure 3.12 Manufactured Active Fiber Composite Sensor
40
Figure 4.1 Data Acquisition System
41
Figure 4.2 Software Requirements
47
Figure 4.3 Sensing architecture
52
Figure 4.4 LabVIEW front panel layout a) Trigger parameters; (b) analysis
parameters (c) date and total running time and number of stress cycles; (d) firing
neurons and LP filtered cumulative AE voltage; (e) displayed parameter depending
on the tab control; (f) LED indicator showing AE; (g) number of stress cycles; (h)
frequency of vibration (i) Stop button to stop execution of the Virtual Instrument; (j)
55
Loading frequency
x
Figure 5.1 Aluminum Rivet Plate; (a) Picture of the plate, (b) Geometric model of the
57
riveted plate along with sensors
Figure 5.2 Response of SNS for an AE lead break located near Sensor 4; (a) Crack
information, (b) Time waveform of the cumulative AE
58
Figure 5.3 Response of SNS for an AE lead break located near sensor 2; a) Crack
58
Figure 5.4 Measurement of Impedance of the Kapton® and superglue layer (a)
61
Impedance measurement circuit, (b) Variation of Impedance with frequency
Figure 5.5 Excitation to the PZT; (a) Pulse Excitation, (b) Response of sensors 2, 3
62
and 4 for a pulse excitation to PZT-1
Figure 5.6 Actuation through the joint; (a) Response of sensors 2 and 4 for an
excitation with PZT 3; (b) Response of sensors 2, 3 and 4 for a pulse excitation from
63
PZT-5
Figure 5.7 Setup of MTS machine and LabVIEW data acquisition system to test the
64
riveted aluminum plate
Figure 5.8 Response of SNS for an AE lead break located near sensor 4, (a) Crack
65
Information, and (b) Time waveform of AE
xi
Figure 5.9 Response of SNS for an AE lead break located near sensor 2, a) Crack
Information b) Time waveform of AE
65
Figure 5.10 Geometry of a narrow aluminum plate with supports
66
Figure 5.11 Crack generated due to loading the aluminum plate on the MTS machine
67
(the plate is straight and finally fractured without bending)
Figure 5.12 Response of SNS analog processor; (a) Crack Location Information, and
(b) Time domain waveform
68
Figure 6.1Fiber glass plate size with three bonded Active fiber composite sensors
69
Figure 6.2 Simply supported beam
70
Figure 6.3 Response of sensor-1, 2, 3 for low frequency tap at sensor-1
71
Figure 6.4 Response of sensor-1, 2,3 for low frequency tap at sensor-2
71
Figure 6.5 Response of sensor-1, 2,3 for low frequency tap at sensor-3
72
Figure 6.6.Lead break location on the beam plate
73
Figure 6.7 Lead break response for sensor-1
74
Figure 6.8 Lead break response for sensor-2
74
xii
75
Figure 6.9 Lead break response for sensor-3
Figure 6.10 Lead break response for sensor-2 (a) and frequency response for sensor-2
(b)
75
Figure 6.11 Response for Sensors in Series, lead break location near sensor-1
76
Figure 6.12 Response for Sensors in Series, lead break location near sensor-2
77
Figure 6.13 Response for Sensors in Series, lead break location near sensor-3
77
Figure 6.14 Response for Sensors in parallel, lead break location near sensor-1
78
Figure 6.15 Response for Sensors in parallel, lead break location near sensor-2
79
Figure 6.16 Response for Sensors in parallel, lead break location near sensor-3
79
Figure 6.17 Response of Sensors-1and 3 for actuation at AFC-2
81
Figure 6.18 Response of Sensors-1and-3 for actuating sensor-2
81
Figure 6.19 Experimental setup for power harvesting of sensors bonded on the beam
82
Figure 6.20 Response from sensor-2 under sinusoidal MTS loading
83
Figure 6.21 A composite beam under loading
84
xiii
List of tables
Table 1.1 Behavior of various Active Materials
Table 2.1 Comparison of one-dimensional properties of PZT ceramics [4-6]
Table 2.2 Typical Properties of the conductive epoxy H20E (Epoxy Technology, Inc.)
Table 3.1 Manufacturing Tolerance for the AFC preform
Table 3.2 Steps in PZT poling
Table 3.3 AFC sensor dimensions
Table 4.1 Comparison of various software design environment
Table 4.2 Sub VI in shm.vi
Table 4.3 Number of channels
Table 5.1 Pre-Assigned Voltages for Different Neurons.
Table 6.1 Values used in equation 6.9.
Table 6.2 Comparison of Results
xiv
Chapter 1 Introduction
In the current economic climate it is desirable that the life of a given structure like an
aircraft or bridge be as long as possible. These structures must remain in operation for
longer periods of time. However this expectation or rather the economic need has driven
the field of structural health monitoring. Structural Health Monitoring (SHM) involves
implementing damage detection and monitoring strategies to extend the life of
engineering infrastructure. Structural health monitoring helps in making decisions
regarding the use, maintenance and retirement of structures under monitoring.
1.1 Structural Health Monitoring
SHM can be considered as the identification of signals which are caused or modified
by damage in a structure. SHM can be broadly divided into two types; namely active
structural health monitoring and passive structural health monitoring, which are discussed
below.
1.1.1 Active structural health monitoring
Active SHM requires the use of both sensors and actuators. Thereby, the location and
magnitude of the damage are determined due to wave propagation processes. These
methods need external power for health monitoring [1].
1.1.2 Passive structural health monitoring
Passive SHM techniques don’t use external power for structural health monitoring.
This method is termed passive because the operator waits for an internal dislocation in
response to a change in loading, and solves for the damage source kinematics. They use
1
properties such as change in resistance, change in strain, or sensing Acoustic Emissions
(AE). Various passive techniques are available for SHM like fiber optic strain
measurement, etc. [2]. The AE technique is a fast, accurate cost effective method [3] that
is applied for monitoring the health of the structure. This is possible because
discontinuities in a structure will produce detectable AE before structural failure occurs.
The AE technique is considered in this thesis. The AE are transient elastic waves that are
primarily generated by microcrack growth. Hence the analysis of AE produced during
mechanical tests is a non-destructive technique for the study of the health of structures.
Sensors are a critical component in a SHM system. They play the part of the ears
and eyes of the system. This thesis deals not only with developing a monitoring system
but also focuses on active materials for building sensors for monitoring of structures.
Active fibers composites (AFC) were first manufactured in 1999 at MIT [1] and mainly
focused primarily on the actuation properties of the AFC. The idea of a composite
material consisting of an active piezoceramic fibrous phase embedded in a polymeric
matrix phase has many advantages.
Typically, crystalline materials have much higher strengths in the fiber form,
where the decrease in volume fraction of flaws leads to an increase in specific strength.
Also, in addition to protecting the fibers, the flexible nature of the polymer matrix allows
the material to more easily conform to curved surface found in realistic industrial
applications. Moreover, active fiber composites offer many distinct advantages with
respect to their monolithic counterparts. The multiphase construction yields a more robust
actuator that is capable of being added to a lay-up as “active layers” along with
conventional fiber-reinforced laminae. While complex arrangements of piezoelectric
2
blocks are required to sense the bending and twisting of a structure, the fiber-reinforced
composite nature of active fiber composites yields in-plane sensing or anisotropy,
allowing a single patch the ability to sense both bending moments and twisting torques.
Also the AFC have a large bandwidth ranging from 1 Hz into MHz. All these
characteristics of the AFC make them well suited for realistic monitoring applications.
These AFC form the artificial nerve’s of the Structural Neural System (SNS). These are
tested in the Smart Structures and BioNanotechnology laboratory [4] and the results are
discussed in results chapter-7 of the thesis. Research on the use of a SNS is reported in
papers published by Schulz et. al [8-11]. This initial research showed that the SNS allows
efficient use of data acquisition instrumentation for structural health monitoring. The
Sensor/Neuron measures dynamic strains and these signals are interpreted to indicate if
the structure is operating within the limits of the design specifications. The SNS is a
biomimetic concept, which is analogous to that of the human neural system. The small
size sensors coupled with large coverage will provide the simplicity and sensitivity
needed for real time structural health monitoring. The goal of this research is to develop a
passive SNS based on the architecture of the biological neural system using smart sensors
and electronic components to detect AE due to propagating damage. The SNS reduces the
number of data acquisition channels and simultaneously improves the sensitivity of
damage detection. This thesis specifically deals with development and testing of a
prototype two neuron SNS [6]. It carries further the work done previously in Smart
Structures and Biotechnology laboratory [4]. The experimentation was conducted on an
Aluminum beam and a glass fiber composite plate. The results of the testing are
discussed in the thesis which show that the automated SNS developed in the lab was
3
sensitive to low frequency dynamic strains caused by structural vibrations and impact and
high frequency AE that accompanies damage growth [52]
1.2 Piezoceramic Material
Piezoceramics are a type of active material which functions as an energy conversion
device, transforming an energy input of one form into an energy output of another form.
In this sense, a variety of materials qualify as active materials other than piezoceramics,
including shape-memory alloys, electroactive polymers, and magnetorheological fluids.
Each of these materials accepts one type of input field and outputs a field of another form.
Table 1.1 shows the behavior of each of these active materials.
Material
Input Field
Output Field
Piezoceramic
Voltage
Displacement
Shape Memory Alloys
Temperature
Displacement
Electroactive Polymers
Voltage
Displacement
Magnetorheological fluids
Magnetic Field
Viscosity
Table 1.1 Behavior of various Active Materials.
Over the past 20 years a great amount of research has been done in the field of smart
materials especially in the field of piezoceramics. When a voltage stresses a piezoceramic
element electrically, its dimensions change. Figure 1.1 shows a monolithic piezoceramic
patch. When a force stresses the monolithic PZT mechanically, it generates an electric
charge. If the electrodes are not short-circuited, a voltage associated with the charge
appears. A piezoceramic is therefore capable of acting as either a sensing or transmitting
element, or both. Since piezoceramic elements are capable of generating very high
4
voltages, they are compatible with today's generation of solid-state devices - rugged,
compact, reliable, and efficient. Pierre and Jacques Curie discovered piezoelectric
materials in the form of quartz, tourmaline and Rochelle salts in 1880 as a result of their
investigations of pyroelectricity [12]. Polycrystalline, metallic compounds, piezoceramics
exhibit extremely strong electromechanical coupling and mechanical properties similar to
other ceramic materials. A flurry of improved piezoceramics exhibiting stronger
piezoelectric effects were developed over the course of the next two decades, yielding the
most common modern piezoceramics like Lead Zirconate Titanate (PZT) and Lead
Metaniobate (PMN).
Figure 1.1 Monolithic PZT patch [9]
1.3 Interdigitated Electrode Monolithic Ceramics
The interdigitated electrode concept was introduced to enhance performance of
monolithic ceramic actuators [14] which is shown in Figure 1.2.
5
Figure 1.2 Interdigital Electrode Monolithic Ceramic [15]
The electrode fingers of alternating polarity are arranged on the top surface and a
mirror image is on the bottom surface. The electric field is thus aligned in the plane of the
ceramic. The advantage of this technique was the use of the higher primary piezoelectric
effect (d33) and anisotropic actuation and sensing. Even though the use of a higher
electromechanical coefficient (d33) gave some advantage over the monolithic PZT the
problems associated with catastrophic cracking of monolithic ceramics still remained.
Micro cracks initiated near the electrodes leading to crack propagation and failure of
actuator/sensor under stress. This initiated a number of new electroding schemes like
floating electrodes but there has not been a permanent solution to the problem.
1.4 Piezoelectric Active fiber composite
Piezoelectric fiber composite actuators were originally developed as a means of
overcoming many of the practical difficulties associated with using monolithic
piezoceramic actuators in structural control applications [6]. Chief among these
difficulties were brittleness of piezoceramic materials, poor conformability, particularly
when applied to non-planar structures, nondirectional nature of strain actuation, and
6
overall low strain energy density. In these the piezoceramic fibers were unidirectionally
aligned to maximize the volume fraction and anisotropic actuation. Uniform electrodes
were applied through vapor deposition above and below the ceramics. The poling
direction was through the thickness and actuation was due to the transverse piezoelectric
effect. There were certain benefits from the standpoint of actuation such as strength and
conformability, performance and large-scale actuation. At the same time there were
problems associated with the dielectric mismatch between the fiber and matrix material,
which limited the actuation energy density. There was no investigation of the use of these
materials from a sensor perspective. For sensor applications, the bulk PZT material was
used. One of the disadvantages of the active fiber composite was the high cost fabrication
process.
Figure 1.3 Piezoelectric Active Fiber Composites [9]
1.5 The Macro fiber composite
The NASA Langley Research Center Macro-Fiber Composite (MFC) actuator [16]
was developed to alleviate many of the manufacturing and performance disadvantages
7
associated with early piezocomposites [6]. The MFC (see Figure 1.3) retains the most
advantageous feature of the early piezocomposite actuators, namely, high strain.
Figure 1.4 Components of Macro Fiber Composites [K. Wilikie, 14]
The MFC used low cost piezoceramic wafers, which are machined using a computer
controlled saw. The piezo sheets are easy to handle and are precisely aligned in the
epoxy matrix within the actuator package. Just as was the case for Active Fiber
Composites, MFC’s use an interdigitated electrode pattern to deliver an electric field
along the length of the fibers and rely on solid bonding between the matrix and fibers to
properly transfer actuation loads. There was no work on the MFC materials from the
sensor perspective.
1.6 Continuous Sensors
AFC nodes can be connected in a series arrangement to form a continuous sensor or
Active Fiber Sensor (AFS) [17-20]. This resulted in a reduction in the number of data
acquisition channels for AE monitoring and a larger structural area could be monitored
using continuous sensors. In addition to this, the probability of the sensor being close to
8
the damage increases resulting in better diagnostic characteristics. This is essential for
composite structures where waves generated by acoustic emissions attenuate rapidly.
With the continuous sensor arrangement, a large number of sensors can be connected in a
series arrangement requiring only one channel of data acquisition. Any damage event
producing an AE signal near any node on a row of the sensor will generate a response. If
this arrangement is used to form a grid of sensors, responses from rows and columns can
be used to locate the cell within which the damage event has occurred.
1.7 Objective of the Research
The Objective of this research is to understand the characteristics of an active fiber
composite and its use in structural health monitoring for sensing applications.This thesis
focuses on the relationship between sensing systems and their ability to detect changes in
a structure’s behavior. The recent development in active fiber composites has been a
driving factor in developing a unique approach using the AE technique. This thesis
explains conceptually the development of single fiber AFC sensors using PZT ribbons.
The modeling and constitutive relations of the AFC and continuous sensors are also
explained. The manufacturing of the AFC sensors in the Smart Structures and
Bionanotechnology lab [4] is given in detail in chapter 4 of the thesis. In this thesis a data
acquisition system is developed for processing of the acquired data using LabVIEW and
incorporating single fiber continuous sensors in the structural neural system (SNS). The
testing indicates that the SNS will be able to continuously monitor a structure and provide
a long-term history of the health of the structure. Initial testing with conventional
monolithic PZT is done to understand the PZT behavior and verify the feasibility of the
SNS system developed for structural health monitoring using AE techniques. Further an
9
effort is made to understand the behavior of the AFC for different excitations like low
frequency tapping, a lead break and sinusoidal actuation using the function generator. In
brief the thesis covers the following aspects
•
Tries to understand concepts of active fiber composite
•
Models and forms the constitutive relations of AFC
•
Gives in detail the manufacturing process for the AFC
•
Develops a data acquisition system using LabVIEW for acquiring and processing
the data
•
Characterizes the manufactured AFC
10
Chapter 2 Active Fiber Composites
This chapter discusses in brief piezoelectric active fiber composites, there design,
modeling and the steps that are necessary to manufacture them. This chapter deals with
the overall choices that where made in selecting different materials from manufacturing
point of view while keeping in mind the functional requirement of the sensor. Various
tradeoffs’s where investigated regarding the manufacturing and the performance of the
AFC sensor. The design had the following specific objective:
•
To explore the sensitivity issues and tradeoffs in the design process of an active
fiber sensor.
•
To determine a set of material combination which will satisfy the sensor
requirements
•
Illustrate a single design iteration through a decision making process
•
To develop a general approach for future design of active fiber sensors
AFC combine piezoceramic materials and additional inactive components in a
specific structure to form an overall actuator/sensor package with the advantageous
properties of both piezoceramics and other structural materials. The advantages are:
•
Greater flexibility in design, handling and application
•
Unidirectional sensing, mostly self-powered
•
More rugged than monolithic PZT
•
The electroding can be designed for the application
•
Fiber preforms can be cut to different shapes easily
•
A high bandwidth and high voltage coefficient for sensing acoustic waves
11
This chapter is divided into different sections that elaborate the design issues in the
process of development of active fiber sensors. In the end the current design procedure
that is being used is summarized.
2.1 Modeling Active Fiber Composite Sensors
Modeling of the AFC sensor is discussed briefly here. The linear constitutive
relationship is used to relate mechanical and electrical fields. The piezoelectric
constitutive equations are listed in the IEEE standard ANSI/IEEE Std. 176-1987. This
standard is used to derive the basis of the AFS electrical modeling.
When a PZT material is subjected to mechanical stress ‘T’ with units Newton per
⎛ N ⎞
meter squared ⎜ 2 ⎟ it produces an electric displacement ‘D’ with units of Coulomb per
⎝m ⎠
⎛ C ⎞
meters squared ⎜ 2 ⎟ which is a linear function of ‘T’ written as D = dT where d is the
⎝m ⎠
⎛N⎞
Piezoelectric coupling coefficient with units of Newton per Coulomb ⎜ ⎟ . When an
⎝C⎠
⎛V ⎞
electric field ‘E’ with units of Volts per meter ⎜ ⎟ is applied across PZT electrodes it
⎝m⎠
produces a strain or distortion ‘S’ which is given by S = dE . For an elastic material the
relationship of strain ‘S’ to stress ‘T’ is given by S = s ET where s E is the mechanical
compliance of the material at zero mechanical stress with units of meters squared per
⎛ m2 ⎞
Newton ⎜
⎟ . For a dielectric material, the electric displacement ‘D’ and electric field
N
⎝
⎠
‘E’ are related by D = ε E where ε is the dielectric permittivity measured at zero
12
⎛F⎞
mechanical stress with units of Farad per meter ⎜ ⎟ . For a piezoelectric ceramic these
⎝m⎠
relationships are given by the following equations [28].
S = S T +d E
i
ij j
mi m
where m, n = 1, 2, 3 and i, j, k =1, 2, 3, 4, 5 ,6. The piezoelectric
D = d T + εT E
n
nj j
nm m
constitutive equation in matrix form can be written as:
⎡ T
⎡ D ⎤ ⎢ε
⎢S ⎥ = ⎢
⎣ ⎦ ⎢d
⎣ t
⎤
d ⎥ ⎡E⎤
⎥⎢ ⎥
s E ⎥ ⎣T ⎦
⎦
(2.1)
Equation (2.1) is a coupled field equation that relates the applied electric field (E)3x1
in Kilovolts/meter, the electric displacement (D)3x1, the strain (S)6x1 and the stress (T)6x1.
Material properties such as the dielectric permittivity (εT)3x3,, the induced strain (d)3x6 ,
and the compliance (sE)6x6 are used to relate the mechanical and electrical fields. The
subscript ‘t’ indicates transpose and superscript ‘T’ indicates a constant stress condition.
In the continuous sensor arrangement the sensor can be modeled as a capacitor in parallel
with a current source [17-19]. Further simplification is possible in beam case if the
electric field is only applied in 3-direction and any actuation transverse to the AFC fiber
direction is neglected, then the one dimensional equation can be used assuming that the
PZT ribbon fibers exhibit linear bulk piezoceramic properties. If the sensor is bonded
perfectly to the structure, then the strain/displacement compatibility and stress/force
equilibrium principles can be applied. With an assumption that in vibration of a simply
supported beam strain occurs only in the 1 direction and the AFC is poled in 3 direction,
equations (2.1) reduces to:
13
S = sET + d E
1 11 1 13 3
(2.2)
D = d T + εT E
3
31 1 33 3
(2.3)
Rearranging the above equations and using the relation e = d / s E and d = d
31
31 11
13 31
gives:
D = e S +εS E
3 31 1 33 3
(2.4)
The current i = Q& = D& A
E = V / A where Q is the charge, Ae is the
3 e and 3
e
electrode area, and
S
ε 33
= C p he / Ae where
C
p
is the capacitance and h e is the
electrode spacing. This gives:
i = e A S& + C V&
31 e 1
p
(2.5)
and for open circuit case where i=0;
V = e A S / C +V
31 e 1 p 0
(2.6)
Here V is the voltage generated by the AFC sensor in the dynamic strain condition
and Vo is the initial voltage. These equations can be used to approximate the d 31
coefficient by having a single AFC sensor bonded on a beam when a known load and
loading cycle is applied to the beam. The response from the sensor can be measured using
an oscilloscope. This is the simplest way to evaluate the approximate properties of the
manufactured.
14
2.2 Design of Active Fiber Composites
The design adopted here is a result of initial design iteration using available resources.
Further experimental evaluations and availability of new materials will help adapt new
models and design improvements.
The following flowchart shows in brief the steps necessary for active fiber sensor
design which is discussed later on.
Figure 2.1 Flowchart of Active Fiber Sensor Design
2.3 Fiber Material
The properties of different PZT materials available are given in the Table 2.1. The
comparisons are based on the one-dimensional mode of operation. The PZT 5H has a
very high induced strain constant due to domain mobility and also has the highest
induced stress constant. This property makes the material very suitable for actuation
applications; the good actuation capability is also evident in the high coupling coefficient
that takes into account the dielectric constant. In general such hard ceramics are suitable
15
PZT 5A
PZT 5H
PZT 4S
PZT 8M
Dielectric K T
33
1770
3350
1500
800
Induced Strain d 31 (m/V)
171
292
123
-97
Induced Stress e33 (N/C)
15.8
23.2
14.6
17.3
Coupling Coefficient k 33
0.774
0.790
0.861
0.767
Young’s Modulus (GPa)
53
48
60
77
Depole Stress T33 (MPa)
72
44
>150
>150
Coercive Field (kV/m)
11.2
7.2
8
8.4
for actuation applications. For sensor application a softer ceramic with a similar
coupling coefficient is required for an efficient conversion of mechanical energy into
electrical energy. The results of actuation and sensing capabilities of the manufactured
AFC are discussed in chapter 6. The choice of material is also dependent on the ease of
polarization, handling and availability in the form of fibers. The fibers used in the
research were commercially produced by CeraNova Corporation [22]. This company has
been involved in manufacturing PZT fibers since 1992 and has produced all the ribbon
fibers used in this research.
Table 2.1 Comparison of one dimensional properties of PZT ceramics [15-16]
The fibers used are PZT 5A ribbons bought in approx. 6 inches length and approx
250-micrometer height and 750-micrometer width (i.e. 3:1 aspect ratio).
16
2.4 Fiber cross section
The piezoelectric ceramic fibers are available in different cross sections as shown in
Figure-2.2
Figure 2.2 Types of PZT fibers
Rectangular fibers have certain advantages over the circular ones. Fibers with a
rectangular cross section have a higher thickness fraction of piezo ceramic material for
the same thickness of the composite (diameter in circular fiber case). A higher thickness
fraction of ceramic material is desired for maximum sensitivity. Also rectangular fibers
show more efficient use of matrix material. The surface area coming in contact with
electrode is also higher in fibers with rectangular cross section. The choice of fiber cross
section also depends on application. If we normalize performance of fibers with their
mass for a given volume of composite the apparent advantage of rectangular fibers
reduces. In the current use for sensing the high frequency low amplitude AE, the sensors
should be small in size and more sensitive. These requirements make rectangular fibers
an obvious choice. The rectangular fibers are easier to handle so the decision was made to
use these fibers for development of sensors.
17
2.5 Composite thickness
Once the fiber cross-section is determined the next step is to determine the thickness
of the composite ply. The fibers used have a thickness of 250 micrometers so the overall
thickness of the composite ply was kept as close to that number as possible. To have
maximum wetting of fibers by epoxy and avoid any voids, a pressure-casting mold was
used to make the composite ply. Any increase in the thickness of the ply will require a
higher poling voltage. The process of manufacturing the sensor requires removing excess
epoxy from top and bottom of the fibers after the poling. After removal of excess epoxy
another layer of conductive epoxy is applied which acts as an electrode as well as a bond
with the structure. Since the electrodes are directly in contact with the AFC matrix, the
sensitivity is improved.
2.6 Matrix Material
The matrix material surrounds the fibers and provides the structural integrity for the
sensor. In order to do that the matrix material should form a good bond with the PZT
ribbon fibers. In the longitudinal direction the strength of the active fiber composite is
determined primarily by the strength of fibers but in the transverse direction it is
determined by the bond between the fiber and epoxy and by the strength of epoxy itself.
The performance requirement for the matrix material apart from the strength is to have a
high dielectric breakdown so that it can survive high poling voltages. Also the matrix
material should not have high porosity which might cause arcing between the electrodes
during poling or cause percolation of conductive epoxy at the stage of electroding.
During the initial design iterations silver conductive paint was used to paint electrodes on
18
the sensor due to ease of use. It was observed in many sensors that the paint percolated
through the epoxy matrix material and caused electric short circuit between the electrodes.
The stiffness of the matrix material is expected to affect the unidirectional sensing
characteristics of sensors. Based on the on the earlier experimental work done in Smart
Structures and BioNanotechnology lab [4] a selection of EPON Resin 862 epoxy was
made for the matrix material [17].
2.7 Electroding
In active fiber sensors electrodes are needed to collect the charge generated by the
piezo ceramic fibers and to provide connection for completing the electric circuit.
Electrodes are also needed to create the strong electric field required for alignment of
electric dipoles during the poling process. The two requirements are different from each
other by way of voltages involved and the requirements of sensing itself. The Poling
process is done prior to the use of the active fiber composite as a sensor. Poling through
the thickness can be achieved by simply placing an electrode on top and bottom of the
composite and applying a high voltage using an amplifier. Due to the high resistance of
the matrix material the current drawn will be negligible. An unique approach was used to
apply a temporary electrode made of strips of copper for poling and then replace the
electrodes with the final electrodes. It was observed in the initial design iteration that if
copper strips are kept in the final assembly the strain transfer from the structure to the
piezo fibers reduces considerably during sensing. This result in a very low response from
the sensor and the waves generated by small acoustic emissions are not detected. The
problem was solved by using conducting silver epoxy H20E as the final electrode. The
advantage in this approach is that the epoxy forms a good bond with the active fiber
19
composite and at the same time it can be used to bond the whole sensor to the structure if
needed. This eliminates a few layers of material like a metallic electrode, insulating film
and an additional layer of glue that should be used in conventional sensors. This provides
the maximum sensitivity of the active fiber sensors. The properties of conductive epoxy
H20E are given in Table 2.2 (courtesy Epoxy Technology, INC.) which is given in detail
in Appendix E.
Parameter
Typical Value
Number of Components
Two
Mixing Ratio
Part A : Part B :: 1:1 by weight
Cure Schedule
800C 90 minutes
Viscosity
2200-3200 cPs
Glass Transition Temperature
> 800C
Lap Shear Strength
1500 psi
Die Shear Strength
> 10Kg / 3400 psi
Degradation Temperature
4100C
Thermal Conductivity
29 W / m0K
Volume Resistivity
< 0.0004 ohm-cm
Pot Life
4 days
Shelf Life
One Year
Table-2.2 Typical Properties of the conductive epoxy H20E (courtesy Epoxy Technology,
Inc.)
20
2.8 Summary
This chapter discussed a number of issues in the design of active fiber composites
using different constituent materials. The design studies demonstrated the tradeoffs with
material selection, which often involves conflicting choices for the optimal solution.
Such a conflict exists with fiber material selection, where hard ceramics seem best suited
for low field response and high stress designs, but soft ceramics are the material of choice
for high field actuation. The chapters-2 and 6 involve manufacturing and testing of the
active fiber sensors.
21
Chapter 3 Manufacturing of Active fiber Sensors
The next logical step after the design of the AFC sensor is the development of the
manufacturing technique. During this step the practical limitations in the theoretical
design along with the material limitations were understood resulting in various iterations
before finalizing a general manufacturing approach.
For example, finding a gasket
material which will give the right thickness of the composite. Also as the gasket gets
compressed in the mold, the reduction in thickness was needed to be accounted for before
choosing the gasket material. One of the other factors was the fiber geometry which did
set the maximum compaction and maximum composite size. In developing the techniques
for manufacturing, it is also possible to come across innovations that could improve the
design.
The initial iteration was based on the previous work that was carried out in the Smart
Structures and BioNanotechnology Lab [17,4]. The initial iteration which lacked
geometrical uniformity and repeatability in composite properties was improved. Much of
the difficulty was related to the alignment of the fibers and the excessive composite
thickness necessitating sanding of the composite prior to electroding, causing difficulty in
these areas. However, this initial work had identified many of the issues with
manufacturing methods, and laid the groundwork for the methods presented in this
chapter. Previous work carried out in the Smart structures and BioNanotechnology lab [4]
consisted of six ribbon fiber of shorter length. This chapter describes new manufacturing
techniques that accommodate the change in geometry and the single neuron sensor. The
chapter describes in detail the steps that are taken for successfully manufacturing the
AFC sensor.
22
The following are the key parameters, which had to be controlled while manufacturing of
the Active fiber sensor.
Voids
Voids are the cavities or the surface holes found on the surface or inside the composite
casting where air or vacuum is trapped in the matrix. Figure 3.1 shows the void formation
during the casting of the AFC sensor. Castings with a significant number of voids must
be discarded, resulting in wasted product, time and labor. Voids create a concentration of
electric field in this area. Therefore it is necessary and important to understand the causes
of voids and what can be done to minimize them. This is the first step to a more efficient
and productive in casting operation.
Figure 3.1 Void formation in AFC preform
Voids are attributed to following factors:
•
Release agent
•
Air
The following information has been compiled through the preliminary manufacturing of
composites. Some of the techniques found here are the results of many years of research
and development. To minimize voids a careful preparation of the epoxy and application
of release agent is necessary which is explained in the following sections.
23
Alignment
Alignment of the PZT fiber is very necessary before injection of the epoxy in the mold.
Two AFC preforms can be cast at the same time. Therefore it is necessary that the fibers
of each preform maintain their position during the period of injection of epoxy and curing.
Any misalignment may result in touching of the PZT fibers thus weakening the sensor.
To achieve proper alignment, a double stick tape is used which is explained in later
sections.
Compaction
Compaction plays a very important role in deciding the thickness of the AFC sensor.
Increase in the thickness of the AFC preform results in higher poling voltage. Ideally the
thickness of the preform should be equal to the thickness of the PZT fiber (0.25 mm)
however the thickness of the AFC preform is determined by the thickness of the Gasket
used. Different materials of gasket where tried like polycarbonates, Teflon, paper etc.
Within the available materials the paper gasket gave the minimum thickness (0.30 mm)
which was used for casting of the AFC sensors.
3.1 Mold
The PZT ribbons need to be placed in an epoxy medium in order to remain at equal
spacing and provide strength to the preform. The mold that is used for the casting of the
AFC had the following requirements:
•
Accommodate the long AFC neuron
•
Develop compressive pressure on the gasket
•
Withstand temperatures up to 6000F
•
Be easy to clean
24
Using these basic guidelines a pressure mold was manufactured in the UC machine
shop. The various parts of the mold are shown in Figure 3.1 and are described below
along with their functions.
Figure 3.2 AFC casting Mold
Mold Design, Part A/Part B
Part A and Part B are manufactured from Aluminum 7051 bar stock. The overall
dimension of each part is 7” X 3.5” X 0.75”. Part A has four threaded holes on it. One for
injecting the epoxy and three for venting which are plugged after the injection of epoxy is
over. There are in all a total of 18 bolt holes on Part A and Part B which are used to hold
them together and develop compressive pressure on the gasket.
Gasket
The gasket used is an automotive paper gasket which is used in car engines. The
gasket is cut out using a razor blade for each casting. The cut area is dog bone shaped in
which the single fiber neuron is aligned. The size of the cut area is such that it
25
accommodates two neurons at a time thus enabling the casting of two neurons in a single
batch.
Injection Assembly
The injection assembly shown in Figure-3.3 consists of:
•
Injection cylinder
•
Nipple
•
Collar
•
Piston rod
•
Piston
•
O-rings
Figure 3.3 Injector Assembly
The whole injection assembly is made from standard parts except for the piston,
which is custom manufactured. The length of the cylinder is based upon the volume of
epoxy that needs to be injected in the mold.
26
Bolt/Plugs
There are total of 18 bolts, which are used to assemble the mold and develop
compressive pressure on the gasket thus reducing the thickness of the sensor. Plugs are
used to plug the venting holes in Part A.
3.2 Manufacturing process
The manufacturing of AFC can be divided into
•
Casting
•
Poling
•
Electroding
3.2.1 Casting
Casting is the most important step of all. Casting is described in detail below.
Cleaning the mold and injector
The mold and the injector are cleaned using cleaner 19 SAM manufactured by AXEL
industries to remove any dirt or deposits from previous casting. They are then cleaned
using acetone and are blow-dried using compressedm air.
Treating the PZT fibers
The PZT fibers are the sensing element in the AFC. These ribbons are PZT 5A fibers
with an aspect ratio of 3:1. Since they are brittle, they can easily be cut with a razor blade
to the appropriate length for use in the molding process. The piezoceramic ribbon fibers
shown in Figure 3.4 are 165.1mm long so they are cut into 100mm long pieces using a
sharp razor blade. The fibers are cleaned by immersing them in an acetone bath for
27
15mins and then they are blow-dried using pressurized air. Finally they are heated for 15
minutes at 200º F.
Figure 3.4 PZT fiber size 165.1mm × 0.75mm × 0.25mm [23]
Applying release agent
Three coats of release agent are applied. After application of every coat it is allowed
to dry for 15minutes. Applying release agent is a very important step in casting of the
AFC. Release agents act as a "lubricant" between the mold and the epoxy itself. The
proper application of a release agent will yield castings without surface voids. However,
when a release agent is over applied, it may "pool" or "puddle" on the mold. As the epoxy
is injected into the mold these pools prevent the epoxy from filling in all the detail. When
the casting is removed from the mold surface voids will be apparent in the areas where
pooling occurred. Voids caused by too much release agent are recognizable as small
spherical voids on the surface of the finished casting.
Aligning the fibers
Misalignment results in bidirectional sensing of the AFC sensor. Therefore it is
necessary to properly align the fibers. The fibers are dipped in the epoxy and are
manually aligned on the Part A of mold. The mold is then heated at 200 F for 10 minutes
till the epoxy gets tacky. This prevents the fiber from moving during the injection process
28
thus maintaining the alignment. Using a double stick tape is another way to align the
fibers.
Preheating the Mold and injection assembly
The Part A and Part B are assembled along with the gasket using the bolts. The mold
along with the injection assembly is preheated to 100F, which is necessary for
maintaining low viscosity of the epoxy while casting.
Preparing the epoxy
During casting the epoxy matrix surrounds the ribbon fibers. Approximately 24.2
grams of EPON Resin 862 epoxy is taken in a beaker. It is then heated in a vacuum oven
for 10 minutes at 100°F under vacuum. This helps in degassing and decreasing the
viscosity of the epoxy. This procedure usually takes about 15 minutes and is a critical
step in casting. If this step is eliminated then the preform becomes porous because of the
tiny air bubbles trapped inside the epoxy matrix
Injection of epoxy
To inject and monitor the flow of epoxy four holes were made on the surface of the
top-mold. One of these would be used to inject the epoxy and the other three are
monitored and closed in consecutive order based on the location of these holes. The
epoxy filled injector is then assembled to the mold. The threaded piston rod is then turned
to inject the epoxy in the mold. As the epoxy reaches the hole it starts flowing out
through it. Plugs are used to plug these holes. This method serves as a tool to monitor the
distributed flow of epoxy through out the mould. Once all the holes are plugged, the
injector’s screw should be turned 13 full turns in order to create a pressure of
approximately 350 PSI.
29
3.2.2 Curing
The assembly (Mold + injector) is heated in a Fisher scientific vacuum oven at 180º F
show in Figure 3.5 for approximate 120 minutes. At the end of the process the mold is
allowed to cool down to room temperature
Figure 3.5 Curing for the AFC Sensor
After cooling, the thin wafer of preform can be removed from the mold by cutting off the
ends just inside the injection holes using a razor blade. Each preform can be used to
produce sensor with length varying from 1”- 4”.
3.2.3 Electroding
Electrodes are necessary as they serve following purpose:
•
Helps in poling to perform
•
Forms electrical lead from the sensor
30
In order to save costs, a successful method was developed to place the electrodes on
the small 4” long AFC sensor using conventional tooling. The Table 3.1 shows the
mechanical tolerances of the AFC preform that were manufactured.
Dimension
Units
Tolerances
Length
75mm-80 mm
+/- 2 mm
Thickness
0.30 mm to 0.32mm
+/- 0.02 mm
Weight
0.36 gm
+/- 0.05 gm
Table 3.1 Manufacturing Tolerances for an AFC preform
Two possibilities were tried for electroding:
•
Structure Integrated electroding
•
Stand-alone electroding
In either case silver conductive epoxy is used (Appendix E) to form the electrical
contact. A copper strip or electrical wires are integrated in the silver conductive epoxy
during curing to form the electrical leads from the sensor. Depending on the application
these sensors can be made stand alone sensors or sensors which can be integrated in the
structure itself. The later being more convenient and practical as far as the installation
part goes. Both types are discussed here in brief however the stand alone electroding is
used for general purposes.
Structure integrated electroding
The sensor is bonded with the help of silver conductive epoxy which forms the
electrical leads for poling and acquiring the response of the sensor after its mounted on
the structure as shown in Figure 3.6. The processes of curing, bonding and poling etc are
carried out on the structure itself, a Kapton® sheet is not used. Even though this helps in
31
better strain transformation from the structure to the sensors due to practical reason it
may not be feasible for large structures or on metallic structures.
Figure 3.6 Structure Integrated electroding
Stand-alone electroding
The sensors are bonded on a Kapton® sheet away from the structure as shown in
Figure 3.7. The process of poling and curing is done in laboratory environment. The
sensor (encapsulated in Kapton®) is bonded according the procedure explained in Section
3.3.4.
Figure 3.7 Stand-alone Electroding
32
3.2.4 Field Installation Procedure
Sensors installation is an important step in structural health monitoring that may have
significant impact on the nature of data that is collected. The development of an
installation method which was not only reliable but also repeatable was necessary and
also which would reproduce the same results. For this a literature survey was done and
from the published data an initial approach was formulated. The way in which the sensors
are installed depends on the type of structure. It is known that the PZT sensors can
produce voltage as high as 1000 V. For this reason it is very important that the PZT
sensors must be isolated from the metallic surface. The operating temperature range of
Epon 862 limits the temperature range in which the Active fiber composite sensors
operate, which is from –60°F to +200° F. Also the active fiber composite sensors must be
capable of being installed in the field on surfaces where access is difficult and the time
available for installation is limited. Imbedding active fiber composite sensors in the
structural component is possible, but the structural integrity of the smart material (active
fiber sensor) is difficult to verify over the component’s life.
Commercially available monolithic PZT patches have a polyamide coating and wire
connector to make installation easier. However the Active fiber composite sensor built
doesn’t have a polyamide coating nor wire connectors. These need to be built into the
sensor while bonding (for composites) or before bonding (for metallic). With keeping all
these factors in mind a field installation procedure was developed which is shown in
Figure 3.8
33
Figure 3.8 Sensor field installation procedure
Key steps for quality bonding
Surface Preparation
All foreign materials, such as dirt, grease, cutting coolants and lubricants, water or
moisture, and weak surface scale (e.g., oxides, sulfides), must be removed. Thorough
cleaning with various physical or chemical processes removes these contaminants and
conditions the surface for bonding. The process of cleaning the surface usually involves
several of the following steps:
•
Solvent Cleaning
•
Mechanical Cleaning
34
Solvent Cleaning
Clean the application area of the AFC sensor element with cotton tipped applicators
dipped into a solvent, e.g., Acetone (do not use cotton buds with plastic grip). Renew the
cotton tips frequently until the application surface is completely clean (cotton tips remain
clean). If possible, the surface area cleaned should extend beyond the space required for
the Active fiber sensor. The same procedure needs to be followed for the Active Fiber
Composite sensor.
Mechanical Cleaning
Surface abrasion (with abrasive paper) is a common procedure in preparing metals or
composites for strain gage bonding. The same procedure is used for AFC sensors.
Surface abrasion can be used on plastics and composites, but should always be preceded
by degreasing to prevent embedment of contaminants in the surface. For some highperformance composites, however, abrasion may not be permitted because of the risk of
damage to near-surface fibers. Moreover, abrasion is not always adequate with certain
types of plastics (e.g., fluorocarbons, polyolefin’s) for achieving optimum bond strength.
Sensor layout Lines
If required, the position of AFC sensor to be bonded can be marked by a brass needle
or a hard 4H-pencil for exact pin pointing of the location.
Adhesive
To have quality bonding of AFC sensors, utmost cleanness is essential. Therefore the
bonding is preferably to be made on a dust-free workbench with filtered air supply. For
relatively short-term applications in a benign environment, cyanoacrylate (super glue)
adhesive (where compatible with the plastic) is often a convenient choice because of the
35
simple, quick curing procedure. Epoxy adhesives that cure at room temperature or
somewhat above the room temperature are eminently suitable for bonding AFC to most
types of plastics and composites. These adhesives are available in a wide range of
formulations with different characteristics and properties time/temperature/clamping
pressure for curing, elongation capability, expected glue line thickness, etc. should be
selected accordingly. When necessary for elevated-temperature testing, epoxies which
cure or post-cure at higher temperatures can be employed; assuming, of course, that such
temperatures are suitable for the plastic or composite.
Pressure
During setting of the adhesive, the AFC sensors have to be clamped with a constant
pressure. Spring clamps or C clamps can be used as a universal clamping tool. For
economic production and best results of bonding, a specific "tailor-made" clamping tool
would be recommended for use to create the pressure. The sensor is covered with a
Teflon sheet and a backup plate is placed on top with which helps to apply uniform
pressure over the entire AFC sensor
Post Cleaning
After bonding the sensor edges are cleaned of any spills of the super glue. The sensor
is checked for the resistance. If the circuit is open then the installation procedure is
successful if not then the sensor is closely inspected for location where there is a
possibility of short-circuiting of the electrodes.
36
3.2.5 Poling
Theory
The poling of piezoelectric ceramic fiber in the AFC preform after casting is an
important stage in the manufacturing of active fiber composites. Poling is necessary for
the activation of piezoelectric properties of the PZT fiber embedded in the epoxy, which
is done via the use of an electric field. Figure 3.9 shows the Weiss domains before and
after poling.
Figure 3.9 Weiss domains; (a) Before poling; (b) During Poling; (c) After Poling
A PZT material consists of electric dipoles which are because of charge separation
between the positive and negative ions. Groups of dipoles with parallel orientation are
called Weiss domains which can be seen in Figure 3.9. The Weiss domains are randomly
oriented in the raw PZT material, before the poling treatment has been finished as seen in
Figure 3.9 (a). With the field applied, the material expands along the axis of the field and
37
contracts perpendicular to that axis as seen in Figure 3.9(b). The electric dipoles align and
roughly stay in alignment upon cooling as shown in 3.9(c). The material now has a
remnant. When force is applied to a poled piezoelectric material, the Weiss domains
migrate proportional to the applied force. The result is a generation of the charge. The
various factors that play important role in poling are:
•
Poling Temperature
•
Electric field
Poling Temperature
The application of a DC voltage at a temperature T < Tc where Tc is the Curie
temperature, is limited by ohmic heating due to electronic conductivity, physical
breakdown at defects in the ceramic, or by the requirement to allow the migration of
space charge within the PZT material. The ideal poling temperature is the curie
temperature of the PZT (500° F) however because of limitations on the epoxy matrix; the
temperature can’t be raised above 180° F.
Electric Field
When an electric field (DC voltage) is applied to a poled piezoelectric material, the
Weiss domains increase their alignment proportional to the voltage. The magnitude
electric field depends on the temperature at which poling is done. The higher the
temperature the lower is the magnitude of the electric field required. An initial poling
trial was completed by varying the temperature and the applied field, and then after
measuring the response for a lead break the magnitude was finalized. An electric field of
4000V/mm is applied for poling of the AFC sensor.
38
Poling Procedure
This is the final step in AFC sensor manufacturing. As this involves application of
high voltages utmost care must be taken while performing it. The setup consists of a high
voltage DC power supply (Glassman High voltage Inc.), a General Electric Countertop
Oven and a poling fixture made in house shown in Figure 3.10.
Figure 3.10 Poling setup (a)Poling fixture (b) Entire Poling Setup
The AFC preform is clamped in the fixture. The temperature is set to 180°F on the
oven and is closely monitored using a thermocouple. All the connection are made as
shown in Figure 3.10
Figure 3.11 Poling Wiring Diagram
39
Table 3.2 shows the steps in poling along with the time required for each step.
Step No.
Step Detail
1
Clamp the AFC waveform in fixture
2
Make electrical connections as shown in Figure 3.8
3
Start the oven and raise the temperature to 180° F. Soak it for 15 minutes
4
Apply an electric field of 4000V/mm for 10 minutes
5
Turn off the DC supply and take out the fixture from the oven and place it on
table
6
Turn on the power supply and apply the same electric field. Use fan for rapid
cooling of the fixture to room temperature.
7
Turn off the supply after 15 minutes and remove the electrical connection
8
Check the response of the senor
Table 3.2 Steps in Poling of AFC sensors
Figure 3.12 shows an AFC sensor manufactured in the Smart Structures and
BioNanotechnology lab [4]. Table 3.3 gives the physical dimension of the AFC sensor
Figure 3.12 Manufactured Active Fiber Composite Sensor
Table 3.3 AFC sensor dimensions
Parameter
Value
120.16
mm
Length
15mm
Breadth
0.30mm
Thickness
36mg
Weight
40
Chapter 4 The Data Acquisition System
The analog and continuous time signals measured by the sensor must be converted
into the form a computer can understand. This is what is referred to as data acquisition.
Traditionally, measurements are done on stand-alone instruments of various types of
instruments like oscilloscopes, multi meters, counters etc. However, the need to record
the measurements and process the collected data for visualization has become
increasingly important.
There are several ways in which the data can be exchanged between instruments and a
computer. Many instruments have a serial port, which can exchange data to and from a
computer or another instrument. Use of a GPIB interface board (General purpose
Instrumentation Bus) allows instruments to transfer data in a parallel format and gives
each instrument an identity among a network of instruments. Another way to measure
signals and transfer the data into a computer is by using a Data Acquisition (DAQ) board.
A typical commercial DAQ card contains analog to digital converter (ADC) and a digital
to analog converter (DAC) that allows input and output of analog and digital signals in
addition to digital input/output channels.
Figure 4.1 Data Acquisition System
The task associated with designing the data acquisition systems are:
41
•
Hardware design
•
Software Design
•
Testing and Debugging
4.1 Hardware Design
Data acquisition boards and software can be used in a variety of computers. The
Basic Analog-to-Digital (A/D) Conversion, Digital-to-Analog (D/A) Conversion and
Digital I/O Data acquisition boards help in measuring real-world information represented
by analog signals coming from sensors or transducers that convert temperature, pressure,
sound, or light into voltage. The electronic sampling of analog signals is called A/D
conversion or analog-to-digital conversion. A/D conversion changes real-world analog
voltages into digital codes for computer processing and storage. A complementary
process, D/A conversion (digital-to-analog conversion) changes digital data into analog
voltages. This permits a computer to drive chart recorders, audio amplifiers, process
actuators, and other devices requiring an analog driving voltage. Thus DAQ board is the
component that listens to the sensors. The choice of DAQ hardware is dependent on rious
factors including cost.
There are various aspects that are to be considered while choosing a DAQ board.
4.1.1 Signal Type
The type of signal that needs to be acquired namely voltage, current, thermocouple,
RTD, thermistor, Frequency voltage, strain gauge etc. The AFC sensor gives out a
voltage output. So the signal type was an analog voltage type.
42
4.1.2 Voltage range
The voltage range depends on the maximum voltage output given out by the SNS box,
which was 15V.
4.1.3
Resolution
Precision of the analog input signal converted into digital format is dependent upon
the number of bits the ADC uses. The resolution of the converted signal is a function of
the number of bits the ADC uses to represents the digital data. The higher the resolution,
the higher the number of divisions the voltage range is broken into, and therefore, the
smaller the detectable voltage changes. An 8-bit ADC gives 256 levels (2^8) compared to
a 12-bit ADC that has 4096 levels (2^12). Hence, 12-bit ADC will be able to detect
smaller increments of the input signals then an 8-bit ADC. The higher the better.
4.1.4
Number of Input channels
The SNS box gives out two channel of information, which will be expanded into 4
channels later on. So a DAQ board with 4 input channels was selected
4.1.5
Simultaneous sampling
Simultaneous Sample and Hold (SS&H) systems use a separate sample and hold
circuit on each input. When sampling begins, all circuits simultaneously switch to hold,
freezing each input signal until it can be sampled by the A/D converter. Multiplexing is to
use a single analogue-to-digital converter and switch each signal in turn to the converter.
This is a much cheaper solution. However it does not provide simultaneous sampling
across the inputs and as more inputs are added the maximum sampling rate is reduced per
43
input. For example, if a system can read 1 input channel 100 times a second, when
reading 10 input channels it is limited to 10 readings per second per channel. Hence a
simultaneous sampling DAQ board was selected
4.1.6
Sampling rate
The data is acquired by an ADC using a process called sampling. Sampling analog
signal involves taking a sample of the signal at discrete times. This rate at which the
signal is sampled is known as sampling frequency. The sampling frequency determines
the quality of the analog signal that is converted. Higher sampling frequency achieves
better conversion of the analog signals. The minimum sampling frequency required to
represent the signal should at least be twice the maximum frequency of the analog signal
under test (this is called the Nyquist rate). If the sampling frequency is equal or less then
twice the frequency of the input signal, a signal of lower frequency is generated from
such a process (Aliasing). The AE signal gives out a frequency of large bandwidth 0300KHz. So we need a DAQ board with a sampling rate of 2 × 300KHz = 600KHz per
channel.
Hardware Selection
Data acquisition cards that fit internal PC-computer slots provide cost-effective highspeed multi-channel analogue inputs. A National Instruments simultaneous sampling
PCI-6110E was used which have performed impeccably throughout. The 6110E has 4
single-ended analog inputs, suitable for measuring voltages in ranges ±0.05V to
±42V.The sampling rate is 1.25Ms/channel with a 12-bit resolution the specifications of
which are provided in Appendix D.
44
4.2 Software Design
DAQ hardware without software is of little use-and without proper controls the hardware
can be very difficult to program. The purpose of having appropriate software is the
following:
•
Acquire, Monitoring and simultaneously processing data in real time
•
Controlling the test
•
Generating reports in variety of graphical formats
•
Stream data to and from disk
•
Use various functions of a DAQ board from a single user interface
•
Real Time Display
•
True Multitasking Operation
4.2.1
Prior Work
There was no previous system in the Smart-Bio-nanotechnology laboratory [4] that was
tailor-made for the acquisition and analysis of the AE data. The previous research group
used custom programs written in Matlab® to run the collect data and analyzed it offline.
The user interface and hardware interface routines were all written or accessed using
Matlab®. No off-the-shelf system exists for these kinds of data acquisition systems, and
therefore most research groups develop their own custom software for controlling the lab
apparatus.
45
4.2.2
Limitations of Prior Solutions
The system that was previously used had difficulties regarding limitations of designing
highly specialized software for data acquisition using Matlab® or C/C++
•
They cannot be easily adapted to the requirements of the experiments
•
They are not very maintainable It becomes increasingly difficult to maintain and
update thousands of lines of program code written using Matlab® routines,
especially if the original programmer leaves the project.
•
It becomes more difficult to add new hardware to the system – One usually needs
to rewrite portions of the interface code that accesses the hardware.
•
Designing and controlling an experiment often requires a lot of technical savvy,
requiring the researcher to write and debug many lines of code, thus detracting.
4.2.3
Problem Statement
The experiment required a software system for conducting monitoring of the structure
under fatigue using either PZT patches or AFC sensors. This software system should
interface with the data acquisition hardware, provide post-experiment data analysis
capability, and be accessible to non-programmers who wish to setup the control flow for
the experiments.
4.2.4
Specifications
The specifications for this system can be divided into three broad categories:
1. Data Acquisition
2. Analysis
3. User Interface
46
Figure 4.2 shows these categories in the form of flowchart
Figure 4.2 Software Requirements
Data acquisition
Each time there is an acoustic emission two analog voltages must be sampled at a
minimum of 1MHz. The voltages must be time stamped according to the absolute time.
National Instruments data acquisition card available, the PCI-6110e whose specifications
include 4 single-ended analog inputs (Please see Appendix D for a data sheet).
Analysis
The data that is acquired must be analyzed in real time. An algorithm is developed which
performs the analysis of the acquired signal. Analysis involves:
•
Pin pointing which sensor is firing
•
Calculating the cumulative peak voltage
•
Calculating the cumulative AE hits per sensor
•
Calculating the frequency of AE emission
User Interface
•
Allow the user to pause or pause an experiment, or cancel it completely, or
remove it from further runs while the set of experiments are in progress
•
Log the AE data, (crack location and the time information), and also the time of
47
each acoustic emission
•
Allow real-time monitoring of the experiment’s status: Show a real-time display
of the two channel data against time along with frequency content.
•
Once the experiment is over prompt the user to move the logged data from the
work directory into the data directory.
Software’s under consideration
•
Microsoft’s Visual C++ environment
•
Matlab®
•
Nation Instruments LabVIEW
The advantages and disadvantages of which are listed in Table 4.1
Table 4.1 Comparison of Various Software Design Environments.
Comparison
Matlab
®
VC++
LabVIEW
Characteristic
Needs
Third
Party Interface
libraries Direct Support
Hardware Support
Drivers
provided
Slower
Speed
but
than
faster
VC++ Fastest
Slowest
than
LabVIEW
User Interface
Easy, Drag and Drop
Very Complicated
Easy, Drag and Drop
Modular
Possible, with little Possible, with little Easiest
Programming
tweaking
tweaking
Learning Curve
Slow
Slow
Fast
LabVIEW was selected as the DAQ software as it not could only do the
48
\aforementioned tasks in Section 4.2 but also provided flexibility of changing
requirements. In addition to this LabVIEW was easier to learn and the development time
was short.
In the Figure 4.3 a complete DAQ system with LabVIEW is shown. The driver
software is a lower level driver that interfaces LabVIEW software with the DAQ boards.
As a user of LabVIEW one does not have to worry about configuration and control of
components within DAQ boards. LabVIEW identifies each board by a device number
and therefore one can have as many devices as the computer can accept on their
expansion slots. LabVIEW can also combine and display inputs from various sources like
inputs from serial and parallel port, DAQ boards, and GPIB boards on a single interface
as shown in Figure 4.3.
Figure 4.3 LabVIEW Software and DAQ system [ref www.ni.com]
LabVIEW is programmed with set of icons that represents controls and functions,
available in the menu of the software. Such a programming is called visual programming
49
and National Instruments calls it G. The user interface, which is called a VI consists of
two parts- a front panel and a diagram. This is similar to that of an instrument where a
front panel is used for an input, output controls, and to display the data whereas the
circuit resides on the circuit board. Similarly you can bring the buttons, indicators and
graphing and display functions on the front panel as LabVIEW is used to perform system
simulations, since it contains many commonly used filter, digital signal processing, and
statistical functions. LabVIEW compiles almost as fast as C or Matlab®.
While developing the graphical interface the data acquisition and analysis was done in
real time along with the real time display. Before the actual programming the tasks were
simplified into a flowchart and then the coding was done. This reduced the development
time and also ensured that the seamless integration of all the requirements was done.
4.2.5
Development of the LabVIEW system
The following block diagram gives an analogous representation of how the Virtual
Instrument (VI) works. The LabVIEW Front panel consists of all the controls and the
indicators while the wiring diagram is in the block diagram (Appendix A). Before
implementing the algorithm the parameters that needed to be monitored along with the
required outputs where individually programmed. The Entire shm.vi is made up of
different SubVI which can be seen in Table 4.2
50
Table 4.2 Sub VI’s in shm.vi
Sr
Name of VI
Process description
No
1
input.vi
This SubVI includes two sections: one reads the data from a text
file that is stored. The second one provides friend user interface
for user to adjust the parameters like threshold voltage, peak
detection voltage
2
daq.vi
This SubVI does the actual interfacing with the PCI 6110e and
generates the waveform data from two channels for further
analysis
3
time.vi
This SubVI generates the time and frequency data necessary for
further analysis
4
peak.vi
The function of this SubVI is to calculate the no of AE hits on
each sensor and the cumulative voltage
5
output.vi
6
shm.vi
Used to plot the raw data , analyzed data and streaming to disk
This GUI incorporates all the above SubVI viz setup, acquisition
analysis and output
The data was in the form of two channels form the SNS box as shown in Table 4.3 and
Figure 4.4
Table 4.3 Number of Channels
Channel Number
Type of Information
Channel 0
Crack Location
Channel 1
Time information
51
Channel 1
Sensor
Channel 2
Channel 3
Channel 4
Structural Neural System Box
Preamplifier
Crack
Information
Time
Information
Figure 4.3 Sensing architecture
The main constraint on this was the frequency at which the data needed to be sampled
which was dependant on the frequency content of the data. Typically, AE systems
operate in a range of 1 kHz to 2 MHz or greater in frequency. The lower frequency limit
is imposed by background noises such as friction, outside impacts, or process generated
signals, that tend to mask acoustic emissions. The upper frequency limit is imposed by
attenuation, which tends to limit the range of detection of acoustic emission signals. A
critical part of the AE application process is the selection of a suitable frequency range
for AE detection and signal processing. It must be above the non-AE related background
noises, while providing the necessary detection range (distance/frequency) and sensitivity
to AE related signals. Hence the sampling frequency was set at 1MHz which was the
limited by the bus bandwidth speed of the computer.
4.3 Testing and Debugging
Various debugging techniques where used in LabVIEW
52
4.3.1
Finding Errors
Click the broken Run button or select Windows>>Show Error List to display the Error
list window, which lists all the errors. Double-click an error description to display the
relevant block diagram or front panel and highlight the object that contains the error
4.3.2
Execution Highlighting
Execution highlighting shows the flow of data on the block diagram from one node to
another using a bubble that move along the wires. Use execution highlighting in
conjunction with single stepping to see how data move from node to node through a VI.
4.3.3
Single-Stepping
Single-step through a VI to view each action of the VI on the block diagram as the VI
runs. The single-stepping buttons affect execution only in a VI or subVI in single-step
mode. Enter single-step mode by clicking the Step over or Step into button.
4.3.4
Probes
The Probe tool is used to check intermediate values on a wire as a VFI runs. When
execution pauses at a node because of single stepping or a breakpoint, the wire can be
probed after it has executed to see the value that flowed through that wire.
A custom probe can be created to specify which indicator to view the probed data. For
example, for viewing numeric data, a chart within the probe can be used to see that data.
4.3.5
Breakpoints
Breakpoint tool can be used to place a breakpoint on a VI, node, or wire on the block
diagram and pause execution at that location. After setting a breakpoint on a wire,
execution pauses after data pass through the wire. A breakpoint can be placed on the
block diagram workspace to pause execution after all nodes on the block diagram execute.
53
When a VI pauses at a breakpoint, LabVIEW brings the block diagram to the front and
uses a marquee to highlight the node or wire that contains the breakpoint. LabVIEW
highlights breakpoints with red borders for nodes and block diagrams and red bullets for
wires.
4.3.5.1.1 Testing
The developed system was run using signal generators (Agilent function generator) to
simulate the AE signal. The data acquisition performed according to specifications up to
a sine frequency of 1MHz before it started dropping samples (much higher than the
maximum of 1MHz required). With the known input the output was measured and the
system logic was verified.
Figure 4.5 shows the front panel or the graphical user
interface of the shm.vi that was built using LabVIEW. The VI monitors the AE data from
the neurons continuously. The trigger level in the neurons is set depending upon the
material under fatigue testing. Whenever an AE occurs, the number of acoustic events on
neuron-1 and neuron-2 are recorded by the VI and are counted and then plotted against
the number of stress cycles that the structure undergoes. The number of stress cycles can
be determined by a separate PZT sensor on the structure. In addition, the peak voltages
are measured for each AE and are plotted against the number of cycles. The data
generated is stored in a spreadsheet for further analysis. The VI uses visual and sound
indicators to alert the operator each time an AE occurs.
54
Tab Control
(a)
(d)
(b)
(e)
(c)
(f)
(j)
(i)
(h)
(g)
Figure 4.4 LabVIEW front panel layout a) Trigger parameters; (b) analysis parameters
(c) date and total running time and number of stress cycles; (d) firing neurons and LP
filtered cumulative AE voltage; (e) displayed parameter depending on the tab control; (f)
LED indicator showing AE; (g) number of stress cycles; (h) frequency of vibration (i)
Stop button to stop execution of the Virtual Instrument; (j) Loading frequency
55
Chapter 5 Experimentation
5.1 Testing the SNS on a Riveted Aluminum Plate using Lead Breaks
Riveted aluminum structures are used extensively in aerospace structures. To monitor
them effectively and continuously, a large number of sensors are required to detect crack
growth. To study the possibility of the use of the SNS on riveted structures, an aluminum
riveted plate (Figure 5.1) was constructed and was tested to see if the SNS can locate the
simulated AE. This plate was constructed of three aluminum plates (7075 – T6) joined
with rivets as shown in Figure 5.1 Figure 5.1(a) shows the aluminum riveted plate. Figure
5.1(b) shows the geometric modeling of the plate along with the placement of PZT
sensors. Two of the base plates have dimensions 15.29 X 15.29 X 0.305 (cm). The plate
used to join the bottom two plates has dimensions 15.29 X 0.762 X 0.305 (cm). The plate
was joined using 12 rivets. A Lead Zirconium Titanate (PZT) single sheet was purchased
from Piezo Systems Inc. to form the individual sensor elements. The material was PSI –
5A 4E with dimensions 7.24 X 7.24 X 0.027 (cm). This sheet was cut manually using a
sharp razor blade to 1.524 X 0.889 X 0.00267 (cm) dimensions. Five monolithic PZT’s
were made. These PZT’s were bonded onto the aluminum plate using superglue. Kapton®
was used as an insulating layer between the PZT and the aluminum plate. Since the
current SNS prototype had only a 2 sensor input capability, sensors 2 and 4 (shown in
Figure 5.1(b)) were used to predict the location of the AE. For the first case an AE was
generated using a pencil lead break near sensor 4. For the second case an AE was
generated near sensor 2.
56
(a)
(b)
Figure 5.1 Aluminum Rivet Plate; (a) Picture of the plate, (b) Geometric model of the
riveted plate along with sensors
The riveted aluminum plate was loaded using a Mechanical Testing Systems (MTS)
machine. For the current paper the response of the SNS for fatigue failure due to bending
has not been shown. The set-up of the MTS machine is shown in Figure 5.7 Using a four
point bending fixture the aluminum riveted plate was excited with an input frequency of 3
Hz. The SNS analog processor box had sensors 2 and 4 as inputs which is developed in
Smart Structures and BioNanotechnology [4] by Mr. Goutham Kirikera. Table 5.1 shows
the pre-assigned voltage values that have been assigned for different neurons. Sensor 2
was pre-assigned a DC voltage of 3/0 volts (ON/OFF state) and sensor 4 was preassigned with a DC value of 5/0 volts (ON/OFF state). The reference voltage of the SNS
analog processor box was set at +3 volts. The response of the SNS analog processor box
is shown in Figures 5.2 and 5.3. For a better understanding the geometric model, the
riveted plate is placed on the top of Figures 5.2 and 5.3
57
Table 5.1 Pre-Assigned Voltages for Different Neurons.
Pre-assigned voltages
Neurons Firing
Sensor 2
Sensor 4
SNS response
(Volts)
(Volts)
(Volts)
None
0
0
0
Sensor 2
3
0
3
Sensor 4
0
5
5
Sensor 2 and Sensor 4
3
5
8
Figure 5.2 Response of SNS for an AE lead break located near Sensor 4; (a) Crack
information, (b) Time waveform of the cumulative AE
Figure 5.3 Response of SNS for an AE lead break located near sensor 2; a) Crack
information, b) Time waveform of the AE
58
Figure 5.2(a) shows the initial amplitude of 5 volts indicting that the AE was located
close to sensor 4. The firing of 3 volts in Figure 5.2(a) that follows the initial 5 volt peak
indicates that sensor 2 has also detected the waves that are propagating in the structure.
Figure 5.2(b) shows the time domain waveform of the response of the plate due to a
simulated AE (pencil lead break) indicating the high frequency content of the waveform.
Similarly Figure 5.3 shows the response of the SNS analog processor box for an AE
whose source was located close to sensor 2. The initial amplitude of 3 volts in Figure
17(a) indicates that the AE was located near sensor 2. Figure 5.3(b) shows the cumulative
time domain voltage information of the straining of both the sensors. The initial peak in
time domain waveforms is used to interpret the frequency content of the AE. Note that
even though the sensor is being excited by the excitation frequency of the MTS machine
the SNS analog processor box automatically filters out the low frequency data and
outputs only the data from the high frequency AE.
5.2 Capacitance effect of the sensor
A PZT acts as a capacitor that has charge attraction/repulsion due to strain. When
using a PZT as a sensor or actuator on an aluminum structure, it is possible that the
structure can serve as the ground or return circuit for the PZT by bonding the PZT
directly to the electrically conductive structure. However, this approach will have current
flowing in the structure to the PZT electrodes, and the PZT can generate 200 volts or
more due to an impact to the structure or when driven to generate waves for active
damage interrogation. If the ground circuit became degraded or interrupted due to
corrosion or loosening, the sensor signal may become degraded and there could be arcing
in the connection that in some situations might be dangerous. Also, if the aluminum were
59
to become live due to a lightning strike or through faults in the vehicle electrical system,
the senor system would possibly be damaged. Therefore, here the PZT is encapsulated in
a Kapton® film that has a large electrical resistance that will prevent any current flow
through the film. A thin Kapton® film is used to minimize shear lag that will reduce the
strain in the PZT. It was found that the layer consisting of the Kapton® sheet and the glue
between the aluminum plate and PZT acted as a capacitor and can cause small currents to
flow in the structure. The impedance of this capacitor was calculated by using a simple
impedance measurement circuit. Figure 5.4(a) shows the impedance measurement circuit
that was used to calculate the capacitance of the Kapton® film and the bond layer. In the
circuit the top electrode of the PZT sensor was not connected. This is because our
primary interest is in measuring the capacitance value and impedance only of the bond
layer. The thickness of the superglue and Kapton® sheet has been exaggerated for clarity
in Figure 5.4(a). The resistors R1 and Ro refer to a known resistance of 10KΩ used for
testing, and an oscilloscope resistance of 1MΩ, respectively. Figure 5.4(b) shows the
variation of impedance of the bond layer as a function of frequency. The capacitance of
the PZT sensor was measured using a capacitance meter and was found to be roughly 8
μF. The average capacitance of the bond layer was found to be in the order of 0.3 nF. The
infinite impedance at low frequencies shown in Figure 5.4(b) is due to the high resistance
of the Kapton® layer.
An interesting result of studying the capacitive effect of multiple PZT sensors that are
bonded to the aluminum and individually electrically insulated and connected to separate
channels of an oscilloscope is that if the aluminum plate is not grounded, the electrical
signal from one PZT due to strain is received at all the others immediately and this can
60
obscure the later signal due to the acoustic waves traveling to the other sensors. The plate
structure and the Kapton® film and the bottom electrode of the PZT form a capacitor and
may cause very small currents to flow in the ground circuit. In practice, the operation of
the neural system generates sensor voltages at high frequency less than one volt, and the
power is very low. The capacitive coupling to the structure is only at high frequency and
produces a very small current.
Figure 5.4 Measurement of Impedance of the Kapton® and superglue layer (a) Impedance
measurement circuit, (b) Variation of Impedance with frequency
5.3 Pulse Excitation
The riveted aluminum plate was tested for propagation of AE with the aid of pulse
excitation. This would tend to produce flexural waves in the plate. Figure 5.6(a) shows
the excitation voltage used to excite the actuators embedded on the aluminum plate. The
excitation voltage applied from the signal generator to the amplifier was a rectangular
pulse. Because of the limited bandwidth of the amplifier, the signal shape has been
distorted. Figures 5.6(b) and 5.7 show the response signals obtained from the PZT’s
attached to the structure. In Figures 5.5 and 5.6 in the legend, ‘A’ refers to the PZT that is
being used as an actuator. Similarly ‘R’ refers to the response of the corresponding
sensors. The geometrical location of PZTs on the riveted plate is shown on the top left of
61
each Figure. It can be seen from Figure 5.5(b) that the amplitude of the response of the
sensors decreases as the waves propagate through the thick section of the lap joint. The
amplitude of strain in the thick section is much less than in the thin section. This is
expected because of the displacement being inversely proportional to the bending inertia.
Figure 5.6(a) shows the response of sensors 2 and 4 for an excitation produced on the
structure using PZT 3. It can be seen that most of the high frequency waves get damped
out or are reflected due to travel from thicker section to thinner section. Figure 5.8(b)
shows the response of sensors 2 and 3 for an excitation produced using PZT 5. It could be
inferred from all the three graphs that most of the high frequency waves get reduced in
amplitude when traveling from one section of the plate to the other section.
Figure 5.5 Excitation to the PZT; (a) Pulse Excitation, (b) Response of sensors 2, 3 and 4
for a pulse excitation to PZT-1
62
Figure 5.6 Actuation through the joint; (a) Response of sensors 2 and 4 for an excitation
with PZT 3; (b) Response of sensors 2, 3 and 4 for a pulse excitation from PZT-5
5.4 Dynamic Testing of an aluminum plate
The study of propagation of AE through an aluminum plate was done using three
experimental setups. The first consisted of loading the riveted aluminum plate joint on the
MTS machine by applying a bending load. AE was provided by manually breaking a
pencil lead on the surface and the location was determined using the SNS analog
processor. To further investigate that the SNS analog processor can detect the original AE
produced by the development of cracks, a second experimental setup was designed by
providing a notch on a narrow aluminum plate and loading it (bending load) in the MTS
machine to produce a crack. The third experiment did not use the SNS and was to study
AE in aluminum plates using conventional AE sensors and applying a tension load using
a larger MTS machine.
5.5 Fatigue Testing of a Riveted Aluminum Joint
The riveted aluminum plate previously tested for pulse excitation was further tested on an
MTS machine. Figure 5.6 shows the setup of the riveted aluminum plate mounted on a
MTS machine and fatigue loaded. An input of 3 Hz was provided to the aluminum plate
63
joint. Sensors 2 and 4 (shown in Figure 5.1) were connected to the SNS analog processor
box to verify if the SNS box does indeed predict the location of the acoustic emission.
Figure 5.7 Setup of MTS machine and LabVIEW data acquisition system to test the
riveted aluminum plate
With the plate being fatigue loaded, an acoustic emission was provided manually
using a pencil lead break near sensor 4. The SNS electronic box had sensors 2 and 4 as
inputs. Sensor 2 was pre-assigned a DC voltage of 3 volts and sensor 4 was pre-assigned
with a DC value of 5 volts. The reference voltage of the SNS analog processor box was
set at 3 volts. With the plate being fatigue loaded and an acoustic emission manually
provided near sensor 4, the response of the SNS analog processor is shown in Figures 5.8
and 5.9. Figure 5.8(a) shows the initial amplitude of 5 volts indicating that the acoustic
emission was located close to sensor 4. The firing of 3 volts shown in Figure 5.8(a)
indicates that sensor 2 has also detected the AE. Figure 5.8(b) shows the time domain
waveform of the simulated AE indicating the high frequency content of the waveform.
Similarly Figure 5.9 shows the response of the SNS for an excitation located near sensor
2. The initial amplitude of 3 volts in Figure 5. 9(a) indicates that the AE was located near
sensor 2. Figure 5.9(b) indicates the time domain information of the straining of both the
64
sensors. The initial peak in time domain waveforms indicates the frequency content of the
AE. Note that even though the sensor is being excited by the excitation frequency of the
MTS machine, the SNS analog processor automatically filters the low frequency data and
outputs only the high frequency acoustic emission and no fretting or noise interference of
the MTS occurred. The joint is being used for sensor design studies and later joint
sections will be tested to fatigue failure with the SNS attached.
Figure 5.8 Response of SNS for an AE lead break located near sensor 4, (a) Crack
Information, and (b) Time waveform of AE
Figure 5.9 Response of SNS for an AE lead break located near sensor 2, a) Crack
Information b) Time waveform of AE
This testing indicates that the neuron of the SNS should be placed in the section of the
structure where the AE occurs and that it is difficult to detect the AE wave after is travels
in a joint from a section of one thickness to a section of another thickness. This is a
65
preliminary conclusion as testing in which the joint is fatigued and testing using long
neuron sensors is needed.
5.6 Monitoring AE on an Aluminum Plate using the SNS
The previous section showed that SNS analog processor can predict the location of
simulated AE with only one channel of data acquisition. This architecture will be
extended to have many simultaneous neurons. The SNS analog processor was next tested
in a simulated real time environment. Figure 5.10 shows the geometry of a 7075-T651
aluminum plate with a notch provided at the center span and side of the plate. The yield
strength for this material as specified by the manufacturer is 73ksi. A thin aluminum plate
was subjected to four point bending in an MTS testing machine. Pa and Pb are the loads
applied from the MTS machine while Ra and Rb are the reactions from the supports. Two
sensors were bonded to the aluminum plate using superglue. The narrow aluminum plate
had 12” X 2.48” X 0.19” dimensions.
Figure 5.10 Geometry of a narrow aluminum plate with supports
Figure 5.11 shows the crack that was generated due to the cyclic loading of the aluminum
plate. In Figure 5.11 the starter notch is shown. Due to a high stress concentration near
66
the notch, the crack starts progressing in the plate releasing strain energy due to bending
of the plate. The plate in Figure 5.11 is straight and exhibited final brittle fracture without
gross yielding.
Notch
Generated crack
Figure 5.11 Crack generated due to loading the aluminum plate on the MTS machine (the
plate is straight and finally fractured without bending)
In a similar set-up to the riveted aluminum joint test, sensor 1 was provided with a
constant DC voltage of 3 volts and Sensor 2 was provided with a constant DC voltage of
5 volts. A reference voltage of 0.75 volts was set for each sensor. Whenever each sensor
response crosses 0.75 volts the SNS responds by firing the DC voltage corresponding to
those sensors. Figure 5.12 shows the response of the SNS analog processor. Figure
5.12(a) shows that the crack is located close to sensor 1. The repeated firing seen in
Figure 5.12(a) is due to the reflection of waves from the boundaries. It could be noticed
that the firing voltage of sensor 1 is not constant as predicted. This is because of the low
bandwidth of the components and the low response time of the components used in the
SNS analog processor box, which was designed for monitoring a composite material. The
high frequency does not give enough time for the components in the SNS analog
processor to fire the required voltage of 3 volts. Figure 5.12(b) shows the response of
SNS analog processor box indicating the high frequency AE due to crack propagation in
the structure. It was initially surprising to see that there was no response of Sensor 2
67
through the SNS analog processor. It was later found that sensor 2 was placed beside the
loading point of the MTS shown as Pb in Figure 5.10, and most of the high frequency AE
is damped when passing through the load point. For a few cases of AE due to crack
growth that are not shown, there was a response from sensor 2 also. During these cases
the amplitude of AE was large indicating a very large release of energy. In the beginning
the AE levels were small and infrequent. As the crack grew the frequency of the bursts
and the amplitude increased and the AE signal near failure was clipped during data
acquisition.
Figure 5.12 Response of SNS analog processor; (a) Crack Location Information, and
(b)Time domain waveform
This test showed that the SNS can detect AE if the sensor is close to the damage. Also,
two different width sensors were tested. The wider sensor gave a larger voltage output
but cut-off some of the high frequency signal. The narrower sensor captured the higher
frequency signal, but the amplitude was lower partly due to the smaller area of the sensor.
This sensor experiment indicates that a long narrow sensor is needed.
68
Chapter 6 Sensor Characterization
In this chapter experiments are performed to characterize the properties of the AFS. The
beam is cut out from a larger fiber glass sheet in the machine shop. The dimensions of
the beam are listed below
•
Length of beam 0.254 m.
•
Width of beam 144.6 mm.
•
Thickness of beam 6.175 mm. Figure 6.1 shows the three AFC sensors which
are bonded on the Fiber glass plate.
Figure 6.1Fiber glass plate size with three bonded Active fiber composite sensors
The beam with the bonded sensors is simply supported on two wooden supports as
shown in Figure 6.2. The sensors were bonded using super glue on the pate.
69
Figure 6.2 Simply supported beam
Testing of beam with the AFC sensors is done for:
•
Low frequency
•
High frequency (Lead break)
•
Sensors in series
•
Sensors in parallel
•
AFC actuation
•
Power harvesting.
6.1 Low frequency response of the sensor
For testing the low frequency response of the sensor, a light tap was given to the beam at
three different locations, i.e. near each sensor. The responses generated by the three
sensors were captured using 3 separate channels of the Tektronix Oscilloscope. The
results are shown in the following Figures 6.3, 6.4, 6.5. Figure 6.3 shows the response for
a low frequency tap near sensor1, Figure 6.4 shows the response for a low frequency tap
near sensor1, and Figure 6.5 shows the response for a low frequency tap near sensor-1.
70
Figure 6.3 Response of sensor-1, 2, 3 for low frequency tap at sensor-1
Figure 6.4 Response of sensor-1, 2,3 for low frequency tap at sensor-2
71
Figure 6.5 Response of sensor-1, 2, 3 for low frequency tap at sensor-3
Figures 6.3, 6.4, 6.5 show that the sensors can pick up low frequencies. It can be seen
in Figure 6.3 that sensor-1 has the highest amplitude followed by sensor 2 and 3. In
Figure 6.4, sensor-2 has the highest amplitude, while sensors 1 and 3 have almost same
response but less than sensor-2. In Figure 6.5 the response of sensor-3 is the highest
followed by sensor 2 and 1. From Figures 6.3, 6.4 and 6.5 it can be inferred that the
amplitude of the response of the sensors decreases as the waves travel away from the
source because of damping.
72
6.2 High frequency response of the sensor (Lead Break)
Figure 6.6.Lead break location on the beam plate
Using the same set-up 0.5mm pencil lead breaks where done near the center of each
sensor as shown in Figure 6.6 and the response was filtered using a bandwidth Kron-hite
filter between 30KHz – 500KHz with a 40dB gain.
73
Figure 6.7 Lead break response for sensor-1
Figure 6.8 Lead break response for sensor-2
74
Figure 6.9 Lead break response for sensor-3
For Figures 6.7, 6.8 and 6.9 it can be seen that the sensors do pickup high frequency.
Figures 6.10(a) shows the response of sensor 2 only while Figure 6.10(b) shows the Fast
Fourier transform of the acquired data i.e. the frequency information for sensor-2
Figure 6.10 Lead break response for sensor-2 (a) and frequency response for sensor-2 (b)
It can be seen from Figure 6.10 (b) that the AFC sensor does pick up high frequency A.E.
waves generated due to the lead break with most of the energy concentrated near 300
KHz. The AFC sensor does detect AE emission which can be seen from Figures 6.7, 6.8,
6.9. However the SNR to noise ratio is poor. Once the signal is filtered it shows the clear
acoustic emission signal. The raw signal from the sensor needs to be preamplified and
filtered which is done by using a commercial filter manufactured by Kron-Hite. In further
development of the sensor, an in house preamplifier and filter will be built to replace the
commercial filter.
75
6.3 High frequency response of the sensors in a series connection
(Lead Break)
The three sensors on the plate where connected in series. The response was filtered using
a bandwidth Kron-Hite filter in a range of 30 KHz-500 KHz with a gain of 40dB
Figure 6.11 Response for Sensors in Series, lead break location near sensor-1
76
Figure 6.12 Response for Sensors in Series, lead break location near sensor-2
Figure 6.13 Response for Sensors in Series, lead break location near sensor-3
77
Figures 6.11, 6.12, 6.13 shows that the sensors do pickup simulated AE emission when
connected in series.
6.4 High frequency response of the sensors for a parallel connection
(Lead Break)
The sensors are connected in parallel and the data was acquired using the Kron-hite filer,
with a gain of 40dB.The response is acquired for three different lead break locations the
responses are shown in figures 6.14, 6.15, 6.16.
Figure 6.14 Response for Sensors in parallel, lead break location near sensor-1
78
Figure 6.15 Response for Sensors in parallel, lead break location near sensor-2
Figure 6.16 Response for Sensors in parallel, lead break location near sensor-3
79
The Figures 6.14, 6.15 and 6.16 show that the sensors do pickup AE waves when
connected in parallel. An attempt has been made to connect the sensors in series and
parallel fashion to form the continuous sensor. Table 6.2 gives the comparison of the
responses for lead break results for an individual sensor, sensors connected in parallel and
series
Table 6.2 Comparison of Results
Parameter
Individual
Parallel
Series
Peak Voltage
0.4V
0.39V
0.21V
Capacitance
0.307nF
0.910nF
0.1nF
The results tabulated in Table 6.2 are expected results. The capacitance value in series
will always be less than when the sensors are connected in parallel. When the sensors are
connected in series or parallel, the only sensor that contributes to the output is the one
near which the lead break is done, while the remaining two sensors add as an impedance
to the flow of current resulting in drop of the voltage which can be seen in Table 6.2.
6.5 AFC actuation
The sensor-2 is used as an actuator using a sine wave with amplitude of
approximately 100V. The response is then measured at other two sensors i.e. at sensor-1
and sensor-3 as shown in Figure 6.17.
80
Figure 6.17 Response of Sensors-1and 3 for actuation at AFC-2
The actuation frequency is varied from 5Hz to 250 KHz and the response is measured at
sensor-1 and sensor-3. Figure 6.18 shows the response of the sensor-2 for different
actuation frequencies.
Figure 6.18 Response of Sensors-1and-3 for actuating sensor-2
81
The Possible reason for the poor response at lower frequencies can be because of the poor
bonding of sensor to the fiber
6.6 Power Harvesting
For power harvesting, a mechanical test machine is used and the voltage signal
generated by the AFC sensor is acquired using a 200 MHz Tektronix oscilloscope. Figure
6.19 shows the test setup. The plate is mounted on the MTS machine for a four point
bending test. A known sinusoidal loading cycle of 5 Hz is applied to load the beam and
response from sensor-2 is observed. The loading sinusoidal cycle is shown in Figure 6.20
Figure 6.19 Experimental setup for power harvesting of sensors bonded on the beam
82
Figure 6.20 Response from sensor-2 under sinusoidal MTS loading
83
Power calculation is done as follows:
P = VI
(6.1)
where P = peak sinusoidal power generated, V= voltage and I= current, rearranging gives
V2
P=
R
(6.2)
where R is the resistance of the oscilloscope. Substituting V=0.15V and R=1M Ω in
equation (6.2) we get P = 0.225μW .
6.7 Calculating the d31 coefficient
For the beam under fatigue strain occurs in the Z-direction, and the AFC sensor is poled
in the Y-direction perpendicular the plane of the beam. The configuration is shown in
Figure-6.21.
Figure 6.21 A composite beam under loading
Here the direction of the PZT is in the Y-axis of the beam. For the beam under 4 point
bending load the deflection is given by
δ
Where δ
BC
BC
=
(
Fa
3x 2 + a 2 − 3Lx
6 EI
)
(6.3)
=deflection of the beam at a distance ‘x’
84
For x =
(
Fa
l
4a 2 − 3L2
,δ
=
δ =δ
max
BC
max
24 EI
2
EI =
)
4a 2 − 3L2 )
(
24δ
max
Fa
(6.4)
where E is the Youngs Modulus and I is the area moment of inertia of the beam
For a beam under bending the stress ‘ σ ’ is given by
σ = ES =
1
My
I
(6.5)
Where S1 = strain in the beam, M= bending moment, y = distance of the fiber from the
neutral axis
ES1 =
S1 =
− My
I
(6.6)
− My
EI
(6.7)
Substituting ‘EI’ in equation of S1 we get
S =
1
−24δ
My
max
Fa 4a 2 − 3L2
(
(6.8)
)
From equation (2.1) in Chapter 2
e AS
V = 31 e 1 + V but e =
0
31
C
p
d
d AS
31 ∴V = 31 e 1 + V substituting for S from equation
1
0
sE
sE C p
11
11
(6.8)
A −24δ
My
e
31
max
V=
+V
0
s E C p Fa 4a 2 − 3L2
11
d
(
)
85
(
Vs E C Fa 4a 2 - 3L2
11 p
d =
31
A 24δ
My
max
e
Substituting the values from Table 6.1 gives d
the expected theoretical value of 80 ×10−12
31
)
= 80 ×10−12
(6.9)
C
. This is about 50% of
N
C
. This can be attributed to the fact that the
N
bonding between the sensor and the fiber glass is not perfect resulting in poor strain
transformation to the AFC sensor.
Table6.1 Values used in equation 6.9.
Parameter
V
s11E
Value
0.15 volts
1.88 ×10
−12
m2
N
Cp
0.33nF
F
a
L
150N
0.09m
0.254m
Ae
4.5e-006 m
1.6e-006 m
δ max
M
y
2
12.858N-m
0.000013m
The calculated electromechanical coefficient or d31 is expected to be less than the
theoretical one because of loss in strain transformation due to bonding layer and Kapton®
sheets used and the narrow width of the sensor which is probably more sensitive to shear
lag. A way to investigate this is to bond the AFC sensor directly on the fiber glass plate
without the Kapton® sheet using the silver conductive epoxy as shown in Figure-3.6 and
measuring the response and compare it with the existing results.
86
Chapter 7 Conclusion
A data acquisition system and sensors for a technique of structural health monitoring
based on a structural neural system and continuous sensors was developed. Testing on an
aluminum beam indicated that the SNS analog processor using conventional monolithic
piezoceramic sensors was able to detect the acoustic emissions. The acoustic emission
level in aluminum was small but detectable. A higher sensitivity of the neural system is
needed.
An
AFC
sensor
was
manufactured
in
the
Smart
Structure
and
BioNanotechnology laboratory [4] with fibers from CeraNova Corporation. These were
tested for low frequency tapping, high frequency AE and for power harvesting. The
laboratory testing has shown that the AFC sensor manufactured in house can detect and
locate simulated acoustic emissions generated on composite panels. Extending this
architecture to handle a large number of sensors would make the SNS capable of
reducing the number of data acquisition channels typically required by a factor of 10 or
more. Connecting the sensor in series forms the continuous sensor which allows many
sensor nodes to be connected together to tremendously reduce the number of channels of
data acquisition needed to detect acoustic emissions. A standard sensor fabrication
method is being developed to produce continuous sensors
87
Chapter 8 Future Work
Although this system is working successfully, there is still room for further work:
8.1 Data acquisition system
The DAQ system developed needs improvement which are mentioned below:
•
Developing a control system using LabVIEW for controlling the MTS controller
•
Real-time integration of offline analysis like smoothing of the data, plotting of the
sensors firing against time
•
Eliminating the use of Matlab®
•
Currently the user interface elements are rudimentary. To increase productivity, it
might be desirable to add features to make them more user friendly and advanced
(such as better table editing features)
•
Although algorithmic state machines (a programming paradigm) are used for the
main control routine, it might be beneficial to extend this concept to some of the
other routines, such as the file management VI. Most important for the shm.vi
system will be better algorithms which will take less time for acquiring, analyzing
and presenting data.
•
Currently the rate of crack growth is measured using Vernier Calipers; the
accuracy can be improved by using equipments like a camera interfaced to the
computer which takes pictures at every acoustic emission
88
8.2 Active Fiber Sensor
The AFC manufactured have a room for improvements. These are:
•
Sensor thickness: As explained in section 3.2 the ideal thickness for sensor is
equal to the thickness of the fiber. Currently the sensor thickness is more than that.
The thickness can be reduced by machining the mold around the edges.
•
Sensor length: The current design of the mold allows a maximum length of 4
inches. The mold needs to be redesigned to manufacture longer length sensors
•
Sensor electroding: Using sputtering instead of silver conductive epoxy for
placing the electrodes on the AFC preform
89
References
[1] Design of a Wireless Active Sensing Unit for Structural Health Monitoring,
Jerome P. Lynch et.al, Department of Civil and Environmental Engineering,
Stanford University, Stanford, CA, 2002.
[2] Fiber optic sensor array for multi-dimensional strain measurement, Barry G
Grossmanny and Li-Tien Huang Florida Institute of Technology, Electrical
Engineering Program, 150 West University Boulevard, Melbourne, FL 329016988, USA
[3] Health monitoring of aerospace structures with acoustic emission and
acousto-ultrasoncs, RD Finlayson, M Friesel, M Carlos and J C Lenain based
on a paper presented at 15th World Conference on NDT, Rome, and October
2000
[4] Smart Structures and Bio-Nano Laboratory, Department of Mechanical
Engineering, University of Cincinnati OH-45221-0072
[5] Fiber optic sensor array for multi-dimensional strain measurement Barry G
Grossmanny and Li-Tien Huang Florida Institute of Technology, Electrical
Engineering Program, 150 West University Boulevard, Melbourne, FL 329016988, USA
90
[6] Design of a Wireless Active Sensing Unit for Structural Health Monitoring,
Jerome P. Lynch et.al., Department of Civil and Environmental Engineering,
Stanford University, Stanford, CA, 2002.
[7] Bent, A. A “Active Fiber Composites for Structural Actuation”, Thesis
submitted to Department of Aeronautics and Astronautics at Massachusetts
Institute of Technology, 1997, ASML # 97-1.
[8] An artificial neural system with distributed parallel processing for
structural health monitoring [electronic resource] / Goutham R. Kirikera
Thesis submitted to the faculty of the University of Cincinnati Ohio 2003
[9] Goutham R. Kirikera, Saurabh Datta, SriLaxmi Pammi, Courtney Brown, Mark
J. Schulz, Mannur J. Sundaresan, “Recent Advances in an Artificial Neural
System for Structural Health Monitoring,” abstract submitted, SPIE 10th
International Symposium, NDE for Health Monitoring and Diagnostics, San
Diego, CA, March 2-6, 2003.
[10] Saurabh Datta, Goutham R. Kirikera, Mark J. Schulz, Mannur J. Sundaresan,
“Sensor Design for An Artificial Neural System,” Ninth International
Conference on Composites Engineering, July 1-6, 2002, San Diego, CA.
[11] Schulz, M.J., Chattopadhyay, S., Sunderesan, M.J., Ghoshal, A., Martin, W.N.,
Pratap, P.R., “Processing , Understanding and applications of Piezoceramic
Materials for an Artificial Neural System.” Ceramic Materials Symposium at
the international Mechanical Engineering Congress and Exposition Winter
91
Annual Meeting of the ASME, Nov.11-16, 2001, New York Hilton and Towers,
NY.
[12] Sundaresan, M.J., Schulz, M.J., Ghoshal, A., Pratap, P., "A Neural System for
Structural Health Monitoring," SPIE 8th International Symposium on Smart
Materials and Structures, March 4-8, 2001.
[13] Electrical Properties of Macro-Fiber Composite Actuators and Sensors,
Justin Michael Lloyd, Thesis submitted to the faculty of the Virginia
Polytechnic Institute and State University, VA June 2004
[14] . http://www.ceramtec.de/intl/e4/ta=e4*247/la=en/ta0=gb*108/ta1=e3*421/le=2/
[15] Hagood, N.W., Kindel,R., Ghandi, K., and Gaundenzi,P., 1993, “Improving
Transverse Actuation of Piezoceramics using Interdigitated Surface
Electrodes”, SPIE Paper No. 1917-25, Proceedings of 1993 North American
Conference on Smart Structures and Materials, Albuquerque, NM.
[16] Eric H. Anderson, Mark D. Holcomb, Donald J. Leo CSA Engineering, Inc.
Mountain View, CA “Integrated Electromechanical Devices for Active
Control of Vibration and Sound” Adam X. Bogue, Farla R. Russo Active
Control eXperts, Inc. Cambridge MA.
[17] Center
Macro-Fiber
CompositeActuator
(LaRC-MFC):
Technical
Overview NASA-Langley Research W. Keats Wilkie Robert G. Bryant, James
W. High, Robert L. Fox, Bruce D. Little,Paul H. Mirick, Richard F. Hellbaum,
Anthony Jalink
92
[18] Active fiber composite continuous sensors for structural health monitoring,
Saurabh Datta Thesis Submitted to University of Cincinnati Ohio 2003
[19] Saurabh Datta, Goutham R. Kirikera, SriLaxmi Pammi, Courtney Brown, Mark
J. Schulz, Mannur J. Sundaresan, “Continuous Sensors for Structural Health
Monitoring,” abstract submitted, SPIE 10th International Symposium, NDE for
Health Monitoring and Diagnostics, San Diego, CA, March 2-6, 2003.
[20] Datta, S., Kirikera, G.R., Sundaresan, M.J., Schulz, M.J., “Active Fiber
Composite Continuous Sensors,“ International conference on Smart Materials,
Structures and System (ISSS-SPIE 2002), December 12-14, 2002, Bangalore
India.
[21] Sunderesan, M.J., Ghoshal A., Martin, W.N. and Schulz, M.J. “A continuous
Sensor to measure Acoustic Waves in Plates” Journal of Intelligent Material
Systems and Structures, vol.12, No.1 pp.41-57, January 2001.
[22] CeraNova Corporation, 101 Constitution Boulevard, Suite D, Franklin, MA
02038-2587.
[23] Smart Structures Analysis and Design, A.V. Srinivasan, D Michael
McFarland.
[24] Structural Health Monitoring of Composite Materials Using Piezoelectric
Sensors, Seth S. Kessler and S. Mark Spearing.
93
[25] Saurabh Datta, Goutham R. Kirikera, SriLaxmi Pammi, Courtney Brown, Mark
J. Schulz, Mannur J. Sundaresan, “Continuous Sensors for Structural Health
Monitoring,” abstract submitted, SPIE 10th International Symposium, NDE for
Health Monitoring and Diagnostics, San Diego, CA, March 2-6, 2003.
[26] Goutham R. Kirikera, Saurabh Datta, Mark J. Schulz, Mannur J. Sundaresan,
“An Artificial Neural System for Health Monitoring of Large Structures,”
Ninth International Conference on Composites Engineering, July 1-6, 2002, San
Diego, CA.
[27] Pedemonte, P. et.al., “Signal Processing for Passive Impact Damage
Detection in Composite Structures”, Smart Structures and Materials 2001 :
Modeling, Signal Processing and Control in Smart Structures, Proceedings of
SPIE vol. 4326, 2001.
[28] Schulz, M.J., Sundaresan, M.J., McMichael, M., Clayton, D., “Evaluation of
Piezoceraic Materials at Moderately Elevated Temperatures”, Proceedings
of IMECE’02, 2002 ASME International Mechanical Engineering Congress &
Exposition, New Orleans, Louisiana, November 17-22,2002.
[29] Muralt, P., “PZT Thin Films for Microsensors and Actuators: Where Do We
Stand?”, IEEE Transactions on Ultrasonics, Ferroelectrics and Frequency
Control, vol.47, no.4, pp.903-915, July 2000.
94
[30] Giurgiutiu, V., Chaudry, Z., C.A. Rogers, 1995, “Energy –Based Comparison
of Solid-State Actuators”, Centre for Intelligent Material Systems and
Structures, Report no. CIMSS 95-101.
[31] Wang, C.S. and Chang, F.K., “Built in Diagnostics for Impact Damage
Identification of Composite Structures”, Proceedings of the 2nd International
Workshop on Structural Health Monitoring, pp. 612-621, San Francisco, CA,
1999.
[32] Keilers, C and Chang, F.K. “Damage Detection and Diagnostics for
Composite Structures Using Built-in Piezoceramics”, Proceedings of SPIE,
vol. 1917, pp. 1009-1019, San Diego, CA, 1993.
[33] Fu-Kuo Chang “Structural Health Monitoring The Demands and
Challenges” Proceedings of the 3rd International workshop on structural health
monitoring, Stanford, CA. Sep-12-14, 2001.
[34] Taylor et al. “ Piezoelectricity Ferro electricity and related phenomena”
vol.4. Gordon and Breach 1985.
[35] Cady W.G., “Piezoelectricity: an introduction to the theory and applications
of electromechanical phenomenon in crystals.” (Dover, NY, 1964).
[36] “A Software Framework For Neuroscience Experiments Involving
Auditory and Visual Stimuli”, Virantha N. Ekanayake Bachelor of
Engineering Project Report/ Honors Thesis, Thayer School of Engineering
Dartmouth College Hanover, New Hampshire, June 8, 1999.
95
[37] “Structural Health Monitoring Static Test of a Wind Turbine Blade”, M.J.
Sundaresan, M.J. Schulz, and A. Ghoshal Intelligent Structures and Mechanisms
(ISM) Laboratory, Department of Mechanical Engineering North Carolina A&T
State University Greensboro, North Carolina subcontract report August 1999,
March 2002 • NREL/SR-500-28719.
[38] “Design and performance of a self-sensing, self-actuating piezoelectric
monomorph with interdigitated electrodes”, Yong K. Honga, Heung-Keun
Parka, Sung Q Leeb, Kee S. Moon, Raghav R. Vangac, and M. Levyc,
Proceedings of the SPIE International Conference on Opto-mechatronic
Actuators, Sensors and Control, SPIE, Philadelphia, Vol. 5602, pp. 210-217,
October 2004.
[39] “Characterization of Piezoelectric Wafer Active Sensors”, Victor Giurgiutiu
and Andrei N. Zagrai, University of South Carolina, Department of Mechanical
Engineering, Columbia, SC 29208, Jouranl Of Intelligent Materials Systems
And Strcutures, Vol. 11 – December 2000.
[40] “Damage Detection In Simulates Aging-Aircraft Panels Using The ElectroMechanical Impeadance Technique”, Victor Giurgiutiu and Andrei Zagrai,
Department of Mechanical Engineering University of South Carolina, Columbia,
SC 29208, Adaptive Structures and Material Systems Symposium, ASME
Winter Annual Meeting, Nov. 5-10, 2000, Orlando, FL.
96
[41] “Demonstration and characterization of PZT thin-film sensors and
actuators for meso- and micro-structures”, Yi-Chu Hsua, Chia-Che Wu b,
Cheng-Chun Lee b, G.Z. Caoc, I.Y. Shen b, 2004 www.sciencedirect.com.
[42] “Implementation of Advanced Fiber Optic and Piezoelectric Sensors
Fabrication and Laboratory Testing of Piezoelectric Ceramic-Polymer
Composite Sensors for Weigh-in-Motion Systems”, Dr. Ali Maher, Mr.
Patrick J. Szary, Dr. Ahmad Safari, Dr. Raj K. Panda, Final report submitted to
NJDOT February 1999 FHWA NJ 1999-029.
[43] “Design, Fabrication and Experimental-Numerical Study of PZT Sensors”,
M. Arik, S. M. Zurnx, K. S. Yigit, and A. Bar-Cohen, Laboratory for Thermal
Management
of
Electronics,
Department
of
Mechanical
Engineering,
Microtechnology Laboratory, Department of Electrical Engineering, University
of Minnesota, Minneapolis, MN 55455.
[44] “Electrical Properties And Power Considerations Of A Piezoelectric
Aactuator, T. Jordan, Z. Ounaies, J. Tripp, and P. Tcheng”, NASA-Langley
Research Center, Hampton, VA 23681,
ICASE, NASA-Langley Research
Center, Hampton, VA 23681, USA.
[45] “The influence of temperature and bonding thickness on the actuation of a
cantilever beam by PZT patches”, Cu-Hai Nguyen, Stanislaw Pietrzko and
Rudolf Buetikofer, 16 June 2004, Online at stacks.iop.org/SMS/13/851
doi:10.1088/0964-1726/13/4/023.
97
[46] “Experiments And Technologies For Decentralized Temperature Control”,
Nicanor Quijano, Thesis Degree Master of Science in the Graduate School of
The Ohio State University, 2002.
[47] “The use of 0-3 piezocomposite embedded Lamb wave sensors for detection
of damage in advanced fibre composites”, R A Badcock and E A Birt,
Structural Materials Centre, DERA Farnborough, Hampshire GU14 0LX, UK,
Smart Mater. Struct. 9 (2000) 291–297. Printed in the UK, PII: S09641726(00)13239-2.
[48] “Computational Material Characterization of Active Fiber Composite”, Tae
Ho Yoon, Seung Hoon Paik, Sang Joon Shin, Seung Jo Kim, Department of
Aerospace Engineering Seoul National University Korea.
[49] "LabVIEW - Graphical Programming for Instruments, User Manual",
National Instruments, 1996.
[50] L.K. Wells, "LabVIEW Student Edition User's Guide", National Instruments,
1995.
[51] "Data Acquisition Basics Manual", National Instruments, 11500 N Mopac
Expwy Austin, TX 78759-35041996.
[52] “A Structural Neural System” Goutham R.Kirikera, Inpil Kang, Vishal Shinde,
et.al Smart Structures and Materials 2005 : Proceedings of SPIE.
98
Appendix A
LabVIEW Code Description
A brief summary on the actual LabVIEW code structure is given here. Please note
that no attempt will be made to go into any great detail on the actual operation of each
routine as these are documented within the source code diagrams. In addition source code
diagrams are difficult to include in hard copy format because of their structure – for
instance case structures have several overlapping sections of code, of which only one is
visible at any one time on the screen. Including printouts of these would be quite useless
as far as comprehending the data goes. Instead, the files are supplied on a disk for
viewing on screen.
When data acquisition is performed, the software needs to know the following
information:
•
Device number
•
Channel that is being used
•
Sampling Rate
•
Trigger type
•
Buffer size
99
This is done by the following part of the VI in Figure A-1
Sampling
Buff
8.2.1.1 Figure A-1 Data acquisition
Stream from Disk
This is done by the following part of the VI
Figure A-2 Stream From Disk
Generate Time and Frequency Data
This is done by the following part of the VI
100
Figure A-3 Generate Time and Frequency Data
Graphical Data Presentation
Figure A-4 Graphical Data Presentation
Streaming to Disk
101
Figure A-5 Stream to Disk
102
Appendix B
®
Matlab Script
This script is included in the LabVIEW GUI. It calculates the number of AE hits from the
crack information signal and the cumulative Peak amplitude of the time information
signal
counter1=0;
counter2=0;
counter3=0;
temp=zeros(1,100);
sum=0;
kk=0;
jj=0;
if (length(X)==samples)
Z=abs(X);
for n=1:samples-1
%%%% conditions to calculate the cumulative voltages
if((Z(2,n)>threshold) )
jj=jj+1;
temp(jj)=Z(2,n);
end
if(Z(2,n)>=threshold & Z(2,n+1)<threshold)
kk=kk+1;
sum=max(temp)+sum;
temp=zeros(1,100);
jj=0;
end
%%%%% conditions to calculate the cumulative no of hits
if ( X(2,n)>=threshold1 & X(2,n+1)<threshold1)
counter1 =counter1+1;
end
if ( X(2,n)>=threshold2 & X(2,n+1)<threshold2)
counter2 =counter2+1;
end
if ( X(2,n)>=threshold3 & X(2,n+1)<threshold3 )
counter3 =counter3+1;
end
end
end
highest=counter1;
medium=counter2-counter1;
103
lowest=counter3-counter2;
104
Appendix C
PCI 6110E Board Specifications
This appendix lists the specifications of 6110 E board. These specifications are typical at
25° Cunless otherwise noted.
Analog Input
Input Characteristics
Number of channels
PCI-6110E ...................................4 differential
PCI-6111E ...................................2 differential
Resolution...........................................12 bits, 1 in 4,096
Max sampling rate ..............................5 MS/s
Min sampling rate ...............................1 kS/s
Analog input characteristics
Input coupling .................................... DC/AC
Max working voltage for all analog input channels
+ input ......................................... Should remain within ±11 V for
ranges ≥ ±10 V; should remain
within ±42 V for ranges < ±10 V
– input ......................................... Should remain within ±11 V
Overvoltage protection ....................... ±42 V
Inputs protected
+ input ......................................... all channels
– input ......................................... all channels
FIFO buffer size ................................. 8,192 samples
Data transfers ..................................... DMA, interrupts,
programmed I/O
DMA modes....................................... Scatter-gather
Transfer Characteristics
INL .................................................... ±0.5 LSB typ, ±1 LSB max
DNL................................................... ±0.3 LSB typ, ±0.75 LSB max
Spurious free dynamic range (SFDR). See table, analog input
characteristics
Effective number of bits (ENOB)....... 11.0 bits, DC to 100 kHz
Offset error ........................................ See table, analog input
characteristics
Amplifier Characteristics
Input impedance ................................. 1 MΩ in parallel with 100 pF
Input bias current ............................... ±200 pA
Input offset current............................. ±100 pA
CMRR................................................ See table, analog input
characteristics
105
Dynamic Characteristics
Interchannel skew .............................. 1 ns typ
fin = 100 kHz
input range = ±10 V
Bandwidth (0.5 to –3 dB)
Input range > ±0.2 V ................... 5 MHz
Input range = ±0.2 V ................... 4 MHz
System noise ...................................... See table, analog input
characteristics
Crosstalk ............................................ –80 dB, DC to 100 kHz
Stability
Recommended warm-up time ............. 15 min.
Offset temperature coefficient
Pregain ........................................ ±5 µV/° C
Appendix A Specifications
© National Instruments Corporation A-5 PCI-6110E/6111E User Manual
Postgain .......................................±50 µV/° C
Gain temperature coefficient...............±20 ppm/° C
Onboard calibration reference
Level ............................................5.000 V (±2.5 mV) (actual
value stored in EEPROM)
Temperature coefficient ...............±0.6 ppm/° C max
Long-term stability.......................±6 ppm/
Analog Output
Output Characteristics
Number of channels ............................2 voltage
Resolution...........................................16 bits, 1 in 65,536
Max update rate
1 channel ......................................4 MS/s, system dependent
2 channel ......................................2.5 MS/s, system dependent
FIFO buffer size..................................2,048 samples
Data transfers......................................DMA, interrupts,
programmed I/O
DMA modes .......................................Scatter gather
Transfer Characteristics
Relative accuracy (INL) ......................±4 LSB typ, ±8 LSB max
DNL....................................................±2 LSB typ, ±8 LSB max
Offset error .........................................±5.0 mV max
Gain error
(relative to internal reference).............±0.1% of output range max
Voltage Output
Ranges ................................................±10 V
Output coupling ..................................DC
1 000 h ,
Appendix A Specifications
PCI-6110E/6111E User Manual A-6 © National Instruments Corporation
Output impedance .............................. 50 Ω ±5%
106
Current drive ...................................... ±5 mA min
Output stability .................................. Any passive load
Protection .......................................... Short-circuit to ground
Power-on state.................................... 0 V
Dynamic Characteristics
Slew rate ............................................ 300 V/µs
Noise.................................................. 1 mVrms, DC to 5 MHz
Spurious free dynamic range .............. 75 dB, DC to 10 kHz
Stability
Offset temperature coefficient ............ ±500 µV/° C
Gain temperature coefficient
Internal reference......................... ±50 ppm/° C
External reference ....................... ±25 ppm/° C
Onboard calibration reference
Level ........................................... 5.000 V (±2.5 mV) (actual
value stored in EEPROM)
Temperature coefficient............... ±0.6 ppm/° C max
Long-term stability ...................... ±6 ppm/
Digital I/O
Number of channels ........................... 8 input/output
Compatibility ..................................... TTL/CMOS
1 000 h ,
Appendix A Specifications
© National Instruments Corporation A-7 PCI-6110E/6111E User Manual
Digital logic levels
Power-on state ....................................Input (High-Z)
Data transfers......................................Programmed I/O
Timing I/O
Number of channels ............................2 up/down counter/timers,
1 frequency scaler
Resolution
Counter/timers .............................24 bits
Frequency scaler ..........................4 bits
Compatibility ......................................TTL/CMOS
Base clocks available
Counter/timers .............................20 MHz, 100 kHz
Frequency scaler ..........................10 MHz, 100 kHz
Base clock accuracy ............................±0.01%
Max source frequency .........................20 MHz
Min source pulse duration ..................10 ns, edge-detect mode
Min gate pulse duration .....................10 ns, edge-detect mode
Triggers
Analog Trigger
Source
PCI-6110E................................... All analog input channels,
external trigger (PFI0/TRIG1)
107
PCI-6111E................................... All analog input channels,
external trigger (PFI0/TRIG1)
Level .................................................. ± full-scale, internal;
±10 V, external
Slope .................................................. Positive or negative
(software selectable)
Resolution .......................................... 8 bits, 1 in 256
Hysteresis........................................... Programmable
Bandwidth ......................................... (–3 dB) 5 MHz internal/external
External input (PFI0/TRIG1)
Impedance ................................... 10 kΩ
Coupling...................................... AC/DC
Protection .................................... –0.5 V to (Vcc + 0.5) V when
conFigured as a digital signal,
±35 V when conFigured as an
analog trigger signal or
disabled, ±35 V powered off
Digital Trigger
Compatibility ..................................... TTL
Response ............................................ Rising or falling edge
Pulse width......................................... 10 ns min
Appendix A Specifications
© National Instruments Corporation A-9 PCI-6110E/6111E User Manual
Bus Interface
Type ...................................................Master, slave
Power Requirement
+5 VDC (±5%)
PCI-6110E ...................................2.5 A
PCI-6111E ...................................2.0 A
Power available at I/O connector ........+4.65 to +5.25 VDC at 1 A
Physical
Dimensions
(not including connectors) .................31.2 by 10.6 cm (12.3 by 4.2 in)
I/O connector ......................................68-pin male SCSI-II type
Environment
Operating temperature ........................0° to 45° C
Storage temperature ............................–20° to 70° C
Relative humidity ...............................5% to 90% noncondensing
© National Instruments Corporation B-1 PCI-6110E/6111E User Manual
This appendix lists the specifications of your 611X E board. These specifications are
typical at 25° C unless otherwise noted.
FIFO buffer size ................................. 8,192 samples
Data transfers..................................... DMA, interrupts, programmed I/O
DMA modes....................................... Scatter-gather
108
Appendix D
Specification of Silver conductive epoxy
Specification of Silver conductive epoxy used for electroding
109