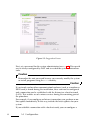
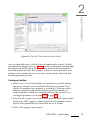
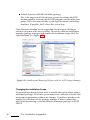
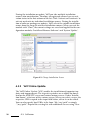
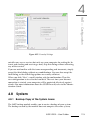
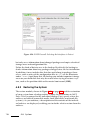
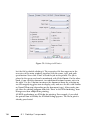
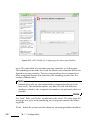
1
‘Interpolation’ is an expert option that controls the scale method. When
finished adjusting the size, press ‘OK’ to scale the image. ‘Reset’ restores
the original values. ‘Cancel’ aborts the procedure.
Changing the Canvas Size
Changing the canvas size is like putting a mat around an image. Even if the
mat is smaller, the rest of the image is there, but you can only see part of it.
If the mat is larger, you see the original image with extra space around it.
To do this, select ‘Image’ -> ‘Canvas Size’.
In the dialog that opens, enter the new size. By default, the width and
height maintain the same proportions as the current image. To change
this, click the chain icon to the right of ‘Ratio’. Enter the desired size in the
height and width fields or adjust the ratios.
After adjusting the size, determine how the existing image should be positioned in comparison to the new size. Use the offset values or drag the
box inside the frame at the bottom. When satisfied with the changes, click
‘OK’ to change the canvas size. Click ‘Reset’ to restore the original values or
‘Cancel’ to cancel the canvas resize.
Note
24
Manipulating Graphics with The GIMP
when printed or modifying the resolution itself. Use the unit drop-down
boxes to change the measuring unit.
The same results can be achieved using the ‘Resize’ option of the crop
tool.
Note
24.5.2
Selecting Parts of Images
It is often useful to perform an image operation on only part of an image.
To do this, the part of the image with which to work must be selected. Areas can be selected using the select tools available in the toolbox, using the
quick mask, or combining different options. Selections can also be modified
with the items under ‘Select’. The selection is outlined with a dashed line,
called marching ants.
Using the Select Tools
The main select tools are rather easy to use. The paths tool, which can also
be used for more than selecting, is more complicated so is not described
SUSE LINUX – User Guide
365