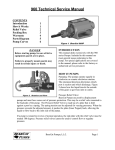
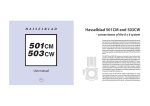
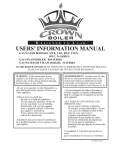
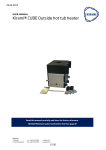
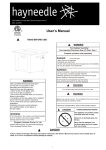
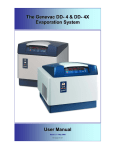
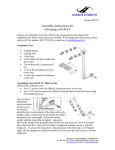
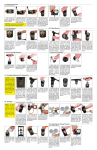
1
Caution: Read and understand these entire instructions
before proceeding.
Caution: Always wear safety goggle and gloves when
servicing this equipment.
Lighting
Caution: Disconnect unit from electrical supply before initial
lamp installation, re-lamping or servicing for any reason.
BRINGING IMAGINATION TO LIGHT
Phoenix
Series
Caution: This luminaire is a source of intense heat and is not
intended for residential use. To reduce risk of fire or injury,
avoid contact by persons or materials. If luminaire is hot,
allow to cool before re-lamping.
Caution: DO NOT touch glass portion of lamp with your hands.
Agents such as sodium, grease or oil from your fingers may be
transferred to the glass wall. The contaminants can cause the
lamp to rupture or can greatly reduce the performance and
life of the lamp. If accidentally soiled, immediately clean the
lamp with a soft, clean and lint free cloth soaked in methylated
spirits (denatured alcohol), then polish with a dry, soft, clean
and lint free cloth.
Ellipsoidal
Spotlight
Caution: DO NOT allow materials to come in contact with
hot lamp. Protect lamp from abrasions and scratches. These
lamps reach very high temperatures (as high as 1740° F
[950°C]). Under certain circumstances, internal or external
influences may cause lamp to rupture.
INTRODUCTION
Congratulations on purchasing one of the finest
lighting instruments available today! Before using
your Phoenix Ellipsoidal Spotlight, be sure to read all
of the instructions in this manual.
/$03&$3
$66(0%/<
Caution: DO NOT expose unit to rain or use in damp or wet
locations. Always use indoors.
SAFETY INSTRUCTIONS
SAVE THESE INSTRUCTIONS FOR FUTURE USE!
6+877(5527$7,21
/2&..12%
6+877(56
/80,1$,5(%2'<
)2&86/2&.,1*
.12%
'523,1,5,66/27
<2.(
6+877(5$66(0%/<
<2.(/2&.,1*
.12%
/(1678%(
3$77(51/2&.,1*
/(9(5
)/,33(5
&2/25)5$0(
$&&(6625<+2/'(5
Altman Lighting, Inc.
57 Alexander St., Yonkers NY, 10701
1-800-4-ALTMAN
SPECIFICATIONS SUBJECT TO CHANGE WITHOUT NOTICE. COPYRIGHT 2012© ALTMAN LIGHTING, INC. ALL RIGHTS RESERVED.
INSTALLING THE LAMP
LAMP
CAUTION: Do not use any lamps exceeding 750W,
or permanent damage will result!
CAUTION: DO NOT touch the glass portion of the
lamp with your hands!
CAUTION: Disconnect fixture before re-lamping.
1.
2.
3.
4.
5.
Loosen cap screw until it spins freely.
Pull lamp cap straight out from the luminaire body.
With protective wrap still in place, grasp lamp at base and
gently push into socket until firmly seated.
Remove protective wrap from bulb and replace lamp cap
into luminaire body.
Tighten cap screw.
CAP
SCREW
USING SHORT YOKE POSITION
1.
2.
3.
4.
5.
Cap Assembly
ADJUSTING YOKE
Shutter Rotation
Lock Knob
Shutter
Handle
Short Yoke
Position
1.
2.
T-Handles
Remove T-Handle and its associated hardware.
Remove yoke bolts, cup washers and pivot covers. Note:
use a 1/4” hex head wrench to remove yoke bolts.
Stretch yoke and snap it into short yoke position.
Replace pivot covers, cup washers and yoke bolts.
Replace T-Handle into square hole, keeping the washer
between handle and yoke.
Shutter
Assembly
Yoke bolts
Cup Washers
Pivot Covers
3.
With one hand on ring handle to hold unit, loosen THandle.
Tilt unit to desired angle. Note: Reference angles have
been molded on the pivot cover to make adjustments
easier and more precise.
Tighten T-Handle to secure fixture in place.
ROTATING SHUTTER ASSEMBLY
1.
Shutter
Lock
Lever
Lens
Tube
2.
3.
4.
Loosen shutter rotation lock knob on either side of the
luminaire.
Rotate shutter assembly 360° in either direction.
Tighten shutter rotation lock knobs to secure shutter assembly.
To lock the shutters in place, rotate the Shutter Lock Lever
until proper tension is applied to shutters.
INSTALLING C-CLAMP
The C-clamp is used to mount the luminaire to a pipe hang
position. The C-clamp attaches to the top of the yoke via
the 1/2” bolt provided with the C-clamp. Be sure to keep the
washer between the bolt head and the yoke.
Altman Lighting, Inc.
57 Alexander St., Yonkers NY, 10701
1-800-4-ALTMAN
SPECIFICATIONS SUBJECT TO CHANGE WITHOUT NOTICE. COPYRIGHT 2012© ALTMAN LIGHTING, INC. ALL RIGHTS RESERVED.
ACCESSORY RETAINING LATCH
This unique retaining hatch is designed for positive locking and
manual return.
1. Slide Clip to right side.
2. Swing latch back.
3. Insert accessory.
4. Close latch. Make sure latch locks in place.
Distance
Knob
Centering
Knob
ADJUSTING LAMP
1.
2.
3.
4.
With power on and all four shutters open, shine light onto a
surface perpendicular to fixture and adjust for sharp focus.
Rotate distance knob all the way to the left to put unit into
peak focus.
Loosen centering knob slightly and adjust so the hot-spot is
in the center of the beam of light. Tighten centering knob
to lock lamp in place.
Turn distance knob to the right until desired field is achieved.
The more you turn to the right, the flatter the field will get.
Cap
Screw
DROP IN IRIS SLOT
This larger slot can accept either a drop-in iris or a motorized
pattern device (gobo rotator, yo-yo etc). The slot has a retractable
cover to prevent light leak when not in use. When a device
is used, the cover should be closed to the edge of the device
placed in the slot. When a drop-in iris is used, always place it so
the flat side is facing the shutters.
Pattern
Slot
Reflector
Housing
CLEANING THE REFLECTOR
1.
2.
3.
4.
5.
6.
7.
Reflector
Remove lamp cap from luminaire.
Remove yoke from luminaire.
Remove shutter assembly rotation lock knobs.
Remove the four screws from the reflector housing.
Lift off the top half of the reflector housing.
Dampen a clean, lint-free cloth with denatured alcohol and
gently wipe reflector clean. Align reflector with locating
springs, replace luminaire body top.
Re-install four screws in luminaire body. WARNING: never
use glass or window cleaner or any abrasive material to
clean the reflector. Use of these items will damage the
reflector.
PATTERN PROJECTION
The pattern holder slot accepts standard ETC Source 4 size
pattern holders. The image of the pattern can be rotated 360°
in either direction. The use of a donut will sharpen the image.
Altman Lighting, Inc.
57 Alexander St., Yonkers NY, 10701
1-800-4-ALTMAN
SPECIFICATIONS SUBJECT TO CHANGE WITHOUT NOTICE. COPYRIGHT 2012© ALTMAN LIGHTING, INC. ALL RIGHTS RESERVED.
Reflector
Housing
Screws
Plate
Stud
Springs
INSTALLING SHUTTER PLATES
1.
2.
Pressure Plate (completely flat): Install such that the tabs are
on the top and bottom and sides.
Iris and spring plate. Install so that the (4) studs face the
back of the unit.
Plate
Studs
Shutter
Plates
SHUTTERS
1. 5IFTIVUUFSTBSFOPUSFNPWBCMFXJUIPVUEJTTFNCMJOHUIFVOJU
2. $BSFNVTUCFHJWFOUPNBLFTVSFFBDIPGUIFGPVSTIVUUFSTTUBZ
JOUIFJSQSPQFSQPTJUJPOTJOCFUXFFOUIFTIVUUFSQMBUFT
Top latch cover
Barrel screws
CLEANING/REPLACING LENSES
1.
2.
3.
4.
5.
6.
7.
Lens
Lens retainer
rings
8.
9.
WARNING: Never use glass or window cleaner or any abrasive material to clean
a lens. These types of cleaners will stain the lens surface. Abrasive materials will
damage the surface of the lens.
Lower accessory
cover
50° (4.5 X 6)
Altman Lighting, Inc.
Remove focus lock knob, push in safety pin and slide lens
barrel out.
Place barrel on a surface so that the two halves are oriented
as the top and bottom.
Remove lower accessory cover with (2) screws.
Remove top latch cover with (2) screws.
Remove (4 ) barrel screws, one on each side.
Carefully remove top half of the barrel.
Replace or clean lenses with mild soap and water, and a
clean, lint-free cloth.
Replace top half of barrel, top latch cover, bottom cover and
re-install screws.
Slide lens barrel back into unit and replace focus lock knobs.
36° (6 X 9)
26° (6 X 12)
57 Alexander St., Yonkers NY, 10701
1-800-4-ALTMAN
19° (6 X 16)
SPECIFICATIONS SUBJECT TO CHANGE WITHOUT NOTICE. COPYRIGHT 2012© ALTMAN LIGHTING, INC. ALL RIGHTS RESERVED.