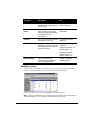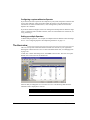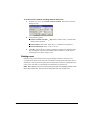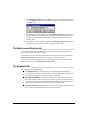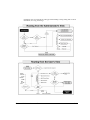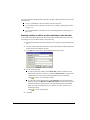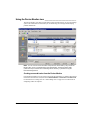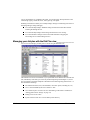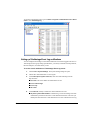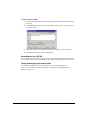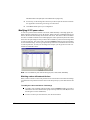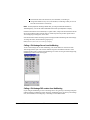
1
ADMINISTERING TELEVANTAGE
TELEVANTAGE 7
COPYRIGHT
© 2005 Vertical Communications, Inc. All rights reserved. This manual and the software described in it are copyrighted with all rights reserved.
No part of this publication may be reproduced, transmitted, transcribed, stored in a retrieval system or translated into any language in any form
by any means without the written permission of Vertical Communications, Inc.
Portions © 1999, Microsoft Corporation. All rights reserved.
Portions copyright (c) 1999 - 2005 NetGroup, Politecnico di Torino (Italy). Copyright (c) 2005 CACE Technologies, Davis (California). All
rights reserved. Redistribution and use in source and binary forms, with or without modification, are permitted provided that the following
conditions are met:
1. Redistributions of source code must retain the above copyright notice, this list of conditions and the following disclaimer.
2. Redistributions in binary form must reproduce the above copyright notice, this list of conditions and the following disclaimer in the
documentation and/or other materials provided with the distribution.
3. Neither the name of the Politecnico di Torino, CACE Technologies nor the names of its contributors may be used to endorse or promote
products derived from this software without specific prior written permission.
TRADEMARKS
Vertical Communications, Inc. and the Vertical Communications logo and combinations thereof are trademarks of Vertical Communications,
Inc. TeleVantage and the TeleVantage logo are registered trademarks of Vertical Communications, Inc. Microsoft, Windows, and Windows
NT are registered trademarks of Microsoft Corporation. SQL Server is a trademark of Microsoft Corporation. Adobe and Acrobat are registered
trademarks of Adobe Systems Incorporated. Dialogic is a registered trademark of Intel Corporation. Other brand names, company names and
product names are trademarks or registered trademarks of their respective companies.
LIMITED WARRANTY ON SOFTWARE
Vertical warrants that (a) the Software will perform substantially in accordance with the accompanying written materials for a period of (30)
days from the date of receipt. Any implied warranties on the Software is limited to thirty (30) days. Some states/jurisdictions do not allow
limitations on duration of an implied warranty, so the above information may not apply to you.
CUSTOMER REMEDIES: Vertical’s and its suppliers’ entire liability and your exclusive remedy shall be, at Vertical’s option, either (a) return
of the price paid, or (b) repair or replacement of the Software that does not meet Vertical’s Limited Warranty and which is returned to Vertical
with a copy of your receipt. This Limited Warranty is void if failure of the Software has resulted from accident, abuse, or misapplication. Any
replacement Software will be warranted for the remainder of the original warranty period or thirty (30) days, whichever is longer.
VERTICAL AND ITS SUPPLIERS DISCLAIM ALL OTHER WARRANTIES, REPRESENTATIONS, PROMISES AND GUARANTEES,
EXPRESS OR IMPLIED, STATUTORY OR OTHERWISE, ON THE SOFTWARE, MEDIA, DOCUMENTATION OR RELATED
TECHNICAL SUPPORT INCLUDING, WITHOUT LIMITATION, THE IMPLIED WARRANTIES OF MERCHANTABILITY,
PERFORMANCE AND FITNESS FOR A PARTICULAR PURPOSE. VERTICAL WILL NOT BE LIABLE FOR ANY BUG, ERROR,
OMISSION, DEFECT, DEFICIENCY OR NONCONFORMITY IN ANY SOFTWARE. AS A RESULT, THE SOFTWARE AND
DOCUMENTATION IS LICENSED “AS IS”, AND THE PURCHASER ASSUMES THE ENTIRE RISK AS TO ITS QUALITY AND
PERFORMANCE.
IN NO EVENT WILL VERTICAL OR ITS SUPPLIERS BE LIABLE FOR INDIRECT, SPECIAL, INCIDENTAL, CONTINGENT,
CONSEQUENTIAL OR SIMILAR DAMAGES OF ANY KIND RESULTING FROM ANY DEFECT IN THE SOFTWARE OR
DOCUMENTATION, INCLUDING, WITHOUT LIMITATION, ANY LOST PROFITS OR SAVINGS, DAMAGES FROM BUSINESS
INTERRUPTION, LOSS OF OR TO DATA, COMPUTER PROGRAMS, BUSINESS, DOWNTIME, GOODWILL, DAMAGE TO OR
REPLACEMENT OF EQUIPMENT OR PROPERTY, OR ANY COSTS OF RECOVERING, REPROGRAMMING OR REPRODUCING
ANY PROGRAM OR DATA USED IN CONJUNCTION WITH THE PRODUCTS, EVEN IF VERTICAL, ITS SUPPLIERS OR ANYONE
ELSE HAS BEEN ADVISED OF THE POSSIBILITY OF SUCH DAMAGES. YOU AGREE THAT VERTICAL’S AND ITS SUPPLIERS’
LIABILITY ARISING OUT OF CONTRACT, NEGLIGENCE, STRICT LIABILITY IN TORT OR WARRANTY SHALL NOT EXCEED
THE AMOUNT PAID BY YOU FOR THIS PRODUCT. ANY WRITTEN OR ORAL INFORMATION OR ADVICE GIVEN BY
VERTICAL DEALERS, DISTRIBUTORS, AGENTS OR EMPLOYEES WILL IN NO WAY INCREASE THE SCOPE OF THIS
WARRANTY, NOR MAY YOU RELY ON ANY SUCH WRITTEN OR ORAL COMMUNICATION.
Some jurisdictions do not allow the limitation or exclusion of implied warranties or liability for incidental or consequential damages, and some
jurisdictions have special statutory consumer protection provisions which may supersede this limitation, so the above limitation or exclusion
may not apply to you. This warranty gives you specific legal rights, and you may also have other rights which vary from jurisdiction to
jurisdiction. This software and license may not be transferred or resold without authorization from Vertical Communications, Inc..
THIS SOFTWARE IS PROVIDED BY THE COPYRIGHT HOLDERS AND CONTRIBUTORS "AS IS" AND ANY EXPRESS OR
IMPLIED WARRANTIES, INCLUDING, BUT NOT LIMITED TO, THE IMPLIED WARRANTIES OF MERCHANTABILITY AND
FITNESS FOR A PARTICULAR PURPOSE ARE DISCLAIMED. IN NO EVENT SHALL THE COPYRIGHT OWNER OR
CONTRIBUTORS BE LIABLE FOR ANY DIRECT, INDIRECT, INCIDENTAL, SPECIAL, EXEMPLARY, OR CONSEQUENTIAL
DAMAGES (INCLUDING, BUT NOT LIMITED TO, PROCUREMENT OF SUBSTITUTE GOODS OR SERVICES; LOSS OF USE,
DATA, OR PROFITS; OR BUSINESS INTERRUPTION) HOWEVER CAUSED AND ON ANY THEORY OF LIABILITY, WHETHER
IN CONTRACT, STRICT LIABILITY, OR TORT (INCLUDING NEGLIGENCE OR OTHERWISE) ARISING IN ANY WAY OUT OF
THE USE OF THIS SOFTWARE, EVEN IF ADVISED OF THE POSSIBILITY OF SUCH DAMAGE.
This product includes software developed by the University of California, Lawrence Berkeley Laboratory and its contributors.
Vertical Communications, Inc.
One Memorial Drive
Cambridge, MA 02142
#97-6602 Edition 7 (September 2005)
CONTENTS
Getting Started
Chapter 1. Introduction to TeleVantage ..........................................1-1
Welcome to TeleVantage......................................................................1-2
What’s new in this version of TeleVantage....................................... 1-2
Major TeleVantage features.............................................................. 1-2
Upgrading from a previous version of TeleVantage..............................1-4
Before configuring a new TeleVantage system.....................................1-5
Configuring a new TeleVantage system ...............................................1-5
Running reports without telephony boards or licenses..................... 1-5
Getting technical support ......................................................................1-6
TeleVantage documentation .................................................................1-6
The TeleVantage documentation set................................................ 1-7
Accessing online documentation ...................................................... 1-9
Using the TeleVantage Administrator
Chapter 2. The TeleVantage Administrator.....................................2-1
About the TeleVantage Administrator ...................................................2-2
Logging on to the Administrator ........................................................ 2-2
Reconfiguring the computer to use a different phone....................... 2-3
The Administrator interface ...................................................................2-3
Using the Tools menu ....................................................................... 2-6
Working in views ............................................................................... 2-7
Customizing columns ............................................................................2-9
Working with voice files.........................................................................2-9
Changing the voice file format......................................................... 2-10
Using the audio controls.................................................................. 2-10
Importing and exporting voice files ................................................. 2-11
Changing audio output .................................................................... 2-11
Chapter 3. Defining System Settings...............................................3-1
About system settings ..........................................................................3-2
Advanced TeleVantage settings ....................................................... 3-2
Documentation for the System Settings dialog box.......................... 3-2
Setting general TeleVantage options ....................................................3-3
Setting general Server settings......................................................... 3-4
Configuring the dial-by-name directory............................................. 3-6
Setting business hours ......................................................................... 3-7
Defining business hours .................................................................... 3-7
Setting up e-mail notification and Exchange synchronization............. 3-10
Exchange synchronization behavior ............................................... 3-10
Enabling e-mail notification ............................................................. 3-10
Enabling Microsoft Exchange synchronization ............................... 3-11
Configuring users for e-mail notification and synchronization ........ 3-11
Enforcing strong password security.................................................... 3-12
Setting up personal call supervision defaults...................................... 3-14
Chapter 4. Recording All TeleVantage Calls................................... 4-1
About recording calls ............................................................................ 4-2
What parts of the call are recorded ................................................... 4-2
Exempting queue calls ...................................................................... 4-2
Privacy ............................................................................................... 4-3
Preparing to record all calls .................................................................. 4-3
Offloading call recording voice files from your TeleVantage Server. 4-3
Storing call recordings on the TeleVantage Server .......................... 4-5
Call recordings and voice resources ................................................. 4-5
Call recordings beeps and conference resources ............................ 4-5
Recording all calls................................................................................. 4-6
Including a beep on call recordings ...................................................... 4-7
Customizing the recording beep ....................................................... 4-7
Archiving call recordings....................................................................... 4-8
Chapter 5. Managing Trunks and Spans......................................... 5-1
About trunks and spans ........................................................................ 5-2
Trunk types........................................................................................ 5-2
Adding trunks..................................................................................... 5-3
Naming trunks ................................................................................... 5-3
Monitoring trunks ............................................................................... 5-3
Deleting trunks................................................................................... 5-4
Configuring trunks for inbound and outbound calls .............................. 5-4
Inbound and outbound calls and hunt groups................................... 5-5
Placing outbound calls on a specific trunk ........................................ 5-5
Telephone company services that help TeleVantage........................... 5-5
Collecting ANI/DID digits ................................................................... 5-6
Using DID with Robbed Bit T1 trunks ............................................... 5-6
Using DID with analog trunks............................................................ 5-6
Setting up fax routing............................................................................ 5-7
Customizing fax routing..................................................................... 5-7
Using Delayed Answer ......................................................................... 5-8
ADMINISTERING TELEVANTAGE
Enabling Delayed Answer................................................................. 5-8
TeleVantage behavior with Delayed Answer.................................... 5-9
The Trunks view..................................................................................5-10
Digital and Internet spans ............................................................... 5-11
Adding an analog trunk .......................................................................5-12
Setting up digit collection on an analog trunk ................................. 5-13
Handling international Caller ID on analog trunks .......................... 5-15
Using Delayed Answer on analog trunks........................................ 5-16
Adding a digital Robbed Bit T1 span...................................................5-17
Using a signaling template .............................................................. 5-19
Adding a digital ISDN or CAS span.....................................................5-19
Adding digital ISDN or CAS spans.................................................. 5-20
Adding a digital ISDN BRI span ..........................................................5-21
Editing an ISDN BRI span............................................................... 5-22
Using a partial digital span ..................................................................5-23
Optimizing your ISDN settings ............................................................5-23
Using ISDN Two B-Channel Transfer............................................. 5-25
Using ISDN BRI point-to-point protocol .......................................... 5-25
Setting location and Caller ID settings ................................................5-25
Specifying ISDN outbound Caller ID ...................................................5-27
Preparing to enter outbound Caller ID settings............................... 5-28
Setting ISDN outbound Caller ID for the system ............................ 5-29
Setting ISDN outbound Caller ID for a span ................................... 5-29
Recognizing inbound Caller ID name on ISDN lines...................... 5-31
Enabling ISDN Megacom support.......................................................5-31
Adding an Internet SIP or H.323 span ................................................5-32
Entering trunk defaults for a span .......................................................5-32
Chapter 6. Managing Users and Roles ............................................6-1
About users ...........................................................................................6-2
About adding users ........................................................................... 6-2
Where to set user options ................................................................. 6-3
The Admin and Operator users......................................................... 6-4
About Operators................................................................................ 6-4
The Users view .....................................................................................6-6
Archiving a user’s voicemail and call recordings .............................. 6-8
Deleting a user .................................................................................. 6-9
About the User dialog box...................................................................6-10
Adding a user by using a template.................................................. 6-11
The User tab .......................................................................................6-12
Identifying the user .......................................................................... 6-12
Assigning an extension ................................................................... 6-12
CONTENTS
Assigning a station ID...................................................................... 6-13
Assigning a DID number ................................................................. 6-14
Creating a password ....................................................................... 6-14
Setting up a personal operator........................................................ 6-15
Entering the user’s Microsoft Windows NT account ....................... 6-15
The User \ Account Codes tab............................................................ 6-15
The User \ Call Log tab....................................................................... 6-15
Determining which calls are logged ................................................ 6-15
Associating the user with an Organization...................................... 6-16
The User \ ISDN Outbound Caller ID tab............................................ 6-16
Specifying a custom Caller ID name............................................... 6-17
The User \ Numbers tab ..................................................................... 6-17
The User \ SIP Accounts tab .............................................................. 6-18
The Voice Mail tab .............................................................................. 6-18
Configuring the user’s voice mailbox .............................................. 6-18
Enabling voicemail greeting logon .................................................. 6-19
The Voicemail \ Notification tabs ........................................................ 6-19
Notification information.................................................................... 6-20
Determining which voice messages send notification .................... 6-21
Setting e-mail notification ................................................................ 6-21
Setting pager notification................................................................. 6-22
Setting call notification..................................................................... 6-22
Scheduling notifications................................................................... 6-23
Defining a schedule for notifications ............................................... 6-24
Setting up custom hours.................................................................. 6-26
The Phone tabs .................................................................................. 6-27
The Audio tab ..................................................................................... 6-28
Setting the storage size for greetings and voice titles .................... 6-28
Choosing a language for telephone prompts.................................. 6-28
The Audio \ Hold Music, Voice Title, and Disk Usage tabs................. 6-29
Setting the user’s hold music .......................................................... 6-29
Recording the user’s voice title ....................................................... 6-29
Viewing the user’s disk usage......................................................... 6-29
The Security tab.................................................................................. 6-30
Configuring password expiration..................................................... 6-30
Configuring whether the user’s calls can be supervised................. 6-31
The Security \ Permissions tab ........................................................... 6-31
Before assigning permissions ......................................................... 6-31
Assigning a user’s permissions....................................................... 6-32
Changing the user’s roles................................................................ 6-33
The Security \ Dialing Permissions tab ............................................... 6-33
The Dial-by-name Directory tab.......................................................... 6-34
ADMINISTERING TELEVANTAGE
The ViewPoint tab ...............................................................................6-34
Adding a user at the telephone ...........................................................6-35
Creating one or more users from templates........................................6-35
Importing users in bulk ........................................................................6-37
Importing users from a .CSV file ..................................................... 6-37
Importing users from Active Directory............................................. 6-39
Reviewing and editing users ........................................................... 6-42
Applying user settings in bulk..............................................................6-43
Which user settings can be applied in bulk..................................... 6-43
Saving settings as the default user template .................................. 6-44
Setting and applying user settings in bulk....................................... 6-44
Modifying a user’s ViewPoint settings.................................................6-46
Managing roles....................................................................................6-46
Assigning users to a role................................................................. 6-47
Editing a role.................................................................................... 6-47
Creating a new role ......................................................................... 6-47
TeleVantage permissions....................................................................6-50
General user permissions ............................................................... 6-51
Dialing permissions ......................................................................... 6-55
Helping new users get started.............................................................6-56
Reducing TeleVantage complexity by hiding features.................... 6-57
Chapter 7. Managing Stations ..........................................................7-1
About TeleVantage stations ..................................................................7-2
Assigning stations to users ............................................................... 7-2
Assigning analog stations 1-4 for failover support ............................ 7-2
About stations and users................................................................... 7-2
About stations and workstation computers ....................................... 7-3
Viewing station activity ...................................................................... 7-3
Applying phone settings in bulk.............................................................7-4
Which phone settings can be applied in bulk.................................... 7-4
Saving settings as a default phone template .................................... 7-4
Setting and applying phone settings in bulk ..................................... 7-5
Using internal stations...........................................................................7-7
Supporting different types of analog CLASS phones ....................... 7-7
Using external stations..........................................................................7-8
Defining the number of external stations .......................................... 7-8
Assigning external stations to users ................................................. 7-9
Configuring a user’s external station............................................... 7-10
What users need to know about external stations.......................... 7-12
Assigning and configuring a user’s station..........................................7-12
Setting general phone options on the Phone tab ........................... 7-13
CONTENTS
The Phone tab for station ID 0 ........................................................ 7-16
Configuring call screening, announcing, and forwarding................ 7-17
Forwarding the user’s calls.............................................................. 7-18
Setting an analog station’s special features.................................... 7-20
Setting a digital station’s special features ....................................... 7-21
Configuring an analog phone’s Caller ID display............................ 7-21
Configuring a phone’s ring patterns ................................................ 7-22
Configuring a station for hands-free answering .............................. 7-22
Configuring a user’s automatic station log out time ........................ 7-23
Configuring digital stations.................................................................. 7-24
Configuring a user’s digital feature phone ...................................... 7-24
Mapping programmable buttons to TeleVantage commands......... 7-28
Using line appearances................................................................... 7-29
Enabling digital phone Busy Lamp Field for the system................. 7-31
Configuring Speed Dial and Call Forwarding on the phone ........... 7-31
Configuring stations for special use.................................................... 7-32
Setting up conference room, fax, or area phones........................... 7-32
Having a station automatically dial when picked up ....................... 7-32
Requiring user logon before a station can place external calls ...... 7-33
Changing the offhook alert audio .................................................... 7-34
Creating null stations....................................................................... 7-34
Chapter 8. Managing Workgroups................................................... 8-1
About Workgroups ................................................................................ 8-2
Public and personal workgroups....................................................... 8-2
Benefits of using workgroups ............................................................ 8-2
Workgroups view............................................................................... 8-3
Creating a Workgroup........................................................................... 8-4
Calling, paging, or picking up calls from workgroups........................ 8-5
Assigning a DID number to a workgroup .......................................... 8-5
Listing the workgroup in the dial-by-name directory ......................... 8-6
When no one answers a call to a workgroup.................................... 8-6
Associating the workgroup with an Organization.............................. 8-6
Limiting the number of simultaneous rung phones ........................... 8-6
Chapter 9. Managing Outbound Calls ............................................. 9-1
About dialing services........................................................................... 9-2
Dialing service types ......................................................................... 9-2
Examples of using dialing services ................................................... 9-3
Testing trunks with dialing services................................................... 9-4
The Dialing Services view..................................................................... 9-4
Deleting or disabling a dialing service............................................... 9-5
Hiding dialing services....................................................................... 9-6
ADMINISTERING TELEVANTAGE
Disabling dialing services while creating them ................................. 9-6
Managing access codes........................................................................9-6
Tips on access codes and names for services................................. 9-6
Avoiding dialing ambiguities.............................................................. 9-7
Creating a dialing service with access code 0 .................................. 9-7
Changing an access code in users’ saved numbers ........................ 9-7
Setting default access codes for callbacks ....................................... 9-8
Changing the access code to select a trunk ..................................... 9-9
Adding a dialing service ........................................................................9-9
The General tab .............................................................................. 9-10
The Trunks tab ................................................................................ 9-13
The Codecs tab ............................................................................... 9-15
The Location Settings tab ............................................................... 9-16
The Dialing Exceptions tab ............................................................. 9-17
The Permissions tab ....................................................................... 9-19
An example of how to set dialing service permissions ................... 9-20
Using routing services.........................................................................9-22
How routing services work .............................................................. 9-22
How you can use routing services .................................................. 9-23
An example of routing rules ............................................................ 9-24
How ViewPoint reformats phone numbers ..................................... 9-26
Adding a routing service.................................................................. 9-27
The Routing Rules tab .................................................................... 9-28
Adding a new routing rule ............................................................... 9-29
Defining patterns to match the dialed digits.................................... 9-31
Adding custom routing variables..................................................... 9-32
Defining a new number for a routing rule........................................ 9-33
Setting dialing timeouts .......................................................................9-35
Changing timeouts with analog or Robbed Bit T1 lines.................. 9-37
Modifying ambiguous dialing timeouts from auto attendants ......... 9-37
Setting up emergency dialing..............................................................9-37
Using standard 911 service with TeleVantage ............................... 9-37
Using enhanced 911 service with TeleVantage ............................. 9-38
Chapter 10. Handling Inbound Calls..............................................10-1
About inbound call routing...................................................................10-2
About auto attendants .........................................................................10-4
What callers can do at an auto attendant ....................................... 10-4
How you can use auto attendants................................................... 10-4
What callers hear ............................................................................ 10-5
The Default Auto Attendant............................................................. 10-5
The Auto Attendants view ............................................................... 10-6
CONTENTS
Setting up an auto attendant............................................................... 10-6
Creating a new auto attendant ........................................................ 10-7
Defining menu choices .................................................................... 10-8
Preventing callers from dialing extensions.................................... 10-13
Restricting an auto attendant to members of a workgroup........... 10-14
Scheduling transfers and greetings............................................... 10-14
Setting up an auto attendant’s hold music .................................... 10-17
Setting custom data variables and skill requirements
with an auto attendant ............................................................ 10-17
Customizing login behavior from auto attendants......................... 10-19
Avoiding the auto attendant ambiguous dialing delay .................. 10-19
Assigning an auto attendant to a trunk ......................................... 10-20
Routing calls to users ....................................................................... 10-20
Routing calls to extensions ............................................................... 10-21
Routing calls to workgroups.............................................................. 10-21
Chapter 11. Tracking and Distinguishing Calls............................ 11-1
About tracking and distinguishing calls............................................... 11-2
Using Organizations ........................................................................... 11-2
Defining an Organization................................................................. 11-3
Assigning users to Organizations.................................................... 11-3
Creating an auto attendant for each Organization.......................... 11-4
Restricting outbound trunk use by Organization............................. 11-4
Configuring Operators for multiple Organizations........................... 11-5
Using account codes .......................................................................... 11-6
Account code modes....................................................................... 11-7
Setting general account code options............................................. 11-8
Setting a user’s account code modes ............................................. 11-9
How users enter account codes...................................................... 11-9
Creating a valid account code list ................................................. 11-10
Using a verbal account code prompt ............................................ 11-12
Viewing account codes in the Call Log or Call Monitor................. 11-12
Generating account code reports.................................................. 11-12
Defining custom data variables......................................................... 11-13
Defining a custom data variable.................................................... 11-14
Setting the value for a custom data variable................................. 11-15
Chapter 12. Monitoring and Maintenance ..................................... 12-1
About monitoring and maintaining your TeleVantage system ............ 12-2
Database server memory usage..................................................... 12-2
Using the Device Monitor view ........................................................... 12-3
Monitoring station activity ................................................................ 12-4
ADMINISTERING TELEVANTAGE
Monitoring trunk activity................................................................... 12-6
Monitoring all calling parties on a device ........................................ 12-7
Viewing an active call’s history........................................................ 12-8
Reading device status..................................................................... 12-8
Enabling and disabling trunks ......................................................... 12-9
Managing your dial plan with the Dial Plan view ...............................12-10
Using the Maintenance Log view ......................................................12-11
Navigating the Maintenance Log view .......................................... 12-12
Clearing the Maintenance Log ...................................................... 12-12
Using the Call Log view.....................................................................12-12
Call Log columns........................................................................... 12-13
Copying a Call Log entry............................................................... 12-15
Viewing a call’s history .................................................................. 12-15
Setting Call Log options ................................................................ 12-16
Displaying a specific number of Call Log entries .......................... 12-16
Entering an account code for a call............................................... 12-16
Exporting the Call Log................................................................... 12-17
Using the Trunk Log view..................................................................12-18
Copying a Trunk Log entry............................................................ 12-19
Archiving the Trunk Log ................................................................ 12-20
Setting Trunk Log options ............................................................. 12-20
Setting Call and Trunk Log options ...................................................12-20
Viewing the TeleVantage Event Log .................................................12-20
Setting up TeleVantage Event Log notifications........................... 12-21
TeleVantage Event Log messages............................................... 12-22
Viewing TeleVantage performance counters ....................................12-35
How TeleVantage counters are organized ................................... 12-36
Viewing performance counters in Windows.................................. 12-37
Archiving call recordings and voice mail ...........................................12-39
Configuring the Recording Archive Service .................................. 12-41
Starting and stopping the TeleVantage Recording Archive
Service.................................................................................... 12-43
Archiving mailbox recordings ........................................................ 12-44
Configuring who can manage archived recordings ...................... 12-46
Using the TeleVantage Archive Recording Browser .................... 12-49
Monitoring database and disk usage ................................................12-49
Viewing storage statistics.............................................................. 12-50
Archiving the Call and Trunk Logs ................................................ 12-51
Moving voice files .......................................................................... 12-52
Changing special TeleVantage directories........................................12-53
Identifying security risks ....................................................................12-53
Backing up TeleVantage ...................................................................12-53
CONTENTS
Backing up TeleVantage data ....................................................... 12-54
Restoring TeleVantage data ......................................................... 12-54
Moving a TeleVantage Server to another PC ............................... 12-55
Shutting down the TeleVantage Server ............................................ 12-56
Canceling or modifying a shutdown .............................................. 12-58
Starting the TeleVantage Server................................................... 12-58
Restarting stations or trunks ............................................................. 12-58
Starting a new Server log .............................................................. 12-59
Capturing network troubleshooting logs ........................................... 12-59
Adjusting or turning off network capture........................................ 12-60
Reporting problems to your TeleVantage provider ........................... 12-61
Setting Problem Report Wizard defaults....................................... 12-61
Using the Problem Report Wizard................................................. 12-61
Reporting TeleVantage Server problems...................................... 12-62
Reporting workstation application problems ................................. 12-63
Reporting distributed problems ..................................................... 12-63
The problem report package ......................................................... 12-64
Running the Problem Report Wizard from the command line ...... 12-64
Chapter 13. Managing System Prompts and Audio ..................... 13-1
About system prompts and audio ....................................................... 13-2
Setting general system prompt options .............................................. 13-2
Setting the system prompt language .............................................. 13-2
Presenting a confirmation prompt before voicemail........................ 13-2
The System Prompts view .................................................................. 13-3
Controlling the prompt display......................................................... 13-4
Managing system prompts.................................................................. 13-4
Playing system prompts .................................................................. 13-4
Exporting system prompt text.......................................................... 13-4
Exporting and importing system prompt audio files ........................ 13-5
Changing the encoding format of system prompts ......................... 13-6
Recording over system prompts ......................................................... 13-6
Recording system prompts professionally ...................................... 13-7
Recording over system prompts yourself........................................ 13-9
Testing system prompts ................................................................ 13-11
Localizing the telephone commands ................................................ 13-13
Changing the TeleVantage ringback tone..................................... 13-13
Changing the offhook alert audio .................................................. 13-13
Setting up system-wide music-on-hold ............................................. 13-13
Adding music-on-hold sources...................................................... 13-14
Testing hold audio with *19 ........................................................... 13-17
ADMINISTERING TELEVANTAGE
Chapter 14. Configuring SIP Internet Telephony..........................14-1
About SIP telephony and TeleVantage ...............................................14-2
Configuring TeleVantage for SIP .................................................... 14-2
Calling TeleVantage extensions from external SIP devices........... 14-3
Dialing SIP addresses from TeleVantage....................................... 14-3
Troubleshooting SIP........................................................................ 14-3
Adding a SIP span ..............................................................................14-4
Modifying SIP span codecs............................................................. 14-8
Using more than one SIP span ....................................................... 14-9
Setting DTMF Transmission Mode and RFC2833 Payload Type 14-10
Configuring a user for a SIP phone...................................................14-10
Using a SIP phone ........................................................................ 14-14
Authenticating SIP phone external stations ......................................14-15
Increasing SIP span security......................................................... 14-17
Authenticating REGISTER and MWI requests ............................. 14-18
About SIP accounts...........................................................................14-20
Creating a SIP account ................................................................. 14-20
Setting voicemail access for SIP stations and users.........................14-22
Configuring a Vertical Aastra SIP phone for TeleVantage ................14-22
Configuring the Vertical Aastra SIP phone configuration files...... 14-23
Specifying the TFTP server address............................................. 14-23
Resetting the phone to pick up configuration changes................. 14-24
Dialing calls from the Vertical Aastra SIP phone .......................... 14-24
Configuring Sipura FXS and FXO gateways for TeleVantage ..........14-24
Obtaining the Sipura device’s IP address..................................... 14-25
Configuring a Sipura FXS port as a TeleVantage
external station ....................................................................... 14-25
Configuring a Sipura FXO port as a PSTN gateway for
TeleVantage ........................................................................... 14-27
Configuring an eyeBeam SIP softphone for TeleVantage ................14-28
Installing and configuring the eyeBeam softphone....................... 14-29
Using the eyeBeam softphone with TeleVantage......................... 14-32
Using SIP servers .............................................................................14-32
The SIP Servers view.................................................................... 14-33
Information you need from a SIP service provider ....................... 14-33
Creating a SIP server.................................................................... 14-33
Caching and re-using SIP authentication credentials................... 14-40
Configuring PSTN T1/E1 and multi-line FXO gateways....................14-40
Setting up Broadvoice as a SIP service provider ..............................14-40
Creating a SIP server for Broadvoice ........................................... 14-40
Creating a SIP account for Broadvoice......................................... 14-41
The SIP Registration Bindings view ..................................................14-42
CONTENTS
Unregistering a SIP phone ............................................................ 14-43
Supporting SIP calls over NATs/firewalls ......................................... 14-43
TeleVantage residing behind a NAT/firewall................................. 14-44
Remote TeleVantage SIP end-points residing behind a NAT ...... 14-45
About SIP off-bus routing.................................................................. 14-46
Disabling off-bus routing................................................................ 14-47
How off-bus routing works............................................................. 14-47
Configuring off-bus routing ............................................................ 14-49
SIP standards supported by TeleVantage ........................................ 14-49
Chapter 15. Configuring H.323 Internet Telephony...................... 15-1
About H.323 Internet telephony and TeleVantage.............................. 15-2
Using a host-based or an embedded stack ........................................ 15-2
Examples of embedded and host-based stack configurations ....... 15-3
Using the RTP Resources tab......................................................... 15-4
Adding an H.323 span ........................................................................ 15-5
Modifying H.323 span codecs ......................................................... 15-8
Configuring a user to use an H.323 phone ......................................... 15-9
Permissions for H.323 phone users.............................................. 15-11
Connecting and configuring H.323 phones....................................... 15-11
Configuring multiple H.323 IP phones .......................................... 15-12
Using an H.323 IP phone over the Internet................................... 15-12
Configuring an H.323 Uniden IP phone for TeleVantage ................. 15-13
Installing the Uniden IP phone ...................................................... 15-13
Configuring the Uniden IP phone .................................................. 15-13
Using a Uniden IP phone .............................................................. 15-16
Contacting Uniden......................................................................... 15-17
Configuring an H.323 Polycom IP phone for TeleVantage ............... 15-18
Overview of TeleVantage - Polycom IP phone integration ........... 15-18
Editing the Polycom configuration files ......................................... 15-18
Configuring the Polycom IP phone ............................................... 15-22
Using the Polycom IP phone......................................................... 15-25
Issues with hold for users of Polycom IP phones ......................... 15-28
Issues for Administrators of Polycom IP phones .......................... 15-28
Contacting Polycom ...................................................................... 15-28
Sample configuration files ............................................................. 15-29
Troubleshooting a Polycom IP phone ........................................... 15-31
Configuring a PBX-IP Media Gateway for TeleVantage ................... 15-32
Configuring the PBX-IP Media Gateway device for use
with TeleVantage.................................................................... 15-32
Using a PBX-IP Media Gateway phone with TeleVantage........... 15-34
Dialing a PBX-IP Media Gateway phone directly.......................... 15-34
ADMINISTERING TELEVANTAGE
Using H.323 terminals with TeleVantage ..........................................15-34
Using NetMeeting or any H.323 terminal as an IP phone ............ 15-34
Placing calls to H.323 terminals such as NetMeeting................... 15-35
Placing calls to NetMeeting from TeleVantage ViewPoint ........... 15-35
Placing calls to NetMeeting from a TeleVantage phone .............. 15-36
Calling TeleVantage from H.323 terminals such as NetMeeting.. 15-36
Using Windows Phone Dialer as an H.323 terminal..................... 15-38
Enhancing a Web page with a “Call Us!” button........................... 15-38
Connecting two Servers using H.323 Gateways...............................15-39
Overview of creating an H.323 Gateway connection.................... 15-40
Illustration of an H.323 Gateway................................................... 15-40
Creating an H.323 Gateway.......................................................... 15-41
Creating H.323 Gateway dialing services..................................... 15-44
Creating H.323 Gateway users to unify two TeleVantage
Servers ................................................................................... 15-45
Receiving Caller ID from third-party H.323 gateways .......................15-48
Appendix A. Command Line Options ............................................. A-1
Appendix B. H.323 Gateway Configuration Worksheet ................ B-1
Index ...................................................................................................I-1
CONTENTS
Getting Started
CHAPTER 1
CHAPTER 1
INTRODUCTION TO TELEVANTAGE
CHAPTER CONTENTS
Welcome to TeleVantage . . . . . . . . . . . . . . . . . . . . . . . . . . . . . . . . . . . . . . . . . . 1-2
Upgrading from a previous version of TeleVantage . . . . . . . . . . . . . . . . . . . . . . 1-4
Before configuring a new TeleVantage system. . . . . . . . . . . . . . . . . . . . . . . . . . 1-5
Configuring a new TeleVantage system . . . . . . . . . . . . . . . . . . . . . . . . . . . . . . . 1-5
Getting technical support . . . . . . . . . . . . . . . . . . . . . . . . . . . . . . . . . . . . . . . . . . 1-6
TeleVantage documentation . . . . . . . . . . . . . . . . . . . . . . . . . . . . . . . . . . . . . . . . 1-6
Welcome to TeleVantage ___________________________________
TeleVantage is a feature-rich, software-based phone system that combines rock-solid stability
with the most advanced communications technology available today. TeleVantage delivers
greater functionality, flexibility, and value than proprietary PBXs to a variety of customers,
from small offices to large enterprise organizations with sophisticated call centers.
What’s new in this version of TeleVantage
For a complete list of new features in this version, see the Whatsnew.htm document displayed
at the end of the Workstation application installation program and also on the root of the
Master CD. It is also available through the online Help.
Major TeleVantage features
Major TeleVantage features include:
Q Fault tolerant architecture. Designed to keep your phone system up and running. If the
network or your desktop computer goes down, your phone lines are unaffected. Even in
the case of a TeleVantage Server malfunction or power outage, your critical phone lines
will stay open.
Q Software-only solution. With Intel’s Host Media Processing (HMP), you can deliver a
pure IP-PBX media server solution using just software. Just add the HMP licenses you
need for the number of IP ports and the media processing you want to support.
Q Intel board scalability. Scale your PBX to 288 trunks and 720 stations by adding the
appropriate Intel telephony boards you need.
Q Graphical call control. Gives you an easy visual way to place calls, transfer, put on
hold, send to voicemail, set up conference calls and more.
Q Verbal menus. Guide you through all call handling and user management tasks so that
you can use TeleVantage even without a computer.
Q Full-featured voicemail. Lets you create caller-specific greetings, log in remotely, and
manage your voice messages graphically from TeleVantage ViewPoint or your e-mail
Inbox. You can also easily call back the person who left you a message.
Q Powerful call center options. Two types of call centers are available in
TeleVantage—call center queues and ACD workgroups. Call center queues provide a
full-featured call distribution system, enabling you to customize your callers’ hold
experience, play single or repeating prompts, prompt callers to enter data, configure call
priority, and set up multi-level supervisor permissions. ACD workgroups provide fewer
features and are available to you if you have not purchased the Call Center Agent
licenses that are required for call center queues. You can use the TeleVantage Call
Center Reporter to run a variety of reports on call center activity for both call center
queues and ACD workgroups.
Q E-mail, pager, and call notification. Receive notification of incoming voicemail, using
e-mail, pager, or by having TeleVantage call you.
1-2
ADMINISTERING TELEVANTAGE
Q Advanced caller identification. Using PIN numbers or Caller ID, TeleVantage lets you
easily screen every call and message, either visually or by announcing the caller’s name
when you answer the phone.
Q Call recording. Lets you record conversations of calls or conferences, on demand or
automatically across the entire company or specified individuals.
Q Personal statuses. Lets you create “Vacation,” “Out of the Office,” and other personal
statuses to let your coworkers know what you are doing. Personal status can set whether
your phone rings, the greeting that plays, and routing list behavior when you are not able
to answer calls.
Q TeleVantage ViewPoint Web Access. Enables users with a Web browser to access
voicemail or manage personal settings from anywhere in the world over the Internet or
from non-Windows platforms in the office.
Q “Follow-me” call forwarding. Features routing lists that try several locations to find
you. You can create several routing lists and apply them to specific callers.
Q Call logging with cradle-to-grave history. Lets users see a record of their own calls
and gives TeleVantage system administrators access to your company’s complete log.
Click on any call in the Call Log or Call Monitor to see a real-time history of its flow
through the system.
Q Scheduled auto attendants. Allows you to schedule an auto attendant’s use of specific
greetings and the way it routes calls according to the time of the day and days of the
week.
Q Flexible Internet-ready architecture. Supports pure SIP or H.323 IP telephony and
hybrid solutions such as IP-connected phones. Lets you adapt to Internet telephony at
your own pace.
Q TAPI Service Provider and Contact Manager Assistant. Lets you use Act!, Outlook,
GoldMine, GoldMine FrontOffice, or other TAPI-compliant applications with
TeleVantage. You can place calls and receive screen-pop identifications when you
receive calls from contacts in these applications.
Q The TeleVantage Software Development Kit and open architecture. Use one of the
many off-the-shelf applications available from third-party vendors to customize
TeleVantage behavior and call processing. For the ultimate in flexibility, programmers
can use the included comprehensive TeleVantage Software Development Kit (SDK) to
develop custom applications.
Q Multi-lingual system prompts. Lets both users and callers select the language in which
they hear TeleVantage prompts.
Q CLASS and ADSI feature support. For analog CLASS phones and IP phones, Caller
ID, Caller ID on call waiting, and message waiting indicators are supported.
Q Avaya, Nortel, Lucent, NEC, Seimens, and Toshiba digital phone support.
TeleVantage supports Avaya, Nortel, Lucent, NEC, Seimens, and Toshiba digital
phones, including the phone’s fixed buttons, LCD display, hot dial pad, and voice-first
answering, as well as the following configurable feature buttons: Primary Directory
Numbers, Secondary Directory Numbers, Record Call, Do Not Disturb, Speed Dial,
CHAPTER 1. INTRODUCTION TO TELEVANTAGE
1-3
Account Code, Park/Unpark, Phone Page, Release, Send to voicemail, Call Forwarding,
Disconnect, Take Call, Flash, Conference/Transfer, and Call Menu.
Q Tenanting support. Tenanting allows one Server to be shared between multiple
companies or groups, called organizations. Calls can be tracked by organization in the
Call Log.
Q Instant Messaging. TeleVantage provides a simple, secure Instant Messaging tool that
enables real-time typed conversation between users who are running ViewPoint and
have instant messaging enabled. Users can initiate an Instant Messaging session by
right-clicking another user’s name in the ViewPoint Extensions list and choosing Send
an instant message.
Upgrading from a previous version of TeleVantage _____________
Wherever possible, TeleVantage settings from previous versions are upgraded seamlessly to
work with new features. However, if you are upgrading from a previous version of TeleVantage,
you may need to make the following changes:
Q To preserve backward compatibility after upgrading, if you have existing H.323 or SIP
trunks, the ISDN T1 and E1 trunks on Intel DM3 boards are disabled and do not display
in your Trunks view. The TeleVantage Administrator provides a method of enabling
them. See “Enabling DM3 ISDN trunks after upgrading” on page 5-19.
Q If you previously used auto archiving of voice messages or call recordings, auto
archiving will be turned off after installing this version of TeleVantage. To archive voice
messages and call recordings again, you must configure the TeleVantage Recording
Archive Service. See “Archiving call recordings and voice mail” on page 12-39.
Q If you intend to use both SIP and H.323 Internet telephony with Intel IP boards, you must
use H.323 with a host-based stack. If your IP boards do not support host-based stack,
you cannot use SIP.
To switch your Intel IP boards to a host-based stack for H.323, you must reconfigure the
IP boards using the Dialogic Configuration Manager, selecting appropriate the
host-based firmware load. Then, in the TeleVantage Administrator, edit the H.323 span
and set it to use a host-based stack.
Q The TeleVantage Problem Report Wizard now generates .ZIP files, not .CAB files.
Q The following documentation sections have been moved from Administering
TeleVantage to Installing TeleVantage: Extending TeleVantage, TeleVantage
Configuration Settings (including registry settings and advanced settings), Protecting
Your Phone System Against Toll Fraud, Issues with VoIP Phones, and TeleVantage
SMDR Service.
1-4
ADMINISTERING TELEVANTAGE
Before configuring a new TeleVantage system ________________
Before you configure a new installation of TeleVantage, be sure that you have successfully
completed the following tasks:
Q Install and configure Intel telephony resources in the TeleVantage Server computer (see
Installing Intel Telephony Components).
Q Connect your trunks and stations, including any necessary VoIP gateways (see Installing
TeleVantage).
Q Install the TeleVantage Server and the TeleVantage Administrator (see Installing
TeleVantage).
Q Add and activate the required licenses (see Installing TeleVantage).
Q Successfully start the TeleVantage Server (see Installing TeleVantage).
Note: You can start the Administrator in a mode that allows you to configure many components
of a TeleVantage system without having installed Intel telephony resources or TeleVantage
licenses. See the next section.
This chapter outlines the tasks you must perform after installation. Detailed instructions for each
step are in subsequent chapters.
Configuring a new TeleVantage system ______________________
After you have successfully installed TeleVantage and entered licenses as described in
Installing TeleVantage and Installing Intel Telephony Components, you are ready to configure
your system. Configuring a new system involves the following minimum steps, each of which
is described in detail in this manual. The other chapters describe additional features and
capabilities.
1.
Configure system settings. See Chapter 3.
2.
Configure your trunks. See Chapter 5.
3.
Create users. See Chapter 6.
4.
Configure your stations. See Chapter 7.
5.
Set up outbound call handling. See Chapter 9.
6.
Set up call routing for inbound calls. See Chapter 10.
Running reports without telephony boards or licenses
You can set up TeleVantage as a “reporter server” that enables you to run reports, even if you
do not have telephony boards and licenses installed. Note that licenses are still required to
configure a system, including adding users, configuring trunks, and placing or receiving calls.
In this mode you can use the TeleVantage Call Center Reporter to run reports. This can be a
useful way to report on database backups you have made to save space. To run reports, you must
have a Server and Reporter licenses, even if those licenses are not activated.
CHAPTER 1. INTRODUCTION TO TELEVANTAGE
1-5
To configure TeleVantage as a reporter server without boards or licenses
1.
Start the Administrator as described in “Logging on to the Administrator” on page 2-2.
2.
With the Administrator running, choose Tools > System Settings. On the Server tab,
check Server should not detect devices during startup, and click OK.
Important: This field is intended for use during the setup of a TeleVantage system.
Checking it on a working TeleVantage system can cause serious problems, such as
calls failing, and station and trunk devices not being detected or displayed in the Device
Monitor.
3.
Start the TeleVantage Server.
To turn off this configuration mode
1.
Enter all required hardware and licenses as described in Installing Intel Telephony
Components and Installing TeleVantage.
2.
Stop the Server.
3.
In the Administrator, choose Tools > System Settings, go to the Server tab, uncheck
Server should not detect devices during startup, and click OK.
4.
Start the Server again.
Getting technical support __________________________________
Contact your TeleVantage provider for technical support. For information about how to report
problems, see “Reporting problems to your TeleVantage provider” on page 12-61.
Before contacting technical support, use the TeleVantage documentation as described in the
next section.
TeleVantage documentation ________________________________
TeleVantage provides documentation in several easy-to-access online formats that provide the
benefits of instant hypertext navigation. This section describes the different TeleVantage
documents and how to access them in various formats.
Ordering printed documentation
You can order extra copies of printed TeleVantage documents. To do so, contact your
TeleVantage reseller or visit www.vertical.com.
1-6
ADMINISTERING TELEVANTAGE
The TeleVantage documentation set
The following table describes the TeleVantage documents and the formats in which each is
available. See the next section for instructions on using each format.
Audience
Available
in print
HTML
book
Acrobat
PDF
Installing TeleVantage
This manual covers the requirements and
installation process for upgrades and fresh
installations, and describes how to order
telephone company services, add licenses,
configure advanced settings, and
troubleshoot problems.
Administrators
and
TeleVantage
providers
Yes
Yes
Yes
Installing Intel Telephony Components
This manual covers the requirements and
installation process for upgrades and fresh
installations, and describes how to change
hardware and troubleshoot problems.
Administrators
and
TeleVantage
providers
Yes
Yes
Yes
Administering TeleVantage
This manual describes setting up, managing
and monitoring your TeleVantage system,
including using the TeleVantage
Administrator to configure system settings,
trunks, stations, users, call routing, IP
telephony, and more.
Administrators
Yes
Yes*
Yes
Using TeleVantage
This manual covers how to use the
TeleVantage system, including the telephone
commands, TeleVantage ViewPoint,
ViewPoint Web Access, working from
remote locations, call center participation,
and more.
All audiences
Yes
Yes
Yes
TeleVantage QuickStart Guide
This small guide provides easy-to-read
instructions for first-time users and basic
TeleVantage use, including a complete
telephone command reference and
coverage of ViewPoint fundamentals.
All audiences
Yes
Yes
Yes
Document
CHAPTER 1. INTRODUCTION TO TELEVANTAGE
1-7
Installing Intel Telephony Components
This manual covers the requirements and
installation process for upgrades and fresh
installations, and describes how to change
hardware and troubleshoot problems.
Administrators
and
TeleVantage
providers
Yes
Yes
Yes
Administering TeleVantage
This manual describes setting up, managing
and monitoring your TeleVantage system,
including using the TeleVantage
Administrator to configure system settings,
trunks, stations, users, call routing, IP
telephony, and more.
Administrators
Yes
Yes*
Yes
Using TeleVantage
This manual covers how to use the
TeleVantage system, including the telephone
commands, TeleVantage ViewPoint,
ViewPoint Web Access, working from
remote locations, call center participation,
and more.
All audiences
Yes
Yes
Yes
TeleVantage QuickStart Guide
This small guide provides easy-to-read
instructions for first-time users and basic
TeleVantage use, including a complete
telephone command reference and
coverage of ViewPoint fundamentals.
All audiences
Yes
Yes
Yes
1-8
ADMINISTERING TELEVANTAGE
Document
TeleVantage Pocket Reference Card
This wallet-sized card is a convenient
reference for the most-used TeleVantage
telephone commands.
Audience
Available
in print
HTML
book
Acrobat
PDF
All audiences
Yes
No
Yes
* Administering TeleVantage and the TeleVantage Call Center Administrator’s Guide are combined into a
single online book called Administering TeleVantage and Call Centers.
Accessing online documentation
You can access TeleVantage’s online documentation in the following formats.
Online Help
From any TeleVantage application window, you can press F1 or click Help to get
context-sensitive Help describing the window and its individual fields. For overviews of
features, see the online or PDF books, not the online Help.
HTML books
TeleVantage provides complete compiled HTML Help (.CHM) versions of four of its printed
manuals, enhanced with hypertext navigation panes and links. To access the HTML books from
within ViewPoint or the Administrator, choose Help > Online Books.
To access the HTML books without ViewPoint or the Administrator, open the following files,
located in C:\Program Files\Common Files\Vertical\TeleVantage:
Q AdministeringTV.chm. Contains Administering TeleVantage and the TeleVantage Call
Center Administrator’s Guide.
Q InstallingTV.chm. Contains Installing TeleVantage.
Q UsingTV.chm. Contains Using TeleVantage.
Adobe Acrobat PDF books
The .PDF versions of TeleVantage manuals are the same files that Vertical sends to be
professionally printed, and can be used for your own printing or browsing. They are available
on the TeleVantage Master CD in the \Manuals directory. To view and print these files, use the
Adobe Acrobat Reader, available on the TeleVantage Master CD in the \Adobe directory.
CHAPTER 1. INTRODUCTION TO TELEVANTAGE
1-9
Using the
TeleVantage
Administrator
CHAPTER 2
CHAPTER 2
THE TELEVANTAGE ADMINISTRATOR
CHAPTER CONTENTS
About the TeleVantage Administrator . . . . . . . . . . . . . . . . . . . . . . . . . . . . . . . . . 2-2
The Administrator interface . . . . . . . . . . . . . . . . . . . . . . . . . . . . . . . . . . . . . . . . . 2-3
Customizing columns . . . . . . . . . . . . . . . . . . . . . . . . . . . . . . . . . . . . . . . . . . . . . 2-9
Working with voice files. . . . . . . . . . . . . . . . . . . . . . . . . . . . . . . . . . . . . . . . . . . . 2-9
About the TeleVantage Administrator ________________________
The TeleVantage Administrator is a Microsoft Windows application that lets you configure,
monitor, and manage your TeleVantage system from:
Q Any PC on your LAN.
Q Remotely over the internet using VPN.
Q Remotely over the Internet using Windows Remote desktop or Windows terminal
services.
For a list of Administrator functions, see “The Administrator interface” on page 2-3.
This chapter describes logging on to the Administrator, using the interface of the Administrator,
and performing basic actions in the Administrator.
Important: Some changes to user and system settings made using the Administrator do not
take effect immediately. The system will recognize changes within 5 minutes of their being made.
Logging on to the Administrator
For information about logging on to the Administrator using command line options, see
Appendix A.
1.
Choose Start > Programs > Vertical TeleVantage > TeleVantage Administrator. The
Log on dialog box opens.
2.
If you want to change your default TeleVantage Server or associated phone (station
ID), click Options to view the expanded dialog box.
3.
Type your User name.
A user name called “Admin” exists by default. To create other administrators, you
must add users to whom you give Administrator permissions (see “The Security \
Permissions tab” on page 6-31).
2-2
4.
Type your Password. The Admin user password is set to 100 at installation. Change
the password for the Admin user after you log on for the first time (see the important
note below).
5.
If you want to log on to a different Server than the one already selected under Server,
click
and select a Server name.
ADMINISTERING TELEVANTAGE
6.
If you want to change your station ID, enter a valid station ID in the Station ID field.
The station ID identifies the phone associated with this computer—the one you use to
make recordings in the Administrator and perform other audio tasks. To find the
station ID of a TeleVantage phone, pick it up and dial *0.
You can enter an external station ID, which enables you to make recordings from a
remote phone such as a home phone, IP phone or cell phone. See “Using external
stations” on page 7-8 for information on configuring external stations.
7.
Click OK.
Important: Leaving the Admin user password as 100 is a security risk that can cost your
company money due to toll fraud. Until you change it, and the password of the Operator user, you
will see a reminder message prompting you to do so each time you start the Administrator. For
instructions on changing passwords, see “Creating a password” on page 6-14. For more
information about system security, see Appendix I of Installing TeleVantage.
Reconfiguring the computer to use a different phone
Each computer running the Administrator (or other TeleVantage workstation applications) has
an assigned phone, which it uses when you perform commands such as making recordings or
listening to voicemail. The phone is specified by the station ID you enter when logging on (see
the previous section).
To change the phone associated with the computer, click Options when logging on and enter
the new station ID. You must do this, for example, if you move the computer to an office with
a different phone.
The Administrator interface ________________________________
The TeleVantage Administrator interface is composed of views (see “Working in views” on
page 2-7). Each view enables you to configure, manage, or monitor an aspect of the
TeleVantage system.
View
Users
Workgroups
Trunks
Description
See
Manage TeleVantage users. Includes “The Users view” on page 6-6
changing passwords and allocating
disk space to users for voicemail
messages and greetings.
Manage workgroups (groups of
related extensions or contacts).
“About Workgroups” on
page 8-2
Manage the phone lines or Internet
“The Trunks view” on
trunks that connect your TeleVantage page 5-10
system to the public phone network.
CHAPTER 2. THE TELEVANTAGE ADMINISTRATOR
2-3
View
Dialing
Services
Description
Customize how outbound calls are
“The Dialing Services view” on
allocated to different trunk groups,
page 9-4
and dialing behavior. Includes routing
services (which route calls based on
customizable rules).
View and manage TeleVantage
activity on stations and trunks.
“Using the Device Monitor
view” on page 12-3,
Auto
Attendants
Manage auto attendants that handle
and route inbound calls with voice
menus.
“About auto attendants” on
page 10-4
Queues
Manage groups of agents in
TeleVantage call center queues.
TeleVantage Call Center
Administrator’s Guide
Device
Monitor
View a log recording Administrator
Maintenance
actions.
Log
2-4
See
“Using the Maintenance Log
view” on page 12-11
Dial Plan
View and edit a complete list of
internally dialable numbers.
System
Prompts
Listen to and change recordings used “The System Prompts view” on
for standard system prompts and
page 13-3
auto attendants.
Call Log
View a record of all the calls made on “Using the Call Log view” on
the system.
page 12-12
“Managing your dial plan with
the Dial Plan view” on
page 12-10
ADMINISTERING TELEVANTAGE
View
Description
Trunk Log
View a record of each trunk allocation “Using the Trunk Log view” on
made by the system.
page 12-18
IVR Plug-Ins
H.323
Gateways
SIP Servers
SIP
Registration
Bindings
Manage TeleVantage IVR Plug-ins,
which are custom interactive voice
response applications that you or
third parties can create.
See
Appendix G of Installing
TeleVantage
Manage TeleVantage H.323
“Connecting two Servers using
Gateways, by which you can
H.323 Gateways” on
page 15-39
exchange calls with remote
TeleVantage Servers over the Internet
or an IP network.
Define SIP servers, which allow
“Using SIP servers” on
page 14-32
TeleVantage to use VoIP
communication through a third-party
SIP service, such as a PSTN
gateway device or a SIP provider like
www.broadvoice.com.
View a list of all SIP end-point
devices registered with the
TeleVantage Server.
CHAPTER 2. THE TELEVANTAGE ADMINISTRATOR
“The SIP Registration Bindings
view” on page 14-42
2-5
Using the Tools menu
The Tools menu of the Administrator offers additional TeleVantage features not available from
the views:
2-6
Command
Description
See
Audio Output
Lets you choose whether audio
files play over your computer
speakers or the phone
associated with this workstation.
“Working with voice files”
(page 2-9)
Backup/Restore
Database
Backs up your TeleVantage files,
so that your system can be
restored in the event of
disruption.
“Backing up TeleVantage”
(page 12-53)
Shut down Server
Stops the TeleVantage Server.
“Shutting down the
TeleVantage Server” (page
12-56)
Update Access
Codes
Lets you change the access
code used for a particular dialing
service.
“Changing an access code
in users’ saved numbers”
(page 9-7)
Adjust Station IDs
Prompts you to shut down the
Server and then increments or
decrements all station IDs on the
system by a number you specify,
so that if you add or remove a
low-number station board you do
not have to edit each station ID
individually.
Recalculate Disk
Usage
Updates the display in the Users
dialog box, Mailbox tab that
shows how full users’ mailboxes
are. The display is updated once
a day automatically.
“Viewing the user’s disk
usage” (page 6-29)
Analyze Security
Runs an online report on how
secure your system is.
Appendix I of Installing
TeleVantage
Upgrade Remote
Phones
Lets you automatically upgrade
IP phone users from
TeleVantage versions 5.x or
earlier to use external stations.
“Automatically upgrading
old IP phone users with
station ID 0” on page 7-9
Phone Templates
Lets you apply one or more
phone settings across multiple
users at the same time.
“Applying phone settings in
bulk” on page 7-4
ADMINISTERING TELEVANTAGE
Command
Description
See
User Templates
Lets you apply one or more user
settings across multiple users at
the same time.
“Applying user settings in
bulk” on page 6-43
Advanced Settings
Editor
Launches the Advanced Settings
Editor, where you can modify
advanced TeleVantage settings
not available from the
Administrator.
Appendix J of Installing
TeleVantage
Columns
Lets you customize the columns
that appear in each view.
“Customizing columns”
(page 2-9)
Options
Lets you customize the
appearance of names, Call Log
size, and defaults for station and
extension numbers.
“Assigning an extension”
(page 6-12)
“Changing the station ID
default” (page 6-14)
“Displaying a specific
number of Call Log
entries” (page 12-16)
System Settings
Lets you configure and
customize several aspects of
your TeleVantage system.
Chapter 3, “Defining
System Settings”
Working in views
To open a view, click its button in the vertical view bar on the left side of the Administrator
window. To change the location of a button on the view bar, drag and drop it.
You can also open a view by clicking the View menu and choosing a view.
Note: If a view is not available to you, you might not have permission to view it. Check with your
system administrator, or see “The Security \ Permissions tab” on page 6-31.
CHAPTER 2. THE TELEVANTAGE ADMINISTRATOR
2-7
The main part of a view contains rows of the items that pertain to that view. For example, in the
Users view, each TeleVantage user appears as an item on a row. Double-click an item to edit it.
Using commands in a view
A command always affects the item or items that are selected. To select multiple items, hold
down the CRTL key as you click the items. You can perform a command using any of the
following methods:
Q Choose a command from the view’s menu. For example, in the Trunks view, click the
Trunks menu and choose a command.
Q Click a toolbar button (see the next table).
Q Right-click an item and choose a command from the shortcut menu that appears. This is
often the fastest way to perform an command.
Using the Administrator toolbar
The Administrator toolbar is located on the main menu bar in each view. It gives you quick
access to several Administrator commands that are also available through the Administrator
menus.
To create a new item when you are working in any TeleVantage view, click the arrow next to
the first button on the toolbar and select an item.
See the next section for information about creating new items that are based on existing items.
2-8
ADMINISTERING TELEVANTAGE
Customizing columns_____________________________________
Click a column header to sort by that column. Click again to sort in the reverse order. The arrow
in the column header shows by which column and in what direction the display is currently
sorted.
You can resize column widths by dragging the sides of the column headers.
For each view in the Administrator, you can choose the columns that you want to see and the
columns that you want to hide. Some views do not show all the available columns by default.
To show or hide columns in a view
1.
Choose Tools > Columns, or right-click a column header.The Columns dialog box
opens.
2.
From the View dropdown list, choose the view you want to change.
3.
Check a column to show it. Uncheck a column to hide it. For an explanation of the
various columns, click Help.
4.
Click OK.
Working with voice files ___________________________________
A voice file is an audio recording that is stored as a file. TeleVantage stores system prompts,
greetings, voice messages, and recorded conversations in voice files that you can play over your
computer speakers or on the telephone. You can record voice files using the telephone.
TeleVantage supports the following file formats for voice files:
Q .WAV (standard Microsoft Windows audio format)
Q .VOX MuLaw (used in North America and Japan)
Q .VOX ALaw (used in most locations outside North America and Japan)
The TeleVantage Server natively uses 8-bit PCM .VOX format. For disk space requirements,
see Installing TeleVantage.
Note: When archiving voice messages or call recordings you can specify .MP3 as the file
format. See “Archiving call recordings and voice mail” on page 12-39.
CHAPTER 2. THE TELEVANTAGE ADMINISTRATOR
2-9
Changing the voice file format
You can change the format of your TeleVantage .VOX voice files from ALaw to MuLaw, or
from MuLaw to ALaw, by using the TVConvert utility as follows:
1.
Run the file TVConvert.exe in the TeleVantage Server directory on the TeleVantage
Server computer. The default path is:
C:\Program Files\TeleVantage Server\TVConvert.exe
2.
Click OK to convert all your TeleVantage voice files to the other format. If the voice
files are ALaw, they become MuLaw. If they are MuLaw, they become ALaw.
In most cases you will not need to use this procedure, because your voice file format will have
been correctly set when your TeleVantage system was installed
Using the audio controls
TeleVantage’s audio controls make it easy to create and modify recordings of all types. The
following controls appear in TeleVantage wherever you can create and listen to recordings.
To create and play recordings, use the buttons on the audio controls as shown in the following
table and speak into your phone.
Record
When you are ready to record, pick up your phone, and
then click this button. A beep signals that recording has
begun.
Play
To hear the recording, click this button.
Stop
When you are done recording, you can either hang up or
click this button.
Fast
Forward
To skip ahead in the playback, click this button.
Rewind
To skip back in the playback, click this button.
To move forward and backward within the recording, drag the slider bar.
2-10
ADMINISTERING TELEVANTAGE
Importing and exporting voice files
To import or export a voice file, use the import or export buttons on the recording control, as
shown in the next table.
Import
You can import a voice file in .WAV or .VOX format to
use for any TeleVantage recording (greetings, voice titles,
and so on).
TeleVantage can import .WAV files with a frequency of
8Khz, 11.025 Khz, 22.05 Khz, or 44.1 Khz. You can also
import an 8 kHz PCM .VOX file (MuLaw format for
North America and Japan, ALaw format for other
countries).
Export
You can export any of your recordings, including system
prompts and voice titles, to a .WAV file or a .VOX
MuLaw or ALaw file.
Changing audio output
TeleVantage can play audio files over your telephone. You can also play them on your computer
if it has a sound card and speakers.
To hear audio output over the phone, click the telephone button on the
status bar, or choose Tools > Audio Output > Phone.
To hear audio output over your computer speakers, click the speaker
button on the status bar, or choose Tools > Audio Output > Speakers.
CHAPTER 2. THE TELEVANTAGE ADMINISTRATOR
2-11
CHAPTER 3
CHAPTER 3
DEFINING SYSTEM SETTINGS
CHAPTER CONTENTS
About system settings . . . . . . . . . . . . . . . . . . . . . . . . . . . . . . . . . . . . . . . . . . . . . 3-2
Setting general TeleVantage options . . . . . . . . . . . . . . . . . . . . . . . . . . . . . . . . . 3-3
Setting business hours . . . . . . . . . . . . . . . . . . . . . . . . . . . . . . . . . . . . . . . . . . . . 3-7
Setting up e-mail notification and Exchange synchronization . . . . . . . . . . . . . . 3-10
Enforcing strong password security . . . . . . . . . . . . . . . . . . . . . . . . . . . . . . . . . 3-12
Setting up personal call supervision defaults . . . . . . . . . . . . . . . . . . . . . . . . . . 3-14
About system settings ____________________________________
System settings control overall TeleVantage behavior. Before adding TeleVantage trunks or
users, you should define your system settings by choosing Tools > System Settings.
Advanced TeleVantage settings
Some TeleVantage settings are low-level settings that are rarely, if ever, changed, and cannot be
changed from the Administrator. For a complete description of these settings, see Appendix J of
Installing TeleVantage.
Documentation for the System Settings dialog box
The following table shows where to find documentation for the various tabs of the System
Settings dialog box:
Tab
See...
Server
page 3-3
Server \ External H.323 Gateways
page 15-48
Server \ SIP Accounts
page 6-18
Server \ Network Capture
page 12-59
Call Data \ Account Codes
page 11-6
Call Data \ Custom Data
page 11-13
Organizations
page 11-2
Business Hours
page 3-7
Licenses
Licenses \ Reserved
Dial-by-name Directory
page 3-6
E-mail Notification
page 3-10
E-mail Notification \
Exchange Synchronization
page 3-10
E-mail Notification \ Event Log
page 12-21
Security
page 3-12
Security \ Permitted Passwords
page 3-12, page 3-14
Security \ Server Firewall
Security \ Workstation Firewall
Audio
3-2
Installing TeleVantage
Appendix F of Installing TeleVantage
page 13-2, page 13-13
ADMINISTERING TELEVANTAGE
Tab
See...
Audio \ Hold Sources
page 13-14
Call Log and Trunk Log
page 12-20
Call Log and Trunk Log \ Archive
page 12-51
Internal Dialing
Dial-by-name directory: page 3-6
Select a trunk: page 9-9
voicemail access: page 14-22
Internal dialing timeouts: page 9-35
External Dialing
page 9-8
External Dialing \
ISDN Outbound Caller ID
page 5-29
External Dialing \ Routing Variables
page 9-32
Emergency
page 9-37
Emergency \ E-911
page 9-37
Recordings \ Archive
page 12-39
Recordings \ System Call Recording
page 4-6
Recordings \ Reminder Beeps
page 4-7
Queue
Chapter 2 of TeleVantage Call Center
Administrator’s Guide
Queue \ Agent Skills
Chapter 3 of TeleVantage Call Center
Administrator’s Guide
Storage
page 12-50
Storage \ Special Directories
page 12-53
Analog Trunks
page 5-16
Analog Trunks \ Caller ID
page 5-15
Analog Trunks \ Digit Collection
page 5-13
Problem Report Wizard
page 12-61
Setting general TeleVantage options_________________________
General TeleVantage options include the following:
Q Setting general Server settings. See the next section.
Q Configuring the dial-by-name directory. See page 3-6.
CHAPTER 3. DEFINING SYSTEM SETTINGS
3-3
Setting general Server settings
To set general Server settings, do the following:
1.
Choose Tools > System Settings. The System Settings dialog box opens.
2.
Choose the Server tab.
3.
Define the following settings:
Q Number of external stations. Enter the number of external stations your system
requires. TeleVantage automatically creates external station IDs as needed to have
that many. See “Using external stations” on page 7-8 for more information.
You must restart the TeleVantage Server after changing this field.
Important: Do not reduce the number of external stations if users are assigned to
those stations. The effect is exactly like removing a station board from your
computer. Calls to users whose stations have been removed go straight to voicemail.
Q Generate tones using software. Check this box to generate dial, reorder, callback,
and stutter dial tones using TeleVantage software. You will need to use this feature
only if you are using Dialogic boards that do not generate these tones in hardware.
You must check this box if you are using the D/41ESC board. U.S. customers can
usually leave this box unchecked, because most U.S. Dialogic hardware generates
the tones.
Q Server should not detect devices during startup. If checked, you can use
TeleVantage to configure a system and run reports, even if you do not have
telephony boards and licenses installed. See “Running reports without telephony
boards or licenses” on page 1-5.
Important: This field is intended for use during the setup of a TeleVantage system.
Checking it on a working TeleVantage system can cause serious problems, such as
calls failing, and station and trunk devices not being detected or displayed in the
Device Monitor.
3-4
ADMINISTERING TELEVANTAGE
Q Allow voice-first answering. If checked, users with Toshiba digital phones as well
as Cybiolink or Aastra Powertouch analog phones can use the voice-first answering
feature. With voice-first answering, internal calls are connected to the user’s
speakerphone automatically without the phone ringing or needing to be picked up.
A beep indicates an incoming internal call. (External callers ring the phone as
normal.)
To use voice-first answering, a user must turn it on using ViewPoint or the
telephone commands. See Using TeleVantage for details.
Q Present a confirmation menu before voicemail. Check to have callers hear the
confirmation prompt, “To leave a message press 1, or press * to return to the menu”
after they hear a user’s voicemail greeting. If unchecked (the default), callers go
directly to recording their message after hearing the greeting.
Q Allow callers to directly leave a voicemail. Check to enable callers to dial a user’s
voice mailbox directly by dialing the extension followed by * from internal dial
tone or from an auto attendant.
If checked, the system adds a 3-second delay after dialing an extension before the
call is connected, to wait for the *. Callers can skip the delay by pressing # after the
extension. To change the delay, see “Setting dialing timeouts” on page 9-35 and
“Avoiding the auto attendant ambiguous dialing delay” on page 10-19.
Q Default Flash behavior while in a call. Select what happens when users press
Flash (or quickly press the hook) while on a call.
Choose Menu assisted transfer to take users to the TeleVantage call handling
menu (for details, see Appendix A of Using TeleVantage).
Choose Direct transfer to immediately prompt users for an extension to transfer
the call. Use this option to create faster, simplified telephone transferring for
users who answer and transfer many calls. Note that with direct transfer, users
cannot access the other commands on the call handling menu unless they have
TeleVantage ViewPoint or a Toshiba digital phone.
You can also set this behavior individually for each user. See “Configuring Flash
behavior” on page 7-16.
Q Park/Hold ringback. Select what happens when a user answers an automatic
ringback call after leaving a call on hold or parked for too long.
Choose Announce to have TeleVantage announce the caller, as with normal
call announcing.
Choose Direct connect to have the user connected immediately with the caller.
Note: By default ringback occurs once, and if the ringback call is unanswered the
call is sent to the user’s voicemail. You can increase the number of ringback attempts
before the call goes to voicemail using the RingbackRetries advanced setting. See
Appendix J of Installing TeleVantage.
CHAPTER 3. DEFINING SYSTEM SETTINGS
3-5
For instructions on setting ringback, see Using TeleVantage.
4.
Click OK.
Configuring the dial-by-name directory
The dial-by-name directory enables callers to dial TeleVantage users by name, which is helpful
when the extension is not known.
To configure the dial-by-name directory
1.
Choose Tools > System Settings.
2.
Choose the Dial-by-name Directory tab.
3.
In Search directory by, select one of the following methods by which callers can
search for users:
Q Last name. Callers enter the first few letters of the last name. This is the default.
Q First name. Callers enter the first few letters of the first name.
Q Last name or First name. Callers enter the first few letters of either the first or last
name.
4.
In Present names using, select one of the following methods for presenting the
names of users to callers:
Q Extension number. Callers hear an extension number after each name, for
example, “For John Sargent, press 175.” This is the default.
Q Numbered list. Callers hear a sequence number after each name, as in “For John
Smith, press 1”.
3-6
5.
Use the Present a confirmation menu before transferring field to choose what
happens when a dial-by-name entry results in a single match. If unchecked, the caller
is connected immediately. Check the field to have the caller to confirm his or her
choice. For example, a caller would hear, “For John Sargent, press 1. To try again,
press *.”
6.
Click OK.
ADMINISTERING TELEVANTAGE
Changing the internal dial-by-name extension
By default, users can dial 411 to access the dial-by-name directory. To change the number, do
the following:
1.
Choose Tools > System Settings. The System Settings dialog box opens.
2.
Choose the Internal Dialing tab.
3.
Enter the number in Dial-by-name directory.
Note: When you change 411 to another number, the system prompts that refer to it
automatically update to use the new number.
Setting business hours ___________________________________
TeleVantage uses your business hours settings in schedules that you create for the following:
Q After hours greetings. See “Scheduling transfers and greetings” on page 10-14.
Q Automatic transfers. See “Scheduling transfers and greetings” on page 10-14.
Q Notification of new voice messages. See “Scheduling notifications” on page 6-23.
Q Call rules. See Using TeleVantage.
You can create as many sets of business hours as you need. For example, you can create a set of
business hours for the company as a whole (the default), and then create additional sets of
business hours for individual departments, shifts, and so forth.
Defining business hours
To define your business hours, you define your daily work hours, work days and holidays, as
follows:
1.
Choose Tools > System Settings. The System Settings dialog box opens.
2.
Choose the Business Hours tab.
CHAPTER 3. DEFINING SYSTEM SETTINGS
3-7
From the Business Hours tab you can do the following:
Q To create a new set of business hours, fill in the fields, then click Save As.
Q To edit an existing set of business hours, select its Name from the dropdown list.
Q To delete a set of business hours, select its Name from the dropdown list, then click
Delete.
3.
On the Work Hours tab, under Work days, check each day that is a work day, and
under Work hours, enter the starting and ending times for each work day.
Note: When you define business hours and holidays, you can type dates and times in
most formats. Your entries are converted to a standard format that is based on your
Windows regional settings.
You can enter more than one time range for a day, separated by commas, for example,
“9:00 AM - 12:00 PM, 3:00 PM - 6:00 PM.” Use this format to express business hour
shifts that overlap midnight. For example, to express a shift that runs from 5:00 PM to
2:00 AM the next morning, enter “12:00 AM - 2:00 AM, 5:00 PM - 12:00 AM” for
each work day.
3-8
ADMINISTERING TELEVANTAGE
4.
To define holidays, click the Holidays tab.
5.
Click Add to add a new holiday. Click Edit to edit an existing one.
6.
Enter the Holiday date.
7.
Choose if this is an All day holiday or Partial day holiday. For a partial day holiday,
enter:
Q Work hours begin at. Starting time for work on the holiday.
Q Work hours end at. Ending time for work on the holiday.
8.
Click OK.
9.
Click OK to close the System Settings dialog box.
CHAPTER 3. DEFINING SYSTEM SETTINGS
3-9
Setting up e-mail notification and Exchange synchronization ____
TeleVantage can automatically send an e-mail to a user whenever he or she receives a new voice
message, and send the voice message audio file as an attachment to the e-mail.
If you enable e-mail notification and your organization is using Microsoft Exchange Server, you
can use TeleVantage Exchange synchronization to link the recordings in user’s Inbox with the
corresponding e-mail notifications in Microsoft Outlook. For example, when a user deletes an
e-mail notification in Outlook, the voice message is automatically deleted from his or her Inbox.
For a detailed description of Exchange synchronization, see the next section.
Once you enable e-mail notification and Exchange synchronization for the system, you must
configure each user appropriately.
Exchange synchronization behavior
Synchronization behavior for a user depends on whether the user has chosen to attach the voice
message to e-mail notifications, as follows:
Q If a voice message is attached to an e-mail notification:
Q Moving a voice message from the Inbox folder to the Deleted folder in either
system also moves the voice message on the other system. For example, if you
delete voice messages from the TeleVantage Inbox (using either the telephone
commands or ViewPoint), the corresponding e-mail notifications and any
attachments are deleted from the Exchange Inbox also.
Q A voice message in TeleVantage is deleted permanently when the associated e-mail
notification in Exchange is deleted or is moved to any folder other than the Inbox
or Deleted folder in Exchange.
Q An e-mail notification in Exchange is deleted permanently when the associated
voice message is deleted permanently in TeleVantage.
Q If a voice message is not attached to an e-mail notification:
Q An e-mail notification in Exchange is deleted permanently when the associated
TeleVantage voice message is deleted, either via ViewPoint or the telephone
commands.
Q Deleting an e-mail notification in Exchange has no effect on the voice message in
TeleVantage. Voice messages therefore cannot be deleted accidentally in
TeleVantage before a user has the opportunity to listen to them.
Enabling e-mail notification
To enable e-mail notification for the system, do the following:
3-10
1.
If you are using MAPI for e-mail notification, be sure you have prepared your
TeleVantage Server as described in Chapter 3 of Installing TeleVantage.
2.
Choose Tools > System Settings, then choose the E-mail Notification tab.
ADMINISTERING TELEVANTAGE
3.
To enable e-mail notification, check Send e-mail notifications using. Select either
MAPI or SMTP from the dropdown list.
If you selected SMTP, fill in the SMTP settings fields with information provided by
your e-mail administrator or Internet Service Provider.
4.
Click OK.
E-mail notification of voice messages will be available the next time the TeleVantage Server is
started.
Enabling Microsoft Exchange synchronization
1.
Be sure you have properly prepared your TeleVantage Server. Exchange
Synchronization requires MAPI, even if your system uses SMTP for e-mail
notifications. It also requires that Microsoft Outlook be installed and running on the
TeleVantage Server computer. See Chapter 3 of Installing TeleVantage for specific
instructions.
1.
Choose Tools > System Settings. The System Settings dialog box opens.
2.
Choose the E-mail Notification \ Exchange Synchronization tab.
3.
Check Synchronize messages with Microsoft Exchange. Then enter the following
information:
Q In Exchange Server name, enter the name of the Exchange Server on your LAN.
Q In Synchronization interval, enter the frequency of synchronization, in minutes.
The default is one minute.
4.
Click OK.
Microsoft Exchange synchronization will be available the next time the TeleVantage Server is
started.
Configuring users for e-mail notification and synchronization
For information on setting up e-mail notification for a user, see “Setting e-mail notification” on
page 6-21.
For information on setting up Exchange synchronization for a user, see “Enabling Microsoft
Exchange Server synchronization” on page 6-19.
CHAPTER 3. DEFINING SYSTEM SETTINGS
3-11
Enforcing strong password security _________________________
Password security is crucial in preventing your company from being victimized by toll fraud.
Unauthorized users who gain privileged access to your telephone system can place outbound
long distance or international calls that get charged to you. In 99.9% of cases, access is gained
through insecure (easy-to-guess) passwords. By making your passwords more secure, you can
dramatically increase the security of your TeleVantage system against toll fraud. For more
information about making your system secure, see Appendix I of Installing TeleVantage.
To enforce strong password security on your system
1.
Choose Tools > System Settings. The System Settings dialog box opens.
2.
Choose the Security tab.
3.
Use the following options to safeguard your TeleVantage system against unauthorized
access:
Q Passwords automatically expire after __ days. Checking this option forces users
to regularly change their passwords. Enter the number of days that each user may
keep a password before the system requires them to change it to something new.
You can override this setting for individual users, to permit passwords that never
expire. You can also manually force a user to change his or her password whenever
you want. See “The Security tab” on page 6-30.
Note: You should exempt users with Polycom H.323 phones from having to change
their passwords.
Q Automatically lock out accounts after __ failed logon attempts. If checked, the
system locks out an account after the number of consecutive failed logon attempts
that you enter. A locked-out account cannot log on to the system, even with the
correct username and password, until the administrator unlocks it.
Note: For lockout to occur, the multiple failed logon attempts must all happen within
a 30-minute time period. You can change this time period by changing the
LockoutResetInterval registry setting. See Appendix J of Installing TeleVantage.
To unlock a locked-out account, do the following:
Q User. In the Users view, double-click the user to open the Users dialog box,
click the Other tab, uncheck User is locked out, and click OK.
Q Queue. In the Queues view, double-click the queue to open the Queue dialog
box, click the Account tab, uncheck Queue is locked out, and click OK.
Q Hang up trunks after __ failed logon attempts. If checked, the system hangs up
on any incoming caller who tries to log on to a TeleVantage account with an invalid
password after the number of consecutive attempts that you enter.
4.
Choose the Security \ Permitted Passwords tab.
By forbidding easy-to-guess passwords, you can make your system much more secure
from unauthorized access. Vertical highly recommends checking all the options on
3-12
ADMINISTERING TELEVANTAGE
this tab to prevent toll fraud.
When you change any of the options on this tab, users whose passwords are now
prohibited will be prompted to change them the next time they log on, and will show
up in the Security Analysis report (see Appendix I of Installing TeleVantage).
5.
Use the following options to restrict the passwords that users can choose:
Q Minimum password length. Enter the minimum number of digits for a password.
For secure passwords, the minimum should be at least five, and preferably seven or
more digits.
Q Prevent passwords that contain an account’s extension. Passwords that contain
the extension number are especially easy to guess. Check this option to prevent the
extension from being any part of the password. For example, a user at extension 337
could not have a password of 337, 33755, or 13378080.
Q Prevent passwords that contain entries from the following list. Check to prevent
passwords from containing any of the digit strings in the list. TeleVantage provides
by default a list of easy-to-guess digit strings.
To add a new digit string to the list, click Add. To edit a digit string in the list, select
it and click Edit. To remove a digit string from the list, select it and click Delete.
6.
Click OK.
CHAPTER 3. DEFINING SYSTEM SETTINGS
3-13
Setting up personal call supervision defaults __________________
You can set system defaults for whether users’ personal calls can be Monitored, Coached, or
Joined using the Supervise commands. When you create a new user, these defaults are used to
define if users’ personal calls can be supervised, and you can override the defaults for individual
users (see “Configuring whether the user’s calls can be supervised” on page 6-31).
Notes
Q When you change a system default, users who have that Supervise permission set to
“System Default” change to reflect the new default.
Q Whether or not a user can use the Supervise commands is controlled by permissions. See
“Assigning a user’s permissions” on page 6-32.
To change personal call supervision defaults
1.
Choose Tools > System Settings. The System Settings dialog box opens.
2.
Choose the Security tab.
3.
In each of the following fields choose “Yes” or “No”:
Q Personal calls can be monitored. Users with the "Allow monitoring user calls"
permission can listen to users’ personal (not queue) calls without the monitored user
knowing.
Q Personal calls can be coached. Users with the "Allow coaching user calls"
permission can add themselves to users’ personal (not queue) calls and be heard by
the coached user, but not by the caller.
Q Personal calls can be joined. Users with the "Allow joining user calls" permission
can add themselves to users’ personal (not queue) calls as full participants.
4.
Click OK.
For instructions on using the Monitor, Coach, and Join features, see Chapter 12 of Using
TeleVantage. For information on configuring a user for the permissions needed to Coach,
Monitor or Join another user's personal calls, see “Assigning a user’s permissions” on
page 6-32. For information on supervising queue calls, see the TeleVantage Call Center
Administrator’s Guide.
CHAPTER 4
CHAPTER 4
RECORDING ALL TELEVANTAGE
CALLS
CHAPTER CONTENTS
About recording calls. . . . . . . . . . . . . . . . . . . . . . . . . . . . . . . . . . . . . . . . . . . . . . 4-2
Preparing to record all calls. . . . . . . . . . . . . . . . . . . . . . . . . . . . . . . . . . . . . . . . . 4-3
Recording all calls . . . . . . . . . . . . . . . . . . . . . . . . . . . . . . . . . . . . . . . . . . . . . . . . 4-6
Including a beep on call recordings. . . . . . . . . . . . . . . . . . . . . . . . . . . . . . . . . . . 4-7
Archiving call recordings . . . . . . . . . . . . . . . . . . . . . . . . . . . . . . . . . . . . . . . . . . . 4-8
About recording calls _____________________________________
You can have TeleVantage automatically record all calls handled by the system, while
exempting the individuals, roles, or queues of your choice. For example, you could record all
calls except for those belonging to users in the Administrators role. You can also exempt internal
(station-to-station) calls.
Note: Users can also record their own calls manually (see Using TeleVantage), and you can
configure call center queues to automatically record calls (see the TeleVantage Call Center
Administrator’s Guide).
System call recordings are stored in a voice mailbox of your choice. You can manage them
exactly as you would manage voice messages. For instructions on playing and managing voice
messages using the phone or ViewPoint, or managing archived recordings using the
TeleVantage Archived Recording Browser, see Appendix E of Using TeleVantage.
Important: If you record all calls or even a significant portion of calls, or if you have users with
thousands of saved voice messages and large maximum mailbox sizes, disk space on the
TeleVantage Server can quickly fill up with voice messages and call recordings. In addition,
ViewPoint performance will significantly degrade while a user searches for and acts on thousands
of recordings, or when recordings are being delivered to the user in quick succession. See
“Offloading call recording voice files from your TeleVantage Server” on page 4-3 for how to
manage many recordings properly.
What parts of the call are recorded
Call recordings include only calls with two or more parties, and only the portion of the call from
time the parties are connected to the end of the call. The following parts of a call are not
recorded:
Q hold music
Q auto attendant messages
Q voicemail greetings
Q voicemail messages
Q telephone commands or prompts
Q IVR Plug-in prompts
Q consultation calls during supervised transfers
When a call is transferred, the various conversations are included in a single call recording.
Exempting queue calls
Call centers usually comprise a large portion of a system’s total phone traffic. If your site uses
TeleVantage call center queues, it is recommended that you exempt your queues from system
call recording, and use the queue’s own recording features to record queue calls (see the
TeleVantage Call Center Administrator’s Guide). Otherwise, a needless duplication of
recordings can result.
4-2
ADMINISTERING TELEVANTAGE
Privacy
Some states require that you announce to callers that their calls may be recorded. TeleVantage
includes a system prompt, MayBeMonitored.vox, that says, "Your call may be monitored or
recorded,” which you can play as needed (for example, by using an auto attendant or call center
queue greeting). In addition, TeleVantage allows you to play a regular “reminder beep” while
recording calls which alerts users and callers that their calls are being recorded (see “Including
a beep on call recordings” on page 4-7). It is the license-holder’s responsibility to comply with
any Federal or other applicable statutes regarding the recording of phone calls. Vertical
Communications, Inc. disclaims any responsibility for failing to comply with such regulations.
Preparing to record all calls ________________________________
Recording all TeleVantage calls can use significant amounts of disk space and can consume
many Intel Dialogic voice resources. Including regular reminder beeps on recorded calls also
requires additional conference resources. Before beginning to record calls, you should plan for
how to store the resulting voice files and manage the demand for voice and conference
resources. See “Call recordings and voice resources” on page 4-5 for information on managing
voice resources for call recording needs.
Offloading call recording voice files from your TeleVantage Server
Each minute of call recording consumes .46 MB of disk space. If you store all call recordings
on the TeleVantage Server computer, it can rapidly consume your available hard disk space and
interfere with phone system performance and users’ ability to receive voice messages.
Therefore, it is highly recommended that you automatically offload call recordings from the
TeleVantage Server computer. The following are two ways to do so.
Automatically archiving recordings
The recommended approach to archiving is to have TeleVantage automatically archive all
recordings of a certain age. You can choose which users are subject to automatic archiving and
you can specify the network location of your choice for archive files. Users with permission can
then search, manage and listen to the archived recordings using the TeleVantage Archived
Recording Browser. See “Archiving call recordings and voice mail” on page 12-39. Recordings
are archived in .VOX, .WAV or .MP3 format with detailed Call Log information about the call.
Moving recordings to any e-mail address
As an alternative to automatic archiving, you can use TeleVantage e-mail notification to
automatically move call recordings to any e-mail address. To do so:
1.
Create a placeholder user (named, for example, “Recorded Calls”) to whom you send
all call recordings. For instructions on creating a user, see “About adding users” on
page 6-2.
2.
Set up e-mail notification for the user with the following selections:
Q Send e-mail for all messages
CHAPTER 4. RECORDING ALL TELEVANTAGE CALLS
4-3
Q Attach voice message and delete from Inbox
For instructions on setting up e-mail notification, see “Setting e-mail notification” on
page 6-21.
With these settings, the call recording files are moved to your e-mail server in the form of e-mail
attachments, with detailed Call Log information, and are deleted from the TeleVantage Server
computer as soon as they arrive, so that no extra disk space is consumed.
When you offload call recording files via e-mail notification, you will have a large number of
e-mails in the e-mail account to which they are sent—one e-mail for each recorded call.
TeleVantage automatically puts information about the call into the e-mail’s subject and body,
so that you can use your e-mail program’s Search capability to find a particular call recording.
The e-mail’s subject holds information in the following format:
SysRec: TrunkX/NAME->Station Y/User Y
where -> indicates the direction of the call, Trunk X indicates the trunk number involved and
the Caller ID name (where available), Station Y indicates the station ID of the station involved,
and User Y indicates the extension of the user involved.
The e-mail body also includes the following Call Log information that further describes what
was recorded (example data used):
Notes:
Trunk 1/ Unknown -> Station 2/ Queue 500
CustomData:
CustProp1=Value of Custom Property 1;CustProp2=Value of Custom Property 2;
--- Call Recording Details --Direction: Inbound
From: Unknown
To: Queue 500
Answered By: User 2
From Number: 6172344500
To Number: 500
From Code: <None>
To Code: <None>
From Device: Trunk 1
To Device: Station 2
Duration: 01:07
Start Time: 8/31/2005 11:17:55
Stop Time: 8/31/2005 11:19:02
Wait Time: 00:07
Parties: 2
Caller ID Name: <None>
Organization: <None>
Call Log ID: 04010000002119
TeleVantage Code:1207:1010:1
4-4
ADMINISTERING TELEVANTAGE
Storing call recordings on the TeleVantage Server
If you decide to store call recordings on the TeleVantage Server instead of offloading them, you
should choose the amount of disk space that you want to devote to storing call recording files.
Even if you configure TeleVantage to automatically archive call recordings daily you still need
enough disk space to hold 24 hours of recordings before they are archived. When this space is
filled, you can have TeleVantage automatically make room for the newest call recordings by
deleting the oldest. To set this up:
1.
Limit the size of the placeholder user’s voice mailbox to the amount of disk space you
want to devote to call recordings. Use the formula 1 minute = .46MB. For example, to
devote 1 GB to call recordings, set the user’s voice mailbox to 2185 minutes. See
“Configuring the user’s voice mailbox” on page 6-18.
2.
Configure system call recording to automatically delete the oldest call recording when
the mailbox is full. See “Recording all calls” on page 4-6.
Call recordings and voice resources
Call recording involves one additional voice resource for each call being recorded. For example,
if your system has 5 trunk calls and 8 internal calls occurring at the moment, 13 extra voice
resources are required to allow for call recording. Including a reminder beep on call recordings
also uses one voice resource shared across all calls.
Note: TeleVantage does not use dedicated trunk voice resources for system call recording.
Before beginning to record all calls, you should make sure that your hardware configuration
includes enough voice resources to meet the increased demand. For a more in-depth discussion
of voice resource usage, see Installing Intel Telephony Components.
Call recordings beeps and conference resources
Adding reminder beeps to a two-party call requires three conference resources: one for each
party, and one for the reminder beep. This can significantly increase conference resource usage.
For a more in-depth discussion of conference resource usage see Installing Intel Telephony
Components.
CHAPTER 4. RECORDING ALL TELEVANTAGE CALLS
4-5
Recording all calls ________________________________________
Use the following procedure to set up the automatic recording of all TeleVantage calls, and
specify exemptions for calls that you do not want to record:
1.
Choose Tools > System Settings. The System Settings dialog box opens.
2.
Choose the Recordings \ System Call Recording tab.
3.
Check Record all calls to have TeleVantage automatically record system calls
according to the settings you make here. If unchecked, TeleVantage does not record
system calls.
4.
From the Send call recordings to dropdown list, select the voice mailbox to which
system call recordings are sent.
5.
From the When mailbox is full dropdown list, choose one of the following options:
Q Discard new call recording. TeleVantage deletes the new call recording instead of
storing it. Selecting this will cause call recordings to stop when the mailbox is full.
Q Delete oldest call recording. TeleVantage deletes the oldest call recording in the
mailbox to make room for the new recording. Only call recordings can be deleted
by this method. TeleVantage never deletes voice messages in this way.
6.
To exempt internal calls, so that only calls involving a trunk are recorded, check Do
not record internal station to station calls. If unchecked, both internal calls and calls
involving a trunk are recorded.
7.
Use the Do not record calls while these are in the call list to exempt users or roles
from system call recording. You can exempt any of the following entities:
Q Users. The system does not record any call while an exempted user is a participant.
4-6
ADMINISTERING TELEVANTAGE
If an exempted user joins a conference call that is being recorded, the recording
pauses as long as the exempted user is in the call. If the exempted user leaves the
conference, the recording resumes.
Q Roles. The system does not record any call while a member of the role is a
participant.
Q Queues. The system does not record any queue call.
When a queue call is transferred to a user who is not an agent in the queue, it ceases
being a queue call and recording of it begins.
To exempt a user, role, or queue from system call recording, click Add. Make your
selection in the System Call Recording Exclusion dialog box and click OK.
8.
When you are finished adding exemptions, click OK.
Including a beep on call recordings _________________________
You can include a regular “reminder” beep on TeleVantage call recordings. If enabled, the
reminder beep is heard by all parties in the call and is included in the recording. You can enable
or disable recording beeps for each type of TeleVantage call recording.
To include a reminder beep
1.
Choose Tools > System Settings. The System Settings dialog box opens.
2.
Choose the Recordings \ Reminder Beeps tab.
3.
Check the appropriate box to include a beep with each type of recorded call as follows:
Q User call recording. Call recordings made manually by users using the *16
telephone command or ViewPoint’s Call Monitor commands.
Q Queue call recording. Automatic call recordings set up in a call center queue.
These include queue call recordings and agent call recordings.
Q System call recording. Call recordings set up in System Settings, Recordings \
System Call Recording tab, as described in this chapter.
4.
Click OK.
Customizing the recording beep
You can customize the beep and interval of the reminder using TeleVantage advanced settings.
See Appendix J of Installing TeleVantage.
CHAPTER 4. RECORDING ALL TELEVANTAGE CALLS
4-7
Archiving call recordings __________________________________
To save space on the Server and improve ViewPoint performance, you can archive call
recordings to a location of your choice, and access them using the TeleVantage Archived
Recording Browser. See “Archiving call recordings and voice mail” on page 12-39.
4-8
ADMINISTERING TELEVANTAGE
CHAPTER 5
CHAPTER 5
MANAGING TRUNKS AND SPANS
CHAPTER CONTENTS
About trunks and spans . . . . . . . . . . . . . . . . . . . . . . . . . . . . . . . . . . . . . . . . . . . 5-2
Configuring trunks for inbound and outbound calls. . . . . . . . . . . . . . . . . . . . . . . 5-4
Telephone company services that help TeleVantage . . . . . . . . . . . . . . . . . . . . . 5-5
Setting up fax routing . . . . . . . . . . . . . . . . . . . . . . . . . . . . . . . . . . . . . . . . . . . . . 5-7
Using Delayed Answer . . . . . . . . . . . . . . . . . . . . . . . . . . . . . . . . . . . . . . . . . . . . 5-8
The Trunks view . . . . . . . . . . . . . . . . . . . . . . . . . . . . . . . . . . . . . . . . . . . . . . . . 5-10
Adding an analog trunk . . . . . . . . . . . . . . . . . . . . . . . . . . . . . . . . . . . . . . . . . . . 5-12
Adding a digital Robbed Bit T1 span. . . . . . . . . . . . . . . . . . . . . . . . . . . . . . . . . 5-17
Adding a digital ISDN or CAS span. . . . . . . . . . . . . . . . . . . . . . . . . . . . . . . . . . 5-19
Adding a digital ISDN BRI span . . . . . . . . . . . . . . . . . . . . . . . . . . . . . . . . . . . . 5-21
Using a partial digital span . . . . . . . . . . . . . . . . . . . . . . . . . . . . . . . . . . . . . . . . 5-23
Optimizing your ISDN settings . . . . . . . . . . . . . . . . . . . . . . . . . . . . . . . . . . . . . 5-23
Setting location and Caller ID settings . . . . . . . . . . . . . . . . . . . . . . . . . . . . . . . 5-25
Specifying ISDN outbound Caller ID . . . . . . . . . . . . . . . . . . . . . . . . . . . . . . . . . 5-27
Enabling ISDN Megacom support. . . . . . . . . . . . . . . . . . . . . . . . . . . . . . . . . . . 5-31
Adding an Internet SIP or H.323 span . . . . . . . . . . . . . . . . . . . . . . . . . . . . . . . 5-32
Entering trunk defaults for a span . . . . . . . . . . . . . . . . . . . . . . . . . . . . . . . . . . . 5-32
About trunks and spans ___________________________________
Trunks are the outside phone lines that connect your business to the telephone company and
other providers.
A TeleVantage trunk is a single channel of communication that can support one call at a time.
A span is a collection of many trunks bundled together on a single digital line. For example, a
T1 span on ISDN PRI contains 23 trunks.
Adding trunks to your TeleVantage system is a three-step process:
1.
Connecting the physical trunk line to the Dialogic telephony board in the TeleVantage
Server computer. See Installing Intel Telephony Components.
2.
Defining the trunk in the TeleVantage Administrator’s Trunks view. This involves
defining the individual trunks and (for digital trunks) the span behavior and settings.
See “Adding trunks” on page 5-3.
3.
Including the trunks in one or more dialing services so that users can place outbound
calls on it. See “About dialing services” on page 9-2.
For information about required hardware and how to order services from your phone company,
see Installing Intel Telephony Components and Installing TeleVantage.
Trunk types
TeleVantage supports analog, digital, and Internet trunks in any combination.
Analog trunks
Q Standard analog trunks. The classic trunk type.
Q Analog Direct Inward Dial (DID) trunks. For TeleVantage to support analog DID
trunks, they must be properly configured (see Installing Intel Telephony Components).
Q Centrex trunks or analog extensions from another PBX. In TeleVantage, these are
referred to collectively as Centrex/PBX extensions.
Note: TeleVantage does not support ground start analog circuits.
Digital trunks
Q Robbed Bit T1 trunks. 24 trunks per span.
Q ISDN PRI over T1 trunks. 23 trunks per span.
Q ISDN PRI over E1 trunks. 30 trunks per span.
Q ISDN BRI over BRI trunks. Two trunks per span.
Q E1 CAS trunks. 30 trunks per span.
Note: TeleVantage supports both Wink start and Immediate start on Robbed Bit T1 trunks.
5-2
ADMINISTERING TELEVANTAGE
Internet trunks
Q H.323 trunks. The number of trunks depends on the Internet telephony board used.
Q SIP trunks. The number of trunks depends on the Internet telephony board used, and
whether you are also using H.323 trunks, since any configured H.323 trunks consume
available Intel IPM resources before SIP trunks.
Note: You do not need additional phone company trunks for TeleVantage Internet telephony.
Dialogic Internet telephony boards connect to your network and access the Internet through your
router.
Adding trunks
This chapter contains instructions for adding new trunks of each type, as follows:
Q “Adding an analog trunk” (page 5-12)
Q “Adding a digital Robbed Bit T1 span” (page 5-17)
Q “Adding a digital ISDN or CAS span” (page 5-19)
Q “Adding a digital ISDN BRI span” (page 5-21)
Q “Adding an Internet SIP or H.323 span” (page 5-32)
Before you perform the steps in each section of this chapter, you must have installed and
configured the Intel telephony components that are required for your trunks. See Installing Intel
Telephony Components for instructions.
If you add a trunk in the Administrator before it is physically installed or configured, the trunk
has a status of “Not Installed” in the Device Monitor, until the physical trunk is installed.
Naming trunks
When you name your trunks later in this chapter, give them names that convey important
information about them, so that you can identify trunks quickly and easily. Information
recommended for use in a trunk name includes:
Q The telephone number of an analog trunk
Q The IP address of an Internet trunk
Q The name of the digital or Internet span to which the trunk belongs
Monitoring trunks
For instructions on how to monitor the activity on a trunk, how to enable or disable a digital
trunk, or how to restart a trunk that is experiencing problems, see “Using the Device Monitor
view” on page 12-3.
CHAPTER 5. MANAGING TRUNKS AND SPANS
5-3
Deleting trunks
Deleting a trunk removes it from your TeleVantage system configuration but does not affect the
telephone line, the hardware, or the Trunk license.
Although you can delete a single analog trunk, you cannot delete a single T1, E1, or Internet
trunk from the span to which it belongs. If you must permanently remove a digital trunk, you
must delete the entire span. To disable an individual trunk in a span temporarily, right-click the
trunk in the Device Monitor choose Disable Trunk. Uncheck the options for receiving inbound
calls and placing outbound calls.
A deleted trunk appears in the Device Monitor as “NA” if the physical line is still connected to
the Intel Dialogic board.
Configuring trunks for inbound and outbound calls ____________
You can configure trunks as inbound-only, outbound-only, or both inbound and outbound. In
most TeleVantage installations, trunks are configured for both inbound and outbound use.
If it is critical that a phone line is always available for inbound calls (for example, if you have
an emergency hotline), you can set up an inbound-only trunk. Similarly, if it is critical that there
is always a trunk available for outbound calls, you can set up an outbound-only trunk.
For instructions on configuring each trunk type for inbound and outbound calls, see the
instructions for that trunk type in this chapter.
Matching trunk settings with your phone company
TeleVantage inbound and outbound settings control only how TeleVantage treats trunks. They
do not affect how the telephone company treats trunks.
For example, if you configure a trunk for inbound calls only, TeleVantage does not use it for
outbound calls. You do not receive any calls on the trunk, however, unless you have instructed
your telephone company to include the trunk in your inbound hunt group.
Similarly, specifying a trunk as outbound-only does not prevent inbound calls if your telephone
company included the trunk in your inbound hunt group and given the trunk's telephone number
to outside parties. If calls arrive on a trunk designated for exclusive outbound use, TeleVantage
plays a message indicating that the caller dialed a wrong number and then hangs up.
Note: The message played under these circumstances is the system prompt “Wrong Number.”
You can rerecord it to have the message give the caller the correct number to reach your
company. See Chapter 13 for more information about recording system prompts.
5-4
ADMINISTERING TELEVANTAGE
Inbound and outbound calls and hunt groups
It is recommended that you ask your telephone company for a terminated hunt group. In this
arrangement, inbound calls try the lowest phone number first and then the next higher until a
free line is found. When you are adding trunks to your configuration in the Administrator, assign
the lowest phone numbers to the lowest TeleVantage trunk numbers.
On outgoing calls, by default TeleVantage starts searching for a free line with the highest
TeleVantage trunk number. This behavior results in the fewest conflicts for lines (if you have a
terminated hunt group), because inbound calls are arriving on the lower-numbered trunks, and
outbound calls are going out on the higher-numbered trunks. This behavior is defined by the
dialing service used to place the call, and can be changed to accommodate other configurations
and needs. See “About dialing services” on page 9-2 for more information.
Placing outbound calls on a specific trunk
Users with the permission Select a specific trunk for outbound call can place a call on a
specific trunk for testing purposes by dialing 88, the trunk number, and then the phone number.
For example, to place a call on trunk #1, dial 8801 (you must use 4 digits, but see the second
note below). To place a call on trunk #12, dial 8812. When you are using specific-trunk dialing,
you do not need to dial the access code to make an external call.
You can change the 88 code to other digits. See “Changing the access code to select a trunk” on
page 9-9.
Note: If you want to allow users to access a specific trunk, create a dialing service that allocates
that trunk. See “About dialing services” on page 9-2. To restrict the use of outbound trunks to
certain users, see “Restricting outbound trunk use by Organization” on page 11-4.
Note: If your system has more than 100 trunks, dial five digits, for example 88001 to use trunk
#1.
Telephone company services that help TeleVantage____________
The following services from your phone company enable TeleVantage to work with maximum
efficiency:
Q Caller ID/ ANI (Automatic Number Identification). Enables TeleVantage to
identify incoming calls by number and sometimes name too, perform one-click callback
of voice messages, and use other features. ANI provides Caller ID information about
analog DID and digital trunks.
Q DID (Direct Inward Dial). Enables direct routing of incoming calls to individual
stations, so callers do not need to dial an extension at an auto attendant. To give a user a
DID number, see “Assigning a DID number” on page 6-14.
Q DNIS (Dialed Number Identification Service). Provides DID data on toll-free lines
such as 800, 877, and 888 numbers. Throughout TeleVantage, “DID” means both DID
and DNIS.
CHAPTER 5. MANAGING TRUNKS AND SPANS
5-5
Collecting ANI/DID digits
Some caller or number identification services that you can order with your analog or Robbed Bit
T1 phone lines require that TeleVantage collect information that arrives with an inbound call.
Note: TeleVantage automatically collects Caller ID digits on analog trunks and ANI/DNIS digits
on ISDN or CAS trunks, if available. If your system has only these trunk types and services, you
can skip this section.
For TeleVantage to collect DID/DNIS information when a call arrives on an analog or Robbed
Bit T1 trunk, or to collect ANI digits on a Robbed Bit T1 trunk, the TeleVantage Server needs
to know exactly how the data is signaled. Use the information supplied by your telephone
company or T1 carrier to define these signals to TeleVantage. For detailed instructions, see:
Q “Setting up digit collection on an analog trunk” (page 5-13).
Q Instructions for using the Robbed Bit T1 Experimenter in Installing TeleVantage.
See Installing TeleVantage for information about ordering and installing DID/DNIS for analog
or digital lines.
Using DID with Robbed Bit T1 trunks
1.
Make sure that your Robbed Bit T1 trunks have been installed correctly.
2.
Configure digit collection signaling for the trunks (see Installing TeleVantage for
instructions on using the Robbed Bit T1 Experimenter).
3.
Verify that each trunk in the digital span is configured to accept inbound calls and that
calls are sent to a user or auto attendant (see “Entering trunk defaults for a span” on
page 5-32).
4.
Assign DID numbers to users or auto attendants (see “The User tab” on page 6-12).
Using DID with analog trunks
5-6
1.
Make sure your analog DID trunks and digital interface units have been correctly
installed and configured. See Installing Intel Telephony Components and Installing
TeleVantage.
2.
Configure analog digit collection signaling for the trunks (see “Setting up digit
collection on an analog trunk” on page 5-13).
3.
Enable DID for each inbound analog DID trunk (see “Adding an analog trunk” on
page 5-12).
4.
Assign DID numbers to users or auto attendants (see “Assigning a DID number” on
page 6-14).
ADMINISTERING TELEVANTAGE
Setting up fax routing _____________________________________
TeleVantage supports the use of fax machine and modem communication. The quality of the
communication (for example, the bandwidth supported) is determined by the telephony board
used.
TeleVantage also supports fax detection on incoming calls, and can route calls to the appropriate
extension (for example, a fax machine or fax server). Fax detection and routing is supported on
the following trunk types:
Q Analog
Q Robbed Bit T1
Q ISDN/CAS T1/E1
To route faxes to a fax machine
1.
Create a placeholder user whose station ID is connected to the fax machine (for
example, a user named “First floor fax machine.”) See “About adding users” on
page 6-2.
2.
Select that user when defining a trunk, in the Faxes are sent to dropdown list. For
instructions on defining trunks of different types, see the sections in the rest of this
chapter.
Note: By default, if a DID match occurs on an inbound fax call, the call is routed to the user
whose DID number is dialed, not diverted to the Faxes are sent to extension. You can change
this behavior and enable fax diverting by changing the registry setting DirectCallsUseFaxTarget.
See Appendix J of Installing TeleVantage.
Whenever TeleVantage detects a fax signal on a trunk, the call is automatically routed to the
trunk’s fax target station. You can select a different station as the fax target for each trunk.
For instructions on how to configure specific trunk types to support fax routing, see the sections
on adding those trunk types later in this chapter.
Customizing fax routing
If you have a bank of fax machines, you can route faxes to the entire bank at once. Whichever
fax machine answers first receives the call. To set this up, add all the fax machine users to a
workgroup (see “Creating a Workgroup” on page 8-4), then select the workgroup as the fax
target when defining the trunk (see the rest of this chapter).
To handle faxes differently based on time or date, you can route fax calls to an auto attendant
and then schedule transfers to the appropriate fax devices.
CHAPTER 5. MANAGING TRUNKS AND SPANS
5-7
Using Delayed Answer ____________________________________
By default, TeleVantage immediately connects incoming calls, then handles the calls according
to system setup and caller dialing. Every call is thus “answered” in a telephone-company sense
even if it is never handled by a user, voicemail, auto attendant, or other TeleVantage entity. This
behavior has the following disadvantages:
Q Incoming long distance calls initiate billing as soon as they arrive, whether or not they
are answered internally.
Q Callers to TeleVantage receive an indication that their call has been answered, even
when it has not. In automated calling systems, for example, this would cause the calling
machine to start its programmed behavior. This can affect TeleVantage Servers tied
together using H.323 Gateways.
To avoid these disadvantages, TeleVantage provides a Delayed Answer feature that you can
activate on a per-span basis, or for all analog trunks. When Delayed Answer is used,
TeleVantage does not “answer” a call in the telephone company sense until the call is either
answered or handled internally. On ISDN trunks, if the call is never handled—for example, if it
passes unanswered through a routing list with “Hang Up” as the final action—TeleVantage
sends a “not answered” signal to the telephone company, and the call is disconnected without
incurring billing time or activating any remote connection sequence. (Analog trunks in this case
ring without answering until the caller hangs up.)
Note: Delayed Answer is enabled by default for ISDN trunks.
Enabling Delayed Answer
You can enable Delayed Answer separately for each digital span and for your analog trunks as
a group.
To enable Delayed Answer on a digital span, use the Connect inbound calls field on the
General tab of the dialog box for that span. Choose one of the following options:
Q Immediately when received. Delayed Answer is disabled. Calls are connected as soon
as they are received by TeleVantage.
Q When answered or handled. Delayed Answer is enabled. Calls are not connected until
they have been answered or handled by TeleVantage or a user. See the next section for
more details.
To enable Delayed Answer for analog trunks, see “Using Delayed Answer on analog trunks” on
page 5-16.
5-8
ADMINISTERING TELEVANTAGE
TeleVantage behavior with Delayed Answer
When Delayed Answer is enabled, TeleVantage waits to answer an incoming external call until
any of the following happens:
Q The call is routed to a station, and the station answers the call. (If call announcement is
on, the recipient must press "1" to accept the call.)
Q The call is routed to an external number—for example, with call forwarding or a routing
list steps—and the external destination answers the call. (If call announcement is on, the
recipient must press "1" to accept the call.)
Q TeleVantage plays any prompt to the caller, for example, an auto attendant, voicemail,
or queue prompt.
Q TeleVantage plays internal dial tone to the caller, for example, on an IP phone
connection or if the caller logs in.
If none of these events happens before TeleVantage would disconnect the call, the behavior
depends on the trunk type, the type of extension dialed, and the result of the call, as follows:
How TeleVantage disconnects an unanswered call
Analog and robbed bit T1 trunks
TeleVantage waits until the calling party disconnects the call.
(This behavior also occurs for some E1 CAS trunk calls. See the next section.)
All other trunk types
Call was sent to a station
Q
If the station did not answer or the user pressed 2 to decline the call, the call is
disconnected with the reason “normal clearing.”
Q
If the station was busy—for example, if the user was in a call with Call waiting
disabled—the call is disconnected with the reason “busy.”
Call was sent to an external number
Q
If the connection timeout expired, the call is disconnected with the reason
“normal clearing.”
Q
If some other reason prevented connection, that reason is sent when the call is
disconnected. For example, if the line is busy, the reason would be “busy.”
Call was sent to a queue
Q
If the queue is closed, the call is disconnected with the reason “rejected.”
Q
If the queue is too busy, the call is disconnected with the reason “busy.”
Q
If the call has exceeded the queue’s maximum wait time, it will be disconnected
with the reason “busy.”
CHAPTER 5. MANAGING TRUNKS AND SPANS
5-9
Disconnecting “accepted” calls on E1 CAS trunks
On E1 CAS trunks, calls in the “accepted” state are disconnected as if on analog trunks, that is,
TeleVantage waits for the calling party to disconnect the call. Calls are placed in the “accepted”
state in the following circumstances:
Q TeleVantage tried to connect the call to a station and the station has been ringing (or
played call waiting).
Q TeleVantage tried to connect to an external number and it received an “alerting”
indication from the network during that connection attempt.
Q TeleVantage tried to connect to a queue that is neither closed and nor too busy.
Delayed Answer and the Call Log
When Delayed Answer is enabled, all calls continue to show up in the TeleVantage Call Log,
even calls that were not “answered” in a telephone company sense.
The Trunks view__________________________________________
Click Trunks in the view bar to open the Trunks view.
Each trunk that you add appears as a row in the view. The following table show the information
that appears for each trunk.
5-10
Column
Description
Number
Port number on the Dialogic board associated
with this trunk.
Type
Type of trunk: Analog, Robbed Bit T1, Internet, or
ISDN/CAS E1/T1.
Inbound
If checked, this trunk is used for inbound calls.
ADMINISTERING TELEVANTAGE
Column
Description
Outbound
If checked, this trunk is used for outbound calls.
Rings
Number of rings before TeleVantage picks up an
incoming call.
Retrieve DID
If checked, TeleVantage retrieves Direct Inward
Dial digits from calls coming in on this trunk.
Centrex
If checked, indicates a Centrex trunk.
Span
For digital spans, the number of the span to which
the trunk belongs.
Name
Descriptive name assigned to the trunk.
Send calls to
Auto attendant, operator, user, or IVR Plug-in that
receives inbound calls on this trunk.
Send faxes to
User to whom inbound faxes on this trunk are
routed.
IP Address
IP address of the Internet trunk, if applicable.
RTP Resource
RTP resource of the Internet trunk, if a
host-based stack is being used.
Span Description
Optional information provided when the span was
added.
Because you can add trunks to the configuration before the physical trunks are added to your
system, the number of trunks shown in the trunks view may not reflect the actual number of
trunks available for TeleVantage’s use.
Digital and Internet spans
TeleVantage represents digital and Internet trunks as a span of a number of individual trunks.
The number corresponds to the number of available channels. For example, a Robbed Bit T1
span offers 24 channels. When you add a Robbed Bit T1 span, 24 individual trunks appear in
the Trunks view. You can set some properties for the span as a whole and some properties for
individual trunks in the span only as follows:
Q To set properties for a span as a whole, right-click a trunk in the span and choose Open
Span.
Q To set properties for an individual trunk, right-click the trunk and choose Open Trunk.
When you add a digital T1, E1, or BRI span, make sure that the span type matches the protocol
type that was specified with the Dialogic Configuration Manager (DCM), as described in
Installing Intel Telephony Components. You cannot change a span’s type after you add it. If you
create a span of the wrong type, delete the span and add a new one of the correct type.
CHAPTER 5. MANAGING TRUNKS AND SPANS
5-11
Adding an analog trunk____________________________________
Use the following procedure to add a new analog, analog DID, or analog Centrex/PBX trunk.
1.
Choose Trunks > New Trunk > Analog Trunk. A new Trunk dialog box opens.
2.
Enter the number and name of the trunk, as follows:
Q Number. Identifies the hardware resource on the TeleVantage Server used for this
trunk. If you are using a Dialogic BCP Connection Panel, the number must
correspond to the port on the panel to which the trunk is connected.
If you have a mix of analog and digital trunks, and have not yet installed the trunks,
be sure that you assign trunk numbers that reflect how trunks will be installed in
your system. Analog trunks always use the lower-numbered trunks, so either add
the analog trunks first, or bump up the starting trunk number for the digital span to
reflect the actual trunk number. See “Digital and Internet spans” on page 5-11 for
information about adding a digital span.
Q Name. Descriptive name for the trunk. See “Naming trunks” on page 5-3.
3.
Choose whether the trunk is used for inbound calls, outbound calls, or both, using the
following fields:
Q Accept inbound calls. Check this box if the trunk is used for inbound calls.
Q Number of rings before answering. Enter the number of rings that
TeleVantage detects on the incoming call before accepting it. Billing for a call
begins at the moment TeleVantage accepts it, at which point TeleVantage sends
the call to the destination you specify in Calls are sent to.
The default of 2 rings allows for the capture of Caller ID on analog trunks,
which in the U.S. appears between the first and second ring. In areas such as the
U.K., where Caller ID appears before the first ring, this setting can be changed
to 1 so that calls on an inbound trunk are answered after the first ring.
5-12
ADMINISTERING TELEVANTAGE
TeleVantage uses Caller ID for identifying contacts, performing callbacks, and
other features.
Q Calls are sent to. Select the auto attendant, user, ACD workgroup, call center
queue, or IVR Plug-in that answers all inbound voice calls on this trunk. To
change the target according to time of day, send the calls to an auto attendant
and define the appropriate scheduled transfer action.
Q Faxes are sent to. Select the extension that answers all inbound fax calls on
this trunk. See “Setting up fax routing” on page 5-7 for more information.
Q Retrieve DID digits from this analog line. Check this box to detect DID digits
and route inbound calls directly to the user, auto attendant, or IVR Plug-in
associated with the DID number. See “Setting up digit collection on an analog
trunk” on page 5-13 for more information.
Q Allow outbound calls. Check this box if the trunk is used for outbound calls.
Q Centrex/PBX transfers supported. If this is a Centrex trunk or a trunk connected
to an external PBX, check the box to enable users to transfer or forward calls using
only Centrex or PBX extensions. When this option is selected (and if supported by
your Centrex service or PBX), TeleVantage can transfer or forward a call without
using any TeleVantage trunks.
Q Pre-transfer sequence. Type the keys required before transferring a call to a
Centrex or PBX extension. The valid keys are 0-9, *, #, and & (Flash). The
default is &.
Q Post-transfer sequence. Type the keys required after TeleVantage dials the
pre-transfer sequence and the extension, to transfer a call to a Centrex or PBX
extension. The valid keys are 0-9, *, #, and & (Flash). After the post-transfer
sequence is dialed, TeleVantage hangs up.
4.
Click OK to add the trunk to your configuration.
Setting up digit collection on an analog trunk
The format used to transmit ANI and DID/DNIS information on analog trunks varies with the
carrier, as follows:
Q Fixed format. Each piece of information is always the same length. For example, DID
information is typically the last four digits that the caller dialed.
Q Variable format. Each piece of information can vary in length, with filler digits used as
separators, for example, 4 DID digits and 5 ANI digits in the format
#DDDD#AAAAA#.
To collect the variable-format digits shown in the previous example, you must specify the
following three (3) separate actions that TeleVantage must perform (see the next procedure):
Q Collect the filler digit # that indicates the start of the DID information. The digit type is
Filler, and the number of digits to collect is 1.
CHAPTER 5. MANAGING TRUNKS AND SPANS
5-13
Q Collect the DID digits sent by the carrier. The digit type is DID. You collect a variable
number of digits up to the filler digit, #.
Q Collect the ANI digits sent by the carrier. The digit type is ANI. You collect a variable
number of digits up to the filler digit, #.
To collect digits on an analog trunk
1.
Choose Tools > System Settings.
2.
Choose the Analog Trunks > Digit Collection tab. Any digit collection actions that
already have been defined appear in the list under Current actions.
3.
In the Wait field, enter the number of milliseconds that you want TeleVantage to wait
for the analog DID interface device to send digits.
4.
Click Add to add an action to the list under Current actions, or click Edit to modify
the selected action. In either case, the Modify Action dialog box opens.
5.
In the Modify Action dialog box, select the Digit type to retrieve. You can retrieve
DID, ANI, or Filler digits.
6.
Under Digit length, do one of the following:
Q To retrieve fixed-format data, click Exactly __ digits, and then type the number of
digits to collect.
5-14
ADMINISTERING TELEVANTAGE
Q To retrieve variable-format data in which each piece of information may vary in
length, and filler digits are used as separators, click Variable up to the first ___
digit, and then type the filler digit.
7.
Click OK.
8.
Repeat steps 4-7 to add all the actions required to collect digits coming in on the trunk,
and then click OK.
After you have configured analog digit collection correctly, make sure that the trunk is
configured to accept inbound calls and retrieve DID digits. Double-click the trunk in the Trunks
view to open the Trunk dialog box to verify both of these settings.
Handling international Caller ID on analog trunks
If your carrier ever sends incoming Caller ID numbers that begin with something other than area
code—for example, international numbers that begin with 0, or with the country code—you
should make sure that TeleVantage is set up to handle them. If you do not, then users will not
be able to use the callback feature on international calls, or any calls where the Caller ID number
begins with something other than the area code.
To enable TeleVantage to handle international Caller ID
1.
Choose Tools > System Settings.
2.
Choose the Analog Trunks > Caller ID tab.
3.
Check Caller ID does not always begin with area code.
4.
Enter the following data to specify your Server’s regional location (the illustration
above shows settings for the United States):
Q Country/Region. Select your country.
Q Long distance prefix. Enter the number you must dial to make a long distance calls
from your location.
CHAPTER 5. MANAGING TRUNKS AND SPANS
5-15
Q International prefix. Enter the number you must dial to make an international call
from your location.
Q Area code. If applicable, enter your area code. Otherwise, leave blank.
Q Local number length. Enter the length of a local number in your location, without
area code or prefixes of any kind.
5.
Click OK.
Once these settings are made, users can use the callback feature on international calls and other
calls with non-standard Caller ID numbers.
Using Delayed Answer on analog trunks
For an explanation of Delayed Answer, see“Using Delayed Answer” on page 5-8.
Delayed Answer is enabled or disabled for all your analog trunks as a group. To do so:
1.
Choose Tools > System Settings. The System Settings dialog box opens. Choose the
Analog Trunks tab.
From the Trunks view, you can also choose Trunks > Analog Settings.
2.
From the Connect inbound calls dropdown list, select one of the following:
Q Immediately when received. Delayed Answer is disabled. Calls are connected as
soon as they are received by TeleVantage.
Q When answered or handled. Delayed Answer is enabled. Calls are not connected
until they have been answered or handled by TeleVantage or a user. For a more
detailed description of when TeleVantage connects calls under Delayed Answer,
see “TeleVantage behavior with Delayed Answer” on page 5-9.
3.
5-16
Click OK.
ADMINISTERING TELEVANTAGE
Adding a digital Robbed Bit T1 span_________________________
This section explains how to add a digital Robbed Bit T1 span by configuring signaling and
adding the span to TeleVantage in the Trunks view.
Note: Before you add a Robbed Bit T1 span in the Administrator, you may want to run the
TeleVantage Robbed Bit T1 Experimenter on the TeleVantage Server computer to configure
signaling on the T1 span. For information about installing and using the Experimenter, see
Installing TeleVantage.
To add a Robbed Bit T1 span
1.
Choose Trunks > New Trunk > Robbed Bit T1 Span. A new Robbed Bit T1 Span
dialog box opens.
2.
On the General tab, specify the following information for the span:
Q Span number. The sequence number of this Dialogic T1 board as installed in your
TeleVantage Server computer (the sequence number of the first T1 board is 1, not
0).
Q Starting trunk number. The starting trunk number of the span. The dialog box
shows you the range of numbers of the 24 trunks belonging to this span. If your
system also has analog trunks, the analog trunks must have the lower trunk
numbers, so if you have not added them yet, leave room for them in your numbering
of the span.
Q Wink duration. The length in milliseconds of the signal TeleVantage sends to your
T1 carrier to indicate that it is ready to receive digits. You can also set the wink
duration using the Robbed Bit T1 Experimenter.
Q Signaling debounce time. The duration in milliseconds that a signal must be
constantly present on the line for the signal to be reported. For example, a wink is
usually signaled by changing the A and B bits from low to high (AH BH) and then
quickly changing them back to low (AL BL). If you don’t want to see these
individual signals your debounce time must be longer than the duration of the wink.
CHAPTER 5. MANAGING TRUNKS AND SPANS
5-17
Q Send and receive. For T1 trunks with ANI or DID/DNIS service only, the
signaling type—DTMF or MF—used for inbound digit collection. You can also set
this in the Robbed Bit T1 Experimenter.
Q Connect inbound calls. Whether or not to use Delayed Answer on this span. For
more information see “Using Delayed Answer” on page 5-8.
Q Description. A description of the span, typically including the main phone number
of the span.
3.
Click the Signaling tab and review the event definitions that appear for your T1 trunk.
These are the event definitions that you specified using the Robbed Bit T1
Experimenter. The trunk will not work unless these definitions match your carrier’s
definitions.
Note: You can import and export signaling templates to make the signaling setup
easier. See the next section.
To change a definition, do one of the following:
Q Select the definition you want to change, and click Edit. Use this method only if you
know exactly what change you need to make.
Q Use the Robbed Bit T1 Experimenter (see Installing TeleVantage). This method is
useful since it allows you to test the settings, but it requires that the TeleVantage
Server be stopped.
5-18
4.
Click the Trunks tab and set the default values for the 24 trunks that will be created in
this span. You can then change these values for each trunk individually. See “Entering
trunk defaults for a span” on page 5-32.
5.
Use the Caller ID Settings tab to set the values for your location and Caller ID formats.
See “Setting location and Caller ID settings” on page 5-25.
6.
Click OK to add the span to your configuration.
ADMINISTERING TELEVANTAGE
Using a signaling template
The Robbed Bit T1 Experimenter includes templates that contain Robbed Bit T1 signaling
definitions that will be valid in many cases, as follows:
Q Local1. Use this template for a local Robbed Bit T1 trunk.
Q Longdistance. Use this template for a long-distance Robbed Bit T1 trunk.
To apply a template to a span, click Load Template on the signaling tab. Select the template to
apply, click Open, and then click OK.
Note: If you have installed the Robbed Bit T1 Experimenter to a directory other than the
TeleVantage Administrator’s directory, you must look for the template in that directory.
You can also export the current signaling definitions shown in the tab, for example, to use in
another span. Click Save as Template, and specify the path and filename.
To edit signaling definitions applied from a template, see the previous section.
Adding a digital ISDN or CAS span __________________________
Before adding an ISDN span, see Appendix B of Installing Intel Telephony Components for
information on configuring your ISDN trunks.
Enabling DM3 ISDN trunks after upgrading
If you have upgraded from a previous version of TeleVantage and have IP trunks defined, ISDN
T1 and E1 trunks from Intel DM3 boards are not automatically detected and are not recognized
when you try to create a new ISDN T1/E1 Span.
If you have DM3 ISDN trunks on your system that are not being detected when you create an
TV ISDN T1/E1 span, do the following:
1.
Select Trunks > Enable DM3 ISDN Trunks or click the following toolbar button:
2.
Restart the TeleVantage Server.
3.
Using the Administrator, edit your SIP or H.323 spans and change the starting trunk
number for each of them to match the new trunk numbers shown in the Device
Monitor. You need to do this because DM3 T1/E1 spans are detected before your
H.323 or SIP spans.
CHAPTER 5. MANAGING TRUNKS AND SPANS
5-19
Adding digital ISDN or CAS spans
Use the following procedure to add an ISDN T1, ISDN E1, or CAS E1 trunk. To add ISDN
Basic Rate Interface (BRI) trunks, see “Adding a digital ISDN BRI span” on page 5-21.
1.
Choose Trunks > New Trunk > ISDN/CAS T1/E1 Span. A new ISDN/CAS T1/E1
Span dialog box opens.
2.
Click the General tab and specify the following information for the span:
Q Board number. The sequence number of the span.
Q Description. A description of the span, typically including the main phone number
of the span.
Q Protocol type. Select whether the trunk is a T1 ISDN, E1 ISDN, or E1 CAS type.
The actual protocol used—for example, NI2 or 5ESS—is determined when the
Dialogic drivers are installed, as described in Installing Intel Telephony
Components.
Note: If you are using an E1 board with the CAS protocol, and your country’s E1
CAS protocols are different than the standard format, contact your TeleVantage
provider.
Q Starting trunk number. The starting trunk number of the span. The dialog box
shows you the range of numbers of the trunks belonging to this span. If your system
also has analog trunks, the analog trunks must have the lower trunk numbers, so if
you have not added them yet, leave room for them in your numbering of the span.
Q Connect inbound calls. Whether or not to use Delayed Answer on this span. For
more information see “Using Delayed Answer” on page 5-8.
Q E1 protocol. If you selected E1 CAS as the Protocol type, enter the PDK protocol
for your country, in the format
pdk_cc_r2_io
where cc is the country code of your country. For example, in Mexico you would
enter pdk_mx_r2_io. (Older formats of cc_r2_io are also accepted.)
You must enter a PDK protocol that is supported by TeleVantage. To see what PDK
protocols are available, look in C:\Program Files\Dialogic\CFG. Each supported
PDK protocol has a corresponding .CDP file in that directory.
5-20
ADMINISTERING TELEVANTAGE
3.
Click the Tuning tab and optimize your ISDN settings as needed. See “Optimizing
your ISDN settings” on page 5-23.
4.
Click the Trunks tab and set the default values for the 24 trunks that will be created in
this span. You can then change these values for each trunk individually. See “Entering
trunk defaults for a span” on page 5-32.
5.
Use the Caller ID Settings tab and Outbound Caller ID tab to set the values for your
location and Caller ID formats. See “Setting location and Caller ID settings” on
page 5-25.
6.
Click OK to add the span to your configuration.
Note: ANI/DNIS is automatically retrieved by TeleVantage for ISDN T1 trunks and E1 trunks.
Adding a digital ISDN BRI span _____________________________
Before adding an ISDN span, see Appendix B of Installing Intel Telephony Components for
information on configuring your ISDN trunks.
Use the following procedure to add a new ISDN Basic Rate Interface (BRI) span. To add
Primary Rate Interface (PRI) spans, see “Adding a digital ISDN or CAS span” on page 5-19.
1.
Choose Trunks > New Trunk > ISDN BRI Span. A new ISDN BRI Span dialog box
opens
2.
Click the General tab and specify the following information for the span:
Q BRI board number. The sequence number of the span.
CHAPTER 5. MANAGING TRUNKS AND SPANS
5-21
Q Description. A description of the span, typically including the main phone number
of the span.
Q Number of ports. The number of trunks supplied by your Dialogic BRI board. If
you are using a BRI/80-SC board, select 8. If you are using a BRI/160-SC board,
select 16.
Q Protocol. The protocol of your BRI span, as given to you by your BRI supplier.
Q Starting trunk number. The starting trunk number of the span. The dialog box
shows you the range of numbers of the trunks belonging to this span. If your system
also has analog trunks, the analog trunks must have the lower trunk numbers, so if
you have not added them yet, leave room for them in your numbering of the span.
Q Connect inbound calls. Whether or not to use Delayed Answer on this span. For
more information see “Using Delayed Answer” on page 5-8.
Q Service Protocol Identifier Number (SPID). A unique number assigned to each
trunk in the BRI span. Enter the SPID numbers supplied to you by your BRI
supplier. If your BRI board is the Dialogic BRI/2VFD, you do not need to enter
SPID numbers.
3.
Click the Trunks tab and set the default values for the trunks that will be created in this
span. You can then change these values for each trunk individually. See “Entering
trunk defaults for a span” on page 5-32.
4.
Use the Caller ID Settings tab and Outbound Caller ID tab to set the values for your
location and Caller ID formats. See “Setting location and Caller ID settings” on
page 5-25.
5.
Click OK to add the span to your configuration.
Editing an ISDN BRI span
If you make changes to an ISDN BRI span, you must restart all trunks in the span for your
changes to take effect. When you make changes and click OK, TeleVantage prompts you to
restart the span. Choose one of the following options:
Q Click Yes. The span is restarted, and all calls using the span are disconnected without
warning.
Q Click No. Your changes are saved, but they will not take effect until you manually restart
the span. To do so, select any trunk in the span in the Trunks view and choose Trunks >
Restart Span.
5-22
ADMINISTERING TELEVANTAGE
Using a partial digital span_________________________________
In some cases you might want to use only part of a TeleVantage digital span, and disable the
unused trunks. For example, you may have purchased a partial T1 line from your telephone
company, or you may want to use some of the trunks for data rather than phone traffic.
To disable unused digital trunks in a span
1.
In the Trunks view, double-click each trunk that you want to disable in turn. The Trunk
dialog box opens.
2.
Uncheck both Accept Inbound calls and Allow outbound calls.
3.
Click OK.
When you disable a trunk in this manner, TeleVantage responds to incoming calls on it by
playing a message that says, “The number you have dialed does not accept inbound calls.”
Note: Do not try to disable trunks for this purpose using the Device Monitor > Disable Trunk
command in the Device Monitor view. Trunks disabled that way are enabled again whenever the
Server is restarted, and TeleVantage does not respond at all to incoming calls on those trunks.
Optimizing your ISDN settings______________________________
When you are adding an ISDN trunk, you can use the Tuning tab to change ISDN board
parameters. Any changes you make take effect after the current call ends.
To optimize your ISDN settings
1.
Run the Dialogic Makecall Utility (DMU), which is supplied on the TeleVantage
master CD. For instructions, see Installing Intel Telephony Components. The DMU
wizard leads you through the process of testing your ISDN board and generates the file
Outbound_MCB.txt in the Output subdirectory.
CHAPTER 5. MANAGING TRUNKS AND SPANS
5-23
2.
Click the Tuning tab, click Import, select the Outbound_MCB.txt file, and then click
OK.
This procedure updates all ISDN parameters based on their optimum value as determined by the
DMU. To undo the update, click Restore Defaults. The parameters on the Tuning tab return to
their initial values.
You can also change each parameter individually by clicking the Value column. Click OK on
the Tuning tab when you are done.
Note: The parameter Set in service on startup controls whether trunks are placed in service
when the TeleVantage Server starts up, and taken out of service when the Server is shut down.
When the Server is down, incoming calls receive a busy signal. If you change this parameter, you
must restart both the TeleVantage Server and the Dialogic drivers.
Check Apply these settings to all ISDN PRI / E1 CAS spans to update all existing spans of this
type with your settings.
5-24
ADMINISTERING TELEVANTAGE
Using ISDN Two B-Channel Transfer
Two B-Channel Transfer is a phone company service that enables you to conserve TeleVantage
trunk use when transferring incoming calls to another external number. By default, TeleVantage
uses two trunks when an incoming trunk call gets transferred or forwarded to an external
number. With Two B-Channel Transfer, TeleVantage signals the ISDN carrier to perform a
direct transfer between the two external numbers, enabling TeleVantage to release both trunks.
To use ISDN Two B-Channel Transfer, the following must be true:
Q The routing list transferring the call to the external number must check Attempt
Centrex/PBX transfer. See Chapter 15 of Using TeleVantage.
Q Your ISDN carrier must support the ISDN Two B-Channel Transfer feature and enable
it for your ISDN PRI span using the NI2 protocol only (it is not enabled by default in
most locations).
Q Two B Channel Transfer Supported must be set to “Yes” on the Tuning tab of the
ISDN span.
Note: You can test your ISDN line to see if it supports this feature using the TeleVantage Two
B-Channel transfer utility. See Appendix B of Installing Intel Telephony Components.
Using ISDN BRI point-to-point protocol
Some ISDN BRI providers require the point-to-point protocol. You can activate the
point-to-point protocol using the PointToPoint field on the Tuning tab for the span.
Important: If PointToPoint is set to to “Yes,” Check DLink Status must also be set to “Yes.”
Likewise, if PointToPoint is set to “No,” Check DLink Status must be set to “No.”
Setting location and Caller ID settings _______________________
When adding a Robbed Bit T1 or ISDN span, use the Caller ID Settings tab to specify the
Server’s location and how it handles incoming Caller ID in different formats.
Note: The location settings can affect your outbound Caller ID. For example, if your carrier
expects a ten-digit Caller ID number and you are sending a seven-digit local number,
TeleVantage appends the area code specified on this tab. For more about outbound Caller ID,
see the next section.
CHAPTER 5. MANAGING TRUNKS AND SPANS
5-25
To specify location and Caller ID formats
1.
Click the Caller ID Settings tab.
2.
Enter the following general information:
Q Country/Region. Select the country where this TeleVantage Server resides.
Q Long distance prefix. Enter the number to dial to begin a long-distance call. In the
United States, this number is 1.
Q International prefix. Enter the number to dial to begin an international call. In the
United States, this number is 011.
Q Area code. If applicable, enter the area or city code of the region where this
TeleVantage Server resides. Otherwise, leave blank.
3.
If your carrier sends you Caller ID information, check Inbound Caller ID supported.
Unchecking this field disables inbound Caller ID collection and makes processing
incoming calls slightly faster.
4.
If your carrier ever sends incoming Caller ID numbers that begin with something other
than area code, for example numbers prefixed with 0, check Inbound Caller ID does
not always begin with area code, and then enter the length of a local phone number
in the Local number length field. When checked, TeleVantage automatically adjusts
to incoming Caller ID numbers with different formats, enabling callback to work
correctly.
If unchecked, callback will not work on Caller ID numbers that do not begin with the
area code.
If your carrier always sends Caller ID numbers beginning with the area code, you do
5-26
ADMINISTERING TELEVANTAGE
not need to check this field, but there is no harm in doing so.
5.
Under Inbound Caller ID Name, specify how your carrier sends Caller ID Name
information on inbound calls.
Q Transmitted in setup message. Check if your carrier sends Caller ID Name as part
of the setup message.
If Caller ID Name is sent later, uncheck the field and specify the Number of
milliseconds to wait after setup message for Caller ID Name.
Q Information element.../Offset.../Length.... These fields define where the Caller ID
Name appears, so that TeleVantage can extract it. Get the figures from your carrier,
or use the TeleVantage D-Channel ISDN Trace utility (see Appendix B of
Installing Intel Telephony Components) to see the locations yourself.
6.
Click OK.
Specifying ISDN outbound Caller ID _________________________
You can specify the Caller ID information that accompanies outbound calls from the
TeleVantage system on ISDN trunks (PRI or BRI). You can customize outbound Caller ID for
the system as a whole as well as for individual users and queues. You can customize ISDN
outbound Caller ID in the following places:
To customize ISDN
outbound Caller ID...
See...
For the system as a whole
“Setting ISDN outbound Caller ID for the system”
(page 5-29)
For an individual user
“The User \ ISDN Outbound Caller ID tab” (page 6-16)
Using TeleVantage
For a call center queue
TeleVantage Call Center Administrator’s Guide
For an ISDN span
This section
The Caller ID on an outbound call using an ISDN trunk is determined as follows:
Q Individual user and queue settings override the system setting.
Q Span settings override all other settings.
For example, to block individual user or queue settings, you must edit the span setting.
Note: On trunk types other than ISDN, outbound Caller ID is always set by the telephone
company.
CHAPTER 5. MANAGING TRUNKS AND SPANS
5-27
Getting the outbound Caller ID setting that you want
Use the following guide to get the outbound ISDN Caller ID that you want:
Desired result
Configuration
All outbound Caller ID is set by
your telephone company
This is the default behavior. To restore it after
changes, double-click the ISDN span in the
Trunks view, click the Outbound Caller ID tab,
and make sure that all fields under By default
send and If it exists, send are unchecked.
The number (617) 111-2345 is
always your outbound Caller ID
number for all spans
Choose Tools > System Settings. On the
External Dialing \ ISDN Outbound Caller ID tab,
select Custom and enter 6171112345 in
Number. Make sure that the ISDN spans are set
to use the system default.
Specify a custom Caller ID
number for each user that
matches their DID number, so
people can return their calls easily
Double-click the ISDN span in the Trunks view,
click the Outbound Caller ID tab, and check
Individual or system default Caller ID number.
For each user in the Users view, double-click
the user, click the Other tab, set Calling party
presentation to “Custom,” and enter the user’s
DID number in Calling party Number. Users can
select that number or other settings in
ViewPoint (Tools > Options).
Preparing to enter outbound Caller ID settings
Before specifying ISDN Outbound Caller ID, ask your ISDN carrier the following questions:
Q Does my ISDN line support custom calling party numbers (sometimes referred to as
custom Caller ID or customer-defined Caller ID)?
Q What is my Preferred Party Plan—“ISDN” or “National?”
If the Preferred Party Plan is “ISDN,” ask:
Q What is my Preferred Party Type—“International” or “National?”
5-28
ADMINISTERING TELEVANTAGE
Setting ISDN outbound Caller ID for the system
System-wide ISDN outbound Caller ID settings serve as the defaults. Both user settings and
span settings can override them.
To set outbound ISDN Caller ID for the system
1.
Choose Tools > System Settings. The System Settings dialog box opens.
2.
Choose the External Dialing \ ISDN Outbound Caller ID tab.
3.
From the Calling party presentation dropdown list, select one of the following:
Q Span default. The system’s outbound Caller ID number and name will be what you
specify in the properties of the ISDN span used to place the call. See “Specifying
ISDN outbound Caller ID” on page 5-27.
Q Custom. The system’s outbound Caller ID number and name will be what you
specify in the following fields:
Q Calling party number. Enter the number to use as your outbound Caller ID
number, for example your business’ main number.
Q Calling party name. Enter the text to use as your outbound Caller ID name, for
example the name of your business.
Q Blocked. The system’s Caller ID is blocked on outbound calls. Note that the system
still sends Caller ID information even though it is blocked: this is a requirement,
because some institutions have the right to read blocked Caller ID, for example
emergency services and 800-numbers.
4.
Click OK.
Setting ISDN outbound Caller ID for a span
When adding an ISDN span, you can optionally click the Outbound Caller ID tab to configure
this span to send Caller ID on outbound calls.
Important: Not all providers support this feature. If you configure the span to use this feature
and your carrier does not support it, outbound calls can fail. Be sure to test the line after enabling
outbound Caller ID.
By default, each span is set to accept your system setting for outbound Caller ID (see the
previous section). By editing the span setting, you can override the system setting for outbound
calls placed on this span. Editing the span setting is the only way to override outbound ISDN
Caller ID settings for individual users and queues.
CHAPTER 5. MANAGING TRUNKS AND SPANS
5-29
To set ISDN outbound Caller ID for a span
1.
Click the Outbound Caller ID tab in the ISDN dialog box.
2.
Specify the following outbound Caller ID format information to match your ISDN
provider’s requirements:
Q Preferred party plan. Select “ISDN” or “National.”
Q Preferred party type. If your Preferred party plan is “ISDN,” select “International”
or “National.”
3.
Check Send outbound Caller ID. If unchecked, the trunk does not specify outbound
Caller ID information.
4.
Under By default send, enter any of the following information as the span’s basic
outbound Caller ID settings. These settings determine caller ID for all outbound calls
on the span unless you specifically permit other settings (see step 5):
Q Span Caller ID name. This span’s outbound Caller ID name; for example, your
business name.
Note: ISDN carriers currently do not support custom Caller ID names. The Caller
ID name they attach to a call comes from a national database based on Caller ID
number. The name you enter here would only be used in a Server-to-Server
configuration using H.323 Gateways.
Q Span Caller ID number. This span’s outbound Caller ID number; for example, your
business’ main number. If unchecked, Caller ID number is set by your telephone
company.
5-30
ADMINISTERING TELEVANTAGE
Q Blocked. Check to block outbound Caller ID information on this span, so that it
does not appear to the destination party. Note that the system still sends Caller ID
information even though it is blocked: this is a requirement, because some
institutions have the right to read blocked Caller ID, for example emergency
services and 800-numbers.
5.
Under If it exists, send, specify whether to send Individual or system default Caller
ID name and number. If checked, the custom Caller ID information specified for a
user, queue, or the system as a whole is attached to outbound calls where specified.
(User and queue settings override the system-wide setting if both are specified.) If no
custom information is specified, the span settings are used.
If unchecked, customized numbers are ignored and the Span Caller ID number setting
in step 3 is always used.
6.
If your ISDN provider limits the outbound Caller ID numbers on this span to the span’s
registered numbers, you must do the following:
Q Check Only send registered numbers.
Q Enter all the registered phone numbers for the span, as provided by your ISDN
provider. To enter a number, click Add. Enter the number in the Registered Number
dialog box and click OK.
When entering the number, preface it with a plus sign, the long distance prefix and
the area code, in the format +16173540600. Use a dash to enter a range, for example
+16171112222 - +16171112244. Do not use dashes or parentheses in the number
itself.
If your ISDN provider supports any custom outbound Caller ID numbers, leave Only
send registered numbers unchecked.
7.
Click OK.
Recognizing inbound Caller ID name on ISDN lines
If you are using ISDN PRI, you may need to customize your caller ID settings to correctly
receive Caller ID. See “Setting location and Caller ID settings” on page 5-25.
Enabling ISDN Megacom support ___________________________
If you are using ISDN Megacom service, you must change the following settings on the ISDN
span’s Tuning tab in order to make outbound international calls:
Q Alternate Called Number prefix. Enter your international dialing prefix. For example,
011. This is the only required setting.
Q Alternate Called Number plan. Enter the value used to override the called number Plan
parameter. For example, 1.
Q Alternate Called Number type. Enter the value used to override the called number Type
parameter. For example, 1.
CHAPTER 5. MANAGING TRUNKS AND SPANS
5-31
Without this change, international calls will fail, because TeleVantage does not provide the
parameter indicating national or international calls that ISDN Megacom service requires.
For each outbound call, TeleVantage checks the dial string to see if it is prefixed with the
number specified in Alternate Called Number prefix.
If it does not contain the international prefix, the call proceeds like a normal domestic call, and
no further steps occur.
If it does contain the international prefix, TeleVantage strips the prefix from the dial string, and
then checks whether Alternate Called Number type and Alternate Called Number plan are
present. If they are, TeleVantage uses them to override the called number Type and called
number Plan parameters.
Adding an Internet SIP or H.323 span ________________________
For instructions on adding a SIP span, see “Adding a SIP span” on page 14-4.
For instructions on adding an H.323 span, see “Adding an H.323 span” on page 15-5.
Entering trunk defaults for a span ___________________________
When you create a new digital span, you can set the defaults for all the trunks in the span on the
Trunks tab.
5-32
ADMINISTERING TELEVANTAGE
To enter trunk defaults for a span
1.
Check Accept inbound calls if the trunk is used for inbound calls.
2.
In Calls are sent to, select the auto attendant, user, or IVR Plug-in that answers all
inbound voice calls on this trunk.
In Faxes are sent to. Select the auto attendant, user, or IVR Plug-in that answers all
inbound fax calls on this trunk. See “Setting up fax routing” on page 5-7 for more
information.
3.
Check Allow outbound calls if the trunk is used for outbound calls.
After you add the span, the Trunks tab is disabled. To modify the settings for an individual trunk
after the span has been added, edit the trunk in the Trunks view.
CHAPTER 5. MANAGING TRUNKS AND SPANS
5-33
CHAPTER 6
CHAPTER 6
MANAGING USERS AND ROLES
CHAPTER CONTENTS
About users . . . . . . . . . . . . . . . . . . . . . . . . . . . . . . . . . . . . . . . . . . . . . . . . . . . . . 6-2
The Users view . . . . . . . . . . . . . . . . . . . . . . . . . . . . . . . . . . . . . . . . . . . . . . . . . . 6-6
About the User dialog box. . . . . . . . . . . . . . . . . . . . . . . . . . . . . . . . . . . . . . . . . 6-10
The User tab . . . . . . . . . . . . . . . . . . . . . . . . . . . . . . . . . . . . . . . . . . . . . . . . . . . 6-12
The User \ Account Codes tab . . . . . . . . . . . . . . . . . . . . . . . . . . . . . . . . . . . . . 6-15
The User \ Call Log tab . . . . . . . . . . . . . . . . . . . . . . . . . . . . . . . . . . . . . . . . . . . 6-15
The User \ ISDN Outbound Caller ID tab . . . . . . . . . . . . . . . . . . . . . . . . . . . . . 6-16
The User \ Numbers tab . . . . . . . . . . . . . . . . . . . . . . . . . . . . . . . . . . . . . . . . . . 6-17
The User \ SIP Accounts tab. . . . . . . . . . . . . . . . . . . . . . . . . . . . . . . . . . . . . . . 6-18
The Voice Mail tab . . . . . . . . . . . . . . . . . . . . . . . . . . . . . . . . . . . . . . . . . . . . . . 6-18
The Voicemail \ Notification tabs. . . . . . . . . . . . . . . . . . . . . . . . . . . . . . . . . . . . 6-19
The Phone tabs. . . . . . . . . . . . . . . . . . . . . . . . . . . . . . . . . . . . . . . . . . . . . . . . . 6-27
The Audio tab . . . . . . . . . . . . . . . . . . . . . . . . . . . . . . . . . . . . . . . . . . . . . . . . . . 6-28
The Audio \ Hold Music, Voice Title, and Disk Usage tabs . . . . . . . . . . . . . . . . 6-29
The Security tab . . . . . . . . . . . . . . . . . . . . . . . . . . . . . . . . . . . . . . . . . . . . . . . . 6-30
The Security \ Permissions tab . . . . . . . . . . . . . . . . . . . . . . . . . . . . . . . . . . . . . 6-31
The Security \ Dialing Permissions tab . . . . . . . . . . . . . . . . . . . . . . . . . . . . . . . 6-33
The Dial-by-name Directory tab . . . . . . . . . . . . . . . . . . . . . . . . . . . . . . . . . . . . 6-34
The ViewPoint tab . . . . . . . . . . . . . . . . . . . . . . . . . . . . . . . . . . . . . . . . . . . . . . . 6-34
Adding a user at the telephone . . . . . . . . . . . . . . . . . . . . . . . . . . . . . . . . . . . . . 6-35
Creating one or more users from templates . . . . . . . . . . . . . . . . . . . . . . . . . . . 6-35
Importing users in bulk . . . . . . . . . . . . . . . . . . . . . . . . . . . . . . . . . . . . . . . . . . . 6-37
Applying user settings in bulk . . . . . . . . . . . . . . . . . . . . . . . . . . . . . . . . . . . . . . 6-43
Modifying a user’s ViewPoint settings. . . . . . . . . . . . . . . . . . . . . . . . . . . . . . . . 6-46
Managing roles . . . . . . . . . . . . . . . . . . . . . . . . . . . . . . . . . . . . . . . . . . . . . . . . . 6-46
TeleVantage permissions . . . . . . . . . . . . . . . . . . . . . . . . . . . . . . . . . . . . . . . . . 6-50
Helping new users get started. . . . . . . . . . . . . . . . . . . . . . . . . . . . . . . . . . . . . . 6-56
About users _____________________________________________
Unlike a traditional PBX, TeleVantage manages phone traffic by user rather than by device,
giving the system the flexibility to handle users who move from phone to phone. This chapter
explains how to create and manage users and roles. Roles are templates of specific permissions
that are used to grant permissions to users (see “Assigning a user’s permissions” on page 6-32).
To create users, see the next section, ““About adding users.”
Your TeleVantage system can contain the following types of users:
Q User. An extension that can have an associated internal or external phone, a voice
mailbox, and settings for call handling and security.
Q ACD workgroup user. A special type of user that routes calls to one or more Automatic
Call Distribution (ACD) workgroups. For information about setting up ACD
workgroups, see TeleVantage Call Center Administrator’s Guide.
Q H.323 Gateway user. A special type of user that represents a user on a remote
TeleVantage Server that is linked to your Server by an H.323 Gateway connection over
the Internet or other IP network. With H.323 Gateway users, the users on both
TeleVantage Servers appear to be local, effectively creating a single large TeleVantage
site. For more information, see “Connecting two Servers using H.323 Gateways” on
page 15-39.
The instructions in this chapter refer to the standard User type.
About adding users
You can add new users either singly or in bulk, or by importing from a pre-existing list. Use any
of the following methods to add users:
Q One at a time in the User dialog box. To create a single new user via the User dialog
box, choose File > New > User in the Administrator. The bulk of this chapter describes
adding a user in the User dialog box, beginning with “About the User dialog box” on
page 6-10.
Q One at a time using a phone. By dialing *0 at a TeleVantage station, you can create a
single new “sketch user” with that station ID assigned and a few details configured. By
going from phone to phone, you can assign stations to users relatively quickly when
setting up a new TeleVantage system. However, you must then use the Administrator to
configure most of the important information (such as the name) for each user. See
“Adding a user at the telephone” on page 6-35.
Q In bulk by entering names into a grid. To create many new users at once by typing in
names and selecting settings from user and phone templates, choose File > New > Users
from Template. See “Creating one or more users from templates” on page 6-35.
Q In bulk by importing from .CSV files or Active Directory. If you have a pre-existing
list of people in a .CSV file or in Microsoft Active Directory, you can import them as
TeleVantage users, making custom changes as you go. See “Importing users in bulk” on
page 6-37.
6-2
ADMINISTERING TELEVANTAGE
Important: You must have a Station license available for each user that has an assigned
internal station ID other than 0. Station IDs of 0 and external stations do not require station
licenses. For more information about license requirements, see Installing TeleVantage.
Preparing templates before adding users
If you will be adding groups of users with similar settings, you can prepare user templates first,
allowing you to easily apply common settings to users as you create them. You can create
multiple user templates to cover different groups of similar users. You can then apply them in
any of the following ways:
Q Customize your templates, then add users in bulk. If you create templates first, then
add or import users in bulk, you can go down the list and specify the appropriate
template for each user. When importing, you can set up the template to override some
pre-existing settings while leaving others as is.
Q Add users, then apply templates. You can add users, either singly or in bulk, with a
minimum of information, for example, name, extension, and station ID. You can then
create templates and apply each directly to the users of your choice, filling in the rest of
the settings.
Q Save a default template, then import or use *0. When you save a user template as your
default template, that template is applied whenever you import users or add new users at
the telephone with the *0 command. Note that if you use *0 with a template, you will
still need to add user names later.
For instructions on creating and applying user templates, see “Applying user settings in bulk”
on page 6-43.
Where to set user options
User options are set in both the TeleVantage Administrator and ViewPoint.
Q Some options can only be set in the Administrator. These options are described in
detail in this chapter.
Q Some options can only be set in ViewPoint. These include the user’s routing list,
contacts, voicemail greetings, call rules, and personal workgroups. To edit these options
from the Administrator, select the user in the Users view and choose Users > Edit All
ViewPoint Settings. See “Modifying a user’s ViewPoint settings” on page 6-46.
ViewPoint options are described in detail in Using TeleVantage.
Q Some options can be set in both places. You can set up users with standard defaults
for your organization and then individual users can customize the settings further. You
also can restrict the options that users can customize. These options are described in this
chapter and in Using TeleVantage.
CHAPTER 6. MANAGING USERS AND ROLES
6-3
The Admin and Operator users
Two default users come pre-defined in TeleVantage, as follows:
Q Admin. The Admin user belongs to the Administrators role. The Admin user and all
users who belong to the Administrators role are permitted to run the Administrator
application and the Device Monitor application. They also can perform all
administrative functions. You cannot delete or rename the Admin user, and you can only
change select logon permissions for the Admin user (see “Managing roles” on
page 6-46).
You can give individual administrative permissions to any user—for example,
permission to shut down the phone system—without making the user a member of the
Administrators role. See “TeleVantage permissions” on page 6-50.
Q Operator. The Operator user is the user to whom all calls are sent by default if they
cannot be handled in any other way. For example, if a user’s mailbox cannot be found,
the call is sent to the extension assigned to the Operator. You cannot delete or rename
the Operator, but you can change the Operator user’s roles and permissions. Operators
are covered in detail in the next section.
Changing the Admin and Operator users’ passwords
Immediately after installing TeleVantage, you should change the passwords of the Admin user
and Operator user, in order to make your system more secure from unauthorized access. For
more information, see Appendix I of Installing TeleVantage.
About Operators
Your system can have a main Operator user and also personal operators for other users. This
section discusses operators from the Administrator’s viewpoint. For more information, see
“Customizing ViewPoint for Operators” in Using TeleVantage.
Understanding personal operators
The TeleVantage system has one Operator user, but each user can specify a personal operator.
A user’s personal operator is the extension to which callers are transferred if the caller presses
0 from within the user’s voice mailbox or routing list. By default, a user’s personal operator is
the Operator user, but a user can specify any extension as their personal operator (even that of
an auto attendant, IVR Plug-in, or queue). See “Setting up a personal operator” on page 6-15.
6-4
ADMINISTERING TELEVANTAGE
How callers are transferred to Operators
The following table shows to which operator callers are transferred when they press 0 in
different locations.
Caller presses 0 within
Auto attendant
Caller is transferred to
Operator user
If the auto attendant is restricted by workgroup, the
caller is transferred to the extension specified in the
workgroup’s If no answer, transfer field.
Dial-by-name directory
Operator user
User’s voice mailbox
Personal operator
User’s routing list
Personal operator
As soon as TeleVantage knows what user is being
called, the call enters that user’s routing list.
On hold
Personal operator
Note: If a user does not set up a personal operator, callers are transferred to the Operator user
in all cases.
Changing the Operator’s extension from 0
You can change the Operator’s extension to a number other than the default of 0 (for example,
in order to use 0 as a dialing service access code). However, even when the Operator’s extension
is something other than 0, callers must press 0 to transfer to the Operator. For example, if a caller
reaches a user’s voicemail, and wants to transfer to the Operator instead of leaving a voice
message, the caller dials 0, even if the Operator’s extension is 111.
Extending ring duration for live Operator systems
If you have a system in which all calls are answered by a live Operator, you may want to increase
the Operator user’s ring duration, which determines how long a call rings the Operator’s phone
before proceeding to the next action on the routing list. An increased ring duration helps ensure
that multiple calls continue to ring until they are answered, without being diverted.
By default the maximum ring duration is 120 seconds, but you can increase the maximum to 999
seconds by editing the MaxRingDuration advanced setting. See Appendix J of Installing
TeleVantage.
Setting up workgroups for the Operator
To make it easier for the Operator to transfer calls to different departments, you can set up a
separate workgroup for each department in your system. The Operator’s Call Monitor will then
display a tab for each department, and the Operator will be able to see a list of people in a
specific department by clicking on the appropriate tab. See Chapter 8, “Managing
Workgroups,” for details about setting up workgroups.
CHAPTER 6. MANAGING USERS AND ROLES
6-5
Configuring a system without an Operator
If you choose not to have a person act as an Operator in your system, the Operator extension still
receives calls whenever callers press 0 from within the system. Even if the Operator user’s
extension has no station associated with it, voice messages left by callers are saved in the
Operator user’s mailbox.
If you do not want this to happen, create a new routing list for the Operator user that has a single
action—transferring calls to another extension, such as an auto attendant. For instructions, see
Using TeleVantage.
Setting up multiple Operators
To define multiple Operators—for example, for multiple businesses that share the TeleVantage
Server—see “Configuring Operators for multiple Organizations” on page 11-5.
The Users view___________________________________________
The Users view presents information about individual users and roles in your organization.
Roles appear in bold in the Users view. For more information about roles, see “Managing roles”
on page 6-46.
To add, edit, or delete TeleVantage users, click Users in the view bar. The Users view opens.
Double-click a user in the view to edit that user.
Each user that you add appears as a row in the Users view. The following table shows the
information that is displayed for each user.
6-6
Column
Description
Name
User’s name.
Extension
Extension number dialed to reach the user.
ADMINISTERING TELEVANTAGE
Column
Description
DID
Direct inward dial number used to dial the
user directly.
Station
Default station ID (phone device) assigned to
the user.
Device Type
The type of station. The types are:
MSI. Analog phone
DKT. Toshiba digital phone
EXT. External station
Type
The type of user (see “About users” on
page 6-2).
Agent
If checked, the user is an agent in one or
more call center queues. See the
TeleVantage Call Center Administrator’s
Guide.
Locked Out
If checked, the user is unable to log in to his
or her account due to multiple failed attempts
to access that account as defined in System
Settings (see “Enforcing strong password
security” on page 3-12).
Personal Status
The name of the user’s current personal
status.
ACD DND
If checked, the user is not currently accepting
ACD workgroup calls.
Mail Usage
Percentage of allocated voicemail space
currently used. For details on how the
information in this and the following two
columns is calculated, see “Viewing the
user’s disk usage” on page 6-29.
Greeting Usage
Percentage of allocated greeting and voice
title space currently used.
Disk Usage
Amount of disk space in megabytes used by
the user's voice message, greeting, and
voice title files.
Mailbox Size
Total space allocated to the user for voice
messages, in minutes.
CHAPTER 6. MANAGING USERS AND ROLES
6-7
Column
Description
Greeting Size
Total space allocated to the user for greetings
and voice titles, in minutes.
Forwarding To
Number to which the user is currently
forwarding calls.
Gateway Name
Name of the gateway.
Listed
If checked, the user is listed in the
dial-by-name directory.
Voice Title
If checked, the user has a recorded voice
title. You can record titles for users on the
Recordings tab of the User dialog box, or
they can record their own.
Announce Callers
Displays the types of calls to which the user
is applying call announcing.
Exchange Sync
If checked, TeleVantage and Microsoft
Exchange Inboxes are synchronized.
Comments
Comments added about the user.
Must Change
Password
If checked, the user must change his or her
password at the next logon.
Note: This column is checked only if the field
User must change password on next logon is
checked for the user (see “The Security tab”
on page 6-30). The column is not checked if
the user’s password has expired.
Password Never
Expires
If checked, the user’s password never
expires.
Title
The job title entered for this user. You can
enter titles for users when you create them.
Organization
Name of the Organization with which the user
is associated, if any.
Archiving a user’s voicemail and call recordings
You can manually archive a user’s voicemail and call recordings from the Users view.
Archiving mailbox recordings can save space on your hard drive, especially if the mailbox
contains call recordings. For an overview of mailbox archiving and instructions on setting up
automatic archiving, see “Archiving call recordings and voice mail” on page 12-39.
6-8
ADMINISTERING TELEVANTAGE
To archive a user’s mailbox recordings from the Users view
1.
From the Users view, choose Users > Archive voicemail. The Archive voicemail
dialog box opens.
2.
Set the following options:
Q Archive voicemail older than __ days. Enter a number of days. voicemail older
than that will be archived.
Q Archive folders. Select either “Inbox only” or “All folders except Deleted.”
Q Archive audio format. Select “VOX” or “WAV.”
3.
Click OK to archive the user’s mailbox recordings according to the selections made.
The recordings are archived in your default archive location (see “Archiving call
recordings and voice mail” on page 12-39).
Deleting a user
Deleting a user prevents that user from using TeleVantage and removes all of the user’s
voicemail files from the system (unless the voice mailbox is being shared with another user). A
deleted user’s Call Log entries are left in place to maintain an accurate and complete call history
on the system. Note that you cannot delete the Administrator or Operator user.
Note: Before deleting a user you may want to first archive their voice messages to WAV or VOX
files for later retrieval. See “Archiving call recordings and voice mail” on page 12-39.
CHAPTER 6. MANAGING USERS AND ROLES
6-9
About the User dialog box _________________________________
To create a user, choose File > New > User. The User dialog box opens.
Click in the tree pane on the left to select a tab in the User dialog box. Click a
to expand a
tab category. The following table provides an overview of the tabs, and reference to where each
is documented in detail.
6-10
User dialog box tab
Overview
See
User
Basic user information, including name,
extension, station ID, and password
password.
p. 6-12
Account Codes
Whether and under what circumstances
TeleVantage prompts the user to enter an
account code.
p. 6-15
Call Log
Whether the user’s calls are logged, and
whether the user belongs to an
Organization.
p. 6-15
ISDN Outbound Caller ID
Personalized outbound Caller ID
information for ISDN trunks.
p. 6-16
voicemail
voice mailbox size and features,
including Exchange synchronization.
p. 6-18
E-Mail Notification
Whether the user is notified of new voice
messages by e-mail.
p. 6-19
ADMINISTERING TELEVANTAGE
User dialog box tab
Overview
See
Pager Notification
Whether the user is notified of new voice
messages by page.
p. 6-19
Call Notification
Whether the user is notified of new voice
messages by call.
p. 6-19
Phone
Station setup.
p. 7-12
Audio
Storage size for greeting and voice title
files, and telephone prompt language.
p. 6-28
Hold Music
Personalized hold music source.
p. 6-29
Voice Title
The user’s voice title.
p. 6-29
Disk Usage
Space usage report for voice messages,
greetings, and voice titles.
p. 6-29
Security
Password expiration control, and
whether the user’s calls can be
supervised.
p. 6-30
Permissions
All user permissions, and the roles to
which the user belongs.
p. 6-31
Dialing Permissions
What numbers the user is allowed to dial
or disallowed from dialing.
p. 6-33
Dial-by-name Directory
Whether the user is listed in the
TeleVantage dial-by-name directory.
p. 6-34
ViewPoint
ViewPoint application options, including
Navigation pane, Tip-of-the-day, and
Welcome Wizard options.
p. 6-34
Adding a user by using a template
Create a user, named, for example, “User Template” that has the settings you want all users to
share, such as mailbox size and dialing permissions. You can also set up notification options in
the template, and you can enable phone features that are applied to all users that are created using
the template.
To add a new user based on the template, select the template user in the Users view, and then
choose Edit > Copy. Choose Edit > Paste to open the User dialog box, in which you can
customize the new user’s properties, such as first and last name, extension and station ID, e-mail
address for notifications, and so on.
CHAPTER 6. MANAGING USERS AND ROLES
6-11
The User tab _____________________________________________
Choose File > New > User, then click User in the tree pane.
Identifying the user
In Type, choose User. Then enter the user’s First name and Last name. You must enter a name
in one of the name fields. You can enter the user’s Title and any Comments (such as the user's
department) that you want to be displayed along with the user name in the User view.
It can be helpful to use the Title field for the user’s department, for example, “Sales.” When a
caller requests to be transferred to someone in Sales, the Operator can see all the users in the
Sales department grouped together in ViewPoint’s Transfer Call dialog box. You can also use
workgroups to group users by department (see Chapter 8, “Managing Workgroups” ).
Assigning an extension
A user’s extension is the number callers dial to reach the user. Extensions must comply with the
following restrictions:
Q No longer than 10 digits
Q Numeric characters only
Q Must be unique
In addition, follow these recommendations when assigning extensions:
Q Avoid extensions that begin with another extension or access code. For example, if one
user is given extension 17 and another extension 177, users who dial extension 17 will
experience a brief delay while TeleVantage waits to see if another “7” is dialed. See
“Avoiding dialing ambiguities” on page 9-7 for more information.
6-12
ADMINISTERING TELEVANTAGE
Q Avoid extensions that begin with the same number used for an auto attendant menu
choice. Slow dialers may be unable to dial the extension at the auto attendant, because
they will activate the menu choice instead. See “Setting up an auto attendant” on
page 10-6.
Q Avoid extensions that begin with frequently dialed area codes—if users forget to dial an
access code, they may unexpectedly dial the extension instead. For example, if 1-617 is
a commonly dialed prefix for your location, do not assign extension 161.
When you create a new user, you can accept the extension suggested automatically by
TeleVantage or you can assign a different one. TeleVantage suggests the next-highest extension
number that has not yet been assigned, and it reuses extensions that have been unassigned.
By default, new extensions are assigned starting with extension 100. If you want all your
extensions to start with a different number, choose Tools > Options, and then enter the Starting
extension number under User auto suggestion.
Note: You can give the Operator user an extension other than the default of 0. See “Changing
the Operator’s extension from 0” on page 6-5.
Assigning a station ID
A user’s Station ID is the numeric identifier of the telephone at the user's default location. To
find the station ID of an internal station, pick up the phone and dial *0. For an external station,
find an unused external station ID by looking in the Device Monitor, where external stations are
listed with type EXT at the bottom of the station list (see “Using the Device Monitor view” on
page 12-3). If there are no external stations available, see “Setting general TeleVantage options”
on page 3-3 for how to create them. For users without a telephone, enter a station ID of 0.
Note: Station ID is not used for users of the type ACD workgroup or H.323 Gateway.
It is important to understand the distinction between a user’s extension and station ID:
Q Extension. The number that callers dial to reach the user, not the number they dial to
reach the telephone on the user’s desk. Because users can set up call forwarding or
routing lists to route their calls elsewhere, a call to a user’s extension might actually ring
another phone in the office, their home phone, a cell phone, and so on.
CHAPTER 6. MANAGING USERS AND ROLES
6-13
Q Station ID. The station ID represents the physical telephone assigned to the user, either
a normal TeleVantage phone or a remote phone defined as an external station. It also
represents the user’s default location. In the absence of call forwarding or other custom
changes, calls to the user’s extension ring his or her station. There is no way to dial a
phone according to its station ID.
Changing the station ID default
When you create a new user, TeleVantage suggests the lowest unassigned station ID. By default,
your first station IDs are assigned starting with station ID 1. To start with a different station ID,
choose Tools > Options and enter a different Starting station number. The station ID you enter
for a user, however, must always be the actual station ID of the user’s phone for TeleVantage to
work correctly.
Station ID and station licenses
Each time you assign a new station ID to a user, you consume one station license (except for
external stations, which do not consume station licenses). If you try to save a user with a new
station assignment and the system does not have a free license, you will be unable to save the
user. You may encounter this problem if someone has reserved station licenses for use with IVR
Plug-ins. See Installing TeleVantage.
Assigning a DID number
You can assign a DID number to a user from the block of numbers provided by your telephone
service provider. When TeleVantage recognizes this number as the final digits on an inbound
call, the caller is automatically connected to this user, bypassing the main auto attendant.
To assign multiple DID numbers to a user, separate each number with a comma (,). For more
information about DID, see “Telephone company services that help TeleVantage” on page 5-5.
Creating a password
Enter a numeric Password that controls access to the user's voicemail and account options. This
password also allows the user to log on to ViewPoint. The user’s password can be changed either
on this tab or in ViewPoint.
Retype the new password in the Confirmation field.
Important: Assigning secure passwords is one of the key means by which you can protect your
business from unauthorized access, and lost money due to toll fraud. See Appendix I of Installing
TeleVantage.
User passwords must conform to your system’s password requirements. See “Enforcing strong
password security” on page 3-12.
6-14
ADMINISTERING TELEVANTAGE
Setting up a personal operator
By default, TeleVantage dials the Operator user’s extension whenever a caller presses 0 while
listening to a user's greeting or leaving a message. To transfer calls to another user instead (for
example, a departmental operator, personal assistant, or other auto attendant), select the user to
whom you want to transfer calls from the Operator dropdown list on the General tab. For more
information about operators, see “The Admin and Operator users” on page 6-4. A personal
operator can be also be set in ViewPoint.
Entering the user’s Microsoft Windows NT account
In the NT account field, enter the user’s Windows network account name, for example,
MAIN\MAnatolia or WORKGROUP\John. This field is primarily for use by Add-ins and Client
API developers.
The User \ Account Codes tab ______________________________
The User \Account Codes tab lets you set up the user’s account code modes. Account code
modes determine whether and under what circumstances TeleVantage prompts the user to enter
an account code. For instructions, see “Setting a user’s account code modes” on page 11-9. For
an overview of account codes, see “Using account codes” on page 11-6.
The User \ Call Log tab ____________________________________
The User \ Call Log tab lets you define how the user’s calls appear in the Call Log in terms of
which calls are logged, whether they are associated with an Organization, and what happens if
the user logs onto another user’s station. For more information on the Call Log, see “Using the
Call Log view” on page 12-12.
Determining which calls are logged
By default, all inbound and outbound calls made by the user appear in the Call Log. However,
there are times when you might not want to log a user’s calls due to space or readability reasons,
for example if the user’s station is connected to a fax server used for sending thousands of faxes
daily.
To turn off call logging for the user, uncheck Log this user’s calls. If checked, you can choose
whether to log the user’s inbound calls, outbound calls, or both.
CHAPTER 6. MANAGING USERS AND ROLES
6-15
Notes
Q Turning off call logging does not affect the Trunk Log (see “Using the Trunk Log view” on
page 12-18). Trunk calls involving the user continue to be logged in the Trunk Log.
Q If you turn off call logging for a call center agent, you will not be able to run reports on the
agent’s personal calls. Reports on queue calls and all statistics in the Queue Monitor are
unaffected.
Q Users with call logging turned off cannot use ViewPoint’s callback feature (File > Return
Last Call) or the list of recently dialed calls on ViewPoint’s File menu.
Q If you have turned off internal call logging at the system level (see “Setting Call and Trunk
Log options” on page 12-20), the user’s internal calls will not be logged, regardless of this
setting.
Associating the user with an Organization
If you have created one or more Organizations, you can associate the user with the Organization
to which he or she belongs. Calls that the user places or receives will be logged with that
Organization showing in the Call Log’s Organization column. Organizations are a means of
setting up multiple companies that share an office and a TeleVantage Server. See “Using
Organizations” on page 11-2.
To associate the user with an Organization, check Organization, and select an Organization
from the dropdown list.
If unchecked, the user’s calls will appear in the Call Log with the Organization column blank.
The User \ ISDN Outbound Caller ID tab ______________________
If supported by your ISDN provider, you can use the User \ ISDN Outbound Caller ID tab to
customize the Caller ID number and name that accompany outbound calls placed by the user on
ISDN trunks. Note that the user can make his or her own selection in ViewPoint, but cannot
specify a different custom number or name. If the user selects Custom, the Caller ID number and
name are what is entered here.
Note: On trunk types other than ISDN, outbound Caller ID is always set by the telephone
company.
From the Calling party presentation dropdown list, select one of the following options:
Q System default. Outbound Caller ID will be whatever you have set for the TeleVantage
system as a whole (see “Setting ISDN outbound Caller ID for the system” on page 5-29).
The current setting is displayed in parentheses.
Q Custom. You can specify custom outbound Caller ID information for the user, for
example the user’s DID number and Organization.
Enter the custom Caller ID number in Calling party number.
To specify a custom name, see the next section, “Specifying a custom Caller ID name.”
Note: If you specify a custom number, people who use the telephone company’s *69
6-16
ADMINISTERING TELEVANTAGE
service to call the user back will dial the custom number.
Q Blocked. Caller ID is blocked on outbound calls from the user. Note that the system still
sends Caller ID information even though it is blocked: this is a requirement, because
some institutions have the right to read blocked Caller ID, for example emergency
services and 800-numbers.
For more information about ISDN outbound caller ID, see “Setting ISDN outbound Caller ID
for the system” on page 5-29, and “Specifying ISDN outbound Caller ID” on page 5-27.
Specifying a custom Caller ID name
If you select “Custom” under Calling party presentation, you can choose the following options
for the user’s outbound Caller ID name, using the Calling party name dropdown list:
Q System default. Whatever you have set for the TeleVantage system as a whole (see
“Setting ISDN outbound Caller ID for the system” on page 5-29). The current setting is
displayed in parentheses.
Q Organization name. The name of the user’s Organization, if one is defined. The current
name is displayed in parentheses.
Q User name. The user’s TeleVantage name (displayed in parentheses).
Q Custom name. Whatever you enter in Calling party custom name.
The user can make their own selection, including a self-customized name, in ViewPoint.
The User \ Numbers tab ___________________________________
The User \ Numbers tab lets you view and edit the numbers that appear in the user’s “My
Numbers” list in ViewPoint.
To enter or edit a user’s number
1.
Click the type of number you want to enter or modify, for example Home or Mobile,
then click Edit.
To delete a number, click it, then click Clear.
2.
If the Call Using field is present, select the dialing service to use when placing calls to
this number.
3.
In the Number, Address, Email, or IM address field, enter the phone number, IP
address, email address or instant messaging address.
4.
Check Public to give other programs access to the number, for example, an add-in that
automatically dials certain numbers. If unchecked, other programs cannot read or
access the number.
5.
Click OK to return to the User dialog box.
6.
Click OK to close the User dialog box.
CHAPTER 6. MANAGING USERS AND ROLES
6-17
The User \ SIP Accounts tab ________________________________
The User \ SIP Accounts tab lets you define individual SIP accounts for the user. It is needed
only if your system is using SIP-based Internet telephony. For more information, see “Creating
a SIP account” on page 14-20.
The Voice Mail tab ________________________________________
Choose File > New > User, then click Voice Mail in the tree pane.
Configuring the user’s voice mailbox
In Mailbox with __ minute max size, enter the maximum size of the mailbox, in minutes.
Mailboxes can be as large as 999,999 minutes (447 GB).
Choose the default setting of 20 minutes (9.2 MB of storage) for typical users. You may need to
increase the default for users who record calls, because call recordings (including those that
were e-mailed to the user) are stored in the user’s mailbox.
Important: Voice messages take up disk space on the TeleVantage Server computer. Once
available disk space becomes scarce, system performance will suffer. To avoid this problem,
archive your users’ voice messages and call recordings regularly. See “Archiving call recordings
and voice mail” on page 12-39.
To create an extension without a voice mailbox—for example, a conference room, fax machine,
or an H.323 Gateway user—click No mailbox.
6-18
ADMINISTERING TELEVANTAGE
Enabling Microsoft Exchange Server synchronization
You can enable synchronization of a user’s TeleVantage voice messages with the corresponding
e-mail notifications in Exchange.
To enable synchronization
1.
Check Synchronize with Exchange Server mailbox. If this control is disabled, first
set up Exchange Server notification on the E-mail Notification \ Exchange
Synchronization tab of the System Settings dialog box. For more information, see
“Setting up e-mail notification and Exchange synchronization” on page 3-10.
2.
Enter the user’s Exchange Server mailbox. This can be obtained from Microsoft
Exchange.
Note: Exchange Server mailboxes must not be confused with the e-mail address
supplied when setting up e-mail notification for the user (see “Setting e-mail notification”
on page 6-21). One of the e-mail addresses specified for the user for e-mail notification
must route e-mail to the Exchange Server mailbox that you specify here.
Choosing the mailbox for call recordings
By default, call recordings that the user makes manually from ViewPoint’s Call Monitor are sent
to the mailbox of the user who made them. To send personal recordings to another user’s
mailbox instead, select a name from the Send personal call recordings to dropdown list.
Note: This field applies only to call recordings manually made by the user. The destination for
automatic call recordings made by the system and by queues are set separately. See Chapter 4
and the TeleVantage Call Center Administrator’s Guide.
Enabling voicemail greeting logon
By default, users can log on to their TeleVantage accounts from a TeleVantage station or auto
attendant only. You can also choose to let this user log on by pressing 9 during his or her
voicemail greeting. (For this type of logon, the user is prompted only for password.) If you have
a DID-based system without auto attendants, you should enable this feature for all users,
because it is the only way for them to access their accounts remotely. To enable the feature,
check Allow voicemail log on during greeting by pressing 9.
Note: voicemail greeting logon can be slightly less secure than auto attendant logon, because
the caller does not need to know the extension number. If you enable voicemail greeting logon,
you should enforce secure passwords. See “Enforcing strong password security” on page 3-12.
The Voicemail \ Notification tabs ____________________________
Expand the Voicemail tab category to select the E-Mail, Pager, and Call Notification tabs.
You can have TeleVantage notify a user by e-mail, page, or phone call whenever he or she
receives a new voice message. This powerful feature enables users to keep abreast of their
TeleVantage voicemail no matter where they are. Notification messages include important
CHAPTER 6. MANAGING USERS AND ROLES
6-19
details about the call, and give users quick access to hearing the message and responding to it.
You have notifications sent for all voice messages or for Urgent messages only. You can also
have notifications sent only at certain days or times.
Users can also configure notifications in ViewPoint.
Note: Notifications are sent only for new voice messages, not new call recordings that arrive in
a user’s Inbox.
Note: TeleVantage retries call and pager notification of new voice messages when all trunks are
busy or other factors prevent calling. Retry behavior is governed by the TeleVantage advanced
setting Server\CallPageNotificationRetry (the default is 3 retries). For more information on
advanced settings, see Appendix J of Installing TeleVantage.
Notification information
The following information is attached to notifications of each type, making them a powerful tool
for voicemail management, even at a remote location.
E-mail notifications can contain:
Q Caller’s name
Q Phone number at which the call originated
Q TeleVantage extension at which the message was left
Q Voice message length
Q Notes associated with the message
Q Voice message as a .WAV file attachment
Pager notifications can optionally contain:
Q Caller ID for message
Q TeleVantage extension that was dialed
Q Voice message length
Call notifications contain:
Q Voice title of the user who received the message
Q Voice title or recorded name of the person who left the message, if available
Q Identification of urgent messages
Q Length of the voice message
Q Ability to press # right from the call and hear the message, then press 43 to call them
back.
Note: You can use call notifications to log onto your account from a remote location and have
TeleVantage pay for the call rather than your remote phone. See Chapter 6 of Using TeleVantage.
6-20
ADMINISTERING TELEVANTAGE
Determining which voice messages send notification
For each notification type—e-mail, pager, and call—you can define how often notifications are
sent, using the following dropdown list options:
Q Do not send notifications. The user does not receive notification of new voice
messages.
Q Send notification for all messages. The user receives a notification whenever new
voice messages arrive.
Q Send for Urgent messages only. The user receives a notification whenever voice
messages marked Urgent arrive.
Setting e-mail notification
Make sure e-mail notification is configured properly as described in Installing TeleVantage. See
“Configuring e-mail notification support” in Chapter 10 of that manual for more information.
1.
Select the E-mail Notification tab.
2.
Select whether e-mail notifications occur, and if so, how often. See the previous
section.
3.
In the E-mail address(es) field, enter the e-mail address to which notifications are
sent. Separate multiple addresses by semicolons (;).
Note: If using SMTP, valid e-mail addresses must be in the format of
[email protected]. If using MAPI, e-mail addresses must be resolvable via the
Microsoft Outlook address book.
4.
In the next dropdown list, choose whether the voice message is attached to the e-mail
as a .WAV file, by selecting one of the following:
Q Do not attach voice message. The voice message is not attached to the e-mail.
Q Attach voice message. Messages are attached to the e-mail and also appear in the
user’s TeleVantage Inbox marked as unheard.
Q Attach voice message and mark as already heard. Messages are attached to the
e-mail and appear in the user’s Inbox marked as already heard.
Q Attach voice message and delete from Inbox. Messages are attached to the e-mail
only, and do not appear in the user’s TeleVantage Inbox. You cannot select this
option if Exchange synchronization is enabled for a user (see “Enabling Microsoft
Exchange Server synchronization” on page 6-19).
CHAPTER 6. MANAGING USERS AND ROLES
6-21
Setting pager notification
1.
Select the Pager Notification tab.
2.
Select whether pager notifications occur, and if so, how often. See “Determining
which voice messages send notification” on page 6-21.
3.
In the Page using field, select the dialing service that you want TeleVantage to use to
dial the user’s pager.
4.
In the Dial Sequence field, enter the dial string for the pager, including the phone
number of the paging service and the pager's PIN if required. The dial string can
contain any touch tone digit (0-9, *, #). You can enter commas to indicate 1-second
pauses in the dial sequence.
You can also use the following special characters to add information to the page:
Q I or i sends the Caller ID number (for an external call) or TeleVantage extension
(for an internal call).
Q E or e sends the TeleVantage extension that the caller dialed.
Q L or l sends the length of the voice message in seconds.
For example, the dial sequence 18007771000,,,1245983#E causes TeleVantage to
dial the paging service, pause for 3 seconds, enter the pager’s PIN (1245983) followed
by # to indicate end-of-PIN, enter your extension (where the voice message was left),
and then hang up. In this example, your pager displays only the extension number.
If users receive only the last portion of the pager data specified, there are not enough
pauses between the pager number and the information. If this problem occurs, add
more commas.
Note: Do not enter multiple stars (*) in a row in the pager string. Use only one star to
send a dash. Multiple consecutive stars can terminate the page message.
Setting call notification
6-22
1.
Select the Call Notification tab.
2.
Select whether call notifications occur, and if so, how often. See “Determining which
voice messages send notification” on page 6-21.
3.
Click
4.
Choose one of the following options:
in the Number field to open the Call Notification Number dialog box.
ADMINISTERING TELEVANTAGE
Q Click Extension and select an extension from the dropdown list.
Q For an external number, use the Call Using dropdown list to select the access code
and dialing service to use when placing notification calls. Then enter the number to
dial in Number, exactly as it should be dialed.
5.
Click OK.
Scheduling notifications
If you do not want to receive notifications 24 hours a day, 7 days a week, you can schedule
notifications to occur at specific times only. For example, you can have TeleVantage send
notifications only during business hours or after business hours on work days. You can also set
up custom hours. You can create different schedules for e-mail, pager, and call notification.
Notifications can also be scheduled in ViewPoint.
Note: When you turn notification on for a user, by default TeleVantage sends notifications 24
hours a day, 7 days a week. If this is what you want to do, you do not need to schedule
notifications.
Important: Notifications are never queued for later delivery. When you use a schedule, voice
messages that arrive during an unscheduled time do not produce notifications at all.
A schedule contains individual schedule entries. For example, if you want a user to be notified
of new voice messages during business hours and all day on holidays, you would add a schedule
entry for “during business hours” and another schedule entry for “on holidays.” You (or users)
can define custom schedule entries for even greater precision.
You can enable or disable each schedule entry as needed. For example, if you do not want a user
to be paged during a specific upcoming holiday, disable the schedule entry for “on holidays.”
You can enable it after the holiday has passed.
CHAPTER 6. MANAGING USERS AND ROLES
6-23
Defining a schedule for notifications
After setting the options in the e-mail, pager, or call section on the Notifications tab, click
Schedule in the appropriate section to define a schedule for notification. The Schedule
(E-mail/Pager/Call) Notifications dialog box opens. The Schedule button is unavailable until
you have created notification settings on the Notifications tab.
The Schedule Notifications dialog box lists the schedules that have been defined so far, if any.
Click one of the following:
Q Always send a notification. The schedule entries in the list (if any have been created)
are ignored, and the user receives notification of new voice messages at all times.
Q Only send a notification during the following times. The user receives notification
only during the times specified in the schedule entries that appear in the list with a check
mark in the Enabled column.
6-24
ADMINISTERING TELEVANTAGE
To add a schedule entry
1.
To add a schedule entry, click Add. The Schedule Notification dialog box opens.
2.
To view or change the business and holiday hours used for scheduling, or to create
other sets of business hours, click Business Hours. See “Setting business hours” on
page 3-7.
3.
Under This schedule entry occurs, choose one or more of the following time periods
during which you want to notify the user of new voice messages. For purposes of
illustration, each of the time periods in the following list show in parentheses what
would be the result of selecting that time period in a company whose business hours
are Monday through Friday, from 9:00 a.m. to 5:00 p.m.
Q During business hours. (Notifications are sent during business hours, Monday
through Friday, from 9:00 a.m. to 5:00 p.m.)
Q During nonbusiness hours. (Notifications are sent at all times other than business
hours, including early mornings, evenings, weekends, and holidays. Notifications
are sent Monday through Friday, 5:01 p.m. to 8:59 a.m., and on Saturdays, Sundays,
and holidays.)
Q After business hours on workdays. (Notifications are sent Monday through
Friday, 5:01 p.m. to 8:59 a.m.)
Q On nonworkdays. (Notifications are sent on Saturdays and Sundays.)
Q On holidays. (Notifications are sent on holidays.) See “Setting business hours” on
page 3-7.
Q During custom hours. (Notifications are sent during specific days and hours
independent of the business and holiday hours already defined.) See “Setting up
custom hours” on page 6-26.
4.
Be sure to check Enable this schedule action, and then click OK. Now the schedule
in the Schedule Notifications dialog box includes the schedule entry you just created.
Add more schedule entries as needed, and then click OK when you are finished.
CHAPTER 6. MANAGING USERS AND ROLES
6-25
Setting up custom hours
You can define custom hours that are not related to your office’s business hours and holidays
and use them to schedule notifications, auto attendant actions (described in Chapter 10), and
routing list actions (described in Chapter 9). Custom hours are specific to the user, auto
attendant, or routing list for which you create them. That is, the custom hours you set up for a
user do not apply automatically to other users. Custom hours for a user can also be set up in
ViewPoint.
When setting custom hours, you can enter dates and times in most formats—they are converted
to a standard format based on your Windows regional settings.
To set custom hours
1.
Click Custom Hours in either the Schedule Notification dialog box (for users) or the
Schedule Action dialog box (for auto attendants). The Custom Hours dialog box
opens.
2.
On the Days tab, check each day of the week for which you want the custom schedule
to be active. If you leave the Hours field blank for a selected day, the entire day is
included in the custom schedule. To include only part of a day, enter starting and
ending hours.
Note: You can enter multiple time ranges separated by commas, for example, “9:00
AM - 12:00 PM, 3:00 PM - 6:00 PM.”
6-26
ADMINISTERING TELEVANTAGE
3.
On the Dates tab, click Add if you want to apply the custom schedule to a specific date.
4.
In the Custom Date dialog box that opens, enter the Custom date, and then click All
day or Partial day. For a partial day, enter starting and ending times.
5.
Click OK to add the custom date to the list on the Dates tab of the Custom Hours dialog
box.
The Phone tabs __________________________________________
Use the Phone tab and subtabs to configure the user’s phone. For instructions, see “Assigning
and configuring a user’s station” on page 7-12.
You can apply phone settings to multiple users at once using phone templates. See “Applying
phone settings in bulk” on page 7-4.
CHAPTER 6. MANAGING USERS AND ROLES
6-27
The Audio tab____________________________________________
Choose File > New > User, then click the Audio tab.
Setting the storage size for greetings and voice titles
In the Maximum greeting and voice title storage field, enter how many minutes worth of audio
files this user can store for greetings and voice titles. These voice file types include the
following:
Q Greetings. All greetings displayed in ViewPoint’s Greetings view, plus the user’s
grab-and-hold greeting.
Q Voice titles. The user’s own voice title plus all voice titles for the user’s contacts.
The default setting of 10 minutes requires 4.6 MB of storage. The Administrator opens a
warning message if the total allotment of voice message and greeting space for all users exceeds
the available disk space on the TeleVantage Server.
Choosing a language for telephone prompts
From the Telephone prompts dropdown list, choose the language that TeleVantage system
prompts will play in for this user. When the user logs on or is identified on the telephone,
TeleVantage automatically switches to this language for all subsequent system prompts during
the call. The language can be also be set in ViewPoint. This setting does not affect any prompts
that other callers or users hear.
The list shows the languages currently installed. You must reinstall the TeleVantage Server to
add other languages. See Installing TeleVantage.
6-28
ADMINISTERING TELEVANTAGE
The Audio \ Hold Music, Voice Title, and Disk Usage tabs _______
Expand the Audio tab category to select the Audio \ Hold Music, Audio \ Voice Title, and
Audio \ Disk Usage tabs.
Setting the user’s hold music
Users can have individualized hold music that is different from the default system hold music.
A user’s hold music is heard by callers whenever the user puts them on hold. A user’s hold music
can come from any station that you have set up as a music-on-hold device.
To customize hold music for a user
1.
Expand the Audio tab category and select the Hold Music tab.
2.
Check Change hold music to.
3.
Select the music-on-hold source from the dropdown list. You can click
to add a
music-on-hold source. For instructions, see “Setting up system-wide music-on-hold”
on page 13-13.
If unchecked, the system-wide hold music is used for the user. To set up system-wide hold
music, see “Setting up system-wide music-on-hold” on page 13-13.
Recording the user’s voice title
Expand the Audio tab category to select the Voice Title tab, where you can record the user’s
voice title.
A user’s voice title is a short recording consisting only of the user’s name. TeleVantage uses the
voice title in several prompts, for example, the call screening prompt when the user calls another
user (the user receiving the call hears “Call from <voice title>”). Users can record their voice
titles themselves in their own voices, using either the telephone commands or ViewPoint.
However, since the voice title is a critical part of the TeleVantage system (for example, users
without a voice title are not listed in the dial-by-name directory), it is recommended that you
record them, after which those users who want to re-record them can do so.
To record the voice title, use the audio controls. See “Using the audio controls” on page 2-10.
Viewing the user’s disk usage
Expand the Audio tab category to select the Disk Usage tab, which displays how much space
the user’s audio files are taking up. The percentage of allocated space is also displayed.
To avoid slowing the opening and scrolling of the Users view, TeleVantage does not
dynamically recalculate these totals. Totals are recalculated once a day at 1:00 a.m. You can also
recalculate the totals at any time by choosing Tools > Recalculate Disk Usage.
To configure space for the user’s voice messages, see “The Voice Mail tab” on page 6-18. To
configure space for the user’s greetings and voice titles, see “The Audio tab” on page 6-28.
CHAPTER 6. MANAGING USERS AND ROLES
6-29
The Security tab __________________________________________
Choose File > New > User, then click Security in the tree pane. Use the Security tab to configure
the user’s password settings and whether the user’s calls can be supervised.
Configuring password expiration
Use the options on the Security tab to protect the user’s account and your TeleVantage system
from unauthorized access and toll fraud. For more information about toll fraud, see Appendix I
of Installing TeleVantage. For system-wide security options, see “Enforcing strong password
security” on page 3-12.
The following security options are available:
Q Password never expires. If checked, the user’s password does not expire, although you
can always manually change it or force the user to change it. If unchecked, the user’s
password may expire as determined by your system settings (see “Enforcing strong
password security” on page 3-12).
Checking this field is a security risk, as long-standing passwords are easier to guess.
Note: You should check this field for users of IP phones that use PLAR, because a
changed password prevents the phone from working.
Q User must change password on next logon. If checked, the system requires the user
to change his or her password the next time he or she logs on to any workstation
application or by using the telephone commands.
Q User is locked out. If checked, the account cannot log on to the system, even with the
correct username and password. Depending on your system settings (see “Enforcing
strong password security” on page 3-12), lockout can occur automatically if someone
repeatedly tried and failed to log on to the account. Uncheck the field to unlock the
account and permit normal logging on.
6-30
ADMINISTERING TELEVANTAGE
Configuring whether the user’s calls can be supervised
You can choose whether the user’s personal calls can be supervised by other users with
permission to do so. These settings do not apply to call center queue calls or ACD workgroup
calls. Supervision of call center queue calls is controlled separately by agent permissions (see
the TeleVantage Call Center Administrator’s Guide).
You can set system defaults for these settings. See “Setting up personal call supervision
defaults” on page 3-14.
In each of the following fields choose “Yes,” “No,” or “System Default”:
Q Personal calls can be monitored. Any user with the "Allow monitoring user calls"
permission can listen to this user’s personal (not queue) calls without this user knowing.
Q Personal calls can be coached. Any user with the "Allow coaching user calls"
permission can add himself or herself to this user’s personal (not queue) call and be
heard by this user, but not by the caller.
Q Personal calls can be joined. Any user with the "Allow joining user calls" permission
can add himself or herself to this user’s personal (not queue) call as a full participant.
For instructions on using the Monitor, Coach, and Join features, see Chapter 12 of Using
TeleVantage. For information on configuring a user for the permissions needed to Coach,
Monitor or Join another user's personal calls, see “Assigning a user’s permissions” on
page 6-32. For information on supervising queue calls, see the TeleVantage Call Center
Administrator’s Guide.
Notes
Q To coach a call between two users, the user being coached must allow coaching and the
other user must allow monitoring. This is because coaching the first user automatically
involves hearing (monitoring) the other user. If your supervisors will be coaching calls
between users, you should set up users to allow monitoring as well as coaching.
Q The Advanced Setting “Server\DropMonitorsAfterTransferComplete” determines whether
or not supervisors are disconnected when the user they are supervising is transferred. By
default supervisors are disconnected. See Appendix J of Installing TeleVantage for more
about advanced settings.
The Security \ Permissions tab _____________________________
The Security \ Permissions tab lets you define permissions and roles for the user.
For an explanation of all the user permissions, see “TeleVantage permissions” on page 6-50.
Before assigning permissions
Before assigning permissions and roles to users, set up the roles the way you want (see
“Managing roles” on page 6-46). A role is a template enabling you to apply the same group or
collection of permissions to multiple users, so by setting up roles in advance, you can save time
in giving each user the permissions he or she needs.
CHAPTER 6. MANAGING USERS AND ROLES
6-31
Assigning a user’s permissions
A user’s permissions determine which TeleVantage views and features he or she can use. To
assign permissions, do the following:
1.
Assign the user to a role if necessary. A role is a collection of permissions. By default,
new users belong to the Users role. To assign the user to a new or different role, click
Change. See the next section for instructions.
Note: A quicker way to assign batches of users to a role is to edit the role. See
“Assigning users to a role” on page 6-47.
You can assign a user to more than one role. If the roles’ permissions conflict, the most
permissive setting is used. For example, users who belong to both the Users role and
the Administrators role have their permission for Place external calls when logged
on via a trunk set to Allow, which is the permission level for the Administrators role.
2.
If you want to give the user unique permissions, different from those of the roles to
which he or she belongs, edit the user’s permissions using the Permissions pane. The
user’s Permissions pane settings override all role settings.
To adjust an individual permission for a user, click the Value column for that
permission in the Permissions pane. Select one of the following from the dropdown
list:
Q Use roles (value). Permission for this item is determined by the user’s role
memberships (described in the following section). The actual value of the
permission is displayed in parentheses.
Q Allow. The listed feature (for example, exporting Contacts) is available to the user.
Q Disallow. The function is not available to the user.
Q View and Edit. The specified tab or folder (such as the Phone settings tab or the Call
Log folder) can be viewed and edited by the user.
Q View only. The user can view the folder or tab, but cannot change it.
Q No access. The folder or tab cannot be used or viewed by the user.
6-32
ADMINISTERING TELEVANTAGE
Changing the user’s roles
To change the roles to which the user is assigned, do the following:
1.
Click Change on the Permissions tab. The Roles dialog box opens.
2.
Use Add and Remove to place the roles to which the user should belong in the
Selected roles list.
To create a new role, click New Role. See “Creating a new role” on page 6-47 for
instructions.
3.
Click OK.
Note: If the user belongs to no roles, by default the user’s permissions are all set to deny access.
The Security \ Dialing Permissions tab _______________________
The Security \ Dialing Permissions tab lets you control which numbers the user is permitted to
dial.
Note: It is recommended that you set dialing permissions at the Role or dialing service level, and
set permission at the user level only for special exceptions. In cases of conflict, the more
individual setting applies. See “Dialing permissions hierarchy” on page 6-56 for more information.
To set dialing permissions
1.
Use the Default permission list to specify how to set the user’s dialing permissions.
Choose one of the following options:
Q Use Role permissions. Applies the dialing permissions set up for the role to which
the user belongs. This is the easiest way to set up dialing permissions for users. See
“Managing roles” on page 6-46 for more information.
Q Use Role permissions except the following. Applies the dialing permissions set
up for the role, except for the numbers allowed or disallowed in the Exception
permissions list. The listed settings override the role’s settings.
Q Allow all numbers except the following (ignore Role permissions). Allows the
user to dial all numbers except those disallowed in the list.
Q Disallow all numbers except the following (ignore Role permissions). Prevents
the user from dialing any numbers except those allowed in the list.
CHAPTER 6. MANAGING USERS AND ROLES
6-33
2.
Under Exception permissions, click Add to add a new exception permission to the
list. Click Edit to modify an existing exception permission. The Dialing Permission
dialog box opens.
3.
In the Dialing Permission dialog box, choose to Allow or Disallow calls, and then enter
the digits. Enter a phone number or the initial digits of a phone number. Be sure to
include 1 before the number if it is normally be dialed as part of the number, for
example, 1800.
4.
Click OK. The exception permission appears in the Exception permissions list and is
applied whenever the user dials a number beginning with the digits.
The Dial-by-name Directory tab _____________________________
Use the Dial-by-name Directory tab to specify whether the user can looked up by name by
callers who don’t know his or her extension.
To include a user's name in the dial-by-name directory that callers can search, check List in
dial-by-name directory, and make sure that the user has a voice title recorded.
To play a user's extension along with the user's name when callers choose the user from the
dial-by-name directory, check Play extension to the caller.
The ViewPoint tab ________________________________________
This tab contains the following fields:
Q Use Navigation Pane. If checked, the user’s ViewPoint application displays the
Navigation pane on the left side. If unchecked, ViewPoint displays the view bar instead,
which restores the look of TeleVantage version 5.0 and earlier.
Q Show Welcome Wizard. If checked, the ViewPoint Welcome Wizard start when the
user starts ViewPoint, offering a step-by-step guide to recording his or her voice mail
greeting and voice title and entering personal phone numbers. It also leads him or her
to the TeleVantage Quick Tour and online Help for more information.
Q Show Tip of the Day. If checked, the Tip of the Day window opens whenever the user
starts ViewPoint, showing different tips on using TeleVantage.
6-34
ADMINISTERING TELEVANTAGE
Adding a user at the telephone _____________________________
You can add a new user at an unassigned TeleVantage station by picking up the phone and
pressing *0. You are prompted to enter an extension and password for the user, and the phone’s
station ID is automatically assigned to the user. You can also record the user’s voice title and
change user preferences. The user is automatically assigned user settings from the default user
template (see “Saving settings as the default user template” on page 6-44) and phone settings
from the default phone template for his or her phone type (see “Saving settings as a default
phone template” on page 7-4).
New users created at the telephone are given a first name of “New” and a last name of “User X,”
where X is the user’s extension. For example, a user created at the telephone with extension 117
is named “New User 117.” To change the name, use the Administrator.
When creating a batch of users, you can use the *0 command as a time-saving way to assign
stations to users, without knowing the station ID of each TeleVantage phone. Do the following:
1.
Create your users in the Administrator, assigning their names and extensions and other
details but giving each user a station ID of 0.
2.
Go to each phone that will belong to a new user. At each phone, press *0. When
prompted for an extension, enter the appropriate user’s extension. The phone’s station
ID is assigned to the user. If the extension you enter doesn’t exist, TeleVantage creates
a new user.
For example, use the Administrator to create a user named Amy Smith, with an extension of 117
and station ID 0. Then go to Amy Smith’s phone, press *0, and enter 117 when prompted for an
extension. That phone’s station ID is assigned to Amy Smith.
Creating one or more users from templates___________________
Instead of adding users one at a time, you can add one or more users together by entering their
information into a grid. For each user, you manually enter unique information such as name and
extension, and select a user template and phone template to apply other settings.
CHAPTER 6. MANAGING USERS AND ROLES
6-35
To create users in bulk
1.
In the Administrator, choose File > New > Users from Template. The Edit and Review
Users dialog box opens.
2.
Click New User to add a new empty row in the grid.
3.
Click each cell to enter the user information for that setting.
If you do not want to apply the default user and phone settings, you can choose to apply
a custom phone or user template that contains a collection of settings. Double-click the
User Template and Phone Template cells and click
to open the Template dialog
box, where you can select the appropriate template. From each template dialog box,
you can do the following:
Q Click Select to accept the template showing.
Q Choose a different template using the fields at the top of the screen.
Q Click Start Editing to change settings. Note that you must save the changes as a
template before clicking Select.
For instructions on user templates, see “Applying user settings in bulk” on
page 6-43. For instructions on phone templates, see “Applying phone settings in
bulk” on page 7-4.
When the user and phone are added, the settings from those templates are applied. You
still have to manually add the settings not covered by the template, such as the user’s
name, extension, station ID, and other unique information.
Note: Settings not listed in the grid are applied from the selected user and and phone
templates. If a user template is not specified, the default user template is used. If a
phone template is not specified, the default template for the family and model of the
user’s assigned station is used. Note that if the default user template does not apply a
setting, the setting is taken from the Users role.
6-36
ADMINISTERING TELEVANTAGE
4.
When you have entered each user that you want to add, click Import. TeleVantage will
attempt to add users from the grid, applying user and phone template settings to each
user. If there are any users who could not be imported, the grid reappears with just
these users showing the errors and warnings highlighted, as follows:
Q Errors (in red). Users with errors will not be imported. Errors include duplicate
extensions or DID numbers.
Q Warnings (in yellow). Warnings indicate users who will be imported but who might
cause administrative difficulties. Warnings occur for users with ambiguous
extensions (for example, 101 and 1014), shared station IDs, and phone templates
that don’t match the phone type indicated by their station ID. To have the grid
refrain from highlighting warnings in the next pass, check Ignore warnings.
5.
Repeat until all users have been successfully added.
Note: For the Add and Export options in the dialog box, see the next section.
Importing users in bulk____________________________________
Instead of adding users one at a time, you can import multiple users at once into the
Administrator from the following sources:
Q A .CSV (comma-separated value) file. A sample .CSV file, Sample.csv (showing the
header rows) is located in the \Program Files\TeleVantage\Administrator\ directory.
Q Your Microsoft Active Directory, if you have one (see “Importing users from Active
Directory” on page 6-39).
Microsoft .NET is required to use the import-users feature. You can download Microsoft .NET
from www.microsoft.com\downloads.
Importing users from a .CSV file
Before importing users from a .CSV file, you must prepare the .CSV file in the proper format.
A sample guide file, Sample.csv, is included with TeleVantage in the Administrator’s directory
(by default C:\Program Files\TeleVantage\Administrator). TeleVantage also provides the same
sample in Microsoft Excel format, Sample.xls, with formatting that the .CSV version does not
support.
CHAPTER 6. MANAGING USERS AND ROLES
6-37
To prepare the .CSV file
1.
Open the sample file Sample.csv in Microsoft Excel or another editing program such
as Notepad.
2.
Add each user to be imported as a separate row, and enter the appropriate information
for each column. For an explanation of the user fields, see “About the User dialog box”
on page 6-10 and the sections following it.
The first row with the column headers is not required. However, the columns of data
must stay in that order.
Note: To apply TeleVantage user and phone templates to a user when you import,
enter template names in the User template and Phone template cells. Leaving the
Phone Template cell blank applies the default phone template for the type of phone to
which the user’s station ID corresponds. See “Applying user settings in bulk” on
page 6-43 and “Applying phone settings in bulk” on page 7-4 for more information.
3.
When you have added all the users to be imported, save the .CSV file. If you are using
Microsoft Excel, be sure to save the file in .CSV format.
To import the .CSV file
1.
2.
In the Administrator, choose File > Import and Export.
On the first screen of the Import and Export Wizard, click Import Users, then click
Next. The Select Import Source dialog box opens.
3.
Select CSV (comma delimited) file.
If your .CSV file does not have a row of column headers as the first row, uncheck First
record contains field names.
Click OK.
6-38
ADMINISTERING TELEVANTAGE
4.
Browse to your .CSV file and select it. When you click OK, the list of users appears in
the Edit and Review Users dialog box, where you can make final changes before
importing. See “Reviewing and editing users” on page 6-42 for instructions.
Importing users from Active Directory
You can import users directly from your Microsoft Active Directory. Active Directory is the
integrated, distributed directory service that is included with Microsoft Windows Server 2003
and Microsoft Windows 2000 Server. Organizations using Active Directory often have already
entered into it most of the people who will become TeleVantage users.
To import users from Active Directory
1.
In the Administrator, choose File > Import and Export.
2.
On the first Import and Export Wizard screen, click Import Users, then click Next.
3.
On the Select Import Source dialog box, select Microsoft Active Directory, then click
OK. The Select Users or Groups dialog box opens.
4.
Choose from the following options:
Q Object types. Select which Active Directory objects will be imported as users. You
can select Users, Groups, or both. If you select Groups, all users in the groups are
imported. Multiple copies of a user (for example, if the same user appears in two
groups) will be imported as a single TeleVantage user.
Q Location. Select which parts of the Active Directory to import from. By default
users are imported from anywhere in the directory.
Q Object names. You can enter specific names of users or groups to import only
those objects. Click Advanced to open a dialog box in which you can search for
specific names and select them to enter into this list. (You can also enter names
CHAPTER 6. MANAGING USERS AND ROLES
6-39
directly into the list—click Examples for instructions). After clicking Advanced,
the Select Users or Groups advanced dialog opens.
Use the Object Types and Locations options to filter the search if needed, then
click Find Now. A list of matching Active Directory objects appears in the bottom
pane. Select the objects that you wish to import as TeleVantage users (hold down
CTRL while clicking to select multiple objects), then click OK to return to the
Select User or Groups dialog box with those users added.
6-40
ADMINISTERING TELEVANTAGE
5.
Click OK. The Edit Property Map dialog opens, where you can map how Active
Directory fields are imported into TeleVantage user fields.
6.
Each TeleVantage user field is listed as a row under TeleVantage Destination Field.
The fields are the same as in the User dialog box; for information, see “About the User
dialog box” on page 6-10 and the sections following it. For each field, double-click the
Import Action cell in its row and choose one of the following from the dropdown list:
Q Ignore. The TeleVantage user field will be left blank. You can use this for fields
that do not have a corresponding field in Active Directory, for example, Password.
Note that before importing you will have a chance to manually fill in any blank
fields (see the next section).
Q Import from Active Directory. The TeleVantage user field will be populated by the
Active Directory field listed in the Action Details cell. To populate from a different
Active Directory field, double-click the Action Details cell and select the new field
from the dropdown list.
Q Auto number starting at. This option is meant for unique numeric user data such
as extensions and station IDs. Double-click the Action Details cell to enter the
starting number of your choice. Imported users will receive incremental numbers
starting from that number.
You can choose any of the following options while editing the import map:
Q Reset. Sets the map back to the state used for the last import operation.
Q Clear. Sets all map fields to Ignore.
Q Default. Sets the map back to the TeleVantage default.
CHAPTER 6. MANAGING USERS AND ROLES
6-41
Q Export. Saves the map to an .XML file. You can then import the .XML file for a
later batch of users that you want to import with the same map.
Q Import. Loads a saved .XML map file.
7.
Click OK. The list of users appears in the Edit and Review Users dialog box, where
you can make final changes before importing. See the next section for instructions.
Reviewing and editing users
In the Edit and Review Users dialog box, you can make changes to the user list before importing.
The fields are the same as in the User dialog box; for information, see “About the User dialog
box” on page 6-10 and the sections following it.
To import users
1.
Review the list of users, correcting any errors and filling in any missing information
as needed. You can make any of the following changes to the users as displayed:
Q To edit a cell, click the cell and type the new value.
Note: For instructions on changing the User Template or Phone Template cells
from this grid, see “Creating one or more users from templates” on page 6-35.
Note: The fields SIP User Info and SIP URI apply to a user’s SIP account. See
“About SIP accounts” on page 14-20. The MAC Address field applies to a user’s
Vertical Aastra SIP phone. See “Configuring a user for a SIP phone” on page 14-10.
Q To manually enter a new user, click New User to create a new row in the grid, then
fill in the user information.
Q To add more users from a .CSV file or Active Directory, click Add and select the
users as specified in the preceding sections.
6-42
ADMINISTERING TELEVANTAGE
Q To remove one or more users so that they are not imported, select the users and click
Remove. Hold down the CTRL key while clicking to select multiple users.
You can click Export to export the list, with changes you’ve made, to a .CSV file.
2.
Click Import. TeleVantage will attempt to import users from the grid. If there are any
users who could not be imported, the dialog box reappears with errors and warnings
highlighted, as follows:
Q Errors (in red). Users with errors will not be imported. Errors include duplicate
extensions or DID numbers.
Q Warnings (in yellow). Warnings indicate users who will be imported but who might
cause administrative difficulties. Warnings occur for users with ambiguous
extensions (for example, 101 and 1014), shared station IDs, and phone templates
that don’t match the phone type indicated by their station ID. To have the Edit and
Review Users dialog refrain from highlighting warnings in the next pass, check
Ignore warnings.
3.
Repeat until all users have been successfully imported.
Note: If you import a user with a call forwarding number, TeleVantage assigns the dialing
service based on the type of number. For example, if the number is an IP address and you have
an Internet dialing service, that service is assigned.
Applying user settings in bulk______________________________
Instead of editing users one at a time, you can apply one or more user settings across multiple
users at the same time. With this feature you can:
Q Quickly create a group of new users with similar settings.
Q Edit one or more user settings across multiple existing users with one command.
For each user setting, you choose whether to apply it or leave it unchanged. For example, you
can increase mailbox size to 100 minutes across multiple users, leaving all other settings of those
users unchanged.
You can also save a collection of user settings as a user template. User templates can be used as
default settings when creating new users, or loaded later as a basis for applying to new users.
Which user settings can be applied in bulk
You can apply only those settings that can reasonably pertain to multiple users at once. You
cannot apply in bulk the following types of setting:
Q Unique user identifiers. For example: name, extension, DID number, station ID, voice
title, e-mail address, SIP account, personal numbers, notification of new voice messages,
ISDN outbound Caller ID.
Q Phone settings specific to the user’s station rather than the user, that are shared between
all users who share the station. For example: message waiting light status, digital phone
CHAPTER 6. MANAGING USERS AND ROLES
6-43
feature button settings, hands-free answering. To apply these to users in bulk, use phone
templates. See “Applying phone settings in bulk” on page 7-4.
To change these settings you need to edit the user directly.
Saving settings as the default user template
When you save a collection of settings as a user template, you can click Make Default to make
it the default template. The default template is applied whenever you create a user using the *0
telephone command (see “Adding a user at the telephone” on page 6-35), and whenever you
create or import users in bulk and leave the User Template cell blank (see “Creating one or more
users from templates” on page 6-35).
TeleVantage comes with a system user template called the Standard template, which is the initial
default template. You cannot edit or delete the Standard template.
Setting and applying user settings in bulk
To make user settings and apply them to one or more users in bulk, do the following:
1.
Choose Tools > User Templates. The first screen of the User Templates Wizard
opens.
The screen opens with the default user template loaded. Using the top part of the
screen, you can manage templates in the following ways:
Q To load a different user template, select it from the Template dropdown list, or click
Explore Templates.
Q To save the current collection of settings as a template, click
. You do not need
to save your settings as a template in order to apply it to users. You cannot save
changes to the Standard template, but you can make another template the default.
Q To make the currently selected template the default template, click Make Default.
Q To delete the currently selected template, click
. You cannot delete the Standard
template.
6-44
ADMINISTERING TELEVANTAGE
2.
Choose which settings to apply.
Click a tab in the Category pane to view the settings for that tab.
Only settings that are selected will be applied to users, as as illustrated below:
Call waiting will be turned on for the selected users
Call waiting will be turned off for the selected users
Call waiting will be left unchanged for all users
Settings that are not selected will be left as the users have configured them. New users
will receive the default settings.
Some settings, such as permissions and queue skills, have the choice “Do not apply”
on the dropdown list. Choosing “Do not apply” is the same as unselecting a setting:
those settings will be left as is when applied to users.
Note: When setting roles (Security \ Permissions tab) to “Unassign,” note that each
user must have at least one assigned role. If applying the settings would unassign a
user’s last role, the change would be aborted and the settings will not be applied to that
user or any following users.
For details on any of the fields, see its description for the User dialog box (see “About
the User dialog box” on page 6-10 and following sections).
3.
When you have indicated all of the settings you want to change, click Next to choose
the users to which they will be applied. The second screen of the User Templates
Wizard opens.
4.
In the All users pane, select the users to whom you want to apply the settings, then
click Add. (Hold down the CTRL key as you click to select multiple users.) Selecting
a Role or workgroup will add all the members of that Role or workgroup to the
Selected users pane.
5.
Click Apply to apply the settings to the users in the Selected users pane.
CHAPTER 6. MANAGING USERS AND ROLES
6-45
Modifying a user’s ViewPoint settings________________________
There are times when you may need to troubleshoot aspects of a user’s account that can only be
accessed using ViewPoint. For example, with ViewPoint you can modify the following user
settings that cannot be modified in the Administrator:
Q Routing lists
Q Call rules
Q voicemail greetings
Q Personal status settings
TeleVantage lets you modify a user’s ViewPoint-based settings directly from the Administrator,
without your having to know the user’s password. Private aspects such as the user’s voice
messages are not accessible.
You must have ViewPoint installed to use this feature.
To modify a user’s ViewPoint-based settings from the Administrator
1.
In the Users view, select the user whose ViewPoint settings you want to edit.
2.
Choose Users > Edit All ViewPoint Settings.
A limited version of ViewPoint opens with the selected user logged in. You can access all
ViewPoint-based features except for the following:
Q The user’s voicemail
Q The user’s Call Monitor
To change those features—for example, to share the user’s calls or voicemail to another
user—you must start ViewPoint and log in as that user.
To modify many ViewPoint-based settings, choose Tools > Options. For complete instructions
on using ViewPoint, see Using TeleVantage.
Managing roles___________________________________________
Roles are templates that enable you to apply the same set of permissions to multiple users. You
can create as many different roles as you want, to represent different groups of users who have
similar permissions. Roles appear in the Users view in bold.
When a user belongs to a role, he or she inherits the role’s permissions. A user can belong to
more than one role, in which case the most permissive settings apply in cases of conflict.
You can grant a user individual permission settings that override those of the role, by adjusting
his or her permissions individually on the Permissions tab of the User dialog box. See “The
Security \ Permissions tab” on page 6-31.
6-46
ADMINISTERING TELEVANTAGE
TeleVantage comes with the following two roles:
Q Administrators. You cannot delete this role, but you can edit some of its settings. By
default the role has full permissions. You can disallow only the following permissions:
Q Place external calls when logged on via a trunk
Q Place external calls from a station
Q Forward or route calls to external numbers
Q Return calls when logged on via a trunk
The Admin user belongs to the Administrators role by default and cannot be removed.
Q Users. By default new users belong to this role.
Assigning users to a role
The quickest way to assign a batch of users to a role is to edit the role and add the users. See
“Creating a new role” on page 6-47.
You can also assign a user to a role by editing the user. See “The Security tab” on page 6-30.
Editing a role
To edit an existing role, double-click it in the Users view. For further instructions, see the next
section.
When editing a role, be aware of the following:
Q When you change a role’s permissions, those permissions change for all users belonging
to the role, except where a user’s individual permission setting overrides the role, or
where a user’s other role provides a more permissive setting.
Q When you remove a user from a role, the user loses all permissions granted by that role.
Q The Administrators role can only be edited in limited ways.
Creating a new role
You can create a new role, for example Admin Assistant, for a group of users that require the
same or similar permissions. All users that you assign to this role are automatically granted its
permissions, except where their individual permission settings override roles.
CHAPTER 6. MANAGING USERS AND ROLES
6-47
To create a new role
1.
Choose File > New > Role. The Role dialog box opens.
2.
Enter the name of the role and any comments about its function.
3.
Click the Users tab to assign users to the role.
To add users to the role, select them in the All users list and click Add. To select
several users at once, hold down SHIFT or CTRL as you click.
To remove a user from the role, select the user and click Remove.
6-48
ADMINISTERING TELEVANTAGE
4.
Click the Permissions tab to choose the role’s permission settings.
To set a permission, click its Value column and select the setting you want.
5.
Click the Dialing Permissions tab to specify which numbers can be dialed by users
belonging to this role. A disallowed number prevents the dialing of any number
beginning with those digits.
Note: You can set dialing permissions globally for each Phone Number dialing
service, and also individually for each user. In cases of conflict, the more individual
setting applies. See “Dialing permissions hierarchy” on page 6-56.
CHAPTER 6. MANAGING USERS AND ROLES
6-49
6.
Use the Default permission list to specify how to set the role’s dialing permissions.
Choose one of the following options:
Q Use dialing service permissions. The role applies no dialing permissions or
restrictions to users belonging to it. Users’ dialing is controlled by the permissions
of the dialing service they use, and any individual exceptions they have.
Q Use dialing service permissions except the following. The exceptions you enter
here override dialing services’ permissions for users belonging to this role.
Q Allow all numbers except the following (ignore dialing service permissions).
Users belonging to this role can dial all numbers except what you disallow here,
regardless of dialing service permissions. Users are also prohibited from dialing any
numbers disallowed at the individual level.
Q Disallow all numbers except the following (ignore Role permissions). Users
belonging to this role cannot dial any numbers except what you allow here,
regardless of dialing service permissions. Users are also permitted to dial any
numbers allowed at the individual level.
7.
Under Exception permissions, click Add to add exception permissions to the list. For
instructions, see page 6-34.
8.
When you are finished defining dialing permissions, click OK to close the Role dialog
box.
TeleVantage permissions __________________________________
A user’s access to TeleVantage features is controlled by permissions. There are three types of
TeleVantage permissions:
Q General user permissions. These control what ViewPoint views and TeleVantage
commands the user can use. See the next section.
Q Dialing permissions. These control what phone numbers the user can dial. See “Dialing
permissions” on page 6-55.
Q Call center agent permissions. These apply to agents in a call center queue only, and
control what queue features the agent can use. See the TeleVantage Call Center
Administrator’s Guide.
Users inherit general permissions and dialing permissions from the roles to which they belong.
Roles are collections of permissions that you set up to define jobs or roles in your office. See
“Managing roles” on page 6-46. Users can also have individual permissions that override the
permissions of the roles to which they belong.
6-50
ADMINISTERING TELEVANTAGE
General user permissions
To assign permissions to a role, see “Creating a new role” on page 6-47. To assign individual
permissions to a user, see “The Security tab” on page 6-30. You can assign the permissions in
the following table:
TeleVantage General User Permissions
Permission
Controls the ability to...
Standard
Access Tools menu in ViewPoint
Use the Tools menu in ViewPoint, which includes access
to call forwarding, personal status, the Call Center
Reporter, and more. See Using TeleVantage.
Access call center reporter
Use the call center reporter to run reports.
Access system call log via API
Use the TeleVantage Client API’s
System.GetSystemCallHistory method to get call log data
on any call in the system. This applies to API developers
only.
Add parties when replying to
voicemail
Send voicemail replies to additional users as well as the
sender. Applies only to using ViewPoint.
Allow coaching/joining/
monitoring user calls
Monitor, coach, or join other users’ calls. The target user
must be set up to permit call supervising (see “Configuring
whether the user’s calls can be supervised” on page 6-31).
Place external calls when logged
on via a trunk
Dial in to TeleVantage from a remote location and place
external calls through the Server that get billed to the
Server. See also Forward or route calls to external
numbers.
Place external calls from a station Place outbound calls on TeleVantage trunks.
Change Personal Status
Change the user’s own personal status. You might disallow
this for agents in a call center queue, to ensure that they
take calls during their shifts. See the TeleVantage Call
Center Administrator’s Guide.
Change the personal status of
any user
Change their own or another user’s personal status, using
the Apply Personal Status command in ViewPoint. The
user must still enter the other user’s password to change
his or her personal status.
ViewPoint call control
Use the ViewPoint Call Monitor to handle calls.
Delete Call Log entries
Use the Edit > Delete command in ViewPoint’s or the
Administrator’s Call Log.
CHAPTER 6. MANAGING USERS AND ROLES
6-51
TeleVantage General User Permissions
Permission
Controls the ability to...
Export data
Export contacts, extensions, or the Call Log, using
ViewPoint. Does not affect exporting audio files or using
export commands in the Administrator.
Forward or route calls to external
numbers
Specify an external number when forwarding calls or
setting up routing lists.
Forward voicemail
Forward voice messages to one or more users.
Lock/unlock the layout of
ViewPoint views
Use ViewPoint’s View > Lock the layout command to lock
the current layout in place and unlock it.
Log on to ViewPoint Web Access
Use ViewPoint Web Access.
Log on to ViewPoint
Use TeleVantage ViewPoint.
Log on via IP trunk
Log on when making an Internet call to TeleVantage .
Log on via station
Log on by pressing # at a station.
Log on via trunk
Log on when calling from a remote location, either via the
auto attendant or by pressing 9 at a voicemail greeting.
Change password
Change the user’s own TeleVantage password.
Off-hook page
Use the *15 telephone command to place pages or
intercom calls.
Pick up other ringing call
Use the *91 or *99 commands to answer one ringing
station from another.
Play audio into call
Use the Call Monitor’s Play audio into call command to
insert recorded audio into a call.
Record calls
Record calls using the Call Monitor.
Reply to voicemail
Send voice messages as replies to voice messages
received.
Report on all call logs
Run the Call Log report on the Call Log of any user or
queue. When set to Disallow (the default), the report can
be run only on the Call Log of the user logged in to the
Reporter. For instructions on running reports, see the
TeleVantage Call Center Administrator’s Guide.
Return external calls when logged
in on a trunk
Use the 43 or 44 commands to call back a voice message
from an external number, when calling in from a remote
location.
Send voicemail
Record and send new voice messages directly to users’
voice mailboxes.
6-52
ADMINISTERING TELEVANTAGE
TeleVantage General User Permissions
Permission
Controls the ability to...
Show ‘All’ tab in ViewPoint
Extensions view
See a tab in ViewPoint’s Extensions view that shows all
extensions in the system. With this tab turned off, the user
can still see the filtered tabs, such as tabs for workgroup or
call center queue extensions.
Show menu bar in ViewPoint
See ViewPoint’s menu bar, from which all commands can
be chosen.
View call history
See the History pane in the Device Monitor or the Call Log
(Administrator or ViewPoint).
Access...
View and use the specified features in ViewPoint’s Options
dialog box (Tools > Options).
Note: Access external station settings also controls the 6 9
telephone command to set a new remote phone as an
external station.
Access call forwarding options
Forward calls, using ViewPoint, Administrator, or
telephone commands.
Access voice title
Record the user’s own voice title, using ViewPoint,
Administrator, or telephone commands. Does not affect the
ability to record or capture voice titles for contacts.
Phone Commands
Access saved messages
Press 2 after logging on to access voice messages in the
Saved folder.
Call back last incoming call
Dial *69 to return the most recent incoming call.
Dial by name
Dial *93 to use the TeleVantage dial-by-name directory.
Disable call waiting
Dial *70 to disable call waiting on the next call.
Enter account code
Dial *11 to enter an account code for the current call.
Manage account settings
Use the 6 command from the voicemail / Account menu to
manage account preferences.
Manage calls on hold
Dial *95 to manage calls on hold.
Redial
Dial *66 to redial the last call placed.
Disconnect (remote)
Dial *96 to log off from a remote TeleVantage session.
Send message to all
Option to send a voice message to 8888#, sending it to all
users.
Set ‘calling as’
Dial *14 to mark subsequent outbound calls as originating
from a queue.
CHAPTER 6. MANAGING USERS AND ROLES
6-53
TeleVantage General User Permissions
Permission
Controls the ability to...
Set personal status...
Set that personal status by logging in and pressing 6 1 x.
The permissions for Available, Available (Queue Only) and
Available (Non-Queue) control the ability to dial *50-*52 to
set that personal status.
Start a new call via #
Press # for dial tone to dial a new call from either the
voicemail / Account menu (after logging on) or the Call
Handling menu (after pressing Flash).
Toggle hands-free
Dial *10 to turn hands-free answering on or off.
Toggle voice-first
Dial *12 to turn voice-first answering on or off.
Universal pickup
Dial *91 to answer another ringing phone.
Unpark
Dial *92 to retrieve a parked call.
Workgroup pickup
Dial *99 to answer another ringing phone within a
workgroup.
Folder Visibility
View...
These permissions control whether or not the specified
view or folder appears when the user logs into the
TeleVantage ViewPoint or ViewPoint Web Access. To
make a folder visible but not editable, use the Folder
Access section.
Administration
Access...
View and be able to use the specified features in the
Administrator.
Edit all ViewPoint settings
Use the Edit all ViewPoint Settings button to edit a user’s
ViewPoint settings from the Administrator.
Export Call Log
Export the Call Log using the Administrator. Does not
affect exporting the Call Log using ViewPoint.
Export system prompt text
Export system prompts to a text file using the
Administrator.
Select a specific trunk for
outbound call
Dial 88 followed by a trunk number and a phone number to
place a call on a specific trunk.
Backup and restore the database
Perform database backups and restores.
Edit system settings in
TeleVantage settings editor
Use the TVSettings.exe application to modify registry
settings.
6-54
ADMINISTERING TELEVANTAGE
TeleVantage General User Permissions
Permission
Controls the ability to...
Start and stop the Server
Use the Administrator or Device Monitor commands to
start and stop the TeleVantage server.
Access...folder
These permissions control the degree of access the user
has to the specified Administrator view or folder. The
choices are the same as for Folder Access below.
Note that the permission Access Queues folder enables
users to sign agents in and out of any queue, including
themselves if they are non-observer agents. It overrides
the per-queue permission Queue sign in/out (see the
TeleVantage Call Center Administrator’s Guide).
The objects shown in the Dial Plan view are edited using
the permissions for other folders (Users, Queues, etc.), so
the permission Access Dial Plan folder has an
Allow/Disallow choice.
Folder Access
Access...
These permissions control the degree of access the user
has to the specified ViewPoint view or folder. The choices
are as follows:
No access - the view or folder does not appear.
View only - the user can view but not edit or delete the
folder’s items.
View and Edit - the user has full access to the view or
folder.
Note that a No access setting prevents the user from
accessing the folder even using the TeleVantage API.
Disallowing a folder using the Folder Visibility permission
removes it from ViewPoint, but still permits access via the
API.
Dialing permissions
Dialing permissions determine what phone numbers can be dialed by TeleVantage users. By
default, all numbers are allowed. You can use dialing permissions to disallow certain numbers,
either globally, by role, or on a per-user basis. You can decide whether to permit all numbers
except for a few, or disallow all numbers except for a few.
A user who dials a disallowed number hears the message, “I’m sorry, you do not have
permission to dial that number.” A user cannot include a disallowed number in a routing list or
forward calls to a disallowed number.
CHAPTER 6. MANAGING USERS AND ROLES
6-55
A disallowed number means that the user cannot dial any number beginning with those digits.
Commonly disallowed numbers include the following:
Prefix
Disallows
1
Long-distance calls. Be aware that in some areas this may
block local calls as well.
011
International calls.
1550
Group conversation lines.
1554
Adult information services.
1900
Long-distance programs.
1976
General information programs.
Dialing permissions hierarchy
You can set dialing permissions separately for the following:
Q Phone Number dialing services. Use this setting to create global dialing restrictions
that affect everyone using the dialing service. See “The Permissions tab” on page 9-19.
Q Roles. Use this setting to apply the same dialing restrictions to a group of users. See
“Managing roles” on page 6-46.
Q Users. Use this setting to give individual users exceptions to the more general dialing
permissions. See “The Security \ Dialing Permissions tab” on page 6-33.
In cases where dialing permissions conflict, the more individual setting applies. User settings
override role settings, and role settings in turn override dialing service settings. For example, if
a dialing service disallows 011 numbers, and a role allows them, users belonging to the role can
dial them. However, if a user has 011 numbers disallowed at the individual level, that user
cannot dial them.
Helping new users get started ______________________________
To get new users up and running quickly on the system, give them copies of the TeleVantage
QuickStart Guide and the TeleVantage Pocket Reference Card, and alert them to the
TeleVantage Welcome Wizard, available from ViewPoint by choosing Tools > Welcome
Wizard.
When you add a new user, a “Welcome to TeleVantage” voice message is copied automatically
to the user’s voice mailbox. This message helps the new user get started by explaining how to
record a voice title and create a custom voicemail greeting using the telephone commands.
The information that a new user must know includes:
Q His or her extension, station ID, and password.
Q His or her DID number, if any.
6-56
ADMINISTERING TELEVANTAGE
Q A list of your office’s dialing services and access codes, along with instructions about
when to use each one.
Q A list of special access codes, such as the codes for the TeleVantage dial-by-name
directory and emergency services.
Q The path he or she must use to install TeleVantage workstation applications, such as
TeleVantage ViewPoint, TAPI Service Provider, and Contact Manager Assistant. The
default path is <Servername>\NetSetup\Setup.exe.
Q The URL address for ViewPoint Web Access, if your system supports it.
Q The telephone key he or she must use at an auto attendant to log in from a remote phone,
if you have changed it from #.
Q Whether they have permission to make external calls:
Q From stations
Q When logged in from an outside phone
Q In call forwarding or routing list situations
Q A list of any ViewPoint views or tabs in ViewPoint’s Option dialog box that they cannot
access.
Q Whether they can record calls in the Call Monitor.
Note: The TeleVantage QuickStart Guide contains a form where the user can write down some
of this information.
Reducing TeleVantage complexity by hiding features
TeleVantage is a feature-rich application that can overwhelm new users. You can reduce
TeleVantage’s complexity by hiding and simplifying features, in the following ways:
Q Use direct transfer to simplify the Flash button. By default, when a user presses Flash
during a call, he or she hears the full call-handling menu of telephone commands. With
direct transfer, Flash becomes a transfer button—the user hears a simple prompt for the
extension to which to transfer the call. You can set direct transfer for the system as a
whole (see “Setting general TeleVantage options” on page 3-3) or for individual users
(see “Configuring Flash behavior” on page 7-16).
Q Hide unnecessary telephone commands. Use permissions to disallow more advanced
telephone commands such as account code, “calling as,” and voice-first answering. See
“The Security \ Permissions tab” on page 6-31.
Q Hide unnecessary ViewPoint views and features. Use permissions to present a simplified
ViewPoint interface containing only the features that your users need. For example, you
can have ViewPoint display only the Call Monitor and Voice Messages view, while
hiding commands such as call recording.
CHAPTER 6. MANAGING USERS AND ROLES
6-57
Experiment with the right configuration for the users in your system. You can use roles to define
different configurations for different grades of users, for example “Regular users” who
encounter a limited feature set and “Power users” who get the full feature set. See “Managing
roles” on page 6-46.
6-58
ADMINISTERING TELEVANTAGE
CHAPTER 7
CHAPTER 7
MANAGING STATIONS
CHAPTER CONTENTS
About TeleVantage stations . . . . . . . . . . . . . . . . . . . . . . . . . . . . . . . . . . . . . . . . 7-2
Applying phone settings in bulk. . . . . . . . . . . . . . . . . . . . . . . . . . . . . . . . . . . . . . 7-4
Using internal stations. . . . . . . . . . . . . . . . . . . . . . . . . . . . . . . . . . . . . . . . . . . . . 7-7
Using external stations . . . . . . . . . . . . . . . . . . . . . . . . . . . . . . . . . . . . . . . . . . . . 7-8
Assigning and configuring a user’s station . . . . . . . . . . . . . . . . . . . . . . . . . . . . 7-12
Configuring digital stations . . . . . . . . . . . . . . . . . . . . . . . . . . . . . . . . . . . . . . . . 7-24
Configuring stations for special use . . . . . . . . . . . . . . . . . . . . . . . . . . . . . . . . . 7-32
About TeleVantage stations ________________________________
A station is a TeleVantage phone or other telephony device, such as a softphone application, fax
machine or music-on-hold player. To include a phone as part of the TeleVantage system, you
must define it as a station by assigning it to a user. Every station must be assigned to a user. For
unattended phones such as a conference room phone, create a placeholder user (for example,
named “Conference Room 5”), and assign the phone to that user. You configure station behavior
by editing the user.
For a list of phones and phone types supported by TeleVantage, see Chapter 5 of Installing
TeleVantage.
There are two types of TeleVantage station:
Q Internal stations. Phones connected by physical wire to a station board in the
TeleVantage Server computer. This can include analog and digital phones.
Q External stations. Phones that are not physically connected to TeleVantage—for
example, cell phones or home phones—that are defined to behave as TeleVantage
stations. This also includes all IP phones, whether in or out of the office. See “Using
external stations” on page 7-8.
Assigning stations to users
Each TeleVantage station has a unique station ID number that identifies the phone. To find a
station’s station ID, dial *0 at the station.
To assign a phone to a user, edit the user and enter the phone’s station ID in the Station ID field
(see “Assigning a station ID” on page 6-13).
Assigning analog stations 1-4 for failover support
On analog systems using a BCP connection panel or using the DI0408LSAR2 integrated trunk
and station board, TeleVantage’s failover support provides limited phone service in the event of
a power failure or Windows server failure, by automatically routing the first four incoming
analog trunks to stations 1-4. If your site uses this analog setup, you should assign station 1 to
your Operator and stations 2-4 to people who are assigned to answer phones in the event of a
system failure.
About stations and users
TeleVantage handles a user’s assigned station as follows:
Q Inbound calls. Calls to the user’s extension ring that station, unless the user routes calls
elsewhere by using call forwarding or a custom routing list.
Q Outbound calls. By default, TeleVantage calls placed from a station are associated with
the station’s default user. They appear in the Call Log as being from the user and are
subject to the user’s dialing restrictions and permissions.
Other users can associate themselves with the station by logging in, using either the
telephone commands at that station or TeleVantage ViewPoint. While logged in,
7-2
ADMINISTERING TELEVANTAGE
TeleVantage treats outbound calls as being from them. For information on shared
stations, see Chapter 7 of Using TeleVantage. For information on resetting stations to
their default users, see “Configuring a user’s automatic station log out time” on
page 7-23.
Sharing a station between multiple users
You can give multiple users the same station ID, which means they share the same phone.
Outgoing calls from the phone are attributed in the Call Log to the user who logged on most
recently.
For example, Roger and Dorothy work different shifts, but they share the same workstation. At
the beginning of his shift, Roger logs on to ViewPoint. In the Call Log, the From column for
calls he makes shows “Roger.” At the end of his shift he logs off and exits ViewPoint. Dorothy
then starts work, and makes a call using the telephone. Because she forgot to log in, this call is
also identified in the Call Log as having been placed by Roger. After Dorothy logs in, either via
ViewPoint or the telephone commands, the station is in her name and the calls she makes are
attributed to her in the Call Log.
About stations and workstation computers
Each computer running a TeleVantage workstation application—such as TeleVantage
ViewPoint or the TeleVantage Administrator—has an assigned station. The computer rings its
assigned station whenever you perform a TeleVantage application command requiring a phone,
for example speed-dialing a call or making a recording. The computer’s station is assigned when
you install the TeleVantage workstation applications, and you can change it at any time by
clicking Options when you log on to ViewPoint or the Administrator (see “Logging on to the
Administrator” on page 2-2).
Note: A workstation computer’s assigned station applies to all TeleVantage applications on it.
For example, when you change the assigned station for ViewPoint, it changes for the
Administrator too.
Viewing station activity
You can use the Device Monitor to view all station activity and to restart a station that is
experiencing problems. See “Monitoring station activity” on page 12-4.
CHAPTER 7. MANAGING STATIONS
7-3
Applying phone settings in bulk_____________________________
Instead of making phone settings one user at a time, you can apply one or more phone settings
across multiple users at the same time. With this feature you can:
Q Quickly set up a group of new users with similar phone settings.
Q Edit one or more phone settings across multiple existing users with one command.
Each family and model of TeleVantage station (analog, digital, Toshiba, IP) comes with its own
template of phone settings. You can save a collection of phone settings as a new default template
for that phone type, for example to automatically give all new Toshiba phone users the same
feature button settings.
Which phone settings can be applied in bulk
You can apply only those phone settings specific to the station rather than the user, meaning
settings shared between all users who use the same phone. For user-specific phone behavior
settings, such as call announcing and ring patterns, apply user settings instead (see “Applying
user settings in bulk” on page 6-43).
Saving settings as a default phone template
When you save a collection of settings as a phone template, you can click Make Default to make
it the default template for that station type. The default template is applied when you add a user
with a station ID corresponding to a phone of that type, in the following circumstances:
Q When you add a user at the telephone using the *0 command (see “Adding a user at the
telephone” on page 6-35).
Q When you add or import users and leave the Phone Template cell blank (see “Applying
user settings in bulk” on page 6-43).
Note that when you add a user in the User dialog box, custom default templates are not applied.
TeleVantage comes with a group of system phone templates all named “Standard.” They are the
the initial default templates for the various phone types. You cannot edit or delete a Standard
phone template.
7-4
ADMINISTERING TELEVANTAGE
Setting and applying phone settings in bulk
To make phone settings and apply them to one or more users in bulk, do the following:
1.
Choose Tools > Phone Templates. The first screen of the Phone Templates Wizard
opens.
The screen opens with the default analog phone template loaded. Using the top part of
the screen, you can manage templates in the following ways:
Q To load a different phone template, select it from the Template dropdown list, or
click Explore Templates.
Q To save the current collection of settings as a template, click
. You do not need
to save your settings as a template in order to apply them to users. You cannot save
changes to a Standard template, but you can make another template the default for
that phone type.
Q To make the currently loaded template the default template for this phone type,
click Make Default.
Q To delete the currently loaded template, click
. You cannot delete the Standard
template.
2.
Choose the type of phone for which you want to apply settings using the following
fields at the top of the screen:
Q Family. The category of phone.
Q Model. The specific phone model.
3.
Choose which settings to apply.
Click a tab in the Category pane to view the settings for that tab. The tabs will be
CHAPTER 7. MANAGING STATIONS
7-5
different depending on which phone type you select.
Only settings that are selected will be applied to users, as as illustrated below:
Hands-free answering will be turned on for the selected users
Hands-free answering will be turned off for the selected users
Hands-free answering will be left unchanged
Settings that are not selected will be left as currently set for the user.
Phones with feature button assignments (Toshiba and other digital phones) have the
choice “Do not apply” on the dropdown list for each button. Choosing “Do not apply”
is the same as unchecking a application checkbox: those settings will be left as is when
applied to users.
For information on any of the fields, see “Assigning and configuring a user’s station”
on page 7-12.
7-6
4.
When you have indicated all of the settings you want to change, click Next to choose
the users to which they will be applied. The second screen of the Phone Templates
Wizard opens.
5.
In the All users pane, select the users to whom you want to apply the settings, then
click Add. (Hold down the CTRL key as you click to select multiple users.) Selecting
a Role or workgroup will add all the members of that Role or workgroup to the
Selected users pane.
6.
Click Apply to apply the settings to the users in the Selected users pane.
ADMINISTERING TELEVANTAGE
Using internal stations ____________________________________
The station ID of an internal station corresponds to the interface on the station board to which
the station is connected.
To add an internal station to your TeleVantage system
1.
Using phone cable, connect the phone, fax machine, or other device to the
TeleVantage Server’s station board, BCP Control Panel, or breakout box, as described
in Installing Intel Telephony Components.
2.
In the User’s view of the TeleVantage Administrator, assign the appropriate station ID
to a user. See “Assigning a station ID” on page 6-13.
Supporting different types of analog CLASS phones
Two TeleVantage registry settings specify the format used to send information to analog
CLASS internal stations:
Q HKLM\SOFTWARE\Artisoft\TeleVantage\Server\MSIBoard<n>\CID_FSK_FORMAT
Specifies the format for Caller ID information.
Q HKLM\SOFTWARE\Artisoft\TeleVantage\Server\MSIBoard<n>\VMWI_FSK_FORMAT
Specifies the format for message waiting light information.
Important: These two registry settings change the message format sent to all phones
connected to the specified MSI, DISI, or HDSI board.
With these settings you can choose which of the following formats is used to send Caller ID
information to CLASS phones:
Q Single Data Message Format (SDMF), which sends the date, time, and 10-digit Caller
ID number.
Q Multiple Data Message Format (MDMF), which sends the date, time, 10-digit Caller ID
number, and 15-digit caller name.
Q United Kingdom message format (UK), which sends the date, time, 18-digit Caller ID
number, and 20-digit caller name. This information is only delivered as Caller ID on call
waiting, that is, when the user is on another call.
The default format, MDMF, works for most CLASS phones, as does SDMF.
Note: These formats specify only how TeleVantage sends Caller ID information to CLASS
phones. They do not affect how Caller ID information is passed along with a call by the phone
company.
CHAPTER 7. MANAGING STATIONS
7-7
Using external stations ____________________________________
You can set up a remote phone as an external station, making it behave as though it were a
TeleVantage station. A remote phone is any phone not connected to a station board port on the
TeleVantage Server computer—for example, a user’s home phone. If a user works primarily
from a remote phone, you should assign that user an external station.
All IP phones must be defined as external stations, whether or not they reside within the office.
Assigning a user an external station provides the following benefits to users of remote phones:
Q ViewPoint’s Call Monitor can be used to transfer, conference, record and manage calls
at the phone.
Q ViewPoint can be used to record greetings and messages using the phone.
Q Users and call center agents can receive calls with hands-free answering at the remote
phone.
Q TeleVantage station features work with the remote phone, for example TeleVantage call
waiting and the phone’s message waiting light for TeleVantage voicemail.
For instructions on working with an external station, see Chapter 6 of Using TeleVantage.
Notes
Q If a user often roams from location to location but primarily has a desk phone with a
traditional station, you do not need to create an external station to give him or her many
of the benefits of external stations. Instead see Chapter 6 of Using TeleVantage for
information on how a roaming user can create an external station on the fly from a remote
number.
Q TeleVantage cannot control ring cadences on external stations.
Configuring external stations is a three-part process:
1.
Defining the number of external stations needed by your TeleVantage Server. See the
next section.
2.
Assigning external stations to users. See page 7-9.
3.
Configuring a user’s external station. See page 7-10.
Defining the number of external stations
You create external stations to assign by entering the number of external stations that you want.
Station IDs for the external stations are created after the TeleVantage Server is restarted and are
displayed in the Device Monitor below regular stations in the list.
Important: Because defining external stations requires a restart of the TeleVantage Server, you
should schedule this procedure for a time when your phone service will be least affected.
7-8
ADMINISTERING TELEVANTAGE
To define the number of external stations
1.
Choose Tools > System Settings.
2.
Click the Server tab.
3.
In Number of external stations, enter the number of external phones that you want to
be configured as external stations.
4.
Click OK.
5.
Restart the TeleVantage Server to have the change take effect. See “Shutting down the
TeleVantage Server” on page 12-56.
The external stations are given station IDs beginning where the internal stations left off. For
example, if your internal stations are station IDs 1-14, and you create 4 external stations, the
external stations will be station IDs 15-18. To see the station IDs of your external stations, go to
the Device Monitor view and look in the stations pane. External stations have Device Type
“EXT,” and by default appear at the bottom of the station list.
Note: If you later add or remove Dialogic boards, and your external station IDs change, you can
select Tools > Adjust Station IDs and re-assign the station IDs in your system to match where
the external stations now start.
Assigning external stations to users
You assign an external station to a user by assigning the user the station ID of an external station.
See “Assigning a station ID” on page 6-13. Once you’ve assigned the station ID, you can then
configure the external station using the Phone tab of the User dialog box. See “Configuring a
user’s external station” on page 7-10.
Automatically upgrading old IP phone users with station ID 0
If you have IP phone users from a TeleVantage 5 or earlier who were created with station ID 0,
you can easily convert them to external stations.
You must first have enough available, unassigned external stations to accommodate the old IP
phone users you want to upgrade. Automatically upgrading performs the following changes to
each old IP phone user:
Q They are assigned the external station ID of your choice, with settings that match their
prior “Use IP Phone” settings.
Q Call forwarding is turned off.
CHAPTER 7. MANAGING STATIONS
7-9
To upgrade old IP phone users
1.
Choose Tools > Upgrade Remote Phones. The Upgrade Remote Phones dialog box
opens, showing each user defined with station ID 0 and an IP phone.
2.
For each user whom you want to upgrade to an external station, click the Action
column and select an available external station. To create more external stations, see
“Defining the number of external stations” on page 7-8.
3.
Click OK. The specified users are converted to using the selected external stations.
Configuring a user’s external station
Once the user has a station ID that corresponds to an external station (see “Using external
stations” on page 7-8), the Phone \ External Station tab of the User dialog box offers options for
configuring the external station, assigning the user an IP phone, and creating a null station.
To configure an external station
1.
Under Destination, select one of the following types of external station:
Q External Number. Choose for any external station with a phone number, then enter
the phone number in Number. For more information, see “Using external stations”
on page 7-8.
Q Generic H.323 Device. Choose for any H.323-based IP phone not listed, including
Polycom IP phones. (Polycom phones must be set up as generic H.323 devices since
7-10
ADMINISTERING TELEVANTAGE
they do not support the MWI message waiting light feature). See “Configuring a
user to use an H.323 phone” on page 15-9 for more instructions.
Q Intel PBX-IP Media Gateway. Choose for stations connected to an Intel PBX-IP
Media Gateway. See “Configuring a user to use an H.323 phone” on page 15-9 for
more instructions.
Q Uniden IP Phone. Choose for H.323-based Uniden IP phones. See “Configuring a
user to use an H.323 phone” on page 15-9 for more instructions.
Q TeleVantage Softphone. Choose for the TeleVantage H.323 Softphone.
Q SIP Phone. Choose for any SIP-based IP phone, such as the Vertical Aastra 480i or
eyeBeam. See “Configuring a user for a SIP phone” on page 14-10 for more
instructions.
Q None. Choose to create a null station, then select whether the null station is on-hook
or off-hook in Hook State. For more information, see “Creating null stations” on
page 7-34.
2.
In Call using, select the dialing service used when the user places calls from the phone.
(Null stations do not need this field.) For more information, see “About dialing
services” on page 9-2.
3.
Check Interpret ** as Flash using Intel voice resources to give the user access to the
TeleVantage telephone commands at the external phone. For example, the user could
press **1 to transfer a call. If checked, all calls involving the external station consume
an extra voice resource to monitor for the ** digits. For instructions on calculating
voice resource needs and installing extra voice resources, see Installing Intel
Telephony Components.
If unchecked, a voice resource is not used and the user is not able to use TeleVantage
telephone commands at the external station.
Note: This field does not apply in the same way to SIP phones and should be usually
be left unchecked. See “Configuring a user for a SIP phone” on page 14-10.
4.
Check Disconnect when idle to have TeleVantage hang up the trunk call whenever
the external station enters the Idle state (on-hook/not in a call). This setting overrides
the typical 10-15 second delay before the phone company signals a disconnect to the
other end of a call. Checking the setting can be useful in the following situations:
Q For remote users who hang up one call and immediately place another using
ViewPoint. Such users may find that the new call does not ring their external
station, because TeleVantage still considers the station off-hook. Checking the
setting should solve that problem.
Q For third-party applications that need “disconnect supervision” to detect the
moment a call ends, for example, an IVR Plug-in that records voice messages.
Note that if checked, the station will not return to dial tone after the other party in a
call hangs up.
5.
Click OK.
CHAPTER 7. MANAGING STATIONS
7-11
Other station behavior is configured as for any phone type. See “Assigning and configuring a
user’s station” on page 7-12.
What users need to know about external stations
Chapter 6 of Using TeleVantage contains instructions for using external stations. In general an
external station behaves identically to an internal station. However, users should know the
following:
Q If you checked Interpret ** as Flash for a user (see “Configuring station behavior
(external station)” on page 7-12), you should tell the user to press ** whenever they
would press Flash to use a TeleVantage feature. If you have unchecked Interpret ** as
Flash, you should tell the user that Flash-based telephone commands are not available
for them.
Q Users with non-IP phones must call the office and log in to place outbound TeleVantage
calls from the phone. See Using TeleVantage for instructions.
If the user has problems placing calls from ViewPoint
Users with external stations that connect to an external telephone number (for example, a home
or cell phone) might find that when they hang up their external station and then immediately
place a new call using ViewPoint, their phone does not ring to connect them to the call. This is
due to the typical 10-15 second delay before the phone company sends a disconnect message to
the other end of a call, so TeleVantage believes the external station to be still off-hook. You can
solve this problem by checking Disconnect when idle on the Phone tab of the User dialog box,
which will cause TeleVantage to immediately release the trunk when the caller hangs up. See
“Configuring a user’s external station” on page 7-10.
Assigning and configuring a user’s station____________________
You assign and configure a user’s station using the User dialog box as follows:
1.
Assign the station to the user by entering the Station ID of that station in the User tab.
See “Assigning a station ID” on page 6-13 for details.
2.
Use the Phone tab and subtabs of the User dialog box to configure the station. Different
tabs will be needed for different types of station (analog, digital, and external), as
follows:
Tab
7-12
Phone types
Description
See
Phone tab
All
General phone options
p. 7-13
Phone \ Call
Announcing tab
All
Call screening, announcing, and
forwarding options
p. 7-17
Phone \ External
Station tab
External
External station configuration,
including phone type
p. 7-10
ADMINISTERING TELEVANTAGE
Tab
Phone \ Station
Features tab
Phone \ Caller ID
Display tab
Phone types
Description
See
Phone features, including CLASS
and ADSI analog phone features
and voice-first answering
p. 7-20
Digital
PDN / SDN assignment and
button mapping options
p. 7-24
Analog
Caller ID padding options
p. 7-21
Analog,
External
Phone \ Ring
Patterns tab
All
Custom ring patterns
p. 7-22
Hands-free tab
All
Hands-free answering
p. 7-22
Automatic Log
Out tab
All
Options for after the user logs into
another station
p. 7-23
Note: The user can set most of his or her phone options from ViewPoint as well.
Setting general phone options on the Phone tab
Use the Phone tab in the User dialog box to set general options for a user’s station. The Phone
tab has different options depending on the user’s type of phone (analog, digital, or external).
CHAPTER 7. MANAGING STATIONS
7-13
Setting the number of seconds to ring the phone
In the Ring phone for __ seconds field, enter the number of seconds TeleVantage rings the
user’s extension before proceeding to the next action in the user’s routing list. This option can
also be set in ViewPoint.
Having the station automatically dial when taken off hook
To have the user’s station automatically dial a number whenever it is taken off hook—for
example, to create a hotline phone—enter the number in On offhook, automatically speed dial.
For more information, see “Having a station automatically dial when picked up” on page 7-32.
Using call waiting
To give the user call waiting, check Enable call waiting. If unchecked, when the user is on a
call new calls go straight to voicemail without playing the call waiting beep.
If the user uses ViewPoint’s Call Monitor folder to spot incoming calls, and thus does not want
the audible beep over the phone, check Do not play call waiting beep when using ViewPoint.
The beep will play only when the user is not running ViewPoint.
With analog phones, you can use call waiting in conjunction with multiple line appearances to
control the number of lines. See “Using multiple line appearances for analog phones” on
page 7-14.
Configuring ringback behavior
Check Ring back if the user leaves a call on hold or parked to use TeleVantage’s ringback
feature, which rings the user back if he or she leaves a call on hold or parked for too long. If
checked, enter the Ring back interval in seconds to specify how long TeleVantage waits before
ringing the user back.
Imitating a station on externally routed calls
This section does not apply to external stations.
By default, when calls are routed to a user at a non-external-station remote phone—for example,
when a user sets call forwarding—the user cannot use ViewPoint features on the call or enjoy
any of the benefits of an external station. However, you can check Imitate a station when
routing incoming calls to external numbers to enable those features for a user by having
TeleVantage imitate a station on his or her externally-routed calls. This can enable internal
phone users to have the benefits of an external station when using their mobile or temporary
phones.
Using multiple line appearances for analog phones
If the user has an analog phone, you can use the Enable multiple line appearances field to give
the user extra “lines” for simultaneous incoming calls. When the user is on a call and a new
incoming call arrives on another line, the user hears the call waiting beep and can press Flash
to take the call.
7-14
ADMINISTERING TELEVANTAGE
The multiple line appearances feature makes an analog phone behave similarly to a digital
feature phone with PDNs defined, though without PDN lights on their phone to switch between
calls or the ability to use SDNs. See “Using line appearances” on page 7-29.
Note: These settings apply to the phone only. The user can always take incoming calls visually
using the Call Monitor. See Using TeleVantage.
Use the Enable call waiting and Enable multiple line appearances fields in conjunction as
follows:
Both unchecked
Enable call waiting
checked
Enable multiple line
appearances
unchecked
Enable call waiting
unchecked
Enable multiple line
appearances
checked
Both checked
The user has one line. If the user is on the phone, new
incoming calls go straight to the next step on the user’s
routing list. The user never hears the call waiting beep.
Standard call waiting. The user has two lines—one for
the current call, one for the “call waiting” call. Once both
lines are in use, new incoming calls go straight to the
next routing list step without beeping.
The user has the number of lines that you specify.
When the user is on the phone, he or she hears the call
waiting beep and can press Flash to accept incoming
calls until all the lines are in use. Only when all the lines
are in use do new incoming calls go straight to the next
routing list step without beeping.
The user has an infinite number of lines. New calls
always trigger call waiting and never go straight to the
next routing list step.
A user with active calls on multiple lines can switch between them using the Call Monitor or the
telephone commands, as described in Using TeleVantage.
Dropping station loop current when a call disconnects
Check Drop loop current for __ milliseconds to have TeleVantage briefly interrupt current on
the line whenever the station enters the Idle state (on-hook/not in a call). This setting is useful
if you have a third-party application that needs “disconnect supervision” to detect the moment
a call ends, for example, an IVR Plug-in that records voice messages. With this field checked,
the end of a call causes an interruption of line current that third-party applications should
respond to immediately. You can change the duration of the current interruption from the default
of 1 second by entering a new duration (in milliseconds).
If unchecked, line current is maintained when the station enters the Idle state.
CHAPTER 7. MANAGING STATIONS
7-15
Having digital or SIP stations go offhook when alerted
If the user has a digital station or a SIP phone that supports this feature, you can check
Automatically go off-hook when alerting station to have the station automatically go off-hook
when you used from ViewPoint, for example, when the user clicks to play audio or place a call.
If unchecked, the station rings.
Sending DTMF digits to stations
This section does not apply to digital phones.
Use the Send digits to station field if you are integrating a third-party device with TeleVantage,
such as a fax server or voicemail system. Note that if the device has trouble detecting these
digits, you should change the TeleVantage advanced setting
Artisoft\Server\SendDigitsToStationDelay to 500 to give the device more time to answer the
call before receiving digits. See Appendix J in Installing TeleVantage for details. Also see
Installing TeleVantage for more information about using TeleVantage with third-party devices.
Configuring Flash behavior
This section does not apply to digital phones.
You can use the Flash behavior while in a call field to select what happens when this user
presses Flash (or quickly presses the hook) while on a call. The options are as follows:
Q System default. The user’s behavior is whatever you have chosen as the system-wide
behavior. See “Setting general TeleVantage options” on page 3-3.
Q Menu assisted transfer. Pressing Flash takes the user to the TeleVantage call handling
menu, of which one of the options is transferring the call (for details, see Appendix A of
Using TeleVantage).
Q Direct transfer. Pressing Flash lets the user immediately enter an extension to transfer
the call. Choose this option to create faster, simplified telephone transferring for a user
who answers and transfers many calls. Note that with direct transfer, the user cannot
access Conference or the other commands on the call handling menu unless he or she has
ViewPoint.
The Phone tab for station ID 0
If the user has station ID 0, the Phone tab presents a special display. Do not use this tab to assign
an IP phone to a user. This method of assigning IP phones has been replaced by external stations
(see “Using external stations” on page 7-8). This tab exists as a legacy for IP phones assigned
using previous versions of TeleVantage. If your system has those, you should redefine them as
external stations in order to get the full range of TeleVantage features now available. See
“Automatically upgrading old IP phone users with station ID 0” on page 7-9.
7-16
ADMINISTERING TELEVANTAGE
Configuring call screening, announcing, and forwarding
Use the Phone \ Call Announcing tab in the User dialog box to set call screening, announcing,
and forwarding options for the user’s phone.
Announcing who the call is for
With Announce who the call is for checked, when the user picks up the phone he or she hears
a recorded message that says “Call for,” followed by the name of the user being called. This
setting is useful when users are sharing a station.
Customizing or turning off call announcing
Call announcing allows the user to screen callers using their telephone. When the user answers
his or her phone, TeleVantage plays, “Call from,” followed by the name of the caller. The user
can then accept or decline the call (see Using TeleVantage for detailed instructions).
Under Screen and announce the caller for these types of calls, choose any of the following:
Q Internal. Calls from other TeleVantage users.
Q External. Calls from external callers who reached the auto attendant (including those
transferred to the user by another user).
Q External Direct. Calls from external callers who dialed the user’s DID number.
To turn call announcing off for a type of call, uncheck it for that type. With call announcing
turned off, the user is connected directly to the caller when he or she answers the phone.
Other call announcing options
Use the following options in conjunction with call announcing:
Q Ask callers without a voice title for their names. By default, if call announcing is
turned on, contacts and users without voice titles are prompted to say their names. When
you pick up the phone, you hear, “Call from,” followed by what they say. If you uncheck
this field, callers are not prompted to say their names.
With this field unchecked, when you receive a call from a caller without a voice title you
will hear either “Call from internal user,” “Call from external caller,” or “Call from
contact,” depending on the caller.
Q If Caller ID is present, do not ask for their name. If checked, incoming callers with
Caller ID are not prompted to say their names. This is a useful setting if you have a phone
CHAPTER 7. MANAGING STATIONS
7-17
with a Caller ID display. You can skip asking the caller for a name if you can see on your
Caller ID display who is calling.
If unchecked, all callers without voice titles are prompted to say their names.
Q Announce who is transferring. Check this option if you want to hear the name of the
person transferring a call to you. For example, if checked, you would hear “Helen Shire
is transferring a call from Shane West.” To announce who is transferring, you must have
call announcing turned on for internal calls. If it is not turned on, you are connected
directly to transferred calls.
Forwarding the user’s calls
Click Call Forwarding on the Phone \ Call Announcing tab to forward the user’s calls. The Call
Forwarding dialog box opens.
To forward the user’s calls, do the following:
1.
Check Forward calls.
2.
Select the type of forwarding destination in the list below.
3.
Enter the forwarding extension or phone number. For external numbers, select the
dialing service to use from the Call Using dropdown list.
For an explanation of Attempt Centrex/PBX transfer, see “Forwarding calls over Centrex/PBX
trunks” on page 7-19.
You can also set the following call forwarding options:
Q Call number for __ seconds. Determines for how long a call rings at the forwarded
phone before proceeding to the next step on the user’s routing list (usually voicemail).
If the option Prompt recipient for password or Prompt recipient to accept or decline
call is checked (described below), you must allow at least 30 seconds. Otherwise the call
might be sent to voicemail before the user finishes listening and responding to the
prompts.
7-18
ADMINISTERING TELEVANTAGE
Q Prompt recipient for password. If checked, the person who picks up the phone hears,
“Call for <the user’s voice title>. Please connect me.” To be connected to the caller, the
recipient must enter the user’s TeleVantage password. Choosing this option ensures that
only users can receive their forwarded calls.
This option is used only when calls are forwarded to an external number and the user has
a voice title recorded.
Q Prompt recipient to accept or decline call. If checked, when the user picks up the
phone, TeleVantage announces the caller (“Call from”) and intended recipient (“Call
for”) and offers the option to accept or decline the call. Declined calls proceed to the next
step in the user’s routing list, usually voicemail.
Note: When you forward calls to a mobile phone, make sure that you check Prompt
recipient to accept or decline call. See the next section, “Mobile phone issues with
forwarded calls.”
Q Select Ignore call rules and use Standard routing list if you want to sends all of the
user’s incoming calls to the forwarded phone. This setting disables the user’s call rules
and uses the Standard routing list for all calls. See Using TeleVantage for an explanation
of routing lists and call rules.
Leaving this field unchecked keeps the user’s active routing list and call rules in effect,
which means that some calls might ring elsewhere than the forwarded phone.
Mobile phone issues with forwarded calls
Calls to a mobile phone are picked up by the mobile phone company first and then passed to the
individual phone. When TeleVantage detects the first pickup, it stops proceeding down the
routing list, whether or not anyone has actually answered the mobile phone. For this reason,
when forwarding calls to a mobile phone, always check Prompt recipient to accept or decline
call. TeleVantage then relies on user input to signal a connection. TeleVantage proceeds down
the routing list unless someone explicitly accepts the forwarded call.
Call forwarding and voicemail
If a forwarded call is not answered, it is sent to the user’s voicemail.
To completely transfer a user’s calls to another user's phone, so that the other user receives
voicemail as well as the calls themselves, do not use call forwarding. Instead, use ViewPoint to
create a routing list whose final (and only) action is Transfer to Extension, and make it the user’s
active routing list. See Using TeleVantage.
Forwarding calls over Centrex/PBX trunks
In certain circumstances you can use the option Attempt Centrex/PBX transfer when forwarding
calls to external numbers, which economizes TeleVantage trunk usage. You can use this option
if your Server has either of the following:
Q Centrex trunks
Q ISDN trunks with Two B-Channel Transfer enabled
Q A connection to an external PBX
CHAPTER 7. MANAGING STATIONS
7-19
Q A connection to a SIP/PSTN Gateway device
Q A connection to another TeleVantage Server via a H.323 Gateway
If this option is checked when a trunk call would be forwarded to an external number,
TeleVantage attempts to have the carrier create a direct transfer from the origin number to the
external forwarding number, thus saving two TeleVantage trunks.
Example: A call is forwarded between three TeleVantage Servers using H.323 Gateways as
follows: it starts on Server A, goes to Server B, and is forwarded to Server C. With Centrex/PBX
transfer, TeleVantage automatically simplifies the path to a direct connection between Servers
A and C, thus saving trunk usage on Server B. For more information on H.323 Gateways, see
“Connecting two Servers using H.323 Gateways” on page 15-39.
If the requirements for Centrex/PBX transfer are not present—for example, on a normal analog
trunks—TeleVantage forwards the call to the external number in the usual way, using a second
trunk.
Note: When a call is routed out using a Centrex/PBX transfer, TeleVantage loses control of it
and cannot send it to subsequent steps on the user’s routing list. For example, after a call is
transferred using Centrex/PBX, it does not go to voicemail.
Note: Centrex/PBX transfer is never used in the following situations: supervised transfers,
transferring a conference call, routing from a workgroup, or transfers involving call center agents.
This option is also available when specifying external phone numbers in a user’s routing list.
See Using TeleVantage.
Setting an analog station’s special features
Certain analog telephones used as internal stations support special features, known as CLASS
and ADSI features. Not all analog phones support all features. For a list of phones that have
these features, see Installing TeleVantage. If a user has a phone that supports one or more of
these features, you activate them on the Phone \ Station Features tab.
Note: For external stations, only the Stutter dial tone field is available on this tab.
Check any of the following features that are supported on the user’s phone:
Q Analog phone type. For most analog phone types, select Standard. If the user is using
an Aastra Powertouch or Cybiolink phone, select that phone type instead.
Note: You must be using an Aastra Powertouch or Cybiolink phone, and have selected
it here, to use voice-first answering, paging, or intercom while on-hook. However, if your
regular analog phone is off-hook and in hands-free mode, you can use these features too.
7-20
ADMINISTERING TELEVANTAGE
Q Caller ID. TeleVantage sends Caller ID name and phone number to the user’s phone on
an incoming call, along with the date and time of the call. Caller ID is sent for
TeleVantage users and external callers, as well as for contacts who can be identified by
TeleVantage. TeleVantage may also send “P”, indicating a private call, or “O”,
indicating an out of area call.
Q Caller ID on call waiting. TeleVantage delivers Caller ID information while the user is
on another call, so that the user can decide whether or not to accept the incoming call.
When this option is used, the first call waiting beep is a different tone than the second
beep, because the first beep is a special ADSI Alert Tone. You can change the volume
of the first beep by modifying the registry key DXCH_ADSIALERT_AMPL. See
Appendix J of Installing TeleVantage.
Q Message waiting indicator. TeleVantage notifies the user when a new voice message
is received by activating the message waiting indicator on the user’s phone.
Q Stutter dial tone. TeleVantage alerts the user to the existence of unheard messages via
a stutter dial tone when the user picks up the phone.
Q Voice-first answering. Enables voice-first answering. With voice-first answering,
internal calls are connected to the user’s speakerphone automatically without the phone
ringing or needing to be picked up. All external callers ring the phone as normal.
To use this field, voice-first answering must be enabled at the system level (see “Setting
general TeleVantage options” on page 3-3), and the user must have selected Aastra
Powertouch or Cybiolink under Phone Type above. Voice-first answering is also
available if your analog phone is in hands-free mode.
Setting a digital station’s special features
The Phone \ Station Features tab for digital phones is described in “Configuring digital stations”
on page 7-24.
Configuring an analog phone’s Caller ID display
Use the Phone \ Caller ID Display tab to specify how TeleVantage extensions appear in an
analog phone’s Caller ID display.
For internal calls, TeleVantage sends the user's extension as Caller ID. Some Caller ID displays
cannot handle Caller ID strings of less than 10 digits. Check Pad extensions when sent as
Caller ID to add digits to a short string so the phones display extensions correctly. Choose the
following padding options:
Q Padding position. Choose one of the following:
Q Before extension. Add digits before the extension with the padding character you
select, for example, *******186.
Q After extension. Pads after the extension, for example, 186*******.
Q Padding character. Type the character used to fill padding spaces, for example, “*”.
CHAPTER 7. MANAGING STATIONS
7-21
Configuring a phone’s ring patterns
Use the Phone \ Ring Patterns tab to customize ring patterns for the phone. You can set different
ring patterns for Internal calls and External calls.
Configuring a station for hands-free answering
This section applies to all phone types (analog internal and external stations, and digital phones).
Use the Phone \ Hands-free tab to enable hands-free answering for the user, a feature which is
especially helpful for headset and speakerphone users. Using hands-free answering, a user can
leave his or her phone off-hook and still receive, place, and end calls. The dial tone does not
play, and the phone does not ring. When an incoming call arrives, a beep plays to notify the user,
then the call is connected. (For complete instructions on working in hands-free mode, see Using
TeleVantage).
Note: If you are using a BCP Connection Panel with stations 1 through 4 in hands-free mode,
and the Server goes down, the Dialogic BCP Panel’s Watchdog mode will be prevented from
restoring phone service to those stations. For more information about Watchdog mode, see
Installing Intel Telephony Components.
To enable hands-free answering for the user
1.
On the Phone \ Hands-Free tab, check Enable hands-free answering. If unchecked,
hands-free answering is turned off and the user’s phone behaves normally.
2.
To allow dialing while using hands-free answering, check Allow dialing in hands-free
mode. If checked, the user can place calls by dialing them. If unchecked, the user must
press Flash first to get a dial tone, then dial the call.
Note: This option requires the system to dedicate a voice resource for each user for
whom it is checked. To see your system voice resource availability and current use, see
“Viewing TeleVantage performance counters” on page 12-35. For more information
regarding voice resource use, see Installing Intel Telephony Components.
3.
In Dial tone duration before going silent, enter the length of time in seconds that you
want the dial tone to play after a call ends. To end a hands-free call, the user presses
the Flash button or hangs up, and then waits for the phone to go off-hook again.
During this time the user hears a dial tone. This setting allows you to control whether
or not the user hears a dial tone for a specific amount of time before returning to
off-hook status after disconnecting from a call. The default setting is 0, meaning that
dial tone is not played at all after a call ends.
Changing the hands-free answering beep
You can change the beep that signals an incoming call during hands-free mode, by replacing or
re-recording the sound file HandsFreeBeep.vox, located by default in C:\Program
Files\TeleVantage Server\Vfiles.
7-22
ADMINISTERING TELEVANTAGE
Creating an overhead paging system with hands-free answering
You can create a paging system by connecting a hands-free extension (at which hands-free
answering is enabled) to an overhead speaker. To broadcast an announcement over the paging
system, dial the extension. With hands-free answering, the call is connected without the need to
lift a receiver, so you are connected immediately to the speaker. The zip tone plays over the
speaker to signal the beginning of your announcement.
Configuring a user’s automatic station log out time
This section applies to all phone types (analog internal and external stations, and digital phones).
If the user has logged in at another user’s workstation—using either ViewPoint or the telephone
commands—the setting on the Phone \ Automatic Log Out tab determines how much inactive
time elapses before the user is automatically logged out and the station is reset to its default user.
This feature is useful if a roaming user walks away from a phone without logging out. Enter the
number of minutes in Automatically log out of other user’s stations after __ minutes of
inactivity.
All calls are written to the Call Log according to the user logged in at the station, so a user can
log in anywhere in the office and make calls that are logged correctly under his or her name.
Calls from the station continue to be logged under the visiting user’s name until one of the
following happens:
Q The visiting user logs out, either by pressing *00 at the dial tone or by choosing File >
Exit and Log Off in ViewPoint. This resets the station to its default user.
Q Another user logs in to the station using ViewPoint or telephone commands. This resets
the station to the new user.
Q The amount of time specified in Automatically log out of other user’s stations after
__ minutes of inactivity is exceeded. This resets the station to the default user. Inactivity
is defined as any time except during active calls (inbound or outbound) and when
telephone commands are used that require entering a password (for example, logging
into the phone to listen to voicemail). All other station activity, such as picking up the
phone and dialing *14, or using ViewPoint to play a voice message over the station,
count as inactivity.
Note: Incoming calls for other users, such as calls forwarded to the station, do not count
as activity even if they are answered.
Uncheck Automatically log out of other user’s stations after __ minutes of inactivity to
prevent resetting the station after any amount of inactivity.
CHAPTER 7. MANAGING STATIONS
7-23
Configuring digital stations_________________________________
A variety of proprietary digital phones from Avaya, Nortel, Siemens, NEC, and Toshiba are
supported by TeleVantage and contain several features that are useful for TeleVantage users.
Some features are built in to the phone’s fixed buttons. Others are available by configuring the
phone’s programmable buttons. See Installing TeleVantage for a complete list of supported
phones.
With a supported digital phone you can do the following:
Q Use line appearances to handle multiple calls simultaneously, and share lines between
phones. See “Using line appearances” on page 7-29.
Q Map the phone’s programmable buttons to additional TeleVantage commands. See
“Mapping programmable buttons to TeleVantage commands” on page 7-28.
Digital phones that lack buttons
On digital phones without a Hold button, Spkr button, or Cnf/Trn button, you can make those
features available by mapping them to one of the programmable buttons. See “Mapping
programmable buttons to TeleVantage commands” on page 7-28.
On digital phones without a message waiting indicator, TeleVantage illuminates the LED
associated with the Access Voice Mail feature key to show new voice messages.
Configuring a user’s digital feature phone
When a user’s station ID corresponds to a digital feature phone, the Phone \ Station Features tab
of the User dialog box presents special options for configuring the phone.
Note: Digital feature phone users can configure the same settings using the Phone tab of
ViewPoint’s Option dialog box. They cannot, however, configure SDNs using ViewPoint.
7-24
ADMINISTERING TELEVANTAGE
Configure digital phone features as follows:
Q To configure a phone button, click its Button number in the list, then select a feature
from the dropdown list in the Feature column.
If you select Access Voice Mail, Speed Dial, Primary Directory Number, Secondary
Directory Number, or Set Personal Status in the Features list, see the following
sections for instructions.
To find which button on a phone corresponds to a button number in TeleVantage, press
the buttons on the phone. The TeleVantage button number displays in the phone’s LCD
display for unassigned buttons.
Note: On the T-series Norstar phone, button settings you make in TeleVantage apply to
that button plus one on the phone. For example, if you assign Speed Dial to button 1,
press button 2 on the phone for Speed Dial. Button 1 on the T-series Norstar is reserved
for speakerphone use.
Q LCD idle message. Enter the message that you want to appear on the first line of the
LCD display when the phone is not in use. The last line shows the current day and time.
The idle message usually shows the user name and extension for the phone.
Q Ring volume. The slider bar adjusts the default ring volume for the phone. Note that
pressing the phone's volume up and volume down buttons has the same effect as using
the slider bar to change the ring volume of the phone.
Note: For DSI digital phones, ring volume is controlled locally and not by this
TeleVantage setting.
Q Use voice-first answering. Enables voice-first answering. With voice-first answering,
internal calls are connected to the user’s speakerphone automatically without the phone
ringing or needing to be picked up. All external callers ring the phone as normal.
To use this field, voice-first answering must be enabled at the system level (see “Setting
general TeleVantage options” on page 3-3)
Q Pickup answers a ringing SDN. If checked, when an SDN rings, picking up the phone
connects you immediately to the call. If unchecked, to connect to a ringing SDN call you
must pick up the phone, then press the SDN.
When PDNs ring, picking up the phone always connects you to the call.
CHAPTER 7. MANAGING STATIONS
7-25
Setting Speed Dial parameters
If you select the Speed Dial feature and click the button in the Parameter column, the Speed
Dial window opens.
Do any of the following:
Q To speed-dial an extension, click Extension and select an extension from the dropdown
list. To have Speed Dial buttons light up when the target user is in a call, see “Enabling
digital phone Busy Lamp Field for the system” on page 7-31.
Q To speed-dial an outside number, click Phone number, select the number used to get an
outside line in the Call using field, and then enter the phone number that you want to
dial in the Number field.
Q To speed-dial a custom dial string, click Direct Dial and enter the string to be dialed.
Direct Dial lets you enter dial sequences to navigate prompts, for example TeleVantage
telephone commands beginning with *.
Click OK when done.
7-26
ADMINISTERING TELEVANTAGE
Setting Secondary Directory Number parameters
If you select the Secondary Directory Number (SDN) feature and click the button in the
Parameter column, the Secondary Directory Number dialog box opens. For general information
on SDNs, see “Using SDNs” on page 7-30.
In the Select station to monitor list, select a user for the SDN. If you check Ring this phone
when the extension is called, you can set your phone to either ring immediately, or specify the
number of seconds to wait before ringing. You can also select a specific Ring pattern to
distinguish incoming SDN calls from other calls.
Note: Setting the SDN to ring is not the same as having the phone connect to the call
immediately when picked up. For immediate connection, check Pickup answers a ringing SDN
on the Phone tab.
Setting personal status parameters
If you select the Set Personal Status feature, click the Parameter column to select the personal
status to attach to this button.
The button functions as a toggle that switches your personal status between the personal status
selected and “Available.” You cannot assign custom personal statuses to feature phone buttons.
To set custom personal statuses, you must use the telephone commands or ViewPoint.
Setting Access Voice mail parameters
If you select the Access Voice Mail feature, the default behavior connects to the voice mail
account of the user currently logged in to the phone. You can click the Parameter column to
select a different user.
CHAPTER 7. MANAGING STATIONS
7-27
Mapping programmable buttons to TeleVantage commands
Several TeleVantage commands are available to be mapped to a digital feature phone’s
programmable buttons. The user can press the button to activate the command. For instructions
on mapping a button to a TeleVantage feature, see “Configuring a user’s digital feature phone”
on page 7-24.
The following TeleVantage features are available:
Feature
Description
Access Voice Mail
Connects the user to his or her TeleVantage
voicemail account or that of another user.
Account Code
Lets the user enter an account code for the call
using their telephone keypad.
Call Forwarding
Forwards the user’s calls to a fixed destination
configured for that button. Pressing the button
also configures the call forwarding number.
Call Menu
Connects the user to the telephone commands’
call handling menu, enabling transfer,
conferencing and more.
Cnf/Trn
Conferences or transfers the call.
Do Not Disturb
Selects the Do Not Disturb personal status,
sending all calls directly to voicemail. Pressing it
again makes you Available.
7-28
Flash
Performs a trunk Flash command, required for
Centrex transfers.
Hold
Puts the caller on TeleVantage hold.
Park/Unpark
Parks the call so it can be retrieved from any
phone, or unparks a parked call.
Phone Page
Performs the *15 command to place a page or
intercom call.
Record Call
Begins recording the call. Pressing it again stops
recording the call.
Redial
Redials the last call received.
Release
Disconnects the call. Note that if another line
appearance is ringing, hanging up the phone will
connect that line, so Release gives the user a way
to hang up without taking the new call.
Send to Voice Mail
Sends the call to the user’s voicemail.
ADMINISTERING TELEVANTAGE
Feature
Description
Set Personal Status
Sets the personal status of your choice. Click the
Parameter column to select the personal status
you want. The button toggles between that
personal status and “Available.”
Speaker
Allows the user to use the speaker option on a
phone without a Spkr button.
If your phone already has a Spkr button, do not
map this command to a button. Two speaker
buttons can conflict with each other.
Speed Dial
Places a call to the number configured for that
button. Also lets you set the speed dial number.
If you have enabled Busy Lamp field for digital
phones, Speed Dial buttons light up when their
target user is on a call. See “Enabling digital
phone Busy Lamp Field for the system” on
page 7-31.
Take Call
Answers a ringing call or connects to a call you
are screening.
Using line appearances
Line appearances allow the digital feature phone to handle multiple simultaneous calls, with
each “line” mapped to a programmable button. For example, if a user is on a call on Line 1, an
incoming call might ring Line 2, and the user can press button #2 to put the first call on hold and
answer the new call. The user can have calls on hold on multiple lines and switch between them
simply by pressing the buttons.
A user can have as many line appearances as there are programmable buttons on his or her
phone.
There are two types of line appearances:
Q Primary Directory Numbers (PDNs). These are extra lines for the user.
Q Secondary Directory Numbers (SDNs). These are lines that are mapped to another
user’s phone, so that the line is shared between them. When a call is on the line, either
user can pick up.
For instructions on configuring line appearances, see “Configuring a user’s digital feature
phone” on page 7-24.
CHAPTER 7. MANAGING STATIONS
7-29
Using PDNs
A digital feature phone button set to a PDN gives the user an extra line with which to place or
receive calls. When an incoming call arrives while the user is on the phone, the call rings the
next available PDN. To answer the incoming call, the user can press that PDN button. The
previous call is put on hold.
Using TeleVantage call waiting in conjunction with PDNs gives the user an unlimited number
of lines. Once all PDN lines are in use, a new incoming call causes the call waiting beep to
sound, and the user can press the call menu feature button to take the call. The user can continue
to add new calls in this manner, and can switch between them using ViewPoint or the telephone
commands.
Note: When the user places outbound calls, the highest-numbered available PDN is used.
When incoming calls arrive, the lowest-numbered available PDN is used. This provides a visual
cue when multiple calls are being handled.
A user can add PDNs to his or her digital feature phone using ViewPoint.
Using SDNs
A feature phone button set to an SDN is mapped to another user’s phone, giving them both
access to the line. When a call comes in to the target user’s phone, both that phone and the SDN
ring, and either user can pick up. Any number of different users can have SDNs mapped to the
same phone, and they will all have access to the line.
Example: An administrative assistant has an SDN mapped to her boss’s phone. When a call to
the boss comes in, it rings both the boss’s phone and the assistant’s SDN. The assistant can
answer and screen the call and put it on hold. The assistant can then let her boss know who is on
that particular line, and the boss can take the call simply by picking up the phone and pressing
the PDN light corresponding to the call on hold.
SDNs can be set using the Administrator only.
When assigning SDNs to a phone, you should match the same number of PDNs on the target
phone, or you will miss calls on that phone. For example, if the target phone has active calls on
two PDNs, and you only have one SDN mapped to that phone, you will only have access to one
of the two calls. Even when mapping to a single-line phone, you should create at least two or
three SDNs, because TeleVantage permits multiple calls on hold.
Note: If there are insufficient SDNs to cover a target phone’s PDNs, the SDNs cover the
highest-numbered PDN buttons. For example, if there are two SDNs mapped to a phone with
three active PDN lines on buttons 1, 2, and 3, the SDNs will pick up the calls on buttons 1 and 2.
When a user makes outbound calls on an SDN line, the user’s own TeleVantage dialing
permissions are used.
7-30
ADMINISTERING TELEVANTAGE
Silencing the soft ring on new calls when you’re on the phone
By default, when a new incoming call arrives to an available PDN or SDN while you’re on the
phone, the phone emits a soft ring. You can silence this ring system-wide, affecting all digital
feature phones, by setting the following registry setting to 0:
HKEY_LOCAL_MACHINE\SOFTWARE\Artisoft\TeleVantage\Server\
Settings\Dkt\CallWaitingInterval
Enabling digital phone Busy Lamp Field for the system
TeleVantage supports Busy Lamp Field (BLF) on all supported digital phones, but to use it you
must enable it for the TeleVantage system.
With BLF enabled, digital phone buttons assigned to Speed Dial a user light up when the target
user is on a call. Digital phone users can then see at a glance whether their Speed Dial targets
are available to take calls.
The light illuminates only when the target user is on a call; it does not illuminate for other types
of TeleVantage unavailability such as Do Not Disturb. The Speed Dial target must be a
TeleVantage user or H.323 Gateway user. BLF does not work with Speed Dials aimed at
non-user targets such as queues or auto attendants.
For instructions on assigning a digital phone button to a Speed Dial command, see “Mapping
programmable buttons to TeleVantage commands” on page 7-28.
Enabling BLF
You enable BLF for the system as a whole, not for individual digital phones. To enable it, add
the following registry setting as a DWORD value set to 1:
HKLM\Software\Artisoft\TeleVantage\Server\Settings\Dkt\SpeedDialMonitor
You must restart the TeleVantage Server for the change to take effect.
To later disable BLF, either delete the registry setting or set it to 0. This also requires a
TeleVantage Server restart.
Configuring Speed Dial and Call Forwarding on the phone
Users can configure their Speed Dial and Call Forwarding settings using only the feature phone
buttons, as follows:
To set a Speed Dial number from the phone:
1.
Press Redial.
2.
Press the Speed Dial button that you want to set. The LCD (if you have one) says,
"Enter Number:"
3.
Enter number to be speed-dialed.
4.
Press Redial.
CHAPTER 7. MANAGING STATIONS
7-31
To set a Call Forwarding number from the phone:
1.
Press Redial.
2.
Press the Call Forwarding button that you want to set. The LCD (if you have one) says,
"Enter Number:"
3.
Enter the call forwarding number.
4.
Press Redial.
Configuring stations for special use _________________________
This section describes special station configurations for phones other than normal user phones.
Setting up conference room, fax, or area phones
All stations must be assigned to a user, even phones that are not associated with an individual in
the workplace, such as a conference room phone. To represent such phones, create placeholder
users called “Conference Room 1,” “Mail Room,” ““Sales Fax Machine,” and so forth, and
assign the stations to them.
Having a station automatically dial when picked up
You can configure a station to automatically dial a number whenever it comes offhook. You
might want this feature in the following situations:
Q A lobby or waiting-room phone that automatically calls the Operator.
Q A hotline phone that calls a key person, like the company president.
Q Phones that call an IVR Plug-in. You can use this feature to set up information kiosk
phones that play messages in response to caller questions.
You can configure the station to dial any TeleVantage extension or external number.
To configure a station to automatically dial when picked up
1.
In the TeleVantage Administrator, go to the Users view and double-click the user
whose station you want to configure.
If the station you want to configure is shared by more than one user, double-click any
of those users.
2.
In the User dialog box, click the Phone tab.
3.
Check On off-hook, automatically speed dial.
If unchecked, the station does no automatic dialing when taken offhook.
7-32
ADMINISTERING TELEVANTAGE
4.
Click
5.
Select or enter the number to automatically dial whenever the phone is taken offhook,
as follows:
to open the Speed Dial dialog box.
Q To choose an extension, click Extension and select the extension from the
dropdown list.
Q To choose an external number, select the dialing service to use from the Call Using
dropdown list, then enter the number in the Number field.
6.
Click OK to close the Speed Dial dialog box.
7.
Click OK to close the User dialog box.
Requiring user logon before a station can place external calls
You might want the area phones in your office—for example, phones in lobbies or conference
rooms—to be unable to place calls unless a TeleVantage user logs in. Unauthorized people
would then be unable to place external, perhaps long-distance calls from your office, and you
would also ensure that all calls from those phones appeared in the Call and Trunk Logs with the
name of the users who were authorized to dial them.
To require logon before placing calls
1.
Create a Role called, for example, “Area Phones.” Set the permission Place external
calls from a station to “Disallow.” See “Managing roles” on page 6-46.
2.
For each area phone in your office, create a placeholder user named after the phone,
for example, “Conference Room 1,” “Waiting Room,” and so forth. Give each
placeholder user the station ID of the corresponding area phone. Assign the
placeholder users the “Area Phones” role only. See “About adding users” on
page 6-2.”
CHAPTER 7. MANAGING STATIONS
7-33
The area phones now cannot place external calls unless a TeleVantage user logs on. The
following optional steps prevent the area phones from placing internal calls as well without user
logon:
3.
Create an auto attendant whose only menu choice is the User login action. Uncheck
Process all other digits as user extensions. See “Setting up an auto attendant” on
page 10-6.
4.
Double-click each placeholder user to edit it. On the Phone tab, enter the auto
attendant’s extension in On offhook, automatically speed dial.
After completing steps 3 and 4, the area phones are configured so that when someone picks one
up, he or she is automatically connected to an auto attendant at which logging on is the only
option. To place calls, users would pick up the phone, dial the auto attendant’s key for logon (by
default #), followed by their extension and password, followed by #, then the number they want
to dial.
Changing the offhook alert audio
You can change the alert prompt and tone played when a stations is left offhook for too long.
See “Changing the offhook alert audio” on page 13-13.
Creating null stations
By using the external station feature you can define null stations, which are TeleVantage
stations that do not have a physical phone. Null stations can be used in the following ways:
Q As a placeholder when creating a user’s external station, if you do not know the remote
number that the user plans on using for the external station. The user can then finish
setting up the external station by configuring the phone in ViewPoint (see Chapter 6 of
Using TeleVantage).
Q As a virtual station required by a custom Client API application to perform call control.
Custom applications based on the Client API require a station to perform call control,
which normally would require a physical station port and phone. By defining a null
station you can satisfy the needs of the Client API application without using a physical
phone.
To define a null station
7-34
1.
Make sure there are available, unassigned external stations as described in “Defining
the number of external stations” on page 7-8.
2.
Create a user (see Chapter 6).
3.
On the User tab of the User dialog box, assign the user the station ID of an unassigned
external station. You can see which stations are available by looking at the Device
Monitor (see “Using the Device Monitor view” on page 12-3).
4.
On the Phone tab, click the Destination dropdown list and select “None.”
ADMINISTERING TELEVANTAGE
5.
From the Hook state dropdown list on the Phone tab, specify the hook status of the
null station. For users set this to on-hook. For Client API applications, you should set
this to off-hook, which makes it act just like a station off-hook in hands-free mode, so
all calls sent to the extension are immediately answered.
6.
Click OK.
CHAPTER 7. MANAGING STATIONS
7-35
CHAPTER 8
CHAPTER 8
MANAGING WORKGROUPS
CHAPTER CONTENTS
About Workgroups . . . . . . . . . . . . . . . . . . . . . . . . . . . . . . . . . . . . . . . . . . . . . . . 8-2
Creating a Workgroup . . . . . . . . . . . . . . . . . . . . . . . . . . . . . . . . . . . . . . . . . . . . . 8-4
About Workgroups _______________________________________
A workgroup is a group of related extensions or contacts. With TeleVantage workgroups you
can do the following:
Q Place or pick up calls to a group of users. You can direct calls to a workgroup so that all
phones (including external stations) in the workgroup ring simultaneously, and the first
to answer receives the call. Users in a workgroup can also use the *99 telephone
command to answer any ringing phone in their workgroup.
Note: To call workgroups using methods other than simultaneous ring, create a user
with a routing list that calls the members of the workgroup using top down, round robin,
or other methods. Or, for full call center support, see the TeleVantage Call Center
Administrator’s Guide.
Q Enable the *91 and *99 commands to work with trunk-connected phones, such as IP
phones.
Q Organize groups of extensions for display in ViewPoint’s Extensions view, making it
easier for users to locate an extension for calling or transferring calls.
See Using TeleVantage for instructions on placing calls, routing calls to workgroups, and using
the Extensions view.
Public and personal workgroups
TeleVantage provides two types of workgroups: public and personal.
Public workgroups are visible to all TeleVantage users. Only public workgroups can have
extensions, so they can be dialed from any phone. Likewise, the *99 telephone command only
works with public workgroups. Administrators and users with the appropriate permissions can
create public workgroups. Public workgroups are managed in the Administrator.
Personal workgroups created by users to easily locate a group of related extensions in
ViewPoint’s Extensions list. A personal workgroup is visible only to the user who created it and
cannot have an extension. Personal workgroups do not have extensions. Personal workgroups
are managed in ViewPoint (see Using TeleVantage).
Benefits of using workgroups
TeleVantage workgroups offer the following benefits:
Q The process of finding an individual to take calls or to join a conference call is easier,
because the Extensions view in ViewPoint can be filtered by workgroup.
Q Auto attendants, queues, contacts, or IVR Plug-ins can be added to a workgroup (for
informational purposes) and viewed in the Extensions view.
Q Contacts can be added to workgroups for caller identification via call rules (see Using
TeleVantage).
Q Any public workgroup member can pick up a ringing call within the workgroup by
dialing *99.
8-2
ADMINISTERING TELEVANTAGE
Q Calls to a workgroup simultaneously ring the phones (including external stations) of all
the users who are members of that workgroup. IVR Plug-ins, auto attendants, queues,
and contacts who are members of that workgroup are not called. Public workgroups can
be called by their extension numbers or via ViewPoint. Private workgroups can only be
called via ViewPoint.
Q When workgroup members set their personal statuses to Do Not Disturb (see
Using
TeleVantage) their phones do not ring when the workgroup is called.
Note: The TeleVantage Advanced Setting Server\UseGroupMemberDNDSetting
governs workgroup call behavior to shared stations: whether one user’s Do Not Disturb
setting prevents workgroup calls to that user only, or the station as a whole. For more
information, see Appendix J of Installing TeleVantage.
Q When workgroup members forward their calls internally (see Using TeleVantage), calls
to the workgroup ring at the number to which calls are being forwarded.
Workgroups view
To add, edit, and delete public workgroups, click Workgroups in the view bar to open the
Workgroups view:
CHAPTER 8. MANAGING WORKGROUPS
8-3
Creating a Workgroup _____________________________________
To create a public workgroup, choose File > New > Workgroup and enter information on the
tabs in the Workgroup dialog box, as follows:
8-4
1.
On the General tab, enter the Name of the workgroup and at least one member. You
can optionally add a note about the workgroup in the Description field.
2.
To add members to the workgroup, select names from the list of Available extensions
and click Add. To select multiple names, hold down CTRL while clicking.
3.
Use the arrows next to the Members list to arrange the order of the members. The order
in which the names appear can be used in conjunction with a user who has a routing
list that calls the members of this workgroup in a “top down” or “round robin”
sequence (for more information about routing lists, see Using TeleVantage). You can
also use the Remove button to delete members from the list
ADMINISTERING TELEVANTAGE
4.
To give the workgroup a number so that it can be dialed using the telephone, click the
Dialing tab. All of the information on the Dialing tab is optional. Use the following
sections to configure dialing for this workgroup.
Calling, paging, or picking up calls from workgroups
Assign an Extension number that callers can dial to reach the workgroup. For more information
about extension requirements and restrictions, see “Assigning an extension” on page 6-12.
When no extension number is entered, the workgroup can be called using ViewPoint, but not
from the auto attendant or telephone, and users cannot use the paging option (*15).
Assigning a DID number to a workgroup
You can assign a DID number to a workgroup from the block of numbers provided by your
telephone company. When TeleVantage recognizes this number as the final digits on an inbound
call, the caller is automatically connected to this workgroup, bypassing the main auto attendant.
To assign multiple DID numbers to a workgroup, separate each number by a comma (,). For
more information about DID, see “Telephone company services that help TeleVantage” on
page 5-5.
Recording a voice title for a workgroup
You can give the workgroup a voice title, which is played to callers whenever they select the
workgroup from the dial-by-name directory. The voice title should be recording of just the
workgroup’s name, for example, “Sales Department.” See “Using the audio controls” on
page 2-10.
CHAPTER 8. MANAGING WORKGROUPS
8-5
Listing the workgroup in the dial-by-name directory
If you have recorded a voice title, check List in dial-by-name directory to list the workgroup in
your company’s dial-by-name directory and play the workgroup’s extension when the extension
number is dialed after the time limit has expired for the phone to ring.
When no one answers a call to a workgroup
Calls to the workgroup’s extension ring the phones of all users in the workgroup. As an option,
you can set a time limit for how long such calls can ring unanswered. If the time limit is
exceeded, TeleVantage transfers the call to an extension of your choice. If you do not choose
this option, calls to the workgroup continue to ring all users’ phones until the call is answered
or the caller gives up.
To set a time limit for ringing on calls to the workgroup
1.
Check Limit the time that calling this workgroup will ring all users’ phones.
2.
In Ring time in seconds, enter how long calls can ring unanswered before being
transferred.
3.
In If no answer, transfer, select the extension to which TeleVantage transfers
unanswered calls.
Note: The extension you specify is also the workgroup’s personal Operator. If the workgroup is
used for dial restrictions in an auto attendant, callers who dial 0 at the auto attendant are
transferred to the If no answer, transfer extension.
Associating the workgroup with an Organization
Check Organization and select an Organization to have calls to this workgroup logged with that
Organization. Calls must end at the workgroup to be logged with the selected Organization. If
the call proceeds to a user, it will be logged with the user’s Organization. For more about
Organizations, see “Using Organizations” on page 11-2.
Limiting the number of simultaneous rung phones
You can use the advanced setting \Server\SimultaneousRingLimit to limit the number of
phones that can be rung simultaneously to prevent ringing of very large workgroups, for
example, with hundreds of phones. For instructions on using Advanced Settings, see Appendix
J of Installing TeleVantage
8-6
ADMINISTERING TELEVANTAGE
CHAPTER 9
CHAPTER 9
MANAGING OUTBOUND CALLS
CHAPTER CONTENTS
About dialing services . . . . . . . . . . . . . . . . . . . . . . . . . . . . . . . . . . . . . . . . . . . . . 9-2
The Dialing Services view . . . . . . . . . . . . . . . . . . . . . . . . . . . . . . . . . . . . . . . . . . 9-4
Managing access codes . . . . . . . . . . . . . . . . . . . . . . . . . . . . . . . . . . . . . . . . . . . 9-6
Adding a dialing service . . . . . . . . . . . . . . . . . . . . . . . . . . . . . . . . . . . . . . . . . . . 9-9
Using routing services. . . . . . . . . . . . . . . . . . . . . . . . . . . . . . . . . . . . . . . . . . . . 9-22
Setting dialing timeouts . . . . . . . . . . . . . . . . . . . . . . . . . . . . . . . . . . . . . . . . . . . 9-35
Setting up emergency dialing . . . . . . . . . . . . . . . . . . . . . . . . . . . . . . . . . . . . . . 9-37
About dialing services_____________________________________
Dialing services route outbound TeleVantage calls over your trunks. Users must select a dialing
service to make an external call, though this can be as simple as dialing 9 before the number. By
creating multiple dialing services, you can intelligently manage your outbound trunk use and
place the full variety of TeleVantage trunk types at your users’ fingertips, including the ability
to dial Internet addresses, extensions on remote TeleVantage Servers, and more.
Each dialing service has a name and an access code. The access code is a number (such as 9)
that users dial to begin an external call. The access code tells TeleVantage which dialing service
to use. When placing external calls from ViewPoint, users select a dialing service by name with
the Call Using dropdown list.
Each dialing service routes calls over a group of trunks. For example, a Phone Number dialing
service (for example, access code 9) can route calls over your telephone company trunks, while
an Internet Address dialing service (for example, access code 71) can route calls over your
Internet trunks. Users would dial 9 plus a phone number to place a normal phone call, or 71 plus
an IP address to place an Internet call.
By default, TeleVantage comes with one dialing service, called “Phone number,” with an access
code of 9. It routes calls over any of your available telephone company trunks (analog or digital).
For some installations this will be the only dialing service needed. If so, you can skip this
chapter.
Dialing service types
You can add the following types of dialing service:
Q Phone Number service. Used to dial standard phone numbers over the public telephone
network. You can specify prefixes and suffixes to automatically take advantage of phone
company services, restrict the dialing of unwanted numbers, and configure the service
for accurate processing of dialing rules, such as when calling back voice messages.
Q Centrex/PBX Extension service. Used to dial Centrex extensions, PBX extensions, or
other custom numbers over trunks that are connected to external switches such as the
phone company’s Centrex service or an external PBX. You can specify the minimum
and maximum digits your Centrex/PBX service uses.
Q SIP Address service. Used to place SIP calls over SIP trunks. This type of dialing
service is required if you are using SIP-based IP phones.
Q H.323 Address service. Used to dial IP addresses over H.323 trunks. With this service,
users can pick up a phone and dial an IP address (for example, a number such as
123*456*78*90) to connect to H.323 devices such as a PC running Microsoft’s
NetMeeting software. Users can also place such calls from ViewPoint using either IP
addresses or domain names (for example, a name such as voip.mycompany.com).
9-2
ADMINISTERING TELEVANTAGE
Q SIP-to-Phone Number service. Used to send calls to a SIP PSTN gateway device, for
example an AudioCodes FXO Gateway, or to an Internet telephony service provider
(ITSP) that provides connection to the telephone network, for example Broadvoice.com.
Q SIP-to-Centrex service. Used to send calls to a SIP provider with extensions on a
private numbering plan, for example, Free-world dialup or Freeipcall. You can also use
it to connect to another SIP-capable PBX, such as another TeleVantage Server.
Q H.323-to-Phone Number service. Gateway service used to dial a phone number
through another TeleVantage Server at a remote location. The call connects to the
remote Server using the Internet or a private TCP/IP network, and then the phone
number is dialed from that Server.
Q H.323-to-Centrex/PBX Extension service. Gateway service used to dial Centrex or
PBX extensions or other custom numbers through another TeleVantage Server at a
remote location. The call connects to the remote Server using the Internet or a private
TCP/IP network, and the number is dialed from that Server. This type of service accesses
an internal dial tone on the remote Server, so you can you can dial any valid number that
can be dialed at that Server’s dial tone, such as an extension, 411, or # to log in to a
remote account.
Q Routing service. A special dialing service that routes calls through other dialing
services. You can use routing services to route calls differently based on different
routing rules, such as time of day, number dialed, or the user placing the call. With
routing rules you can offer your users one access code for all outbound
calling—including phone service and Internet calling—while still taking advantage of
advanced dialing service features.
For more information, see “Using routing services” on page 9-22.
Examples of using dialing services
By creating new dialing services, you can do any of the following:
Q Segregate trunks for different uses. For example, you might want to use your
long-distance T1 and Internet trunks for all long-distance calls and route all your local
calls over your analog trunks. You can create one dialing service that manages your
long-distance T1 and Internet trunks and another that manages your analog trunks. Users
can select the appropriate dialing service manually by access code or name, or you can
set up a routing service that distinguishes between local and long-distance numbers and
automatically routes calls over the appropriate trunks.
Q Enable Internet calls. Any use of Internet telephony requires that you create one of the
Internet dialing services. This includes using H.323 Gateways to connect two
TeleVantage Servers over the Internet (see Connecting two Servers using H.323
Gateways15-39).
Q Set up global dialing restrictions. You can use dialing services to control what
numbers users can dial over your telephone company trunks. For example, you could
prevent the dialing of international calls by disallowing calls beginning with 011. (Roles
CHAPTER 9. MANAGING OUTBOUND CALLS
9-3
and individual users can have dialing exceptions that override a dialing service’s
permissions. See “Dialing permissions hierarchy” on page 6-56).
Q Use the same trunks in different ways. For example, you can send both Centrex
numbers and regular phone numbers over your Centrex trunks. You can create a
Centrex/PBX dialing service (access code 6) and a Phone Number dialing service
(access code 9) that route calls to the same group of trunks. You can define the Phone
Number dialing service to automatically prefix another 9 to the number dialed by the
user, so that the user gets an outside line from the Centrex system.
Q Take advantage of use telephone company services. For example, you can create a
Cost Saving dialing service that automatically prefixes all numbers with the
“10-10-xxx” code belonging to the carrier of your choice. The user dials only the access
code and the phone number.
Testing trunks with dialing services
You can also use dialing services to install and test new trunk lines without interfering with live
call handling on the TeleVantage Server. You add the new trunks to a service that you use for
testing. After the trunks work properly, you can move them to the default Phone Number service
or another dialing service that users access to place calls.
You can also use dialing services to isolate problem trunks from your system without
interrupting service. Remove them from the dialing service and the Server will no longer use
them to place calls.
The Dialing Services view __________________________________
To add, edit, and delete dialing services, click Dialing Services in the view bar. The Dialing
Services view opens.
Each dialing service appears as a row in the Dialing Services view. Double-click a dialing
service to edit it.
9-4
ADMINISTERING TELEVANTAGE
The following table describes the information displayed for each dialing service.
Column
Description
Type
Dialing service type. For the different types, see the
previous section.
Name
Name that you assign to a dialing service when you
create it.
Access Code
Number that users dial to select this service. For
example, 9 to access a dialing service that routes all
phone number calls. See “Managing access codes”
on page 9-6 for more information.
Note: You can see the access code for a call in the
From code and To code columns of the Call Log view.
Enabled
If checked, TeleVantage allows users to dial phone
numbers using this service. See “Disabling dialing
services while creating them” on page 9-6.
In ViewPoint
If not checked, TeleVantage does not display this
service in ViewPoint (see “Hiding dialing services” on
page 9-6).
In Dial Plan
If not checked, the dialing service cannot be accessed
by dialing its access code.
Default
If checked, this is a default service. See “Setting
default access codes for callbacks” on page 9-8 for
more information.
Trunk Order
Order in which the dialing service’s list of trunks is
prioritized (see “The Trunks tab” on page 9-13 for
more information). This column is blank for routing
services, because they always get their lists of trunks
from other dialing services.
Deleting or disabling a dialing service
Deleting a dialing service means that users can no longer use that dialing service when placing
calls. If you delete the last remaining dialing service assigned to a trunk, you have in effect
disabled that trunk for outbound calls. ViewPoint contacts and routing lists that refer to the
access code for the deleted service will not work until you specify an alternate access code (see
“Changing an access code in users’ saved numbers” on page 9-7).
To disable a dialing service temporarily, edit the dialing service and uncheck Enabled on the
General tab.
CHAPTER 9. MANAGING OUTBOUND CALLS
9-5
Hiding dialing services
You can hide a dialing service if you do not want users to see it in ViewPoint or dial it. Hiding
dialing services can be useful when you want to use them for testing purposes, or make them
available to users only through a routing service.
For example, you can set up dialing services for each of several long-distance carriers and then
set up a single routing service that chooses the least expensive dialing service for each call. You
can then hide the dialing services for the individual carriers so that users can only make
long-distance calls through the routing service.
To hide a dialing service, edit it and uncheck the following on the General tab:
Q Show in ViewPoint. This hides the dialing service from all Call Using lists in
ViewPoint.
Q Include in dial plan. This hides the access code so that dialing it does not select the
dialing service.
To hide a dialing service for purposes of testing, clear Show in ViewPoint, leave Include in dial
plan checked, and give the service a multi-digit access code for testers to use, that would be hard
for users to select accidentally.
Disabling dialing services while creating them
While you are creating a dialing service, it can be helpful to uncheck Enabled on the General
tab. Doing this disables the dialing service, and makes it unavailable to users. With the dialing
service disabled, you can click OK to save the dialing service at any time during the creation
process without giving users access to an incomplete service. When you have finished creating
the dialing service, check Enabled again.
Managing access codes ___________________________________
This section covers choosing access codes for new dialing services that avoid dialing
ambiguities and help your system run smoothly.
Tips on access codes and names for services
If your system has multiple dialing services that users will access directly, it is important to
choose their names and access codes carefully, because these are the points of contact for the
users who place outbound calls. Typically, you set up dialing services with names like “Phone
Number,” “Centrex Extension,” or “Cambridge H.323 Gateway” and access codes of 9 or 7,
which makes it easy for users to remember the dialing service to use when they place a call.
For dialing services that you do not want users to access directly and that you may have hidden
(see “Hiding dialing services” on page 9-6), consider using 4-digit access codes of the form
80xx. Doing this places the access codes in the same numbering space as is used for auto
attendants, which helps prevent dialing ambiguities. It is important not to select access codes
that begin with the same digit as extensions.
9-6
ADMINISTERING TELEVANTAGE
Avoiding dialing ambiguities
When setting up access codes, extensions, and auto attendant menu choices, it is possible to
introduce ambiguities that will delay dialing. For example, if you have a dialing service with an
access code of 9 and a user with the extension 901, a user who dials either one will experience
a delay while TeleVantage waits to see if the number is complete.
Note: Users can bypass the delay by pressing # after dialing. You can change the length of the
delay by modifying the internal dialing ambiguous timeout system setting (see “Setting dialing
timeouts” on page 9-35). The same delay exists when dialing from an auto attendant; to bypass
that delay, see “Avoiding the auto attendant ambiguous dialing delay” on page 10-19).
TeleVantage warns you when you try to save an extension or access code that starts with the
same digits as one that already exists.
To see your entire extension plan at a glance, and easily spot dialing ambiguities, use the Dial
Plan view (see “Managing your dial plan with the Dial Plan view” on page 12-10).
Creating a dialing service with access code 0
By default, 0 is the Operator user’s extension. To use 0 as a dialing service access code (for
example, to have users dial 0 to get an outside line), you must first change the Operator user’s
extension to a number other than 0. See “Changing the Operator’s extension from 0” on
page 6-5.
Changing an access code in users’ saved numbers
When users save phone numbers in ViewPoint that can be speed-dialed or auto-dialed, the
dialing service used to make the call is saved with them. Such numbers include contact phone
numbers and the phone numbers specified in call forwarding and routing lists. You can do a
global replace of one dialing service for another across all users’ saved numbers. For example,
you can specify that all numbers saved with the “9 - Phone number” service now use your “8 Centrex” service.
CHAPTER 9. MANAGING OUTBOUND CALLS
9-7
To replace all occurrences of one saved dialing service with another
1.
Choose Tools > Update Access Codes. The Update Access Codes dialing box opens.
2.
Choose the dialing service you want to replace under Current access code and the
dialing service you want to replace it with under New access code.
3.
Click OK.
All phone numbers that users have entered in the TeleVantage database with the Current
access code are changed to use the New access code.
Setting default access codes for callbacks
When users return calls or voice messages using the telephone commands or ViewPoint, the
system automatically uses a default access code. You can set one default access code for phone
numbers and one default access code for Internet addresses. The defaults are used system-wide.
To set default access codes for callbacks
1.
Choose Tools > System Settings. The System Settings dialog box opens.
2.
Choose the External Dialing tab.
3.
Change the following as needed:
Q Default phone number access code. Select the access code for the dialing service
that will be used to return a call from a phone number from the Call Log and Voice
Messages views. The default is 9. You can select a routing service (see “Using
routing services” on page 9-22) or any dialing service that takes phone numbers as
inputs. You typically would use a routing service or a Phone Number dialing
service.
Q Default H.323 address access code. Select the access code for the H.323 Internet
dialing service that will be used to return an H.323 IP call—typically a NetMeeting
call—that did not come from a remote TeleVantage Server. When returning a call
that came from a remote TeleVantage Server, the system automatically uses the
correct access code required to reach the remote Server.
Q Default SIP address access code. Select the access code for SIP Internet dialing
service that will be used to return a SIP call.
4.
9-8
Click OK.
ADMINISTERING TELEVANTAGE
Where the default access codes appear
In the Administrator, the Default column of the Dialing Services view shows the current defaults
for phone number and Internet callbacks.
In ViewPoint, the Place Call To dialog box always opens with the current default dialing service
for phone numbers selected (the user can also choose a different dialing service to place a call).
When you import contacts, new phone numbers and IP addresses automatically receive the
default access codes.
Changing the access code to select a trunk
TeleVantage enables users to choose a specific trunk on which to place an outbound call, by
dialing a special access code followed by the trunk number they want. Users must have the
permission Select a specific trunk for outbound call to use this command. To change the
access code to select a trunk, do the following:
1.
Choose Tools > System Settings, then choose the Internal Dialing tab.
2.
In Select a trunk, enter the access code that users dial to select a specific trunk.
3.
Click OK.
Note: If users need to select trunks, you can also create dialing services for the appropriate
trunks. See “About dialing services” on page 9-2 for more information.
Adding a dialing service___________________________________
This section describes adding a new dialing service of any type other than routing service. For
instructions on adding a routing service, see “Using routing services” on page 9-22. For a
description of the dialing service types, see “Dialing service types” on page 9-2.
To add a new dialing service
1.
Choose File > New > Dialing Service, and the type of dialing service to create. The
Dialing Service dialog box for that type opens.
2.
Define the dialing service using some or all of the following tabs. Which tabs are
available depends on the type of service being added. The tabs are described in detail
in the following sections.
Q General tab. Use to enter the service’s name and access code, hide or show the
service, and enter other general information. See the next section.
Q Trunks tab. Use to specify on which trunks the service routes outbound calls, and
how the trunks are prioritized. See page 9-13.
Q Codecs tab. Internet services only. Use to optimize the codecs for the Internet
connections that the service makes. See page 9-15.
Q Location Settings tab. Phone number services only. Use to specify the location of
the TeleVantage Server to enable accurate dialing. See page 9-16.
CHAPTER 9. MANAGING OUTBOUND CALLS
9-9
Q Dialing Exceptions tab. Phone number type only. Use to add dialing rules for
exchanges in your area code that require different dialing. See page 9-17
Q Permissions tab. Phone number type only. Use to control which numbers can be
dialed using the service. See page 9-19.
3.
When you have finished defining the dialing service, click OK on any tab to close the
Dialing Service dialog box.
The General tab
Use this tab to enter the service’s name and access code, enable or disable the service, hide or
show the service, and enter other information specific to the service type. The following sections
describe the General tab for each service type.
General information for all dialing service types
The following fields of the General tab are the same for all dialing service types:
Q Name and Access code. Choose a name and access code that will make it easy for users
to select this dialing service when placing a call. See “Tips on access codes and names
for services” on page 9-6.
Note: If you change the access code of a dialing service here, you must use Tools >
Update Access Codes before the change can take effect. See “Changing an access
code in users’ saved numbers” on page 9-7.
Q Comments. Any comments to help you identify this dialing service.
Q Enabled. To make this dialing service available to users, leave Enabled checked.
Clearing the check box disables the dialing service so that users cannot select it.
Disabling can be useful while you are in the process of creating or troubleshooting the
dialing service.
Q Show in ViewPoint. To hide this dialing service in ViewPoint, uncheck this field.
Hiding a service from ViewPoint is typically done for testing purposes or to make the
service available only via a routing service. See “Hiding dialing services” on page 9-6.
Q Can be dialed. To prevent users from using the dialing service’s access code, uncheck
this field. Making the access code non-dialable is typically done to make the service
available only via a routing service. For testing purposes, you would leave this field
checked.
9-10
ADMINISTERING TELEVANTAGE
Completing the General tab
To complete the General tab, enter the following information if it applies to the service type you
are adding. Each field is described in the following sections.
Q Collect all digits before dialing on trunk. See the next section.
Q Dial prefix and suffix. See page 9-11.
Q Minimum and maximum number of digits. See page 9-12.
Q Prevent hold, transfer, and other call control. See page 9-12.
Q H.323 Gateway and remote Server information. See page 9-12.
Collect all digits before dialing on trunk
Check this field to have TeleVantage wait until the user finishes dialing before sending the
complete dial string to the phone company. Uncheck it to have TeleVantage send digits to the
phone company as the user dials them, and let the phone company determine when the dial string
is complete.
Normally, digits are sent as the user dials them. In certain cases, however, you can collect all
digits:
Q To simulate a dial tone for carriers that do not generate a dial tone after a Primary
Interexchange Carrier (PIC) code (in the U.S., you can create a dialing service that uses
a PIC code prefix to access a particular carrier).
Q To improve tone detection when users attempt to place an outbound call while logged
into TeleVantage remotely from a digital cell phone or other low-quality connection.
If you check this option, TeleVantage assumes that all digits have been dialed when the dialing
service ambiguous timeout elapses, and places the call (for more information, see “Setting
dialing timeouts” on page 9-35). Users can dial # when they are done dialing to skip the timeout
and place the call immediately.
Dial prefix and suffix
When you create a Phone Number or Centrex/PBX Extension dialing service, you can enter a
dialing prefix and suffix. A dialing prefix consists of digits dialed automatically by the dialing
service before the number that the user dialed. Similarly, a dialing suffix consists of digits dialed
automatically after the number the user dialed.
The following are examples of how you can use a dialing prefix or suffix:
Q To create a Phone Number service (“Outside Line”) used to dial phone numbers over a
Centrex trunk. Enter a dialing prefix, typically 9, to get an outside line from Centrex.
You can also support the dialing of Centrex/PBX extensions over the same trunks by
creating a Centrex/PBX Extension dialing service without entering a dialing prefix.
Q To create a Centrex/PBX Extension service (“voicemail”) that accesses a PBX that
provides voicemail. Enter a prefix that takes users into voicemail. Enter a suffix that
takes them directly to their new messages.
CHAPTER 9. MANAGING OUTBOUND CALLS
9-11
Q To create a Phone Number service (“Calling Card”) that makes it easy for users to charge
calls to a calling card company. Enter a dial prefix that is the entire number used to
access the calling card company (including the calling card number), and then enter a
dialing suffix that is the number of the credit card used to pay for these calls.
All users need to do to charge a call is dial the access code for the dialing service, then
the number they want to call. The dialing service automatically dials the number of the
calling card (the prefix), then dials the number the user dialed, and finally supplies the
credit card number (the suffix).
Prevent hold, transfer, and other call control
This option on Centrex/PBX Extension dialing services is primarily for calls to external
overhead paging devices or for any other time where you want a call go directly out through a
port without any call progress detection or call handling.
If checked, the following happens for calls that use the dialing service:
Q Call progress is not performed on the call, so that all calls appear in the Call Log with
the result “Connected,” even if they were placed to a busy number or never answered.
Q Users cannot perform any call handling command on the calls, such as Hold or Transfer.
The telephone commands and ViewPoint’s Call Monitor commands are both disabled
for the duration of the call. If a user presses Flash after placing the call, the call is
disconnected.
If unchecked, call progress analysis and the TeleVantage call handling commands are enabled
as usual for calls on the dialing service.
Minimum and maximum number of digits
When a user dials a Centrex/PBX extension, TeleVantage waits to collect all of the digits up to
the minimum number of digits you specify here, and does not dial them until one of the
following occurs:
Q A timeout occurs (see “Setting dialing timeouts” on page 9-35).
Q The user presses # to signify that all digits have been entered.
Q The maximum number of digits (that you specify below) have been entered.
If every Centrex/PBX extension that users can dial is the same length, you can expedite dialing
by entering that information here. For example, if the extensions are 3 digits long, set both
values to 3.
H.323 Gateway and remote Server information
Enter the following information when defining an Internet-to-Phone Number or
Internet-to-Centrex/PBX Extension dialing service:
Q <H.323/SIP PSTN> Gateway. For H.323, select the H.323 Gateway that will direct calls
from this dialing service to a remote TeleVantage Server. To create a new H.323
Gateway, click the H.323 Gateway button. See “Creating an H.323 Gateway” on
page 15-41.
9-12
ADMINISTERING TELEVANTAGE
For SIP, select the TeleVantage SIP server representing the SIP device or provider
through which you will send SIP calls to the telephone network.
Q Remote Server’s Phone Number service access code. (H.323-to-Phone-number
services only.) Use this field to specify the dialing service that the remote Server will use
to place outbound calls. Enter the access code of a Phone Number dialing service on the
remote Server (typically 9).
Q Place Centrex/PBX calls on remote Server using. (H.323-to-Centrex/PBX Extension
services only). Select one of the following options, depending on the type of H.323
Gateway calling you want to perform using this dialing service:
Q To call TeleVantage extensions on the remote Server.
Select Remote Server’s internal dial tone. With this selection , callers are
connected directly to the internal dial tone on the remote Server, from which they
can dial extensions, log into accounts, or use the TeleVantage telephone commands.
Q To place Centrex/PBX calls through the remote Server.
Select Remote Server’s Centrex/PBX service access code, and enter the access
code of a Centrex/PBX Extension dialing service on the remote Server. This option
lets users dial Centrex/PBX extensions that are external to the remote Server, for
example, to connect to a legacy PBX on the remote Server or dial a Centrex
extension.
The Trunks tab
The Trunks tab is used by all dialing service types except routing services (see page 9-22). This
tab specifies the trunks to which calls will be routed and the order in which those trunks will be
allocated. In this procedure, the Trunks tab from the Phone Number Service dialog box is used
CHAPTER 9. MANAGING OUTBOUND CALLS
9-13
for illustration. All dialing service types except routing services have the same tab, but the
options on the tab refer to the trunks appropriate to the dialing service you are creating, and the
Available trunks list will show the appropriate trunks.
To complete the Trunks tab
1.
In Use trunks in this order, choose one of the following:
Q Bottom to Top. Trunks are allocated starting at the bottom of the list each time.
If a trunk is busy, the next trunk up is allocated.
Q Top to Bottom. Trunks are allocated starting at the top of the list each time. If
a trunk is busy, the next trunk down is allocated.
Q Round Robin. Trunks are allocated in the same sequence as Bottom to Top, but
starting with a different trunk for each call.
2.
Select one of the following:
Q Use all <type> trunks. If selected, this dialing service will allocate all trunks listed
under Available trunks and will use the algorithm selected in the previous step.
Q Use only selected trunks. If selected, this dialing service will allocate only the
trunks in the Selected trunks list on the right and will use the algorithm selected in
the previous step. Click Add to add a trunk to the Selected trunks list. Click
Remove to remove it.
Q Available trunks. Lists all the trunks in the TeleVantage system that can be
used by this type of dialing service:
Q Phone Number service: analog and digital trunks
Q Centrex/PBX Extension service: analog and digital trunks
Q Internet Address service: Internet trunks
Q Internet-to-Phone Number service: Internet trunks
Q Internet-to-Centrex/PBX Extension service: Internet trunks
Q Selected trunks. Lists the trunks that this dialing service will allocate. Use the
arrows to move a trunk higher or lower in the list.
9-14
ADMINISTERING TELEVANTAGE
The Codecs tab
When you add a dialing service of the type H.323 Address, SIP Address, Internet-to-Phone
Number, or Internet-to-Centrex/PBX Extension, you can use the default codecs specified for the
Internet span (see “Modifying SIP span codecs” on page 14-8 or “Modifying H.323 span
codecs” on page 15-8) or override the defaults and specify one or more codecs.
You can create different Internet dialing services optimized for specific uses, for example, one
Internet dialing service with codecs optimized for NetMeeting, and another with codecs
optimized for TeleVantage Server-to-TeleVantage Server communication over the Internet.
If you decide to override the default codecs for the span, arrange the codecs in the order in which
you prefer to use them. For example, you may prefer one codec over another to get greater
bandwidth or better voice quality.
To specify codecs for a dialing service
1.
Do one of the following:
Q To have the dialing service use the default codecs as defined at the Internet span
level, click Use codecs from Internet span.
Q To override the Internet span codecs with specific codecs for this dialing service,
click Use the following codecs.
2.
If you chose Use the following codecs, do the following:
Q Check the Enabled column for the codecs you want to use.
Q Click the up or down arrows to move a specific enabled codec in the list.
3.
Click OK.
CHAPTER 9. MANAGING OUTBOUND CALLS
9-15
The Location Settings tab
The Location Settings tab is used by Phone Number and Internet-to-Phone Number dialing
services. TeleVantage uses location information to format and dial telephone numbers entered
in ViewPoint or collected from Caller ID information.
Identify the local and long-distance phone number formats used to dial using this service, as
follows:
Q Country/Region. Choose the location of the TeleVantage Server.
Q Long-distance prefix. Enter the prefix required to dial a long-distance number from the
Server location.
In the U.S., enter 1. Outside of the U.S. and Canada, the long-distance prefix is typically
0.
Q International prefix. Enter the prefix required to dial an international number from the
Server location. In the U.S., enter 011. Outside of the U.S., the international prefix is
typically 00.
Q Area code. Enter the city or area code for local phone numbers, if applicable. If not,
leave blank.
Q Dial local numbers without area code. Check to have TeleVantage strip the area code
from local numbers before dialing. In most areas, this field should be checked, unless
the service allocates trunks that only support long-distance numbers or if it always
expect numbers to include area codes.
Q Include long distance prefix in area code. Check to have TeleVantage assume that the
long distance prefix is always included with the area code, as in the U.K., for example,
0181. This field is only available for a Phone Number service, and it is disabled in the
U.S.
Note: When using this tab to create an Internet-to-Phone Number dialing service, these values
must match those on the remote TeleVantage Server.
9-16
ADMINISTERING TELEVANTAGE
The Dialing Exceptions tab
The Dialing Exceptions tab is used only for Phone Number dialing services. If Dial local
numbers without area code on the Location Settings tab is checked (see “The Location
Settings tab” on page 9-16), TeleVantage dials all calls within your area code as local calls. All
other calls are dialed as long-distance calls. You can change this default behavior or add other
dialing rules to cover exceptions for certain exchanges.
Dialing exceptions apply only to calls placed from ViewPoint. When placing a call using the
telephone, you must dial it with the correct area code usage.
Note: If you did not check Dial local numbers without area code, you usually do not need to
specify dialing exceptions. Dialing exceptions are used to only to convert numbers entered into
ViewPoint, and callback numbers from Caller ID. Dialing exceptions do not affect manually dialed
numbers.
The Dialing Exceptions tab displays dialing exceptions created so far. If these settings are
incorrect, calls dialed automatically to local exchanges will be dialed as long-distance calls.
To enter dialing exceptions
1.
Click Add to create a new dialing exception, or Edit to modify an existing one. The
Dialing Exception dialog box opens.
For information about importing and exporting dialing exceptions, see “Exporting and
importing dialing exceptions” on page 9-18.
2.
In the Dialing Exception dialog box, add a default dialing rule for each city or area
code for which you want to define exceptions.
Q City/Area code. Enter the city or area code.
Q Dial as. Select a dial string from the dropdown list. This string will be used to dial
all calls to this city or area code that do not match any of the exceptions that you
define. In this example, the default dialing rule for the 617 area code has been
defined. Click Apply to save the default dialing rule.
3.
In Number, enter the exchange within the selected City/Area code that requires a
dialing exception. Select the Dial string to be used for calls to this exchange from the
CHAPTER 9. MANAGING OUTBOUND CALLS
9-17
dropdown list. In the following figure, the dialing exception for the 235 exchange has
been defined.
4.
Click Apply to save the dialing exception.
You can define several dialing exceptions for a city or area code to cover different
exchanges. Continue to enter exchanges for which dialing exceptions are needed.
When you are done, click OK.
The Dialing Exceptions tab displays the default dialing rule and the dialing exceptions
you defined.
You can continue to add default dialing rules for other city or area codes, or add
additional dialing exceptions. Enter only those city or area codes for which local
calling applies. If a city or area code is not in the list, all calls to it are dialed as
long-distance calls.
Exporting and importing dialing exceptions
Exporting and importing dialing exceptions allows you to copy dialing exceptions from one
TeleVantage Server to another, or from one Phone Number service to another on the same
TeleVantage Server, so that you do not have to retype them on each system. Dialing exceptions
are exported into a comma-separated value (.CSV) file.
To export dialing exceptions
9-18
1.
In the Phone Number Service dialog box, click the Dialing Exceptions tab.
2.
Click Export. The Export Dialing Exceptions dialog box opens.
3.
Enter a file name for the exported file. Click Browse to specify a destination.
4.
Click Finish to export the file.
ADMINISTERING TELEVANTAGE
To import dialing exceptions
1.
In the Phone Number Service dialog box, click the Dialing Exceptions tab.
2.
Click Import. The Import Dialing Exceptions dialog box opens.
3.
Click Browse to locate the file to import.
4.
Click Finish to import the file.
The Permissions tab
The Permissions tab is used only for Phone Number dialing services. It enables you to control
which numbers can be dialed when using the dialing service. Dialing service permissions can be
inclusive (“allow all numbers except for...”) or exclusive (“disallow all numbers except for...”).
Note: Dialing service permission settings can be overridden by dialing permissions set at the
role or user level. See “Dialing permissions hierarchy” on page 6-56.
To set dialing permissions
1.
Specify the default behavior when users dial a number using this service by selecting
one of the following:
Q Allow all. Users can dial all numbers using this dialing service except those
numbers that appear in the list under Numbers beginning with.
Q Disallow all. Users cannot dial any numbers using this dialing service except those
numbers that appear in the list under Numbers beginning with.
CHAPTER 9. MANAGING OUTBOUND CALLS
9-19
2.
Click Add to add a new permission, or Edit to modify an existing one.
3.
Choose to Allow or Disallow calls, and then enter the digits. The permission is applied
whenever a user selects this dialing service and then dials a number beginning with the
digits you entered.
4.
Click OK to close the Dialing Permission dialog box.
An example of how to set dialing service permissions
The following example illustrates how to set dialing service permissions:
Q You want to allow users to dial all local numbers in the 216 area code. These calls are
dialed without the area code because they are local calls as set up on the Location
Settings tab (see “The Location Settings tab” on page 9-16).
Q You want to allow calls to some exchanges in the 330 and 440 area codes, which are
dialed with a 1 in front of them because they are long-distance calls, for example,
1-330-531-1234 and 1-440-674-4321.
Q In addition, you want to prevent calls to all other long-distance and international
numbers, but allow calls to 1800 and other toll-free numbers.
To do this with the fewest steps, set up the following dialing service permissions:
Q By default, allow all numbers except those starting with:
Q Disallow 1. This prevents calls to long-distance numbers.
Q Disallow 011. This prevents calls to international numbers.
Q Allow 1330531. This allows calls to numbers in the 531 exchange of the 330
area code.You must enter a separate permission for each valid exchange in the
330 area code.
Q Allow 1440674. This allows calls to numbers in the 674 exchange in the 440
area code. You must enter a separate permission for each valid exchange in the
440 area code.
9-20
ADMINISTERING TELEVANTAGE
Q Allow 1800. This allows calls to toll-free numbers. You must create a separate
permission for each valid toll-free area code that you want to allow users to dial.
In this example, the rules are applied in this order, longest to shortest:
1330531—allow
1440674—allow
1800—allow
011—disallow
1—disallow
The following numbers are allowed:
1 330 531 1234
1 800 123 4567
731 4521 (in the local area code)
The following numbers are disallowed:
1 347 555 1212
1 330 532 1212
011 44 181 555 1212
CHAPTER 9. MANAGING OUTBOUND CALLS
9-21
Using routing services ____________________________________
If you have created several different dialing services, you may be able to simplify dialing for
your users by creating a routing service. A routing service is a special type of dialing service
that routes the number dialed to other dialing services. The routing service can choose how to
route a call based on the phone number dialed, the time of day or day of the week, or the user
placing the call. By using routing services you can do the following:
Q Allow users to dial a single access code (for example, 9) for all their phone calls. Routing
rules can automatically determine the best dialing service for a given call, and are not
limited to a single type of trunk. This includes intelligent routing of SIP and H.323 calls.
Q Automatically route a call to trunks on an alternate dialing service when all the trunks of
the preferred dialing service are in use.
Q Prevent certain users from dialing certain numbers, at all times or only at certain times
of the day.
For specific examples of using routing services, see “How you can use routing services” on
page 9-23.
You can add as many routing services as you want, but typical installations need no more than
one routing service.
How routing services work
A routing service uses routing rules to identify which dialing service will be used for the number
dialed. For example, the following table shows a simple routing rule that identifies local calls.
If the dialed number matches the pattern in the Digits dialed column, then the Local calls
dialing service will be used to place the call. Local calls is referred to as the target dialing
service for this rule.
Schedule Digits dialed
New digits
Action Service/Reason
Always
Nxxxxxx
Route
Nxxxxxx
Notes
76 - Local calls
This example shows the routing rule as it would appear on the Routing Rules tab of the Routing
Service dialog box (see “The Routing Rules tab” on page 9-28).
All routing rules contain the following information:
Q Digits dialed. A pattern that matches the dialed numbers that you want the routing rule
to process. The pattern Nxxxxxx matches any seven-digit number starting with the digits
2 through 9. See “Defining patterns to match the dialed digits” on page 9-31 for details.
Q Schedule. One or more scheduled times at which the rule will be applied. This field is
set to Always if no schedule is defined, and the rule is always applied.
Q Membership. A rule can be used to restrict the dialing of certain numbers or the use of
certain trunks to a specific group of users. If this is the case, the Membership column is
checked. If no membership is defined, the rule applies regardless of the user who placed
the call.
9-22
ADMINISTERING TELEVANTAGE
Q New digits. The pattern of the number to be passed to the target dialing service. In the
example shown in the previous table, the number is unchanged.
Q Action. A rule’s action can be Route, which attempts to route the call through the target
dialing service, or Stop, which stops processing of any further routing rules that use this
pattern.
Q Service/Reason. The example shown in the previous table gives the access code and
name of the target dialing service for this rule. If the rule’s action was Stop, this field
would list the reason for stopping, which can be played over the phone as an error
prompt.
Q Notes. Comments that you can enter when you create the rule.
A routing service can have an unlimited number of routing rules. The routing service attempts
to match the number dialed to each routing rule from the topmost rule down to the end of the list
of routing rules. If one or more valid rules are found, the routing service attempts to route the
call through the target dialing service. If all trunks on the target dialing service are busy, the
routing service tries the next matching routing rule and corresponding target dialing service until
the call is placed or all valid routing rules have been tried. If the routing service finds a rule that
tells it to stop processing the number, no further attempts to match a number dialed to a routing
rule are made. If the number dialed does not match any rules, then the user will hear “The dialing
service you selected is not properly configured. Please contact your administrator.“
If a routing rule matches the dialed digits, the target dialing service checks the rule’s New digits
against the dialing permissions defined for the user, the user’s roles, and the target dialing
service. If the dialed digits are blocked by these permissions, the target dialing service is not
used. For information about dialing permissions, see Chapter 6, “Managing Users and Roles.”
Before the routing service passes the number to a dialing service, it modifies the number
according to the pattern specified in New digits (the number is unchanged if New digits matches
Digits dialed). The dialing service then applies any prefixes, suffixes, and dialing exceptions
(see pages 9-11 and 9-17) to the modified number before the call is placed.
How you can use routing services
By setting up multiple dialing services and using a routing service, you can do any of the
following:
Q Route local calls and long-distance calls to different trunks. With this setup, users
can dial a single access code for all calls, and the routing service will automatically route
the calls on the correct trunks for local and long-distance. You’ll need three dialing
services: one for your local trunks, one for your long-distance trunks, and a routing
service. Give the routing service the access code that users will dial (for example, 9). In
the routing service, set up a rule that sends calls dialed in the pattern Nxxxxxx to your
local dialing service. Set up another rule that sends calls with the pattern 1NxxNxxxxxx
to your long-distance dialing service. Note that some long-distance carriers don’t
recognize 800-numbers, so you may need an additional rule to send digit pattern
1800Nxxxxxx to your local dialing service (and similar rules for 877, 888, and 866
numbers). These additional rules should be listed first.
CHAPTER 9. MANAGING OUTBOUND CALLS
9-23
Q Restrict the outbound use of certain trunks to specific users. A rule can be limited
to specific users or Roles only, enabling you restrict the use of a certain phone number,
dialing service or collection of trunks to those users. You might use this feature if one
organization sharing the Server has special dialing privileges or has ownership of several
trunks. To restrict a rule to a group of users, either specify the individual users in the
membership or create a Role containing the appropriate users and then specify the Role
in the rule.
Q Schedule the use of different dialing services for the same number to implement
least-cost routing. For example, you have three different carriers for long-distance
calls. One is the least expensive during business hours, one during the evening hours of
business days, and one during nights and weekends. You can set up three dialing
services for the three carriers. In your routing service, create three routing rules. Each
routing rule matches long-distance numbers but is in effect only during the specified
time period. Each rule routes calls to the appropriate dialing service for the lowest price.
Q Route long-distance calls over an H.323 Gateway so that they are made as local
calls from a remote TeleVantage Server. For example, you are in the New York office.
Your company also has an office in Boston. Your New York users make many calls to
a Boston area code (617). You can set up an Internet-to-Phone Number dialing service
named Call Through Boston that routes calls over the TeleVantage Server in Boston.
You can then create a routing rule that matches numbers with the 617 area code
(1617Nxxxxxx) and routes the calls to the Call Through Boston dialing service.
Q Perform least-cost routing by selecting the least expensive dialing service for a
given phone number and time. For example, you might have two different carriers for
long-distance calls. One carrier is the least expensive during business hours, and the
other is the least expensive during evenings and weekends. You can set up a dialing
service for each of the two carriers. You can then set up a routing service that can route
the call through either dialing service. The routing service automatically assigns the
highest priority to the dialing service of the least expensive carrier, based on the call’s
time of day. Users do not have to remember separate access codes for the two carriers
because they always dial the access code for the routing service.
An example of routing rules
Arrange your routing rules in the order that you want them to be evaluated and applied, from top
to bottom (see the next figure). You can create multiple rules to match the same phone number.
The first routing rule can be the least expensive long-distance option, for example, while
subsequent rules route to progressively more expensive options.
The routing service in the following example has four routing rules (rules 6 through 9) that
match the same set of numbers. Rule numbers are provided in the figure for purposes of
illustration only.
Rule Schedule
1 Always
2 Always
3 Always
9-24
Membership
Digits dialed
XYZ users
New digits
Action Service/Reason
Route
79 - T1 line
All
011
Stop
Invalid number
All
1900
Stop
Invalid number
ADMINISTERING TELEVANTAGE
4
5
6
7
8
Always
All
411
Always
All
411
Weekdays
All
1NxxNxxxxxx
Always
All
1NxxNxxxxxx
Always
All
1NxxNxxxxxx
9 Always
All
1NxxNxxxxxx
10 Always
All
~
411
Route
79 - T1 line
Stop
All lines busy
1010321NxxNxxxxxx
Route
79 - T1 line
+1NxxNxxxxxx
Route
79 - T1 line
+1NxxNxxxxxx
Route
78 - All trunks
Stop
All lines busy
Route
79 - T1 line
~
Rules 1-10 in the preceding figure work as follows:
1.
This rule is defined so that calls from specific users (for example, all users in the XYZ
Organization) are routed to the T1 line dialing service. You might do this if your other
trunks are paid for by a different business that is sharing the system. (See “Using
Organizations” on page 11-2 for more information about handling multiple businesses
on a system.)
2.
This rule is defined so that users are not permitted to place international calls with this
routing service. This could be useful if you only want international calls to be placed
by users who have been given a special access code that corresponds to a different
dialing service.
3.
This rule is defined so that calls to 900 pay-per-minute numbers are prevented. You
could replace 900 with a routing variable that matches all pay-per-minute numbers.
See “Adding custom routing variables” on page 9-32.
4.
This rule is defined so that 411 calls are routed to the T1 line dialing service, which
was created to place calls over a T1 line.
5.
This rule is defined so that call processing stops and a message plays if all trunks are
busy on T1 line. The message says that all lines are currently busy. Without this stop
rule, rule 9 would match 411 calls also, so this stop rule causes a much quicker timeout
when no lines are available.
6.
This rule is defined so that long-distance calls placed during hours defined by the
Weekdays schedule use the least expensive carrier. The PIC code 10-10-321 (a code
used to save money by using a particular carrier) is added to the dialed digits before
the number is passed to the T1 line dialing service.
7.
This rule is defined so that long-distance calls that are not placed during Weekday
hours use the same target dialing service as rule 5. The PIC code is not used.
8.
This rule is defined so that if all of the T1 line dialing service trunks are busy, calls are
routed to the All trunks dialing service.
9.
This rule is defined so that call processing stops if the dialed digits match this rule and
the call has not yet been processed. With the stop rule in place, if no trunks are
available from the previous rules, the routing service stops the processing of the call
and plays a system prompt to the user saying that no lines are available. Without such
a stop rule, the routing service would search for another matching rule and therefore
rule 9, which was not created to handle long-distance calls, would then handle the call.
CHAPTER 9. MANAGING OUTBOUND CALLS
9-25
10. This rule is defined so that all other numbers, for example, local numbers, are passed
to the T1 line dialing service unchanged.
How ViewPoint reformats phone numbers
Phone numbers dialed from a telephone reach the routing service exactly as dialed. On the other
hand, ViewPoint can automatically reformat phone numbers before they are received by a
routing service.
For example, ViewPoint may strip the area code from a local number, even if the user has
entered the area code in ViewPoint’s Check Phone Number dialog. Putting local numbers from
ViewPoint and the telephone into the same seven-digit form allows you to use the same routing
rules for local phone numbers from both ViewPoint and the phone.
Your routing rules must be able to handle numbers received from ViewPoint, so it is important
that you understand when and how ViewPoint reformats them. Here are the main points to
remember:
Q ViewPoint stores information about whether or not a number can be reformatted.
In ViewPoint’s Check Phone Number dialog, the use country code and area code
dialing rules checkbox specifies whether or not the number may be reformatted.
If this checkbox is not checked, ViewPoint will never reformat this number. (For more
information, see “Using dialing services” in Using TeleVantage).
Q If the number can be reformatted, ViewPoint uses the dialing rules specified in the
Location Settings tab of the routing service’s default dialing service. A routing
service does not have location settings of its own, but every routing service is configured
with a default dialing service (see “Adding a routing service” on page 9-27). The
9-26
ADMINISTERING TELEVANTAGE
location settings of the default dialing service supply the rules that ViewPoint will use
to reformat the number.
The number can be reformatted in the following ways:
Q If a user enters a number without an area code, ViewPoint can use the dialing
service’s area code and country code settings to add that information. For example,
if the user types 3540600 in ViewPoint’s Place Call To dialog box, ViewPoint can
add the area code, and the number received by the routing service will be
6173540600.
Q If the routing service’s default dialing service has Dial local numbers without area
code checked, ViewPoint will strip the area code from the number before sending
it to the routing service. For example, even if the user enters 6173540600,
ViewPoint will strip the area code from the number, and the number received by the
routing service will be 3540600.
It is important to remember that all reformatting takes place before the routing service receives
the number and begins to apply routing rules to it. Dialing services specified in routing rules will
never receive a number until after ViewPoint has had a chance to reformat the number based
using the routing service’s default dialing service.
Adding a routing service
1.
Choose File > New > Dialing Service > Routing Service. The Routing Service dialog
box opens.
2.
On the General tab, enter the basic information about the routing service. For
instructions on Name, Access code, Enabled, Show in ViewPoint, and Can be
dialed, see “General information for all dialing service types” on page 9-10.
CHAPTER 9. MANAGING OUTBOUND CALLS
9-27
3.
From the Resolve dialed numbers using... drop down-list, select the Phone Number
dialing service whose location settings are applied to numbers dialed from ViewPoint.
Select a Phone Number dialing service from the dropdown menu, click
to create a
new dialing service, or press ALT and click to edit the selected default service. You
cannot specify an H.323 or SIP phone number service.
Note: The Phone Number service you specify does not influence call routing. It is used
only to determine location settings for the routing service.
4.
Click the Routing Rules tab and add routing rules (see “Adding a new routing rule” on
page 9-29) until you have provided coverage for all phone numbers that you expect
users to dial.
5.
Click OK to add the routing service.
The Routing Rules tab
The top pane on the Routing Rules tab displays routing rules for this routing service.
The bottom pane displays the routing variables that are currently available. Click Routing
Variables if you need to create or edit routing variables for use in your routing rules.
See “Adding custom routing variables” on page 9-32 for more information.
To create a new routing rule, click Add (see the next section).
9-28
ADMINISTERING TELEVANTAGE
Adding a new routing rule
When you click Add On the Routing Rules tab, the Add Routing Rule dialog box opens.
Use this rule under the following conditions
In this section of the dialog box, you can define what calls the rule handles. You can have the
rule handle calls on the basis of the digits dialed, the time or date when the calls are placed, and
the users placing the calls, in any combination.
Q Digits dialed. Type the pattern that will match the dialed numbers you want the routing
rule to process. For example, Nxxxxxx would match any seven-digit local number. See
“Defining patterns to match the dialed digits” on page 9-31 for details. The pattern
entered here appears in the Dialed digits column of the Routing Rules tab. This field
cannot be left blank.
To have the routing rule process calls without regard to the number dialed, enter ~ here.
For example, you might have a routing rule that processes calls solely on the basis of
schedule or membership. Stop rules cannot use the ~ character.
Q Schedule. If you want to apply the rule only at scheduled times, check this field and
click
. In the Custom Hours dialog box that opens, define the hours and days of the
week or the specific dates that this rule will be in effect. See “Setting up custom hours”
on page 6-26 for more information. If you enter a schedule, it appears in the Schedule
column of the Routing Rules tab.
Q Membership. If you want to apply the rule only to outbound calls from certain users,
check this field and click
. In the Routing Rule Members dialog box that opens, add
CHAPTER 9. MANAGING OUTBOUND CALLS
9-29
the users or roles you want to the Selected Members list by selecting them and clicking
Add. If a role is selected, all users in the role are members.
Click OK to return to the Add Routing Rule dialog box. The rule will be used only on
calls from the users in the Selected Members list.
Note: If your TeleVantage Server is shared between different organizations, you can
use the Membership feature to restrict the use of some trunks to members of a role that
has the same members as the organization. You might do this, for example, if one
company had paid for certain proprietary trunks. See Chapter 11, “Tracking and
Distinguishing Calls.”
Execute the following action
In this section of the dialog box, you can specify the action to be performed with the dialed
digits. You can choose one of two actions: you can either Route, which passes the number to the
target dialing service, or Stop, which stops processing any further routing rules that use this
pattern. The action you choose appears in the Action column of the Routing Rules tab.
Q Route the call to another dialing service. Select this option if you want the number
passed to the target dialing service.
Q Dialing Service. From the dropdown list, select the target dialing service for this
rule. The dialing service you select appears in the Service/Reason column of the
Routing Rules tab.
Q New Number. Type the pattern that defines the number that you want to pass to the
target dialing service. If you do not want to change the number, use the same pattern
that you entered in Digits dialed. See “Defining a new number for a routing rule”
on page 9-33 for more information. If you enter a pattern, it appears in the New
digits column of the Routing Rules tab.
Q Stop processing rules. Select this option if you want to prevent the routing service
from looking further for rules that match the dialed number.
If no rules have matched when the stop rule is reached, or if no trunks are available from
the target dialing services of the rules that matched, TeleVantage plays an appropriate
system prompt to the user. The available prompts include “I’m sorry, all lines are
9-30
ADMINISTERING TELEVANTAGE
currently busy,” “I’m sorry, the phone system has not been configured to dial this
number. Please contact your administrator,” and “I’m sorry, the number you entered was
invalid. Please try again.” The name of the prompt you select appears in the
Service/Reason column of the Routing Rules tab.
Most routing services will include stop rules. You can use them for the following
purposes:
Q Prevent numbers from being dialed over inappropriate trunks. For example,
create routing rules that route 411 calls to dialing services that support 411. Add a
stop rule so that TeleVantage does not attempt to dial 411 on dialing services with
trunks that do not support 411 calls. Restrict 1800 numbers to specific trunks in the
same way.
Q Eliminate timeouts when a user is dialing from the telephone. For example,
with 911 calls, you can create one or more routing rules for the dialing services that
can handle 911 calls. Add a stop rule for 911 that will cause TeleVantage to pass
the call to a 911 dialing service immediately instead of evaluating all of the
remaining rules for matches before routing the call.
Q Block calls to numbers. You can set up stop rules for 1900 numbers, for example,
to prevent users from calling them (this could also be done with dialing
permissions, but stop rules can provide a more versatile solution in some cases).
Defining patterns to match the dialed digits
When defining a routing rule, you must specify a Digits dialed string to define which dialed
numbers activate the rule. By default, you can use the following characters to build the Digits
dialed string (you can also define others):
Q 0-9. Specific numbers. The rule activates when those exact digits are dialed. For
example, you could enter 16173540600 to activate the rule when that phone number is
dialed.
Q N. Any digit from 2-9. Use for variable numbers that start an area code or exchange (area
codes and exchanges never start with 0 or 1).
Q x. Any digit from 0-9.
Q ~. Any sequence of digits and asterisks to the end of dialed digits. You can use this
character in either of the following ways:
Q To create an ambiguous timeout (see “Avoiding dialing ambiguities” on page 9-7).
Q To include a variable number of trailing digits for a rewrite rule. For example, 1~
would capture all digits or asterisks dialed after the 1.
You cannot use the ~ character when defining a stop rule.
You can use the available characters in combination. For example, 1617Nxxxxxx would activate
the rule for any number in the 617 area code. The string 1NxxNxxxxxx would activate the rule
for any long-distance number in the North American Numbering Plan. The following list
presents examples of match patterns and the phone numbers that match them:
CHAPTER 9. MANAGING OUTBOUND CALLS
9-31
Q 1617Nxxxxxx matches 16173540600 and any other seven-digit phone number in the 617
area code.
Q 1617~ matches 1617, 16173540600, 16173540600*123456789, or any other set of digits
that follows the digits 1617.
Q Nxxxxxx matches 3540600, 2000000 and any other seven digits in which the first digit
is from 2-9.
Q ~ matches any number dialed.
Notes
Q A match is made when any number beginning with the Digits dialed string is detected. For
example, a Digits dialed string of 0 would activate the rule any number beginning with 0,
such as 011.
Q Variables are case-sensitive. For example, upper-case N and lower-case n would be
interpreted as two different variables.
Adding custom routing variables
Routing rules use a set of variables to define the phone numbers to be matched. As explained
previously, by default the system defines the routing variables N, x, and ~. You can define
additional routing variables that match individual digits or combinations of digits, such as area
codes or exchanges.
For example, if you are in the 617 area code and calls to the 617, 781, and 508 area codes have
the same low cost over certain trunks, you can create a new routing variable AAA that matches
the digit sequences 617, 781, and 508. By using the AAA routing variable, for example, in a
1AAANxxxxxx match pattern, you can match calls to any seven-digit phone number in these three
area codes. Doing this would enable you to consolidate your handling of 617, 781, and 508 calls
in a single routing rule.
9-32
ADMINISTERING TELEVANTAGE
To add a routing variable
1.
Click Variables on the Routing Rules tab (see page 9-28). You can also choose Tools
> System Settings and click the External Dialing \ Routing Variables tab.
2.
Click Add. The Routing Variable dialog box opens.
3.
Enter a name for the new variable in the Name field, and then enter the set of values
that the variable will match in the Data field. The name must be a string that consists
of a repeating upper case letter (for example, W, RRR or HHHHH).
Note: The number of characters in the Name of the routing variable must be the same
as the number of digits being matched. For example, you can use a variable named
BBB to match the area codes 617 and 781, but you cannot use a variable named
BBBBB to match those area codes, and a variable BBB cannot contain anything but
3-digit numbers.
4.
Click OK to return to the External Dialing \ Routing Variables tab. Click Add to add
another routing variable or click OK.
Defining a new number for a routing rule
You can include any of the characters shown in the following table in the New number that you
define for a routing rule (see “Adding a new routing rule” on page 9-29).
CHAPTER 9. MANAGING OUTBOUND CALLS
9-33
See “Examples of number patterns and dialed digits” on page 9-35 for examples of dialed digits
and new numbers that use these characters.
Characters
Digits placed in the new number
N, x
Places the digit that the variable matched into the new
number. The position of the variable within the match
pattern is preserved in the new number. For example, If
the match pattern Nxxxxxx matches the dialed digits
5551212, including xxxx in the new number would yield
the digits matched by the first four x variables: 5512.
+
If + is the first character in the New Number field, the
routing rule’s target dialing service will apply its area
code and country code rules to the basic number. If a +
is not present, the target dialing service’s area code and
country code rules are not used.
0,-,9,*,#
9-34
Valid telephone digits.
,&
A comma in the dialing sequence causes a 2-second
pause. An ampersand causes a Flash on analog trunks,
and is ignored on other trunk types.
[n]
The nth digit in the dialed digits.
[n-m]
The nth through mth digits in the dialed digits.
[n-]
The nth through the last dialed digit.
~
All digits matched by the ~ in the dialed digits. (Can only
be used when the match pattern uses ~.)
"<string>"
Use quoted strings without modification. For example,
the following new number begins with the MyNetPhone
gateway as a quoted string, incorporates all the dialed
digits, and then adds an account name and password as
a suffix: “gateway.mynetphone.net/”[1-]*1234*1234.
ADMINISTERING TELEVANTAGE
Examples of number patterns and dialed digits
The following table illustrates some of the possibilities for defining the new number used by a
routing rule. The first column shows number patterns and dialed digits that match those patterns.
The second column shows New Number patterns that incorporate some or all of the dialed digits
and the number that results from applying the new number pattern to the dialed digits.
Note: The last example in the following table assumes that the U.S. is the country and 617 is
the area code that was selected on the Location Settings tab of the routing rule’s dialing service.
Match pattern/
Dialed digits
New Number pattern/
Number produced by pattern
1NxxNxxxxxx
16173540600
NxxNxxxxxx
6173540600
1NxxNxxxxxx
16173540600
Nxx[5-11]
6173540600
1NxxNxxxxxx
16173540600
[5-11]
3540600
1NxxNxxxxxx
16173540600
[5][6][7][8][9][10][11]
3540600
1NxxNxxxxxx
18005551111,,1211#E
[1-]
18005551111,,1211#E
1Nxx~
16173540600
18002255288,1Nxx~,4321
18002255288,16173540600,4321
Nxxxxxx
3540600
1010321Nxxxxxx
101032116173540600
Nxxxxxx
3540600
+1617Nxxxxxx
+16173540600
Setting dialing timeouts ___________________________________
Dialing timeouts determine the delay between when a user finishes dialing a number and when
TeleVantage places the call. Some delay is necessary to make sure that the user has finished
dialing and does not intend to enter additional digits.
There are two types of dialing timeout:
Q Incomplete timeouts. The delay when the digits dialed so far do not make a
recognizable number. At the end of this delay, TeleVantage intervenes to clear the digits
entered and prompt the user to try again.
Q Ambiguous timeouts. The delay when the digits dialed so far could be resolved into
more than one valid number. For example, 313 when there is a Phone Number access
code 3 and an extension 313. This delay also follows an unambiguous extension to
CHAPTER 9. MANAGING OUTBOUND CALLS
9-35
determine whether the user will enter # for a PIN or * for a direct-to-voicemail call. At
the end of this delay, TeleVantage places the call to the number it considers complete.
Notes
Q The default dialing timeouts work in most installations, and you should be careful
modifying them. With too short a timeout, users may have their calls connected
erroneously before they are finished dialing.
Q You should arrange your dialing plan to reduce ambiguous numbers. See “Avoiding
dialing ambiguities” on page 9-7.
Q Users can bypass any dialing timeout delay by pressing # at the end of the number they
are dialing.
To set dialing timeouts
1.
Choose Tools > System Settings. The System Settings dialog box opens.
2.
Choose the Internal Dialing tab to modify timeouts for internal calls (calls from a
station to another station).
3.
Adjust the following fields as needed:
Q Internal dialing incomplete timeout. Number of milliseconds before TeleVantage
times out on an internal call if not enough digits were entered to make a valid
number. The default is 8000 milliseconds (8 seconds).
Q Internal dialing ambiguous timeout. Number of milliseconds before TeleVantage
places an internal call when further valid digits could be entered. The default is
3000 milliseconds (3 seconds).
4.
Choose the External Dialing tab to modify timeouts for external calls (calls involving
an access code).
5.
Adjust the following fields as needed:
Q Dialing service incomplete timeout. Number of milliseconds before TeleVantage
times out on an external call if not enough digits were entered to make a valid
number. The default is 8000 milliseconds.
Q Dialing service ambiguous timeout. Number of milliseconds before TeleVantage
places an external call when further valid digits could be entered. The default is
3000 milliseconds.
6.
9-36
Click OK.
ADMINISTERING TELEVANTAGE
Changing timeouts with analog or Robbed Bit T1 lines
If users intermittently hear “Number not available” when they dial out on analog or Robbed Bit
T1 trunks, you may want to consider increasing the Dialing service ambiguous timeout by
half-second intervals. This problem does not occur on ISDN or IP lines).
If you increase this timeout by too much, however, users can miss the beginning of the audio
signal at the target if the called party answers immediately, for example, a company auto
attendant. If this problem occurs, you can do any of the following:
Q Reduce the dialing service ambiguous timeout.
Q Instruct users to enter # after dialing a number.
Q Collect all digits before dialing (see page 9-11).
Modifying ambiguous dialing timeouts from auto attendants
The ambiguous dialing timeouts in System Settings affect only numbers dialed from stations.
The same delay exists for numbers dialed from auto attendants—for example, to cover
ambiguities between an auto attendant menu choice and an extension. See “Avoiding the auto
attendant ambiguous dialing delay” on page 10-19.
Setting up emergency dialing ______________________________
You can configure TeleVantage to support the following kinds of emergency dialing services:
Q Standard 911
Q Enhanced 911 (E-911).
Note the following:
Q A user can make an emergency call from any TeleVantage station, even one not assigned
to any user, and even if the user is blocked from making external calls.
Q If you want users who are logged in to TeleVantage on a trunk to be able to make
emergency calls, use the TeleVantage Advanced Settings Editor to set the following
setting to a value of 1. The default, 0, does not allow emergency calls to be made by a
user logged in on a trunk.
Dial911AtDialtoneOnTrunk
See Appendix J of Installing TeleVantage for instructions on advanced settings.
Using standard 911 service with TeleVantage
Standard 911 service does not require additional hardware. All standard 911 calls use a
TeleVantage trunk and go through the phone company to the emergency dispatching center.
You can change the emergency number from 911 to something else as follows:
1.
Choose Tools > System Settings. The System Settings dialog box opens.
2.
Choose the Emergency tab.
CHAPTER 9. MANAGING OUTBOUND CALLS
9-37
3.
Enter the new number in the Emergency Number field.
4.
Check Emergency number can be dialed at internal dial tone if you want users to
be able to dial the emergency number without first dialing an access code (such as 9
to get an outside line). If unchecked, users must dial the access code and then the
emergency number (for example, 9 911). This setting affects emergency calls only. Be
careful when changing this setting as you may cause accidental emergency calls.
5.
Click OK.
Using enhanced 911 service with TeleVantage
Enhanced 911 (E-911) calls send the calling station’s ANI information (the TeleVantage station
ID) to the phone company’s E-911 center so they can identify the location of the person who
made the emergency call, for example, the specific floor and office in a large building.
Note: E-911 service is not supported on IP phones. Emergency calls made from IP phones are
handled as standard 911 calls.
Before enabling E-911 service
Before you can use E-911 service with TeleVantage, you must have installed and configured an
E-911 device, and connected one or more E-911 stations. See Appendix J of Installing
TeleVantage for instructions.
Note: E-911 stations must be physically connected to the E-911 device and dedicated to the
E-911 service. They cannot be shared with a user.
How E-911 calls work
If E-911 is enabled and the E-911 device has been installed and configured correctly, an
emergency call from any station is automatically routed to one of the E-911 stations. As soon as
the E-911 station takes the call, the station ID of the caller’s station is passed to the E-911 device.
The E-911 device then calls the emergency center directly over a dedicated trunk.
If for any reason the emergency call cannot be placed using E-911 service, TeleVantage
automatically places a standard 911 call to the emergency center using the local carrier.
After you install and configure an E-911 device and stations, you must use the Emergency tab
to enable E-911 service and assign your E-911 stations.
To enable E-911 service
9-38
1.
Choose Tools > System Settings. The System Settings dialog box opens.
2.
Choose the Emergency \ E-911 tab.
3.
Check Enable support for E-911 service.
ADMINISTERING TELEVANTAGE
4.
Click Add to add each E-911 station that is connected to the E-911 device. The Add
E-911 Station dialog box opens.
5.
Select a station from the dropdown list, and then click OK.
The list shows all unassigned station IDs. Note that an E-911 station will not appear in
this list if a user is also assigned to that station ID. If an E-911 station does not appear
in this list, you must unassign it from the user who shares it. To change a user’s station
ID, see “Assigning a station ID” on page 6-13.
6.
Repeat the steps in this procedure until you have added all E-911 stations, then click
OK to close the System Settings dialog box.
How E-911 calls work
If E-911 is enabled and the E-911 device has been installed and configured correctly, an
emergency call from any station is automatically routed to one of the E-911 stations. As soon as
the E-911 station takes the call, the station ID of the caller’s station is passed to the E-911 device.
The E-911 device then calls the emergency center directly over a dedicated trunk.
If for any reason the emergency call cannot be placed using E-911 service, TeleVantage
automatically places a standard 911 call to the emergency center using the local carrier.
Troubleshooting E-911
Causes for failure of an E-911 call include the following:
Q All the E-911 stations are busy.
Q The E-911 device fails.
Q The dedicated trunk from the E-911 device to the emergency center is down.
Q The trunk does not respond within a certain time period.
Q E-911 service is not enabled in TeleVantage.
CHAPTER 9. MANAGING OUTBOUND CALLS
9-39
CHAPTER 10
CHAPTER 10
HANDLING INBOUND CALLS
CHAPTER CONTENTS
About inbound call routing. . . . . . . . . . . . . . . . . . . . . . . . . . . . . . . . . . . . . . . . . 10-2
About auto attendants . . . . . . . . . . . . . . . . . . . . . . . . . . . . . . . . . . . . . . . . . . . . 10-4
Setting up an auto attendant . . . . . . . . . . . . . . . . . . . . . . . . . . . . . . . . . . . . . . . 10-6
Routing calls to users . . . . . . . . . . . . . . . . . . . . . . . . . . . . . . . . . . . . . . . . . . . 10-20
Routing calls to extensions . . . . . . . . . . . . . . . . . . . . . . . . . . . . . . . . . . . . . . . 10-21
Routing calls to workgroups . . . . . . . . . . . . . . . . . . . . . . . . . . . . . . . . . . . . . . 10-21
About inbound call routing _________________________________
This chapter provides an overview of inbound call routing methods in TeleVantage and directs
you to the chapters in this manual that explain in detail how to use them.
With TeleVantage, you can route incoming calls in the following ways. You can use one of these
methods or several of them in combination:
Q Route calls to an auto attendant. Incoming calls go to an auto attendant, at which
callers enter an extension number. Auto attendants can also provide a dial-by-name
directory for callers who do not know a user’s extension.
Q Route calls on a trunk directly to a user. All incoming calls on a specific trunk go to
a specified user’s phone. With this method, you can send calls to a live operator who then
transfers them to users. You can also give a user a dedicated private line.
Q Ring multiple users simultaneously. Incoming calls simultaneously ring the phones of
all users in a specific workgroup. The first user in the workgroup who answers is
connected to the caller. Workgroups can contain an unlimited number of users. For more
information about workgroups, see Chapter 8, “Managing Workgroups.”
Q Route calls to a call center queue or an ACD workgroup. Incoming calls are
automatically put on hold in a call center queue or an ACD workgroup until an agent
becomes available. See TeleVantage Call Center Administrator’s Guide for details about
setting up and using call center queues and ACD workgroups.
Q Route calls directly to an IVR Plug-in. Incoming calls are transferred to an IVR
Plug-in for further processing. For more information about IVR Plug-ins, see Appendix
G of Installing TeleVantage.
Q Assign DID (Direct Inward Dial) numbers. Incoming calls on any trunk are routed to
the appropriate user, auto attendant, workgroup, IVR Plug-in, or queue using the DID
numbers that callers dial. Departments in your company can have their own phone
numbers and auto attendants without requiring your system to use dedicated trunks. For
more information, see “Telephone company services that help TeleVantage” on
page 5-5.
Q Route calls to a fax machine or a pool of fax machines. For more information, see
“Setting up fax routing” on page 5-7.
10-2
ADMINISTERING TELEVANTAGE
In addition, users can route calls by setting up call forwarding or using routing lists. For more
information, see Using TeleVantage.
CHAPTER 10. HANDLING INBOUND CALLS
10-3
About auto attendants_____________________________________
By default TeleVantage uses auto attendants to route calls to users. Auto attendants
automatically answer incoming calls and offer callers options for directing their calls. For
example, your main auto attendant might say: “Welcome to Barchetta Industries. You may dial
an extension at any time. For Sales, press 1. For Customer Support, press 2. To hear a recorded
message about our special offers, press 3. To speak to the Operator, please hold.”
What callers can do at an auto attendant
You can set up an auto attendant to let callers do any of the following:
Q Dial an extension
Q Dial a user by name in the dial-by-name directory
Q Log in using a TeleVantage extension and password
Q Hear a recorded message
Q Transfer to a user, queue, workgroup, or IVR Plug-in
Q Transfer directly to a voice mailbox to leave a message
Q Transfer to another menu (another auto attendant)
You can also specify an automatic action to take if callers do nothing.
How you can use auto attendants
You can use auto attendants in powerful ways, as follows:
Q You can create additional auto attendants and assign them to different trunks or DID
numbers. For example, if you distribute different phone numbers for your sales
department and your accounting department, you can create a custom auto attendant for
each department.
Q TeleVantage lets you nest auto attendants, so that one option on an auto attendant menu
can take callers to a menu of other options on another auto attendant. By creating
multilevel auto attendants you can offer callers a nearly unlimited number of choices.
Q You can customize an auto attendant to automatically change its behavior by time of day
by scheduling greetings and call transfer behavior. For example, after 6:00 pm (and on
weekends) your auto attendant could automatically play a “We’re closed” greeting that
reads your business hours, then transfer calls to a voice mailbox.
Q You can create auto attendants that are recorded in different languages but contain the
same menu choices. A master auto attendant tells callers, “To continue in English, press
1. To continue in Spanish, press 2.” Pressing the appropriate choice transfers the caller
to the auto attendant recorded in that language. The language choice also changes the
system prompts that TeleVantage presents to the caller to the specified language.
Q Different auto attendants can have different hold music (for example, sales pitches for
sales reps or soothing music for support lines).
10-4
ADMINISTERING TELEVANTAGE
Q Auto attendants can attach any number of Custom Data variables to calls. Custom Data
variables can be attached to all calls handled by the auto attendant, calls that select a
specific menu choice, or calls handled by a schedule rule. For example, you could have
callers to your Customer Support line press 1 for Product A, or 2 for Product B. Each
option would transfer the caller to your customer support queue, but would set the
“Product” variable differently. Agents using ViewPoint’s Call Monitor would see a
“Product” column showing the product that each caller had selected.
Q Auto attendants can attach any number of call center skill requirements to calls bound
for a call center queue, letting you use skills-based routing. Skill requirements can be
attached to all calls handled by the auto attendant, calls that select a specific menu
choice, or calls handled by a schedule rule. For more information, see Chapter 3 of the
TeleVantage Call Center Administrator’s Guide.
Q Auto attendants can be dedicated to a specific workgroup, so that callers can dial only
the extensions of users who belong to that workgroup. The dial-by-name directory is
similarly restricted. In this way you can have multiple companies share your office, and
ensure that callers to one company do not reach users in another company by accident.
What callers hear
The auto attendant recording that callers hear is composed of a series of short individual
recordings. The individual recordings are the following:
Q A greeting. The greeting is the first thing the auto attendant plays when it answers a call,
for example, “Thank you for calling Barchetta Industries.”
Q Menu prompts. Each menu prompt recording tells callers about a single option. For
example, “For Sales, press 1.” You must record each such prompt individually and
specify the sequence in which you want the auto attendant to play them.
Note: Callers do not have to wait for a menu prompt to press the key for it. They can press the
key as soon as they reach the auto attendant. This can be useful for pressing multiple keys quickly
in cases where one menu choice leads to another menu.
The Default Auto Attendant
When TeleVantage is installed, all incoming trunk lines are assigned to the Default Auto
Attendant at extension 8000. The Default Auto Attendant is also assigned to any new trunk that
you add. You can change these assignments at any time.
The Default Auto Attendant plays a greeting and offers the caller the following options:
Q Dial any TeleVantage extension.
Q Press 9 to access a dial-by-name directory.
Q Press 0 to transfer to the Operator.
Q Press # to log in to TeleVantage.
If three seconds pass after the greeting has played without the caller pressing a key, the call is
transferred to the Operator.
CHAPTER 10. HANDLING INBOUND CALLS
10-5
The 8000 extension and dialing services
The default auto attendant’s extension of 8000 means that there will be a short delay when
dialing 8 as a dialing service. To use 8 as a dialing service without the delay in dialing, change
the default auto attendant’s extension to a number that doesn’t begin with 8.
The Auto Attendants view
To create and manage auto attendants, click the Auto Attendants icon in the view bar to open
the Auto Attendants view.
Each auto attendant that you create appears as a row in the Auto Attendants view. A nested auto
attendant is considered a separate auto attendant and appears on its own row.
Double-click an auto attendant in the view to edit it in the Auto Attendant dialog box.
Auto attendants that you create are not used until you assign them to a trunk in the Calls are
sent to field in the Trunk dialog box, as described for the various trunk types in Chapter 5. In
this way you can create multiple auto attendants for various situations and then activate the one
you want at the appropriate time.
Setting up an auto attendant________________________________
The following aspects of setting up an auto attendant are described in the sections that follow:
Q “Creating a new auto attendant” (see the next section)
Q “Defining menu choices” (page 10-8)
Q “Restricting an auto attendant to members of a workgroup” (page 10-14)
Q “Scheduling transfers and greetings” (page 10-14)
Q “Setting up an auto attendant’s hold music” (page 10-17)
Q “Setting custom data variables and skill requirements with an auto attendant” (page
10-17)
10-6
ADMINISTERING TELEVANTAGE
Q “Customizing login behavior from auto attendants” (page 10-19)
Q “Assigning an auto attendant to a trunk” (page 10-20)
Creating a new auto attendant
1.
Select File > New > Auto Attendant. The Auto Attendant dialog box opens.
2.
Enter the following information:
Q Name (required). Descriptive name for the new auto attendant, for example, “Sales
auto attendant.”
Q Extension (required). Extension used to reach the auto attendant. TeleVantage
users can transfer callers to the auto attendant at this extension. See “Assigning an
extension” on page 6-12 for recommendations and restrictions.
To test the auto attendant, dial the auto attendant’s extension. The default auto
attendant is assigned an extension of 8000.
Q DID number. To give this auto attendant a DID number, assign one from the block
of numbers provided by your telephone company or T1 provider. When
TeleVantage recognizes this number as the final digits of an inbound call, the caller
is automatically connected to this auto attendant, instead of the main auto attendant.
To assign multiple DID numbers to an auto attendant, separate each number by a
comma.
Q Description. Information that describes the auto attendant.
Q Organization. Check this field and select an Organization to have calls to this auto
attendant logged with that Organization. Calls must end at the auto attendant to be
logged with the selected Organization. If the call proceeds to a user, it will be
logged with the user’s Organization. For more about Organizations, see “Using
Organizations” on page 11-2.
As a further way of segregating auto attendant use by Organization, you can restrict
dialing by membership. See “Restricting an auto attendant to members of a
workgroup” on page 10-14.
CHAPTER 10. HANDLING INBOUND CALLS
10-7
3.
Record a greeting that plays when callers first reach the auto attendant. A typical
greeting is, “Thank you for calling Barchetta Industries. If you know your party’s
extension, you can enter it at any time.” For more information, see “Using the audio
controls” on page 2-10.
4.
Click each of the remaining tabs to finish creating the new auto attendant:
Q Menu Choices (described in the next section)
Q Scheduled Actions (described in “Scheduling transfers and greetings” on page
10-14)
Q Hold (described in “Setting up an auto attendant’s hold music” on page 10-17)
5.
Click OK on any tab to save the new auto attendant.
6.
To activate the auto attendant to handle incoming calls, assign it to a trunk (see
“Assigning an auto attendant to a trunk” on page 10-20).
You can save time and reduce typing when you want to create a new auto attendant by
right-clicking an existing auto attendant in the Auto Attendants view and clicking Copy on the
shortcut menu. Then right-click anywhere in the view and click Paste on the shortcut menu. The
Auto Attendant dialog box opens with a copy of the existing auto attendant and you can now
customize it.
Defining menu choices
An auto attendant can present a series of menu choices to callers. For example, callers might
press 1 to transfer to the Sales department, 2 to transfer to the Customer Service department, etc.
When a caller reaches an auto attendant, its greeting plays, followed by its menu choice prompts
in the order you specify.
Important: If your auto attendant supports extension dialing, make sure that its menu choices
do not conflict with extension numbers. For example, if you assign the 2 key to a menu choice,
make sure there are no extensions beginning with 2. Otherwise callers trying to dial the extension
will select the menu choice instead. See “Assigning an extension” on page 6-12.
Each menu choice can contain the following:
Q Prompt. A recorded message that explains the option to the caller. For example, “For
Sales, press 1.”
Q Key. The telephone key callers must press to select the option.
Q Action. The action the system takes when the key is pressed.
Q Language. The language for subsequent system prompts. When callers enter the key
associated with this menu choice, all subsequent prompts are in the specified language.
Your system supports the languages that were installed with the TeleVantage Server. For
more information, see Installing TeleVantage.
Q Custom data. Extra information attached to the call. Whenever a caller selects the menu
choice, you can attach a custom data variable to the call with the value you define (text
10-8
ADMINISTERING TELEVANTAGE
or numeric). That value can be seen by users or used to automate call handling. For more
information, see “Defining custom data variables” on page 11-13.
Menu choice actions
The following table lists the actions that you can choose.
Action
Description
Transfer to user
Transfers the call to a TeleVantage user.
Send to voicemail
Transfers the call to a user’s voice mailbox.
Play message
Plays a message that you record.
User login
Offers callers the TeleVantage login prompt. For
options, see “Customizing login behavior from
auto attendants” on page 10-19.
Dial by name
Offers callers the dial-by-name directory.
Jump to auto
attendant
Transfers the call to another auto attendant
(see the Note following this table).
Transfer to IVR
Plug-in
Transfers the call to an IVR Plug-in for
processing.
Transfer to Queue
Transfers the call to a call center queue.
Transfer to
workgroup
Transfers the call to a workgroup. The
workgroup phones ring simultaneously, and the
first workgroup member to answer the call is
connected to it.
Note: TeleVantage automatically disconnects calls if callers do not press a key during three
consecutive jumps between auto attendants (for example, if you set up an auto attendant to jump
to itself for the “nothing” menu choice action). Callers are presumed to have hung up. To change
the number of auto attendants that can execute without caller input, use the
Server\MaxAutoAttendantLoops advanced setting. See Appendix J of Installing TeleVantage for
instructions on advanced settings.
CHAPTER 10. HANDLING INBOUND CALLS
10-9
Setting general menu options
1.
In the Auto Attendant dialog box, click the Menu Choices tab.
2.
In Number of seconds before performing ‘nothing’ menu choice, enter the number
of seconds that the auto attendant will wait without a menu choice being selected,
before performing the action associated with the Nothing menu choice. The wait
begins after the final menu choice prompt finishes playing. You can choose the action
for the Nothing menu choice using the following steps.
Note: If you have turned on fax detection for your trunks, the combined time for this
setting plus the auto attendant prompt (greeting and menu choice prompts) should be
at least 10 seconds. If the combined time is less than 10 seconds, the system might fail
to detect fax tones and route them before the “nothing” menu choice takes over.
3.
To permit callers to dial extensions from this auto attendant, leave Process all other
digits as user extensions field checked. For information on unchecking it, see
“Preventing callers from dialing extensions” on page 10-13.
Note: Auto attendant extensions (for example, 8001) cannot be dialed at an auto
attendant.
4.
To disable type-ahead for this auto attendant, check Prevent type-ahead.
Type-ahead enables users to enter a sequence of commands together. For example,
with a series of auto attendants set up as submenus, a caller could press 123 to choose
menu choice 1, menu choice 2 from the submenu, and menu choice 3 from the final
submenu. The problem with type-ahead is that if a caller enters a non-existent
extension (for example, 123), the auto attendant processes the digits as type-ahead
commands and sends the user to the appropriate menu or submenu. With type-ahead
disabled, callers dialing non-existent extensions are never sent to menu choices.
However, callers selecting menu choices must wait until they hear the prompts for
10-10
ADMINISTERING TELEVANTAGE
each menu before entering commands for that menu.
5.
To dedicate this auto attendant to a workgroup, so that only users in the workgroup can
be dialed from it, check Restrict dial-by-name and extension matching to members
of, and select the workgroup. For more information, see “Restricting an auto attendant
to members of a workgroup” on page 10-14.
Adding or editing a menu choice
1.
On the Menu Choices tab of the Auto Attendant dialog box, click Add to create a new
menu choice. Click Edit to modify the selected menu choice.The Edit Menu Choice
dialog box opens.
2.
On the General tab, type the text of the Prompt to offer this menu choice, for
example, “For Sales, press 1.” Use the audio controls to record the prompt. For more
information, see “Using the audio controls” on page 2-10.
3.
In When caller presses, select the key that callers must press to select the menu
choice. Valid keys are 0-9, *, or #.
4.
In the Perform action dropdown list, select the action to perform when callers press
the key. For a list of actions, see “Menu choice actions” on page 10-9.
For transfers to a user, IVR Plug-in, or queue, select an optional Announce prompt,
that determines what callers hear when they select this menu choice:
Q Nothing. The call is transferred with no announcement.
Q Name or extension. Announces the name of the user, IVR Plug-in, or queue, using
the voice title if available. If no voice title is available, the auto attendant announces
the extension to which the call is transferring.
Q One moment please. Announces “One moment please” as the call is transferred.
CHAPTER 10. HANDLING INBOUND CALLS
10-11
5.
Click the Advanced tab.
6.
To change the language of subsequent prompts, check Change the caller’s telephone
prompts to. Then select another language that was installed with TeleVantage from
the dropdown list. When callers press the key for this menu choice, all subsequent
prompts are in the language you specify here.
For example, to give callers the option of accessing a dial-by-name directory in
Spanish, set up a dial-by-name menu choice on the General tab, and then select
Spanish on the Advanced tab.
7.
To set the value for one or more custom data variables or call center queue skill
requirements whenever this menu choice is selected, click Add. The Custom Data /
Skill Requirement dialog box opens.
Q To set a custom data variable, click Custom data, select the variable from the
dropdown list, then enter the value to be assigned to the variable when the menu
choice is selected. For more information about custom data variables, see “Defining
custom data variables” on page 11-13.
10-12
ADMINISTERING TELEVANTAGE
Q If you have a TeleVantage call center queue that uses skills-based routing, you can
assign skill requirements to the call by clicking Agent skill, selecting the skill from
the dropdown list, then entering minimum and maximum values to define which
agents are qualified to answer the call. For more information about queues and
skills-based routing, see the TeleVantage Call Center Administrator’s Guide.
8.
Click OK to return to the Edit Menu Choice dialog box.
9.
Click OK to save the menu choice and return to the Auto Attendant dialog box.
10. On the Menu Choices tab, use the arrows to change the order in which menu choices
are presented to callers.
11. Add more menu choices or click OK to save the auto attendant.
Preventing callers from dialing extensions
By default, all auto attendants permit the caller to dial extensions. However, you may want an
auto attendant to offer menu choices only, for example an auto attendant whose only purpose is
to transfer callers to call center queues, or an informational auto attendant that provides recorded
messages based on caller choices. You can disallow extension dialing, to ensure that callers
entering digits do not get transferred to extensions by accident.
To disallow extension dialing, uncheck Process all other digits as user extensions on the
Menu Choices tab. When unchecked, the auto attendant responds only to the digits you define
as menu choice selections. Note that this eliminates the dialing delay if a menu choice is
ambiguous with an extension number (see “Avoiding the auto attendant ambiguous dialing
delay” on page 10-19).
When checked, the auto attendant permits the dialing of extensions.
CHAPTER 10. HANDLING INBOUND CALLS
10-13
Restricting an auto attendant to members of a workgroup
You can restrict an auto attendant to be able to reach only the extensions within a workgroup,
which is useful for tenanting situations. When you do so, callers to the auto attendant can dial
the extensions of workgroup members only, and the dial-by-name directory is restricted to
workgroup members only. If they dial other extensions in the system, they receive an invalid
extension message. You can use this feature when separate businesses share a TeleVantage
Server, to make sure that callers to one business don’t reach users in another business. For more
information about handling multiple organizations in a TeleVantage system, see Chapter 11.
To restrict auto attendant dialing to the members of a workgroup, check Restrict dial-by-name
and extension matching to members of on the Menu Choices tab, and select the workgroup.
Click
to define a new workgroup (see “Creating a Workgroup” on page 8-4).
Note: When you restrict auto attendant dialing to a workgroup, callers who press 0 at the auto
attendant are transferred to the workgroup’s If no answer, transfer extension, not the system’s
Operator extension.
Scheduling transfers and greetings
You can customize an auto attendant to automatically change its behavior based on time of day
or on special dates. You can schedule the following actions:
Q Playing of a different main greeting, which replaces the auto attendant’s regular
greeting. For example, you can schedule a “We’re closed” greeting to be played to all
callers after business hours and on weekends.
Q A transfer to any other extension, including another auto attendant, user, queue, IVR
Plug-in, or workgroup. For example, to provide extended customer support coverage,
support calls that arrive after your California office closes in the evening can transfer
automatically to the main auto attendant at your facility in New Zealand.
Note: If you have scheduled a greeting and a transfer to occur at the same time, the transfer
always takes precedence and the greeting does not play. Also, if you have two greetings or two
transfers scheduled for overlapping times, the top-most scheduled item always takes
precedence.
10-14
ADMINISTERING TELEVANTAGE
To schedule transfers or greetings
1.
In the Auto Attendants view, create a new auto attendant or double-click an existing
auto attendant to edit it. The Auto Attendant dialog box opens.
2.
Click the Scheduled Actions tab.
The following table shows the information that appears for each scheduled action
already defined for this auto attendant.
3.
Column
Description
Enabled
If checked, the action will be performed as
scheduled. If unchecked, the action is
temporarily disabled.
Description
Time period during which the action will be
performed.
Action
Action that will be performed.
Click Add to schedule a new action. Click Edit to modify the selected action. The
Schedule Action dialog box opens.
CHAPTER 10. HANDLING INBOUND CALLS
10-15
4.
On the Occurrence tab, select one of the periods of time during which the action will
occur.
Note: If your TeleVantage system uses several sets of business hours, click
Business Hours before you click OK in the Schedule Action dialog box and verify that
the action will take place according to the set of business hours that you want to use.
For more information about business hours, see “Setting business hours” on page 3-7.
If you choose During custom hours, click Custom Hours and see “Setting up custom
hours” on page 6-26.
5.
Check Enable this schedule action to activate this action as soon as you save the auto
attendant. If unchecked, the action is temporarily disabled.
6.
Click the Action tab.
7.
Under This schedule entry, select the action that the auto attendant will perform
immediately when a call arrives during the period covered by the schedule entry:
Q Transfers to. Immediately transfers callers to the extension that you select from the
dropdown list during the scheduled time period.
Q Plays greeting. Immediately plays the greeting that you record during the
scheduled time period. For more information, see “Using the audio controls” on
page 2-10.
8.
10-16
Using the Set these custom data and skill requirements section, you can have the
auto attendant automatically attach custom data variables and/or call center queue skill
requirements to all calls handled by the schedule rule. For more information about
custom data, see “Defining custom data variables” on page 11-13. For more
information about call center queue skill requirements, see the TeleVantage Call
Center Administrator’s Guide.
ADMINISTERING TELEVANTAGE
9.
Click OK. The Schedule Action dialog box closes.
10. On the Scheduled Actions tab in the Auto Attendant dialog box, use the arrows to
move a scheduled transfer or greeting to a different position on the list. If you have two
greetings or two transfers scheduled for overlapping times, the one that is at the top of
the list will be used. If a greeting and a transfer are scheduled for the same time, the
greeting is not played.
11. Click OK in the Auto Attendant dialog box to save your changes.
Setting up an auto attendant’s hold music
An auto attendant can play music that is different than the system-wide hold music. Callers hear
an auto attendant’s hold music while the auto attendant is transferring them to an extension, and
they continue to hear it while on hold until they reach a part of TeleVantage that uses different
hold music, such as a queue or another auto attendant that has different hold settings. Each auto
attendant can have its own hold music setting.
If you do not specify hold music for an auto attendant, the auto attendant uses the system default
hold music. To configure system default hold music, see “Setting up system-wide
music-on-hold” on page 13-13.
To set up different hold music for an auto attendant
1.
In the Auto Attendant dialog box, click the Hold tab.
2.
Check Play hold music from and select the music-on-hold source you want. To add
music-on-hold sources, see “Adding music-on-hold sources” on page 13-14.
3.
Click OK.
Setting custom data variables and skill requirements with an auto
attendant
You can have an auto attendant automatically attach any number of custom data variables and/or
call center skill requirements to calls.
For more about custom data variables, see “Defining custom data variables” on page 11-13. For
more about using skill requirements for skills-based routing in a call center queue, see Chapter 3
of the TeleVantage Call Center Administrator’s Guide.
CHAPTER 10. HANDLING INBOUND CALLS
10-17
You can have an auto attendant attach custom data variables or skill requirements to a call in the
following ways:
Q To every call handled by the auto attendant. See the next section.
Q To each call that selects a specific menu choice. See “Adding or editing a menu choice”
on page 10-11.
Q To each call handled by a schedule rule. See “Scheduling transfers and greetings” on
page 10-14.
Attaching variables or skill to all calls handled by an auto attendant
To have an auto attendant automatically attach custom data variables and/or call center skill
requirements to every call that it handles, do the following:
1.
Edit the auto attendant in the Auto Attendant view to open the Auto Attendant dialog
box.
2.
Click the Advanced tab. The tab lists the custom data variables and skill requirements
defined so far to be attached to all calls .
3.
Click Add. The Custom Data / Skill Requirement dialog box opens.
4.
Do one of the following:
Q To add a custom data variable, click Custom data, select the variable from the
dropdown list, then enter a value for a variable in Variable value. The custom data
variable will be set to that value for all calls handled by the auto attendant.
Click
to create a new custom data variable.
Q To add a call center skill requirement, click Agent skill, select the skill from the
dropdown list, then set Minimum and Maximum values for the skill. The skill will
be attached with those required values to all calls handled by the auto attendant.
Skills will not be used unless the call is routed to a call center queue that uses
skills-based routing.
Click
5.
10-18
to create a new agent skill.
Click OK.
ADMINISTERING TELEVANTAGE
Customizing login behavior from auto attendants
By default, the User login menu choice prompts for extension and password, then sends users
to TeleVantage’s voicemail/account menu (see Appendix A of Using TeleVantage for details).
However, you can customize the user login destination, so that users who successfully log in are
sent to any extension.
You can use this feature to provide quick access to an extension for verified users, for example,
to an IVR Plug-in that gives them custom account information. Instead of having to log in from
the auto attendant, press # for an internal dial tone, and dial the extension, the user simply logs
in and is connected immediately to the extension.
Notes
Q When sending login calls to a custom destination, the standard TeleVantage alert prompts
do not play, for example the prompts alerting the user to DND status, active call
forwarding, and nearly full voice mailbox. However, the user still is prompted to change
his or her password if that is required.
Q Customizing user login changes the login behavior through this auto attendant only. Users
logging in from a station’s dial tone always have the default behavior.
To customize user login
1.
In the Auto Attendant dialog box, click the Menu Choices tab.
2.
Click Add. The Edit Menu Choice dialog box opens.
3.
From the Perform action dropdown menu, select User login.
4.
Check Bypass account menu and transfer to.
5.
Select the destination extension from the dropdown list.
6.
Click OK.
Avoiding the auto attendant ambiguous dialing delay
By default, when a caller dials an ambiguous number at an auto attendant, there is a 3-second
delay while the system waits to see if the number is complete. For example, if the auto attendant
has a menu choice accessed by pressing 2, and an extension 200, a caller pressing 2 will
experience the delay while the auto attendant waits to see if more digits are coming.
You can bypass or change the delay in the following ways:
Q The caller can press # after dialing the number. This signals that the number is complete,
and the caller is connected without delay.
CHAPTER 10. HANDLING INBOUND CALLS
10-19
Q You can modify your dialing plan to eliminate ambiguous numbers. See “Avoiding
dialing ambiguities” on page 9-7.
Q You can turn off extension dialing, if the auto attendant is meant to be used only for
menu choices. To do so, uncheck Process all other digits as user extensions on the
Menu Choices tab. This bypasses any ambiguities between menu choices and extension
numbers, enabling menu choices to be dialed without the delay. See “Preventing callers
from dialing extensions” on page 10-13 for more information.
Q You can modify the length of the delay by changing the TeleVantage Advanced Setting
AutoAttendantInterdigitTimeout. Be careful when modifying this setting if
ambiguous numbers exist, because callers may find themselves connected to the wrong
number.
Assigning an auto attendant to a trunk
In the Trunk dialog box or on the Trunks tab of an Internet span, select the auto attendant under
Calls are sent to.
Deleting auto attendants
If you delete an auto attendant, all trunks using that auto attendant will use the Default Auto
Attendant. You cannot delete the Default Auto Attendant.
Routing calls to users _____________________________________
When you route calls directly to users, all incoming calls on the dedicated trunk are sent to that
user. If the user is busy or does not answer, the calls follow the user’s routing list.
By routing calls directly to a user, you can do the following:
Q Send incoming calls on the trunk to a live Operator who then transfers the calls to the
appropriate destination. You can do this on all your trunks.
Q Send incoming calls on the trunk to a user. If your phone lines do not support direct
inward dial (DID), this is the only way to let callers dial a user directly (without going
through an auto attendant).
To route calls on a trunk to a user, select a user in the Calls are sent to dropdown list on the
Trunk dialog box. See “Adding an analog trunk” on page 5-12.
10-20
ADMINISTERING TELEVANTAGE
Routing calls to extensions ________________________________
To route calls on a trunk to any extension (user, auto attendant, queue, IVR Plug-in, or
workgroup), modify the trunk in the dialog box specified in the next table.
Trunk type
To modify trunk, open this dialog box
Analog trunk
Trunk dialog box
Robbed Bit T1
span
Robbed Bit T1 Span dialog box, Trunks tab
Internet span
Internet Span dialog box, General tab
ISDN/CAS T1/E1
span
ISDN/CAS T1/E1 Span dialog box, Trunks tab
For more information about routing inbound calls on a trunk, see Chapter 5, “Managing Trunks
and Spans.”
Routing calls to workgroups _______________________________
You can have incoming calls ring the phones of all users in a workgroup at the same time. The
first user to answer the call is connected to the caller. This feature is handy for departments or
small offices in which it does not matter who answers an incoming call.
To route calls on a trunk to a workgroup, select a workgroup in the Calls are sent to dropdown
list on the Trunk dialog box. See “Adding an analog trunk” on page 5-12.
Note: You can also select a workgroup in the Faxes are sent to dropdown list on the Trunk
dialog box, to direct incoming faxes to a bank of fax machines or a fax server with many ports.
The first fax machine to answer receives the fax.
If you want to route calls to a group of people using a distribution algorithm other than
simultaneous ring, create a placeholder user whose routing list calls the workgroup, and route
calls to the placeholder user. See Using TeleVantage for instructions on creating routing lists.
CHAPTER 10. HANDLING INBOUND CALLS
10-21
CHAPTER 11
CHAPTER 11
TRACKING AND DISTINGUISHING
CALLS
CHAPTER CONTENTS
About tracking and distinguishing calls . . . . . . . . . . . . . . . . . . . . . . . . . . . . . . . 11-2
Using Organizations . . . . . . . . . . . . . . . . . . . . . . . . . . . . . . . . . . . . . . . . . . . . . 11-2
Using account codes. . . . . . . . . . . . . . . . . . . . . . . . . . . . . . . . . . . . . . . . . . . . . 11-6
Defining custom data variables . . . . . . . . . . . . . . . . . . . . . . . . . . . . . . . . . . . . 11-13
About tracking and distinguishing calls ______________________
TeleVantage provides several ways to track groups of similar calls for purposes of
record-keeping, billing, or automated call handling. The most basic ways to track related calls
are by sorting the Call Log and Trunk Log (see “Using the Call Log view” on page 12-12 and
“Using the Trunk Log view” on page 12-18), and by running reports using the TeleVantage Call
Center Reporter (see the TeleVantage Call Center Administrator’s Guide). This chapter
describes the following more advanced methods of tracking and distinguishing calls:
Q Using Organizations. Organizations enable two or more separate businesses or
contractors share a TeleVantage Server and trunks, yet be independent of each other in
terms of caller experience and internal billing. See the next section.
Q Using account codes. With user-entered account codes you can distinguish any group
of calls for reporting and accounting purposes. For example, if your office contains
employees or contractors whom you bill separately for their phone use, you can use
account codes to mark calls by the user they belong to. Other uses of account codes
include marketing campaigns, case and issue tracking, and more. See page 11-6
Q Defining custom data variables. Custom data variables enable you to attach any
information to incoming calls, for example, the name of the product that the caller is
calling about. Users can view custom data variables in their Call Monitors, and you can
set up automatic call handling based on custom data values. You can also report on calls
involving custom data variables. See page 11-13.
Using Organizations ______________________________________
With Organizations, two or more separate businesses or other groups can share a TeleVantage
Server, yet remain independent. Callers dialing a user in one Organization would never know
that other businesses exist there, and internal billing can be kept strictly separate.
Once you define one or more Organizations, and assign each user to the appropriate
Organization, you can do the following:
Q Log calls by Organization for purposes of tracking or billing.
Q Restrict callers at the auto attendant to dialing only the extensions of users in the
Organization they’re calling.
Q Distribute outbound trunk use between Organizations.
This section covers the following aspects of using Organizations:
Q “Defining an Organization” (page 11-3).
Q “Assigning users to Organizations” (page 11-3).
Q “How calls are logged by Organization” (page 11-4).
Q “Creating an auto attendant for each Organization” (page 11-4).
Q “Restricting outbound trunk use by Organization” (page 11-4).
Q “Configuring Operators for multiple Organizations” (page 11-5).
11-2
ADMINISTERING TELEVANTAGE
Defining an Organization
To use Organizations, you must first define them.
1.
Choose Tools > System settings. The System Settings dialog box opens.
2.
Choose the Organizations tab, which lists the Organizations you have defined so far.
To edit or delete an existing Organization, click the Organization, then click Edit or
Delete.
3.
To add a new Organization, click Add. The Organization dialog box opens.
4.
Enter the name of the Organization, for example, the name of the company that is
sharing the TeleVantage Server.
5.
Click OK to return to the Organizations dialog box.
6.
When you are done adding Organizations, click OK to close the System Settings dialog
box.
Assigning users to Organizations
Once you have defined Organizations, you can mark calls by which Organization they belong
to. You can view a call’s Organization using the Organization column in the Call Log, and
TeleVantage reports, and easily sort by Organization for tracking or accounting purposes. You
can also display a call’s Organization in ViewPoint’s Call Monitor.
Note: Users in different Organizations cannot have identical extensions. Every TeleVantage
user must still have a unique extension.
To assign a user to an Organization
1.
Double-click the user in the Users view to open the User dialog box, and choose the
User \ Call Log tab.
2.
Check Organization, and select the Organization to which the user should belong.
Click
to create a new Organization. See “Defining an Organization” on page 11-3.
3.
Click OK.
See “About adding users” on page 6-2 for complete information about setting up a user’s
account.
CHAPTER 11. TRACKING AND DISTINGUISHING CALLS
11-3
How calls are logged by Organization
The Organization column in the Call Log displays the Organization for each call that is
associated with one. Outbound calls are logged with the Organization of the user who placed the
call. Inbound calls are logged with the Organization of the user who answered the call (the user
who appears in the Call Log’s Answered By field.
Note: If a call center queue agent places calls as the queue, the call is still logged with the
Organization of the agent, not the Organization of the queue.
Conference calls are logged with the Organization of the user who started the conference call.
Creating an auto attendant for each Organization
Assuming that each Organization has its own phone number, you can define a separate auto
attendant for each Organization. Callers will then hear a greeting and menu choices specific to
the Organization they’re calling, and they will be unable to accidentally dial users in other
Organizations, either by extension or dial-by-name.
To create an auto attendant for an Organization
1.
Create a public workgroup containing the same users that are the members of the
Organization. For instructions see “Creating a Workgroup” on page 8-4.
2.
Define an auto attendant as described in “Setting up an auto attendant” on page 10-6.
Check Restrict dial-by-name and extension matching to members of on the Menu
Choices tab, and select the workgroup.
3.
Route the trunk(s) corresponding to the Organization’s phone number to the auto
attendant. See “Assigning an auto attendant to a trunk” on page 10-20. Alternately,
edit the auto attendant to give it the appropriate DID number. See “Creating a new auto
attendant” on page 10-7.
Restricting outbound trunk use by Organization
You can restrict the use of one or more outbound trunks to specific users, such as the members
of an Organization. For example, if one company within an office has paid for extra trunks for
its business, you can ensure that only members of that business use those trunks for outbound
calls.
To restrict outbound trunk use by user, you set up dialing services and a routing service as
follows:
1.
Create one dialing service for each group of trunks. Set up each dialing service to route
calls to the trunks appropriate for that group.
When creating these dialing services, make sure that Include in dial plan is
unchecked, so users cannot access these dialing services directly.
For example, if the members of company ABC can use trunks 1-4, and the members
of Company YYZ can use all trunks 1-8, create two dialing services, one that routes
calls to trunks 1-4, and a second that routes calls to trunks 1-8.
11-4
ADMINISTERING TELEVANTAGE
2.
Create a routing service as described in “Adding a routing service” on page 9-27. Give
it an easily-to-use access code, for example, 9.
3.
In the routing service, make sure there are routing rules for each dialing service you
created in step 1. For each routing rule, do the following:
Q Click Route the call to another dialing service and specify one of the dialing
services from step 1.
Q Check Membership and click
. Add as members all the users (or other entities)
who can use the dialing service’s trunks.
Optionally, click Schedule if you want to restrict an Organization’s calls over a set
of trunks to a particular time.
For added convenience, you can define a role for each company that contains all the
employees of that company, then add the role as a member here. See “Managing
roles” on page 6-46.
For example, if you selected the dialing service for Company YYZ, add as members
all the users from Company YYZ.
For detailed instructions on setting up routing services, see “Adding a new routing
rule” on page 9-29.
When you have completed these steps, all users can dial the same access code to place outbound
calls (for example, 9), but each company’s users will have their calls routed on the trunks
reserved for that company.
Configuring Operators for multiple Organizations
At several places in the TeleVantage system, callers can press 0 to transfer to an Operator (see
“About Operators” on page 6-4). With multiple Organizations, you might want to have a
different Operator for each Organization. To set up multiple Operators and make sure that
callers reach the right Operator for the Organization they are calling, do the following:
1.
Decide which extensions will be the Operators for the different Organizations. For
example, 101 for Company ABC, and 102 for company YYZ. These examples are
used in the following steps.
2.
Edit each user. On the General tab under Operator, select the Operator extension
appropriate to the user’s Organization. For example, if a user belongs to Organization
ABC, select extension 101. This ensures that callers pressing 0 while leaving a user
voicemail are handled correctly.
For full instructions, see “The User tab” on page 6-12.
3.
If you have restricted one or more auto attendants by workgroup (see “Creating an auto
attendant for each Organization” on page 11-4), edit each workgroup specified by an
auto attendant. On the Dialing tab under If no answer, transfer, select the Operator
extension appropriate to the Organization. For example, if the workgroup holds the
CHAPTER 11. TRACKING AND DISTINGUISHING CALLS
11-5
members of Organization YYZ, select extension 102. This ensures that callers
pressing 0 at an auto attendant are handled correctly.
For full instructions, see “When no one answers a call to a workgroup” on page 8-6.
4.
If you are using TeleVantage call center queues, edit each queue. On the General tab
under Operator, select the extension appropriate to the queue’s Organization. For
example, if the queue belongs to Organization ABC, select extension 101. This
ensures that callers pressing 0 while leaving the queue voicemail are handled correctly.
See the TeleVantage Call Center Administrator’s Guide for complete information on
creating and using a call center.
5.
You can set up the default Operator at extension 0 to automatically transfer calls to the
correct custom Operator based on who is calling. To do so, you must have created a
workgroup for each Organization, containing all the users in that Organization. Edit
the default Operator in ViewPoint. For each Organization, create a call rule that
activates for that Organization’s workgroup, and sends calls to the appropriate custom
routing list. For each Organization, define a custom routing list to have no steps, only
a final action that transfers the call to that Organization’s custom Operator. For
example, the call rule that activates for workgroup ABC would send calls to a routing
list that transfers them to extension 101.
See Using TeleVantage for instructions on creating call rules and routing lists.
Using account codes______________________________________
TeleVantage allows you to track your phone traffic by either forcing or optionally allowing
users to enter an account code for each call. Account codes can represent any aspect of your
phone traffic—customer number, product line, department, and so forth—that you want to track.
You can define the available account codes and tell your users the codes that they should or must
enter under specific circumstances.
Some of the ways you can use account codes are as follows:
Q For billing clients. With account codes you can track calls to various customers whom
you bill for the phone time you spend with them. You can associate account codes with
contacts for automatic customer tracking.
Q For internal accounting. If phone bills are a significant part of your company’s
expenses, you can use account codes to perform detailed expense analyses. For example,
you can track phone use by department.
Q For marketing campaigns. By setting up an account code for the campaign and having
agents use it whenever they place or receive campaign calls, you can track the time,
resources, and results of the campaign.
Account code information appears in the Call Log (see “Using the Call Log view” on
page 12-12), and you can generate reports using the TeleVantage Call Center Reporter that show
calls by account code. For information about the Call Center Reporter, see TeleVantage Call
Center Administrator’s Guide.
11-6
ADMINISTERING TELEVANTAGE
Example: Your office is working on the Gould case and the Avellanos case. You give the Gould
case an account code of 88 and the Avellanos case an account code of 55. Whenever users place
or receive calls relating to the Gould case, they enter 88. Whenever they place or receive calls
relating to the Avellanos case, they enter 55. You can then run a report that sorts calls by account
code and see the phone traffic for the Gould and Avellanos cases separately. You can also run a
report that sorts by user, so that you can see how much phone time a specific user spent on each
case.
Account code modes
On a per-user basis, you can set account code entry to be voluntary or required. You can also
choose to have the system verify account codes against a list of valid account codes.
The following account code modes are available:
Q Optional non-verified. The user is not prompted to enter account codes, but can enter
one if desired. If the user does enter an account code, it is not checked against the list of
valid account codes.
Q Optional verified. The user is not prompted to enter account codes. If the user does enter
an account code, it is checked against the list of valid account codes. If the account code
is invalid, the user is prompted to enter it again.
Q Forced non-verified. The user is required and prompted to enter an account code when
placing an external call. The account code is not checked against the list of valid account
codes. This option is not available for inbound or internal calls.
Q Forced verified. The user is required and prompted to enter an account code when
placing an external call, and the account code is checked against the list of valid account
codes. If the account code is invalid, the user is prompted to enter it again in order to
make an external call. This option is not available for inbound or internal calls.
CHAPTER 11. TRACKING AND DISTINGUISHING CALLS
11-7
Setting general account code options
Before setting up account code modes for individual users, you should configure the
system-wide account code options as follows:
1.
Choose Tools > System Settings. The System Settings dialog box opens.
2.
Choose the Call Data \ Account Codes tab.
3.
Under Default inbound mode and Default outbound mode, choose the account code
modes that you want to be active at stations to which a user has not been assigned. For
an explanation of the modes, see “Account code modes” on page 11-7.
4.
Check Collect account code before dialing number to prompt users for an account
code immediately after they dial a dialing service access code (for example, 9).
Uncheck the box to prompt users for an account code after they have finished dialing
the entire phone number.
5.
Check Verify account code according to range to have the system verify account
codes by length. If an account code contains too many digits or too few digits, users
are prompted to enter it again. Under Minimum length and Maximum length, specify
the acceptable range for account code length. For example, if account codes in your
system can be two, three, or four digits, enter a Minimum length of 2 and a Maximum
length of 4.
Note: It is more efficient to set Minimum length and Maximum length to the same
number and use account codes that are all the same length. When set up this way, the
system immediately recognizes when users finish entering an account code, so they do
not need to press # at the end of the account code. When account codes are of variable
length, users must press # to end the account code or there will be a slight pause while
the system waits for more digits.
If Minimum length and Maximum length are both set to 0, account codes will not be
verified by length.
6.
11-8
Click OK.
ADMINISTERING TELEVANTAGE
Setting a user’s account code modes
For each user, you can define whether account code entry is voluntary or forced, and whether
the system verifies entered account codes against a list of valid account codes.
To set a user’s account code modes
1.
Double-click a user in the Users view. The User dialog box opens. You can also set
account code modes when you create a new user.
2.
Click the User \ Account Codes tab.
3.
Use the Inbound mode and Outbound mode dropdown lists to select the user’s
account code modes for inbound and outbound calls. See “Account code modes” on
page 11-7.
4.
Check Allow automatic account code lookup to enable automatic association of
account codes with contacts for this user. If enabled, the user can enter an account code
for each contact, and the system automatically applies the account code to calls to and
from the contact. See Using TeleVantage for more information about using contacts.
5.
Click OK.
For complete instructions on defining a user, see “About adding users” on page 6-2.
How users enter account codes
You should tell users what account codes to enter in which circumstances, and how they will be
expected to enter them. Users can enter account codes for calls in the following ways:
Q When prompted by the system while placing an outbound call. Only users forced to
enter account codes encounter this prompt. Exactly where the prompt occurs in the
dialing sequence depends on whether you checked Collect account code before
dialing number (see “Setting general account code options” on page 11-8).
By default the account code prompt is a beep. To change it, see “Using a verbal account
code prompt” on page 11-12.
Q Automatically when placing a call to a contact. When a user places a call from
ViewPoint to a contact with an associated account code, the account code is
automatically entered for the call. You can enter account codes for public contacts, and
users can enter them for private contacts. For more about contacts, see Chapter 16 of
Using TeleVantage.
Q During a call. On an inbound or outbound call, users can press Flash to put a caller on
hold, then *11 to enter an account code for the current call. In ViewPoint, they can
right-click the call in the Call Monitor and choose Enter account code from the shortcut
CHAPTER 11. TRACKING AND DISTINGUISHING CALLS
11-9
menu. Users can use this command as many times as they want during a call to change
or correct the account code. The last account code entered is the one that is used for the
call.
Q Before dialing a call. A user can press *11 before dialing a call to enter an account code
for that call. The user picks up the phone and dials *11 <account code> <access code>
<phone number>. In the following example, spaces are shown for clarity:
*11 8877 9 212 123 4567
In this example, 8877 is the account code and 9 is the access code.
In ViewPoint, users can enter an account code before placing a call by using the Place
Call To dialog box (or the Dial field in any view). To do so, they type the phone number,
then a vertical bar ( | ), then the account code.
Q After a call has finished. In ViewPoint, a user can enter an account code for a completed
call by selecting the call in the Call Log and choosing Actions > Enter account code.
The user must have the permission Access Call Log folder set to “View and Edit” (see
“TeleVantage permissions” on page 6-50).
Indicating the end of an account code
When users use the phone to specify account codes, TeleVantage detects the end of an account
code when any of the following occurs:
Q The account code reaches the maximum number of digits. To define the maximum
number of digits, see “Setting general account code options” on page 11-8.
Q The user presses #.
Q Three seconds elapse after the user entered a digit. The system uses the digits already
entered as the account code that the user intended to enter.
If a user does not enter an account code before 5 seconds have elapsed after the beep, the
system beeps again to prompt the user to enter the account code.
Note: If you have a high maximum number of digits and your account codes can be of variable
lengths, you should encourage users to press # when they reach the end of an account code.
Users can cancel an account code entry while they are entering it by pressing *.
Creating a valid account code list
If you want to use verified account codes for some or all users, you must create a text file that
lists your valid account codes. The text file must be called Accountcode.txt and must reside in
the \Accountcode directory on the TeleVantage Server computer. By default, the complete path
is:
C:\Program Files\TeleVantage Server\Accountcode\Accountcode.txt
When a user whose account code mode is set to “Verified” enters an account code, TeleVantage
checks the account code against the contents of the text file. If the account code is not listed in
the text file, TeleVantage prompts the user to enter it again.
11-10
ADMINISTERING TELEVANTAGE
Formatting the text file
Type each account code as a separate line in the text file. Blank lines are permitted and are
ignored by the system. If you want to add a comment line that is ignored by the system, begin
the line with a semicolon (;).
Account codes can contain only the numbers 0 through 9 and the wild card characters ? and %
(see the next section).
Note: Account codes in the text file must meet your account code length requirements or they
will not be added to the list of valid account codes. For example, if your account codes must be
between 2 and 4 digits, a 5-digit account code will be rejected even if it appears in the text file.
See “Setting general account code options” on page 11-8 for instructions on setting account code
length requirements.
Using wild card characters
You can use the wild card characters ? and % when you enter valid account codes in the text file:
Q Question mark (?). Indicates any single digit. For example, an account code entry of 12?
would make 123, 124, and 129 all valid account codes. In this case, however, neither 12
nor 1233 would be valid account codes.
Q Percent sign (%). Indicates any number of digits, including none. For example, an
account code entry of 12% would make 12, 123, 1233, and 12789213120 all valid
account codes.
If you use either of these wild card characters in an account code, it must be the final character
in an account code, and if you use both of these wild card characters in the same account code,
the % character must be the final character.
Valid
Invalid
12?
1?2
12??
1%2
12%
?12
12?%
%12
12?????%
12%?
CHAPTER 11. TRACKING AND DISTINGUISHING CALLS
11-11
Note: Account codes that are identical except for wild card characters conflict with each other.
For example, 1234 conflicts with 1234? and 1234%. In the case of conflicting entries, only the first
entry is used to verify account codes.
Using a verbal account code prompt
By default, the account code prompt is a single beep. You should explain to your users that they
must enter an account code when they hear the beep. TeleVantage provides an alternate account
code sound file, with a verbal prompt that says, “Please enter an account code.”
To use the verbal account code prompt instead of the beep
1.
Find the file AccountCodePrompt.vox in the user directory. This file contains the beep.
By default the path is C:\Program Files\TeleVantage
Server\Vfiles\User\AccountCodePrompt.vox.
2.
Rename the file, for example, to AccountCodePrompt.vox.beep.
Users now hear the verbal prompt instead of the beep when they are prompted to enter an
account code.
Note: By renaming the beep file, TeleVantage automatically uses another
AccountCodePrompt.vox file, which is found in your language directory and which contains the
verbal prompt. The default path for the English language verbal prompt file is the following. It (or
any other language version of this file) can be rerecorded using the System Prompts view.
C:\Program Files\TeleVantage Server\Vfiles\EN00\AccountCodePrompt.vox
Viewing account codes in the Call Log or Call Monitor
The Call Log view contains an Account Code column that shows the account code associated
with each call. If the Account Code column is blank, no account code was entered for the call.
Click the Account Code column header to sort the Call Log by account code. For more
information, see “Using the Call Log view” on page 12-12.
Note: In the Call Log you can you can change a call’s account code or enter a new one. Select
the call and choose Call Log > Enter Account Code. You must have the permission Access
Call Log folder set to “View and Edit” (see “TeleVantage permissions” on page 6-50).
ViewPoint’s Call Monitor view also contains an Account Code column, but it is hidden by
default. In the Call Monitor view, choose View > Current View > Show Columns to display it.
Generating account code reports
For information about generating reports that show account code usage, see the TeleVantage
Call Center Administrator’s Guide.
You can also export the Call Log, with its account code information, to a .CSV file that you can
view in spreadsheet applications. See “Exporting the Call Log” on page 12-17.
11-12
ADMINISTERING TELEVANTAGE
Defining custom data variables _____________________________
TeleVantage lets you attach extra information to incoming calls, using custom data variables.
The information is displayed to users in ViewPoint’s Call Monitor, and can also be used to
automate call handling. Examples of attaching extra information to calls using custom data
variables include the following:
Q Based on the caller’s auto attendant choice, set a variable called Product to the name of
the product that the caller is calling about. For example, callers who press 1 have
Product=“Widget,” while callers who press 2 have Product=“Advanced Widget.” When
users answer the calls they see the product name in the Call Monitor in a column labeled
“Product.”
Q Based on contact recognition, set a variable called Priority to a higher number for VIP
callers to a call center queue. For example, a normal caller has Priority=1, while a VIP
caller has Priority=10. VIP callers are automatically bumped closer to the head of the
queue.
Note: Custom data variables are case sensitive.
Using custom data variables is a two-step process, as follows:
1.
Defining a custom data variable.
2.
Setting the value for a custom data variable.
These steps are described in the following sections.
CHAPTER 11. TRACKING AND DISTINGUISHING CALLS
11-13
Defining a custom data variable
You can define as many custom data variables as you want.
1.
Choose Tools > System Settings. The System Settings dialog box opens.
2.
Choose the Call Data \ Custom Data tab, which lists the custom data variables created
so far.
Each custom data variable is attached to every incoming call, though a given variable
might not be used for every call.
Note: If you have purchased the TeleVantage Call Center module, two system
variables are present by default, Expected wait time and Number of people ahead. For
instructions on using them, see the TeleVantage Call Center Administrator’s Guide.
3.
To create a new custom data variable, click Add. The Custom Data dialog box opens.
4.
Enter the following information for the custom data variable:
Q Name. Enter a name for the variable. Keep the name relatively short, as it will
appear in a column header in ViewPoint’s Call Monitor. Custom data variable
names are case sensitive.
Q Description. Enter a description of the variable if needed.
11-14
ADMINISTERING TELEVANTAGE
Q Data Type. This determines the type of information that the variable holds. Select
one of the following:
Q Long. An integer number.
Q Double. A number that have decimal places.
Q Boolean. The value must be either 0 or 1.
Q String. Text. Numbers can be part of the text string, but they are treated as text
characters.
Q Default value. Enter the value that the variable receives if no other action sets a
value. For string variables you can leave the field blank, meaning the variable is
empty by default. For numeric variables you must enter a number, usually 0.
5.
Click OK to add the custom data variable to the list.
6.
Click OK to close the System Settings dialog box.
The variable you created is now available to be attached to any incoming call (for example, by
an auto attendant or call center queue). Users have a corresponding column in the Call Monitor
where they can view the variable’s value for each call.
Setting the value for a custom data variable
You can have TeleVantage set the value of a custom data variable in the following ways:
Q Auto attendant choice. When defining an auto attendant menu choice, you can have it
set the value of one or more custom data variables. See “Defining menu choices” on
page 10-8.
Q Call center queue. If you purchased the TeleVantage Call Center module, you can have
a queue set the value of a custom data variable based on caller data entry. See the
TeleVantage Call Center Administrator’s Guide.
Q IVR Plug-in. An IVR Plug-in can set the value of custom data variables based on a
variety of methods, including when it was called and caller data entry. For more
information see Appendix G of Installing TeleVantage.
Q TeleVantage Call Classifier. The TeleVantage Call Classifier can set custom data
variables based on database queries, Caller ID name or number, DID, account codes, or
other custom variables.
CHAPTER 11. TRACKING AND DISTINGUISHING CALLS
11-15
CHAPTER 12
CHAPTER 12
MONITORING AND MAINTENANCE
CHAPTER CONTENTS
About monitoring and maintaining your TeleVantage system. . . . . . . . . . . . . . 12-2
Using the Device Monitor view . . . . . . . . . . . . . . . . . . . . . . . . . . . . . . . . . . . . . 12-3
Managing your dial plan with the Dial Plan view . . . . . . . . . . . . . . . . . . . . . . . 12-10
Using the Maintenance Log view . . . . . . . . . . . . . . . . . . . . . . . . . . . . . . . . . . 12-11
Using the Call Log view. . . . . . . . . . . . . . . . . . . . . . . . . . . . . . . . . . . . . . . . . . 12-12
Using the Trunk Log view . . . . . . . . . . . . . . . . . . . . . . . . . . . . . . . . . . . . . . . . 12-18
Setting Call and Trunk Log options . . . . . . . . . . . . . . . . . . . . . . . . . . . . . . . . . 12-20
Viewing the TeleVantage Event Log . . . . . . . . . . . . . . . . . . . . . . . . . . . . . . . . 12-20
Viewing TeleVantage performance counters . . . . . . . . . . . . . . . . . . . . . . . . . 12-35
Archiving call recordings and voice mail . . . . . . . . . . . . . . . . . . . . . . . . . . . . . 12-39
Monitoring database and disk usage . . . . . . . . . . . . . . . . . . . . . . . . . . . . . . . 12-49
Changing special TeleVantage directories . . . . . . . . . . . . . . . . . . . . . . . . . . . 12-53
Identifying security risks . . . . . . . . . . . . . . . . . . . . . . . . . . . . . . . . . . . . . . . . . 12-53
Backing up TeleVantage . . . . . . . . . . . . . . . . . . . . . . . . . . . . . . . . . . . . . . . . . 12-53
Shutting down the TeleVantage Server . . . . . . . . . . . . . . . . . . . . . . . . . . . . . 12-56
Restarting stations or trunks . . . . . . . . . . . . . . . . . . . . . . . . . . . . . . . . . . . . . . 12-58
Capturing network troubleshooting logs . . . . . . . . . . . . . . . . . . . . . . . . . . . . . 12-59
Reporting problems to your TeleVantage provider . . . . . . . . . . . . . . . . . . . . . 12-61
About monitoring and maintaining your TeleVantage system_____
This chapter describes several methods of monitoring and maintaining your TeleVantage
system.
You can also monitor your system using the TeleVantage Call Center Reporter, which lets you
run reports on a variety of system elements, including trunk use, call traffic, queues, agents,
identified callers, account code use, and more. For more information on running the Call Center
Reporter, see TeleVantage Call Center Administrator’s Guide.
You can also automatically record any or all calls in the system for review later. See Chapter 4.
Database server memory usage
The TeleVantage database is configured by default to use up to 50% of the available system
memory, which TeleVantage automatically allocates to itself at system startup. Memory size is
set when the TeleVantage Server starts. If you add more memory to the system (for example, to
support more extensions or trunks), memory size is reset the next time you start the TeleVantage
Server.
Memory usage by the database server is dynamic. Some types of database activity (for example,
nightly Call Log archiving on busy systems) may require more memory. If more memory is
required to support database operations, the database server requests it from Windows.
However, this memory is not released automatically when it is no longer needed. For this reason,
memory usage by the TeleVantage database typically ramps up to the maximum available, and
then levels off. This is normal behavior—not a memory leak—and is not an indication that
memory used by the database server is about to reach the maximum or that the system may fail.
If Windows needs the memory back at a later time for its own use or for another application, it
will ask the database server to release some. Also, when you stop the TeleVantage Server, all
the memory allocated for use by the database server is released.
12-2
ADMINISTERING TELEVANTAGE
Using the Device Monitor view _____________________________
The Device Monitor view shows current station, trunk, and caller activity on your TeleVantage
system. This information is useful when you are monitoring current usage and identifying
potential bottlenecks.
Note: You can view the same information and perform the same tasks by using the Device
Monitor utility, which runs independently of the Administrator. The Device Monitor utility
(TVDevmon.exe) is located in the TeleVantage Server directory, by default C:\Program
Files\TeleVantage Server.
Creating users and trunks from the Device Monitor
From the Device Monitor you can create a user for the selected station, or configure the selected
trunk. Select the station or trunk, then choose Device Monitor > Create User or Create Trunk.
For instructions on creating users see “About adding users” on page 6-2. For instructions on
configuring trunks see Chapter 5.
CHAPTER 12. MONITORING AND MAINTENANCE
12-3
Device Monitor panes
The Device Monitor consists of three panes:
Q The station pane (top). Shows current station activity. See the next section.
Q The trunk pane (middle). Shows current trunk activity. See “Monitoring trunk activity”
on page 12-6.
Q The status pane (bottom). Shows details of the selected station or trunk. Shows either
device status (see “Reading device status” on page 12-8) or call history (see “Viewing
an active call’s history” on page 12-8).
Device Monitor columns
Some device Monitor columns are hidden by default. To show or hide columns, choose Tools
> Columns, and select either “Device Monitor” or “Device Monitor Trunks.”
Monitoring station activity
The following table shows the information that is presented in the upper pane of the Device
Monitor view for each TeleVantage station (internal telephone).
Column
Description
Station
Number that corresponds to the MSI board
resource to which a phone is attached.
External stations appear with station IDs in the
range from 16,385 through 20,480.
Idle station. (Also called on-hook.)
Active station. (Also called off-hook.)
Status
Current station activity. For a list of status codes,
see “Reading device status” on page 12-8.
Call Duration
The duration of the call since it began using the
selected station.
Device Type
The type of station. The types are:
MSI. Analog phone
DKT. Toshiba digital phone
EXT. External station
12-4
ADMINISTERING TELEVANTAGE
Column
Description
Device
The name of the Dialogic device to which the
station is connected, in the format DxxxBnCn,
where Bn is the board number and Cn is the
channel number. Note that a single physical board
is composed of several virtual boards, usually
containing 4 channels each. For example, a 24-port
board would contain 6 virtual boards (B1-B6) of 4
channels each.
Phone Family
For digital stations, the brand of phone connected.
For all other stations, the type of phone.
Phone Model
For digital stations, the model of phone connected.
Button count
For digital stations, the number of buttons available
on the phone.
Note: the Siemens Optiset phone displays with 28
buttons even though there are only 12 on the
phone. This is to support the Optiset add-on
module.
Assignment
Name and extension of the user permanently
assigned to this station. This column may also
contain:
Not assigned.
Station is not currently used.
Not installed. Station has been configured for a
user, but the supporting hardware has not yet been
installed.
Logged In
Name of the user currently logged in at the station.
Active Party
Name and phone number/extension of the person
using this station for a call. Where available, the
TeleVantage username or contact name is used,
otherwise the Caller ID name is used if available.
Connected To
Name, phone number/extension, and device name
of the party to which the active party is connected.
For calls with more than one Connected To parties,
“& Others” appears at the end. Look at the Device
Monitor's bottom pane to see all parties
participating in the conference with this station.
CHAPTER 12. MONITORING AND MAINTENANCE
12-5
Monitoring trunk activity
The following table shows the information that appears in the middle pane of the Device
Monitor view for each trunk in TeleVantage.
Note: Greyed-out trunks represent devices for which no trunks have yet been configured.
Column
Description
Trunk
Trunk number that corresponds to the
resource on the trunk board to which the line is
connected.
Idle trunk.
Active trunk.
Status
Current trunk activity. For a list of status
codes, see “Reading device status” on
page 12-8.
Call Duration
The duration of the call since it began using
the selected trunk.
Detected Device
The type of trunk as detected by the Server
during the last start, which may not be the
same as the configured device (see below).
The trunk types are:
Not detected. No trunk line detected for
this trunk.
Analog.
Robbed Bit T1.
Internet.
ISDN. (T1 or E1)
CAS. (E1)
Configured Device
12-6
The trunk type as configured in the Trunks
view. The types are the same as for Detected
Device, except that not detected does not
appear here.
ADMINISTERING TELEVANTAGE
Column
Description
Device
The name of the Dialogic device to which the
trunk is connected. The formats are as follows,
where where Bn is the board number, Cn is
the channel number, and Tn is the trunk
number:
Analog trunk. DxxxBnCn.
Digital trunk. DTIBnTn.
IP trunk. DM3BnIPTn.
Note that a single physical board is composed
of several virtual boards, usually containing 4
channels each. For example, a 24-port board
would contain 6 virtual boards (B1-B6) of 4
channels each.
In
If checked, the trunk is used for inbound calls.
Out
If checked, the trunk is used for outbound
calls.
Enabled
If checked, the trunk is enabled for use by
TeleVantage.
Name
Optional descriptive name for the trunk.
Active Party
These fields contain the same data as for
stations (see the previous table).
Connected To
Monitoring all calling parties on a device
The bottom pane of the Device Monitor shows all parties on the device that you select in the
station or trunk pane. For example, if you click Trunk 1, the Connected Devices pane shows all
parties involved with Trunk 1.
Column
Description
Device
Name of the device.
Active Party Name
Name of the party using the device.
Number
Phone number/extension of the other party.
CHAPTER 12. MONITORING AND MAINTENANCE
12-7
Viewing an active call’s history
When you select a station or trunk in an active call and click History, the status pane shows the
complete “cradle-to-grave” record of the call from the moment it entered the TeleVantage
system until it was disconnected. You can see how a call was routed or transferred, and how it
ended.
By default call history data is automatically purged from the system after 5 days to conserve disk
space. To adjust the number of days, see “Setting Call and Trunk Log options” on page 12-20.
Reading device status
The following table lists the statuses that a device (station or trunk) can be in.
12-8
Status
Description
Startup
The TeleVantage system is starting.
No loop current
The device is not connected to the telephone
company.
Pre-idle
A brief period just before the device goes idle.
Idle
The device is free (phone on-hook).
Internal dial
Internal dial tone is playing.
External dial
External dial tone is playing.
Calling...
TeleVantage is ringing the device.
Incoming call
A call is arriving at the device.
Offering call
TeleVantage is playing a call-offering prompt.
In call
The device is in use (phone off-hook).
Taking message
A voice mailbox greeting is playing or a voice
message is being left.
Reorder
The device has been left off-hook for too long
or is in an error condition.
Dialog node
Caller is listening to the auto attendant menu
or going down a routing list.
Hold recall
A call on hold or parked is ringing back the
user who placed it there.
Audio Ctl
User is using the audio controls to play,
record, or otherwise manage an audio file.
Logging into TUI
User is logging in to his or her account using
the telephone commands.
ADMINISTERING TELEVANTAGE
Status
Description
Navigating TUI
The user is using the TeleVantage telephone
commands.
Screening message
The user is listening to a voice message being
left.
Dialing external
number
An external number is being dialed.
Playing hold music
The device is used for music on hold.
Plugin
Custom statuses set by an IVR Plug-in.
Hands free
The device is in hands-free mode.
Disabled
The device is not responding to device status
queries.
Out of service
Not configured
The device is not currently used.
Not installed
The device has been configured, but the
supporting hardware has not yet been
installed.
Blocked
An Alarm condition on a T1 or E1 trunk. No
new calls can be handled in this state, and
any existing calls are disconnected. Check
for hardware problems (for example,
unplugged cables). Restarting the trunk may
also help unblock it. If a trunk is frequently
Blocked, check with your telephone company.
Device type mismatch
The Detected Device (the physical trunk line
attached to the port) does not match the
Configured Device.
Device not detected
No device type has been configured.
Enabling and disabling trunks
For testing purposes, you can enable or disable one or more trunks without shutting down
TeleVantage. Select the trunk and choose Device Monitor > Disable/Enable Trunk. You can
disable multiple trunks at once by CTRL-clicking them in the Device Monitor. The Enabled
column in the Device Monitor view reflects the current state of a trunk.
When a device is disabled, TeleVantage does not process any events for the device. No calls,
either inbound or outbound, can be placed on the disabled device. While the device is disabled,
you can run various Dialogic utilities on the trunk, such as ISDIAG or DMU, to determine the
CHAPTER 12. MONITORING AND MAINTENANCE
12-9
correct call parameters or troubleshoot the trunk. You can then apply these parameters to the
TeleVantage registry, enable the device, and try placing a call again.
Disabling a trunk does not allow you to modify Dialogic settings. The following restrictions on
modifying Dialogic settings still apply:
Q You cannot modify Dialogic .PRM file settings and have them take effect without
restarting the Dialogic drivers.
Q You cannot modify Dialogic DCM settings while the drivers are running.
Q You cannot disable a Dialogic board via the DCM without first stopping the
TeleVantage Server and the Dialogic drivers.
Managing your dial plan with the Dial Plan view________________
You can view and manage your dial plan as a whole using the Dial Plan view.
The Dial Plan view shows each number in your system that can be dialed from an internal dial
tone, identified by name and type. It lists only numbers beginning with the digits 0-9, and so
does not include TeleVantage telephone commands such as those beginning with Flash or *. It
does include the following:
Q All enabled extensions (users, auto attendants, call center queues, IVR Plug-ins, etc.)
Q Users’ contacts dialable by the user's extension + PIN
Q User extensions plus * for direct-to-voice-mail dialing, if the feature is enabled (see
“Setting general Server settings” on page 3-4)
Q Dialing service access codes
Q System extensions such as 411 for the dial-by-name directory
12-10
ADMINISTERING TELEVANTAGE
You can filter the Dial Plan view using the toolbar dropdown list to show only those numbers
that are dialable from external phones (PSTN) or SIP servers.
You can use the Dial Plan view to check your dial plan for ambiguous numbers and correct them
when they occur. For more information, see “Avoiding dialing ambiguities” on page 9-7.
You can edit a dial plan entry by selecting it and choosing Dial Plan > Edit. The appropriate
dialog box for editing that number opens. Editing an extension-plus-Contact-PIN opens
TeleVantage ViewPoint as if you had chosen Users > Edit all ViewPoint Settings from the
Users view (see “Modifying a user’s ViewPoint settings” on page 6-46).
Note: If the Dial Plan > Edit option is unavailable, you may not have permission to access or
edit the selected item.
You can delete a dial plan entry using the Delete key or the toolbar Delete icon.
Using the Maintenance Log view____________________________
The Maintenance Log view displays tracked actions and presents details about each action.
Information contained in the log is stored in the database. To open the Maintenance Log view,
click its button in the view bar. The Maintenance Log tracks many administrative actions,
including:
Q Restarting a device
Q Starting the Server
Q Stopping the Server
Q Scheduling a Server shutdown
Q Changing a user’s password
Q Changing a queue’s password
Q Logging on to the Administrator or Device Monitor
Q Logging out of the Administrator or Device Monitor
Q Account lockout
Q Trunk hangup after maximum login attempt
Q Changing any editable item in any Administrator view
Q Deleting an item from a view
Q Enabling or disabling a device
The following columns appear in the Maintenance Log view:
Q Action taken
Q Item that was acted upon (if applicable)
Q Date and time of the action
Q Name of the user who was logged on when the change was made
CHAPTER 12. MONITORING AND MAINTENANCE
12-11
Q Name of the computer from which the change was made
Q Details about the action
Navigating the Maintenance Log view
The Maintenance Log view shows 50 entries at a time, in a default order starting with the most
recent. You can show the next or previous 50 entries by choosing Maintenance Log > Next 50
entries or Maintenance Log > Next 50 entries.
You can also jump to a particular date by choosing Maintenance Log > Jump to date. Enter the
date in the dialog box that opens and click OK.
Clearing the Maintenance Log
To clear the Maintenance Log, click
in the toolbar.
Using the Call Log view____________________________________
The Call Log view displays a record of the calls placed and received on the TeleVantage system.
Each call appears as a row in the view. You can use the Call Log view to analyze system usage
patterns, and you can export Call Log records to generate traffic analysis reports.
To open the Call Log view, click its button in the view bar.
12-12
ADMINISTERING TELEVANTAGE
Call Log columns
The following table shows the information that is displayed for each call. Several columns are
hidden by default. To show and hide columns, right-click the columns header and choose
Columns.
Column
Description
From
Name of the person who placed the call. On incoming
calls, “Unknown” appears unless the user identified
the caller as a contact. On outgoing calls, this column
contains the user’s name.
To
Name of the party who received the call. On incoming
calls, the user’s name appears. On outgoing calls,
“Unknown” appears unless the user identified the
person as a contact.
Answered By
Name of the user who answered an incoming call or
was last dialed. On unanswered calls, the name of
the user who was dialed. On answered calls that
were subsequently transferred, the name of the
transfer recipient, whether or not they answered.
Number
On incoming calls, Caller ID name and number if
available. On outgoing calls, the number the user
dialed. On a call to or from another TeleVantage user,
this field contains <NA>.
From Number
On incoming calls, the caller’s extension or external
phone number. On outgoing calls, the user’s
extension.
To Number
On incoming calls, the user’s extension or, if the user
called into TeleVantage externally, the external
number. On outgoing calls, the external number or
extension the user called.
Callback
Number
If a caller enters a callback number, it appears with
the prefix “Callback:”
Called
Number
On incoming calls, your Direct Inward Dial (DID)
number if the caller used it to call you. The field is
blank for incoming calls without DID. On outgoing
calls, the number you dialed.
Start Time
Date and time that the call started.
Wait Time
On incoming calls, the length of time between dialing
the user’s extension and the call being answered. On
outgoing calls, Wait Time is always 00:00.
CHAPTER 12. MONITORING AND MAINTENANCE
12-13
Column
Description
Duration
Length of time that the parties are connected.
Call ID
The TeleVantage ID number of the call. The call ID
number also appears in queue logs to identify the call
(see Appendix A of the TeleVantage Call Center
Administrator’s Guide).
Result
How the caller’s wait ended. The assigned values for
the possible outcomes are:
Abandoned. Caller hung up before call was
answered.
Connected. Caller was connected to a party.
To voice mail. Caller went to voice mail, but did not
necessarily leave a message.
Blind transfer. A blind transfer sent the caller to
another party.
Supervised transfer. A supervised transfer sent the
caller to another party.
Login. Caller logged in to a valid TeleVantage user
account.
No Answer. Outbound call that was not answered.
Login failed. The caller attempted to log in to a
TeleVantage account, but failed to enter a valid
password for the maximum number of retries (see
“Enforcing strong password security” on page 3-12).
Unknown. TeleVantage was unable to identify the
outcome of the call.
12-14
Account Code
The account code entered for the call, if any.
Message
If checked, the caller left a voice message.
Recorded by
User
If checked, this call was recorded by a user who
handled it.
Recorded by
Queue
If checked, this call was automatically recorded by a
call center queue.
From Device
On incoming calls, the trunk or extension from which
the call originated. On outgoing calls, the user’s
station number.
To Device
On incoming calls, the user’s station number. On
outgoing calls, the trunk used for the call. If an
incoming call was transferred, this column shows the
last station that took the call.
ADMINISTERING TELEVANTAGE
Column
Description
Parties
Number of people who took part in the call, including
the caller, the called party, anyone to whom the call
was transferred, and any conference call participants.
Dial String
Digits that TeleVantage actually dialed over the trunk,
which may be different than the digits TeleVantage
displays in a contact’s phone number. For example, a
dial string may contain an international or
long-distance access code, a dialing prefix, or a
dialing suffix.
From Type
Type of incoming call: Phone, H.323 Gateway, or
Internet.
From Code
Access code of the dialing service that will be used to
return this call. Only applicable to calls coming in from
remote TeleVantage Servers over an Internet trunk.
From Rules
If checked, TeleVantage’s routing rules will be applied
when returning this call.
To Type
Type of outgoing call: Phone, Centrex, or Internet.
To Code
Access code used to dial an outbound call.
To Rules
If checked, routing rules were used to make an
outbound call.
Organization
Organization associated with the call, if any.
Organizations are associated with outbound calls
only, and represent the Organization to which the
calling party belongs. For more information see
“Using Organizations” on page 11-2.
Custom Data
Custom data, if any, associated with the call.
Copying a Call Log entry
Choosing Edit > Copy with a Call Log entry selected copies that Call Log entry as text,
including call history.
Viewing a call’s history
When you select a call in the Call Log, its history in the system appears in the History pane
below. The History pane shows the complete “cradle-to-grave” record of the call from the
moment it entered the TeleVantage system until it was disconnected. You can see how a call
was routed or transferred, and how it ended.
By default call history data is automatically purged from the system after 5 days to conserve disk
space. To adjust the number of days, see “Setting Call and Trunk Log options” on page 12-20.
CHAPTER 12. MONITORING AND MAINTENANCE
12-15
Setting Call Log options
To choose whether or not to use the Call Log, and whether or not to log internal calls, see
“Setting Call and Trunk Log options” on page 12-20.
Displaying a specific number of Call Log entries
The Call Log can become very large over time and its size can cause a delay in its display. To
reduce this delay, you can view fewer Call Log items at one time and not load the full database.
To set the number of calls displayed in the Call Log
1.
Choose Tools > Options. The Options dialog box opens.
2.
In Display __ calls at a time, enter the number of entries that you want to appear when
you open the Call Log view, using the following as a guide:
Q A high setting will likely cause a delay while the specified number of entries are
copied over the network, but you can navigate within the information easily using
the scrolls bars after the entries have been retrieved.
Q A low setting minimizes the delay before information is displayed, but you must
retrieve entries more often in order to view the entire Call Log.
3.
Click OK.
Note: This option controls how many entries are transferred in one request, but does not limit
the entries available for view. All Call Log entries are always available by choosing Call Log >
Next __ Calls or Previous __ Calls, or using the buttons on the toolbar.
By default, only external calls are logged. For information about logging internal calls, see
“Setting Call and Trunk Log options” on page 12-20. For information about archiving the Call
Log, see “Archiving the Call and Trunk Logs” on page 12-51.
Entering an account code for a call
To enter an account code for a call or change the one already entered, select the call and choose
Call Log > Enter Account Code.
Account codes are a means of marking calls for tracking or billing purposes. For more
information, see “Using account codes” on page 11-6.
12-16
ADMINISTERING TELEVANTAGE
Exporting the Call Log
You can export the Call Log to a comma-separated value (.CSV) file that can be read by most
spreadsheet and database applications. Exported Call Log entries are not deleted from the
TeleVantage database, and the size of the TeleVantage database does not change after an export.
1.
Choose File > Import and Export. The Import and Export Wizard opens.
2.
Under Select an import or export action, select Export Call Log and click Next.
3.
In Save exported file as, enter the path and file name for the exported file or click
Browse to specify a destination.
4.
Under Options, enter the Start date and End date.
5.
Click Finish to export the file. Depending on the size of your Call Log, an export may
take several minutes to complete.
Archiving the Call Log
See “Archiving the Call and Trunk Logs” on page 12-51.
Result codes when exporting the Call Log
When the Call Log is exported, the Result field appears as a code. Use the following table to
interpret the result codes:
Code
Result
0, 3
Abandoned
1, 2
Connected
4
Left message
5
Blind transfer
6
Supervised transfer
8
Login to telephone commands
12
Login failed max number of times
CHAPTER 12. MONITORING AND MAINTENANCE
12-17
Using the Trunk Log view __________________________________
The Trunk Log view keeps a record of all trunk allocations. Each row shows information about
a single trunk allocation.
Note that a trunk allocation is not the same as a call. A single trunk allocation can subsume many
calls—for example, if a user logs in from a remote phone and places multiple calls through
TeleVantage. A single call can also subsume multiple trunk allocations—for example, a
conference call. For a call-by-call record, use the Call Log (see “Using the Call Log view” on
page 12-12).
To match a Call Log record and a Trunk Log record, use the Start Time columns.
To open the Trunk Log view, click its button in the view bar.
The following table shows the information that is displayed for each time a trunk is used.
12-18
Column
Description
Direction
Icon for inbound or outbound call.
Trunk
Name of the trunk.
Start Time
Time the trunk was allocated.
Accepted Time
Time the call was accepted by TeleVantage. Note that
if you are using Delayed Answer, this time can be
later than the Start Time (see “Using Delayed
Answer” on page 5-8).
Connected Time
Time at which the call was connected to a user.
Connected
Duration
Length of time that the call was connected to a user.
Remote Disconnect
Time
If the call was disconnected by the remote party, time
of the disconnection.
ADMINISTERING TELEVANTAGE
Column
Description
Local Disconnect
Time
If the call was disconnected on the TeleVantage side,
time of the disconnection.
Remote/Local
Disconnect Reason
Reason for the disconnection. Possible reasons are:
Normal clearing (party hung up)
No answer
Busy
Destination out of order
Operator intercept (Something wrong with the
number, usually expressed by three tones
followed by, “I’m sorry, the number you have
dialed...”)
Unassigned number
Network congestion
Call rejected
Destination incompatible
Access Code
Access code dialed.
Internal Name
Name of the user involved with the call.
Internal Number
Extension or IP address on the internal side of the
allocation.
External Name
Name of the external party if available (contact name
or Caller ID name).
External Number
Phone number of the external party.
Authorizer Name
Name of the user who had permission to make the
call.
Authorizer
Extension
Extension of the user who had permission to make
the call.
Inbound Number
Caller ID name and number on an inbound call.
Inbound DID
DID number dialed, if any, on an inbound call.
Outbound Number
The outbound Caller ID sent by TeleVantage.
Outbound Dial
String
Dial string used on an outbound call. Everything but
the access code is included.
Copying a Trunk Log entry
Choosing Edit > Copy with a Trunk Log entry selected copies that Trunk Log entry as text.
CHAPTER 12. MONITORING AND MAINTENANCE
12-19
Archiving the Trunk Log
See “Archiving the Call and Trunk Logs” on page 12-51.
Setting Trunk Log options
To choose which trunk types’ activity appears in the Trunk Log, see the next section, “Setting
Call and Trunk Log options.”
Setting Call and Trunk Log options __________________________
You can choose whether to log calls, and which type of calls are logged in the Call and Trunk
Logs. To do so:
1.
Choose Tools > System Settings. The System Settings dialog box opens.
2.
Choose the Call Log and Trunk Log tab.
3.
Use the following fields to set up your call logging choices:
Q Log calls. If checked, TeleVantage logs calls in the Call and Trunk Logs according
to the selections you make on this tab. If unchecked, the Call Log and Trunk Log
are not used.
Q Log internal calls. Check to have internal (station-to-station) calls logged in the
Call Log. If unchecked, the Call Log keeps track of calls that involve a trunk only.
Q Log call history events. Check to have call history events logged for recent calls
displayed in the Call Log (note that call history events are purged after a number of
days, as defined below).
Q Log trunk activity on. Check Analog, T1, E1, and BRI trunks and IP trunks to
have calls on those types of trunks appear in the Trunk Log.
Q Delete call history events older than __ days. Enter the number of days that call
history text remains in the system before being automatically deleted.
4.
Click OK.
Viewing the TeleVantage Event Log __________________________
The TeleVantage Event Log contains a record of all TeleVantage-related system events,
including start and stop times of the TeleVantage Server and other TeleVantage applications,
and error messages.
Errors indicate that a failure has occurred. Warnings indicate that a critical resource is getting
low, though no failures have occurred yet.
Note: All calls to 911 are logged in the Windows Event Log as an entry.
You can set up TeleVantage to send e-mail notifications when events are logged to the
TeleVantage Event Log. For more information, see “Setting up TeleVantage Event Log
notifications” on page 12-21.
12-20
ADMINISTERING TELEVANTAGE
To view the TeleVantage Event Log, choose Start > Programs > Administrative Tools > Event
Viewer. Click TeleVantageLog.
Setting up TeleVantage Event Log notifications
You can configure TeleVantage to send e-mail notification of each event logged in the Server’s
TeleVantage Event Log. By setting up notifications, you can stay informed of critical problems,
like low disk space, no matter where you are.
To receive e-mail notification of TeleVantage Event Log events
1.
Choose Tools > System Settings. The System Settings dialog box opens.
2.
Choose the E-mail Notification \ Event Log tab.
3.
Under E-mail phone system events for, select one of the following from the
drop-down list:
Q No events. This is the default. No notifications are sent.
Q Errors and warnings.
Q Errors only.
Q All events.
4.
Under E-mail to, identify to whom the e-mail notifications are sent:
Q All phone system administrators. Notifications go to all TeleVantage users with
Administrator permissions who have e-mail notification turned on. The users you
identify here must also have e-mail notification set to receive Windows Event Log
CHAPTER 12. MONITORING AND MAINTENANCE
12-21
notifications (see “Setting e-mail notification” on page 6-21).This is the default
setting.
Q E-mail address(es). Enter the e-mail addresses of users whom you want to receive
notifications, separated by semicolons.
5.
Click OK.
TeleVantage Event Log messages
Messages are identified in the TeleVantage Event Log by application and message number.
Double-click a message to see its text.
The following messages are posted to the TeleVantage Event Log:
This SQL Server has been optimized for 8 concurrent queries. This limit has been
exceeded by # queries and performance may be adversely affected.
This event means that occasionally the TeleVantage server and ViewPoint are concurrently
accessing the TeleVantage database in excess of the 8 simultaneous database transactions
allowed by Microsoft's MSDE database. You can ignore this message if you only receive 100
or so of these events per day. If you're getting this event hundred of times per day, you should
upgrade to the full version of Microsoft SQL Server which doesn't have a limit on the number
of simultaneous queries. See Chapter 3 of Installing TeleVantage for more information.
100 - Informational
Server Started -- Version ##
An informational message indicating when the TeleVantage Server started.
101 - Informational
Server Stopped
An informational message indicating when the TeleVantage Server was shut down. This
message indicates an orderly shutdown, not a shutdown caused by a problem.
102 - Informational
Connecting to SQLServer
103 - Informational
Disconnecting from SQL Server
Information messages indicating when the TeleVantage Server connected to and disconnected
from SQL Server.
104 - Error
DSSQL Error
105 - Error
No Voice Resource Available
12-22
ADMINISTERING TELEVANTAGE
This message indicates that Server was unable to provide a voice resource for a requested
operation. This error should not be encountered in normal operation and may indicate that you
need additional voice resources for your current load. For more information on how to add voice
resources, see Installing Intel Telephony Components.
106 - Informational
Device ## Restarted
This message indicates a trunk or station was restarted to recover from an error condition. The
restart may have been initiated automatically by the TeleVantage Server or manually by the
administrator. If this message appears only infrequently, it can be ignored. If it is seen often,
contact your TeleVantage provider.
107 - Informational
Inbound call detected on outbound trunk ##
This message indicates a call was received on a trunk allocated for outbound calling only. The
TeleVantage Server played a wrong number message and disconnected the call. If this message
is seen frequently, it may indicate that the number for the line in question has been distributed
to potential callers or that the line is included in an inbound hunt group.
108 - Informational
Inbound H.323 Gateway authentication failed. Trunk ##, Gateway extension: ##,
Source: nnn.nnn.nnn.nnn
This message indicates that an inbound H.323 Gateway call failed to provide the correct
password.
110 - Error
Error occurred trying to perform least-cost routing.
111 - Error
Unable to start Mail Server. Voice Mail notifications via Email will be disabled.
On startup, the TeleVantage Server was unable to start the e-mail notification process. For
example, it could not establish a MAPI connection with your mail post office. Mail notification
will be disabled until the problem is resolved. Contact your TeleVantage provider.
112 - Informational
Started Mail Server.
An informational message indicating that the TeleVantage Mail Server started successfully
when the Server started.
113 - Warning
No loop current detected on outbound trunk N
CHAPTER 12. MONITORING AND MAINTENANCE
12-23
114 - Error
Thread performing least-cost routing is not responding.
115 - Error
Server Restarted
The TeleVantage Server had to be restarted by the TeleVantage Watchdog process.
116 - Error
Server cannot record any more voice messages or calls. Disk space is low.
TeleVantage cannot perform call recording on voice messages or calls, because the disk space
on the voice files disk is low.
117 - Informational
Server can now record voice messages and calls. Disk space is available.
Call recording can resume, after having been disabled due to low disk space. Sufficient disk
space on the voice files computer is now available.
118 - Error
Stopped using trunk ##: the trunk may have been disconnected.
TeleVantage Server has stopped using a trunk.
119 - Error
Failed to Restart Server: Total Restarts Exceeded.
TeleVantage Server failed to restart after trying several times.
120 - Error
Failed to Stop Device Handle ##.
121 - Error
Unable to start Exchange Server synchronization. Exchange Server
synchronization will be disabled.
Unable to start TeleVantage Exchange Server synchronization.
122 - Informational
Started Exchange Server synchronization.
TeleVantage Server started Microsoft Exchange Server synchronization.
123 - Error
Unable to open device: ##
TeleVantage Server was unable to open the Dialogic device.
12-24
ADMINISTERING TELEVANTAGE
124 - Error
Unable to delete temporary message file for device ##.
This is recorded when there is a problem deleting a temporary message file for a device. The
temporary message file for station 2 is S2-m.vox. For example, if this file cannot be deleted, an
invalid message will be left for the recipient.
125 - Error
T1 Alarm: <Alarm Information>
A T1 alarm occurred on the trunk.
T1 alarms
The following two T1 alarms are written to the Windows Event Log:
Q Red Alarm. Signals that the Robbed Bit T1 line has lost synchronization with the
switch to which it is connected. TeleVantage disables all channels on the affected digital
span so that spurious signals are not processed as incoming calls.
Q Red OK. Signals that synchronization has been restored. All channels on the affected
digital span are re-enabled.
All T1 alarms are written to the TeleVantage Server logs.
126 - Error
Unable to start IVR Plugin ’<ProgID>’: License count exceeded.
Unable to start the IVR Plug-in because the number of your Station licenses is less than the total
number of stations assigned to users plus the total number of IVR Plug-ins currently running
(every running IVR Plug-in uses 1 Station license).
127 - Error
Insufficient licenses: <message>
TeleVantage Server detects an insufficient number of Trunk, IP Port, ViewPoint, or Server
licenses, and the Server was unable to start. Make sure that you have TeleVantage licenses for
every user, trunk, and IP trunk you have added in the Administrator.
128 - Error
Notification via pager failed; Unable to allocate trunk; user ‘<username>’,
number ‘##’, access code ##
An attempt to send a pager notification of a new voice message failed. The error message shows
the user’s name and the full dial string of the pager number that was dialed unsuccessfully. Alert
the user that the pager number might be incorrect or that pause characters should be added to the
dial string.
CHAPTER 12. MONITORING AND MAINTENANCE
12-25
129 - Error
Server attempted to load a T1/E1 ISDN/CAS span but could not find the Dialogic
GlobalCall Package.
If you plan on using a T1/E1 ISDN/CAS span, please reinstall the Dialogic Drivers and make
sure you have selected the GlobalCall package.
130 - Error
Disabling Exchange Server synchronization. Unable to connect to database.
TeleVantage could no longer access the SQL Server database and disabled Exchange Server
synchronization.
131 - Error
Failed to reset station N. Please restart the server.
132 - Error
Ring failed on station ## with error 14. Please restart the station.
133 - Error
Device ## is not responding, restarting...
TeleVantage was unable to open the Dialogic device and is automatically restarting it.
134 - Error
Unable to offer call to IVR Plug in ‘<ProgID>’. Reason: ‘<reason>’.
Started the IVR Plug-in but OfferCall failed.
135 - Error
CallPlaced Event failed IVR Plug in ‘<ProgID>’. Reason: ‘<reason>’.
Failed to hand off and outbound call to an IVR Plug-in.
136 - Error
Unable to start IVR Plug in ‘<ProgID>’. Reason: ‘<reason>’.
137 - Error
Device ## is not responding.
The trunk or station has stopped responding to events. Try restarting it.
138 - Error
Email notification thread is not responding.
E-mail notifications will be disabled until the problem is resolved.
139 - Error
Device ## Disabled.
12-26
ADMINISTERING TELEVANTAGE
This station or trunk was disabled by a user through the Administrator.
140 - Informational
Device ## Enabled.
This station or trunk was re-enabled by a user through the Administrator.
142 - Informational
Emergency: <Username> at extension x## dialed <emergency number> from
<station ##>
The specified user dialed TeleVantage’s emergency number (usually 911) from the specified
station.
143 - Informational
Timed Out Waiting For Response from IVR Plugin ‘<AppID>’. Reclaiming voice
device.
The specified IVR Plug-in did not respond to the TeleVantage Server. The Server assumed that
the Plug-in was hung, and has terminated it and reclaimed its associated voice resource.
144 - Informational
Maintenance log cleared.
The Maintenance Log has been cleared using the Administrator. See “Using the Maintenance
Log view” on page 12-11.
145 - Warning
Account <name> has been locked out due to password failures.
The named user account has been locked out due to repeated attempts to access the account with
bad passwords. See “Enforcing strong password security” on page 3-12.
146 - Warning
No Low Priority Voice Resource Available
There are no low-priority voice resources in the pool available to generate FSK signals for
CLASS or ADSI phone features such as message waiting light, Caller ID display, intercom,
paging, or voice-first answering. Voice resources will continue to be allocated for other tasks
such as playing and recording voice files. For more information on managing voice resources,
Installing TeleVantage.
147 - Error
No Voice Resource Available For System Call Recording
148 - Error
Removing Failed Sink: <name>
CHAPTER 12. MONITORING AND MAINTENANCE
12-27
149 - Warning
Database size is nearing critical limit. Archive call log or upgrade to full version
of SQL Server.
Your TeleVantage database is nearing the 2GB limit of MSDE. Archive the Call Log to make
more room (see “Archiving the Call and Trunk Logs” on page 12-51), or upgrade to the full
version of SQL Server if you have not done so already. See the database server requirements in
Installing TeleVantage
150 - Error
Database size has passed the critical limit and call logging has been stopped.
Archive call log or upgrade to full version of SQL Server.
New calls are not being written to the Call Log because the TeleVantage database has passed
the critical MSDE size limit (about 2 GB). Archive the Call Log to make more room (see
“Archiving the Call and Trunk Logs” on page 12-51), or upgrade to the full version of SQL
Server if you have not done so already. See the database server requirements in Installing
TeleVantage.
151 - Informational
Hook State mismatch occurred on station N.
152 - Error
Hook State mismatch occurred on station X. Station restarted
A station has been restarted automatically by TeleVantage due to an Intel Dialogic issue with
HSDI boards, where under conditions of heavy load a station can sometimes read as off-hook
when it is actually on-hook. Restarting the station will have solved the mismatch problem.
153 - Error
Device Blocked: dtiBn
A blocked event has been received from a Dialogic digital phone board, where n is the board
number.
154 - Error
Device Unblocked: dtiBn
An unblocked event has been received from a Dialogic digital phone board, where n is the board
number.
155 - Error
Infinite Loop:
TeleVantage detected a call center which may be sending callers back and forth to an extension
in an infinite loop. This can happen if the queue redirects callers to an extension whose routing
list automatically sends calls to the queue.
12-28
ADMINISTERING TELEVANTAGE
156 - Error
ISDN SetInService timed out for board N.
Using the Administrator, turn off the ISDN parameter ’SetInService On Startup.’ Then stop the
TeleVantage Server and Dialogic drivers and restart the Server.
157 - Error
Failed to resolve the following email addresses:
An email notification was sent where at least one of the email addresses could not be resolved
from a name to an address, for example, an address of “John Smith” could not be resolved as an
e-mail address. Possible causes include a mistyped name (for example, “Jhon Smith”), an
ambiguous name (for example, “John S”), or a problem with the address book associated with
the default MAPI profile on the TeleVantage Server PC.
158 - Error
Failed to send email. subject:
TeleVantage failed to send the specified email notification. This can happen for numerous
reasons, such as a network failure. The specific error is included if available.
159 - Error
Exchange server synchronization failed for TeleVantage <username> with
Exchange mailbox <name> on Exchange Server <servername>
TeleVantage failed to synchronize voice messages with email notifications in the Exchange
mailbox for the specified user. This can happen for numerous reasons, such as a network failure.
The specific error is included if available.
160 - Error
Error archiving voice mail: <name>
161 - Error
No Voice Resource Available For Beep during Call Recording
162 - Error
Server Started After Unexpected Shutdown
163 - Warning
No conference resource available
The Server has run out of conference resources. These messages will be logged every 15
minutes while conference resources are out.
You can choose whether to log these messages using the Advanced Setting
OutOfConfResEventInterval. See Appendix J of Installing TeleVantage or instructions on
advanced settings.
CHAPTER 12. MONITORING AND MAINTENANCE
12-29
164 - Warning
Server cannot communicate with Workstation applications because you have
Internet Connection Firewall (ICF) enabled.
For the Server to operate properly with a firewall, you must upgrade your PC to Windows XP
SP2 or higher. Alternatively you can disable ICF.
165 - Warning
Server cannot communicate with Workstation applications because Windows
Firewall exceptions are not allowed.
Please enable Windows Firewall exceptions by selecting "Start" > "Control Panel" > "Windows
Firewall" and uncheck "Don’t allow exceptions".
166 - Warning
Server cannot communicate with Workstation applications due to a problem
creating a Windows Firewall exception.
Please disable the Windows Firewall by selecting "Start" > "Control Panel" > "Windows
Firewall" and uncheck "On".
167 - Warning
Server cannot communicate with Workstation applications due to a problem with
system DCOM settings.
168 - Warning
Cannot communicate with your <name> Server because you have Internet
Connection Firewall (ICF) enabled.
To use this application with a firewall, you must upgrade your PC to Windows XP SP2 or
higher. Alternatively you can disable ICF.
169 - Warning
Cannot communicate with your <name> Server because Windows Firewall
exceptions are not enabled.
170 - Warning
Cannot communicate with your <name> Server due to a problem creating a
Windows Firewall exception.
To use this application please disable the Windows Firewall by selecting "Start" > "Control
Panel" > "Windows Firewall" and uncheck "On".
171 - Warning
Cannot communicate with your <name> Server due to a problem with system
DCOM settings.
12-30
ADMINISTERING TELEVANTAGE
172 - Warning
Windows networking settings have been updated so the <named> workstation
applications can operate properly. You must restart your computer before the
new settings will take effect.
173 - Informational
Server is configured to ignore all telephony devices.
To detect telephony devices, choose Tools > System Settings, click the Server tab, and
uncheck Server should not detect devices during startup.
174 - Warning
Device N State Changed. Reason: <name>.
175 - Error
Exchange server synchronization failed for user "<name>"
The listed user has an Exchange mailbox that matches more than one entry on the Exchange
server. Edit the user and specify a unique mailbox name.
176 - Error
TeleVantage is unable process email because it cannot connect to the database.
TeleVantage could not connect to the database after 10 attempts. Possible reasons include email
notification and/or Exchange synchronization may not be working properly.
177 - Error
Missing language file: <name>.
178 - Error
No voice resource available for hold audio source N. No hold audio will be
played.
179 - Error
No files for hold audio source N. No hold audio will be played.
180 - Error
Unable to open file <name> for hold audio source N. File will be skipped.
181 - Warning
Intel HMP or Dialogic SR5.1.1 driver information is missing from the registry and
may prevent <name> from handling calls
182 - Error
Intel HMP drivers are detected but N is configured for Intel Dialogic SR5.1.1
drivers. N must be configured for Intel HMP drivers before the Server will start.
CHAPTER 12. MONITORING AND MAINTENANCE
12-31
183 - Error
Intel Dialogic SR5.1.1 drivers are detected but N is configured for Intel HMP
drivers. N must be configured for Intel Dialogic SR5.1.1 drivers before the Server
will start.
184 - Error
The Intel Dialogic SR5.1.1 FP1 Service Update was not found on this PC. Please
install the Intel Dialogic SR5.1.1 FP1 Service Update and N Driver Updates for
proper operation.
185 - Error
The Intel Dialogic HMP FP1 Service Update was not found on this PC. Please
install the Intel Dialogic HMP FP1 Service Update for proper operation.
186 - Error
The N Driver Updates version N was not installed on this PC. Please install these
N Driver updates for proper operation.
187 - Error
The server could not start because it failed to start the Intel Dialogic drivers.
Please check the event log and check your configuration using Dialogic
Configuration Manager (DCM). As a test try starting the drivers manually from
the DCM.
188 - Error
No IP Media Resource Available
189 - Error
No Low-bit Rate Codec Resource Available
190 - Warning
The custom N network capture filter is invalid and the default capture filter will
be used instead. Ensure that the custom N capture filter was entered properly or
contact your N Provider to obtain a valid capture filter.
For more information, see the capture filter syntax in the documentation section of
http://www.winpcap.org.
191 - Error
The Server did not start because the IP address specified when you installed
HMP is no longer valid.
You must change it by editing the HKEY_LOCAL_MACHINE\SOFTWARE\SBLabs\dm3ssp
registry key. You should use a static IP address, not one that is dynamically assigned.
12-32
ADMINISTERING TELEVANTAGE
192 - Error
MP3 Conversion Error: <name> in function N.
193 - Error
Unable to start SIP span N. Reason: <name>.
194 - Error
SIP trunks are out of service: no available IPM resources found in the system.
195 - Warning
’Off hook’ event received from station N, which is currently out of service and not
registered with the Server.
Please check the SIP device’s configuration and its registration with the TeleVantage Server’s
SIP span.
196 - Error
Attempted to call station n, which is currently out of service.
Please check the station configuration and its registration with the TeleVantage Server.
197 - Warning
Requested IPM feature is not supported by Intel/Dialogic board; feature: <name>,
board: N.
198 - Warning
Server cannot capture network traffic due to low disk space.
Please make sure N MB of disk space is free for network traffic to be captured.
199 - Informational
Server is now capturing network traffic. Disk space is available.
200 - Error
Username <name> has been locked out from SIP authentication for N seconds
due to N repeated authentication failures.
See “Increasing SIP span security” on page 14-17 for more information.
201 - Error
New voice mail call notification failed for user <name>; Unable to reach <name>.
202 - Warning
Network capture was unable to start because it was unable to discover a valid
NIC.
CHAPTER 12. MONITORING AND MAINTENANCE
12-33
203 - Warning
Network capture was unable to start because no valid WinPCap library.
The following two errors occur when you start the Intel Dialogic drivers, if you do not have any
DM3 telephony boards installed. These errors are benign and should be ignored.
204 - Error
This beta version of the Server ## has expired.
The Server will be able to process calls from stations or logged-in trunks until it is upgraded to
a newer version. Please contact your TeleVantage provider for a newer version.
205 - Warning
This beta version of the Server ## will expire on <date>.
On this date the Server will not be able to process calls from stations or logged-in trunks until it
is upgraded to a newer version. Please contact your TeleVantage provider for a newer version
as soon as possible.
206 - Error
Server logging has been disabled due to a disk operation error. Failed to open
log file ##.
Please check the drive for errors.
207 - Warning
A hard drive partitioned as FAT32 has been detected on the Server.
Please convert the drive to NTFS to ensure mission critical reliability for the Server.
208 - Error
The Server detected an IP address conflict that is preventing VoIP calls from
functioning properly. The IP address ## used by the Server’s Intel Dialogic
IPLink board with ID=## is conflicting with another device with a MAC address of
##.
Please resolve the IP address conflict.
209 - Warning
The Server detected that an unsupported firmware file ## is being used by the
Intel Dialogic board ##, which can result in unpredictable behavior.
Please stop the Server and Intel Dialogic drivers and use the Dialogic Configuration Manager to
specify a supported firmware file prefixed with the ’@’ symbol as described in Installing Intel
Telephony Components.
12-34
ADMINISTERING TELEVANTAGE
7000 - Error
The dlgcmpd service failed to start due to the following error: The system cannot
find the device specified.
7001 - Error
The dlgcmcd service depends on the dlgcmpd service which failed to start
because of the following error: The system cannot find the device specified.
Viewing TeleVantage performance counters __________________
When the TeleVantage Server is installed, the Setup program registers with Windows a set of
TeleVantage-specific performance counters for tracking run-time Server statistics. A
TeleVantage performance counter template is also installed that you can enable to aid in the
tracking down of any performance issues on the TeleVantage Server PC, including third-party
applications.
Note: If you have created or deleted TeleVantage devices, performance counter data may not
be accurate until you restart the device.
Enabling the TeleVantage performance counter template
1.
On the TeleVantage Server PC, choose Start > Programs > Administrative Tools >
Performance. The Performance dialog box opens.
2.
Expand the Performance Logs and Alerts tree view and select Counter Logs.
3.
Do one of the following, depending on your system:
Q Windows XP / Windows 2003 Server. Select TvPerformance in the list.
Q Windows 2000. Choose Action > New Log Settings From, and browse to
\Program Files\TeleVantage Server \TVPerformance.htm. Click OK twice. When
TvPerformance is added to the list, select it.
4.
Choose Action > Start to enable logging.
Once enabled, performance log data is written to the \Program Files\TeleVantage Server\Logs
directory.
Limiting performance data logging
By default, data is continuously written to multiple 200 MB files as long as there is available
disk space on the drive, or until you turn performance logging off (by selecting TvPerformance
as described in the previous procedure, then and choosing Action > Stop.)
To avoid having to monitor available disk space on the drive and manually turn off performance
logging when disk space gets low, you can limit the size of the logs or the logging time period.
To do so:
1.
Open the Performance dialog box as described in step 1 above.
2.
Right-click TvPerformance, and then choose Properties.
CHAPTER 12. MONITORING AND MAINTENANCE
12-35
3.
Click the Schedule tab:,
4.
Use the fields in the Stop log section to specify when logging will end automatically.
5.
Click OK to save your change.
How TeleVantage counters are organized
The counters are organized into two groups: Phone System Calls and Phone System Devices.
The counters can be monitored by system administration tools such as the performance
monitoring utilities provided with Windows.
The Phone System Calls group has the following counters:
Q Existing calls. Total number of active calls currently being handled by TeleVantage.
Q Total calls. Total number of calls handled by the Server since it was last started.
The Phone System Devices group has the following counters:
Q Stations. Total number of internal and external stations configured and in service in the
system.
Q Station in use. Number of stations off-hook.
Q % stations in use. Percentage of stations off-hook.
Q Trunks. Total number of configured trunks in the system.
Q Trunks in use. Number of trunks allocated to calls.
Q % trunks in use. Percentage of trunks allocated to calls.
12-36
ADMINISTERING TELEVANTAGE
Q Voice Resources. The total number of shared voice devices, plus any disconnected
voice devices. A disconnected voice device is an LSI port without a physical trunk
plugged in, that displays as “No Loop Current” in the Device Monitor. For example, if
a system had one D/160SC-8LS trunk board with physical trunks plugged into four of
the eight slots, the Performance Counters voice resource figure would be 12—eight
shared plus four disconnected.
Q Voice Resource in use. Number of voice resources currently being used.
Q % voice resources in use. Percentage of voice resources currently being used.
Q IP Media Resources. The total number of shared IP Media resources (also known as
Intel RTP resources) in the system available for SIP. This number does not include IPM
resources attached to H.323 trunks or those disabled using the "DisableDevices" registry
setting.
Q IP Media Resources in use. The total number of shared IP Media resources being used.
Q % IP Media Resources in use. The percentage of shared IP Media resources being used.
Q RTP Relays in use. The total number of RTP Relays being used (see “About SIP off-bus
routing” on page 14-46). This number indicates how many SIP trunks are currently
using RTP Relays.
Q LBR Codec Resources. The number of low-bit rate (LBR) codec resources (g723 and
g729) on a system running HMP. The number of concurrent H.323 and SIP calls using
low-bit rate codecs is limited to the number of LBR codec resources. All calls in excess
of this limit will use the g711 codec if it is configured in the span or dialing service, or
fail if g711 is not configured. The LBR Codec Resources in use and % LBR Codec
Resources in use counters show how many LBR counters are currently being used by
the system. Note that on a non-HMP system, these counters will always show as 0.
Viewing performance counters in Windows
The performance monitoring utility that comes with Windows is the application most commonly
used to view performance counter information. You can add TeleVantage counters to a
performance monitor’s display just as you can with the pre-installed Windows counters.
Note: This section does not describe the performance monitoring utility in depth. See the utility’s
Help if you need more detailed information.
To start the Windows Performance Monitor, choose Start > Administrative Tools >
Performance Monitor.
In Windows 2000, the utility is part of the Microsoft Management Console and is called the
System Monitor. To start the Management Console, choose Start > Administrative Tools >
Performance. The following examples use the System Monitor from Windows 2000.
CHAPTER 12. MONITORING AND MAINTENANCE
12-37
To add the TeleVantage counters to the System Monitor display, right-click on the display and
choose Add Counters from the shortcut menu. In the Add Counters dialog box, choose one of
the TeleVantage groups from the Performance object drop-down list.
As shown in the next figure, TeleVantage performance counters for the group you have chosen
are listed under Select counters from list. To add a counter, select it from the list and click Add.
Repeat this process for each counter that you want to display. When you have selected all of the
counters that you want to view, click Close.
12-38
ADMINISTERING TELEVANTAGE
The counters you have selected are listed below the performance graph in the main System
Monitor window.
Archiving call recordings and voice mail _____________________
If you record all calls or even a significant portion of calls, or if you have users with thousands
of saved voice messages and large maximum mailbox sizes, disk space on the TeleVantage
Server can quickly fill up with voice messages and call recordings. In addition, ViewPoint
performance will suffer when managing thousands of recordings, or when recordings are being
delivered to the user in quick succession.
To handle thousands or even millions of recordings effectively, TeleVantage lets you archive
mailbox recordings (voice mail and call recordings) to a network directory of your choice, called
the archive folder. Archiving moves the mailbox recording as well as all information about the
recording from the TeleVantage Server to the archive folder, so archived voice messages and
call recordings no longer appears in ViewPoint.
Users can then search for and manage archived recordings using the TeleVantage Archived
Recording Browser without burdening the TeleVantage Server, TeleVantage database, or
ViewPoint.
You can restore archived recordings to the mailbox of origin or export them to another location.
(When an archived recording is restored or exported, it remains in the archive folder until
purged.) For more about managing and listening to archived recordings using the TeleVantage
Archived Recordings Browser, see Appendix E in Using TeleVantage.
CHAPTER 12. MONITORING AND MAINTENANCE
12-39
This section describes how to do the following:
Q Configure the Recording Archive Service. See page 12-41. (For installation steps, see
Chapter 15 in Installing TeleVantage.)
Q Start and stop the Recording Archive Service. See page 12-43.
Q Archive mailbox recordings automatically and manually. See page 12-44.
About the TeleVantage Recording Archive Service
The TeleVantage Recording Archive Service, which manages the archive process, runs on the
archive server, a separate PC from the TeleVantage Server. By off-loading archive processing,
the Recording Archive Service can handle the resource-intensive archiving process without
impacting TeleVantage performance, and can also archive mailbox recordings from multiple
TeleVantage Servers.
About mailbox recording file formats
You can archive mailbox recordings in any of the following formats. You can specify which
format to use on a user-by-user basis (see “Archiving mailbox recordings” on page 12-44.)
Q .VOX is TeleVantage’s native format. (.VOX size = 64 Kbps, 469 Kb/minute.)
Q .WAV format is commonly used by Windows applications such as Windows Media
Player, which cannot play .VOX files. (.WAV size = 64 Kbps, 469 Kb/minute.)
Q .MP3 is a popular format that consumes less disk space than .VOX files because of its
very high compression rate. The compression rate makes it consume a significant
amount of CPU and time when converting files into it. (.MP3 size = 20 Kbps, 146
Kb/minute.)
Note: When you archive using .VOX format, mailbox recordings are simply copied to the archive
location. When you archive in .WAV or .MP3 format, each recording is converted from .VOX to
the other format as it is copied to the archive folder, so using .WAV or .MP3 format may make
archiving slightly slower. Archiving a mailbox recording in .MP3 format results in the smallest file
size, about one-third the size than if you archived the same recording in .VOX or .WAV format
(.VOX and .WAV formats result in files of the same size.)
See “Working with voice files” on page 2-9 for more about the voice file formats supported by
TeleVantage.
12-40
ADMINISTERING TELEVANTAGE
Searching and acting on archived recordings
You use the TeleVantage Archived Recording Browser to search and manage archived
recordings.
To use the Archived Recording Browser, you log on using an archive browser user name and
password. Archive browser users do not necessarily correspond to TeleVantage users, and you
do not have to create an archive user browser for each TeleVantage user who needs to search for
and act on mailbox recordings. Multiple TeleVantage users can log on to the Archived
Recording Browser simultaneously using the same archive browser user name and password.
Typically, you create archive browser users with different levels of access rights, and then
provide the appropriate archive browser user name and password to those TeleVantage users
who need to use the Archived Recording Browser.
For details on how to use the Archived Recording Browser to search for and act on mailbox
recordings, or to import a recording archive from TeleVantage 6.x, see Appendix E in Using
TeleVantage.
Configuring the Recording Archive Service
1.
To configure the TeleVantage Recording Archive Service, choose Start > Programs
> Vertical TeleVantage > TeleVantage Recording Archive Service Manager. The
TeleVantage Recording Archive Manager opens:
CHAPTER 12. MONITORING AND MAINTENANCE
12-41
2.
Click Settings. The TeleVantage Recording Archive Service Manager Settings dialog
box opens:
3.
To specify the Recording archive shared folder, Click
and browse to the archive
folder you created (see Chapter 15 of Installing TeleVantage). The archive folder is a
network folder where mailbox recordings are archived, that must be shared with full
read/write permissions to any user who wants to access the recordings. If you are
archiving mailbox recordings from multiple TeleVantage Servers, all Servers archive
to individual subfolders within the archive folder.
4.
Specify the time when mailbox recordings will be archived automatically. (The default
archive time is 3:00 AM.) You can specify additional archive times if you need to
archive more frequently.
Under Add an archive time, enter the time using the format hh:mm AM or PM and then
click Add to add it to the Run archive at these times list.
To remove an archive time from the list, select it, and then click Remove.
5.
To add a TeleVantage Server to the list of Servers from which mailbox recordings will
be archived, click Add, and then browse to the Server that you want to add.
When you specify multiple TeleVantage Servers for archiving, archiving occurs on
one Server at a time, in the order that the Servers are specified here. Once archiving
completes on one Server, it starts on the next Server in the list. Mailbox recordings
from all of the Servers are archived to the same archive folder.
Note: Each TeleVantage Server name that you specify here is used to populate the
Archiving server field on that Server’s Recording \ Archive tab (Tools > System
Settings in the TeleVantage Administrator.) For details, see Section “Message
‘TeleVantage Recording Archive Service has not been configured to archive this server’
when starting the Administrator on the TeleVantage Server“ in Appendix B in Installing
TeleVantage.
12-42
ADMINISTERING TELEVANTAGE
To permanently remove a TeleVantage Server from the list, select it and then click
Remove. Once removed from the list, you cannot automatically or manually archive
mailbox recordings from that Server. To temporarily prevent mailbox recordings on a
specific Server from being archived, see the next step.
6.
Select the Enabled checkbox for each Server that you want to archive automatically.
Note: If Enabled is not checked, mailbox recordings will not be archived automatically
on the Server, but you can still perform manual archives according to the instructions in
“Archiving mailbox recordings manually” on page 12-45.
7.
Click OK to save your changes.
Starting and stopping the TeleVantage Recording Archive Service
Important: The Recording Archive Service must be running on the archive server in order for
an automatic or manual archive to occur. It is recommended that you set the Recording Archive
Service to auto-start according to the following instructions.
1.
On the archive server, choose Start > Programs > Vertical TeleVantage >
TeleVantage Recording Archive Service Manager. The TeleVantage Recording
Archive Manager opens:
CHAPTER 12. MONITORING AND MAINTENANCE
12-43
2.
Use the buttons to Start/Continue, Pause, or Stop the Recording Archive Service
manually.
Note: If you pause the Archive Recording Service, scheduled or manual archives will
not start until you click Start/Continue and the Service is running again. If you click
Pause while a scheduled or manual archive is in process, the Service will show a status
of Pause Pending until the archive has completed. The status of the Service will then
automatically be set to Paused.
3.
Select the Auto-start service checkbox to start the Recording Archive Service
automatically whenever the TeleVantage Server starts.
Archiving mailbox recordings
You can archive mailbox recordings automatically according to the settings in the Recording
Archive Service Manager, or archive manually at any time. You can modify the mailbox archive
settings for an individual user when you set up the archiving event.
Archiving mailbox recordings automatically
Use the TeleVantage Administrator to configure automatic archiving for various mailboxes
according to the following steps.
To archive mailbox recordings automatically
1.
Choose Tools > System Settings. When the System Settings dialog box opens,
choose the Recordings \ Archive tab.
The Archiving server field is blank until you configure the Recording Archive Service
to include the list of Servers from which mailbox recordings will be archived,
according to the instructions in “Configuring the Recording Archive Service” on
page 12-41.
12-44
ADMINISTERING TELEVANTAGE
Note: If you set up automatic archiving according to the following steps, archiving will
not occur if Archiving server is blank, and a message will be displayed to that effect
each time you start the TeleVantage Administrator.
2.
The Archive the following mailboxes list shows the users whose voice mailboxes will
be automatically archived. To add users to the list or change the users listed, click
Change. The Select Mailboxes To Archive dialog box opens.
3.
Users in the Selected mailboxes list will have their mailbox recordings automatically
archived. Use the Add and Remove buttons to modify the list. Click OK to return to
the Recordings \ Archive tab.
4.
To modify the mailbox archive settings for an individual user, click the following
columns for the user in the Archive the following mailboxes list:
Q Folders. Select which of a user’s folders to archive from the drop-down list:
Q Inbox only. Only mailbox recordings in the user’s Inbox are archived.
Q All folders except Deleted. All the user’s mailbox recordings are archived,
including those in custom folders. Mailbox recordings in the user’s Deleted
folder are not archived.
Q Days to keep. Enter the number of days that the user’s recordings remain in the
database before being archived.
Q Format. Select whether to archive the user’s audio files as MP3, VOX, or WAV
files.
5.
Click OK.
Archiving mailbox recordings manually
At any time, you can manually archive all mailbox recordings selected for automatic archiving,
or a single user’s or queue’s mailbox recordings. (You can archive a single user’s recordings
even if the user is not already included in the selected mailbox list used for automatic archiving.)
Use the TeleVantage Administrator to archive mailbox recordings manually according to the
following steps.
CHAPTER 12. MONITORING AND MAINTENANCE
12-45
To manually archive all selected mailbox recordings
1.
Choose Tools > System Settings. The System Settings dialog box opens.
2.
Choose the Recordings \ Archive tab.
3.
Click Archive Now. TeleVantage archives all selected mailbox recordings already
specified on the System Settings dialog box, Recordings \ Archive tab (see page
12-44.)
To manually archive a single user’s or queue’s mailbox recordings
1.
In the Users view, select the user and choose Users > Archive Mailbox Recordings.
For a queue, select it in the Queues view and choose Queues > Archive Mailbox
Recordings. The Archive Voice Mail dialog box opens.
2.
Modify any of the following settings:
Q Archive voice mail older than ___ days. Enter in days which mailbox recordings
you want to archive now.
Q Archive folders. Select which of a user’s folders to archive from the drop-down
list:
Q Inbox only. Only mailbox recordings in the user’s Inbox are archived.
Q All folders except Deleted. All the user’s mailbox recordings are archived,
including those in custom folders. Mailbox recordings in the user’s Deleted
folder are not archived.
Q Archive audio format. Select whether to archive the user’s audio files as MP3,
VOX, or WAV files.
3.
Click OK to start archiving the user’s mailbox recordings.
Configuring who can manage archived recordings
You can configure one or more Archive Recording Browser user accounts. You might create
multiple accounts, each with different privileges to manage recordings. Each account can be
shared by multiple users. For instructions on installing the Archive Recording Browser, see
Installing TeleVantage.
12-46
ADMINISTERING TELEVANTAGE
To add new archive browser users
1.
Start the Archived Recording Browser by choosing Start > Programs > Vertical
TeleVantage > TeleVantage Archived Recording Browser. The TeleVantage
Archived Recording Browser dialog box opens:
2.
If you are running the Archived Recording Browser for the first time, enter a User
Name of Archive Admin, leave the Password field blank, and then click OK.
Otherwise, log in as any archive browser user with Archive Admin privileges.
Close the Search Archived Recordings dialog box when it opens.
Important: Be sure to change the default password for the Archive Admin user for
improved security.
3.
In the Archived Recording Browser, choose Tools > Manage Archive Users. The
Manage Archive User dialog box opens:
4.
Password-protect the default Archive Admin user. To do so, select the Archive Admin
user, and then click Edit. In the Edit Archive User dialog box, enter a Password and
then click OK twice to save the new password.
CHAPTER 12. MONITORING AND MAINTENANCE
12-47
5.
To add another archive browser user, in the Archived Recording Browser, choose
Tools > Manage Archive Users, and then click Add. The New Archive User dialog
box opens:
6.
Enter the User Name and Password for the archive browser user. These do not have
to be the user’s TeleVantage user name and password (see “Searching and acting on
archived recordings” on page 12-41 for more about archive browser users.)
7.
Optionally, check This user has Archive Admin privileges if you want the user to be
able to add, edit, or delete archive users, or create other Archive Admin users.
8.
Click one of the following to specify the user’s access rights.
Q User has rights to see all recordings in database. Select this option if you want
the new user to be able to view and act on all archived mailbox recordings. Click
OK and then go to step 10.
Q User only has the rights specified below. Select this option to limit the new
user’s access rights to only the options you specify in the next step.
9.
Select one of the following from the drop-down list:
Q Servers. If given access to a TeleVantage Server, the user can search and
manage only the mailbox recordings that were archived from the specified
Server.
Q Archived Mailboxes. If given access to an Archived Mailbox, the user can
search and manage only the mailbox recordings that were archived from the
specified Mailbox.
12-48
ADMINISTERING TELEVANTAGE
Q Users and Contacts. If given access to a user or contact, the user can search
and manage all archived voice messages and call recordings involving the
specified user or contact.
To give the user an access right, select it in the Available access rights list, and then
click
to add it to the Selected access rights list. Repeat this step to give the user
all of the access rights required. To remove an access right, select it in the Selected
access rights list and then click
.
10. When you are done setting the user’s access rights, click OK.
11. Add any additional archive browser users by repeating steps 5-10.
Using the TeleVantage Archive Recording Browser
For instructions, see Appendix E of Using TeleVantage.
Monitoring database and disk usage ________________________
TeleVantage’s database stores your system configuration settings (information about trunks,
users, auto attendants, and so forth), the Call Log, and an index to voice prompts, greetings,
voice titles, and voice message files in a database. The voice files themselves are stored
separately on disk.
Tasks associated with monitoring database and disk space include:
Q Allocating database space
Q Allocating disk space
See Installing TeleVantage for information on the limits of MSDE and SQL Server databases.
CHAPTER 12. MONITORING AND MAINTENANCE
12-49
Viewing storage statistics
To view how much of the available space your system is currently consuming, do the following:
1.
Choose Tools > System Settings. The System Settings dialog box opens.
2.
Choose the Storage tab.
The tab provides the following storage information:
Q Database. Percentage of disk space allocated for the TeleVantage database that is
currently used, also shown in kilobytes used out of the total number of kilobytes
allocated. The size of the TeleVantage database is set and the required disk space
allocated when the TeleVantage Server is installed. The default database size is 100 MB.
It will grow automatically up to a maximum of 2 GB if you are using the MSDE
database, or to the size of your hard drive if you are using SQL Server Standard or
Enterprise editions. See Installing TeleVantage for supported databases and
requirements.
When you start the Administrator, TeleVantage displays a warning message if the
TeleVantage database is 80% or more full. You should check the database usage
periodically to make sure that you are not running out of space. You will also
automatically receive e-mail notifications of low space if you have set up Windows
Event Log notifications (see “Setting up TeleVantage Event Log notifications” on
page 12-21).
Q Messages. Percentage of disk space allocated for all users’ voice mail messages, as well
as any call recordings users have made, that is currently used.
Q Greetings. Percentage of disk space allocated for all users’ greetings and voice titles
that is currently used.
12-50
ADMINISTERING TELEVANTAGE
Q Call Log. Amount of space currently used in the TeleVantage database for Call Log
records, in kilobytes. Some or all of this space can be recovered by archiving Call Log
information if total database usage is high (see “Archiving the Call and Trunk Logs” on
page 12-51).
Q Trunk Log. Amount of space currently used in the TeleVantage database for Trunk Log
records, in kilobytes. Some or all of this space can be recovered by archiving Trunk Log
information if total database usage is high (see “Archiving the Call and Trunk Logs” on
page 12-51).
Click Refresh to refresh the tab with current data.
Archiving the Call and Trunk Logs
Over time, Call Log and Trunk Log information will begin to fill up your TeleVantage database.
To recover database space, you can archive old Call and Trunk Log information that is no longer
needed to a location outside the database.
Important: Archived information is permanently removed from the TeleVantage database. You
cannot run Call Center reports on the time period that has been archived.
Call and Trunk Log information is written to comma-separated value (.CSV) text files that can
be read by most spreadsheet and database applications. The default path for these files is
C:\Program Files\TeleVantage Server\Archive\Calllog.csv. and ..\Trunklog.csv.
You can archive Call and Trunk Log data in the following ways:
Q Set up automatic archiving, which takes place at 1:00 a.m. every day.
Q Automatically overwrite the Call and Trunk Logs after a number of days that you
specify.
Q Perform a manual archive on an as-needed basis, in addition to daily automatic
archiving. You can do a manual archive whether or not automatic archiving is turned on.
You do not need to stop the TeleVantage Server or any other TeleVantage components to
perform an archive. However, because archiving is database-intensive, you may want to
perform it during off-peak hours so that it does not affect normal system operation.
To archive Call and Trunk Log information
1.
Choose Tools > System Settings. The System Settings dialog box opens.
2.
Choose the Call Log and Trunk Log > Archive tab.
3.
Use the following fields to specify how you want to perform archiving:
Q Archive Call Log and Trunk Log daily. If checked, the Call Log and Trunk Log
are archived automatically at 1:00 a.m. every day. If unchecked, the logs will
continue to grow unless you manually archive them.
Q Archive calls older than ___ days. Number of days a call remains in the Call Log
until it is archived.
CHAPTER 12. MONITORING AND MAINTENANCE
12-51
Q Archive file name. Locations of the Call Log and Trunk Log archive files on the
TeleVantage Server. The files are in .CSV format and can be viewed with most
spreadsheet or database applications.
Q Overwrite archive every ___ days. Number of days that archived information will
be appended to the Call Log and Trunk Log archive files. After that number of days,
archived information in the files will be deleted and the files will be reused.
Q Archive will be overwritten on. Date and time that the Call Log and Trunk Log
archive files will next be overwritten and the data in them deleted. To preserve the
archived data, back up the files just before they will be overwritten.
4.
Click Archive Now to manually archive the Call Log and Trunk Log according to the
settings specified above. The archive begins immediately and may take several
minutes to complete. You cannot perform any other Administrator functions until the
archive completes. You can perform a manual archive at any time whether or not
automatic archiving is turned on.
5.
Click OK to save your archiving settings.
Note: Use the Import and Export Wizard (see “Exporting the Call Log” on page 12-17) to create
a file containing Call Log information without removing the information from the database.
Changing the Call Log or Trunk Log archive location
Click Change under Archive filename to specify a new location for the Call Log or Trunk Log
archive file. Changing the archive path starts a new archive file in the new location the next time
the archive is made. Any existing archive files remain in the old location.
Avoiding CPU spikes while archiving
Archiving the Call and Trunk logs can be CPU-intensive. To avoid CPU spikes, you can use the
\Artisoft\CallLog\AutoArchiveDelay advanced setting. See Appendix J of Installing
TeleVantage for instructions on advanced settings.
Moving voice files
If disk space is low on the drive on which you installed TeleVantage, you can move your voice
message and prompt files to another local drive that has sufficient space. To move voice files,
you must log on to the Administrator as a user who has write access to both the source and
destination directories.
To move voice message files
12-52
1.
Shut down the TeleVantage Server. You cannot move voice files while the Server is
running.
2.
Start the TeleVantage Administrator.
3.
Choose Tools > Systems Settings and then click the Storage tab.
4.
Click Move.
ADMINISTERING TELEVANTAGE
5.
Choose a new location for your voice files. The drive you select must be a local drive
on the TeleVantage Server, not a network drive.
6.
Click OK.
Changing special TeleVantage directories ____________________
You can change the location where TeleVantage stores the following important components on
disk:
Q The database.
Q The database transaction log.
Q The database backup.
Q Voice files.
Note: You must shut down the TeleVantage Server before changing the location of special
directories.
To change special TeleVantage directories
1.
Choose Tools > System Settings. The System Settings dialog box opens.
2.
Choose The Storage \ Special Directories tab.
3.
Click Move next to a component to specify a new location for that component.
4.
When you are done changing special directory locations, click OK.
Identifying security risks __________________________________
You can analyze your system for potential security risks by choosing Tools > Analyze Security.
For more information on system security, see Appendix I of Installing TeleVantage.
Backing up TeleVantage ___________________________________________
It is critically important to back up the TeleVantage database on a regular basis. The system
configuration information stored in the TeleVantage database, the accountcode.txt file, and
the voice files (stored separately) are vital to the proper operation of TeleVantage.
You must also regularly back up the TeleVantage voice files by copying them to another
location.
Important: After upgrading TeleVantage to a new version, you cannot restore a database
backup that was created using the previous version. You can only restore a database backup that
was created using the currently running version of TeleVantage.
Note: For the most accurate backup, schedule the backup for a time when the system is not
being heavily used. Backing up during times of heavy activity can result in an occasional voice
message being lost from the backed-up files.
CHAPTER 12. MONITORING AND MAINTENANCE
12-53
Backing up TeleVantage data
Use the following procedure to back up the TeleVantage database and other critical files:
1.
Optionally, stop the TeleVantage Server as described in “Shutting down the
TeleVantage Server” on page 12-56. Stopping the Server is not necessary, but ensures
that the database and voice files match (because voice messages cannot be left while
the system is stopped).
2.
Choose Tools > Backup Database.
3.
Click OK to confirm the backup. The TeleVantage Administrator creates a backup
copy of your TeleVantage database and also copies your current TeleVantage registry
settings to a TVServer.reg file.
4.
Copy the following files to tape or to another disk.
If your TeleVantage 5.0 system was a new installation:
Q C:\Televantage Server\Data\Backup\Tvdb.dmp
Q C:\Televantage Server\Data\Backup\TVServer.reg
If you have had your TeleVantage system since version 3.5 or earlier:
Q C:\MsSQL7\Artisoft\Backup\Tvdb.dmp
Q C:\MsSQL7\Artisoft\Backup\TVServer.reg
5.
Copy the contents of the following directory and all its subdirectories to tape or to
another disk. The default location is:
C:\Program Files\TeleVantage Server\Vfiles\
Note: Be sure to include Temprecs and its files.
You must also back up the file C:\Program Files\TeleVantage Server\account
code\accountcode.txt by backing it up to a safe location on a regular basis.
Note: For instructions on moving a backup of the database or voice files, see “Changing special
TeleVantage directories” on page 12-53.
Restoring TeleVantage data
You can restore the database from the backup that you have created previously on the same
version of the TeleVantage software.
For a successful restoration, the backup used to restore the TeleVantage database must match
the backup voice files exactly. For example, you must not use a backup of the database made on
Monday and a backup of the voice files made on Tuesday. The best way to insure a successful
restoration is to use database and voice file backups made at the same time.
Important: After upgrading TeleVantage to a new version, you cannot restore a database
backup that was created using the previous version. You can only restore a database backup that
was created using the currently running version of TeleVantage.
12-54
ADMINISTERING TELEVANTAGE
To restore the TeleVantage database
1.
Make sure that the TeleVantage Server has been shut down (see page 12-56) and that
there are no copies of TeleVantage ViewPoint or the Administrator running (except
the one you are using).
2.
Choose Services in the Windows Control Panel to stop and restart the MSSQL service
(doing this ensures that no one is connected to the database Server).
3.
Copy the most recent version of the Tvdb.dmp and TVServer.reg files from your
backup device to one of the following:
Q For an upgraded system. Copy the file to:
C:\MsSQL\Vertical\Backup\
Q For a fresh system. Copy the file to:
C:\Program Files\Televantage Server\Data\Backup
If the file already exists, overwrite it.
4.
From the TeleVantage Administrator, choose Tools > Restore Database.
5.
Click Yes to confirm that you want to restore the database.
6.
If a file (TVServer.reg) containing backed-up TeleVantage Server registry settings is
present when you restore the database, click Yes when you are prompted to restore the
registry settings as well.
7.
Delete all the files in the \Vfiles directory. The default location for this directory is:
c:\Program Files\TeleVantage Server\Vfiles
8.
Copy the latest version of the files from your backup device to the \Vfiles directory.
Be sure to include the \Vfiles\Temprecs directory and its files.
9.
If necessary, copy the file accountcode.txt to C:\Program Files\TeleVantage
Server\account code\accountcode.txt. Overwrite the old version.
Moving a TeleVantage Server to another PC
You can restore the TeleVantage database from an online backup to another PC. The backup and
restore function copies all Server registry settings and automatically resolves different source
and target path names to simplify the process of moving a TeleVantage Server.
Important: If you move the TeleVantage database between differently localized versions of
Windows, you must contact Vertical or your TeleVantage provider for the "DatabaseTools" utility,
and use the "Sync Collations" function to set the database to match the new Windows version.
CHAPTER 12. MONITORING AND MAINTENANCE
12-55
To restore TeleVantage data to another PC
1.
It is critical to make sure that the new TeleVantage Server is running exactly the same
version of TeleVantage, including service packs or patches.
2.
Perform a backup of the original Server as described in “Backing up TeleVantage
data” on page 12-54.
3.
Restore the backup to the new Server as described in “Restoring TeleVantage data” on
page 12-54.
Shutting down the TeleVantage Server _______________________
Some actions require shutting down or restarting the TeleVantage Server, for example installing
new voice boards. While the Server is shut down all TeleVantage processing is stopped,
including the following:
Q No inbound calls are received. Callers dialing the TeleVantage system hear whatever
signal your telephone company provides. On analog trunks, this is usually ringing. On
digital trunks it may be a fast busy signal.
Q No calls can be placed. Stations provide no dial tone.
Q TeleVantage ViewPoint applications on the network are disconnected. Each ViewPoint
displays a Retry message when the Server first shuts down.
To shut down the Server
To shut down the Server, choose Tools > Shut down Server in the Administrator or Device
Monitor. The Shut Down TeleVantage Server dialog box opens.
12-56
ADMINISTERING TELEVANTAGE
The shutdown process is a series of 6 steps that are performed sequentially as shown in the
dialog and as described below.
1.
Delay __ minutes. Check to have a delay between clicking OK in this dialog box and
the Server shutdown. Enter the number of minutes to delay. During the delay, users
picking up a station hear the message “The phone system is about to shut down.”
During the delay, you can cancel the shutdown by returning to this dialog box (see the
next section).
Uncheck the field to shut down the Server immediately when you click OK.
2.
Prevent new incoming or outgoing calls. Check to prevent the start of new external
calls before the Server is shut down. Internal (station-to-station) calls are still
permitted. Incoming trunk calls will hear a busy signal. Attempts at placing outgoing
external calls will fail to allocate a trunk.
If unchecked, new external calls can be placed and received.
3.
Choose what happens if there are active calls in progress before the Server shuts down:
Q Immediately terminate all active calls. All calls are disconnected and the Server
shuts down.
Q Wait __ minutes for calls to complete. Enter a number of minutes that the
shutdown will wait if calls are still in progress. If a delay was specified in step 1,
this wait begins when the delay expires. The shutdown continues when this wait
time elapses or all calls are completed, whichever comes first. If calls are still in
progress when the wait time elapses, they are disconnected.
Q Indefinitely wait for calls to complete. Server shutdown is postponed until no
active calls are in progress. Note that if you choose this option and don’t check
Prevent new incoming or outgoing calls, the shutdown may be postponed for
quite a long time.
4.
Choose the level of shutdown that you want to perform:
Q Stop TeleVantage Server. Only the TeleVantage Server is shut down. The Intel
Dialogic drivers remain up and the Server computer remains running.
Q Stop TeleVantage Server and Intel Dialogic Drivers. Both the TeleVantage
Server and the Intel Dialogic drivers are shut down.
Note: If you choose this option, only the Intel Dialogic System Release (SR) drivers
are shut down, not the Intel Dialogic DSI board drivers. To shut down the DSI board
drivers, you must use the Intel MEA Configuration Manager. For details, see
“Test-starting the Intel Dialogic drivers” in Chapter 7 in Installing Intel Telephony
Components.
QRestart PC. The TeleVantage Server computer is restarted.
5.
Capture Intel Dialogic firmware dump. Do not check this option unless Vertical
support requests Intel Dialogic troubleshooting logs. The logs are generated during
shutdown and are automatically attached to the Problem Report Wizard the next time
you run it (see “Running the Problem Report Wizard from the command line” on
page 12-64).
CHAPTER 12. MONITORING AND MAINTENANCE
12-57
6.
Start TeleVantage Server. The TeleVantage Server is automatically restarted after
shutting down. The TeleVantage Server starts the Intel Dialogic drivers automatically
if they were previously stopped in step 4.
7.
Reason for shutdown. Enter a required reason for shutting down the Server. The
reason will appear in the TeleVantage Event Log and maintenance log. (see “Viewing
the TeleVantage Event Log” on page 12-20).
Canceling or modifying a shutdown
Once you begin a shutdown process, you can cancel it or modify the shutdown options at any
time before the Server actually shuts down. To do so:
1.
Choose Tools > Shut down Server.
2.
To cancel the shutdown, click Cancel shutdown.
To modify the shutdown, check Change shutdown sequence and change any of the
options described in the previous section.
3.
Click OK.
Starting the TeleVantage Server
To start the TeleVantage Server manually after a shutdown, choose Tools > Start Server.
Restarting stations or trunks _______________________________
The TeleVantage Server periodically tests stations and trunks to see if they are responding. If a
device is not responding, TeleVantage writes the following warning message to the Windows
Event Log: “Device n is not responding.”, where “n” is the device number (positive numbers are
stations, negative numbers are trunks.) The default testing interval is 5 minutes. For information
about modifying the interval or turning off the setting, use the registry setting
HkeyLocalMachine\Software\Artisoft\TeleVantage\Server\Settings\MonitorInterval.
Some error conditions may make a trunk or station unusable, and you must restart the device
manually. For example, if a single station shows the status “Reorder” and does not respond to
picking it up and hanging it up again, then you must restart it to re-establish the connection to
TeleVantage. Generally, if the status of a device does not seem to reflect its actual status and
you have checked the phone or trunk line to see if it is working, you must restart the device.
Similarly, you can manually restart a trunk that has become unstable because of an error
condition. You also must restart a trunk using the Device Monitor view to detect loop current
on a newly added trunk before TeleVantage can use it. With digital trunk types you can choose
to restart the entire span.
Both automatic and manual restarts are logged in the TeleVantage Event Log. For more
information, see “Viewing the TeleVantage Event Log” on page 12-20.
Note: Be aware that restarting a device may take up to 30 seconds. During that time, you cannot
perform any other operations in the Device Monitor view.
12-58
ADMINISTERING TELEVANTAGE
To restart a station or trunk
1.
Do one of the following:
Q To restart a single device, select the device and choose Device Monitor > Restart
Station, Restart Trunk, or Restart Span. The Restart Span command is available
for digital trunk types, and restarts all trunks in the span.
Q To restart multiple devices, press CTRL or SHIFT while you select trunks or
stations, right-click, and then choose Restart Devices on the shortcut menu. You
cannot restart both trunks and stations in the same operation.
2.
Click Yes to confirm the restart.
Starting a new Server log
Choosing Device Monitor > Start new Server log creates a new TeleVantage Server log file.
Perform this operation only under the direction of your TeleVantage provider.
Capturing network troubleshooting logs _____________________
By default, TeleVantage continually captures network traffic information and writes it to logs
that can help simplify the troubleshooting of client/server or voice-over-IP communications
issues.
Network capture logs capture the following protocols:
Q Session Initiation Protocol (SIP).
Q Realtime Transport Protocol (RTP), turned off by default.
Q Trivial File Transfer Protocol (TFTP)
Q Address Resolution Protocol (ARP)
Q Internet Control Message Protocol (ICMP)
Q Transmission Control Protocol (TCP) (H.225, H.245)
Q Microsoft Distributed Component Object Module (DCOM)
Q Dynamic Host Configuration Protocol (DHCP)
Q Bootstrap Protocol (BootP)
Q Domain Naming System (DNS)
When network capture is enabled, a separate series of log files is written for each network
interface card (NIC) in the TeleVantage Server PC. By default, each series consists of 20 files
of 32 mb each, that are continually overwritten starting with the oldest. The logs are written to
the Server’s log directory, typically C:\Program Files\TeleVantage Server\Logs. The filenames
of the captured traces are in the format Tv_cap_nnnnnnnnnnnn_00xx.cap, where nnnnnnnnnnnn
represents the last 12 digits of the WinpCap NIC ID, and 00xx represents the capture number
(for example, 0001, 0002 ...0020). For example: Tv_cap_1E2F3B4A5C85_0010.cap.
CHAPTER 12. MONITORING AND MAINTENANCE
12-59
Note: Network capture logs are not included in the problem report package created by the
Problem Report Wizard (described on page 12-61.) You must manually gather and submit
network capture logs as directed by your TeleVantage provider.
Adjusting or turning off network capture
In the Administrator, you can adjust the number and size of the log files or files or turn off
network capture completely.
To adjust or turn off network capture
1.
Choose Tools > System Settings.
2.
Click the Server \ Network Capture tab.
3.
To disable network capture, uncheck Capture server network traffic.
4.
If Capture server network traffic is checked, adjust any of the following options:
Q Include VOIP audio packets. Check to have the logs capture the audio portion of
Voice-over-IP calls (RTP protocol.) This option is turned off by default because it
can cause network capture files to fill up quickly. Select this option only if you are
experiencing problems with voice quality issues on VoIP calls.
Q Maximum file size. Specify the maximum size of each log file before TeleVantage
increments the file number and begins creating a new log file.
Q Maximum number of files. Specify the total number of log files that can be on the
system at any one time. When that number is reached, TeleVantage begins
overwriting the existing log files starting with the oldest.
5.
Click OK.
Note: If available disk space drops below a minimum threshold (default 100 MB), TeleVantage
stops writing network capture logs. You can change this threshold using the registry setting
HKLM\Software\Artisoft\TeleVantage\Server\Settings\MinDiskFreeSpace. For more information
see Appendix J of Installing TeleVantage.
12-60
ADMINISTERING TELEVANTAGE
Reporting problems to your TeleVantage provider _____________
Use the Problem Report Wizard to report any problems you experience with your TeleVantage
system to your provider. Your TeleVantage provider has the expertise to debug, correct, and
expand your TeleVantage system, and has access to Vertical Technical Support resources for
further assistance.
The Problem Report Wizard asks you to describe the frequency, patterns, and circumstances of
the problem you are reporting. Based on the information you supply, the Problem Report Wizard
isolates exactly when and where the problem occurred and automatically collects the
appropriate TeleVantage log files and other information from your computer. By assembling all
the relevant information, the Wizard helps your provider quickly identify the problem and begin
to solve it.
Note: For information about known issues and workarounds for currently reported problems,
see the Known Issues topic in the online Help for the TeleVantage Administrator.
Setting Problem Report Wizard defaults
You can set values for the Problem Report Wizard that will be automatically supplied as defaults
whenever it is run. The user running it can always change the defaults.
To set Problem Report Wizard defaults
1.
Choose Tools > System Settings. The System Settings dialog box opens.
2.
Choose the Problem Report Wizard tab.
3.
Fill in any Default information for the person reporting the problem.
4.
To set up a default status of e-mailing the Problem Report Package, check Send
package via e-mail by default and specify the default E-mail address.
5.
Click OK.
Using the Problem Report Wizard
Use the Problem Report Wizard according to the following guidelines:
Q For TeleVantage Server problems, run the Wizard on the TeleVantage Server. See
“Reporting TeleVantage Server problems” on page 12-62.
Examples of Server problems include:
Q The TeleVantage Server stops unexpectedly.
Q Caller ID is not sent correctly.
Q There is no dial tone.
Q A call-handling problem occurred. For example, TeleVantage does not answer
incoming calls, calls are being disconnected, or calls are handled improperly (calls
cannot be transferred, put on hold, and so forth).
CHAPTER 12. MONITORING AND MAINTENANCE
12-61
Q For problems with any of the workstation applications—ViewPoint, Administrator, or
TAPI Service Provider—run the Wizard on the computer that is experiencing the
problem. See “Reporting workstation application problems” on page 12-63.
Examples of workstation application problems include:
Q Workstation application behaves unexpectedly.
Q User cannot connect to the network.
Q User cannot connect to the TeleVantage database.
Q Workstation application does not start.
Q Workstation application closes unexpectedly.
Q Data or commands executed in a workstation application don’t look or behave
properly.
Q For distributed problems (problems that occur with both a workstation application
running on a user’s computer and the TeleVantage Server) run the Wizard on the user’s
computer. Then run the Wizard on the Server so that you create a single problem report
package. See “Reporting distributed problems” on page 12-63.
Examples of distributed problems include:
Q Problems with specific calls in ViewPoint or Administrator.
Q Problems with specific voice messages in a ViewPoint Voice Messages folder.
Q Call-handling problems that involve ViewPoint or Administrator (calls cannot be
conferenced, for example).
Q User cannot make outbound calls from ViewPoint.
Reporting TeleVantage Server problems
If you experience a problem with the TeleVantage Server, run the Problem Report Wizard on
the Server. The Wizard automatically collects the required information from the Server,
including the appropriate Server logs.
Server log files are critical to successfully identifying and solving many problems. Because
these files can be large, by default the Wizard collects TeleVantage Server log information only
for the period of time during which the problem occurred.
Important: You can choose to include all the available Server log information when you run the
Problem Report Wizard. Be aware that doing this can result in a very large problem report
package. A large package can make it more difficult for your provider to identify the problem.
Therefore, use this option (described in the following procedure) on a case-by-case basis and
only if you need to capture as much history information as possible before the log files are
overwritten. Be sure to delete the problem report package from your system as soon as you send
it to your provider to regain disk space.
12-62
ADMINISTERING TELEVANTAGE
To report a TeleVantage Server problem
1.
On the TeleVantage Server computer, do one of the following:
Q From the TeleVantage Administrator, choose Help > Report a Problem.
Q Choose Start > Programs > Vertical TeleVantage Server > TeleVantage Problem
Report Wizard.
To report a problem with a specific call or voice message, select the problem call (or
the call that left the problem message) in the Call Log view and choose Call Log >
Report a Problem. The Problem Report Wizard starts with information about the call
already entered.
2.
Answer the questions presented in each Wizard window.
To include all the available Server log information in the problem report package,
uncheck the Limit logs to the following time frame.
Reporting workstation application problems
For a problem with any of the TeleVantage workstation applications—ViewPoint,
Administrator, Contact Manager Assistant, or TAPI Service Provider—run the Problem Report
Wizard on the computer that is experiencing the problem. The Wizard automatically collects the
required information.
To report a workstation application problem
1.
On the computer that is experiencing the problem, choose Start > Run. Enter the
following path and then click OK. The path on your system may be different.
C:\Program Files\Common Files\Vertical\TeleVantage\TVPRwizard.exe
Alternately, to report a problem with a specific call or voice message, select the
problem call (or the call that left the problem message) in the Call Log view and
choose Actions > Report a Problem. The Problem Report Wizard starts with
information about the call already entered.
2.
Answer the questions presented in each Wizard window.
Reporting distributed problems
For a problem that involves both a workstation application running on a user’s computer and the
TeleVantage Server (a distributed problem usually involves ViewPoint Call Monitor view), you
should gather information from both computers before contacting your TeleVantage provider.
The Problem Report Wizard assembles all the information so that your provider receives all the
necessary information about the problem in one .ZIP file.
CHAPTER 12. MONITORING AND MAINTENANCE
12-63
To report a distributed problem
1.
Run the Wizard on the user’s computer to collect information about that computer and
create a problem report package (perform the steps for reporting a workstation
application problem on page 12-63).
2.
Run the Wizard on the TeleVantage Server to gather all the necessary Server
information (perform the steps for reporting a Server problem on page 12-62).
3.
Check This report includes a Problem Report Package from ViewPoint.
The Wizard automatically browses the Packages folder on the Server so that you can
select the .ZIP file that was produced on the user’s computer. The Wizard then
includes that file in the problem report package it creates on the Server.
If the Packages folder is not found, or the file was saved to another location, click
Browse to select the .ZIP file that was produced on the user’s computer.
The problem report package
The problem report package is a single .ZIP file. It contains all the information gathered about
the problem by the Problem Report Wizard. The Wizard saves the problem report package to
the location you specify.
The Wizard summarizes the information reported, including the date and time the report was
created, in a ProblemInfo.txt file within the .ZIP file. You can open a .ZIP file with any zip
utility (for example, WinZip).
To prevent problem report packages from being overwritten, the Wizard gives each one a unique
name based on your company name and a sequence number.
E-mailing the Problem Report Package
Optionally, you check Send Problem Report Package via e-mail in the final window to e-mail
the problem report package to a destination of your choice. Because a problem report package
can be large, after you send you should delete it from your system to regain disk space.
Running the Problem Report Wizard from the command line
You can run the Problem Report Wizard without having a TeleVantage application open by
running it from the command line. This can be useful for automatically creating scheduled
Problem Report Wizard captures using the Windows scheduling service. Run the file
TVPRWizard.exe, located in C:\Program Files\Common Files\Vertical\TeleVantage. You can
run the file in the following ways:
12-64
ADMINISTERING TELEVANTAGE
Q To run the PRWizard normally, specify \createcab:Yes. The PRWizard runs with
whatever parameters you specify.
Q To run the PRWizard automatically, do not include the \createcab parameter. The
PRWizard runs in the background, with a progress bar showing.
When running the Problem Report Wizard from the command line, you can use any of the
following parameters. All are optional.
Parameter
Description
/calllogentry:
Specified Call Log entry from the Administrator or
ViewPoint
/stations:
List of stations involved
/clientpackage:
Full path and filename of a client package to include
/includedatabase:
If Yes, includes a database backup
/estimateddate:
Estimated date of occurrence
/estimatedtime:
Estimated time of occurrence
/exactdate:
Exact date of occurrence
/exacttime:
Exact time of occurrence
/rangestartdate:
Start date of log range
/rangestarttime:
Start time of log range
/rangeenddate:
End date of log range
/rangeendtime:
End time of log range
/summary:
Text summary of the problem
/reproducible:
Whether the problem is reproducible. Enter Yes, No, or
Unknown.
/details:
Text describing details of the problem
/contactname:
Name of contact at your company
/contactcompany:
Your company
/contactphone:
Your contact phone number
/contactemail:
Your contact email address
/supportname:
Name of your support contact
/supportissue:
Support issue number
/packagepath:
Directory in which to place the .ZIP file
/packagefile:
Filename of the .ZIP file
CHAPTER 12. MONITORING AND MAINTENANCE
12-65
12-66
Parameter
Description
/mailpackage:
Whether the package should be e-mailed (not applicable
if /createcab is set to Yes)
/createcab:
If Yes then the .ZIP file creation will begin automatically
/maxevents:
Maximum number of Event Log events per Event Log
type
/cabpriority:
Process priority for cabarc. Enter Normal, Idle, High,
Realtime, Below_normal, or Above_normal.
ADMINISTERING TELEVANTAGE
CHAPTER 13
CHAPTER 13
MANAGING SYSTEM PROMPTS AND
AUDIO
CHAPTER CONTENTS
About system prompts and audio . . . . . . . . . . . . . . . . . . . . . . . . . . . . . . . . . . . 13-2
Setting general system prompt options. . . . . . . . . . . . . . . . . . . . . . . . . . . . . . . 13-2
The System Prompts view . . . . . . . . . . . . . . . . . . . . . . . . . . . . . . . . . . . . . . . . 13-3
Managing system prompts . . . . . . . . . . . . . . . . . . . . . . . . . . . . . . . . . . . . . . . . 13-4
Recording over system prompts . . . . . . . . . . . . . . . . . . . . . . . . . . . . . . . . . . . . 13-6
Localizing the telephone commands. . . . . . . . . . . . . . . . . . . . . . . . . . . . . . . . 13-13
Setting up system-wide music-on-hold . . . . . . . . . . . . . . . . . . . . . . . . . . . . . . 13-13
About system prompts and audio ___________________________
System prompts are audio prompts that TeleVantage plays to callers and users. System prompts
offer callers menu choices and provide menus and instructions to users. This chapter explains
how to play and rerecord the system prompts used throughout TeleVantage.You can use the
standard prompts included with the system or record over them to create customized prompts.
The chapter also describes how to set up hold music, which enables callers to hear music
whenever they are put on hold by a user or the system.
Setting general system prompt options ______________________
This section describes general system-wide options you can set for system prompt behavior.
Setting the system prompt language
You can choose which language system prompts play in by default. Individual users can select
a different language for prompts that are played to users and callers navigating their accounts.
To set the default system prompt language
1.
Choose Tools > System Settings. The System Settings dialog box opens.
2.
Choose the Audio tab.
3.
From the Default system prompts dropdown list, select the language you want.
4.
Click OK.
Presenting a confirmation prompt before voicemail
You can choose whether or not callers hear the prompt, “To leave a message press 1, or press *
to return to the menu” after they hear a user’s voicemail greeting. See “Setting general Server
settings” on page 3-4.
13-2
ADMINISTERING TELEVANTAGE
The System Prompts view _________________________________
The System Prompts view in the Administrator allows you to listen to and change the recordings
used for standard system prompts and auto attendants. For example, when you are setting up
your TeleVantage system, you typically go to this view to change the default Greeting prompt
so that it contains your company name. Click the System Prompts button in the view bar to open
the System Prompts view.
Each system prompt appears as a row in the view. The information in the following table is
displayed for each system prompt.
Column
Description
File name
File name of the prompt.
Text
Contents of the file in text form.
The text displayed here is accurate only if it is
updated each time the file is changed. If you are
unsure of the accuracy of the text, play the file to
confirm what it says.
Last modified
Last time that the file was modified.
Comment
How the prompt is used in TeleVantage. Applies
to custom prompts and auto attendant prompts
only. The column is blank for all other prompts.
Language
The set of language prompts to which this system
prompt belongs. User-recorded prompts such as
auto attendant prompts have this column blank.
CHAPTER 13. MANAGING SYSTEM PROMPTS AND AUDIO
13-3
Controlling the prompt display
By default the System Prompts view displays all system prompts on the TeleVantage Server.
Use the control on the toolbar if you want to display only the custom prompts you have recorded
or only the prompts for a single language.
Note: To install additional language prompts, you must run the TeleVantage Server installation
again and select the languages you want.
Managing system prompts _________________________________
This section explains the following aspects of managing system prompts:
Q “Playing system prompts”
Q “Exporting system prompt text” (page 13-4)
Q “Exporting and importing system prompt audio files” (page 13-5)
Q “Changing the encoding format of system prompts” (page 13-6)
Playing system prompts
You can play system prompts to confirm that they contain the correct information. System
prompts play over the telephone or through your computer speakers. If you choose to play a
prompt over the telephone, your phone rings and the prompt plays when you answer. See “Using
the audio controls” on page 2-10 for more information.
To play a system prompt
1.
Select the name of the prompt that you want to play.
2.
Choose System Prompts > Play.
Exporting system prompt text
Use the following procedure to export system prompt text into a .CSV file for processing by a
professional recording studio or for maintenance purposes.
13-4
ADMINISTERING TELEVANTAGE
To export system prompt text
1.
Choose File > Import and Export. The Import and Export Wizard opens.
2.
Select Export System Prompt Text and click Next.
3.
Under Save exported file as, accept the suggested location and file name or click
Browse and choose a different location and enter a file name.
4.
Under Options, accept the suggested dates or enter new ones.
5.
Click Finish. The file is exported.
Exporting and importing system prompt audio files
You can export a system prompt from your Server for use on another TeleVantage Server. You
also can import an existing sound file and use it as a system prompt. For more information, see
“Importing and exporting voice files” on page 2-11.
CHAPTER 13. MANAGING SYSTEM PROMPTS AND AUDIO
13-5
Changing the encoding format of system prompts
TeleVantage supports two .VOX file formats, MuLaw format for use in the United States and
Japan, and ALaw format for use in other countries. When TeleVantage is installed, the correct
format is used based on the location of the TeleVantage Server.
On rare occasions, it may be necessary to convert the voice files on a TeleVantage system from
one encoding format to another, for example, if you are staging a TeleVantage system in one
location that will be deployed in another.
To change the encoding format of all .VOX files in the system
1.
Choose Tools > Shutdown Server to temporarily stop the TeleVantage Server.
2.
Run the utility TVConvert.exe, which is located in the directory in which the
TeleVantage Server was installed.
3.
Choose Tools > Start Server to restart the Server.
TVConvert.exe checks the Windows registry for the current .VOX file format, converts all files
to the other format, and updates the Windows registry.
Recording over system prompts ____________________________
You may want to record over system prompts for some of the following reasons:
Q You want your custom prompts and system prompts to be recorded with the same voice.
Q You want to change the message text of a prompt, for example, the Welcome message.
Q You have access to voice talent that you prefer over the existing TeleVantage voices.
Q You have localized the telephone commands for a language not provided with
TeleVantage (see “Localizing the telephone commands” on page 13-13) and want to
record all of the prompts in that language as well.
Recording options
You can record system prompts in either of the following ways:
Q “Recording system prompts professionally” (page 13-7)
Q “Recording over system prompts yourself” (page 13-9)
The sentence file
The sentence file is a text file that contains all the voice prompts and the sentences they form.
The American English sentence file is located in:
C:\Program Files\TeleVantage Server\TVLEN00.INI
Note: “EN00” identifies American English files. TeleVantage includes two other sets of system
prompts. EN10 identifies British English files. ES00 identifies Latin American Spanish files.
13-6
ADMINISTERING TELEVANTAGE
The .VAP and .VOX files
TeleVantage prompts are contained in:
Q The .VAP file, an indexed file containing individual .VOX recordings of variable
information. Variable information, for example, numbers and dates, is used to build
more complex prompts.
Q .VOX files. There is a separate .VOX file for each sentence and phrase in TeleVantage.
The .VAP and .VOX files are used together to produce the complete prompts that callers and
users hear. For example, in the sentence prompt, “You have three new messages, and twelve
saved messages”, the words “three” and “twelve” come from the .VAP file.
The American English .VAP and .VOX files are located in:
C:\Program Files\TeleVantage Server\Vfiles\EN00
The American English .VAP file is called TVLEN00.VAP.
The recording process
To record a complete set of system prompts, you must do the following:
Q Record the .VAP file.
Q Build the indexed .VAP file.
Q Record the .VOX files.
Q Test the new prompts.
Q Deploy the new prompts.
Recording system prompts professionally
If you choose to obtain professional recordings, you should choose a voice vendor with
experience in telephony recording, and then:
Q Select a voice
Q Provide the appropriate files to the vendor in formats they can use
Q Test the new prompts for voice quality, usability, file-naming accuracy, and indexing
accuracy
Q Deploy the new prompts
Selecting a voice
The vendor will often provide you with 44kHz, full-bandwidth voice samples from which to
choose. Ask your vendor to provide voice samples that have been re-sampled or recorded as
MuLaw PCM Mono 8 kHz, which is the format used in TeleVantage. This will ensure that your
selection is based on how the voice will actually sound when used in your TeleVantage system.
CHAPTER 13. MANAGING SYSTEM PROMPTS AND AUDIO
13-7
Keep in mind that high-pitched voices and high-frequency sounds degrade more as a result of
this type of re-sampling, which may result in considerable change in higher frequency sounds at
telephony bandwidth.
Using the standard TeleVantage voices
To add or modify prompts using one of the standard TeleVantage voices, contact Marketing
Messages as shown in the following table. They provided the original set of prompts. Marketing
Messages can record new voice files using the standard voices.
Language
Voice
U.S. English
“Ellen”
Latin American Spanish
“Claudia”
U. K. English
“Helen”
French Parisian
“Sylvie”
French Canadian
“Gisele”
German
“Anneli”
Contact Marketing Messages as follows:
Marketing Messages
51 Winchester Street
Newton, MA, U.S.A. 02461
800-486-4237 (phone)
617-527-3728 (fax)
http://www.marketingmessages.com
Providing files to the vendor
After you have selected a voice, you must provide your vendor with the list of prompt files and
the text of each prompt to be recorded. The list of prompt files is available in the System Prompts
and Prompts section of the TVLEN00.INI file.
You also need to provide your vendor with the TVLEN00.VAP file, so that your voice vendor
can match the indexing of the new .VAP file to the existing file.
Testing the new prompts
It is important that you thoroughly test all voice files that you receive from the vendor to ensure:
Q Accuracy of file names
Q Synchronization of written and spoken prompt content
Q Quality of voice recording
Q Accuracy of index order and format of the .VAP file
13-8
ADMINISTERING TELEVANTAGE
See “Testing system prompts” on page 13-11 for information about using the Sentence Tester
to assist with some of these tasks.
Deploying the new prompts
After all files are tested, you can replace the existing prompt files with the new ones. Place all
new .VOX files and the .VAP file in the following directory:
C:\Program Files\TeleVantage Server\Vfiles\User
The following auto attendant prompts must also be copied to the User directory.
Q AACLOSED.VOX
Q AAHI.VOX
Q AA4SBN.VOX
Q AAOPORWT.VOX
The default location is C:\Program Files\TeleVantage Server\Voice Files\EN00.
Recording over system prompts yourself
When you record over system prompts yourself, you can record all of the .VOX files as well as
the.VAP file, as with professional recording, or record just the .VOX files and use the .VAP file
included with TeleVantage.
If you do not record over all the files, be aware that since prompts are combined with other
prompts when presented to callers or users, recording some but not all prompts may result in a
mismatch of voices.
Recording over .VOX files
You use the TeleVantage Administrator to record over these files (see the next procedure).
CHAPTER 13. MANAGING SYSTEM PROMPTS AND AUDIO
13-9
To record over a prompt
1.
In the System Prompts view, double-click the prompt. The Edit System Prompt dialog
box opens.
2.
Under Contents, enter the text of the new prompt. Use this text as a script when you
record the prompt.
3.
Record the prompt. See “Using the audio controls” on page 2-10 for instructions.
4.
Click OK to save the new version of the prompt.
Recording over the .VAP file
You can record over the .VAP file by using a variety of recording tools and VAP tools. If you
do not already have such a tool, you should consider VFEdit, which is available on the Internet.
Testing and deploying the new prompts
Use the Sentence Tester to test the new prompts. See “Testing system prompts” on
page 13-11.For information about deploying the new prompts, see “Deploying the new
prompts” on page 13-9.
13-10
ADMINISTERING TELEVANTAGE
Testing system prompts
You can test system prompts by listening to them in context over your telephone. By joining
individual prompts into sentences and playing them as they are used in TeleVantage, you can
evaluate intonation, emphasis, and consistency.
Note: Computers must run on Windows 2000 or later to test system prompts.
To test system prompts
1.
Start the Administrator using the /sentence command line option (see page A-1 for
more information).
2.
Choose Tools > Test Sentences. The Test Sentences dialog box opens.
3.
In Language to test, select the language of the prompts that you want to test.
CHAPTER 13. MANAGING SYSTEM PROMPTS AND AUDIO
13-11
4.
Under Sentences, select a sentence from the list.
The Current sentence box displays how that sentence is described in the sentences.ini
file. Many sentences consist of a single .VOX file. Other sentences are made up of
several joined .VOX files, and may contain variables as well.
5.
You can double click a sentence to test it, or select it and press Test. When your phone
rings, pick it up and listen to the sentence in the language you selected. You can
continue to play messages, and even change languages, without hanging up your
phone.
6.
If the sentence contains variables, they are indicated in the Name column with an
asterisk. You can enter a new Value for a variable, and optionally select a different
variable Data Type.
For example, by default the sentence ToPurgeMsg sentence plays as:
“To permanently delete the 1 message in your ViewPoint’s Deleted folder, press 3.
Otherwise, press 4.”
By changing the Value of Variable 1 to 6, the sentence plays as:
“To permanently delete the 6 messages in your ViewPoint’s Deleted folder, press
3. Otherwise, press 4.”
Click Clear to return all Values to their original settings.
13-12
ADMINISTERING TELEVANTAGE
Localizing the telephone commands ________________________
The TeleVantage Localization Kit is available if you want to localize and record the telephone
commands in another language. The Localization Kit includes all the necessary documentation
and tools for localization.
Although the process for recording system prompts is the same for localized system prompts,
the localization process requires several more steps, which are described in the Localization Kit.
For more information about the TeleVantage Localization Kit, contact your TeleVantage
provider.
Changing the TeleVantage ringback tone
By default, the ringback tone (the sound you hear when the phone you dialed is ringing) is the
United States tone. To rerecord this tone, rerecord the file Ringback.vox, located in the
following directory on the TeleVantage Server computer:
C:\TeleVantage Server\vfiles\User
For instructions on rerecording the file, see “Recording over system prompts” on page 13-6.
Changing the offhook alert audio
When a TeleVantage station is left offhook for too long, it plays the prompt “Please hang up and
try your call again,” followed by a loud reorder tone for two minutes, similar to the tone played
by telephone companies. To change the offhook audio, change the following files:
Q HangUp.vox. The verbal prompt.
Q OffhookAlert. The reorder tone.
Setting up system-wide music-on-hold ______________________
The system-wide music-on-hold is the music that all callers on hold hear unless a user or queue
has selected a different source.
To set up system-wide music-on-hold
1.
Choose Tools > System Settings. The System Settings dialog box opens.
2.
Choose the Audio tab.
3.
Check Play hold music from, and select the music-on-hold source from the dropdown
list. If “<no hold audio sources>” is displayed, you have not defined any
music-on-hold sources. Click
to add a music-on-hold source. See the next section
for instructions.
4.
You can use the slider bar to adjust the hold volume from all audio files on the system.
You must click OK for the volume setting to take effect. To check the volume, pick
up a TeleVantage station, press *19, and enter the ID of a file-based hold music source.
This volume setting has no effect on hold sources from station or audio input devices.
CHAPTER 13. MANAGING SYSTEM PROMPTS AND AUDIO
13-13
5.
Click OK.
It is highly recommended that you use music on hold for systems with call centers or systems
that use “follow-me” call forwarding, so callers don’t hear ringing or silence for too long.
TeleVantage plays whatever is on the specified channel and does not monitor the channel. If the
music device stops, callers on hold hear nothing.
Note: If you are using the Windows CD Player application or other software application for
music-on-hold, you can have the application automatically start whenever the Server computer is
started, so that you never need to remember to manually launch it. From the Windows Control
Panel, choose Scheduled Tasks, then select the application and When my computer starts. In
the application options, set it to automatically start playing at startup and to repeat.
Adding music-on-hold sources
To play music to callers on hold, you must define one or more music sources. A source can be
any of the following:
Q One or more audio files (.WAV or VOX format).
Q A CD player or other music device, connected to a station port on any supported station
board.
Q An audio device connected to the Audio Input port on a DISIx or DI0408LSAR2
integrated trunk and station board.
Note: You can use the CD drive of the Server computer, as long as the device or sound card is
connected to a station port.
You can add as many different music-on-hold sources as you want. You can then choose a
different source for any of the following uses:
Q System-wide hold music. See “Setting up system-wide music-on-hold” on page 13-13.
Q Auto attendant-specific hold music. See “Setting up an auto attendant’s hold music” on
page 10-17.
Q User-specific hold music. See “Setting the user’s hold music” on page 6-29.
Q Queue-specific hold music. See TeleVantage Call Center Administrator’s Guide.
13-14
ADMINISTERING TELEVANTAGE
To add a music-on-hold source
1.
Choose Tools > System Settings. The System Settings dialog box opens.
2.
Choose the Audio \ Hold Sources tab.
The ID column displays the number of each hold audio source. When using the *19
telephone command, enter this number to test a hold audio source. See “Testing hold
audio with *19” on page 13-17.
Note: ID numbers increment automatically and are fixed, so if you delete the ID 3
source you will never have another source at ID 3.
3.
Click Add. The Hold Audio Source dialog box opens.
4.
Enter the following information:
Q Name. A name for the music-on-hold source. Choose a name that users and
administrators will recognize when selecting hold music, for example, “Customer
Service Soothing Jazz.”
Q Description. A further description of the source, if needed. For example, you could
specify the location of the CD player.
Q Type. Select one of the following:
Q Station. The source is connected to a station port. Enter the station ID (port
number) in the Station number field.
Q Audio Input. The source is connected to the Audio Input port on a DISIx or
DI0408LSAR2 integrated trunk and station board. In the Board number field,
enter the number of the board with the Audio Input port. To get the number,
count only your DISIx and DI0408LSAR2 boards in order of Board ID. For
CHAPTER 13. MANAGING SYSTEM PROMPTS AND AUDIO
13-15
example, if you have a DISI board at Board ID 4 and a DI0408LSAR2 board at
Board ID 6, you would specify the DI0408LSAR2 board by entering 2.
Note: If two boards both have Board ID 0, count in order of their PCI bus
address.
Q File. The source is a sequence of one or more audio files. See the next section,
“Using files as hold audio.”
5.
Click OK. The source is added to the list of available sources.
6.
To edit or delete a music-on-hold source, select it and click Edit or Delete.
7.
When you are finished adding music-on-hold sources, click OK to close the System
Settings dialog box.
Using files as hold audio
You can create sequences of audio files to use as a hold audio source. When selected,
TeleVantage plays the audio files sequentially in a loop. .WAV and .VOX files are supported.
Note: .MP3 files are not supported, but several available applications let you convert .MP3 files
into .WAV or .VOX format.
Each file sequence used as a hold audio source consumes a voice resource.
TeleVantage provides a selection of classical, jazz and new age music .VOX files that you can
use as royalty free hold music within TeleVantage. The files are located on the TeleVantage
Master CD in the \MusicOnHold folder. Note that the only legal use for the music files is with
TeleVantage. The music files were created by Marketing Messages
(www.MarketingMessages.com); visit their website for other musical options.
13-16
ADMINISTERING TELEVANTAGE
To create a sequence of audio files as a hold audio source
1.
In System Settings, add a hold audio source of type File as described in the previous
section through step 4.
2.
Click the browse icon next to File. The Hold Audio Files dialog opens, displaying the
file sequence as defined so far.
TeleVantage will play the files in the order displayed. You can edit, delete, or reorder
files in the sequence using the buttons provided.
3.
Click Add. The Audio File dialog box opens. Click the Import icon
and select the
audio file to add to the sequence. Type a name for the file in Contents, then click OK.
4.
Repeat this step to add as many files as you want to the sequence.
5.
When you have completed building your audio file sequence, click OK to close the
Hold Audio Files, Hold Audio Source, and System Settings dialog boxes.
Testing hold audio with *19
You can use the *19 telephone command to test a hold audio source. Pick up a TeleVantage
station, dial *19, and enter the ID number of the hold audio source you want to test. TeleVantage
plays the audio from that source exactly as callers on hold are hearing it.
CHAPTER 13. MANAGING SYSTEM PROMPTS AND AUDIO
13-17
CHAPTER 14
CHAPTER 14
CONFIGURING SIP INTERNET
TELEPHONY
CHAPTER CONTENTS
About SIP telephony and TeleVantage . . . . . . . . . . . . . . . . . . . . . . . . . . . . . . . 14-2
Adding a SIP span . . . . . . . . . . . . . . . . . . . . . . . . . . . . . . . . . . . . . . . . . . . . . . 14-4
Configuring a user for a SIP phone. . . . . . . . . . . . . . . . . . . . . . . . . . . . . . . . . 14-10
Authenticating SIP phone external stations . . . . . . . . . . . . . . . . . . . . . . . . . . 14-15
About SIP accounts. . . . . . . . . . . . . . . . . . . . . . . . . . . . . . . . . . . . . . . . . . . . . 14-20
Setting voicemail access for SIP stations and users. . . . . . . . . . . . . . . . . . . . 14-22
Configuring a Vertical Aastra SIP phone for TeleVantage . . . . . . . . . . . . . . . 14-22
Configuring Sipura FXS and FXO gateways for TeleVantage . . . . . . . . . . . . 14-24
Configuring an eyeBeam SIP softphone for TeleVantage . . . . . . . . . . . . . . . 14-28
Using SIP servers . . . . . . . . . . . . . . . . . . . . . . . . . . . . . . . . . . . . . . . . . . . . . . 14-32
Configuring PSTN T1/E1 and multi-line FXO gateways . . . . . . . . . . . . . . . . . 14-40
Setting up Broadvoice as a SIP service provider . . . . . . . . . . . . . . . . . . . . . . 14-40
The SIP Registration Bindings view . . . . . . . . . . . . . . . . . . . . . . . . . . . . . . . . 14-42
Supporting SIP calls over NATs/firewalls . . . . . . . . . . . . . . . . . . . . . . . . . . . . 14-43
About SIP off-bus routing . . . . . . . . . . . . . . . . . . . . . . . . . . . . . . . . . . . . . . . . 14-46
SIP standards supported by TeleVantage . . . . . . . . . . . . . . . . . . . . . . . . . . . 14-49
About SIP telephony and TeleVantage________________________
Developed by the Internet Engineering Task Force (IETF) specifically for Internet use, SIP
(Session Initiation Protocol) is a standard protocol for VoIP communication. SIP enables IP
communication with other SIP-compatible devices, including SIP phones, SIP servers for free
dialing such as www.freeworlddialup.com, SIP carriers such as www.broadvoice.com, and SIP
applications such as Microsoft Windows Messenger.
For technical details on TeleVantage’s SIP implementation, see “About SIP off-bus routing” on
page 14-46 and “SIP standards supported by TeleVantage” on page 14-49.
Licenses spreadsheet
The spreadsheet IntelRTPResourceNeeds.xls, located in your TeleVantage Administrator
directory (by default C:\Program Files\TeleVantage\Administrator) can help you plan the
number of Intel RTP and TeleVantage trunk licenses you need for your configuration.
Configuring TeleVantage for SIP
Setting up TeleVantage for SIP, including SIP phones and gateways, involves the following
tasks:
14-2
1.
Install the Intel telephony components and software required to support SIP telephony.
See Installing Intel Telephony Components for more information.
2.
If you will be using Vertical Aastra SIP phones, install a TFTP server such as the one
included on the TeleVantage Master CD. See Installing TeleVantage for instructions.
3.
Add and configure one or more SIP spans. See “Adding a SIP span” on page 14-4.
4.
Add and configure one or more SIP dialing services. See “Adding a dialing service”
on page 9-9.
ADMINISTERING TELEVANTAGE
5.
If you are using SIP phones, configure each SIP phone user to set up his or her SIP
phone as an external station. See “Configuring a user for a SIP phone” on page 14-10.
6.
Customize SIP accounts for users and, if necessary, create system SIP accounts for
external SIP devices or providers. See “About SIP accounts” on page 14-20.
7.
To support SIP stations’ message waiting displays, specify a system voicemail access
code. See “Setting voicemail access for SIP stations and users” on page 14-22.
8.
Connect and configure any SIP phones or external SIP/PSTN gateway devices you
will be using. For each device, see the appropriate section in this chapter.
9.
If you are using an external SIP/PSTN gateway device or an external SIP service
provider, create a TeleVantage SIP server for each external entity. See “Using SIP
servers” on page 14-32.
In addition, if your system or any of your SIP end-points reside behind a NAT/firewall, you will
need to make special configuration changes. See “Supporting SIP calls over NATs/firewalls” on
page 14-43.
Calling TeleVantage extensions from external SIP devices
As soon as you create a SIP span and a SIP dialing service, external callers with SIP devices can
place calls to TeleVantage users by entering the following address:
sip: <User’s extension>@<SIP span IP address>.
For example, if Vin Williams’ extension was 105 and your SIP span’s IP address was
11.22.33.44, SIP callers would place calls to Vin Williams at sip:[email protected].
Users can also customize their SIP URIs, in which case their address would be different. See
“Creating a SIP account” on page 14-20.
Dialing SIP addresses from TeleVantage
When you create a SIP span and SIP dialing service, TeleVantage users can place calls to SIP
addresses from ViewPoint by entering the SIP URI (for example, sip:[email protected])
in the Dial toolbar field or anywhere else they could enter a phone number.
Troubleshooting SIP
For tips on troubleshooting SIP, see Appendix H of Installing TeleVantage.
CHAPTER 14. CONFIGURING SIP INTERNET TELEPHONY
14-3
Adding a SIP span ________________________________________
SIP trunks (created in SIP spans) are required for voice communication over the Internet using
the SIP protocol. To use SIP spans, the TeleVantage Server computer must have an always-on,
preferably high-speed connection to the Internet, and one or more Intel IP resources. Intel IP
resources can come from Intel HMP drivers or Dialogic Internet telephony boards installed as
described in Installing Intel Telephony Components. The TeleVantage SIP “trunks” represent
the individual channels provided by the Intel IP resources.
Note: After adding SIP trunks to a span, you must restart the TeleVantage Server. If the trunks
fail to appear, delete the span and add the span again. Then restart the TeleVantage Server.
Only one SIP span is required for most configurations. See “Using more than one SIP span” on
page 14-9 for more information.
Note: If you have a SIP span and an H.323 span on the same TeleVantage Server, the number
of H.323 trunks should be less than the number of IP resources available, because SIP calls use
the IP resources left over after allocating those resources to H.323 trunks. SIP Spans should be
created with the remaining IP resources and should be listed below the H.323 Span in the Trunks
view.
Use the following procedure to add a SIP span:
1.
Choose Trunks > New Trunk > SIP span. A new SIP Span dialog box opens.
2.
On the General tab, specify the following information for the span:
Q SIP span number. The number of the SIP span, starting with 1. Note that this
number has nothing to do with boards or H.323 spans. If you have a second SIP
14-4
ADMINISTERING TELEVANTAGE
span, it should be numbered 2. All SIP span numbers must be consecutive; any gap
in numbering will cause the subsequent SIP spans to not be recognized.
Q IP Address. Select the IP address of the NIC you want to use on the TeleVantage
Server computer for SIP signalling (including call setup and tear down). If using
Intel telephony boards, be sure to select the IP address of your PC’s NIC, not the IP
address of an Intel IPLink board.
Important: The IP address for transmitting and receiving RTP is a completely
different and unrelated setting. Using Intel IP boards, the IP address for the RTP
address is determined by the Dialogic Configuration Manager. For HMP the IP
address for RTP audio is determined by the following registry key (See Chapter 5 of
Installing Intel Telephony Components for details):
HKEY_LOCAL_MACHINE\SOFTWARE\SBLabs\dm3ssp
Q Description. A description of the span. Include the IP address of the span in the
description for easy reference.
Q Number of trunks. The number of trunks contained in the span. In general, you
should enter a number that does not exceed the number of IP Media resources
available from your Intel IP ports. To find the number IP Media resources available,
see Installing Intel Telephony Components.
Under certain circumstances you may enter more trunks than you have available IP
Media resources, thus potentially saving the purchase of an additional board. See
“Entering more trunks than you have RTP resources” on page 14-7.
Note: If you later reduce the number of trunks, the last-numbered trunks will be
deleted. If you later increase the number of trunks, new trunks will be added at the
end, with the properties defined in the Trunks tab.
Q Starting trunk number. The starting trunk number of the span. The dialog box
shows you the range of numbers of the trunks belonging to this span. If your system
also has other trunks such as analog, ISDN, or H.323, the other trunks must have
the lower trunk numbers than SIP trunks. If you have not added the other trunks yet,
leave room for them in your numbering of the span.
Q Send inbound calls to. Select the auto attendant, user, or IVR Plug-in that answers
all inbound voice calls on the trunks in this span.
Q Connect inbound calls. Whether or not to use Delayed Answer on this span. For
more information see “Using Delayed Answer” on page 5-8.
Q Listener port. The port used by the SIP span to listen for incoming SIP traffic. By
default it is 5060. You can change the port number, for example, to avoid conflicts
with another application already listening at the port.
Q Synchronize phone configuration settings. Check this field if you will be using
Vertical Aastra SIP phones and have already installed a TFTP server (such as the
Tftpd32 TFTP server included with TeleVantage) to manage their configuration.
You must install a TFTP server before checking this field. See Chapter 17 of
Installing TeleVantage for instructions.
CHAPTER 14. CONFIGURING SIP INTERNET TELEPHONY
14-5
When Synchronize phone configuration settings is checked, changes made to
the SIP span or SIP stations in the Administrator will automatically create and
update the Aastra.cfg and <mac>.cfg files, instead of your having to manually edit
them. The SIP phones will be updated with the new configuration the next time they
are reset. After checking the field, enter the path of the TFTP server root directory
to select the directory.
in TFTP server root directory, or click
Important: Be sure to specify the path in UNC format, for example,
“\\PCName\TFTP Directory” where “PCName” is the name of the PC on which the
TFTP server is installed. This enables the use of the TeleVantage Administrator from
any PC on the network. Do not use a standard path (for example, “C:\Program
Files\TFTP”), or the Administrator will only run from the TeleVantage Server PC.
Note: You must have copied the Aastra configuration files from the TeleVantage
Master CD's \IPPhones\SIP\Aastra directory to your TFTP Server's root directory
before clicking OK.
3.
Click the Trunks tab and specify how trunks in this span are used:
Q Accept inbound calls. If checked, the trunks are used for inbound calls.
Q Allow outbound calls. If checked, the trunks are used for outbound calls.
4.
Click the Codecs tab and review the default codecs used by this span for all inbound
calls and as dialing service defaults for outbound calls. If you must change
TeleVantage’s default codec list, see the next section, “Modifying SIP span codecs.”
Note: You can override the default span codecs when you set up a dialing service that
allocates trunks in this span (see “The Codecs tab” on page 9-15).
5.
If your system or any of your SIP end-points reside behind a NAT/firewall, use the
NAT / Firewall tab to make special configuration changes. See “Supporting SIP calls
over NATs/firewalls” on page 14-43.
6.
To authenticate SIP traffic through this span for security purposes, use the Inbound
Authentication tab. See “Authenticating SIP phone external stations” on page 14-15.
7.
To authenticate REGISTER and message waiting light (MWI) subscriptions to this
span, use the Inbound Request Handling tab. See “Authenticating REGISTER and
MWI requests” on page 14-18.
8.
If necessary, use the Tuning tab to change low-level SIP span settings for the best
connection. See Installing TeleVantage.
9.
Click OK to add the span to your configuration.
After creating a SIP span, be sure to create a SIP dialing service. See “Adding a dialing service”
on page 9-9. Then, unless you want to change codecs from G.711, you can proceed to
“Configuring a user for a SIP phone” on page 14-10.
14-6
ADMINISTERING TELEVANTAGE
Entering more trunks than you have RTP resources
Under certain circumstances you may create a SIP span with more trunks than you have
available RTP resources, thus potentially saving yourself the purchase of additional IP hardware
or HMP licenses. You may have more SIP trunks than RTP resources if:
Q You have the RTP relay enabled. See “About SIP off-bus routing” on page 14-46.
Q You are not doing system call recording on all calls.
Q The majority your call volume consists of two-party calls between SIP endpoints: SIP
stations, SIP PSTN gateways, or SIP-based Internet Telephony Service Providers.
Q You have set aside additional RTP resources for each expected caller waiting in a call
center queue or ACD workgroup.
To do a “What if” analysis to see how many more trunks you can create beyond your RTP
resources, TeleVantage provides a Microsoft Excel spreadsheet called
IntelRTPResourceNeeds.xls, located in the TeleVantage Administrator directory (by default,
C:\Program Files\TeleVantage\Administrator). Follow the instructions on-screen to determine
your trunks needs.
CHAPTER 14. CONFIGURING SIP INTERNET TELEPHONY
14-7
Modifying SIP span codecs
A codec is a protocol used to compress and packetize voice audio into digital signals for
transmission over an IP network. When an IP call is established between two devices, the
devices automatically choose which codec to use. This choice is based on whether the codec is
available to both devices and how highly the codec is preferred by both, as follows:
Q When TeleVantage initiates a call, it constructs the list of codecs in the order specified
in the SIP span (or dialing service), and places the list in the session description of the
outgoing INVITE request. Normally, the end-point destination selects one codec out of
the list, and sends its response with the selected codec in the session description. That
codec is used in the call.
Q When TeleVantage is the recipient of a call, it receives a list of codecs in the session
description of the incoming INVITE request, and picks the first codec in the list which
is supported by the receiving SIP span. Note that the order of codecs in the SIP span
doesn’t matter; when receiving calls codec priority is set by the remote party.
The Codecs tab on the SIP span dialog box lets you make codecs available to your device and
arrange them in order of preference. The codecs with a check in the Enabled column are the
ones available for use with TeleVantage—these are grouped at the top of the list. The enabled
codecs are listed in order of preference, an order you can change. For example, you may prefer
one codec over another for bandwidth reasons.
Note: You can enable only one codec of each type (G711, G723, G729, and GSM). Also you
should never disable the G.711 codec, as it is used when devices fail to negotiate other codecs.
14-8
ADMINISTERING TELEVANTAGE
Matching codecs with external devices
When you have control over the codec preference in an external device used with TeleVantage
(for example, a SIP phone), you should set codec preferences for the device in the same priority
as you set them in the SIP span.
To modify the codecs available to TeleVantage
Q To make a codec available with TeleVantage, check its Enabled column. The codec is
added as the last in the enabled codecs group at the top of the list (Click OK, then view
the tab again to see the modified list).
Q To move a codec up or down in the list, click the arrow buttons.
Some codecs you can make available include:
Q G.711 ALaw, G.711 MuLaw. Also known as PCMU. Supported by all VoIP devices, but
high bandwidth. (64 kbs.) Note that the recommended frame size for G.711 codecs is
20ms.
Q G.729a. Offers a good balance between sound quality and bandwidth. (8.8 kbs.)
Q G.723.1. 5.3 kbs. or 6.3 kbs.
Q GSM. 13.0 kbs.
Using more than one SIP span
If your system uses SIP phones as external stations, and also interacts with an external SIP server
(for example, a PSTN gateway or a SIP provider like www.broadvoice.com), you may want to
create two SIP spans, one for station traffic and one for external SIP service traffic. This setup
provides the following advantages:
Q Added security. You can set the external SIP service span to disallow station access
entirely. Because stations allow privileged access to TeleVantage, including the ability
to place outbound calls through the Server, this setup protects your system against
potential toll fraud from hackers working through the gateway or provider. For more
about protecting your system from toll fraud, including SIP station protection, see
Appendix I of Installing TeleVantage.
Q Control over resource usage. The two-span setup prevents the case when many SIP
stations are in use at once, utilizing all SIP trunks. By confining the SIP stations to their
own span, you ensure that even when the span is fully utilized, incoming calls from the
gateway or provider can still arrive.
CHAPTER 14. CONFIGURING SIP INTERNET TELEPHONY
14-9
Setting DTMF Transmission Mode and RFC2833 Payload Type
To set SIP DTMF Transmission Mode and RFC2833 Payload Type, go to the Codecs tab of the
SIP span dialog box.
Use the Transmission mode field to specify how digits within a SIP call are transmitted.
Use the RFC2833 payload type field to specify the RTP payload type that will be used by
RFC2833 DTMF events. It is used only if Transmission mode is set to “via rfc2833.” In most
cases you won’t need to modify this parameter, since almost every SIP end-point uses payload
type “101” (the default value).
Configuring a user for a SIP phone __________________________
Each user with a SIP phone must have an external station configured with a SIP phone as its
destination. SIP phones include the Vertical Aastra 480i, 9133i, or 9112i phones and the
eyeBeam SIP softphone.
Before beginning, make sure there are enough unassigned external stations for the SIP phone
users. To check, look in the Device Monitor for unassigned stations of type EXT (see “Using
the Device Monitor view” on page 12-3). To add more external stations, see “Defining the
number of external stations” on page 7-8.
To assign a user a SIP phone as an external station
14-10
1.
Double-click the user in the Users view to open the User dialog box. You can also
right-click the external station in the Device Monitor and choose Create user.
2.
On the User \ General tab, give the user a station ID that corresponds to an unassigned
external station.
3.
Click the Phone \ External Station tab.
ADMINISTERING TELEVANTAGE
4.
Under Destination, select “SIP Phone.” The following options appear:
5.
In Call Using, select your SIP dialing service. If you haven’t created a SIP dialing
service yet, see “Adding a dialing service” on page 9-9.
6.
Under Phone’s SIP address, choose whether the phone is registered with
TeleVantage or not, as follows:
Q Registered to SIP span. Choose this method for any SIP phone that will be
registered with a TeleVantage SIP span (this will be most cases). When you
configure the SIP phone, you should set the phone’s SIP Server or Domain field to
the IP address or fully qualified domain name (FQDN) of the SIP span you select
here.
In the Userinfo field, enter a unique identifier for the phone, for example
“Station45” or “MirisPhone.” You should avoid using just the user’s name, as this
may conflict with creating a SIP account for that user. This field uniquely identifies
the phone on the TeleVantage SIP span, so whatever text is specified here must also
be entered in the SIP phone's Username field when you configure the phone.
For instructions on configuring a SIP phone, see the appropriate phone section later
in this chapter.
Q SIP URI. Choose this method if the SIP phone is already registered with a
third-party SIP service such as <www.broadvoice.com> or fwd.pulver.com, and
you want to receive calls from TeleVantage too. Enter the phone’s SIP URI, for
example, “sip:[email protected].” This option is also useful if the SIP
phone is already registered to another TeleVantage Server. It can also be used if
your remote SIP phone cannot register with TeleVantage due to firewall
configuration issues but can register with a third-party SIP service such as
Broadvoice. Note that when using this option, calls from the phone will be placed
CHAPTER 14. CONFIGURING SIP INTERNET TELEPHONY
14-11
over the phone’s SIP service, not TeleVantage, so you cannot dial TeleVantage
extensions without first dialing the TeleVantage Server's SIP span address.
7.
Set Interpret ** as Flash using Intel voice resources as follows:
Q For SIP phones configured through a Sipura FXS port, check the field. See
“Configuring a Sipura FXS port as a TeleVantage external station” on page 14-25.
Q For all other SIP phones, make sure that the field is unchecked, because by default
SIP devices using RFC2833 can send digits without needing voice resources.
Note: If this field is checked and your span is set to send DTMF digits in-band
(using the tuning parameter DTMFXferMode), then all calls involving the phone
consume an extra voice resource to monitor for the ** digits. By default, spans are
not set to send DTMF digits in-band, so checking this field unnecessarily consumes
extra voice resources. For information about voice resource needs, see Installing
Intel Telephony Components.
8.
Check Disconnect when idle to have TeleVantage hang up the trunk call immediately
whenever a call on the SIP phone ends.
For most SIP users, you should leave this field unchecked. In this state TeleVantage
provides 10-15 seconds of TeleVantage dial tone after a call ends, making it easy to
place new calls immediately after a call ends. If checked, the connection to the SIP
phone is dropped when the call is completed, and the phone returns to Idle and will
play its own dial tone, busy tone or silence.
9.
If you have a Vertical Aastra SIP phone, select it in the Device type dropdown list,
and enter its MAC address (found on a sticker on the bottom of the phone). This
enables TeleVantage to automatically update the Aastra phone’s <mac>.cfg and
Aastra.cfg files whenever you change your SIP configuration.
Note: To use this feature, you must install and properly configure the TFTP Server
included with the TeleVantage Services installer. See Installing TeleVantage for
instructions.
For other SIP phones, leave “Generic SIP device” selected.
14-12
ADMINISTERING TELEVANTAGE
10. Click the Phone \ Station Features tab.
11. Choose any of the following SIP phone features:
Q Supports auto-answer via SIP header field. Check this field if the SIP phone
supports auto-answer, which is the ability for a SIP phone to automatically go
off-hook when it receives calls with a special message. Vertical Aastra SIP phones
support this feature, so you should check the field for those phones. When checked,
the phone can be used to receive pages and intercoms or be configured for
voice-first answering and/or auto-answering with ViewPoint. See Using
TeleVantage for more information on these features.
If checked, use the SIP header field name drop-down list to specify which SIP
header field carries the message that triggers auto-answer. For Vertical Aastra
phones, select “Alert-info.” Under SIP header field value, specify the auto-answer
marker text. For Vertical Aastra phones, accept the default. If you have another type
of SIP phone that requires a different message text, enter it here.
Q Stutter dial tone. Check to hear a stutter dial tone when listening to TeleVantage
dial tone to signal unheard TeleVantage voicemail.
You should uncheck this field for most SIP phones (such as Vertical Aastra), since
SIP phones generate their own dial tone locally.
Q Voice-first answering. Check to configure this phone to use voice-first answering.
(This option is unavailable if you have not selected Supports auto-answer via SIP
header field above.) For a description of voice-first answering, see Using
TeleVantage.
Q Automatically go offhook when alerting station. Check to have the phone
automatically go offhook whenever you access it from ViewPoint, for example
when clicking to place a call or make a recording. If unchecked, the phone rings and
CHAPTER 14. CONFIGURING SIP INTERNET TELEPHONY
14-13
you must physically answer it. (This option is unavailable if you have not selected
Supports auto-answer via SIP header field above.)
12. Check Identify station using phone’s SIP address to have TeleVantage identify the
SIP address you defined in step 6 as a TeleVantage station, with full station privileges,
so that the user can place TeleVantage calls simply by picking up and dialing.
Uncheck the field if you want to require the user to log in to TeleVantage before
placing TeleVantage calls from the SIP phone. When unchecked, taking the phone
off-hook creates a call to the TeleVantage auto attendant defined for the SIP span.
Inbound calls will still ring the station normally and can be handled in ViewPoint too.
Under Authenticate using, choose one of the following methods by which
TeleVantage authenticates connections from the SIP phone:
Q SIP span’s ‘Inbound Authentication’ settings. This setting makes the phone
dependent on the SIP span’s configuration. If the span’s Station identification field
is set to “SIP stations must have authentication credentials” (see the next section,
“Authenticating SIP phone external stations” ), then the phone must be configured
with a username and password that match the span’s credentials.
If the span is not set to require credentials, then the phone may connect to
TeleVantage without any authentication credentials.
Q User’s extension and password. When configuring the SIP phone’s
authentication fields, you must enter the user’s TeleVantage extension and
password. Note if you use this option, and the user's password changes, you must
update the phone too.
Q Station credentials. With this option you can enter the username and password of
your choice, which is unique for every station and will not change when the user's
password changes. When configuring the SIP phone’s authentication fields, you
must enter the same username and password as specified here.
For more information, see “Authenticating SIP phone external stations” on
page 14-15.
13. Click OK.
Using a SIP phone
You should be aware, and inform SIP phone users, of the following SIP phone behaviors:
Q SIP phones do not show as off-hook in the Device Monitor or ViewPoint Extension lists
until the number is fully dialed.
Q When a SIP phone user dials 9 (or other access code) for an outside line, the phone does
not provide an “external dial tone” until the user has dialed the full number.
Q After dialing the number, the SIP phone user should press Dial or Send, otherwise there
will be a 3 to 4 second delay before the call is placed.
14-14
ADMINISTERING TELEVANTAGE
Authenticating SIP phone external stations ___________________
When you use SIP phones as external stations, the phone connects to TeleVantage as soon as
the first digit is dialed or the Send button is pressed, and is automatically identified as a
TeleVantage station, allowing the user to place outbound calls through TeleVantage. This
makes your system vulnerable to potential toll fraud, since a hacker could gain access to the
system by sending a SIP message faked to look like it was the external station connecting. To
protect against such fraud, you can have your SIP phones perform authentication whenever they
connect to TeleVantage.
Authentication involves configuring TeleVantage to require authentication, then configuring
each SIP phone with the proper authentication credentials. You can base SIP phone
authentication on any of the following methods:
Q A username and password entered in the SIP span. This is the more convenient method,
as you can hand out one set of credentials to enter in every SIP phone’s configuration.
Q The user’s extension and TeleVantage password. This method is the more secure, but
potentially more labor-intensive. Each SIP phone must be configured with the individual
extension and password of its user, and the phone configuration must be updated each
time the user’s password changes or expires (see “Enforcing strong password security”
on page 3-12). This method is most appropriate for users who configure their own SIP
phones.
Q A custom username and password specific to the phone. Again, each SIP phone must be
configured with the individual username and password. This is method is most
appropriate when someone who does not know a user's password configures the phone,
or when multiple users share and configure the same phone
You choose the authentication method on a phone-by-phone basis. So, for example, you could
have span-based authorization for most phones, but have extra security on certain phones by
setting up for extension/password authorization.
If a SIP phone without proper credentials contacts TeleVantage, it is treated not as a
TeleVantage station but as a normal incoming trunk call, and is connected to the auto attendant
defined for the SIP span.
CHAPTER 14. CONFIGURING SIP INTERNET TELEPHONY
14-15
To set up SIP phone authentication
1.
Edit the SIP span, and go to the Inbound Authentication tab.
2.
Enter a Default user name and Default password of your choice.
3.
Set Station identification to “SIP stations must have authentication credentials.”
The other options operate as follows:
Q “Allow SIP stations without authentication credentials.” SIP phone external
stations can place outbound calls through TeleVantage without using
authentication. With this option selected, authentication credentials are not required
when placing a call from a SIP phone. This option creates a security risk.
Q “Do not allow SIP stations at all.” SIP phone external stations may not place calls
through this span. Use this setting to create a SIP span for other purposes. See
“Using more than one SIP span” on page 14-9.
4.
If necessary, specify custom information for the following parameters of the
authentication challenge message sent by the TeleVantage Server:
Q Realm. Specifies the Realm parameter. By default, the Server uses the value in the
SIP span’s IP Address field (see “Adding a SIP span” on page 14-4). You can enter
something here to override the default.
Q Nonce timeout. Specifies the timeout (in seconds) for the Nonce parameter. If the
incoming authenticated SIP request has a Nonce value older than the specified
timeout, the request is rejected as unauthorized.
Q Qop. Specifies the Qop-options or “quality of protection” parameter, which
indicates whether the content of the SIP request body (the session description in the
14-16
ADMINISTERING TELEVANTAGE
INVITE message) is included in the calculation of the authentication digest. You
can set it to one of the following (include the single quotes):
Q ‘auth’ (or blank) - The request body is not included. This is the recommended
setting.
Q ‘auth-int’ - The request body is included. You can use this setting to ensure that
the session description in incoming INVITE requests is not tampered with in
transit. However, you may encounter interoperability problem with some SIP
end-points, as this parameter is not widely accepted.
Q ‘auth,auth-int’ - TeleVantage supports both “auth” and “auth-int” when sending
authentication challenges. It is up to the requester (the SIP phone) to select
which QoP to use.
5.
Click OK.
6.
For each SIP phone user, edit the user and go to the Phone \ Station Features tab, which
should be set up as described in “Configuring a user for a SIP phone” on page 14-10.
Check Identify station using phone’s SIP address, and enter authentication
credentials as described in that section.
You can enter credentials for multiple SIP-phone users at once using phone templates.
See “Applying phone settings in bulk” on page 7-4.
7.
Using a web browser, go to the configuration page for the SIP phone (for instructions,
see the appropriate SIP phone section in this chapter). Find the fields to enter the
phone’s authentication credentials (for example, for a Sipura ATA adapter, they are
Auth ID and Password). Enter one of the following:
Q SIP span’s authentication setting. Match the username and password you entered
for the SIP span in step 2.
Q User’s extension and password. Enter the TeleVantage extension and password
of the SIP phone user.
Q User’s station credentials. Enter the credentials created for that user’s station. See
“Configuring a user for a SIP phone” on page 14-10.
Your SIP phones will now use authentication when connecting and your system will be far more
secure against toll fraud. For other things you can do to protect against toll fraud, see
Appendix I of Installing TeleVantage.
Increasing SIP span security
In addition to securing SIP phone connections, you can use the Inbound Authentication tab to
increase the security of your system against any unauthorized access through the SIP span. Use
the following fields as needed:
Q Only allow requests within the local network. Check this setting to shield TeleVantage
against incoming SIP requests from the Internet, except for those from defined SIP
servers (see “Using SIP servers” on page 14-32). Calls from the Internet are defined as
those coming from outside the Local network mask defined on the NAT / Firewall tab
CHAPTER 14. CONFIGURING SIP INTERNET TELEPHONY
14-17
(see “Supporting SIP calls over NATs/firewalls” on page 14-43). Any call from outside
the network that is not from a defined SIP server will be rejected with a “403 Forbidden” response code.
Q Allow direct calls from the Internet using sip:<ext>@<SIP span IP address>. This
setting helps protect your internal dial plan. It specifies how TeleVantage handles
incoming SIP calls from the Internet direct to an extension on your dial plan. Calls from
the Internet are defined as those coming from outside the Local network mask defined
on the NAT / Firewall tab (see “Supporting SIP calls over NATs/firewalls” on
page 14-43). You can have TeleVantage allow all such calls, reject all such calls, or
allow only authenticated calls.
Q Account lockout. These settings provide protection against multiple attempts to breach
your security. Multiple failures to access a SIP account can cause that account to be
locked out. A locked-out account cannot be used for SIP authentication until it is reset
here by an administrator or until the lockout duration expires.
Q Lockout threshold. Enter the number of consecutive failed authentication attempts
that trigger the SIP account to be locked out. Enter 0 to disable account lockout and
permit any number of access attempts.
Q Lockout duration. Enter the number of seconds that a locked-out SIP account
remains locked out before automatically becoming unlocked.
Q Lockout reset interval. Enter the number of seconds that must elapse after a failed
authentication attempt before the failure counter is reset to 0.
Account lockouts are logged to the Windows Event log.
To manually reset a locked-out account, edit the locked-out entity and click OK. For
example, if a user’s SIP account is locked out, double-click the user in the Users view to
open the User dialog box, then click OK. If the SIP span is locked out, do the same for
the SIP span dialog box.
Authenticating REGISTER and MWI requests
In addition to authenticating external stations when they try to place calls through TeleVantage,
you can also authenticate any attempt by a SIP device to register with the TeleVantage Server,
and any attempt by a SIP device to establish message waiting light (MWI) display subscriptions.
14-18
ADMINISTERING TELEVANTAGE
To authenticate REGISTER and MWI subscription requests
1.
Edit the SIP span and go to the Inbound Request Handling tab.
2.
For each category, Registrations and MWI subscriptions, enter the following
information:
Q Accept mode. To accept only incoming requests with proper authentication
credentials, select “Only authenticated.”
“Non-authenticated” means all requests in that category are accepted. “Never”
means no requests in that category are ever accepted, even with proper
authentication credentials.
Q Default expiration interval. Specify the default duration (in seconds) of
TeleVantage’s acceptance of the request. This value is used if the requesting
end-point doesn’t specify the EXPIRES header field in its request.
Q Minimum expiration interval. Specify the minimum duration (in seconds) of
TeleVantage’s acceptance of the request. If the requesting end-point specifies a
value in the EXPIRES header field that is smaller than this value, TeleVantage will
respond with the message “423 - Interval too small.”
Q Maximum expiration interval. Specify the minimum duration (in seconds) of
TeleVantage’s acceptance of the request. If the requesting end-point specifies a
value in the EXPIRES header field that is greater than this value, TeleVantage will
respond with the message “-1 = unlimited.”
3.
Click OK.
CHAPTER 14. CONFIGURING SIP INTERNET TELEPHONY
14-19
About SIP accounts_______________________________________
A SIP account is similar to a DID number: it provides a unique address by which external callers
can place calls to a user or queue directly, without going through an auto attendant. A user’s SIP
account address is called a SIP URI (Uniform Resource Identifier).
When you configure your system to use SIP, by default each TeleVantage user and queue has a
SIP URI in the format “sip:<extension>@<IP address of SIP span>. For example, if the IP
address of your SIP span is 11.22.33.44, and a user is at extension 102, that user’s default SIP
URI is “sip:[email protected].” Any external SIP caller could call that SIP URI, and the call
would ring the user’s phone. Likewise, when the user places outbound SIP calls, that SIP URI
appears as the calls’ “From” address.
You can create customized SIP accounts for the following purposes:
Q To provide more meaningful SIP URIs for users. For example, a user could have a SIP
URI of “sip:[email protected].” This SIP URI would be used by SIP callers to
reach the user, and would appear as the “From” address on the user’s outbound calls.
Q To authenticate connections with an external SIP server such as www.broadvoice.com
or a PSTN gateway device. See “Using SIP servers” on page 14-32. In this case a user
would have a SIP URI registered with the external SIP server, for example,
“sip:[email protected].”
In addition to SIP accounts for users, you can create system SIP accounts that define SIP account
defaults for users without a personal SIP account. With external SIP servers, you should always
create a system SIP account registered with that SIP server, so that users without individual SIP
accounts have default authorization to place and receive calls through that server.
Note: For specific instructions on creating a system SIP account for Broadvoice, see “Creating
a SIP account for Broadvoice” on page 14-41.
Creating a SIP account
Use this procedure to create either personal SIP accounts for users or system SIP accounts.
1.
Do one of the following:
Q System defaults. To set SIP account defaults for the system, choose Tools >
System Settings, go to the Server \ SIP Accounts tab, and click Add.
14-20
ADMINISTERING TELEVANTAGE
Q User. To create or customize an individual SIP account for a user, double-click the
user in the Users view to open the User dialog box, go to the User \ SIP Accounts
tab, and click Add.
The SIP Account dialog box opens.
2.
Under Display name, enter the user’s full name, or whatever you want to appear in the
display name portion of the SIP URI (for example, “Vin Williams” in “Vin Williams”
<sip:[email protected]>). For a system SIP account, you might enter
“TeleVantage.” For a user’s SIP account, you should enter the user’s name.
3.
Under Userinfo of SIP URI, enter the portion of the SIP URI that appears before the
@ sign, as follows:
Q When creating a system SIP account for an external SIP server, enter the userinfo
given to you by the SIP server. When creating a system SIP account to set local
system defaults, you can enter anything here—users’ extensions become their
default userinfo.
Q For a user’s SIP account, enter a version of the user’s name, for example,
“vwilliams” in the SIP URI “sip:[email protected].”
4.
Choose whether this is a local or external SIP account as follows:
Q Choose This is a local account to create a TeleVantage-based SIP URI that other
SIP-using parties use to contact the user. The IP address of the SIP span appears
after the @ sign in the SIP URI.
Q Leave Default account for outbound calls checked unless the user has another
SIP account that he or she wants to appear in the From header on outbound calls.
Q Choose This is an account at external server to create a SIP URI used to log in to
an account on an external SIP server, for example a third-party dialing service such
as Broadvoice (www.broadvoice.com). Choose the appropriate SIP server from the
dropdown list (if none are available, see “Creating a SIP server” on page 14-33).
Then fill in the following:
CHAPTER 14. CONFIGURING SIP INTERNET TELEPHONY
14-21
Q REGISTER address-of-record for this account. Check to have TeleVantage
use this account when sending REGISTER updates to the external server. Users
with more than one SIP account on the same SIP server should check this for
only one account.
Q This account requires authentication. If logging on to the account requires
password verification, check this field and fill in the appropriate user name and
password information.
5.
Click OK.
Setting voicemail access for SIP stations and users ____________
Some SIP-based VoIP phones have a voicemail button to access new voice messages. For it to
function, you must specify a voicemail access code in TeleVantage and enter that code in the
SIP phone’s configuration.
If you enter an all-numeric code, then any TeleVantage user can dial it as a quick way of
reaching his or her voicemail account from his or her extension. Dialing the code takes the user
straight to the password prompt, bypassing the extension prompt.
If you enter a code containing letters, then it is used only for SIP stations and cannot be dialed
by users.
To specify a voicemail access code in TeleVantage
1.
Choose Tools > System Settings, and click the Internal Dialing tab.
2.
Under voicemail access enter a code, either a number that can be dialed by all users,
or an alphanumeric code used only by SIP stations.
3.
Click OK.
To enter the voicemail access code in the SIP phone’s configuration
See the appropriate section in this chapter for the brand of SIP phone.
Configuring a Vertical Aastra SIP phone for TeleVantage ________
TeleVantage supports Vertical Aastra SIP phones, including the use of voice-first answering,
page and intercom calls. This section describes how to install and configure a Vertical Aastra
SIP phone for use with TeleVantage.
Before installing a Vertical Aastra SIP phone, make sure you have done the following:
Q Configured the system for SIP as defined in the previous steps in this chapter. See
“Configuring TeleVantage for SIP” on page 14-2.
Q Installed and enabled a TFTP server, and copied the contents of the TeleVantage Master
CD's \IPPhones\SIP\Aastra directory to the TFTP server’s root directory. See Chapter
17 of Installing TeleVantage for instructions.
14-22
ADMINISTERING TELEVANTAGE
Configuring a Vertical Aastra SIP phone involves these tasks, described in the following
sections:
1.
Configuring the Vertical Aastra SIP phone configuration files.
2.
Specifying the TFTP server address.
3.
Resetting the phone to pick up configuration changes.
This section covers only those configuration settings necessary for the Vertical Aastra SIP
phone to work with TeleVantage. Other settings may be left in their default configuration.
Note: Aastra SIP phones must be restarted if configuration changes are made to the SIP span
or the user’s SIP phone external station settings.
Configuring the Vertical Aastra SIP phone configuration files
The following configuration files, that you copied from the TeleVantage Master CD’s
\IPPhones\SIP\Aastra directory into your TFTP Server’s directory, are used as templates to
configure any Vertical Aastra SIP phone, and can be modified, if needed, to change the phone’s
soft buttons or other features.
Note: There is no need to edit these files if you are satisfied with the default buttons and
behavior. However, if you want to edit any of the behavior, simply open the files with Notepad
and make the changes you need.
Q Aastra.cfg. This file is a master template used by every Vertical Aastra SIP phone.
Changes to this file will be applied to every Vertical Aastra SIP phone the next time it
is rebooted.
Q <mac>.cfg. This file contains phone-specific settings that correspond to the MAC
address of the phone (displayed on the bottom of the Vertical Aastra SIP phone and the
phone’s box). Changes to this file affect only that individual phone.
Specifying the TFTP server address
Perform these steps for each Vertical Aastra SIP phone on your network. Be sure to edit the
configuration files as described in the previous section before following these steps.
To set the Vertical Aastra SIP phone to recognize the TFTP server
1.
Press Options on the Vertical Aastra SIP phone to access the options menu.
2.
Select option 8, Network. You may need to enter the administrator’s password. By
default it is 22222.
3.
Select option 6, TFTP server.
4.
Enter the TFTP server’s IP address (the IP address of the PC where you installed the
TFTP server, which commonly is your TeleVantage Server's IP address).
5.
Press Done.
CHAPTER 14. CONFIGURING SIP INTERNET TELEPHONY
14-23
Resetting the phone to pick up configuration changes
After finishing the configuration steps described in the previous sections, or after editing any
SIP phone external station settings or the SIP span’s IP address, you should reset the Vertical
Aastra SIP phone. You can do so using any of the following methods:
Q If you are at the phone, unplug and reconnect the network/power cable.
Q If you are at the phone and can't unplug it, press Options > "Up" button > 10 > Phone
Status, "Show" softkey > "3" Restart Phone > Restart.
Q If you are not near the phone, open a web browser, enter the phone's IP address (found
at Options > "8" Network Status > "2" IP Address), click the "Restart" link. Then click
the "Restart" button.
When the phone is reset, the custom settings defined in the configuration files are downloaded
to the phone using the TFTP protocol and the phone should be able to place and receive calls
with TeleVantage. If that is not the case, check the TFTP server's logs to make sure the
download was successful.
You may also need to reset the phone in the following situations:
Q There is a change in your network
Q You need to re-load modified information from the phone’s configuration files
Q The settings for the phone on the TeleVantage system have been modified
Q You have downloaded new firmware for the phone
Dialing calls from the Vertical Aastra SIP phone
When dialing numbers from the Vertical Aastra SIP phone, users can speed up the call
placement by pressing the Dial softkey after the last digit. Otherwise, there is a 4-second timeout
before the phone attempts to dial the number.
Configuring Sipura FXS and FXO gateways for TeleVantage _____
TeleVantage supports the full line of Sipura analog telephone adapters (ATAs), as well as the
Sipura 3000 which also provides a single-line FXO trunk gateway to the PSTN. These devices
provide an affordable way to connect a small number of analog devices—such as phones, fax
machines, or a few analog trunks—to TeleVantage using SIP VoIP. By plugging an analog
phone into a Sipura adapter, you can use the phone as a TeleVantage station without any
physical analog station ports on the TeleVantage Server.
Before you begin, be sure to have a copy of the Sipura SPA Configuration Guide. You can get
this doc at http://www.sipura.com/support/index.htm. Please read through the document and
website FAQ.
14-24
ADMINISTERING TELEVANTAGE
Depending on the Sipura model, you can configure a Sipura device in two ways:
Q Configure one or more FXS ports to connect an analog phone, which will appear to
TeleVantage as a SIP phone external station.
Q (Sipura 3000 only). Configure an FXO port as a PSTN gateway device configured as a
TeleVantage SIP server to place and receive PSTN calls.
Obtaining the Sipura device’s IP address
To configure a Sipura adapter via its web browser, you need to know its IP address.
Also make sure you have the IP address of the Sipura adapter. You can discover or set the IP
address as follows:
1.
Connect an Ethernet cable from the Sipura device to your router.
2.
Plug a touch-tone telephone into the PHONE port on the SPA-3000.
3.
Press the star key four times (****) to enter the Sipura Configuration Menu.
4.
If using a dynamic IP address, press 110# to check the current IP address.
If using a static IP address, press 111# to set the IP address of your choice. Enter digits
using numbers on the phone’s keypad. Use the star key (*) for decimal points.
Configuring a Sipura FXS port as a TeleVantage external station
Before installing a Sipura device, make sure you have followed the previous steps in this chapter
to configure the system for SIP, including setting up users with external stations. See
“Configuring TeleVantage for SIP” on page 14-2.
Note: When configuring the external station for Sipura, be sure to check Interpret ** as Flash
using Intel voice resources and tell the user to press ** instead of Flash. The phone’s normal
Flash button or hook-depress will not work correctly through a Sipura FXS port.
You can configure a Sipura adapter’s FXS port for a TeleVantage SIP phone external station,
letting you place and receive PSTN calls using an analog phone or fax machine connected to the
Sipura FXS port. To do so, configure the Sipura device and create a corresponding TeleVantage
user with a SIP external station, as follows:
1.
Insert a standard RJ-11 telephone cable into the PHONE port. Connect the other end
of the cable to an analog telephone.
2.
Open a web browser, and enter the IP address of the Sipura adapter in the browser’s
address field. See the previous section, “Obtaining the Sipura device’s IP address.”
3.
At the main Sipura web page, select Advanced Login in the header on the right side
of the page.
CHAPTER 14. CONFIGURING SIP INTERNET TELEPHONY
14-25
4.
Select Advanced. This brings you to the advanced view of the Info tab.
5.
Select the Line 1 tab. The page should begin with a Line Enable setting.
6.
Under Proxy and Registration, make the following change:
Q Proxy. Enter the IP address of the TeleVantage SIP Span.
7.
Under Subscriber Information, make the following changes:
Q Display Name. Enter the TeleVantage user’s name.
Q Password / Auth name. Enter the authentication credentials, if any, as required by
the setup of the user’s SIP phone external station. See “Configuring a user for a SIP
phone” on page 14-10 for details.
Q User ID. Enter text to match the Userinfo setting for the user's SIP phone external
station. See “Configuring a user for a SIP phone” on page 14-10.
Q Auth ID. Set to “Yes.”
8.
Under Audio Configuration, make the following changes:
Q Disable all G726 codecs. These are not supported by TeleVantage.
Q DTMF Tx Method. Set to “AVT” to send digits as RFC2833 events.
9.
Click Submit All Changes.
For information on other Sipura device settings, refer to the Sipura documentation.
Enabling fax transmission on a Sipura FXS port
Use the following procedure to set up a Sipura FXS port for fax transmission:
14-26
1.
Open a web browser, and enter the IP address of the Sipura FXS device in the
browser’s address field.
2.
On the SIP tab, set RTP packet size to 0.020.
ADMINISTERING TELEVANTAGE
3.
On the Line1 tab, do the following:
Q Set Network jitter level to "Very high."
Q Set Preferred Codec to "G711u" or "G711a."
Q Set Use Pref Codec Only to "Yes."
Q Set DTMF Process AVT to "Yes."
Q Set DTMF Tx Method to "AVT."
Q Set Silence Supp Enable to "No."
Q Set Echo Canc Enable to "No."
4.
Click Submit All Changes to reboot the device.
Note: To send DID digits to the fax device, see “Sending DTMF digits to stations” on page 7-16
for details on the settings you should enable.
Configuring a Sipura FXO port as a PSTN gateway for TeleVantage
You can configure a Sipura 3000 adapter’s FXO port as a PSTN gateway recognized by
TeleVantage, letting you place and receive PSTN calls over the analog trunk line connected to
the Sipura FXO port. To do so, configure the Sipura device and create a corresponding
TeleVantage SIP Server, as follows:
1.
If you haven’t done so already, create a SIP dialing service. See “Adding a dialing
service” on page 9-9.
2.
Insert a standard RJ-11 telephone cable into the LINE port. Connect the other end of
the cable to an analog PSTN line.
3.
Open a web browser, and enter the IP address of the Sipura adapter in the browser’s
address field. See “Obtaining the Sipura device’s IP address” on page 14-25.
4.
At the main Sipura web page, select Advanced Login in the header on the right side
of the page.
5.
Select Advanced. This brings you to the advanced view of the Info tab.
6.
Select the PSTN LINE tab. The page should begin with a Line Enable setting.
Important: Make a note of the Sipura port number, listed on the PSTN line tab under
SIP Port. You will need to append the port number entered here to the IP address when
creating the TeleVantage SIP server for the Sipura FXO port (see “Creating a SIP
server” on page 14-33).
If needed, adjust PSTN Answer Delay to control how many seconds the Sipura FXO
port waits before answering incoming calls. By default, the wait is 16 seconds
(approximately 4 rings). Note that if incoming calls have Caller ID, you should set this
to no lower than 10, to ensure that Caller ID data is received.
7.
Under SIP Settings, set SIP Remote Party ID to “Yes.”
8.
Under Proxy and Registration, make the following change:
CHAPTER 14. CONFIGURING SIP INTERNET TELEPHONY
14-27
Q Proxy. Enter the IP address of the TeleVantage SIP span.
9.
Under Subscriber Information, make the following changes:
Q Display Name. Enter the TeleVantage user’s account name.
Q Password / Auth name. Enter the authentication credentials, if any, required by the
corresponding TeleVantage SIP server. See “Inbound tab” on page 14-36 for
details.
Q User ID. Enter text to match the Userinfo setting for the SIP server. See “SIP Server
tab” on page 14-34 for details.
Q Auth ID. Set to “Yes.”
10. Under Audio Configuration, make the following changes:
Q Disable all G726 codecs. These are not supported by TeleVantage.
Q DTMF Tx Method. Set to “AVT” (this represents RFC2833).
11. For the Dial Plans section, which determines the numbers that can be dialed over the
FXO port, please refer to the Sipura documentation. An example dial plan for U.S.
ten-digit outbound dialing would look like this:
((1(2-9)xxxxxxxxx|(2-9)xxxxxxxxx|xx.)
12. Under VOIP to PSTN Gateway Setup, use the following settings to set up the FXO
port to dial directly to TeleVantage as an IP gateway:
Q VOIP to PSTN Gateway Enabled. Select “Yes.”
Q Line 1 VOIP Caller DP. Set to “None.”
Q Line 1 VoIP Fallback DP. Set to “None.”
13. Under PSTN to VOIP Gateway Setup, make the following changes:
Q PSTN-to-VOIP Gateway Enable. Set to “Yes.”
Q PSTN Ring Thru Line 1. Set to “No.”
Q PSTN CID for VOIP CID. Set to “Yes.”
14. Click Submit All Changes to reboot the device.
15. For each Sipura FXO device, create a corresponding SIP server in TeleVantage, as
described in “Creating a SIP server” on page 14-33. Note that when entering the
Sipura IP address you will need the Sipura port number you collected in step 6. Also
make sure that the SIP server is also as SIP Registrar field is unchecked.
For information on other Sipura device settings, please refer to the Sipura documentation.
Configuring an eyeBeam SIP softphone for TeleVantage ________
TeleVantage supports the eyeBeam SIP softphone on platforms running Windows XP, 2003,
and 2000. This section describes how to install and configure an eyeBeam SIP softphone for use
with TeleVantage.
14-28
ADMINISTERING TELEVANTAGE
Notes
Q These procedures describe the eyeBeam audio-only softphone version 1.1 3004w or
higher. It is recommended that you have the eyeBeam User’s Manual available as you
install the softphone.
Q The configuration procedure describes only those steps necessary for the eyeBeam
phone to work with TeleVantage. Other settings may be left in their default configuration.
For information on using other eyeBeam features, see the eyeBeam documentation.
Before installing an eyeBeam SIP softphone, make sure you have followed the previous steps
to configure the system for SIP. See “Configuring TeleVantage for SIP” on page 14-2.
This section covers only those configuration settings necessary for the eyeBeam SIP softphone
to work with TeleVantage. Other settings may be left in their default configuration.
Installing and configuring the eyeBeam softphone
To install and configure an eyeBeam SIP softphone, do the following:
1.
Install the softphone on the PC that will be using it.
2.
Start the softphone. When prompted, enter the license key that you were supplied, and
click OK.
3.
In the Audio Tuning Wizard, configure the phone with the desired audio settings. See
the eyeBeam documentation for how to set audio settings.
CHAPTER 14. CONFIGURING SIP INTERNET TELEPHONY
14-29
4.
Next, the Settings dialog box opens. Choose the SIP Accounts \ Add a New SIP
Account \ Server tab.
Note: If you accidentally exit the dialog box, right-click anywhere on the eyeBeam
phone and choose Settings to open it again.
5.
Check Enable this SIP account. This enables the eyeBeam phone to register with
TeleVantage.
6.
Under User details, enter the following information:
Q Display name. Enter the user’s name as you want it to display in the display name
portion of the SIP address. For example “Vin Williams” in “Vin Williams”
<vwilliams@sip:www.example.com>.
Q User name. Enter text to match the Userinfo field in the TeleVantage external
station configuration (see “Configuring a user for a SIP phone” on page 14-10).
Q Password/Authentication user name. Enter the authentication credentials if they
are required. Enter either the TeleVantage SIP span’s username and password , the
user’s TeleVantage extension and password, or the station credentials, depending
on how you set up the external station (see “Configuring a user for a SIP phone” on
page 14-10).
Important: Configuring the external station to use authentication, and entering the
correct authentication credentials here, protects your system from toll fraud. For
more about toll fraud, see Appendix I of Installing TeleVantage.
Q Domain. Enter the name or IP address of the SIP server to which this phone is
registered. This should match one of the following:
14-30
ADMINISTERING TELEVANTAGE
Q For SIP phones registered to TeleVantage, it should match the name/address
under Registered to SIP span in the user’s external station configuration (see
“Configuring a user for a SIP phone” on page 14-10).
Q For SIP phones registered to a third-party service such as pulver.com, it should
match the name/address under Server in the TeleVantage SIP server’s
configuation (see “Using SIP servers” on page 14-32).
7.
Under Domain Proxy, check both Register with domain and Use as outbound
proxy.
8.
Click the SIP Accounts \ Add a New SIP Account \ Advanced tab and uncheck Send
SIP keep alives.
9.
Click the Media \ Audio \ Devices tab. Decide whether or not to Enable VAD.
Disabling VAD creates a more natural audio sound, since the eyeBeam will transmit
audio continuously rather than stopping transmission when it doesn't detect voice
(which results in silence gaps). However, disabling VAD increases the bandwidth used
during phone calls since audio is always transmitting. Vertical recommends disabling
the option, as tests have proved audio to be more reliable that way.
10. Click the Media \ Audio \ Advanced \ Codecs tab. The following codecs on the
eyeBeam are supported by TeleVantage:
Q G711 uLaw.
Q G711 alaw.
Q GSM.
Q G729.
For best results, arrange the codecs in the Enabled Codecs pane in the same
preference order as you have in your SIP span (see “Modifying SIP span codecs” on
page 14-8). This ensures that the correct codec is used, regardless of which side
initiates the call.
11. Choose the System \ General tab. Configure the following settings:
Q Auto answer. Enter the amount of time that the phone rings before connecting
audio, when Auto Answer is enabled.
Q Auto Dial Enabled. Make sure this option is checked. This enables the phone to
give the user internal TeleVantage dialtone on pickup. With Auto dialing, the user
does not have to press the Dial button to initiate the call. Note that if you find auto
dialing to be slow you can decrease the Minimum and Maximum Wait times.
12. Choose the Media \ Audio \ Devices tab. Under Microphone Settings and Speaker
Settings, make sure that the correct audio devices on the user’s PC are selected for
voice capture and audio.
13. Click OK or Apply to save your changes. If the configuration has been made correctly
the eyeBeam should show "Logged in - enter phone number" and "Your Number is
CHAPTER 14. CONFIGURING SIP INTERNET TELEPHONY
14-31
<username>". In the Settings dialog box you should also see a submenu under SIP
Accounts with the name/address of your TeleVantage Server.
Using the eyeBeam softphone with TeleVantage
See Appendix G of Using TeleVantage for instructions on using the eyeBeam interface.
Using SIP servers ________________________________________
For TeleVantage to communicate with an external SIP PSTN gateway device (such as an FXO
adapter) or service provider, you must create a corresponding TeleVantage SIP server and a SIP
dialing service. Once these are defined, all TeleVantage users can place and receive calls
through the SIP device or provider. For example, when you create a SIP server defining a PSTN
Gateway device, any user can make SIP calls to the regular telephone network through that
device by picking up his or her phone and dialing the access code of the SIP dialing service.
Note: This section describes creating a SIP server in generic terms. For specific instructions on
creating SIP servers for several PSTN Gateway devices and the Broadvoice SIP service provider,
see later in the chapter.
Examples of external SIP entities requiring SIP servers are:
Q PSTN gateways. Devices that convert VoIP calls into calls on the Public Switched
Telephone Network (PSTN).
Note that you do not need an external PSTN gateway device for users to make SIP calls
to the phone system. TeleVantage acts as a full-featured PSTN gateway when there are
the proper trunk and station resources installed. However, using a third-party PSTN
gateway device allows you to have your TeleVantage Server in one location and connect
to the PSTN at any remote location. Using this approach, your TeleVantage Server
could be in Boston and the gateway device could be at a remote office in New York or
San Francisco.
Q Internet Telephone Service Providers (ITSPs). These companies provide a VoIP
connection to the PSTN for a nominal monthly fee. An example is Broadvoice
(www.broadvoice.com). ITSPs provide customers with real phone numbers, and deliver
calls to that number via VoIP. Likewise, your calls to the ITSP over VoIP ring PSTN
users as calls coming from your phone number. With such a service you do not need a
PSTN trunk on-site to place and receive calls, although it is wise to still have one in case
you have a failure connecting to the ITSP over the Internet.
Q Private Networks. These are subscription-based directory services that use the SIP
protocol and allow you to place calls to other registered users within the network. An
example is www.freeworlddialup.com.
Q Other TeleVantage Servers. With a SIP server connection to another TeleVantage
Server, you can place calls using VoIP to another TeleVantage Server. However, this
approach does not provide all of the features of a H.323 Gateway, which requires the
H.323 protocol. See “Connecting two Servers using H.323 Gateways” on page 15-39 for
more information.
14-32
ADMINISTERING TELEVANTAGE
The SIP Servers view
You must create a separate SIP server for each external SIP gateway/FXO device or SIP service
(such as another TeleVantage Server, Broadvoice or fwd.pulver.com) that you want
TeleVantage users to access. You do not need to create a SIP server for SIP phones or SIP FXS
gateways.
You create, view, and edit SIP servers using the Administrator’s SIP servers view.
Information you need from a SIP service provider
To create a SIP server for a SIP service provider (ITSP) such as Broadvoice, you need the
following information from them:
Q Assigned Phone Number.
Q Account Password.
Q Authorization User Name. This might be the same as the assigned phone number.
Q Authorization Password. This might be the same as the account password.
Q SIP Server. For example, sip.broadvoice.com or fwd.pulver.com.
Note: For specific instructions on defining a SIP server for Broadvoice, see “Setting up
Broadvoice as a SIP service provider” on page 14-40.
Creating a SIP server
To create a SIP server, choose File > New > SIP server. The SIP Server dialog box opens to the
SIP Server tab.
You create a SIP server using some or all of the following tabs, depending on what type of
external SIP device/service you are creating:
Q SIP Server. Basic information including the SIP server’s name and IP address, and
whether it is also a Registrar. See the next section.
CHAPTER 14. CONFIGURING SIP INTERNET TELEPHONY
14-33
Q Inbound. How TeleVantage treats incoming calls from PSTN gateways or SIP services
that deliver PSTN calls like www.broadvoice.com. See page 14-36.
Q Number Formatting. Location settings for the calls that match the phone number
terminated by the PSTN gateway or the number provided to you by PSTN SIP services
like www.broadvoice.com. See page 14-37.
Q SIP URI Rules. Formatting rules for SIP URI addresses, as required by the SIP service
or gateway. See your service or gateway provider’s requirements for details. See
page 14-37.
Q Outbound Caller ID. Caller ID information that appears on outbound calls using the SIP
server for PSTN gateways. See page 14-38.
Q PSTN Gateway. Gateway settings. Used only with PSTN Gateway devices. See
page 14-39.
Click OK to close the SIP Server dialog box and save the SIP server at any point.
SIP Server tab
Use this tab to enter basic information about the external SIP device/service, and to specify
whether it is also a Registrar.
1.
Enter the following basic information:
Q Name. A name for the SIP server. The name you enter will be referred by the
SIP-to-Phone Number or SIP-to-PBX/Centrex dialing service as well as user and
system SIP accounts.
Q Comments. Any descriptive information about the SIP server.
2.
14-34
In the SIP server location section, specify the location of the external SIP entity in
one of the following ways:
ADMINISTERING TELEVANTAGE
Q Server. If the external SIP entity has a fixed IP address or DNS name, check this
option and enter the IP address or name here.
Important: Sipura devices do not use the default port, so for Sipura devices you
must enter the IP address followed by a colon and the Sipura device’s SIP port
number. For example, 10.11.12.13:5062. See “Configuring a Sipura FXO port as a
PSTN gateway for TeleVantage” on page 14-27 for more information.
Q Registered to SIP span. Check this option for external SIP entities that have no
fixed IP address, but instead are configured to register with the TeleVantage Server.
Some PSTN gateway devices fall into this category. The IP address of your SIP
span should appear in the field by default. If the field is blank, add a SIP span (see
“Adding a SIP span” on page 14-4).
In the Userinfo field, enter the user information that the external SIP entity will use
to register with TeleVantage. Note that you must configure the external SIP entity
to use that same user information.
3.
Check SIP server is also a SIP Registrar if the external SIP device/service is a
Registrar. SIP Registrar servers are those capable of receiving REGISTER updates to
keep track of changes in end user location. If checked, TeleVantage users with SIP
accounts can register with this SIP service to have their SIP calls routed to
TeleVantage.
Note: Sipura devices are not Registrars and should have this field unchecked.
After checking the field, define how the Registrar accepts REGISTER requests as
follows:
Q Send REGISTER via SIP service. Select a SIP Address dialing service that
TeleVantage will use to send REGISTER messages to the SIP Registrar. Note that
this dialing service is used only to send the REGISTER requests, and not for
outbound calls via a PSTN gateway or ITSP. For more information on dialing
services see Chapter 9.
Q REGISTER expires. Enter the length of time (in seconds) before the REGISTER
update expires and the SIP Registrar reverts to the default end-user location. The
default is 3600 (one hour).
Q Retry interval. For cases where a REGISTER request fails, enter how many
seconds TeleVantage waits before trying again. The default is 60 (one minute).
CHAPTER 14. CONFIGURING SIP INTERNET TELEPHONY
14-35
Inbound tab
How TeleVantage treats incoming calls from PSTN gateways or SIP services that deliver PSTN
calls like www.broadvoice.com.
Define the handling of incoming calls as follows:
1.
Check Identify inbound calls from SIP server using if TeleVantage will be
processing or displaying inbound calls from the external SIP device/server in any way
other than as generic SIP calls.
If unchecked, TeleVantage treats inbound calls as generic SIP calls unrelated to the
PSTN.
If checked, a security risk exists that bogus SIP messages can access the PSTN through
TeleVantage. To negate that risk, choose SIP server authentication credentials and
enter the username and password for the external SIP device/service. (If connecting to
an ITSP, verify that the ITSP supports inbound authentication.) This setting ensures
that only actual calls from that device/service will be accepted. If you choose SIP
server location, TeleVantage accepts all inbound calls from this external
device/service without performing an authentication check.
2.
14-36
Check Handle calls from this server as telephone calls to have TeleVantage assume
that INVITE requests from the SIP entity originated as telephone calls on the PSTN
network. If checked, TeleVantage displays the call as originating from the telephone
that called into the external SIP device/service—the userinfo part of the caller’s SIP
URI displays as the call’s DID number, and the calling party identity displays as Caller
ID. If unchecked, TeleVantage displays the call as originating with the IP address of
the external SIP device/service.
ADMINISTERING TELEVANTAGE
Number Formatting tab
Use this tab to configure location settings for the calls that match the phone number terminated
by the PSTN gateway or the number provided to you by PSTN SIP services like
www.broadvoice.com. You need to configure this tab only if the SIP server you are defining
interacts with the PSTN—for example, PSTN Gateway devices and IP service providers.
Complete the following fields:
Q Country/Region. Select the country where your TeleVantage Server resides.
Q Long distance prefix. Enter the number to dial to begin a long-distance call. In the
United States, this number is 1.
Q International prefix. Enter the number to dial to begin an international call. In the United
States, this number is 011.
Q Area code. If applicable, enter the area or city code of the region where your
TeleVantage Server resides. Otherwise, leave blank.
Q Include long distance prefix in area code. Check to have TeleVantage assume that the
long distance prefix is always included with the area code, as in the U.K., for example,
0181. Leave this field unchecked in the U.S.
Q Inbound Caller ID does not always begin with area code. If the PSTN carrier ever
sends incoming Caller ID numbers that begin with something other than area code, for
example numbers prefixed with 0, check this field, and then enter the length of a local
phone number in the Local number length field. When checked, TeleVantage
automatically adjusts to incoming Caller ID numbers with different formats, enabling
callback to work correctly. If unchecked, callback will not work on Caller ID numbers
that do not begin with the area code.
If the PSTN carrier always sends Caller ID numbers beginning with the area code, you
do not need to check this field, but there is no harm in doing so.
SIP URI Rules tab
Use this tab to configure formatting rules for SIP URI addresses, as required by the SIP service
or gateway. A SIP URI is the text address of a SIP device end user, similar to an email address,
usually in a format like “sip:[email protected]” or—on a SIP phone
CHAPTER 14. CONFIGURING SIP INTERNET TELEPHONY
14-37
call—sip:[email protected].” You must configure the SIP URI formatting to match the
format expected by the external SIP device or service. Consult their documentation or technical
support to find their expected SIP URI formatting.
Make the following settings:
Q Include URI parameter ‘user=phone’. Check if the SIP URI requirements include the
parameter “user=phone” when sending a phone number, for example,
“sip:[email protected];user=phone.”
Q Prefer number in global format. Check if the external SIP device/service requires
phone numbers to be sent in global format (sometimes called "canonical format") within
the URI string, for example, “sip:[email protected];user=phone.”
Q ‘Phone-context’ parameter. Choose how to handle the parameter “phone-context” in
the URI string. This parameter is expected by some external SIP devices/services.
Choose one of the following options:
Q None. The “phone-context” parameter is not added to the URI string.
Q Use country code (+1). The “phone-context” parameter is added and set to the
country code of the country specified in Location settings. Example:
“sip:12125551212;[email protected];user=phone.”
Q Custom. The “phone-context” parameter is added and set to whatever text you
enter. Example: “sip:12125551212;[email protected].”
Outbound Caller ID tab
If you are defining a SIP server for an ITSP, such as Broadvoice, make sure that Send outbound
Caller ID is unchecked. This check-box exists mainly for SIP/PSTN gateways. SIP VoIP
providers, like Broadvoice, usually require that you send the caller ID corresponding to your
account with the provider.
If the SIP server you are defining interacts with the PSTN—for example, PSTN Gateway
devices—then complete the tab exactly as described for outbound Caller ID on an ISDN span.
See “Setting ISDN outbound Caller ID for a span” on page 5-29 for instructions.
Note: If you change the Send outbound Caller ID field, you must restart the TeleVantage
Server for the change to take effect.
14-38
ADMINISTERING TELEVANTAGE
PSTN Gateway tab
This tab is only for SIP servers defining a PSTN Gateway device.
Specify the following options for PSTN Gateway devices:
Q FXO gateway supports Centrex/PBX transfer. Check if your FXO Gateway supports
Centrex/PBX-style transfer and you want to use that feature. With Centrex/PBX
transfer, TeleVantage can transfer or forward a SIP call without using any SIP trunks.
When a call comes in on one SIP trunk and is sent out on another (due to call forwarding,
for example), the call is turned over to the FXO Gateway which makes a direct
connection, freeing the two TeleVantage trunks.
Q Pre-transfer sequence. Type the keys required by the PSTN Gateway before
transferring a call. The valid keys are 0-9, *, #, and & (Flash). The default is &.
Q Post-transfer sequence. Type the keys required by the PSTN Gateway after
TeleVantage dials the pre-transfer sequence and the extension, to transfer a call.
The valid keys are 0-9, *, #, and & (Flash). After the post-transfer sequence is
dialed, TeleVantage hangs up.
Q FXO Gateway supports Flash via INFO message. Check if your FXO Gateway has the
ability to send a Flash on its PSTN trunk lines, and you want to use that feature. It is
required, for example, to make users’ Attempt Centrex PBX/transfer feature (see
“Forwarding the user’s calls” on page 7-18) work with SIP. If checked, fill in the
Content-type and Body fields with the information that your FXO Gateway must
receive to send the Flash. Consult your FXO Gateway documentation or technical
support for the proper entries. If left unspecified, Flash INFO messages will be sent
according to the SIP span tuning parameters “OobFlashContentType” and
“OobFlashBody.”
Q PSTN Gateway provides in-band call progress tones. Check this field for SIP FXO
(trunking) Gateway devices. SIP FXO Gateways return a connected signal on outbound
calls as soon as the call reaches the destination, regardless of whether the call is
answered or reaches a busy signal. Checking this field enables TeleVantage to use its
own call progress analysis to determine the real outcome of the outbound call.
CHAPTER 14. CONFIGURING SIP INTERNET TELEPHONY
14-39
Caching and re-using SIP authentication credentials
You can use the SIP span’s UacAuthCacheTimeout tuning parameter to accommodate some
SIP providers’ requirements or your own organization's security preferences.
When TeleVantage acts as a SIP client, sending requests (INVITE or REGISTER) to a server
that requires authentication, it avoids extra round trips caused by “401 - Unauthorized” or “407
- Proxy Authorization Required” responses by caching authentication challenge parameters
received from authenticating servers and re-using them in subsequent requests to those servers.
Caching and reusing authentication challenge parameters decreases security and is not allowed
by some SIP providers. If your TeleVantage systems interacts with such a provider, modify
TeleVantage’s caching behavior by setting the tuning parameter UacAuthCacheTimeout to 0.
The UacAuthCacheTimeout setting specifies a timeout in seconds for how long TeleVantage
re-uses authentication challenge parameters. By default this parameter is set to -1, meaning that
authentication challenge parameters are refreshed only when the authenticating server responds
with “401 - Unauthorized” or “407 - Proxy Authorization Required.” When set to 0,
TeleVantage doesn’t cache authentication challenge parameters at all, meaning that a request
requiring authentication by remote server completes in two steps: first, TeleVantage sends the
request without any authentication and receives a rejection response containing the
authentication challenge; then, TeleVantage resends the request, this time with authentication
credentials using the challenge parameters provided by the server in the previous response.
Configuring PSTN T1/E1 and multi-line FXO gateways __________
Contact your TeleVantage provider for information on how to configure PSTN T1/E1 and
multi-line FXO gateways for use with TeleVantage.
Setting up Broadvoice as a SIP service provider _______________
TeleVantage supports SIP calls through an external SIP service provider, such as Broadvoice
(www.broadvoice.com). To use such a provider with TeleVantage, you must create a SIP server
and SIP account in TeleVantage for that provider. This section illustrates these tasks for
Broadvoice. The procedures will be similar for any other SIP service provider.
Setting up TeleVantage to use Broadvoice involves the following tasks:
Q Creating a SIP server for Broadvoice. See the next section.
Q Creating a SIP account for Broadvoice. See page 14-41.
Creating a SIP server for Broadvoice
See “Using SIP servers” on page 14-32 for complete instructions on creating SIP servers. Use
the following procedure to define Broadvoice as a SIP server:
1.
Choose File > New SIP Server. The SIP Server dialog box opens.
2.
On the General tab, enter the following information:
Q Name. A descriptive name such as “Broadvoice.”
14-40
ADMINISTERING TELEVANTAGE
Q Server. Check, and enter “sip.broadvoice.com.”
Q Gateway is also a SIP Registrar. Check. Select a SIP Address dialing service in
Send REGISTER via SIP service, and accept the defaults for expiration and retry
interval.
3.
On the Inbound tab, enter the following information:
Q Handle calls from this server as telephone calls. Check.
Q Identify inbound calls from gateway using:. Check.
Q SIP server location. Check.
4.
On the Number Formatting tab, enter the settings for placing outbound calls from your
location.
5.
On the SIP URI Rules tab, uncheck Include URI parameter ‘user=phone’.
6.
On the Outbound Caller ID tab, make sure that Send outbound Caller ID is
unchecked. This check-box exists mainly for SIP/PSTN gateways. SIP VoIP
providers, like Broadvoice, usually require that you send the caller ID corresponding
to your account with the provider.
7.
Skip the PSTN Gateway tab.
8.
Click OK.
Creating a SIP account for Broadvoice
See “About SIP accounts” on page 14-20 for complete instructions on creating a SIP account.
Use the following procedure to define a system SIP account for Broadvoice:
1.
Choose Tools > System Settings and go to the Server \ SIP Accounts tab.
2.
Click Add to open the SIP Account dialog box.
3.
Enter the following information:
Q Display Name. The display name will show up in the From field on outbound calls
from users who have no individual SIP account for Broadvoice. Enter
“TeleVantage” or your company’s name.
Q Userinfo of SIP URI. The phone number provided to you by Broadvoice.
Q Userinfo of Contact URI. The DID number of the TeleVantage target that will
receive inbound calls from Broadvoice. If there is no TeleVantage target with
matching DID, inbound calls will be handled by the auto attendant assigned to the
SIP trunk.
Q Use this account in From header field on outbound calls. Check. If you have two
system SIP accounts for Broadvoice, check this field for only one of them.
Q This is an account at external server. Check, and select the Broadvoice SIP server
(“sip.broadvoice.com”) from the dropdown list.
Q Register address-of-record for this account. Check.
CHAPTER 14. CONFIGURING SIP INTERNET TELEPHONY
14-41
Q This account requires authorization. Check, and enter the username and
password supplied to you by Broadvoice.
4.
Click OK.
The SIP Registration Bindings view__________________________
The SIP Registration Bindings view shows a list of all SIP devices registered with the
TeleVantage Server.
For each registered SIP device, you can view the following information.
14-42
Name
Description
Display name
The display name of SIP URI account associated with the
device.
Registration URI
The IP address of the TeleVantage SIP span to which the
device is registered. If you have only one SIP span, all SIP
devices will be registered to that IP address.
Contact URI
The IP address of the physical SIP device.
Registration time
The date and time of that SIP account’s most recent
registration with TeleVantage.
Expires
The number of seconds until the current registration expires.
Remote transport
binding
The device’s IP address and port number as carried by the
REGISTER request. Note that if the REGISTER request was
sent by a SIP device residing behind a NAT, then this will
show the public IP address and port number of the NAT
device, not the SIP device.
ADMINISTERING TELEVANTAGE
Name
Description
User-Agent
A description of the device, contained in the User-Agent field
of the REGISTER request. Some SIP devices send this
information and some do not. It is internal to the device and
cannot be configured.
Unregistering a SIP phone
By selecting a SIP phone that is registered with TeleVantage in the SIP Registration Bindings
view and deleting it, you can immediately cause the SIP phone to unregister with TeleVantage.
Supporting SIP calls over NATs/firewalls _____________________
TeleVantage systems using SIP may need further configuration changes to properly traverse a
NAT/firewall. Some of these configurations must be made at the NAT/firewall device. Others
you make using the NAT / Firewall tab of the SIP span.
There are two scenarios in which SIP configuration for a NAT might be needed:
Q TeleVantage itself resides behind a NAT and must communicate with one or more
remote SIP end points, for example a PSTN gateway device or SIP provider.
Q Remote SIP end points, for example SIP phone external stations, reside behind a remote
NAT (such as a SOHO router at a home or branch office) and must communicate with
the TeleVantage Server.
CHAPTER 14. CONFIGURING SIP INTERNET TELEPHONY
14-43
TeleVantage residing behind a NAT/firewall
Vertical recommends that a SIP span be configured with either a public IP address or a domain
name. This minimizes possible configuration issues with other SIP devices and end points. If it
is necessary to run TeleVantage on a private IP network behind a NAT, and have it interact with
remote SIP end-points on the Internet outside your LAN, the following configuration steps may
be needed:
1.
Edit the NAT/firewall in front of TeleVantage and set port forwarding to forward to
the TeleVantage Server SIP port. By default this is UDP 5060, but can be changed at
the span level (see “Adding a SIP span” on page 14-4).
2.
In the Administrator, edit the SIP span and go to the NAT / Firewall tab.
3.
Configure the following settings in the Local NAT / Firewall traversal section:
Q Local network mask. Specify which addresses are local, i.e., inside the
NAT/firewall. On local calls, the NAT/firewall traversal settings are ignored; for
example, when SIP stations connected to your LAN call each other, the call does
not pass through the NAT.
Enter a list of all local networks inside the NAT/firewall, separated by semicolons
(;), each in the format “<IP address>/<significant bits>”. For example, “10.0.0.0/8”.
Requests sent to addresses in this range are considered local and do not use the
NAT/firewall traversal settings.
Note: If you leave the field blank, TeleVantage uses the SIP span’s subnet mask to
figure out local network. For example, if IP address of the SIP span is 10.0.34.45
and the subnet mask is 255.0.0.0, the default local network mask, calculated by
TeleVantage, will be 10.0.0.0/8.
Q NAT IP Address. Enter the public IP address of the NAT behind which
TeleVantage resides. When sending SIP requests to the Internet, TeleVantage will
use this address as the SIP message’s “Contact” header field and the “media
session” connection information.
Note: If TeleVantage itself has a public IP address, or if TeleVantage doesn’t
interact with any SIP end-points on the Internet, you can leave NAT IP Address
blank.
Q Add rport parameter. Choose when to add the "rport" parameter to the VIA header
field of the TeleVantage Server’s outbound request. Use this parameter when
TeleVantage sends requests to external SIP end-points from behind a
port-translating NAT.
Q Keep-alive interval. Specify the interval (in seconds) between periodic OPTION
messages that TeleVantage sends to keep open the traversal “hole” in the NAT
during a SIP call.
This setting is needed only if your NAT/firewall is not configured to use port
forwarding through the TeleVantage Server SIP port, as described in step 1. If port
14-44
ADMINISTERING TELEVANTAGE
forwarding is set up, then set Keep-alive interval to 0, which disables sending
keep-alive messages.
4.
Click OK.
Remote TeleVantage SIP end-points residing behind a NAT
This section covers the situation where remote SIP end-points important to TeleVantage reside
behind a remote NAT/firewall and must communicate with the TeleVantage Server. For
example, a SIP phone external station connected to a home router with a NAT. To properly
configure this setup, do the following:
1.
If the TeleVantage Server resides behind a NAT/firewall of its own, be sure to set port
forwarding on that NAT to the TeleVantage Server SIP port (by default 5060). See the
previous section.
If there is also a NAT/firewall in front of TeleVantage, further steps are necessary. See
the next section, “NAT/firewall also in front of TeleVantage.”
2.
In the Administrator, edit the SIP span and go to the NAT / Firewall tab.
3.
Configure the following settings in the Remote NAT traversal section:
Q Symmetric request route mode. When TeleVantage recognizes an incoming
request as coming from behind a NAT/firewall device (using the Symmetric
network mask field below), the return messages it sends must follow “symmetric
routing”; that is, it extracts from within the message the correct IP address of the
end-point and sends to that rather than to the IP address of the NAT/firewall.
Specify one of the following here:
Q Symmetric address and port. TeleVantage extracts and uses both the IP
address and the port number for symmetric routing. This is the default setting
and is the most common.
Q Symmetric address only. TeleVantage extracts and uses only the IP address
for symmetric routing. The port number used is the one received. Use this
setting if your firewall cannot handle full symmetric routing that includes the
port number.
Q Symmetric network mask. Enter the addresses of all remote NAT/firewall private
networks that contain a SIP end point needing to communicate with TeleVantage.
Because almost all private networks are in the range 192.168.x.x, you can enter
“192.168.0.0/16” to cover almost all cases. If you need to cover private networks in
the range 10.x.x.x, add that as follows: “192.168.0.0/16 ; 10.0.0.0/8”.
If you need to add others, enter them separated by semicolons, each in the format
<IP address/significant bits>.
When TeleVantage receives SIP messages from within a listed range, it recognizes
that it is dealing with a device behind a NAT/firewall. Therefore, it extracts the
public IP address of the NAT/firewall from elsewhere in the IP packet to use for
return communication.
CHAPTER 14. CONFIGURING SIP INTERNET TELEPHONY
14-45
Q Keep-alive interval. Specify the interval (in seconds) between periodic OPTION
messages that TeleVantage sends to keep open the traversal “hole” in the remote
NAT/firewall during a SIP call. If you experience disconnections during SIP calls
involving a remote SIP end-point defined in Symmetric network mask, try
decreasing this number.
4.
Click OK.
NAT/firewall also in front of TeleVantage
If there is a NAT/firewall in front of TeleVantage as well as in front of the remote SIP end-point,
you must open ports used for RTP traffic in the NAT/firewall in front of TeleVantage. To do so:
1.
Set the SIP span tuning parameter "OffbusRoutingMode" to "Use RTP relay (fixed)".
2.
Calculate the range of RTP ports used by the TeleVantage RTP Relay. The beginning
of the range is specified in the SIP span tuning parameter “RtpRelayPortRangeStart,”
and the total number of ports is equal to twice the number of trunks in the SIP span.
For example, if “RtpRelayPortRangeStart” is 6004, and you have 12 trunks in the SIP
span, the range is 6004-6028.
3.
Configure the NAT/firewall in front of TeleVantage to allow incoming UDP packets
over the ports in this range to the TeleVantage host IP address.
About SIP off-bus routing __________________________________
To reduce VoIP latency (a delay in audio between two parties), TeleVantage uses off-bus
routing on calls between two SIP end-points—for example, two SIP phones or a SIP phone
station and a SIP service provider. With off-bus routing, packets from the VoIP call are routed
more directly from one SIP end-point to the other through TeleVantage’s RTP Relay instead of
via the Intel TDM bus (both Intel HMP software and Dialogic boards have a TDM bus). The
result is higher voice quality, since calls using the TDM bus must be routed onto and then off of
the bus, introducing latency. In addition, using the RTP relay allows TeleVantage to support
more firewall and NAT configurations. Skipping the TDM bus can also reduce IP resource
usage.
Using the RTP Relay does place a minimal extra load on the TeleVantage Server computer’s
CPU usage. However, since the TeleVantage RTP relay operates by default in Windows kernel
mode, the extra CPU overhead is normally very small.
TeleVantage uses off-bus routing via the RTP Relay only when necessary. For example, if a SIP
end-point is connected to MSI station (which is already connected to the TDM bus),
TeleVantage does not use the RTP Relay. You can use performance counters to keep track of
off-bus routing usage. See “Viewing TeleVantage performance counters” on page 12-35 for
details.
14-46
ADMINISTERING TELEVANTAGE
Disabling off-bus routing
With off-bus routing disabled each SIP end-point in a call uses an Intel IP resource, which may
increase your Intel board or HMP IP resource requirements.
To disable off-bus routing, edit the SIP span and set the tuning parameter OffbusRoutingMode
to “Disabled.”
How off-bus routing works
The following SIP-call scenarios illustrate when TeleVantage uses off-bus routing via the RTP
Relay, and when it routes calls through the TDM bus.
SIP-to-SIP call
In a call involving only two SIP end-points, off-bus routing is used. The TDM bus is not used
and neither Intel voice resources nor Intel RTP resources are consumed. However, TeleVantage
Internet trunk licenses are required by each leg of the call.
SIP end-point
RTP
RTP
SIP end-point
Signaling
Signaling
TeleVantage Server
SIP Trunk
SIP Trunk
RTP Relay
RTP
RTP Relay
Uses
CPU
TDM bus
CHAPTER 14. CONFIGURING SIP INTERNET TELEPHONY
14-47
SIP-to-SIP call with third-point audio
If a call between two SIP end-points involves audio to or from a third source—for example, call
recording, coaching, or monitoring—then TeleVantage uses both off-bus routing and the TDM
bus. Using the TDM bus requires 1 Intel RTP resource per SIP end-point and also can consume
voice resources and conference resources depending on the operation being performed (for
example, playing audio into a call will consume 1 conference resource and 1 voice resource).
SIP end-point
RTP
RTP
SIP end-point
Signaling
Signaling
TeleVantage Server
SIP Trunk
SIP Trunk
RTP Relay
RTP
RTP Relay
Uses
CPU
RTP resource
Call recording
RTP resource
TDM bus
Non-SIP end-point enters the call
If a non-SIP end-point enters a SIP-to-SIP call, then TeleVantage ceases using the RTP Relay
and routes the call using the TDM bus, which consumes 1 Intel RTP resource per SIP end-point
and the appropriate number conference or voice resources depending on the media operation, if
any. The changeover can happen dynamically within a call. Scenarios include the following:
Q The call is conferenced.
Q One end-point is transferred to a non-SIP phone.
Q One end-point accesses any TeleVantage feature requiring a voice resource, for
example, hold music, verbal call screening, voicemail, etc.
When the non-SIP end-point leaves the call, returning it to a pure SIP-to-SIP call, TeleVantage
dynamically begins using off-bus routing via the RTP Relay again.
14-48
ADMINISTERING TELEVANTAGE
Configuring off-bus routing
The following SIP span tuning parameters let you configure the behavior of off-bus routing:
Q OffbusRoutingMode. Master switch that enables or disables the off-bus routing feature.
It is enabled by default. The options are as follows:
Q Disabled. The audio stream between two SIP end-points traverses the TDM bus
using two IPM resources.
Q Use RTP Relay (dynamic). The RTP Relay is used in calls between two SIP
end-points, but not between a SIP end-point and a TDM line device.
Q Use RTP Relay (fixed). The RTP Relay is always used. This mode is preferable in
configurations that have mostly SIP devices.
Q RtpRelayIpAddress. The IP address that RTP Relays will use. If not specified, the first
IP interface in the system will be used. This setting lets you specify a NIC for RTP
Relays on a PC with multiple NICs. Enter the IP address in normal dotted format.
Q RtpRelayPortRangeStart. The start of the range of IP ports used by RTP Relays. The
total number of ports in the range can be calculated by multiplying number of SIP trunks
by 4. Default is 6004.
Q DisableRtpReinviteToUA. Use this as a workaround for some SIP phones that ignore
modified RTP connection parameters on re-INVITE messages sent to the phone. Two
such devices are the Polycom SoundPoint IP phone version 1.4.1, and the
Sipura/SPA3000 ATA version 2.0.11. With this setting enabled, TeleVantage does not
send re-INVITE messages with updated RTP connection parameters to SIP end-points
with “User-Agent” Strings matching this regular expression.
SIP standards supported by TeleVantage_____________________
TeleVantage supports the following SIP RFCs/drafts. Third-party SIP device features will work
with TeleVantage if they use the appropriate RFC/draft.
RFC
SIP device features
RFC 3261
SIP: Session Initiation Protocol.
Basic SIP call creation and ending.
SIP registration (in both directions).
RFC 2327
SDP: Session Description Protocol.
Setting up audio path between SIP
end-point during call setup.
Hold/Retrieve via SIP phone’s button.
RFC 3264
An Offer/Answer Model with SDP.
Codec negotiation during call setup.
RFC 3515
The SIP Refer Method.
SIP transfer via SIP phone’s button.
CHAPTER 14. CONFIGURING SIP INTERNET TELEPHONY
14-49
RFC
14-50
SIP device features
RFC 3842
A Message Summary and MWI Event
Package for SIP.
Message waiting indicator (MWI).
SIP Call Control – Transfer.
See
http://www.ietf.org/internet-drafts/draftietf-sipping-cc-transfer-04.txt for details.
RFC 2617
HTTP authentication.
SIP request authentication (in both
directions).
RFC 2833
RTP payload for DTMF digits.
Detect and transmit DTMF tones within
the RTP stream.
Use SIP INFO message to detect and
transmit DTMF tones using the SIP
signaling path.
RFC 3581
An Extension to the Session Initiation
Protocol (SIP) for Symmetric Response
Routing.
SIP INFO method for DTMF Generation.
Support for out-of-band digit transfer
using SIP INFO message.
For more info see
http://www.cisco.com/en/US/products/sw
/iosswrel/ps1839/products_feature_guid
e09186a00800b5db6.html.
ADMINISTERING TELEVANTAGE
CHAPTER 15
CHAPTER 15
CONFIGURING H.323 INTERNET
TELEPHONY
CHAPTER CONTENTS
About H.323 Internet telephony and TeleVantage . . . . . . . . . . . . . . . . . . . . . . 15-2
Using a host-based or an embedded stack. . . . . . . . . . . . . . . . . . . . . . . . . . . . 15-2
Adding an H.323 span. . . . . . . . . . . . . . . . . . . . . . . . . . . . . . . . . . . . . . . . . . . . 15-5
Configuring a user to use an H.323 phone . . . . . . . . . . . . . . . . . . . . . . . . . . . . 15-9
Connecting and configuring H.323 phones . . . . . . . . . . . . . . . . . . . . . . . . . . . 15-11
Configuring an H.323 Uniden IP phone for TeleVantage . . . . . . . . . . . . . 15-13
Configuring an H.323 Polycom IP phone for TeleVantage . . . . . . . . . . . . 15-18
Configuring a PBX-IP Media Gateway for TeleVantage . . . . . . . . . . . . . . 15-32
Using H.323 terminals with TeleVantage . . . . . . . . . . . . . . . . . . . . . . . . . . . . 15-34
Connecting two Servers using H.323 Gateways. . . . . . . . . . . . . . . . . . . . . . . 15-39
Receiving Caller ID from third-party H.323 gateways . . . . . . . . . . . . . . . . . . . 15-48
About H.323 Internet telephony and TeleVantage _______________
Developed by the telephone companies, the H.323 Internet protocol enables communication
with H.323-compatible devices, such as Microsoft NetMeeting, H.323 phones, and other
TeleVantage Servers.
With the H.323 protocol you can use TeleVantage’s H.323 Gateway feature to connect two or
more TeleVantage Servers over VoIP. TeleVantage H.323 Gateways allow users on one
TeleVantage Server to make calls from the other TeleVantage Server just by dialing an
extension or access code, including making PSTN calls from the remote Server’s location. See
“Connecting two Servers using H.323 Gateways” on page 15-39.
Setting up TeleVantage for H.323 involves the following tasks:
1.
Install the Intel Dialogic components and software required to support H.323
telephony. See Installing Intel Telephony Components for more information.
2.
If you will be using Uniden or Polycom H.323 phones, install a TFTP server such as
the one included on the TeleVantage Master CD. See Installing TeleVantage for
instructions.
3.
Decide whether you want to use a host-based or embedded stack. See the next section.
4.
Add and configure one or more H.323 spans. See “Adding an H.323 span” on
page 15-5.
5.
Add and configure one or more H.323 dialing services. See “Adding a dialing service”
on page 9-9.
6.
If you are using H.323 phones, configure each H.323 phone user to set up his or her
SIP phone as an external station. See “Configuring a user to use an H.323 phone” on
page 15-9.
7.
Connect and configure any H.323 phones. See “Connecting and configuring H.323
phones” on page 15-11.
In addition, if you want to connect two or more TeleVantage Servers using H.323 Gateways, see
“Connecting two Servers using H.323 Gateways” on page 15-39.
Using a host-based or an embedded stack ____________________
If you are using Intel Dialogic IP boards, and not HMP, then before configuring TeleVantage
for H.323 you should decide whether you want to define your H.323 spans using a host-based
stack or an embedded stack. With a host-based stack, you create virtual H.323 trunks that can
be independent of the physical trunks on your Internet boards. Host-based stacks give you vastly
increased flexibility in mapping your H.323 trunks to the IP address or addresses of your choice.
You might choose a host-based stack for the following reasons:
Q DI0408x boards require host-based stack setup.
Q You want to use SIP and H.323 on the same TeleVantage Server (SIP requires that you
configure your Intel IPLink board for a host based stack).
15-2
ADMINISTERING TELEVANTAGE
Q Some Intel Dialogic Internet boards have .PCD firmware files available that give you
extra conference ports, and accessing the extra ports requires host-based stack setup.
Q You want to divide your Internet trunks into multiple spans with different IP addresses,
for example, one inside your firewall and one outside.
Important: You cannot assign the same IP address to more than one trunk board when using
a host-based stack.
Examples of embedded and host-based stack configurations
The following charts shows different configurations of Internet telephony boards using
embedded and host-based stacks.
In the diagram above, two IPLink boards configured with an embedded stack
provide their own on-board call control and RTP resources. Each IPLink board
has its own NIC and IP address and must be assigned to a separate TeleVantage H.323 span. Inbound calls must be directed to the IP address of the
desired IPLink board.
In the diagram above, two IPLink boards configured with host-based stacks provide RTP resources for one host-based H.323 span. RTP audio travels over the
NIC and IP address of both IPLink boards. The host-based H.323 Span provides
call control (e.g., setup and tear-down) for all 48 H.323 trunks. Inbound calls are
directed to the host PC’s IP address.
CHAPTER 15. CONFIGURING H.323 INTERNET TELEPHONY
15-3
In the diagram above, two DI0408LSAR2 boards configured with Media Load 5
and a host-based stack provide RTP resources for one host-based H.323 span.
RTP audio travels over the host PC’s NIC and IP address. The host-based
H.323 span provides call control (e.g., setup and tear-down) for all 24 H.323
trunks. Inbound calls are directed to the host PC’s IP address.
Using the RTP Resources tab
When you select “Host based stack” under Type on the General tab of the H.323 Span dialog
box, the RTP Resources tab becomes available. RTP stands for Real-time Transport Protocol,
the protocol used by Internet boards to transmit audio. Once you have added the H.323 span and
restarted the Server, you can use the RTP Resource tab to realign the RTP resources on your
Internet boards with the TeleVantage H.323 trunks you are defining.
Important: Changes to the RTP Resources tab require a restart of the affected trunks to take
effect.
15-4
ADMINISTERING TELEVANTAGE
By default, TeleVantage assigns the RTP resources on your Internet board in order to the trunks
in your H.323 span. You can restore this arrangement by choosing Automatically assign RTP
resources and clicking OK.
To make a different assignment, do the following:
1.
Click Use these specific RTP resources.
2.
In the Assignments list, select one or more RTP resources and click Remove to clear
them from their trunk assignments.
3.
To add an RTP resource to an empty trunk assignment, select the RTP resource in the
Resources list and the empty trunk assignment in the Assignments list, then click
Add. You must select a resource that has not already been added, and there must be an
empty trunk assignment available, or you will be unable to add the resource.
4.
When you are done reassigning RTP resources to trunks, click OK.
Adding an H.323 span_____________________________________
H.323 trunks (created in H.323 spans) are required for voice communication over the Internet
using the H.323 protocol. To use H.323 spans, the TeleVantage Server computer must have an
always-on, preferably high-speed connection to the Internet, and one or more Dialogic Internet
telephony boards installed as described in Installing Intel Telephony Components. The
TeleVantage H.323 “trunks” represent the individual channels that the Dialogic telephony board
supports.
Important: If you plan to have both H.323 and SIP spans on the same system, make sure you
have enough host-based RTP resources on your Internet telephony board(s) to cover both. When
allocating IP resources, TeleVantage allocates them to H.323 trunks first, then allocates the
remainder to SIP trunks.
Note: After adding Internet trunks to a span, you must restart the computer. If the trunks fail to
appear, delete the span and add the span again. Then restart the computer.
CHAPTER 15. CONFIGURING H.323 INTERNET TELEPHONY
15-5
Use the following procedure to add a H.323 span:
1.
Choose Trunks > New Trunk > H.323 Span. A new H.323 Span dialog box opens.
2.
On the General tab, specify the following information for the span:
Q H.323 span number. The number of the H.323 span, starting with 1. Note that this
number has nothing to do with boards or SIP spans. If you have a second H.323
span, it should be numbered 2.
Q Span type. Select one of the following:
Q “Host-based stack.” The protocol stack runs on the Server's CPU. You have the
ability to create virtual IP trunks and specify multiple IP addresses of your
choice for all calls. Some Internet telephony boards also provide additional
conference resources when configured for host-based stacks.
Q “Embedded stack.” Your IP trunks are determined by your Intel Dialogic
Internet board. Each physical board will receive calls on a different IP address.
The protocol stack runs on the board's DSP, offloading the Server's CPU.
If your board supports both methods, it is recommended that you choose host-based
stack. HMP supports only host-based stack. For more guidance on this field, see
“Using a host-based or an embedded stack” on page 15-2.
Q IP Address. If using an embedded stack, enter the IP address of the IP telephony
board. If using a hosted-based stack, be sure to select here the IP address of a NIC
on the TeleVantage Server, not the IP address of an Intel IPLink board. This IP
address will be used for H.323 signalling.
Important: The IP address for transmitting and receiving RTP audio is a completely
different and unrelated setting. If using Intel IP boards, the IP address for RTP audio
will be transmitted using the IP address as defined in the Dialogic Configuration
Manager. Alternatively, if using HMP, the IP address for RTP audio is configured
15-6
ADMINISTERING TELEVANTAGE
using the following registry key:
HKEY_LOCAL_MACHINE\SOFTWARE\SBLabs\dm3ssp.
Q Description. A description of the span. Include the address of the span in the
description for easy reference.
Q Number of trunks. The number of trunks contained in the span.
For an embedded stack, enter a number that does not exceed the number of
channels available on your Internet telephony boards. To find the number of
channels available on a board, see Installing Intel Telephony Components.
For a host-based stack, enter a number equal to the number of RTP resources
you want configured on this H.323 Span. See “Using a host-based or an
embedded stack” on page 15-2. If you enter a number that exceeds the total RTP
resources available, those trunks will show in the Device Monitor with a status
of "No loop current."
Note: If you are planning to have both H.323 and SIP trunks on the same system,
enter fewer trunks here than available RTP resources, to save resources for SIP
trunks. TeleVantage allocates RTP resources to H.323 trunks first, then the
remainder to SIP trunks.
Note: If you later reduce the number of trunks, the last-numbered trunks will be
deleted. If you later increase the number of trunks, new trunks will be added at the
end, with the properties defined in the Trunks tab.
Q Starting trunk number. The starting trunk number of the span. The dialog box
shows you the range of numbers of the trunks belonging to this span. If your system
also has analog trunks, the analog trunks must have the lower trunk numbers, so if
you have not added them yet, leave room for them in your numbering of the span.
Q Send inbound calls to. Select the auto attendant, user, or IVR Plug-in that answers
all inbound voice calls on the trunks in this span.
Q Connect inbound calls. Whether or not to use Delayed Answer on this span. For
more information see “Using Delayed Answer” on page 5-8.
Q H.323 listener port. The port used by the H.323 span to listen for incoming Internet
traffic. By default it is 1720. You can change the port number, for example, to
increase your Internet security since 1720 is the standard listener port, or to avoid
conflicts with another application already listening at the port.
3.
Click the Trunks tab and specify how trunks in this span are used:
Q Accept inbound calls. If checked, the trunks are used for inbound calls.
Q Allow outbound calls. If checked, the trunks are used for outbound calls.
4.
Click the Codecs tab and review the default codecs used by this span for all inbound
calls and as dialing service defaults for outbound calls. If you must change
TeleVantage’s default codec list, see the next section, “Modifying H.323 span
codecs.”
Note: You can override the default span codecs when you set up a dialing service that
CHAPTER 15. CONFIGURING H.323 INTERNET TELEPHONY
15-7
allocates trunks in this span (see “The Codecs tab” on page 9-15).
5.
If necessary, use the Tuning tab to fine-tune your H.323 span for the best connection.
See Appendix H of Installing TeleVantage for instructions.
6.
Click OK to add the span to your configuration.
Modifying H.323 span codecs
A codec is a protocol used to translate voice audio, which inherently is an analog signal, into
digital signals for transmission over an IP network. When an IP call is established between two
devices, the devices automatically choose which codec to use. This choice is based on whether
the codec is available to both devices and how highly the codec is preferred by both. The Codecs
tab on an H.323 span dialog box lets you make codecs available to your device and arrange them
in order of preference. The codecs with a check in the Enabled column are the ones available
for use with TeleVantage—these are grouped at the top of the list. The enabled codecs are listed
in order of preference, an order you can change. For example, you may prefer one codec over
another for bandwidth reasons.
Note: You can enable only one codec of each type (G711, G723, G729, and GSM).
Matching codecs with external devices
When you have control over the codec preference in an external device used with TeleVantage,
you should set codec preferences for the device in the same priority as you set them in the H.323
span.
To modify the codecs available to TeleVantage
Q To make a codec available with TeleVantage, check its Enabled column. The codec is
added as the last in the enabled codecs group at the top of the list (Click OK, then view
the tab again to see the modified list).
Q To move a codec up or down in the list, click the arrow buttons.
15-8
ADMINISTERING TELEVANTAGE
Codecs you can make available include:
Q G.711 ALaw, G.711 MuLaw. Also known as PCMU. Supported by all VoIP devices, but
high bandwidth. (64 kbs.) Note that the recommended frame size for G.711 codecs is
20ms.
Q G.729a. Offers a good balance between sound quality and bandwidth. (8.8 kbs.)
Q G.723.1. Best for Microsoft NetMeeting. (5.3 kbs. or 6.3 kbs.)
Q MSGSM. (13.0 kbs.)
Q GSM. (13.0 kbs.)
Configuring a user to use an H.323 phone ____________________
Each user with an H.323 phone must be configured to have the H.323 phone as an external
station. H.323 phones include Uniden phones, Polycom phones, and phones connected to an
Intel NetStructure PBX-IP Media Gateway.
Important: Before beginning, make sure there are enough unassigned external stations for the
H.323 phone users. To add more external stations, see “Defining the number of external stations”
on page 7-8.
To assign a user an H.323 phone as an external station
1.
Double-click the user in the Users view to open the User dialog box.
2.
On the General tab, give the user a station ID that corresponds to an unassigned
external station.
3.
Click the Phone \ External Station tab.
CHAPTER 15. CONFIGURING H.323 INTERNET TELEPHONY
15-9
4.
Under Destination, select “Uniden phone” or “Intel PBX-IP Media Gateway” for
those types of phones. For other H.323 phones, including Polycom phones, select
“Generic H.323 Device.” The following options appear:
5.
In Call Using, select your H.323 dialing service. If you haven’t created an H.323
dialing service yet, see “Adding a dialing service” on page 9-9.
6.
In Address, enter the phone’s IP address as follows:
Q For Uniden and Polycom phone users, enter the IP address of the phone.
Q For phones connected to a PBX-IP Media Gateway, enter the IP address of the
Gateway device, followed by a forward slash ( / ), followed by the Gateway
extension of the Gateway phone’s port. For example, if the Gateway device has an
IP address of 222.99.14.96, and the user’s phone is attached to Port 1 of the
Gateway device, and Port 1 has an extension of 101 in the Gateway configuration,
then you would enter 222.99.14.96/101 in Address.
7.
Check Interpret ** as Flash using Intel voice resources to give the user access to the
TeleVantage telephone commands at the external phone. For example, the user could
press **1 to transfer a call. If checked, all calls involving the external station consume
an extra voice resource to monitor for the ** digits. For instructions on calculating
voice resource needs and installing extra voice resources, see Installing Intel
Telephony Components.
If unchecked, a voice resource is not used and the user is not able to use TeleVantage
telephone commands at the external station.
8.
Check Disconnect when idle to have TeleVantage hang up the trunk call immediately
whenever a call on the H.323 phone ends.
Most users should leave this field unchecked. When unchecked, TeleVantage provides
15-10
ADMINISTERING TELEVANTAGE
10-15 seconds of internal dial tone after a call ends, making it easy to place new calls
immediately after a call ends. If checked, the H.323 phone does not return to dial tone
after the other party in a call hangs up, so the user would have to hang up and pick up
to place a new call.
The only reason H.323 phone users should check the field is if their H.323 phone
provides its own internal call history. If unchecked, that history would show calls as
being longer than they really were (TeleVantage’s Call Log logs the calls correctly).
Checking the field would make the phone’s call history accurate.
9.
Check Automatically change address to location of last login to have TeleVantage
automatically reset the external station to the phone’s IP address whenever the phone
logs into TeleVantage, for example, when the user picks up the phone. The IP phone
must be properly configured to automatically log in as described in its configuration
section in this chapter. This setting should be used for IP phones using DHCP
(dynamic) IP addresses if a static IP address is not available.
10. For the user to pick up the phone and make TeleVantage calls, TeleVantage must be
able to identify the station. Choose one of the following identification methods:
Q Identify station using phone’s PLAR connection string. TeleVantage identifies
the station using the phone’s Private Line Automatic Ringdown (PLAR) setting,
defined in the phone’s configuration. See the phone’s section in this chapter.
Q Identify station using phone’s IP address. TeleVantage identifies the station if
the incoming IP address matches the external station Address field (above). Use
this option if the phone has a static IP address.
If TeleVantage cannot identify the phone, then on pickup the user is connected to the
auto attendant defined for the H.323 span.
11. Click OK.
Permissions for H.323 phone users
Make sure that users of H.323 phone external stations have the permission Log on via IP trunk
set to “Allow.” If the user is allowed to make external calls, make sure the user also has the
permission Place external calls when logged in via a trunk set to “Allow.” (Both permissions
are in the “Standard” category.) Because an H.323 phone is not plugged in to a station port on
the Server, H.323 phone users need this permission to place any external calls.
Connecting and configuring H.323 phones ___________________
To use an H.323 phone with TeleVantage, you must configure it properly. TeleVantage supports
the use of the following H.323 phones:
Q Uniden UIP 300 phones. See page 15-13.
Q Polycom Soundpoint IP phones. See page 15-18.
Q Digital phones connected to an Intel NetStructure PBX-IP Media Gateways. See
page 15-32.
CHAPTER 15. CONFIGURING H.323 INTERNET TELEPHONY
15-11
Configuring multiple H.323 IP phones
If you are using several H.323 IP phones on your TeleVantage Server, be aware of the following
considerations:
Q Having a sufficient number of IP trunks. If a user takes his or her IP phone off hook at
a time when there are no available IP trunks, he or she will hear a delay in dial tone until
there is an available trunk. There is no way to signal to the phone that there are no IP
trunks available; the user will hear silence. Unless your users are call center agents, an
IP-trunks-to-IP-phones ratio of 1-3 or 1-4 should be sufficient for a typical medium sized
office. See Installing Intel Telephony Components for more information.
Q Configuring multiple Internet telephony boards in your TeleVantage Server. If your
TeleVantage Server includes multiple Intel Internet telephony boards which have their
own on-board network interfaces, you gain more flexibility by using a host-based stack
(See “Using a host-based or an embedded stack” on page 15-2.) If you use an embedded
stack instead, remember that each of the boards has a unique IP address. Therefore, you
will have multiple PLAR addresses to manage. For best results, you should spread the
connection load among your IP boards, having some phones connect to each IP board.
For the Uniden phones and Intel NetStructure PBX-IP Media Gateway, set the PLAR
address for each phone to connect to the IP board you have chosen. For Polycom phones,
you will have multiple <ServerIP>.cfg files each containing a different PLAR IP
address; make sure a phone's <MACid>.cfg file references the <ServerIP>.cfg file for
the IP board you intend the phone to use.
Using an H.323 IP phone over the Internet
To use an IP phone at an external location outside your network, do the following:
1.
Connect the LAN port of the phone to a network that has access to the Internet.
2.
If you are using a H.323 phone that is behind a firewall or NAT device, make sure the
phone has an IP address that is addressable by the TeleVantage Server. In a remote
office, you may have to open ports in your firewall or enable H.323 to pass for the IP
number of the phone. In a single person home office, such as with a cable modem or
DSL connection to the Internet and a small router managing NAT to local private IP
numbers, you can put the private IP number of the phone in the DMZ of the router.
You can then use the public IP address from your ISP as the addressable IP number of
the IP phone. Use this number, rather than the local private IP number actually
assigned to the phone, when configuring the user extension in TeleVantage.
Note: When using an IP phone over the Internet instead of on a LAN, the transmission is
susceptible to greater delay and packet loss, both of which affect voice audio quality.
15-12
ADMINISTERING TELEVANTAGE
Configuring an H.323 Uniden IP phone for TeleVantage _________
This section describes how to install, configure, and use a Uniden Uniden UIP 300 IP phone
with TeleVantage.
Installing the Uniden IP phone
To install a Uniden phone, do the following:
1.
Connect the Ethernet cable to the network port on the phone, located behind the LCD
display.
2.
If power is not available through the Ethernet cable, connect the AC Adaptor to the AC
Adaptor port on the phone, located behind the LCD display. Plug the AC Adaptor into
a power outlet. Uniden IP phones support Power over LAN by PowerDsine (see
http://www.powerdsine.com ) to get power through the Ethernet cable.
3.
Attach the handset to its port on the side of the phone.
4.
When the phone prompts for a password, enter 654321.
Configuring the Uniden IP phone
1.
Determine the IP address of the phone. To do so, press the following buttons on the
phone: MENU, down arrow, SELECT. This opens the View Info menu. Make a note of
the IP address displayed.
Note: You can configure the phone using DHCP or a static IP address. If the default
IP address "000.000.000.000" is displayed, a DHCP server may not be available. If the
default IP address "169.254.001.x" is displayed, DHCP is not enabled on the phone and
no static IP address has yet been set. In this case you should enable DHCP or assign
a static IP address to the phone. See the next section for instructions.
2.
On a PC that is connected to the same network as the phone, open a web browser and
go to the IP address of the phone.
3.
Enter the administrator ID ("admin") and password (654321) in the login window.
4.
Open the Network Configuration page. Change the network settings if necessary, then
click Submit. The phone will be automatically restarted if settings are changed. Wait
for the IP phone to return to standby mode and reload the page from the web browser.
5.
Open the H.323 Configuration page. In the PLAR section, set the VOIP Proxy IP to be
the IP number of the Internet telephony board in the TeleVantage Server. Fill in the
Connection Str field as follows:
Q If the user has been set up with the IP phone as an external station, you can leave
this field blank. The connection to TeleVantage is made automatically by matching
the incoming IP address and no password is required. (However, if the Advanced
setting EnableIPAddressMatch has been set to require a connection string, you
must enter one as described in the next bullet. See “Choosing whether to require a
connection string” on page 15-14.)
CHAPTER 15. CONFIGURING H.323 INTERNET TELEPHONY
15-13
Q If the user uses a TeleVantage station as his or her primary phone and only
occasionally uses the IP phone, then enter the following in Connection Str:
* <user’s extension> * <user’s TeleVantage password> *
(spaces around the star characters are for clarity; do not enter them)
For example, for extension 123 with password 456 you would enter *123*456*.
You can also set a Display name to appear on the phone.
Change the other H.323 settings if necessary, then click Submit. The phone will be
automatically restarted if settings are changed. Wait for the IP phone to return to
standby mode and reload the page from the web browser.
6.
Open the Codec Configuration page. Make sure that the G.711 codec the preferred
codec. Make sure that the Packet Size is set the same in the Uniden phone as in
TeleVantage (where this setting is referred to as frame size). Note that the Uniden
phone defaults to a packet size of 20 ms, and TeleVantage defaults to a 10 ms or 30
ms frame size, so you must edit one side to make them match. The Uniden phone also
requires the jitter depth (buffer) to be twice as big as the packet size. It is recommended
that you set the packet / frame size to 30 ms and the jitter buffer to 60 ms. When you
are done configuring the page, click Submit.
7.
Open the SNTP Configuration page. SNTP allows the phone to automatically receive
the correct date and time when the phone is rebooted. You may have an SNTP server
on your LAN, or use one of several publicly addressable SNTP servers on the Internet.
If you do not wish to use SNTP, you can set the date and time on the phone manually
using the LCD screen under the Phone Configuration submenu. However, if you
manually set the date and time, your settings will be lost any time the phone is
rebooted. Change the SNTP settings if necessary, then click Submit.
After following these steps, be sure to configure the H.323 phone user in TeleVantage. See
“Configuring a user to use an H.323 phone” on page 15-9.
Your Uniden IP phone is now ready for operation.
Choosing whether to require a connection string
By default, TeleVantage does not require the Uniden phone to have a connection string
(containing extension and password) if the phone is defined as an external station. The Uniden
phone connects to TeleVantage automatically using IP address matching. This approach enables
easy administration but is vulnerable to fraudulent access. If someone provides a spoofed IP
address to the phone, that person could access TeleVantage as the user without needing a
password, and place calls. (For more on protecting your system from toll fraud, see Appendix I
of Installing TeleVantage.
You can have TeleVantage require a connection string for IP phones defined as external stations.
To do so, using the Advanced Setting EnableIPAddressMatch (see Appendix J of Installing
TeleVantage for instructions on advanced settings).
15-14
ADMINISTERING TELEVANTAGE
Assigning an IP address to the Uniden phone
By default, the Uniden IP phone does not use DHCP.
Note: If you have a DHCP server on your network, it is easiest to enable DHCP on the phone,
and automatically have the phone obtain a valid IP number, Subnet Mask, LAN gateway, etc. You
can then connect to the phone using a web browser as described in the previous section and
change any setting you wish, including disabling DHCP and setting a static IP address.
To assign an IP address to the phone using DHCP
1.
Press MENU, up arrow, up arrow (so the phone’s LCD screen says Configuration).
Press SELECT, up arrow, SELECT.
2.
Enter the password (the default password is 654321), then press SELECT. The
Network Configuration menu appears.
3.
The first screen indicates whether DHCP is enabled or disabled. To enable DHCP if it
is disabled, press SELECT, up arrow, SELECT, and SELECT again to restart the
phone. When the phone restarts it obtains an IP address from your DHCP server. You
can then follow the procedure in the previous section to configure the phone via a web
browser or change the IP number via the Menu keys.
To assign a static IP address to the phone
1.
Press MENU, up arrow, up arrow (so the phone’s LCD screen says Configuration).
Press SELECT, up arrow, SELECT.
2.
Enter the password (the default password is 654321), then press SELECT. The
Network Configuration menu appears. To assign a static IP address to the phone, you
must first disable DHCP if it is enabled. Press SELECT, up arrow, SELECT. When the
message "Press Select to Restart" appears, press Del/Cancel to return to the Network
Configuration menu.
When the phone restarts, it attempts to retain all the settings it initially obtained from
the DHCP server (IP number, subnet, LAN gateway) but will now use that IP number
as a static IP number.
3.
If you do not have a DHCP server to automatically set the correct addresses into the
phone, you will have to edit all settings manually. Repeat steps 1-2 to get to the
Network Configuration menu. From the Network Configuration menu press up arrow,
SELECT. The IP address menu appears. Press SELECT and enter a static IP address,
then press SELECT.
You can also use this procedure to view or edit an IP address provided automatically
by DHCP.
4.
When the message "Press Select to Restart" appears, press Del/Cancel to return to the
Network Configuration menu.
5.
Configure the Subnet Mask and Default Gateway address in the same manner. The
Subnet Mask menu is next to the IP address (one additional up arrow), and the Default
Gateway menu is next to the Subnet Mask.
CHAPTER 15. CONFIGURING H.323 INTERNET TELEPHONY
15-15
Using a Uniden IP phone
For basic operation of the Uniden IP phone, see Uniden’s Quick Reference Guide, available in
PDF format on the TeleVantage Drivers CD in the IPPhones\H.323\Uniden directory. This
section describes features that work together with TeleVantage.
The Uniden UIP 300 phones have several features that are valuable to TeleVantage users. When
an incoming call is received from TeleVantage, the screen shows the contact name if the call is
recognized as a contact, or Caller ID information.
On the right side of the number pad, the phone has two line appearance keys, a Mute key,
up/down controls to set ringer and call volume, and a speakerphone / head set key.
On the left side of the number pad, the phone has buttons for Redial, Transfer, and Hold which
map directly to those TeleVantage commands. For example, when you press the Hold button the
caller hears TeleVantage hold music.
Note: You must use the Hold button to put a call on hold when switching between calls on
different line appearances.
There is also a Conference button which is mapped to the conference feature on the TeleVantage
telephone commands.
15-16
ADMINISTERING TELEVANTAGE
Creating a conference call
To create a TeleVantage conference call using the Uniden IP phone, do the following:
1.
Place or receive a call.
2.
Press the Conference button on the phone, then press # to dial an additional party.
3.
Place the second call.
4.
Press the Conference button again.
5.
Press 5 to create the conference or press # to add an additional parties.
Using the Message Waiting Indication light
The Message Waiting Indication (MWI) light is on the top of the phone. Note that this will only
work if you have configured the user in TeleVantage as an external station with the Destination
set to Uniden or Intel PBX-IP Media Gateway. If the Destination is set to Generic H.323 Device
or External Number, or the user is only forwarding calls to an IP phone, the MWI will not work.
Using the feature buttons
Above the number pad, the phone has five user-settable feature buttons. These can be set via
the Phone Configuration menu in the LCD screen or via the web browser interface for the phone.
The phone is also capable of storing phone numbers for contacts. This too is can be set via the
Phone Configuration menu in the LCD screen or the web browser interface for the phone. These
contacts are separate from TeleVantage contacts.
Accessing other phone settings
The LCD Contrast level and many other settings can also bet set in the Phone Configuration
menu accessible by pressing the Menu key on the phone.
Contacting Uniden
If you need additional assistance configuring your Uniden IP phone with TeleVantage, contact
your TeleVantage Provider.
For more information about Uniden IP phones, contact Uniden using the following information:
Uniden America Corporation
4700 Amon Carter Blvd
Fort Worth, TX 76155
1-800-554-3988
www.uniden.com
CHAPTER 15. CONFIGURING H.323 INTERNET TELEPHONY
15-17
Configuring an H.323 Polycom IP phone for TeleVantage ________
This section describes using a Polycom IP phone with TeleVantage.
Note: If you are using a SoundPoint IP 400 phone, the bootrom version of your phone should
be 1.1.1. The version does not matter for SoundPoint IP 500 phones.
Overview of TeleVantage - Polycom IP phone integration
To use a Polycom IP phone with your TeleVantage system, you must complete the following
tasks. Each task is discussed in detail in this section.
1.
Install and configure a TFTP server as described in Chapter 17 of Installing
TeleVantage. When the phone is plugged in, it downloads several files from the TFTP
server to configure itself. The files contain information about how the phone logs in to
the TeleVantage Server via PLAR, the IP address of the TeleVantage IP trunk, how
the keys on the phone are programmed, and other phone configuration details. See the
next section.
2.
Edit the configuration files on the TFTP server’s default directory for each Polycom
IP phone on the network. These files are in XML format. See “Editing the
configuration files” on page 15-20.
3.
Configure the Polycom IP phone using its on-screen commands. See “Configuring the
Polycom IP phone” on page 15-22.
After connecting the Polycom phone, see “Using the Polycom IP phone” on page 15-25 for
instructions on using it with TeleVantage.
Editing the Polycom configuration files
When the Polycom phone boots up, it accesses the TFTP server and reads information from
configuration files that enables it to connect to TeleVantage.
The following files must be present in the TFTP server’s default directory:
Q <MACid>.cfg
Q <UserFile>.cfg
Q <ServerIP>.cfg
Q Func.cfg
Q Ipmid.cfg
Q Hmx.ld
These files are described in detail in the following sections.
About the configuration files
The following files are supplied on the TeleVantage Drivers CD in the
IPPhones\H.323\Polycom directory, and should be copied into the TFTP server's download
directory.
15-18
ADMINISTERING TELEVANTAGE
Important: Do not use Wordpad to edit the XML files, as Wordpad can reformat the files. Use
an XML editor such as XML Wordpad (available from msdn.microsoft.com).
Q <MACid>.cfg. The first file read by the Polycom phone when rebooted or plugged in. It
contains the list of other configuration files which provide specific configuration
information for the phone. (For instructions on rebooting the phone, see “Configuring
the Polycom IP phone” on page 15-22). The name of the file should be the 12-digit MAC
address of the phone. The phone's MAC address is on a sticker on the back of the phone,
or you can read the "ENet" field while pressing and holding the button beneath the
"About" softkey on the phone's LCD screen. When the phone boots up, if it does not find
a file with its MAC address, it will read a file named 000000000000.cfg.
Hint: When debugging a configuration file, add a file named 000000000000.cfg to your
TFTP server for the phone to read. You may have incorrectly named your file, and the
phone will default to this file if it does not find one with its own MAC address.
After reading this file, the Polycom IP phone reads from the files listed in the field
CONFIG_FILES in the order listed.
Note:If the same setting is contained in more than one configuration file, the setting that
the phone downloads first will take effect. The order that the phone downloads the files is
determined in <MACid>.cfg.
Q <UserFile>.cfg. Defines specific settings for the user, like extension and password so
they can log into the server. This file is unique per user.
The settings include the Display name for the user (20 characters maximum), and the
user's extension and password. This file should be protected and only accessible by the
user (and the TFTP system Administrator) since it contains the user's extension and
password.
Q <ServerIP>.cfg. Defines the IP address for the TeleVantage IP trunk and key mappings
for the feature buttons on the phone. This file will be the same for all users who are using
ports on the same IP board in the TeleVantage Server.
Q Func.cfg. Defines protocol parameters for the phone. This file is common to all users
and shouldn't be modified. Vertical does not provide support for modified versions of
this file.
Q Ipmid.cfg. Defines codecs, tones and other basic parameters of the phone. Also specifies
the SNTP server for obtaining the correct time, and the GMT offset. This file must be
the same for all users.
Q Hmx.ld. This Polycom file loads the basic operation of the phone. It's a binary file and
can't be modified.
Location of the configuration files on the TFTP server
The <MAC>id.cfg file must be in the default directory of the TFTP server. Each phone on your
network must have a separate <MACid>.cfg file.
The other configuration files are listed in the <MACid.cfg> file. You can rename them or move
them into other directories.
CHAPTER 15. CONFIGURING H.323 INTERNET TELEPHONY
15-19
Security for the configuration files
The configuration files include all of the settings for the Polycom IP phone. Some of the
information required is a TeleVantage user login (including password), so the accessibility of
this information must be carefully considered to minimize the security risk to your system.
One alternative is to create subdirectories from the TFTP root for each of the Polycom IP phone
users; each user would only be able to read the root directory and their subdirectory, so it would
not be possible to see other users’ login information. Since some of the files (including Func.cfg,
Ipmid.cfg, and Hmx.ld) are shared across all users, these files would need to be accessible to all
users, or duplicated in all user subdirectories.
Note: The user account on the TFTP server should have "write" access to the TeleVantage
Server so the phone can upload log files that are useful in troubleshooting problems.
Editing the configuration files
You must make the following edits to the configuration files on the TFTP server. The .cfg files
are in XML format, and should be edited using an XML editor or basic text editor (do not use
Wordpad, because it reformats the file). You can download an XML editor called XML Notepad
from msdn.microsoft.com.
Example of an XML editor
Note: These configuration file edits specify the TeleVantage IP trunk, the user extension, and
the password that enable you to log in when you pick up the phone. Other features of the Polycom
IP phones that are not utilized by TeleVantage are not addressed in this document.
For more information on configuration files, see “Sample configuration files” on page 15-29.
To edit the configuration files
1.
Edit <UserFile>.cfg to use information specific to the phone's user.
a. In the "Features" folder, edit the "plar.log.string" field to contain the login string for
this user. The login string for a user with extension 202 and password 202 would
be:"*202*202*".
b. In the "GENDESC" folder, edit the "genDesc.name" string to reflect the name of
user. This name will appear on the LCD screen of the Polycom IP phone when it is
15-20
ADMINISTERING TELEVANTAGE
idle. It will also be transmitted as caller ID when the Polycom IP phone is used to
call another user on the TeleVantage Server.
c. In the "GENDESC" folder, edit the "genDesc.E164addr" field to be the
TeleVantage extension for the user. This will also appear on the LCD screen of the
Polycom IP phone.
d. Rename this file to reflect information about the user (for example, User202.cfg).
2.
Edit <ServerIP>.cfg to contain the IP address that the user will use to access the IP
telephony board in your TeleVantage Server.
a. In the FEATURES folder, edit the feature.plar.address field to be the IP address of
your IP trunk. Use the IP address of the Intel Dialogic Internet telephony board, or,
if you are using an Internet board which does not have its own network interface
card on it, the IP address of your TeleVantage Server. Your network administrator
can tell you the IP address of the Server or boards.
b. Rename this file to describe your IP address (e.g., TVIP2.cfg).
Notes
Q If you have more than one IP board in a TeleVantage Server, you may need
more than one of these files, each specifying the IP address of a different IP
telephony board. You need one file for each non-DM/IP040-LSI board and
another file to cover all DM/IP040-LSI boards. (All DM/IP040 boards share the
TeleVantage Server’s single IP address.) You determine which user uses which
board by having their <MACid>.cfg file point to the appropriate <ServerIP>.cfg
file. Each <MACid>.cfg file can point to only one <ServerIP>.cfg file.
Q Do not change the settings listed in the VoipProt.server.address field. Entering
the address of your IP board will result in the IP stack crashing on the Server.
3.
Edit <MACid>.cfg to specify the configuration files to be used by the phone. This file
will specify the name and subdirectory where the other configuration files can be
found.
a. In the CONFIG_FILES field, list the four other configuration files, including the
<UserFile>.cfg file with the user’s login string, and the <ServerIP>.cfg file with the
IP board to be used. If some of these files are in a subdirectory on the TFTP server,
you can specify that in the file name (for example, "/User202/User202.cfg").
Note: The order of the files in this list is significant: if more than one field with the
same name is encountered in different files, the first value will take effect and the
subsequent values will be discarded. Put the customized files at the front of the list
so that if later updates are made to the downloaded files, any duplicate fields will not
affect the custom fields you have set.
b. The APP_FILE_PATH should show the binary application file (hmx.ld). If this file
is moved to a subdirectory on the TFTP server, edit this field to specify.
c. Rename this file to be the 12-digit MAC address of the phone (found on a sticker
on the back of the phone), or to 000000000000.cfg as a default.
CHAPTER 15. CONFIGURING H.323 INTERNET TELEPHONY
15-21
4.
Edit Ipmid.cfg to change the SNTP (time server) and the GMT offset parameters, as
follows:
In the TCPAPP field, edit the tcpIpApp.sntp.address field and enter a valid time
server IP address. Also edit the tcpIpApp.sntp.gmtOffset field to reflect the proper
GMT offset for your time zone. This value is listed in seconds.
These are the only files that you need to edit. However, if you need to change the codec used by
the phones when communicating over IP to TeleVantage, or modify the feature key mappings
on the phone, you will need to edit other configuration settings. See “Sample configuration
files” on page 15-29 for samples of each of the configuration files.
Note: Supported codecs are G.711 ALaw and MuLaw, and G.723.1. G729 has not received
extensive testing.
Configuring the Polycom IP phone
The configuration of the Polycom phone can only be done when rebooting the phone, or when
it is first plugged in. To reboot the phone, hold down the buttons labeled Volume-, Volume +,
Hold and Voicemail at the same time for several seconds. These are buttons 8, 10, 11, and 12 on
the diagram on page 15-26.
Note: For TeleVantage, these buttons may be labeled Volume -, Volume +, Take, and
Available.
Just before the phone reboots, press the "Setup" softkey button to enter the setup screens. Use
the arrow buttons on the top right hand corner of the phone to move between fields. To save your
changes to the settings, you must press the Save button before moving to the next field.
When alphanumeric fields (such as TFTP login and TFTP password) are highlighted, you will
see two additional softkeys on the screen which allow you to switch between alphabetic and
numeric characters. To enter a lower case letter, hit the "a->A" key, then use the number keypad
to enter the letters beneath each number. To enter an "a", hit the 2 key once; to enter a "b", hit
the 2 key twice, etc. To enter an upper case letter, hit the "a->A" softkey once again. To enter a
number, hit the "->123" softkey. Use the left and right arrow keys to move within a field.
To save your changes to the settings, you must press the Save button before moving to the next
field.
15-22
ADMINISTERING TELEVANTAGE
Set the following configuration for the Polycom phone:
Setting
DHCP Client
DHCP Timeout
Value
Comments
<Enabled/Disabled>
If DHCP is disabled, the
phone uses a fixed IP
address from the Phone IP
Addr field below. If DHCP is
enabled, the phone receives
information from the DHCP
server in the format
specified below. If using
DHCP be sure that
"Automatically change
address to location of last
log on" is checked in the
user’s external station
settings.
<30>
Number of seconds the
phone waits for secondary
DHCP offer messages
before selecting an offer.
When set to "Default", the
phone will look for vendor
specific option number 66
(string type) in the response
sent from the DHCP server.
The DHCP server must be
configured to send the boot
server address in option 66,
for example, "192.168.0.1".
DHCP Boot
Server
<default/override>
CHAPTER 15. CONFIGURING H.323 INTERNET TELEPHONY
When set to "Override", the
phone will look for the
vendor specific option
number specified by "DHCP
Boot Srv Opt", of type
"DHCP Boot Srv Type", in
the response sent from the
DHCP server. This generally
should not be required
unless the default Boot
Server option is in use for
another purpose on the
network.
15-23
Setting
Value
Comments
<128-254>
Specifies vendor specific
option number for the
response sent from the
DHCP server (if DHCP is
enabled and DHCP Boot
Server set to "Override").
DHCP Boot Svr
Type
<IP Address/String>
Specifies vendor specific
option type for the response
sent from the DHCP server
(if DHCP is enabled and
DHCP Boot Server set to
"Override").
Phone IP Addr
<192.168.1.135>
Fixed IP address assigned
to the phone (if DHCP is
disabled).
Subnet Mask
<255.255.255.0>
Subnet mask of the network
(if DHCP is disabled).
DHCP Boot Svr
Opt
IP address of the H.323
Gateway. Used when SNTP
is obtained from a remote
server.
H.323 Gateway
<192.168.1.136>
IP address of the TFTP
server.
TFTP User
<IPPhoneAccess>
User account to access the
TFTP server for the
configuration files. Using
“anonymous” is not
recommended for security
reasons.
TFTP Password
<IPPhonePassword>
Password for the TFTP user
account.
<192.168.1.136>
IP address of the time
server. This setting enables
the Polycom IP phone to
display the correct time (if
DHCP is disabled).
TFTP Server IP
SNTP Address
15-24
ADMINISTERING TELEVANTAGE
Setting
GMT Offset
Value
Comments
<-5>
Offset in hours from
Greenwich Mean Time (if
DHCP is disabled).You can
find your GMT offset by
looking at the time zone
settings on your computer.
For the eastern United
States, the GMT offset is -5.
Using the Polycom IP phone
The Polycom SoundPoint IP 400 and SoundPoint IP 500 phones have several features that are
valuable to TeleVantage users. The LCD screen, in addition to editing configuration settings,
also provides line appearances and soft keys. When an incoming call is received from
TeleVantage, the screen shows the contact name if the call is recognized as a contact, or Caller
ID information.
To brighten or darken the contrast on the LCD screen, simultaneously hold down the +, -, and 0
keys (buttons 12, 13, and 14 on the diagram on page 15-26) for several seconds. A slider will
appear with a light and dark square on either end; when it does, lift off the keys and then use +
and - to darken and lighten the contrast.
These phones also include a number of feature keys preprogrammed for TeleVantage features.
Your Polycom IP phone may come with keycaps that show functions that do not apply to the
TeleVantage version of the phone. You may want to replace these keycaps with then blank
keycaps that should have also been included with the phone. If you received no blank keycaps,
contact the reseller where you purchased the phone to acquire them.
CHAPTER 15. CONFIGURING H.323 INTERNET TELEPHONY
15-25
The key mappings for TeleVantage are shown beside each key on the following diagram. The
table below shows the functions of all of the key. Some of the keys have been mapped to
TeleVantage telephone commands; the telephone command key sequence is also listed. Check
the diagram carefully for the number corresponding to each key.
Key
number
15-26
Telephone
commands
equivalent
Function
Description
1-6
Screen setup
keys
Move around and
edit setup screens.
N/A
7
Do Not Disturb
Sets the user’s
Personal Status to
Do Not Disturb
612
8
Available
Sets the user’s
Personal Status to
Available
611
9
Flash
Flash hook key
<Flash> or **
ADMINISTERING TELEVANTAGE
Key
number
Telephone
commands
equivalent
Function
Description
10
Take
Press this key before
the Line keys to
toggle between calls
on the phone (Note
that this will put the
call on local hold, but
not TeleVantage
hold.)
N/A
11-12
Volume keys
Adjusts the volume
on the phone
handset or speaker
N/A
13-24
Digit keys
Act as regular DTMF
digit keys
N/A
25-28
Soft keys
Take the function of
the softkey on the
screen directly
above each key
N/A
29
Transfer
Transfer the active
call
<Flash> 1
30
Unhold
Remove the active
call from
TeleVantage hold
<Flash> 4
31
Hold
Place the active call
on TeleVantage hold
<Flash> 7
32
Voicemail
Access the user’s
voicemail
<Flash>
33-35
Line keys
Use with the "Take"
button (button 9) to
N/A
toggle between calls.
36
Park
Place the active call
on TeleVantage Park
(Unpark by hitting
*92)
*66
37
Directory
Hear the
TeleVantage user
directory
*93
CHAPTER 15. CONFIGURING H.323 INTERNET TELEPHONY
15-27
Key
number
38-40
Function
Description
Phone mode
keys
Toggle the phone’s
audio between
handset, speaker,
and headset mode
Telephone
commands
equivalent
N/A
Issues with hold for users of Polycom IP phones
When juggling multiple calls on the Polycom IP phone, a user may use key 10 (labeled "Hold")
and the Line keys to switch between calls. This will place the inactive call on phone hold. In this
state, they will not hear music on hold, and the TeleVantage Call Monitor will not reflect that
they are on hold.
Issues for Administrators of Polycom IP phones
Q Security of the TFTP files on the server. You must protect the files from anonymous
access or the security of your TeleVantage system could be compromised. One method
is to have separate TFTP user accounts (with passwords) per phone. The TFTP user will
only have the ability to see the one folder with the Polycom phone settings, so the other
accounts would be protected.
The individual user .cfg files should have some level of user permission. You should
allow only the individual user and the TFTP server administrator to open the files,
because they contain extensions and passwords.
Q Access. The TFTP server can only be accessed by IP address from the phone and can’t
be accessed by server name.
Contacting Polycom
If you need additional assistance configuring your Polycom IP phone with TeleVantage, contact
your TeleVantage Provider.
For more information about Polycom IP phones, contact Polycom using the following
information:
Polycom Headquarters
1565 Barber Lane
Milpitas, CA 95035
USA
1.800.POLYCOM ext. 6973
or 408.526.9000 ext. 6973
[email protected]
15-28
ADMINISTERING TELEVANTAGE
Sample configuration files
This section contains sample Polycom IP phone configuration files.
<MACid>.cfg
This master configuration file should be renamed to reflect the 12-digit MAC address of your
Polycom IP phone. (Find the MAC address on a label on the back of the phone, or by reading
the ENet field visible while pressing and holding the "About" softkey button). If the phone does
not find a file that matches its MAC address, it will look for a file called 000000000000.cfg.
You will have one such file for each Polycom IP phone, and it must reside in the default
directory of the TFTP server for the phone’s specified TFTP login. This file references in the
CONFIG_FILES field the actual filenames for the user’s configuration files. Subdirectories may
be specified for the configuration files (for example, IPUser1/IPUser1.cfg). The maximum
length of the string that makes up this value is 511 characters, including commas and white
space. This file also defines the location of the hmx.ld file in the APP_FILE_PATH field, which
can also include path information and is restricted to 127 characters.
Field
Value
APP_FILE_PATH
hmx.ld
CONFIG_FILES
IPUser202.cfg, TVIP1.cfg,
func.cfg, ipmid.cfg
<UserFile>.cfg
This file should be renamed to represent the user (and the name should match the
CONFIG_FILES field of the <MACid>.cfg file). The sample download file is called
IPUser202.cfg.
You will have one such file for each Polycom IP phone, which references in the plar.log.string
the login string for that user, "*<extension>*<password>*".
The genDesc.name field will be the string that shows in the phone’s LCD screen. It is also used
as Caller ID when you call into a TeleVantage server, so internal users will see this string in the
Number field of their Call Monitor (along with the phone’s IP address). The genDesc.E164addr
field is the address of the phone; enter the TeleVantage extension of the user. This will also show
on the LCD screen of the IP phone after the name, for example, "IPUser (202)".
Folder
Field
Value
gendesc.name
IP User
genDesc.E164addr
202
plar.log.string
*202*202*
GENDESC
Feature
CHAPTER 15. CONFIGURING H.323 INTERNET TELEPHONY
15-29
<ServerIP>.cfg
This file should be renamed to represent the IP trunk (and the name should match the
CONFIG_FILES field of the <MACid>.cfg file). The sample download file is called TVIP1.cfg.
You will have one such file for each separate IP trunk IP address (for example, if you had two
Internet telephony boards with their own IP addresses, you would have 2 files). Each file
references in the feature.plar.address field the IP address for that IP board.
Note: If you would like to remap some of the function keys on the Polycom IP phones, use the
key map fields. Remapped keys are not supported by Vertical.
Folder
Field
Value
key.map.37
1,*93
key.map.36
1,*66
key.map.32
1,**
key.map.31
1,**7
key.map.30
1,*4
key.map.29
1,**1
key.map.9
1,**
key.map.8
1,**611
key.map.7
1,**612
feature.plar.address
192.168.1.100
feature.autoanswer
0
MAPS
FEATURES
Ipmid.cfg
The ipmid.cfg file contains many settings for the Polycom IP phone. It is recommended that you
do not modify this file, except for changing the SNTP address and GMT offset. The only settings
that may need to be modified are the CODECS fields (under the VOICE folder); the order
should match the order of codecs used by TeleVantage. G.711 and G.723 are the codecs
supported by TeleVantage and the Polycom IP phones. Use G.711 is a higher quality
transmission but will utilize more bandwidth on your network; G.723 is a lower bandwidth,
lower quality codec.
Note: Do not use codec G.729. It is not supported.
15-30
ADMINISTERING TELEVANTAGE
This file also contains settings which specify the level of logging that is done by the phone. The
phone maintains information about its functioning and can upload this information to the TFTP
server to assist when diagnosing problems. Vertical or Polycom Technical Support may direct
you to modify the level of logging provided by the phone when troubleshooting; only modify
these settings under the direction of Vertical or Polycom Technical Support.
Folder
Field
Value
voice.audioProfile.1.rt
pPayload
G711Mu
voice.audioProfile.1.p
ayloadSize
160
voice.audioProfile.2.rt
pPayload
G711A
voice.audioProfile.2.p
ayloadSize
160
voice.audioProfile.3.rt
pPayload
G723
voice.audioProfile.3.p
ayloadSize
1
VOICE
CODECS
Func.cfg
The func.cfg file contains a small number of VoIP protocol parameters. It is never necessary to
modify this file for use with TeleVantage.
Troubleshooting a Polycom IP phone
If you can place a call to a Polycom IP phone, but not place a call from or hear dial tone on the
phone, or if you hear a quick burst of dial tone but then silence, the PLAR login is not working
for some reason. Do the following:
Q Verify the login string. Make sure the login string specified in the <UserFile>.cfg file
is a valid one, and using the correct password. To test, dial the login string from a station
phone (using # characters instead of *) and make sure you log in as the correct user.
Q Recheck the MAC address. Make sure the <MACid>.cfg file is named with the proper
MAC address. An easy way to confirm the MAC address is to press and hold the "Setup"
softkey button (and read the ENet address). It may also be on a sticker on the back of the
phone.
Copy the <MACid>.cfg file with the name 000000000000.cfg. This will be read by
default by any phone when it does not find a file with its MAC address.
CHAPTER 15. CONFIGURING H.323 INTERNET TELEPHONY
15-31
Update the timestamp on the <MACid>.cfg file to force it to be reread when the phone
is rebooted.
Q Confirm the name and accessibility of each of the files on the TFTP server. Make
sure the <MACid>.cfg references the correct files, and that the files exist in the directory
named in this file.
Make sure that the files can all be accessed via TFTP with the TFTP user and password
you specified on the Polycom IP phone setup screen. Test this with an TFTP utility (for
example, typing TFTP at a command prompt).
To test your user privileges, change the login screen to temporarily use the administrator
login and password. (This user should have access to all files.)
If you are using subdirectories to store the configuration files, make sure all
subdirectories referenced in the <MACid>.cfg file are accessible.
Q Validate the file formatting. If you have used Wordpad or another text editor to edit
your configuration files, they may have lost their formatting. Make sure they can be read
by an XML editor such as XML Notepad (downloadable from msn.Microsoft.com). If
not, start again with fresh configuration files.
Configuring a PBX-IP Media Gateway for TeleVantage___________
TeleVantage supports the Intel NetStructure PBX-IP Media Gateway, a device that connects to
your LAN and enables up to 8 digital IP phones. TeleVantage supports both the 2-wire and
4-wire versions of the Media Gateway, enabling you to use either 2-wire or 4-wire Avaya digital
phones. The following digital phones are supported:
Q Avaya 4406D+
Q Avaya 4412D+
Q Avaya 4425D+
Before configuring a Gateway for use with TeleVantage, install the Gateway device on your
LAN and attach up to 8 digital IP phones. Refer to your PBX-IP Media Gateway documentation
for instructions. Make a note of the Gateway device’s IP address.
Configuring the PBX-IP Media Gateway device for use with
TeleVantage
To use a PBX-IP Media Gateway phone with TeleVantage, you must configure it through the
Gateway device as follows:
1.
The first step is to add a temporary route to the PC that you are using to access the
Gateway. From the Windows Start menu choose Start > Run, type cmd in the Run
dialog box, and click OK. When the DOS window appears, type the following
command:
route add 10.12.13.74 <PC Adapter IP>
For example, if your PC's IP address is 198.1.3.25, then the command executed would
15-32
ADMINISTERING TELEVANTAGE
be:
route add 10.12.13.74 198.1.3.25
2.
Point your web browser to the IP address of the Gateway device on your LAN. By
default it is:
http://10.12.13.74
3.
At the logon page, enter a valid username and password. By default the username is
admin and the password is IpodAdmin (both are case-sensitive).
4.
Select IP on the navigation bar to go to the IP page. Make sure that Subnet Mask is set
to the correct Subnet Mask for your TeleVantage Server. The Default Network
Gateway Address setting is not necessary, and can be set to 0.0.0.0 unless the PBX-IP
Media Gateway device will be connecting to another subnet.
5.
Select System on the navigation bar to go to the System page. From the Operating
Mode dropdown list select "H.323 Driving." Under PBX Type select "Magix." Make
sure that PCM Coding is set to "uLaw."
6.
Select Phone on the navigation bar to go to the Phone page. Assign the appropriate
phone set types and Gateway extensions to the ports of the Gateway device. Because
the Gateway extension displays on the phone, it’s best to assign a Gateway extension
that matches the TeleVantage extension of the Gateway phone’s user. For example, if
Rob Smith’s Gateway phone is attached to Port 1, and his TeleVantage extension is
215, then assign Port 1 a Gateway extension of 215.
7.
Select H.323 on the navigation bar to go to the H.323 page. Make sure that Gatekeeper
Mode is set to "Proxy." In the Proxy IP Address field, enter the IP address of the
TeleVantage Server’s Internet telephony board.
8.
Select Import/Export on the navigation bar to go to the Import/Export page. Click
Export Settings and export the settings to a configuration text file.
9.
Leaving the Import/Export page open in the browser window, open the exported
configuration text file in a text editor such as Microsoft Notepad. Make the following
changes there (do not enter the periods at the end of the following lines):
Q Find the line "; External Call Control Mode Login Sequence". For all ports set
"telPhdExtSeqLogin" to *.
Q Find the line "; External Call Control Mode Transfer Sequence". For all ports
set "telPhdExtSeqTrans" to **1.
Q Find the line "; External Call Control Mode Conference Sequence". For all
ports set "telPhdExtSeqConf" to **.
Q Find the line "; External Call Control Mode Redial Sequence". For all ports
set "telPhdExtSeqRedial" to *66.
When your edits are complete, save the modified file.
10. On the Import/Export page, click Browse, select the saved file, then click Import
Settings.
CHAPTER 15. CONFIGURING H.323 INTERNET TELEPHONY
15-33
Using a PBX-IP Media Gateway phone with TeleVantage
Once the PBX-IP Media Gateway is properly configured as described in the previous sections,
a Gateway phone user can use his or her phone as follows:
Q The user can pick up the phone to place a call or use the TeleVantage telephone
commands, as with any phone. The dial tone that sounds is TeleVantage’s internal dial
tone.
Q Incoming calls are routed by TeleVantage to the user’s Gateway phone.
Q Pressing the Hold button on the Gateway phone during an active call puts the other party
on standard TeleVantage hold, with the appropriate music-on-hold.
Q The message-waiting light on the Gateway phone lights up when there are unheard voice
messages in the user's Inbox.
Dialing a PBX-IP Media Gateway phone directly
In addition to dialing a PBX-IP Media Gateway phone user’s extension at a dial tone or an auto
attendant, callers can dial the user’s Gateway phone directly by dialing the following:
<the PBX-IP Media Gateway device’s IP address> * <the PBX-IP Media Gateway phone’s
extension>.
For example, if the Gateway device’s IP address is 222.99.14.96, and the Gateway extension of
the user’s phone is 123, callers would dial 222*99*14*96*123.
Using H.323 terminals with TeleVantage ______________________
The following sections describe integrating TeleVantage with H.323 VoIP devices.
Using NetMeeting or any H.323 terminal as an IP phone
You can set up a Microsoft NetMeeting or any other H.323 application as an
TeleVantage-integrated IP phone by defining it as an external station.
To do so:
1.
Create external stations and assign one to the H.323 terminal user, as described in
“Using external stations” on page 7-8.
2.
On the Phone tab of the User dialog box, use the Destination field to select “Generic
H.323 Device.” Enter the IP address of the H.323 terminal in Address. See
“Configuring a user’s external station” on page 7-10 for full instructions.
For instructions on using an external station IP phone, see “Using external stations” on page 7-8
and Chapter 6 of Using TeleVantage. For a list of supported IP phones, see Installing
TeleVantage.
15-34
ADMINISTERING TELEVANTAGE
Placing calls to H.323 terminals such as NetMeeting
You can use TeleVantage to place and receive IP calls from H.323-based terminals like
Microsoft NetMeeting, a real-time conferencing and collaboration tool. The figure under
“Placing calls to NetMeeting from TeleVantage ViewPoint” on page 15-35 shows how the
process of making TeleVantage-to- NetMeeting calls works.
After you have installed the proper Internet telephony hardware (see Installing Intel Telephony
Components), configured an Internet Address dialing service, and assigned it an access code,
users can place calls to H.323 terminals such as NetMeeting from ViewPoint or using the phone.
Note: Users who call NetMeeting terminals might hear an echo on the line. To avoid the echo,
the NetMeeting user must use an echo-cancelling microphone.
NetMeeting is included with Windows 2000 or later. To download NetMeeting for other
operating systems:
1.
Go to www.microsoft.com/downloads.
2.
Select NetMeeting from the top list, select your operating system from the bottom list,
and then click Find It!
To allow TeleVantage users to place calls to Microsoft NetMeeting or other H.323
terminals
1.
In the TeleVantage Administrator, create an Internet Address dialing service (see
“Adding a dialing service” on page 9-9).
2.
Assign the service a name and an access code, for example, “Internet” and “71”.
Placing calls to NetMeeting from TeleVantage ViewPoint
Users can place Internet calls from anywhere in ViewPoint that allows them to enter phone
numbers. For example, users can place Internet calls from the Place Call To dialog box, when
they are adding a contact or adding a routing list action or when forwarding their calls. Users
select an Internet Address dialing service and then enter the IP address or DNS host name of the
computer that is running NetMeeting.
For example, if a user enters either namemycomputer.mycompany.com or 123.45.67.89 in the
Name/Address field of the Forward To tab of the Call Forwarding dialog box, calls will be
forwarded to NetMeeting at the specified location (see the next figure).
Note: If you use a name, such as namemycomputer.mycompany.com, instead of an IP address,
DNS must be properly configured on this PC, or else the name cannot be resolved to an IP
address and the call will fail.
CHAPTER 15. CONFIGURING H.323 INTERNET TELEPHONY
15-35
Placing calls to NetMeeting from a TeleVantage phone
Users can place calls to PCs running NetMeeting from any TeleVantage phone by dialing the
access code followed by the IP address of the computer running NetMeeting.
IP addresses are dialed with each part of the IP address separated by an asterisk (*). For example,
dialing 71 123*45*67*89 calls the computer running NetMeeting at the IP address
123.45.67.89, where 71 is the access code of the TeleVantage Internet dialing service.
Calling TeleVantage from H.323 terminals such as NetMeeting
Depending on how your TeleVantage Internet span and company firewall is configured,
TeleVantage can receive calls from any H.323 terminal such as NetMeeting.
To receive calls from an H.323 terminal such as NetMeeting
15-36
1.
Configure your firewall to allow access to the IP address of one or more TeleVantage
Internet spans.
2.
In the TeleVantage Administrator, edit the TeleVantage Internet span to allow
incoming calls.
3.
Optionally, do one of the following:
ADMINISTERING TELEVANTAGE
Q Send Internet calls to the desired user, auto attendant, or IVR Plug-in.
Q Assign DID numbers to any user, auto attendant, or IVR Plug-in that you want to
allow H.323 terminals to call directly.
Note: For the purpose of receiving Internet calls, you can give users DID numbers in
TeleVantage only. You do not need to order DID service from your telephone company.
Internet trunks behave almost identically to regular trunks, and provide inbound Caller ID and
direct inward dialing (DID). Internet calls are routed and processed just like regular calls to
ACD workgroups, routing lists, and so forth.
Note that the name of the TeleVantage system is displayed when NetMeeting calls TeleVantage.
To change the name, edit the following registry key:
HKLM\Software\Artisoft\TeleVantage\Company
Calling a TeleVantage Server from NetMeeting
To call a TeleVantage Server from NetMeeting, enter the IP address or DNS name of the
TeleVantage Internet span. This is the IP address assigned to the Ethernet interface on the
Internet telephony board. Callers with NetMeeting 3.0 or later can navigate TeleVantage using
NetMeeting’s built-in touch tone keypad.
Calling a TeleVantage DID number from NetMeeting
If you configure NetMeeting to use a TeleVantage Server as a gateway, TeleVantage interprets
numbers dialed by NetMeeting as DID. Therefore, NetMeeting users can call any TeleVantage
user, auto attendant, ACD workgroup, or IVR Plug-in with a DID number.
CHAPTER 15. CONFIGURING H.323 INTERNET TELEPHONY
15-37
To configure NetMeeting to use a TeleVantage Server as a gateway
1.
Start NetMeeting.
2.
Select Tools > Options.
3.
Click Advanced Calling Options to open the Advanced Calling Options dialog box.
4.
Check Use an H.323 Gateway to call telephones and video conferencing systems.
5.
Enter the IP address or DNS name of the TeleVantage span, for example,
123.45.67.89 or myiplinkaddress.mycompany.com.
6.
Click OK.
Any numbers entered in NetMeeting now are sent to TeleVantage as DID. For example, placing
a call to 1234 in NetMeeting will call the TeleVantage auto attendant, user, or IVR Plug-in that
has a DID of 1234.
Using Windows Phone Dialer as an H.323 terminal
A standard installation of Windows 2000 or later includes Phone Dialer, which has H.323
capabilities similar to those of NetMeeting. Phone Dialer allows you to make voice calls from
your computer.
To make a voice call, all you need is the recipient’s IP address or DNS (Domain Name System)
name. The active call window has buttons that let you access a keypad to manually dial numbers.
To receive calls, you must have Phone Dialer running. When you make or receive a call, a dialog
box opens.
Enhancing a Web page with a “Call Us!” button
By using a CallTo: URL on your Web page, any Internet user with NetMeeting installed can
click on a “Call Us!” link on your Web page to place a call to any TeleVantage DID number. If
you assign a DID number to a TeleVantage ACD workgroup user or queue, you can send
Internet users directly into your ACD workgroup or queue for processing by an agent.
Note: The CallTo: tag is supported in Internet Explorer but is not supported in Netscape version
4.7.
For example, you can insert the following CallTo: tag on your Web page:
<A HREF="callto:600+gateway=123.45.67.89+type=phone”>Call Us!</A>
When a user with NetMeeting installed clicks the Call Us! link, NetMeeting starts and calls the
TeleVantage user who has a DID of “600” using the TeleVantage Internet span with an IP
address of 123.45.67.89.
Note: On your Web page, it is a good idea to include a link to the NetMeeting download page
for those users who do not have NetMeeting installed (www.microsoft.com/downloads).
15-38
ADMINISTERING TELEVANTAGE
Connecting two Servers using H.323 Gateways _______________
H.323 Gateways enable you to connect two TeleVantage Servers over the Internet or a private
IP network (sometimes called an IP tie-line connection). Doing this allows users on one
TeleVantage Server to make calls as if they were on the other TeleVantage Server.
When two TeleVantage Servers are properly configured, users can do the following:
Q Place calls to extensions on the remote Server. In addition to calling extensions, users
can dial # to log in and check remote voice mailboxes, or dial 411 for the remote Server’s
dial-by-name directory.
Q Place external phone calls through the remote Server. Users can call remote phone
numbers as if they were local phone numbers, such as calling directory assistance in
another city.
Q Place outbound Centrex/PBX calls through the remote Server. Users can dial remote
Centrex/PBX extensions as if they were local, such as extensions on a legacy PBX
system connected to the remote Server.
Q Unify two Servers into a single user environment. By creating users of the type H.323
Gateway user on each TeleVantage Server, you can make all users appear to be on the
same TeleVantage Server. Users on each TeleVantage Server can dial each other
directly or select extensions for call forwarding and routing lists regardless of whether
they are local (of the user type User) or remote. Local and remote users appear together
in ViewPoint’s Extensions view, in the Place Call To dialog box, and other lists of
extensions.
Placing calls involving a remote TeleVantage Server
To make an H.323 Gateway call, users must choose the appropriate dialing service when placing
the call, either by dialing the access code over the phone or by selecting it in ViewPoint. See
“Creating H.323 Gateway dialing services” on page 15-44.
By creating users of the type H.323 Gateway, you can also enable users to dial remote
extensions directly, without dialing an access code, or to place calls to remote extensions from
ViewPoint. See “Creating H.323 Gateway users to unify two TeleVantage Servers” on
page 15-45.
Receiving Internet calls from a remote TeleVantage Server
Incoming calls from a remote TeleVantage Server appear in ViewPoint as if they were local
calls. For example, Caller ID name and number are delivered just as they are for regular internal
or external calls, which allows users to identify and call back remote users easily.
Codec use with H.323 Gateway connections
When you connect two TeleVantage Servers over an H.323 Gateway connection, be sure that
the Servers use the same codec lists. If they do not, audio failure can occur during calls. See
“Modifying H.323 span codecs” on page 15-8 for more information.
CHAPTER 15. CONFIGURING H.323 INTERNET TELEPHONY
15-39
Overview of creating an H.323 Gateway connection
Note: The TeleVantage Enterprise Manager Add-on automates the configuration and
maintenance of H.323 Gateways and H.323 Gateway users. The following steps need not be
performed if you have TeleVantage Enterprise Manager.
Setting up an H.323 Gateway connection involves the following steps. It is important to do them
in the correct order:
1.
On each Server, create an H.323 Gateway that points to the other Server. See “Creating
an H.323 Gateway” on page 15-41.
2.
On each Server, create one or more H.323 Gateway dialing services to cover the types
of Internet calling you want to perform. See “Creating H.323 Gateway dialing
services” on page 15-44.
3.
To unify two Servers so that all users appear to be local users, create an H.323
Gateway user for each remote extension. See “Creating H.323 Gateway users to unify
two TeleVantage Servers” on page 15-45.
Using the H.323 Gateway Configuration Worksheet
Appendix B of this manual provides a worksheet to help you set up multiple TeleVantage
Servers for an H.323 Gateway connection. Use the H.323 Gateway Configuration Worksheet to
help plan consistent access codes for dialing services and avoid conflicts such as overlapping
extensions or passwords.
Illustration of an H.323 Gateway
The following figure illustrates TeleVantage Servers in London and Boston that are connected
using an H.323 Gateway.
In the top of the figure, the administrator at the Boston Server set up an Internet-to-Phone
Number dialing service with an access code of 71. The London Server has a Phone Number
dialing service. Users in Boston can now dial phone numbers in London by dialing 71 followed
by the phone number.
15-40
ADMINISTERING TELEVANTAGE
In the bottom of the figure, the administrator at the London Server set up an
Internet-to-Centrex/PBX Extension dialing service—configured to connect to the Boston
Server’s internal dial tone, and Gateway users, one for each user on the Boston Server. Users in
London can now dial the extensions of users in Boston directly.
To establish the connection, each administrator creates an H.323 Gateway that points to the
other Server. The administrator can use the H.323 Gateway on the local Server to control dialing
permissions for incoming calls. For example, the London administrator can prevent Boston
users from making long-distance calls through the London Server by changing the dialing
permissions of the Boston H.323 Gateway.
You can think about TeleVantage H.323 Gateways as an authentication mechanism similar to a
Windows Domain trust relationship. These relationships allow users on one Server to place calls
on a remote Server without having a user account on the remote Server.
Creating an H.323 Gateway
To connect two TeleVantage Servers over H.323 Gateways, administrators on each Server must
create an H.323 Gateway that points to the other Server. For example, on an H.323 Gateway
connection between Boston and London, the Boston Server has an H.323 Gateway called
“London,” and the London Server has an H.323 Gateway called “Boston.” Each H.323 Gateway
has an extension and password that the other H.323 Gateway uses to log in when connecting
H.323 Gateway calls.
The H.323 Gateway’s extension is not meant to be dialed directly. It does not appear in
ViewPoint or the dial-by-name directory, and calls to that extension do not go through. The
extension is used behind the scenes only to let remote Servers connect.
You can use the H.323 Gateway to control remote users’ dialing permissions when placing calls
through your Server. For example, if you are the administrator of the London Server, and you
want to prevent Boston users from placing long-distance calls through your Server, you can edit
the dialing permissions of the H.323 Gateway “Boston.”
Each remote TeleVantage Server to which you connect over the Internet requires a separate
H.323 Gateway. For example, if your Server connects to Servers in London and Chicago, you
must create two H.323 Gateways—“London” and “Chicago.”
CHAPTER 15. CONFIGURING H.323 INTERNET TELEPHONY
15-41
The H.323 Gateways view
To add, edit, and delete H.323 Gateways, click the H.323 Gateways button in the view bar to
open the H.323 Gateways view:
Each of your H.323 Gateways is shown as a line in the view. The following table shows the
information that is displayed for each H.323 Gateway.
Column
Description
Name
Name of the local H.323 Gateway, usually the
name of the remote Server’s location or the name
of the remote Server computer itself.
Extension
Extension of the H.323 Gateway on the local
Server, used by H.323 Gateways on remote
Servers to log on when connecting IP calls.
Password
Password of the H.323 Gateway on the local
Server, used by H.323 Gateways on remote
Servers to log on when connecting IP calls.
Remote Address
IP address or hostname of the remote Server.
Remote
Extension
Extension of the H.323 Gateway on the remote
Server, used by the local Server to log on when
connecting IP calls.
Remote
Password
Password of the H.323 Gateway on the remote
Server, used by the local Server to log on when
connecting IP calls.
Comments
Any comments pertaining to the remote Server.
Double-click an H.323 Gateway in the view to see its properties.
15-42
ADMINISTERING TELEVANTAGE
Creating an H.323 Gateway
The following procedure uses an H.323 Gateway created on a Boston Server that connects to a
remote London Server as an example.
To create and set up an H.323 Gateway
1.
Have the following information ready:
Q The Internet address of the remote Server
Q The extension and password of the H.323 Gateway on the remote Server
2.
Choose File > New > H.323 Gateway.
3.
Enter a Name for the H.323 Gateway. Typically the name describes the remote
Server’s location, for example, “London.”
4.
Assign the H.323 Gateway a unique extension. The extension is not meant to be dialed,
and does not appear in ViewPoint or the dial-by-name directory. Calls to the extension
will not be connected. The H.323 Gateway’s extension is used behind the scenes to
connect to the remote Server to complete H.323 Gateway calls.
5.
Enter a Password for the H.323 Gateway.
6.
Add Comments to further identify the H.323 Gateway.
7.
Under Operator, select the extension to which callers using this H.323 Gateway are
transferred when they press 0 from within the local system. For example, a user on the
remote Server might call a user on this Server using this Gateway, and press 0 while
in the local user’s voice mailbox.
CHAPTER 15. CONFIGURING H.323 INTERNET TELEPHONY
15-43
8.
Under Telephone prompts, select the language of the telephone commands as heard
by users on the remote Server who log on to the local system using this H.323
Gateway.
9.
Under Remote, specify the following information about the remote Server:
Q Remote Server’s IP address. Enter the IP address in the format nnn.nnn.nnn.nnn.
You can also enter the DNS name.
Q Remote H.323 Gateway’s extension. Enter the extension of the H.323 Gateway
on the remote Server that points to this Server.
Q Remote H.323 Gateway’s password. Enter the password of the H.323 Gateway
on the remote Server that points to this Server.
10. On the Permissions tab, do the following:
Q Under Allow external calls, specify which type of calls are allowed through this
H.323 Gateway.
Q Under Dialing permissions, assign dialing permissions that limit the types of calls
that can be made by remote users who make calls through this H.323 Gateway. For
example, you might edit the local H.323 Gateway’s permissions to prevent London
users from making unrestricted long-distance calls from London. See “The Security
\ Dialing Permissions tab” on page 6-33.
11. Click OK.
Important: The administrator on the remote Server needs to know the extension and password
of your H.323 Gateway in order to correctly configure the H.323 Gateway on the remote Server.
Creating H.323 Gateway dialing services
To use an H.323 Gateway connection, you must create at least one dialing service of the
Internet-to-Phone Number or Internet-to-Centrex/PBX Extension type. To create a dialing
service for H.323 Gateway use, do the following:
1.
Refer to the table in this section to determine the type of dialing service you must
create.
2.
See “Adding a dialing service” on page 9-9 for complete instructions on creating the
dialing service.
Note: Before creating an H.323 Gateway dialing service, make sure you have created an H.323
Gateway that points to the remote Server. See “Creating an H.323 Gateway” on page 15-41.
15-44
ADMINISTERING TELEVANTAGE
The type of dialing service you must create depends on the type of H.323 Gateway calling you
want to do, as described in the following table.
Type of calling
Dialing service needed
Special instructions
Calling TeleVantage
extensions on the remote
Server
Internet-to-Centrex
On the General tab, select
Remote Server’s internal
dial tone
Placing phone calls through
the remote Server
Internet-to-Phone Number
Placing Centrex/PBX calls
through the remote Server
Internet-to-Centrex/PBX
Extension
On the General tab, select
Remote Server’s
Centrex/PBX service
access code.
For each remote Server, you must create a separate dialing service for each type of H.323
Gateway calling you want to perform.
Troubleshooting Internet-to-Phone Number dialing services
If, when dialing out over an Internet-to-Phone-Number dialing service, you have problems
sending digits to external phone systems, try increasing the DTMF Gain and DTMF On-time
parameters in your Internet span’s Tuning tab.
Creating H.323 Gateway users to unify two TeleVantage Servers
H.323 Gateway users are a way to unify the users on two TeleVantage Servers connected by an
H.323 Gateway, so that all users display and function as if they were local. Once you create
Gateway users, users on each Server can:
Q Dial any user’s extension directly, without an access code.
Q See local users and remote users listed together in ViewPoint’s Extensions view, Place
Call To dialog box, and all other places where a list of users appears.
Q Select any user when placing a call, transferring a call, or creating a conference call.
Q Search for any user in the dial-by-name directory.
Q Forward calls to any extension, or include any extension in a routing list.
By connecting two Servers over a private IP network and unifying them with H.323 Gateway
users, you can effectively double the number of stations your TeleVantage system supports.
Overview of H.323 Gateway users
An H.323 Gateway user is a special type of user that you create to mirror a user on the remote
Server. For each user on the remote Server, you create an H.323 Gateway user on the local
Server. For example, if the remote Server has a user named Pete Storpin, you would create a user
of the type H.323 Gateway named Pete Storpin on the local Server that points to the remote user.
CHAPTER 15. CONFIGURING H.323 INTERNET TELEPHONY
15-45
The administrator on the remote Server performs the same action, creating an H.323 Gateway
user on the remote Server to mirror each normal user on your Server.
When a user dials an H.323 Gateway user’s extension, behind the scenes the H.323 Gateway
user automatically forwards the call over your Server’s Internet-to-Centrex/PBX Extension
dialing service to the matching user on the remote Server.
Before creating H.323 Gateway users
To create an H.323 Gateway user, you must have already done the following on each Server:
Q Created an H.323 Gateway to point to the remote Server. See “Creating an H.323
Gateway” on page 15-41.
Q Created an Internet-to-Centrex/PBX Extension dialing service that connects to the
remote Server’s internal dial tone. See “Adding a dialing service” on page 9-9.
Q Made sure that no extensions on one Server conflict with extensions on the other. To
avoid conflicts, you can have all the extensions on one Server begin with 1, while all the
extensions on the other Server begin with 2.
The H.323 Gateway Configuration Worksheet in Appendix B can help you plan your H.323
Gateway connection so that no conflicts occur.
To create an H.323 Gateway user
15-46
1.
In the Users view, choose Users > New User. The User dialog box opens.
2.
Under Type, select H.323 Gateway user.
ADMINISTERING TELEVANTAGE
3.
At the bottom of the dialog box, under H.323 Gateway, select the H.323 Gateway that
points to the remote Server on which this user resides. To create a new H.323 Gateway,
click the IP Gateway button.
4.
Make sure that the H.323 Gateway user’s Extension matches the user’s extension on
the remote Server. This field is the only field that must be identical to the remote user’s
setup. However, to reduce confusion, it is recommended that you use the same First
Name and Last Name on both Servers.
5.
Click the Call Handling tab, then click Call Forwarding. Click To another number.
Under Call using, select the Internet-to-Centrex dialing service with which you
connect to the remote Server. Under Number, enter the extension of the user on the
remote Server.
To economize trunk usage on calls sent between two or more Servers, check Attempt
Centrex/PBX Transfer. For more information, see “Forwarding calls over
Centrex/PBX trunks” on page 7-19.
6.
Enter the rest of the user information, which governs how the H.323 Gateway user
behaves on the local Server. For complete instructions on adding users, see “About
adding users” on page 6-2.
7.
Click OK.
Using Contact PINs with H.323 Gateway users
When a contact employs a Contact PIN to dial an H.323 Gateway user, the Contact PIN is lost
when the call is transferred to the actual user on the other Server. The contact might then appear
in the Call Monitor as an unknown caller.
To make sure that Contact PINs are recognized in all cases, users must duplicate their contacts
on the other Server. For example, if Pete Storpin has defined his wife as a contact with a PIN of
55, he must log in to his H.323 Gateway user account on the remote Server and define his wife
again, using the same PIN of 55.
Note: The first time a user receives a Contact PIN call over the H.323 Gateway connection, the
user must associate the call with the contact. Then the contact will be recognized on subsequent
calls.
An easy way to duplicate contacts is to export them from the local Server’s account and import
them to the remote Server’s H.323 Gateway user account. For a full description of Contact PINs
and instructions on exporting and importing contacts, see Using TeleVantage.
H.323 Gateway users and call center queues
If an H.323 Gateway user is added to a call center queue, by default the corresponding user on
the remote Server does not have access to the call center personal statuses (Available Queue
Only, Available Non Queue, and On Break). To give the user access to those statuses, do the
following:
CHAPTER 15. CONFIGURING H.323 INTERNET TELEPHONY
15-47
1.
Edit the full user (not the H.323 Gateway user) in the Administrator to open the User
dialog box, and click the Queue tab.
2.
Check Show queue-related personal statuses.
3.
Click OK.
For more information about call center queues, see the TeleVantage Call Center Administrator’s
Guide.
Enabling call path replacement to economize trunk use
TeleVantage can perform call path replacement on calls transferred or forwarded between
Servers, so as to economize trunk use. For example, if a call starts on Server A, goes to Server
B, and is forwarded to Server C, TeleVantage automatically simplifies the path to a direct
connection between Server A and Server C, thus saving trunk usage on Server B.
To enable call path replacement, make sure that each H.323 Gateway user has the Attempt
Centrex/PBX transfer field checked in their call forwarding settings. The field is checked by
default for H.323 Gateway users.
Receiving Caller ID from third-party H.323 gateways ____________
This section applies when connecting third party H.323 gateways to TeleVantage. It does not
apply when connecting two TeleVantage Servers using H.323 Gateways.
If you use a third-party H.323 gateway, such as a Cisco AS5300/Voice Gateway, to send H.323
calls to TeleVantage, by default the recipient of the call sees the third-party gateway’s IP address
rather than the caller’s original PSTN Caller ID. You can set TeleVantage to propagate the
original Caller ID information as received by the third-party H.323 gateway, as follows:
1.
Choose Tools > System Settings. The System Setting dialog box opens.
2.
Choose the Server \ External H.323 Gateways tab.
3.
Identify one or more third-party H.323 gateways from which TeleVantage should
propagate Caller ID information. You can do so by filling out either or both of the
following fields:
Q Gateway product ID list. Enter the Product ID of the third-party H.323 gateway.
Separate multiple entries with either commas or semicolons.
Q Gateway IP address list. Enter the IP address of the third-party H.323 gateway.
Separate multiple entries with either commas or semicolons.
4.
15-48
Click OK.
ADMINISTERING TELEVANTAGE
On calls from the identified third-party H.323 gateways, TeleVantage will propagate original
PSTN Caller ID information.
CHAPTER 15. CONFIGURING H.323 INTERNET TELEPHONY
15-49
APPENDIX A
APPENDIX A
COMMAND LINE OPTIONS
Starting TeleVantage from the command line
You can use optional command line arguments to log on to the TeleVantage Administrator or
ViewPoint using the Run command of the Start menu, from within an application, or from a
Desktop shortcut such as:
"C:\Program Files\TeleVantage\Test Admin\TVAdmin.exe" /Server=TVTest
/station=17
Use the command line options shown in this section when logging on.
Command line options
/Server=<Server name>
Name of the TeleVantage Server on your network that you want to log
on to. Useful for running ViewPoint or the Administrator against a test
Server.
If you do not use this option, TeleVantage logs you in using the name of
the TeleVantage Server stored in the Windows registry, set when you
install TeleVantage.
/station=<station number>
Station ID assigned for this session.
If you do not use this option, TeleVantage logs you on using the station
number stored in the Windows registry, set when you install
TeleVantage.
/allowmultiple
Allows more than one Administrator or ViewPoint to run simultaneously
on a machine. If you do not use this option, TeleVantage allows one
instance of the Administrator or ViewPoint to run on a machine.
/user=<user name>
User name under which you want to log on.
If you do not use this option, the Administrator or ViewPoint prompts
you for your user name at startup.
/password=<password>
Password for the user account you use to log on.
If you do not use this option, the Administrator or ViewPoint prompts
you for your password at startup.
Command line options
/backup
Administrator only. Performs an immediate online backup of the
TeleVantage database using the current System Settings, and then exits
the Administrator when the backup is complete. See “Backing up
TeleVantage” on page 12-53.
/restore
Administrator only. Performs the same function as choosing Tools >
Restore Database (see “Restoring TeleVantage data” on page 12-54).
You can see any error results in a file by issuing the following command:
TVAdmin.exe /restore > Restore.txt
Note that TeleVantage Server registry settings (which are backed up to
the file TVServer.reg) are not restored when you use this switch. Be sure
to restore this file by opening it.
/sentence
Administrator only. Enables the Tools menu selection Test Sentences,
which allows you to listen to system prompts in context over your
telephone. See “Testing system prompts” on page 13-11.
A-2
ADMINISTERING TELEVANTAGE
APPENDIX B
APPENDIX B
H.323 GATEWAY CONFIGURATION
WORKSHEET
This appendix provides a worksheet to help you create a unified dialing plan before connecting
TeleVantage Servers over H.323 Gateway connections. By using this worksheet, you can avoid
conflicts between connected Servers, such as overlapping extensions or auto attendant numbers.
You can also plan consistent access codes for dialing services.
For complete information about H.323 Gateways, see “Connecting two Servers using H.323
Gateways” on page 15-39.
Two worksheets are presented, an illustrated sample and a blank worksheet that you can copy
and use.
H.323 Gateway Configuration Worksheet
Name
Contact
Internet Span Address
Extensions begin with
Auto attendants begin with
Server 1
Server 2
1HZ<RUN
7RP5DQG
&KLFDJR
$P\/XP
H.323 Gateways
To Server 1
To Server 2
On Server 1
Name:
Local Server 1 extension:
Local Server 1 password:
N/A
On Server 2
Name:
Local Server 2 extension:
Local Server 2 password:
1HZ<RUN
&KLFDJR
N/A
Internet-to-Centrex/PBX Extension Service: Internal Dial Tone
To Server 1
From Server 1
To Server 2
Svr 1 access code:
Uses H.323 Gateway:
N/A
From Server 2
Svr 2 access code:
Uses H.323 Gateway:
1HZ<RUN
&KLFDJR
N/A
Other Internet Dialing Services
Name
Type
%HOO$WODQWLF
DQDORJ
;
R,3WR3KRQH
%HOO$WODQWLF
&HQWUH[
;
R,3WR3KRQH
R,3WR&HQWUH[
R,3WR&HQWUH[
R,3WR3KRQH
R,3WR&HQWUH[
R,3WR3KRQH
R,3WR&HQWUH[
From Server
Access
Code
To Server
Access
Code
H.323
Gateway
&KLFDJR
1HZ<RUN
1HZ<RUN
&KLFDJR
1HZ<RUN
1HZ<RUN
H.323 Gateway Configuration Worksheet
Server 1
Server 2
Name
Contact
Internet Span Address
Extensions begin with
Auto attendants begin with
H.323 Gateways
To Server 1
To Server 2
On Server 1
Name:
Local Server 1 extension:
Local Server 1 password:
N/A
On Server 2
Name:
Local Server 2 extension:
Local Server 2 password:
N/A
Internet-to-Centrex/PBX Extension Service: Internal Dial Tone
To Server 1
From Server 1
From Server 2
Name
To Server 2
N/A
Svr 1 access code:
Uses H.323 Gateway:
Svr 2 access code:
Uses H.323 Gateway:
N/A
Type
R,3WR3KRQH
R,3WR&HQWUH[
R,3WR3KRQH
R,3WR&HQWUH[
R,3WR3KRQH
R,3WR&HQWUH[
R,3WR3KRQH
R,3WR&HQWUH[
From Server
Access
Code
To Server
Access
Code
H.323
Gateway
INDEX
Symbols
*, for direct-to-voice-mail dialing, 3-5
*19, 13-17
Numerics
8000 as default auto attendant extension,
changing, 10-6
911. See enhanced 911
A
Aastra Powertouch phones, 7-20
Aastra SIP phone, configuring, 14-22
access codes
for dialing services, 9-7
updating phone numbers after changing, 9-7
using 0, 9-7
account codes
described, 11-6
examples, 11-6
how users enter, 11-9
in Call Log, 11-12
setting for a user, 11-9
text file of valid codes, 11-10
Adjust Station IDs, 2-6
Admin user, 6-4
Administrator
default password for, 2-2
logging on, 2-2
starting, 2-2
toolbar, 2-8
using commands in, 2-8
Administrators role, 6-47
Adobe Acrobat books, 1-9
advanced settings. See Installing TeleVantage.
allocating space for SQL Server database, 12-50
analog trunks, 5-12
archiving recordings
overview, 12-39
automatically, 12-44
configuring who can manage archived
recordings, 12-46
for a single user, 6-8
for a single user or queue, 12-46
mailbox recording file formats, 12-40
manually, 12-45
searching and acting on archived recordings, 12-41
via Recording Archive Service, 12-40
archiving the Call and Trunk Logs, 12-51
audio controls, 2-10
audio files, as hold audio, 13-16
audio recordings
changing file format, 2-10
creating, 2-10
file formats, 2-9
VOX files, 2-9
WAV files, 2-9
auto attendants
overview, 10-4
actions, 10-9
ambiguous dialing delay, 10-19
and DID, 10-2
attaching custom data or skills to calls with, 10-17
changing default extension of 8000, 10-6
creating, 10-7
creating menu choices for callers, 10-8
custom destination for user login, 10-19
default, 10-5
defining menu choices for, 10-8
routing calls, 10-2
scheduled actions, 10-15
scheduling transfers and greetings, 10-14
setting up, 10-6
what caller hears, 10-5
Auto Attendants view, 10-6
Avaya, 15-32
B
backing up database, 12-53
beep
for hands-free answering, 7-22
on call recordings, 4-7
BLF enabling, 7-31
blocked numbers, 6-56
books, ordering printed, 1-6
BRI, adding a digital span, 5-21
Broadvoice, configuring TeleVantage for, 14-40
business hours, defining, 3-7
Busy Lamp Field, enabling, 7-31
C
caching SIP credentials, 14-40
call announcing, with ringback, 3-5
call forwarding
and voice mail, 7-19
to a mobile phone, 7-19
call handling
fax routing, setting up, 5-7
multiple users at one station, 7-3
outbound calls, 9-1
on a trunk, 5-5
routing, 5-4
routing inbound calls, 5-4
call history
in Call Log, 12-15
in Device Monitor, 12-8
Call Log
archiving, 12-51
avoiding CPU spikes when archiving, 12-52
configuring for a user, 6-15
display options, 6-13
exporting, 12-17
options for, 12-20
INDEX-2
result codes for exported, 12-17
view, 12-12
call notification of new messages, 6-22
call recordings
and voice resources, 4-5
beep with, 4-7
call routing
about, 10-2
flowchart
for Administrator, 10-3
for ViewPoint, 10-3
to a single ACD workgroup, 10-2
to groups, 10-2
trunk directly to a user, 10-2
call waiting, enabling, 7-14
callbacks
setting default access codes for, 9-8
working with international numbers, 5-15
caller ID
displaying on a phone, 7-21
from third-party H.323 gateways, 15-48
handled by ISDN or RBT1 trunks, 5-25
handling international numbers, 5-15
setting outbound for ISDN, 5-27
setting outbound for the system, 5-29
setting outbound for user, 6-16
used to bypass the call announcing prompt, 7-17
calls
entering account codes for, 11-9
recording, 4-2
transferred to you, announcing who is
transferring, 7-18
CAS, adding a digital span, 5-19
Centrex/PBX transfer, 7-19
coaching calls
system default for, 3-14
user settings for, 6-31
columns, customizing, 2-9
commands, using, 2-8
companies. See organizations.
ADMINISTERING TELEVANTAGE
conference calls, on Uniden phones, 15-17
conference resources in SIP calls, 14-48
conference room phones, 7-32
configuring system, overview, 1-5
confirmation menu, before voice mail, 3-5
connecting servers over the internet, 15-39
converting audio recordings to new file format, 2-10
CPU spikes during call log archiving, avoiding, 12-52
CSV files, for system prompts, 13-4
custom data
overview, 11-13
attaching to calls with auto attendants, 10-17
defining variables for, 11-14
setting values for, 11-15
Cybiolink phones, 7-20
D
D/41ESC board, tones for, 3-4
database
backing up, 12-53
restoring, 12-54
Default Auto Attendant, 10-5
defaults
0 for extension of Operator user, 9-7
access codes
viewing in the Administrator, 9-9
viewing in the ViewPoint, 9-9
access codes for callbacks, 9-8
auto attendant, 10-5
database size, 12-50
dialing time-outs, 9-36
delayed answer, 5-8
deleting users, 6-9
Device Monitor view, 12-3
DI0408LSAR2 board, tones for, 3-4
Dial Plan view, 12-10
dial tones, generating with software, 3-4
dial-by-name directory
and default auto attendant, 10-5
on a remote Server, 15-39
system settings for, 3-6
user entry in, 6-34
dialing exceptions
importing and exporting, 9-18
overview, 9-17
dialing services
about, 9-2
adding, 9-4, 9-9, 9-18
and access codes, 9-7
avoiding dialing ambiguities, 9-7
choosing names for, 9-6
deleting, 9-5
disabling while creating, 9-6
for H.323 Gateways, 15-44
identifying trunks allocated by, 9-13
permissions, example of, 9-20
Phone Number dialing service, using a prefix and
suffix, 9-11
types, 9-2
types supported, 9-2
using to test trunks, 9-4
Dialing Services view, 9-4
dialing time-outs, 9-35
digit collection
about, 5-5
setting up on analog trunk, 5-13
digital phones
configuring, 7-24
enabling BLF for, 7-31
digital spans
overview, 5-11
adding, 5-21
Direct Inward Dialing (DID)
assigning number to a user, 6-14, 8-5
routing calls to auto attendants, 10-2
direct transfer
system setting, 3-5
user setting, 7-16
INDEX-3
direct-to-voice-mail dialing, enabling, 3-5
disabling
dialing services while creating them, 9-6
record of in Maintenance Log view, 12-11
trunks, 12-9
disconnections, detecting for third-party
applications, 7-15
disk usage for a user, 6-29
display phones, changing format from MDMF to
SDMF, 7-7
documentation, 1-6
DTMF digits, sending to a station, 7-16
DTMF Transmission Mode for SIP, 14-10
E
E1, adding a digital span, 5-19
Edit All ViewPoint Settings command, 6-46
e-mail
of Event Log notifications, 12-21
of Problem Report Package, 12-64
synchronization with Microsoft Exchange, 3-10
e-mail notification
system setting, 3-10
used to archive recordings, 4-3
overview, 6-19
embedded stack, 15-2
emergency dialing, 9-37
enhanced 911, 9-37
entering account codes for a call, 11-9
errors and warnings, 12-22
Event Log
messages, 12-22
notifications, 12-21
T1 alarms, 12-25
event log for system messages, 12-20
Exchange Server. see Microsoft Exchange Server
expiration of passwords, 3-12
exporting
Call Log, 12-17
dialing exceptions, 9-18
INDEX-4
exporting (cont’d.)
Phone Number dialing service dialing
exceptions, 9-18
system prompt files, 13-4, 13-5
voice files, 2-11
extensions
and station ID, 6-13
assigning, 6-12
assigning to workgroups, 8-5
starting number, 6-13
external stations, 7-8
problems placing calls from ViewPoint, 7-12
setting number of, 3-4
eyeBeam softphone, configuring, 14-28
F
Failover support, 7-2
fax
routing calls to, 10-2
transmission via Sipura, 14-26
file formats for voice files, 2-9
files
.VAP, 13-7
.VOX, 13-7
as hold audio, 13-16
change encoding format, 13-6
changing format, 2-10
converting formats, 2-10, 13-4
exporting and importing system prompts, 13-5
importing and exporting, 2-11
moving, 12-52
MP3, 12-40
playing over phone or computer, 2-11
prompts, 13-7
script for vendors, 13-8
sentence file, 13-6
Test Sentences dialog box, 13-11
testing, 13-8
voice, 2-9
VOX, 12-40
WAV, 12-40
ADMINISTERING TELEVANTAGE
firewall, configuring SIP for, 14-43
Flash behavior
system-wide setting, 3-5
user setting, 7-16
follow-me call forwarding, 7-20
forwarding
and voice mail, 7-19
follow-me, 7-20
to a mobile phone, 7-19
G
Gateway users, 15-45
greetings
creating, 2-10
scheduling in an auto attendant, 10-14
storage size for, 6-28
group conversation lines, blocking, 6-56
H
H.323
overview, 15-2
changing listener port, 15-7
dialing services for, 9-2
host-based vs embedded stacks, 15-2
phones
configuring a user for, 15-9
considerations for, 15-12
H.323 terminal as, 15-34
Intel NetStructure PBX-IP Media
Gateway, 15-32
Polycom, 15-18
Uniden, 15-13
receiving caller ID from gateways, 15-48
spans, 15-5
H.323 Gateways
overview, 15-39
creating, 15-41
dialing services for, 15-44
users for, 15-45
worksheet for configuring, B-1
H.323 Gateways view, 15-42
hands-free answering, configuring, 7-22
Help, online, 1-9
history
in Call Log, 12-15
in Device Monitor, 12-8
hold audio, 13-13
hold music
adding sources for, 13-14
for a user, 6-29
for an auto attendant, 10-17
for the system, 13-13
testing, 13-17
using files for, 13-16
host-based stack, 15-2
hotline, creating, 7-32
hours, defining business hours, 3-7
HTML books, 1-9
hunt group, 5-5
I
importing
Phone Number dialing service dialing
exceptions, 9-18
voice files, 2-11
inbound call routing, 10-2
auto attendant, 10-4
extensions, 10-21
inbound-only trunks, configuring, 5-4
Intel PBX-IP Media Gateway, 15-32
IntelRTPResourceNeeds.xls, 14-2, 14-7
international caller ID, 5-15
Internet, enabling calls over, 9-3
ISDN
adding a digital span, 5-19
Megacom service with, 5-31
optimizing settings, 5-23
outbound caller ID on, 5-27
ISDN BRI, adding a digital span, 5-21
ISDN Two-B Channel Transfer, 5-25
INDEX-5
J
joining calls
system default for, 3-14
user settings for, 6-31
L
languages, installing additional, 13-4
LBR codecs, 12-37
licenses, configuring a system without, 1-5
line appearances, on Toshiba phones, 7-29
line current, dropping on call disconnects, 7-15
lockout, 3-12, 6-30
logging on
from voice mail greeting, 6-19
options, A-1
options from auto attendant, 10-19
to Administrator, 2-2
using command line arguments, A-1
M
Maintenance Log view, 12-11
manuals, ordering printed, 1-6
Marketing Messages, 13-8
MDMF display phone format, 7-7
Megacom service with ISDN, 5-31
memory use, 12-2
menu choices, 10-8
messages, moving voice files to regain space, 12-52
Microsoft Exchange, synchronizing with, 3-10
Microsoft NetMeeting
calling DID number from, 15-37
calling Server from, 15-37
placing calls to
from station, 15-36
from ViewPoint, 15-35
using with TeleVantage, 15-34
mobile phones, issues with forwarded calls, 7-19
INDEX-6
monitoring calls
system default for, 3-14
user settings for, 6-31
moving
Server to another machine, 12-55
voice files, 12-52
MP3, 12-40
multiple companies. See organizations.
multiple line appearances, 7-14
multiple users, 7-3
music-on-hold
adding sources for, 13-14
for a user, 6-29
for an auto attendant, 10-17
for the system, 13-13
testing, 13-17
using files for, 13-16
My Numbers, editing, 6-17
N
Navigation pane, enabling, 6-34
NetMeeting. see Microsoft NetMeeting
network capture logs, 12-59
no call handling, 9-12
no call progress, 9-12
notifications
scheduling, 6-23
setting business hours, 3-7
null stations, 7-34
numbers, blocking specific, 6-56
O
off-bus routing, 14-46
offhook alert audio, 13-13
offhook auto-dialing, 7-32
online books, 1-9
online Help, 1-9
Operator user, 6-4
operator, personal, 6-15
ADMINISTERING TELEVANTAGE
options, setting for user, 6-3
Organizations
associating users with, 6-16
defining, 11-3
with auto attendants, 11-4
overview, 11-2
outbound caller ID
for system, 5-29
for user, 6-16
outbound-only trunks, configuring, 5-4
overhead paging system, creating, 7-23
overview of configuring system, 1-5
P
pager notification of new messages, 6-22
paging device, 9-12
paging system, creating, 7-23
password
assigning, 6-14
expiration, 3-12
expiration options, 6-30
for Administrator, 2-2
system settings for security, 3-12
PBX-IP Media Gateway, 15-32
PDF books, 1-9
PDNs, on Toshiba phones, 7-29
performance counters, 12-37
permissions
assigning to a user, 6-32
dialing, for a user, 6-33
list of, 6-51
personal operator, 6-15
Phone Dialer, 15-38
phones
changing for Administrator, 2-2
changing format from MDMF to SDMF, 7-7
playing system prompts, 13-4
"Please say your name" prompt, turning off, 7-17
point-to-point for ISDN BRI, 5-25
Polycom IP phone, 15-18
prefix and suffix in Phone number dialing service, 9-11
problems, reporting to technical support, 12-61
R
recording
system calls, 4-2
system prompts, 13-9
Recording Archive Service
about, 12-40
starting and stopping, 12-43
recordings
changing file format, 2-10
creating, 2-10
ringback tone, 13-13
voice file formats, 2-9
VOX files, 2-9
WAV files, 2-9
registry settings. See Installing TeleVantage.
reminder beep on call recordings, 4-7
reporter server, using TeleVantage as, 1-5
reporting problems, 12-61
restoring backed-up data, 12-54
RFC2833 Payload Type for SIP, 14-10
ring duration, 7-14
ringback tone, rerecording, 13-13
ringback, system behavior for, 3-5
ringing on Toshiba phones, silencing, 7-31
Robbed Bit T1
adding a digital, 5-17
signaling
configuring, 5-17
template for, 5-19
roles
Administrators role, 6-2
assigning to a user, 6-33
Users role, 6-2
routing calls
directly to auto attendants, 10-2
to call centers, 10-2
to fax machine, 10-2
INDEX-7
routing services
adding, 9-27
adding new routing variables, 9-32
defining a new number for a routing rule, 9-33
defining patterns, 9-31
defining stop rules, 9-30
using for least cost routing, 9-24
using for long-distance calls over an H.323
Gateway, 9-24
routing variables
adding new, 9-32
example, 9-32
RTP resources, more SIP trunks than, 14-7
S
schedule entry
for auto attendant, 10-15
for notifications, 6-25
schedules, setting business hours, 3-7
scheduling transfers and greetings, 10-14
SDMF, changing display phone format to, 7-7
SDNs, on Toshiba phones, 7-29
security, system settings for, 3-12
Server
changing for Administrator, 2-2
moving to another machine, 12-55
shutting down, 12-56
settings
audio output
over your computer speakers, 2-11
over your phone, 2-11
database space, 12-50, 12-51
dialing service permissions, 9-20
disk space, 12-51
in the status bar, 2-11
recipient of Windows Event Log
Notifications, 12-21
workgroup extension, 8-5
shutting down Server, 12-56
INDEX-8
SIP
overview, 14-2
accounts, 14-20
Broadvoice configuration, 14-40
caching authentication credentials, 14-40
configuring behind a NAT/firewall, 14-43
dialing services for, 9-2
Nonce parameter, 14-16
off-bus routing, 14-46
phones
authentication credentials for, 14-15
configuring a user for, 14-10
eyeBeam softphone, 14-28
Vertical Aastra, 14-22
QoP parameter, 14-16
Realm parameter, 14-16
servers, 14-32
Sipura gateways, 14-24
spans
overview, 14-4
authentication credentials for, 14-15
changing listener port, 14-5
codecs for, 14-8
DTMF Transmission Mode, 14-10
increasing security of, 14-17
IP address for, 14-5
more trunks than RTP resources, 14-7
REGISTER and MWI requests to, 14-18
RFC2833 Playload type, 14-10
using more than one, 14-9
supported standards, 14-49
voicemail code for, 14-22
SIP Registration Bindings view, 14-42
SIP Servers view, 14-33
Sipura gateways, configuring, 14-24
skills, attaching to calls with auto attendants, 10-17
soft ring on Toshiba phones, silencing, 7-31
special access codes, 9-8
special directories, changing, 12-53
ADMINISTERING TELEVANTAGE
SQL Server database
allocating space, 12-50
restoring, 12-54
starting the Administrator, 2-2
station ID
adjusting all, 2-6
and extensions, 6-13
assigning to a user, 6-13
changing for Administrator, 2-2
of 0, legacy Phone tab for, 7-16
time-saving way of assigning, 6-35
stations
overview, 7-2
automatic offhook dialing, 7-32
automatically dialing when off-hook, 7-14
external, 7-8
for conference/area rooms and fax, 7-32
internal, 7-7
monitoring activity, 12-4
null, 7-34
requiring logon for, 7-33
restarting with Device Monitor, 12-58
starting number, 6-13
stop rules, defining in routing services, 9-30
supervising calls
system default for, 3-14
user settings for, 6-31
support, technical, 1-6
synchronization with Microsoft Exchange, 3-10
system call recording, 4-2
system prompts
changing encoding format of files, 13-4, 13-6
choosing a language for a user, 6-28
controlling display of, 13-4
customizing, 13-2, 13-3
editing, 13-4
exporting text for CSV files, 13-4
importing and exporting audio files for, 13-4, 13-5
managing, 13-4
playing, 13-4
recording, 13-9
system prompts (cont’d.)
testing, 13-11
translating, 13-6
System Prompts view, 13-3
system settings
allocating disk space, 12-51
archiving the Call Log, 12-51
business hours, 3-7
database space, 12-51
System Settings dialog box, key to, 3-2
T
T1 alarms, 12-25
technical support, 1-6
telephone receiver, using computer speakers for, 2-11
TeleVantage Advanced Settings Editor. See Installing
TeleVantage.
TeleVantage Event Log, 12-20
terminated hunt group, 5-5
tie-lines. see H.323 Gateways
Tip of the Day, enabling, 6-34
toll fraud, protecting system against. See Installing
TeleVantage.
tones, generating with software, 3-4
toolbar, 2-8
transfer
between two Centrex/PBXs, 7-19
directly on Flash, 3-5
transferring calls, announcing name when, 7-18
translating system prompts, 13-6
Trunk Log
archiving, 12-51
options for, 12-20
view, 12-18
trunks
adding, 5-3
analog, adding, 5-12
ANI/DID, 5-5
changing system settings before adding, 3-2
configuring signaling on, 5-17
INDEX-9
trunks (cont’d.)
deleting, 5-4
digit collection, setting up, 5-13
digital, 5-11
disabling, 12-9
H.323, 15-5
identifying those allocated by dialing services, 9-13
Internet, 5-11
number of, 5-12
optimizing ISDN settings, 5-23
restarting with Device Monitor, 12-58
Robbed Bit T1, 5-17
routing to a user, 10-2
setting defaults for, 5-32
setting properties for, 5-11
SIP, 14-4
types supported, 5-2
Trunks view, 5-10
Tuning tab, for ISDN settings, 5-23
TVConvert.exe, 13-4, 13-6
Two-B Channel Transfer, 5-25
U
Uniden IP phone, configuring, 15-13
updating access codes, 9-7
users
account code modes, 11-9
adding, 6-2, 6-12
Admin, 6-4
changing system settings before adding, 3-2
clearing lockout, 6-30
customizing auto attendant login, 10-19
deleting, 6-9
disk usage, 6-29
and external stations, 7-12
logging calls for, 6-15
mailbox size, 6-18
managing, 6-1
modifying ViewPoint settings from
Administrator, 6-46
My Numbers for, 6-17
INDEX-10
users (cont’d.)
Operator, 6-4
permissions for, 6-32
personal operator for, 6-15
reducing complexity for, 6-57
ringing multiple users simultaneously, 10-2
roles, 6-2
routing trunks directly to, 10-2
setting options, 6-3
storage for greetings and titles, 6-28
Users role, 6-47
Users view, 6-6
V
VAP file, 13-7
variables, attaching to calls with auto attendants, 10-17
variables. See custom data variables.
Vertical Aastra SIP phone, configuring, 14-22
view bar
enabling in ViewPoint, 6-34
in Administrator, 2-7
view bar, enabling, 6-34
ViewPoint
audio controls, 2-10
call routing flowchart, 10-3
modifying user settings from Administrator, 6-46
Navigation bar or view bar in, 6-34
views
customizing columns in, 2-9
list of, 2-3
using commands in, 2-8
voice files
converting, 13-4, 13-6
importing and exporting, 2-11
moving, 12-52
supported formats, 2-9
voice mail
archiving a single user’s, 6-8
letting callers dial directly, 3-5
mailbox size, 6-18
ADMINISTERING TELEVANTAGE
voice mail (cont’d.)
playing confirmation menu before, 3-5
playing from computer speakers, 2-11
Urgent, 6-21
voice resources and call recording, 4-5
voice titles
recording, 6-29
storage size for, 6-28
voice-first answering, enabling, 3-5
VOX files, 2-9
and VAP file, 13-7
converting, 13-4, 13-6
W
warnings, 12-22
WAV files, 2-9
Web sites, setting up a "Call us" link on, 15-38
Welcome Wizard, enabling, 6-34
wink duration, 5-17
workgroups
adding members, 8-4
assigning a DID number, 8-5
assigning an extension, 8-5
benefits of, 8-2
creating, 8-4
entering general information, 8-4
public and personal, defined, 8-2
routing calls to ACD, 10-2
specifying timeout parameter, 8-6
Workgroups view, 8-3
INDEX-11
ADMINISTERING TELEVANTAGE