1
INSTALLING TELEVANTAGE
TELEVANTAGE 8
COPYRIGHT
© 2008 Vertical Communications, Inc. All rights reserved. This manual and the software described in it are copyrighted with all rights reserved.
No part of this publication may be reproduced, transmitted, transcribed, stored in a retrieval system or translated into any language in any form
by any means without the written permission of Vertical Communications, Inc.
Portions © 1999, Microsoft Corporation. All rights reserved.
TRADEMARKS
Vertical Communications and the Vertical Communications logo and combinations thereof are trademarks of Vertical Communications, Inc.
TeleVantage and the TeleVantage logo are registered trademarks of Vertical Communications, Inc. Microsoft, Windows, and Windows NT are
registered trademarks of Microsoft Corporation. SQL Server is a trademark of Microsoft Corporation. Adobe and Acrobat are registered
trademarks of Adobe Systems Incorporated. Dialogic is a registered trademark of Dialogic Corporation. Other brand names, company names
and product names are trademarks or registered trademarks of their respective companies.
LIMITED WARRANTY ON SOFTWARE
Vertical warrants that (a) the Software will perform substantially in accordance with the accompanying written materials for a period of (30)
days from the date of receipt. Any implied warranties on the Software is limited to thirty (30) days. Some states/jurisdictions do not allow
limitations on duration of an implied warranty, so the above information may not apply to you.
CUSTOMER REMEDIES: Vertical’s and its suppliers’ entire liability and your exclusive remedy shall be, at Vertical’s option, either (a) return
of the price paid, or (b) repair or replacement of the Software that does not meet Vertical’s Limited Warranty and which is returned to Vertical
with a copy of your receipt. This Limited Warranty is void if failure of the Software has resulted from accident, abuse, or misapplication. Any
replacement Software will be warranted for the remainder of the original warranty period or thirty (30) days, whichever is longer.
VERTICAL AND ITS SUPPLIERS DISCLAIM ALL OTHER WARRANTIES, REPRESENTATIONS, PROMISES AND GUARANTEES,
EXPRESS OR IMPLIED, STATUTORY OR OTHERWISE, ON THE SOFTWARE, MEDIA, DOCUMENTATION OR RELATED
TECHNICAL SUPPORT INCLUDING, WITHOUT LIMITATION, THE IMPLIED WARRANTIES OF MERCHANTABILITY,
PERFORMANCE AND FITNESS FOR A PARTICULAR PURPOSE. VERTICAL WILL NOT BE LIABLE FOR ANY BUG, ERROR,
OMISSION, DEFECT, DEFICIENCY OR NONCONFORMITY IN ANY SOFTWARE. AS A RESULT, THE SOFTWARE AND
DOCUMENTATION IS LICENSED “AS IS”, AND THE PURCHASER ASSUMES THE ENTIRE RISK AS TO ITS QUALITY AND
PERFORMANCE.
IN NO EVENT WILL VERTICAL OR ITS SUPPLIERS BE LIABLE FOR INDIRECT, SPECIAL, INCIDENTAL, CONTINGENT,
CONSEQUENTIAL OR SIMILAR DAMAGES OF ANY KIND RESULTING FROM ANY DEFECT IN THE SOFTWARE OR
DOCUMENTATION, INCLUDING, WITHOUT LIMITATION, ANY LOST PROFITS OR SAVINGS, DAMAGES FROM BUSINESS
INTERRUPTION, LOSS OF OR TO DATA, COMPUTER PROGRAMS, BUSINESS, DOWNTIME, GOODWILL, DAMAGE TO OR
REPLACEMENT OF EQUIPMENT OR PROPERTY, OR ANY COSTS OF RECOVERING, REPROGRAMMING OR REPRODUCING
ANY PROGRAM OR DATA USED IN CONJUNCTION WITH THE PRODUCTS, EVEN IF VERTICAL, ITS SUPPLIERS OR ANYONE
ELSE HAS BEEN ADVISED OF THE POSSIBILITY OF SUCH DAMAGES. YOU AGREE THAT VERTICAL’S AND ITS SUPPLIERS’
LIABILITY ARISING OUT OF CONTRACT, NEGLIGENCE, STRICT LIABILITY IN TORT OR WARRANTY SHALL NOT EXCEED
THE AMOUNT PAID BY YOU FOR THIS PRODUCT. ANY WRITTEN OR ORAL INFORMATION OR ADVICE GIVEN BY
VERTICAL DEALERS, DISTRIBUTORS, AGENTS OR EMPLOYEES WILL IN NO WAY INCREASE THE SCOPE OF THIS
WARRANTY, NOR MAY YOU RELY ON ANY SUCH WRITTEN OR ORAL COMMUNICATION.
Some jurisdictions do not allow the limitation or exclusion of implied warranties or liability for incidental or consequential damages, and some
jurisdictions have special statutory consumer protection provisions which may supersede this limitation, so the above limitation or exclusion
may not apply to you. This warranty gives you specific legal rights, and you may also have other rights which vary from jurisdiction to
jurisdiction. This software and license may not be transferred or resold without authorization from Vertical Communications, Inc..
NETWORK CAPTURE TECHNOLOGY
Copyright (c) 1999 - 2005 NetGroup, Politecnico di Torino (Italy).Copyright (c) 2005 CACE Technologies, Davis (California). All rights
reserved. Redistribution and use in source and binary forms, with or without modification, are permitted provided that the following conditions
are met:
1. Redistributions of source code must retain the above copyright notice, this list of conditions and the following disclaimer.
2. Redistributions in binary form must reproduce the above copyright notice, this list of conditions and the following disclaimer in the
documentation and/or other materials provided with the distribution.
3. Neither the name of the Politecnico di Torino, CACE Technologies nor the names of its contributors may be used to endorse or promote
products derived from this software without specific prior written permission.
THIS SOFTWARE IS PROVIDED BY THE COPYRIGHT HOLDERS AND CONTRIBUTORS “AS IS” AND ANY EXPRESS OR
IMPLIED WARRANTIES, INCLUDING, BUT NOT LIMITED TO, THE IMPLIED WARRANTIES OF MERCHANTABILITY AND
FITNESS FOR A PARTICULAR PURPOSE ARE DISCLAIMED. IN NO EVENT SHALL THE COPYRIGHT OWNER OR
CONTRIBUTORS BE LIABLE FOR ANY DIRECT, INDIRECT, INCIDENTAL, SPECIAL, EXEMPLARY, OR CONSEQUENTIAL
DAMAGES (INCLUDING, BUT NOT LIMITED TO, PROCUREMENT OF SUBSTITUTE GOODS OR SERVICES; LOSS OF USE,
DATA, OR PROFITS; OR BUSINESS INTERRUPTION) HOWEVER CAUSED AND ON ANY THEORY OF LIABILITY, WHETHER
IN CONTRACT, STRICT LIABILITY, OR TORT (INCLUDING NEGLIGENCE OR OTHERWISE) ARISING IN ANY WAY OUT OF
THE USE OF THIS SOFTWARE, EVEN IF ADVISED OF THE POSSIBILITY OF SUCH DAMAGE.
This product includes software developed by the University of California, Lawrence Berkeley Laboratory and its contributors.
Vertical Communications, Inc.
1-877-VERTICAL
www.vertical.com
#98-6601 Edition 8 January 2008
CONTENTS
Chapter 1. Introduction .....................................................................1-1
TeleVantage overview...........................................................................1-2
Major TeleVantage features.............................................................. 1-2
Significant new features in TeleVantage 8 ....................................... 1-4
How to use this manual.........................................................................1-5
Where to get help..................................................................................1-5
TeleVantage documentation .................................................................1-6
The TeleVantage documentation set................................................ 1-6
Accessing online documentation ...................................................... 1-8
Chapter 2. TeleVantage Components..............................................2-1
Introduction ...........................................................................................2-2
TeleVantage Server ..............................................................................2-3
The Device Monitor .......................................................................... 2-3
Server reliability features................................................................... 2-3
TeleVantage Administrator....................................................................2-4
TeleVantage ViewPoint.........................................................................2-4
TeleVantage Call Center Reporter.................................................... 2-4
TeleVantage Web Services...................................................................2-4
TeleVantage Enterprise Manager .........................................................2-5
TeleVantage Multi-line TAPI Service Provider ......................................2-5
TeleVantage TAPI Service Provider .....................................................2-5
TeleVantage Contact Manager Assistant..............................................2-6
TeleVantage Archived Recording Browser and Recording Archive Service
2-6
TeleVantage Station Message Detail Recording (SMDR) Service .......2-6
TeleVantage Robbed Bit T1 Experimenter ...........................................2-6
TeleVantage Software Development Kit ...............................................2-7
Chapter 3. TeleVantage Requirements............................................3-1
Introduction ...........................................................................................3-2
Choosing a location for the TeleVantage Server PC ............................3-2
TeleVantage Server PC requirements ..................................................3-2
TeleVantage Server PC operating system requirements ................. 3-2
TeleVantage Server PC CPU and memory requirements................ 3-3
TeleVantage Server PC hard drive and available disk space
requirements .............................................................................. 3-6
TeleVantage Server PC RAID requirements .................................... 3-8
TeleVantage Server PC slot requirements ....................................... 3-8
TeleVantage Server PC COM/USB port requirements..................... 3-8
TeleVantage Server PC network requirements ................................ 3-9
TeleVantage Server PC power supply and cooling requirements.... 3-9
TeleVantage Server PC CD ROM requirements ............................ 3-10
TeleVantage Server PC license requirements................................ 3-10
TeleVantage system configuration limits ........................................ 3-10
Using industrial PCs for larger systems based on Dialogic Boards 3-11
TeleVantage database server requirements....................................... 3-11
Database configuration recommendations ..................................... 3-12
Network requirements......................................................................... 3-12
Using TeleVantage with a LAN ....................................................... 3-13
Using TeleVantage without a LAN .................................................. 3-13
Network configuration requirements ............................................... 3-13
Requirements for e-mail notification of voice messages ................ 3-14
IP telephony network requirements................................................. 3-15
Proxy server requirements .............................................................. 3-15
TeleVantage license requirements ..................................................... 3-16
Dialogic HMP license requirements ................................................ 3-17
Administrator and ViewPoint requirements......................................... 3-18
TAPI Service Provider/Contact Manager Assistant requirements ...... 3-19
TeleVantage Web Services requirements .......................................... 3-20
Call Center Reporter requirements..................................................... 3-21
TeleVantage Recording Archive Service requirements ...................... 3-21
TeleVantage SMDR Service requirements......................................... 3-22
Emergency dialing service requirements............................................ 3-22
Enhanced 911 service requirements .............................................. 3-23
Section 1 Preparing for Installation
Chapter 4. Trunk Options and Requirements................................. 4-1
Introduction ........................................................................................... 4-2
Using trunks with TeleVantage ............................................................. 4-2
Ordering services from your telephone company ................................. 4-2
Ordering caller identification.............................................................. 4-3
Ordering Direct Inward Dial ............................................................... 4-3
Ordering hunt groups ........................................................................ 4-4
Ordering inbound- and outbound-only trunks ................................... 4-4
Ordering emergency dialing service.................................................. 4-4
Ordering call waiting .......................................................................... 4-4
Ordering ISDN Two B-Channel Transfer service.............................. 4-4
Analog trunk requirements.................................................................... 4-5
INSTALLING TELEVANTAGE
Additional required hardware for analog service .............................. 4-5
T1 trunk requirements ...........................................................................4-5
T1 carrier requirements..................................................................... 4-5
Additional required hardware for T1 service ..................................... 4-6
U.S. local and long-distance service................................................. 4-7
E1 trunk requirements...........................................................................4-7
E1 carrier requirements..................................................................... 4-7
Additional required hardware for E1 service..................................... 4-8
ISDN BRI trunk requirements................................................................4-9
ISDN BRI carrier requirements ......................................................... 4-9
Additional required hardware for ISDN BRI service ......................... 4-9
VoIP requirements ..............................................................................4-10
VoIP features in TeleVantage ......................................................... 4-10
Chapter 5. Phone Options and Requirements ................................5-1
Introduction ...........................................................................................5-2
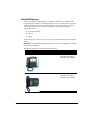
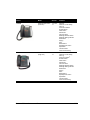
Using analog phones with TeleVantage................................................5-2
Tested ADSI phones ......................................................................... 5-3
Tested analog phones....................................................................... 5-4
Using SIP phones with TeleVantage.....................................................5-6
Using H.323 phones with TeleVantage...............................................5-10
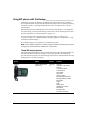
Using digital phones with TeleVantage ...............................................5-11
Tested digital phones ...................................................................... 5-13
Wiring requirements ............................................................................5-13
Analog phone and digital phone wiring requirements..................... 5-13
SIP phone, H.323 phone, and IP gateway wiring requirements..... 5-14
Replacing an existing PBX ............................................................. 5-14
Replacing telephones connected directly to trunk lines.................. 5-14
Using TeleVantage with a paging system ...........................................5-15
Using an external paging device with TeleVantage........................ 5-15
Creating an overhead paging system with hands-free answering . 5-15
Section 2 Performing the Installation
Chapter 6. Gateway Options and Requirements ............................6-1
Introduction ...........................................................................................6-2
Using gateway PSTN/FXO ports with TeleVantage..............................6-2
Using gateway station/FXS ports with TeleVantage .............................6-3
Using IP gateway T1/E1/BRI ports with TeleVantage...........................6-3
Gateway requirements ..........................................................................6-4
CONTENTS
Chapter 7. Upgrading or Installing TeleVantage ............................ 7-1
Introduction ........................................................................................... 7-2
Is this upgrade for you?..................................................................... 7-2
TeleVantage CDs .............................................................................. 7-2
Starting the Setup programs ............................................................. 7-3
Troubleshooting installation problems............................................... 7-3
Upgrading vs. installing for the first time ........................................... 7-4
Preparing for an upgrade...................................................................... 7-4
Important special upgrade scenarios ................................................ 7-5
Upgrading from a previous version of TeleVantage ............................. 7-6
Upgrading from TeleVantage 7.5 ...................................................... 7-6
Upgrading from TeleVantage 4, 5, 6, or 7......................................... 7-7
Starting the upgrade.......................................................................... 7-7
Upgrading from TeleVantage 3.5 or earlier....................................... 7-8
Installing a TeleVantage system for the first time ................................. 7-8
What you must know before installing .............................................. 7-9
Starting the first-time installation ....................................................... 7-9
Chapter 8. Installing and Configuring Windows on the TeleVantage
Server ................................................................................ 8-1
Introduction ........................................................................................... 8-2
Perform these steps .......................................................................... 8-2
Installing Windows 2000/XP/2003 ........................................................ 8-2
Configuring Windows 2000/XP/2003 for TeleVantage ......................... 8-3
Creating the Windows 2000/XP/2003 user for TeleVantage............ 8-3
Chapter 9. Installing The TeleVantage Database Server ............... 9-1
Introduction ........................................................................................... 9-2
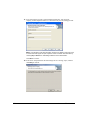
Installing MSDE from the Master CD.................................................... 9-3
Applying the latest SQL Server service pack........................................ 9-4
Chapter 10. Installing the TeleVantage Server Software .............10-1
Introduction ......................................................................................... 10-2
Task checklist .................................................................................. 10-2
Requirements .................................................................................. 10-2
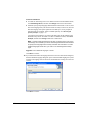
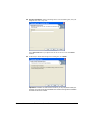
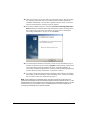
Installing the TeleVantage Server....................................................... 10-2
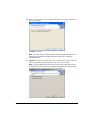
Installing the TeleVantage Administrator .......................................... 10-15
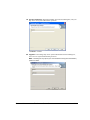
Entering and activating your TeleVantage licenses.......................... 10-16
Testing the TeleVantage Server ....................................................... 10-21
Setting the TeleVantage Server to autostart..................................... 10-23
Completing the TeleVantage Server installation............................... 10-24
Setting access rights to the TeleVantage Server.......................... 10-24
INSTALLING TELEVANTAGE
Configuring TeleVantage for use with a proxy server................... 10-24
Configuring e-mail notification and Exchange synchronization .... 10-25
Upgrading Windows on the TeleVantage Server PC ........................10-27
Chapter 11. Installing TeleVantage Workstation Applications....11-1
Introduction .........................................................................................11-2
Requirements .................................................................................. 11-2
Installation checklist ........................................................................ 11-3
Windows 98 PC requirements.............................................................11-3
Installing the TeleVantage workstation applications ...........................11-4
Using the TeleVantage Workstation Setup..................................... 11-5
Configuring the TeleVantage workstation applications .......................11-8
Configuring the TeleVantage Administrator and ViewPoint ........... 11-8
Configuring the TeleVantage TAPI Service Provider ..................... 11-8
Configuring the TeleVantage Contact Manager Assistant ........... 11-10
Synchronizing system clocks ............................................................11-10
Upgrading Windows on a workstation PC to Windows .....................11-10
Chapter 12. After Installing TeleVantage.......................................12-1
Your TeleVantage system so far.........................................................12-2
Installing optional TeleVantage services.............................................12-2
Setting up and configuring your TeleVantage system.........................12-2
Section 3 Installing TeleVantage Services
Chapter 13. Installing TeleVantage Web Services........................13-1
Introduction .........................................................................................13-2
Requirements .................................................................................. 13-2
Installing Microsoft Internet Information Services ...............................13-3
Setting up a secure Web site on the TeleVantage Web server...... 13-4
Installation steps .................................................................................13-5
Running ViewPoint Web Access.........................................................13-8
Chapter 14. Installing TeleVantage Multi-line TAPI Service Provider
14-1
Introduction .........................................................................................14-2
Installing the Multi-line TAPI Service Provider ....................................14-2
Configuring the Multi-line TAPI Service Provider ................................14-6
Basic configuration (required) ......................................................... 14-6
Connecting to multiple TeleVantage Servers ................................. 14-6
Restricting station access to users when using the Multi-line TSP 14-6
CONTENTS
Configuring TAPI applications for the Multi-Line TAPI Service Provider
14-7
Chapter 15. Installing the TeleVantage Recording Archive Service..
15-1
Introduction ......................................................................................... 15-2
Installation steps ................................................................................. 15-2
Chapter 16. Installing the TeleVantage SMDR Service ................ 16-1
Overview............................................................................................. 16-2
Output connection options............................................................... 16-2
Installing the SMDR service................................................................ 16-3
Configuring the SMDR service ........................................................... 16-3
Starting, pausing, and stopping the service .................................... 16-4
Starting the SMDR service automatically on restart ....................... 16-4
Choosing the SMDR format ............................................................ 16-4
Selecting the output connection type .............................................. 16-4
TCP/IP ports to avoid.......................................................................... 16-5
TeleVantage SMDR formats............................................................... 16-6
Toshiba CTX SMDR format .............................................................. 16-10
Avaya Lucent Definity SMDR format ................................................ 16-12
Chapter 17. Installing the TFTP Service........................................ 17-1
Overview............................................................................................. 17-2
Installing and configuring the Tftpd32 TFTP Server ........................... 17-2
Configuring the Tftpd32 TFTP Server once it has been started ..... 17-6
Appendixes
Appendix A. Using TeleVantage with
Microsoft Terminal Services
or Citrix MetaFrame ........................................................ A-1
Installing workstation applications on an application server .................A-2
Using the Terminal Services Client on Windows 2000 PCs .................A-4
Using Terminal Services for remote administration ..............................A-5
Appendix B. Troubleshooting ......................................................... B-1
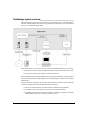
TeleVantage system overview..............................................................B-2
Troubleshooting telephone problems ...................................................B-3
Troubleshooting database server problems .........................................B-4
Troubleshooting TeleVantage Server problems ...................................B-5
INSTALLING TELEVANTAGE
Troubleshooting workstation application problems .............................. B-7
Troubleshooting TeleVantage Services problems ............................. B-13
Other troubleshooting topics .............................................................. B-16
Appendix C. Changing the Domain of the TeleVantage Server ... C-1
Appendix D. Managing TeleVantage Licenses .............................. D-1
How TeleVantage licenses affect system behavior.............................. D-1
Viewing the status of licenses on your system .................................D-3
About entering licenses........................................................................ D-3
About activating licenses...................................................................... D-3
How to activate your licenses............................................................D-4
Licensing errors.................................................................................D-6
Importing license information ............................................................D-7
Exporting license information ............................................................D-8
More about TeleVantage licensing....................................................... D-9
How hardware locking works ............................................................D-9
Terms of use ...................................................................................D-10
Installing a dongle ...........................................................................D-11
Special licensing situations .............................................................D-11
Appendix E. Performing Unattended Workstation Installations .. E-1
Performing a typical unattended installation ........................................ E-1
Performing a custom unattended installation ....................................... E-2
Custom unattended installation examples ........................................E-2
Workstation Setup command parameters............................................ E-3
Verifying that an unattended installation was successful ..................... E-6
Appendix F. Configuring TeleVantage for the Windows Firewall F-1
Overview .............................................................................................. F-1
Adjusting Windows Firewall exceptions ............................................... F-2
Windows Firewall exceptions added for TeleVantage ......................... F-4
TeleVantage Server firewall exceptions ........................................... F-4
Workstation PC firewall exceptions................................................... F-5
Adjusting Windows Firewall exceptions for TeleVantage Web Services ...
F-5
Upgrading Windows after TeleVantage is installed.............................. F-6
Appendix G. Extending TeleVantage.............................................. G-1
Extending TeleVantage with off-the-shelf applications ........................ G-2
In-band signaling applications.......................................................... G-2
TAPI applications ............................................................................. G-2
Extending TeleVantage with third-party devices .................................. G-3
CONTENTS
Using an overhead loudspeaker with TeleVantage ............................. G-7
The TeleVantage SDK......................................................................... G-7
Installing the TeleVantage SDK ....................................................... G-8
The TeleVantage SDK Application Programming Interfaces .......... G-8
The Client API .................................................................................. G-9
The Add-in API ................................................................................. G-9
The IVR Plug-in API ........................................................................ G-9
The Device Status API ................................................................... G-12
Appendix H. Troubleshooting VoIP ................................................ H-1
Fine-tuning your Internet span connection ......................................... H-1
Troubleshooting problems with SIP or H.323 ...................................... H-3
Troubleshooting an H.323 IP phone .................................................... H-8
Testing audio delay from an IP phone with *18 ............................... H-9
Appendix I. Protecting Your Phone System Against Toll Fraud.... I-1
About toll fraud....................................................................................... I-2
Typical toll fraud strategies................................................................. I-2
Identifying toll fraud................................................................................ I-2
Protecting your system against toll fraud............................................... I-3
Password security .............................................................................. I-3
User permissions................................................................................ I-4
Setting up dialing restrictions ............................................................. I-4
Making account logon more secure ................................................... I-5
Securing your phone system database.............................................. I-6
Securing SIP stations ......................................................................... I-6
Checking for current scams ............................................................... I-6
Responding to toll fraud attempts .......................................................... I-7
Using Caller ID to prevent fraudulent calls......................................... I-7
Appendix J. TeleVantage Configuration Settings .......................... J-1
About TeleVantage configuration settings ............................................ J-2
TeleVantage registry settings ............................................................... J-2
Changing TeleVantage registry settings ........................................... J-2
Registry settings on the TeleVantage workstation computers........ J-10
TeleVantage Server language locale settings .................................... J-17
Locale definitions............................................................................. J-17
Defining custom tones ........................................................................ J-18
Disabling Dialogic devices .................................................................. J-20
Modifying how conference resources are used .............................. J-21
Dialogic device names .................................................................... J-24
Dialogic telephony board settings....................................................... J-25
INSTALLING TELEVANTAGE
VoiceBoard settings ........................................................................ J-25
VoiceBoard channel settings .......................................................... J-28
Robbed Bit T1 Setting ..................................................................... J-30
E1 and T1 board settings ................................................................ J-30
ISDN Megacom service settings..................................................... J-33
Using the TeleVantage Advanced Settings Editor .............................. J-34
Viewing current values .................................................................... J-35
Changing key values....................................................................... J-36
Modifying other supported TeleVantage settings ........................... J-36
Appendix K. Further Reading.......................................................... K-1
Books on telecommunications ..........................................................K-1
Books on Windows telephony architecture.......................................K-1
Web sites about telecommunications ...............................................K-2
Web sites about Windows telephony architecture............................K-2
Web sites about VoIP........................................................................K-2
Index ...................................................................................................I-1
CONTENTS
CHAPTER 1
CHAPTER 1
INTRODUCTION
CHAPTER CONTENTS
TeleVantage overview . . . . . . . . . . . . . . . . . . . . . . . . . . . . . . . . . . . 1-2
How to use this manual . . . . . . . . . . . . . . . . . . . . . . . . . . . . . . . . . . 1-5
Where to get help . . . . . . . . . . . . . . . . . . . . . . . . . . . . . . . . . . . . . . 1-5
TeleVantage documentation . . . . . . . . . . . . . . . . . . . . . . . . . . . . . . 1-6
TeleVantage overview _____________________________________
Welcome to TeleVantage!
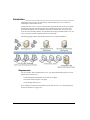
TeleVantage is a feature-rich, software-based phone system that combines rock-solid stability
with the most advanced communications technology available today. TeleVantage delivers
greater functionality, flexibility, and value than proprietary PBXs to a variety of customers,
from small offices to large enterprise organizations with sophisticated call centers.
About this manual
This manual provides information on planning for your TeleVantage system, as well as
instructions for installing the TeleVantage Server, TeleVantage database server, and
TeleVantage workstation applications.
For information on selecting the Dialogic telephony hardware and software necessary to run
TeleVantage, as well as instructions for installing these components, see Installing Dialogic
Telephony Components. For instructions on using TeleVantage after it is installed, see
Administering TeleVantage and Using TeleVantage.
Major TeleVantage features
Major TeleVantage features include:
Q
Fault tolerant architecture. Designed to keep your phone system up and running. If the
network or your desktop computer goes down, your phone lines are unaffected. Even in
the case of a TeleVantage Server malfunction or power outage, your critical phone lines
will stay open.
Q
Software-only solution. With Dialogic's Host Media Processing (HMP), you can
deliver a pure IP-PBX media server solution using just software. Just add the HMP
licenses you need for the number of IP ports and the media processing you want to
support.
Q
System scalability. Scale to 280 trunks and 720 stations using the appropriate Dialogic
telephony boards, or to 288 VoIP ports using Dialogic HMP. (See page 3-10 for more
information.)
Q
Graphical call control. Gives you an easy visual way to place calls, transfer, put on
hold, send to voice mail, set up conference calls and more.
Q
Verbal menus. Guides you through all call handling and user management tasks so that
you can use TeleVantage even without a computer.
Q
Full-featured voice mail. Lets you create caller-specific greetings, log in remotely, and
manage your voice messages graphically from TeleVantage ViewPoint or your e-mail
Inbox. You can also easily call back the person who left you a message.
1-2
INSTALLING TELEVANTAGE
Q
Powerful call center options. Two types of call centers are available in
TeleVantage—call center queues and ACD workgroups. Call center queues provide a
full-featured call distribution system, enabling you to customize your callers’ hold
experience, play single or repeating prompts, prompt callers to enter data, configure call
priority, and set up multi-level supervisor permissions. ACD workgroups provide fewer
features and are available to you if you have not purchased the Call Center Agent
licenses that are required for call center queues. You can use the TeleVantage Call
Center Reporter to run a variety of reports on call center activity for both call center
queues and ACD workgroups.
Q
E-mail, pager, and call notification. Receive notification of incoming voice mail,
using e-mail, pager, or by having TeleVantage call you.
Q
Advanced caller identification. Using PIN numbers or Caller ID, TeleVantage lets you
easily screen every call and message, either visually or by announcing the caller's name
when you answer the phone.
Q
Call recording. Lets you record conversations of calls or conferences, on demand or
automatically across the entire company or specified individuals.
Q
Personal statuses. Lets you create “Vacation,” “Out of the Office,” and other personal
statuses to let your coworkers know what you are doing. Personal status can set whether
your phone rings, the greeting that plays, and routing list behavior when you are not able
to answer calls.
Q
TeleVantage ViewPoint Web Access. Enables users with a Web browser to access
voice mail or manage personal settings from anywhere in the world over the Internet or
from non-Windows platforms in the office.
Q
“Follow-me” call forwarding. Features routing lists that try several locations to find
you. You can create several routing lists and apply them to specific callers.
Q
Call logging with cradle-to-grave history. Lets users see a record of their own calls
and gives TeleVantage system administrators access to your company's complete log.
Click on any call in the Call Log or Call Monitor to see a real-time history of its flow
through the system.
Q
Scheduled auto attendants. Allows you to schedule an auto attendant’s use of specific
greetings and the way it routes calls according to the time of the day and days of the
week.
Q
Flexible Internet-ready architecture. Supports pure SIP or H.323 IP telephony and
hybrid solutions such as IP-connected phones. Lets you adapt to Internet telephony at
your own pace.
Q
TAPI Service Provider and Contact Manager Assistant. Lets you use Act!, Outlook,
GoldMine, GoldMine FrontOffice, or other TAPI-compliant applications with
TeleVantage. You can place calls and receive screen-pop identifications when you
receive calls from contacts in these applications.
CHAPTER 1. INTRODUCTION
1-3
Q
The TeleVantage Software Development Kit and open architecture. Use one of the
many off-the-shelf applications available from third-party vendors to customize
TeleVantage behavior and call processing. For the ultimate in flexibility, programmers
can use the included comprehensive TeleVantage Software Development Kit (SDK) to
develop custom applications.
Q
Multi-lingual system prompts. Lets both users and callers select the language in which
they hear TeleVantage prompts. American English, UK English, and Spanish voice
prompts are included with TeleVantage. French Canadian, French Parisian, and German
voice prompts are available separately. See your TeleVantage provider for more
information.
Q
CLASS and ADSI feature support. For analog CLASS phones and IP phones, Caller
ID, Caller ID on Call Waiting, and message waiting indicators are supported.
Q
Digital phone support. TeleVantage supports Toshiba digital phones, including the
phone’s fixed buttons, LCD display, hot dial pad, and voice-first answering, as well as
the following configurable feature buttons: Primary Directory Numbers, Secondary
Directory Numbers, Record Call, Do Not Disturb, Speed Dial/Busy Lamp Field (BLF),
Account Code, Park/Unpark, Phone Page, Release, Send to Voice Mail, Call
Forwarding, Disconnect, Take Call, Flash, Conference/Transfer, and Call Menu.
Q
Tenanting support. Tenanting allows one Server to be shared between multiple
companies or groups, called organizations. Calls can be tracked by organization in the
Call Log.
Q
Instant Messaging. TeleVantage provides a simple, secure Instant Messaging tool that
enables real-time typed conversation between users who are running ViewPoint and
have instant messaging enabled. Users can initiate an Instant Messaging session by
right-clicking another user’s name in the ViewPoint Extensions list and choosing Send
an instant message.
Significant new features in TeleVantage 8
For a complete list of new features, do either of the following:
1-4
Q
Double-click the WhatsNew.htm document on the Master CD.
Q
Select the Show What’s New checkbox at the end of the TeleVantage Workstation
Setup.
INSTALLING TELEVANTAGE
How to use this manual ___________________________________
There are two related installation manuals that guide you through all of the steps required to plan
for and install your TeleVantage system:
Q
Installing TeleVantage (this manual) is your starting point, and contains two main
sections:
Q
Section 1, “Preparing for Installation”. The chapters in this section describe the
TeleVantage components, PC and network requirements, and the various trunk and
station options you can use with TeleVantage.
If you are installing TeleVantage for the first time—or even if you are upgrading
from a previous version—read the chapters in this section thoroughly for
information that will help you plan and prepare for installation, including current
TeleVantage requirements, and how to order trunks and services.
Q
Section 2, “Performing the Installation”. The chapters in this section describe the
installation process in detail.
Follow the steps in each chapter before going to the next chapter. The Introduction
in each chapter explains exactly which of the steps in that chapter you must
perform.
Q
Installing Dialogic Telephony Components describes the two types of telephony
resources (Dialogic HMP or Dialogic boards) that you can use with TeleVantage, as well
as how to install and configure them. For an overview of the ways that you can provide
telephony resources for TeleVantage, see Chapter 2 in Installing Dialogic Telephony
Components.
Where to get help ________________________________________
Contact your TeleVantage provider for technical support—Vertical only provides technical
support through TeleVantage providers. For information about how to report problems, see
“Reporting problems to your TeleVantage provider” in Chapter 12 in Administering
TeleVantage.
You can get help through TeleVantage documentation as described in the next section.
CHAPTER 1. INTRODUCTION
1-5
TeleVantage documentation ________________________________
TeleVantage provides documentation in several easy-to-access online formats that provide the
benefits of instant hypertext navigation. This section describes the different TeleVantage
documents and how to access them in various formats.
Ordering printed documentation
You can order printed versions of some TeleVantage documents. To do so, contact your
TeleVantage provider.
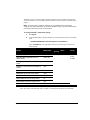
The TeleVantage documentation set
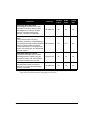
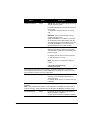
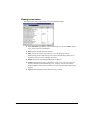
The following table shows the TeleVantage documentation set and the formats in which each
item is available. See “Accessing online documentation” on page 1-8 for instructions on using
each format.
Audience
Available
in print
HTML
book
Acrobat
PDF
Installing TeleVantage
This manual covers the requirements and
installation process for upgrades and fresh
installations, and describes how to order
telephone company services, add licenses,
and troubleshoot problems.
Administrators
and
TeleVantage
providers
Yes
Yes
Yes
Installing Dialogic Telephony
Components
This manual covers the requirements and
installation process for upgrades and fresh
installations, and describes how to change
hardware and troubleshoot problems.
Administrators
and
TeleVantage
providers
No
Yes
Yes
Administering TeleVantage
This manual describes setting up, managing
and monitoring your TeleVantage system,
including using the TeleVantage
Administrator to configure system settings,
trunks, stations, users, call routing, IP
telephony, and more.
Administrators
No
Yes1
Yes
Using TeleVantage
This manual covers how to use the
TeleVantage system, including the telephone
commands, TeleVantage ViewPoint,
ViewPoint Web Access, working from
remote locations, call center participation,
and more.
All audiences
No
Yes
Yes
Document
Audience
Available
in print
HTML
book
Acrobat
PDF
TeleVantage QuickStart Guide
This small guide provides easy-to-read
instructions for first-time users and basic
TeleVantage use, including a complete
telephone command reference and
coverage of ViewPoint fundamentals.
All audiences
No
Yes
Yes
TeleVantage Call Center Administrator’s
Guide
This manual describes configuring,
maintaining, supervising, and participating in
a TeleVantage call center. Contains separate
sections for administrators and agents.
Includes instructions for running call center
queues, ACD workgroups, and TeleVantage
call center reports.
Administrators
No
Yes1
Yes
TeleVantage Developer’s Guide
This reference describes how to extend
TeleVantage's built-in features using the
Client API, the Add-in API, the IVR Plug-in
API, the Device Status API, and TAPI.
Programmers
No
No
Yes
TeleVantage Pocket Reference Card
This wallet-sized card is a convenient
reference for the most-used TeleVantage
telephone commands.
All audiences
No
No
Yes
Document
1. Administering
TeleVantage and the TeleVantage Call Center Administrator’s Guide are combined in a
single HTML book called Administering TeleVantage and Call Centers
CHAPTER 1. INTRODUCTION
1-7
Accessing online documentation
You can access TeleVantage’s online documentation in the following formats.
Online Help
From any TeleVantage application window, you can press F1 or click Help to get
context-sensitive Help describing the window and its individual fields. For overviews of
features, see the online or PDF books, not the online Help.
HTML books
TeleVantage provides complete compiled HTML Help (CHM) versions of four of its printed
manuals, enhanced with hypertext navigation panes and links. To access the HTML books from
within ViewPoint or the Administrator, choose Help > Online Books.
To access the HTML books without ViewPoint or the Administrator, open the following files,
located by default in C:\Program Files\Common Files\Vertical\TeleVantage:
Q
AdministeringTV.chm. Contains Administering TeleVantage and the TeleVantage Call
Center Administrator’s Guide.
Q
InstallingTV.chm. Contains Installing TeleVantage.
Q
InstallingIntel.chm. Contains Installing Dialogic Telephony Components.
Q
UsingTV.chm. Contains Using TeleVantage.
Adobe Acrobat PDF books
The PDF versions of TeleVantage manuals are the same files that Vertical sends to be
professionally printed, and can be used for your own printing or browsing. They are available
on the Master CD in the \Manuals directory. To view and print these files, use the Adobe
Acrobat Reader, available on the Master CD in the \Adobe directory.
1-8
INSTALLING TELEVANTAGE
CHAPTER 2
CHAPTER 2
TELEVANTAGE COMPONENTS
CHAPTER CONTENTS
Introduction . . . . . . . . . . . . . . . . . . . . . . . . . . . . . . . . . . . . . . . . . . . 2-2
TeleVantage Server . . . . . . . . . . . . . . . . . . . . . . . . . . . . . . . . . . . . 2-3
TeleVantage Administrator . . . . . . . . . . . . . . . . . . . . . . . . . . . . . . . 2-4
TeleVantage ViewPoint . . . . . . . . . . . . . . . . . . . . . . . . . . . . . . . . . . 2-4
TeleVantage Web Services . . . . . . . . . . . . . . . . . . . . . . . . . . . . . . . 2-4
TeleVantage Enterprise Manager . . . . . . . . . . . . . . . . . . . . . . . . . .2-5
TeleVantage Multi-line TAPI Service Provider . . . . . . . . . . . . . . . . 2-5
TeleVantage TAPI Service Provider . . . . . . . . . . . . . . . . . . . . . . . .2-5
TeleVantage Contact Manager Assistant . . . . . . . . . . . . . . . . . . . . 2-6
TeleVantage Archived Recording Browser and Recording Archive
Service . . . . . . . . . . . . . . . . . . . . . . . . . . . . . . . . . . . . . . . . . . . . . . 2-6
TeleVantage Station Message Detail Recording (SMDR) Service . 2-6
TeleVantage Robbed Bit T1 Experimenter . . . . . . . . . . . . . . . . . . . 2-6
TeleVantage Software Development Kit . . . . . . . . . . . . . . . . . . . . . 2-7
Introduction _____________________________________________
TeleVantage consists of several components that you can install separately. This chapter
provides an overview and a description of the purpose of each of the following components:
Q
TeleVantage Server. See page 2-3.
Q
TeleVantage Administrator. See page 2-4.
Q
TeleVantage ViewPoint. See page 2-4.
Q
TeleVantage Web Services. See page 2-4.
Q
TeleVantage Enterprise Manager. See page 2-5.
Q
TeleVantage TAPI Service Provider. See page 2-5.
Q
TeleVantage Contact Manager Assistant. See page 2-6.
Q
TeleVantage Archived Recording Browser and Recording Archive Service. See
page 2-6.
Q
TeleVantage Station Message Detail Recording (SMDR) Service. See page 2-6.
Q
TeleVantage Robbed Bit T1 Experimenter. See page 2-6.
Q
TeleVantage Software Development Kit. See page 2-7.
TeleVantage workstation applications
The Administrator, TeleVantage ViewPoint, the TAPI Service Provider, and the Contact
Manager Assistant are also referred to within this manual as the TeleVantage workstation
applications.
TeleVantage add-ons
If you are using any of the following TeleVantage add-ons, contact your TeleVantage provider
to see if you also need to upgrade any of the them when you install this version of TeleVantage.
2-2
Q
TeleVantage Call Classifier and WebPop
Q
TeleVantage Persistent Pager
Q
TeleVantage Smart Dialer
Q
TeleVantage Call Center Scoreboard
Q
TeleVantage Conference Manager
Q
TeleVantage Microsoft Customer Relations Management (MSCRM)
INSTALLING TELEVANTAGE
TeleVantage Server _______________________________________
The TeleVantage Server is the heart of the TeleVantage system. It controls phone traffic in and
out of your office, and maintains a database of user and system information, call history, and
contacts, as well as all voice files, including voice messages.
The TeleVantage Server runs on a Windows PC that contains Dialogic telephony resources. See
“TeleVantage Server PC requirements” on page 3-2 for specific Server requirements. See
Chapter 2 in Installing Dialogic Telephony Components for a comparison of the methods by
which you can provide telephony resources on the Server.
The Device Monitor
The Device Monitor lets you see the current activity and status of each trunk and station on the
TeleVantage Server. You can also start and stop the Server by using the Device Monitor, which
you can run independently of the TeleVantage Administrator application. The Device Monitor
is installed automatically on the TeleVantage Server PC.
The same information is also available in the Device Monitor view of the TeleVantage
Administrator.
Server reliability features
Because consistent phone service is vital to any business, the TeleVantage Server takes steps to
ensure continued phone service, even when the phone system is impaired.
Failover support
With analog phone service, TeleVantage ensures failover telephone support in the event of a
power failure or system crash. To set up failover, use the Dialogic DI0408LSAR2 integrated
trunk and station board, which supports on-board failover with direct trunk-to-station
connections (no cabling is required.) See “Supported integrated trunk and station board” in
Chapter 4 in Installing Dialogic Telephony Components for more information.
Note: Failover support is only available for analog trunks. On systems that primarily use digital
(T1, E1, or IP) trunks, configure several analog trunks so that the system can automatically switch
to failover mode when necessary.
Other reliability features
For further reliability, Windows supports RAID drives and uninterruptible power supplies.
CHAPTER 2. TELEVANTAGE COMPONENTS
2-3
TeleVantage Administrator _________________________________
The TeleVantage Administrator application enables you to configure, maintain, and monitor
your TeleVantage system. You can use the Administrator to manage trunks, extensions, users,
create and modify auto attendant menus, and manage all aspects of your TeleVantage system.
You can install the Administrator on any PC on your network, including the TeleVantage Server
PC.
See “Administrator and ViewPoint requirements” on page 3-18 for specific requirements.
TeleVantage ViewPoint ____________________________________
TeleVantage ViewPoint is a Windows application that can be used in conjunction with any
telephone to place and receive calls, access voice messages visually, change call handling
preferences, and use any of the features of the TeleVantage system. You can install ViewPoint
on any PC on your network.
While ViewPoint enhances your access to TeleVantage, it is not required. Most TeleVantage
features are also available to users over the phone through the telephone commands.
See “Administrator and ViewPoint requirements” on page 3-18 for specific requirements.
A Web browser-accessible version of ViewPoint is available by installing TeleVantage Web
Services (described below.)
TeleVantage Call Center Reporter
The TeleVantage Call Center Reporter is installed automatically when you install TeleVantage
ViewPoint.
The Call Center Reporter allows you to run more than a dozen detailed reports on call activity
and telephone usage in TeleVantage. By carefully tracking only the call activity on which you
want to report, it allows you to quickly identify how effectively your phone system is being used
by users, agents, queues, and trunks.
The TeleVantage Call Center Reporter has additional requirements beyond those of
TeleVantage ViewPoint. See “Call Center Reporter requirements” on page 3-21 for details.
TeleVantage Web Services _________________________________
With TeleVantage Web Services, users can use TeleVantage Viewpoint Web Access, an HTML
version of the TeleVantage ViewPoint application that is accessible via any Web browser. With
ViewPoint Web Access, users can access TeleVantage remotely through the Internet or their
Intranet, and from non-Windows platforms such as Macintosh. ViewPoint Web Access offers
access to all TeleVantage data and most ViewPoint functions.
See “TeleVantage Web Services requirements” on page 3-20 for specific requirements.
2-4
INSTALLING TELEVANTAGE
TeleVantage Enterprise Manager
TeleVantage Enterprise Manager allows a distributed network of TeleVantage Servers to appear
and behave as a single phone system.
Enterprise Manager facilitates the configuration and operation of a network of TeleVantage
Servers (called a TeleVantage domain) by automating the initial intra-Server configuration and
providing data synchronization services that make the domain of TeleVantage Servers appear
as a single distributed phone system.
Enterprise Manager manages the domain’s Enterprise Gateways, Enterprise Gateway users, and
dialing services automatically. Without Enterprise Manager, you would need to do this
manually, configuring multiple TeleVantage Servers to communicate with each other using
Voice over IP (VoIP) by setting up Enterprise Gateways and Enterprise Gateway users on each
TeleVantage Server via the TeleVantage Administrator.
For more information, see TeleVantage Enterprise Manager Installation and Administrator
Guide.
TeleVantage Multi-line TAPI Service Provider
You can install TeleVantage Multi-line TAPI Service Provider on any server that needs multiple
lines for TAPI support, for example, Citrix MetaFrame or Windows Terminal Services.
TeleVantage Multi-line TAPI Service Provider provides TAPI screen pops and TAPI dialing for
multiple users with TAPI-compatible applications such as Act!. The TeleVantage Multi-line
TAPI Service Provider can be used with the Contact Manager Assistant to provide screen pops
to Microsoft Outlook, GoldMine, and GoldMine FrontOffice as well.
TeleVantage TAPI Service Provider __________________________
The TAPI Service Provider allows any TAPI-compatible application on a networked PC to
access your phone lines through TeleVantage. See “TAPI Service Provider/Contact Manager
Assistant requirements” on page 3-19 for specific requirements. Users who install the TAPI
Service Provider on their PCs can place calls from their station using contact managers such as
Microsoft Outlook, Act!, GoldMine, and GoldMine FrontOffice.
The TAPI Service Provider runs in the background and enables the contact manager or other
application to use TeleVantage. You can install the TAPI Service Provider with or without
TeleVantage ViewPoint.
Note: This TAPI service provider is meant for individual users as it only allows managing calls
on one station. For multiple users, see the TeleVantage Multi-line TAPI Service Provider
described in the previous section.
CHAPTER 2. TELEVANTAGE COMPONENTS
2-5
TeleVantage Contact Manager Assistant ______________________
The TeleVantage Contact Manager Assistant tightly integrates with Outlook, GoldMine, and
GoldMine FrontOffice, so that you can receive screen-pop notification when any of your
Outlook, GoldMine, or GoldMine FrontOffice contacts call you. See “TAPI Service
Provider/Contact Manager Assistant requirements” on page 3-19 for specific requirements.
You can install the Contact Manager Assistant on individual workstations with the TeleVantage
TAPI Service Provider, or on a Citrix Server or Windows Terminal Server along with the
Multi-line TAPI Service Provider described on page 2-5.
The TeleVantage Contact Manager Assistant is not required if you are using Act! as your contact
manager.
TeleVantage Archived Recording Browser and Recording Archive
Service _________________________________________________
The TeleVantage Archived Recording Browser is a tool for searching, listening to, and
managing thousands of mailbox recordings (voice messages and call recordings) that have been
archived to a separate archive server PC by the Recording Archive Service. Off loading the
archive process from the TeleVantage Server allows mailbox recordings to be archived from
multiple TeleVantage Servers, and prevents the resource-intensive archiving process from
impacting TeleVantage performance.
See “TeleVantage Recording Archive Service requirements” on page 3-21 for specific
requirements for the archive server PC.
TeleVantage Station Message Detail Recording (SMDR) Service __
The TeleVantage SMDR Service lets you send real-time call data from TeleVantage to a third-party
application. Third-party applications might be anything from a printer that prints a line for each call,
to call accounting software that generates detailed reports. For complete information about
supported output formats, as well as how to install, configure, and use SMDR Service, see
Administering TeleVantage.
Note: SMDR Service is not normally needed, since TeleVantage has comprehensive call
logging and reporting built in.
TeleVantage Robbed Bit T1 Experimenter _____________________
The TeleVantage Robbed Bit T1 Experimenter is a utility that lets you configure a Robbed Bit
T1 line to match the signaling specifications used by your carrier and make test calls until the
line is operating properly. You can also use the TeleVantage Administrator to configure Robbed
Bit T1 settings.
2-6
INSTALLING TELEVANTAGE
TeleVantage Software Development Kit ______________________
The TeleVantage Software Development Kit (SDK) lets you extend TeleVantage functionality.
The TeleVantage SDK consists of the following components:
Q
The Client Application Programming Interface (API) gives custom applications the
ability to access all functions and data in TeleVantage ViewPoint.
Q
The Add-In API allows you to extend the ViewPoint application itself with additional
functionality.
Q
The IVR Plug-in API is a powerful way to integrate virtually any interactive voice
response or voice processing application with your TeleVantage system.
Q
The Device Status API gives custom applications the ability to get detailed information
about trunks and stations from the TeleVantage Server.
For more information about extending TeleVantage, see Administering TeleVantage and
TeleVantage Developer’s Guide. The TeleVantage Developer’s Guide is available as an Acrobat
file—tvsdk.pdf—in the \manuals directory on the Master CD.
CHAPTER 2. TELEVANTAGE COMPONENTS
2-7
CHAPTER 3
CHAPTER 3
TELEVANTAGE REQUIREMENTS
CHAPTER CONTENTS
Introduction . . . . . . . . . . . . . . . . . . . . . . . . . . . . . . . . . . . . . . . . . . . 3-2
Choosing a location for the TeleVantage Server PC. . . . . . . . . . . . 3-2
TeleVantage Server PC requirements . . . . . . . . . . . . . . . . . . . . . . 3-2
TeleVantage database server requirements . . . . . . . . . . . . . . . . . 3-11
Network requirements . . . . . . . . . . . . . . . . . . . . . . . . . . . . . . . . . . 3-12
TeleVantage license requirements . . . . . . . . . . . . . . . . . . . . . . . .3-16
Administrator and ViewPoint requirements . . . . . . . . . . . . . . . . . . 3-18
TAPI Service Provider/Contact Manager Assistant requirements . 3-19
TeleVantage Web Services requirements . . . . . . . . . . . . . . . . . . . 3-20
Call Center Reporter requirements . . . . . . . . . . . . . . . . . . . . . . . .3-21
TeleVantage Recording Archive Service requirements. . . . . . . . . 3-21
TeleVantage SMDR Service requirements . . . . . . . . . . . . . . . . . . 3-22
Emergency dialing service requirements . . . . . . . . . . . . . . . . . . . 3-22
Introduction _____________________________________________
This chapter describes hardware and software requirements for the PCs on which the various
TeleVantage components run. It also describes the requirements for telephone lines and the local
area network (LAN) configuration in your office environment. Make sure all these requirements
are met before you begin the installation.
In addition to the requirements described in this chapter, see Installing Dialogic Telephony
Components for information about Dialogic hardware and software requirements.
Choosing a location for the TeleVantage Server PC _____________
The TeleVantage Server must be located in a dust-free environment that is close to the location
at which the trunk lines from your telephone company enter the premises and your inside phone
lines begin. The existing telephone wiring closet available in most offices is a suitable location.
The Server must also have access to your network wiring if you plan to use any TeleVantage
components on your LAN or remotely, or if you plan to use the Internet telephony features
provided by TeleVantage.
The location does not have to be easily accessible, since you can remotely reconfigure and
manage a TeleVantage Server, using Windows Terminal Services or Remote Desktop (as long
as the TeleVantage Server is not running Windows 2000 Professional.) See the TeleVantage
Server operating system requirements below for details.
TeleVantage Server PC requirements_________________________
The TeleVantage Server PC works optimally if it is dedicated to TeleVantage. The minimum
requirements for the TeleVantage Server PC are described below.
Important: Virtual PC software solutions from companies like Microsoft or VMWare cannot be
used for the TeleVantage Server.
TeleVantage Server PC operating system requirements
The following operating systems can be used:
Q
Microsoft® Windows® Server 2003. Base release as well as Service Pack (SP) 1 and
and 2. Windows Server 2003 includes Windows Terminal Services for remote
management.
Q
Windows 2000 Server. SP4 or higher. Windows 2000 Server includes Windows
Terminal Services for remote management.
3-2
INSTALLING TELEVANTAGE
Q
Windows XP Professional. Base release as well as SP1-SP2. Windows XP
Professional includes Remote Desktop for remote management. Note that a TeleVantage
Server using Windows XP Professional is limited to supporting a maximum of 10
simultaneous connections to any TeleVantage workstation application (ViewPoint,
Administrator, TAPI Service Provider, Contact Manager Assistant, Archived Recording
Browser, or ViewPoint Web Access session.)
Q
Windows 2000 Professional. SP4 or higher. Remote management software is not
included, but you can purchase Symantec pcAnywhere separately. Note that a
TeleVantage Server using Windows 2000 Professional is limited to supporting a
maximum of 10 simultaneous connections to any TeleVantage workstation application
(ViewPoint, Administrator, TAPI Service Provider, Contact Manager Assistant,
Archived Recording Browser, or ViewPoint Web Access session.)
Important operating system-specific notes
Review the notes that apply to your version of Windows:
Q
Windows Server 2003 or Windows XP Professional SP2. If your TeleVantage Server
currently runs or will run Windows XP Professional SP2 or Windows Server 2003 SP1
or SP2, review the important information about Windows Firewalls in Appendix F,
“Configuring TeleVantage for the Windows Firewall.”
Q
Windows Server 2003 or Windows 2000 Server. Windows Terminal Services can
operate in either Remote Administration or Full Terminal Services mode. Only Remote
Administration mode is supported on the TeleVantage Server PC. You can install
Terminal Services in Full Terminal Services mode on any non-TeleVantage Server PC
in your network.
TeleVantage Server PC CPU and memory requirements
TeleVantage supports dual- and quad-processor CPUs as well as Intel’s Hyperthreading
Technology (HT.)
CPU and memory requirements depend on the following variables:
Q
Call activity
Q
Data storage requirements
Q
Your telephony resources on the TeleVantage Server
Q
If you are using Dialogic Host Media Processing (HMP) software, see the table on
page 3-5.
Q
If you are using Dialogic boards, see the table on page 3-6.
For information to help you decide which method of providing telephony resources is
best for you, see Chapter 2 in Installing Dialogic Telephony Components.
CHAPTER 3. TELEVANTAGE REQUIREMENTS
3-3
When to increase CPU speed and memory
CPU speed and memory availability have a direct effect on TeleVantage performance. While the
minimum requirements listed in the tables on pages 3-6 and 3-5 are adequate for lightly-used,
demonstration, or test systems, a faster CPU and additional memory are recommended for
systems with heavier usage.
For example, a system that handles 5000 calls per day requires more memory and a faster CPU
than a system that handles only 500 calls each day. In addition, a system that processes more
than 5000 calls a day will probably require the full version of Microsoft SQL Server for the
TeleVantage database server, which will in turn consume additional memory.
You should increase CPU speed and memory beyond the amounts recommended in the tables
on pages 3-6 and 3-5 in cases like the following:
Q
You are using Windows XP Professional or Windows Server 2003.
Q
You are using VoIP.
Q
You experience heavy call volumes.
Q
You have a call center that handles a high volume of calls.
Q
You have significant storage requirements (for example, you retain a year or more of
Call Log data on your TeleVantage Server without archiving.)
Q
You record all calls.
CPU and memory requirements when using Dialogic HMP
The table on page 3-5 lists CPU and memory recommendations for various configurations when
you are using Dialogic HMP software to provide telephony resources for TeleVantage.
Important: Be aware that Dialogic HMP requires a more powerful CPU and more memory to
handle the amount of traffic compared to Dialogic boards, since all media processing occurs on
the PC’s CPU and memory. See Chapter 3 in Installing Dialogic Telephony Components for
specific Dialogic HMP requirements.
In the table, Number of simultaneous VoIP and voice resources used is the total number of
Realtime Transport Protocol (RTP) resources available.
Note: An Excel spreadsheet called IntelRTPResourceNeeds.xls is provided for you to help
calculate the resources you need to support your configuration. It is located by default in
C:\Program Files\TeleVantage\Administrator.
3-4
INSTALLING TELEVANTAGE
Number of
simultaneous
VoIP and voice
resources used
(xx/yy)
Recommended CPU and speed
Using G.711 codec1
Using G.723.1,
G.729A, or G.729AB
codec
Recommended
memory
Up to 4/22
Intel® Pentium III, 850
MHz or higher
Intel Pentium III, 850
MHz or higher
512 MB
Up to 32/162
Intel Pentium III, 1.26
GHz or higher
Intel Pentium 4, 1.7 GHz
or higher
1 GB
Up to 64/322
Intel Pentium 4, 2.0 GHz
or higher
Dual Intel Xeon™, 2.0
GHz or higher
1 GB
Up to 96/482
Single Intel Xeon, 2.4
GHz or higher
Dual Intel Xeon, 2.8 GHz
or higher
2 GB
Over 96/482
Dual Intel Xeon, 2.4 GHz
or higher
Dual Intel Xeon, 3.06
GHz or higher
2 GB
1. Based
on 20 ms frame size.
2. In xx/yy, xx refers to the number of resources used for the Basic RTP G.711 codec; yy refers to the
resource usage with one of the G.723.1, G.729A, or G.729AB (Enhanced RTP) codecs. One-half
as many simultaneous VoIP and voice resources are supported when using one of the Enhanced
RTP codecs as when using a Basic RTP G.711 codec, because using an Enhanced RTP resource
also consumes one Basic RTP G.711 resource.
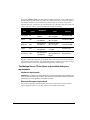
CPU and memory requirements when using Dialogic boards
The table on page 3-6 lists minimum CPU and memory recommendations for various
configurations when you are using Windows 2000 and Dialogic boards and drivers to provide
telephony resources for TeleVantage at a light-to-average call volume. See page 3-4 for cases
in which you should bump up memory and CPU requirements to the next tier in the table.
CHAPTER 3. TELEVANTAGE REQUIREMENTS
3-5
In the table, Total # of ports is the total number of trunks and stations. In any configuration of
Dialogic boards, the total number of trunks in use simultaneously cannot exceed 280, and the
total number of stations in use simultaneously cannot exceed 720. In office environments
without a call center, typically only 25% of stations are ever in use at the same time, but be sure
to know your environment's typical and peak usage and plan accordingly.
System
size
Total # of
ports
Examples
Recommended
CPU
Recommended
memory
Very small
32
8 trunks and 24
stations
Pentium® II, 400
MHz or higher
at least 256 MB
Small
168
48 trunks and
120 stations
Pentium II, 400
MHz or higher
at least 512 MB
Medium
360
96 trunks and
264 stations
Pentium III, 800
MHz or higher
at least 768 MB
Large
672
192 trunks and
480 stations
Pentium IV, 2 GHz
or higher
at least 1 GB
Very large
1000
280 trunks and
720 stations
Dual Xeon™, 3
GHz processors or
higher
at least 2 GB
Dialogic recommends a minimum of 512 MB of memory for systems with 3 or more Dialogic
DM3 telephony boards installed. (See “About DM3 boards” in Chapter 4 in Installing Dialogic
Telephony Components for a list of DM3 boards supported by TeleVantage.)
TeleVantage Server PC hard drive and available disk space
requirements
Hard drive requirements
Important: It is critical that you format all hard drives on the TeleVantage Server with NTFS (not
FAT or FAT32) as the Server file system. This is especially important for the hard drive where the
TeleVantage voice files, database, and log files are stored.
Minimum disk space requirements
The amount of disk space you need depends on the size of your system, because each user
requires significant space for voice files such as voice messages and greetings.
3-6
INSTALLING TELEVANTAGE
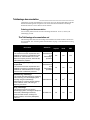
The following table lists the minimum disk space required for systems with different numbers
of users, all of whom have voice mailboxes. By default, TeleVantage allows a maximum of 30
minutes of voice files per user—20 minutes for voice messages and 10 minutes for personal
recordings such as greetings and voice titles. Increasing the default per-user settings for voice
messages and personal recordings requires more disk space, as indicated in the table.
Minimum disk space requirements by
Minutes of voice files per user
Users
30
minutes
60
minutes
90
minutes
120
minutes
180
minutes
240
minutes
24
5 GB
5 GB
5.5 GB
5.5 GB
6.5 GB
7 GB
48
5 GB
5.5 GB
6.5 BG
7 GB
8.5 GB
9.5 GB
96
5.5 GB
7 GB
8.5 GB
9.5 GB
12.0 GB
15 GB
144
6.5 BG
8.5 GB
10 GB
12 GB
16 GB
20 GB
264
8 GB
11.5 GB
15 GB
18.5 GB
25.5 GB
33 GB
300
8.5 GB
12.5 GB
16.5 GB
20.5 GB
28.5 GB
36.5 GB
420
10 GB
15.5 GB
21.5 GB
27 GB
38.5 GB
49.5 GB
560
12 GB
20 GB
27 GB
34.5 GB
49.5 GB
64.5 GB
720
14 GB
24 GB
33.5 GB
43 GB
62.5 GB
81.5 GB
If you want to calculate the total disk space required for your specific configuration (if it is not
included in the previous table), add the following together and then round up to the nearest .5
GB:
1 GB for Windows. Microsoft recommends at least 1 GB disk space for
Windows 2000 Server.
+ 1.2 GB for Dialogic hardware and drivers or Dialogic HMP software
+ 2 GB for the TeleVantage database and system files
+ # of users * (.46 MB * minutes of voice files per user)
640 MB per network interface card if network capture is enabled (network
+ capture is enabled by default.) See “Capturing network troubleshooting
logs” in Chapter 12 in Administering TeleVantage for more information.
CHAPTER 3. TELEVANTAGE REQUIREMENTS
3-7
Offline storage requirements
An offline storage device such as a tape drive is useful for backing up the TeleVantage database,
voice messages, and Windows Event Logs.
TeleVantage Server PC RAID requirements
TeleVantage supports and recommends Windows Server RAID implementations. To ensure
maximum uptime, configure your TeleVantage Server PC with RAID as you would any other
mission-critical system. Some options are listed in the following table. Contact your server
manufacturer for more detailed information.
Version
Disk controllers/
Drives required
Comments
RAID 1
1 controller (disk mirroring);
2 drives
Provides fault tolerance in the event of a
single drive failure, but not a controller
failure. Slower, because data must be written
to both drives.
RAID 1
2 controllers (disk duplexing);
2 drives
Provides fault tolerance in the event of a
single disk or single controller failure.
RAID 5
1 controller;
at least 3 drives
Provides continual operation in the event of a
single drive failure, but not a controller
failure.
TeleVantage Server PC slot requirements
The TeleVantage Server PC requires slots for Dialogic boards, if that is how you are providing
telephony resources. Slots are not required if you are providing telephony resources via Dialogic
HMP. See Chapter 2 in Installing Dialogic Telephony Components for more about using
Dialogic telephony boards vs. using Dialogic HMP.
TeleVantage Server PC COM/USB port requirements
Up to 2 COM ports may be required, as follows:
3-8
Q
1 COM or USB port for an optional UPS with power-down alarm feature.
Q
1 COM port if you are using TeleVantage Station Message Detail Recording (SMDR)
Service to connect with a third-party call accounting package over a serial connection.
See Administering TeleVantage for information about installing, configuring, and using
SMDR Service.
INSTALLING TELEVANTAGE
TeleVantage Server PC network requirements
Although TeleVantage can run without being connected to a network, many of its features are
unavailable without a network. See “Network requirements” on page 3-12 for more information,
as well as other network-related requirements.
Network interface card requirements
If you are using a network, you must have a network interface card (NIC) installed in the
TeleVantage Server.
If you are using Dialogic HMP or Dialogic Internet telephony boards using a host-based VoIP
stack, you must have a 100 BaseT NIC (a 1000 BaseT NIC may improve CPU utilization.)
Although it is not a requirement, consider installing two NICs in the Server PC. Use one NIC
for the VoIP RTP audio traffic handled by the Dialogic telephony resources, and the other NIC
for your other network traffic (for example, Administrator, ViewPoint or other data
connections).
Note: Use a static IP address for the NIC that handles VoIP RTP audio traffic.
Modem or LAN connection requirements
If you will be using TeleVantage ViewPoint Web Access, you need Internet access for the PC
running TeleVantage Web Services. For more information, see Chapter 14, “Installing
TeleVantage Multi-line TAPI Service Provider.”
TeleVantage Server PC power supply and cooling requirements
Power supply requirements
It is highly recommended that you use an uninterruptible power supply (UPS) in conjunction
with the TeleVantage Server to protect against power surges and failures.
Make sure that your power supply meets the requirements of any installed Dialogic boards.
DM3 boards in particular require a lot of power. (See “About DM3 boards” in Chapter 4 in
Installing Dialogic Telephony Components for a list of DM3 boards supported by TeleVantage.)
Contact your technical support representative if you have questions on power supply
requirements for specific boards.
Cooling requirements
If you will be using any of the following Dialogic boards, the TeleVantage Server PC will need
multiple fans:
Q
Dialogic Internet telephony boards
Q
Dialogic boards with high power requirements
CHAPTER 3. TELEVANTAGE REQUIREMENTS
3-9
TeleVantage Server PC CD ROM requirements
One CD ROM drive is required to install the TeleVantage software and related components
from the TeleVantage CDs.
TeleVantage Server PC license requirements
A Server license is required for each TeleVantage Server. See “TeleVantage license
requirements” on page 3-16 for more information.
Dongle requirements
A dongle is one of the hardware locking options for TeleVantage licenses, and is not required.
If you want a dongle, contact your TeleVantage provider. Two Rainbow Technologies dongles
are supported with TeleVantage:
Q
Vertical Communications Computer ID Key Parallel Port Dongle (part #SLM25-4)
Q
Vertical Communications Computer ID Key USB Dongle (part #SLMUSB-4)
See “How hardware locking works” on page D-9 for more information about dongles and other
options for hardware locking.
TeleVantage system configuration limits
Scalability limits
Vertical has certified TeleVantage 8.0 and Dialogic HMP 3.0 to support up to 288 G.711 IP
ports on a single Intel Xeon processor with hyper-threading and 2 GB RAM. While HMP 3.0
has been certified by Dialogic to support up to 500 G.711 IP ports running on a Quad core 2.66
GHz processor and 4 GB RAM, that configuration has not yet been certified with TeleVantage
8.0 at the time this manual was printed. Contact your TeleVantage provider for the latest
certification results if you need to support more than 288 VoIP ports.
If you are using Dialogic telephony boards, a single TeleVantage Server can support up to 280
trunks and 720 stations.
Connecting TeleVantage Servers
Multiple TeleVantage Servers can be connected together in several ways to create a combined
system with greater capacity:
3-10
Q
To use TeleVantage Enterprise Manager, see TeleVantage Enterprise Manager
Installation and Administrator Guide.
Q
To use TeleVantage Gateways, see Chapter 14 of Administering TeleVantage.
INSTALLING TELEVANTAGE
Using industrial PCs for larger systems based on Dialogic Boards
Very small- to small-sized TeleVantage systems can be configured on a standard PC that meets
the requirements outlined earlier in this chapter. Systems that are not expected to exceed 16
trunks by 48 lines—or other configurations not exceeding 4 boards—can usually be constructed
in this way.
Larger systems may require more slots than are found in a standard PC. These systems may also
require a bigger power supply to power all the boards. Large systems can be built using
industrial PCs.
For information about recommended industrial PCs, contact your TeleVantage provider.
TeleVantage database server requirements ___________________
TeleVantage uses a database server to manage and access the TeleVantage database.
Q
Database server software. The database server that you choose depends on how you
intend to use TeleVantage. For example, a system that processes more than 5000 calls a
day will probably require the full version of Microsoft SQL Server for the TeleVantage
database server, which will consume additional memory. (See the CPU and memory
requirements section on page 3-3 for a discussion of call volume and system size.)
Q
Very small, small, or medium-sized TeleVantage Servers with typical office call
volumes. Use any of the following database servers:
Q
Microsoft Data Engine (MSDE) 2000 SP3a or SP4 (any edition.) MSDE 2000
is included on the Master CD.
Q
Microsoft SQL Server 2000 SP3a or SP4 (any edition.) SQL Server 2000 must
be purchased separately.
Note: MSDE 1.x and SQL Server 7.x are not supported. If you are running MSDE 1.x
or SQL Server 7.x, you will need to upgrade as described in Chapter 9.
Q
Large or very large TeleVantage Servers (Servers with heavy call
volumes—more than 5000 calls a day, more than 5000 contacts, or that
maintain a year’s worth of Call Log data). Use Microsoft SQL Server 2000
Standard or Enterprise Edition with the latest service pack applied.
Note: MSDE 2000, SQL Server 2000 (Personal, Developer, and Evaluation
Editions), and SQL Server 2000 Desktop Engine are not recommended for large or
very busy Servers because each contains a performance governor that prevents
more than 8 simultaneous transactions, and each has a database size limit of 2 GB.
For more about the database server options available if you are installing TeleVantage
for the first time or upgrading from a previous version, see Chapter 9, “Installing The
TeleVantage Database Server.”
Q
Available disk space. 300 MB of available free space on the hard drive on which you
install the database server.
CHAPTER 3. TELEVANTAGE REQUIREMENTS
3-11
Database configuration recommendations
For best performance and reliability, Microsoft recommends (but does not require) that you
install the following components on separate hard drives. These components must be installed
on a local drive of the TeleVantage Server, but do not have to be on the same local drive.
Q
Database server
Q
TeleVantage database
Q
Database transaction logs
Q
Database backup files
You specify the location of the database server when you install it according to the instructions
in Chapter 9. You can specify separate paths for TeleVantage database, database transaction
logs, and database backup files in either of the following ways:
Q
While installing the TeleVantage Server (first-time installations only).
Q
At a later time using the TeleVantage Administrator. See “Changing special
TeleVantage directories” in Chapter 12 of Administering TeleVantage.
Network requirements_____________________________________
TeleVantage runs simultaneously on two communication systems:
Q
Your internal telephone wiring connects the TeleVantage Server to users’ telephones
around the office.
Q
A Microsoft TCP/IP local area network connects the TeleVantage Server to users’
Windows PCs. This is the typical setup in most installations.
Note: TeleVantage runs on Microsoft networking over TCP/IP. If your site already runs
a different network protocol, such as Novell IPX, you will need to run a dual stack
configuration. The TCP/IP networking protocol must be installed on your network.
This manual explains how to configure your network for TeleVantage, but it does not describe
wiring your premises or installing your LAN itself.
3-12
INSTALLING TELEVANTAGE
Using TeleVantage with a LAN
You must use a LAN if any of the following circumstances exist:
Q
You are installing TeleVantage software, such as TeleVantage ViewPoint or the
TeleVantage Administrator, on a remote PC.
Q
You are using Dialogic HMP or are installing a Dialogic DM/IPx IP telephony board or
DI0408LSAR2 integrated trunk and station board in order to use the TeleVantage
Internet telephony features.
Q
You are using TeleVantage Web Services to provide ViewPoint Web Access to users via
their Web browsers.
Q
You are using the TeleVantage e-mail notification feature.
TCP/IP and the Microsoft Network Client software are used to provide three kinds of
communication for TeleVantage, as follows:
Q
Communication between the TeleVantage database and ViewPoint or the Administrator
is provided by Microsoft Data Access Components (MDAC) using TCP/IP or named
pipes. This mechanism delivers information such as mailbox contents, greetings lists,
and Call Log data.
Q
Communications between the TeleVantage Server and ViewPoint or Administrator is
provided by Microsoft Distributed Component Object Model (DCOM). DCOM allows
real-time monitoring, call control, and media control, for example, when initiating file
recording or playing from Windows.
Q
Access to voice files stored on the Server is provided by Microsoft networking file
services so that audio can be played over the speakers on TeleVantage users’ PCs.
Using TeleVantage without a LAN
It is possible, although not recommended, to run a TeleVantage system without a LAN. In such
a configuration, users would access TeleVantage only through their phones, not through
TeleVantage ViewPoint, and some ViewPoint-only features would be unavailable to them. To
configure system settings and behavior, system administrators can run the TeleVantage
Administrator or ViewPoint on the TeleVantage Server PC itself.
Network configuration requirements
This section explains network configuration requirements for workgroup-based and
domain-based Windows networks.
Note: If you are installing TeleVantage on a network, the TeleVantage Server PC must be a
member (stand-alone) Server, not a domain controller.
CHAPTER 3. TELEVANTAGE REQUIREMENTS
3-13
Microsoft Windows workgroup-based networks
In a Windows workgroup-based network, or a non-Microsoft network, anyone who runs a
TeleVantage workstation application requires a network connection to the TeleVantage Server.
In order for the TeleVantage Server PC to be accessible via the network, you must do one of the
following:
Q
Set up an account for every user who will run a TeleVantage workstation application on
a different PC in the workgroup. These accounts must be kept in sync with users’
accounts on their PCs, for example if a user changes their password, that change must
be made on the TeleVantage Server as well.
Q
Enable the Guest account with an empty password on the TeleVantage Server (not
recommended for security reasons)
Note: The Windows Server installations disable the Guest account by default.
Microsoft Windows domain-based networks
In a Windows domain-based network, authentication is provided by the domain controller. In
this configuration, each TeleVantage user must be a member of the domain that contains the
TeleVantage Server.
The TeleVantage Server PC must be a member of the domain, or a stand-alone server, but not a
domain controller.
Novell networks
To run TeleVantage on a Novell network, you must add Gateway and Client services for
NetWare as a service on the TeleVantage Server PC.
Requirements for e-mail notification of voice messages
TeleVantage can automatically send an e-mail message to any address whenever a user receives
a new voice message. Users can also choose to have the recorded voice message attached to the
e-mail as a .WAV file. This enables users to receive both e-mail and voice mail using their
e-mail application, and to monitor voice mail from a remote location as it arrives.
You can also synchronize TeleVantage with Microsoft Exchange Server so that messages
deleted in one place are deleted from the other as well (see “IP telephony network requirements”
on page 3-15.)
3-14
Q
If you are upgrading from a previous version of TeleVantage, your existing Microsoft
Windows Messaging Application Programming Interface (MAPI) e-mail notification
and Exchange synchronization settings are retained.
Q
For all first-time installations, e-mail notification and Microsoft Exchange
synchronization are turned off by default.
INSTALLING TELEVANTAGE
Requirements for e-mail notification
In order to use e-mail notification, you must have an e-mail system or provider that supports
Simple Mail Transfer Protocol (SMTP). Ask your e-mail administrator or SMTP provider for
the SMTP connection parameters.
Configuring e-mail notification is described in Chapter 3 of Administering TeleVantage.
Note: For backward compatibility, e-mail notification is also supported using MAPI. The
requirements and configuration steps are the same as for Microsoft Exchange synchronization.
Requirements for Exchange synchronization
In order to use Exchange synchronization, you must install and configure Microsoft Outlook on
the TeleVantage Server. Microsoft Outlook Express is not supported. See the documentation
that came with your e-mail client for installation and configuration procedures.
If you are using Outlook XP or Outlook 2003, Outlook must be running via a logged-on user for
e-mail notifications to be sent.
Configuring Exchange synchronization is described on page 10-26.
IP telephony network requirements
It is recommended that your network's routers support DiffServ QoS via the TOS Octet to
maintain good voice quality of service. See “Setting the Layer 3 QoS TOS Octet for higher VoIP
quality” on page H-2 for more information.
IP telephony uses the SIP and H.323 protocols, which may be incompatible with the following
network devices:
Q
Firewalls
Q
Network Address Translators (NATs)
Q
Packet filters
Q
Proxy servers
If you are planning to use IP telephony, check with the vendors of these devices to make sure
that they support SIP or H.323.
Proxy server requirements
If your network uses a proxy server to access the Internet, a special configuration is required on
Windows 2000/XP2003 PCs in order to run TeleVantage workstation applications. See
“Configuring TeleVantage for use with a proxy server” on page 10-24.
If you are using Microsoft Proxy Server, TeleVantage requires Microsoft Proxy Server version
2.0 or later.
CHAPTER 3. TELEVANTAGE REQUIREMENTS
3-15
TeleVantage license requirements ___________________________
TeleVantage licenses can be used for 60 days before they must be activated to a hardware key
over the Internet. See “Entering and activating your TeleVantage licenses” on page 10-16 for
details.
The following licenses are available. The specific licenses that you need depend on how you
plan to use TeleVantage.
Q
Server license. Required for each TeleVantage Server. You must have a valid Server
license in order to start the TeleVantage Server. A Server license is provided when you
purchase TeleVantage, and authorizes you to run one copy of the TeleVantage Server.
Only one Server license is required per TeleVantage Server regardless of the number of
trunks or users the Server supports.
In order to answer or place calls, you need the following licenses:
Q
Trunk license. Required for each trunk line. You must have a valid Trunk license for
each analog, T1, E1, or BRI trunk connected to the TeleVantage Server.
Q
IP Port license. Required for each SIP or H.323 trunk connected to the TeleVantage
Server. Note that you need one TeleVantage IP Port license per SIP or H.323 trunk, not
per IP phone. A single call between two IP phones consumes 2 IP trunks for call control,
even if using TeleVantage’s SIP RTP Relay for audio.
Q
Station license. Required for each internal station port (station ID) assigned to a
TeleVantage User (extension). Station licenses are not consumed by station ports used
for music on hold, by external stations, or by phones at a remote number (for example,
home phones or cell phones).
A Station license is also required for each simultaneous call involving an IVR Plug-in.
For more information about IVR Plug-in licensing, see Administering TeleVantage. For
information about how TeleVantage Conference Manager (a TeleVantage Add-on that
uses an IVR Plug-in) uses Station licenses, see the TeleVantage Conference Manager
documentation.
In order to use TeleVantage ViewPoint, TeleVantage Call Center, TeleVantage Call Center
Reporter, or TeleVantage Conference Manager, you need the following licenses:
Q
3-16
ViewPoint license. Used by the following:
Q
TeleVantage ViewPoint
Q
TeleVantage ViewPoint Web Access
Q
Custom applications developed with the TeleVantage SDK that use a Client API
session
Q
TeleVantage Station Message Detail Recording (SMDR) Service
INSTALLING TELEVANTAGE
TeleVantage ViewPoint requires one ViewPoint license per PC. With one ViewPoint
license, a user can log on to ViewPoint multiple times on a single PC.
Unlike TeleVantage ViewPoint, ViewPoint Web Access and Client API sessions are
licensed per user, not per PC. Therefore, the same user can log on simultaneously to
ViewPoint Web Access multiple times or to multiple Client API sessions with only one
ViewPoint license, even on multiple PCs.
TeleVantage SMDR Service is an example of an application that uses a Client API
session. Since SMDR Service needs to log on as the Administrator user, if that user is
running TeleVantage ViewPoint, SMDR Service will use the same licence.
Q
Call Center Agent license. Required for each agent who is a member of a call center
queue. A single licensed agent can participate in multiple call center queues.
Q
Reporter license. Required to run the TeleVantage Call Center Reporter. If you want to
use the Reporter, even for non-queue reports such as call activity on trunks, you need a
Call Center Reporter license.
Q
Conference Manager license. Required to run the optional TeleVantage Conference
Manager add-on.
See “How TeleVantage licenses affect system behavior” on page D-1 for more information.
To see a license summary that shows the total number of each type of license currently installed
on the TeleVantage Server, in the Administrator choose Tools > System Settings, and then
click the Licenses tab. The Stations field under License summary displays the total number of
licenses.
License requirements for the TeleVantage Add-ons are described in the documentation for each
Add-on.
Note: You must supply a valid license serial number and verification key before you can use the
corresponding TeleVantage component. For this reason, you may want to purchase additional
licenses from your TeleVantage provider to allow for expected system growth so that you do not
have to wait for a license the next time you expand your system.
Dialogic HMP license requirements
If you are using Dialogic HMP to provide telephony and voice resources on the TeleVantage
Server, you must obtain and install a Dialogic HMP license that is adequate for your needs. For
more information, see Chapter 3 in Installing Dialogic Telephony Components.
CHAPTER 3. TELEVANTAGE REQUIREMENTS
3-17
Administrator and ViewPoint requirements ___________________
PCs running the TeleVantage Administrator or ViewPoint must meet the following
requirements:
Q
Operating system. The following operating systems can be used:
Q
Windows Server 2003, base release as well as SP1 and SP2
Q
Windows XP, base release as well as SP1 and SP2
Q
Windows 2000, SP4 or higher
Q
Windows NT Workstation or Server 4.0, SP6a or higher
Q
Windows Vista
Important: Windows 98 or ME can be used but are not recommended because of the
multi-tasking performance limitations of those operating systems. Windows 98 or ME
should not be used for users running high call volumes, such as operators, call center
agents, or users running several applications besides TeleVantage ViewPoint.
Note: If your Administrator or ViewPoint PCs currently run or will run Windows XP
Professional SP2 or Windows Server 2003 SP1 or R2, review the important information
about Windows Firewalls in Appendix F, “Configuring TeleVantage for the Windows
Firewall.”
Q
Processor. Minimum Pentium II 400 MHz.
Q
Memory. Minimum 128 MB RAM for Windows NT, 2000, 98, or ME. Minimum 256
MB RAM for Windows 2003 Server or Windows XP.
Important: This is the minimum memory required to support the TeleVantage
Administrator or ViewPoint. More memory may be required if other applications are
running on the same PC, if the user has thousands of contacts, voice messages, or call
recordings, or if Call Logs are very large. To manage thousands of voice messages or
call recordings, consider using the TeleVantage Archived Recording Browser instead of
ViewPoint.
Q
Disk space. 10 MB free disk space.
Q
Software.
Q
TCP/IP with Microsoft Network Client.
Q
Internet Explorer 5 or later.
Q
On Windows 98 PCs, Microsoft DCOM 98. See “Windows 98 PC requirements”
on page 11-3.
Q
Hardware. Sound card and speakers to listen to voice messages and call recordings and
to hear call announcements without using a phone.
Q
Network connection. TCP/IP connection to the TeleVantage Server. See “Network
requirements” on page 3-12.
Note: A ViewPoint license is required in order to use TeleVantage ViewPoint. See “TeleVantage
license requirements” on page 3-16 for more information.
3-18
INSTALLING TELEVANTAGE
Using a wheel mouse with TeleVantage
To scroll through ViewPoint or Administrator views using a Microsoft mouse with a mouse
wheel, you must have installed the latest Microsoft Intellipoint driver.
To obtain the latest Intellipoint driver, go to the following location and search for a download
using the keyword “Intellipoint”:
http://www.microsoft.com/downloads
TAPI Service Provider/Contact Manager Assistant requirements _
The PC on which you want to install the TeleVantage TAPI Service Provider or the TeleVantage
Contact Manager Assistant workstation applications must meet the following minimum
requirements:
Q
Operating system. The following operating systems can be used:
Q
Windows Server 2003, base release as well as SP1 and SP2
Q
Windows XP Professional or Windows XP Home, base release as well as SP1 and
SP2
Q
Windows 2000, SP4 or higher
Q
Windows NT Workstation or Server 4.0, SP6a or higher
Q
Windows 98
Q
Windows ME
Note: If your TAPI Service Provider or Contact Manager Assistant PCs currently run
or will run Windows XP Professional SP2 or Windows 2003 Server 2003 SP1 or R2,
review the important information about Windows Firewalls in Appendix F, “Configuring
TeleVantage for the Windows Firewall.”
Q
Software. The Contact Manager Assistant requires the TAPI Service Provider. Neither
the Contact Manager Assistant or the TAPI Service Provider require the presence of
TeleVantage ViewPoint on the same PC.
The following contact managers are also supported:
Q
Q
Act! 3.0, 4.0, 2000, and 6.0
Q
GoldMine 4.0, 5.0, 6.5, and 6.7, and GoldMine Business Contact Manager
Q
GoldMine FrontOffice 2000
Q
Microsoft Outlook 98, 2000, XP, and 2003
Network connection. TCP/IP connection to the TeleVantage Server. See “Supported
integrated trunk and station board” in Chapter 4 in Installing Dialogic Telephony
Components.
CHAPTER 3. TELEVANTAGE REQUIREMENTS
3-19
TeleVantage Web Services requirements _____________________
You can install TeleVantage Web Services on the same PC as the TeleVantage Server if you
plan to use the IIS to support a small number of simultaneous connections for TeleVantage
purposes only. However, if you plan to use the TeleVantage Web Services to support many
TeleVantage users or for other high-volume Web-related activity, it is recommended that you
install it on a separate networked PC from the TeleVantage Server.
Important: Be aware that installing IIS on the TeleVantage Server is a potential security risk.
Installing TeleVantage Web Services and IIS on a separate server limits the impact of a security
incident.
The PC on which you install TeleVantage Web Services must meet the following minimum
requirements:
Q
Operating system. The following operating systems support more than 10
simultaneous users:
Q
Windows Server 2003, base release as well as SP1 and SP2
Q
Windows 2000 Server, SP4 or higher
Q
Windows NT Server 4.0, SP6a or higher
The following operating systems support up to 10 users connected to the Web server
simultaneously:
Q
Windows 2000, SP4 or higher
Q
Windows XP Professional or Windows XP Home, base release as well as SP1 and
SP2
Q
Windows NT Workstation 4.0, SP6a or higher.
This operating system requires Microsoft Internet Information Server (IIS) 4.0 or
greater. IIS 4.0 is part of the Windows NT 4.0 Option Pack.
Note: If your TeleVantage Web Services PCs currently run or will run Windows XP
Professional SP2 or Windows Server 2003 SP1 or R2, review the important information
about Windows Firewalls in Appendix F, “Configuring TeleVantage for the Windows
Firewall.”
Q
Processor. Minimum Pentium II 400 MHz.
Q
Memory. 256 MB, plus ~ 15MB per simultaneous Viewpoint Web Access user. For
example, if your office of 100 users expects 20 simultaneous Viewpoint Web Access
connections, your Web Services PC should have 256 + (20 * ~15) = ~ 556MB of
memory.
3-20
INSTALLING TELEVANTAGE
Q
Disk space. 200 MB.
Q
Network connection. TCP/IP connection to the TeleVantage Server. See “Network
requirements” on page 3-12.
Note: A ViewPoint license is required in order to use TeleVantage ViewPoint Web Access. See
“TeleVantage license requirements” on page 3-16 for more information.
Call Center Reporter requirements __________________________
The Call Center Reporter is installed along with TeleVantage ViewPoint. To run the
TeleVantage Call Center Reporter you must have the following:
Q
A PC that meets the requirements listed in “Administrator and ViewPoint requirements”
on page 3-18.
Q
Microsoft Excel 2000, Excel XP, or Excel 2003 installed on the PC. Excel 97 is not
supported.
Q
A Reporter license. See “TeleVantage license requirements” on page 3-16 for more
information.
TeleVantage Recording Archive Service requirements __________
The Recording Archive Service runs on a separate PC from the TeleVantage Server for
reliability, since it has its own CPU, disk space, and database server requirements. Installing the
Recording Archive Service on the TeleVantage Server will negatively impact TeleVantage
Server performance, especially if you are archiving mailbox recordings in MP3 format. For
more information, see “About mailbox recording file formats” in Chapter 12 in Administering
TeleVantage.
The PC that you select as the archive server should have a very large amount of available disk
space in order to support the voice message and call recording files to be archived. The archive
server must be a local PC on your LAN; it cannot be remotely connected via the Internet.
Q
Operating system. You can use any of the operating systems supported by the
TeleVantage Server (see page 3-2.)
Note that a PC using Windows XP, XP Professional, or Windows 2000 Professional is
limited to supporting a maximum of 10 simultaneous connections by the Archived
Recording Browser.)
Q
Database server. Install Microsoft MSDE or SQL Server on the archive server before
installing the Recording Archive Service. You can use any of the database server options
described in “TeleVantage database server requirements” on page 3-11.
Q
Memory. Enough memory to run Microsoft MSDE or SQL Server effectively (at least
512 MB.)
CHAPTER 3. TELEVANTAGE REQUIREMENTS
3-21
Q
Disk space. Be sure to provide enough disk space for the mailbox recordings that you
will archive. See “Minimum disk space requirements” on page 3-6 for minimum disk
space recommendations based on minutes of voice files.
Important: The hard drive used for archived recordings must be an NTFS-partitioned
drive. Do not archive recordings to a FAT or FAT32-partitioned drive.
Q
Backup. A tape backup unit or a DVD burner is recommended to save old recordings
Q
RAID. Configure you archive server PC with RAID so that if a hard drive fails, you do
not lose your valuable recordings.
Requirements for the TeleVantage Archived Recording Browser (which runs on other
networked PCs) are the same as for the Administrator or Viewpoint, described on page 3-18.
TeleVantage SMDR Service requirements _____________________
TeleVantage Station Message Detail Recording (SMDR) Service requires the following on the
TeleVantage Server:
Q
An available COM port, if your call accounting package requires one.
Q
TeleVantage ViewPoint.
Q
A ViewPoint license. SMDR Service can share a ViewPoint license with the
Administrator user (see “TeleVantage license requirements” on page 3-16.)
Emergency dialing service requirements _____________________
TeleVantage supports both standard 911 and Enhanced 911 (E-911) emergency dialing services:
Q
Standard 911 calls does not require any additional hardware. All standard 911 calls use
a TeleVantage trunk and go through the local carrier to the emergency dispatching
center.
Q
All E-911 calls go through a special E-911 device and do not use a TeleVantage trunk.
Typically, a dedicated trunk connects the E-911 device directly to the emergency
dispatching center.
An E-911 call transmits the Automatic Number Identification (ANI) of the calling
station as the TeleVantage station ID. This information allows the E-911 center at the
telephone company to identify the location of the person who made the emergency call.
For example, this information can include the specific floor and office in a large building
from which the call was made.
If for any reason the emergency call cannot be placed using E-911 service, TeleVantage
automatically places a standard 911 call to the emergency center using the local carrier.
Note: E-911 service is not supported on IP phones. Emergency calls made from IP phones are
handled as standard 911 calls.
3-22
INSTALLING TELEVANTAGE
Contact your local telephone company to determine the emergency dialing services that are
available in your area.
For details on how to set up standard 911or E-911 emergency dialing in TeleVantage, see
“Setting up emergency dialing” in Chapter 9 of Administering TeleVantage.
Enhanced 911 service requirements
After you determine that E-911 service is available from your phone company, you need to
install and configure an E-911 device to make E-911 calls from TeleVantage stations.
Note: When configuring the E-911 device, enter each station number as a 4-digit number,
adding a leading zero if necessary. For example, enter station 3 as 0003, station 123 as 0123, etc.
Once the E-911 device is installed and configured, use telephone cable to connect it to an
available station port. Then, in the TeleVantage Administrator, assign one or more TeleVantage
stations for the exclusive purpose of handling E-911 calls.
Each E-911 station:
Q
Must be physically connected to a port of the E-911 device
Q
Must be dedicated to the E-911 service, and cannot be shared with a user
Q
Can be any station that is not already assigned and that has a valid station license.
See Administering TeleVantage for more about setting up E-911 stations.
E-911 device suppliers
For more information about obtaining, installing, and configuring an E-911 device, contact:
Teltronics, Inc.
http://www.teltronics.com
800-877-8358 (U.S.)
941-753-5000 ext 7315
CHAPTER 3. TELEVANTAGE REQUIREMENTS
3-23
Section 1
Preparing for
Installation
CHAPTER 4
CHAPTER 4
TRUNK OPTIONS AND REQUIREMENTS
CHAPTER CONTENTS
Introduction . . . . . . . . . . . . . . . . . . . . . . . . . . . . . . . . . . . . . . . . . . . 4-2
Using trunks with TeleVantage . . . . . . . . . . . . . . . . . . . . . . . . . . . .4-2
Ordering services from your telephone company . . . . . . . . . . . . . . 4-2
Analog trunk requirements . . . . . . . . . . . . . . . . . . . . . . . . . . . . . . . 4-5
T1 trunk requirements . . . . . . . . . . . . . . . . . . . . . . . . . . . . . . . . . . . 4-5
E1 trunk requirements . . . . . . . . . . . . . . . . . . . . . . . . . . . . . . . . . . . 4-7
ISDN BRI trunk requirements . . . . . . . . . . . . . . . . . . . . . . . . . . . . .4-9
VoIP requirements. . . . . . . . . . . . . . . . . . . . . . . . . . . . . . . . . . . . . 4-10
Introduction _____________________________________________
Trunks are the phone lines that you order from the telephone company. This chapter describes
requirements for the trunks and services that you can use with TeleVantage.
Note: Placing VoIP calls over the Internet or your private TCP/IP network does not require
additional telephone company trunks. See “VoIP requirements” on page 4-10 for more
information.
Connecting and configuring trunks
Connecting trunk lines to the Dialogic trunk boards in your TeleVantage Server PC is covered
in Chapter 6 in Installing Dialogic Telephony Components. Once connected, you must configure
your trunks via the TeleVantage Administrator. See Chapter 5 in Administering TeleVantage for
details.
Using trunks with TeleVantage ______________________________
There are two ways to use trunks with TeleVantage:
Q
Install one or more Dialogic telephony boards that provide trunk resources of the type
that you want to use (analog, T1, E1, or ISDN BRI) on the TeleVantage Server. See
Chapter 4 in Installing Dialogic Telephony Components for details.
Important: For the most up-to-date board specifications, refer to the Excel file
SupportedTelephonyBoards.xls, included on Dialogic Drivers CD.
Q
Use a SIP gateway device with FXO/T1/E1/BRI ports to provide VoIP connectivity
options to trunks. See “Using gateway PSTN/FXO ports with TeleVantage” on page 6-2
or “Using IP gateway T1/E1/BRI ports with TeleVantage” on page 6-3 for details.
Note: If you use a gateway, the trunks must meet the requirements of the gateway
itself, which may be different than Dialogic trunk board requirements described in this
chapter. See the documentation that came with your gateway for details.
Ordering services from your telephone company ______________
You can order the following services when you order trunks from your telephone company.
4-2
Q
Caller identification. See page 4-3.
Q
Direct Inward Dial (DID). See page 4-3.
Q
Hunt groups. See page 4-4.
Q
Inbound-only and outbound-only trunks. See page 4-4.
Q
Emergency Dialing service. See page 4-4.
Q
Call waiting. See page 4-4.
Q
ISDN Two B-Channel transfer. See page 4-4.
INSTALLING TELEVANTAGE
Ordering caller identification
Inbound caller identification
Caller ID or Automatic Number Identification (ANI) is used by TeleVantage as a means of
identifying incoming calls. Many useful TeleVantage features rely on caller identification.
Customized greetings, customized routing lists, and call rules for individuals all use caller
identification.
It is highly recommended that you order a caller identification service for all of your trunk lines.
Q
For analog trunks, order Caller ID.
Q
For T1, E1, ISDN BRI, or analog DID trunks, order ANI.
Outbound caller identification
TeleVantage allows you to specify custom outbound Caller ID information on ISDN trunks.
Not all ISDN providers support custom numbers as outbound Caller ID—some restrict you to
using only registered numbers for your trunks, and some do not allow you to set custom Caller
ID at all. If you want to specify custom numbers as outbound caller ID on your ISDN trunks,
ask your ISDN provider if they support custom calling party numbers, sometimes referred to as
custom Caller ID or customer-defined Caller ID.
For more about configuring outbound Caller ID, see Administering TeleVantage.
Ordering Direct Inward Dial
When you order DID, your site is given a block of sequential telephone numbers. You then
assign these numbers to individual phones within TeleVantage. In this way callers can dial users
assigned to those phones directly, without having to go through an auto attendant or operator.
DID generally transmits the last three or four digits of the phone number dialed. TeleVantage
recognizes the DID digits and routes the call to the appropriate user or auto attendant. DID
enables you to set up private phone numbers for users without having to dedicate trunks.
Another service, Dialed Number Identification Service (DNIS) works in the same way as DID,
but is used for toll-free lines such as 800, 877, and 888 numbers. In TeleVantage, DID refers to
both DID and DNIS.
To use DID, you must configure your TeleVantage trunks to recognize it. For instructions, see
Administering TeleVantage.
CHAPTER 4. TRUNK OPTIONS AND REQUIREMENTS
4-3
Ordering hunt groups
Trunks used with TeleVantage must be configured by the phone company in a terminated hunt
group so that calls roll over to the next trunk if the first one is busy.
In this arrangement, incoming calls try the lowest numbered phone line first. If that line is busy,
they try the next higher phone line and continue trying lines until a free line is found. If you will
be using the same trunks for both inbound and outbound calls, you must configure dialing
services in the Administrator so that on outbound calls, TeleVantage starts searching for a free
line from the highest numbered trunk. This configuration helps to limit glare conflicts on lines.
Ordering inbound- and outbound-only trunks
Inbound-only trunks and outbound-only trunks do not affect TeleVantage performance, but they
may be of benefit in your organization. If you order them, you must configure them in the
Administrator. See Administering TeleVantage for details.
Ordering emergency dialing service
Consult your local phone company to determine the emergency dialing services that are
available in your area. For information about using Enhanced 911 service, which is designed to
help the local emergency dispatching center identify the precise location of a caller making an
emergency call, see “Enhanced 911 service requirements” on page 3-23.
Ordering call waiting
It is strongly recommended that you do not order call waiting on analog trunk lines. TeleVantage
provides its own call waiting tone to users on incoming calls. If telephone company call waiting
tones arrive as well, they can confuse users.
Ordering ISDN Two B-Channel Transfer service
With ISDN PRI trunks using the NI2 protocol, Two B-Channel Transfer allow you to transfer
incoming calls to external numbers without consuming TeleVantage trunks while the external
callers are connected. For more information, see Administering TeleVantage, Chapter 5, “Using
Two B-Channel Transfer.”
Note: When ordering this service from the phone company, TeleVantage does not require the
“Notify on transfer” option.
4-4
INSTALLING TELEVANTAGE
Analog trunk requirements ________________________________
TeleVantage supports standard loop-start analog trunks. TeleVantage can also use Centrex
trunks or operate behind a PBX that is connected to the central office at the telephone company.
Additional required hardware for analog service
No additional hardware is required for analog or Centrex/PBX trunks.
To support analog DID service, you need a DID interface unit which sits between TeleVantage
and your phone company. One DID interface unit can support up to 4 analog DID trunks. For
information about DID interface units that work with TeleVantage, see your TeleVantage
provider.
T1 trunk requirements ____________________________________
TeleVantage supports two protocols over T1 lines:
Q
ISDN
Q
Robbed Bit. (Robbed bit signaling is not supported on Dialogic DM3 ISDN boards. For
more information about specific boards, see the Notes to the “Basic board information”
table in Appendix E in Installing Dialogic Telephony Components.
T1 carrier requirements
The following table lists the T1 configuration requirements for TeleVantage. You must supply
this information to your phone company when you order T1 service.
T1 Requirements for TeleVantage
Framing Type
D4 Superframe or Extended Superframe
Interface
DSX-1
Supervisory signal
2- or 4-wire E&M
Wink
Wink and double wink
Line coding/Framing
For D4 Superframe: AMI
For Extended Superframe: B8ZS
Digit signaling
Robbed Bit: DTMF or MF
ISDN: DTMF
CHAPTER 4. TRUNK OPTIONS AND REQUIREMENTS
4-5
T1 ISDN PRI Protocols
TeleVantage currently supports the following ISDN PRI protocols over T1 lines. The drivers for
these protocols are installed automatically with Dialogic SR 6.0. Contact your TeleVantage
provider if your protocol is not listed.
Q
National ISDN 2 (NI2). NI2 is required if you want to use the Two B-Channel Transfer
feature (See Administering TeleVantage, Chapter 5, “Using Two B-Channel Transfer.”).
Even if you are not using Two B-Channel Transfer, NI2 is preferred if your provider
offers multiple protocols.
Q
4ESS
Q
5ESS
Q
DMS
Q
QSIG
Q
CR13
Q
INS1500
Additional required hardware for T1 service
Robbed Bit T1 service requires the following:
Q
Channel Service Unit (CSU).
Q
Cable. Connects the CSU to the Dialogic board, provided by the CSU vendor.
ISDN T1 service requires the following:
Q
Network Termination Unit (NTU). Most ISDN installations include an NTU from the
phone company, so you should ask your phone company for details. Connect the NTU
between TeleVantage and the digital line coming in from the phone company.
If you do not have an NTU available, you can use a standard Channel Service Unit
(CSU) that handles Extended Superframe Format (ESF) instead.
Q
Network Termination type 1 adapter (NT1). Typically supplied by the phone
company.
Q
Cable. Connects the NTU to the Dialogic board. When ordering one from your supplier,
specify the following:
Q
Recommended cable type. Twisted-pair, in which each of the two pairs is
shielded and the two pairs also have a common shield.
Q
Connectors. The cable connects to the board via a RJ-45 Modular connector on the
front or rear bracket of the board.
Connect the CSU or NTU between TeleVantage and the digital line coming in from the phone
company.
Note: A Digital Service Unit (DSU) is not required because the Dialogic boards supply DSU
functionality.
4-6
INSTALLING TELEVANTAGE
U.S. local and long-distance service
Two kinds of T1 trunks are available from phone companies in the United States, local and
long-distance.
Local T1 trunks
Local T1 trunks operate similarly to local analog lines, in that local calls are free, and you can
place long-distance calls using the long-distance carrier of your choice.
Important: It is recommended that you not use local T1 lines because they do not supply ANI
Caller ID information used by TeleVantage to recognize contacts when they call. Most incoming
calls from contacts on local T1 trunks will display as “Unknown” in the Call Log and in the
ViewPoint Call Monitor and Voice Messages views. Also, call rules for external contacts will not
work.
Local T1 trunks support DID, and you can order blocks of DID numbers for each T1 line.
Long-distance T1 trunks
Long-distance T1 trunks handle local and long-distance calls through the same carrier, so that
all outbound calls are charged at the rate charged by your long-distance carrier.
Long-distance T1 trunks do not support outbound toll-free calls, for example, to 411 or 800 and
888 numbers, and require that you dial the area code for all numbers, even those in your local
area.
Long-distance T1 trunks provide ANI, which enables full TeleVantage functionality. DID is
supported on incoming calls only if the line is used for toll-free calling, for example, 800 or 888
numbers.
Because of the higher cost and limitations on outbound calls, long-distance T1 lines are
recommended for inbound-only trunks, for example, in call centers.
E1 trunk requirements ____________________________________
TeleVantage supports both kinds of E1 service:
Q
ISDN
Q
CAS. (CAS signaling is not supported on Dialogic DM3 ISDN boards. For more
information about specific boards, see the Notes to the “Basic board information” table
in Appendix E in Installing Dialogic Telephony Components.
Note: The Dialogic drivers do not support E1 and T1 trunks on the same TeleVantage Server.
E1 carrier requirements
TeleVantage currently supports the following ISDN PRI protocols over E1 lines. The drivers for
these protocols are automatically installed with Dialogic SR 6.0 if you select the required
features as described in “Installing Dialogic SR 6.0” in Chapter 7 in Installing Dialogic
Telephony Components. Contact your TeleVantage provider if your protocol is not listed here.
CHAPTER 4. TRUNK OPTIONS AND REQUIREMENTS
4-7
E1 ISDN PRI protocols
Q
CTR4 (ETSI 300), also known as EuroISDN
Q
Net5
Q
QSIG
Q
Austel
Q
DASS2
Q
ITR6
Q
PTC132
Q
VN3
Q
VN4
E1 CAS protocols
The Dialogic GlobalCall 4.0 Protocols for E1/CAS are installed with Dialogic SR 6.0. You
specify the protocol to use when you add the E1 CAS span in the TeleVantage Administrator,
as described in Chapter 5 of Administering TeleVantage.
Additional required hardware for E1 service
No additional hardware is required to support E1 CAS service.
To support E1 ISDN service, you need the following:
Q
Network Termination Unit (NTU). Most ISDN installations include an NTU from the
phone company, so you should ask your phone company for details. Connect the NTU
between TeleVantage and the digital line coming in from the phone company.
If you do not have an NTU available, you can use a standard Channel Service Unit
(CSU) that handles Extended Superframe Format (ESF) instead.
Q
Network Termination type 1 adapter (NT1). Typically supplied by the phone
company.
Q
Cable. Connects an NTU to the Dialogic board. When ordering one from your supplier,
specify the following:
Q
Recommended cable type. Twisted-pair, in which each of the two pairs is
shielded and the two pairs also have a common shield.
Q
Connectors. The cable connects to the board via a RJ-45 Modular connector on the
front or rear bracket of the board.
Note: A Digital Service Unit (DSU) is not required because the Dialogic boards supply DSU
functionality.
4-8
INSTALLING TELEVANTAGE
ISDN BRI trunk requirements_______________________________
TeleVantage supports ISDN BRI trunks.
Note: Connecting BRI devices such as BRI phones to Dialogic ISDN BRI boards is not
supported.
ISDN BRI carrier requirements
TeleVantage supports the following ISDN BRI protocols. The drivers for these protocols are
provided on the TeleVantage Drivers CD. Contact your TeleVantage provider if your protocol
is not listed here.
ISDN BRI Protocols
Q
5ESS (ATT 5ESS BRI)
Q
DMS100 (Northern Telecom DMS100 BRI)
Q
NTT (Japanese INS-Net 64 BRI)
Q
NET3 (EuroISDN BRI)
Q
NI1 (National ISDN 1)
Q
NI2 (National ISDN 2)
Additional required hardware for ISDN BRI service
To support ISDN BRI service, you need the following:
Q
Dialogic shielded breakout box. Part number 89-0592-001.
Q
Dialogic SCSI-3 BRI breakout box cable. Part number 99-2280-003.
Q
Network Termination type 1 adapter (NT1). Typically supplied by the phone
company. Connect the NT1 between TeleVantage and the digital line coming in from
the phone company.
All BRI/x-PCI boards require an NT1.
Q
Cable. Connects the NT1 to the Dialogic board. See the Quick Install Card included
with your Dialogic BRI board for details. BRI/x-PCI boards require a special cable with
pins 3 and 4 crossed, pins 5 and 6 crossed, and pins 1, 2, 7, and 8 wired straight through.
Shared voice resources
Unlike other Dialogic trunk boards, the BRI boards do not supply any voice resources
to handle auto attendants, voice mail access, or other TeleVantage features. To use BRI
boards with TeleVantage, you must install extra Dialogic boards that provide shared
voice resources. See “Supported voice resource boards” in Chapter 4 in Installing
Dialogic Telephony Components for a list of Dialogic boards that provide shared voice
resources.
CHAPTER 4. TRUNK OPTIONS AND REQUIREMENTS
4-9
VoIP requirements ________________________________________
TeleVantage supports two protocols for voice communication over the Internet.
Q
Session Initiation Protocol (SIP). Developed by the Internet Engineering Task Force
(IETF) specifically for Internet use, SIP is a well-accepted standard for Voice over
Internet Protocol (VoIP) communication. SIP enables VoIP communication with other
SIP-compatible devices, including SIP desktop phones or softphones, SIP services, and
SIP carriers. For more information, see Chapter 14 in Administering TeleVantage.
Q
H.323. Developed by telephone companies, the H.323 protocol enables communication
with H.323-compatible devices, such as some VoIP phones, and H.323-based terminals
such as Microsoft NetMeeting. For more information, see Chapter 15 in Administering
TeleVantage.
Placing VoIP calls over the Internet or your private TCP/IP network does not require additional
telephone company trunks. Instead, Dialogic Internet telephony resources must be installed on
the TeleVantage Server. Telephony resources can be provided in two ways as described on page
3-3.
VoIP also requires the following:
Q
The TeleVantage Server PC must have an always-on, preferably high-speed connection
to the Internet.
Q
You must use a static IP address for the NIC that handles VoIP RTP audio traffic on the
TeleVantage Server PC. For more information, see “Network interface card
requirements” on page 3-9.
VoIP features in TeleVantage
TeleVantage supports VoIP in the following ways. See “Configuring TeleVantage Internet
telephony” in Chapter 14 in Administering TeleVantage for configuration requirements.
Q
TeleVantage Enterprise Gateways. By configuring TeleVantage Enterprise Gateways
on two or more TeleVantage Servers, users on one TeleVantage Server can make calls
over the Internet or your private TCP/IP network as if they were on the other
TeleVantage Server. See “Connecting two Servers using TeleVantage Gateways” in
Chapter 15 in Administering TeleVantage.
Q
SIP carrier support. SIP carriers, also known as Internet telephony service providers
(ITSPs), provide a VoIP connection to the Public Switched Telephone Network (PSTN)
for a nominal monthly fee. (An example is www.broadvoice.com.)
SIP carriers provide customers with real phone numbers, and deliver calls to those
numbers via VoIP. Likewise, calls to the SIP carrier over VoIP ring PSTN users as calls
coming from those telephone numbers. With a SIP carrier, you do not need a PSTN trunk
on-site in order to place and receive calls, although it is wise to have one in case you
encounter a problem connecting to the SIP carrier over the Internet.
4-10
INSTALLING TELEVANTAGE
If you are ordering a SIP account from www.broadvoice.com, tell them that you are
using a ‘General SIP device.’ TeleVantage requires no specific settings to work with
BroadVoice.
For information on enabling communications with a SIP carrier via the TeleVantage
Administrator, see “Using SIP Servers” in Chapter 14 in Administering TeleVantage.
Q
SIP gateways. SIP gateways are devices that provide the following types of ports. For
more information on supported gateways and requirements, see Chapter 6.
Q
PSTN/FXO ports connect your VoIP network to the Public Switched Telephone
Network (PSTN) via analog trunks.
Q
Station/FXS ports allows analog phone users to place and take VoIP calls.
Q
T1, E1, and BRI ports connect your VoIP network to the PSTN via T1, E1, or BRI
trunks.
CHAPTER 4. TRUNK OPTIONS AND REQUIREMENTS
4-11
CHAPTER 5
CHAPTER 5
PHONE OPTIONS AND REQUIREMENTS
CHAPTER CONTENTS
Introduction . . . . . . . . . . . . . . . . . . . . . . . . . . . . . . . . . . . . . . . . . . . 5-2
Using analog phones with TeleVantage . . . . . . . . . . . . . . . . . . . . . 5-2
Using SIP phones with TeleVantage . . . . . . . . . . . . . . . . . . . . . . . .5-6
Using H.323 phones with TeleVantage . . . . . . . . . . . . . . . . . . . . . 5-10
Using digital phones with TeleVantage . . . . . . . . . . . . . . . . . . . . . 5-11
Wiring requirements . . . . . . . . . . . . . . . . . . . . . . . . . . . . . . . . . . . 5-13
Using TeleVantage with a paging system . . . . . . . . . . . . . . . . . . . 5-15
Introduction
This chapter discusses the wide variety of phones that you can use with TeleVantage.
For instructions on how to connect your phones, see Chapter 6 in Installing Dialogic Telephony
Components.
For information on how to configure TeleVantage for your phones and phone features, see the
following in Administering TeleVantage:
Q
Chapter 7, “Managing Stations”
Q
Chapter 14, “Configuring SIP Internet Telephony”
Supported phones
TeleVantage supports the following phone types:
Q
Analog phones and ADSI display phones. See page 5-2.
Q
SIP desktop phones and softphones. See page 5-6.
Q
H.323 phones. See page 5-10.
Q
Digital phones. See page 5-11.
Using analog phones with TeleVantage_______________________
TeleVantage supports standard analog touchtone telephones (also called 2500 sets), including
ADSI phones and CLASS features. Multiline analog phones can also be used, but line use
indicator lights may not perform correctly on some models.
There are two ways to use analog phones with TeleVantage:
Q
Install one or more Dialogic telephony boards that provide analog phone resources on
the TeleVantage Server. See “Supported analog station boards” in Chapter 4 in
Installing Dialogic Telephony Components for details.
Important: For the most up-to-date board specifications, refer to the Excel file
SupportedTelephonyBoards.xls, included on the root directory of the Dialogic Drivers
CD.
Q
5-2
Use a SIP gateway device with FXS ports to allow analog phone users to place and take
VoIP calls. See “Using gateway station/FXS ports with TeleVantage” on page 6-3 for
details.
INSTALLING TELEVANTAGE
Tested ADSI phones
TeleVantage supports Analog Display Service Interface (ADSI) phones. In addition to the
CLASS features described in “Tested analog phones” on page 5-4, ADSI phones can provide
soft-button menu access to many TeleVantage functions (for a complete feature list, see the
ADSI script manufacturer for your phone.) ADSI phones also support the following
TeleVantage features:
Q
Voice-first answering
Q
Intercom
Q
Paging
See Administering TeleVantage and Using TeleVantage for more about setting up and using these
features.
Important: You may need to update the script that is running on your ADSI phone. To do this,
contact your phone supplier.
The following ADSI phones can be used with TeleVantage.
Brand
Model
CLASS features
1
Vertical
Intellivoice TS-ML298i
Vertical
Aastra Power Touch 480e
CHAPTER 5. PHONE OPTIONS AND REQUIREMENTS
Caller ID
Caller ID on Call Waiting
Message Waiting Indicator
Caller ID
Caller ID on Call Waiting
Message Waiting Indicator
5-3
Brand
Model
CLASS features
Vertical
Fanstel ST-2118
Caller ID
Caller ID on Call Waiting
Message Waiting Indicator
CybioLink
P-I
CY-2135-B
CY-2135-BH
Caller ID
Caller ID on Call Waiting
Message Waiting Indicator
1. Includes
a TeleVantage ViewPoint Add-In that allows users to configure the buttons of
the phone via a GUI.
Tested analog phones
TeleVantage supports plain analog phones as well as analog phones with the following CLASS
features:
Q
Caller ID
Q
Caller ID on Call Waiting
Q
A CLASS Bellcore message waiting indicator
Some CLASS feature phones require you to set a phone switch or option in order to use CLASS
features. Refer to the documentation that came with your phone for any setup steps required to
activate these features.
5-4
INSTALLING TELEVANTAGE
Note: Message waiting indicators other than CLASS Bellcore are not supported with
TeleVantage. For example, the message waiting indicator on some analog phones is set via a
line voltage change, and that is not supported. When choosing a phone for use with TeleVantage,
make sure that the phone supports FSK message waiting indication (9v message waiting
indication is not supported.) Two TeleVantage Windows registry settings—CID_FSK_FORMAT
and VMWI_FSK_FORMAT—specify the specific FSK format used to send Caller ID or visual
message waiting information to CLASS phones. See Administering TeleVantage for more
information.
The following analog phones can be used with TeleVantage. Other analog phones not listed
below should work with TeleVantage as long as they conform to the requirements previously
described. Contact your TeleVantage provider for more information about other analog phones
to use with TeleVantage.
Brand
Model
CLASS features
Vertical
Aastra 9110
n/a
Aastra 9116
Caller ID
Caller ID on Call Waiting
Message Waiting Indicator
Fanstel BT118G
n/a
Fanstel ST118B
Caller ID
Caller ID on Call Waiting
Message Waiting Indicator
9316CW
Caller ID
Caller ID on Call Waiting
Message Waiting Indicator
Maestro 900 DSS
Caller ID
Caller ID on Call Waiting
956
957
960
Caller ID
Caller ID on Call Waiting
Message Waiting Indicator
951
Message Waiting Indicator
9130 Cordless
Caller ID
Caller ID on Call Waiting
Sony
Caller ID IT70
Caller ID
Caller ID on Call Waiting
Radio Shack
System 1350 Caller ID
Speakerphone (430-0987)
Caller ID
Caller ID on Call Waiting
Message Waiting Indicator
Vodavi
STARPLUS 2706 (Caller ID)
Caller ID
Caller ID on Call Waiting
Message Waiting Indicator
Aastra
AT&T
CHAPTER 5. PHONE OPTIONS AND REQUIREMENTS
5-5
Using SIP phones with TeleVantage__________________________
TeleVantage supports VoIP desktop and softphones that conform to the Session Initiation
Protocol (SIP) standard. Developed by the Internet Engineering Task Force (IETF) specifically
for Internet use, SIP is a well-supported standard for Voice over Internet Protocol (VoIP)
communication.
Both SIP desktop and SIP softphones have been tested with TeleVantage. To use SIP phones
with TeleVantage, you must provide Dialogic VoIP resources on the TeleVantage Server that
meet the requirements in “VoIP requirements” on page 4-10.
For more information about using SIP phones with TeleVantage, see Administering
TeleVantage, Chapter 14, “Configuring Internet Telephony Support” and Appendix E, “Using
an IP Phone with TeleVantage.”
For troubleshooting tips, see Appendix H, “Troubleshooting VoIP.”
Note: Unlike CLASS (see page 5-4) or ADSI (see page 5-3) features which take time to send to
analog phones, these features are instantaneous on SIP phones.
Tested SIP desktop phones
The following SIP desktop phones can be used with TeleVantage. Other SIP desktop phones not
listed below should work with TeleVantage as long as they conform to the requirements
previously described. Contact your TeleVantage provider for more information about other SIP
desktop phones to use with TeleVantage.
Brand
Model
Version
Features
Vertical
Aastra 480i IP Phone
(multi-line1)
1.2.5.316,
1.4
Caller ID
Caller ID on call waiting
Call Log
Conference button2
Do Not Disturb
Flash button
Hold button
Intercom button
Message Retrieval button
Message Waiting Indicator
Mute button
Paging
Park
Redial button
Speakerphone button
Speed Dial
Transfer button
Voice-first answering
5-6
INSTALLING TELEVANTAGE
Brand
Model
Version
Features
Vertical
Aastra 9133i IP Phone
(multi-line1)
1.2.5.316,
1.4
Caller ID
Caller ID on call waiting
Call Log
Conference button2
Do Not Disturb
Flash button
Hold button
Intercom button
Message Retrieval button
Message Waiting Indicator
Mute button
Paging
Park
Redial button
Speakerphone button
Speed Dial
Transfer button
Voice-first answering
Vertical
Aastra 9112i IP Phone
(single-line)
1.2.5.316,
1.4
Caller ID
Caller ID on call waiting
Call Log
Conference button2
Do Not Disturb
Flash button
Hold button
Intercom button
Message Retrieval button
Message Waiting Indicator
Mute button
Paging
Park
Redial button
Speakerphone button
Speed Dial
Transfer button
Voice-first answering
CHAPTER 5. PHONE OPTIONS AND REQUIREMENTS
5-7
Brand
Model
Version
Features
Vertical
Aastra 480i CT IP
Phone with cordless
handset and base
station (multi-line3)
1.2.5.316
Caller ID
Caller ID on call waiting
Call Log
Conference button2
Do Not Disturb
Flash button4
Hold button
Intercom button5
Message Retrieval button
Message Waiting Indicator
Mute button
Paging
Park
Redial button6
Speakerphone button
Speed Dial
Transfer button
Voice-first answering5
1. Requires
one Internet trunk per call.
2. Supports 3-way calling, including combining IP and PSTN calls.
3. Simultaneous
calls on the cordless handset and base unit are not supported. If there is an active call on
the handset and the user attempts to place a new call via the base unit on another line, the call is not
made, and the first call is placed on hold.
4. The
Flash button on the cordless handset is not supported—press ** to access the TeleVantage telephone commands on the handset.
5. Incoming
intercom and voice-first answering are supported via the speaker on the base unit, not the
cordless handset.
6. Pressing
5-8
the Redial button on the cordless handset redials the last number dialed via the base unit.
INSTALLING TELEVANTAGE
Tested SIP softphones
The following SIP softphones can be used with TeleVantage. Contact your TeleVantage
provider for more information about other SIP softphones to use with TeleVantage.
Manufacturer
Model
Version
Features
CounterPath Solutions, Inc.
http://www.counterpath.com/index.php?me
nu=products&smenu=eyebeam
eyeBeam
Audio-only1 2 3 4
1.1, 1.5
Call Forwarding
Caller ID
Caller ID on call waiting
Call Log
Call Waiting
Do Not Disturb
Hold
Message Waiting Indicator
Mute
Redial
Speakerphone
Speed Dial
Transfer
CounterPath Solutions, Inc.
http://www.counterpath.com/index.php?me
nu=Products&smenu=PPC
X-PRO SIP
Softphone for
Pocket PC
2.2
Call Forwarding
Caller ID
Caller ID on call waiting
Call Log
Call Waiting
Do Not Disturb
Hold
Message Waiting Indicator
Mute
Redial
Speakerphone
Speed Dial
Transfer
1. Only
supported on PCs running Windows 2000, XP and 2003. Windows 98 and NT are not supported.
2. While
many headsets work with the Xten eyeBeam softphone, the following headsets are recommended: from Plantronics (http://www.plantronics.com), the CS50-USB VoIP Headset (cordless),
DSP-500 USB Folding Headset (corded), and DSP-400 USB Multimedia Headset (corded); from GN
Netcom (http://www.gnnetcom.com), the GN 8120 USB digital USB-to-headset adapter (corded; compatible with any GN Netcom QD Headset.)
3. Instant
messaging and video features on SIP softphones are not supported in TeleVantage.
4. Requires one Internet trunk per call.
CHAPTER 5. PHONE OPTIONS AND REQUIREMENTS
5-9
Using H.323 phones with TeleVantage________________________
TeleVantage supports VoIP phones that conform to the H.323 internet telephony standard,
including H.323-based terminals such as Microsoft NetMeeting. Developed by telephone
companies, the H.323 protocol enables communication with H.323-compatible devices, such as
some VoIP phones.
Note: Unlike CLASS features (see page 5-4) which take time to send to analog phones, these
features are instantaneous on H.323 phones.
For more information about using H.323 phones with TeleVantage, see Administering
TeleVantage, Chapter 14, “Configuring Internet Telephony Support” and Appendix E, “Using
an IP Phone with TeleVantage”.
To use H.323 phones with TeleVantage, you need to provide Dialogic VoIP resources on the
TeleVantage Server that meet the requirements in “VoIP requirements” on page 4-10.
Tested H.323 phones
The following H.323 phones can be used with TeleVantage. Other H.323 phones not listed
below should work with TeleVantage as long as they conform to the H.323 standard. Contact
your TeleVantage provider for more information about other H.323 phones to use with
TeleVantage.
5-10
Brand
Model
Version
Features
Uniden
http://www.uniden.com/product.cfm
?product=UIP300&filter=bp1
UIP 300:
UIP 300
1.05, 1.08
Call Forwarding
Caller ID
Call Waiting
Do Not Disturb
Hold
Message Waiting Indicator
Multi-line Support (up to 2)
Mute
Redial Transfer
Speakerphone
Speed Dial
INSTALLING TELEVANTAGE
Brand
Model
Version
Polycom
Soundpoint 500
http://www.polycom.com/products_
services/1,1443,pw-34-182-215,00.
html
SoundPoint 500:
Microsoft
NetMeeting
Features
Caller ID
Included
with
Windows
Caller ID
Using digital phones with TeleVantage _______________________
TeleVantage supports digital phones via the Toshiba Strata CS-DKTU digital station board.
Important: For the most up-to-date board specifications, refer to the Excel file
SupportedTelephonyBoards.xls, included on the root directory of the Dialogic Drivers CD.
Digital phone features
When used with TeleVantage, the digital phones listed in the table on page 5-13 behave as
TeleVantage digital stations, and do not emulate the exact same digital phone behavior
supported by each phone’s proprietary PBX. For specifics on configuring and using these
phones with TeleVantage, see Chapter 7 in Using TeleVantage.
When used with TeleVantage, digital phones support the following features:
Q
Caller ID
Q
Caller ID on Call Waiting
Q
Message Waiting Indicator1
Q
Voice-first answering
Q
Intercom
Q
Flash
Q
Paging
Q
Supported feature keys:
CHAPTER 5. PHONE OPTIONS AND REQUIREMENTS
5-11
1.
Q
Access Voice Mail
Q
Account code
Q
Call Forwarding (CFD)
Q
Call Menu
Q
Conference/Transfer (Cnf/Trn)
Q
Do Not Disturb (DND)
Q
Flash
Q
Hold/Retrieve2
Q
Park/Unpark
Q
Phone Page
Q
Primary Directory Numbers (PDNs)
Q
Record Call
Q
Redial
Q
Release
Q
Secondary Directory Numbers (SDNs)
Q
Send to Voice Mail (SVM)
Q
Set Personal Status
Q
Speaker2
Q
Speed Dial (SD) and Busy Lamp Field (BLF)
Q
Take Call
For digital phones that do not have a fixed Message Waiting Indicator, TeleVantage uses
the LED associated with the Access Voice Mail feature key (if one has been assigned) to
indicate that a new voice message has been received.
2. For
digital phones that do not have a fixed Hold/Retrieve and/or Speaker button, you can
assign these features to one of the phone’s programmable buttons.
Note: Unlike CLASS (see page 5-4) or ADSI (see page 5-3) features which take time to send to
analog phones, these features are instantaneous on digital phones.
5-12
INSTALLING TELEVANTAGE
Tested digital phones
The following digital phones can be used with TeleVantage. Contact your TeleVantage provider
for more information about other digital phones to use with TeleVantage. A representative
phone from each phone family is pictured..
Brand
Model
Toshiba
DKT-2001
DKT-2010-S
DKT-2010-SD
DKT-2020-H
DKT-2020-SD (pictured)
DKT-3001 Single-line phone
DKT-3010-S 10-button multi-line speakerphone
DKT-3010-SD 10-button multi-line speakerphone w/ LCD display
DKT-3020-SD 20-button multi-line speakerphone w/ LCD display (pictured)
Note: When used with TeleVantage, these phones are supported in 2000
emulation mode only. The extra-wide display and extra feature buttons are
not used.
Wiring requirements ______________________________________
Analog phone and digital phone wiring requirements
Analog phones (plain analog and ADSI) and digital phones are connected to the TeleVantage
Server using standard 2-wire telephone cable. Four-wire cabling can be used if it is already in
use at your facility. All connections to the Server must be terminated with RJ-11 connectors.
Important: If you are using Toshiba Strata DKT-series digital phones, there cannot be any
signal on the second pair of wires in an existing 4-wire scenario. If there is any signal or voltage
on the second pair, the Toshiba phones will not work. Toshiba phones are not sensitive to polarity
on the line—if the wires are swapped, a Toshiba phone will still work properly.
CHAPTER 5. PHONE OPTIONS AND REQUIREMENTS
5-13
Maximum cabling distances
The maximum cabling distance between an analog phone and an HDSI/x analog station board
is one mile (5280 feet.) The maximum cabling distance between an analog phone and a DISIx
analog station board or DI0408LSAR2 integrated trunk and station board is 3500 feet. The
maximum cabling distance between a Toshiba digital phone and the Toshiba Strata CS-DKTU
station board is 1000 feet.
SIP phone, H.323 phone, and IP gateway wiring requirements
IP phones and IP gateways are connected to your network via an Ethernet connection. Your
TeleVantage Server must also be connected to your network via Ethernet. For devices connected
to an IP gateway, see the wiring requirements in the documentation provided by the IP gateway
manufacturer.
Replacing an existing PBX
If you are replacing an existing PBX with TeleVantage, the information in this section may
apply to you.
Wiring punch down blocks to TeleVantage
Punch down blocks are commonly used to terminate 50-pair cables from offices to the wiring
closet at the company location, and from the wiring closet to the telephone company. Each
phone connection from this punch down block—that is, each station or trunk—must be
connected to a wire terminated with an RJ-11 connector in order to be connected to the Dialogic
station breakout box or trunk board.
Wiring patch panels to TeleVantage
If your offices are wired to patch panels, you can use a standard phone cord with RJ-11
connectors from the patch panel to the Dialogic station breakout box. This method assumes that
the patch panel accepts RJ-11 connectors. Network patch panels generally use RJ-45 connectors
but often accept RJ-11 connectors as well.
Replacing telephones connected directly to trunk lines
If you are not replacing a PBX and your office phones are connected directly to trunk lines, the
office may need to be rewired. Trunk lines must come to a central location at the TeleVantage
Server and station lines must be wired from the TeleVantage Server to the offices.
5-14
INSTALLING TELEVANTAGE
Using TeleVantage with a paging system _____________________
There are several ways to use TeleVantage with a paging system:
Q
Use the TeleVantage *15 telephone command to page a group of users over each user’s
speakerphone simultaneously. This option does not require an external paging system or
overhead speaker. See Using TeleVantage for more information.
Q
Use an external paging device. See page 5-15.
Q
Create an overhead paging system with hands-free answering. See page 5-15.
Using an external paging device with TeleVantage
You can attach an external paging device to a station or trunk port. For a station port, you must
then activate the hands-free feature for that extension as described in Administering
TeleVantage.
For more information about standard PBX paging systems from various manufacturers, contact:
Graybar Electric Company, Inc.
1-800-472-9227
http://www.graybar.com
Creating an overhead paging system with hands-free answering
You can create a paging system by connecting a hands-free extension (an extension at which
hands-free answering is enabled) to an overhead speaker. To broadcast an announcement over
the paging system, a user dials the extension and is connected immediately to the speaker. For
more about configuring an extension for hands-free answering to create an overhead paging
system, see Chapter 7 in Administering TeleVantage.
CHAPTER 5. PHONE OPTIONS AND REQUIREMENTS
5-15
Section 2
Performing the
Installation
CHAPTER 6
CHAPTER 6
GATEWAY OPTIONS AND
REQUIREMENTS
CHAPTER CONTENTS
Introduction . . . . . . . . . . . . . . . . . . . . . . . . . . . . . . . . . . . . . . . . . . . 6-2
Using gateway PSTN/FXO ports with TeleVantage . . . . . . . . . . . . 6-2
Using gateway station/FXS ports with TeleVantage . . . . . . . . . . . . 6-3
Using IP gateway T1/E1/BRI ports with TeleVantage . . . . . . . . . . . 6-3
Gateway requirements . . . . . . . . . . . . . . . . . . . . . . . . . . . . . . . . . . 6-4
Introduction _____________________________________________
TeleVantage supports VoIP gateway devices using the SIP protocol to provide a wide variety of
VoIP connectivity options for analog, T1, E1, or BRI trunks, and for analog devices including
analog phones and fax machines. You can use gateways no matter which method you use to
provide telephony resources on the TeleVantage Server (Dialogic HMP software or Dialogic
boards.)
This chapter lists supported gateways that provide the following types of ports:
Q
Public Switched Telephone Network (PSTN)/FXO ports
Q
Station/FXS ports
Q
T1/E1/BRI ports
For requirements, see page 6-4.
Using gateway PSTN/FXO ports with TeleVantage ______________
The PSTN/Foreign eXchange Office (FXO) ports on IP gateways convert PSTN calls to VoIP
calls and vice versa. Gateways that provide FXO ports have one or more PSTN interfaces for
analog trunks, and also an ethernet interface to connect to your router or other data networking
equipment.
Once the gateway’s FXO ports and TeleVantage are properly configured, the ports appear as
TeleVantage SIP servers through which users can place and receive PSTN calls. A TeleVantage
user can make or receive regular calls via the gateway and not realize that the calls are being
transmitted using VoIP.
TeleVantage can also act as a full-featured PSTN/FXO gateway when Dialogic analog and
Internet trunk boards are installed on the TeleVantage Server. An advantage of using a
third-party gateway is that you can have your TeleVantage Server in one location, and connect
to the PSTN at any remote location using VoIP. Using this approach, your TeleVantage Server
could be in Boston and the gateway could be initiating and receiving calls in a remote office in
San Francisco.
Tested gateways that provide FXO ports
The following gateways have been tested with TeleVantage:
Manufacturer’s product Web site
Sipura Technology Inc.
Type
1. The
6-2
Ports
Analog
SPA-30001
Analog
See your TeleVantage provider for the
models supported and their specific
capabilities.
http://www.sipura.com/products/index.htm
Quintum Technologies, Inc.
http://www.quintum.com/enterprise/en_prod
ucts.html
Model
1 analog trunk
(FXO) port
Sipura SPA-3000 was tested with software version 3.1.7 and hardware version 2.0.1.
INSTALLING TELEVANTAGE
Using gateway station/FXS ports with TeleVantage_____________
The station/Foreign eXchange Station (FXS) ports on IP gateways connect analog phones to the
Internet or your private TCP/IP network via an Ethernet connection, allowing analog phone
users to place and take VoIP calls. Gateways that provide FXS ports are also known as analog
telephone adaptors (ATAs.)
Once the FXS ports and TeleVantage are properly configured, a TeleVantage user can use an
analog phone as a TeleVantage station without consuming an analog station resource on the
TeleVantage Server.
Tested gateways that provide FXS ports
The following gateways have been tested with TeleVantage:
Manufacturer’s product Web site
Sipura Technology Inc.
Analog Telephone Adaptors
Type
1. The
Ports
Analog
SPA-1001
SPA-2000
SPA-2100
SPA-30001
Analog
See your TeleVantage provider for
the models supported and their
specific capabilities.
http://www.sipura.com/products/index.htm
Quintum Technologies, Inc.
http://www.quintum.com/enterprise/en_products
.html
Model
1 or 2 analog
station (FXS) ports
Sipura SPA-3000 was tested with software version 3.1.7 and hardware version 2.0.1.
Using IP gateway T1/E1/BRI ports with TeleVantage ____________
T1, E1, and BRI ports connect TeleVantage Internet trunks and the PSTN via T1, E1, or BRI
lines. Once the T1, E1, and BRI ports and TeleVantage are properly configured, the ports appear
as TeleVantage SIP servers through which users with SIP desktop phones or SIP softphones can
place and receive PSTN calls.
Tested gateways that provide T1/E1/BRI ports
The following gateways have been tested with TeleVantage:
Manufacturer’s product Web site
Quintum Technologies, Inc.
http://www.quintum.com/enterprise/en_products
.html
Type
Digital
CHAPTER 6. GATEWAY OPTIONS AND REQUIREMENTS
Model
Ports
See your TeleVantage provider for
the models supported and their
specific capabilities.
6-3
Gateway requirements ____________________________________
The following are required to use gateways with TeleVantage:
Q
For any gateway:
Q
Configure TeleVantage for SIP according to the instructions in Chapter 14 in
Administering TeleVantage.
Q
Install and configure the gateway.
For information on how to set up and connect a gateway, see the manufacturer’s
documentation. For instructions on how to configure a Sipura gateway for use with
TeleVantage, see Chapter 14 in Administering TeleVantage.
Q
For FXO/T1/E1/BRI ports. PSTN trunks and services that meet the requirements
described in Chapter 4.
Important: FXO, T1, E1, and BRI ports simply provide connectivity between
TeleVantage Internet trunks and the PSTN. You must still order PSTN trunks and
related services from your phone company before you can connect them to the
gateway.
Q
For FXS ports. Analog devices, including analog phones and fax machines, that meet
the requirements in Chapter 5.
Note: When analog phones are connected to FXS ports, only CLASS features are
supported—ADSI features are not supported.
6-4
INSTALLING TELEVANTAGE
CHAPTER 7
CHAPTER 7
UPGRADING OR INSTALLING
TELEVANTAGE
CHAPTER CONTENTS
Introduction . . . . . . . . . . . . . . . . . . . . . . . . . . . . . . . . . . . . . . . . . . . 7-2
Preparing for an upgrade . . . . . . . . . . . . . . . . . . . . . . . . . . . . . . . . 7-4
Upgrading from a previous version of TeleVantage . . . . . . . . . . . . 7-6
Installing a TeleVantage system for the first time . . . . . . . . . . . . . . 7-8
Important!
The TeleVantage installation process requires that you restart your PC one or more
times. Keep the Master CD in the drive while restarting. Do not remove the Master CD
until instructed to do so.
If you remove the Master CD before or during a restart, the installation
may not complete successfully.
Introduction
Is this upgrade for you?
Review this section carefully to determine if you should upgrade to TeleVantage 8.
Important: Be aware that if you do not upgrade to TeleVantage 8 for any reason, you will not
have access to Dialogic or Vertical support for Dialogic SR 5 and DIalogic HMP 1.1 because
Dialogic has discontinued support for those versions.
Note that TeleVantage 8 includes and requires Dialogic SR 6.0 SU 142, and does not work with
any previous version of the Dialogic drivers.
Do not upgrade to TeleVantage 8 if either of the following apply to you:.
Q
You have one or more EOL’d telephony boards installed in the TeleVantage Server and
do not plan to remove them or replace them with supported boards. See the What’s New
(available on the TeleVantage Master CD) for a list of EOL’d boards which are not
supported by Dialogic SR 6.0 SU 142.
If you are running TeleVantage 7.5 and do not plan to remove or replace EOL’d boards,
you should continue to use TeleVantage 7.5 and the Dialogic SR 5.1.1. SU 107 drivers
included with that version.
If you are running TeleVantage 4, 5, 6, or 7 and do not plan to remove or replace EOL’d
boards, you can upgrade to TeleVantage 7.5 and Dialogic SR 5.1.1. SU 107. See
Installing TeleVantage for version 7.5 for more information.
Q
You need to use an embedded H.323 VoIP stack. See “Using an embedded H.323 stack”
in Chapter 4 in Installing Dialogic Telephony Components for more information. Note
that embedded stack is only supported by Dialogic SR 5.1.1 SU 69, included with
TeleVantage 7.
TeleVantage CDs
All the software that you need to upgrade your existing TeleVantage system or to install a new
TeleVantage system is contained on three CDs. The Setup program on each CD allows you to
install the components listed below.
All of the manuals mentioned in this section are available on the Master CD in the \Manuals
directory.
The Master CD
Follow the instructions in this manual to install these components.
7-2
Q
Microsoft Data Engine (MSDE).
Q
TeleVantage Server.
Q
TeleVantage Services.
Q
TeleVantage workstation applications.
INSTALLING TELEVANTAGE
The Master CD also contains the following:
Q
TeleVantage Enterprise Manager. For installation instructions, see the TeleVantage
Enterprise Manager Installation and Administrator Guide.
Q
TeleVantage SDK. For installation instructions, see Chapter 15 in Administering
TeleVantage.
The Dialogic HMP CD
Follow the instructions in Chapter 5 in Installing Dialogic Telephony Components to install
these components.
Q
Dialogic HMP Software Release (SR) 3.0.
Q
Dialogic HMP SR 3.0 Service Update (SU) 157.
The Dialogic Drivers CD
Follow the instructions in Chapter 7 in Installing Dialogic Telephony Components to install
these components.
Q
Dialogic System Release (SR) 6.0.
Q
Dialogic SR 6.0 Service Update (SU) 142.
Q
TeleVantage SR 6.0 Driver Updates.
Starting the Setup programs
The Setup program starts automatically when you insert any CD into your CD-ROM drive. You
can also start the Setup program manually by running autorun.exe from the root directory on
any CD. Once the Setup program starts, follow the on-screen instructions. This manual does not
describe all Setup screens in detail.
Note: If the message “Corrupt installation detected” appears after you insert the CD or run
autorun.exe, log on as a local administrator, and then reinsert the CD.
Installing TeleVantage from a zip file
If you are installing TeleVantage from a zip file that you downloaded, extract the contents of the
file to your TeleVantage Server’s hard drive. Then, wherever a procedure in this manual refers
to running a Setup program from a TeleVantage CD, run that program manually from the CD
image that you extracted.
Troubleshooting installation problems
If you experience problems after completing a first-time installation or upgrade, see Appendix
B, “Troubleshooting” for more information.
CHAPTER 7. UPGRADING OR INSTALLING TELEVANTAGE
7-3
Upgrading vs. installing for the first time
Q
If you are upgrading from a previous version of TeleVantage, go to the next section.
Q
If you are installing a new TeleVantage system, go to “Installing a TeleVantage system
for the first time” on page 7-8.
Preparing for an upgrade __________________________________
The information in this section applies to all upgrade paths, no matter what version of
TeleVantage you currently have installed.
Important: Do not under any circumstances uninstall TeleVantage Server or Microsoft
MSDE/SQL Server. If you uninstall either one, you will lose your TeleVantage database and voice
messages. The TeleVantage installation program preserves your earlier TeleVantage Server
configuration, including voice messages and prompts. If you follow the instructions in this manual,
you will not lose any data when you upgrade.
Scheduling an upgrade
If you are upgrading the live telephone system at your company, you must schedule the
installation after business hours. The process of installing TeleVantage can take more than two
hours. It can take significantly longer if you must configure and test T1, E1, BRI, or VoIP
trunks. During this time, your telephone system will be offline and unavailable.
Backing up the TeleVantage database and voice files
Important: The upgrade is one-way, and cannot be uninstalled. To recover to a previous
version, you will need to restore the entire PC image to the same version of TeleVantage that you
were running previously according to the following instructions.
To maintain the integrity of your existing TeleVantage system and ensure a successful upgrade,
back up your entire system—including the TeleVantage database and voice files—to a safe
location off the TeleVantage Server PC. By backing up your system, you will be able to
reconstruct your current system if you need to recover to the version of TeleVantage that you
were running previously. Backing up an existing TeleVantage system may take an hour or more,
especially if there are many voice messages stored in your database.
To backup the TeleVantage database and voice files, perform an offline backup according to the
instructions in Chapter 12 of Administering TeleVantage. Be sure to refer to the copy of
Administering TeleVantage that matches the TeleVantage version of the system that you are
backing up, because the process is different for each version of TeleVantage.
If for any reason you are unable to start the TeleVantage Administrator, you can back up your
files by running the Administrator from the command line. See “Cannot start Administrator to
back up the TeleVantage database” on page B-10.
Note: You can only restore the TeleVantage database and voice files to a Server that is running
the exact same version of TeleVantage (including service packs and hot fixes) as the Server on
which you performed the backup. For example, you cannot backup a TeleVantage 5.x Server and
restore it to a TeleVantage 6.x Server. This restriction applies to minor releases as well, for
example, 6.0 and 6.1.
7-4
INSTALLING TELEVANTAGE
Important special upgrade scenarios
This section contains information about other tasks you may want to do at the same time that
you upgrade to TeleVantage 8:
Q
Move the TeleVantage Server to a new PC. See page 7-5.
Q
Change the domain of the TeleVantage Server. See page 7-5.
Q
Move the TeleVantage voice files. See page 7-5.
If these scenarios do not apply to you, skip to “Upgrading from TeleVantage 7.5” on page 7-6.
Moving the TeleVantage Server to a new PC
Before you upgrade, you can move the TeleVantage Server to a new PC, for example if you have
outgrown the original PC you are using for your TeleVantage Server.
If you plan to do so, see “Moving the TeleVantage Server to another PC” on page D-11 for
information about license activation considerations.
To move the TeleVantage Server to a new PC
1.
Make sure that the Windows user name you log in as to install TeleVantage on the new
PC is the same user name as on the original PC.
2.
On the new PC, install the exact same version of TeleVantage that is installed on the
original PC (for example, version 5.00.1640), plus any TeleVantage service packs and
hot fixes that you have installed.
Note: Be sure to install exactly the same TeleVantage system prompt languages on
the new TeleVantage Server PC as on the original PC. For example, if you installed
Spanish and English system prompts on the original PC, install those languages on the
new PC as well.
3.
Backup the TeleVantage database and voice files on the original PC. Then, restore the
TeleVantage database and voice files to the new PC.
4.
Make sure that the new Server is operating properly.
Changing the domain of the TeleVantage Server
See Appendix C, “Changing the Domain of the TeleVantage Server” if any of the following
conditions apply to your upgrade:
Q
Your network configuration has changed, and you now have a domain that you want the
TeleVantage Server to be a part of.
Q
You recently installed a Microsoft Exchange Server on your network, and you now want
to support e-mail notification in TeleVantage. To support this feature, the TeleVantage
Server must be on a domain.
Q
You changed the name or password of the domain user.
Q
You moved the TeleVantage Server to a different domain.
CHAPTER 7. UPGRADING OR INSTALLING TELEVANTAGE
7-5
Moving the TeleVantage voice files
If you want to upgrade your TeleVantage system, but do not have enough free space on your
disk to perform the installation, you can move the TeleVantage voice files to another location
before performing the upgrade. See Administering TeleVantage for more information about
moving voice files.
Upgrading from a previous version of TeleVantage
This section describes the following upgrade paths:
Q
Upgrading from TeleVantage 7.5
Q
Upgrading from TeleVantage 4, 5, 6, or 7
Q
Upgrading from TeleVantage 3.5 or earlier
Upgrading from TeleVantage 7.5
Upgrade tasks
During an upgrade, you must perform the tasks listed in the following table in the order
specified. This list is only an overview of the tasks you must perform. Detailed instructions for
each task are presented in Installing Dialogic Telephony Components and later chapters in this
manual.
Step
1
Description
If you were previously using Dialogic SR 5.1.1 drivers and Dialogic telephony
boards:
Q
If you are removing or replacing any EOL’d Dialogic telephony boards, you must
first remove these boards from the TeleVantage Server before installing the new
Dialogic SR 6.0 SU 142 drivers.
Q
Install new boards as required.
Q
Upgrade the Dialogic drivers.
If you were previously using Dialogic HMP:
Q
Upgrade the Dialogic HMP software already installed on your TeleVantage Server.
2
Upgrade the TeleVantage Server and TeleVantage Administrator.
3
Add and activate your TeleVantage 8 licenses.
4
Upgrade the TeleVantage workstation applications.
5
Upgrade TeleVantage Web Services.
6
Upgrade or install TeleVantage ViewPoint Web Access, TeleVantage Multi-line TAPI
Service Provider, TeleVantage Recording Archive Service, or TeleVantage SMDR
Service.
Go to “Starting the upgrade” on page 7-7.
7-6
INSTALLING TELEVANTAGE
Upgrading from TeleVantage 4, 5, 6, or 7
Upgrade tasks
During an upgrade, you must perform the tasks listed in the following table in the order
specified. This list is only an overview of the tasks you must perform. Detailed instructions for
each task are presented in Installing Dialogic Telephony Components and later chapters in this
manual.
Step
1
Description
If you were previously using Dialogic drivers and Dialogic telephony boards:
Q
If you are removing or replacing any EOL’d Dialogic telephony boards, you must
first remove these boards from the TeleVantage Server before installing the new
Dialogic SR 6.0 SU 142 drivers.
Q
Install new boards as required.
Q
Upgrade the Dialogic drivers.
If you were previously using or will be using Dialogic HMP (introduced in
TeleVantage 7) to supply telephony resources:
Q
Upgrade or install Dialogic HMP.
2
Install and configure the database server.
3
Upgrade the TeleVantage Server and TeleVantage Administrator.
4
Add and activate your TeleVantage 8 licenses.
5
Upgrade the TeleVantage workstation applications.
6
Upgrade TeleVantage Web Services.
7
Upgrade or install TeleVantage ViewPoint Web Access, TeleVantage Multi-line TAPI
Service Provider, TeleVantage Recording Archive Service, or TeleVantage SMDR
Service.
Go to the next section.
Starting the upgrade
Do one of the following:
Q
If you are upgrading or installing new Dialogic boards on the TeleVantage Server, go to
Chapter 6 in Installing Dialogic Telephony Components.
Q
If you are leaving your Dialogic boards intact, but are upgrading your Dialogic drivers,
go to Chapter 7 in Installing Dialogic Telephony Components.
Q
If you are upgrading or installing Dialogic HMP, go to Chapter 5 in Installing Dialogic
Telephony Components.
CHAPTER 7. UPGRADING OR INSTALLING TELEVANTAGE
7-7
Upgrading from TeleVantage 3.5 or earlier
If you are upgrading from TeleVantage 3.5 or earlier, you must first upgrade your system to
TeleVantage 6.1 or higher, and then upgrade again to TeleVantage 8. See Installing TeleVantage
(for the intermediate version that you choose to install) for details. Be sure to review “Notes for
specific upgrade paths” in Chapter 6 in those manuals (in TeleVantage 6, this information was
moved to Appendix F.)
Installing a TeleVantage system for the first time _______________
If you are installing TeleVantage for the first time, you must perform the tasks listed in the
following table in the order specified. This list is only an overview of the tasks you must
perform. Unless otherwise noted, detailed instructions for each task are presented in later
chapters in this manual.
Step
Description
1
Verify that the PCs you plan to use for the TeleVantage Server, the TeleVantage
workstation applications, and TeleVantage Web Services meet the requirements
described in Chapter 3.
2
Verify your Microsoft network type and the IP address of the TeleVantage Server PC,
as detailed in “What you must know before installing” on page 7-9. You will need this
information during the installation.
3
Install and configure Windows on the TeleVantage Server PC.
4
Do one of the following:
If you will be using Dialogic HMP software to supply telephony resources for
TeleVantage:
Q
Install Dialogic HMP according to the instructions in Chapter 5 in Installing Dialogic
Telephony Components.
If you will be using Dialogic boards to supply telephony resources for
TeleVantage:
7-8
Q
Install the boards as required. For instructions, see Chapter 6 in Installing Dialogic
Telephony Components.
Q
Install the Dialogic Drivers. For instructions, see Chapter 7 in Installing Dialogic
Telephony Components.
5
Install and configure the database server.
6
Install the TeleVantage Server and TeleVantage Administrator on the TeleVantage
Server.
7
Add and activate your TeleVantage 8 licenses.
8
Install the TeleVantage workstation applications.
9
Install TeleVantage Web Services.
10
Install TeleVantage ViewPoint Web Access, TeleVantage Multi-line TAPI Service
Provider, TeleVantage Recording Archive Service, or TeleVantage SMDR Service.
INSTALLING TELEVANTAGE
What you must know before installing
For a smooth first-time installation, gather the following information before you begin:
Q
Network environment type. Is your Microsoft network a domain or workgroup
environment?
Q
Q
If you are in a domain environment, you must know the name of the domain and the
name and password of a domain user with administrator privileges on the PC on
which the TeleVantage Server will be installed. See “Supported integrated trunk
and station board” in Chapter 4 in Installing Dialogic Telephony Components for
more information.
Q
If you are in a workgroup environment, you do not need to know this information.
The IP address of the TeleVantage Server PC.
Important: If you are using VoIP, (SIP, Dialogic HMP, or H.323 host-based stacks),
you must configure your TeleVantage Server with a static IP address. You cannot use
a dynamically-assigned IP address.
Q
If you use static IP addressing, you must know the IP address of the Server PC, your
Subnet Mask, and the IP address of your default gateway to properly configure the
TeleVantage Server on a network.
Q
If you use dynamic IP addressing, you do not need to know this information.
Starting the first-time installation
To begin installing TeleVantage for the first time, go to Chapter 8, “Installing and Configuring
Windows on the TeleVantage Server.”
Read the Introduction in Chapter 8 and follow the steps as directed. The Introduction also
addresses site-specific installation considerations, such as the versions of operating system or
other system components already present on your PC.
CHAPTER 7. UPGRADING OR INSTALLING TELEVANTAGE
7-9
CHAPTER 8
CHAPTER 8
INSTALLING AND CONFIGURING
WINDOWS ON THE TELEVANTAGE
SERVER
CHAPTER CONTENTS
Introduction . . . . . . . . . . . . . . . . . . . . . . . . . . . . . . . . . . . . . . . . . . . 8-2
Installing Windows 2000/XP/2003 . . . . . . . . . . . . . . . . . . . . . . . . . .8-2
Configuring Windows 2000/XP/2003 for TeleVantage . . . . . . . . . . 8-3
Introduction _____________________________________________
Before you install TeleVantage components, you or your system administrator must install and
configure one of the Windows operating systems listed on page 3-2 on the TeleVantage Server
PC.
If you are upgrading from a previous version of TeleVantage, go to Chapter 8. Otherwise,
continue reading this chapter.
Note: Throughout this chapter, the term “Windows 2000/XP/2003” refers to the versions of
Windows supported on the TeleVantage Server: Windows 2000 Server, Windows 2000
Professional, Windows XP Professional, and Windows Server 2003.
Perform these steps
You will perform the following steps as you install the TeleVantage Server:
Q
Install and configure Windows 2000/XP/2003.
Q
Configure Windows 2000/XP/2003 for TeleVantage.
Q
Create the Windows 2000/XP/2003 user for TeleVantage.
Note: Even if Windows 2000/XP/2003 is already installed on your PC, you must perform the last
two steps to ensure that your system is set up correctly for use by TeleVantage.
Installing Windows 2000/XP/2003____________________________
Install Windows 2000/XP/2003 on a clean PC according to the instructions that came with the
software.
When you are done, you are ready to perform the following tasks:
Q
Configure Windows 2000/XP/2003 for TeleVantage
Q
Create a Windows 2000/XP/2003 user for TeleVantage
Go to the next section.
8-2
INSTALLING TELEVANTAGE
Configuring Windows 2000/XP/2003 for TeleVantage ___________
Use the information in the following table to configure Windows 2000/XP/2003 for use with
TeleVantage.
Dialog box name
TeleVantage requirement
Licensing Modes
If each TeleVantage user’s PC already has a Windows 2000/XP/2003
per-seat license to connect to other Windows 2000/XP/2003 Servers,
you do not need any more licenses.
If TeleVantage users’ PCs use concurrent licenses, you must estimate
the number of users who will play voice messages and custom
recordings over their computer speakers concurrently to determine
how many concurrent licenses you need. Playing voice files over the
telephone does not use the network, so you do not need to allocate
licenses for this purpose.
Computer Name and
Administrator
Password
Enter the network name for the TeleVantage Server PC. Use the
name “TeleVantage” to make the Server easily identifiable.
Go to the next section.
Creating the Windows 2000/XP/2003 user for TeleVantage
After installing and configuring Windows 2000/XP/2003, you must create the Windows
2000/XP/2003 user that will install and run TeleVantage. Depending on your environment, do
one of the following:
Q
If you are not in a domain environment, go to the next section.
Q
If you are in a domain environment, go to “If you are in a Windows 2000/XP/2003
domain environment using Microsoft Exchange” on page 8-4.
If you are not in a Windows 2000/XP/2003 domain environment using
Microsoft Exchange
If you are not in a domain environment, you can create a new user with administrator privileges
on the local system, or you can log on yourself as the TeleVantage system administrator.
To create a new user with administrator privileges
1.
Log on to the TeleVantage Server PC as the local administrator user.
2.
Click Start > Programs > Administrative Tools > Computer Management.
3.
Select System Tools > Local Users and Groups > Users.
4.
Click Action > New User.
5.
Enter properties for the new user and make a note of the user name you enter.
CHAPTER 8. INSTALLING AND CONFIGURING WINDOWS ON THE TELEVANTAGE SERVER
8-3
6.
Click Create to create the new user. Close the dialog box but do not exit Computer
Management.
7.
Select System Tools > Local Users and Groups > Groups.
8.
Select the Administrators group.
9.
Click Add.
10. Make sure the local computer is selected in the Look in drop-down list.
11. Select the new user and click Add.
12. Click OK to close the Select Users or Groups dialog box.
13. Click OK to close the Administrator Properties dialog box.
14. Exit Computer Management.
To add required rights for the new user
1.
Click Start > Programs > Administrative Tools > Local Security Policy.
2.
Select Security Settings > Local Policies > User Rights Assignment.
3.
Select Log on as a batch job.
4.
Click Action > Security and click Add.
5.
Make sure the local computer is selected in the Look in drop-down list.
6.
Select the new user and click Add.
7.
Click OK to close the Select Users or Groups dialog box.
8.
Click OK to close the Local Security Policy Setting dialog box.
9.
Exit Local Security Settings.
When you are done, go to Chapter 9, “Installing The TeleVantage Database Server.”
If you are in a Windows 2000/XP/2003 domain environment using
Microsoft Exchange
If you are in a domain environment in which you will use Microsoft Exchange with TeleVantage
for e-mail notification or synchronization, you must create a domain user so that TeleVantage
can communicate with Exchange. The domain user must be a member of the Domain Users
Group, which is the default group for a new domain user.
To create a domain user that is a member of the Domain Users Group
8-4
1.
Log on to your Windows 2000/XP/2003 primary domain controller (PDC) PC as a
domain administrator user.
2.
Click Start > Programs > Administrative Tools > Active Directory Users and
Computers.
INSTALLING TELEVANTAGE
3.
In the console tree, double-click the domain node.
4.
In the details pane, right-click the organizational unit to which you want to add the
user, point to New, and then click User.
5.
Enter properties for the new user and make a note of the user name you enter. For
information about individual properties, see your Windows documentation.
6.
Click Add to add the new user.
7.
Log off.
To add the new user to the local Administrator group
1.
Log on to your TeleVantage Server PC as a member of the Domain Administrators
group.
2.
Click Start > Programs > Administrative Tools > Computer Management.
3.
Select System Tools > Local Users and Groups > Groups.
4.
Select the Administrators group.
5.
Click Action > Add to Group and click Add.
6.
Make sure the domain is selected in the Look in drop-down list.
7.
Select the new user and click Add.
8.
Click OK to close the Select Users or Groups dialog box.
9.
Click OK to close the Administrator Properties dialog box.
10. Exit Computer Management.
To add required rights for the new user
1.
Click Start > Programs > Administrative Tools > Local Security Policy.
2.
Select Security Settings > Local Policies > User Rights Assignment.
3.
Select Log on as a batch job.
4.
Click Action > Security and click Add.
5.
Make sure the local computer is selected in the Look in drop-down list.
6.
Select the new user and click Add.
7.
Click OK to close the Select Users or Groups dialog box.
8.
Click OK to close the Local Security Policy Setting dialog box.
9.
Exit Local Security Settings.
Where to go next_______________________________________
When you have installed and configured Windows 2000/XP/2003, go to Chapter 9.
CHAPTER 8. INSTALLING AND CONFIGURING WINDOWS ON THE TELEVANTAGE SERVER
8-5
CHAPTER 9
CHAPTER 9
INSTALLING THE TELEVANTAGE
DATABASE SERVER
CHAPTER CONTENTS
Introduction . . . . . . . . . . . . . . . . . . . . . . . . . . . . . . . . . . . . . . . . . . . 9-2
Installing MSDE from the Master CD . . . . . . . . . . . . . . . . . . . . . . .9-3
Applying the latest SQL Server service pack . . . . . . . . . . . . . . . . . 9-4
Introduction _____________________________________________
If you are upgrading from TeleVantage 7, skip to Chapter 10.
TeleVantage uses a database server to manage and access the TeleVantage database. See
“TeleVantage database server requirements” on page 3-11 for information about the pros and
cons of the various database servers you can use with TeleVantage.
Q
If you are installing TeleVantage for the first time. Do one of the following depending
on your needs:
Q
Q
Install Microsoft MSDE 2000 SP3a from the Master CD. See page 9-3. SP4 is also
supported, but must be downloaded from Microsoft.
Q
Install your own copy of SQL Server 2000. Be sure to apply the latest SQL Server
service pack according to the instructions on page 9-4.
If you are upgrading from a previous version of TeleVantage. If you have not
already done so, it is critical that you backup your TeleVantage database before starting
the upgrade. See “Backing up the TeleVantage database and voice files” on page 7-4.
Note the following:
Q
If your current database server is MSDE 1.0. MSDE 1.0 is not supported. You
must either install MSDE 2000 SP3a from the Master CD according to the
instructions on page 9-3, or your own copy of MSDE 2000 SP4.
Q
If your current database server is SQL Server 2000 SP2 or earlier (any edition).
Be sure to apply the latest SQL Server service pack according to the instructions on
page 9-4.
Q
If your current database server is SQL Server 7.0 (any edition). SQL Server 7.0
is not supported. Install your own copy of SQL Server 2000. You must apply the
latest SQL Server service pack and then set the database compatibility level
according to the instructions on page 9-4. Also, be sure not to change your
Authentication from SQL to NT or Windows. The TeleVantage database requires
SQL authentication.
If you experience problems with your database server after following the instructions in this
chapter, see “Troubleshooting database server problems” on page B-4.
9-2
INSTALLING TELEVANTAGE
Installing MSDE from the Master CD_________________________
Important: The MSDE database server installation has been customized for TeleVantage. You
must install the database server using the Master Setup program, according to the following
instructions.
To install MSDE from the Master CD
1.
Insert the Master CD. If the Master Setup does not start automatically, run
autorun.exe from the root directory on the Master CD.
2.
Click Microsoft Data Engine.
3.
The Master Setup searches to see if Microsoft Internet Explorer 5.0 or higher is already
installed on your PC. If you do not get a warning message, go to the next step.
If Internet Explorer 5.0 or higher is not detected, you are prompted to install it. Go to
the following location to obtain the latest version:
http://www.microsoft.com/downloads
Download and install the latest version, and then re-start the TeleVantage Master
Setup.
4.
Follow the on-screen instructions. The Master Setup searches to see if the correct
version of Microsoft Data Engine is detected on your PC. If it is found, click Next to
exit Setup. Go to the next chapter.
If Microsoft Data Engine is not detected on your PC, follow the on-screen instructions.
CHAPTER 10. INSTALLING THE TELEVANTAGE DATABASE SERVER
9-3
5.
First-time installations: Do the following:
Q
The Master Setup shows the default directory where MSDE will be installed. To
install MSDE in a different location, click Browse. Click Next to continue.
Q
In the MSDE Password screen, enter the password that will be used by the MSDE
system administrator account. It is important to save this password as it will be
needed for all future upgrades. Click Next to continue.
Upgrades: The Master Setup automatically uses the existing MSDE directory and
system administrator (sa) password. If the sa password is not accepted, see the
troubleshooting tip on page B-5.
6.
MSDE installation will take awhile, from 5 minutes when you are installing for the
first time, to up to an hour when you are upgrading.
Note: After file copying starts, a command window will open briefly. Do not close the
command window—closing it can cause the MSDE installation to fail.
7.
If you are prompted to restart the PC, do so.
Applying the latest SQL Server service pack __________________
If you did not install MSDE 2000 SP3A from the Master CD, you need to apply the latest SQL
Server service pack before continuing.
Upgrading from TeleVantage 5.x: The TeleVantage 5.x installation process changed the SQL
Server sa account password, which you must enter when applying the latest SQL Server service
pack. Before applying the service pack, install the 8 Server as described in the next chapter. The
8 Server installation program prompts you to change the sa account password to something you
know. When the 8 Server installation completes, apply the SQL Server service pack using the
new sa account password.
To apply the latest SQL Server service pack
9-4
1.
Download the latest SQL Server service pack by going to http://www.microsoft.com
and searching on the keyword “SQL Server”.
2.
Find the version of SQL Server you are running (MSDE 2000 or SQL Server 2000)
from the SQL Server downloads site, and download the service pack installer.
3.
Double-click the downloaded file to extract the contents and follow the enclosed
instructions.
INSTALLING TELEVANTAGE
If you upgraded from SQL Server 7 to SQL Server 2000
If you upgraded from SQL Server 7 to SQL Server 2000, you need to set the compatibility level
correctly on the TeleVantage database. To do so:
1.
Run the following utility from the Master CD:
2.
Click Apply.
Support\SQL7toSQL2000\SQL2000CompatLevel.exe
Where to go next_______________________________________
When you have successfully installed or upgraded your database server, go to Chapter 10.
CHAPTER 10. INSTALLING THE TELEVANTAGE DATABASE SERVER
9-5
CHAPTER 10
CHAPTER 10
INSTALLING THE TELEVANTAGE
SERVER SOFTWARE
CHAPTER CONTENTS
Introduction . . . . . . . . . . . . . . . . . . . . . . . . . . . . . . . . . . . . . . . . . . 10-2
Installing the TeleVantage Server . . . . . . . . . . . . . . . . . . . . . . . . .10-2
Installing the TeleVantage Administrator. . . . . . . . . . . . . . . . . . . 10-15
Entering and activating your TeleVantage licenses . . . . . . . . . . 10-16
Testing the TeleVantage Server . . . . . . . . . . . . . . . . . . . . . . . . .10-21
Setting the TeleVantage Server to autostart . . . . . . . . . . . . . . . . 10-23
Completing the TeleVantage Server installation . . . . . . . . . . . . . 10-24
Introduction _____________________________________________
Task checklist
You must perform the tasks listed in the following table in the order specified to install and
configure the TeleVantage Server. This list is only an overview of the tasks you must perform.
Detailed instructions for each task are presented in later sections in this chapter.
Step
Description
1
Install the TeleVantage Server.
2
Install the TeleVantage Administrator.
3
Install a dongle, if you plan to use that method of hardware locking for your
TeleVantage licenses.
4
Enter and activate your TeleVantage licenses.
5
Test the TeleVantage Server.
6
Set the TeleVantage Server to autostart.
7
Set access rights to the TeleVantage Server.
8
Optionally, configure TeleVantage for use with a proxy server. Perform this step if you
use a proxy Server to access the Internet from a local area network.
9
Optionally, configure e-mail notification support. Perform this step if your users want to
receive e-mail notification of voice messages.
If you experience problems after following the instructions in this chapter, see “Troubleshooting
TeleVantage Server problems” on page B-5.
Requirements
For a list of the hardware and software requirements for the TeleVantage Server PC, see
“TeleVantage Server PC requirements” on page 3-2.
Installing the TeleVantage Server ____________________________
Note: If you are installing on a TeleVantage Server PC running Windows Server 2003 from a
remote location (for example, using Remote Desktop), from the Start menu, click Administrative
Tools > Terminal Services Configuration > Server Settings, and set Delete temporary
folders on exit to No. Be sure to reset this setting to its original value when the installation
completes.
1.
10-2
If you are installing TeleVantage from a zip file that you downloaded, extract the
contents of the file to your TeleVantage Server’s hard drive. Do not run any of the
extracted files yet.
INSTALLING TELEVANTAGE
2.
Close all open Windows applications running on the TeleVantage Server PC. You do
not need to stop SQL services.
3.
Do one of the following:
4.
Q
If you are installing TeleVantage for the first time, go to step 4.
Q
If you are upgrading from a previous version of TeleVantage, shut down the
TeleVantage components. To do so:
Q
Stop the TeleVantage Server. To do so, in the TeleVantage Administrator,
choose Tools > Shut down Server and then select Stop TeleVantage Server
and Dialogic Drivers.
Q
Exit all TeleVantage workstation applications (ViewPoint, Administrator,
TAPI Service Provider, and Contact Manager Assistant) running on any PCs in
the network.
Q
Exit the Device Monitor by right-clicking its icon in the system tray and
choosing Exit Device Monitor. Make sure that you exit the Device Monitor and
that you do not just minimize it.
Q
Stop all TeleVantage applications, including the TeleVantage Archived
Recording Browser, TeleVantage Station Message Detail Recording (SMDR)
service, TeleVantage Conference Manager, and TeleVantage Enterprise
Manager.
Log on to the network using the Windows Server user created for the TeleVantage
Server.
Note: If you have not already created this user, which will be used to run the
TeleVantage Service, see Chapter 8 for information about creating the Windows Server
user.
5.
If you are installing on a TeleVantage Server running on Windows Server 2003
from a remote location (for example, using Remote Desktop), do the following.
Otherwise, go to step 6.
From the Start menu, click Administrative Tools > Terminal Services Configuration
> Server Settings, and set Delete temporary folders on exit to No. You will be
reminded to restore this setting to its original value after the TeleVantage Server
installation completes.
6.
Insert the Master CD. If the Master Setup does not start automatically, run
autorun.exe from the root directory on the Master CD.
CHAPTER 10. INSTALLING THE TELEVANTAGE SERVER SOFTWARE
10-3
7.
Click TeleVantage Server.
8.
The TeleVantage Server Setup starts.
Follow the on-screen instructions.
10-4
INSTALLING TELEVANTAGE
9.
In the License Agreement dialog box, signify your agreement with the conditions by
clicking I accept the terms in the license agreement.
Click Next to continue.
10. In the Customer Information dialog box, enter your Name and your Company name.
Click Next to continue.
CHAPTER 10. INSTALLING THE TELEVANTAGE SERVER SOFTWARE
10-5
11. In the TeleVantage Provider Contact Information dialog box, enter the name,
company, and the telephone number or e-mail address of your TeleVantage provider.
Note: It is important to enter this information, because it is helpful to users who need
to contact technical support to report a problem. Users can obtain this information by
choosing Help > About from TeleVantage ViewPoint or the Administrator.
Click Next to continue.
12. If the Server Setup detects that the TeleVantage Server is running, stop it, and then
click Retry to continue.
10-6
INSTALLING TELEVANTAGE
13. In the Telephony platform dialog box, select the method by which you are providing
telephony resources for TeleVantage, based on whether you installed Dialogic
telephony boards or Dialogic HMP software according to the instructions in Installing
Dialogic Telephony Components.
Note: A warning message appears if you choose an option that does not match what
is already installed on your TeleVantage Server, or if you must install missing
components for proper operation.
Click Next to continue.
14. The TeleVantage Server and voice file location dialog box shows the default directory
in which the TeleVantage Server will be installed.
CHAPTER 10. INSTALLING THE TELEVANTAGE SERVER SOFTWARE
10-7
First time installations:
Q
To install the TeleVantage Server in a different location from the default location,
click TeleVantage Server, and then click Change and browse to that location.
Q
Install the system prompt languages that both callers and users hear. To do so, select
each of the languages that your callers and users are likely to want to use, but note
that each language will require significant extra disk space. (Voice prompts for
other languages are available, and are installed separately. See “Multi-lingual
system prompts” on page 1-4.)
Voice files for the languages you select in this dialog box will be installed in the
default directory shown. To install voice files in a different location, click Voice
Prompts, and then click Change and browse to that location.
Note: This step installs language files, but does not specify how they are used in
TeleVantage. Once installed, you use the TeleVantage Administrator and ViewPoint
to specify which languages will be used by individual users and callers. To install
additional languages at later time, you must run the TeleVantage Server Setup
again.
Upgrades: Select additional languages to install.
Click Next to continue.
15. If you selected more than one language in the Server and voice file location dialog box,
the Select Default Language dialog box opens. Select the default language for system
prompts. This language will also be used as the default when creating new users and
contacts.
Click Next to continue.
10-8
INSTALLING TELEVANTAGE
16. In the TeleVantage Server Voice File Format dialog box, specify the encoding format
used in your location.
Click Next to continue.
Note: If you must change voice file format after installing the TeleVantage Server, see
Administering TeleVantage. This dialog box does not appear if you reinstall the
TeleVantage Server.
17. Upgrades: In the Preserve Existing Server Voice Files dialog box, choose what to do
with any customized system prompts that you have previously recorded.
Note: This choice affects only system prompts that you have customized, not other
recordings that you have made, such as greetings or auto attendants. Custom greetings
and auto attendants are always preserved during an upgrade.
CHAPTER 10. INSTALLING THE TELEVANTAGE SERVER SOFTWARE
10-9
Q
Preserve existing voice files. Choose this option if you have not customized any
system prompts, or if you want to retain your customized system prompts. Any
system prompts that have been customized are retained, while unmodified system
prompts are overwritten with TeleVantage 7 versions.
Q
Overwrite existing voice files. Choose this option to overwrite all system
prompts.
Click Next to continue.
18. In the Windows Account Name and Password dialog box, enter the name and
password of the account you will use to run the TeleVantage Server.
Click Next to continue.
10-10
INSTALLING TELEVANTAGE
19. First-time installations: In the Microsoft SQL Server Password dialog box, enter your
SQL Server SA (system administrator) password.
Click Next to continue.
20. Upgrades: In the Change SQL Server System Administrator Password dialog box,
enter a new SA (system administrator) password.
Note: This dialog box only opens if your current SQL Server SA (system administrator)
password is blank.
CHAPTER 10. INSTALLING THE TELEVANTAGE SERVER SOFTWARE
10-11
21. In the Select Database Paths dialog box, specify the locations for the components of
the TeleVantage database. For optimal performance, these components should be on
different drives. See page 3-12 for database configuration recommendations.
The database components will be installed in the default directories shown. To install
any of them in a different location, click Change and browse to that location.
Q
Database Path. Location of the TeleVantage database.
Q
Transaction Log Path. Location of the SQL Server transaction logs.
Q
Database Backup Path. Location to which TeleVantage database backups are
saved.
10-12
INSTALLING TELEVANTAGE
22. First-time installations: In the TeleVantage Server Area Code dialog box, enter your
telephone area code or city code.
Leave Area Code blank if your phone lines do not use an area code. Click Next to
continue.
23. In the Ready to Install TeleVantage Server dialog box, click Install.
Important: Installation can take several minutes. If you are prompted to restart your
computer, do so. Be sure to leave the Master CD in the drive throughout the installation
and while the Server PC restarts.
CHAPTER 10. INSTALLING THE TELEVANTAGE SERVER SOFTWARE
10-13
24. After the PC restarts, log on as the same user you used previously. The TeleVantage
Server Setup program will resume, copy additional files, and then complete the
installation automatically. This may take a significant amount of time, so be sure to
allow the TeleVantage Server Setup program to complete.
25. In the Setup Complete dialog box, select the Launch the TeleVantage Workstation
Setup checkbox to install the TeleVantage Administrator on the TeleVantage Server
PC in order to enter your licenses according to the instructions in “Installing the
TeleVantage Administrator” on page 10-15. Click Finish.
26. The TeleVantage Workstation Setup starts. If it does not start automatically, start it
manually as described in the next section. (Upgrades: Without this step, Add-ons such
as the TeleVantage Conference Manager may fail to work after upgrading. All
TeleVantage workstation applications on your network will automatically upgrade the
next time the TeleVantage Administrator or ViewPoint is started.)
27. If you plan to install TeleVantage Enterprise Manager or other Add-Ons (for example,
TeleVantage Conference Manager) on the TeleVantage Server, run the TeleVantage
Service Account Utility now as described on page C-1.
Note: If after installing the TeleVantage Server according to the previous instructions you
upgrade the TeleVantage Server PC to Windows XP SP2 or Windows 2003 Server SP1, run the
TeleVantage Service Account Utility on the TeleVantage Server as described on page C-1; restart
the Server PC if you are prompted to do so; and then follow the instructions in Appendix F,
“Configuring TeleVantage for the Windows Firewall.”
10-14
INSTALLING TELEVANTAGE
Installing the TeleVantage Administrator _____________________
This section explains how use the TeleVantage Workstation Setup program to install the
TeleVantage Administrator in the default location on the TeleVantage Server PC.
Note: You will use Workstation Setup again in Chapter 11 to install the TeleVantage workstation
applications on other PCs or to install other workstation applications on the Server. All the
Workstation Setup options are described in that chapter.
To install the TeleVantage Administrator on the TeleVantage Server PC
1.
If you came here by checking select the Launch the TeleVantage Workstation Setup
checkbox at the end of the TeleVantage Server Setup program, go to step 5.
2.
Log on to the TeleVantage Server PC as the same user you specified when you
installed the TeleVantage Server.
3.
Close all open Windows applications.
4.
If the TeleVantage Workstation Setup is not running, from the Start menu, choose
Programs > Vertical TeleVantage > TeleVantage Workstation Setup. Follow the
on-screen instructions.
5.
When the Welcome to the TeleVantage Workstation Setup screen appears, click Next
to continue.
6.
Review the License Agreement. Click I accept the terms in this license agreement,
and then click Next to continue.
7.
In the Customer Information screen, enter your User Name and Organization.
8.
In the TeleVantage Server Information screen, enter the TeleVantage Server Name
and the Telephone Station ID of the phone that will be used by the person
administering the TeleVantage system from this PC (the Admin user).
The station ID corresponds to the port number on the station board to which the phone
is connected. To hear your station ID, pick up the phone and dial *0.
Note: If there is not a TeleVantage phone near this PC, enter a station ID of 0. Without
a phone, the user administering TeleVantage from this PC will be able to perform all
administrative functions with the exception of recording voice prompts. If you enter a
station ID of 0, when you click Next, the No Telephone Station ID Specified screen
opens to make sure that you understand this limitation, and gives you the opportunity
to go back and enter a valid station ID.
Select Only for me if you want only this user to be able to run the Administrator from
this PC.
Click Next to continue.
CHAPTER 10. INSTALLING THE TELEVANTAGE SERVER SOFTWARE
10-15
9.
In the Setup Type screen, select Typical to install the TeleVantage Administrator in
the default location. To install additional workstation applications on the TeleVantage
Server, perform a custom installation, as described in Chapter 11.
Click Next to continue.
10. In the Ready to Install screen, click Install. Installation may take several minutes.
11. In the Installation Completed screen, select the Show What’s New checkbox to see a
complete listing of the new features available in this version of TeleVantage. Click
Finish to complete the installation.
Go to the next section.
Entering and activating your TeleVantage licenses _____________
If you are upgrading from TeleVantage 7, skip to “Testing the TeleVantage Server” on
page 10-21.
This section explains how to do the following:
Q
Enter licenses manually, using the TeleVantage Administrator.
Q
Activate licenses over the Internet to enable full functionality on your TeleVantage
system.
Note the following important information:
Q
You need to enter new licenses even if you are upgrading from a previous version.
You need to know the serial number and verification key of the license in order to enter
it. Typically, this information is supplied by your TeleVantage provider as a printed
document or in a license file. If your TeleVantage provider supplies you with a license
file, see page D-7 for instructions on how to import it.
Q
Keep your license serial numbers and verification keys in a safe location and do
not share them with others. This information forms the basis for your ability to install
and use TeleVantage.
Q
You must activate your licenses. Activation requires the following:
Q
Hardware ID. When you activate your licenses, you must choose a hardware ID on
the TeleVantage Server PC to which your licenses are locked. Be sure to review the
hardware locking options described in “How hardware locking works” on
page D-9. If you plan to use a dongle for hardware locking, install it according to
the instructions in “Installing a dongle” on page D-11 before entering and activating
your licenses.
Q
Internet access on the PC on which you are running the TeleVantage
Administrator. If you do not have an Internet connection, you can activate your
licenses from another PC in the network that does have Internet access. See
“Activating licenses via the web” on page D-4 for instructions.
Q
10-16
Partner ID. Request this number from the place where you purchased TeleVantage.
INSTALLING TELEVANTAGE
You must have a valid Server license to start the TeleVantage Server. Trunk, Station, IP Port,
ViewPoint, Call Center Agent, Reporter, and Conference Manager licenses are optional, and are
only required if you want to use these components. See “TeleVantage license requirements” on
page 3-16 for information about the different licenses that are available.
For details about how TeleVantage licensing works see Appendix D, “Managing TeleVantage
Licenses.”
To enter and activate TeleVantage licenses
1.
Start the TeleVantage Administrator by choosing Start > Programs > Vertical
TeleVantage > TeleVantage Administrator.
2.
In the Administrator Log On dialog box, enter your User name and Password, and
then click OK.
Note: After first installing the TeleVantage Administrator, log on using the default User
name Admin and the default Password of 100.
3.
If you logged on using the default User name and Password, the Security Warning
dialog box opens, reminding you to change the defaults to protect your system.
Click OK to continue.
4.
Change the default passwords for the Admin and Operator user accounts right now to
protect yourself against toll fraud. To do so:
Q
Open the Users view by clicking its button in the view bar on the left side of the
Administrator window.
Q
Double-click the Admin user.
CHAPTER 10. INSTALLING THE TELEVANTAGE SERVER SOFTWARE
10-17
Q
Change the default Password to one that is at least 5 digits long and cryptic. Retype
the new password in the Confirmation field. Click OK.
Q
Change the password for the Operator user as well.
See page I-3 for more information about password security.
10-18
5.
Choose Tools > System Settings, and then click Licenses in the Category pane.
6.
Enter your Server license first. Select Server from the License category drop-down
list, and then enter the Serial number and Verification key for the Server license.
7.
To enter the next license, select the appropriate license category from the drop-down
list in the right pane.
INSTALLING TELEVANTAGE
8.
Click Add. The Modify License dialog box opens.
Enter the Serial number and Verification key for the license, and then click OK.
For each remaining license, repeat this step.
9.
If this PC is connected to the Internet, click Activate to activate your licenses, and then
go to step 11.
If this PC is not connected to the Internet, or you plan to activate your licenses later,
click OK.
10. Licenses Must be Activated dialog box opens to remind you that your licenses have
not been activated.
See “How to activate your licenses” on page D-4 for instructions on how to activate
your licenses.
Go to “Testing the TeleVantage Server” on page 10-21.
CHAPTER 10. INSTALLING THE TELEVANTAGE SERVER SOFTWARE
10-19
11. The Activation Information dialog box opens.
Complete the information in the Activation Information dialog box. All fields in bold
are required. Completing all the fields will help your technical support representative
when troubleshooting problems, and will keep you informed of any updates.
Note: If you do not know your Partner ID (a required field), request it from the place
where you purchased TeleVantage.
12. Specify the hardware ID to which you want to lock your TeleVantage licenses by
selecting one of the following from the drop-down list. Once locked to a hardware ID,
your licenses will only work on a PC with that hardware ID. For more information, as
well as details on the pros and cons of locking to each type of hardware ID, see “How
hardware locking works” on page D-9.
Q
Hard drive. The serial number of each hard drive on the TeleVantage Server PC.
Q
Network card. The MAC address of each NIC on the TeleVantage Server PC.
Q
Dongle. Serial number of a dongle, if one is installed on the TeleVantage Server PC
along with the dongle drivers. See page 3-10 for information on how to obtain a
dongle.
10-20
INSTALLING TELEVANTAGE
13. The next message box confirms the hardware ID that you selected since it is an
important decision. Click OK to continue, or Cancel to go back and specify a different
hardware ID.
14. Click OK. TeleVantage submits your license information to Vertical.
Q
If activation was successful, activated licenses are returned and automatically
added to your system.
Click OK twice, to acknowledge the message and exit the System Settings dialog
box.
Q
If activation was not successful, the reason is displayed. See “Licensing errors” on
page D-6 for more information.
Important: Once your licenses are activated, back up the TeleVantage database according to
the instructions in Administering TeleVantage so that you do not have to repeat the activation
process if you ever need to restore the TeleVantage database.
For more information, see Appendix D, “Managing TeleVantage Licenses.”
Testing the TeleVantage Server _____________________________
At this point in the installation or upgrade process, you should test the TeleVantage Server to
make sure that it has been installed correctly. Testing the Server consists of starting the Server
from the Device Monitor and checking for errors.
Note: The TeleVantage Server will not start until you have entered a valid Server license. See
“Entering and activating your TeleVantage licenses” on page 10-16.
Important: If you have Dialogic PCI boards installed on the Server, perform the process
described in “PCI boards not recognized at Server startup” in Appendix C in Installing Dialogic
Telephony Components if you have not already done so. Otherwise, the Found New Hardware
wizard will start after every Server restart. However, do not under any circumstances use the
Found New Hardware wizard to install drivers for Dialogic boards.
CHAPTER 10. INSTALLING THE TELEVANTAGE SERVER SOFTWARE
10-21
To test the TeleVantage Server
1.
Close all Windows applications, including the TeleVantage Administrator if it is
running.
2.
Shut down the TeleVantage Server. To do so:
Q
Right-click the Device Monitor icon in the system tray and then click Show Device
Monitor. If the Device Monitor is not running, start it manually. The default
location is:
C:\Program Files\TeleVantage Server\tvdevmon.exe
Q
Stop the TeleVantage Server by selecting Tools > Stop Server.
The status of the TeleVantage Server is displayed at the bottom of the Device Monitor.
3.
To simulate a normal startup, restart the TeleVantage Server PC.
If you upgraded from a previous version of TeleVantage, the TeleVantage Server
autostart setting is automatically reset to what it was before the upgrade. If the
TeleVantage Server was set to autostart, go to step 6.
4.
5.
The TeleVantage splash screen indicates that the Device Monitor is starting. Open the
Device Monitor by right-clicking the Device Monitor icon in the system tray. Then
choose Show Device Monitor (by default, the Device Monitor starts minimized when
you log on).
Start the TeleVantage Server from the Device Monitor by selecting Tools > Start
Server.
After the TeleVantage Server starts, the Device Monitor displays the status of all
station ports on the station boards and all trunks on the trunk boards. You can close the
Device Monitor without affecting the operation of the TeleVantage Server.
6.
Check for startup errors. Not all error messages are displayed in the Device Monitor,
so you should also use the Windows Event Viewer to check the System Log for any
startup warnings or Dialogic errors. To do so:
Q
Choose Start Menu > Programs > Administrative Tools > Event Viewer. In the
Tree pane, click TeleVantage Log to view TeleVantage or database server
messages, warnings, or errors. Expand System Log to view operating
system-related events.
Note: If you are not running the Windows Event Viewer on the TeleVantage Server,
choose Log > Select Computer.
If you encounter database server errors, see “Troubleshooting database server problems” on
page B-4. For TeleVantage Server-related problems, see “Troubleshooting TeleVantage Server
problems” on page B-5.
When you are satisfied that the TeleVantage Server is running correctly, go to the next section,
“Setting the TeleVantage Server to autostart.”
10-22
INSTALLING TELEVANTAGE
Setting the TeleVantage Server to autostart
Set the TeleVantage Server to autostart so that telephone service is automatically restored
whenever the TeleVantage Server PC restarts.
Q
Upgrading from a previous version of TeleVantage. If the TeleVantage Server was
set to autostart before the upgrade, you do not need to reset it now. Go to “Completing
the TeleVantage Server installation” on page 10-24.
Q
Installing TeleVantage for the first time. When you are satisfied that the TeleVantage
Server is working correctly, you should set the Server to start automatically according
to the instructions in this section
Important: When the TeleVantage Server starts, it automatically starts the Dialogic drivers. Do
not set the drivers to autostart in the Dialogic Configuration Manager. If the drivers are already
running when the TeleVantage Server starts, the Windows Service Control Manager may
experience problems.
To set the TeleVantage Server PC to autostart
1.
Click Start > Settings > Control Panel > Administrative Tools > Services.
2.
In the Services dialog box, locate and double-click TeleVantage server.
3.
On the General tab of the TeleVantage Server Properties dialog box, select Automatic
from the Startup type drop-down list.
4.
Click OK, and then exit the Services dialog box.
5.
To test automatic startup, first perform an orderly shutdown:
Q
In the Device Manager, stop the TeleVantage Server by choosing Tools > Shut
down Server.
Q
In the Dialogic Configuration Manager (DCM), stop the Dialogic drivers. See
Appendix D in Installing Dialogic Telephony Components for instructions.
6.
Restart the TeleVantage Server PC.
7.
In the Device Monitor, check the status of the TeleVantage Server. “Started” means
that the autostart was successful.
8.
Verify that the Startup type for the TeleVantage Server is Automatic, according to
the instructions in steps 1-3. On subsequent reboots of the TeleVantage Server PC, the
TeleVantage Server will start automatically.
Note: If you configure your TeleVantage system for e-mail notification, e-mail notification will not
be enabled after Server startup until the TeleVantage user logs on to the system. E-mail
notification is used to alert TeleVantage system administrators that the TeleVantage Server is
being stopped and restarted.
CHAPTER 10. INSTALLING THE TELEVANTAGE SERVER SOFTWARE
10-23
Completing the TeleVantage Server installation ________________
After you install and test the TeleVantage Server, you can perform any of the following tasks to
complete the installation for your specific environment:
Q
Set access rights to the TeleVantage Server (see page 10-24.)
Q
Configure TeleVantage for use with a proxy server (see page 10-24.)
Q
Configure e-mail notification support (see page 10-25.)
Setting access rights to the TeleVantage Server
Make sure that any user who will use TeleVantage ViewPoint or run the TeleVantage
Administrator remotely has network access to the TeleVantage Server.
Also make sure that each TeleVantage user can log on to a PC that is on the same network as
the TeleVantage Server PC.
As a prerequisite, the user’s PC must be able to see the TeleVantage Server in Network
Neighborhood. Also, the buffer share on the TeleVantage Server must be accessible. Verify that
it is accessible by attempting to open the buffer share in Network Neighborhood.
Configuring TeleVantage for use with a proxy server
If you use a proxy server to access the Internet from a local area network, you must configure
your network in one of the ways described in this section. If you do not configure your network
appropriately, Windows PCs that also use the proxy server will be unable to run TeleVantage
workstation applications (such as ViewPoint or the Administrator) correctly.
If you do not use a proxy server, go to “Configuring e-mail notification and Exchange
synchronization” on page 10-25.
Configuration options
Configure your network in one of the following ways:
10-24
Q
Make sure that local IP traffic does not go through the proxy server (by means of local
address translation tables).
Q
2000/XP PC running a TeleVantage workstation application, change the protocol for
client-server configuration to TCP (from the default UDP).
INSTALLING TELEVANTAGE
To change the protocol to TCP on a Windows PC
1.
Choose Start > Run.
2.
Enter dcomcnfg.exe in the Open field. The Distributed COM Configuration
Properties dialog box opens.
3.
If Connection-oriented TCP/IP is not at the top of the DCOM Protocols list, select it
and click Move Up until it is the first protocol in the list.
4.
Click OK.
5.
Restart the PC.
6.
Repeat steps 1-4 for each PC running a TeleVantage workstation application.
Configuring e-mail notification and Exchange synchronization
Configuring e-mail notification
You can configure TeleVantage to automatically send an e-mail message to any address
whenever a user receives a new voice message. See “Requirements for e-mail notification” on
page 3-15 for more information. Also see “Setting up e-mail notification and Exchange
synchronization” in Chapter 3 of Administering TeleVantage for detailed configuration steps.
Note: The Microsoft Outlook outgoing mail format must be configured as Plain Text format on
the TeleVantage Server PC in order for voice messages attached to e-mail notifications to be sent
correctly as WAV audio files. For more information, see “E-mail notification WAV file attachments
are incorrectly sent as .DAT files” on page B-11.
CHAPTER 10. INSTALLING THE TELEVANTAGE SERVER SOFTWARE
10-25
Sending e-mail notifications if you are using custom Outlook forms
If you are using custom Outlook forms (for example, you are using a product like Excendia
Outlook-by-Phone), you need to set the TeleVantage Advanced Setting
Artisoft\Server\MAPIMessageClass to IPM.Note.OT.Voice. To do so, use the TeleVantage
Advanced Settings Editor (see page J-34 for instructions.)
Adding a timestamp to e-mail notifications
To add a timestamp containing the time when TeleVantage submitted the e-mail notification to
your e-mail server, set the following TeleVantage Advanced Setting
Artisoft\Server\EmailNotifyAddSubmittedTime to 1. To do so, use the TeleVantage Advanced
Settings Editor (see page J-34 for instructions.) When this setting is set to 0 (the default), no
timestamp is added.
The timestamp appears at the bottom of the e-mail notification.
Configuring Exchange synchronization
You can synchronize TeleVantage voice mail and Microsoft Exchange e-mail. See
“Requirements for Exchange synchronization” on page 3-15 for more information.
To use Exchange synchronization, you may need to configure your network as follows:
Q
If you are using Microsoft Exchange Server for your post office: The TeleVantage
mail user (user account) must be a domain user. See Appendix C, “Changing the Domain
of the TeleVantage Server” for instructions.
Q
If you are using Microsoft Exchange 2000 for your post office: You need to give the
TeleVantage mail user full access to all mailboxes. For more information, go to
http://support.microsoft.com and search the Knowledge Base for article #262054.
Q
If you are using TeleVantage on a non-Microsoft network: If you are using a
non-Microsoft network such as NetWare, you may have to install the network client for
that network on the TeleVantage Server PC to establish communications between
Windows and the e-mail post office.
Note: In order for Exchange synchronization to work, each user's Microsoft Outlook client must
be configured to deliver messages to a mailbox on the Exchange Server. Exchange Server
synchronization does not work if the user's Outlook client is configured to deliver messages to a
PST file on the local computer.
Once your network is configured for Exchange synchronization, you also need to configure the
TeleVantage Server.
10-26
INSTALLING TELEVANTAGE
To configure Exchange synchronization on the TeleVantage Server
1.
Use the tools provided with your e-mail post office (see the documentation from the
manufacturer) to create a mail user for the TeleVantage Server. The name you give this
mail user appears on all e-mail notification messages, so you should use a name that
indicates the purpose of the message, for example, “TeleVantage” or
“VoiceMailReceived”.
2.
Install and configure Microsoft Outlook for the TeleVantage mail user. Follow the
instructions in the Outlook documentation.
Important: If you are using Microsoft Outlook 2000, install Outlook with full MAPI
support. See “E-mail notification through Microsoft Outlook does not work if Outlook is
installed in Internet Only mode” on page B-11. Also, select Corporate or Workgroup
mode during installation and configuration (TeleVantage does not support Internet only
mode in Outlook 2000.)
3.
4.
Configure the default MAPI profile for the TeleVantage user, as follows.
Q
On the TeleVantage Server PC, log on using the account that you use to run
TeleVantage. This is the same account that you provided during the installation of
the TeleVantage Server.
Q
Click Start > Settings > Control Panel, and double-click the Mail icon.
Q
Click Add to start the wizard. Follow the Setup wizard directions to configure a
MAPI profile. This MAPI profile must be the default profile for the TeleVantage
mail user.
Set the default MAPI profile as follows:
Q
Double-click the Mail icon from Control Panel, and then click Show Profiles.
Q
From the When starting Microsoft Outlook, use this profile drop-down list, select
the MAPI profile that you just configured.
Q
Click Close.
To complete the configuration of Exchange synchronization, see “Setting up e-mail notification
and Exchange synchronization” in Chapter 3 of Administering TeleVantage. Once configured,
Exchange synchronization will be available the next time the TeleVantage Server is started.
Upgrading Windows on the TeleVantage Server PC ____________
If at a later time you plan to upgrade the TeleVantage Server to Windows XP SP2 or Windows
Server 2003 SP1, see page F-6 for important information that may apply to you.
Where to go next_______________________________________
When you have successfully installed the TeleVantage Server and the Administrator on the
TeleVantage Server PC, go to Chapter 11.
CHAPTER 10. INSTALLING THE TELEVANTAGE SERVER SOFTWARE
10-27
CHAPTER 11
CHAPTER 11
INSTALLING TELEVANTAGE
WORKSTATION APPLICATIONS
CHAPTER CONTENTS
Introduction . . . . . . . . . . . . . . . . . . . . . . . . . . . . . . . . . . . . . . . . . . 11-2
Installing the TeleVantage workstation applications . . . . . . . . . . . 11-4
Configuring the TeleVantage workstation applications . . . . . . . . . 11-8
Synchronizing system clocks . . . . . . . . . . . . . . . . . . . . . . . . . . .11-10
Introduction _____________________________________________
The TeleVantage workstation applications are a set of programs that can optionally be installed
on other PCs. The workstation applications connect with the TeleVantage Server remotely over
your network. With these applications, users can take full advantage of how TeleVantage
integrates the PC and the phone. The following TeleVantage components are the workstation
applications:
Q
TeleVantage ViewPoint
Q
The TeleVantage Administrator
Q
The TeleVantage TAPI Service Provider
Q
The TeleVantage Contact Manager Assistant
Q
The TeleVantage Archived Recording Browser
Note: You installed the TeleVantage Administrator on the TeleVantage Server PC according to
the instructions in Chapter 10. Before installing the Administrator on other PCs in the network, see
“About installing the TeleVantage Administrator” on page 11-4.
Performing unattended installs
For information on installing the TeleVantage workstation applications without user input, see
Appendix E.
Requirements
Important: In order to install any of the TeleVantage workstation applications on a PC, you
must be logged on as a user with Administrator rights.
You can install the TeleVantage workstation applications on any Windows PC on the network,
including the TeleVantage Server, that meets the requirements described in Chapter 3.
Q
For Administrator and ViewPoint PC requirements, see page 3-18.
Q
For TAPI SP and Contact Manager Assistant PC requirements, see page 3-19.
Terminal server support
You can install the workstation applications on a terminal server running Citrix MetaFrame or
Windows Terminal Services. For instructions, see Appendix A.
11-2
INSTALLING TELEVANTAGE
Installation checklist
Use the following checklist as you install and configure the TeleVantage workstation
applications.
Q
Windows 98 systems. Download DCOM 98 onto your TeleVantage Server so that
TeleVantage workstation applications can be installed on Windows 98 systems.
Q
Windows NT systems. Upgrade the PC where you will install any of the workstation
applications to at least Windows NT Service Pack 6a or higher before starting the
installation.
Q
Install the TeleVantage Administrator on the PCs of users who need to administer the
TeleVantage Server, queues, auto attendants, and so forth. You can limit each user’s
administrator privileges as described in Administering TeleVantage.
Q
Install TeleVantage ViewPoint on the PCs of users who will manage their calls and
voice messages from their desktop.
Q
Install the TeleVantage TAPI Service Provider on the PCs of users who will run the
Contact Manager Assistant or want to use some other TAPI-compliant application to
place calls using TeleVantage.
Q
Install the TeleVantage Contact Manager Assistant on the PCs of users of Microsoft
Outlook, GoldMine, GoldMine FrontOffice, or GoldMine Business Contact Manager
will receive screen pop notification of incoming calls.
Q
Synchronize system clocks. This step ensures that message time stamps set by the Server
clock match the time on the PCs of users.
Windows 98 PC requirements ______________________________
If your network does not have any Windows 98 PCs that need to run one or more of the
TeleVantage workstation applications, go to the next section. Otherwise, install Microsoft
DCOM 98 on each Windows 98 PC.
Because Microsoft does not allow other companies to redistribute DCOM 98, you must
download it yourself according to the following instructions.
Once downloaded onto the TeleVantage Server PC, DCOM 98 is automatically installed as
needed when you install one or more TeleVantage workstation applications on a Windows 98
PC.
Note: If you first run the Workstation Setup and attempt to install ViewPoint or the Administrator
workstation application on a Windows 98 SE PC without a previous version of TeleVantage
installed or DCOM 98 installed, you will receive an MDAC installation error. If this happens, see
“TeleVantage ViewPoint and Administrator fail to install on Windows 98 SE if DCOM 98 is not
previously installed” on page B-9.
CHAPTER 11. INSTALLING TELEVANTAGE WORKSTATION APPLICATIONS
11-3
To download DCOM 98
1.
Go to the following location and search using the keyword ‘DCOM 98’:
http://www.microsoft.com/downloads
2.
Follow the on-screen instructions.
3.
In the File Download dialog box, click Save this program to disk.
4.
Save the downloaded file (dcom98.exe) to the following location:
C:\Program Files\TeleVantage Server\NetSetup\DCOM98
Installing the TeleVantage workstation applications_____________
About installing the TeleVantage Administrator
You can install the TeleVantage Administrator on any Windows PC on the network that meets
the requirements described in “Administrator and ViewPoint requirements” on page 3-18.
If you install more than one TeleVantage Administrator, you must coordinate work among the
users who have authority to run the Administrator.
Important: If two people make changes to the same data, only the changes that are saved last
are retained.
For information about setting up TeleVantage users with administrative privileges, see
Administering TeleVantage.
About installing TeleVantage ViewPoint
TeleVantage ViewPoint is the most efficient way to use TeleVantage, and some TeleVantage
features are available only through ViewPoint. However, ViewPoint is not required in order to
make and receive calls, and most TeleVantage features can be accessed without it by using the
telephone commands. See Using TeleVantage for a list of ViewPoint-only features.
You can install ViewPoint on any Windows PC on the network that meets the requirements
described in “Administrator and ViewPoint requirements” on page 3-18. See “TeleVantage
license requirements” on page 3-16 for information about ViewPoint license requirements.
The TeleVantage Call Center and Call Center Reporter are installed automatically with
ViewPoint. See “TeleVantage license requirements” on page 3-16 for information about
required Call Center Agent and Call Center Reporter licenses.
11-4
INSTALLING TELEVANTAGE
About installing the TeleVantage TAPI Service Provider
In addition to the PC requirements described on page 3-19, a user must have the following to
install and use the TAPI Service Provider:
Q
A TeleVantage user name and station ID. You cannot use station ID 0.
Q
A Windows telephony location that allows the user to place calls. Typically, you need
to configure your area code and external dialing prefix, for example “9”.
Using the TeleVantage Workstation Setup
The TeleVantage Workstation Setup can install any or all of the workstation applications. On
all PCs except the TeleVantage Server, if an older version of the TeleVantage Administrator or
ViewPoint is installed, Workstation Setup will automatically run when you start the
Administrator or ViewPoint.
If you have upgraded your TeleVantage Server from a previous version, any user who attempts
to run the old versions of TeleVantage ViewPoint or the Administrator receives a message
saying that new versions need to be installed. All workstation applications detected on the PC
will be upgraded. However, this message does not appear and the upgrade does not take place
if the user only has TAPI Service Provider or Contact Manager Assistant installed. If you are
upgrading and have users who only use those applications, you should notify them that they
need to install the new software as described later in this chapter.
If you encounter problems installing the TeleVantage workstation applications, or running them
after installation, see “Troubleshooting workstation application problems” on page B-7.
To install the TeleVantage workstation applications
1.
Review the “ViewPoint/Administrator installation tips” on page B-8.
1.
Log on to the PC on which the workstation applications will be installed as a user with
administrator privileges.
2.
Close all open Windows applications.
3.
Start the TeleVantage Workstation Setup by running setup.exe, located in the
Netsetup directory on the TeleVantage Server. The default location is:
\\<TeleVantage Servername>\Netsetup\setup.exe
4.
When Workstation Setup starts, follow the on-screen instructions. If you cannot run
the Workstation Setup, see “‘Corrupt installation’ dialog box” on page B-9.
5.
Review the License Agreement. Click I accept the terms in this license agreement,
and then click Next to continue.
6.
In the Customer Information dialog box, enter the User Name associated with this PC
and Organization. If you want only this user to be able to run the workstation
applications from this PC, select Only for me. Click Next to continue.
CHAPTER 11. INSTALLING TELEVANTAGE WORKSTATION APPLICATIONS
11-5
7.
In the TeleVantage Server Information dialog box, enter the TeleVantage Server
Name and the Telephone Station ID of the phone that will be used by the person at
this PC.
The station ID corresponds to the port number on the station board to which the phone
is connected. To hear your station ID, pick up the phone and dial *0.
Note: If there is not a TeleVantage phone near this PC, enter a station ID of 0. Without
a phone, the user at this PC will be able to perform all functions with the exception of
managing calls and recording voice prompts. If you enter a station ID of 0, when you
click Next the No Telephone Station ID Specified dialog box opens to make sure that
you understand this limitation, and gives you the opportunity to go back and enter a valid
station ID.
Click Next to continue.
8.
In the Setup Type dialog box, select one of the following:
Q
Select Typical to install the listed workstation applications in the default
location.When installing TeleVantage for the first time, only ViewPoint is installed.
When upgrading from a previous version of TeleVantage, Workstation Setup
detects the workstation applications that are installed, and upgrades those
applications to the current version.
Click Next to continue. Go to step 10.
Q
Select Custom to choose which workstation applications to install, including the
TAPI Service Provider, Contact Manager Assistant, and Archived Recording
Browser, or to change the installation drive or folder.
Click Next to continue.
9.
In the Custom Setup screen, you can do any of the following:
Q
Click a workstation application to see a description of it as well as the amount of
disk space it requires.
Q
Click Space to check the available space on each hard drive on the PC.
Q
Click Change to change the destination drive or folder where the selected
workstation application will be installed. You can specify a different location for
each workstation application.
Q
If you do not want to install one of the listed workstation applications on this PC,
click the drop-down list for the application and then select This feature will not be
available.
Q
To install another listed workstation application, click the drop-down list for the
application and then select This feature will be installed on local hard drive.
Click Next to continue.
11-6
INSTALLING TELEVANTAGE
10. In the Ready to Install screen, click Install. Installation may take several minutes.
11. When Workstation Setup finishes copying files, if you are installing the TAPI Service
Provider, the TAPI Service Provider Configuration Wizard is displayed.
Q
Enter the name of the TeleVantage Server PC and the Station ID of the phone that
will be used by the person at this PC.
The station ID corresponds to the port number on the station board to which the
phone is connected. To hear the station ID, pick up the phone and dial *0. Click Next
to continue.
Q
Select the User Name of the person assigned to this station ID from the drop-down
list, and enter the user’s Password.
Note: If the person at this PC will be using GoldMine contact management software,
deselect the Application can hang up calls checkbox.
Click Finish to continue.
CHAPTER 11. INSTALLING TELEVANTAGE WORKSTATION APPLICATIONS
11-7
Q
If you are installing the TAPI Service Provider for the first time, Workstation Setup
prompts you to define a Windows telephony dialing location for your PC, which is
required to place outbound calls. If you see this prompt, click OK.
In the Location Information dialog box, select your country from the drop-down
list, enter your area code, and enter the number you must dial to get an outside line,
for example “9”. Click OK.
In the Phone and Modem Options dialog box, select the location from which you
are dialing, and click OK.
12. In the Install Completed screen, select the Show What’s New checkbox to see a
complete listing of the new features available in this version of TeleVantage. Click
Finish to complete the installation.
Note: If after installing the TeleVantage workstation applications according to the previous
instructions you upgrade a Windows 98 or ME workstation PC to Windows XP SP2 or Windows
2003 Server SP1, you need to repair the workstation applications. To do so, from the Windows
Control Panel, click Add/Remove Programs, select TeleVantage workstation applications
and then click Change. When the TeleVantage Workstation Setup starts, follow the on-screen
instructions and click Repair in the Program Maintenance screen.
Configuring the TeleVantage workstation applications __________
Configuring the TeleVantage Administrator and ViewPoint
For information about customizing and using the TeleVantage Administrator, see Administering
TeleVantage.
For information about customizing and using TeleVantage ViewPoint, see Using TeleVantage.
Configuring the TeleVantage TAPI Service Provider
Workstation Setup runs the TAPI Service Provider Configuration wizard automatically when
you install the TAPI Service Provider for the first time on a PC. You can run the Configuration
Wizard later, for example to change your station ID. To do so:
1.
Click Start > Programs > Vertical TeleVantage > TeleVantage TAPI Service
Provider Configuration Wizard.
2.
Follow the on-screen instructions. Click Help for more information.
Configuring your contact manager for use with
the TAPI Service Provider
Before making calls from the contact manager, you must configure it to recognize the TAPI
Service Provider. Use one or more of the following procedures as needed.
11-8
INSTALLING TELEVANTAGE
To configure Outlook
1.
Open the Contacts view in Outlook.
2.
Choose Actions > Call Contact > New Call.
3.
In the New Call dialog box, click Dialing Options.
4.
In the Dialing Options dialog box, verify that Connect Using Line is set to
“TeleVantage Line 1.” This option is available after the TAPI Service Provider is
installed.
5.
Click OK.
To configure GoldMine, GoldMine FrontOffice, or GoldMine Business Contact
Manager
Use the following procedure after you refer to the documentation that came with the product:
1.
Choose Edit > Preferences.
2.
Click the Modem tab.
3.
Under Modem Settings, verify that TAPI Line is set to “TeleVantage Line 1.” This
option is available after the TAPI Service Provider is installed.
4.
Click OK.
To configure Act!
1.
In Act!, Choose Edit > Preferences.
2.
Click the Dialer tab.
3.
Select the Use Dialer checkbox.
4.
Under Modem or Line, verify that “TeleVantage Line 1” is selected. This option is
available after the TAPI Service Provider is installed.
5.
To receive screen pops with contact information when a contact calls, select the
Lookup contact using caller ID checkbox. Deselect the checkbox if you do not want
to receive screen pops.
6.
Click OK.
Calling from another application
After installing the TAPI Service Provider, users can call contacts by using the instructions
provided with their contact managers. Calls appear in their Call Logs as if they had dialed them
from ViewPoint or the phone.
CHAPTER 11. INSTALLING TELEVANTAGE WORKSTATION APPLICATIONS
11-9
Configuring the TeleVantage Contact Manager Assistant
1.
If the Contact Manager Assistant is not running, start it by clicking
Start > Programs > Vertical TeleVantage > TeleVantage Contact Manager
Assistant.
2.
If only the Contact Manager Assistant splash screen appears, right-click the Outlook,
GoldMine, GoldMine FrontOffice, or GoldMine Business Contact Manager icon on
the system tray at the lower right of your screen. Select Setup.
3.
Click Help for detailed instructions.
Synchronizing system clocks_______________________________
It is recommended that you make sure that the system clocks on the TeleVantage Server PC and
user PCs are synchronized. This ensures that message time stamps, which are set by the Server
clock, agree with the time displayed on the user PCs.
In Microsoft domain-based networks, you can synchronize the workstation clock with the
TeleVantage Server clock by including the following statement in the logon script that executes
when the workstation connects to the domain controller:
net time \\<TeleVantageServerName> /set /yes
Upgrading Windows on a workstation PC to Windows __________
If at a later time you plan to upgrade a PC where any of the TeleVantage workstation
applications are installed to Windows XP SP2 or Windows Server 2003 SP1, see page F-6 for
important information that may apply to you.
Where to go next ______________________________________
When you have installed the TeleVantage workstation applications, go to Chapter 14 if you
want to install TeleVantage Web Services to support ViewPoint Web Access, or Chapter 14 if
you want to install TeleVantage Multi-line TAPI Service Provider.
11-10
INSTALLING TELEVANTAGE
CHAPTER 12
CHAPTER 12
AFTER INSTALLING TELEVANTAGE
CHAPTER CONTENTS
Your TeleVantage system so far . . . . . . . . . . . . . . . . . . . . . . . . . .12-2
Installing optional TeleVantage services . . . . . . . . . . . . . . . . . . . . 12-2
Setting up and configuring your TeleVantage system . . . . . . . . . . 12-2
Your TeleVantage system so far _____________________________
You should have already completed the following tasks:
Q
Installed the Windows Server
Q
Installed Dialogic HMP software or Dialogic hardware and drivers
Q
Installed and configured the TeleVantage database server
Q
Installed the TeleVantage Server
Q
Added and activated your TeleVantage licenses
Q
Install workstation applications (optional)
Note: Be sure you have finished all of these tasks before you proceed.
Installing optional TeleVantage services ______________________
Go to the chapters listed to install any of the optional TeleVantage services:
Q
Go to Chapter 13 to install TeleVantage Web Services to support TeleVantage
ViewPoint Web Access.
Q
Go to Chapter 14 to install TeleVantage Multi-line TAPI Service Provider on any Server
that needs multiple lines for TAPI support.
Q
Go to Chapter 15 to install TeleVantage Archived Recording on the archive server to
support mailbox recording archiving and the Archived Recording Browser.
Q
Go to Chapter 16 to install TeleVantage Station Message Detail Recording (SMDR)
Service to send real-time call data from TeleVantage to a third-party application.
Q
Go to Chapter 17 to install the Tftpd32 TFTP Server to download updates to some SIP
and H.323 phones’ firmware and configuration files.
Setting up and configuring your TeleVantage system ___________
After you install the TeleVantage components and optional services according to the
instructions in this manual, you must set up and configure your system using the TeleVantage
Administrator.
See Administering TeleVantage and the TeleVantage Administrator online Help.
12-2
INSTALLING TELEVANTAGE
Section 3
Installing
TeleVantage
Services
CHAPTER 13
CHAPTER 13
INSTALLING TELEVANTAGE WEB
SERVICES
CHAPTER CONTENTS
Introduction . . . . . . . . . . . . . . . . . . . . . . . . . . . . . . . . . . . . . . . . . . 13-2
Installing Microsoft Internet Information Services . . . . . . . . . . . . . 13-3
Installation steps . . . . . . . . . . . . . . . . . . . . . . . . . . . . . . . . . . . . . . 13-5
Running ViewPoint Web Access . . . . . . . . . . . . . . . . . . . . . . . . . .13-8
Introduction _____________________________________________
TeleVantage Web Services is the TeleVantage component that allows you to offer users
TeleVantage ViewPoint Web Access.
ViewPoint Web Access is a version of TeleVantage ViewPoint that users access by using their
Web browsers. Because ViewPoint Web Access is HTML-based, users can access it from
non-Windows platforms such as Macintosh and UNIX. ViewPoint Web Access gives users
access to most TeleVantage features. For information about using ViewPoint Web Access, see
Using TeleVantage and the ViewPoint Web Access online Help.
The following graphic shows TeleVantage Web Services in a typical installation:
Requirements
For your system to offer ViewPoint Web Access, you must install the following on a PC that
will become your Web server:
Q
Microsoft Internet Information Server (IIS) 4.0 or higher
Q
Windows Internet Explorer 5 or higher
Q
TeleVantage Web Services
For a complete list of important requirements for the Web server PC, see “TeleVantage Web
Services requirements” on page 3-20.
13-2
INSTALLING TELEVANTAGE
Windows Internet Explorer requirements
If you need to upgrade, go to the following location to obtain the latest version:
http://www.microsoft.com/downloads
Important: Versions of Internet Explorer with security patches may not be able to connect to a
TeleVantage Server that contains an underscore in its name. This behavior was introduced by
Microsoft to improve security. There are two workarounds—rename the TeleVantage Server, or
use the Server's IP address in place of its name when you run ViewPoint Web Access. For more
information, go to http://support.microsoft.com and search the Knowledge Base for article
#Q321232.
Terminal server support
You can install TeleVantage Web Services on a terminal server running Citrix MetaFrame or
Windows Terminal Services. For instructions, see Appendix A.
Installing Microsoft Internet Information Services ______________
Do one of the following:
Q
If your Web server is a Windows Server 2003 PC, you need to install IIS manually and
then enable dynamic content. Go to “Using TeleVantage Web Services with Windows
2003 Server” on page 13-3.
Q
If your Web server is a Windows 2000/XP Server PC, IIS was installed automatically
with Windows 2000/XP Server. Go to “Installation steps” on page 13-5.
Q
If your Web server is a Windows NT 4.0 Server PC, install the Windows NT 4.0 Option
Pack, which includes IIS. (Your copy of Windows NT 4.0 Server may contain the
Windows NT 4.0 Option Pack.) When you install the Option Pack, choose the Typical
installation and then follow the on-screen instructions to complete the installation. If you
are prompted to restart your PC, do so.
Using TeleVantage Web Services with Windows 2003 Server
Microsoft Internet Information Services (IIS) is no longer installed by default with Windows
2003 Server. Also, once installed manually, IIS starts in highly secure mode where many of the
advanced Web services features are disabled. Both of these changes were introduced by
Microsoft to enhance security on Web servers.
You must install IIS and then enable dynamic content features in order for TeleVantage Web
Services to work. To do so:
1.
From the Start menu, select Administrative Tools > Internet Information Services
(IIS) Manager.
2.
In the left pane, expand the node for the Web server that you will use as the
TeleVantage Web Server, and then click Web Service Extensions.
CHAPTER 13. INSTALLING TELEVANTAGE WEB SERVICES
13-3
3.
In the right pane, click Allow all Web service extensions for a specific application.
4.
Select Active Server Pages from the drop-down list, and then click OK.
Setting up a secure Web site on the TeleVantage Web server
In order to set up a secure Web site so that all transactions are secured by Secure Socket Layer
(SSL) encryption, you need to do the following:
Q
Create a certificate request.
Q
Submit it to a Certificate Authority, an organization that offers certification services for
Microsoft Internet Information Services (IIS). Two examples are www.VeriSign.com
and www.thawte.com.
Q
Install the signed certificate on the TeleVantage Web server.
You must repeat this process for each individual Web site on which you want to offer secure
transactions.
To create a certificate request
1.
On the Web server, start the Microsoft Internet Service Manager. To do so, from the
Start menu, choose Programs > Administrative Tools > Internet Service Manager.
2.
Right-click the Web site on which you want to install a certificate, and then click
Properties. The Properties dialog box opens.
3.
On the Directory Security tab, click Server Certificate under Secure
Communications. The Web Server Certificate Wizard starts.
4.
On the Server Certificate screen, click Create a new certificate. Click Next to
continue.
5.
Follow the onscreen instructions to create a new certificate request.
To submit the certificate request to the Certificate Authority
1.
Contact the Certification Authority of your choice.
2.
Follow their instructions to submit your certificate request. The Certificate Authority
will return a signed certificate to you.
To install the signed certificate on the TeleVantage Web server
13-4
1.
Follow steps 1-3 of creating a certification request, above.
2.
In the Install Certificate screen, click Process the pending request and install the
certificate. Click Next to continue.
3.
Follow the onscreen instructions to install the certificate.
INSTALLING TELEVANTAGE
4.
To configure SSL on the Web site, click Edit on the Directory Security tab.
5.
Click Require secure channel (SSL), and then click OK.
6.
Click Apply, and then click OK.
7.
Browse to the Web site by typing https://<Web site name>. If the page opens, you
have successfully installed your certificate. Once you have successfully installed and
configured your certificate, you will no longer be able to browse to the Web site by
typing http://<Web site name>.
For more information about certificate services, go to the Microsoft Knowledge Base at
http://support.microsoft.com/ and search for article 299875, “HOW TO: Implement SSL on a
Windows 2000 IIS 5.0 Computer.
Installation steps _________________________________________
1.
Close all applications running on the Web server.
If you are installing Web Services on the TeleVantage Server PC (not recommended
for security and CPU load reasons), shut down the TeleVantage Server and Dialogic
System Service. You do not need to close your database server.
2.
Insert the Master CD. If the Master Setup does not start automatically, run
autorun.exe from the root directory on the Master CD.
3.
Click TeleVantage Services.
CHAPTER 13. INSTALLING TELEVANTAGE WEB SERVICES
13-5
4.
The TeleVantage Services Setup starts.
Follow the on-screen instructions.
5.
13-6
In the Setup Type dialog box, click Custom, and then click Next to continue.
INSTALLING TELEVANTAGE
6.
In the Custom Setup dialog box, select TeleVantage Web Services, and deselect the
other features.
You can also do any of the following:
Q
Click Space to check the available space on each hard drive on the PC.
Q
Click Change to change the destination drive or folder where TeleVantage Web
Services will be installed.
Click Next to continue.
7.
If you are installing TeleVantage Web Services on the TeleVantage Server PC, Setup
warns you that for performance and security reasons it is recommended, but not
required, that you install Web Services on a different PC.
Click OK to dismiss the warning and then click Next to continue with the installation,
or click Cancel to exit Setup.
8.
In the Ready to Install dialog box, click Install. If you are prompted to restart your PC,
do so.
TeleVantage Web Services starts automatically whenever the Web server is restarted.
CHAPTER 13. INSTALLING TELEVANTAGE WEB SERVICES
13-7
Running ViewPoint Web Access ____________________________
If you get “The page cannot be displayed” or other error messages while running ViewPoint
Web Access, see “Troubleshooting TeleVantage Services problems” on page B-13.
Logging on to the TeleVantage Web server
After TeleVantage Web Services is installed, you can run ViewPoint Web Access from any Web
browser by entering the URL according to the following format.
http://<Webserver>/TeleVantage
Replace <Webserver> with the name of the PC running the TeleVantage Web Services or with
its IP address, as in the following examples:
http://TeleVantage/TeleVantage
http://192.168.1.6/TeleVantage
Logging on to alternate TeleVantage Servers
You can use ViewPoint Web Access to log on to other TeleVantage Servers, besides the one
TeleVantage Web Services points to by default. This allows one PC running TeleVantage Web
Services to access multiple TeleVantage Servers. To do so, enter the URL according to the
following format:
http://<Webserver>/TeleVantage?Server=<TeleVantageServerName>
For example:
http://TeleVantage/TeleVantage?Server=TeleVantage2
13-8
INSTALLING TELEVANTAGE
CHAPTER 14
CHAPTER 14
INSTALLING TELEVANTAGE
MULTI-LINE TAPI SERVICE PROVIDER
CHAPTER CONTENTS
Introduction . . . . . . . . . . . . . . . . . . . . . . . . . . . . . . . . . . . . . . . . . . 14-2
Installing the Multi-line TAPI Service Provider. . . . . . . . . . . . . . . . 14-2
Configuring the Multi-line TAPI Service Provider . . . . . . . . . . . . . 14-6
Introduction _____________________________________________
You can install TeleVantage Multi-line TAPI Service Provider (TSP) on any server that needs
multiple lines for TAPI support, typically a Citrix MetaFrame or Windows Terminal Services
server. If necessary, the Multi-line TSP can be installed on the TeleVantage Server, for example
to support a custom multi-line TAPI application that does not use Windows Terminal Services.
For a graphic showing the TeleVantage Multi-line TSP in a typical installation, see page 13-2.
The Multi-line TSP provides TAPI screen pops and TAPI dialing for multiple users with
TAPI-compatible applications such as Act!. The Multi-line TSP can be used with the Contact
Manager Assistant to provide screen pops to Microsoft Outlook, GoldMine, and GoldMine
FrontOffice as well.
Note: TeleVantage also includes the basic single-line TSP, which should be used on individual
workstations. See Chapter 11 for installation instructions.
Important: If the stations on the TeleVantage Server are reordered for any reason (for example,
stations are added or deleted, or a Dialogic board that provides station resources is added or
removed), applications that use the Multi-line TSP (Act!, Goldmine, and so forth) may no longer
work. To resolve the problem, after the TeleVantage Server is restarted, be sure to restart the
Terminal Services PC to re-initialize TAPI.
Installing the Multi-line TAPI Service Provider__________________
1.
Close all applications running on the PC where you are installing the Multi-line TSP.
2.
If you are installing the Multi-line TSP on a terminal server, do the following:
3.
14-2
Q
Click Start > Settings > Control Panel > Add/Remove Programs > Add New
Programs > CD or Floppy.
Q
When prompted to insert a floppy disk or CD, click Next to continue.
Q
In the Run Installation Program dialog box, click Browse.
Q
Browse to the network location of the TeleVantage Master CD, or to the zip file that
you extracted in step 1 on page 10-2. In the \Server folder, click
TVServicesSetup.exe, and then click Open.
Q
Click Finish, and then go to step 5.
If you are installing the Multi-line TSP on the TeleVantage Server, insert the Master
CD. If the Master Setup does not start automatically, run autorun.exe from the root
directory on the Master CD.
INSTALLING TELEVANTAGE
4.
Click TeleVantage Services.
5.
The TeleVantage Services Setup starts.
Follow the on-screen instructions.
CHAPTER 14. INSTALLING TELEVANTAGE MULTI-LINE TAPI SERVICE PROVIDER
14-3
6.
In the Setup Type dialog box, select Custom, and then click Next to continue.
7.
In the Custom Setup dialog box, select TeleVantage Multi-line TAPI Service
Provider, and deselect the other features. (If you have already installed TeleVantage
Web Services, that feature is detected and pre-selected—you do not need to deselect
it.)
Optionally, select TeleVantage Contact Manager Assistant so that users receive
screen pops when Outlook or GoldMine contacts call them (you do not need to install
the Contact Manager Assistant to receive screen pops from Act!.)
14-4
INSTALLING TELEVANTAGE
You can also do any of the following:
Q
Click a component to see a description of it as well as the amount of disk space
required to install it.
Q
Click Space to check the available space on each hard drive on the PC.
Q
Click Change to change the destination drive or folder where the selected
component will be installed. You can specify a different location for each
component.
Click Next to continue.
8.
If you are installing the TeleVantage Multi-line TSP on the TeleVantage Server PC,
Setup warns you that for performance and security reasons it is recommended, but not
required, that you install the Multi-line TSP on a different PC.
Click OK to dismiss the warning and then click Next to continue with the installation,
or click Cancel to exit Setup.
9.
In the Multi-line TAPI Service Provider Configuration dialog box, select the checkbox
if you want TAPI applications to be able to hang up calls. Note that this setting applies
to all users and applications on this server.
Important: This checkbox must be deselected for GoldMine users.
10. In the Ready to Install dialog box, click Install. If you are prompted to restart your PC,
do so.
The TeleVantage Multi-line TSP starts automatically whenever the server is restarted.
CHAPTER 14. INSTALLING TELEVANTAGE MULTI-LINE TAPI SERVICE PROVIDER
14-5
Configuring the Multi-line TAPI Service Provider _______________
This section describes how to perform the following steps to configure the TeleVantage
Multi-line TSP for use with TAPI applications.
Q
Basic configuration (required). See page 14-6.
Q
Connecting to multiple TeleVantage Servers. See page 14-6.
Q
Restricting station access to users when using the Multi-line TSP. See page 14-6.
Q
Configuring TAPI applications for the Multi-Line TAPI Service Provider. See page
14-6.
Basic configuration (required)
1.
From the Start menu, choose Settings > Control Panel > Phone and Modem
Options.
2.
On the Advanced tab, click Add.
3.
In the Add Provider dialog box, click TeleVantage Multiline Service Provider and
then click Add.
4.
Close the Phone and Modem Options dialog box.
Connecting to multiple TeleVantage Servers
If you want the Multi-line TSP to be able to connect to multiple TeleVantage Servers, add the
following Windows registry key for each Server, where <Server> is either a NetBios name (for
example, “TeleVantage”) or an IP Address (for example, “123.12.76.102”):
HKLM\Software\Vertical\TeleVantage\Client\MultilineTSP\<ServerName>
For instructions on how to change registry settings, see page J-2.
Restricting station access to users when using the Multi-line TSP
Without further configuration, all users of the Multi-line TSP can see—and make calls
using—all stations on the TeleVantage Server, instead of just their own station.
You can restrict station access on a per-user basis via the Microsoft Management Console
(MMC.) For more information about using and configuring the Telephony MMC, see the
following Knowledge Base article at the Microsoft Support Web Site:
http://support.microsoft.com/default.aspx?scid=kb;en-us;259375
14-6
INSTALLING TELEVANTAGE
The following graphic shows the Telephony MMC being used to assign TAPI Line 4 to the
TeleVantage user “Administrator’:
Configuring TAPI applications for the Multi-Line TAPI Service
Provider
This section describes how to configure the following TAPI applications to use the Multi-line
TSP:
Q
GoldMine. See page 14-7.
Q
Act!. See page 14-8.
Q
Microsoft Outlook. See page 14-8.
Q
TeleVantage Contact Manager Assistant (Outlook or GoldMine users only.) See page
14-8.
Configuring GoldMine for the Multi-Line TAPI Service Provider
Perform the following configuration steps from the PC of each GoldMine user who will use the
Multi-line TSP.
1.
In GoldMine, choose Edit > Preferences.
2.
On the Modem tab, select the entry with the user’s station ID from the TAPI Line
drop-down list. (To hear the station ID, pick up the user’s phone and dial *0.)
For example, select the following entry to connect to the TeleVantage Server named
MainServer from station ID 6:
15: Line 6:MainServer
3.
Configure the TeleVantage Contact Manager Assistant as described on page 14-8.
CHAPTER 14. INSTALLING TELEVANTAGE MULTI-LINE TAPI SERVICE PROVIDER
14-7
Configuring Act! for the Multi-Line TAPI Service Provider
Perform the following configuration steps from the PC of each Act! user who will use the
Multi-line TSP.
1.
In Act!, choose Edit > Preferences.
2.
On the Dialer tab, select the Use Dialer checkbox.
3.
Select the entry with the user’s station ID from the Modem or line drop-down list. (To
hear the station ID, pick up the user’s phone and dial *0.)
For example, select the following entry to connect to the TeleVantage Server named
MainServer from station ID 22:
Line 22:MainServer
Configuring Outlook for the Multi-Line TAPI Service Provider
Perform the following configuration steps from the PC of each Outlook user who will use the
Multi-line TSP.
1.
In Outlook, open the Contacts view.
2.
Choose Actions > Call Contact > New Call.
3.
In the New Call dialog box, click Dialing Options.
4.
In the Dialing Options dialog box, select the entry with the user’s station ID from the
Connect using line drop-down list. (To hear the station ID, pick up the user’s phone
and dial *0.)
For example, select the following entry to connect to the TeleVantage Server named
MainServer from station ID 16:
Line 16:MainServer
5.
Configure the TeleVantage Contact Manager Assistant as described below.
Configuring TeleVantage Contact Manager Assistant for the Multi-Line
TAPI Service Provider
Perform the following configuration steps from the PC of each Contact Manager Assistant user
who will use the Multi-line TSP (Outlook or GoldMine users only.)
1.
From the Start menu, choose Vertical TeleVantage > TeleVantage TAPI Service
Provider Configuration Wizard.
2.
In the first dialog box, enter the name of the TeleVantage Server and the Station ID
of the phone that will be used by the person at this PC. (To hear the station ID, pick up
the user’s phone and dial *0.)
Click Next to continue.
14-8
3.
In the next dialog box, select the User Name of the person assigned to this station ID
from the drop-down list, and then enter the user’s Password.
4.
Click Finish.
INSTALLING TELEVANTAGE
CHAPTER 15
CHAPTER 15
INSTALLING THE TELEVANTAGE
RECORDING ARCHIVE SERVICE
CHAPTER CONTENTS
Introduction . . . . . . . . . . . . . . . . . . . . . . . . . . . . . . . . . . . . . . . . . . 15-2
Installation steps . . . . . . . . . . . . . . . . . . . . . . . . . . . . . . . . . . . . . . 15-2
Introduction _____________________________________________
The TeleVantage Recording Archive Service is installed on the archive server—a different PC
from the TeleVantage Server. The archive server PC must be on your LAN, and cannot be
remotely connected via the Internet.
For a graphic showing the TeleVantage Recording Archive Service in a typical installation, see
page 13-2.
For information on how to configure the Recording Archive Service, perform automatic and
manual archives, and manage archive users, see Chapter 12 in Administering TeleVantage. For
details on using the Archived Recording Browser to search for and act on mailbox recordings,
see Appendix E in Using TeleVantage.
Installation steps
1.
Identify a PC that meets the requirements for the archive server as described in
“TeleVantage Recording Archive Service requirements” on page 3-21. The archive
server PC must be a different PC than the TeleVantage Server.
2.
Using Windows Explorer, create your archive folder, an empty directory, on a disk
with a significant amount of available storage for your archived recordings. Note the
following:
Q
It is preferable but not necessary to create the archive folder on the archive server
PC.
Q
It is not recommended to create the archive folder on the TeleVantage Server PC.
Q
The archive folder must be a network folder that is shared with full read/write
permissions to all archive browser users.
Note: If you are upgrading from TeleVantage 6.x, you can import your current
recording archive, once you have completed the steps in this section. See “Importing a
recording archive from TeleVantage 6.x” in Appendix E in Using TeleVantage for more
information.
15-2
3.
Install Microsoft MSDE or SQL Server on the archive server according to the steps in
Chapter 9 in Installing TeleVantage.
4.
Insert the Master CD. If the Master Setup does not start automatically, run
autorun.exe from the root directory on the Master CD.
INSTALLING TELEVANTAGE
5.
Click TeleVantage Services.
6.
The TeleVantage Services Setup starts.
Follow the on-screen instructions.
CHAPTER 15. INSTALLING THE TELEVANTAGE RECORDING ARCHIVE SERVICE
15-3
15-4
7.
In the Setup Type dialog box, select Custom, and then click Next to continue.
8.
In the Custom Setup dialog box, select TeleVantage Recording Archive Service, and
deselect the other features. (If you have already installed TeleVantage Web Services,
that feature is detected and pre-selected—you do not need to deselect it.)
INSTALLING TELEVANTAGE
You can also do any of the following:
Q
Click a component to see a description of it as well as the amount of disk space
required to install it.
Q
Click Space to check the available space on each hard drive on the PC.
Q
Click Change to change the destination drive or folder where the selected
component will be installed. You can specify a different location for each
component.
Click Next to continue.
9.
If you are installing the TeleVantage Recording Archive Service on the TeleVantage
Server PC, Setup warns you that for performance and security reasons it is
recommended, but not required, that you install the Recording Archive Service on a
different PC.
Click OK to dismiss the warning and then click Next to continue with the installation,
or click Cancel to exit Setup.
10. In the Windows Account Name and Password dialog box, enter the name and
password of the account that you will use to run the TeleVantage Recording Archive
Service.
CHAPTER 15. INSTALLING THE TELEVANTAGE RECORDING ARCHIVE SERVICE
15-5
11. In the Microsoft SQL Server Password dialog box, enter your SQL Server SA (system
administrator) password.
12. In the Ready to Install dialog box, click Install. If you are prompted to restart your PC,
do so.
15-6
INSTALLING TELEVANTAGE
CHAPTER 16
CHAPTER 16
INSTALLING THE TELEVANTAGE
SMDR SERVICE
CHAPTER CONTENTS
Overview . . . . . . . . . . . . . . . . . . . . . . . . . . . . . . . . . . . . . . . . . . . . 16-2
Installing the SMDR service . . . . . . . . . . . . . . . . . . . . . . . . . . . . . 16-3
Configuring the SMDR service . . . . . . . . . . . . . . . . . . . . . . . . . . .16-3
TCP/IP ports to avoid . . . . . . . . . . . . . . . . . . . . . . . . . . . . . . . . . . 16-5
TeleVantage SMDR formats . . . . . . . . . . . . . . . . . . . . . . . . . . . . . 16-6
Toshiba CTX SMDR format. . . . . . . . . . . . . . . . . . . . . . . . . . . . . 16-10
Avaya Lucent Definity SMDR format . . . . . . . . . . . . . . . . . . . . . .16-12
Overview________________________________________________
The TeleVantage SMDR (Station Message Detail Recording) Service lets you send real-time
call data from TeleVantage to a third-party application. Third-party applications might be
anything from a printer that prints a line for each call, to call accounting software that generates
detailed reports.
TeleVantage sends out the information for each call as soon as the call is ended. The information
is sent as text in any of the following supported SMDR formats:
Q
TeleVantage formats. TeleVantage’s own format that outputs all call information that
appears in the Administrator’s Call Log. This format provides the most complete
TeleVantage SMDR call data. For details on the data stream sent, see “TeleVantage
SMDR formats” on page 16-6
Q
Toshiba CTX. An emulation of the format for Toshiba's CTX100 and CTX670 switches,
which are supported by many third-party products. For details on the data stream sent,
see “Toshiba CTX SMDR format” on page 16-10.
Q
Lucent/Avaya Definity. An emulation of the SMDR format for Lucent's Definity
switch, which is supported by many third-party products. For details on the data stream
sent, see “Avaya Lucent Definity SMDR format” on page 16-12.
The SMDR Service is a Microsoft Windows Service that runs behind the scenes. It does not
require that a user be logged into the PC.
You can configure settings for the SMDR Service using the TeleVantage SMDR Service
Manager. See “Configuring the SMDR service” on page 16-3.
Output connection options
The TeleVantage SMDR Service can send call information from the TeleVantage Server on the
following connection methods:
Q
COM port. This is the standard way in which PBXs send SMDR data. To use this
method, plug one end of a serial cable into the appropriate COM port on the TeleVantage
Server computer, and connect the other end to the COM port of the PC or device that
requires SMDR data.
Q
TCP/IP Socket. The data stream is broadcast over the network from the IP address of the
TeleVantage Server. Any computer on the network (or Internet) would be able to receive
the data. By default the TeleVantage TCP/IP port 1000, but you can change this to any
port. Certain TCP/IP ports are not recommended, like 23. For a list of ports to avoid, see
“TCP/IP ports to avoid” on page 16-5.
Note: Only one device can listen to the TCP/IP port at a time.
Q
16-2
Text File. The data is written to text file anywhere on the network that gets constantly
updated. You can have TeleVantage automatically back the file up at midnight. When
using this method, the best format to use is TeleVantage CSV.
INSTALLING TELEVANTAGE
Installing the SMDR service ________________________________
To use the SMDR service, install it on the TeleVantage Server PC. The SMDR service requires
that TeleVantage ViewPoint also be installed on the same PC. For instructions on installing
ViewPoint, see Installing TeleVantage.
Note: You can install the SMDR service without shutting down the TeleVantage Server.
However, it is recommended that you perform the installation during off-peak hours in case a
Server restart is needed.
To install the SMDR service
1.
On the TeleVantage Server PC, insert the Master CD and run the file
\SMDR\Setup.exe.
2.
Follow the instructions in the SMDR Service Setup window.
Configuring the SMDR service _____________________________
To configure settings for the SMDR service, including the data format and connection type, run
the TeleVantage SMDR Service Manager on the TeleVantage Server computer. To start it,
choose Start > Programs > Vertical TeleVantage Server > TeleVantage SMDR Manager.
Important: To change configuration settings, you must either stop or pause the SMDR Service
according to the instructions in the next section.
CHAPTER 16. INSTALLING THE TELEVANTAGE SMDR SERVICE
16-3
Starting, pausing, and stopping the service
Click the buttons in the Service section to Start, Pause and Stop the SMDR Service. You must
either stop or pause the service to change configuration settings.
Q
Stopping the service. While the service is stopped, TeleVantage calls that complete are
not reported.
Q
Pausing the service. While the service is paused, TeleVantage calls that complete are
stored in a buffer. When you click Continue, they are reported.
Starting the SMDR service automatically on restart
Check Auto-start the service to have Microsoft Windows automatically start the service
whenever the PC is started, regardless of whether anyone has logged in or not.
Choosing the SMDR format
To select the format for data sent by the SMDR Service, use the SMDR Format drop-down list.
For a list of supported formats, see “Overview” on page 16-2.
Selecting the output connection type
In the Output section, check whichever of the following methods you are using to connect the
TeleVantage Server with your third-party SMDR application:
Q
Serial connection. Check to enable connection through a serial cable running from a
COM port on the TeleVantage Server computer to an SMDR device.
Q
Q
COM port. Select which COM port on the TeleVantage Server computer to use. For
information on selecting a COM port, see your Windows documentation.
TCP/IP Socket. Check to enable broadcasting of SMDR data on your network or the
Internet.
Q
16-4
Port. Enter the number of the TCP/IP port on which to broadcast SMDR data. For
a list of port numbers to avoid, see “TCP/IP ports to avoid” on page 16-5.
INSTALLING TELEVANTAGE
Q
Text file. Check to have the SMDR Service write call data to a text file in the location of
your choice. Click Settings to set file location and archiving options in the Text File
Output Settings dialog box.
You can set the following text file options:
Q
Click
to specify a new location or filename for the file.
Q
Check Archive Log Daily to have TeleVantage automatically begin writing to a
new file every midnight, leaving the previous day’s file as an archive. The
filenames are numbered sequentially. Click
to specify the location for the
archive files.
TCP/IP ports to avoid _____________________________________
When choosing a TCP/IP port on which to broadcast SMDR information using a TCP/IP Socket
connection, avoid the following port numbers:
Port
Traditional use
TCP25
SMTP
TCP20,TCP21
FTP
TCP80
HTTP
TCP110
POP3
TCP119
NNTP
TCP389
LDAP
For more information, see the following website:
http://www.ietf.org/rfc/rfc1700.txt?number=1700
CHAPTER 16. INSTALLING THE TELEVANTAGE SMDR SERVICE
16-5
TeleVantage SMDR formats_________________________________
The TeleVantage formats provide the most complete SMDR call data, offering all call
information that appears in the Administrator’s Call Log. There are two TeleVantage formats
that provide exactly the same data stream, formatted in different ways:
Q
TeleVantage fixed-width. The data is formatted in fixed-width columns. Note that long
data, for example in the Custom Data column, can be truncated when using this format.
Q
TeleVantage CSV. The data is formatted as comma-separated values.
The following table shows the data stream for both TeleVantage formats. The “Width in
Characters” column applies only to the fixed-width format.
16-6
Position
Description
1
Direction.
Q
0 - Inbound
Q
1 - Outbound
Q
2 - Internal
Q
3 - Conference
Width in characters
1
2
From Name.
Name of the person who originated the
call. On incoming calls, "Unknown"
appears unless the caller has been
identified as a global contact. On outgoing
calls, the name of the user who placed the
call.
15
3
To Name.
Name of the party who received the call.
On incoming calls, this is the name of the
user who took the call. On outgoing calls,
"Unknown" appears unless the person has
been identified as a global contact.
15
4
Answered By.
Name of the user who answered an
incoming call. Useful for analyzing data for
call centers.
15
5
Number.
Phone number of the caller or the person
you called. For incoming calls, the Caller
ID information that came in with the call, if
available. For a call to or from another
TeleVantage user, this field contains <NA>.
30
INSTALLING TELEVANTAGE
Position
Description
6
From Number.
Number the call came from. For incoming
calls, the caller's extension or external
phone number. For outgoing calls, the
extension of the user who placed the call.
15
7
To Number.
Number the call was placed to. For
incoming calls, the extension of the user
who was called. For outgoing calls, the
external number or extension that was
called.
15
8
Callback Number.
If a caller enters a callback number, it
appears with the prefix "Callback:"
15
9
DID.
The DID of the incoming call.
10
10
Start Time.
Date and time when the call started.
17
11
Wait Time.
On incoming calls, the length of time from
when the caller selected an extension to
when the user picked up. On outgoing
calls, Wait Time is always 00:00.
8
12
Duration.
Length of the call, after the two parties are
connected.
8
13
Result.
How the caller's wait ended:
1
Q
1 - Connected (caller hung up first)
Q
2 - Connected (callee hung up first)
Q
3 - Abandoned
Q
4 - voicemail
Q
5 - Blind Transfer
Q
6 - Supervised Transfer
Q
7 - Merged
Q
8 - Logged In
CHAPTER 16. INSTALLING THE TELEVANTAGE SMDR SERVICE
Width in characters
16-7
16-8
Position
Description
14
Account Code.
The Account code for this call
10
15
Message.
1
Q
0 - no message
Q
1 - the caller left a voice message.
Width in characters
16
From Device.
On incoming calls, the trunk or extension
from which the call originated. On outgoing
calls, your station number.
11
17
To Device.
On incoming calls, your station number. On
outgoing calls, the trunk used for the call. If
an incoming call was transferred, To
Device shows the last station that took the
call.
11
18
Parties.
Number of people who took part in the call,
including the caller, the called party,
anyone to whom the call was transferred,
and any conference call participants.
2
19
Dial String.
Digits that TeleVantage actually dialed over
the trunk, which may be different than the
digits TeleVantage displays in a contact's
phone number. For example, a dial string
may contain an international or
long-distance access code, least cost
routing information, or a dialing prefix or
suffix.
15
20
From Type.
Type of Caller ID number received on an
incoming call:
1
Q
0 - No number
Q
1 - Phone Number
Q
2 - IP Address
Q
6 - Extension
INSTALLING TELEVANTAGE
Position
Description
21
From Code.
Access code of the dialing service that will
be used to return this call. Only applicable
to calls coming in from remote TeleVantage
Servers over an Internet trunk.
10
22
From Rules.
1
23
Q
0 - No rules
Q
1 - TeleVantages dialing rules will be
applied when returning this call.
To Type.
Type of number called on an outbound call:
Q
0 - No number
Q
1 - Phone Number
Q
2 - IP Address
Q
6 - Extension
Width in characters
1
24
To Code.
Access code used to dial an outbound call.
10
25
To Rules.
If checked, dialing rules were used to
make an outbound call.
1
26
Custom Data.
Custom data, if any, associated with the
call. For most systems this will be blank.
30
CHAPTER 16. INSTALLING THE TELEVANTAGE SMDR SERVICE
16-9
Toshiba CTX SMDR format _________________________________
This format is an emulation of the format used for Toshiba's CTX100 and CTX670 switch. This
format sends a subset of the data that the TeleVantage format sends. It provides all the basic
information that a Toshiba CTX SMDR recipient requires, but is not an exact duplicate of their
format and may not represent details in the same way. This format provides a subset of the data
that the TeleVantage format sends.
The following table shows the data stream for the Toshiba CTX SMDR format:
Position
Description
LINE 1 Basic Call Information
1
Record Type
•
•
2
Blank
3-5
"001" - Record Number
6
Blank
7-12
Node ID (Ignored in our implementation)
13
Blank
14-22
Origin Information
•
•
•
Inbound: "T001" + Trunk # (000-999)
Outbound: "DN" + Extension Number
Internal: "DN" + Extension Number
23
Blank
24-32
Termination Information
•
•
•
16-10
"B" - Abandoned
"N" - Normal Inbound/Outbound Call
Inbound: "DN" + Extension Number
Outbound: "T001" + Trunk # (000-999)
Internal: "DN" + Extension Number
33
Blank
34-47
Time Stamp (MM/DD HH:NN:SS)
48
Blank
49-58
Call Duration (HH:NN:SS + ".o")
59
Blank
59
Blank
60-91
Number Dialed
INSTALLING TELEVANTAGE
Position
Description
92
Carriage Return
93
Line Feed
LINE 2 CallerID and DID
1
Blank
2
"&"
3-19
CallerID
20
Blank
21-39
Blank (Ignored in our implementation)
40-46
DNIS/DID
47-62
Blank (Ignored in our implementation)
63
Carriage Return
64
Line Feed
LINE 3 Account Code
(optional, will not appear if no account code)
1
Record Type
•
•
"B" - Abandoned
"N" - Normal Inbound/Outbound Call
2
Blank
3-5
"002" - Record Number
6-47
Mirror of Line 1
48-59
Blank
60-91
Account Code
92
Carriage Return
93
Line Feed
CHAPTER 16. INSTALLING THE TELEVANTAGE SMDR SERVICE
16-11
Avaya Lucent Definity SMDR format _________________________
This format is an emulation of the standard SMDR format for Lucent's Definity switch. It
provides all the basic information that a Lucent Definity recipient requires, but is not an exact
duplicate of their format and may not represent details in the same way. This format provides a
subset of the data that the TeleVantage format sends.
The following table shows the data stream for the Avaya Lucent Definity SMDR format:
Position
Description
1-4
Time of day (HHMM)
5
Space
6
Duration - hours
7-8
Duration - minutes
9
Duration - tenths of minutes
10
Space
11
Condition Code
"9" - Inbound
"7" - Outbound
"0" - Internal
12
Space
13-15
Dialing Service
16
Space
17-19
TAC Trunk Access
Inbound: Blank
Outbound: Trunk Number
20
Space
21-35
Digits Dialed
36
Space
37-41
Station Number
Inbound: Trunk Number
Outbound: Extension
16-12
42
Space
43-57
Account Code
INSTALLING TELEVANTAGE
Position
Description
58
Space
59-82
Ignored in TeleVantage implementation of this format
83
Carriage Return
84
Line Feed
CHAPTER 16. INSTALLING THE TELEVANTAGE SMDR SERVICE
16-13
CHAPTER 17
CHAPTER 17
INSTALLING THE TFTP SERVICE
CHAPTER CONTENTS
Overview . . . . . . . . . . . . . . . . . . . . . . . . . . . . . . . . . . . . . . . . . . . . 17-2
Installing and configuring the Tftpd32 TFTP Server . . . . . . . . . . . 17-2
Overview________________________________________________
This chapter describes how to install the Tftpd32 TFTP Server included with TeleVantage.
If you are using any of the following phones with TeleVantage, you must install a TFTP (Trivial
File Transfer Protocol) server on your network. Each of these phones uses the Tftpd32 TFTP
Server to download updates to the phone's firmware and configuration files.
Q
Vertical Aastra SIP phones
Q
Polycom H.323 phones
Q
Uniden H.323 phones
For the specific models of these phones that are supported in TeleVantage, see “Tested SIP
desktop phones” on page 5-6 and “Tested H.323 phones” on page 5-10.
Installing and configuring the Tftpd32 TFTP Server _____________
You can install the Tftpd32 TFTP Server on the TeleVantage Server or on another PC.
Note: The Windows account used by the TeleVantage Server and any account that will run the
Administrator must have full read/write access to the directory where you install the Tftpd32 TFTP
Server.
To install and configure the Tftpd32 TFTP Server
17-2
1.
Insert the Master CD. If the Master Setup does not start automatically, run
autorun.exe from the root directory on the Master CD.
2.
Click TeleVantage Services.
INSTALLING TELEVANTAGE
3.
The TeleVantage Services Setup starts.
Follow the on-screen instructions.
4.
In the Setup Type dialog box, select Custom, and then click Next to continue.
CHAPTER 17. INSTALLING THE TFTP SERVICE
17-3
5.
In the Custom Setup dialog box, select Tftpd32 TFTP Server, and deselect the other
features. (If you have already installed TeleVantage Web Services, that feature is
detected and pre-selected—you do not need to deselect it.)
You can also do any of the following:
Q
Click a component to see a description of it as well as the amount of disk space
required to install it.
Q
Click Space to check the available space on each hard drive on the PC.
Q
Click Change to change the destination drive or folder where the selected
component will be installed. You can specify a different location for each
component.
Note: By default, the installation location that you specify here is also used as the root
directory for the Tftpd32 TFTP Server phone configuration files. You can change the
root directory at a later time according to the instructions in “Configuring the Tftpd32
TFTP Server once it has been started” on page 17-6.
Click Next to continue.
17-4
6.
In the Ready to Install dialog box, click Install. If you are prompted to restart your PC,
do so.
7.
When the installation completes, you can configure the Tftpd32 TFTP Server if
needed. While this is not necessary in most configurations, to do so click Start >
Programs > Vertical TeleVantage > Tftpd32 TFTP Server.
INSTALLING TELEVANTAGE
8.
Once configured properly, start the Tftpd32 TFTP Server using the Windows Services
control panel, and set the Tftpd32 TFTP Server service to auto-start. To do so, click
Start > Settings > Control Panel > Administrative Tools > Services.
9.
In the Services dialog box, locate and double-click Tftpd32 TFTP Server.
10. On the General tab of the Properties dialog box, select Automatic from the Startup
type drop-down list. Click Start to start the Tftpd32 TFTP Server without rebooting.
11. Click OK, and then exit the Services dialog box.
12. Depending on the phones you are using, copy the entire contents of one of the
following folders on the Master CD to the same folder where you installed the Tftpd32
TFTP Server (the default location is C:\Program Files\TeleVantage\Tftpd32\.)
\IPPhones\SIP\Aastra
\IPPhones\SIP\Aastra\1.2.5 Build 316 (Copy the contents of this folder if you are
using any Vertical Aastra 480i CT IP Phones with cordless handset and base
station.)
\IPPhones\H323\Polycom
\IPPhones\H323\Uniden
Note: Additional required configuration steps for these phones are described in
Chapters 14 and 15 in Administering TeleVantage.
13. Important: In Windows Explorer, share the directory where you installed the Tftpd32
TFTP Server to the account used by the TeleVantage Server and to all users who will
need to run the TeleVantage Administrator. When you set up the share, use the share
name TFTP, so that once shared, you can refer to it as a UNC path, for example
\\TeleVantage\TFTP.
CHAPTER 17. INSTALLING THE TFTP SERVICE
17-5
Configuring the Tftpd32 TFTP Server once it has been started
Detailed information on configuring the Tftpd32 TFTP Server is available at the following
location:
http://tftpd32.jounin.net/
To make any changes to the Tftpd32 TFTP Server configuration settings, you must first stop the
service. To do so:
17-6
1.
Click Start > Settings > Control Panel > Administrative Tools > Services.
2.
In the Services dialog box, locate Tftpd32 TFTP Server. Right-click on it and then
click Stop.
3.
Click Start > Programs > Vertical TeleVantage > Tftpd32 TFTP Server.
4.
Click Settings.
5.
Make any necessary changes. For more information on configuring the Tftpd32 TFTP
Server, click Help.
6.
When you are done making changes, close the Settings dialog box.
7.
Right-click on Tftpd32 TFTP Server in the Services dialog box again, and then click
Start.
INSTALLING TELEVANTAGE
Appendixes
APPENDIX A
APPENDIX A
USING TELEVANTAGE WITH
MICROSOFT TERMINAL SERVICES
OR CITRIX METAFRAME
Using Microsoft Terminal Services or Citrix® MetaFrame with TeleVantage enables you to do
the following:
Q
Manage a TeleVantage Server remotely.
Q
Run the TeleVantage Administrator or ViewPoint on a PC that does not meet the
minimum requirements described in “Administrator and ViewPoint requirements” on
page 3-18.
Q
Centrally manage the installation and maintenance of the TeleVantage Administrator
and ViewPoint workstation applications by installing them on an application server,
instead of on individual users’ PCs.
Q
Run the Dialogic Configuration Manager (DCM) remotely to perform many of the
configuration tasks described in Chapter 7 in Installing Dialogic Telephony
Components. See Appendix D in Installing Dialogic Telephony Components for
information on how to configure DCM to run under Terminal Services.
Q
Run TeleVantage Multi-line TAPI Service Provider (TSP) to provide multiple lines for
TAPI support.
Microsoft Terminal Services or Citrix MetaFrame can be used in one of two modes, Application
Server or Remote Administration. Both of these modes can be used with TeleVantage, as
follows:
Q
Application Server. In Application Server mode, remote PCs can be used as terminals
for programs running in a multisession environment on an application server. For
example, several users on remote PCs can start terminal sessions to run TeleVantage
ViewPoint. Each session starts a new instance of ViewPoint, and all instances of
ViewPoint run simultaneously on the application server. No TeleVantage software is
required on the remote PCs.
Both the TeleVantage Administrator and TeleVantage ViewPoint are compatible with
the multisession environment provided by Microsoft Terminal Services and Citrix
MetaFrame. See “Installing workstation applications on an application server” on
page A-2 for details on how to set up an application server for use with TeleVantage.
Note: To use TAPI and the Contact Manager Assistant on Microsoft Terminal Services
or Citrix MetaFrame, you must install the TeleVantage Multi-line TAPI Service Provider,
using the TeleVantage Services Setup program. You cannot use the single-line TAPI
Service Provider included with the TeleVantage Workstation Installer with Terminal
Services or Citrix Metaframe. For details, see Chapter 14.
Q
Remote Administration. In Remote Administration mode, you can use a remote PC to
access a TeleVantage Server over the network just as if you were sitting at the Server
console. Remote Administration can be used to perform upgrade and maintenance tasks
remotely. For details, see “Using Terminal Services for remote administration” on
page A-5.
Installing workstation applications on an application server______
Bear the following considerations in mind when you set up an application server for
TeleVantage:
Q
The application server should not be the same PC as your TeleVantage Server PC.
Q
Applications should not be installed in the same partition as the Windows operating
system. In most cases, Windows will be installed on your C drive and applications will
be installed on a D drive. The D drive can either be a separate hard disk or another
partition on the same disk as the C drive.
Q
Always use Add/Remove Programs (located on the Windows Control Panel) to install
programs. This ensures that the programs are set up properly for multisession use.
Note: The server must be in remote administration mode to remotely install any TeleVantage
workstation applications. See “Using Terminal Services for remote administration” on page A-5.
Installing workstation applications on a Windows 2003 server
To install the TeleVantage workstation applications on a Microsoft Windows 2003 Terminal
Server, see the documentation that came with Terminal Services.
Installing workstation applications on a Windows 2000 server
To install the TeleVantage workstation applications on a Microsoft Windows 2000 Terminal
Server, do the following:
1.
On the Terminal Server PC, open the Windows Control Panel and click Add/Remove
Programs.
2.
In the Install/Uninstall tab, click Install.
3.
In the Install Program dialog box, click Next, and then click Browse.
4.
In the Browse dialog box, go to the TeleVantage installation directory. The default
location is:
\\<TeleVantage Servername>\Netsetup
A-2
INSTALLING TELEVANTAGE
5.
Select either admin.exe or client.exe, depending on the workstation application that
you want to install.
6.
Click Finish, and then proceed with the installation. Add/Remove Programs will make
sure that the application is set up for multisession use.
7.
If you want to install more than one application, close Add/Remove Programs and
restart it for each new application that you want to add.
Installing workstation applications on a Windows NT server
To install the TeleVantage workstation applications on a Microsoft Windows NT Terminal
Server, do the following.
Note: This procedure can also be used with Citrix MetaFrame.
1.
On the Terminal Server PC, open a command prompt window and type change user
/install.
2.
Stop all ODBC-dependent services including, but not limited to, IIS, SQL Server, SQL
Server Enterprise Manager, Terminal Server licensing service, and the ODBC
Administrator.
3.
Install MDAC 2.7 Service Pack 1A by running the following file. <Servername> is
your TeleVantage Server PC:
<Servername>\NetSetup\Mdac\Mdac_typ.exe
Follow the on-screen instructions to install MDAC with the “Complete” option.
4.
With this installation window still open, run the application compatibility script by
running the following file:
C:\Application Compatibility Scripts\Install\Odbc.cmd
5.
Find the following file:
C:\Application Compatibility Scripts\rootdrv2.cmd
If that file is not present, repeat step 4, and it should appear.
When you have located the file, edit it in Notepad and add the following line to the end
of the file. You can set RootDrive to W: or any unused drive letter.
Set RootDrive=W:
Save and close the file when you are done.
6.
Run the following file again:
C:\Application Compatibility Scripts\Install\Odbc.cmd
7.
Return to the final window of the MDAC 2.7 SP 1A installation. Click Restart
Windows.
APPENDIX A. USING TELEVANTAGE WITH MICROSOFT TERMINAL SERVICES OR CITRIX METAFRAME
8.
If you see the following error message after restarting your PC, click OK, and then
restart your PC again.
9.
At the Terminal Server command prompt, type change user /install.
10. Install any of the TeleVantage workstation applications, such as TeleVantage
ViewPoint, from the TeleVantage Server NetSetup directory. For detailed
instructions, see Chapter 11.
11. At a command prompt, type change user /execute.
Using the Terminal Services Client on Windows 2000 PCs _______
You must install the Windows Terminal Services Client on the PC of any user who needs to run
the TeleVantage Administrator or ViewPoint remotely. Remote PCs use the Terminal Services
Client to run sessions in on the application server.
In Windows 2000, you have a choice between two different versions of the Terminal Services
Client:
Q
Terminal Services Client. The standard Terminal Services Client is provided with
Terminal Server. To install it, you must first create a set of installation disks with
Terminal Server Client Creator that you then use on each remote PC. You can use this
option if you do not want to install Microsoft Internet Explorer on remote PCs.
Q
A-4
Terminal Services Advanced Client (TSAC). The Terminal Services Advanced Client
(TSAC) is an ActiveX control that can be used to run Terminal Services sessions within
Microsoft Internet Explorer. It provides almost the same functionality as the full
Terminal Services Client, but is designed to deliver this functionality over the Web.
TSAC is somewhat easier to install because you do not have to create and use a set of
floppy disks.
INSTALLING TELEVANTAGE
Using Terminal Services for remote administration_____________
In Remote Administration mode, you can use a remote PC to access a server over the network
just as if you were sitting at the server console. Remote Administration can be used to perform
upgrade and maintenance tasks remotely.
When you start a session, your remote terminal may not be aware of applications that are already
running on the server and will not display them on the console or in the task manager. This does
not apply to all applications. For example, neither TeleVantage ViewPoint nor the
Administrator would be visible, but the TeleVantage Device Monitor would be visible in the
system tray. Before attempting to upgrade an application, you should restart the server to make
sure the application is no longer running.
See page Appendix D in Installing Dialogic Telephony Components for instructions on how to
set up and run the Dialogic Configuration Manager (DCM) remotely using Microsoft Terminal
Services.
APPENDIX A. USING TELEVANTAGE WITH MICROSOFT TERMINAL SERVICES OR CITRIX METAFRAME
APPENDIX B
APPENDIX B
TROUBLESHOOTING
This appendix contains information that may be helpful when you are troubleshooting problems
with various TeleVantage components. It is divided into the following sections:
Q
“TeleVantage system overview” on page B-2
Q
“Troubleshooting telephone problems” on page B-3
Q
“Troubleshooting database server problems” on page B-4
Q
“Troubleshooting TeleVantage Server problems” on page B-5
Q
“Troubleshooting workstation application problems” on page B-7
Q
“Troubleshooting TeleVantage Services problems” on page B-13
Q
“Other troubleshooting topics” on page B-16
For information on troubleshooting VoIP problems with SIP or H.323, see Appendix H.
For information on troubleshooting problems with Dialogic HMP or Dialogic telephony
hardware and drivers, see Appendix C in Installing Dialogic Telephony Components.
Reporting problems
For information about how to report problems, see Administering TeleVantage.
TeleVantage system overview_______________________________
The following figure shows the logical structure of a TeleVantage Server. Understanding this
information will be helpful when you are trying determine the significance of system behavior
when you are troubleshooting problems.
The TeleVantage Server connects to a user by means of two different physical sets of wiring:
Q
Phone wire connects the station telephone to the Server (by means of the station board.)
Q
The network connects TeleVantage ViewPoint to the Server.
When troubleshooting networking problems, keep in mind that TeleVantage uses three kinds of
communication between the TeleVantage Server and TeleVantage ViewPoint or TeleVantage
Administrator.
As shown in the previous figure, the network connection between the Server and TeleVantage
ViewPoint actually consists of three different logical connections:
B-2
Q
The Server software and the ViewPoint software communicate using DCOM.
Q
ViewPoint accesses voice files stored on the Server through file sharing.
Q
The MSDE Client software, which is embedded in ViewPoint, communicates with the
MSDE database on the Server using its own IPC protocol.
INSTALLING TELEVANTAGE
Understanding these different data paths can be important in understanding and troubleshooting
the TeleVantage system. For example, the previous diagram shows that if a user can listen to
voice mail messages using the telephone commands, but cannot do so using ViewPoint,
problems with file sharing or accessing the MSDE database may be the cause. To solve the
problem, you would use Windows Explorer to check the file sharing privileges on the Server
machine.
Troubleshooting telephone problems________________________
This section provides information about the following problems:
Q
Calls are rejected. See page B-3.
Q
Faint music heard on calls. See page B-3.
Q
All incoming calls hear a busy signal but the phones are not busy. See page B-3.
Q
Hang up not being detected. See page B-4.
Q
Gateway calls between TeleVantage Servers fail. See page B-4.
Q
Toshiba Strata DKT-series digital phones do not appear in the Device Monitor. See page
B-4.
Calls are rejected
Possible causes for the error message, “I’m sorry, the other party rejected the call” include the
following:
Q
The call is placed on an Internet telephony trunk, and the receiving party does not have
an IP phone.
Q
None of the trunks at the receiving end are configured to accept incoming calls.
Q
An outbound call is placed on an ISDN line, but the switch sends TeleVantage a
disconnect message before the call is connected to the intended recipient.
Faint music heard on calls
This problem is probably due to radio interference. Installing a Radio Shack RF Filter (Part
Number 43-150) on the user end between the jack and the phone should correct the problem.
All incoming calls hear a busy signal but the phones are not busy
Use the Services icon on the Windows Control Panel to ensure the Dialogic service is running.
When Dialogic boards are powered up and no drivers are present, the reaction to incoming calls
is controlled by the setting of the hook-state switch (SW1) on the boards. This switch may be
set to generate a busy signal.
APPENDIX B. TROUBLESHOOTING
B-3
Hang up not being detected
Not all telephone company lines indicate a disconnect in the same way. Most will drop loop
current (which is fairly easy to detect) but some may do other things, including:
Q
Go silent
Q
Play a dial tone
Q
Play a reorder tone
Q
Play some other kind of tone
To determine the disconnect tones, see Administering TeleVantage.
Gateway calls between TeleVantage Servers fail
TeleVantage 3.x Servers cannot communicate with a TeleVantage 8.0 Server over an IP
Gateway connection. Upgrade the TeleVantage 3.x Servers toTeleVantage 8.0.
Toshiba Strata DKT-series digital phones do not appear in the Device
Monitor
After installing a Toshiba Strata CS-DKTU digital station board on the TeleVantage Server and
connecting Toshiba Strata DKT phones to the board, the phones do not appear in the Device
Monitor.
This problem occurs because Toshiba Strata CS-DKTU digital station boards do not work in an
Advanced Configuration and Power Interface (ACPI) hardware environment. To correct the
problem, you must change the hardware profile that your TeleVantage Server PC is using. For
details, see the TeleVantage Knowledge Base article #1541, “Toshiba Strata DKT digital
phones do not appear in the Device Monitor.”
Troubleshooting database server problems ___________________
This section provides information about the following problems:
Q
Cannot access the TeleVantage database server. See page B-4.
Q
Valid sa password not accepted when installing MSDE 2000 from Master CD. See page
B-5.
Cannot access the TeleVantage database server
If you cannot connect to or load the database server, verify the following:
B-4
Q
The system was restarted after Microsoft MSDE was installed and the MSDE service is
running.
Q
The correct MSDE password was entered during installation. (The password is entered
if you followed the installation instructions.) Contact your TeleVantage provider for
assistance.
INSTALLING TELEVANTAGE
Valid sa password not accepted when installing MSDE 2000 from
Master CD
If you installed your existing version of MSDE or SQL Server as a stand-alone (non-networked)
version, the network libraries were not installed, and all sa passwords (even a valid one) will be
rejected. To resolve the problem, do the following:
1.
Run the Microsoft Data Access Components (MDAC) installer (mdac_typ.exe) from
either of the following locations:
\Program Files\TeleVantage Server\netsetup\mdac directory on the TeleVantage
Server PC
\server\netsetup\mdac directory on the Master CD
2.
Rerun the TeleVantage Master Setup, and try to install Microsoft Data Engine again.
Troubleshooting TeleVantage Server problems ________________
This section provides general tips for troubleshooting TeleVantage Server problems, as well as
information about the following problems:
Q
Cannot connect to the TeleVantage database during TeleVantage Server installation or
when starting the Server or Administrator. See page B-6.
Q
TeleVantage Server does not appear in Windows Services list. See page B-6.
Q
Slow Server and station startup after migrating TeleVantage to a new Server with a new
name. See page B-6.
Q
TeleVantage Server start up problems. See page B-7.
Q
Device Monitor problems. See page B-7.
General tips for troubleshooting TeleVantage Server problems
If you encounter problems after successfully installing the TeleVantage Server, check the
following:
Q
Is there sufficient free disk space on the drive containing the vfiles directory?
Q
Is there sufficient free database space? (Choose Tools > System Settings and click the
Storage tab to check.)
Q
What is the accessibility of database, voice files, and shares on the network?
Q
Can the server be pinged? (Try entering C:\ping <Servername> from a DOS prompt.)
APPENDIX B. TROUBLESHOOTING
B-5
TeleVantage Server does not appear in Windows Services list
If the TeleVantage Server does not appear in the Services list (Start > Settings > Control Panel
> Administrative Tools > Services), open a command prompt on the Server, and enter the
following commands:
CD \Program Files\TeleVantage Server
tvserver.exe /service
Cannot connect to the TeleVantage database during TeleVantage
Server installation or when starting the Server or Administrator
This problem can occur if the connection from Microsoft MSDE/SQL Server to the database file
has been removed. This can happen if you uninstalled and reinstalled MSDE/SQL Server for any
reason.
Important: The following steps should not be used for routine maintenance or to restore a
version of the TeleVantage database once TeleVantage is installed and running successfully. In
those cases, you should always use the TeleVantage Administrator to restore the TeleVantage
database according to the instructions in Chapter 12 of Administering TeleVantage.
To restore a connection to the TeleVantage database
1.
On the same PC where the database server is installed, run the following utility from
the Master CD:
2.
Enter the Database administrator password (the SQL sa password).
3.
Browse to the location of the TeleVantage Database backup file, for example
\Program Files\TeleVantage Server\Data\tvdbdev_5.dat.
4.
Click OK.
Support\TVDBRestore\TVDBRestore.exe
If the problem occurred during Server installation, begin the Server installation over again
according to the instructions in “Installing the TeleVantage Server” on page 10-2.
Slow Server and station startup after migrating TeleVantage to a new
Server with a new name
This problem is caused by importing a database from another machine with a different machine
name.
To prevent this problem, when migrating to a new machine and new TeleVantage version, do
the following:
B-6
1.
Move your existing version of TeleVantage to a new machine and verify that it works.
2.
Back up the database on the existing Server.
3.
Copy TVDB.Dmp and TVServer.Reg to the backup directory on the new Server
(C:\Program Files\TeleVantage Server\Data\Backup.)
4.
Copy the voice (VOX) files to the new Server.
INSTALLING TELEVANTAGE
5.
Restore the TeleVantage database.
6.
Upgrade to the new version of TeleVantage and verify that it works.
TeleVantage Server start up problems
Q
TeleVantage Server is unknown. Run the utility TVAccUtl.exe as described in
Appendix C.
Q
TeleVantage Service will not start. Verify that the account (valid license) from which
the user is trying to start the TeleVantage Server has administrator privileges.
Q
TeleVantage Server does not start because account password changed. When you
installed the TeleVantage Server, you entered the Windows account name and password
used to run the TeleVantage Server. If the password for this account changes, the
TeleVantage Server will not start.
To resolve this problem, use the DCOM config utility to update the account password in
the Identify settings for TeleVantage Starter application.
Q
Cannot connect to the TeleVantage database. See “Cannot connect to the
TeleVantage database during TeleVantage Server installation or when starting the
Server or Administrator” on page B-6.
Q
‘Unable to find libdxxmt.dll’ error when starting Server. This error indicates that the
Dialogic drivers are not properly installed and started. Reinstall the drivers according to
the instructions.
Device Monitor problems
Q
Device Monitor does not appear when the Device Monitor menu item is selected.
Click the Device Monitor icon in the system tray (lower right area of the task bar). By
default, the Device Monitor starts minimized.
Q
A trunk or station displays ‘Error!’ in Device Monitor. The trunk or station is
experiencing an error from which it cannot automatically recover. Use the Device
Monitor Restart command to reinitialize the device.
Q
Toshiba DKT-series digital phones do not appear in the Device Monitor. See page
B-4.
Troubleshooting workstation application problems ____________
This section provides information about the following:
Q
ViewPoint/Administrator installation tips. See page B-8.
Q
‘Corrupt installation’ dialog box. See page B-9.
Q
‘TeleVantage workstation applications -- Installation operation failed’ error when
installing TeleVantage workstation applications. See page B-9.
Q
TeleVantage ViewPoint and Administrator fail to install on Windows 98 SE if DCOM
98 is not previously installed. See page B-9.
APPENDIX B. TROUBLESHOOTING
B-7
Q
‘Server not available’ dialog box appears when upgrading TeleVantage ViewPoint or
Administrator. See page B-10.
Q
‘Error 7595’ when starting TeleVantage ViewPoint. See page B-10.
Q
‘Error 3706 (Provider cannot be found. It may not be properly installed.) has occurred’
when starting TeleVantage ViewPoint. See page B-10.
Q
Cannot start Administrator to back up the TeleVantage database. See page B-10.
Q
Cannot connect to the TeleVantage database when launching the Administrator. See
page B-11.
Q
E-mail notification through Microsoft Outlook does not work if Outlook is installed in
Internet Only mode. See page B-11.
Q
TeleVantage cannot connect to an SMTP mail server to send e-mail notifications. See
page B-11.
Q
E-mail notification WAV file attachments are incorrectly sent as .DAT files. See page
B-11.
Q
Workstation applications regularly lose connection to the TeleVantage Server. See page
B-12.
Q
On a Windows XP Home SP2 PC, ViewPoint fails to connect to the TeleVantage Server.
See page B-13.
ViewPoint/Administrator installation tips
Q
‘Class Automation’ errors 430 or 1720 can occur if the latest version of Windows
Scripting Runtime is not installed. Install Windows Scripting Runtime, then try
installing ViewPoint again by running Client.exe from the Server's \NetSetup directory.
You can download Windows Scripting Runtime from the following location:
http://msdn.microsoft.com/downloads/default.asp?URL=/downloads/sample.
asp?url=/msdn-files/027/001/733/msdncompositedoc.xml
Q
Error 1904 may occur when installing ViewPoint on Windows NT, ending the
installation. If this happens, reboot the system and run the ViewPoint installation again.
Q
If you run the ViewPoint installation while Microsoft Outlook is running, you may see
an error message that says, ‘Microsoft Outlook cannot run the add-in. This feature is
currently not installed. Would you like to install it now?’ If you see this message, do the
following:
Q
Click No.
Q
Another dialog box then appears with the message, ‘Add-in fldpub.dll could not be
installed or loaded. Problem may be resolved by using Detect and Repair on the
Help menu.’
Q
Click OK.
Q
Manually restart your system by choosing Start > Shut Down.
When your system restarts, ViewPoint installation will continue.
B-8
INSTALLING TELEVANTAGE
‘Corrupt installation’ dialog box
This error means you are unable to install TeleVantage workstation applications. You must log
on as a user with administrator privileges to the PC on which the workstation applications will
be installed. If you do not, a “Corrupt Installation” dialog box may open.
‘TeleVantage workstation applications -- Installation operation failed’
error when installing TeleVantage workstation applications
If this error occurs while installing TeleVantage workstation applications, the TeleVantage
Workstation Setup exits without installing the applications.
This error results if an older version of Windows Script is installed on the target PC, or the
current version was not installed correctly. The minimum version required is Windows Script
5.6.
To obtain the latest version of Windows Script
1.
Go to the Microsoft Download Center at the following location:
http://www.microsoft.com/downloads
2.
Search for ‘Windows Script’. Locate the download for the latest version of Windows
Script for your operating system.
3.
Download and install Windows Script on the affected PC.
4.
Restart the PC.
5.
Run the TeleVantage Workstation Setup and install the workstation applications
again.
TeleVantage ViewPoint and Administrator fail to install on Windows 98
SE if DCOM 98 is not previously installed
To safely install TeleVantage ViewPoint or the Administrator on a Windows 98 SE PC that does
not have a previous version of TeleVantage installed, you must install DCOM 98 first as
described in “Windows 98 PC requirements” on page 11-3.
Note: If you first run the Workstation Setup and attempt to install ViewPoint or Administrator
workstation application on a Windows 98 SE PC without a previous version of TeleVantage
installed or DCOM 98 installed, you will receive an MDAC installation error. If this happens,
perform the following steps:
1.
Close all open applications on the affected PC.
2.
Run the Microsoft Data Access Components (MDAC) installer (mdac_typ.exe) from
either of the following locations:
\Program Files\TeleVantage Server\netsetup\mdac directory on the TeleVantage
Server PC
\server\netsetup\mdac directory on the Master CD
3.
Restart the affected PC.
APPENDIX B. TROUBLESHOOTING
B-9
4.
Obtain the file installedmdac.reg from the \support directory on the Master CD, and
then run it on the affected PC.
5.
Install the ViewPoint or Administrator workstation application again and restart the
PC.
‘Server not available’ dialog box appears when upgrading TeleVantage
ViewPoint or Administrator
If the TeleVantage Server has been started, close the “Server not available” dialog box and
continue with the installation.
‘Error 7595’ when starting TeleVantage ViewPoint
This error occurs if you upgraded your TeleVantage database server from SQL 7 to SQL 2000.
To resolve the problem, perform the steps in “If you upgraded from SQL Server 7 to SQL Server
2000” on page 9-5 to set the database compatibility level correctly.
‘Error 3706 (Provider cannot be found. It may not be properly installed.)
has occurred’ when starting TeleVantage ViewPoint
This error can occur on some PCs when starting ViewPoint. To fix the problem:
1.
Using a program such as WinZip (http://www.winzip.com), open the file
mdac_typ.exe from either of the following locations:
\Program Files\TeleVantage Server\netsetup\mdac directory on the TeleVantage
Server PC
\server\netsetup\mdac directory on the Master CD
2.
Using WinZip, double-click the file sqloldb.cab to view its contents in a new window.
3.
In that new window, extract all the files in sqloldb.cab into C:\Program
Files\Common Files\System\Ole DB.
4.
At a command prompt, enter the following:
regsvr32 “C:\Program Files\Common Files\System\Ole DB\sqloledb.dll”
5.
Start TeleVantage ViewPoint again.
Cannot start Administrator to back up the TeleVantage database
If you are unable to start the Administrator, you can still back up the TeleVantage database by
running the Administrator from the command line.
From Start > Run, enter the path of the application in quotes, and then enter the /backup
command as follows:
“\\<system name>\C\Program Files\TeleVantage Administrator\TVAdmin.exe”
/backup
B-10
INSTALLING TELEVANTAGE
Cannot connect to the TeleVantage database when launching the
Administrator
See “Cannot connect to the TeleVantage database during TeleVantage Server installation or
when starting the Server or Administrator” on page B-6.
E-mail notification through Microsoft Outlook does not work if Outlook
is installed in Internet Only mode
E-mail notification through Microsoft Outlook will not work if Outlook is installed in Internet
Only mode. Outlook must be installed with full MAPI support to be used with the TeleVantage
Server. To change modes, go to Microsoft Outlook and select Tools > Options > Mail Services
> Reconfigure Mail Support.
TeleVantage cannot connect to an SMTP mail server to send e-mail
notifications
E-mail notifications of voice messages may not be sent if TeleVantage cannot connect to your
SMTP mail server. If this occurs, edit the following TeleVantage Advanced Settings to change
the retry parameters.
Q
Artisoft\Server\SMTPRetryInterval. Specifies how long TeleVantage waits (in
seconds) before retrying after failing to connect to an SMTP mail server to send an
e-mail notification. The default is 30 seconds.
Q
Artisoft\Server\SMTPMaxRetries. Specifies how many retry attempts TeleVantage
makes to send an e-mail notification via an SMTP mail server before logging the failure
to the Windows Event Log. The default is 5 attempt. (A setting of 0 means that no retry
is attempted.)
For instructions on using the TeleVantage Advanced Settings Editor, see page J-34.
E-mail notification WAV file attachments are incorrectly sent as .DAT
files
When TeleVantage attaches a voice message to an e-mail notification, the voice message is
normally sent as a WAV audio file. However, if the Microsoft Outlook outgoing mail format is
not configured as Plain Text format on the TeleVantage Server PC, the attachment is sent as a
.DAT file instead.
To use Plain Text format for voice messages attached to e-mail notifications, do either of the
following:
To set the outgoing mail format in Microsoft Outlook:
1.
Open Outlook on the TeleVantage Server PC.
2.
Choose Tools >Options.
3.
Click the Mail Format tab.
APPENDIX B. TROUBLESHOOTING
B-11
4.
Under ‘Message Format,’ select Plain Text.
5.
Click OK.
To set the outgoing mail format in the Windows registry on the TeleVantage
Server:
1.
Run Regedit.
2.
Edit the following registry key and set it to the DWORD value indicated:
HKEY_LOCAL_MACHINE\SOFTWARE\Artisoft\TeleVantage\Server\Settings\In
etMailFormat=3
The settings to try for this registry key are the following. Try 3 first, and if the problem
still occurs, try 1 or 2.
1 = MIME (Multipurpose Internet Mail Extensions)
2 = UUEncode (Unix-to-Unix Encoding, an example of MIME)
3 = BinHex (another example of MIME)
For more information, see the Microsoft Knowledge Base article #278321,
‘HOWTO: Force a Particular Internet Encoding by Using MAPI’, available at the
following location:
http://support.microsoft.com/default.aspx?scid=kb;EN-US;q278321
Workstation applications regularly lose connection to the TeleVantage
Server
The DCOM connection used by the workstation application to connect to the TeleVantage
Server will time out if there is an invalid DNS suffix on the affected PC. If the problem occurs,
remove the invalid DNS suffix according to the following instructions.
B-12
1.
On the affected PC, click Start > Settings > Network and Dial-up Connections >
Local Area Connections.
2.
In the Local Area Connection Status dialog box, click Properties.
3.
In the Local Area Connection Properties dialog box, click Internet Protocol (TCP/IP),
and then click Properties.
4.
In the Internet Protocol (TCP/IP) Properties dialog box, click Advanced.
5.
In the Advanced TCP/IP Properties dialog box, click the DNS tab.
INSTALLING TELEVANTAGE
6.
Verify any DNS suffixes listed in the middle of the dialog box by pinging each from
a command line. To do so:
Q
Click Start > Run.
Q
In the Run dialog box, type cmd, and then click OK.
Q
From the command line, type ping <HostName>, (for example, ping
Vertical.com), and then press Enter.
If the suffix is invalid, you will get the message, “Unknown host <HostName>”.
7.
To delete an invalid DNS suffix, select it in the Advanced TCP/IP Properties dialog
box, and then click Remove.
On a Windows XP Home SP2 PC, ViewPoint fails to connect to the
TeleVantage Server
When you start ViewPoint, the message “Could not connect to TeleVantage” is displayed.
This problem occurs because Windows XP Home cannot connect to a network domain by
design. To fix the problem:
1.
From the workstation PC, browse to the TeleVantage Server PC on the network.
2.
When you are prompted to log in to the domain, do so using a valid Windows user
name and password.
3.
Try to start ViewPoint again. You should now be able to connect to the TeleVantage
Server.
Troubleshooting TeleVantage Services problems ______________
This section provides information about the following:
Q
Web Services installer seems to complete without requiring a reboot, but a reboot is
required to finish. See page B-14.
Q
Messages ‘The page cannot be displayed’ while running ViewPoint Web Access. See
page B-14.
Q
Web Services \Audio folder contains many files. See page B-14.
Q
Applications that use the TeleVantage Multi-line TAPI Service Provider do not work
after stations are reordered or added on the TeleVantage Server. See page B-15.
Q
Message ‘TeleVantage Recording Archive Service has not been configured to archive
this server’ when starting the Administrator on the TeleVantage Server. See page B-15.
APPENDIX B. TROUBLESHOOTING
B-13
Web Services installer seems to complete without requiring a reboot,
but a reboot is required to finish
If the Web Services installer completes without requiring a restart, it is recommended that you
restart anyway to ensure that the setup is really completed.
Messages ‘The page cannot be displayed’ while running ViewPoint
Web Access
These messages may be the result of anti-virus software scanning that causes IIS to restart
ViewPoint Web Access. Turning off virus scanning for the file global.asa may help resolve this
issue. For more information, go to http://support.microsoft.com and search the Knowledge
Base for article #Q248013.
Any of the following error messages may signal this condition:
‘The page cannot be displayed’
‘HTTP/1.1 404 Object Not Found’
‘HTTP Error 500-12 Application Restarting’
Web Services \Audio folder contains many files
When a user accesses an audio file via ViewPoint Web Access (for example, records a greeting,
or listens to a voice message), the audio file is copied from the TeleVantage Server to the
following location on the Web server:
C:\Program Files\TeleVantage Web Services\Audio
Normally, these temporary audio files are deleted automatically. If they are not deleted, audio
files will accumulate in the folder, unnecessarily consuming disk space on the Web server. A
file will not be deleted automatically in either of the following cases:
Q
The account under which IIS runs on the Web server does not have Delete permission
for the \Audio folder.
Q
The file is marked Read-only.
To fix the problem:
First, make sure that the account under which IIS runs has Delete permission for the \Audio
folder. By default, this is the same account as the anonymous account for IIS. To do so:
1.
On the Windows Desktop, right-click My Computer, and then click Manage.
2.
In the Computer Management dialog box, in the left pane, expand Services and
Applications > Internet Information Services > Web Sites > Default Web Site.
B-14
3.
Right-click TeleVantage, and then click Properties.
4.
On the Directory Security tab, click Edit in the Anonymous access and
authentication control section.
INSTALLING TELEVANTAGE
5.
In the Authentication Methods dialog box, make a note of the User name in the
Anonymous access section, and then exit.
6.
In Windows Explorer, right-click the \Audio folder and then click Properties. The
default location is:
C:\Program Files\TeleVantage Web Services\Audio
7.
In the Properties dialog box, on the Security tab, click on the user name that you
identified above. Verify that the user has Full Control for the \Audio folder.
8.
If necessary, delete any Read-only files from the \Audio folder manually.
Once the Delete permission has been set according to these instructions, the next time that Web
Services connects to the TeleVantage Server after a Server restart, the \Audio folder will be
emptied automatically.
Applications that use the TeleVantage Multi-line TAPI Service Provider
do not work after stations are reordered or added on the TeleVantage
Server
If the stations on the TeleVantage Server are reordered for any reason (for example, stations are
added or deleted, or a Dialogic board that provides station resources is added or removed),
applications that use the Multi-line TSP (Act!, Goldmine, and so forth) may no longer work.
To resolve the problem, if stations are reordered after the TeleVantage Server is restarted, be
sure to restart the Terminal Services PC to re-initialize TAPI.
Message ‘TeleVantage Recording Archive Service has not been
configured to archive this server’ when starting the Administrator on
the TeleVantage Server
The full text of the message is:
‘Voice mail archiving is currently enabled, but the new TeleVantage Recording Archive
Service has not been configured to archive this server. Voice mail will not be archived
until the TeleVantage Recording Archive Service has been configured to archive this
server.’
This message appears if voice mailboxes on this TeleVantage Server have been selected for
automatic archiving, but the Server itself has not been added to (or has been removed from) the
TeleVantage Servers list (the list of Servers from which mailbox recordings will be archived)
in the TeleVantage Recording Archive Service Manager Settings dialog box on the archive
server PC.
You can recognize this problem in the TeleVantage Administrator on the Recordings / Archive
tab (Tools > System Settings.) The Archiving server field will be blank, but the Archive the
following mailboxes list will contain one or more entries.
Mailbox recordings will not be archived from this TeleVantage Server until the Server is added
to the TeleVantage Servers list on the archive server PC. For instructions, see “Configuring the
Recording Archive Service” in Chapter 12 in Administering TeleVantage.
APPENDIX B. TROUBLESHOOTING
B-15
Other troubleshooting topics _______________________________
This section describes other problems that you may encounter.
Microsoft WinSock Proxy blocks local UDP traffic
Microsoft Proxy Server is a gateway to the Internet that allows multiple workstations on a single
network to share one Internet connection.
MS Proxy Server can sometimes block UDP (User Datagram Protocol) traffic on the network.
If DCOM is configured to use UDP first and UDP traffic is blocked by MS Proxy Server,
TeleVantage workstation applications may not be able to establish a DCOM connection with the
Server.
Preconditions
MS Proxy Server
installed on the
network.
Symptoms
The following error(s) will be visible in
the TeleVantage logs.
In TvInfo log: Automation error
–2147023174
In TVComLog.txt:
AtlAdvise("{1D7D9320-64EC-11D1-B
866-006097C0E8CC}") failed;
HRESULT 0x800706ba: The RPC
server is unavailable.
Resolution
Move Connection-oriented TCP to
the top of the DCOM protocol list.
See “To change the protocol to TCP
on a Windows PC” on page 10-25.
Microsoft WinSock Proxy client DLL causes deadlock in RPCSS
Microsoft Proxy Server is a gateway to the Internet that allows multiple workstations on a single
network to share one Internet connection. RPCSS is the DCOM resolver/end-point mapper
process. MS Proxy Client can sometimes cause a deadlock in RPCSS.
Preconditions
MS Proxy Client is
installed on the client
PC.
B-16
Symptoms
TeleVantage ViewPoint hangs at the
splash screen.
Resolution
Uninstall MS Proxy Client.
INSTALLING TELEVANTAGE
APPENDIX C
APPENDIX C
CHANGING THE DOMAIN OF THE
TELEVANTAGE SERVER
This appendix describes how to change the domain of the TeleVantage Server PC for any of the
following reasons:
Q
Your network configuration has changed, and you now have a domain that you want the
TeleVantage Server to be a part of.
Q
You recently installed a Microsoft Exchange Server on your network, and you now want
to support e-mail notification in TeleVantage. To support this feature, the TeleVantage
Server must be on a domain.
Q
You changed the name or password of the domain user.
Q
You moved the TeleVantage Server to a different domain.
You must reconfigure Microsoft Windows services and Component Object Model (COM)
settings to enable TeleVantage to start on the new domain. To do so, use the TeleVantage
Service Account Utility, which automatically updates TeleVantage services and COM settings
to reflect your changes. (The TeleVantage Service Account Utility also resets COM settings
required by the Dialogic board drivers.)
If you do not have a TeleVantage Server user on the new domain, create one. See “Creating the
Windows 2000/XP/2003 user for TeleVantage” on page 8-3.
To run the TeleVantage Service Account Utility
1.
Run the file TVAccUtl.exe, which is located in the TeleVantage Server directory. The
default location for this directory is C:\Program Files\TeleVantage Server.
2.
Enter the Domain name, Account name, and Password for the domain.
3.
Click OK.
APPENDIX D
APPENDIX D
MANAGING TELEVANTAGE LICENSES
This appendix provides background information on how TeleVantage licenses work, and
addresses the following topics:
Q
How TeleVantage licenses affect system behavior. See page D-1.
Q
How to activate licenses manually. See page D-4.
Q
How to import and export license information to a license file. See pages D-7 and
D-8.
Q
How hardware locking works. See page D-9.
Q
Installing an optional dongle. See page D-11.
Q
Terms of use. See page D-10.
Q
Special licensing situations. See page D-11.
For information on how to enter licenses using the TeleVantage Administrator, and activate
them using Web-based one-click activation, see “Entering and activating your TeleVantage
licenses” on page 10-16.
How TeleVantage licenses affect system behavior _____________
It is strongly recommended that you enter all of your licenses and activate them immediately
after installing the TeleVantage Server, as described on page 10-16. Also, if you add licenses to
a previously-activated system (for example, adding 10 new Trunk licenses), you must activate
again. In either case, activating licenses immediately avoids all of the disruptions (described
below) that occur before licenses are activated.
For more about license activation, see page D-3.
Before your licenses are activated
You can use your TeleVantage system for 60 days without activating your licenses. The 60-day
grace period starts on the day you enter the licenses using the TeleVantage Administrator. You
can activate your licenses at any time during or after the 60 days.
Until you activate your licenses, starting any TeleVantage workstation application will pause at
the splash screen, to remind you of the number of days left. Users must click OK to continue
running the application.
After your licenses are activated
Once you activate your TeleVantage licenses, the 60-day grace period is eliminated and your
system is fully licensed. All of theTeleVantage workstation applications are fully enabled, and
remain so unless the hardware ID you choose stops operating or is removed.
After 60 days without activation
If you do not activate your licenses within 60 days, the following occur:
Q
All TeleVantage workstation applications—with the exception of the TeleVantage
Administrator—display a message at startup stating that “Your licenses have expired.
Ask your TeleVantage Administrator to activate system licenses to fully enable the
features of this application.” When the user clicks OK to close the message window, the
application shuts down.
Q
The TeleVantage Server continues to function normally, so users can place and take
calls, including emergency calls. However, users must use the phone to do so, as they
will no longer be able to use TeleVantage ViewPoint.
Q
The only functions available in the TeleVantage Administrator are the ability to start and
stop the TeleVantage Server, perform backups, and enter and activate licenses. You can
no longer add users, make configuration changes, and so forth.
Using trial licenses
Trial licenses allow you to evaluate TeleVantage for 60 days, starting on the day you enter the
trial licenses using the TeleVantage Administrator. Trial licenses cannot be activated.
At any time during or after the trial period, you can purchase full licenses from your
TeleVantage provider, and then enter and activate them. The trial period can only be extended
by obtaining a new set of trial licenses from your TeleVantage provider.
With trial licenses, starting any TeleVantage workstation application will pause at the splash
screen, to remind you of the number of days left. Users must click OK to continue running the
application. In addition, when users take their phone off-hook during the last 5 days of the trial
period, they hear a message warning of the upcoming end of the trial period before they get dial
tone.
After the 60-day trial license period ends, the following occur:
D-2
Q
TeleVantage will not answer any calls, no new calls can be placed, and all active
calls are dropped. The TeleVantage Server shuts down and cannot be restarted.
Q
All TeleVantage workstation applications—with the exception of the TeleVantage
Administrator—display a message at startup stating that “Your licenses have expired.
You must purchase full licenses to fully enable the features of this application.” When
the user clicks OK to close the message window, the application shuts down.
Q
The only available function in the TeleVantage Administrator is the ability to enter and
activate licenses.
INSTALLING TELEVANTAGE
Viewing the status of licenses on your system
The status of the licenses on your system is displayed in the splash screen and About dialog box
for any of the TeleVantage workstation applications. On the splash screen licenses have not yet
been activated on the system, the number of days left in the 60-day grace period is also
displayed.
About entering licenses ___________________________________
You use the TeleVantage Administrator to enter licenses into your system. There are two ways
to enter licenses:
Q
Enter licenses manually. For details, see “Entering and activating your TeleVantage
licenses” on page 10-16.
Q
Import licenses from a license file. For details, see “Importing license information”
on page D-7.
About activating licenses__________________________________
Activating your TeleVantage licenses does the following:
Q
Eliminates the 60-day grace period so your system is fully operational.
Q
Disables on-screen messages and telephone warnings that occur before licenses are
activated and when using trial licenses. See “How TeleVantage licenses affect system
behavior” on page D-1 for more information about how systems behave before and after
licenses are activated, and when using trial licenses.
Q
Locks the licenses to your TeleVantage Server hardware so they cannot be used on more
than one system at the same time.
Activation consists of the following steps:
1.
You submit your license and hardware information to Vertical using one of the
methods described in the next section.
2.
Vertical verifies the information and locks your licenses to a hardware ID on your
TeleVantage Server.
3.
Activated licenses are returned to you and applied to your TeleVantage system.
Note: When you activate licenses, the license information you submit to Vertical is verified and
saved for future troubleshooting purposes.
APPENDIX D. MANAGING TELEVANTAGE LICENSES
D-3
Once a system is activated, it stays activated until you add additional licenses (for example, you
purchased another Station license to support more users), or the hardware ID against which the
licenses are locked stops operating or is removed. At that time, the system becomes inactivated
and the 60-day grace period begins, until you activate again. You will also need to activate your
licenses again if you change the hardware ID on the TeleVantage Server. See “Terms of use” on
page D-10 for information on how hardware locking works.
How to activate your licenses
You can activate TeleVantage licenses in two ways:
Q
Automatically, using one-click activation
Q
Manually, by submitting your exported license information directly to the Vertical
activation website
If you encounter problems with any of the activation methods or have questions, contact your
TeleVantage provider.
Important: Once your licenses are activated, back up the TeleVantage database so that you
do not have to repeat the activation process if you ever need to restore the TeleVantage
database.
About one-click activation
If you have Internet access on the PC on which you are running the TeleVantage Administrator,
one-click activation is the easiest way to activate your licenses. When you use one-click
activation, all the required information is submitted and imported automatically for you. See
“Entering and activating your TeleVantage licenses” on page 10-16 for details about using
one-click activation.
Activating licenses via the web
If you do not have Internet access on your Administrator PC or have a problem with one-click
activation, you can go directly to the Vertical activation website to activate your licenses.
D-4
INSTALLING TELEVANTAGE
To activate licenses via the web
1.
Export your licensing information as described on page D-8. The license file contains
all the required information for successful activation
2.
Using your browser, go to http://activation.Vertical.com/activation
Note: If you have problems with one-click activation or activating via the web, make
sure that the TeleVantage Administrator can connect on TCP Port 80 to the host
activation.Vertical.com. Note that Port 80 is the default port for HTTP so it is the most
common port to be open, but it is possible that your network administrator has blocked
that Port and redirected HTTP traffic over a different Port.
APPENDIX D. MANAGING TELEVANTAGE LICENSES
D-5
3.
4.
Supply your licensing in either of the following ways:
Q
If your browser supports file uploads, enter the name of the license file you exported
from the Administrator, and then click Upload.
Q
If your browser does not support file uploads, paste the contents of your license file
into the web page. To do so:
Q
Open your exported license file using Windows Notepad.
Q
In Windows Notepad, select Edit > Select All, and then select Edit > Copy.
Q
Click in the text box on the Vertical activation database web page. In your
browser, select Edit > Paste.
Q
Click Activate.
A license file containing activated licenses—called activation.lic—is downloaded to
you after a brief pause. Save the file to your PC, and then import the file according to
the instructions in “Importing license information” on page D-7.
Licensing errors
If activation was not successful, one of the following error messages is displayed. If you have
further questions or need help, contact your TeleVantage provider.
Q
Q
“Unknown activation failure”. An unexpected error has occurred.
“Activation database unavailable”. The activation database is not available. Please try
activating again later.
Q
“Invalid license”. One or more licenses in an exported license file is invalid. Export
your licenses again from the TeleVantage Administrator and activate them again.
Q
“Exceeded maximum activation count”. One or more of your licenses has already
been activated using a different hardware ID. See “Terms of use” on page D-10 for more
information.
Q
“Exceeded maximum activation depth”. One or more of your licenses has already
been locked to the maximum number of hardware IDs allowed. See “Terms of use” on
page D-10 for more information.
Q
“Invalid activated license”. The license file that you are importing contains one or
more invalid licenses. Activate your licenses again.
Q
D-6
“Partner ID Verification Database is unavailable”. Vertical schedules maintenance to
the Partner ID Verification Database at times that cause the least disruption to
customers. However, sometimes unplanned downtime may occur. If you receive this
error during normal business hours (9 AM to 8 PM EST, Monday through Friday),
contact your Technical Support representative for more information on when the Partner
ID Verification Database will be available.
INSTALLING TELEVANTAGE
Importing license information
You import license information for any of the following reasons:
Q
To enter licenses, if your TeleVantage provider supplied you a license file that contains
your license serial numbers and verification keys
Q
After successfully activating your licenses manually via the activation website
Q
To use licenses exported from another PC, for example, if you have moved your
TeleVantage Server to another PC
Q
To rebuild a TeleVantage Server
During an import, only new license records are imported. Licenses that were that were imported
or activated previously are ignored.
To import licensing information
1.
In the TeleVantage Administrator, choose Tools > System Settings, and then click
Licenses in the Category pane.
2.
Click Import. The Import File From dialog box opens. Browse to the license file that
you want to import, select it, and then click Open.
APPENDIX D. MANAGING TELEVANTAGE LICENSES
D-7
3.
After the import finishes, click OK to close the message window that displays the
number of license records that were imported.
Note: Only new license records are imported. Licenses that were imported or
activated previously are ignored.
After importing new licenses, be sure to activate them using one of the methods described in
“About activating licenses” on page D-3.
Exporting license information
You export license information for any of the following reasons:
Q
To activate your licenses manually, via the activation website
Q
To create a record of all your licenses that you can view and print
Q
To use the licenses on another PC, if you need to move your TeleVantage Server to
another PC
Q
To use the licenses to rebuild a TeleVantage Server
Q
When reporting a license issue to your Technical Support representative
Exporting your TeleVantage licenses creates a license file—a text file with the
extension.LIC—that contains the following information:
Q
Serial numbers and verification keys for all the licenses in your system
Q
MAC address of the network interface cards (NICs) on the TeleVantage Server, if one
is present
Q
Serial number of the hard disk drive where the TeleVantage Server was installed
Q
Serial number of your dongle, if one is present
Q
Profile information that you entered when you activated licenses
You can view the exported license file using a text editor.
To export license information
D-8
1.
In the TeleVantage Administrator, choose Tools > System Settings, and then click
Licenses in the Category pane.
2.
Click Export.
INSTALLING TELEVANTAGE
3.
In the Registration Information dialog box, update or add customer profile
information, and then click OK.
Note: If you do not know your Partner ID (a required field), you can request it from the
place where you purchased TeleVantage.
4.
The Export Licenses To dialog box opens. Browse to the location where you want to
save the exported license file, and then click Save.
5.
Click OK to close the message window that displays the number of license records that
were exported.
More about TeleVantage licensing___________________________
How hardware locking works
Your TeleVantage licenses can only be used on one system at a time. When you activate your
TeleVantage licenses, they are locked to one of the following hardware IDs on your
TeleVantage Server PC. You can choose which hardware ID to use. There are pros and cons to
each one.
Q
Network card (NIC). Locking your licenses to the MAC address of a NIC on the
TeleVantage Server PC is probably the best choice, since NICs are cheap and easy to
move to another PC. However, if your NIC is located on the PC motherboard it cannot
be moved. In that case, lock your licenses to a dongle or hard drive, or buy another NIC
and install it in the TeleVantage Server PC.
Q
Dongle. You can lock your licenses to the serial number of a dongle, if one is installed
on the TeleVantage Server PC along with the dongle drivers. Dongles are very easy to
transport to another PC, and are a good choice if you may eventually move the
TeleVantage Server to a different PC, or you do not want to or cannot move your NIC
or hard drive. Also, since a dongle serves no other purpose, it will rarely fail. However,
dongles cost money and must be purchased separately. If you choose this option, see
“Installing a dongle” on page D-11.
Q
Hard drive. Locking your licenses to the serial number of a hard drive on the
TeleVantage Server PC is another option. However, hard drives are more difficult to
move to another PC, and may have to be replaced or upgraded.
APPENDIX D. MANAGING TELEVANTAGE LICENSES
D-9
The hardware ID is verified each time the TeleVantage Server or any of the workstation
applications start. If the hardware ID is not detected (for example, the dongle fell out or your
NIC failed), your licenses revert to an unactivated state, and the 60-day grace period starts again.
If necessary, you can relock your licenses to a different hardware ID once, as described in the
next section.
Terms of use
The following terms of use apply when you activate licenses. License locking and relocking are
automatic until these limits are reached. At that point, you must contact your TeleVantage
provider or technical support representative for assistance.
Q
You can activate a license once. Once an license is activated, it can never be activated
again.
For example, if you activate Trunk license 1 on TeleVantage Server A, and then try to
activate Trunk license 1’s serial number and verification key on a TeleVantage Server
B, the activation will fail.
Q
You can change the hardware ID for an activated license once. There may be
circumstances under which you need to use your activated TeleVantage licenses with a
different hardware ID, for example, a failure on the network card or hard disk drive used
for the initial activation, a catastrophic hardware failure such as a flood or fire, or a
complete upgrade or migration of the TeleVantage Server, where you do not want to
move any of the old hardware over to the new PC. You are allowed to relock your
licenses to a new hardware ID once without contacting your TeleVantage provider.
For example, if you activate your licenses on a TeleVantage Server with hardware ID A,
and then need to replace your network card, you can reactivate the licenses using
hardware ID B. However, if you try to reactivate the same licenses a third time using a
different hardware ID, the activation will fail. Also, after activating the licenses using
hardware ID B, the licenses on hardware ID A can no longer be upgraded to new
versions of TeleVantage, and additional licenses cannot be added to hardware ID A
unless a fresh set of licenses is entered and activated.
D-10
INSTALLING TELEVANTAGE
Installing a dongle
See page 3-10 for a list of supported dongles.
To install a dongle on the TeleVantage Server
1.
Run the Sentinal System Driver installation program from the following location on
the Master CD:
\dongle\setup.exe
Follow the on-screen instructions.
2.
In the Setup Type dialog box, select Complete, and then click Next.
3.
Plug the dongle into the appropriate port.
4.
Restart the TeleVantage Server.
Now when you run the TeleVantage Administrator, the dongle will appear in the Lock your
licenses to this hardware key drop-down list in the Activation Information dialog box.
Special licensing situations
This section describes situations that may require you to relock your TeleVantage licenses to a
different hardware ID, as described in “Terms of use” on page D-10.
Once you have installed the TeleVantage Server on a PC with the new hardware, you must
activate the licenses again using the one of the methods described on page page D-4.
Moving licenses to another TeleVantage Server
If you want to use your TeleVantage licenses on a different Server, be aware that once activated,
they will no longer be available on the original Server.
Moving the TeleVantage Server to another PC
If you are moving the TeleVantage Server to another PC, you can avoid having to activate the
licenses again if you move the network interface card (NIC) as well. If you have more than one
NIC on the TeleVantage Server, you only have to move the one to which the TeleVantage
licenses are locked. If you have no NIC, move your hard drive where the TeleVantage Server
was installed.
Moving the hardware is optional. If you cannot move the NIC or hard drive—for example, the
NIC is attached to the PC’s motherboard, or the hard drive failed or is too small—simply
activate the licenses again on the new PC. See “Terms of use” on page D-10 for information
about limits on activating TeleVantage licenses again on new hardware.
APPENDIX D. MANAGING TELEVANTAGE LICENSES
D-11
APPENDIX E
APPENDIX E
PERFORMING UNATTENDED
WORKSTATION INSTALLATIONS
You can install the TeleVantage workstation applications unattended (silently), so that your
organization can perform automatic software updates or use a network maintenance system that
performs remote installations. When running Workstation Setup unattended, you can perform
either of the following types of installation:
Q
Typical installation. In a typical installation, the following occur. You cannot change
any of these options.
Q
When installing TeleVantage for the first time on the TeleVantage Server, only the
Administrator is installed. On all other PCs, when installing TeleVantage for the
first time, only TeleVantage ViewPoint is installed.
When upgrading from a previous version of TeleVantage, Workstation Setup
detects the workstation applications that are installed, and upgrades those
applications to the current version.
Q
Q
The workstation applications are installed in the default location.
Custom installation. In a custom installation, you can specify which workstation
applications to install, change the installation drive or folder, uninstall workstation
applications, and specify other options.
Note: Because the PC where the workstation applications are installed must be restarted to
complete the installation, you should perform unattended installations when users will not be
interrupted while they are working.
Performing a typical unattended installation __________________
To perform a typical unattended workstation application installation, run the following
command on the PC where the workstation applications will be installed:
\\<TeleVantage Servername>\Netsetup\setup.exe /s /v"/qn /l*v
%TEMP%\wssetup.log"
Performing a custom unattended installation __________________
To perform a custom unattended workstation application installation, run the following
command on the PC where the workstation applications will be installed, including any of the
parameters described in the table on page E-3.
\\<TeleVantage Servername>\Netsetup\setup.exe /s /v"/qn CUSTOM_INSTALL=1
/l*v %TEMP%\wssetup.log"
This example only shows the parameters required for any custom unattended installation. For
other examples of custom installation commands, see the next section.
Note that any string value that contains a space must be delimited with the characters /" before
and after the string value, as in the following example:
TVCMAFOLDER=/"C:\Program Files\CMA/"
Custom unattended installation examples
The following examples demonstrate different unattended installations. See “Workstation Setup
command parameters” on page E-3 for details on the command parameters you can sue.
This command installs only the TeleVantage Administrator in the default location:
setup.exe /s /v"/qn CUSTOM_INSTALL=1 ADDLOCAL=Admin"
This command installs the TeleVantage Administrator and ViewPoint in the default location:
setup.exe /s /v"/qn CUSTOM_INSTALL=1 ADDLOCAL=Admin,Client"
This command installs all of the workstation applications in the default location:
setup.exe /s /v"/qn CUSTOM_INSTALL=1 ADDLOCAL=ALL"
This command does the following:
Q
Installs the single-line TAPI Service Provider in the default location.
Q
Installs the Contact Manager Assistant in the specified location.
Q
Configures the single-line TAPI Service Provider.
Q
Launches the Contact Manager Assistant when the installation completes, if a restart is
not required.
setup.exe /s /v"/qn CUSTOM_INSTALL=1 ADDLOCAL=TSP,CMA TVSERVER=TeleVantage
TVSTATION=1 TVUSER=Operator TVPASSWORD=0 TVTSPAPPHANGUP=1 TVTSPTRACE=1
TVCMAFOLDER=/"C:\Program Files\CMA/" TVLAUNCHCMA=1 /l*v
%TEMP%\wssetup.log"
When run on a Terminal Server PC, this command installs all of the workstation applications in
the default location:
setup.exe /s /v"/qn CUSTOM_INSTALL=1 ADDLOCAL=ALL TERMINALSVRMODE=1"
E-2
INSTALLING TELEVANTAGE
Workstation Setup command parameters
The following parameters can be specified in any order. Separate parameters with spaces.
Name
Value
Description
CUSTOM_INSTALL
Integer
Installation type:
0 = (Default) Typical installation.
1 = Custom installation.
ADDLOCAL
Admin
Client
CMA
TSP
ALL
Workstation application to install:
To install more than one application, separate each
one with a comma (,), for example:
ADD_LOCAL=Admin,Client
To install all of the workstation applications, specify
ALL, for example:
ADDLOCAL=ALL
REMOVE
Admin
Client
CMA
TSP
ALL
Workstation application to remove:
To remove more than one application, separate
each one with a comma (,), for example:
REMOVE=Admin,Client
To remove all of the workstation applications,
specify ALL, for example:
REMOVE=ALL
TVSERVER
String
Name of the TeleVantage Server PC:
TVSERVER=TeleVantage
TVSTATION
String
Station ID of the phone that will be used by the
person at this PC:
TVSTATION=186
If you do not know the station ID, pick up the phone
and dial *0.
If there is not a TeleVantage phone near this PC,
enter a station ID of 0.
TVSTATION=0
APPENDIX E. PERFORMING UNATTENDED WORKSTATION INSTALLATIONS
E-3
Name
SUPPRESS_MSGS
Value
Integer
Description
0 = (Default) Workstation Setup displays message
boxes on the PC where the applications are
installed. Workstation Setup stops processing and
waits until someone responds to each message
box.
1 = Suppress display of message boxes. The
messages are still written to the Workstation Setup
Log (see “Performing a typical unattended
installation” on page E-1.)
Use the following 4 parameters to specify the complete path to the location where a
workstation application will be installed, for example:
TVCLIENTFOLDER=/"C:\Program Files\TV Client/"
If not specified, the application will be installed in the default location.
TVCLIENTFOLDER
String
Location where ViewPoint will be installed.
TVADMINFOLDER
String
Location where the Administrator will be installed.
TVTSPFOLDER
String
Location where the single-line TAPI Service
Provider will be installed.
TVCMAFOLDER
String
Location where the Contact Manager Assistant will
be installed.
Optionally, use the following 4 parameters if you are installing the single-line TAPI Service
Provider (ADD_LOCAL=TSP or ADD_LOCAL=ALL.) If you do not provide this information during
the unattended install, you must run the TAPI Configuration Wizard later to configure TAPI SP
for the user at this PC. See “Configuring the TeleVantage TAPI Service Provider” on page 11-8
for more information
TVUSER
String
TAPI SP only. User name of the person assigned
to the station ID in TVSTATION:
TVUSER=SRyan
Note: TVUSER must be the user assigned to the
station ID in TVSTATION, else this parameter is
ignored.
TVPASSWORD
String
TAPI SP only. User’s TeleVantage password:
PASSWORD=17530
E-4
INSTALLING TELEVANTAGE
Name
TVTSPAPPHANGUP
Value
Integer
Description
TAPI SP only. Specifies whether applications using
TAPI SP can hang up calls.
0 = (Default) Applications using the TAPI SP cannot
hang up calls.
1 = Applications using the TAPI SP can hang up
calls.
Important: Some contact manager programs
experience problems when
TVTSPAPPHANGUP=1. For details, run the TAPI
SP Configuration Wizard after installing TAPI SP,
and read the Help for the second Wizard screen. Do
set TVTSPAPPHANGUP=1 for users who use
Microsoft Outlook as their contact manager.
TVTSPTRACE
Integer
TAPI SP only. Specifies whether TAPI SP writes
debugging information to disk when placing calls.
This information is useful when communicating with
technical support.
0 = (Default) TAPI SP does not create a trace file.
1 = TAPI SP creates a trace file.
Note: The trace file is located at the following
location:
C:\Program Files\TeleVantage
Client\Logs\Tvtsp.txt
Set the following parameter to 1 when installing workstation applications on a server PC
running Windows Terminal Server or Citrix MetaFrame so that users do not have to re-enter
logon information when they access the applications.
TERMINALSVRMODE
Integer
1 = Individual user logon settings are preserved for
users who access workstation applications via
Terminal Services.
0 = (Default) Mode used for non-Terminal Services
installations.
Use the following 3 parameters to launch a workstation application after the installation
completes.
Note: Each parameter takes effect only if the application was installed successfully and no
restart is necessary. These parameters are not affected by the REBOOT parameter setting.
TVLAUNCHCLIENT
Integer
0 = (Default) Do not start TeleVantage ViewPoint
after the installation completes.
1 = Start ViewPoint after the installation completes.
APPENDIX E. PERFORMING UNATTENDED WORKSTATION INSTALLATIONS
E-5
Name
Value
Description
TVLAUNCHADMIN
Integer
0 =(Default) Do not start the Administrator after the
installation completes.
1 = Start the Administrator after the installation
completes.
TVLAUNCHCMA
Integer
0 = (Default) Do not start the Contact Manager
Assistant after the installation completes.
1 = Start the Contact Manager Assistant after the
installation completes.
REBOOT
String
Force = (Default) Automatically restarts the PC
where the workstation applications are installed
after the installation completes.
ReallySuppress = Do not restart the PC after
installation completes. If you specify
REBOOT=ReallySuppress, the PC must be
restarted later.
Verifying that an unattended installation was successful ________
You can determine if a unattended installation was successful by viewing the Workstation Setup
Log. This file is created in the \Temp directory on the PC where Workstation Setup was run.
When an installation is successful, an entry appears near the end of the file:
MSI (c) (80:34): Product: TeleVantage workstation applications -- Installation
operation completed successfully.
Note: You can also examine the Windows Event Log on the PC to see if the installation
completed successfully.
E-6
INSTALLING TELEVANTAGE
APPENDIX F
APPENDIX F
CONFIGURING TELEVANTAGE FOR
THE WINDOWS FIREWALL
Important: The information in this appendix applies only if your TeleVantage Server or any
workstation PCs are running Windows XP SP2 or Windows Server 2003 SP1.
This appendix includes the following topics:
Q
“Adjusting Windows Firewall exceptions.” See page F-2.
Q
“Windows Firewall exceptions added for TeleVantage.” See page F-4.
Q
“Adjusting Windows Firewall exceptions for TeleVantage Web Services.” See page
F-5.
Q
“Upgrading Windows after TeleVantage is installed.” See page F-6.
Overview _______________________________________________
Once the TeleVantage Server is installed and the TeleVantage workstation applications are
installed or upgraded, the firewall settings on all Windows XP SP2/Windows Server 2003 SP1
PCs running TeleVantage applications are automatically updated so that TeleVantage can
operate properly on most networks. These changes are made because TeleVantage will not work
properly with the default Windows Firewall settings for these versions of Windows.
Without these modifications to the default Windows Firewall settings, TeleVantage applications
cannot communicate over a network. If necessary, you can tailor these modifications to match
your unique network configuration and security requirements, as described later in this
Appendix.
About the Windows Firewall
The Windows Firewall is designed to protect Windows from unwanted network access,
including potentially hostile viruses. Left unchanged, these security measures also prevent
TeleVantage workstation applications from receiving requests from the TeleVantage Server (for
example, a request to display a new call in the Call Monitor.) Similarly, TeleVantage Servers
will not be able to accept requests from the TeleVantage workstation applications (for example,
to make a call.)
To enable necessary communication between TeleVantage components, TeleVantage adds
several entries to the Firewall Exceptions List on all TeleVantage PCs running these versions of
Windows. (The TeleVantage Server PC is updated at installation; each TeleVantage workstation
PC is updated as soon as a TeleVantage application on it runs for the first time after installation
or upgrade.)
For a complete list of the Windows Firewall exceptions added by TeleVantage and their
associated default values, see “Windows Firewall exceptions added for TeleVantage” on
page F-4.
You must change the default firewall security settings using the TeleVantage Administrator
according to the instructions in “Adjusting Windows Firewall exceptions” on page F-2 if either
of the following are true:
Q
Your TeleVantage Server and workstation PCs are not all located on one subnet.
Q
Your TeleVantage Server’s IP address can change because you use DHCP to obtain an
IP address automatically
If you do not make these changes, TeleVantage workstation applications such as ViewPoint may
not operate properly (for example, calls will not appear in the Call Monitor.)
Adjusting Windows Firewall exceptions
Perform the following procedure on any TeleVantage Server that is running Windows XP
SP2/Windows Server 2003 SP1. Your changes will be picked up by workstation PCs the next
time that they connect to the Server.
1.
Start the TeleVantage Administrator and choose Tools > System Settings.
2.
Select the Security \ Server Firewall tab.
The settings on the Security \ Server Firewall tab determine which IP addresses will
be allowed to communicate with the TeleVantage Server PC, including the IP
addresses of any PCs that will be running TeleVantage workstation applications such
as ViewPoint.
3.
Choose one of the following options to define the scope for the Windows Firewall
exceptions required by TeleVantage:
Q
Any computer (including those on the internet). With this option, the
TeleVantage Server PC accepts network traffic from all IP addresses. TeleVantage
connections will always work with this setting.
Important: This setting leaves your Windows PC the most vulnerable to
potentially harmful connections.
Q
My network (subnet) only. With this option (the default setting), the TeleVantage
Server PC accepts traffic only from other TeleVantage PCs within your subnet.
The range of your subnet is defined by your subnet mask, which is usually
255.255.255.0. For example, with an IP address of 192.168.114.20 and subnet mask
255.255.255.0, the PC would accept communication from IP addresses
192.168.114.1 through 192.168.114.255.
F-2
INSTALLING TELEVANTAGE
Note: Vertical recommends this setting as the easiest and most secure setting
that guarantees communication for the TeleVantage system on a typical LAN where
all TeleVantage PCs are on the same subnet. If all of your TeleVantage PCs are not
on the same subnet, you cannot choose this option, and must choose either Any
computer or Custom List.
Q
Custom list. With this option, you list the IP addresses, subnets, or both
representing the PCs whose network traffic is accepted by this Server PC.
You can enter an individual IP address, or a range of IP addresses using an IP
address followed by a forward slash (/) and a subnet mask. Separate each entry in
the list with a comma and no space.
For example, entering 192.168.114.201/255.255.255.0 specifies the range
192.168.114.0 through 192.168.114.255. (Note that choosing this option and
entering your IP address followed by your subnet mask is the same as choosing the
option My network (subnet) only.)
Q
None (firewall must be configured manually). This option makes no
modifications to the Server PC's Windows Firewall.
Important: The TeleVantage system will not work properly if you choose this
option. However, you can manually configure the firewall exceptions added for
TeleVantage (listed on page F-4) through Windows to permit TeleVantage system
communications. To configure firewall exceptions manually, choose Start > Settings
> Control Panel > Windows Firewall. Consult your Windows documentation for
further instructions.
Go to step 5.
4.
Select the Security \ Workstation Firewall tab, and then click Custom list.
The settings on this tab determine which IP addresses will be allowed to send network
requests to the TeleVantage workstation PCs. You only need to specify the IP address
of your TeleVantage Server PC, which you can do in several ways.
Q
If your TeleVantage Server has a fixed IP address, click Server IP Address to
automatically enter the IP address(es) of your TeleVantage Server PC.
Q
If you have multiple TeleVantage Servers, enter each Server’s IP address, so that
any TeleVantage workstation can connect to any TeleVantage Server. Separate
each IP address with a comma and no space.
Q
If your TeleVantage Server uses DHCP to obtain an IP address dynamically, be sure
to specify the complete list of IP addresses or subnets that could be dynamically
assigned to your TeleVantage Server PC.
APPENDIX F. CONFIGURING TELEVANTAGE FOR THE WINDOWS FIREWALL
F-3
Note the following:
Q
If your Server’s IP address ever changes you must update this setting in order
for the TeleVantage workstation applications to connect.
If you are using TeleVantage SoftPhone, the Custom List must include the IP
addresses of both the TeleVantage Server PC and your Internet telephony
board, even if you are using a host-based stack. Separate each IP address with a
comma and no space, for example, 127.55.55.55,127.55.55.56.
5.
Click OK to close the System Settings dialog box.
When any TeleVantage workstation application starts, it reads the Security \ Workstation
Firewall settings you set above. Then it modifies the PC’s Windows Firewall Exception List to
match those settings. For example, if you entered 192.168.114.20 in the Custom List (the fixed
IP address of your TeleVantage Server), then as soon as ViewPoint is run on any PC, that PC's
Windows Firewall is opened to DCOM traffic from 192.168.114.20 so it can receive events
from the TeleVantage Server.
Note: TeleVantage workstation PCs can always access the latest Security \ Workstation
Firewall settings as long as the Server’s firewall is not blocking the IP address of the TeleVantage
workstation PC.
If you make changes to the Administrator’s Security \ Workstation Firewall tab while one or
more TeleVantage workstation applications are connected, they will not get the new settings
until they restart.You can force a restart of all workstations applications connected to your
TeleVantage Server by restarting the TeleVantage Server via Tools > Shutdown Server.
Note: PCs running the TeleVantage TAPI Service Provider must be restarted to apply the new
firewall settings.
Windows Firewall exceptions added for TeleVantage ___________
The following Windows Firewall exceptions are added to any Windows XP SP2/Windows
Server 2003 SP1 TeleVantage Server PCs and TeleVantage workstation PCs using the scoping
you specified in the TeleVantage Administrator System Settings Security \ Server Firewall and
Security \ Workstation Firewall tabs, according to the instructions in the previous section. All
of these exceptions are required to run TeleVantage across a network.
TeleVantage Server firewall exceptions
The following firewall exceptions are added to TeleVantage Server PCs:
F-4
Q
DCOM Resolver: Port TCP135.
Q
MSSQLSERVER: TeleVantage dynamically determines the actual EXE name(s) based
on the installed instances of MSDE or SQL Server.
Q
TeleVantage Device Monitor: TVDevMon.exe.
INSTALLING TELEVANTAGE
Q
TeleVantage Server: TVServer.exe.
Q
TeleVantage Control: TVCntrl.exe.
Q
File and Printer Sharing: A standard, built-in firewall exception that TeleVantage
enables. The ports include TCP139, TCP445, UDP137, and UDP138.
Workstation PC firewall exceptions
The following firewall exceptions are added to workstation PCs:
Q
DCOM Resolver: Port TCP135.
Q
TeleVantage ViewPoint: TVClient.exe.
Q
TeleVantage Administrator: TVAdmin.exe.
Q
TeleVantage Advanced Settings Editor: TVSettings.exe.
Q
TeleVantage Reporter: TVReporter.exe.
Q
TeleVantage Web Services: TVWeb.exe.
Q
TeleVantage Voicemail Archive Browser: TVRecordingBrowser.exe.
Q
TeleVantage Enterprise Manager: TVEM.exe.
Q
TeleVantage SecBridge: TVSecBrg.exe.
Adjusting Windows Firewall exceptions for TeleVantage Web
Services ________________________________________________
Note: The information in this section applies only to TeleVantage Servers and workstation PCs
running TeleVantage Web Services.
Required steps
The following steps are required on all TeleVantage Server PCs and workstation PCs running
TeleVantage Web Services in order to open a Windows Firewall exception for port 80, the
default port used for HTTP traffic. (This required port exception is not added automatically.)
1.
From the Start menu, select Control Panel > Windows Firewall. The Windows
Firewall dialog box opens.
2.
On the Exceptions tab, click Add Port.
3.
In the Add a Port dialog box, enter the following:
Name = Web Server.
Port number = 80.
Verify that the TCP checkbox. is selected.
4.
Click OK to save your changes.
APPENDIX F. CONFIGURING TELEVANTAGE FOR THE WINDOWS FIREWALL
F-5
Upgrading Windows after TeleVantage is installed______________
Important: After performing either of the procedures described in this section, review the rest
of the topics in this Appendix to secure your TeleVantage Server or workstation PC.
Upgrading the TeleVantage Server to Windows XP SP2/Windows
Server 2003 SP1
Perform the steps in this section if you installed TeleVantage on a Server running another
version of Windows, and have subsequently upgraded to Windows XP SP2/Windows Server
2003 SP1on the Server.
In either of these cases, do the following:
1.
Run the TeleVantage Service Account Utility as described in Appendix F.
2.
Restart the TeleVantage Server if you are prompted to do so.
Upgrading a workstation PC to Windows XP SP2/Windows Server
2003 SP1
Perform the steps in this section if you installed any of the TeleVantage workstation applications
on a PC running Windows 98 or ME and have subsequently upgraded to Windows XP
SP2/Windows Server 2003 SP1 on that PC. Note that these steps are not required if you
upgraded to Windows XP SP2 from Windows NT, Windows 2000, or Windows XP (base
release or SP1.)
To repair the workstation applications
F-6
1.
From the Start menu, choose Settings > Control Panel > Add/Remove Programs.
2.
Click TeleVantage workstation applications.
3.
Click Change. When the TeleVantage Workstation Setup starts, follow the on-screen
instructions.
4.
In the Program Maintenance screen, click Repair, and then click Next to continue.
5.
In the Ready to Repair screen, click Install.
INSTALLING TELEVANTAGE
APPENDIX G
APPENDIX G
EXTENDING TELEVANTAGE
Versatility is what makes TeleVantage so powerful, and that versatility is enhanced even further
by the ability to integrate other applications into the TeleVantage Server. You can extend a
TeleVantage system in the following ways:
Q
In-band signaling applications. Software designed to interact with PBX or Centrex
systems can be configured to work with TeleVantage, providing custom IVR or
call-handling functions (fax back, touch tone data retrieval, and so on).
Q
TAPI applications. TAPI-compatible phone dialers and contact managers such as Act!,
GoldMine, FrontOffice 2000, and Microsoft Outlook can be integrated into TeleVantage
through the TeleVantage single-line or Multi-line TAPI Service Provider.
Q
Third-party telephony devices. Devices such as fax servers and voice mail systems can
be integrated into the TeleVantage Server.
Q
Custom software. If you have a requirement that cannot be met by one of the many
off-the-shelf applications available from third-party vendors, programmers can use the
TeleVantage Software Development Kit (SDK) to integrate custom-built software with
your TeleVantage system.
See the following topics:
Q
Extending TeleVantage with off-the-shelf applications. See page G-2.
Q
Extending TeleVantage with third-party devices. See G-3.
Q
Using an overhead loudspeaker with TeleVantage. See G-7.
For an overview of what programmers can accomplish using the TeleVantage SDK, see:
Q
In-band signaling applications. See page G-2.
Q
TAPI applications. See page G-2.
Q
Installing the TeleVantage SDK. See page G-8.
Q
The TeleVantage SDK Application Programming Interfaces. See page G-8.
Q
The Client API. See page G-9.
Q
The Add-in API. See page G-9.
Q
The IVR Plug-in API. See page G-9.
Q
The Device Status API. See page G-12.
Extending TeleVantage with off-the-shelf applications___________
Many off-the-shelf applications produced by third-party vendors can be integrated into the
TeleVantage Server without any custom programming. These applications are integrated in one
of the following ways:
Q
In-band signaling applications can be configured to work with most Centrex and PBX
systems, including TeleVantage.
Q
TAPI applications can use the TeleVantage single-line or Multi-line TAPI Service
Provider to communicate with the Server.
In-band signaling applications
A human caller can send commands to any PBX, including TeleVantage, by generating a flash
hook command by quickly pressing and releasing the hang-up button (or hook) on a telephone
handset cradle. The flash hook command signals the PBX that special instructions will follow,
such as placing a call on hold or transferring a call to another extension. For example, a
TeleVantage user can generate a flash and then press 1 to transfer a call.
This method of sending instructions is called in-band signaling. Many telephony applications
use this same method, communicating with PBX or Centrex systems through flash hook
commands.
Most PBXs use their own proprietary sets of flash hook commands. An application that uses
in-band signaling will usually provide you with a way to configure it for a specific set of flash
hook commands, such as those used by TeleVantage. For example, &3 (a flash followed by a 3)
is the flash hook command that TeleVantage uses to disconnect from a call, so you can configure
the in-band signaling application to use &3 as its disconnect command. For a complete list of
the TeleVantage telephone commands, see the “Telephone Commands Quick Reference” in
Using TeleVantage.
TAPI applications
TAPI applications can communicate with the Server through the TeleVantage TAPI Service
Provider (TSP). The TSP can be installed on the TeleVantage Server and on any workstation
networked to the Server. When it is installed, users can use TAPI-enabled phone dialers, contact
managers, and similar applications. No modem is required, and ViewPoint does not need to be
installed on the user’s computer.
The TSP runs in the background, establishing a connection between the TAPI application and
the TeleVantage Server. Whenever a call is transferred to the station being monitored by the
TSP, any TAPI-compatible application running on the same computer is notified of the call. The
application can then perform functions such as getting Caller ID or DID, transferring the call,
putting the call on hold, parking the call, or hanging up. TAPI applications can also place new
calls.
G-2
INSTALLING TELEVANTAGE
While any TAPI-compatible application should work with TeleVantage, the contact managers
listed in Installing TeleVantage are actively supported.
For detailed instructions on how to install the TSP and use it with the supported contact
managers, see Installing TeleVantage. If you are writing a TAPI-compatible application, see the
online TeleVantage Developer’s Guide (TVSDK.PDF) for a description of the TAPI features that
the TSP supports. (The developer’s guide is installed with the SDK and is in the \manuals
directory of the Master CD).
Automatic reconnect to Server
The TSP validates the connection to the Server every 10 minutes by default. If the connection
is lost, the TSP tries to reconnect. You can specify the validation interval in minutes by editing
the following registry key:
HKLM\Software\Vertical\Client\TSP\ServerPingInterval
See “ServerPingInterval” on page J-13.
Extending TeleVantage with third-party devices _______________
Many telephony devices produced by third-party vendors, such as fax servers or voice mail
systems, can be integrated into the TeleVantage Server. This option is only available for devices
connected to analog station boards or SIP FXS gateways.
To use a third-party device with TeleVantage, attach the device to a TeleVantage station and
configure it using the tabs in the User dialog box.
When you integrate a third-party device, you may need to indicate how to send DID, or
extension numbers, to the station as touch tone digits (DTMF). Consult the documentation for
your third-party device for more information about the kind of DTMF information that is
required.
Note: Some third-party devices require a delay before DTMF digits are sent to the device. To
specify this delay, change the SendDigitsToStationDelay registry setting (see “Modifying other
supported TeleVantage settings” on page J-36).
To send DID information to a device as DTMF, on the Phone tab select one of the following
methods from the Send digits to station drop-down list:
Q
Do not send digits. If you are not integrating a third-party device, accept the default
method. No DTMF digits are sent.
Q
Send DID from PSTN. Send the DID number as DTMF digits from the trunk on which
the call arrived.
APPENDIX G. EXTENDING TELEVANTAGE
G-3
Q
Send user’s extension number. Send the extension number of the calling user as
DTMF digits.
Q
Send call type and extension number. Send the call type and extension number as
DTMF digits. This method is described in detail in the next section.
Note: If you choose any setting except the default Do not send digits, all call screening options
are disabled for the station.
Sending call type and extension number to a device
The Send call type and extension number method sends DTMF digits that represent the call
type and one or more extension numbers to help the third-party device determine where the call
came from. Using this information, the third-party device can customize call handling for
individual calls.
For example, a third-party voicemail system can use the extension number to preselect a specific
user’s voice mailbox. Using the call type, the system can then customize how the call is handled.
When users dial in from their desks, they are connected directly to their voice mailboxes and
offered a “retrieve voicemail” menu. For external callers, the voicemail system offers a “leave
message” menu with the user’s voice mailbox already selected.
G-4
INSTALLING TELEVANTAGE
The possible combinations of DTMF digits that are sent to the device are described in the
following table.
Type of call
Direct call to this extension from an external caller.
DTMF digits sent
“1”
Direct call to this extension from an internal caller at
another TeleVantage source extension.
“2{source extension}#”
Call from an external caller to a different target extension.
"5{target extension}#"
The call was sent to this extension via a routing list action
because the target extension was busy or the call was not
answered.
Call from an internal caller at another source extension to
a different target extension.
"6{target extension}#
{source extension}#"
The call was sent to this extension via a routing list action
because the target extension was busy or the call was not
answered.
The following example illustrates one way that TeleVantage can be configured to send DID
digits to stations:
Q
Frank Smith is assigned extension 101. Miri Anatolia is assigned extension 102.
Q
A third-party voice mail system is attached to several TeleVantage stations. The system
administrator creates a user for each device and assigns each one an extension, as in
“voice mail Port 1” at extension 301, “voice mail Port 2” at extension 302, and so forth.
When setting the Send digits to station option for each user, the system administrator
selected Send call type and extension number. Finally, each voice mail port is added
to a workgroup called voice mail, at extension 300 (for more on setting up workgroups,
see “Creating a Workgroup” in Chapter 8 in Administering TeleVantage.
Q
Both Frank and Miri have a routing list that rings them first at their own extensions, and
then sends calls to the workgroup voicemail at extension 300. Any calls for Frank and
Miri that they do not pick up go to the first available voicemail port in the workgroup.
Note: In the previous example it is highly recommended that you use more than one voice mail
device. A single device at extension 300, for example, can only handle one call at a time—either
a user checking for voice messages or an external caller leaving a message. If a second call
comes in to the device while it is busy, the second call goes to the final action of extension 300’s
routing list, which may be TeleVantage’s voice mail, or any other final action that you configured.
APPENDIX G. EXTENDING TELEVANTAGE
G-5
Using the previous example again for illustration, the possible DTMF combinations that may be
sent to one of the voicemail systems are described in the next table. In all cases, the call is
handled by the first available voicemail device in the workgroup voicemail.
Type of call
DTMF digits sent
An external caller calls voicemail directly at extension 300 in
order to leave a message for a user.
“1”
For a direct external call, the DTMF digits do not contain any
information about the extension that was dialed. The caller
follows the prompts offered by the device to identify the user
who will receive the message.
Frank Smith at extension 101 calls voicemail directly at
extension 300 in order to retrieve his voice messages.
“2101#”
For a direct internal call, the DTMF digits identify Frank’s
extension. The voicemail device can send Frank directly to his
own voice mailbox.
An external caller calls Miri Anatolia at extension 102. If there is
no answer or a busy signal at extension 102, the call rings
voicemail at extension 300.
"5102#"
For an external call re-routed by a routing list, the DTMF digits
contain Miri’s extension. The voicemail device can send the
caller directly to Miri’s voice mailbox to leave a message for
her.
Frank Smith at extension 101 calls Miri Anatolia at extension
102. If there is no answer or a busy signal at extension 102, the
call rings voicemail at extension 300.
"6102#101#"
For an internal call re-routed by a routing list, the DTMF digits
contain Frank’s and Miri’s extensions. The voicemail device
can send Frank directly to Miri’s voice mailbox where he can
leave her a message, and he may be identified as the sender.
G-6
INSTALLING TELEVANTAGE
Using an overhead loudspeaker with TeleVantage _____________
TeleVantage includes a special workaround for sites that place brief paging calls to an overhead
loudspeaker system, for example, “Photo department, call on line 2.” Two problems with paging
calls are commonly encountered:
Q
When overhead paging calls are very short, they can appear in the Call Log as
Abandoned even if completed successfully. This is because the Dialogic board does not
have time to perform its automatic Call Progress Analysis (CPA) to determine the result
of the call.
Q
If a user puts an overhead paging call on hold, TeleVantage hold music is played over
the loudspeaker.
To avoid these problems, create a Centrex/PBX Extension dialing service to handle all calls to
the overhead paging system. When defining the dialing service, check Prevent hold, transfer,
and other call control.
Checking the field has the following effects:
Q
It disables the Dialogic board’s CPA. All calls on the dialing service return a result of
“Connected.” Note that this is true even if they were placed to a number that was busy
or did never answered. This allows overhead paging systems to work better with the Call
Log and reports.
Q
Users cannot perform any call handling command on the calls, such as Hold or Transfer.
The telephone commands and ViewPoint’s Call Monitor commands are both disabled
for the duration of the call. This prevents any unexpected audio from being broadcast
over the loudspeaker system.
For full instructions on creating a Centrex/PBX dialing service, see “Adding a dialing service”
in Chapter 9 in Administering TeleVantage.
The TeleVantage SDK _____________________________________
The TeleVantage SDK is a powerful set of software libraries that programmers can use to
achieve the tightest possible integration between their applications and the TeleVantage Server.
A programmer can use the SDK to integrate custom voice and call processing applications such
as:
Q
Order processing systems with interactive voice response (IVR)
Q
Customer identification and screen pop applications
Q
Smart operators that transfer calls based on Caller ID or other information
APPENDIX G. EXTENDING TELEVANTAGE
G-7
Q
Automatic customer support call handling
Q
Custom applications that monitor the status of TeleVantage devices
Q
Custom menus and functions to extend ViewPoint
For complete information about the SDK, see TeleVantage Developer’s Guide.
Applications that use the TeleVantage SDK can be created by programmers who have
experience with a Windows programming platform such as C#, VB .NET, Visual Basic 6,
Visual C++, or Delphi. Vertical maintains a list of consultants qualified to develop applications
using the TeleVantage SDK.
Most custom applications can use TAPI or in-band signaling (as described in “In-band signaling
applications” on page G-2) to perform Caller ID and call control. Applications that need to
perform interactive voice-processing tasks (collecting and interpreting touch tone digits, playing
and recording voice files, generating spoken messages, and so on) require that you use the IVR
Plug-in API (see “Developing IVR Plug-ins” on page G-10 for details).
Installing the TeleVantage SDK
The TeleVantage SDK consists of sample programs and Help files as well as the software
libraries that programmers will use to integrate their applications with TeleVantage. You can
print TeleVantage Developer’s Guide—TVSDK.PDF—and provide it to programmers. The
manual is also found in the \manuals directory of the Master CD.
To install the TeleVantage SDK
1.
Insert the Master CD. If the Master Setup does not start automatically, run
autorun.exe from the root directory on the Master CD.
2.
Click TeleVantage SDK.
3.
Follow the on-screen instructions.
The TeleVantage SDK Application Programming Interfaces
The TeleVantage SDK consists of three APIs (Application Programming Interfaces) that can be
incorporated into custom applications. Each API is a software library that the application can
use to access specific functions and data within TeleVantage. The following APIs are provided:
Q
The Client API. Using the Client API, applications can perform any operation that
ViewPoint can perform, including all call handling and interacting with the TeleVantage
Server database.
Q
The Add-In API. Using the Add-in API, you can develop custom applications that extend
TeleVantage ViewPoint with enhanced functionality.
G-8
INSTALLING TELEVANTAGE
Q
The IVR Plug-in API. Using the IVR Plug-in API, programmers can tightly integrate a
custom application with the TeleVantage Server to perform complex call-handling or
voice-processing tasks (order entry, customer service, e-mail readers, and so on). The
application (called an IVR Plug-in) is a virtual extension on the TeleVantage Server. The
IVR Plug-in can be dialed from a phone or auto attendant, called from an internet trunk,
or have calls forwarded or transferred to it, just like a regular extension assigned to a
user.
Q
The Device Status API. Using the Device Status API, an application can monitor the
status of all devices on the TeleVantage Server. For example, it can monitor current
users on the system, obtain the name of a user currently logged on at a station, or identify
the trunk to which a station is connected. The application can generate custom reports
concerning the calls handled by TeleVantage.
The remainder of this chapter provides an overview of each API. For more detailed information,
see TeleVantage Developer’s Guide (tvsdk.pdf), which is available in the Manuals\ directory on
the Master CD.
The Client API
The Client API is an extensive collection of the COM objects used to write TeleVantage
ViewPoint. It contains objects that are typically used to interact with the TeleVantage Server
database and the call-processing engine. Using the objects available in the Client API, your
applications can use any function found in ViewPoint.
The Add-in API
The Add-in API lets you develop custom applications that extend TeleVantage ViewPoint with
enhanced functionality. Once you load these applications into ViewPoint, they can provide new
menus, tool bar options, and automatic processing of calls and other data. The Add-in API also
exposes a reference to the Client API, so an Add-in can easily manage and change data for the
currently logged-in ViewPoint user.
The IVR Plug-in API
The IVR Plug-in API enables a custom application to function as a virtual extension on the
TeleVantage Server. The application (called an IVR Plug-in) can act just as if it were using a
regular extension assigned to a user. IVR Plug-ins run on the TeleVantage Server and are
assigned an extension in the TeleVantage Administrator's IVR Plug-in view. Programmers use
the IVR Plug-in API to get notification of new calls from the TeleVantage Server, retrieve Caller
ID, DID, or other call data, and then optionally perform any voice processing (get digits, play
or record greetings, perform database lookups, and so forth) by using the Plug-in API’s built-in
voice processing commands to play files, get digits, play tones, etc. After an IVR Plug-in
finishes processing the call, it can hang up or transfer the call back to any TeleVantage
extension, auto attendant, voice mail box, or even another IVR Plug-in. IVR Plug-ins can also
make outbound calls, which can be useful for predictive dialing applications, or internal calls to
other extensions.
APPENDIX G. EXTENDING TELEVANTAGE
G-9
The IVR Plug-in API is exposed to your applications through a TeleVantage software
component. Sample applications are provided to illustrate how the IVR Plug-in API is used.
Q
TVIVRLib type library. This software component exposes the IVR Plug-in API so your
applications can use it to process calls. The library is contained in tvivr.tlb, which is
located in the \Program Files\Common Files\Artisoft\TeleVantage directory when you
install the TeleVantage Server or install the TeleVantage SDK.
Several sample IVR Plug-ins written in Visual Basic 6, VB.NET and C# are installed with the
TeleVantage SDK. The samples are provided in two versions: PlugInMedia samples that use the
Plug-in API’s built-in voice processing capabilities and CallSuite samples that require
Dialogic’s Call Suite for voice processing. By default, all samples are located in either the
\Program Files\TeleVantage SDK\PluInMedia or \Program Files\TeleVantage
SDK\PluInMedia directories. You must have Visual Basic 6.0 installed to use the sample
programs as is, or modify them to meet your needs. The following samples are provided:
Q
First. . This small IVR Plug-in demonstrates the most basic layout and design of an IVR
Plug-in for a telephony server. It answers a call, plays a file, and then returns the caller
to the active routing list.
Q
CustID. This IVR Plug-in demonstrates how to transfer customers to different agents
automatically, based on the customer’s area code obtained from their caller ID or their
customer record. It also includes a CustomerID database manager to maintain the
Customer and Agent database tables accessed by the CustomerID IVR Plug-in. The
program can be used to customize the customer and agent data for your location.
Q
OutBound. This sample includes two IVR Plug-ins (PlaceCall and ReceiveCall) that
demonstrate how an IVR Plug-in (PlaceCall) can place outbound calls that are handled
by the ReceiveCall Plug-in. It then plays a voice prompt, and then transfer the calls to a
TeleVantage user.
Q
OrderStatus. This IVR Plug-in answers calls, prompts the caller for their 5 digit order
number, searches a Orders database for a matching record and then reads back the order
status, e.g. “Your order number [12345] was shipped on [December 31, 2002] and
totalled [$123.56]”
Developing IVR Plug-ins
The TeleVantage SDK allows a programmer to integrate an application with the TeleVantage
Server, including the ability to perform tasks such as dialing a phone number, interpreting touch
tone digits, playing or recording voice files, or generating spoken messages. It also allows you
to use telephony toolkits such as CallSuite to perform actions such as text-to-speech synthesis,
voice recognition, accurate call progress analysis and faxing (which the IVR Plug-in API does
not perform).
G-10
INSTALLING TELEVANTAGE
Telephony toolkits can be used to build applications such as:
Q
Order entry systems
Q
Benefits enrollment hotlines
Q
Real estate fax lines
Q
voicemail and paging systems
Q
Product literature fax-on-demand systems
Q
Movie rating and information lines
Q
Talking classifieds
Q
Predictive dialers
Q
Golf tee reservation systems
Q
Ski condition hotlines
IVR Plug-in licensing and reserved station licenses
IVR Plug-ins are licensed at runtime and count against your station licenses. Each separate call
handled by an IVR Plug-in consumes a station license for the duration of that call. For example,
the TeleVantage Conference Manager (a Vertical TeleVantage Add-on application that is an
IVR Plug-in) sometimes needs to place 5 outbound calls at once, meaning that it will consume
5 station licenses. If your system has 16 station licenses, and 15 are assigned to user’s stations,
you have only one free license for all IVR Plug-ins to use, and the Conference Manager would
fail when it attempts to place 5 outbound calls.
You can reserve a specified number of station licenses for use by IVR Plug-ins to make sure that
they have the licenses they need. Reserved station licenses cannot be used for users. If an
administrator tries to assign a station to a new user, and the only free station licenses are the
reserved ones, the administrator receives a message and is unable to assign the station. To assign
the station, the administrator must either purchase an additional station license or reduce the
number of reserved licenses.
To reserve station licenses for IVR Plug-ins
1.
In the Administrator, choose Tools > System Settings. The System Settings dialog
box opens.
2.
Click the Licenses \ Reserved tab.
APPENDIX G. EXTENDING TELEVANTAGE
G-11
3.
Enter the number of station licenses you want to reserve in Reserve __ station
licenses for calls involving IVR Plug-ins.
4.
Click OK.
Note: If you use Callsuite, additional Callsuite licenses will apply. See Callsuite’s documentation
for more information.
The Device Status API
The Device Status API provides functions that allow an application to monitor the status of all
devices (stations and trunks) on a TeleVantage Server. The application can obtain the device
name, number, hook state, current activity, and extensions for each device on the system. Each
extension can be examined for the extension number, the user’s name, and whether the
extension is in a Do Not Disturb personal status. Using these functions, the application could:
Q
Monitor current users on the system and maintain a call log in a format customized for
your special needs.
Q
Obtain a current list of users permanently assigned to a station.
Q
Obtain the name of a user currently logged in at a station.
Q
Identify the trunk to which a station is connected.
All Device Status information is read-only. The API can be used in combination with the IVR
Plug-in API to provide IVR applications with device information.
The Device Status sample program
The Device Status sample program is a Visual Basic project for a simple device monitor that
displays a constantly updated list of status reports on each device in the system. Programmers
can use this sample program as a starting point for their own applications, expanding and
customizing it as desired. It requires no hardware or software beyond what is already required
for the TeleVantage Server and Visual Basic.
G-12
INSTALLING TELEVANTAGE
APPENDIX H
APPENDIX H
TROUBLESHOOTING VOIP
Fine-tuning your Internet span connection ___________________
In the TeleVantage Administrator, the SIP and H.323 Span dialog boxes include a Tuning tab
where you can change VoIP resource parameters. Any changes you make take effect after the
current call ends.
To change a VoIP parameter
1.
In the Trunks view, double-click the H.323 or SIP span to open its dialog box, and then
click the Tuning tab.
2.
Click in the Value column of the parameter that you want to change and select a new
value from the drop-down list. A description of each parameter is displayed below it.
3.
Click OK to save your changes or click Restore defaults to restore the board defaults
and cancel any changes.
You can also click Export to save your Tuning tab settings to an .XML file, or Import to import
a previously saved file.
Setting the Layer 3 QoS TOS Octet for higher VoIP quality
VoIP traffic on the Internet is flagged with a special byte, called the Layer 3 Quality of Service
(QoS) Type of Service (TOS) Octet, that gives it higher priority over other traffic as it is routed
to its destination. Not all routers on the Internet recognize the Layer 3 QoS TOS Octet, but those
that do (DiffServe routers) prioritize the traffic according to the byte’s value, helping to maintain
high quality of service for VoIP traffic.
By default, TeleVantage Internet spans (SIP and H.323) set a value of 184 (decimal) for the TOS
Octet, which maps to IP Precedence 5 (Express Forward) and DiffServe 46 (RFC 2598
Expedited Forwarding.)
You can modify this value via the parameter Layer 3 QoS TOS Octet on the Tuning tab, which
will adjust the quality of service on outbound VoIP traffic from TeleVantage. Changes to Layer
3 QoS TOS Octet take place immediately; no restart of the span or Server is needed.
Notes
Q
To adjust the TOS Octet on incoming VoIP traffic to TeleVantage, you must adjust it at the
end-point sending the traffic, for example, the IP phone.
Q
Not all Dialogic boards that provide IP telephony resources support the TOS Octet. See
Installing Dialogic Telephony Components for details.
To enter a value for the Layer 3 QoS TOS Octet
1.
Determine the 8-digit binary number that you want. The first three bits (Bits 0-2)
correspond to Precedence and are set as follows:
Q
111 - Network Control
Q
110 - Internetwork Control
Q
101 - CRITIC/ECP
Q
100 - Flash Override
Q
011 - Flash
Q
010 - Immediate
Q
001 - Priority
Q
000 - Routine
The next five bits are set as follows:
H-2
Q
Bit 3 - Delay. (0 = Normal Delay, 1 = Low Delay)
Q
Bit 4 - Throughput. (0 = Normal Throughput, 1 = High Throughput)
Q
Bit 5 - Reliability. (0 = Normal Reliability, 1 = High Reliability)
Q
Bit 6 - Cost. (0 = Ignore Cost for Routing, 1 = Minimize Cost)
Q
Bit 7 - Ignored. (Reserved for Future Use)
INSTALLING TELEVANTAGE
2.
Take the 8-digit binary number and translate it to standard decimal. You can do so
using the Windows Calculator (Start > Programs > Accessories > Calculator). Click
View > Scientific, click Bin, enter the 8-digit binary number, and click Dec. The
number appears in standard decimal format.
3.
In the Internet span’s Tuning tab, click the Value column for the Layer 3 QoS TOS
Octet parameter, and enter the standard decimal number.
4.
Click OK.
For more information on the Layer 3 QoS TOS Octet, refer to the following documents:
http://www.ietf.org/rfc/rfc1349.txt
http://www.ietf.org/rfc/rfc2474.txt
Troubleshooting problems with SIP or H.323__________________
This section provides information about the following:
Q
Analyzing audio problems with SIP or H.323. See page H-3.
Q
Troubleshooting general SIP problems. See page H-3.
Q
Troubleshooting problems with SIP devices such as SIP phones and external SIP
stations. See page H-5.
Q
Troubleshooting problems with SIP PSTN gateways or SIP Carriers. See page H-7.
Analyzing audio problems with SIP or H.323
Use the network capture feature on TeleVantage Server (Tools > System Settings > Network
Capture) and check Capture server network traffic and Include VOIP audio packets.
Note: Only enable network capture while troubleshooting as this feature can consume
TeleVantage Server resources.
To analyze the output of the Network Capture, we recommend using Ethereal which can be
obtained from http://www.ethereal.com.
Troubleshooting general SIP problems
If you are providing telephony resources via Dialogic telephony boards, check the Windows
Server Event Log for either of the following events:
Q
An IP telephony board has failed
Q
An IP address conflict between an IP telephony board and another device has been
detected.
If you are using the Tftpd32 TFTP Server (included with TeleVantage) to download updates to
Aastra SIP phones’ firmware and configuration files, your Technical Support representative may ask
you to turn on Tftpd32 TFTP Server logging via the Windows registry setting TftpLogFile. To do
so, see page J-16. For more about the Tftpd32 TFTP Server, see Chapter 17.
APPENDIX H. TROUBLESHOOTING VOIP
H-3
I cannot get SIP calls to work.
Have you followed the step by step instructions in Chapter 14 of Administering TeleVantage?
This chapter contains the majority of the information you need to know in order to get SIP calls
to work.
Is your Dialogic board configured with a host-based VoIP stack?
You can not use SIP with an embedded H.323 stack, so be sure that your IP boards as configured
in the DCM are using a host-based VoIP stack. Some boards do not support host-based VoIP
stack—to verify if your board does, see the Trunk Resources by Board table in Appendix E in
Installing Dialogic Telephony Components.
I am using SIP and H.323 and my IP Spans are configured properly but I can't
place SIP calls.
Be sure to create your H.323 Span first so your H.323 trunks have lower numbers than your SIP
trunks (in other words, the H.323 trunks are listed above the SIP trunks in the Device Monitor.)
Without this order, the configuration will not work properly. To resolve this problem, edit your
H.323 and SIP spans in the TeleVantage Administrator and change each span’s starting trunk
number so the SIP and H.323 trunks are in the proper order. Then restart the TeleVantage
Server.
I changed my SIP span's number of trunks. Now the SIP trunks do not seem to
be working.
You must restart the TeleVantage Server after changing the numbering of SIP or H.323 trunks
in a span.
Do I have to restart a SIP span after I changed any of its settings?
Most settings take effect on the next call—you will be prompted to restart the span for the few
settings that do not take effect right away.
Important: You must restart the TeleVantage Server after you create or delete a SIP span, or
change the span's IP address, port, or number of trunks in the span.
I have created a SIP span and restarted the Server, but all of my SIP trunks show
up in the Device Monitor with a status of “No loop current.”
Check TeleVantage Windows event log. The problem is likely to have been reported there.
I have created a SIP span and restarted the Server, but all of my SIP trunks show
up in the Device Monitor with a red “Idle” status.
Check TeleVantage Windows event log. The problem is likely to have been reported there.
H-4
INSTALLING TELEVANTAGE
Troubleshooting problems with SIP devices such as SIP phones
and external SIP stations
Have you followed the step by step instructions in Chapter 14 of Administering TeleVantage?
This chapter contains the majority of the information you need to know in order to get SIP calls
to work.
My SIP phone or device is not ringing or cannot make calls.
Check the TeleVantage Administrator's SIP Registration Bindings view to see if your SIP
device is listed. If is it not listed, confirm that the SIP device's configuration (Proxy IP, domain,
or Server address) refers to the IP address of your TeleVantage Server's SIP span and that the
username (or userid) matches the corresponding userinfo setting of the TeleVantage user's
external station.
My SIP phone was working, but is no longer able to dial numbers or receive calls
First, unplug the phone and then plug it back in again. If you still have a problem, check to be
sure that the phone’s configuration matches the settings for the SIP span and the User’s external
station settings, as described in Chapter 14 in Administering TeleVantage.
The Device Monitor shows my SIP external station's status as “Out of Service.”
This means that there is no SIP registration in the Registration Binding Table that matches the
configuration of that external station. This problem can occur for any of the following reasons:
Q
The SIP phone is not connected to the network.
Q
The SIP phone failed to register due to authentication failure.
Q
The phone configuration doesn't match SIP external station configuration.
See “My SIP phone or device is not ringing or cannot make calls.” on page H-5 for more
information.
How do I find out the firmware versions of the device currently being used with
TeleVantage?
In the TeleVantage Administrator, select the SIP Registration Bindings view and look at the
User-Agent column on the far right. This column contains this information as reported by the
device.
APPENDIX H. TROUBLESHOOTING VOIP
H-5
When I make a call, I get the TeleVantage auto attendant.
This usually means that the phone is not being recognized as an external SIP station, and is being
handled as an unknown SIP trunk call.
First, check to make sure your device is listed in the Registration Binding Table (see “My SIP
phone or device is not ringing or cannot make calls.” on page H-5 for more information.)
Q
If your device is not listed in the Registration Binding Table, verify the IP address
specified in the Proxy/Server/domain address fields (these terms can be different
depending on what device is in use) matches the SIP Span address.
Q
If your device is listed in the Registration Binding Table, verify that the username (or
User ID, depending on device) in the device's configuration correctly matches the
userinfo field in the User's external station settings as shown in the TeleVantage
Administrator.
Next, verify that the authentication credentials match the device's settings.
Lastly, confirm that the external station is correctly identified by pressing *0 on the phone to
verify its station ID and extension.
The phone is reporting that the call failed or is showing an “Unauthorized”
message.
See “When I make a call, I get the TeleVantage auto attendant.” on page H-6 regarding verifying
authentication credentials.
When I attempt to make an outbound call to an external number, I do not receive
dialtone after dialing a feature or external dialing access code (for example, 9), or
there is a long delay before I hear ringback after dialing an extension.
Most SIP devices generate local dialtone when going off hook, and you must press a termination
key (usually the # button or a “Send” key) in order for the device to send the dial string to any
SIP Server, including TeleVantage.
My SIP phone has a Voicemail Access button, but it does not connect to my voice
mail.
Verify that the phone's configuration for this button matches the dial string as configured in the
TeleVantage Administrator (Tools > System Settings > Internal Dialing > Voice mail
Access.)
How can I verify that I am receiving audio in both directions from a SIP external
station?
Press *18 from any external IP station (SIP or H323) to verify two-way audio and check for
latency.
H-6
INSTALLING TELEVANTAGE
When I am on a call, and I get a 2nd call, my phone’s second line does not ring, I
just hear the call waiting beep.
At this time, multiple line appearances on SIP stations are not supported.
I do not see Caller ID while I am on a call (CIDCW) on my SIP phone.
At this time, CIDCW is not supported.
I am using a SIP device from a home/remote office (behind a local NAT or router)
that is outside of my corporate LAN. How do I configure the phone?
See Chapter 14 in Administering TeleVantage for information on how to configure a SIP end
point behind a NAT or firewall.
Using my SIP device, I hear audio in only one direction (1-way audio.)
Check to see if the phone or TeleVantage Server is behind a NAT/firewall. If so, see Chapter 14
in Administering TeleVantage for information on how to configure a SIP end point behind a
NAT or firewall.
TeleVantage is not detecting DTMF digits that I press on my SIP device.
Verify that the SIP phone and TeleVantage SIP span are both configured to send digits via
RFC2833 and not in-band or SIP INFO.
Note: If you are using a DMIP241-1T1-P10 board, then you must set the phone to send DTMF
digits “In Band”. You can leave DTMF transmission mode of SIP span set to RFC2833, as
TeleVantage will user use “in-band” with these boards.
Troubleshooting problems with SIP PSTN gateways or SIP
Carriers
I am receiving a busy signal when trying to make outbound calls to a SIP
provider.
Check the following:
1.
You created a TeleVantage SIP span.
2.
You created a TeleVantage SIP Server for the SIP provider as specified in Chapter 14
in Administering TeleVantage.
3.
You configured your TeleVantage SIP account correctly.
APPENDIX H. TROUBLESHOOTING VOIP
H-7
I configured a PSTN gateway or SIP carrier as a SIP Server, and configured a user
with DID, but when I call the DID number the call is sent to the TeleVantage auto
attendant and not to the DID user.
By looking at the TeleVantage Call Log's From field, verify that TeleVantage is displaying calls
from the PSTN gateway with PSTN numbers, instead of SIP URI (for example,
(sip:[email protected]).)
If you see SIP URIs in the From field, you can resolve this problem by using the TeleVantage
Administrator to open your SIP Server > Inbound tab and be sure that the fields Identify
inbound calls using, Server location, and Handle calls from this server as Telephone calls
are checked:
Also, verify that if the TeleVantage SIP span requires authentication, the gateway's
authentication credentials match. Otherwise, inbound calls will be handled as unknown
SIP callers and will be sent to the TeleVantage auto attendant.
Troubleshooting an H.323 IP phone__________________________
If you are having difficulty configuring your IP phone with TeleVantage, review the following
steps carefully.
If you are providing telephony resources via Dialogic telephony boards, check the Windows
Server Event Log for either of the following events:
Q
An IP telephony board has failed
Q
An IP address conflict between an IP telephony board and another device has been
detected.
If your IP telephony boards are functioning, check to see if TeleVantage can place a call to the
IP phone (either by dialing the IP address directly from a station phone, or by configuring a
user’s external station address to the IP phone’s IP address and dialing the user's extension).
If you cannot place a call to the IP phone:
Q
Ping the phone. Make sure you can ping the phone from a machine on the network.
Q
Check the IP address and Subnet Mask. Make sure the IP address and Subnet Mask
information in the IP phone setup screens are correct.
Q
Use a valid IP trunk address. Make sure the IP phone references a legitimate
TeleVantage IP trunk. For the Uniden phone, check the IP Proxy address using the web
browser admin. For the Polycom phone, check the appropriate <ServerIP>.cfg file.
Remember that most Dialogic Internet telephony boards have their own NIC interfaces,
and therefore their own IP addresses, different from that of the NIC in the TeleVantage
Server PC. The DM/IP241-1T1-P100 and DM/IP301-1E1-P100 are examples of boards
with an onboard NIC; this is signified by the “1” (not “0”) in the last digit of the model
number. The DISI0408LSAR2 board does not have an onboard NIC and uses the PC’s
NIC.
If you are using a board with its own NIC interface, use the IP address of the board, not
of the TeleVantage Server itself.
Q
Ensure that a supported codec and frame size are in use. Only G.711 is supported
with the Uniden IP phone. Other codecs have received limited testing. Make sure the
frame size is set to the same value in TeleVantage and the Uniden phone. The Uniden
phone defaults to 20 ms frames and TeleVantage defaults to 20ms or 30 ms. Polycom
phones support G.711 and G.723 codecs when used with TeleVantage and IP phones.
Q
Confirm that there is an available IP trunk. If IP phone users share IP trunks on the
TeleVantage Server, there may be no IP trunks available at the time they are trying to
make a call. This can be confirmed by observing the state of the IP trunks in the
TeleVantage Device Monitor.
Q
Check the network. You may be experiencing a network problem. Make sure you can
ping the IP address of the IP telephony board or TeleVantage Server.
Q
Check the H.323 stack. If users see “Disconnected” in the LCD screen of the IP phone,
there may be a problem with the IP telephony board or its H.323 stack. Check the
Windows server event log to verify errors. The IP telephony board or TeleVantage
Server may need to be restarted.
If you are using the Tftpd32 TFTP Server (included with TeleVantage) to download updates to
Polycom or Uniden H.323 phones’ firmware and configuration files, your Technical Support
representative may ask you to turn on Tftpd32 TFTP Server logging via the Windows registry setting
TftpLogFile. To do so, see page J-16. For more about the Tftpd32 TFTP Server, see Chapter 17.
Testing audio delay from an IP phone with *18
You can press *18 from dial tone at an IP phone to test the phone’s connection to the
TeleVantage Server. After you press *18, the system echoes back anything you say, enabling
you to judge any delay occurring between the phone and TeleVantage. To end the test, hang up
or press #.
This test can help you judge whether poor audio quality is occurring between the phone and
TeleVantage, or elsewhere in the Internet connection.
APPENDIX H. TROUBLESHOOTING VOIP
H-9
APPENDIX I
APPENDIX I
PROTECTING YOUR PHONE SYSTEM
AGAINST TOLL FRAUD
CHAPTER CONTENTS
About toll fraud . . . . . . . . . . . . . . . . . . . . . . . . . . . . . . . . . . . . . . . . I-2
Identifying toll fraud . . . . . . . . . . . . . . . . . . . . . . . . . . . . . . . . . . . . . I-2
Protecting your system against toll fraud . . . . . . . . . . . . . . . . . . . . I-3
Responding to toll fraud attempts . . . . . . . . . . . . . . . . . . . . . . . . . . I-7
About toll fraud __________________________________________
Businesses using any phone system, not just TeleVantage, are vulnerable to loss of money from
unauthorized people “hacking” into their phone system. Hackers make hundreds of outbound
long distance or international calls that cost businesses around the world millions of dollars
every year. TeleVantage contains several features and options that can protect your system
against toll fraud.
Typical toll fraud strategies
While hackers committing toll fraud try a variety of techniques to gain access to a system, it is
important to note that 99% of the time access is gained through insecure (easy-to-guess)
passwords. The Administrator’s System Settings provide several options for enforcing
harder-to-guess passwords. See “Enforcing strong password security” in Chapter 3 in
Administering TeleVantage.
The following are the most common methods of attempted toll fraud:
Q
Calling the main auto attendant, pressing #, logging in as the Administrator, pressing #
for dial tone and placing outbound calls.
Q
Attempting to log on at every extension (101, 102, etc.) until an extension with an easy
password is found. Once found, the hacker will change call forwarding to the external
number they want to dial (for example, an international number or the number of another
hacked PBX), and then make calls to the external number as needed. By calling through
multiple hacked PBXs, Caller ID and traces will be unable to track down the hacker's
identity.
Q
Calling random users and telling them they are a representative from the phone company
and need their voice mailbox password to track down a problem with the phone system.
Users should be told to never give out their passwords, and if they have reason to believe
someone else has it, to change it immediately to something secure.
Identifying toll fraud_______________________________________
The following methods will help you tell whether your system has been targeted by toll fraud
hackers:
Q
Check your Administrator's call log daily for multiple logon attempts. A failed logon
attempt will show as "logon - Abandoned". A successful fraudulent logon will typically
show many long distance or international calls placed afterwards from that extension.
Note: You can have TeleVantage automatically hang up on callers and lock out
accounts after multiple failed logon attempts. See “Enforcing strong password security” in
Chapter 3 in Administering TeleVantage.
I-2
Q
Check your phone bills carefully for international numbers or long distance numbers you
do not recognize.
Q
Watch your Device Monitor for sudden bursts where every line is busy with people
trying to log on.
INSTALLING TELEVANTAGE
Protecting your system against toll fraud_____________________
The following are a variety of ways to secure your phone system. While practicing all of these
strategies will keep your phone system very secure, by far the most important strategy is to just
improve the security of passwords.
Password security
The Security tab in System Settings (see “Enforcing strong password security” in Chapter 3 in
Administering TeleVantage) gives you several options for making user passwords more secure.
For maximum security you should choose all of the following options:
Q
Set a minimum password length. Passwords should be at least 5 digits long, preferably 7.
Q
Prevent passwords from including the user’s extension.
Q
Prevent passwords from including easy-to-guess elements like same-digit strings (111)
or consecutive-digit strings (123).
Q
Regularly force password change.
Changing the Admin and Operator passwords
TeleVantage’s two default users, the Admin and Operator, have easy-to-guess passwords.
Immediately after installing TeleVantage, you should change the passwords on those accounts
to something more secure, by editing those users in the Users view. Reminder messages in the
Administrator will warn you if you leave the extensions as is.
Identifying users with security-risk passwords
The Administrator has a built-in Security Analysis report that analyzes your system for potential
security risks. To run the Security Analysis report, choose Tools > Analyze Security. The report
appears on-screen.
APPENDIX I. PROTECTING YOUR PHONE SYSTEM AGAINST TOLL FRAUD
I-3
Use the report to determine which users in your system have passwords that make your system
vulnerable. If you have implemented the security options described in this section, few users
should appear in the list. Those who do might have old passwords that have not yet been
changed, either because they have not yet logged in and been forced to change their passwords,
or because they are exempt from forced password change. Talk to those users about making their
passwords more secure.
You can address your security problems directly from the dialog box by selecting an item and
clicking Edit. The Edit dialog box for that item opens.
User permissions
Disallow security-risk permissions for all users except those individuals who really need them.
You can change permissions for individual users by editing the user account (see “The Security
\ Permissions tab” in Chapter 6 in Administering TeleVantage), or for many users at once by
editing the User's Role (see “Managing roles in Chapter 6 in Administering TeleVantage.)
Security-risk permissions which should be disallowed are:
Q
Place external calls when logged on via a trunk (under the Standard permission group)
Q
Log on via trunk (Standard)
Q
Log on via IP trunk (Standard)
Q
Log on via station (Standard)
Q
Forward or route calls to external numbers (Standard)
Q
Return calls when logged on via a trunk (Standard)
Q
Select a specific trunk for outbound call (Administration)
Setting up dialing restrictions
A good way to prevent unauthorized outbound calling is to place restrictions on users' dialing
permissions. You can change permissions for individual users by editing the user account (see
“The Security \ Permissions tab” in Chapter 6 in Administering TeleVantage), or for many users
at once by editing the User's Role (see “Managing roles” in Chapter 6 in Administering
TeleVantage.)
Some dialing restrictions to consider:
I-4
Q
Disallow access to any number dialed during toll fraud. To find a list of numbers, search
your call logs for frequent calls to international locations.
Q
Disallow dialing 011 and 00 to block all international calls (00 dials the international
operator). To permit some international calls you can do the following:
Q
Enable 011 for those individuals who are authorized to make international calls.
Those individuals can then dial any country.
Q
Enable country codes for those foreign countries that are appropriate for users to
call. To do so, enable 011xxx where xxx is the desired country code.
INSTALLING TELEVANTAGE
The full list of country codes can be found in your phone book. The list is maintained by
the ITU (International Telecommunication Union), a division of the United Nations. The
ITU web site is http://www.itu.int and the most recently published list of country codes
is available at http://www.itu.int/itudoc/itu-t/ob-lists/icc/e212_685.html (this list is
valid as of June 2000, and some additional country codes have been assigned since then.)
Q
Disallow dialing sequences that call for-pay services like 1900 or 1976, 976, etc. For
information on additional numbers that should be blocked, see this website:
http://www.lincmad.com/telesleaze.html
Q
Disallow dialing certain international North American area codes if desired, such as
those in the Caribbean. For example, disallowing 1242 blocks calls to the Bahamas.
The full list of North American area codes can be found in your phone book or at the
web site for the North American Numbering Plan Administration:
http://www.nanpa.com
For the numerical list of area codes, see:
http://docs.nanpa.com/cgi-bin/npa_reports/nanpa?function=list_npa_geo_nu
mber
Making account logon more secure
There are several ways to prevent hackers from even getting to the account logon choice of your
auto attendant. Some methods make it difficult for your own users to use the system, so you
need to judge how far you want to go to prevent toll fraud at the expense of phone system ease
of use. Please note that these options do not make your system secure by themselves, as they
only slow down hackers. The only way to do that is to make sure your user passwords are secure
and change often.
Auto attendant security options include the following:
Q
In your main auto attendant, change the default "#" for user logon to something else.
Ideally, give your remote users a phone number routed to a special auto attendant that
permits remote logon, while your main auto attendant does not. For DID systems, where
you can't control the specific trunk used on inbound calls, give your remote users a DID
number instead that routes them to the special auto attendant.
Q
Do not permit logon in your main auto attendant that is assigned to every trunk. Instead,
create a unique auto attendant on a different trunk each week that permits logon. Publish
the trunk's phone number to your users as it changes.
APPENDIX I. PROTECTING YOUR PHONE SYSTEM AGAINST TOLL FRAUD
I-5
Securing your phone system database
Toll fraud typically involves “hacking” over phone lines instead of data hacking. However, the
TeleVantage database runs on a Windows server on your network and contains all permission
settings and can be hacked at that level. It is always wise to keep your corporate network secure
from unauthorized external access. This safeguards your database against tampering by network
and computer hackers. Some ways to do this include:
Q
Use standard firewall technology to secure access to your network. If desired, allow
access to specific protocols and ports, such as those for HTTP or H.323 (VoIP).
Q
For extra security, host the TeleVantage Web Services on a separate server from the
TeleVantage Server and database.
Securing SIP stations
If your system uses SIP phones as external stations, hackers can gain entry to the system by
sending a SIP message that duplicates the SIP URI of a SIP phone user, for example,
vwilliams@sip:www.Vertical.com. Without protection, TeleVantage assumes the call is
coming from the external station and automatically logs it in and provides internal dial tone,
permitting the caller to place outbound calls through TeleVantage.
To protect against SIP fraud, you can do the following:
Q
Make sure that each SIP phone uses authentication credentials whenever it connects to
TeleVantage. See “Authenticating SIP phone external stations” in Chapter 14 in
Administering TeleVantage for instructions.
Q
If your system interacts with an external SIP server, such as a PSTN gateway or a SIP
provider (IPSP), set up two SIP spans, one to handle SIP stations and the other to handle
traffic from the external SIP server. See “Using more than one SIP span” in Chapter 14
in Administering TeleVantage.
Checking for current scams
Most telephone carriers maintain toll fraud web pages with current information. For example:
http://www.att.com/fraud/
newscenter.verizon.com/kit/servicestandard/scams.vtml
You can monitor these web sites for up-to-date information and potential remedies.
I-6
INSTALLING TELEVANTAGE
Responding to toll fraud attempts___________________________
If your phone system has been the target of toll fraud attempts, you can do the following:
Q
Report Caller ID numbers and called numbers of fraudulent calls to your long distance
carrier. Sometimes carriers can block certain numbers from calling you.
Q
Report excessive toll fraud to your local FBI office. Note, however, that the FBI does
not usually get involved with toll fraud unless losses are substantial.
You can also use the information from previous toll fraud attempts to make your system even
more secure. For example, you can add any numbers being called during toll fraud to the list of
numbers prevented with dialing permissions. If fraudulent calls have been made to a particular
few countries that are not otherwise called, disallow dialing those country codes (011xxx).
Using Caller ID to prevent fraudulent calls
If you know the Caller ID from which fraudulent calls originate, you can prevent calls from
those numbers. To do so:
1.
Create a user called “Fraud Detector.” Create it with a secure password, a station ID
of 0, and use permissions to prevent it from making any external calls.
2.
Log on to ViewPoint as the “Fraud Detector” user.
3.
Create a routing list called “Normal.” Delete the “Call me where I am” action. Change
the final action to “Transfer to an extension” and select your main Auto Attendant.
Uncheck the greeting from playing. Make this the default and active routing list.
4.
Create a second routing list called “Fraud Call.” Delete the “Call me where I am”
action. Change the final action to “Hang up.”
5.
Create a contact named “Fraudulent person.” Edit the phone numbers of the
“Fraudulent person” contact and add any numbers of known fraudulent callers.
6.
Create a call rule so that when the contact "Fraudulent person" calls that they are
handled by the "Fraud Call" routing list which hangs up on them.
7.
Assign every trunk to call the Fraud Detector user, instead of your auto attendant.
Subsequent calls from the known fraudulent numbers will be automatically hung up on, and will
appear in the Call Log as being from “Fraud Detector.” Other calls will be handled as normal.
As new fraudulent numbers are detected, you can associate the Caller ID with “Fraudulent
person.”
APPENDIX I. PROTECTING YOUR PHONE SYSTEM AGAINST TOLL FRAUD
I-7
APPENDIX J
APPENDIX J
TELEVANTAGE CONFIGURATION
SETTINGS
CHAPTER CONTENTS
About TeleVantage configuration settings. . . . . . . . . . . . . . . . . . . . J-2
TeleVantage registry settings . . . . . . . . . . . . . . . . . . . . . . . . . . . . . J-2
TeleVantage Server language locale settings . . . . . . . . . . . . . . . . J-17
Defining custom tones . . . . . . . . . . . . . . . . . . . . . . . . . . . . . . . . . . J-18
Disabling Dialogic devices. . . . . . . . . . . . . . . . . . . . . . . . . . . . . . . J-20
Dialogic telephony board settings . . . . . . . . . . . . . . . . . . . . . . . . . J-25
Using the TeleVantage Advanced Settings Editor . . . . . . . . . . . . J-34
About TeleVantage configuration settings_____________________
This appendix lists the TeleVantage configuration settings that store information that is rarely
changed, or that cannot be changed using the Administrator.
There are two ways main sources of TeleVantage configuration settings:
Q
The TeleVantage Advanced Settings Editor. This TeleVantage application allows
Administrators to edit settings that are stored in the TeleVantage database. See “Using
the TeleVantage Advanced Settings Editor” on page J-34.
Q
The Windows registry. To edit the Windows registry, use Regedit.exe or
Regedt32.exe. See the next section.
Note: In this chapter, all registry entries are shown as decimal, rather than hex, values. In
RegEdit the default entry format is hex.
TeleVantage registry settings _______________________________
The following sections cover the TeleVantage configuration settings stored in the Windows
registry. TeleVantage registry settings are found in two places:
Q
On the TeleVantage Server computer. See this section.
Q
On the TeleVantage workstation computers. See “Registry settings on the TeleVantage
workstation computers” on page J-10.
Note: In this chapter, HKLM is the abbreviation for HKEY_LOCAL_MACHINE and HKCU is
the abbreviation for HKEY_CURRENT_USER.
Changing TeleVantage registry settings
For all registry settings listed in this appendix, TeleVantage uses an internal default value unless
the PC's Windows registry contains a corresponding setting with a different value.To change the
default value of a TeleVantage registry setting, you will likely need to add the setting, since most
of the registry settings listed in this appendix are not present when TeleVantage is installed.
To change a TeleVantage registry setting in the Windows registry, do the following:
J-2
1.
Click Start > Run.
2.
In the Run dialog box, type Regedit or Regedit32.
3.
Click OK. The Registry Editor opens.
4.
Navigate to the folder that holds the registry setting you want to change.
INSTALLING TELEVANTAGE
5.
If the registry setting exists, double-click it to edit it.
If the registry setting does not exist, right-click the folder where it should go and
choose New, then select the type of setting to add (choose DWORD unless this
appendix specifies otherwise.) Enter the name of the setting. Then double-click the
setting to edit it.
6.
Enter the desired value for the registry setting and click OK.
7.
When you are done editing registry settings, close the Registry Editor, for example by
choosing Registry > Exit.
The following tables show TeleVantage registry settings according to the registry keys under
which they are found.
HKLM\Software\Artisoft\TeleVantage\
COMPANY
STRING value sent to incoming IP callers who are directed to an auto attendant or IVR
Plug-in. Some terminals such as NetMeeting will be able to display this name in their
user interface. Calls that go directly to users will use the user’s name instead. Note that
this value is written by the installer. This setting takes effect when
SendDisplayOnAnswerCall (see page J-7) is non-zero. See also
Q931DefaultSourceName on page J-7.
Default is TeleVantage.
HKLM\Software\Artisoft\System\
LOCKOUTRESETINTERVAL
DWORD value that sets the time frame in which multiple failed logon attempts must
occur to result in a lockout (see “Enforcing strong password security” in Chapter 3 in
Administering TeleVantage.) The value is in minutes and by default is set to 30.
Increasing the value means that lockout will be more likely, while decreasing the value
means that lockout will be less likely. A value of 0 will result in lockout never
occurring.
Default is 30 minutes.
APPENDIX J. TELEVANTAGE CONFIGURATION SETTINGS
J-3
HKLM\Software\Artisoft\TeleVantage\Server\Settings\
6E23WK
DWORD specifying whether, with a queue set to automatically record calls, an
incoming call that is transferred out of the queue continues to be recorded. Changes to
this registry setting take effect the next time that the TeleVantage Server is started.
When set to 1 (the default), recording stops as soon as the call is transferred out of the
queue.
When set to 0, recording continues after the call is transferred out of the queue.
DbCacheInterval
DWORD value specifying the number of minutes between database cache refreshes.
Default is 5 minutes. Setting to 0 turns off cache refreshes.
DisableCallHistory
DWORD value specifying whether call history is enabled or disabled. When call
history is enabled, call history events are logged for display in the Call History pane in
the TeleVantage Administrator Device Monitor view and in ViewPoint’s Call Monitor.
For more about call history, see “Viewing a call’s history” in Chapter 12 in
Administering TeleVantage.
Default is 0 (call history is enabled.) If set to 1, call history is disabled.
Changes to this setting take effect the next time that the TeleVantage Server starts.
DisableDevices
See “Disabling Dialogic devices” on page J-20 for details.
Default is 0.
EnableIPLogin
DWORD value specifying whether or not to enable IP caller login.
Default is 1 (login is enabled.)
EmptySentItemsFolder
DWORD value specifying whether or not to purge the Sent box in a Lotus Notes-based
e-mail system each time an e-mail notification includes an attached voice message. If
you are not using an e-mail system based on Lotus Notes, you do not need to define this
setting. For more information, see “Using Lotus Notes for e-mail notification” in
Installing TeleVantage.
Default value is 0 (Sent box should not be purged.) A value of 1 indicates that the Sent
box should be purged.
J-4
INSTALLING TELEVANTAGE
HKLM\Software\Artisoft\TeleVantage\Server\Settings\
ExpWaitRingCycleLength
DWORD value specifying in milliseconds how much time is added to the expected wait
time estimate for queues. Note that this time is added to each queue’s calculation. To
adjust an individual queue’s expected wait time, see TeleVantage Call Center
Administrator’s Guide.
Default value is 6000 milliseconds (6 seconds.)
LogHours
DWORD value specifying the number of hours to log.
Unless this is set to 0, TeleVantage may automatically increase NumLogs based on
available disk space so that the logs are not overwritten for the specified number of
hours.
LogHours default is 48. Set to 0 and the Server will not adjust logging settings.
LogPath
STRING value specifying the subdirectory in which TeleVantage Server log files
(Tvlogxxx.TXT) will be created. If this registry value does not exist, or points to an
invalid directory, Server logging will be disabled.
Default path is: “” (empty string.)
MaxNonSilence
DWORD value specifying the maximum length of uninterrupted sound (in 10 ms units)
that will be recorded before the recording is terminated.
Default is 0 (no timeout.)
MinDiskFreeSpace
DWORD value specifying the minimum amount of disk space (in megabytes) on the
TeleVantage Server that must be available for Server logging and saving voice
messages. If the minimum amount is not available, no logging will occur and no voice
messages will be saved.
Default value is 100 MB.
Note: This setting applies to Server logging only. To specify the minimum amount of
disk space that must be available for TeleVantage workstation applications logging, see
FreeSpaceRequired on page J-12.
MonitorInterval
DWORD value specifying the interval in minutes between TeleVantage Device
Monitor checks for devices that are not responding.
Default is 1 minute.
APPENDIX J. TELEVANTAGE CONFIGURATION SETTINGS
J-5
HKLM\Software\Artisoft\TeleVantage\Server\Settings\
MonitorLocPBE
DWORD value specifying how the ViewPoint status of hot-desking agents (agents
logged into another user’s phone) is updated after the agent logs out using the *00
command.
When set to 1, the agent’s ViewPoint status changes to on-hook when they log out using
the *00 command.
When set to 0 (the default), the agent’s ViewPoint status is not updated (it remains
off-hook) when they log out using the *00 command.
MonitorRestart
DWORD value. If this value is non-zero, the system will attempt to restart a
nonresponding device after the interval specified by Monitortimeout is exceeded. A
non-zero setting can cause problems when a device is not responding, because it can
result in slow database access.
Default is 0 (system will not attempt to restart the device.)
Monitortimeout
DWORD value in milliseconds. If a device has not responded for this length of time,
TeleVantage checks the MonitorRestart setting to see if the device should be restarted,
and adds the message “Device %1 is not responding” to the Windows Event Log.
Default is 300000 milliseconds (5 minutes.)
NumConcurrentIPGCOpens
DWORD value that specifies how many IP trunks TeleVantage opens at a time at
Server startup.
Occasionally on Server startup, IP trunk status in the TeleVantage Device Monitor will
flicker from Idle to No loop current to Pre-idle to Idle. If you experience flicker, you
can reduce the value of this registry setting.
The default is 12.
J-6
INSTALLING TELEVANTAGE
HKLM\Software\Artisoft\TeleVantage\Server\Settings\
NumLogs
DWORD value specifying the number of TeleVantage Server log files (Tvlogxxx.TXT)
kept before they are overwritten.
This key interacts with LogHours (see p. J-5) to determine how logs are kept. Each
Server log file grows to a maximum of 4MB in size before a new log file is created. The
Server keeps track of its logging rate and calculates whether the number of logs files
specified here will contain enough data to meet the required number of hours set by
LogHours. If not, TeleVantage automatically increases NumLogs so as to meet the
required number of hours.
To prevent automatic increasing of NumLogs, set LogHours to 0.
NumLogs is set to 100 by the Server installer on a fresh install. If this key is deleted,
the default value is 1. To disable logging, set to 0.
PartyCustomDataMax
DWORD value specifying the maximum size allowed (in bytes) for custom data
attached to each party. If ViewPoint attempts to set custom data for a party that exceeds
this size, the attempt will be disallowed.
Default is 10000 bytes.
Q931DefaultSourceName
STRING value used when forwarding incoming PSTN calls without Caller ID to an
Internet Address or Enterprise Gateway service. The IP telephony board drivers will
substitute the string “Name” unless another string is provided in the source address.
This key should have the same value as the COMPANY setting (see page J-3).
Default is “TeleVantage”.
SendDisplayOnAnswerCall
DWORD value specifying whether or not to display the company or user name to
inbound Internet callers. You may need to disable this setting to use certain IP boards
that do not support this feature.
Default is 0 (automatic), specifying that all boards except the IP041 boards provide a
display string when answering a call. A setting of 1 always provides a display string. A
setting of 2 never provides a display string.
TruncateRecordings
DWORD value specifying whether or not TeleVantage should truncate extra silence at
the end of voice message recordings.
Default is 1 (silence is truncated.) A value of 0 specifies that extra silence is not
truncated.
APPENDIX J. TELEVANTAGE CONFIGURATION SETTINGS
J-7
HKLM\Software\Artisoft\TeleVantage\Server\Settings\
UnknownCallerName
STRING value specifying the name to display in the call log when the actual caller
name is unknown.
Default is “Unknown”.
UseConferencesForEchoCancellation
DWORD value specifying whether or not TeleVantage uses additional echo
cancellation and gain control to improve the audio quality of forwarded calls on analog
trunks. In particular, this feature can improve audio quality for the D/120-JCT board.
However, the feature uses a conference resource when it connects an analog trunk to
another trunk.
If you have PCI analog trunk boards, you must set the Receive Gain of those boards
appropriately depending on whether the feature is on or off. If the feature is on, set the
Receive Gain to P1. If the feature is off, set the Receive Gain to N1. For instructions on
changing Receive Gain, see Installing Dialogic Telephony Components. Note that if
you have ISA analog trunk boards, you do not need to change Receive Gain.
When set to 0 (the default), the feature is off.
When set to 1, the feature is on.
UseDedicatedVoiceDevices
DWORD value specifying whether or not TeleVantage will allocate dedicated voice
devices when it allocates a voice device. When the Server requires a voice device (for
playing/recording audio, or playing/detecting tones), it attempts to allocate one in the
following order:
Q
Allocate a shared voice device.
Q
Allocate a dedicated, disconnected voice device (i.e. attached to LSI front end that
is not plugged in.)
Q
If UseDedicatedVoiceDevices is enabled, allocate a dedicated, connected voice
device.
Default is 1 (Enabled. Server will attempt to allocate dedicated voice devices if
necessary.) A value of 0 disables this setting.
UserVoxPath
STRING value specifying the path for local user voice prompts. Path string must end
in a backslash.
Default is set during installation.
J-8
INSTALLING TELEVANTAGE
HKLM\Software\Artisoft\TeleVantage\Server\Settings\
VoxHighEventInterval
DWORD value specifying the time interval (in milliseconds) for generating the Event
log message "No Voice Resource Available."
Default is 800000 (15 minutes.)
WaitLoopCurrenttimeout
DWORD value specifying the number of milliseconds to wait for loop current before
dialing an outside number. Set this to zero to skip loop current checks when making
outbound calls.
Default is 1400 milliseconds.
HKLM\Software\Artisoft\TeleVantage\Server\ Settings\DKT
CallWaitingInterval
DWORD value that controls how long (in milliseconds) Toshiba phones wait between
soft rings. The soft ring is the call waiting ring that occurs when a new incoming call
arrives to a PDN or SDN while the user is on a call. A value of 0 means the soft ring is
disabled.
Default is 3000 milliseconds.
SpeedDialMonitor
DWORD setting that specifies whether digital phone Busy Lamp Field (BLF) is
enabled or disabled system-wide. For more about BLF, see “Enabling digital phone
Busy Lamp Field for the system” in Chapter 7 in Administering TeleVantage.
When set to 1, BLF is enabled system-wide for all digital phones.
When set to 0 (the default), BLF is disabled system-wide.
HKLM\Software\Artisoft\TeleVantage\Server\ EXTBoard\ZipTone
Frequency
DWORD value that specifies the call waiting tone for external stations. Note that all SIP
and H.323 phones are defined as external station.
Changes to the settings take effect on all external stations on the next call waiting tone.
Default is 1250 Hz.
APPENDIX J. TELEVANTAGE CONFIGURATION SETTINGS
J-9
HKLM\Software\Artisoft\TeleVantage\Server\ EXTBoard\ZipTone
Amplitude
DWORD value that specifies the amplitude of the call waiting tone for external stations.
Default is -32 db.
Duration
DWORD value that specifies (in hundredths of a second) the duration of the call
waiting tone for external stations.
Default is 50 (500 milliseconds.)
To disable the call waiting tone for external stations, set Duration to 0.
Registry settings on the TeleVantage workstation computers
All supported TeleVantage workstation registry settings are found (or can be created) under the
registry keys presented in this section. The workstation application settings are divided into
those that apply to the current user (in the next section) and those set for the local machine
(beginning on page J-12.)
Current user settings
The workstation application settings in this section are located in HKEY_CURRENT_USER
(HKCU.)
HKCU\Software\Artisoft\TeleVantage\Client
MaxSelectionBeforeConfirmation
DWORD value specifying the maximum number of items (voice messages, contacts,
and so forth) can be selected in ViewPoint to be moved or deleted before the following
message is displayed:
“This operation make take some time, do you want to continue?”
For example, if set to 49, the message will be displayed when 50 or more items are
selected in ViewPoint to be moved or deleted.
Default is 49 items selected.
ShowStatusBarServerInfo
DWORD value specifying whether ViewPoint displays on the status bar the name of
the Server to which it is connected. A setting of 0 does not display the Server name; a
setting of 1 does display it.
Default is 0 on installation.
J-10
INSTALLING TELEVANTAGE
HKCU\Software\Artisoft\TeleVantage\Client\Admin\App
LoggedInUserId
STRING value indicating the ID of the user who last logged in.
Default is “” (empty string) on installation.
HKCU\Software\Artisoft\TeleVantage\Client\Layout
RedrawMode
DWORD value used to control the “flicker” effect in ViewPoint display. The default
setting of 1 (Normal) is less CPU-intensive but may result in a flicker. A setting of 2
(Buffered) eliminates the flicker, but performance may suffer.
Default is 1 on installation.
HKCU\Software\Artisoft\TeleVantage\Client\Logon
Address
STRING value specifying the user's station ID.
Default is 0.
AutoLogon
DWORD value specifying whether or not autologon is on.
Default is 0 (off.)
Database
STRING value specifying the name of the database.
Default is “TVDB”.
History
STRING value specifying the list of recently logged in users. Specify an empty string
to clear the list.
Default is “” (empty string.)
Server
STRING value specifying the name of the TeleVantage Server computer. May be either
a NetBios name (for example, “TeleVantage”) or an IP Address (for example,
“123.12.76.102”.)
Default is “” (empty string.)
APPENDIX J. TELEVANTAGE CONFIGURATION SETTINGS
J-11
HKCU\Software\Artisoft\TeleVantage\Client\Logon
Username
STRING value specifying the user's TeleVantage login name.
Default is “” (empty string.)
HKCU\Software\Artisoft\TeleVantage\Client\Call Monitor
PersistentSort
DWORD value specifying how ViewPoint’s Call Monitor displays newly arriving
calls, after the view has been sorted by clicking on a column header. A setting of 1 turns
on persistent sorting, so that newly arriving calls appear in the correct place according
to the sort order. A setting of 0 turns off persistent sorting, so that new calls always
appear on the bottom row. After a call appears on the bottom row, you can click a
column header to sort the new call correctly with the others.
Note that turning on persistent sorting can result in slower ViewPoint performance.
Default is 0 (persistent sorting off) on installation.
HKCU\Software\Artisoft\TeleVantage\Client\Debug
FreeSpaceRequired
DWORD value specifying the minimum amount of disk space (in megabytes) on the
local machine that must be available for workstation application logging. If the
minimum amount is not available, no logging will occur.
Default value is 50 MB.
Note: This setting applies to workstation application logging only. To specify the
minimum amount of disk space that must be available for TeleVantage Server logging,
see MinDiskFreeSpace on page J-5.
Local machine settings
The workstation application settings in this section are located in HKEY_LOCAL_MACHINE
(HKLM.)
HKLM\Software\Artisoft\TeleVantage\Client\SecBridge
MaxTraceFileSize
DWORD value specifying the maximum size (in megabytes) of the SecBridge log file.
Default is 1 MB.
J-12
INSTALLING TELEVANTAGE
HKLM\Software\Artisoft\TeleVantage\Client\SecBridge
TracePath
STRING value specifying the path at which SecBridge log files are created.
Default is Program Files/Common Files/<Company><Product Name> /Logs
OutputToTraceFileOn
DWORD value specifying whether tracing should go to a file on disk.
Default is 1 (yes)
MaxRevisions
DWORD value specifying the number of log file revisions.
Default is 5.
HKLM\Software\Artisoft\TeleVantage\Client\Server
Pingtimeout
DWORD value specifying the ping timeout duration. If this is not set to 0, users who
log on to the Terminal Server remotely will need administrator permissions to run
ViewPoint (see “Installing ViewPoint on Microsoft Terminal Server” in Installing
TeleVantage.)
Default is 5000 milliseconds.
HKLM\Software\Artisoft\TeleVantage\Client\TSP
HangUpCalls
DWORD value specifying whether or not the current user can hang up calls in a TAPI
client application that is using the TeleVantage TAPI Service Provider. This setting
must be set to 0 for GoldMine users.
Default is 1 (client applications can hang up calls using TAPI functions.) A setting of 0
will prevent client applications from hanging up calls via TAPI.
ServerPingInterval
DWORD value specifying how often the TAPI Service Provider validates the
connection to the TeleVantage Server. If the connection is lost, the TAPI Service
Provider tries to reconnect.
If the Server is restarted, there is a maximum delay of about 10 minutes before the
Contact Manager Assistant, for example, will start popups again for incoming calls.
Default is 10 minutes.
APPENDIX J. TELEVANTAGE CONFIGURATION SETTINGS
J-13
HKLM\Software\Artisoft\TeleVantage\Client\TSP
TraceMaxRevisions
DWORD value specifying the maximum number of backup log files that will be
generated on this machine before the TAPI Service Provider starts overwriting the
oldest files.
Default is 10 log files.
TraceToFile
DWORD value specifying whether or not the TAPI Service Provider will log activity
for this user to a disk file.
Default is 1 (TSP will log.)
TraceDirectory
STRING value specifying the path to the TAPI Service Provider log file folder.
Default is the \Logs subdirectory of the TeleVantage ViewPoint install folder.
TraceLevel
DWORD value specifying a number used to limit logging output from the TAPI Service
Provider. The higher it is, the more events will be logged.
Default is 10 events.
HKLM\Software\Artisoft\TeleVantage\Client\TSP\Logon
Address
STRING value specifying the station ID that the TAPI Service Provider will monitor
for incoming calls. TAPI client applications are notified of all calls to this station.
The user can set and change this value using the TeleVantage TAPI Configuration
Wizard.
No default. Must be set before the TAPI Service Provider can run.
Server
STRING value specifying the name of the TeleVantage Server computer to which the
TAPI Service Provider will call. May be either a NetBios name (for example,
“TeleVantage”) or an IP Address (for example, “123.12.76.102”.)
The user can set and change this value using the TeleVantage TAPI Configuration
Wizard.
No default. Must be set before the TAPI Service Provider can run.
J-14
INSTALLING TELEVANTAGE
HKLM\Software\Artisoft\TeleVantage\Client\MultilineTSP
HangUpCalls
DWORD value specifying whether or not the current user can hang up calls in a TAPI
client application that is using the TeleVantage Multi-line TAPI Service Provider.Note
that this is a global setting that applies to all Multi-line TAPI Service Provider lines.
This setting must be set to 0 for GoldMine users.
Default is 1 (client applications can hang up calls using TAPI functions.) A setting of
0 will prevent client applications from hanging up calls via TAPI.
LogPath
STRING value specifying the subdirectory in which TeleVantage Multi-line TSP log
files (filename format TVMultilineTSP_svchostxxx.txt) will be created. If this registry
value does not exist, or points to an invalid directory, logging will be disabled.
Default path is: “” (empty string.)
HKLM\Software\Artisoft\TeleVantage\Enterprise Manager
ForceDeleteGatewayUser
STRING value specifying whether or not Enterprise Manager deletes the IP Gateway
user when the corresponding local extension is removed from replication.
Note: If Enterprise Manager cannot delete an IP Gateway user due to unforwarded
voice messages, it no longer maintains that user automatically. Failure to delete the IP
Gateway user manually may result in an extension conflict if you decide to replicate the
same local extension at a later time.
When set to “1”, Enterprise Manager will delete the IP Gateway user regardless of
whether or not there are unforwarded voice messages in the IP Gateway user’s Inbox.
When set to “0” (the default), Enterprise Manager will not delete the IP Gateway user
if there are unforwarded voice messages.
LogSize
DWORD value specifying the maximum size (in megabytes) of each Enterprise
Manager log file.
Default is 4 MB.
APPENDIX J. TELEVANTAGE CONFIGURATION SETTINGS
J-15
HKLM\Software\TFTPD32
TftpLogFile
STRING value specifying the location of the Tftpd32 TFTP Server log files, for
example:
“C\\Program Files\\TeleVantage\\Tftpd32\\TFTP.log”
When this key exists, the Tftpd32 TFTP Server writes an entry to the log file each time
any of the SIP or H.323 phones listed in Chapter 17 download updates to the phone's
firmware and configuration files from the Tftpd32 TFTP Server.
This setting will take effect the next time that the Tftpd32 TFTP Server service starts.
Note: Since there are no size constraints on Tftpd32 TFTP Server log files, this setting
should only be used when troubleshooting problems with SIP phones, typically at the
direction of your Tech Support representative.
If this key does not exist (the default), no log files are created.
For more about the Tftpd32 TFTP Server, see Chapter 17.
J-16
INSTALLING TELEVANTAGE
TeleVantage Server language locale settings __________________
TeleVantage currently uses the following locale codes:
EN00
EN10
ES00
U.S. English
U.K. English
Latin American Spanish
HKLM\Software\Artisoft\TeleVantage\Server\TUI
DefaultLocaleCode
STRING value specifying the default locale code.
Default value is determined during installation.
Locale definitions
Each installed locale code has its own set of registry entries, as follows:
HKLM\Software\Artisoft\TeleVantage\Server\TUI
Description
STRING value specifying the language description for this locale code.
Defaults are: EN00 =“US English”, EN10 = “UK English”, ES00 = “Latin American
Spanish”.
LocaleDLL
STRING value specifying the DLL to use for this locale code.
Defaults are: EN00 = “TVLEN00.DLL”, EN10 = “TVLEN10.DLL”,
ES00 = “TVLES00.DLL”.
SentenceFile
STRING value specifying the sentence file for this locale code.
Defaults are: EN00 = “TVLEN00.INI”, EN10 = “TVLEN10.INI”,
ES00 = “TVLES00.INI”.
VapFile
STRING value specifying the system voice file for this locale code.
Defaults are: EN00 = “TVLEN00.VAP”, EN10 = “TVLEN10.VAP”,
ES00 = “TVLES00.VAP”.
APPENDIX J. TELEVANTAGE CONFIGURATION SETTINGS
J-17
Defining custom tones ____________________________________
Custom tones can be defined for incoming fax detection and disconnect detection. (Disconnect
tone is an issue for analog trunks only. Robbed-bit T1, E1 CAS, and ISDN PRI trunks do not,
in general, use an in-band tone to signal a disconnect.) For a detailed discussion of custom
disconnect tones, see the TeleVantage Knowledge Base article #1099, “A Practical Guide to
Custom Disconnect Tones.”
You can define one incoming fax tone and up to ten different disconnect tones under the
following Windows registry keys:
HKLM\SOFTWARE\Artisoft\TeleVantage\Server\ToneDefinitions
\IncomingFaxTone
HKLM\SOFTWARE\Artisoft\TeleVantage\Server\ToneDefinitions
\DisconnectTone<n>
where <n> is a digit from 1 through 9 (for example, \DisconnectTone1, \DisconnectTone2,
and so forth.)
Custom trunk disconnect detection tones are used in installations where a PBX sits between the
central office and TeleVantage, and where the PBX provides a tone to indicate trunk hangup.
By default, defines a DisconnectTone1 as a fast busy tone.
After you enter custom tones, you must restart the TeleVantage Server. At startup, TeleVantage
will read the definitions for all custom tones and define them to the Dialogic drivers.
Note: Use the information in this section to define custom disconnect tones via the Windows
registry for all Dialogic telephony boards that provide analog trunk resources, except for the
following boards: DI0408LSAR2, DM/V160LP, and DM/V160LPEU. For these boards, you must
edit the Dialogic .config file associated with the board. For more information, see the TeleVantage
Knowledge Base article #1099.
Each custom tone is defined by the DWORD values listed in the following table.
Custom Tone Keys
J-18
Key
Description
freq1
First frequency (in Hz) for the tone
freq1dev
Allowable deviation for the first frequency (in Hz.) This allows
TeleVantage to use a range for detecting the tone, instead of an exact
frequency.
freq2
Second frequency (in Hz) for the tone
freq2dev
Allowable deviation for the second frequency (in Hz)
cadence
Enables or disables cadence. 1 = enabled and 0 = disabled.
minrep
Number of repetitions for the cadence (that is, the number of times that the
on/off signal is repeated)
dualtone
Specifies whether the tone is a dual tone or single tone. 0 = single tone and 1
= dual tone.
cadenceon
Length of time for which the cadence is “on” (in 10ms units)
INSTALLING TELEVANTAGE
Custom Tone Keys
Key
Description
cadenceon_dev Allowable deviation for “on” time (in 10ms units)
cadenceoff
Length of time for which the cadence is “off” (in 10ms units)
cadenceoff_dev Allowable deviation for “off” time (in 10ms units)
leadingedge
1 = tone detection on leading edge, 0 = on trailing edge
Example: Defining a disconnect tone
The keys in the next table are DWORD values that define the default disconnect tone for
TeleVantage. The tone has the following characteristics:
Q
A Dual Tone Frequency with a first frequency of 450Hz – 510 Hz (that is, 480 +/- 30)
and a second frequency of 580ms – 660ms (that is, 620 +/- 40)
Q
On and off times are both between 200ms – 300ms (that is, 250ms +/- 50ms)
Q
Cadence must repeat 2 times
Q
Cadence begins on the leading edge of the tone
Custom Tone Keys
Key
DWORD Description
freq1
480
First frequency (in Hz) for the tone
freq1dev
30
Allowable deviation for first frequency (in Hz)
freq2
620
Second frequency (in Hz) for the tone
freq2dev
40
Allowable deviation for second frequency (in Hz)
cadence
1
1 = cadenced tone, 0 = noncadenced tone
minrep
2
Number of repetitions for the cadence
dualtone
1
1 = dualtone, 0 = single tone
cadenceon
25
Time for which cadence is “on” (in 10ms units)
cadenceon_dev
5
Allowable deviation for “on” time (in 10ms units)
cadenceoff
25
Time for which cadence is “off” (in 10ms units)
cadenceoff_dev
5
Allowable deviation for “off” time (in 10ms units)
leadingedge
1
Tone detection: 1 = leading edge, 0 = trailing edge
APPENDIX J. TELEVANTAGE CONFIGURATION SETTINGS
J-19
Disabling Dialogic devices _________________________________
By default, TeleVantage allocates and opens all Dialogic devices that are present on the Server
for itself. If you do not want TeleVantage to allocate all of the available devices, use the
procedure described later in this section to disable the Dialogic devices.
You might need to disable Dialogic devices for any of the following reasons:
Q
Disable devices to allow non-TeleVantage applications to run on the TeleVantage
Server. For example, you may have another telephony application installed on the
TeleVantage Server that must own some Dialogic devices. You would identify the
specific Dialogic devices and channels required by the application, and then disable
those devices. When TeleVantage opens Dialogic devices at startup, it will ignore the
disabled devices, making them available to the application.
Note:You do not need to reserve devices when developing an IVR Plug-in, which will
automatically share TeleVantage’s Dialogic resources as needed.
Q
Disable devices to connect a fractional T1 or E1 line to TeleVantage. For example,
you may have a T1 line with 12 channels instead of 24. To connect this T1 line to
TeleVantage, you still connect it to a Dialogic board with 24 channels, but you disable
half of the channels. When TeleVantage starts, it will see 12 instead of 24 trunks, which
will match the fractional T1 line. You must be sure to disable the correct half, for
example, trunks 1-12 or trunks 13-24, whichever matches the fraction of the T1 line you
have.
Q
Disable devices to ignore several trunks on a telephony board and use its voice
resources only. For example, you could install a D480SC-2T1 card that supports two
T1 lines (even though you only have one T1 line) and 48 voice processors in one slot.
The D480SC-2T1 card has 24 extra voice resources that you can use to provide dial tone
and voice prompts for those 24 stations. Installing a D240SC-T1 card (that supports only
one T1 line) and another board that provides the additional 24 voice resources would
consume an additional slot. For this configuration, you would disable the T1 resources
for the second T1 line on the D480SC-2T1 board. TeleVantage will not see the disabled
T1 resources when starting up, but it will see all the voice resources.
To disable Dialogic devices in the Windows registry
1.
Using the conventions described in “Dialogic device names” on page J-24, determine
the device names for the Dialogic devices you want to disable.
2.
Run Regedit.
3.
Create the following key as a string value (if it does not already exist):
HKLM\SOFTWARE\Artisoft\TeleVantage\Server\Settings\DisableDevices
J-20
INSTALLING TELEVANTAGE
4.
Set the contents of DisableDevices to a comma-separated list of the device names you
are disabling.
For example, to disable the third and fourth channels on the first telephony board in a
system, set the contents of DisableDevices as follows:
DXXXB1C3,DXXXB1C4
To disable all the channels on a board, set DisableDevices to the board name without
any channel, for example:
DXXXB1
5.
Save the changes to the registry.
Note: If you add or remove Dialogic boards, you must update the DisableDevices list.
Modifying how conference resources are used
By default, TeleVantage may utilize the conference resources on any board in the system that
meets the conference requirements to start a conference call and add participants. Priority
settings and board order determine which available board is used first, if more than one board
meets the conference requirements.
Some boards support more conferences, or more parties per conference than others. If a
conference grows too large for the board currently handling it, the conference is automatically
moved to a board that supports the increased number of participants, if one is available. (See
Appendix A in Installing Dialogic Telephony Components for details on the conference
capabilities of different telephony boards.)
You can modify how conference resources are used in the following ways:
Q
Disable all of the conferencing resources on an individual board. See the next
Q
Change a board’s conference priority. For instructions, see “Changing a board’s
section for details.
conference priority” on page J-22.
Disabling a board’s conference resources
Disabled conference resources are never used for TeleVantage conference calls. One reason to
do this (rather than disable all of the resources on the board as described in “Disabling Dialogic
devices” on page J-20), would be to keep a board’s conferencing resources free for use by
another application, while still allowing its other resources to be used by TeleVantage.
You can disable all of the conference resources on a board via the Windows registry.
Note: For some boards, conference resources are only available when the boards are
configured with certain media loads, as indicated in the table on page J-22; other media loads do
not provide conference resources on these boards.
APPENDIX J. TELEVANTAGE CONFIGURATION SETTINGS
J-21
To disable a board’s conference resources
1.
Run Regedit.
2.
Create the following key (if it does not already exist):
HKLM\SOFTWARE\Artisoft\TeleVantage\Server\Settings\DisableDevices
3.
Under DisableDevices, create a STRING Value containing the board name whose
conference resources you want to disable, using the appropriate format for your board
type as listed in the following table.
Board
Media Load
Value
where
DISIx analog station boards
n/a
/DCBBnDy
DI0408LSAR2 integrated trunk and station
board
ml3 or ml4
n and y are the
board number
DM/IP241-1T1-P100 Internet telephony
board
ml11
DM/IP301-1E1-P100 Internet telephony
board
ml11
DM/V480A-2T1-PCI T1 trunk board
ml10
DM/V600A-2E1-PCI E1 trunk board
ml10
DM/V1200A-4E1-PCI E1 trunk board
ul1
DM/V2400A conference bridge board
ml9
Toshiba CS-DKTU digital station board
n/a
/DktConfBn
n is the board
number
4.
To disable conference resources on additional boards, repeat step 3 for each board.
5.
Save the changes to the registry.
Changing a board’s conference priority
When a conference call is created, TeleVantage chooses which telephony board handles the
conference based on the board’s conference priority setting. The highest-priority board (with the
lowest priority number) that meets the conference requirements gets chosen first. The lower a
board’s priority number is, the more often it will be used for conference calls.
You might change a board’s conference priority to reserve the resources on the board for larger
conferences. For example, DI/SIx boards support up to 16 participants per conference, while the
DM/V2400A board supports up to 60 participants. While both boards have the same default
conference priority, you could change priorities so that the resources on the DI/SIx boards are
used first. That way, the DM/V2400A resources are available to handle conferences with more
than 16 participants.
J-22
INSTALLING TELEVANTAGE
The table on page J-23 lists the default priorities assigned to each of the boards that provide
conference resources. You can change a particular board’s conference priority via the Windows
registry.
Note: For some boards, conference resources are only available when the boards are
configured with certain media loads, as indicated in the table on page J-23; other media loads do
not provide conference resources on these boards.
To change a board’s conference priority
1.
Run Regedit.
2.
Create the following key for the board that you want to prioritize (if it does not already
exist):
HKLM\SOFTWARE\Artisoft\TeleVantage\Server\<boardName>\
where <boardName> is the appropriate Value for your board type as listed in the
following table.
Board
Media load
Default
Value
priority
DISIx analog station boards
n/a
200
/DCBBoardn
DI0408LSAR2 integrated trunk and
station board
ml3 or ml4
DM/IP241-1T1-P100 Internet telephony
board1
ml11
DM/IP301-1E1-P100 Internet telephony
boarda
ml11
DM/V480A-2T1-PCI T1 trunk board
ml10
DM/V600A-2E1-PCI E1 trunk board
ml10
DM/V960A-4T1-PCI T1 trunk board
ml9b
DM/V1200A-4E1-PCI E1 trunk board
ul1
DM/V2400A conference bridge board
ml9
Toshiba CS-DKTU digital station board
n/a
300
/DktBoardn
where
n is the
board
number
1. Conference
resources are available on this board only if you set up your Internet span as a host-based
stack. See “Using a host-based VoIP stack” in Chapter 4 in Installing TeleVantage for more information.
APPENDIX J. TELEVANTAGE CONFIGURATION SETTINGS
J-23
3.
Create a DWORD Value ConfPriority under the key you created in the previous step
(if it does not already exist), and set it to 100 (highest priority), 200 (medium priority),
or 300 (lowest priority.)
4.
To change the conference priority of additional boards, repeat steps 2-3 for each board.
5.
Save the changes to the registry.
Dialogic device names
Dialogic system software creates standard names for devices and channels within devices.
These names are used to open the devices to receive device handles, which are used in all
subsequent Dialogic driver functions.
Dialogic telephony board device names
A Dialogic telephony board device name has the form DXXXBnCn, where Bn is the board
number and Cn is the channel number. For example, Channel 1 on Board 1 would be named
DXXXB1C1. If multiple telephony boards have been installed, the board number 1 is assigned
to the Dialogic telephony board that was installed in the TeleVantage Server with the lowest
board ID. (For information about setting Dialogic board IDs, see Installing Dialogic Telephony
Components.) The board number is then incremented by 1 for every four voice ports. The
channel number is assigned sequentially starting with 1 each time the board number changes and
incremented by 1 for each voice channel. Whenever all the devices on one Dialogic telephony
board have been named, the board-numbering sequence continues on the Dialogic telephony
board that was installed with the next lowest board ID.
For example, if you installed a Dialogic D/120JCT-LS in the TeleVantage Server with the board
ID set to 0 and a D/41JCT-LS with the board ID set to 1, the devices on these boards would have
the names shown in the following table.
J-24
Board
Board ID
Channel
D/120JCT-LS
0
DXXXB1C1 - LSI/VOX
DXXXB1C2 - LSI/VOX
DXXXB1C3 - LSI/VOX
DXXXB1C4 - LSI/VOX
DXXXB2C1 - VOX
DXXXB2C2 - VOX
DXXXB2C3 - VOX
DXXXB2C4 - VOX
D/41JCT-LS
1
DXXXB3C1 - LSI/VOX
DXXXB3C2 - LSI/VOX
DXXXB3C3 - LSI/VOX
DXXXB3C4 - LSI/VOX
INSTALLING TELEVANTAGE
If you assigned the lower board ID to the D/41JCT-LS board, the devices on the same boards
would have the names shown in the following table.
Board
Board ID
Channel
D/120JCT-LS
0
DXXXB1C1 - LSI/VOX
DXXXB1C2 - LSI/VOX
DXXXB1C3 - LSI/VOX
DXXXB1C4 - LSI/VOX
D/41JCT-LS
1
DXXXB2C1 - LSI/VOX
DXXXB2C2 - LSI/VOX
DXXXB2C3 - LSI/VOX
DXXXB2C4 - LSI/VOX
DXXXB3C1 - VOX
DXXXB3C2 - VOX
DXXXB3C3 - VOX
DXXXB3C4 - VOX
Dialogic Internet telephony board device names
You can disable Dialogic Internet telephony boards to make them available for
non-TeleVantage use, but you cannot disable individual channels on the boards. Board names
use the form DM3Boardn, where n is the board number. The board number is assigned
sequentially starting with zero and is incremented by 1 for each board.
Dialogic telephony board settings___________________________
Dialogic telephony board settings consist of VoiceBoard keys, which apply to all channels for
a specified board number, and VoiceBoard Line keys, which apply to individual channels on the
board.
VoiceBoard settings
VoiceBoard keys are located under:
HKLM\SOFTWARE\Artisoft\TeleVantage\Server\VoiceBoard<n>
where <n> is the Dialogic board number (see “Dialogic device names” on page J-24 for an
explanation of board numbering conventions.)
HKLM\Software\Artisoft\TeleVantage\Server\VoiceBoard<n>
Key
DXBD_FLASHCHR
Default Description
&
Flash Character. Character that causes a hook flash when
detected. (10ms units.)
DXBD_FLASHTM
50
Flash Time. Length of time onhook during flash. (10ms
units.)
APPENDIX J. TELEVANTAGE CONFIGURATION SETTINGS
J-25
HKLM\Software\Artisoft\TeleVantage\Server\VoiceBoard<n>
Key
Default Description
DXBD_MAXPDOFF
50
Maximum Pulse Digit Off. Maximum time loop current
may be off before the existing loop pulse digit is considered
invalid and reception is re-initialized. (10ms units.)
DXBD_MAXSLOFF
25
Maximum Silence Off. Maximum time for silence being
off, during audio pulse detection. (10ms units.)
DXBD_MINIPD
25
Minimum Loop Interpulse Detection. Minimum time
between loop pulse digits during loop pulse detection.
(10ms units.)
DXBD_MINISL
25
Minimum Interdigit Silence. Minimum time for silence to
be on between pulse digits for audio pulse detection. (10ms
units.)
DXBD_MINLCOFF
40
Minimum Loop Current Off. Minimum time before loop
current drop message is sent. (10ms units.)
Note that boards in the DI series are not affected by this
setting. To change minimum loop current off on a DI board,
you must edit the config file (for example,
@DI0408LSA_REV2_ML3.config) and change the
following line:
transition=0xC15CA024,0x80,0x88,100,400
(0xxx->1xxx)
! Net_Drop
400 is the min lc off value and 100 is the buffer time.
DXBD_MINPDOFF
2
Minimum Pulse Detection Off. Minimum break interval
for valid loop pulse detection. (10ms units.)
DXBD_MINPDON
2
Minimum Pulse Detection On. Minimum make interval
for valid loop pulse detection. (10ms units.)
DXBD_MINSLOFF
2
Minimum Silence Off. Minimum time for silence to be off
for valid audio pulse detection. (10ms units.)
DXBD_MINSLON
1
Minimum Silence On. Minimum time for silence to be on
for valid audio pulse detection. (10ms units.)
DXBD_MINTIOF
5
Minimum DTI Off. Minimum time required between
ring-received events. (10ms units.)
DXBD_MINTION
5
Minimum DTI On. Minimum time required for rings
received event. (10ms units.)
DXBD_OFFHDLY
50
Off-hook Delay. Period after off-hook, during which no
events are generated (no DTMF digits detected during this
time.) (10ms units.)
DXBD_PAUSETM
DXBD_P_BK
20
0
6
Pause Time. Delay caused by a comma in the dialing
string. (10ms units.)
Pulse Dial Break. Duration of pulse dial off-hook interval.
(10ms units.)
J-26
INSTALLING TELEVANTAGE
HKLM\Software\Artisoft\TeleVantage\Server\VoiceBoard<n>
Key
Default Description
DXBD_P_IDD
10
0
Pulse Interdigit Delay. Time between digits in pulse
dialing. (10ms units.)
DXBD_P_MK
4
Pulse Dial Make. Duration of pulse dial off-hook interval.
DXBD_R_EDGE
2
Ring Edge. Detection of ring edge:
(10ms units.)
1- Beginning of ring
2 - End of ring
DXBD_R_IRD
80
Inter-ring Delay. Maximum time to wait for the next ring
(100ms units.) Distinguishes between calls. Set to 1 for T-1.
DXBD_R_OFF
5
Ring-off interval. Minimum time for ring not to be present
DXBD_R_ON
3
Ring-on Interval. Minimum time ring must be present to
before qualifying as “not ringing” (100 ms units.)
qualify as a ring (100ms units.)
DXBD_S_BNC
DXBD_TTDATA
4
10
Silence and Non-silence Debounce. Length of a changed
state before Call Status Transition message is generated.
(10ms units.)
Duration of DTMF digits for dialing. (10ms units.)
DXBD_MFMINON
0
Minimum MF On. The duration to be added to the standard
MF tone duration before the tone is detected. The minimum
detection duration is 65ms for KP tones and 40ms for all
other tones. This parameters affects all the channels on the
board (10ms units.)
DXBD_MFTONE
6
MF Minimum Tone Duration. The duration of a dialed MF
tone. This parameter affects all the channels on the board.
Max value 10 (10ms units.)
DXBD_MFDELAY
DXBD_MFLKPTONE
6
MF Interdigit Delay. The length of silence period between
tones during MF dialing. This parameter affects all the
channels on the board (10ms units.)
10
MF length of LKP Tone. The length of the LKP tone during
MF dialing. This parameter affects all the channels on the
specified board. Max value 15 (10ms units.)
DXBD_T_IDD
5
DTMF Interdigit Delay. Time between digits in DTMF
dialing. (10ms units.)
DXBD_MINOFFHKTM 25
0
Minimum Off-hook Time. Specified in 10ms units.
APPENDIX J. TELEVANTAGE CONFIGURATION SETTINGS
J-27
VoiceBoard channel settings
Channel-level settings are controlled by the VoiceBoard Line registry keys, which are located
under:
HKLM\SOFTWARE\Artisoft\TeleVantage\Server\VoiceBoard<n1>\Line<n2>
where <n1> is the Dialogic board number and <n2> is the channel number (see “Dialogic device
names” on page J-24 for an explanation of board and channel numbering conventions.)
..\Server\VoiceBoard<n1>\Line<n2>
DXCH_ADSIALERT_AMPL
DWORD value that specifies the volume of the ADSI alert tone, which is the first Caller
ID beep when sending Caller ID with call waiting. The Dialogic default is -13, which
is louder than the TeleVantage setting.
TeleVantage default is -23.
MinTrunkOnhookTime
DWORD value specifying the minimum on-hook time in milliseconds before the trunk
will be used for another outbound call.
Note: If you are using a dedicated trunk for automatic pages, you should set the value
for that trunk to 1000 milliseconds, otherwise paging calls may fail if they occur too
soon after a previous one.
Default is 3000 milliseconds.
DXCH_D_FLAGS
DWORD value for DTMF detection edge select.
Default is 0.
DXCH_DTINITSET
DWORD value that specifies the DTMF digits on which to initiate play on. You can
OR values of different DTMF digits to form the bit mask. Legal values are as follows:
Value
Digit
Value
Digit
-DM_1
-DM_2
-DM_3
-DM_4
-DM_5
-DM_6
-DM_7
-DM_8
1
2
3
4
5
6
7
8
-DM_9
-DM_0
-DM_S
-DM_P
-DM_A
-DM_B
-DM_C
-DM_D
9
0
*
&
a
b
c
d
Default is 0.
J-28
INSTALLING TELEVANTAGE
..\Server\VoiceBoard<n1>\Line<n2>
DXCH_DTMFTLK
DWORD value for DTMF Talk. Sets the minimum time for DTMF to be present during
playback to be considered valid. Increasing the value provides more immunity to
talkoff/playoff. Set to -1 to disable.
Default is 5.
DXCH_DTMFDEB
DWORD value for DTMF debounce time. Maximum length of time in which DTMF
can be absent and then come back on again and still be considered the same DTMF tone.
Default is 0.
DXCH_MFMODE
DWORD value for MF Mode. A word-length bit mask that selects the minimum length
of KP tones to be detected. Possible values:
Q
0 - detect KP tone > 40ms
Q
2 - detect KP tone > 65ms
Q
Greater than 2 - KP tone returned to application during MF detection. Ensures
only standard length KP tones (100ms) are detected. If set to 0 any KP tone greater
than 40ms will be detected.
Default is 2.
DXCH_MAXRWINK
DWORD value for Maximum Loop Current for wink. Maximum time loop current
needs to be on before recognizing a wink (10ms units)
Default is 20.
DXCH_MINRWINK
DWORD value for Minimum Loop Current for wink. Minimum time loop current
needs to be on before recognizing a wink (10ms units)
Default is 10.
DXCH_WINKDLY
DWORD value for Wink Delay. The delay after a ring is received before issuing a wink
(10ms units)
Default is 15.
DXCH_RINGCNT
DWORD value for Ring Count. Number of rings to wait before returning a ring event.
Default is 4.
APPENDIX J. TELEVANTAGE CONFIGURATION SETTINGS
J-29
..\Server\VoiceBoard<n1>\Line<n2>
DXCH_WINKLEN
DWORD value for Wink Length. The duration of a wink in the off-hook state (10ms
units.)
Default is 15.
Robbed Bit T1 Setting
The setting IgnoreSpuriousSignals should be activated only in cases where all other efforts to
configure Robbed Bit T1 signaling correctly have failed (see “Adding a digital Robbed Bit T1
span” in Chapter 5 in Administering TeleVantage.)
HKLM\SOFTWARE\Artisoft\TeleVantage\Server\DTIBoard<n>\
\Server\DTIBoard<n>
IgnoreSpuriousSignals
DWORD value to aid correct Robbed Bit T1 configuration when other methods have
failed. If enabled, the IgnoreSpuriousSignals setting makes TeleVantage ignore certain
signals if the device is offhook.
To enable, set to 00000001.
To disable, set to 00000000.
E1 and T1 board settings
In the following lists, Board<n> refers to a Dialogic board number. See “Dialogic device
names” on page J-24 for an explanation of board numbering conventions.
HKLM\SOFTWARE\Artisoft\TeleVantage\Server\DTIBoard<n>\GlobalCall
\Server\DTIBoard<n>\GlobalCall
CIDName...
The CIDName settings allow you to customize how your system receives Calling Name
Identification on PRI lines. See the next section, “Configuring Calling Name
Identification on PRI boards.”
DumpCallInfo
DWORD value specifying whether or not to include raw call-event information
elements from E1 and T1 trunks (ISDN PRI, robbed-bit, CAS) in the TeleVantage
Server log (filename format Tvlogxxx.txt.)
Default is 0, which suppresses the information element logging. Set to 1 to include the
information elements in the log.
J-30
INSTALLING TELEVANTAGE
\Server\DTIBoard<n>\GlobalCall
HandleProgressInd
DWORD value specifying whether TeleVantage uses IE-based audio connection on
ISDN trunks. Add for each PRI board in your system. When this feature is turned on,
audio is connected on IEs of 1 and 8 on PROCEEDING, SETUP_ACK, and
ALERTING.
When set to 0 (the default), this feature is turned off. Audio connects on all ISDN calls
regardless of Progress IEs.
When set to 1, this feature is turned on. Audio connects on ISDN calls only with the IEs
described above.
InProtocol and OutProtocol
These values define the CAS protocol on E1 boards. For details, see “Manually entering
E1 CAS protocols” in Installing Dialogic Telephony Components.
DNISLength
DWORD value specifying the number of expected DNIS (DDI) digits (in milliseconds)
to be received by the TeleVantage Server before attempting to process the inbound call.
No default, but the TeleVantage Server attempts to get the DNIS 9 digit string upon
notification of an inbound call.
DNISWaitTime
DWORD value specifying the expected DNIS (DDI) time (in milliseconds) that the
TeleVantage Server will wait for digits to be received before attempting to process the
inbound call.
Default is 2000 milliseconds (2 seconds) after it receives the notification of an inbound call.
OverlappedDNIS
DWORD value specifying how DNIS digits are delivered on your system. Normally,
DNIS digits are delivered completely on the SETUP message. Some European switches
deliver DNIS digits one at a time after the SETUP message (“overlapped digits.”)
If set to 0 (the default), DNIS digits are delivered completely on the SETUP message.
If set to 1, DNIS digits are delivered as overlapped digits.
Configuring Calling Name Identification on PRI boards
Depending on your ISDN provider, Calling Name Identification is delivered in an Information
Element (IE) either when the incoming call is offered (in the SETUP message), or on a
subsequent FACILITY message.
This information is controlled via the registry values described below. The default values
represent commonly-used settings, but you may need to customize the defaults based on how
your provider delivers Calling Name Identification.
APPENDIX J. TELEVANTAGE CONFIGURATION SETTINGS
J-31
Add the following for each PRI board in your system, under:
HKLM\SOFTWARE\Artisoft\TeleVantage\Server\DTIBoard1\GlobalCall
Q
CIDNameOnSetup (DWORD.) Message that contains the calling name field. When set
to 0, calling name is delivered in the FACILITY message. When set to 1 (the default),
calling name is delivered in the SETUP message.
Q
CIDNameIE (DWORD.) IE in which the calling name field is delivered. default is 28
(0x1C.)
Q
CIDNameOffset (DWORD.) Offset within the IE where the calling name field begins.
Default is 14 (0x0E.)
Q
CIDNameLength (DWORD.) Length of the calling name field within the IE. Default is
15 (0x0F.)
Q
CIDNameTimeout (DWORD.) Used only when CIDNameOnSetup = 0. Maximum
length of time TeleVantage waits for the FACILITY message to arrive. The default,
2000, specifies a 2-second wait.
The following is a sample IE taken from a TeleVantage Server log that conforms to the default
CIDNameIE, CIDNameOffset, and CIDNameLength values described above. The IE is
displayed in hexadecimal and ASCII:
IE: 0x1C: 9F 8B 01 00|A1 17 02 01|01 02 01 00|80 0F 52 4F|42 42 49 4E|53 20 45 4E|47 49 4E 45|45
"....!.........ROBBINS ENGINEE"
BRI board settings
HKLM\SOFTWARE\Artisoft\TeleVantage\Server\BRIBoard<n>\ISDN
\Server\BRIBoard<n>\ISDN
DumpCallInfo
DWORD value specifying whether or not to include raw call-event information
elements from BRI trunks in the TeleVantage Server log (filename format
Tvlogxxx.txt.)
Default is 0, which suppresses the information element logging. Set to 1 to include the
information elements in the log.
DNISWaitTime
DWORD value specifying the expected DNIS (DDI) time (in milliseconds) that the
TeleVantage Server will wait for digits to be received before attempting to process the
inbound call.
Default is 2000 milliseconds (2 seconds) after it receives the notification of an inbound
call.
J-32
INSTALLING TELEVANTAGE
\Server\BRIBoard<n>\ISDN
HandleProgressID
DWORD value specifying whether TeleVantage uses IE-based audio connection on
ISDN trunks. Add for each BRI board in your system. When this feature is turned on,
audio is connected on IEs of 1 and 8 on PROCEEDING, SETUP_ACK, and
ALERTING.
When set to 0, (the default), this feature is turned off. Audio connects on all ISDN calls
regardless of Progress IEs.
When set to 1, this feature is turned on. Audio connects on ISDN calls only with the IEs
described above.
OverlappedDNIS
DWORD value specifying how DNIS digits are delivered on your system. Normally,
DNIS digits are delivered completely on the SETUP message. Some European switches
deliver DNIS digits one at a time after the SETUP message (overlapped digits.)
Set to 0 (the default) if DNIS digits are delivered completely on the SETUP message.
Set to 1 if DNIS digits are delivered as overlapped digits.
PointToPoint
DWORD value specifying whether the board uses point-to-point protocol.
To use point-to-point protocol, set to 1. You must also change the firmware file for the
board (see Installing Dialogic Telephony Components.)
Default is 0 (Multipoint protocol)
ISDN Megacom service settings
These settings enable you to make outbound international calls using ISDN Megacom service.
The first setting is required, and the last two settings are optional.
For each outbound call, TeleVantage checks the dial string to see if it is prefixed with the
number specified in InternationalPrefix.
If it does not contain the international prefix, the call proceeds like a normal domestic call, and
no further steps occur.
If it does contain the international prefix, TeleVantage strips the prefix from the dial string, and
then checks whether InternationalType and InternationalPlan are present. If they are,
TeleVantage uses them to override the called number and calling number call parameters.
APPENDIX J. TELEVANTAGE CONFIGURATION SETTINGS
J-33
HKLM\SOFTWARE\Artisoft\TeleVantage\Server\DTIBoard<n>\GlobalCall\
MakeCall
..\DTIBoard<n>\GlobalCall\MakeCall
InternationalPrefix
STRING value for your international dialing prefix. For example,
InternationalPrefix=“011”.
Default is “011”.
InternationalType
DWORD value used to override the called number call parameter.
Default is 1 (INTL_NUMBER.)
InternationalPlan
DWORD value used to override the calling number call parameter.
Default is 1 (ISDN_NUMB_PLAN.)
Using the TeleVantage Advanced Settings Editor_______________
The TeleVantage Advanced Settings Editor is a utility that you can use to view and alter settings
for both the Server and individual users. The TeleVantage Server uses a database to store
numerous settings. Other TeleVantage settings are stored in the Windows registry of each
machine, as described in “TeleVantage registry settings” on page J-2. You must have
Administrator permissions to run the TeleVantage Advanced Settings Editor.
Use this utility with extreme caution, preferably under the direction of your TeleVantage
provider.
To run the TeleVantage Advanced Settings Editor, start the Administrator and choose Tools >
Advanced Settings Editor.
J-34
INSTALLING TELEVANTAGE
Viewing current values
The main window of the program displays a list of all available settings.
Q
In the User Name drop-down list, select a TeleVantage user. In the Location column,
“User” refers to the user specified here.
Q
Name indicates the path and name of the key.
Q
Value indicates the current value of this key. You can change the value by
double-clicking the item and entering a new value in the Edit Setting dialog box, as
described in the next section, “Changing key values.”
Q
Default indicates the TeleVantage default value for this key.
Q
Location indicates where the key value will be stored. “User” and “Server” keys are
stored in a database on the TeleVantage Server. “Registry” keys are stored in the
Windows Registry of the machine on which you are running the TeleVantage Settings
program.
Q
Type indicates whether the value is Boolean, Long, or String.
APPENDIX J. TELEVANTAGE CONFIGURATION SETTINGS
J-35
Changing key values
When you double-click on a key listed in the main window, the Edit Setting dialog box opens.
Q
Name displays the name of the key.
Q
Value allows you to change the value of the key by typing a new value and clicking OK.
Q
Default displays the default value.
Q
Location displays the location of the key.
Q
Type displays the type of value for this key (Boolean, Long, or String.)
Q
Description displays a description of the key.
Modifying other supported TeleVantage settings
Vertical support is available for the settings described in this section. These settings are stored
either as Registry keys on the current computer or as System items on the Server database.
Support is not available for other settings except when your TeleVantage provider has
specifically instructed you to alter them.
Registry keys on the current computer
audio\temp file dir
STRING value that specifies the directory in which to store temporary files.
Default value is “” (empty string.)
audio\VolumePercentage
DWORD value that specifies the percentage to increase the current wave volume on
playback or recordings or greetings.
Default value is 35 (increase volume by 35%.)
J-36
INSTALLING TELEVANTAGE
Registry keys on the current computer
Call Monitor\Hold Conference Parties
DWORD value that specifies whether or not external conference parties may be put on
hold.
Default value is 1 (true.) A value of 0 would specify that parties may not be put on hold.
Database\Connectiontimeout
DWORD value that specifies the amount of time (in seconds) to wait before timing out
when connecting to the database.
Default value is 15 seconds.
Device Monitor\RefreshInterval
DWORD value that specifies the interval (in minutes) between Device Monitor
application refresh cycles.
Default value is 5 minutes.
System database settings
ACD\NoAnswerTime
DWORD value that specifies how long to wait after an agent in a call center queue fails
to answer a call before offering that agent another call.
A setting of 0 means that available agent phones will always be rung, even if a call
comes in immediately after they failed to answer one. 0 is a useful setting for queues
using simultaneous ring.
Note: A setting of 0 indicates that agents will never be placed in the NoAnswer state.
This means that agents will never be detected as having failed to answer a call;
therefore, they will never be automatically placed On Break for missing calls, even if
the queue is set to do so. Also, the queue statistics Away, No Answer, and Forced Break
will never be incremented, even if a call is placed back on the queue because an agent
failed to answer the phone.
Default value is 30 seconds.
APPENDIX J. TELEVANTAGE CONFIGURATION SETTINGS
J-37
System database settings
\CallLog\AutoArchiveDelay
\CallLog\AutoArchiveDelayInterval
DWORD values that enable you to slow down Call Log archiving so that the process
consumes less CPU usage.
AutoArchiveDelayInterval specifies how often a delay is inserted into the archive
process. Enter the number of calls to be archived between each instance of the delay.
For example, if set to 10 (the default), the delay will be inserted after every 10 archived
calls. If set to 0, the delay is turned off, and Call Log archiving proceeds at full speed
and CPU usage.
AutoArchiveDelay specifies a delay in milliseconds (the default setting is 200.)
As a rough guideline, a delay of 200 every 10 calls should peak CPU use at about 70%
and a delay of 200 every 1 call will peak it at about 25%. Each system is different, so
test to find the values that work for you.
Note: Changes to these settings will be applied the next time that the Call Log is
archived.
Messages\MaxMessageDuration
Maximum length (in minutes) of a single voice message.
Default is 5 minutes.
Server\ACDWrapupTime
DWORD value specifying the number of milliseconds (for ACD group) between when
an agent hangs up a call and when the oldest waiting caller is notified that the agent
became available.
Default is 4000 milliseconds.
Server\AutoAttendantInterdigitTimeout
DWORD value specifying how long (in milliseconds) an auto attendant waits to see
whether a dialed number is complete in cases where ambiguous numbers exist, for
example, when there is a menu choice at 2 and an extension at 200.
Default is 3000 milliseconds.
Server\BufferDirCleanupThreshold
DWORD value specifying the threshold age (in days) of old files that the Server
automatically deletes from the buffer directory. The Server will delete files as old or
older than this setting. Note that many buffer files are created by workstation
applications such as ViewPoint, so the threshold should be kept long enough so that
workstation applications will be stopped and restarted, ensuring that the remaining files
are really unused.
Default value is 10 days.
J-38
INSTALLING TELEVANTAGE
System database settings
Server\CPAConnectDelay
DWORD value that specifies the delay in milliseconds after call progress analysis
returns the connected result before marking an outbound call as connected. Increasing
this value may help discriminate between abandoned and connected calls.
Default value is 2000 millseconds.
Server\AllowCallsWithoutUsers
DWORD value that specifies whether or not to allow conference calls with no users
(that is, all parties have left the conference) and external transfers of external calls.
Default value is 1 (true.) A value of 0 would prevent conference calls with no users and
external transfers of external calls.
Server\AllowGatewayUserLogin
DWORD value. If this value is non-zero, the system will allow Gateway users to log in
from an auto attendant or internal dial tone. Gateway users inherit the permissions of
their Enterprise Gateway and usually have the ability to dial external numbers while
logged in on a trunk.
Default value is 1.
Server\AudioControlRingtimeout
DWORD value that specifies the maximum time (in milliseconds) that the TVAudio
Control will spend attempting to connect before returning with a timeout.
Default value is 30000 milliseconds.
Server\CallRecordingBeepFile
Specifies the filename of the file containing the sound used as a reminder beep during
call recordings (see “Including a beep on call recordings” in Chapter 4 in Administering
TeleVantage.) By default the file is StdCallRecordingBeep.vox, which produces a 500
millisecond beep. TeleVantage provides an alternate file called
ShortCallRecordingBeep.vox, which produces a 200-millisecond beep. Both beeps
have a frequency of 1400 Hz with a 25% amplitude. You can specify your own filename
as long as the file resides in the default prompt directory (by default, C:\Program
Files\TeleVantage Server\Vfiles.)
See CallRecordingBeepInterval for the spacing between beeps.
Default value is StdCallRecordingBeep.vox
Server\CallRecordingBeepInterval
The time (in milliseconds) between reminder beeps on call recordings. The beep
interval will never be less than the duration of the beep sound file
(CallRecordingBeepFile) plus one second, regardless of what is entered here.
Default value is 15,000 milliseconds (15 seconds.)
APPENDIX J. TELEVANTAGE CONFIGURATION SETTINGS
J-39
System database settings
Server\CCRouteOutbound
DWORD value that determines whether or not outbound calls are recognized by call
center distribution algorithms. For example, whether “Longest Idle Agent” counts
agents’ outbound calls.
Default is 0 (off), meaning outbound calls are not recognized by call center distribution
algorithms. Can be set to 1 (on) to recognize outbound calls.
Server\CheckRecipientCallForSetting
DWORD value. Check both callee and recipient “call for” setting. The callee is the
person whom the call is for. The recipient is the person who answers the phone, or, to
be more precise, the person who most recently logged in at that station. Note that these
can be different people.
Default value is 1 (yes.) With this setting (or if the setting is not present), “call for” will
be announced if either the callee or the recipient has “call for” turned on. Can be set to
0 (no.)
Server\DefaultGreetingSize
DWORD value that specifies default size (in minutes) for greeting space.
Default value is 10 minutes.
Server\DefaultMailboxSize
DWORD value that specifies default size for a new mailbox.
Default value is 20.
Server\Dial911AtDialtone
DWORD value that specifies whether the emergency number can be dialed at the
internal dial tone.
Default value is 0 (no.) Can be set to 1 (yes.)
Server\DialToneAfterGUIHold
DWORD value that controls whether users of Toshiba digital phones hear dial tone after
putting a call on hold using ViewPoint.
If the phone has multiple line appearances, dial tone is not heard after ViewPoint hold
regardless of this setting. This setting affects only phones with no line appearances.
Default value is 0 (no dial tone.) Can be set to 1 (dial tone.)
J-40
INSTALLING TELEVANTAGE
System database settings
Server\DirectCallsUseFaxTarget
DWORD value that determines whether incoming faxes on DID calls are diverted to the
Send faxes to extension for the trunk. When enabled, faxes are diverted, but all trunks
on the span must use the same fax target. When disabled, DID calls are always routed
to the user whose DID number is being dialed, even when they are fax calls.
Default value is 0 (disabled.) Can be set to 1 (enabled.)
Server\DropMonitorsAfterTransferComplete
DWORD value specifying whether supervisors on a call are disconnected when the user
they are supervising is transferred to a new third party, or parked and then unparked by
a new third party. Supervisors are users who have used the Coach or Monitor command
on the call.
The default is 1 (supervisors are disconnected when the supervised user is transferred.)
Can be set to 0, in which case supervisors remain with the call as long as the new third
party doesn’t prohibit supervision.
Note that the supervisor is always disconnected if the supervised user leaves the call, or
if a user who prohibits supervision enters the call.
Server\E911RingDuration
DWORD value that specifies the number of milliseconds to ring E-911 stations before
dialing out of trunk.
Default value is 4000 millseconds (4 seconds.)
Server\EmailNotifyAddSubmittedTime
BOOLEAN value specifying whether TeleVantage adds a line to the body each e-mail
notification of a new voice message, listing the timestamp when TeleVantage submitted
the e-mail to the e-mail server. Use this setting to help debug delays in e-mail
notification.
Default is 0 (timestamp not included.) Set to 1 to include the timestamp.
Server\EnableIPAddressMatch
DWORD value specifying whether IP phones defined as external stations require a
connection string of *<ext>*<pwd>*. The setting applies especially to Uniden IP
phones. The default of 0 means that a connection string is not required, and the IP phone
connects to TeleVantage automatically using IP address matching. This setting has
some security risk. Can be set to 1, in which case the connection string is required.
APPENDIX J. TELEVANTAGE CONFIGURATION SETTINGS
J-41
System database settings
Server\ExternalCallOfferingDelay
DWORD value specifying the wait (in milliseconds) before TeleVantage starts call
offering on a trunk for routing lists and call forwarding. This setting applies to normal
PSTN calls (analog, RB T1, and ISDN.) For IP calls where a positive indication of
connection is received, use ExternalCallOfferingDelayConnected.
Default is 8000 milliseconds.
Server\ExternalCallOfferingDelayConnected
DWORD value specifying the wait (in milliseconds) before TeleVantage starts call
offering on a trunk for routing lists and call forwarding. This setting applies to IP calls
where a positive indication of connection is received. For normal PSTN calls (analog,
RB T1, and ISDN), use ExternalCallOfferingDelay.
Default is 100 milliseconds.
Server\HoldRecallBehaviorForParkedCalls
DWORD value specifying the system-wide behavior when a ringback calls is answered
(ringback calls are calls left on hold or parked that ring the user back.) When set to 0,
the system announces the call. When set to 1, the call is immediately connected.
Default is 0.
Server\InternalDialtoneTrunkFirsttimeout
DWORD value that specifies the dial tone duration (in milliseconds) before the trunk
goes to reorder when a user is logged in remotely.
Default value is 180000 milliseconds.
Server\InternalDialtoneTrunkSecondtimeout
DWORD value that specifies the dial tone duration (in milliseconds) after a remote
party hangs up before the station goes to reorder when a user is logged in remotely.
Default value is 180000 milliseconds.
Server\InternalDialtoneStationFirsttimeout
DWORD value that specifies the dial tone duration (in milliseconds) before the station
goes to reorder.
Default value is 25000 milliseconds.
Server\InternalDialtoneStationSecondtimeout
DWORD value that specifies the dial tone duration (in milliseconds) after a remote
party hangs up before the station goes to reorder. If there is a PBX behind TeleVantage
that uses the reorder tone as a disconnect tone, you may want to decrease this value.
Default value is 5000 milliseconds.
J-42
INSTALLING TELEVANTAGE
System database settings
Server\IPVoiceTitleMaxSilence
Sometimes voice titles for IP calls are cut off. This is because latency causes extra
silence at the start of the call. This setting allows you to change the Maximum duration
of silence allowed in milliseconds.
Default is 2000
Server\LongIdleTime
DWORD value that specifies the minimum duration (in seconds) of a function call or
IVR Plug-in before a Windows event is generated.
Default value is 21600 seconds.
Server\MaxAutoAttendantLoops
DWORD value that specifies the maximum number of auto attendants to which a call
will be routed without the caller pressing a key.
Default value is 3.
Server\MaxGreetingDuration
The maximum length (in minutes) of a single greeting recording.
Default is 5 minutes.
Server\MaxRingDuration
DWORD value that specifies the maximum ring duration (in milliseconds) for internal
and external calls. The maximium possible value is 999000. Note that for live Operator
systems you might want to use the maximum value, to help prevent Operator calls from
continuing down the Operator’s routing list.
Default value is 120000 milliseconds.
Server\MinimumMessage
DWORD value that specifies the minimum duration (in milliseconds) for voicemail
messages. Messages shorter than this are discarded.
Default value is 2000 milliseconds.)
Server\MinRingDuration
DWORD value that specifies the minimum ring duration (in milliseconds) for internal
and external calls. The minimum possible value is 1000.
Default value is 5000 milliseconds.
Server\MinRingDurationForExternal
DWORD value that specifies the minimum ring duration (in milliseconds) for external
calls.
Default value is 12000 milliseconds.
APPENDIX J. TELEVANTAGE CONFIGURATION SETTINGS
J-43
System database settings
Server\MinRingDurationForExternalCallOffering
DWORD value that specifies the minimum ring duration (in milliseconds) for external
calls using call offering in routing lists.
Default value is 12000 milliseconds.
Server\MinRingDurationForExternalPadding
DWORD value that specifies the extra time (in millseconds) that the system adds to ring
durations for external calls in routing lists.
Default value is 3000 millseconds.
Server\MSDEFullPercentage
DWORD value specifying the maximum percentage of MSDE database size allowed,
after which the Server will stop logging call data.
Default is 90.
Server\MSDECriticalLimitPercentage
DWORD value specifying the critical limit on the MSDE database size (as a
percentage), at which the phone system raises an NT event.
Default is 80.
Server\OutOfConfResEventInterval
Settings that determines whether the Server logs a message to the TeleVantage Event
Log whenever it runs out of conference resources. Possible values are:
-1: Conference resource failures are not logged.
0: Conference resource failures are always logged.
xxx: Number of milliseconds to wait for before logging a consecutive failure event.
Server\PageRequestTimeout
DWORD value specifying how much time (in milliseconds) the Server allots, when a
user makes a page, to take all paged Cybiolink and Aastra Powertouch phones offhook.
(No delay occurs for Toshiba digital phones.) At the end of the allotted time the page
connection is made with however many phones were successfully taken offhook. Note
that if the time is too short, some paged phones will not be taken offhook and will not
receive the page.
Default is 10000 milliseconds.
Server\PageTimeout
DWORD value specifying how much time (in milliseconds) a page can last, following
the beep that signals connection. At the end of the allotted time, the page ends
automatically.
Default is 30000 milliseconds.
J-44
INSTALLING TELEVANTAGE
System database settings
Server\PageVoxAllocMaxRetryInterval
DWORD value specifying the length of time TeleVantage waits (in milliseconds) to
retry taking a phone offhook for a page, after it fails due to lack of voice resources.
Default is 2000 milliseconds
Server\PageVoxAllocRetries
DWORD value specifying the maximum number of attempts to take a phone offhook
for a page.
Default is 10.
Server\ParkHoldRingBackBehavior
DWORD value specifying what happens to parked calls that are never unparked.
If set to 0, (the default), calls remain parked indefinitely.
If set to 1, calls go to the voice mailbox of the user who parked the call. If the user has
no voice mailbox, the call goes to the user’s personal Operator.
If set to 2, calls go to the personal Operator of the user who parked the call.
Server\PauseBetweenRingback
DWORD value specifying (in seconds) how long TeleVantage waits between ringback
attempts for a call left on hold or parked. Used in conjunction with RingbackRetries.
Default is 10.
Server\PlayInSeconds
DWORD value specifying whether the Expected Wait Time prompt for call center
queues announces the wait time in minutes only, or minutes and seconds. A setting of
1 announces minutes and seconds. A setting of 0 (the default) announces minutes only.
Server\PlayToneBeforePage
DWORD value specifying whether TeleVantage plays a beep tone on page/intercom
calls using *15 before the call is connected. A setting of 1 (the default) plays the beep.
A setting of 0 connects the page/intercom call without a beep.
Server\PrependVTMessageDuration
DWORD value specifying the length (in seconds) of voice messages beyond which
TeleVantage does not automatically prepend the caller’s voice title. On short messages,
the voice title is sometimes wanted to identify the caller, while on longer messages it is
assumed the identification is provided in the message.
Default is 5.5 seconds.
APPENDIX J. TELEVANTAGE CONFIGURATION SETTINGS
J-45
System database settings
Server\RefreshVMWI
DWORD value specifying the number of milliseconds to wait before refreshing the
CLASS phone message waiting lights.
Default is 5000 milliseconds.
Server\PresentExtensionBeforeCallerID
DWORD value specifying how callback is performed on voice messages that have both
an extension and a Caller ID number. This can occur when a user calls in from a remote
phone, logs in, presses # and dials an internal number, and leaves a message. When set
to 0 (the default), callback dials the Caller ID number. When set to 1, callback dials the
extension.
Server\RequireLoginForTUIOnTrunk
DWORD value specifying whether or not TeleVantage will require a user login after
pressing ** on a remote phone (trunk ** has the same effect as a station flash.)
Default value is 1 (login is required.) A value of 0 specifies that login is not required.
Server\RestartTimerAfterRingingAgent
DWORD value that controls whether Hold prompts play when agents are available in a
call center queue. If set to 1 (True), Hold prompts do not play as long as an agent is
available. The Seconds before this prompt setting starts counting only when all agents
are unavailable. (This restores the TeleVantage 4.x behavior.)
If set to 0 (False), Hold prompts always play according to the Seconds before this
prompt schedule, whether or not agents are available. (This can result in callers hearing
Hold prompts even when agents are available.)
Default is 0 (False.)
Server\RingbackRetries
DWORD value specifying how many times TeleVantage attempts ringback for a call
left on hold or parked, after the first ringback attempt. If the final attempt is unanswered
the call is sent to the voicemail of the user who put it on hold or parked it. Used in
conjunction with PauseBetweenRingback.
Default is 0.
Server\RoutingListContinueDelay
DWORD value specifying the time duration a caller has to press # and be advanced to
the next action in the routing list.
Default value is 15 seconds.
J-46
INSTALLING TELEVANTAGE
System database settings
Server\SendDigitsToStationDelay
DWORD value that specifies the delay (in millseconds) before sending digits to a
station, for example, DID digits.
Default value is 0 milliseconds.
Server\TrunkAllocationInterval
DWORD value that specifies the amount of time (in milliseconds) that dialing services
wait before trying to allocate another trunk. This is only used when a trunk is not
responding. If you decrease this value, you also need to decrease
WaitLoopCurrenttimeout (see page J-9.)
Default value is 1800 milliseconds.
Server\TUIIdleTimeout
DWORD specifying number of milliseconds before the TUI times out. Timeout causes
a trunk to hang up. When a station times out, the re-order tone will play and then the
station will be disabled until it is hung up.
Default is 120000 milliseconds.
Server\TUITransferRingDelay
LONG value specifying the amount of time (in milliseconds) that the server waits
before ringing the recipient’s phone on call transfers using the telephone commands.
The delay gives the transferer time to hang up when performing a blind transfer.
Increasing the ring delay can avoid extra ringing of the recipient’s phone that may cause
confusion.
Default value is 5000 milliseconds.
Server\UISupportIdleTimeout
DWORD specifying the time in milliseconds before a station goes to dialtone after
ViewPoint plays or records audio. Note that if a station is taken off-hook automatically,
the timeout is this setting or 10 seconds, whichever is less.
Default is 120000 milliseconds.
APPENDIX J. TELEVANTAGE CONFIGURATION SETTINGS
J-47
System database settings
Server\UseGroupMemberDNDSetting
Specifies whether workgroup calls to an Available user with a shared station ring the
phone if the phone's other user is in Do Not Disturb (DND) status.
If set to Off (the default behavior that matches previous versions), whether or not the
phone rings depends on which user is currently logged in to the station. If a user is
taking calls and is logged in to the station, the phone rings. If a user is in DND and is
logged in, the phone does not ring. (For an explanation of logging in to stations, see
Chapter 7 of Using TeleVantage.)
If set to 1 (On), the phone rings regardless of which user is currently logged in.
Default value is 0 (Off.)
Server\VoxLowEventInterval
Minimum Time interval in milliseconds for generating Event logs when a low priority
voice resource cannot be allocated. A low priority voice resource is a voice resource
used for setting MWI and paging.
Default value is -1 (Ignore setting.)
Server\VoxLowBorrowedMinFreeAbsolute
The minimum number of borrowed voice resources the system leaves for other purposes
before allocating a borrowed voice resource for a low priority task. A low priority task
is an MWI or paging task.
Note: This setting overrides VoxLowBorrowedMinFreePercentage.
Default value is -1 (Equivalent to the number of borrowed voice resources—don’t
allocate any borrowed voice resources.)
Server\VoxLowBorrowedMinFreePercentage
The minimum percentage of borrowed voice resources the system leaves for other
purposes before allocating a borrowed voice resource for a low priority task. A low
priority task is an MWI or paging task.
Note: This setting is overridden by VoxLowBorrowedMinFreeAbsolute unless that
setting is -1.
Default value is -1 (Equivalent to 100%—don't allocate any borrowed voice resources.)
Server\VoxLowSharedMinFreeAbsolute
The minimum number of shared voice resources the system leaves for other purposes
before allocating a shared voice resource for a low priority task. A low priority task is
an MWI or paging task.
When set to -1, the system uses the following table for the value of this setting:
J-48
INSTALLING TELEVANTAGE
System database settings
Total #of shared
voice resources
# of shared resources that
remain free for other purposes
1
2
3
4
5
6
7
8
>8
1
1
2
3
4
4
4
4
50% of total # of shared voice
resources
Note: This setting overrides VoxLowSharedMinFreePercentage.
Default value is -1 (Use system defaults, see table above.)
Server\VoxLowSharedMinFreePercentage
The minimum percentage of shared voice resources the system leaves for other
purposes before allocating a shared voice resource for a low priority task. A low priority
task is an MWI or paging task.
Note: This setting is overridden by VoxLowSharedMinFreeAbsolute unless that
setting is -1.
Default value is -1, (Equivalent to 50%.)
Server\VoxSysCallRecEventInterval
Minimum time interval in milliseconds for generating Event logs when a voice resource
cannot be allocated for System Call Recording.
Default value is 900000 (15 minutes.)
If set to -1, this setting is ignored.
Server\VoxSysCallRecBorrowedMinFreeAbsolute
The minimum number of borrowed voice resources the system leaves for other purposes
before allocating a borrowed voice resource for System Call Recording.
Note: This setting overrides VoxSysCallRecBorrowedMinFreePercentage.
Default value is -1 (Equivalent to the number of borrowed voice resources—don't
allocate any borrowed voice resources.)
APPENDIX J. TELEVANTAGE CONFIGURATION SETTINGS
J-49
System database settings
Server\VoxSysCallRecBorrowedMinFreePercentage
The minimum percentage of borrowed voice resources the system leaves for other
purposes before allocating a borrowed voice resource for System Call Recording.
Note: This setting is overridden by VoxSysCallRecBorrowedMinFreeAbsolute unless
that setting is -1.
Default value is -1 (Equivalent to 100%—don't allocate any borrowed voice resources.)
Server\VoxSysCallRecSharedMinFreeAbsolute
The minimum number of shared voice resources the system leaves for other purposes
before allocating a shared voice resource for System Call Recording.
When set to -1, the system uses the following table for the value of this setting:
Total #of shared
voice resources
# of shared resources that
remain free for other purposes
1
2
3
4
5
6
7
8
>8
1
1
2
3
4
4
4
4
10% of total # of shared voice
resources
Note: This setting overrides VoxSysCallRecSharedMinFreePercentage.
Default value is -1 (Use system defaults, see table above.)
Server\VoxSysCallRecSharedMinFreePercentage
The minimum percentage of shared voice resources the system leaves for other
purposes before allocating a shared voice resource for a System Call Recording.
Note: This setting is overridden by VoxSysCallRecSharedMinFreeAbsolute unless
that setting is -1.
Default value is -1 (Equivalent to 10%.)
System\MinAdminBuild
DWORD value that specifies minimum build version number of the Administrator
program that is allowed to log on to the Server.
Default value is 0.
J-50
INSTALLING TELEVANTAGE
System database settings
System\MinClientBuild
DWORD value that specifies minimum build version number of ViewPoint that is
allowed to log on to the Server.
Default value is 0.
System\MinDevMonBuild
DWORD value that specifies minimum build version number of the Device Monitor
that is allowed to log on to the Server.
Default value is 0.
APPENDIX J. TELEVANTAGE CONFIGURATION SETTINGS
J-51
APPENDIX K
APPENDIX K
FURTHER READING
The following books and websites offer further information about telecommunications and
Microsoft Windows telephony architecture:
Books on telecommunications
Black, Uyless, Voice over IP, 2nd edition. ISBN 0-1306-5204-0
Carr, Joseph, Winder, Steve and Bigelow, Stephen J., Understanding Telephone Electronics,
4th edition. ISBN 0-7506-7175-0
Bodin, Madeline and Dawson, Keith, The Call Center Dictionary, 3rd edition. ISBN
1-5782-0095-4
Carden, Carlton, Understanding Computer Telephony, 2nd edition. ISBN 1-5782-0000-8
Dodd, Annabel Z., The Essential Guide to Telecommunications, 4th edition. ISBN
0-1314-8725-6
Flannagan, William A., The Guide to T-1 Networking, 5th edition. ISBN 1-5782-0021-0
Goralski, Walter J. and Kolon, Matthew C., IP Telephony. ISBN 0-0713-5221-X
Grigonis, Richard, Computer Telephony Encyclopedia. ISBN 1-5782-0045-8
Miller, Mark A., Voice over IP - Strategies for the Converged Network. ISBN 0-7645-4617-1
Moulton, Pete, The Telecommunications Survival Guide. ISBN 0-1302-8136-0
Newton, Harry, Newton's Telecom Dictionary, 21st edition. ISBN 1-5782-0315-5
Sulkin, Allan, PBX Systems for IP Telephony. ISBN 0-0713-7568-6
Camarillo, Gonzalo, SIP Demystified. ISBN 0-0713-7340-3
Sinnreich, Henry and Johnston, Alan B., Internet Communications Using SIP. ISBN
0-4714-1399-2
Books on Windows telephony architecture
Friedman, Mark, Windows 2000 Performance Guide. ISBN 1-5659-2466-5
Mueller, Scott, Upgrading and Repairing PCs, 15th edition. ISBN 0-7897-2974-1
Solomon, David, Inside Microsoft Windows 2000, 3rd edition. ISBN 0-7356-1021-5
Tulloch, Mitch, Windows 2000 Administration in a Nutshell. ISBN 1-5659-2713-3
Web sites about telecommunications
LincMad (telephone area codes and splits)
http://www.lincmad.com
AT&T fraud education
http://www.att.com/fraud
North American Numbering Plan administration
http://www.nanpa.com
Web sites about Windows telephony architecture
AnandTech (hardware analysis and news)
http://www.anandtech.com
PCI-SIG specifications
http://www.pcisig.com/specifications
Storage Review (hard disk and storage-related performance)
http://www.storagereview.com
Freeware Sysinternals (Windows advanced utilities, technical information, and source
code)
http://www.sysinternals.com
SysOpt.com (system optimization information)
http://www.sysopt.com
Tom's Hardware Guide (PC hardware reviews and news)
http://www.tomshardware.com/index.html
Upgrading and repairing PCs
http://www.upgradingandrepairingpcs.com
Web sites about VoIP
VoIPTroubleshooter (online diagnostic tools for network managers)
www.voiptroubleshooter.com
K-2
INSTALLING TELEVANTAGE
INDEX
Symbols
*18 phone command H-9
A
Aastra SIP phones
brands and models tested (table) 5-6
about
add-ons 2-2
Administrator 2-4
ADSI phones 5-3
Advanced Settings Editor J-34
analog phones 5-4
Archived Recording Browser 2-6
Automatic Number Identification (ANI) 4-3
Call Center Reporter 2-4
call waiting 4-4
Caller ID
inbound 4-3
outbound 4-3
Client API G-9
Contact Manager Assistant 2-6
database server 9-2
Device Monitor 2-3
Device Status API G-12
DID interface unit 4-5
digital phones 5-11
Direct Inward Dial (DID) 4-3
documentation 1-6
Drivers CD 7-2
E1 trunks 4-7
emergency dialing service 4-4
emergency dialing services 3-22
Enterprise Manager 2-5
failover support 2-3
H.323 phones 5-10
hunt groups 4-4
in-band signaling applications G-2
inbound- and outbound-only trunks 4-4
inbound caller identification 4-3
installing for the first time 7-8
ISDN BRI trunks 4-9
ISDN Two B-Channel Transfer service 4-4
IVR Plug-in API G-9
licenses 10-16
Master CD 7-2
Multi-line TAPI Service Provider 2-5
outbound caller identification 4-3
PSTN/FXO gateways 6-2
Recording Archive Service 2-6, 15-2
Robbed Bit T1 Experimenter 2-6
SDK G-7
Server 2-3
Server reliability features 2-3
SIP phones 5-6
SMDR service 16-2
Software Development Kit 2-7
Station Message Detail Recording (SMDR) Service
2-6
station/FXS gateways 6-3
system 1-2
T1 trunks 4-5
TAPI applications G-2
TAPI Service Provider 2-5
Tftpd32 TFTP Server 17-2
toll fraud I-2
trunks 4-2
upgrading from a previous version 7-6, 7-7
ViewPoint 2-4
ViewPoint Web Access 13-2
Web Services 2-4
wiring requirements 5-13
workstation applications 2-2, 11-2
Act!
configuring
for Multi-line TAPI Service Provider 14-8
for TAPI Service Provider 11-9
activated licenses
about D-1
Add-in API
about G-9
add-ons
about 2-2
Administrator
about 2-4
installing 10-15
PC requirements 3-18
ADSI phones
about 5-3
brands and models tested (table) 5-3
Advanced Settings Editor
about J-34
analog phones
about 5-4
brands and models tested (table) 5-5
analog trunks
about 4-5
additional required hardware
DID interface unit 4-5
operating behind a PBX 4-5
requirements 4-5
ANI. See Automatic Number Identification
Archived Recording Browser
about 2-6
Automatic Number Identification (ANI)
about 4-3
C
Call Center Reporter
about 2-4
PC requirements 3-21
call waiting
about 4-4
Caller ID (inbound)
INSTALLING TELEVANTAGE
about 4-3
Caller ID (outbound)
about 4-3
caller identification
inbound 4-3
outbound 4-3
calling name on ISDN PRI
configuring J-31
changing Server domain 7-5
channel settings
about J-28
Citrix MetaFrame
installation modes A-1
Client API
about G-9
COMPANY J-3
configuring
Act!
for Multi-line TAPI Service Provider 14-8
for TAPI Service Provider 11-9
Contact Manager Assistant
for Multi-line TAPI Service Provider 14-8
for TAPI Service Provider 11-10
e-mail notification of voice messages 10-25
GoldMine
for Multi-line TAPI Service Provider 14-7
for TAPI Service Provider 11-9
Layer 3 QoS TOS Octet for higher VoIP quality H-2
Microsoft Outlook
for Multi-line TAPI Service Provider 14-8
for TAPI Service Provider 11-9
Multi-line TAPI Service Provider 14-6
SMDR service 16-3
system for Windows Firewall F-1
TAPI Service Provider 11-8
Tftpd32 TFTP Server 17-6
Windows 8-3
contact management software
and TAPI Service Provider 11-8
configuring
Act! 11-9
INDEX-2
Contact Manager Assistant 11-10
GoldMine 11-9
Microsoft Outlook 11-9
Contact Manager Assistant
about 2-6
configuring
for Multi-line TAPI Service Provider 14-8
for TAPI Service Provider 11-10
installing 11-5
PC requirements 3-19
CounterPath SIP softphones 5-9
custom tones
defining for disconnect detection J-18
defining for fax detection J-18
D
database server
about 9-2
installing 9-3
requirements 3-11
troubleshooting problems B-4
DCOM 98
installing for use with workstation applications 11-3
Device Monitor
about 2-3
Device Status API
about G-12
Dialogic boards
cooling requirements 3-9
requirements
CPU and memory 3-5
Dialogic devices
disabling J-20
Dialogic HMP
license requirements 3-17
requirements
CPU and memory 3-4
DID interface unit
about 4-5
DiffServe routers
INDEX-3
about H-2
digital phones
about 5-11
brands and models tested (table) 5-13
features 5-11
Direct Inward Dial (DID)
about 4-3
disabling
Dialogic devices J-20
disconnect tones
defining J-18
DM3 boards
memory requirements 3-6
power requirements 3-9
documentation
about 1-6
dongle
installing D-11
Drivers CD
about 7-2
E
E1 and T1 board registry settings J-30
E1 trunks
about 4-7
additional required hardware 4-8
E1 CAS protocols supported 4-8
E1 ISDN PRI protocols supported 4-8
requirements 4-7
carrier requirements 4-7
e-mail notification
adding timestamp 10-26
and custom Outlook forms 10-26
configuring 10-25
network requirements 3-14
requirements 3-14
emergency dialing service
about 3-22, 4-4
Enhanced 911 (E-911) service
requirements 3-23
ordering 4-4
requirements 3-22
Enterprise Manager
about 2-5
eyeBeam SIP softphone 5-9
F
failover support
about 2-3
fax detection tones
defining J-18
G
gateways
PSTN/FXO gateways
about 6-2
supported
PSTN/FXO gateways (table) 6-2
station/FXS gateways (table) 6-3
GoldMine
configuring
for Multi-line TAPI Service Provider 14-7
for TAPI Service Provider 11-9
H
H.323 phones
about 5-10
brands and models tested (table) 5-10
how to use this manual 1-5
hunt groups
about 4-4
I
in-band signaling applications
about G-2
inbound- and outbound-only trunks
about 4-4
inbound caller identification
about 4-3
INSTALLING TELEVANTAGE
inbound PRI calling name identification J-31
installing
Administrator 10-15
applying latest SQL Server service pack 9-4
Contact Manager Assistant 11-5
database server 9-3
dongle D-11
for the first time
about 7-8
starting the installation 7-9
using the CDs 7-2
from a zip file 7-3
Microsoft MSDE from Master CD 9-3
Multi-line TAPI Service Provider 14-2
Recording Archive Service 15-2
SDK G-8
Server 10-2
SMDR service 16-3
TAPI Service Provider 11-8
Tftpd32 TFTP Server 17-2
using this manual 1-5
ViewPoint 11-4
Web Services 13-5
Windows 8-2
workstation applications on application server A-2
workstation applications unattended E-1
installing for the first time
what you must know before installing 7-9
intercom and page settings J-44
Internet telephony
requirements 3-15
Internet telephony board device names J-25
IP phones
testing via *18 phone command H-9
troubleshooting H-8
ISDN
inbound calling name on PRI boards J-31
ISDN BRI trunks
about 4-9
additional required hardware 4-9
protocols supported 4-9
INDEX-4
requirements 4-9
carrier requirements 4-9
shared voice resources 4-9
ISDN Two B-Channel Transfer service
about 4-4
ordering 4-4
IVR Plug-in API
about G-9
IVR Plug-ins
developing G-10
licensing G-11
reserving station licenses for G-11
L
Layer 3 QoS TOS Octet
configuring H-2
licenses
about 10-16
entering licenses D-3
hardware locking D-9
trial licenses D-2
activated licenses D-1
activating 10-16, D-3
via Web D-4
activation errors D-6
affect on system behavior D-1
entering 10-16
exporting D-8
importing D-7
installing dongle D-11
moving
licenses to another Server D-11
Server to another PC D-11
one-click activation D-4
requirements 3-16
Dialogic HMP 3-17
summary 3-17
terms of use D-10
viewing 3-17
status of licenses on system D-3
INDEX-5
M
Master CD
about 7-2
Microsoft Exchange synchronization
configuring 10-26
requirements 3-15
Microsoft MSDE
installing from Master CD 9-3
Microsoft Outlook
configuring
for Multi-line TAPI Service Provider 14-8
for TAPI Service Provider 11-9
Microsoft Terminal Server
installation modes A-1
Multi-line TAPI Service Provider
about 2-5
configuring 14-6
Act! 14-8
contact management software for use with 14-7
Contact Manager Assistant 14-8
GoldMine 14-7
Microsoft Outlook 14-8
connecting to multiple Servers 14-6
installing 14-2
restricting station access to users 14-6
N
network
requirements 3-12
for e-mail notification of voice messages 3-14
running without a LAN 3-12
using Novell IPX 3-12
using TCP/I 3-12
new installations. See installing for the first time
Novell networks
using 3-14
O
ordering
Automatic Number Identification (ANI) 4-3
call waiting 4-4
Caller ID (inbound) 4-3
Caller ID (outbound) 4-3
Direct Inward Dial (DID) 4-3
hunt groups 4-4
inbound- and outbound-only trunks 4-4
inbound caller identification service 4-3
ISDN Two B-Channel Transfer service 4-4
outbound caller identification service 4-3
ordering services from phone company 4-2
outbound caller identification
about 4-3
overhead loudspeaker
solving common problems G-7
using G-7
P
page and intercom settings J-44
paging system
solving common problems G-7
using 5-15, G-7
PBX
customizing trunk disconnect tones J-18
replacing 5-14
wiring
patch panels 5-14
punch down blocks 5-14
phone company
ordering services 4-2
phones
supported
ADSI phones (table) 5-3
analog phones (table) 5-5
H.323 phones (table) 5-10
SIP desktop phones (table) 5-6
SIP softphones (table) 5-9
Toshiba digital phones (table) 5-13
troubleshooting problems B-3
PocketPC softphone 5-9
INSTALLING TELEVANTAGE
PRI boards
inbound calling name J-31
proxy server
configuring system 10-24
requirements 3-15
PSTN/FXO gateways
about 6-2
Q
Quintum VoIP gateways 6-2
R
Recording Archive Service
about 2-6, 15-2
installing 15-2
PC requirements 3-21
registry settings
BRIBoard settings
DNISWaitTime J-32
DumpCallInfo J-32
HandleProgressID J-33
OverlappedDNIS J-33
PointToPoint J-33
defining custom tones J-18
DTIBoard settings
CIDName J-30
DNISLength J-31
DNISWaitTime J-31
DumpCallInfo J-30
HandleProgressInd J-31
IgnoreSpuriousSignals J-30
InProtocol and Outprotocol J-31
InternationalPlan J-34
InternationalPrefix J-34
InternationalType J-34
OverlappedDNIS J-31
Enterprise Manager settings
ForceDeleteGatewayUser J-15
LogSize J-15
External station settings
INDEX-6
ZipTone J-9
Server settings
6E23WK J-4
CallWaitingInterval J-9
COMPANY J-3
DbCacheInterval J-4
DefaultLocaleCode J-17
Description J-17
DisableCallHistory J-4
DisableDevices J-4, J-20
DisconnectTone J-18
E1 and T1 J-30
EmptySentItemsFolder J-4
EnableIPLogin J-4
ExpWaitRingCycleLength J-5
IncomingFaxTone J-18
LocaleDLL J-17
LOCKOUTRESETINTERVAL J-3
LockoutResetInterval J-3
LogHours J-5
LogPath J-5
MaxNonSilence J-5
MinDiskFreeSpace J-5
MonitorInterval J-5
MonitorLocPBE J-6
MonitorRestart J-6
Monitortimeout J-6
NumConcurrentIPGCOpens J-6
NumLogs J-7
PartyCustomDataMax J-7
Q931DefaultSourceName J-7
SendDisplayOnAnswerCall J-7
SentenceFile J-17
SpeedDialMonitor J-9
TruncateRecordings J-7
UnknownCallerName J-8
UseConferencesForEchoCancellation J-8
UseDedicatedVoiceDevices J-8
UserVoxPath J-8
VapFile J-17
VoxHighEventInterval J-9
WaitLoopCurrenttimeout J-9
INDEX-7
VoiceBoard settings
DXBD_FLASHCHR J-25
DXBD_FLASHTM J-25
DXBD_MAXPDOFF J-26
DXBD_MAXSLOFF J-26
DXBD_MFDELAY J-27
DXBD_MFLKPTONE J-27
DXBD_MFMINON J-27
DXBD_MFTONE J-27
DXBD_MINIPD J-26
DXBD_MINISL J-26
DXBD_MINLCOFF J-26
DXBD_MINOFFHKTM J-27
DXBD_MINPDOFF J-26
DXBD_MINPDON J-26
DXBD_MINSLOFF J-26
DXBD_MINSLON J-26
DXBD_MINTIOF J-26
DXBD_MINTION J-26
DXBD_OFFHDLY J-26
DXBD_P_BK J-26
DXBD_P_IDD J-27
DXBD_P_MK J-27
DXBD_PAUSETM J-26
DXBD_R_EDGE J-27
DXBD_R_IRD J-27
DXBD_R_OFF J-27
DXBD_R_ON J-27
DXBD_S_BNC J-27
DXBD_T_IDD J-27
DXBD_TTDATA J-27
DXCH_ADSIALERT_AMPL J-28
DXCH_D_FLAGS J-28
DXCH_DTINITSET J-28
DXCH_DTMFDEB J-29
DXCH_DTMFTLK J-29
DXCH_MAXRWINK J-29
DXCH_MFMODE J-29
DXCH_MINRWINK J-29
DXCH_RINGCNT J-29
DXCH_WINKDLY J-29
DXCH_WINKLEN J-30
MinTrunkOnhookTime J-28
workstation settings
Address J-11, J-14
audio temp file dir J-36
AutoLogon J-11
Call Monitor Hold Conference Parties J-37
Connectiontimeout J-37
Database J-11
FreeSpaceRequired J-12
HangUpCalls J-13, J-15
History J-11
LoggedInUserID J-11
LogPath J-15
MaxRevisions J-13
MaxSelectionBeforeConfirmation J-10
MaxTraceFileSize J-12
OutputToTraceFileOn J-13
PersistentSort J-12
Pingtimeout J-13
RedrawMode J-11
RefreshInterval J-37
Server J-11, J-14
ServerPingInterval J-13
ShowStatusBarServerInfo J-10
TftpLogFile J-16
TraceDirectory J-14
TraceLevel J-14
TraceMaxRevisions J-14
TracePath J-13
TraceToFile J-14
Username J-12
VolumePercentage J-36
registry settings. See also system database settings
remote administration
using Windows Terminal Services A-5
reporting problems B-1
requirements
Administrator PC 3-18
analog trunks 4-5
calculating disk space required for Server 3-6
Call Center Reporter PC 3-21
INDEX-8
Contact Manager Assistant PC 3-19
database server PC 3-11
Dialogic boards
CPU and memory 3-5
Dialogic HMP
CPU and memory 3-4
E1 trunks 4-7
e-mail notification of voice messages 3-14
emergency dialing service 3-22
Enhanced 911 (E-911) service 3-23
Internet telephony 3-15
ISDN BRI trunks 4-9
licenses 3-16
HMP 3-17
Microsoft Exchange synchronization 3-15
network 3-12
network configuration 3-13
Novell IPX networks 3-12
proxy server 3-15
Recording Archive Service PC 3-21
Server PC 3-2
Station Message Detail Recording (SMDR) Service
3-22
T1 trunks 4-5
TAPI Service Provider PC 3-19
TCP/IP networks 3-12
ViewPoint PC 3-18
VoIP 4-10
Web Services PC 3-20
Robbed Bit T1 Experimenter
about 2-6
S
SDK
about G-7
APIs G-8
installing G-8
SDK. See Software Development Kit
secure Web site, setting up on Server 13-4
security
dialing restrictions I-4
for passwords I-3
logon accounts I-5
monitoring current scams I-6
securing
phone system database I-6
SIP stations I-6
user permissions I-4
Server
about 2-3
access rights
setting 10-24
calculating required disk space 3-6
changing domain 7-5
configuration limits 3-10
configuring
e-mail notification 10-25
configuring for use with proxy server 10-24
configuring Microsoft Exchange synchronization
10-26
database configuration requirements 3-12
failover support 2-3
installing 10-2
PC requirements 3-2
physical location for 3-2
registry settings J-2
reliability features 2-3
setting access rights 10-24
setting to autostart 10-23
testing 10-21
troubleshooting problems B-5
using industrial PCs for large systems 3-11
Service Account Utility
using C-1
SIP desktop phones
brands and models tested (table) 5-6
SIP phones
about 5-6
securing when used as external stations I-6
SIP softphones
brands and models tested (table) 5-9
Sipura VoIP gateways 6-2
INDEX-9
SMDR service
about 16-2
configuring 16-3
formats
Avaya Lucent Definity 16-12
Call Log formats 16-6
Toshiba CTX 16-10
installing 16-3
output connection options 16-2
SMDR. See Station Message Detail Recording
(SMDR) Service
Software Development Kit
about 2-7
Station Message Detail Recording (SMDR) Service
about 2-6
requirements 3-22
station/FXS gateways
about 6-3
system
about 1-2
components 2-2
configuration limits 3-10
documentation set 1-6
major features 1-2
new features 1-4
overview (graphic) B-2
system clocks
synchronizing 11-10
system database settings
ACD
NoAnswerTime J-37
Call Log
AutoArchiveDelay J-38
AutoArchiveDelayInterval J-38
Messages
MaxMessageDuration J-38
Server
ACDWrapupTime J-38
AllowCallsWithoutUsers J-39
AllowGatewayUserLogin J-39
AudioControlRingtimeout J-39
AutoAttendantInterdigitTimeout J-38
BufferDirCleanupThreshold J-38
CallRecordingBeepFile J-39
CallRecordingBeepInterval J-39
CCRouteOutbound J-40
CheckRecipientCallForSetting J-40
CPAConnectDelay J-39
DefaultGreetingSize J-40
DefaultMailboxSize J-40
Dial911AtDialTone J-40
DirectCallsUseFaxTarget J-40, J-41
DropMonitorsAfterTransferComplete J-41
E911RingDuration J-41
EMailNotifyAddSubmittedTime J-41
EnableIPAddressMatch J-41
ExternalCallOfferingDelay J-42
ExternalCallOfferingDelayConnected J-42
HoldRecallBehaviorForParkedCalls J-42
InternalDialtoneStationFirsttimeout J-42
InternalDialtoneStationSecondtimeout J-42
InternalDialtoneTrunkFirsttimeout J-42
InternalDialtoneTrunkSecondtimeout J-42
IPVoiceTitleMaxSilence J-43
LongIdleTime J-43
MaxAutoAttendantLoops J-43
MaxGreetingDuration J-43
MaxRingDuration J-43
MinAdminBuild J-50
MinDevMonBuild J-51
MinimumMessages J-43
MinRingDuration J-43
MinRingDurationForExternalCallOffering J-44
MinRingDurationForExternalPadding J-44
MinViewPointBuild J-51
MSDECriticalLimitPercentage J-44
MSDEFullPercentage J-44
OutOfConfResEventInterval J-44
PageRequestTimeout J-44
PageTimeout J-44
PageVoxAllocMaxRetryInterval J-45
PageVoxAllocRetries J-45
ParkHoldRingbackBehavior J-45
INDEX-10
PauseBetweenRingback J-45
PlayInSeconds J-45
PlayToneBeforePage J-45
PrependVTMessageDuration J-45
PresentExtensionBeforeCallerID J-46
RefreshVMWI J-46
RequireLoginForTUIOnTrunk J-46
RestartTimerAfterRingingAgent J-46
RingbackRetries J-46
RoutingListContinueDelay J-46
SendDigitsToStationDelay J-47
TrunkAllocationInterval J-47
TUIIdleTimeout J-47
TUITransferRingDelay J-47
UISupportIdleTimeout J-47
UseGroupMemberDNDSetting J-48
VoxLowBorrowedMinFreeAbsolute J-48
VoxLowBorrowedMinFreePercentage J-48
VoxLowEventInterval J-48
VoxLowSharedMinFreeAbsolute J-48
VoxLowSharedMinFreePercentage J-49
VoxSysCallRecBorrowedMinFreeAbsolute J-49
VoxSysCallRecBorrowedMinFreePercentage
J-50
VoxSysCallRecEventInterval J-49
VoxSysCallRecSharedMinFreeAbsolute J-50
VoxSysCallRecSharedMinFreePercentage J-50
system database settings. See also registry settings
T
T1 trunks
about 4-5
additional required hardware 4-6
configuration requirements 4-5
local trunks 4-7
long-distance trunks 4-7
requirements 4-5
carrier requirements 4-5
T1 ISDN PRI protocols supported 4-6
TAPI applications
about G-2
TAPI Service Provider
about 2-5
configuring 11-8
contact management software for use with 11-8
installing 11-8
PC requirements 3-19
TCP/IP networks
using 3-12
Tftpd32 TFTP Server
about 17-2
configuring 17-6
installing 17-2
third-party devices
integrating G-3
toll fraud
about I-2
identifying I-2
protecting system against I-3
responding to I-7
Toshiba digital phones (table) 5-13
Troubleshooting
specific problems
analyzing audio problems with SIP or H.323 H-3
troubleshooting
database server problems B-4
general tips for troubleshooting Server problems B-5
IP phones H-8
phone problems B-3
Server problems B-5
Server startup problems B-7
specific problems
All incoming calls hear a busy signal but the
phones are not busy B-3
Applications that use the Multi-line TAPI
Service Provider do not work after stations
are reordered or added on the Server B-15
Calls are rejected B-3
Cannot access the database server B-4
Cannot connect to the database during Server
installation or when starting the Server or
Administrator B-6
INDEX-11
Cannot start Administrator to backup the
database B-10
Corrupt installation dialog box B-9
Device Monitor does not appear when its menu
item is selected B-7
E-mail notification through Microsoft Outlook
does not work if Outlook is installed in
Internet Only mode B-11
E-mail notification WAV file attachments are
incorrectly sent as .DAT files B-11
Error ‘Installation operation failed’ when
installing workstation applications B-9
Error ‘Unable to find libdxxmt.dll’ when starting
the Server B-7
Error 3706 when starting ViewPoint B-10
Error 7595 when starting ViewPoint B-10
Faint music heard on calls B-3
Gateway calls between Servers fail B-4
Hang up not being detected B-4
Messages ‘The page cannot be displayed’ while
running ViewPoint Web Access B-14
Microsoft WinSock Proxy blocks local UDP
traffic B-16
Microsoft WinSock Proxy client DLL causes
deadlock in RPCSS B-16
on a Windows XP Home SP2 PC, ViewPoint
fails to connect to the Server B-13
Server cannot connect to an SMTP mail server to
send e-mail notifications B-11
Server does not appear in Windows Services list
B-6
Server does not start because account password
changed B-7
Server is unknown B-7
Server not available dialog box appears when
upgrading ViewPoint or Administrator B-10
Server Service will not start B-7
Slow Server and station startup after migrating to
a new Server with a new name B-6
Station displays ‘Error!’ in the Device Monitor
B-7
Toshiba Strata DKT-series digital phones do not
appear in the Device Monitor B-4
troubleshooting general SIP problems H-3
troubleshooting problems with SIP devices such
as SIP phones and external SIP stations H-5
troubleshooting problems with SIP PSTN
gateways or SIP Carriers H-7
Trunk displays ‘Error!’ in the Device Monitor
B-7
Valid sa password not accepted when installing
MSDE 2000 from Master CD B-5
ViewPoint and Administrator fail to install on
Windows 98 SE if DCOM 98 is not
previously installed B-9
Web Services Audio folder contains many files
using
Direct Inward Dial (DID) 4-3
hunt groups 4-4
inbound- and outbound-only trunks 4-4
overhead loudspeaker G-7
paging system 5-15, G-7
proxy server 10-24
Service Account Utility C-1
this manual 1-5
ViewPoint Web Access 13-8
utilities
Service Account Utility C-1
B-14
Web Services installer seems to complete
without requiring a reboot, but a reboot is
required to finish B-14
Workstation applications regularly lose
connection to the Server B-12
ViewPoint Web Access problems B-13
ViewPoint/Administrator installation tips B-8
Web Services problems B-13
workstation application problems B-7
trunks
about 4-2
customizing disconnect tones J-18
using
analog trunks 4-5
Centrex trunks 4-5
U
upgrading
from a previous version
about 7-6, 7-7
backing up files 7-4
changing the Server domain 7-5
moving the Server to a new PC 7-5
moving voice files 7-6
preparing system for upgrade 7-4
scheduling an upgrade 7-4
upgrade paths 7-6, 7-7
using the CDs 7-2
INDEX-12
V
ViewPoint
about 2-4
installing 11-4
PC requirements 3-18
ViewPoint Web Access
about 2-4, 13-2
logging on
to alternate Servers 13-8
to the Web server 13-8
troubleshooting problems B-13
using 13-8
voice board device names J-24
voice board settings J-25
voice files
moving before upgrading 7-6
VoIP
features 4-10
requirements 4-10
VoIP gateways
Quintum gateways 6-2
Sipura gateways 6-2
W
Web Services
about 2-4
adjusting Windows Firewall exceptions for F-5
installing 13-5
PC requirements 3-20
setting up secure Web site 13-4
troubleshooting problems B-13
wheel mouse
using 3-19
where to get help 1-5
Windows
configuring 8-3
creating user 8-3
domain-based network
using 3-14
installing 8-2
workgroup-based network
using 3-14
Windows Firewall
configuring system for F-1
Windows Terminal Services
using for remote administration A-5
wiring requirements
about 5-13
analog phone requirements 5-13
digital phone requirements 5-13
H.323 phone requirements 5-14
IP gateway requirements 5-14
SIP phone requirements 5-14
when not replacing a PBX 5-14
when replacing a PBX 5-14
workstation applications
about 2-2, 11-2
installing
unattended E-1
installing DCOM 98 11-3
installing on application server A-2
troubleshooting problems B-7
X
X-PRO SIP Softphone for Pocket PC 5-9
INDEX-13