1
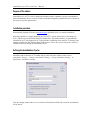
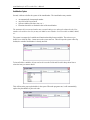
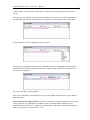
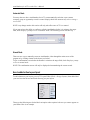
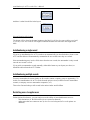
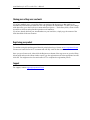
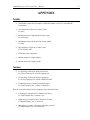
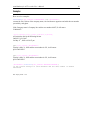
Another efficient and affordable ACT! Add-On by
AutoNumbers
for ACT! records
for ACT! 2008 and up
v.6.0
http://www.exponenciel.com
AutoNumbers for ACT! records User’s Manual
Table of content
Purpose of the add-on ................................................................................................................... 3
Installation procedure ................................................................................................................... 3
Defining the AutoNumbers Syntax .............................................................................................. 3
AutoNumber Syntax .............................................................................................................. 4
Automatic Mode .................................................................................................................... 6
Manual Mode......................................................................................................................... 6
How to add a button to your layout ............................................................................................. 6
AutoNumbering a single record ................................................................................................... 7
AutoNumbering multiple records ................................................................................................ 7
Restricting access to regular users ............................................................................................... 7
Sharing your settings over a network .......................................................................................... 8
Registering your product .............................................................................................................. 8
Support ........................................................................................................................................... 8
Variables......................................................................................................................................... 9
Functions ........................................................................................................................................ 9
Examples ...................................................................................................................................... 10
2
AutoNumbers for ACT! records User’s Manual
3
Purpose of the add-on
AutoNumbers for ACT! records is designed to number contacts, companies, groups or opportunities
either automatically when a record is created or manually through the program interface or a button in
the layout (except for opportunities).
Installation procedure
Download the program file from our download page and double-click it to start the installation.
Note that contrarily to versions supporting previous ACT! versions and because of the changes in
ACT!, add-ons are now DLL files and not executable files. This means that they are automatically
initialized by ACT! when placed in ACT! plugin folder (a subfolder of the main ACT! directory) and
cannot be started from the Windows Start menu anymore. This is why you are not given a choice of
installation directory during the installation process.
Defining the AutoNumbers Syntax
Launch the add-on from the ACT! toolbar and go to the Edit menu. Choose either Contact
AutoNumber Settings…, Company AutoNumber Settings…, Group AutoNumber Settings… or
Opportunity AutoNumber Settings… .
First, the settings window allows you to select the field (character field only) where the AutoNumber
will be stored.
AutoNumbers for ACT! records User’s Manual
4
AutoNumber Syntax
Second, it allows to define the syntax of the AutoNumber. The AutoNumber may contain:
•
•
•
•
An automatically incremented number
Any field of the record itself
System variables (like date, time, etc.)
Functions that allow to format the data of the AutoNumber
The automatically incremented number may contain leading zeros and may be adjusted in the Next
number to be used text box. So you may use 00001 as next number. It will increment to 00002, 00003,
etc.
The syntax is composed of variables and functions that help format variables. The easiest way to
define it is to click the Edit… button next to the syntax text box. This will open the syntax editor. By
default, the variable NextNumber is already inserted.
To insert fields or variables, all you need to do is use the Fields and Variables drop-down lists to
select the item you want to insert.
This will insert the proper placeholder in the syntax. When the program runs, it will automatically
replace the placeholders by the real value.
AutoNumbers for ACT! records User’s Manual
In this example, the Next number will be directly followed by the company name of the contact
record.
You may type any character you want inserted anywhere. For instance, if you want to separate the
incremented number and the company name by an hyphen, type the hyphen in the syntax editor.
See the appendix for more explanations on the variables.
You may also use functions to format your AutoNumber. Below is an example of formatting. The
Left function will only keep the first 3 letters of the company name and the UCase function will
convert them to uppercase.
For a list of functions, see the appendix.
Once your AutoNumber is formatted properly, close the window and choose to keep your changes
when prompted.
Note for the users of TriggerCalc Pro: if you are accustomed to using TriggerCalc Pro, the syntax
editor is familiar to you. But please note that the syntax of an autonumber is different from a
calculation in the sense that it is composed of a juxtaposition of characters, variables and functions.
There is no need here for operators like + or &.
5
AutoNumbers for ACT! records User’s Manual
Automatic Mode
You may choose to have AutoNumbers for ACT! run automatically each time a new contact,
company, group or opportunity record is created. Simply check Run automatically when creating a
new record.
NOTE: Any change made to this section will only take effect once ACT! is re-started.
If you want to have the ability to confirm or edit the AutoNumber before it is written to the target
field, check Display a prompt screen in automatic mode. The following screen will show up.
Manual Mode
There are two ways to manually create an AutoNumber, either through the main screen of the
program or by clicking a button in the layout (see below).
To get a confirmation screen before the number is written to the target field, check Display a prompt
screen in manual mode.
NOTE: The confirmation screen will only be displayed when numbering the current record.
How to add a button to your layout
To add a button to your layout, go to ACT! Layout Editor (Tools > Design Layouts ) then add a label
(you need to select the text tool under Drawing) to your layout.
Then type the following text for the label: an/caption where caption is the text you want to appear on
your button. Here is an example:
6
AutoNumbers for ACT! records User’s Manual
And here is what it looks like in the layout:
Size and location of the button
The button will be placed at the same location as the label. It will have the same width as your label,
so you may resize it as needed. The height is automatic and therefore not tied to the height of the
label.
AutoNumbering a single record
If you set up AutoNumbers for ACT! records to run automatically (as described above), then re-start
ACT! and the add-on will automatically autonumber the new records once they are created.
Since autonumbering may involve field values from the new records, the autonumber is only created
once the new record is saved.
If you prefer to autonumber records manually, either add a button to your layout (see above) or
launch the add-on from the ACT! Toolbar.
AutoNumbering multiple records
You may autonumber the current lookup or all records (contact, company, group or opportunity). To
do this, run AutoNumbers for ACT! records from the proper screen (a contact screen to autonumber
contacts, a company screen to autonumber companies, etc.).
Then select Current lookup or All records in the main window and click Run.
Restricting access to regular users
Under Options>Preferences, you can restrict access the ability of non administrators users to:
- edit calculations (ie. the Edit and Preferences menu are dimmed)
- update more than one contact at once (ie. the Current lookup and All records options are
dimmed.)
7
AutoNumbers for ACT! records User’s Manual
8
Sharing your settings over a network
If you have multiple users, you need to share your settings with other users so that numbers are
automatically incremented no matter the user who generates the AutoNumber. To share your settings
with other users, go to the Preferences menu and select Options…. Under Data folder, select a folder
accessible to all users and repeat this operation on all machines.
If you have already defined your AutoNumbers on your local drive, simply copy the content of the
local data folder to the new location.
Registering your product
To continue using this product passed the trial period, please buy a license at www.exponenciel.com.
Licenses are issued for one ACT! username and will only work for that username.
Once you get a license code, either click the Register now button of the nag screen or go to the Help >
About menu and once the About window opens, type the registration code in the appropriate box and
click OK. You might need to close and restart ACT! to complete the registration process.
Support
For support, contact [email protected].
AutoNumbers for ACT! records User’s Manual
APPENDIX
Variables
•
NextNumber returns the next number. When this number is used, it is automatically
incremented.
•
Year returns the 4-digit year of today’s date
Ex: 2005
•
Month returns the 2-digit month of today’s date
Ex: 05 for May
•
Monthname returns the name of the current month
Ex: May
•
Day returns the 2-digit day of today’s date
Ex: 20 for May 20th
•
Hour returns the 2-digit hour
•
Minute returns the 2-digit minutes
•
Second returns the 2-digit seconds
Functions
•
LCase(string) converts the string to lowercase
Ex: LCase(Company Inc.) returns company inc.
•
UCase(string) converts the string to uppercase
Ex: UCase(Company Inc.) returns COMPANY INC.
•
Trim(string) removes leading and trailing spaces
Ex: Trim( Company Inc. ) returns Company Inc.
Note the semi-colon in between the arguments of the functions below:
•
Left(string;x) returns the first x characters of string
Ex: Left(Company Inc.;3) returns Com
•
Right(string;x) returns the last x characters of string
Ex: Right(Company Inc.;3) returns nc.
•
Mid(string;x;y) returns y characters starting at position x
Ex: Mid(Company Inc.;3;2) returns mp
9
AutoNumbers for ACT! records User’s Manual
10
Examples
Here are a few examples:
UCase(Left([TBL_CONTACT.COMPANYNAME];3))-[NextNumber]
extracts the first 3 letters of the company name, converts them to uppercase and adds the next number
preceded by an hyphen.
If the Company name is Company Inc. and the next number 00075, il will return:
COM-00075
[Year]/[Month]/[Day]-[Hour]:[Minute]:[Second]
will return the date in the following format:
2005/05/31-21:30:07
for May 31st, 2005 at 9:30:07 pm
QUO-[Year][Month][NextNumber]
If today is May 31, 2005 and the next number is 025, it will return:
QUO-200505025
QUO-[Year][Month][NextNumber]
If today is May 31, 2005 and the next number is 025, it will return:
QUO-200505025
[NextNumber]-Initials([TBL_CONTACT.MANAGERUSERNAME])
If the contact manager is Chris Huffman and the next number is 000234
000234-CH
Rev. July 29, 2008 – v.6.0