1
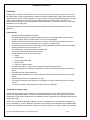
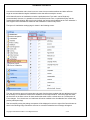
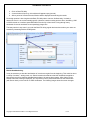
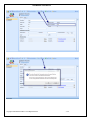
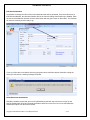
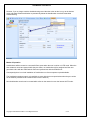
CRM Innovation, LLC AutoNumber User Manual V1.0 AutoNumber User Manual AutoNumber AutoNumber is an add-on product that can create a unique, easy to read reference number for records in the CRM system. This tool allows system customizers to add AutoNumbering to CRM entities that are not supported by the built-in numbering system. It makes it easy to create an AutoNumber that can be used by users to uniquely identify a record in the system without referencing another field or the GUID. The AutoNumber can be used to link the CRM record with other systems – a back office system or accounting applications or even paper files. AutoNumber supports all custom entities and systems entities that users are permitted to create new attributes. Feature Recap: • • • • • • • • • • • • • • • • Supports records generated by Workflow. An AutoNumber can also be applied to entities that have a numbering system already such as Contracts, Cases, Articles, Quotes, Orders, Invoices, and Campaigns. AutoNumber field can be set to be read only or does not even have to be published to the form There can be more than one AutoNumber for a record (i.e. multiple fields) Customizable prefix and suffix for each entity including setting the length of the prefix and/or suffix. Starting AutoNumber can be set by the user The AutoNumber can be incremented or decremented The amount of increment can be set by the user. AutoNumbers can be of various format types: Integer Floating point Fixed length (padded left) Decimal value Positive or negative values At anytime the admin can stop, reset or restart the AutoNumber parameters Records created prior to starting the AutoNumber system can be numbered by the AutoNumber add-in. Preview the format of the AutoNumber Supports online and offline users. (AutoNumbers are added to records when the user goes back online) AutoNumbers will never be duplicated or re-used. The system is enterprise class as there is no possibility of using the same number for 2 different records. If a record is deleted or deactivated it’s number will not be used again. “AutoNumber Settings” page: A CRM user that has been granted rights to the Settings page will be able to enable AutoNumbers for any custom and customizable entities. The user can enable the entities for which they require to provide the AutoNumbers. Only entities enabled here and published would be displayed in the CRM Entity picklist in the AutoNumber entity. NOTE: The only Attribute type that is eligible to receive an AutoNumber is a nvarchar type. AutoNumbers are not generated for ‘numeric’ attributes. Therefore the only attributes that will appear in the CRM Attribute Picklist in the AutoNumber entity will be nvarchar (text field). Therefore if you need to create a new attribute Copyright © 2009 CRM Innovation LLC All Rights Reserved 2 of 9 AutoNumber User Manual to receive an AutoNumber value, then be sure to create it as an nvarchar attribute and allow sufficient length to accommodate the largest AutoNumber value that will eventually be created. A field that will receive an AutoNumber must be a published to the Form and it can be Read-only (recommended). However, it is possible to remove the field from the Form, re-publish the Entity and the AutoNumbering will still work. But to get it going initially, the field must be published to the Form otherwise it won’t appear in the CRM Attribute Picklist on the AutoNumber custom entity record. The layout of AutoNumber settings page is shown in the following screen. The user will need to return to this page when the entity form has been updated with new attributes as it will be necessary to re-Publish the revised Form attributes. So the steps would be: return this page and select the check box in the Save column for those entities that need to have a refresh done as a consequence of Form changes. If not, then those ‘new’ attributes will not be available in the AutoNumber form record entity picklist (subsequent step) After successfully saving the settings a response will be displayed in red to the right of the Cancel button as show in the following image. Should the save not be successful a detailed error message will appear. Copyright © 2009 CRM Innovation LLC All Rights Reserved 3 of 9 AutoNumber User Manual AutoNumber Records Once the Entities that need an AutoNumber have been selected and published from the AutoNumber Settings page, then you can navigate to the AutoNumber custom entity. This entity behaves much like other records that you are familiar with in CRM. The specifics of each field on the form are shown in the image and table following. An AutoNumber record has 4 required fields: Description, Starting Value, Increment, Increment Direction, CRM Entity, and CRM Attribute. Although the last two aren’t marked as required. Once you make the selection of the CRM Entity, then the CRM Attribute Picklist will be populated with fields that are eligible to receive an AutoNumber value. Once you save the record you can no longer change the Entity or the Attribute. Reference 1 2 3 Field Label Description CRM Entity CRM Attribute Purpose Describe the purpose of this AutoNumber Select the entity that will be using the AutoNumber Select the Attribute that will hold/display the AutoNumber. The Attribute must be of nvarchar type. Don't create a Y2K problem plan ahead. :) Copyright © 2009 CRM Innovation LLC All Rights Reserved 4 of 9 AutoNumber User Manual 4 5 Enable Next Auto Number 6 7 8 Fixed Length Preview Starting Value 9 Increment 10 Increment Direction 11 12 Prefix Suffix Use this checkbox to turn on/turn off numbering of this AutoNumber for this Entity/Attribute combination. This attribute (read only) displays the value of the next number in the sequence. If you required the display and sequencing of the AutoNumber in a predetermined length then enable this checkbox. When you enter the Starting Value, if you have selected this check box, then that 'value' will be the 'format/length' of the fixed length AutoNumber. Displays a sample of the AutoNumber This is the first number in the AutoNumber sequence that will be applied to the first record. Set the value that the sequence will increment by: this can be a positive, negative or floating point value. For example legitimate values could be: 1, 2, 1.5, -1, 0.05, or 7. The Increment Direction is applied in conjunction with the Starting Value and the Increment to set the 'direction' the AutoNumber sequence moves in. For example a Starting Value of 300, Increment of 1, with an Increment Direction of Down would sequence from 300, 299, 298 and so on. Alternatively a Starting Value of -100, Increment of 1 and Direction Up would sequence -100, -99, -98. It is possible therefore to start at any point and go in any direction. A prefix allows the user to modify appearance of the AutoNumber by attaching a fixed preceding modifier to the AutoNumber A suffix allows the user to modify appearance of the AutoNumber by attaching a fixed ending modifier to the AutoNumber After the AutoNumber record is saved, the form tool bar will now look as follows: If you don’t see these items then the following step in the Installation process was missed: To make the AutoNumber tool bar visible in an AutoNumber record, go to Administration, System Settings, Customization tab and then Custom menus and toolbars – select Web Application, Outlook. Save the form. These selections significantly expand the functionality of the AutoNumber add-in past just creating numbers. Their purpose will be explained in the subsequent sections of this document. Back Fill Utility Perhaps of all the special features available from the form tool bar the Back Fill Utility is the most valuable in existing CRM implementations. This utility allows you to apply AutoNumbers to pre-existing records in the database. The process is as follows; 1. Open up the AutoNumber record. Copyright © 2009 CRM Innovation LLC All Rights Reserved 5 of 9 AutoNumber User Manual 2. Click on Back Fill Utility 3. A new window will open up, this window will appear empty (normal). 4. After a period of time the Success Window will be displayed summarizing the results. So the big question is how long does the Back Fill Utility take to execute. Unfortunately, it is hard to determine since it is so environmentally specific. However, based on testing we have done, backfilling 1,000 to 2,000 records on a medium speed SBS 2003 R2 took only a few minutes. Going through many thousands of records would take a correspondingly longer time. The best practice in any event is to not do the Back Fill during regular business hours when your users are extensively interacting with the CRM System. Restart AutoNumbering It may be necessary to start the AutoNumber of records over again from the beginning. This could be due to a variety of reasons – testing mode, etc. Should records exist that have had this AutoNumber applied to them then there will be duplicate AutoNumbers assigned. A warning does appear. After clicking on the Restart button the warning is displayed, you must click on OK to proceed and then use the Save button (with Green check) on the tool bar to effect the Restart. The following images show the screen changes. Copyright © 2009 CRM Innovation LLC All Rights Reserved 6 of 9 AutoNumber User Manual Copyright © 2009 CRM Innovation LLC All Rights Reserved 7 of 9 AutoNumber User Manual Edit Next AutoNumber It is possible to change the value of the next AutoNumber that will be generated. From the toolbar click on Edit Next AutoNumber, the Next Auto Number field in the form will change from Read only to editable. Enter the new next AutoNumber and then click the Save button with the green check on the toolbar. The field then will return to read only and be ready to go. If you try to Save the record without first using the green check mark Save button first before exiting the record you will receive a warning message as follows: Delete/Deactivate AutoNumber Should the situation require that you turn off AutoNumbering the best way to do that is to open up the specific AutoNumber record and uncheck the Enable check box on the form. Do not use the Deactivate AutoNumber option from the Actions toolbar. Copyright © 2009 CRM Innovation LLC All Rights Reserved 8 of 9 AutoNumber User Manual However, if you no longer need the AutoNumbering record then the action to take is to go to the Actions menu and select Delete AutoNumber to permanently delete the AutoNumber record and associated AutoNumbering. Modes of Operation AutoNumbers will be created on a successful Save event when the user is online or in IFD mode. When the User creates a record and saves it while they are offline, no AutoNumber will be assigned until the user goes back online with the CRM Outlook Client and synchronizes with the CRM Server. Consequently there is no local installation of AutoNumber on client computers required/available. The AutoNumber settings page is only available to users with the correct permissions when they are online on the network (it doesn’t work via the browser over the Internet) New AutoNumber records can be created while online on the network or over the Internet in IFD mode. Copyright © 2009 CRM Innovation LLC All Rights Reserved 9 of 9