1
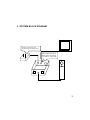
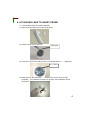
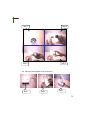
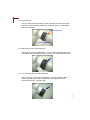
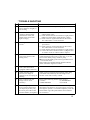
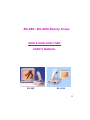
BS-88E / BS-2000 Beauty Scope
SKIN & HAIR ANALYSER
USER’S MANUAL
BS-88E
BS-2000
0
User’s Manual
Congratulations on your purchase of Video Microscope.
We believe the versatility and ease of use of this product will lead you to obtain
more success in business deals and create more profit for you.
The Video Microscope is guided cool light surrounding the lens and automatically
provides the best illumination to enable you to obtain the optimum viewing angle
and color of the target object on the video monitor.
Image retention on hard copy and image storage are possible by simply connecting
the video output of Video Microscope directly to an optional Color Video Printer,
Video Tape Recorder (VTR), or Personal Computer (PC with appropriate image
capture care installed).
1. ACCESSORIES
1-1 Standard accessories:
Item
Q’ty
Description
1
1
Control box
2
1
Handy Probe
3
1
Probe Holder
4
1
RCA (RCA-RCA) video cable
5
1
Power Adaptor (100V-240V)
6
1
User’s manual
1-2 Optional accessories:
Item
Q’ty
Description
1
1
1x Lens (for styling purpose)
2
1
1-5x vari-mag. lens (for full face/body, half body, partial face)
3
1
50x lens (for surface skin inspection)
4
1
30x or 50x polarized lens (for surface/deeper layer skin check)
5
1
200x lens (for hair, scalp inspection)
6
1
650x lens (for hair cuticle inspection)
7
1
MB-88A memory board for 1 & 2 split frames freeze function
8
1
Black Carrying Case
1
2. FRONT / REAR PANEL & PROBE
(Front Panel)
Freeze button
Probe holder
Power switch
MEMORY
1
2
Memory button for 1 frame or 2
split frames freeze switchable
(optional function)
(Rear Panel)
Cooling fan Video Output DC input
2
3. SYSTEM BLOCK DIAGRAM
AC/DC Converter (for
connecting to Control box)
Video output (for RCA
Phone jack) connecting
to monitor’s video input
3
4. ATTACHING LENS TO HANDY PROBE
4-1 ATTACHING LENS TO HANDY PROBE
(1) Take off the anti-dust cover of the handy probe
(2) Find the short post on the lens
Short post
(3) Look at the front side of handy probe, you will find there’s a “︵” shape slot.
“︵" slot
(4) Match (plug in) the post to the “︵” shape slot to ensure they are fully
combined. Turn clockwise to screw on the lens, anti-clockwise to screw
off the lens.
4
Step 1
Step 2
Step 3
Step 4
4-2 Place the probe holder on the control box
Step 1
Step 2
Step 3
5
5. OPERATION
5-1 Installation is now completed. Turn the power switches of both the unit and
your monitor to “ON” position.
5-2 Lens with a contact type illumination head is intended to be placed on or
held just above the viewing object, Then you will get a vivid image on the
monitor.
6. OPTIONAL FUNCTIONS
6-1 Freeze function --- One or two split frames freeze function switchable
(with memory board for 1 or 2 split frames freeze)
1). One frame freeze
Switch the memory button to “1” , then you
can press the freeze button (on handy probe)
to freeze image; to release the frozen image,
just press the button again.
2). Two split frames freeze
Switch the memory button to “2”, then you
can follow the procedures to get 2 split
frames:
Freeze
button
1st freeze
1st freeze
live picture
2nd freeze
1st press
2nd press
3rd press
(The split frames will be cleared
and you can restart the freeze
function.)
Remark: (1) For the 1st freeze picture, you should seize the originally
central part image of the full screen to get the 1/2 split frame
6
6-2 Polarized lens
You can rotate the black rubber ring anti-clockwise to make surface skin
inspection; rotate the black rubber ring clockwise you can make deeper
layer skin inspection.
Polarized inspection
Surface inspection
6-3 650x lens (for hair cuticle inspection
The focus for this lens is adjustable. You can rotate the black rubber ring
clockwise or anti-clockwise to get the right focus to inspect the hair cuticle.
6-4 1-5x vari-mag. lens (for styling purpose)
The focus range for this lens is adjustable. You can rotate the black
rubber ring clockwise or anti-clockwise to get the right focus of full
face/body, half body, or partial face)
7
* TROUBLE SHOOTING
TROUBLE
SHOOTING
1
Turn on the power switch,
but no function, no light, no
fan working.
Check whether the AC adapter is properly connected.
2
The control box is in
operation, but the handy
probe doesn’t work (the
handy probe cannot offer
light or image).
1). Check the cable connection between the control box
and the handy probe.
2). Check whether the lens is locked to its right position.
(Make sure if the lamps inside the lens is light.)
3). Check if the AV signal cable between the control
box and monitor is well-connected.
3
No image on the monitor
screen:
1). Check whether the control box and monitor are
powered on.
2). Check if the AV signal cable between the control
box and monitor is well-connected.
3). Check whether the lens is locked to its right position.
4). Connect the unit to another monitor to judge the unit
or monitor is out of order in order to repair it.
4
How to clear if there are dust
pots on the camera of the
handy probe?
Take off the lens, wipe the small glass of the camera
(inside the handy probe) with a cotton bar; or you can
blow out the dust by using a small air pump.
zPlease hold the handy probe toward ground direction
to avoid new dusts.
If the camera gets mildewed under humid condition,
please contact the engineer to clean it.
5
The freeze function doesn’t
work. (The unit must be
equipped with this function)
Check if the freeze button is OK.
6
While operating freeze
function, the image on
monitor screen is swaying &
flashing.
When you are pressing the freeze button, please keep
your hands still (unmoved), then the image on the
monitor screen will not sway or flash.
7
How to adjust when the
image color is out of
harmony?
Please adjust following buttons of the monitor:
(1) TINT
(2) SHARPNESS
(3) BRIGHTNESS
(4) COLOR
8
While using the polarized
lens to inspect surface skin
(or deeper layer skin), why
the lower part of the screen
becomes darker (or brighter)?
It’s because you do not rotate the black rubber ring to
the bottom of its direction. So some light is covered (or
some light is opened). You should completely rotate the
black rubber ring of the polarized lens anti-clockwise
(or clockwise).
8