1
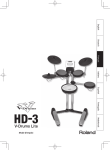
Digital Practice Drum
User's Manual
Content
Congratulations
Thank you for purchasing this digital Practice drum . The drum has been
developed to act and play like a acoustic drum set but with greater ease and
function. Before you use the instrument, we recommend you to read
through this manual.
Power Supply................................................................................................. 5
Using Headphones ......................................................................................... 5
Stand setup.................................................................................................... 6
Cymbal setup.................................................................................................. 7
Taking Care of Your Digital Drum Set
Handling and Transport
Location
Do not expose the unit to the following
conditions to avoid deformation,
discoloration, or more serious damage.
Direct sunlight.
High temperature (near a heat source, or
in a car during the day time).
Excessive humidity.
Excessive dust.
Strong vibration.
Never apply excessive force to the
controls, connectors or other parts of
the instrument.
Always unplug cables by gripping the
plug firmly, but not pulling on the cable.
Disconnect all cables before moving
the instrument.
Physical shocks caused by dropping,
bumping, or placing heavy objects on
the instrument can result in scratches
and more serious damage.
Power Supply
Summary ........................................................................................................ 4
Main Feature .................................................................................................. 4
Setting Up ...................................................................................................... 5
Panel ............................................................................................................... 8
Top Panel ........................................................................................................ 8
Side Panel ....................................................................................................... 9
Rear Panel ...................................................................................................... 9
LCD Display .................................................................................................... 10
Playing The drum ........................................................................................... 11
Changing the Parameters .................................................................................. 11
Beat .............................................................................................................
Rhythm .........................................................................................................
Click Sound ....................................................................................................
Click Volume ...................................................................................................
Make sure to use the suitable AC adaptor,
and also make sure the AC outlet voltage
in your country matches the input voltage
specified on the AC adaptor`s label.
Turn the power switch OFF when the
instrument is not in use.
An AC adaptor should be unplugged from
the AC outlet if the instrument is not to be
used for an extended period of time.
Unplug the AC adaptor during electric
storms.
Avoid plugging the AC adaptor into the
same AC outlet as appliance with high
power consumption, such as electric
heaters or ovens. Also avoid using multiplug adaptors since these can result in
reducing the sound quality, operation
errors, and possibly damage.
Electrical Interference
This instrument contains digital
circuitry and may cause interference if
placed too close to radio or television
receivers. If this occurs, move the
instrument further away from the
affected equipment.
Change The Pad Sound ......................................................................................
Training Mode ..................................................................................................
Beat Check . ....................................................................................................
Balance .........................................................................................................
Pattern ..........................................................................................................
Follow Me ......................................................................................................
Gradual Up/Down .............................................................................................
Count .. ..........................................................................................................
11
11
12
12
12
13
13
13
14
15
15
16
Timer .............................................................................................................. 17
Game .............................................................................................................. 18
Tempo/TAP ...................................................................................................... 19
Record ............................................................................................................ 19
Start Recording ................................................................................................
19
Stop Recording ................................................................................................
19
19
Parameter Save And Factory Set ................................................................... 20
Parameter Save ................................................................................................ 20
Factory Setting ................................................................................................ 20
Playback ........................................................................................................
Turn Power OFF When Making
Connections
To avoid damages, turn off the power
Appendix ........................................................................................................ 21
switches before you disconnect the
Pad Sound List ................................................................................................ 21
related devices from the instrument.
Game Demo List ............................................................................................... 22
2
3
SETTING UP
Summary
The digital drum is an easy-to-use digital drum with advanced functions
especially in self-training. The training function including: beat check
balance
gradual up/down etc.. and it is a unique set of exercises specifically designed to help
build speed, accuracy, stamina, and better timing skills. Moreover, the GAME
function allows users to learn and play with a rhythm by following the dropping bars
on the LCD. The high- quality sounds and the multi_function display, is also suitable
for the professional and amateur drummer.
Power Supply
Your Digital Drum will run either on batteries or power adaptor. Follow the instructions
below according to the power source you intend to use.
Using an AC-Adaptor
Connect the power adaptor to the DC in jack
located on the rear panel of the unit, and plug the
AC power adaptor into an AC power outlet.
AC power
socket
9V
Do not use adaptors other than the one specified. The technical
specification of the adaptor is 9V DC output, 500mA,centre positive
type.
Using Batteries
Main Feature
1 .Press down and slide off the lid of the battery
compartment (located on the bottom of the unit)
65 Pad Sounds and 6 Metronome Sounds
24 Rhythm Types
Beat Check Training
2 . connect the snap cord to the battery, and place
it inside the battery compartment.
Verify the battery's polarity (+ versus -)
3 .Securely close the battery cover.
Do not let the snap cord get caught in the battery compartment lid.
Pattern Training
Stroke Balance Training
Follow Me Training for building sense of timing
Gradual Up/down Training for Developing Your Tempo Feel
Count Training
60 Games for Practising The Built-in Patterns
Record and Playback
Phone Output Supports a Stereo Headphone As Output Device
When to Change the Battery
The battery LOW indicator( )at the lower right of
the display begins to flash when the battery power
drops. Insufficient battery power lowers the volume
level of the mini speaker and causes unstable
operation. Replace the battery as soon as possible.
We recommend replacement with alkaline batteries.
The estimated life span of the batteries is 4 hour
Additional Kick and Hi-hat Can Be Connected To Assembled As a Basic Drum Kit
Using Headphones
An optional set of stereo headphones can be
connected to the Headphones jack located on
the rear panel. When a pair of headphones is
connected to the jack, the internal speakers of
the unit will switch off automatically, perfect for
private practice or late night playing. If you want
to use an external sound system, the headphone
jack can also be used to connect the digital drum
to a stereo system or mixing console.
Turn the power OFF on all equipment before
making any connections.
4
5
KICK
HI-HAT
CONTROL
HI-HAT
PHONES
Stand setup
Cymbal Setup
Mounting the digital drum on the stand
Setup cymbal on the tripod.
1.First, open the tripod so the legs are spaced at least 30cm apart.
30c
m
Loosen wing screw
Attach wing screw
and washer
in the order
Take out washer
2. Attach the wing screw and washer in the order shown
in the figure.
KICK
Using an optional cymbal cable you can
connect cymbal pads to the HI-HAT in jack.
Cymbal
3.Attach the pad
Turn the pad until the screw is just about all the way in;
then adjust the angle of the pad and tighten the wing screw
from side the stand.
Do not forcefully try to turn the pad after the screw is already all
the way in. doing so may damage the stand's screw
Using an optional kick cable of kick you can
connect KICK pads to the KICK in jack.
4.Mounting the digital drum on the tripod.
Wing screw
KICK
Precautions When Folding the Tripod
when folding the digital drum tripod legs to store the unit,
be cautious not to get your
fingers pinched while handling the stand.
HI-HAT
CONTROL
HI-HAT
PHONES
Tighten the knob
KICK
6
7
HI-HAT
CONTROL
HI-HAT
PHONES
Top Panel
Side Panel
7
3
4
5
6
1 DC input
Connect DC 9v.
2 Power Switch
This switch turns the power on/off.
8
POWER
ON
9V
OFF
9
10
2
1
11
2
Fig.2
12
1
Rear Panel
Fig.1
1 Volume knob
Adjust the sound level.
2 [START/STOP] button
Start or stop the metronome.
3 [RECORD]button
1 Kick jack
Connect bass drum controller for mono input.
2 HI-HAT Control jack
Connect hi-hat controller for mono input.
3 HI-HAT jack
Connect hi-hat, crash or cymbal pads for
stereo input.
4 Phone output
The phone output supports a stereo
headphone and amplifier as output device.
Enter record mode.
4 [METRO]button
Use this button to select pad sounds and the item of metronome setting.
5 [TEMPO/TAP]button
Adjust the tempo (from 30 to 240), Hold and press this button to enter TAP mode.
6 Beat indicator
Flashes in quarter note timing. Red indicator flashes on accent beats.
7 LCD display
Display the parameter for current operating item.
8 [VALUE + ]&[VALUE - ]button
Change the values of each parameter.
9 [TRAINING ]button
Select the training mode.
10 [GAME/TIMER]button
Enter game mode, Hold and press this button to enter TIMER mode.
11 Drumpad
12 Mini speaker
Only the metronome sound is played from here. Not including the stroken sound.
8
9
KICK
HI-HAT
CONTROL
HI-HAT
1
2
3
Fig. 3
PHONES
4
PLAYING THE DRUM
LCD Display
Changing the Parameters
4 5
3
6
7
2
1
Press [METRO] button to select the parameter,
including Beat, Rhythm, Click Sound, Click
Volume, Pad Sound and Metronome.
Press the [+] or [-] to adjust the parameter for
each item. The Arrow on the LCD points to the
selected parameter.
Press [START/STOP] button to turn the
metronome on and off.
8
9 10
11
12 13
9
Type
Beat
Number
Fig. 4
Below is a list of beats to be chosen from the
drum.
0~9,2+3,3+2,3+4,4+3, 4+5,5+4,5+6,
6+5,6+7,7+6,7+8,8+7, 8+9,9+8
1 Beat count
Range: 1~9.
2 Beat
3 Time check
4 Tempo, record ,score, timer, game mode indicator
5 Game ok flag
Rhythm
24 rhythm styles at all.
In game2 mode, when the score is more than 60, the flag will be lightened.
6 Parameter display
7
8
9
10
11
12
13
Display the parameter for tempo, game practicing score and etc.
Metronome needle
Metronome item indicator
Game note display
Display the left and right hand notes of current playing song.
Rhythm type
Extend pad jack indicator
Tap icon
Battery low indicator
10
Number
Type
11
TRAINING MODE
Click Sound
The are 6 clicking sounds in total:
indicator of click sound
NO.
1
2
3
4
5
6
NAME
METRONOME
CLAVES
STICKS
COWBELL
VOICE COUNT
ELECTRONIC
This function is a unique set of exercises specifically designed to help build speed, accuracy,
stamina and better timing skills.
Changing the Exercise Function
Press [TRAINING] button to select the
desired function.
Press the [+] or [-] to select the exercise
item. The arrow on the LCD points to the
selected function.
Press the [START/STOP] button to start/stop
the exercise.
Click Volume
indicator of click volume
Beat Check
It provides 0~4 level for volume adjustment.
The beat check mode setting is used with all
other training modes. Regardless of how the
metro sound is played in other training mode,
the rhythm will be checked according to the
beat check setting.
The best check result appears on the display.
Change The Pad Sound
indicator of pad sound
Press the [METRO] button to enter pad
sound selection mode.
65 pad sounds in total. Press the [+] or [-]
to select the sound. (See Appendix).
Be note that do not play the metronome at a very high tempo
and hit the pad quickly using a stringed sound simultaneously,
it may influence the metronome indicator run smoothly.
Slow
GOOD
Normal
GOOD
Quick
Beat Check Level
L-1
Quarter note(relatively easier timing)
L-2
Quarter note(more exact timing)
L-3
8 -note(relatively easier timing)
L-4
8 -note(more exact timing)
L-5
16 th-note(relatively easier timing)
L-6
16 th-note(more exact timing)
L-7
16 th-note triplets(relatively easier timing)
L-8
16 th-note triplets (more exact timing)
indicator of beat check
th
th
indicator of balance
Balance
This function checks the differences in playing
dynamics between the left and right hands
(or one hand).
Press the [START/STOP] button to start/stop
the exercise.
12
GOOD
13
GOOD
Follow Me
Pattern
In this mode, the metronome sound alternately
switches between normal and mute volume levels
according to the selection. This cycle repeats until
you press the [START/STOP] button to stop the exercise.
This function is based on a traditional warm up
exercise and also helps in learning various
rhythmic type. The metronome plays through a
series of note intervals or beat divisions. Each
one is played for 2 measures before moving on
to the next interval level.
It has 4 types to choose:
F-1: 1 measure cycle
(that means one measure play in normal volume &
one measure play in mute statue)
F-2: 2 measure cycle
F-3: 4 measure cycle
F-4: 8 measure cycle
Press the [+] or [-] to select the type for this
exercise.
Press the [+] or [-] to select the type for this exercise.
Press the [START/STOP] button to start/stop the exercise.
Gradual Up/down
Press the [START/STOP] button to start/stop
the exercise.
P-3
This function is designed to improve your playing
stamina by increasing and then decreasing the
metronome speed. The tempo will increase until
it reaches the max tempo you set. Then it will
decrease until it reaches the original tempo.
This repeats until you press the [START/STOP]
button. You are allowed to set the original tempo
before you start to play. Meanwhile, the max
tempo can be set when it reaches the tempo you
want by press [TEMPO] button in process of
exercise.
P-4
It has 5 tempo variation type to choose:
GOOD
Pattern type:
P-1
P-2
G-1
G-2
G-3
G-4
G-5
P-5
P-6
The tempo will increase or decrease by 1BMP on every beat
The tempo will increase or decrease by 1BMP every two beat
The tempo will increase or decrease by 2BMP every 8 measures
The tempo will increase or decrease by 5BMP every 8 measures
If you play correctly for eight measures, the drum will acknowledge this and advance
5 BPM faster.
What is BPM?
BPM is an abbreviation for "beats per minute"
(number of quarter-note beats in a one-minute period). Also means "tempo".
P-7
P-8
The accuracy result is displayed on LCD.(show picture)
Press the [+] or [-] to select the type for this
exercise.
Press the [START/STOP] button to start/stop
the exercise.
14
TEMPO
15
Timer
Count
This function helps you to count the amount
of pad hitting within the fixed time;And it also
offer you to count the time you spend for
finishing the fix hitting amount .
This timer can be set from 1 to 60 minutes, letting you practice for the period of time you
determine.
Briefly hold down the [GAME] button 3
seconds, enter the timer mode. The timer
indicator lightened.
TIMER
The fixed time can be chosen with [+][-]
includes: 15S,30S,60S.
The fixed hitting amount can be chosen
with [+][-] includes: 200,500,1000
Press [+] or [-] button to set the time.
Press [START/STOP] to start to exercise.
TIMER
Press [START/STOP] button to start the timer.
In fixed time accounting mode. After a one-measure count-in, the counting of pad hitting
will be displayed on LCD in real-time. The time left will be shown in the shape of metronome
needle. When it reaches the fixed time, the counting will be stopped automatically and the
pad hitting value flashes.
In fixed hitting counting mode. After a one-measure count-in, the time you spend will be
displayed on LCD in real time. The hitting left will be shown in the shape of metronome
needle.
When it reaches the fixed hitting amount, the time counting will be stopped automatically
and the accounting value flashes. If the time you spend is more than 60 minutes, it will exit
accounting mode.
When the LCD flashes accounting value,
press [+][-] to exit this mode and press
[start/stop] to replay.
16
17
Game
TEMPO/TAP
The game feature let you learn and play a rhythm by following the dropping
bars on the left or right of the LCD. When the dropping bars reaches to the
pad icon which is at the bottom of the LCD, strike the pads.
The digital durm have 60 rhythms, the grade is from easy to hard.
BEAT
TEMPO
Press [TEMPO] to enter tempo mode, LCD
temporarily display the tempo value with
tempo icon for 3 seconds. Press [+] [-] to
adjust the tempo value.
GAME
BEAT
TEMPO
It provide 3 game modes to practise: GAME,
GAME 1, GAME 2.
Press [GAME] button for the first time to
enter the GAME mode, the drum track of the
rhythm is turned on, and it won't score the
note you play.
GAME 1
L
Press [GAME] button for the second time to
enter the GAME 1 mode, the drum track of
the rhythm is mute, it will score your practise.
SC O RE
GAME 1
You are also allowed to set the metronome
tempo by hitting the pad.
Briefly hold down the [TEMPO] button for 3
seconds to enter tap mode. "TAP" icon
flashes.
Hit the pad 4 times to set the tempo, which
value is determined by the interval of the
last 2 hitting.
BEAT
TEMPO
Press the button for 3 seconds
TAP
Note :in game mode, tap function is disenabled.
Press [GAME] button for the third time
to enter the GAME 2 mode, the drum track of
the rhythm is mute, it will score your practise.,
if the score is more than 60, the OK icon will
appear on the LCD, then you can continue to
play the next rhythm. This mode will help you
know well about your progress.
L
R
GAME 2
Record
L
Press [METRO], [TRAINING], [RECORD]
button to exit the GAME mode.
SCORE
GAME 2
OK
Press [GAME] button repeatedly to
enter the corresponding GAME mode in turn.
RECORD
Press [RECORD] button to enter record mode.
"Record" indicator lightened on LCD.
It will flash if the recorded data has been stored
to the digital drum.
Start Recording
In record mode, press the [RECORD] button to
start to record a new pattern.
RECORD
The drum will now play the pattern (beat and
rhythm) already set in metronome, and you can
play according to this pattern.
L
If you'd like to mute the background pattern, set the
volume of metronome to 0 before recording and only
your own playing will sound during record mode.
SONG
RECORD
Stop Recording
Right
Wrong
Right Wrong Right
PAD
T1
18
In recording process, press[RECORD] or
[START/STOP] button to stop it.
Playback
In record mode, press the [START/STOP]
button to playback the user pattern.
19
Parameter Save And Factory Set
Parameter Save
The digital durm can save the current setting, for example: beat/rhythm type,
click/pad sound, tempo value, etc.
Factory Setting
Press both [+] and [-] buttons, then turn the power on,
the digital durm will reset the factory setting.
Battery
When using the battery to supply power, LCD will display the battery level indicator.
The battery level indicator
at the full position of the display when the battery power is sufficient,
it means the system work in optimal status.
The higher left of the display, the stronger the power in the battery.
The battery level indicator
at the lower right of the display when the battery power drops,
it means the system work normally, be note that the insufficient battery power may cause
operation unstable, such as the velocity checking.
The battery level indicator
is empty and begins to flash when the battery power is low,
you are suggested to replace the battery.
Pad Sound List
No.
01
02
03
04
05
06
07
08
09
10
11
12
13
14
15
16
17
18
19
20
21
22
23
24
25
26
27
28
29
30
31
32
33
34
20
NAME
j
Snarei (bank 10)
Standard snare
Standard snare rim
Rock snare
Rock snare rim
Room snare
Room snare rim
Jazz snare
Jazz snare rim
Funk snare
Funk snare rim
Hiphop snare
Hiphop snare rim
Electronic snare1
Electronic snare2
Electronic snare3
Electronic snare4
Electronic snare5
Electronic snare6
Electronic snare7
Electronic snare8
Electronic snare9
Electronic snare10
Kick (bank 12)
Standard kick
Rock kick
Room kick
Jazz kick
Funk kick
Hiphop kick
Electronic snare1
Electronic snare2
Electronic snare3
Electronic snare4
Tom (bank 14)
Standard tom 1
No.
35
36
37
38
39
40
41
42
43
44
45
46
47
48
49
50
51
52
53
54
55
56
57
58
59
60
61
62
63
64
65
Standard tom 2
21
NAME
Standard tom3
Standard tom4
Standard tom5
Standard tom6
Electronic tom1
Electronic tom2
Electronic tom3
Electronic tom4
Electronic tom5
Electronic tom6
CRASH(bank 16)
Standard hihat cl
Standard hihat Ped
Standard hihat Op
Rock hihat Cl
Rock hihat Ped
Rock hihat Op
Standard hihat cl_op
Rock hihat cl_op
Jazz hiihat cl_op
Standard Crash
Rock Crash
Standard Ride
Rock Ride
METRO
i (bank 8)
METRONOME-1
METRONOME-2
CLAVES-1
CLAVES-2
STICKS-1
STICKS-2
COWBELL-1
COWBELL-2
Game Demo List
SONG LIST
No.
name
beat
style
4\4
4\4
6\8
6\8
4\4
4\4
4\4
4\4
4\4
4\4
4\4
4\4
Country
Easy
1
2
3
4
5
6
7
8
9
10
11
12
13
14
15
16
17
18
19
20
21
22
23
24
25
26
27
28
29
30
Country_easy
Country_har d
6/8 Ballad_easy
6/8 Ballad_hard
8 beat ballad_easy
8 beat ballad_hard
Pop bossa_easy
Pop bossa_hard
Funk_1_easy
Funk_1_hard
8 beat pop_easy
8 beat pop_hard
Ballad_easy
Ballad_hard
Blues_1_easy
Blues_1_hard
Bossa_easy
Bossa_hard
Dance_1_easy
Dance_1_hard
Medium
Big band_easy
Big band_hard
Dance_2_easy
Dance_2_hard
Funk_2_easy
Funk_2_hard
Funk_3_easy
Funk_3_hard
Fusion_easy
Fusion_hard
22
4\4
4\4
4\4
4\4
4\4
4\4
4\4
4\4
4\4
4\4
4\4
4\4
4\4
4\4
4\4
4\4
4\4
4\4
Country
Ballad
Ballad
Ballad
Ballad
Latin
Latin
Funk
Funk
Pop
Pop
Ballad
Ballad
Blues
Blues
Latin
Latin
Dance
Dance
Jazz
Jazz
Dance
Dance
Funk
Funk
Funk
Funk
Fusion
Fusion
31
32
33
34
35
36
37
38
39
40
Jazz_1_easy
Jazz_1_hard
Jazz_2_easy
Jazz_2_hard
March_1_easy
March_1_hard
Reggae_easy
Reggae_hard
Latinjazz_easy
Latinjazz_hard
4\4
4\4
4\4
4\4
4\4
4\4
4\4
4\4
4\4
4\4
Jazz
Jazz
Jazz
Jazz
March
March
Reggae
Reggae
Rock
Rock
41
42
43
44
45
46
47
48
49
50
51
52
53
54
55
56
57
58
59
60
Hard
March_2_easy
March_2_hard
Rock Shuffle_easy
Rock Shuffle_hard
Metal_easy
Metal_easy
Pop_easy
Pop_hard
R&B_easy
R&B_hard
Rock_1_easy
Rock_1_hard
Rock_2_easy
Rock_2_hard
Samba_easy
Samba_hard
Shuffle_easy
Shuffle_hard
Swing_easy
Swing_hard
4\4
4\4
4\4
4\4
4\4
4\4
4\4
4\4
4\4
4\4
4\4
4\4
4\4
4\4
4\4
4\4
4\4
4\4
4\4
4\4
March
March
Rock
Rock
Rock
Rock
Pop
Pop
R B
R B
Rock
Rock
Rock
Rock
Latin
Latin
Fusion
Fusion
Jazz
Jazz
23
DD6_G06