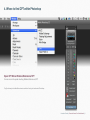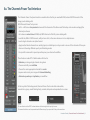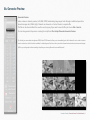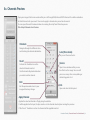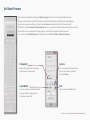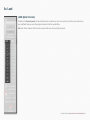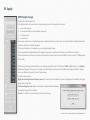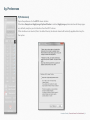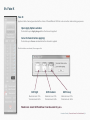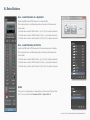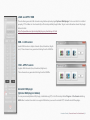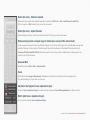
1
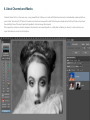
5
1
0
2
CC
KNOW HOW TRANSFER
the photography knowledge hub
Channels Power Tool | Advanced Mask Editing
User Manual - Version 1.1.6 - October 2015
Welcome to Channels Power Tool
© Iryna Hramavataya - depostitphotos.com
Once restarted Photoshop open Channels PowerTool
from Photoshop/Window/Extensions.
Access to the Quick Manual from the Docs&More tab at the bottom of the panel.
CPT Web Page >
Tutorials Page >
Channels Power Tool is developed by Giulana Abbiati. Visit her site >
FAQ Page >
or write to [email protected] >
KNOW HOW TRANSFER
the photography knowledge hub
Know-How Transfer – The Photography Knowledge Hub
A new platform by the same team who developed ALCE, formerly RBG Group or Bigano and associates.
Everyone dealing with photography and digital imaging will find a unique mix of instructional and how-to content here. We offer applications specifically designed by photographers for photographers, as well as effective tutorials and free resources. Our
mission is to create a community, a Central Hub of Photography Knowledge, where photographers can exchange experiences,
share information and grow their skills. Read more about our team here >
Many of them come from the school of the great Dan Margulis and still have a very special relationship with him.
I’m pleased to report here what he wrote about this group taken from his famous post “La Dolce Vita - An era ends”:
They say that Italians get emotional at times like this, and that Italians love beautiful things. I admit to feeling a bit Italian myself as I write
this. I *have* developed an emotional attachment to the country, no doubt. And the relationships I have entered into with several of my students in that country have evolved into something, well, profoundly loving. The old joke has it that in heaven, all lovers are Italian. Right offhand I can think of a couple of exceptions to this generality, but there is no need to go off-topic. The truth is that it is a land of love and great
beauty, made all the more beautiful professionally by seeing the new and sophisticated imaging algorithms being developed by Davide with
Marco Olivotto, and by seeing how Alessandro, Daniele Di Stanio, Tiziano Fruet and others have brought first-class color instruction into a
country where it was rarely found previously.
KNOW HOW TRANSFER
the photography knowledge hub
Channels Power Tool User Manual - Index
1. Channels Power Tool Compatibility
2. Unzip the Downloaded Folder
3a Install CPT in Photoshop CC 2015 MAC
3b. Install CPT in Photoshop CC 2015 WIN
3c. Install CPT on older PS Versions MAC
3d. Install CPT on older PS Versions WIN
4. Where to find CPT within Photoshop
5a.The Channels Power Tool Interface
5b.Generate Preview
5c.Channels Preview
5d.Mask Preview
5e.Load
5f.Apply
5g.Preferences
5h.Fake K
5i. Extra Buttons
6. About Channels and Masks
7.FAQ
8. Links and Credits
9. A brief Presentation of our Products
Channels Power Tool is an application developed by Giuliana Abbiati
1. Channels Power Tool Compatibility
Channels Power Tool works on CC2015, CC2014, CC, CS6 and CS5
For further information visit the CPT page >
or write to
[email protected] >
Copy and paste this link to email it to a different device
http://www.knowhowtransfer.com/download/manuals/cpt_manual_en.pdf
Problems? Go to the FAQ Page >
or write to [email protected] >
2. Unzip the Downloaded Folder
This is what the downloaded folder contains
The install file valid for CC 2015 and CC 2014. A second folder for all other Photoshop Versions. A third folder with user manuals.
We do hope that this manual may support all your needs.
For further information visit the Channels Power Tool page >
or write to
[email protected]
Copy and paste this link to email it to a different device
http://www.knowhowtransfer.com/download/manuals/cpt_manual_en.pdf
KnowHowTransfer | Channels Power Tool User Manual | 6
3a. Install on CC 2015 - MAC
1. Unzip the downloaded folder
4. Press the ‘ Install’ button
2. To install use the CC 2015 folder
This window will open: Press “Install” to install CPT the first time.
Please leave the installer file in his folder
3. Drag the file onto the Photoshop icon
In this case the “Unistall” button will be unactive.
5. Restart Photoshop
6. Open Channels Power Tool from Window/Extensions
Unistall previous CPT versions
To uninstall previous versions use Adobe Extension Manager
Once installed, an help pdf containing all useful info will open (see page 2)
KnowHowTransfer | Channels Power Tool User Manual | 7
3b. Install on CC 2015 - WIN
1. Unzip the Install Folder and copy its content on Desktop.
2. To install use the CC 2015 folderr
5. Press the ‘ Install’ button
This window will open: Press “Install” to install CPT the first time.
In this case the “Unistall” button will be unactive.
6. Restart Photoshop
Please leave the installer
7. Open Channels Power Tool from Window/Extensions
file in his folder
3. Run Photoshop as an Administrator
4. From Filter -> Scripts -> Browse,
open “CPTnstaller CC 2015.jsx
Unistall previous CPT versions
To uninstall previous versions use Adobe Extension Manager
Once installed, an help pdf containing all useful info will open (same than page 2)
KnowHowTransfer | Channels Power Tool User Manual | 8
3c. Install on CC 2014, CC, CS6, CS5.5, CS5 - MAC
ADOBE EXTENSION MANAGER IS REQUIRED TO INSTALL
Each version of Photoshop requires his dedicated AEM version.
PS CC 2014 and CC need AEM CC, PS CS6 need AEM CS6 etc
1. Drag the proper install file on the AEM icon on the dock
Or select the file and “0pen with” Adobe extension Manager
Any version
of Photoshop
requires the
dedicated
CPT installer
and Adobe
Extension
2. Accept the “Extension Disclaimer”
Now AEM will alert you that the “developer of the application” is unknown.
We know him. Dont worry,proceed and accept.
3. Install
AEM will alert you he reason why is that the verification system used by Adobe
cause the expiration of the installed application. This means that without any
apparent reason or notification your installed application will no longer work.
Manager
4. In case, remove the previous version of CPT
Version
Simply press on the “Remove” button in the AEM window
5. Restart Photoshop
Open CPT from the Photoshop/Window/Exetensions menu.
KnowHowTransfer | Channels Power Tool User Manual | 9
3d. Install on CC 2014, CC, CS6, CS5.5, CS5 - WIN
ADOBE EXTENSION MANAGER IS REQUIRED TO INSTALL
Each version of Photoshop requires his dedicated AEM version.
PS CC 2014 and CC need AEM CC, PS CS6 need AEM CS6 etc
1. Unzip the Install Folder and copy its content on Desktop.
2. Run Adobe Extension Manager as an Administrator
4. Accept the “Extension Disclaimer”
Now AEM will alert you that the “developer of the application” is unknown. We
know him. Dont worry; proceed and accept.
The reason of this alerts that the verification system used by Adobe cause the
expiration of the installed application. This means that without any apparent
reason or notification your installed application will no longer work.
3. Insert you admin password and open AEM
Enter your administrator password if requested: Do it even if you’re already
logged as Administrator!
Select the proper .zxp file and “0pen with” Adobe extension Manager.
6. In case, remove the previous version of CPT
Simply press on the “Remove” button in the AEM window
7. Restart Photoshop
Open CPT from the Photoshop/Window/Exetensions menu.
KnowHowTransfer | Channels Power Tool User Manual | 10
4. Where to find CPT within Photoshop
Open CPT: Menu Window/Extensions/CPT
You can access the panel selecting Window/Extensions/CPT.
Tip: If you have just installed the extension and don’t see it, quit and restart Photoshop.
KnowHowTransfer | Channels Power Tool User Manual | 11
5a. The Channels Power Tool Interface
The Channels Power Tool panel contains several buttons that let you work with RGB, Lab and CMYK channels of the
image you’re dealing with.
With Channels Power Tool you can:
- Surf in a full screen Live preview between all the channels of the three main Photoshop color modes and apply the
channel you choose
- Get a low-res contact sheet of RGB,Lab,CMYK channels of the file you’re dealing with
- Load all Lab, RGB e CMYK channels, with just one click, in the same document or in a duplicate one
- Load a single channel as an alpha channel
- Apply and/or blend a channel in an existing layer, in a blank layer, in a layer mask or in one of the channels of the open
document choosing different opacity and blending modes
- Use specific commands to speed up and improve your channels’ workflow
These features made CPT a flexible and useful tool to:
- Evaluate your image single channels at a glance
- Choose and craft your workflow
- Choose the most appropriate channel for a mask
- Improve and correct your image with channel blending
- Automate ,speed up and optimiza your workflow
As for any other Photoshop panel, Channels Power Tool can be dock and undock,
moved into a group, made floating freely, resized, collapsed and expanded to icon view
Tip: most button in the APPLY column features a blue triangle in the top right corner.
This means the button can be personalized in different ways if you press the Alt key at the same time.
KnowHowTransfer | Channels Power Tool User Manual | 12
5b. Generate Preview
Generate Preview
makes a low-res channels preview ( LAB, RGB, CMYK) maintaining image aspect ratio through conditional operations
based on image size ( Width ,High). Channels are showed as a Contact sheet in a separate file.
This file can be closed without the need to save it, anyway if you want to save this file just choose File > Save As.
You can also generate the preview running the script from: File>Script>Channels Generate Preview.
Tip: the fact you can evaluate at a glance all RGB, Lab e CMYK channels, allows you to immediately spot which channel to use in order to create a
mask or a selection, which is the best candidate for a blending and, last but not least, see which channel need restoration in extreme cast images.
All this on your fingertips without needing to duplicate your starting file and at an incredible speed!
KnowHowTransfer | Channels Power Tool User Manual | 13
5c. Channels Preview
Open your image in full screen mode and let you surf through RGB, Lab and CMYK channels for a better evaluation
of which channel suits your needs. You can also apply a channel onto your active document.
You can open Channels Preview window also running the script from Photoshop menu:
File>Script>Channels Live Preview.
Channels
Navigate through the different channels checking the desired radiobutton.
Lens (three icons)
Let you set the zoom factor.
Invert
Activate the checkbox to see the
selected channel inverted.
It will automatically deselected when
you select another channel.
Exit
Exit the preview and return to your
image without any change.
Curves
Open Curve window and let you see
the effects on the image. You can craft
your curve as any other curve, adding or
subtracting points to it.
Info
Open and close the Info panel.
Apply Channel
Applies the selected channel as “Apply image” would do.
It will be applied on the layer, the layer mask or on the channel selected prior running the preview.
If the “invert” checkbox is active the channel will be applied inverted.
KnowHowTransfer | Channels Power Tool User Manual | 14
5d. Mask Preview
Select a layer mask before clicking on Mask Preview, then select one of the available channels.
You can now visualize one after the other the mask itself or the layer modified by the mask applied.
In each case you can modify your channel using Curves and see how this affect the final result.
This button, unlike Channels Preview button, shows more options to fine tune the work with layer masks.
Since all this process keeps all the original layers, even different opacities will be honored.
You can also recall Mask Preview from Photoshop menu File > Script > Mask Live Preview.
Composite
Curves
Applies the composite of the color
mode of your actual image.
You can see how the mask works
on your layer while modified
through Curves.
Layer/Mask
Info
You can visualiza one after the other
the layer with its mask applied
or the layer mask itself.
Opens and closes Info panel.
KnowHowTransfer | Channels Power Tool User Manual | 15
5e. Load
LOAD (Alpha Channels)
It loads in the Channels panel the selected channel as an alpha one. You can load more times the same channels i.e.
you modified it and you want the original one back to further possibilities.
ALL loads al the channels of all the color modes at the same time as alpha channels.
KnowHowTransfer | Channels Power Tool User Manual | 16
5f. Apply
APPLY (Apply image)
Applies the selected channel.
Prior clicking the button you have to choose where you want to apply the channel:
1. on an existing layer
2. on a new blank layer you created on purpouse
3. on a layer mask
4. on a channel
Be sure you selected one standard layer (not an adjustment layer), a layer mask or a channel before clicking the button,
otherwise the process will be stopped.
(The same behaviour is found when you use Image>Apply image).
The channel will be applied without the Apply image options window to be shown (see Preferences section).
If the selected channel doesn’t actually exist because your document works in a different color mode, CPT will generate
it on the fly.
If the channel has been loaded before in your file by any of the tools of CPT panel ( LOAD or ALL buttons), an Options
window will appear. This way you can apply a channel that you have previously added (and maybe edited) or apply a
new one reflecting the actual status of your image.
You have three choices:
Apply the existing channel: channel_name : the existing channel will be chosen for applying and loaded in the Apply
image options window.
Create and Apply a new one: a new channel is generated and loaded in
the Apply image options window.
Cancel: You return to your document without any change.
KnowHowTransfer | Channels Power Tool User Manual | 17
APPLY (Apply image) - optional keys
Bt deafult the channel is applied without opnening tha Apply image options window.
Tip: you can set a different behaviour and decide to always open the Apply image options window before applying your channel, as shown in the
next page.
Option/Alt
By pressing the Option/Alt key while clicking on the desired button, the Apply Image options window will open letting you change the opacity and the blending mode before applying the channel.
Clic+Option/Alt= Opens Apply Image options window.
Shift
By pressing the Shift key you can access more options in the Apply Image window. You can indeed gain more control
on the channel you are applying choosing from which layer you want to source from.
Clic+ Shift= Opens Apply Image options window and let you choose the layer you want to source from for the choosen channel.
If the document includes adjustment layers, that are not supported in the upcoming conversion, CPT will generate a merged layer above the
actual layers stack.
KnowHowTransfer | Channels Power Tool User Manual | 18
5g. Preferences
P (Preferences)
Opens the preferences for the APPLY column buttons.
If checkbox Always show ‘Apply Image‘ Options Window is selected, Apply Image options window will always appear, as default, everytime you click a button from the APPLY column.
If this checkbox is not selected (this is the default choice), the desired channel will be directly applied without any further option.
KnowHowTransfer | Channels Power Tool User Manual | 19
5h. Fake K
Fake K:
Applies a black channel generated with a choice of three different GCRs for color correction and masking purpouses.
Open Apply Options window:
If selected it opens Apply Image before the channel is applied.
Curve K channel before applying:
If selected opens Curves window before the channel is applied.
If both checkboxes are selected, Curves appear first.
GCR light
GCR medium
GCR heavy
Black Ink Limit: 70%
Total Ink Limit: 340%
Black Ink Limit: 70%
Total Ink Limit: 340%
Black Ink Limit: 70%
Total Ink Limit: 340%
Read more about GCR and how it can be useful to you >
KnowHowTransfer | Channels Power Tool User Manual | 20
5i. Extra Buttons
ALL - Load Channels on a duplicate
Loads Lab, RGB and CMYK channels in a dupicate file.
The script performs conditional operations based on the document
color mode:
- if actual color mode is RGB it loads L, a, b, C, M, Y, K as alpha channels;
- if actual color mode is CMYK it loads R, G, B, L, a, b as alpha channels;
- if actual color mode is Lab it loads R, G, B, C, M, Y, K as alpha channels.
ALL - Load Channels on this file
Loads Lab, RGB and CMYK channels in the same document as alphas.
The script performs conditional operations based on the document
color mode:
- if actual color mode is RGB it loads L, a, b, C, M, Y, K as alpha channels;
- if actual color mode is CMYK it loads R, G, B, L, a, b as alpha channels;
- if actual color mode is Lab it loads R, G, B, C, M, Y, K as alpha channels.
Undo
The process is registered as a single History state named “Alpha Channels“. You can undo with Command/Ctrl + Option/Alt+ Z
KnowHowTransfer | Channels Power Tool User Manual | 21
LOAD and APPLY HSB
These buttons generate HSB channels using Adobe optional plugin Optional Multiplugin. To be sure that it is installed
properly, CPT installer set it automatically in Photoshop default plugin folder. To get more information about this plugin
follow this link:
http://helpx.adobe.com/photoshop/kb/plug-ins-photoshop-cs5.html
HSB - LOAD column
Loads HSB channles as alpha channels (Hue, Saturation, Brightness). These channels are generated starting from the RGB file.
HSB - APPLY column
Applies HSB channels (Hue, Saturation, Brightness).
These channels are generated starting from the RGB file.
Uninstall HSB plugin
(Optional Multiplugin di Adobe)
You can permanently delete HSB plugin, installed along CPT, in this Photoshop folder Plug-ins > File formats deleting
HSB folder. In order to be able to use again HSB buttons you need to reinstall CPT, that will reinstall the plugin.
KnowHowTransfer | Channels Power Tool User Manual | 22
Delete (bin icon) - Channels loaded
Delete only those alpha channelsthat have been created by LOAD and/or ALL- Load Channels on this file
(this is an option of ALL button) from your active document.
Delete (bin icon) - alpha Channels
Delete all alpha channels, even those created outside CPT, from your active document.
Stamp on top (create a merged copy of visible layers on top of the actual stack)
Create a merged (composite) version of the file and place it on the top of the layer stack. Invisible layers are ignored
and don’t take part in the creation of the final result. Despite the behaviour of the default Photoshop shortcut
Command/Ctrl+Option/Alt+Shift+E this button works fine even if you select a hidden layer, and always put the
result on top of the oter layers.
Gaussian Blur
Recalls Photoshop Filter > Blur > Gaussian Blur.
Curve
Recalls Photoshop Image >Adjustments > Curves. It is a destructive function, and can be applied only
to a pixel-based layer, a layer mask or a channel.
Adj Curve float (adjust Curves adjustment layer)
Creates a Curves adjustment layer (non-destructive) and opens Curves floating window for a better control.
Edit C (edit Curves adjustment layer)
Let you edit an existing Curves adjustment layer.
KnowHowTransfer | Channels Power Tool User Manual | 23
6. About Channels and Masks
Channels Power Tool is, as the name says, a very powerful tool. It allows us to work with Photoshop channels at unbelievable speed and with unseen control. To be honest, CPT doesn’t introduce new functions compared to what Photoshop can already do by itself, but it takes a step ahed
the usability of one of the most important ingredients of every image: the channels.
This preparatory section is aimed to introduce the characters we’re working with on a daily basis (whether you know it or not) and some concepts that can be an ace in lots of situations.
What are Photoshop channels
Within Photoshop we can find several kind of channels, we will deal only with color channels, the ones that compose our image and are signature of a specific color mode (Grayscale, RGB, Lab, CMYK, HSB etc), and alpha channels, the channels we create usually with the purpouse of
saving a selection, which itself is very volatile stuff and get lost, if everything goes well, when we close our file.
We can give a brief definition of a channel (every kind of ) as “The representation of a selection in grayscale“.
The keyword here is “representation”. Everyone knows how useful a selection is, maybe what is not so clear is that Photoshop gives us several
ways to visualize it (and therefore modify it). We are used to visualize a selection with the so called “marching ants” or maybe in Quick mask
mode. But it is also possible to visualize a selection as a greyscale image, like every time we use a layer mask.
Channels works exactly in this way: they show with a different shade of grey if a given pixel is selected, and how much. In RGB a completely
white pixel (when we look at a specific channel) means “this pixel is (totally) selected“, while a pitch black pixel means “this pixel is (totally) not
selected“. Guess what a medium grey means? Let’s try with an example: create a RGB file and manually paint the R (Red) channel completely
white, then paint G (Green) and B (Blue) pitch black. How our file is gonna be? Exactly, pure red. The values of our channels will be R=255, G=0,
B=0. Doing this we told Photoshop that we want that the red component of the file must be totally selected, while not Green nor Blue must take
part in creating our composite image.
Let’s take a more common example: a landscape with a blue sky in a bright sunny day. Try to visualize how channels will be in the sky area. Blue
will be, for sure, the brightest channel, Red the darkest and Green would be somewhere in the middle. Learn how to take advantage of the inner
selection hidden in every channel means we can obtain extremely complex selection, pixel precise and really with no effort.
At the very beginning it’s hard to pre-visualize the structure of each channels and you need to check them one by one toggling the visibility in
the Channels panel. Here it comes CPT, that let’s you, with literally just one click, see the structure of each channel at a glance. Not only in RGB or
the color mode you are using, but in all three main Photoshop color modes (RGB, Lab and CMYK) at the same time.
KnowHowTransfer | Channels Power Tool User Manual | 25
Apply Image
Image>Apply image is one of the older Photoshop functions and let’s us to do copy-paste of channels or layers (our source) on channels, layers
or layer masks (our destination). You can change the opacity of the source you’re applying, its blending mode or you can also mask it choosing a
channel. The Apply button of Channels Power Tool summon this function that, for unknown reason, doesn’t have a default shortcut. Apply image works also between different files, and in the likely case the file has multiple layers (the most common situation), it permits to choose which
layer should be the source, discarding the others layers. The only condition Apply image requires to be used between different files is that these
must be opened at the same time in Photoshop and share exactly the same size (in pixel) of width and height.
What is GCR and how it can be useful to you
GCR means Grey Component Replacement. This concept works for CMYK color mode, where we can obtain the same color in different ways
using different values combinations for the four primaries. Everything became clear if we consider a color composed by different elements,
generically speaking luminosity, tint and saturation. Luminosity is the equivalent of the grey strenght of a color: how much dark or bright we
perceive this color. We can have two colors with the same tint and saturation (i.e. a certain red) but different luminosity. Let’s call them a dark
red and a bright red for ease sake. What distinguish them is the luminosity. In CMYK we have the theoretical possibility to obtain a grey in two
distinct ways: blending proper quantities of CMY or using just the K. This can take to a lot of issues in we are going to print in offset, but in our
ipothetic example let’s imagine things work in a perfect, mathematical way. Let’s say we want to obtain a medium grey. In RGB we would only
have R=128 G=128 B=128. In CMYK (considering a Coated FOGRA39 profile) we can reach this result in (at least) two different ways: with just a
K=50, meaning we have C=0 M=0 Y=0 K=50, or leaving K=0 and using only CMY components like this: C=58 M=48 Y=47 K=0. Now we got lots
of different possible combinations, adding a little K and subtracting CMY in a right proportion. This is exactly GCR: how we transform our grey
component when converting to CMYK. A low GCR will use a lot of CMY and small K (K will be lighter), a high GCR awill use a lot of K and less CMY
(K will be darker) while a medium GCR will be something in the middle. This explanation leaves a lot of dark areas in explaining this concept,
but nonetheless let us understand how a custom GCR could be useful: to obtain a K darker or lighter, that we can use as a mask, a selection or
anything we could think about.
KnowHowTransfer | Channels Power Tool User Manual | 26
9. FAQ
KNOW HOW TRANSFER
the photography knowledge hub
7. FAQ
For any question about purchasing, installing and trouble shooting
please visit our dedicated FAQ page at the following address:
http://www.knowhowtransfer.com/ctp/faq
KNOW HOW TRANSFER
the photography knowledge hub
8. Links and Credits
Channels Power Tool © knowhowtransfer/bigano.srl/Giuliana Abbiati
Channels Power Tool is developed by Giuliana Abbiati
This manual is designed by Marco Diodato
Channels Power Tool Page >
Buy Channels Power Tool here >
Store Home Page >
Products KHT Home Page >
bigano.com >
Images credits: Cover and pages: Iryna Hramavataya/©depositphotos.com
9. A brief presentation of our Apps for Photoshop.
Wow! Tonal Equalizer - Frequency Separtion Plugin
Channels Power Tool - Advanced Mask Editing
VitaminBW - Single and Triple Tone Black&White Converter
Boost and soft an image in one step detail scales through five dedicated sliders. Positive values, which add detail or shape. Negative value
remove detail and create great, soft transitions.
PS CC 2015, CC2014, CC , CS6 - MAC & WIN.
Buy €32 >
Easily get a preview of all available channels. Create masks from the
channels. Use the powerful Apply Image option to precisely recover the
details of your files. CPT will enhance your color control precision and
productivity. PS CC 2015, CC2014, CC , CS6, CS5 - MAC & WIN. Buy €20 >
An original approach to B&W Conversion with a very clean and simple
interface. Simply press the “Single Tone” or the “Triple Tone” button to
be quickly introduced to advanced conversion techniques.
Double USM - Two Channels Advanced Sharpening
ALCE - Advanced Local Contrast Enhancer
PS Projects - Files Manager for Photoshop
Works separately on Dark and Light halo’s components of an image.
With a double set of sliders and his high quality preview, Double USM
fills the gap. For traditional, HiRaLoam or creative mixed sharpening.
An easy-to-use and powerful Photoshop tool to effectively improve and
finely tune the local contrast of an image. His smart algorithm avoids
the clipping issues typical of methods like shadows/highlights.
A script that lets you create, load and modify Project files – i.e. collections of images in any format, from any folder in your hard drive as file
references, that you might need to open in Photoshop often.
PS CC 2015, CC2014, CC , CS6, CS5 - MAC & WIN.
PS CC 2015, CC2014, CC , CS6, CS5, CS4, CS3 - MAC & WIN.
PS CC 2014, CC , CS6 - MAC & WIN
Buy €12.40 >
Buy €28 >
PS CC 2015, CC2014, CC , CS6 - MAC & WIN.
Buy €26 >
Buy €11 >
Freeware
Premium Raw Scan Service
Floating Adjustments - Restores the old CS3 floating window
False Profile - Tonal range control with low or high gamma
Hasselblad 3F 16bit Raw Scan Service
Restores the Adjustment Layers’ bigger, floating windows look and
behaviour which was the norm back in CS3. It allows the creation of 10
Adjustment kinds as big, floating windows, and the modifications of
existing adj.
PS CC2014, CC , CS6, CS5 - MAC & WIN.
Get Free >
A Photoshop extension to automate the assignment of false RGB profiles
for a full control of the luminosity. Brings new features and refinements
to the process of assigning false profiles. Works in conjunction with the
Dan Margulis’ PPW Tools.
PS CC 2015, CC2014, CC , CS6, CS5 - MAC & WIN.
Get Free >
3F is a raw file obtained froma an analog original. We will scan your
film with the Hasselblad hi-end scanners. Send us you originals from a
35mm to a 13x18cm/5x7”, color or black and white, negative or positive.
All PS Versions, MAC & WIN. Buy 3F 16 bit R
ALL PHOTOSHOP VERSIONS , MAC & WIN
Buy Raw Scan €7 each.>
Apps Store >
Apps home page >
KnowHowTransfer | Channels Power Tool User Manual | 30