1
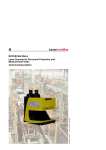
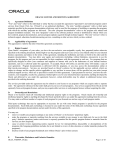
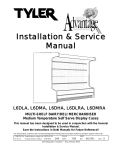
Definition of the machine
Instruction
Dear user:
Thank you for choosing our Car DVR product. In order to operate your product with ease as soon as
possible and get more perfect service, please read the manual carefully and properly keep it, thank you!
we are very serious and rigorous while writing this manual, and hope to be able to provide reliable
information for you.
But the inconsistencies are inevitable in the content of this manual for products software and hardware
upgrade during the process of printing,thus,you should be subject to driving recorder and inform our
company, so that our company can modify the manual as soon as possible, thank you!
This manual is subject to copyright protection, the written content is owned by our company.
Our company reserves the right to modify the product specifications and related information mentioned
by the manual.
Any modifications or changes of the product specifications and related information mentioned by this
manual will have no prior notice.
Without the written permission of our company,any form of reproduction, modification, use,
dissemination or publication of this manual is illegal.
If you'd like to know more about our products, you can login our company's official website. If you have
question on our products before, during, and after using, you can consult the local dealer, also welcome
to call our customer service line.
This product has been patented, and copying is not permitted.
[NOTE] Don't place any items in the airbag scope and the scope which may influence the driving sight ,
so as not to cause unnecessary secondary harm.
The recorder can be automatic circulation recording with high-definition digital camera function when
the automobile starts.It’s built-in microphone and speaker can be synchronously recording. Otherwise,
the LED escorts for your night driving in the dim light. To share your wonderful journey with others by
choosing HD HDMI output and AV-OUT output.
1. The Name of the Appearance and Description:
Above View
Left View
Right View
1.【Skreen】
2.0 inch TFT HD screen.
2.【Camera】
HD CMOS screen.
3.【Flash LED】
Improve the brightness of the camera image .
4.【Power indicator light】
When the machine starts, the indicator light is on ,and when the machine
shuts down ,the light is put out.
5.【The recording light 】
When the video opens ,the recording light is on,and when it’s mute ,the light
is put out .
6.【The video light 】
When the video starts, the light flashes regularly,and when it stops,the light
is on.
7.【Video/turn on】
Short press the start/stop video; Short press can switch to video mode;
Menu to select mode can be used for the turn key.
8.【Recording/down Key】
In video mode, short press can start/stop recording; Menu to select mode
can be used as under turn key.
9.【Menu】
Photo menu Settings: photo mode, short press to enter menu settings,then
short press two to exit menu settings and return to picture mode;
Video menu Settings: video mode, short press to enter menu settings,then
short press four to exit menu settings and return to video mode;
Playback menu Settings: playback mode, short press to enter menu
settings,then short press two to exit menu settings and return back like a
model
10.【Camera】
Short press video mode to the picture mode, short press again can
photograph one; long press the video or photo mode into the playback
mode; In playback mode, short press the play/pause the video file, then long
press for 3 seconds to exit playback mode; Short press to enter the video
menu in video mode setting, short press the to switch menu options again.
11.【Emergency Lock /OK】 Long press 3 seconds video standby mode to start motion detecting, then
long press to exit; In video,short press to start emergency lock function;
Video/photo/playback mode, press the [menu] can be opened/closed .
12.【TF Card Slot 】
To support maximum 32GB TFTF memory card, to storage the video and
photos. Suggest CLASS4 and above.
13.【Horn】
For synchronous sound video file playback.
14.【Bracket Chute 】
To fix the bracket
15.【Power】
Long press for 3 seconds to open, and in the working state, long press for 3
seconds to shutdown;In working state, short press to open the fill light switch
means.
16.【Reset】
To reboot the system when the system crashes or has no respond.
17.【AV-OUT Interface】
or【HDMI Interface】
To play the video in the recorder through the AV line connected the TV or
other with the function of the AV system.
(use HDMI function) connect HD output line to output audios and videos to
the high-definition television
18【External camera
interface 】
or【GPS Line interface 】
(Equipped with external camera )can connect the VGA camera,to realize
the double visual function ;
(Equipped with GPS function )access to the GPS receiver, to record the
car track.
19.【USB interface】
It is a charger interface while charging ; It can be used as a mobile disk or s
camera through the USB cable connected to the computer .
2. Usage
2.1 Installation
Insert CLASS4 or the TF card on the driving recorder , then stick the recorder 3 M glue stick holder to
the upper middle windscreen,where around the rear view mirror, or to install the parts wherever you want.
Just need to link the charger with the machine.
2.2 Battery charging and USB connection
2.2.1. You can use the car charger to charge the recorder
2.2.2. To connect the machine to the computer via USB cable, then press【Video】key. And the
【Recording】 Key to chose “charging”,and press 【Emergency Lock】button, the machine will enter
the video recording standby mode.
2.2.3. To connect to your computer via the USB cable, then to choose "Disk" on the recorder,and it
can be used as a mobile disk.
2.3 Open the driving recorder
To press the【Power】key to open the driving recorder, or to connect car-mounted charger to start the
car,then this unit can be switched on automatically.
NOTE:The electric current will increase suddenly when the vehicle launches.Although our products have
the function of the ignition to open, it cannot guarantee their too strong current vehicles to cause no
damage to the machine, so we suggest you to start the vehicle firstly, then to link to the car charger, and
to use the manual way to boot!
2.4 Switch Mode
The driving recorder has three work modes: video, camera, playback. It enters the camera mode
automatically after it opens, and short press the【Camera】button to camera model, then short press
【Video】key can go back to video mode.
2.5 Video Shooting
2.5.1. The Video
(1) To insert the TF card into the machine, then open the machine after connecting the car-mounted
charger. Please format the TF card when you use it for the first time.
(2) In standby mode, start to video by pressing the【Video】key.
(3) In the default mode ,the video lights flashing at the same time.
(4)In the state of the video, press the 【Video】 to stop the video.
2.5.2. Use the external camera to video (optional)
After plugging in an analog camera, the screen will appear a camera icon below, and a light touch on
short pres【Emergency Lock】can switch among the three show ways: before the cameras, after the
cameras, picture in picture.
2.6 Take Photographs
Open the driving recorder, then press the【Camera】button to photo mode, pressing one time takes one
picture.
2.7 Playback Modes
2.7.1. In video or photo mode, long press the【Camera】to playback mode. Pressing【Turn On】
and【Down】will browse the recorded files in turn.
2.7.2. Video playback: pressing the【Camera】to make sure to play the video file. Press【Turn On】 to
fast rewind,and to press【Camera】will broadcast video normally .
2.7.3. Browse pictures : The files in the central screen without logo are photos, press【Video】and the
【Audio】will browse files in turn.
3. Menu and system Settings
3.1 Video Mode Setting
3.1.1. Resolution: open the machine, press [menu] in the video recording mode.When stay out of the
menu settings, use [up] or [down] to choose to resolution, and then confirm with【Emergency Lock】 to
enter setup. Then again use [up] or [down] to select HD or VGA resolution.With【Emergency Lock】to
confirm and return to the parent menu.
3.1.2.To Print date: open the machine, press [menu] in the video recording mode.When jump out of the
menu settings, press [up] or [down] to choose to print the date, and then confirm with【Emergency Lock】
to enter setup. Then again use [up] or [down] to select ON open/ OFF close .Use【Emergency Lock】to
confirm and return to the parent menu.
3.1.3. Motion detecting: open the machine, press [menu] in the video recording mode. When jump out
of the menu settings, press [up] or [down] to choose to motion detecting, and then confirm with
【Emergency Lock】
key to enter setup. Then again use [up] or [down] to select ON open/ OFF close .Use
[emergency lock ] to confirm and return to the parent menu.
3.1.4. Sound recording: open the machine, press [menu] in the video recording mode. When jump out
of the menu settings, press[over] or [then] to choose to sound recording, and then confirm with
[emergency lock]key to enter setup. Then again use[over] or [then] to select ON open/ OFF close.With
the [emergency lock] key to confirm and return to the parent menu.
3.1.5. Video often: open the machine,press [menu] in the video recording mode. When jump out of the
menu settings, press[over] or [then] to choose to video often ,and then confirm with [emergency lock] key
to enter setup. Then again use[over] or [then] button to select 1 ~ 10 minutes/OFF close,With
[emergency lock] key to confirm and return to the parent menu.
3.1.6. The G-SENSOR: open the machine,press [menu] in the video recording mode. When jump out
of the menu settings, press[over] or [then] to choose to the G SENSOR, and then confirm with
[emergency lock] key to enter setup. Then again use [over] or [then] button to select low - high/OFF close.
With [emergency lock] key to confirm and return to the parent menu.
3.1.7. Automatically boot video: open the machine, press [menu] in the video recording mode. When
jump out of the menu settings, press[over] or [then] to choose to Automatically boot video,and then
confirm with [emergency lock] key to enter setup. Then again use[over] or [then] button to select ON
open/ OFF close/ plug charger only. With [emergency lock] key to confirm and return to the parent menu.
3.1.8. Backlight: open the machine,press [menu] in the video recording mode. When jump out of the
menu settings, press [over] or [then] to choose to backlight, then confirm with [emergency lock] key to
enter setup.Then again use [over] or [then] button to select 1 ~ 5 minutes/OFF close. With [emergency
lock] key to confirm and return to the parent menu.
3.2 Camera Mode Setting
3.2.1. Resolution: open the machine,press the [menu] in the camera mode. When jump out of the
menu settings, press[over] or [then] to choose to resolution,then confirm with [emergency lock] key to
enter setup. Then again use [over] or [then] button to select 2 ~ 12 m resolution With [emergency lock]
key to confirm and return to the parent menu.
3.2.2. The print date: open machine,press the [menu] in the camera mode. When jump out of the menu
settings,press [over] or [then] to choose to print the date, and then confirm with [emergency lock]key to
enter setup. Then again use[over] or [then] button to select ON open/ OFF close. With [emergency lock]
key to confirm and return to the parent menu.
3.2.3. The scene mode: open machine,press the [menu] in the camera mode. When jump out of the
menu settings,press[over] or [then] to choose to scene mode, and then confirm with[emergency lock] key
to enter setup. Then again use[over] or [then] button to select auto/people/sport/high sensitivity/beach.
With [emergency lock] key to confirm and return to the parent menu.
3.2.4. The white balance: open the machine,press the [menu] in the camera mode. When jump out of
the menu settings, press [over] or [then] to choose to white balance, and then confirm with[emergency
lock] key to enter setup. Then again use[over] or [then] button to select sunny/cloudy/tungsten filament
lamp/fluorescent lamp. With [emergency lock] key to confirm and return to the parent menu.
3.2.5. Color: open the machine,press the [menu] in the camera mode. When jump out of the menu
settings,press [over] or [then] to choose to color, then confirm with [emergency lock]key to enter setup.
Then again use[over] or [then] button to select color/white. With [emergency lock] key to confirm and
return to the parent menu.
3.2.6. Three shoot: open the machine,press the [menu] in the camera mode. When jump out of the
menu settings, press [over] or [then] to choose to three shoot, then confirm [emergency lock] key to enter
setup. Then again use [over] or [then] button to select ON open/OFF close. With [emergency lock] key to
confirm and return to the parent menu.
3.3 Playback Mode
Open machine, press the [menu] in the playback mode. When jump out of the menu settings, press
[over] or [then] to choose delete/ display/insets/volume, and then confirm with [emergency lock]key to
enter setup. Then again use [over] or [then] button to select the required settings. With [emergency lock]
key to confirm and return to the parent menu.
3.4. The System Settings
3.4.1. Formatting: open the machine, press [menu] twice.When jump out of the menu settings, press
[over] or [then] to choose to formatting, and then confirm with [emergency lock]key to enter setup. Then
again use [over] or [next] button to select confirmation/cancellation. With [emergency lock] key to confirm
and return to the parent menu.
NOTE: the files will all be deleted after formatting . Please operate carefully!
3.4.2. Language: open the machine,press [menu] twice.When jump out of the menu settings, press
[over] or [then] to choose to select the language, and then confirm with [emergency lock]key to enter
setup. Then use [over] or [then] button to select English / the simplified form/the complexed form of
Chinese /other languages. With [emergency lock] key to confirm and return to the parent menu.
3.4.3. Automatically shutdown: open the machine,press [menu] twice.When jump out of the menu
settings,press [over] or [then] to choose to automatically shutdown, and then confirm with [emergency
lock]key to enter setup. Then use [over] or [then] button to select 15 seconds to five minutes/OFF close.
With [emergency lock] key to confirm and return to the parent menu.
3.4.4. The default setting: open the machine, press [menu] twice.When jump out of the menu settings,
press[[over] or [then] to choose to the default Settings, and then confirm with [emergency lock]key to
enter setup.Then use [over] or [then] button to select confirm/cancel.With [emergency lock] key to
confirm and return to the parent menu.
NOTE: The parameters the customer sets up initially will be restored to the default value if the initial
setups of the system be recovered!
3.4.5. Frequency: open the machine,press [menu] twice.When jump out of the menu settings,
press[over] or [then] to choose the frequency, and then confirm with [emergency lock]key to enter
setup.Then use [over] or [then] button to select 50 Hz / 60 Hz.With [emergency lock] key to confirm and
return to the parent menu.
3.4.6. Set up the date: open the machine ,press [menu] twice.When jump out of the menu settings,
press[over] or [then] button to set the date, and then confirm with [emergency lock]key to enter
setup.Then use [over] or [then] button to select set the date/cancel .Use the [emergency lock] key to
confirm the set-tups,and the [over] [then] button to adjust the date format.With [emergency lock] key to
confirm and return to the parent menu.
3.4.7. TV-OUT: open the machine ,press [menu] twice.When jump out of the menu settings, press[over]
or [then] button to set TV - OUT,and then confirm with[emergency lock ]key to enter setup. Then again
use [over] or [then] key to select NTSC/PAL format.With [emergency lock] key to confirm and return to
the parent menu.
3.4.8. Exposure: open the machine,press [menu] twice.When jump out of the menu settings,
press[over] or [then] button to choose the exposure, and then confirm with[emergency lock ]key to enter
setup. Then again use [over] or [then] key to select - 2 ~ + 2.With [emergency lock] key to confirm and
return to the parent menu.
3.4.9. System information: open the machine,press [menu] twice.When jump out of the menu settings,
press[over] or [then] button to select the frequency.Confirm with the [emergency lock] key to enter the
system information.
4. Other Optional Features
4.1.Using collision induction function
4.1.1. When taking videos, press 【Emergency Lock】 shortly to start emergency lock function, after
the launch it will save the video that happens 10 seconds before and after 20 seconds delay time to
LOCK LOCK file .
4.1.2. When the car taking collision, the system will start the collision induction function, after the
launch it will save the video that happens 10 seconds before and after 20 seconds delay time to LOCK
LOCK file.
NOTE:the LOCK LOCK file which is stored in the file will not be covered in the video cycle , so the
customer should often clean up it when using, and remove the unnecessary file in time, reducing the
useless files occupied in the space of TF card.
4.2 The mobile disk and the computer video
4.2.1. The mobile disk function: through the USB cable connecting the machine to the computer,
pressing the video key and record key and selecting "disk", Press "emergency lock button" , then the
machine screen displays 'USB mobile disk icon, that imply that machine successfully connects to the
computer. Through the computer we can open the "mobile disk" to backup and delete the video and
photos in the TF card .
NOTE:when playing videos on the computer, due to the limitation of USB transmission speed. it may
affect your watching effects, before playing it please copy the video to your computer firstly.
4.2.2. Computer camera features: through the USB cable connecting the machine to the computer,
pressing the video key and record key and selecting "camera",Press "emergency lock button".then the
machine screen displays 'the logo of machine screen’, that imples that machine camera successfully
takes effects.
4.3 The output of AV-OUT and HDMI(optional)
The output of AV-OUT: inserting one end of AV line into the native interface of AV - OUT, and its output
terminal is connected to the the input end of AV- IN
The output of HDMI(optional): connecting one end of specialized hd output line to native HDMI
interface while the other end is connected to the monitor HDMI interface.
Above two kinds of method can make broadcast systems which is with such function play the native
stored pictures and videos with sound accompanied.
NOTE:the machine support double -channel, please use triple-evaporator AV output line. HDMI monitor
can be only used with its resolution ratio adjusted as 1080P.
4.4 Use the track recording function of the GPS (optional)
4.4.1. Make sure that the machine you bought has the function of GPS vehicle trajectory function and
a GPS module receiver .
4.4.2. Insert the GPS receiver connection cables on the machine interface " GPS receiver", the GPS
screen instructions logo will start flashing. After the success of the GPS positioning,the indicator icon will
stop flashing. When using the video , it can produce a suffix '.map' in the file name. .
4.4.3. A dedicated GPS trajectory video player software is needed to check the recorded information.
This software can log in our company's official website to download.
NOTE:'. map' file is for the trajectory information, the file name is the same as the video file name by
using GPS functions, and cannot be deleted
4.4.4.To check the GPS movement track
(1.) login website and download the dedicated GPS trajectory player software to the computer.
(2). When the download is completed, loose the package after opening the file folder, double-click the
EXE setup program to the computer.
(3). Double-click to open procedures, can view the video with Google maps to display routes
(pictured).
1 Minimize and close
To minimize and to close the
player
Language
2
selections
Simplified and traditional
Chinese and some foreign
languages
3 The choice of map
To choose the Google map
or the satellite map
4 Import file
Click to find video file
5 The volume button
To adjust the volume
6 Play button
All the control button for the
video play
7 The camera button
To take the current images
8 Full skreen button
To click ,then the picture will
cover the whole player
9 Coordinate display
Display the current latitude
and longitude of the track
5、 Performance Parameters
The image sensor
Wide angle 140 °or 165 °(Two options)
Display screen
2.0 inch HD TFT
Chipset
Wise F20 or SQ high-performance processor (Two
options)
Storage medium
Top 32 GB TF card (suggest CLASS4 and above)
Picture
JPEG format
Video
1920*1080 20fps; 1280*720 30fps, VGA +30fps
Emergency lock Collision Induction
Support
USB Interface
USB2.0
Motion Detecting
Support
Automatic Override
Support
Audio
Built-in microphone/ Speaker
AV output formats
NTSC / PAL
Power Supply
Built-in lithium battery and external USB power supply
HDMI
optional
GPS trajectory
optional
External camera
optional
DC
5V
6. General Troubleshooting
The problems
The possible reasons
The solution
Can't boot up
A dead battery
Plug in the charger for the battery .
automatic
shutdown
Enable the automatic shutdown function
Battery died
Enter the setting menu and set the"off time" as
“close”
charging
Not stored the
pictures
Power is out before saving the image
charging
Cannot video or
take photos
The TF card is not inserted or is not
tested by the machine
The TF memory card is full
The TF card contains other driving
recorder images
To insert the card if there is no card
Format the TF card after deleting useless file
or backup file
Format the TF card
All buttons are
failure
Program error or wrong operation
Press the RESET button to restart the
machine