1
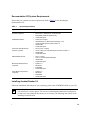
Installation Overview for
Optivity Campus 7.0
Part No. 893-748-G
March 1998
© 1998 by Bay Networks, Inc. All rights reserved.
Trademarks
Bay Networks and Optivity are registered trademarks of Bay Networks, Inc.
Optivity Campus is a trademark of Bay Networks, Inc. Microsoft, Windows, and Windows NT are registered trademarks of
Microsoft Corporation.
Other brand and product names are registered trademarks or trademarks of their respective holders.
Statement of Conditions
In the interest of improving internal design, operational function, and/or reliability, Bay Networks, Inc. reserves the right to
make changes to the products described in this document without notice. Bay Networks, Inc. does not assume any liability
that may occur due to the use or application of the product(s) or circuit layout(s) described herein.
Bay Networks, Inc. Optivity® Network Management Software License Agreement
NOTICE: Please carefully read this license agreement before copying or using the accompanying Optivity network
management software or installing the hardware unit with pre-enabled Optivity network management software (each of
which is referred to as “Software” in this Agreement). BY COPYING OR USING THE SOFTWARE, YOU ACCEPT ALL
OF THE TERMS AND CONDITIONS OF THIS LICENSE AGREEMENT. THE TERMS EXPRESSED IN THIS
AGREEMENT ARE THE ONLY TERMS UNDER WHICH BAY NETWORKS WILL PERMIT YOU TO USE THE
SOFTWARE. If you do not accept these terms and conditions, return the product, unused and in the original shipping
container, within 30 days of purchase to obtain a credit for the full purchase price.
1. License Grant. Bay Networks, Inc. (“Bay Networks”) grants the end user of the Software (“Licensee”) a personal,
nonexclusive license: a) to use the Software either on a single computer or, if applicable, on a single authorized device
identified by host ID; b) to copy the Software solely for backup purposes in support of authorized use of the Software; and
c) to use and copy the associated user manual solely in support of authorized use of the Software by Licensee. This license
applies to the Software only and does not extend to Bay Networks Agent software or other Bay Networks software
products. Bay Networks Agent software or other Bay Networks software products are licensed for use under the terms of
the applicable Bay Networks, Inc. Software License Agreement that accompanies such software and upon payment by the
end user of the applicable license fees for such software.
2. Restrictions on use; reservation of rights. The Software and user manuals are protected under copyright laws. Bay
Networks and/or its licensors retain all title and ownership in both the Software and user manuals, including any revisions
made by Bay Networks or its licensors. The copyright notice must be reproduced and included with any copy of any
portion of the Software or user manuals. Licensee may not modify, translate, decompile, disassemble, use for any
competitive analysis, reverse engineer, distribute, or create derivative works from the Software or user manuals or any copy,
in whole or in part. Except as expressly provided in this Agreement, Licensee may not copy or transfer the Software or user
manuals, in whole or in part. The Software and user manuals embody Bay Networks’ and its licensors’ confidential and
proprietary intellectual property. Licensee shall not disclose to any third party the Software, or any information about the
operation, design, performance, or implementation of the Software and user manuals that is confidential to Bay Networks
and its licensors; however, Licensee may grant permission to its consultants, subcontractors, and agents to use the Software
at Licensee’s facility, provided they have agreed to use the Software only in accordance with the terms of this license.
3. Limited warranty. Bay Networks warrants each item of Software, as delivered by Bay Networks and properly installed
and operated on Bay Networks hardware or other equipment it is originally licensed for, to function substantially as
described in its accompanying user manual during its warranty period, which begins on the date Software is first shipped to
Licensee. If any item of Software fails to so function during its warranty period, as the sole remedy Bay Networks will at its
discretion provide a suitable fix, patch, or workaround for the problem that may be included in a future Software release.
Bay Networks further warrants to Licensee that the media on which the Software is provided will be free from defects in
materials and workmanship under normal use for a period of 90 days from the date the Software is first shipped to
Licensee. Bay Networks will replace defective media at no charge if it is returned to Bay Networks during the warranty
period along with proof of the date of shipment. This warranty does not apply if the media has been damaged as a result
of accident, misuse, or abuse. The Licensee assumes all responsibility for selection of the Software to achieve Licensee’s
intended results and for the installation, use, and results obtained from the Software. Bay Networks does not warrant a) that
the functions contained in the software will meet the Licensee’s requirements, b) that the Software will operate in the
ii
hardware or software combinations that the Licensee may select, c) that the operation of the Software will be uninterrupted
or error free, or d) that all defects in the operation of the Software will be corrected. Bay Networks is not obligated to
remedy any Software defect that cannot be reproduced with the latest Software release. These warranties do not apply to
the Software if it has been (i) altered, except by Bay Networks or in accordance with its instructions; (ii) used in
conjunction with another vendor’s product, resulting in the defect; or (iii) damaged by improper environment, abuse,
misuse, accident, or negligence. THE FOREGOING WARRANTIES AND LIMITATIONS ARE EXCLUSIVE
REMEDIES AND ARE IN LIEU OF ALL OTHER WARRANTIES EXPRESS OR IMPLIED, INCLUDING WITHOUT
LIMITATION ANY WARRANTY OF MERCHANTABILITY OR FITNESS FOR A PARTICULAR PURPOSE.
Licensee is responsible for the security of its own data and information and for maintaining adequate procedures apart from
the Software to reconstruct lost or altered files, data, or programs.
4. Limitation of liability. IN NO EVENT WILL BAY NETWORKS OR ITS LICENSORS BE LIABLE FOR ANY COST
OF SUBSTITUTE PROCUREMENT; SPECIAL, INDIRECT, INCIDENTAL, OR CONSEQUENTIAL DAMAGES; OR
ANY DAMAGES RESULTING FROM INACCURATE OR LOST DATA OR LOSS OF USE OR PROFITS ARISING
OUT OF OR IN CONNECTION WITH THE PERFORMANCE OF THE SOFTWARE, EVEN IF BAY NETWORKS
HAS BEEN ADVISED OF THE POSSIBILITY OF SUCH DAMAGES. IN NO EVENT SHALL THE LIABILITY OF
BAY NETWORKS RELATING TO THE SOFTWARE OR THIS AGREEMENT EXCEED THE PRICE PAID TO BAY
NETWORKS FOR THE SOFTWARE LICENSE.
5. Government Licensees. This provision applies to all Software and documentation acquired directly or indirectly by or
on behalf of the United States Government. The Software and documentation are commercial products, licensed on the
open market at market prices, and were developed entirely at private expense and without the use of any U.S. Government
funds. The license to the U.S. Government is granted only with restricted rights, and use, duplication, or disclosure by the
U.S. Government is subject to the restrictions set forth in subparagraph (c)(1) of the Commercial Computer
Software––Restricted Rights clause of FAR 52.227-19 and the limitations set out in this license for civilian agencies, and
subparagraph (c)(1)(ii) of the Rights in Technical Data and Computer Software clause of DFARS 252.227-7013, for
agencies of the Department of Defense or their successors, whichever is applicable.
6. Use of Software in the European Community. This provision applies to all Software acquired for use within the
European Community. If Licensee uses the Software within a country in the European Community, the Software Directive
enacted by the Council of European Communities Directive dated 14 May, 1991, will apply to the examination of the
Software to facilitate interoperability. Licensee agrees to notify Bay Networks of any such intended examination of the
Software and may procure support and assistance from Bay Networks.
7. Term and termination. This license is effective until terminated; however, all of the restrictions with respect to Bay
Networks’ copyright in the Software and user manuals will cease being effective at the date of expiration of the Bay
Networks copyright; those restrictions relating to use and disclosure of Bay Networks’ confidential information shall
continue in effect. Licensee may terminate this license at any time. The license will automatically terminate if Licensee
fails to comply with any of the terms and conditions of the license. Upon termination for any reason, Licensee will
immediately destroy or return to Bay Networks the Software, user manuals, and all copies. Bay Networks is not liable to
Licensee for damages in any form solely by reason of the termination of this license.
8. Export and Re-export. Licensee agrees not to export, directly or indirectly, the Software or related technical data or
information without first obtaining any required export licenses or other governmental approvals. Without limiting the
foregoing, Licensee, on behalf of itself and its subsidiaries and affiliates, agrees that it will not, without first obtaining all
export licenses and approvals required by the U.S. Government: (i) export, re-export, transfer, or divert any such Software
or technical data, or any direct product thereof, to any country to which such exports or re-exports are restricted or
embargoed under United States export control laws and regulations, or to any national or resident of such restricted or
embargoed countries; or (ii) provide the Software or related technical data or information to any military end user or for
any military end use, including the design, development, or production of any chemical, nuclear, or biological weapons.
9. General. If any provision of this Agreement is held to be invalid or unenforceable by a court of competent jurisdiction,
the remainder of the provisions of this Agreement shall remain in full force and effect. This Agreement will be governed by
the laws of the state of California.
iii
Introducing Optivity Campus 7.0
Welcome to Optivity®, a graphical network management application for the Microsoft® Windows® 95 and
Windows NT® environments. Optivity runs on your Windows-based management station and can be used
with any of the following network management platforms:
• HP OpenView Workgroup Node Manager (included)
• HP OpenView Network Node Manager (must be purchased separately)
• Tivoli TME 10 NetView (must be purchased separately)
This booklet describes the contents of the Optivity Campus™ 7.0 package and gives an overview of how the
various components should be installed and used.
Inventory
Your Optivity Campus 7.0 package includes the following items:
Optivity Campus 7.0 Software CD
Contains the Optivity Campus 7.0 software; also includes HP OpenView Workgroup Node
Manager platform software.
Optivity Campus 7.0 Documentation CD
Contains the documentation for Optivity Campus 7.0 in Adobe Acrobat format. See “Optivity
Campus 7.0 Documentation CD” on page 4 of this booklet for more information.
Optivity Campus Multimedia Tutorial CD
Contains a multimedia demonstration of several Optivity Campus applications. See “Optivity
Campus Multimedia Tutorial” on page 7 of this booklet for more information.
||||| |||||
||||| |||
||||| |||||
||||| |||||
||||| |
||||| |||||
||||| |||
||||| |||||
||||| |||||
||||| |
||||| |||||
||||| |||
||||| |||||
||||| |||||
||||| |
||||| |||||
||||| |||
||||| |||||
||||| |||||
||||| |
Getting Started with Optivity Campus 7.0 for HP OpenView Workgroup Node Manager
Contains instructions for installing Optivity Campus 7.0 with HP OpenView Workgroup Node
Manager.
Getting Started with Optivity Campus 7.0 for HP OpenView Network Node Manager or Tivoli TME
10 NetView
Contains instructions for installing Optivity Campus 7.0 with HP OpenView Network Node Manager
or Tivoli TME 10 NetView.
HP OpenView for Windows Workgroup Node Manager User’s Guide
Describes the features and functions of the HP OpenView Workgroup Node Manager platform
software.
(This documentation may be included in either printed or CD form.)
Release Notes for Optivity Campus 7.0
Contains the latest information about supported agents and devices, bug fixes, and known
problems.
1
Installation Overview
Refer to this section for an overview of getting your Optivity Campus management station running.
Pre-start Checklist
Install Optivity Campus
8379EA
8378EA
Before you start to install Optivity Campus 7.0:
To install the software:
Check the Release Notes
Collect Information
Read the release notes for:
Collect the following information about
your network and management station:
•
Lists of supported devices and agents
•
Bugs fixed and known problems
Check the Platform Software
Optivity Campus 7.0 can be used with any of
the following network management platforms:
•
Default Gateway IP address
•
Default Gateway subnet mask
•
Default Gateway read community string
•
IP address for management station
•
Local subnet read community string
•
HP OpenView Workgroup Node Manager
(included)
•
Commonly used read community strings
•
HP OpenView Network Node Manager
(must be purchased separately)
Run the Setup program
•
Tivoli TME 10 NetView
(must be purchased separately)
Check the System Requirements
Make sure that the computer where you are
installing Optivity Campus meets the system
requirements listed in Chapter 1 of the Getting
Started guide that matches your platform
software.
2
Insert the Optivity Campus software CD and run
the setup program. For detailed installation
procedures, see Chapter 2 of the Getting Started
guide that matches your platform software.
Start Optivity Campus
Further Reading
8380EA
To start using Optivity Campus:
Start the Optivity Software
8381EA
To get the most out of Optivity Campus 7.0, refer
to the following Optivity resources:
•
For instructions on starting Optivity, refer to
Chapter 4 of the Getting Started guide that
matches your platform software.
Discover Network Devices
These notes contain the latest information
regarding features, agent and device support,
bug fixes, and known problems.
•
For instructions to use the Autodiscovery and
Node Discovery features of Optivity Campus,
see Chapter 4 of the Getting Started guide that
matches your platform software.
For HP OpenView Workgroup Node Manager,
the Optivity Getting Started guide includes
instructions for running OpenView
Autodiscovery.
For instructions to use the discovery features of
other platforms, see the documentation supplied
with the platform software.
Release Notes for Optivity Campus 7.0
Using Optivity Campus 7.0
(on Documentation CD)
This guide provides complete instructions
for using the Optivity integrated applications
to manage, monitor, and configure your
network.
•
Optivity Campus Multimedia Tutorial
This combination of video overviews and
real-time animated demonstrations with
sound vividly shows you how to use several
of the Optivity Campus applications.
After discovering network devices, you are ready
to use Optivity applications and tools to manage
your network.
3
Optivity Campus 7.0 Documentation CD
This section describes system requirements for using the Optivity Campus 7.0 Documentation CD.
It also provides instructions for installing Acrobat Reader+Search 3.0 and briefly describes the
Acrobat Reader+Search tool bar elements.
The following documents are included on the Optivity Campus 7.0 Documentation CD:
•
•
•
•
•
•
•
•
•
•
4
Getting Started with Optivity Campus 7.0 for HP OpenView Workgroup Node Manager
(Bay Networks® part number 893-660-G)
Getting Started with Optivity Campus 7.0 for HP OpenView Network Node Manager and Tivoli
TME 10 NetView (Bay Networks part number 201201-A)
Using Optivity Campus 7.0 (Bay Networks part number 893-786-E)
Configuring Your Router Using the Quick2Config Tool (Bay Networks part number 111482)
Monitoring Your Router Using the RouterMan Tool (Bay Networks part number 111483)
Using SpeedView 2.1 for Windows (Bay Networks part number 893-891-B)
Release Notes for the Centillion Platform Release 2.2 (Bay Networks part number 896-00165-C)
Discusses new features of the SpeedView version 2.2 software not included in Using SpeedView
2.1 for Windows.
Using SpeedView Lite 1.0 for Windows (Bay Networks part number 893-916-A)
Release Notes for SpeedView Lite 1.0 for Windows (Bay Networks part number 896-00142-A)
Bay Networks Guide to Implementing BaySecure LAN Access for Ethernet (Bay Networks part
number 345-1106-A)
Documentation CD System Requirements
Ensure that your computer meets the requirements listed in Table 1 before installing the
documentation CD.
Table 1.
System Requirements
System
Requirements
386, 486, and Pentium
personal computers
•
•
•
•
MS-DOS 5.0
Microsoft 3.1, Windows 95, or Windows NT
8 MB RAM (16 MB for Windows NT)
12 MB disk space
SUN SPARCstations
•
•
•
•
Solaris 2.5 or higher
OpenWindows 3.0, Motif Window Manager 1.2.3,
Common Desktop Environment (CDE) 1.0
32 MB RAM
12 MB disk space
HP Series 9000, Model 700
systems or greater
•
•
•
•
HP-UX 10.01 or higher
X11R5 running HP-VUE desktop environment or CDE 1.0
32 MB RAM
12 MB disk space
IBM RS/6000 systems
•
•
•
•
AIX 4.1 or later
CDE 1.0 or Motif Window Manager
32 MB RAM
12 MB disk space
Macintosh 68020 personal
computers
•
•
•
•
System 7.0
MacFinder
4 MB RAM
13 MB disk space
Power Macintosh personal
computers
•
•
•
•
System 7.0
MacFinder
6 MB RAM
13 MB disk space
Installing Acrobat Reader 3.0
Follow the installation instructions for your operating system in the ACROREAD folder of your CD.
Note: Bay Networks recommends that you install Reader+Search 3.0 to search the entire
CD archives for a word or phrase. You can use Acrobat Reader without the Search plug-in
to find a term only within the document you are viewing. The following instructions are for
installing Acrobat+Search.
5
UNIX
For detailed, platform-specific installation and configuration instructions, refer to the “Acrobat
Reader Installers for UNIX” section of the file instguid.txt. The instguid.txt file is located in
the path: /<CD-ROM drive>/acroread/unix/rdr_srch/.
The supported UNIX platforms are Solaris, HP-UX, AIX, and IRIX.
Windows
To install Acrobat Reader+Search in a Windows environment:
1.
Access the Run Window.
Type the executable file and path for Windows 3.1 and Windows 95 or NT, respectively:
<CD-ROM drive>:\ACROREAD\WIN\RDR_SRCH\16BIT\SETUP.EXE
<CD_ROM drive>:\ACROREAD\WIN\RDR_SRCH\32BIT\SETUP.EXE
2.
Select OK and follow the screen instructions.
Macintosh
To install Acrobat Reader+Search in a Macintosh environment, double-click on the following in
succession, and follow the screen instructions:
•
CD ROM Icon
•
ACROREAD
•
MAC
•
Reader+Search
•
Reader
•
Install Acrobat Reader 3.0
6
Acrobat Reader and Search Tool Bar
Web Browser: starts your Web browser
Search Next: next found term
Search Previous: previous found term
Search Results: displays search results
Search: displays Search dialog box
Find: finds text
Fit Width: scales the page to window width
Fit Page: displays the whole page
Actual Size: sets the page view to 100%
Go Forward: returns from Go Back option
Go Back: displays the previous page view
Last: displays the last page of the document
Next: displays the next page of the document
Previous: displays previous page of document
First: displays the first page of the document
Select Text: allows you to select text
Zoom In: magnifies the page view
Hand: scrolls through the window
Thumbnails: displays thumbnails and page
IBM or compatible PC with at least an 80486 processor running at 33 MHz or higher
8 MB minimum of total system memory
2X speed minimum CD-ROM drive or higher
Sound card
256-color VGA monitor
QuickTime for Windows
•
•
•
•
•
•
Bookmarks: displays bookmarks and page
Page Only: displays the page only
Optivity Campus Multimedia Tutorial
The Optivity Campus Multimedia Tutorial, a combination of video overviews and real-time animated
demonstrations with sound, vividly shows you how to use nine of the Optivity Campus applications.
This section tells how to run the Optivity Campus Multimedia Tutorial on a PC or Macintosh
computer. It also lists the hardware and software requirements for running the tutorial.
Running the Tutorial on a PC
Ensure that your computer meets the following requirements before you proceed:
7
Note: If you do not have QuickTime for Windows installed, you can download it from the
Apple Computer World Wide Web site at http://www.apple.com/quicktime.
Do not install the QuickTime for Windows software that is on the Multimedia Tutorial CD;
that version has been superseded.
To run the tutorial:
1.
Start Microsoft Windows on the computer.
2.
Place the CD in the CD drive.
3.
Click on Start and choose Run.
The Run dialog box opens.
4.
In the command line field, type the following:
[CD-ROM drive]:BAYNET.EXE
5.
Click on OK.
The Optivity Campus Multimedia Tutorial begins.
Running the Tutorial on a Macintosh
Ensure that your computer meets the following requirements before you proceed:
•
Apple Macintosh with a 68040 processor or higher
•
2X speed minimum CD-ROM drive or higher
•
Color monitor
To run the tutorial:
1.
Start your Macintosh.
2.
Place the CD in the CD drive.
3.
Double-click the Optivity Multimedia Tutorial CD icon.
4.
Double-click the BAYNET.MAC icon or BAYNET.PPC icon (Power PC optimized).
The Optivity Campus Multimedia Tutorial begins.
8