1
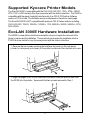
Kyocera EcoLAN 3000E Quick Configuration Guide Network Connectivity for Kyocera Printers Thank You Thank you for choosing the award winning Kyocera network printing products. We are sure you will appreciate the high performance and low cost of ownership that are the hallmarks of Kyocera products. Trademarks Kyocera® is a registered trademark of Kyocera Corporation. NetWare® is a registered trademark of Novell, Incorporated. Windows® is a registered trademark of Microsoft Corporation. Macintosh® is a registered trademark of Apple Computer, Incorporated. PostScript® and Acrobat® are registered trademarks of Adobe Systems, Incorporated. All other products referenced are trademarks or registered trademarks of their respective companies. FCC Notice: This equipment complies with Part 15 of FCC Rules. Operation is subject to the following two conditions: (1) this device may not cause harmful interference, and (2) this device must accept any interference received, including interference that may cause undesired operation. Contents Introduction ......................................................................... 4 Using the CD ROM ............................................................. 4 Supported Kyocera Printer Models ................................... 5 EcoLAN 3000E Hardware Installation ................................ 5 NetWare 2.x & 3.x Configuration ....................................... 6 NetWare 4.x & 5.x Directory Services Configuration ....... 7 Macintosh Configuration ................................................. 10 Windows Peer to Peer Printing Configuration ............... 12 Windows NT 4.0 Configuration ........................................ 14 DHCP Configuration (Dynamic Host Configuration Protocol) .......... 16 WINS Configuration (Windows Internet Naming Service) ................ 17 UNIX Configuration ........................................................... 18 IP Address Setup with the Printer Front Panel............... 19 Introduction The EcoLAN 3000E is the next generation Kyocera internal network interface card allowing easy installation without removing the printer mainboard. Its features include: r Easy Slide-in Installation r Multiple Protocol Support r 10/100 Mbps Ethernet Interface r SNMP Support r 10BaseT / 100BaseT Auto Detection r Flash Upgrade Capability r Setup with the Printer Front Panel r WINS Support r DHCP Support for Automatic IP r HTTP Server for Management Address Assignment with a Browser The EcoLAN 3000E enables Kyocera FS-Series and LS-Series printers to communicate over an Ethernet network with many different network operating systems, including NetWare, Macintosh, UNIX, and Windows. This Guides Role This Quick Configuration Guide provides concise software configuration instructions allowing an experienced system administrator to get the 3000E up and running quickly. For more complete instructions or for printing or configuration options not covered in this guide, please refer to the 3000E Users Manual on the CD ROM. Using the CD ROM The CD ROM packaged with the 3000E includes all installation and configuration utilities, as well as the 3000E Users Manual and this guide in .PDF format. Quick access to the utilities and documentation is provided by the CONTENTS.PDF file. This file and all other documentation on the CD ROM are in Adobe Acrobat .PDF format and cannot be read without Adobe Acrobat Reader 3.0 or later. (Note: The utilities may also be installed without using CONTENTS .PDF by navigating the CD ROM to the appropriate setup file.) On Windows 95, 98 and NT 4.0 systems, inserting the CD ROM will auto-load a screen with options to install Acrobat Reader or to display CONTENTS.PDF. The user will be prompted to install Acrobat Reader if it is not detected on the system. On other systems, Acrobat Reader may be installed manually from the CD ROM. Windows NT 3.51: From the Program Manager File menu, select Run and type: D:\acroread\win\rdr_srch\32bit\setup.exe Windows 3.1, 3.11: Same as NT 3.51, but type: D:\acroread\win\rdr_srch\16bit\setup.exe Macintosh: Run the Reader 3.01 Installer in the Acroread, Mac, Reader + Search, Reader folder. It is also very useful to install the search capability from the Search folder. UNIX: See instguid.txt in the acroread/unix/rdr_search directory on the CD ROM. Once Acrobat Reader is installed, launch the Contents.PDF file on the CD ROM. 4 Supported Kyocera Printer Models The EcoLAN 3000E is compatible with the FS/LS-600, 680, 800, 1700+, 3700+, 5800C, 6700, 7000+, 9000 and any other Kyocera printer with the slide-in interface. The 3000E is compatible with the upper (hard disk) interface slot of an FS/LS-7000 with a Software version of 25.05 or later. The Software version is displayed on the printer status page. The EcoLAN 3000E is NOT compatible with previous FS/LS-Series models, including, FS/LS-400, 850, 1500/A, 1550/A/+, 1600/A/+, 1700, 3400/A/+, 3500/A, 3600/A/+, 3700, 5500, 6500/+. EcoLAN 3000E Hardware Installation The 3000E is a new slide-in interface board which does not require the removal of the printers main board for installation. These instructions describe the installation into the FS-800 but are similar for any Kyocera printer with the slide-in interface. 1. Remove the two screws securing the interface slot cover on the rear panel (shown) or side panel (not shown) of the printer and discard the interface slot cover. 2. Align the edges of the 3000E board with the rails in the interface slot and slide the 3000E into the printer. Secure with the two screws removed in Step 1. 5 NetWare 2.x & 3.x Configuration 1. Login as Supervisor and start PCONSOLE. 2. Define the Print Queue. ê If a Print Queue already exists that will be assigned to the 3000E, skip to step 3 ê Select Print Queue Information from the Available Options menu. ê Press INSERT, type a name for the new queue to be serviced by the 3000E and press ENTER. Press ESCAPE to return to the Available Options menu. 3. Define the Print Server. ê Select Print Server Information from the Available Options menu. ê Press INSERT, type the 3000E Print Server name and press ENTER. The Print Server name may be found on the 3000E status page under Novell Network Information. Press the Status key on the printer front panel to print a printer status page and a 3000E status page. 4. Define the Printer. ê Press ENTER with the new Print Server highlighted, select Print Server Configuration, then select Printer Configuration. ê Select Printer 0 and define a more meaningful name for the printer if desired. The printer name is displayed in various NetWare printing messages, such as when notifying users that their job is completed. ê Set the TYPE field to Remote/Other Unknown. ê Press ESCAPE to exit and select Yes to save the changes. Press ESCAPE again to return to the Print Server Configuration menu. 5. Assign the Print Queue. ê Select Queues Serviced By Printer, highlight the 3000E printer on the Defined Printers list and press ENTER. ê Press INSERT to display the Available Queues list. Select the desired queue and assign a Priority level (recommended choice is 1). ê Press ESCAPE several times to exit PCONSOLE. 6. Confirm Successful Configuration. ê Turn the printer off and then on. Wait 2 minutes and press the Status key on the front panel. This will print a printer status page and a 3000E status page. ê The Novell Connection Information in the bottom half of the status page displays the printer name, file server, queue, etc. If it displays Attached: Yes, this confirms that the 3000E Print Server is ready to accept print jobs. ê If the status page does not display Attached: Yes, please verify that the Novell Print Server Name on the status page under Novell Network Information matches exactly with the Print Server name that was entered in PCONSOLE or refer to the troubleshooting section in the Users Manual. 6 NetWare 4.x & 5.x Directory Services Configuration NetWare Directory Services (NDS) configuration is accomplished using two utilities; 1) NetWares NWAdmin is used to define the required Directory Services objects, and 2) the 3000E parameters are configured with the Windows-based Management Access Program (MAP) if using IPX or with a web browser if using IP. NWAdmin Configuration 1. Enter NWAdmin and browse the tree to the container which will hold the print objects. Note: You must have the Object Create right in this container or you will be unable to create the print objects. Right click on the container and select Details. The top of the Identification page displays the Name of the container. This is the full path or context of the current container (e.g., Sales.Dallas.Acme). Make a note of this context in the space below as it will be needed during the 3000E configuration. Close the Details window. Print Server Context: _______________________________ 2. Select Print Services Quick Setup from the Tools menu. ê Enter the desired names for Print Server, Printer, and Queue. Make a note of the Print Server name in the space below as it will be needed during the 3000E configuration. Print Server Name: ________________________________ ê In the Printer Type field select Other/Unknown from the list. ê In the Print Queue Volume field select the desired NetWare volume which will contain the queue. The selected volume should have sufficient disk space to spool large print jobs. ê Click Create to complete the Print Services Quick Setup. 3. Optional: Right click on the Print Server, Printer, or Queue objects and select Details to define a Print Server password, select Printer notification options, or to assign Queue users. If a Print Server password is defined, make a note of it as it must be duplicated exactly during the 3000E configuration. Print Server Password: ________________________________ 7 NetWare Directory Services Configuration continued... 3000E IPX Based Configuration IPX configuration is accomplished using the Management Access Program (MAP). 1. Install and Run MAP. ê Insert the CD included with the EcoLAN 3000E. ê In Windows 95, 98 or NT 4.0, click on Start and select Run, or in the Windows 3.1 or NT 3.51 Program Manager, select File and choose Run. ê Type: D:\MAP\SETUP.EXE (where D = CD drive letter) and click OK. ê Once installed, double click on the MAP icon to start the program. 2. Select the EcoLAN 3000E to Configure. ê Click on the arrow next to the Server dialog for the list of available EcoLAN cards displayed by unit serial number. To display the name and other details of the EcoLAN cards, select Show All from the Options menu. ê Click on the 3000E to be configured. 3. Continue with the 3000E IP and IPX Common Configuration section below. Note: If the 3000E Does Not Appear on the List If your network is using multiple IPX frame types, and the workstation running MAP and the 3000E are NOT using the same frame type, then the 3000E will not appear in the list. A common scenario is that the workstation frame type is set to Auto and is using frame type 802.2 while the 3000E is using frame type 802.3. The 3000E frame type can be changed using the printer front panel. See the instructions on page 19 for setting the IP address with the front panel, but go into the NetWare submenu rather than the TCP/IP submenu. 3000E IP Based Configuration 1. Set the printers IP Address, Subnet Mask, and Default Gateway with DHCP (page 16) or with the printers front panel (page 19). 2. Connect to the 3000E with a web browser by entering the IP address as the URL, e.g. http://206.129.6.54 3. When the 3000E home page is displayed, select 3000E Configuration and continue with the instructions in the next section. 3000E IP and IPX Common Configuration 1. Password Protection Many of the configuration options are password protected. The default password is: sysadm The password is case sensitive. To change the password, select Change Password in the System column. 8 2. NetWare Configuration. ê Select Setup NetWare in the Protocols column. ê Enter the Print Server Name, Preferred NDS Context, and Print Server Password (if a password was defined) exactly as they were entered in NWAdmin. Note: Entries are not case sensitive (except the sysadm password). Preferred Bindery File Server and Preferred NDS Tree should remain blank unless Bindery mode is used or if the network includes multiple NDS trees. ê If not using Bindery emulation, click the Disable Bindery box. ê Type the password, sysadm, in the appropriate box and click Accept Settings. After a few seconds the screen should report that the update was successful. Click the Back Arrow icon twice to return to the 3000E Configuration page. ê The changes made to the 3000E do not take effect until the unit is reset. Click on Reset in the System column, then click on the Reset Unit button. After a few seconds the screen should report that the unit was reset. 3. Confirm Successful Configuration. ê Reconnect to the 3000E. After the Reset, the program advises waiting 2 minutes before reconnecting, but the 3000E may be available sooner. ê At the 3000E Configuration page, select Unit Status in the System column. ê Scroll down to display the NetWare status. The Queue Status should be Attached. ê If the Queue Status is not Attached, please verify that the entries for Print Server Name, Preferred NDS Context, and Print Server Password match those defined in NWAdmin or refer to the troubleshooting section in the Users Manual. 9 Macintosh Configuration KPDL, Kyoceras PostScript compatible mode is required for Macintosh printing. KPDL is standard on many Kyocera printers, however, it is optional on the following models: FS-600, FS-680, FS-7000 and all LS (Japanese) models. If KPDL is installed, it will appear in the Emulation list in the following procedure and on the printer Status Page. Setting KPDL Emulation For all printers except the FS-600 and FS-680, the default emulation for the Option Interface must be set to KPDL or KPDL (Auto). 1. Press the MODE key. If the first line of the LED panel does not already display INTERFACE, press the + or - key until INTERFACE is displayed. 2. If the line below INTERFACE does not already display OPTION (OPTION 2 on the FS-7000), press the ENTER key, then + or - until OPTION is displayed and press ENTER. 3. Press + or - until Emulation is displayed. Press the ENTER key. A question mark will appear next to the current emulation. 4. Press + or - until KPDL or KPDL(Auto) is displayed. If the printer will be receiving only KPDL jobs, set the emulation to KPDL. If it will also be receiving non-KPDL jobs, set it to KPDL (Auto). Press ENTER to set the new emulation. 5. Press the MODE key to exit the menu system. Naming the Printer and Setting the Zone The 3000E has a default name of KYO_<serial#>, e.g. KYO_163479. This may be changed to a more user friendly name using a standard web browser. Connecting with a browser requires TCP/IP to be setup on the printer and the Macintosh. If TCP/IP is not in use, the name may be changed using the KyoManage utility included on the 3000E CD. See the Users Manual for KyoManage instructions. 1. Set the printers IP Address, Subnet Mask, and Default Gateway with DHCP or with the printers front panel procedure on page 19. 2. Connect to the 3000E with a web browser by entering the IP address as the URL, e.g. http://206.129.6.54 3. When the 3000E home page is displayed, select 3000E Configuration. 4. Select Setup AppleTalk in the Protocols column. 5. Enter the Printer Name. Enter the Zone Name if other than the default zone. 6. Type the password, sysadm, in the appropriate box and click Accept Settings. After a few seconds the screen should report that the update was successful. 7. Click the Back Arrow icon twice to return to the 3000E Configuration page. If NetWare is not in use, it may be disabled under the Setup NetWare option. Be aware that Windows IPX Peer to Peer printing requires NetWare to be enabled. 8. The new printer and zone names do not take effect until the 3000E is reset. Select Reset in the System column, then click on Reset Unit. 10 Installing the Driver and Selecting the Printer 1. The Macintosh LaserWriter Driver is installed from the CD provided with the printer. Insert the CD, open the Drivers folder, then the appropriate country folder, and double click on the FS-Series Installer program in the desired language. 2. Once installation is complete and your system has been restarted, select Chooser from the Apple menu to open the Chooser. 3. Select the LaserWriter 8 driver, the zone (if any) and the 3000E printer. 4. Click on Create. The driver will automatically select the appropriate PPD file and will display a dialog allowing selection of the installed printer options. 5. Some, but not all, of the printer options can be automatically detected by the driver. Select installed options as necessary and confirm that the list of installed options matches the printer configuration. Click on OK. This completes Macintosh printing configuration. 11 Windows Peer to Peer Printing Configuration Peer to Peer printing is available for Windows 95, Windows 98 and Windows NT 4.0. What is Windows Peer to Peer Printing? The peer to peer printing software which is included with the EcoLAN 3000E allows Windows PCs to communicate directly with network attached printers. A network server, such as NetWare or Windows NT, is not required for peer to peer printing. The peer to peer printing software must be installed on each PC that will use peer to peer printing. Once the peer to peer printing software is installed, all EcoLAN 3000E boards on the network automatically appear in the list of available printer ports. The peer to peer printing software can also be used in networks where servers are present, however, often the server print services are utilized instead. Server-based print services offer centralized printing management and spooling and do not require software (other than the printer driver) to be installed on each PC. Peer to Peer Printing over IP or IPX Peer to peer printing is available over both the IP and the IPX protocols. At least one of these protocols must be installed before peer to peer printing may be used. It is assumed that the IP protocol will be used only if the Windows PCs are already configured with IP addresses; otherwise, the simpler to configure IPX protocol would most likely be used. If Using Peer to Peer over IP Configure the 3000E IP address with DHCP (page 16) or with the printer front panel (page 19), then return to this section to complete peer to peer printing installation. If Using Peer to Peer over IPX The IPX protocol must be installed on each PC that will use peer to peer printing over IPX. The following instructions describe IPX protocol installation for Windows 95 or 98. Windows NT 4.0 installation is very similar (check the Protocol tab for NWLink IPX/ SPX Compatible Transport). 1. Click on the Windows Start button and select Settings, Control Panel, Network. 2. Check to see if IPX/SPX-compatible Protocol is displayed on the list of network components. If it is on the list, IPX is already installed. Please continue with the next section. If it is NOT on the list, click on Add. 3. Double click on Protocol, click on Microsoft, and double click on IPX/SPXcompatible Protocol. Windows will prompt for the required Windows disks. 4. Once the files are copied, click on OK to close the network control panel. Windows will prompt to restart the system. IPX will not be active until the system is restarted. Optional: Changing the Printer Name IP Printer Name: Changing the printer name only applies to the IPX protocol. With IP peer to peer printing the printer is identified by its IP address. 12 IPX Printer Name: The IPX peer to peer printing software uses the NetWare Print Server Name to identify the 3000E. The default name is the serial number preceded by KYO, e.g., KYO_163495. If desired, this name can be changed to a more easily identifiable name with MAP. To change the name, follow the MAP Configuration instructions in the NetWare Directory Services Configuration section in this guide (the settings other than NetWare Print Server Name do not need to be entered). Peer to Peer Printing Software Installation The peer to peer printing software should be installed on each Windows PC that will use peer to peer printing services. 1. Insert the CD included with the EcoLAN 3000E. 2. Click on the Windows Start button and select Run. 3. For IPX peer to peer printing, type: D:\IPX-P2P\SETUP.EXE and click OK. For IP peer to peer printing, type: D:\IP-P2P\SETUP.EXE and click OK. Follow the instructions on the screen to complete installation. Note: The IPX P2P installation program only installs a port monitor in the Windows System directory and so does not prompt for an installation directory or program group. IPX P2P may be uninstalled using the IPX-P2P Uninstaller on the CD. Printer Driver Configuration for Peer to Peer Printing 1. If the Printer Driver is Not Already Installed. ê Install the printer driver from the CD which is shipped with the printer. ê On the Printer Connection screen select Local rather than Network. Depending upon the version of the installer and whether IP or IPX peer to peer is being installed, the 3000E may appear in the list of local ports. ê If displayed in the list, select the 3000E and complete the driver installation. If not displayed in the list, select LPT1 and complete installation, then follow the instructions in section 2 below. 2. If the Printer Driver is Already Installed. ê Click on the Windows Start button and select Settings, then Printers. ê Right click on the appropriate printer driver and select Properties. ê In Windows 95/98 select the Details tab and click on the down arrow beside the Print to the following port: field to display the list of available ports. In NT 4.0 select the Ports tab and scroll down the list of ports. ê Select the 3000E from the list of ports and click on OK. IP printers are displayed by IP address, IPX printers by NetWare Print Server Name. Note: If IP printers on a different network segment are not displayed, your router may not be forwarding SNMP broadcasts. If IPX printers are not displayed, see Note: If the 3000E Does Not Appear on the List on page 8. Peer to peer printing configuration is complete. Print jobs will now be directed to the selected 3000E when the current printer driver is used. 13 Windows NT 4.0 Configuration There are several options for setting up printing in a Windows NT environment. u If a NetWare server is present, NetWare print services may be used by following the NetWare configuration instructions in this guide. u Peer to peer print services may be used by following the Windows Peer to Peer Printing instructions in this guide, but are only available for Windows NT 4.0, not for Windows NT 3.51. Peer to peer print services using the IPX protocol may be preferable when TCP/IP setup is not desired. u LPR print services may be used via TCP/IP by following the instructions in this section. Windows NT printing is very flexible. It is possible to configure the individual Windows NT or Windows 95/98 workstations to print using a different protocol than the Windows NT server. For example, a Windows NT server could be configured to print to a 3000E via TCP/IP using the instructions in this section. The 3000E could then be designated as shared on the NT server, allowing workstations to print via the NT server using a different protocol such as NetBEUI. The optimum Windows NT printing configuration depends upon the particular environment and user and administrator experience and preferences. Generally, the LPR printing over TCP/IP covered in the following instructions is the best choice for environments where TCP/IP is already in use. TCP/IP Required Components The following steps describe how to check for and, if necessary, add the Windows TCP/IP components which are necessary for LPR Printing. 1. Click on the Windows Start button, select Settings, and Control Panel. 2. Double click on Network and select the Protocols tab. If TCP/IP Protocol is not in the list of Network Protocols, click on Add to install it. 3. Select the Services tab. If either Microsoft TCP/IP Printing or Simple TCP/IP Services is not in the list of Network Services, click on Add to install them. 4. Click on Close when all protocols and services have been added. If the TCP/IP protocol has just been added, Windows will prompt for the IP address and other TCP/IP parameters. The new protocols and services will not be available until the system is restarted. 3000E TCP/IP Configuration The 3000E must be configured for TCP/IP communication prior to LPR printing setup.Configure the 3000E IP address, subnet mask, and default gateway with DHCP (page 16), with the printer front panel (page 19), or with the MAP or BOOTPL32 procedures in the Users Manual. 14 Configuring the Printer Driver for LPR Printing The printer driver should be installed from the CD which is shipped with the printer. Unfortunately, Windows does not make the Add LPR Port available to the Install Wizard on the CD. Therefore, the printer driver should be installed selecting a standard port such as LPT1. Once the driver installation is completed, the driver port setting should be modified for LPR printing using the following procedure. 1. 2. 3. 4. 5. Click on the Windows Start button and select Settings, and then Printers. Right click on the appropriate printer and select Properties. On the Ports tab, click on Add Port. Double click on LPR Port in the list of available printer ports. In the Name or address of server providing lpd: field, enter the 3000E IP address or the 3000E NetBIOS name (see the WINS Configuration section for more information on using the NetBIOS name). 6. In the Name of printer or print queue on that server: field, enter any desired port name, e.g. LPR1, and click on OK. 7. Click on Close to close the Printer Ports dialog. The 3000E IP address is now displayed and currently selected on the list of ports. 8. If the printer is to be shared, click on the Sharing tab, select Shared and enter the Share name. Click on OK when finished. Connecting to a Shared Printer This section briefly describes the steps for setting up client access to a shared printer. Windows 95/98 Clients Automatic printer driver installation from the NT machine: If a printer driver has been designated for Windows 95 on the Sharing tab in Windows NT, it will be automatically downloaded to the Windows 95 or 98 clients when they run the Add Printer wizard, select Network printer and browse the network for the shared printer. If the printer driver is already installed: In Printers right click on the desired printer and select Properties. On the Details tab, click the Add Port button and browse the network for the shared printer. If the printer driver has not yet been installed: Install the printer driver from the CD which is supplied with the printer. On the Printer Connection screen select Network and browse the network for the shared printer. Windows NT 4.0 Clients Add a new printer (with Add Printer), select Network Printer Server rather than My Computer and choose the shared printer from the shared printers list. 15 DHCP Configuration (Dynamic Host Configuration Protocol) IMPORTANT: EcoLAN 3000E IP address assignment with DHCP will not work if the 3000E has an existing IP address and IP persistence is Permanent. DHCP provides a mechanism for delivering IP configuration parameters, including IP address, subnet mask, etc. to devices (hosts) on an IP network. DHCP alleviates the administrative burden of managing individual IP addresses. A DHCP server processes 3000E DHCP Discovery broadcasts and returns an IP address to the 3000E. The DHCP server may be set up to grant an IP address for a limited time (a temporary lease) or for an unlimited time (an unlimited lease), or it may be configured with a permanent address reservation for each 3000E. With WINS, the DHCP server may be set up to grant the 3000E a temporary lease. In a non-WINS environment, it is highly recommended to set up the DHCP server to grant the 3000E an unlimited lease or permanent address reservation. Unlimited Lease or Address Reservation in Windows NT 4.0 (non-WINS DHCP setup) In Windows NT, lease duration is set for a particular scope, or group of addresses. Thus, lease duration should be set to Unlimited for the scope to which the 3000E belongs. If this is not desired, then the 3000E should be defined as a Reserved Client. A Reserved Client may be added with the Windows NT DHCP Manager by selecting Scope and then Add Reservations. Enter the hardware address of the 3000E (see the 3000E Network Status Page) and the IP address and other IP parameters. IP Address Persistence The 3000E defaults to an IP persistence of Permanent; that is, once an IP address is entered, it is retained through power cycles. This is consistent with non-DHCP maintained IP addresses, however, for DHCP with WINS the IP persistence should not be permanent. Therefore, when an IP address is accepted via DHCP, the 3000E IP persistence is automatically changed from Permanent to Temporary. In a DHCP environment without WINS either permanent or temporary IP persistence may be used. Permanent allows the 3000E to use its IP address even if the DHCP server is down while the 3000E is powered up. To view or change the 3000E IP persistence setting, see 3000E Configuration with HTML on page 17. WARNING: If the 3000E IP persistence is set to Permanent and the DHCP server assigns a temporary lease, the 3000E IP address may be assigned to another device once the lease expires, resulting in two devices with the same IP address. Changing or confirming the IP address with the printer front panel (by pressing Enter twice while the IP address is displayed) automatically sets the IP persistence to Permanent. Disabling DHCP If IP address assignment with DHCP is not desired, it may be disabled using the 3000E Configuration with HTML procedure on page 17 and unchecking the Enable DHCP check box. It may also be disabled with the printer front panel or the MAP utility. 16 WINS Configuration (Windows Internet Naming Service) WINS provides a mechanism for mapping NetBIOS (Windows) names to IP addresses. WINS enables defining a printing configuration which references the printer by its name rather than by its IP address. Thus, even if the printer IP address is changed via DHCP, the printing configuration will still be valid and printing will continue uninterrupted. Another advantage of WINS is that a new printer may replace an old printer simply by giving the new printer the same NetBIOS name as the old printer or by entering the new printers NetBIOS name in the Windows printing configuration. WINS Registration and Naming The 3000E must be given the address of the primary WINS server where it will register its NetBIOS name. It may optionally be given the address of a secondary WINS server. The 3000E obtains its NetBIOS name and addresses of the WINS servers from the DHCP server, or, if not obtained from the DHCP server, they must be manually entered on the 3000E HTML configuration pages. If the 3000E NetBIOS name is not obtained by either of these methods, then it will register its default name of KYO_<serial #>, e.g. KYO_990442. Refer to your DHCP server documentation for the proper procedures to provide the 3000E with its NetBIOS name and/or WINS server addresses, or refer to the following procedure to manually configure these values. 3000E Configuration with HTML 1. Connect to the 3000E with a web browser by entering the IP address/tcpip as the URL, e.g. http://206.129.6.54/tcpip 2. For DHCP with WINS, IP persistence should be Temporary; the check box next to IP Address in NVRAM should be unchecked. If Permanent IP persistence is desired, this box should be checked (see the warning on page 16). 3. If the WINS Server addresses will not be supplied via DHCP, enter the address of the Primary NetBIOS Name Server and optionally the address of a Secondary NetBIOS Name Server. 4. If the printer NetBIOS name will not be supplied via DHCP, enter a NetBIOS Name for the 3000E or leave blank to use the default name of KYO_<serial #>. 5. Type the password, sysadm, in the appropriate box and click Accept Settings. After a few seconds the screen should report that the update was successful. 6. Click on the Home link, then select 3000E Configuration. 7. Select Reset in the System column then click on Reset Unit. Once all steps of this HTML configuration are completed and the 3000E has successfully registered with a WINS server, the word Registered will appear next to either Primary or Secondary Server Registration on the TCP/IP configuration page. The WINS registration is for a limited period, so the 3000E occasionally attempts to refresh its WINS registration. Depending upon which WINS Server is active at refresh, the indication of registered WINS server may change from time to time. 17 UNIX Configuration UNIX printing utilizes a line printer daemon (lpd) to direct print jobs to the printer. The 3000E supports two modes of lpd printing, host-based lpd and printer-based lpd. With host-based lpd, the line printer daemon is run on one or more workstations (hosts) where print jobs are accepted and sent to the 3000E. With printer-based lpd, the 3000E acts as the line printer daemon host and accepts print jobs directly. Many UNIX systems allow either lpd mode to be used, although configuration may be easier for one of the modes depending upon the UNIX system. Following are some advantages and disadvantages of each mode: Banner Page Comparison The host-based lpd can include the user name and file name on the banner page, while the printer-based lpd can only include the host name. Configuration Comparison The host-based lpd requires configuration on each host that will be sending jobs to the printer, while the printer-based lpd requires only the 3000E to be configured. 3000E Configuration TCP/IP configuration of the 3000E is needed for all versions of UNIX. Use the instructions on page 19 to set TCP/IP parameters with the printer front panel or refer to the Users manual for other TCP/IP setup methods. Lpd configuration depends upon the mode selected and the UNIX system in use. Please refer to the Users manual for lpd configuration instructions for your particular UNIX system. 18 IP Address Setup with the Printer Front Panel Set the IP address and other 3000E parameters using the following procedure. Note: Setting the IP address with the front panel automatically sets IP Persistence to Permanent, that is, the IP address is maintained when the printer is turned off and on. 1. Press the MODE key. If the first line of the LED panel does not already display INTERFACE, press the + or - key until INTERFACE is displayed. 2. If the line below INTERFACE does not already display OPTION (OPTION 2 on the FS-7000), press the ENTER key, then + or - until OPTION is displayed and press ENTER. 3. Press the > key to enter the Option submenu. (Note: Not all firmware versions support front panel setup. If there is no Option submenu or not all choices are available on the submenu, please check the firmware requirements listed below.) 4. Press + or - until TCP/IP is displayed. Press the > key to enter the TCP/IP submenu (only accessible when the TCP/IP protocol is On). 5. Press + or - until IP Address is displayed. Press the ENTER key and a cursor will appear under the last digit of the IP address. 6. Press the < or > key to move the cursor to the desired digit to change. Press + or to change the value of a digit. 7. Once all digits are set as desired, press the ENTER key to accept the new address. 8. Repeat steps 5 - 7 for Subnet Mask and Default Gateway (the routers IP address). If unsure of the correct Subnet mask and the first number in the 3000E IP address is from 192 to 254, then use 255.255.255.0 as the Subnet mask. 9. When all settings for IP Address, Subnet Mask, and Default Gateway are completed, press the < key to return to the Option submenu (TCP/IP is displayed). Note: It is recommended to turn off protocols that are not in use, however, be aware that the management and print capabilities which depend upon that protocol will no longer function. E.g., if the Novell protocol (IPX) is turned off, then NetWare printing, management with the MAP utility, and IPX Peer to Peer printing will all be disabled. 10. Optional: Press + or - to display the protocol to turn off, e.g. EtherTalk. Press the ENTER key and a ? will appear next to On. Press + or - to toggle the value to Off and press ENTER to accept the new value. Repeat for each protocol to turn off. 11. When completed, press the MODE key to exit the menu system. 12. Press the STATUS key to print a status page and verify the new settings. Front Panel Setup Firmware Requirements Following are the printer firmware levels required for front panel setup capability. The firmware level of the printer is listed as Software version on the printer status page. FS/LS-800 version 38.01 or later FS/LS-1700+ version 40.00 or later FS/LS-7000 version 25.07 or later FS/LS-3700+ version 32.02 or later FS/LS-5800C, 6700, 7000+, 9000 all versions 19 EcoLAN 3000E Quick Configuration Guide Rev. 1.0, June 1999 Part Number 8836056 Kyocera Corporation 2-14-9 Tamagawadai, Setagaya Ward, Tokyo 158 Japan Kyocera Communications Systems Co., Ltd. 2-14-9 Tamagawadai, Setagaya Ward, Tokyo 158 www.kccs.co.jp/ U.S.A. Kyocera Electronics, Inc. 2301-300 Cottontail Lane, Somerset, NJ 08873 www.kyocera.com/printers Germany Kyocera Electronics Europe GmbH Mollsfeld 12, 40670 Meerbusch www.kyocera.de/drucker.htm France Kyocera Electronics France S.A. Parc les Algorithmes, Saint Aubin 91194 GIF SUR YVETTE U.K. Kyocera Electronics (UK) Ltd. 8 Beacontree Plaza, Gillette Way, Reading, RG2 0BP www.kyocera.co.uk Australia Kyocera Electronics Australia Pty., Ltd. Unit 8, 43, Herbert Street, ARTARMON, NSW 2064 www.kyocera.com.au Italy Kyocera Electronics Italy srl Via Oslavia 17 int. 12 - 20134 MILANO www.kyocera.it