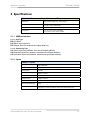
1
TPRO-VME/TSAT-VME
VERSA MODULE EUROCARD (VME)
SYNCHRONIZABLE TIMECODE GENERATOR
WITH VMEbus INTERFACE
User Manual
95 Methodist Hill Drive
Rochester, NY 14623
Phone: US +1.585.321.5800
Fax: US +1.585.321.5219
www.spectracomcorp.com
Part Number 1156-5001-0050
Manual Revision B (2.0)
16 October 2006
Copyright © 2006 Spectracom Corporation. The contents of this publication may not be
reproduced in any form without the written permission of Spectracom Corporation. Printed in
USA.
Specifications subject to change or improvement without notice.
Spectracom, NetClock, Ageless, TimeGuard, TimeBurst, TimeTap, LineTap, MultiTap,
VersaTap, and Legally Traceable Time are Spectracom registered trademarks. All other
products are identified by trademarks of their respective companies or organizations. All rights
reserved.
SPECTRACOM LIMITED WARRANTY
LIMITED WARRANTY
Spectracom warrants each new product manufactured and sold by
it to be free from defects in software, material, workmanship, and
construction, except for batteries, fuses, or other material normally
consumed in operation that may be contained therein AND AS
NOTED BELOW, for five years after shipment to the original
purchaser (which period is referred to as the “warranty period”).
This warranty shall not apply if the product is used contrary to the
instructions in its manual or is otherwise subjected to misuse,
abnormal operations, accident, lightning or transient surge, repairs
or modifications not performed by Spectracom.
The GPS receiver is warranted for one year from date of
shipment and subject to the exceptions listed above. The
power adaptor, if supplied, is warranted for one year from date
of shipment and subject to the exceptions listed above.
THE ANALOG CLOCKS ARE WARRANTED FOR ONE YEAR
FROM DATE OF SHIPMENT AND SUBJECT TO THE EXCEPTIONS
LISTED ABOVE.
THE TIMECODE READER/GENERATORS ARE WARRANTED FOR
ONE YEAR FROM DATE OF SHIPMENT AND SUBJECT TO THE
EXCEPTIONS LISTED ABOVE.
The Rubidium oscillator, if supplied, is warranted for two years from
date of shipment and subject to the exceptions listed above.
All other items and pieces of equipment not specified above,
including the antenna unit, antenna surge suppressor and antenna
pre-amplifier are warranted for 5 years, subject to the exceptions
listed above.
WARRANTY CLAIMS
Spectracom’s obligation under this warranty is limited to in-factory
service and repair, at Spectracom’s option, of the product or the
component thereof, which is found to be defective. If in
Spectracom’s judgment the defective condition in a Spectracom
product is for a cause listed above for which Spectracom is not
responsible, Spectracom will make the repairs or replacement of
components and charge its then current price, which buyer agrees
to pay.
Spectracom shall not have any warranty obligations if the
procedure for warranty claims is not followed. Users must notify
Spectracom of the claim with full information as to the claimed
defect. Spectracom products shall not be returned unless a return
authorization number is issued by Spectracom.
Spectracom products must be returned with the description of the
claimed defect and identification of the individual to be contacted
if additional information is needed. Spectracom products must be
returned properly packed with transportation charges prepaid.
Shipping expense: Expenses incurred for shipping Spectracom
products to and from Spectracom (including international customs
fees) shall be paid for by the customer, with the following
exception. For customers located within the United States, any
product repaired by Spectracom under a “warranty repair” will be
shipped back to the customer at Spectracom’s expense unless
special/faster delivery is requested by customer.
Spectracom highly recommends that prior to returning equipment for
service work, our technical support department be contacted to
provide trouble shooting assistance while the equipment is still
installed. If equipment is returned without first contacting the support
department and “no problems are found” during the repair work,
an evaluation fee may be charged.
EXCEPT FOR THE LIMITED WARRANTY STATED ABOVE,
SPECTRACOM DISCLAIMS ALL WARRANTIES OF ANY KIND
WITH REGARD TO SPECTRACOM PRODUCTS OR OTHER
MATERIALS PROVIDED BY SPECTRACOM, INCLUDING
WITHOUT LIMITATION ANY IMPLIED WARRANTY OR
MERCHANTABILITY OR FITNESS FOR A PARTICULAR PURPOSE.
Spectracom shall have no liability or responsibility to the original
customer or any other party with respect to any liability, loss, or
damage caused directly or indirectly by any Spectracom product,
material, or software sold or provided by Spectracom, replacement
parts or units, or services provided, including but not limited to any
interruption of service, excess charges resulting from malfunctions of
hardware or software, loss of business or anticipatory profits
resulting from the use or operation of the Spectracom product or
software, whatsoever or howsoever caused. In no event shall
Spectracom be liable for any direct, indirect, special or
consequential damages whether the claims are grounded in
contract, tort (including negligence), or strict liability.
EXTENDED WARRANTY COVERAGE
Extended warranties can be purchased for additional periods
beyond the standard five-year warranty. Contact Spectracom no
later than the last year of the standard five-year warranty for
extended coverage.
SPECTRACOM 95 Methodist Hill Drive Rochester, NY 14623
+1.585.321.5800 FAX: +1.585.321.5218 www.spectracomcorp.com [email protected]
Spectracom Corporation
TPRO-VME/TSAT-VME
Table of Contents
1
1.1
1.2
1.3
1.4
1.5
1.6
2
2.1.1
2.1.2
2.1.3
2.1.4
2.1.5
2.2
2.2.1
2.2.2
2.3
2.3.1
2.4
2.4.1
3
3.1
3.2
3.2.1
3.2.2
3.2.3
3.2.4
3.3
3.4
3.5
3.6
3.7
3.8
3.8.1
3.8.2
3.8.3
3.9
3.10
3.11
3.12
3.13
4
4.1
4.2
5
OVERVIEW .............................................................................................. 1-1
General Information about GPS
1-3
Your Spectracom GPS Receiver
1-4
Inventory
1-4
Inspection and Support
1-4
External Connections
1-5
GPS Antenna Connector (TSAT-VME Only)
1-5
SPECIFICATIONS..................................................................................... 2-1
VMEbus Interface
2-1
Inputs
2-1
Outputs
2-2
LED Indicators
2-2
Timing
2-2
Front Panel
2-2
J6 Timecode Input
2-2
J1 20-pin Ribbon Cable Connector (TPRO-VME Only)
2-3
Rear Panel
2-3
P1 and P2 VMEbus Interface and User-Defined Signals
2-3
GPS Receiver/Antenna(TSAT-PMC Only)
2-5
Optional Cable
2-5
CONFIGURATION................................................................................... 3-1
General
3-1
VME Base Address
3-1
Case 1
3-1
Case 2
3-1
Case 3 (default)
3-2
Case 4
3-2
VMEbus Interrupt Level
3-6
Rate Outputs Configuration
3-7
VMEbus P2 Configuration (Does Not Apply to Option -32P2)
3-8
Time Tag Enable/Disable
3-10
FIFO Buffer Clear Configuration
3-11
VMEbus Address Configuration
3-12
A16 Base Address Configuration
3-13
A24 Base Address Configuration
3-13
A32 Base Address Configuration
3-14
Interrupt Request Level Configuration
3-15
VMEbus P2 I/O Configuration
3-15
Rate Output Configuration
3-16
External/Internal Event Configuration
3-17
FIFO Buffer Clear Configuration
3-17
PIN ASSIGNMENTS................................................................................. 4-1
Test Points
4-1
Input/Output Pin Assignments
4-1
INSTALLATION ....................................................................................... 5-1
Synchronizable Timecode Generator User Manual
iii
TPRO-VME/TSAT-VME
5.1
5.2
5.2.1
5.3
6
6.1
6.2
6.3
6.4
6.5
6.6
6.7
6.8
6.9
6.10
6.11
6.12
6.13
6.14
6.15
6.16
7
7.1
7.1.1
7.1.2
7.2
7.2.1
8
8.1
8.2
8.3
8.4
8.5
8.6
9
9.1
9.2
9.3
10
Spectracom Corporation
General
5-1
External GPS Receiver/Antenna Installation
5-2
Routine Maintenance
5-2
Propagation Delay Adjustment
5-3
PROGRAMMING..................................................................................... 6-1
Introduction
6-1
Register Map
6-1
Determining Address Space
6-1
Reading Time
6-2
Reading Latitude, Longitude, and Elevation (TSAT-VME Only)
6-3
Report Latitude (TSAT-VME Only)
6-3
Report Longitude (TSAT-VME Only)
6-4
Reading the Year, Gregorian Date, and Altitude (TSAT-VME Only)
6-4
Report Number of GPS Satellites Being Tracked (TSAT-VME Only)
6-5
Reading External Event Times
6-5
Interrupt Mode
6-6
Setting Propagation Delay Correction
6-7
Presetting Time
6-8
External 1PPS Time Synchronization (Option –M)
6-8
Disabling and Re-enabling Code Input
6-9
Handlers
6-9
PREVENTIVE MAINTENANCE .................................................................. 7-1
Necessary Maintenance
7-1
Oscillator Aging Adjustment
7-1
IRIG-B Output Adjustment
7-1
Optional Preventive Maintenance
7-1
Oscillator Aging Adjustment
7-1
TROUBLESHOOTING .............................................................................. 8-1
The program has trouble talking to the TPRO-VME
8-1
Bad Data from the D32 Ports
8-1
Bad Data from the FIFO Port
8-1
Interrupt Crashes
8-2
Board Never Syncs to Input Code or 1PPS
8-2
Before You Contact Spectracom
8-2
OPTIONS AND ACCESSORIES................................................................. 9-1
Common Options
9-1
Options—TPRO-VME
9-1
Options—TSAT-VME
9-1
DRIVER SUPPORT ................................................................................. 10-1
List of Figures
Figure 2-1: TPRO-VME J1 Pin Identification ..............................................................................................2-3
Figure 3-1: VME Address Jumper Locations ..............................................................................................3-1
iv
Synchronizable Timecode Generator User Manual
Spectracom Corporation
TPRO-VME/TSAT-VME
1 Overview
This manual provides comprehensive information on the system architecture, specifications for
and operation of the Spectracom Model TPRO VME and Model TSAT-VME Synchronizable
Time Code Generators with VMEbus Interface.
The TPRO VME and TSAT VME are used in VMEbus systems for time tagging, synchronizing
multiple systems, and generating pulse rates at exact times and exact frequencies. The TPRO
VME is basically an accurate clock whose time can be captured and read by the host VMEbus
computer. The time capture can be caused by a logic pulse from the outside world (an
“external” event) or can be caused by the host computer program reading the time data directly
from hardware counters with two longword transfers from the TPRO VME.
The Z80 microcomputer in the TPRO VME transfers the captured external time information (i.e.,
hundreds of days through units of microseconds (μS)—a total of 10 bytes) to the host by loading
each of the 10 bytes sequentially from the FIFO through the TPRO VME’s VMEbus interface.
The host that is testing the OUTPUT READY bit of the TPRO VME status register before the
host from the FIFO output reads each byte does “handshaking”.
The longword time stamp data transfer requires no waiting by the host program. For external
event time stamps, the time required for the complete transfer is from 30 to 100 μS after the
event occurs. The time fluctuates because the microcomputer may be interrupted while putting
data in the FIFO. The time data is accurate to the exact microsecond at which the event
occurred, and the accuracy is not affected by the transfer time. Using the on-board bus
interrupter, users can interrupt the host VME processor when the first byte of data is loaded in
the FIFO. In many cases, the interrupt handling (task switching) overhead exceeds the time
required for the complete loading of the FIFO, so that the VME host may never actually need to
wait for the microcomputer to complete FIFO loading.
Typically, the longword time stamp is used for software-initiated time measurements and the
external time stamp is used for intermittent and unpredictable events triggered by the outside
world.
After power-on reset, the clock starts counting automatically at tie 0 days through μS without
any commands. To maintain synchronization with the outside world, the clock can be initialized
and its counting frequency adjusted (disciplined) to correct for any inherent errors due to
adjustment, temperature change, or aging. The Z80 performs these tasks automatically, using
a standard modulated time code signal (IRIG-B, IRIG-A, NASA36, XR3 or 2137) as a reference
input or, optionally, a precision 1 PPS from a GPS system receiver (TSAT-VME). The clock
time can also be set via commands from the host VMEbus computer to the TPRO VME.
The on-board clock drives the on-board LED display option and is also used to generate an
IRIG-B output time code signal that can be fed to other systems. If no input reference is
available, the clock counts at its natural undisciplined frequency. If the input reference
disappears after being initially present, the TPRO VME continues to count from the current time,
using the frequency discipline calculated while the reference was present. If the input reference
reappears, the TPRO VME determines its type and phase, and then uses it for time and
frequency reference. If the accumulated error during open loop operation does not exceed 200
Synchronizable Timecode Generator User Manual
1-1
TPRO-VME/TSAT-VME
Spectracom Corporation
μS, the time count continues unperturbed by the interruption (except for a short-term change in
count frequency to cancel out the error). Otherwise, an abrupt jump in time (called a “jam sync”)
will occur at the beginning of the next second.
In VMEbus standard terminology, the TPRO VME is an A16 (short supervisory or short nonprivileged addressing), an A24 (standard supervisory or standard non-privileged addressing), or
an A32 (extended supervisory or extended non-privileged addressing) D08 (0) VME SLAVE
(D16 transfers are also supported, but the high order byte is not used) with a user-configurable
base address (in steps of 256 bytes) and a user-configurable interrupt level. Longword time
stamp transfers are VMEbus aligned D32 longword transfers.
A status register, a command register, an internal event register, a FIFO read register, two
longword time stamp registers, and several registers for the bus interrupter are offset from the
configured base address. The address of a given register in user address space is generated
by adding the VMEbus 16-bit short, 24-bit standard, or 32-bit extended address base (user
processor specific—may be 24 or 32 bits) and the configured base address of the TPRO VME
(16, 24 or 32 bits) and the offset (6 bits) for the specific register. Status bits tell the host when
event data is in the FIFO, when the input code signal is present, and when the clock is known to
be in time lock with the input time code or the 1PPS input.
The time code signals encode “major” time (days, hours, minutes, and seconds) using pulse
width and amplitude modulation onto a sine wave carrier waveform. The time code repeats
once a second (IRIG-B, NASA36, XR3, 2137) or ten times a second (IRIG-A) and includes
reference marks to mark the exact beginning of a second or a tenth of a second. Each
repetition is known as a frame, and the encoded time is the time at the reference mark at the
beginning of the frame. The TPRO VME automatically determines the type of input time code.
During each frame, the TPRO VME uses the carrier frequency (10 kHz for IRIG-A; 1 kHz for
IRIG-B, NASA36, and 2137; 250 Hz for XR3) for multiple high accuracy time comparisons
between the input time code and the on-board clock. Because any single comparison has jitter,
multiple measurements are averaged for an accurate result, which is then used by the Z80 for
frequency disciplining.
Since time information needs only about half of each frame, the remaining time is sometimes
used to encode countdown information or other application-specific information. Specialized
firmware options for the TPRO VME can recover or generate this information.
Depending on the actual absolute time accuracy required in the user’s application, the TPRO
VME automatically corrects for the time that the time code signal requires to travel the distance
between the time code source and the host computer. This “propagation delay time” is about
3.3 μS per kilometer for radio time code transmission and about 5 μS per kilometer for copper
wire transmission. There is also a time delay on the order of 25 μS that may be caused by
small phase shifts that are due to reactances at the time code input. To correct for propagation
delay, the Z80 can use a propagation delay correction setting ranging between –1000 μS
(because some time sources transmit early) and +8999 μS. The default setting is 0 μS after the
TPRO VME is reset at power-on or after the user issues a RESET command. Users can
change the setting using a sequence of programmed commands to the command register on
the TPRO VME.
If absolute μS accuracy is required, the user will most likely need to calibrate for propagation
delay correction by comparing the on-board clock time with a portable reference (a 1PPS GPS
1-2
Synchronizable Timecode Generator User Manual
Spectracom Corporation
TPRO-VME/TSAT-VME
pulse is good for this) when the TPRO VME is installed. The correct propagation delay
correction setting is converged on rapidly by trial and error. This setting does not need to be
changed unless the location of cabling of the installation is changed.
A 1PPS reference input option allows a 1-pulse-per-second TTL pulse (usually from a GPS
receiver) to be used for oscillator discipline. TPRO VMEs that are configured for this option use
the input code for clock time setting and disciplining if it is present, and automatically switch to
the 1PPS if the input code is not present. Because only minor time (fractions of a second) can
be initialized from the 1PPS, the TPRO VME needs information from the user to set the days
through seconds major time. The user obtains this information from the GPS receiver (usually
over a serial data link) and should then calculate the day, hour, minute and second that the next
1PPS pulse will occur. This information should be formatted into a sequence of 9 data bytes
(one per digit) followed by a SET NEXT 1PPS TIME command. The user should send the 10byte sequence to the TPRO VME command port at least once after the TPRO VME jam syncs
to the 1PPS signal. The loss-of-sync status bit will be asserted after the jam sync until the
NEXT 1PPS TIME SET commands are performed. If using 1PPS input, the user can simply
check the loss-of-synchronization bit periodically to see if the SET NEXT 1PPS TIME command
sequence needs to be performed. If the user does not set major time, the TPRO VME continue
to count from the last major time (or from “0” if starting from power-on reset).
Inputs to the TPRO VME (via the 20-pin, right-angle connector, the VME P2 connector, or the
front panel coaxial connectors) are modulated time code or 1PPS reference and external event
pulses up to 1000 events per second.
IRIG-B time code and two TTL user-configurable rates are provided as outputs. All frequencies
have a 50% duty cycle and all rates have a 1 μS pulse width.
If P2 is a 96-pin connector (without Option –32P2), four pins of P2 Row C are available for userconfigured I/O and the remaining pins of P2 Rows A and C are driven by parallel TTL time data.
If P2 is a 32-pin connector (Option –32P2), there are no connections to backplane P2 Rows A
and C from the TPRO VME.
1.1
General Information about GPS
NOTE: GPS applies only to the TSAT-VME board; the TPRO-VME is not equipped for GPS.
The United States government operates a set of approximately 32 satellites, collectively known
as the "GPS Constellation" or "GPS Satellites." Each satellite has an internal atomic clock and
transmits a signal specifying the time and satellite position. On the ground, the GPS receiver
determines its position (longitude, latitude, and elevation) and the time by decoding the signals
simultaneously from at least four of the GPS satellites.
The satellite orbits are circular, inclined approximately 56 degrees from the equator, orbiting the
Earth once every 11 hours. There are several different orbital planes providing continuous
coverage to all places on Earth. The GPS receiver uses an omni-directional antenna; the
satellites move slowly across the sky (they are not at fixed locations).
Each satellite transmits a spread-spectrum signal, centered at 1575.42 MHz. When power is
first applied, the GPS receiver begins searching for the satellites. It does this by searching for
each satellite individually, listening for each satellite's distinct spread-spectrum hopping
Synchronizable Timecode Generator User Manual
1-3
TPRO-VME/TSAT-VME
Spectracom Corporation
sequence. This process can take a few minutes, as the receiver iteratively locates satellites,
refines its position, and determines for which satellites to search.
The GPS receiver retains the last known position when the power is switched off. This results in
faster satellite acquisition the next time the receiver is switched on. If the antenna has been
moved more than a few miles, however, acquisition time will be slightly longer, as it must first recompute the position.
1.2
Your Spectracom GPS Receiver
Your board’s GPS receiver is built into the antenna housing and communicates to the board via
a serial (RS-422) interface. Power (+12V) is supplied from the board. The unit comes with a
100-foot cable. Extension cables are available in 100-foot lengths. The maximum total length is
500 feet. The connectors on the extension cables are not weatherproof; only the first 100-feet
can be outdoors. The cable consists of several twisted pairs (not coaxial cable) and a foil
shield.
NOTE: Spectracom recommends applying an appropriate silcon grease to the cable
connection at the GPS antenna in order to protect the connection from moisture. An
additional weatherproofing kit (P/N 221213) containing butyl rubber and plastic tape is
also available from Andrews Corporation, US 800.255.1479.
1.3
Inventory
Before installing the board, please verify that all material ordered has been received. If there is a
discrepancy, please contact Spectracom Customer Service at US 585.321.5800.
1.4
Item
Quantity
Description
1
2
3
4
5
1
1
1
1
1
Operation & Maintenance Manual
Board
Breakout Cable (micro DB-25 to several BNC connectors)
GPS Receiver/Antenna (TSAT-VME only)
100-foot Antenna Cable (TSAT-VME only)
Inspection and Support
Unpack the equipment and inspect it for damage. If any equipment has been damaged in
transit, please contact Spectracom Customer Service at US 585.321.5800.
If any problems occur during installation and configuration of your Spectracom product, please
contact Spectracom Technical Support at US 585.321.5823 or US 585.321.5824.
CAUTION:
1-4
Electronic equipment is sensitive to Electrostatic
Discharge (ESD). Observe all ESD precautions and
safeguards when handling the timecode generator.
Synchronizable Timecode Generator User Manual
Spectracom Corporation
TPRO-VME/TSAT-VME
NOTE: If equipment is returned to Spectracom, it must be shipped in its original packing
material. Save all packaging material for this purpose.
1.5
External Connections
Only those functions that are actually used need to be connected. Always switch off the
computer's power before connecting or disconnecting.
1.6
GPS Antenna Connector (TSAT-VME Only)
The TSAT-VME has a commercial Micro–D 15 pin plug connector that connects to the GPS
antenna via the supplied cable. The supplied cable and the optional extension cable include
shielding to meet EMI requirements. Use of other cables is not recommended. The optional
extension cable is for indoor use only.
When power is first applied, the board sends initialization commands to the receiver/antenna.
For this reason, do not disconnect and reconnect the antenna while power is applied.
Synchronizable Timecode Generator User Manual
1-5
TPRO-VME/TSAT-VME
1-6
Spectracom Corporation
Synchronizable Timecode Generator User Manual
Spectracom Corporation
TPRO-VME/TSAT-VME
2 Specifications
Table 2.1—Dimensions, Power, Fabrication & Temperature
Dimensions
261.8mm (10.3”) height x 172.2mm (6.8”) depth x 20mm (0.79”)
width (VME 6U single width, double height)
Power
+5 VDC: ±5% at 3.5A max; +12 VDC: ±5% at 150 mA (max.);
–12 VDC: ±5%) at 100mA (max.)
PWB Fabrication
.062” thick FR4 fire-retardant glass-filled epoxy
Temperature
0 to 50 C (32 to 122 F) operating,
o
o
o
o
–40 to 60 C (–40 to 140 F) storage
o
o
o
o
2.1.1 VMEbus Interface
2.1.1.1 Data Type
D08 (O) Slave
D16 Slave (even bytes n/u)
D32 Aligned Slave for longword time stamp data only
2.1.1.2 Addressing Type
A16 (short supervisory address, short non-privileged address)
A24 (standard supervisory address, standard non-privileged address)
A32 (extended supervisory address, extended non-privileged address)
2.1.2 Inputs
Table2.2—Inputs
Connector
Configurable for 2 pins of 20-pin J2 connector, via P2 backplane C rows, front
panel isolated BNC
Input Code Types
Modulated IRIG-A, IRIG-B, NASA36, 2137, XR3
Configuration
Automatic
Modulation
Amplitude modulated. Ratio of large amplitude to small Amplitude cycles
between 2:1 and 4:1.
Amplitude
1.2V to 8V peak to peak.
Frequency Error
± 100ppm maximum
Impedance
>100K Ω allows multiple units to be driven by single time code source.
Common Mode Rejection
Balanced instrumentation amplifier input withstands ± 100V common mode
voltage.
External Event
Positive going TTL pulse. The user may select either connector J1 or (by
configuring P11 & P12) the VME P2 connector for external event input.
Synchronizable Timecode Generator User Manual
2-1
Spectracom Corporation
TPRO-VME/TSAT-VME
2.1.3 Outputs
Table 2.3—Outputs
Parallel TTL Time
P2 Rows A and C. P2 Rows A and C not connected for option 32P2.
Rates
Two rates are selectable from 1PPS, 5PPS, 10PPS, 20PPS, 100PPS, 1KPPS,
10KPPS, 50KPPS and 100KPPS. The user can access these output signals on
connector J1 or the VME P2 connector.
IRIG-B
1KHz amplitude modulated sine wave λ3V pk/pk into 600 ohms.
2.1.4 LED Indicators
Red LED:
This indicator lights when input code peak to peak amplitude <500 mV pk/pk.
Green LED: This indicator lights when time error between clock and input code (or 1PPS)
is <5 μS.
2.1.5 Timing
Table 2.4—Timing
2.2
Resolution
1 μS
Clock Range
1 μS through 366 days, 23 hours, 59 minutes, 59.999999
seconds
Propagation Delay Correction Range
–1000 μseconds through 8999 μsecond Propagation Delay
setting from VME host using command sequence
Synchronization Time
<20 seconds for <1 μS error from power-on or change of
propagation delay setting
Open Loop Frequency Drift
Open loop timing error shall not exceed 2 μseconds in 10
seconds after 60 minutes with input code or 1PPS at a constant
temperature.
Front Panel
2.2.1 J6 Timecode Input
This BNC jack is the differential time code input. It is isolated from ground. The center
conductor is time code +, the outer conductor is time code –. It is acceptable, but not required,
to connect the outer conductor to signal ground for single-ended time code signals.
The board automatically detects the polarity of this input.
2-2
Synchronizable Timecode Generator User Manual
TPRO-VME/TSAT-VME
Spectracom Corporation
2.2.2 J1 20-pin Ribbon Cable Connector (TPRO-VME Only)
The pinout is as shown below. Note that “N/C” denotes “no connection.”
Table 2.5—Pin-out of Front Panel J1 Connector for TPRO-VME
Pin
Function
1
Pin
Signal Ground
Function
2
Time code+
3
Signal Ground
4
Time code–
5
N/C
6
N/C
7
Signal Ground
8
IRIG out
9
Signal Ground
10
Rate Output #1
11
N/C
12
Rate Output #2
13
Signal Ground
14
Time-Tag Input
15
N/C
16
N/C
17
Signal Ground
18
N/C
19
Signal Ground
20
1 MHz Output
Time code+ and time code– are described above. Rate Output #1 and #2 are described in
Chapter Three, “Rate Outputs Configuration”. Time-Tag input is described in Chapter Three,
“Time Tag Enable/Disable”.
Pins are located on J1 as shown in Figure 2-1. This view is looking into the J1 connector from
the front panel. The component side of the board is “up” in this drawing. The indicator light is
the red LED, which indicates “Lo Code Lvl”. (Illustration is not to scale.)
19
17
15
13
11
9
7
5
3
1
20
18
16
14
12
10
8
6
4
2
J1
Indicator Light
Figure 2-1: TPRO-VME J1 Pin Identification
2.3
Rear Panel
2.3.1 P1 and P2 VMEbus Interface and User-Defined Signals
P1 contains all of the VMEbus interfacing signals except the high-order data lines (D31–D16).
P2 has the high-order data lines D31–D16. Also, the VMEbus specification states that the two
outermost rows of P2 (Rows A and C) are user-defined. These pins provide direct outputs from
the on-board clock, plus four jumper-selected input/outputs (unless the board was ordered with
Option –32P2).
Synchronizable Timecode Generator User Manual
2-3
Spectracom Corporation
TPRO-VME/TSAT-VME
The direct clock time outputs (which are sometimes referred to as “zero-latency” outputs
because they provide the instantaneous time) consist of 54 pins, and provide days through
microseconds in binary-coded decimal (BCD) format.
Table 2.6—Direct Time (“Zero Latency”) Outputs on P2
Pin
Output
Pin
Output
Pin
Output
C10
Day Hundreds (2)
C28
Minute Tens (1)
A15
mS Tens (2)
C11
Day Hundreds (1)
C29
Minute Ones (8)
A16
mS Tens (1)
C12
Day Tens (8)
C30
Minute Ones (4)
A17
mS Ones (8)
C13
Day Tens (4)
C31
Minute Ones (2)
A18
mS Ones (4)
C14
Day Tens (2)
C32
Minute Ones (1)
A19
mS Ones (2)
C15
Day Tens (1)
A02
Second Tens (4)
A20
mS Ones (1)
C16
Day Ones (8)
A03
Second Tens (2)
A21
uS Hundreds (8)
C17
Day Ones (4)
A04
Second Tens (1)
A22
uS Hundreds (4)
C18
Day Ones (2)
A05
Second Ones (8)
A23
uS Hundreds (2)
C19
Day Ones (1)
A06
Second Ones (4)
A24
uS Hundreds (1)
C20
Hour Tens (2)
A07
Second Ones (2)
A25
uS Tens (8)
C21
Hour Tens (1)
A08
Second Ones (1)
A26
uS Tens (4)
C22
Hour Ones (8)
A09
mS Hundreds (8)
A27
uS Tens (2)
C23
Hour Ones (4)
A10
mS Hundreds (4)
A28
uS Tens (1)
C24
Hour Ones (2)
A11
mS Hundreds (2)
A29
uS Ones (8)
C25
Hour Ones (1)
A12
mS Hundreds (1)
A30
uS Ones (4)
C26
Minute Tens (4)
A13
mS Tens (8)
A31
uS Ones (2)
C27
Minute Tens (2)
A14
mS Tens (4)
A32
uS Ones (1)
Pin C1 outputs a 1 MHz square wave to be used as a strobe for the direct time outputs. The
outputs change approximately 10 nS after the strobe’s rising edge; the falling edge occurs 500
nS (± 50 nS) after the rising edge.
Also on P2 Row C are four jumper-selectable signals.
2-4
Synchronizable Timecode Generator User Manual
TPRO-VME/TSAT-VME
2.4
Spectracom Corporation
GPS Receiver/Antenna(TSAT-PMC Only)
Table 2.7—GPS Receiver/Antenna Specifications
Description:
GPS Antenna and Receiver
Size:
5.8” (147 mm) Diameter, 3.9” (100 mm) Height
Weight:
13.4 oz (0.38 kg)
Color:
White
Mounting Threads:
1.0” ID, 14 turns/inch, straight (not tapered);
will accept .75-inch galvanized water pipe for mast
Operating Frequency:
1575.42 MHz
Operating Temperature:
–30 C to +70 C
Storage Temperature:
–55 C to +100 C
Operating Humidity:
95% R.H., non-condensing
Waterproof:
Submersion to 1 meter
Altitude:
–400 m to –18,000 m
Accuracy
Position
Velocity
Time
25 m SEP without SA
0.1 m/s without SA
UTS ± 1 uS (nominal)
Power Dissipation:
2.5 Watts continuous
Acquisition Time:
<15 minutes (5–8 minutes typical)
Re-acquisition:
<2 seconds
2.4.1 Optional Cable
Table 2.8—Optional Extension Cable for (TRIM-CAB-PMC-100)
Length
30.3 m ± 0.3 m (99.5 ft ± 1 ft)
Cable Size
9 mm (0.4 inch) O.D.
Connector Size (both ends)
34 mm X 16 mm (1.4 inch x 0.6 inch)
Synchronizable Timecode Generator User Manual
2-5
Spectracom Corporation
2-6
TPRO-VME/TSAT-VME
Synchronizable Timecode Generator User Manual
Spectracom Corporation
TPRO-VME/TSAT-VME
3 Configuration
3.1
General
The board has several configuration jumpers. The user is responsible for setting these jumpers
to meet the application requirements.
To locate the jumpers, place the board component side up on a table. Position it so that the
front panel is facing toward you, as shown below.
3.2
VME Base Address
Front Panel
Figure 3-1: VME Address Jumper Locations
Figure 3-1 shows the locations of the jumpers used to specify the board’s base address in the
VME memory map.
First, determine how the board is to be mapped into the VMEbus memory map. The board uses
32 (decimal) consecutive addresses, the first of which must be on a boundary of 256 addresses
(A05–A07 must be zero). Determine which type of addressing mode the host will use to access
the board. The board performs equally well using any of these addressing modes; choose the
mode based on the host processor’s requirements.
3.2.1 Case 1
A32 Extended Supervisory Data Access ......................................... (Address Modifier 0D)
OR…
A32 Extended Non-privileged Data Access ......................................(Address Modifier 09)
3.2.2 Case 2
A24 Standard Supervisory Data Access .......................................... (Address Modifier 3D)
OR…
A24 Standard Non-privileged Data Access .......................................(Address Modifier 39)
Synchronizable Timecode Generator User Manual
3-1
TPRO-VME/TSAT-VME
Spectracom Corporation
3.2.3 Case 3 (default)
A16 Short Supervisory Access........................................................ (Address Modifier 2D)
OR…
A16 Short Non-privileged Access .....................................................(Address Modifier 29)
3.2.4 Case 4
Permit any of the above
Distinguish length of address by address modifier field
Other address modifiers can be supported by factory customization, but those shown
above work with most hosts. Note that the board does not distinguish between
Supervisory Access and Non-privileged Access.
For example, if Case 1 is chosen, the board responds only if the address modifier is 0D
or 09 and if A08–A15 match the settings on P4, A16–A23 match the settings on P6, and
A24–A31 match the settings on P7.
If Case 2 is chosen, the board responds only if the address modifier is 3D or 39 and if
A08–A15 match the settings on P4, and A16–A23 match the settings on P6. Address
lines A24–A31 are ignored.
If Case 3, the factory default, is chosen, the board responds only if the address modifier
is 2D or 29 and if A08–A15 match the settings on P4. Address lines A16–A31 are
ignored.
If Case 4 is chosen, the board determines how many address lines to check as a
function of the address modifier code. If the address modifier is 0D or 09, A08–A31
must match the settings on P4, P6, and P7. If the address modifier is 3D or 39, A08–
A23 must match the settings on P4 and P6; the higher address lines will be ignored. If
the address modifier is 2D or 29, A08–A15 must match the settings on P4; the higher
address lines will be ignored.
First, set P16 based on one of the cases described above. P16 consists of two jumpers,
which must be set as follows:
Table 3.1—P16 Jumper Set
3-2
Case
Jumper 1
Jumper 2
1
Pin 4 to Pin 6
Pin 3 to Pin 1
2
Pin 4 to Pin 2
Pin 3 to Pin 5
3 (default)
Pin 4 to Pin 6
Pin 3 to Pin 5
4
Pin 4 to Pin 2
Pin 3 to Pin 1
Synchronizable Timecode Generator User Manual
Spectracom Corporation
TPRO-VME/TSAT-VME
5
6
3
4
1
2
Figure 3-2: P16 Default Settings
Set jumpers on P4 to select the state of address lines A15–A08. These must be set regardless
of which case was chosen (see above). For each address line that needs to be logic “0”,
connect the corresponding pin of P4 to P4 Pin 9. For each address line that needs to be logic
“1”, leave its pin unconnected.
Table 3.2—Address Line and P4 Pin
1
2
3
Address Line
P4 Pin
A08
1
A09
3
A11
4
A12
5
A13
6
A14
7
A15
8
Connect Here for “0”
9
4
5
6
7
8
9
Figure 3-3: P4 Default Settings for A08 through A15
The example shown here specifies A08, A09, and A10 must be “1” and A11–A15 must be “0”.
This corresponds to address xxxx0700 (hex).
In the same manner, set jumpers on P6 to select the state of address lines A23–A16. For each
address line that needs to be logic “0”, connect the corresponding pin of P6 to Pin 1 or 2. For
each address line that needs to be logic “1”, leave its pin unconnected. It is necessary to set P6
only if the addressing mode is Case 1, Case 2, or Case 4.
Synchronizable Timecode Generator User Manual
3-3
TPRO-VME/TSAT-VME
Spectracom Corporation
Table 3.3—Address Line and P6 Pin
Address Line
P6 Pin
Connect Here for “0”
1
Connect Here for “0”
2
A16
3
A17
4
A18
5
A19
6
A20
7
A21
8
A22
9
A23
10
S/N
1
2
3
4
5
6
7
8
9
10
Figure 3-4: P6 Default Settings for A16 through A23
The example shown specifies A16–A19 must be “0” and A20–A23 must be “1”.
corresponds to address xxF0xx00 (hex).
This
NOTE: Pins 1 and 2 must always be connected together.
In the same manner, set the jumpers on P7 to select the state of address lines A31–A24. For
each address line that needs to be logic “0”, connect the corresponding pin of P7 to Pin 1 or 2.
For each address line that needs to be logic “1”, leave its pin unconnected. It is necessary to
set P7 only if the addressing mode is Case 1 or Case 4.
3-4
Synchronizable Timecode Generator User Manual
Spectracom Corporation
TPRO-VME/TSAT-VME
Table 3.4—Address Line and P7 Pin
Address Line
P7 Pin
A31
10
A30
9
A29
8
A28
7
A27
6
A26
5
A25
4
A24
3
Connect here for “0”
2
Connect here for “0”
1
10
9
8
7
6
5
4
3
2
1
Figure 3-5: P7 Default Settings for A24 through A31
The example shown here specifies A24–A28 must be “0” and A29–A31 must be “1”. This
corresponds to address E0xxxx00 (hex).
NOTE: Pins 1 and 2 must always be connected together.
The factory default base addresses are therefore as follows:
A16 access ......................................................................................................... xxxx0700
A24 access ........................................................................................................ xxF00700
A32 access ........................................................................................................E0F00700
Synchronizable Timecode Generator User Manual
3-5
TPRO-VME/TSAT-VME
3.3
Spectracom Corporation
VMEbus Interrupt Level
The board can generate an interrupt when time data has been loaded in the FIFO. This occurs
when the host computer requests the current time or after a time-tag event. If desired, the user
can poll the status register instead of using interrupts. The factory can also customize the board
to provide periodic interrupts.
Two jumpers on P5 are used to select any interrupt IRQ1–IRQ7. Set both jumpers as shown in
Table 3.5.
Table 3.5—P5 Jumper Set
IRQ
Jumper 1
Jumper 2
1
Pin 16 to Pin 2
Pin 15 to Pin 1
2
Pin 16 to Pin 4
Pin 15 to Pin 3
3
Pin 16 to Pin 6
Pin 15 to Pin 5
4
Pin 16 to Pin 8
Pin 15 to Pin 7
5 (default)
Pin 16 to Pin 10
Pin 15 to Pin 9
6
Pin 16 to Pin 12
Pin 15 to Pin 11
7
Pin 16 to Pin 14
Pin 15 to Pin 13
If no interrupt is desired, either make no connection to P5, or leave P5 set for the factory default
and program the interrupt controller to disable interrupts.
P5
Front Panel
Figure 3-6: VME Interrupt P5 Jumper Location
3-6
Synchronizable Timecode Generator User Manual
Spectracom Corporation
1
2
3
TPRO-VME/TSAT-VME
4
5
6
7
8
9
10
11
12
13
14
15
16
Figure 3-7: P5 Default Settings for IRQ5
3.4
Rate Outputs Configuration
Two jumper-selected pulse rate outputs are available on the front-panel J1 connector. Each of
these is a positive going pulse, nominally 1.5 µS in duration, with the rising edge synchronized
to the on-board clock. Separate output drivers are present for each output, even if the same
rate is selected for both.
The outputs are TTL levels, driven by the Q output of a 74LS123 integrated circuit.
P11
P13
P12
Front Panel
Figure 3-8: Rate Output Selection and P2 Configuration Jumper Locations
Rate Output 1 and Rate Output 2 are selected by connecting jumper wires on P13. Rate
outputs and various other signals can be routed to the rear-panel P2 connector by connecting
jumpers on P11 and P12, as described in the next section.
Select the output rate for Rate 1 by installing a jumper from P13 Pin 10 to one of the following
locations on P13. In the same manner, select Rate 2 by installing a jumper from P13 Pin 11 to
one of the following locations. It is acceptable to connect both Pin 10 and Pin 11 to the same
rate, if desired. It is also acceptable to leave the jumpers unconnected if the rate output is not
used.
Synchronizable Timecode Generator User Manual
3-7
TPRO-VME/TSAT-VME
Spectracom Corporation
Table 3.6—Rate Pin Connectors
Rate
Connect to
1 Hz
P13 Pin 1
5 Hz
P13 Pin 2
10 Hz
P13 Pin 3
20 Hz
P13 Pin 4
100 Hz
P13 Pin 5
1 kHz
P13 Pin 6
10 kHz
P13 Pin 7
50 kHz
P13 Pin 8
100 kHz
P13 Pin 9
R115
The factory default sets Rate 1 to 100 Hz, and leaves Rate 2 unconnected.
2Q
1
2
3
4
5
6
7
8
9
10
11
Figure 3-9: P13 Default Setting for 100 Hz Rate 1, No Rate 2
3.5
VMEbus P2 Configuration (Does Not Apply to Option -32P2)
If the board has a P2 connector with all three rows of pins installed (i.e., the board does not
have option –32P2), four of these pins can be used for user-selectable purposes. The possible
selections are:
•
•
•
•
•
•
•
Time Code input (differential)
100 Hz (square wave)
Rate Output 1
Rate Output 2 (see paragraph 3.4)
Time-tag input
Counter reset output
1 MHz output
Any four of these can be connected to P2, Pins C6–C9, and by adding jumper wires between
headers P11 and P12, as shown in Table 3.7.
3-8
Synchronizable Timecode Generator User Manual
Spectracom Corporation
TPRO-VME/TSAT-VME
Table 3.7—P2 Configuration
P11
P12
Pin 1
P2–C6
Pin 2
P2–C7
Pin 3
P2–C8
Pin 4
P2–C9
Pin 1
Time code Input +
Pin 2
Time code Input –
Pin 3
(RESERVED)
Pin 4
(UNUSED)
Pin 5
Rate Output #1 (see Table 3.6)
Pin 6
Rate Output #2 (see Table 3.6)
Pin 7
Time Tag input
Pin 8
Counter Reset Output (low true)
Pin 9
(UNUSED)
Pin 10
(RESERVED)
1
2
3
4
7
8
9
10
P11
R115
2Q
P13
The factory default is to make no connection to P2 Pins C6–C9. As an example, to connect the
time-tag input to P2 Pin C6, add a jumper wire as shown:
21 P
1
2
3
4
5
6
Figure 3-10: Example P11, P12 Connection (Not Default)
In Figure 3-10, P13 (center row) is shown for the purpose of clarity only.
On P12, Pins 1 and 2 are the differential time code input. These two pins are also connected to
the front panel J1 connector (Pins 2 and 4, respectively) and to the front panel BNC jack. The
user must not make connection to more than one of these places.
P12 Pins 5 and 6 correspond to Rate Outputs #1 and #2, and are also connected to front panel
J1 connector Pins 10 and 12, respectively. The user must be careful not to exceed the output
driver capability. Also, it is not recommended that the user make connection to both the front
panel pins and the rear panel P2 connector.
P12 Pin 7 is the time-tag input. This is the same as front panel J1 Pin 14. The user must not
make connection to more than one of these places.
Synchronizable Timecode Generator User Manual
3-9
TPRO-VME/TSAT-VME
Spectracom Corporation
P12 Pin 8 is a low-going pulse (duration approximately 1.5 µS). The falling edge occurs when
the on-board counters are synchronized to the incoming time code (initial sync). This event,
which occurs only once each time sync is established, can be used to synchronize other
external devices.
3.6
Time Tag Enable/Disable
The factory default setting disables the time tag input. This is to prevent spurious events from
being logged. If the time tag featured is going to be used, it is necessary to change this jumper
setting as follows:
Enable Time Tag ..................................................................... W7 to W6 (factory default)
Disable Time Tag .................................................................... W7 to W8 (factory default)
If time tagging is enabled, the user must ensure that no more than 200 events occur per
second.
W6
W7
If more than 200 events per second occur and W7 is
connected to W6, the board may stop functioning
properly. Noise can cause this when a long cable is
connected to J1 with no connection to the time tag input
at the far end.
W8
CAUTION:
Front Panel
W6
W7
W8
Figure 3-11: Time Tag Enable/Disable Jumper Location)
Figure 3-12: Default Setting for Time Tag Disable
3-10
Synchronizable Timecode Generator User Manual
Spectracom Corporation
3.7
TPRO-VME/TSAT-VME
FIFO Buffer Clear Configuration
Normally, the FIFO needs to be cleared only at power-on reset. However, when using the time
tag function, the user can configure the FIFO to be cleared when each time tag event occurs.
This ensures that the data in the FIFO is always that for the most recent event. (In most
applications this is not necessary, as it is possible to read and process one event before the
next occurs, or several events can be stored in the FIFO before the host reads them.)
Another mode, in which the FIFO is cleared when the host accesses the interrupt controller,
allows the time tag input to be used as a bus interrupt. In this application, the user is not
interested in the time tag data. Time tag data is stored in the FIFO, and an interrupt is
generated, when the time tag event occurs. When the host acknowledges the interrupt, the
FIFO data is cleared (the host never reads the FIFO data.)
P14
P9
Front Panel
Figure 3-13: FIFO Clear Configuration Jumper Location
2
3
4
P9
P14
1
Figure 3-14: Default Setting for FIFO Clear on Reset
NOTE: In the preceding two figures, P9 is shown for clarity but is not related to the
FIFO Clear function.
Synchronizable Timecode Generator User Manual
3-11
TPRO-VME/TSAT-VME
Spectracom Corporation
Set P14 to select the method of clearing the FIFO as shown in Table 3.8.
Table 3.8—Clear FIFO Settings
Η
Action
Setting
Clear FIFO
P14 Jumper
Power-on Reset
Pin 1 to Pin 2 (factory default)
Each Time Tag Event
Pin 2 to Pin 3
Interrupt Acknowledge
Pin 2 to Pin 4 Η
A jumper wire, not a push-on jumper, is needed for connecting Pin 2 to Pin 4
P9
P15
P10
Front Panel
Figure 3-15: Other Jumper Locations (Unused)
Do not install jumpers at locations P9, P10, and P15.
NOTE: The optional display connects to P10.
3.8
VMEbus Address Configuration
The TPRO-VME base VMEbus address, VMEbus interrupt level and rate outputs, and
external/internal event options are configured using wire wrap jumpers. Input and Output
connections to the VME P2 connector are also selected via wire wrap jumpers. The
TPRO-VME is factory configured to the following:
Base VMEbus A16 (short) address space address ....................................................... 0700
Base VMEbus A24 (standard) address space address .............................................F00700
Base VMEbus A32 (extended) address space address ........................................F0F00700
VMEbus Interrupt Level ............................................................................................... IRG5*
External Event Enable ..............................................................................................Enabled
FIFO Reset ........................................................................... Reset to empty by SYSRESET
3-12
Synchronizable Timecode Generator User Manual
Spectracom Corporation
TPRO-VME/TSAT-VME
3.8.1 A16 Base Address Configuration
The TPRO-VME base address in A16 (short) address space is configurable via wire wrap P4.
Table 3.9 gives the address bits that correspond to the pins on terminal strip P4. Address bits
that are “0” should be connected to GROUND (P4–9), and address that are “1” should be left
unconnected.
Table 3.9—A16 Short Address Configuration
Address Bits
Pin #
A08
P4–1
A09
P4–2
A10
P4–3
A11
P4–4
A12
P4–5
A13
P4–6
A14
P4–7
A15
P4–8
EXAMPLE
If the factory configuration address 01110000xxxxxxxx (where “x” indicates offsets to I/O ports
on the TPRO-VME) is to be the TPRO-VME A16 base address, then the jumpers shown in
Table 3.10 must be installed.
Table 3.10— A16 Base Address Configuration Example
Pin
TO
P4–9
Pin
P4–8, 4, 3, 2, 1
3.8.2 A24 Base Address Configuration
The TPRO-VME base address in A24 (standard) address space is configurable
via wire wrap P6. Table 3.11 gives the address bits that correspond to the pins
on terminal strip P6. Address bits that are “0” should be connected to GROUND
(P6–2) and address bits that are “1” should be left unconnected.
Table 3.11—A24 Standard Address Configuration
Address Bits
Pin #
A16
P6–3
A17
P6–4
A18
P6–5
A19
P6–6
A20
P6–7
A21
P6–8
A22
P6–9
A23
P6–10
Synchronizable Timecode Generator User Manual
3-13
TPRO-VME/TSAT-VME
Spectracom Corporation
EXAMPLE
The factory configuration A24 base address F00700 is configured by the jumpers shown in
Table 3.10 (for the A16 portion) and in Table 3.12 (for the extra bits for A24).
Table 3.12— Sample A24 Base Address Configuration
Pin
TO
P6–2
Pin
P6–6, 5, 4, 3
3.8.3 A32 Base Address Configuration
The TPRO-VME base address in A32 (extended) address space is configurable via wire wrap
P7. Table 3.13 gives the address bits that correspond to the pins on terminal strip P7. Address
bits that are “0” should be connected to GROUND (P7–2) and address bits that are “1” should
be left unconnected.
Table 3.13—A32 Extended Address Configuration
Address Bits
Pin #
A24
P7–3
A25
P7–4
A26
P7–5
A27
P7–6
A28
P7–7
A29
P7–8
A30
P7–9
A31
P7–10
EXAMPLE
The factory configuration A32 base address F0F00700 is configured by the jumpers shown in
Table 3.10 (for the A16 portion), in Table 3.12 (for the extra bits for A24), and in Table 3.14 (for
the extra bits for A32).
Table 3.14— Sample A32 Base Address Configuration
Pin
P7–2
TO
Pin
P7–6, 5, 4, 3
The synchronization error is asserted until synchronization to input to <5 μS is verified and when
the observed time base error exceeds 5 μS for 5 successive observations spaced at 1 second
intervals. If the observed time base error exceeds 200 μS, jam resynchronization is initiated.
Synchronization error is also asserted when input code is inconsistent or lost (unless 1PPS is
present to verify time error).
Status Bit (3–7).......................................................................................................Not used
Offset (1B–1F) ........................................................................................................Not used
3-14
Synchronizable Timecode Generator User Manual
Spectracom Corporation
3.9
TPRO-VME/TSAT-VME
Interrupt Request Level Configuration
The TPRO-VME can be configured as an interrupter on the VME Priority Interrupt Bus. Any
one of the seven VMEbus interrupt request signal lines IRQ1* to IRQ7* can be chosen by the
user to request service from the VME Interrupt Handler. The user must configure terminal strip
P5 with two jumpers (one from an odd numbered pin to P5-15, one from an even numbered pin
to P5-16) for the desired interrupt level. Table 3.15 shows the configuration of P5 for the seven
configurable interrupt levels.
Table 3.15—Interrupt Priority Configuration
Interrupt Level
Even Jumper
Odd Jumper
VMEbus IRQ1*
P5–2 to P5–16
P5–1 to P5–15
VMEbus IRQ2*
P5–4 to P5–16
P5–3 to P5–15
VMEbus IRQ3*
P5–6 to P5–16
P5–5 to P5–15
VMEbus IRQ4*
P5–8 to P5–16
P5–7 to P5–15
VMEbus IRQ5*
P5–10 to P5–16
P5–9 to P5–15
VMEbus IRQ6*
P5–12 to P5–16
P5–11 to P5–15
VMEbus IRQ7*
P5–14 to P5–16
P5–13 to P5–15
EXAMPLE
For the TPRO-VME factory configuration IRQ5* on the VME Priority Interrupt Bus then P5–10
should connect to P5–16 and P5–9 connect to P5–15.
3.10 VMEbus P2 I/O Configuration
If a 96-pin VMEbus connector is installed in P2 (i.e., Option –32P2 is not present), the
TPRO-VME allows four output signals to interface via CSEL1, CSEL2, CSEL3 and CSEL4
signals on the VMEP2 bus via CSEL1, CSEL2, CSEL3 and CSEL4 by configuring P11.
Table 3.16—Terminal Strip P11 Pin Assignments
Signal Name
Pin Number
P2 Pin
CSEL1
P11–1
P2C–6
CSEL2
P11–2
P2C–7
CSEL3
P11–3
P2C–8
CSEL4
P11–4
P2C–9
Synchronizable Timecode Generator User Manual
3-15
TPRO-VME/TSAT-VME
Spectracom Corporation
Table 3.17 gives pin assignments for terminal strip P12.
Table 3.17—Terminal Strip P12 Pin Assignments
Signal Name
Pin Number
Input Code +
P12–1
Input Code –
P12–2
100 PPS
P12–3
IRIG-B output
P12–4
SEL1
P12–5
SEL2
P12–6
EXTERNAL EVENT
P12–7
GATE*
P12–8
N/C
P12–9
1MHZFREQ
P12–10
EXAMPLE
If Input Code+ and Input Code– are distributed on VME P2 bus lines 2C:06 and 2C:07
respectively then the jumpers shown in Table 3.18 must be installed in order to use the VME P2
connector input option.
Table 3.18—VME P2 Connector Configuration Example
Pin
TO
Pin
P12–1
P11–1
P12–2
P11–2
3.11 Rate Output Configuration
The TPRO-VME can be configured to provide any two rates provided on terminal strip P13.
Table 3.19 gives the rates connected to terminal strip P13.
Table 3.19—Terminal Strip P13 Pin Assignments
3-16
Signal Name
Pin Number
1 PPS
P13–1
5 PPS
P13–2
10 PPS
P13–3
20 PPS
P13–4
100 PPS
P13–5
1 KPPS
P13–6
10 KPPS
P13–7
50 KPPS
P13–8
100 KPPS
P13–9
RATE1
P13–10
RATE2
P13–11
Synchronizable Timecode Generator User Manual
Spectracom Corporation
TPRO-VME/TSAT-VME
EXAMPLE
To select 100 PPS as SEL1 (J1–10) and the 50 kHz PPS rate output as SEL2 (J1–12), the
jumpers shown in Table 3.20 must be installed.
Table 3.20—Rate Configuration Example
Pin
TO
Pin
P13–5
P13–10
P13–8
P13–11
3.12 External/Internal Event Configuration
The TPRO-VME is configured to enable external events at the factory (W6 connects to W7).
Should the user wish to disable this external events capability, then W7 should be jumpered to
W8 rather than W6.
3.13 FIFO Buffer Clear Configuration
P14 configures the FIFO buffer that has been cleared by SYSRESET, by the occurrence of an
external event, or by a host access to the bus 68153 interrupter. Clearing on event can reduce
the time needed by a program to empty the FIFO, especially if low-order time measurement bits
are not needed. It can also eliminate the need for the user to flush the FIFO of stale data before
capturing event times. Connect P14–2 to P14–1 for SYSRESET clear (factory default) or P14–
2 to P14–3 for clear on event. Connect P14–2 to P14–4 to clear the FIFO whenever the BIM is
accessed.
Synchronizable Timecode Generator User Manual
3-17
TPRO-VME/TSAT-VME
3-18
Spectracom Corporation
Synchronizable Timecode Generator User Manual
Spectracom Corporation
TPRO-VME/TSAT-VME
4 Pin Assignments
4.1
Test Points
Table 4.1—Test Point Assignments
Test Points
Signal Name
TP1
6 MHz undisciplined
TP2
100 PPS
TP3
Ground
Table 4.2—Test Point Assignments
4.2
J2 Pin
Signal
Center
CODE IN +
Shield
CODE IN –
Input/Output Pin Assignments
Table 4.3—J1 (20 pin) I/O
J1 Pin
Signal
1
Ground
2
Time Code IN +
3
Ground
4
Time Code IN –
5
N/C
6
N/C
7
Ground
8
IRIG-B OUT
9
Ground
10
SEL RATE 1
11
N/C
12
SEL RATE 2
13
Ground
14
External Event IN
15
N/C
16
N/C
17
Ground
18
N/C
19
Ground
20
1 MHz Disciplined
Synchronizable Timecode Generator User Manual
4-1
TPRO-VME/TSAT-VME
Spectracom Corporation
Table 4.4—J3 (SMB) IRIG-B Output J5 (BNC)
J3 Pin
Signal
Center
IRIG-B OUT +
Shield
GROUND
Table 4.5—P8 GP STAR I/O
4-2
P8 Pin
Signal
01
Ground
03
+5V
05
+5V
07
+12V
09
Ground
11
+12V
13
–12V
15
TTL Serial IN
02
TTL Serial IN
04
TTL Serial OUT
06
Rest*
08
TTL Serial OUT
10
1PPS TTL IN
12
Ground
14
Ground
Synchronizable Timecode Generator User Manual
Spectracom Corporation
TPRO-VME/TSAT-VME
Table 4.6—P2 Parallel Outputs
P2 Row A
Pin Number
P2 Row C
Signal
Pin Number
Signal
01
N/C
01
!DATA VALID
02
40 seconds
02
Reserved
03
20 seconds
03
Reserved
04
10 Seconds
04
Reserved
05
8 seconds
05
Reserved
06
4 seconds
06
CSEL1
07
2 seconds
07
CSEL2
08
1 second
08
CSEL3
09
800 mS
09
CSEL4
10
400 mS
10
200 days
11
200 mS
11
100 days
12
100 mS
12
80 days
13
80 mS
13
40 days
14
40 mS
14
20 days
15
20 mS
15
10 days
16
10 mS
16
8 days
17
8 mS
17
4 days
18
4 mS
18
2 days
19
2 mS
19
1 day
20
1 mS
20
20 hours
21
800 µS
21
10 hours
22
400 µS
22
8 hours
23
200 µS
23
4 hours
24
100 µS
24
2 hours
25
80 µS
25
1 hour
26
40 µS
26
40 minutes
27
20 µS
27
20 minutes
28
10 µS
28
10 minutes
29
8 µS
29
8 minutes
30
4 µS
30
4 minutes
31
2 µS
31
2 minutes
32
1 µS
32
1 minute
Synchronizable Timecode Generator User Manual
4-3
TPRO-VME/TSAT-VME
4-4
Spectracom Corporation
Synchronizable Timecode Generator User Manual
TPRO-VME/TSAT-VME
Spectracom Corporation
5 Installation
5.1
General
The TPRO-VME’s inputs, outputs, and terminal strips should be connected and configured for
the user requirements before the board is installed. Front panel BNC cutouts allow users to
install front panel BNC connectors for code input and IRIG-B output.
The TPRO-VME module should be inserted or removed from the VMEbus backplane only when
the VME system power is off.
There are up to 3 inputs from the external world: an input time code (if used), a TTL external
event pulse (if used), and a 1PPS TTL time pulse (if used).
•
Time code input to the board is connected at J1 (+side to Pin 2, –side to Pin 4), to J2
(if installed), a front panel BNC wired to J2 (if installed) or the VME P2 connector. To use
P2 see Chapter Three. (If input time code is not provided, the board provides “local” timing
starting at 000 days, 00 hours, 00 minutes, 00 seconds).
•
TTL external event pulses are connected at J1 or the VME P2 connector. To use P2 see
Chapter Three. The external event pulses may come from external user equipment, or
pulse outputs from the TPRO-VME at J1 may be looped back and used as external event
inputs with a simple jumper connection.
•
If the 1PPS option is used, a front panel BNC will be factory installed for 1PPS TTL (rising
edge) input.
Custom factory configurations have a manual addendum that details non-standard I/O
configuration.
The user should refer to Chapter Three of this manual in order to be certain that jumpers on
configuration headers P4, P5, P6 and P7 are installed correctly. These configurations control
the TPRO-VME Base Address and Interrupt Request Level. If “on-time” rates are required as
outputs, then terminal strip P13 must be configured.
First-time users are advised to configure the board with the address and interrupt level settings
used for the demonstration program, and then to run the demonstration program to gain
confidence in correct operation. The board can then be configured for the users requirement.
It should be noted that although the VMEbus is an asynchronous bus, operations within the
MC68153 Bus Interrupter Module portion of the TPRO-VME are synchronous. If the
TPRO-VME will be used in an interrupt driven mode, a VMEbus system clock (SYSCLK) signal
must be provided on Pin A10 of the VMEbus P1 connector. Systems that meet the C.1 VMEbus
specification will always have SYSCLK present.
After configuring the wire wrap jumpers, connecting the inputs and outputs, and powering the
VME system down, the TPRO-VME board installs in a dual VME (6U) backplane slot. If the
Synchronizable Timecode Generator User Manual
5-1
TPRO-VME/TSAT-VME
Spectracom Corporation
TPRO-VME is to be used in an interrupt driven mode, there should be no empty connector slots
in the interrupt acknowledge signal path between the INTERRUPT HANDLER and the
TPRO-VME.
5.2
External GPS Receiver/Antenna Installation
The GPS receiver and antenna are housed in a single enclosure. This unit must be mounted
outdoors with an unobstructed view of the sky. Best timing accuracy is obtained when the unit
has a clear view of the entire sky (i.e., the antenna must be mounted horizontally, and the mast
should not be more than 30 degrees off of vertical.
For the most reliable operation, the antenna module should be mounted with a full horizon view
and the 100-foot serial/power cable and coaxial cable run to the VMEbus system location. Any
excess cable length can be coiled without affecting correct operation. The adapter cable on the
TPRO-VME is equipped with three connectors to connect the power, serial data, and 1PPS
signals to the mast module.
Once the mast module and cabling have been installed, and the TPRO-VME has been installed
and connected to the mast module, the system can be powered up again. The TPRO-VME
ignores the GPS time until time lock is achieved. Then, the TPRO-VME synchronizes to the
GPS time as indicated by the green “GOOD SYNC” LED on the TPRO-VME.
Connection to the unit is made with the supplied 12-conductor cable. This cable brings power to
the unit and conveys the serial (RS-422) communication and one-pulse-per-second from the
unit to the computer board. Note that the cable uses no RF signals. The user is responsible
for weatherproofing the cable connection. Suitable weatherproofing compounds, (e.g.,
“marine putty”) are available at hardware stores.
The connector on the antenna end of the cable will pass through a ¾-inch or greater hole. The
connector on the computer end of the cable is larger; it will pass through a 1¾-inch or greater
hole.
There are no special precautions regarding lightning. The unit will not survive a direct or closeproximity lightning strike. Installation of lightning arrestors is neither practical nor possible. The
unit is connected to ground through the cable (and thus through the computer). No additional
grounding is possible. The brass object in the center of the mounting hole is not an electrical
contact. It is acceptable, but not required, that a metal mast make contact with this point.
5.2.1 Routine Maintenance
Inspect the connection to the unit at least once each year. It is not necessary to de-mate this
connection, just verify that the weatherproofing is still intact. Replace the weatherproofing if
necessary.
NOTE: The GPS receivers included with your product are burned in at the Spectracom facility.
Because this burn in is, of course, carried out outdoors, the units may appear soiled.
Do not be concerned; the units are not used. This is just weathering—a normal part of
the burn-in process, which helps to insure that you receive the most reliable product
possible
5-2
Synchronizable Timecode Generator User Manual
TPRO-VME/TSAT-VME
5.3
Spectracom Corporation
Propagation Delay Adjustment
The user can command the TPRO-VME to correct for the period necessary for the time code
signal to travel the distance between the time code source and the host computer, based on the
actual absolute time accuracy that the user’s application requires.
This "propagation delay time" is approximately 3.3 μS per kilometer for radio time code
transmission, and approximately 5 μS per kilometer for copper wire transmission. Also, small
phase shifts that are due to reactances at the time code input may cause a time delay on the
order of 25 μS. To correct for propagation delay, the Z80 can use a propagation delay
correction setting ranging from –1000 (because some time sources transmit early) to +8999 μS.
The default setting is 0 μS after the board is reset at power-on, or after a RESET command from
the user. Users can change the setting using a sequence of programmed commands to the
command register on the TPRO-VME. If the 1PPS input is used for time reference, propagation
delay settings are neither needed nor used.
If absolute μS accuracy is required, the user may need to calibrate for propagation delay
correction by comparing the on-board clock time with a portable reference (a 1PPS GPS pulse
is good for this) when the TPRO-VME is installed. The correct propagation delay correction
setting is converged on rapidly by trial and error. This setting does not need to be changed
unless the location or cabling of the installation is changed.
Determining the correct propagation delay setting often needs the help of a special user
program that experiments with a variety of propagation delay settings while zeroing in on the
correct setting. The normal user program should have the ability to use the correct setting once
it is determined.
Synchronizable Timecode Generator User Manual
5-3
TPRO-VME/TSAT-VME
5-4
Spectracom Corporation
Synchronizable Timecode Generator User Manual
TPRO-VME/TSAT-VME
Spectracom Corporation
6 Programming
6.1
Introduction
In addition to the programming information relating to time data given in this manual, there are
command codes for triggering the TPRO-VME to add latitude, longitude and elevation data in
the FIFO buffer.
6.2
Register Map
Table 6.1—Addressing Base: A6 to A31 Configurable by Wire Wrap
Offset 1
D08/D16 MC68153 control register 0
Offset 3
D08/D16 MC68153 control register 1
Offset 5
D08/D16 MC68153 control register 2
Offset 7
D08/D16 MC68153 control register 3
Offset 9
D08/D16 MC68153 vector register 0
Offset B
D08/D16 MC68153 vector register 1
Offset D
D08/D16 MC68153 vector register 3
Offset F
D08/D16 MC68153 vector register 4
Offset 11
D08/D16 MC68153 Command register 0
Offset 13
D08/D16 MC68153 Internal event register 1
Offset 14
D08/D16 MC68153 D32 longword high order time read and freeze release
Offset 15
D08/D16 FIFO Data read
Offset 17
Not used 1
Offset 18
D32 longword time freeze ad low order data
Offset 19
D08/D16 Status Register
Status Bit 0
“0” FIFO not empty, “1” FIFO empty
Status Bit 1
“0” input code amplitude <500mV pk/pk, “1” Input code amplitude> 500mV pk/pk
Status Bit 2
“0” Synchronization error, “1” Good synchronization
The synchronization error is asserted until synchronization to input to <5uS is verified by the
Z80 or when the observed time base error exceeds 5 µS for five successive observations
spaced at one-second intervals.
If the observed time base error exceeds 200 µseconds, jam resynchronizations are initiated.
Synchronization error is also asserted whenever input code is inconsistent or lost (unless 1PPS
is present to verify time error).
Status Bit (3–7) ...................................................................................................Not used
Offset (1B–1F) ....................................................................................................Not used
6.3
Determining Address Space
The user’s VMEbus processor defines address windows for mapping user addresses into
VMEbus addresses. These mappings vary from manufacturer and even from model to model
for a given manufacturer. There will usually be a different window for A32 (extended) VMEbus
addressing, A24 (standard) VMEbus programming and A16 (short) VMEbus addressing. To
Synchronizable Timecode Generator User Manual
6-1
TPRO-VME/TSAT-VME
Spectracom Corporation
access the various registers used in programming the TPRO-VME, the user must decide what
address space they are going to use (short space is recommended for compatibility with the
AITG-VME). The address used in the user program to access a given register will be the sum
of the address window base, plus the configured base address of the TPRO-VME, plus the
register offset.
6.4
Reading Time
Time can be measured instantaneously by host programs by two sequential D32 longword
reads from the Base+18 and Base+14 addresses. The first read (to Base+18) freezes the time
in hardware latches and also transfers the low order (seconds through microseconds) time bits.
The second read (to Base+14) transfers the high order (days through minutes) time bits and reenables the freeze capability. Bits marked n/u may be “1” or “0”.
Table 6.2—Low Order D32 Register (Base+18)
Bit
Bit
Bit
Bit
Bit
Bit
Bit
Bit
Bit
Bit
Bit
Bit
Bit
Bit
Bit
Bit
31
30
29
28
27
26
25
24
23
22
21
20
19
18
17
16
n/u
40
20
10
8
4
2
1
800
400
200
100
80
40
20
10
Bit
Bit
Bit
Seconds
Bit
Milliseconds
Bit
Bit
Bit
Bit
Bit
Bit
Bit
Bit
15
14
13
12
11
10
9
8
7
6
5
4
3
2
1
0
8
4
2
1
800
400
200
100
80
40
20
10
8
4
2
1
Milliseconds
Bit
Bit
Bit
Bit
Microseconds
Table 6.3—High Order D32 Register (Base+14)
Bit
Bit
Bit
Bit
Bit
Bit
Bit
Bit
Bit
Bit
Bit
Bit
Bit
Bit
Bit
Bit
31
30
29
28
27
26
25
24
23
22
21
20
19
18
17
16
n/u
n/u
n/u
n/u
n/u
n/u
200
100
80
40
20
10
8
4
2
1
——
Days
Bit
Bit
Bit
Bit
Bit
Bit
Bit
Bit
Bit
Bit
Bit
Bit
Bit
Bit
Bit
Bit
15
14
13
12
11
10
9
8
7
6
5
4
3
2
1
0
n/u
20
11
8
4
2
1
n/u
40
20
10
8
4
2
1
n/u
——
6-2
Hours
Minutes
Synchronizable Timecode Generator User Manual
TPRO-VME/TSAT-VME
6.5
Spectracom Corporation
Reading Latitude, Longitude, and Elevation (TSAT-VME Only)
Readings of latitude, longitude or elevation can be caused by the host VME program writing the
appropriate one byte command to the TSAT-VME command port at the base address +11 (hex).
The Z80 microcomputer in the TSAT-VME then transfers the 10 bytes of latitude or longitude or
elevation information sequentially into the time data FIFO on the TSAT-VME board according to
the formats shown in the tables following. The host program reads the 10 bytes of information
(format shown below) sequentially from the FIFO through the TSAT-VMEbus interface.
Handshaking is done by the host testing the OUTPUT READY bit (bit 0) of the TSAT-VME
status register (offset 19 hex) for “0” before each byte is read from the FIFO output. Note that S
latitudes and W longitudes are biased by +180 degrees to distinguish them from N latitudes and
E longitudes. The TSAT-VME automatically updates the position data with data received from
the mast module every second. The OUTPUT READY status bit will be asserted (0) whenever
the FIFO is not empty. The time required for the complete transfer is up to 100 µS after the
command. It fluctuates because the Z80 microcomputer inside the TSAT-VME may be
interrupted while putting data in the FIFO.
Table 6.4—Extra TSAT-VME Commands for Position Reports
Command Byte
6.6
Command
5F (hex)
Latitude Report
5E (hex)
Longitude Report
5D (hex)
Elevation Report
5C (hex)
#SAT Report
Report Latitude (TSAT-VME Only)
The GPS receiver's computation for latitude is put into the FIFO in response to the 0x005f
command. The units are degrees, minutes, and fractional minutes. Latitudes north of the
equator are reported as 0–90 degrees, latitudes south of the equator are reported as 180+
degrees South—i.e., if the reported value is greater than or equal to 180, subtract 180 degrees
and change the sign to negative (south). It is important to convert minutes to decimal degrees
before comparing to 180 degrees. The response is in the format shown here:
Table 6.5—10-byte FIFO Latitude Data Format
Word
Bits 7-4
Bits 3-0
0 (first)
5
F
1
5
F
2
0
10 degrees
3
10 degrees
1
10 degrees
4
10 minutes
1
10 minutes
5
10 minutes
–1
10 minutes
–3
2
0
0
–2
6
10 minutes
0
7
0
0
8
0
0
9 (last)
0
0
Synchronizable Timecode Generator User Manual
6-3
TPRO-VME/TSAT-VME
6.7
Spectracom Corporation
Report Longitude (TSAT-VME Only)
The GPS receiver's computation for longitude is put into the FIFO in response to the 0x005e
command. The units are degrees, minutes, and fractions of minutes. The response is in the
following format:
Table 6.6—10-byte FIFO Longitude Data Format
Word
Bits 7-4
Bits 3-0
0 (first)
5
E
1
5
E
2
0
10 degrees
3
10 degrees
1
10 degrees
4
10 minutes
1
10 minutes
5
2
0
0
–1
10 minutes
–3
10 minutes
–2
6
10 minutes
0
7
0
0
8
0
0
9 (last)
0
0
NOTE: If the reported value is less than 180 degrees, the longitude is East (for Europe, Africa,
Asia, etc.). If the reported value is greater than or equal to 180 degrees, subtract 180
degrees to obtain west longitude (for USA, Canada, Central & South America, etc.).
For example, the reported value for Los Angeles, CA, USA, will be approximately 298
degrees. Since this is greater than 180, subtract 180 to get the correct value, i.e., 118
degrees West. Be sure to convert minutes to decimal degrees before comparing to
180 degrees.
6.8
Reading the Year, Gregorian Date, and Altitude (TSAT-VME
Only)
The GPS receiver's computations for the altitude and Gregorian date are reported in the FIFO in
response to the 0x005d command. Altitude is in units of meters relative to mean sea level.
Table 6.7—10-byte FIFO Elevation Data Format
Word
6-4
Bits 7-4
Bits 3-0
0 (first)
5
D
1
5
D
2
10 day
3
10 meters
4
10 meters
1
0
10 day
5
10 meters
3
10 meters
1
10 meters
5
10 meters
6
10 meters
4
2
0
-1
10 year
3
10 year
7
10 year
8
10 year
9 (last)
10 month
1
0
1
0
2
0
10 month
Synchronizable Timecode Generator User Manual
TPRO-VME/TSAT-VME
Spectracom Corporation
The board increments the Gregorian date approximately one second after time rolls over from
23:59:59 to 00:00:00 (HH:MM:SS). This occurs on every date in every year. Consequently, the
Gregorian date should not be used during minutes 59 and 00—this will avoid rollover problems.
6.9
Report Number of GPS Satellites Being Tracked
(TSAT-VME Only)
The GPS receiver determines automatically which satellites to track. The number (quantity) of
satellites being tracked is reported in the FIFO in response to command (5Ch). The response is
of the form shown here:
Table 6.8—10-byte FIFO #SAT
Data Format
Word
Bits 7–4
Bits 3 – 0
0 (first)
5
C
1
5
C
2
Reserved
Reserved
3
Reserved
Reserved
4
Reserved
Reserved
5
Reserved
Reserved
6
Reserved
Reserved
7
0
# of Satellites
8
Reserved
Reserved
9 (last)
Reserved
Reserved
NOTE: The number of satellites tracked is for diagnostic purposes only. Valid time and
position require that at least four satellites be tracked. The In-Sync flag (status bit 2)
must be used to actually determine whether the board is synchronized and providing
valid position.
There is no difference in timing accuracy when 5, 6, 7, or 8 satellites are being tracked. It is
normal for the number to fluctuate between 5 and 8, given that the GPS receiver picks different
satellites to optimize the timing.
It is normal for the number of satellites to be between 0 and 3 during acquisition and reacquisition.
6.10 Reading External Event Times
A logic pulse can cause time capture from the outside world (an “external” event). The Z80
microcomputer in the TPRO-VME then transfers the 10 bytes of captured time information
sequentially into the time data FIFO on the TPRO-VME board.
It is possible to simulate an external event (e.g., for purpose of testing interrupt-handling
software) by writing to the INTERNAL EVENT register (offset 13). Custom versions of the
TPRO-VME (as detailed in manual addendum supplied with customized versions) may also
allow the external event pulse to latch time in the longword time freeze registers.
Synchronizable Timecode Generator User Manual
6-5
TPRO-VME/TSAT-VME
Spectracom Corporation
The host program reads captured time information (11s of days through units of
microseconds—a total of 10 bytes) sequentially from the FIFO through the TPRO-VME VMEbus
interface. The host that is testing the OUTPUT READY bit (Bit 0) does handshaking of the
TPRO-VME status register (offset 19) for “0” before each byte is read from the FIFO output.
Complete transfer requires a time period of from 30 to 100 µS after the event occurs; it
fluctuates because the microcomputer may be interrupted while putting data in the FIFO. The
time data is accurate to the exact microsecond the event occurred, and the accuracy is not
affected by the transfer time. The user should be sure to empty the FIFO of stale data when
their program is initialized. Do this by continuously reading the FIFO until the OUTPUT READY
status bit is “1” for at least 100 µS, which could take about 512 reads if the FIFO is full.
Table 6.9—10-byte FIFO Event Data Format
Word
Bits 7-4
Bits 3-0
0 (first)
0
0
1
0
0
2
0
Hundreds of days
3
Tens of days
Units of days
4
Tens of hours
Units of hours
5
Tens of minutes
Units minutes
6
Tens of seconds
Units of seconds
7
Hundreds of milliseconds
Tens of milliseconds
8
Units of milliseconds
Hundreds of microseconds
9 (last)
Tens of microseconds
Units of microseconds
6.11 Interrupt Mode
Using the on-board bus interrupter, users can interrupt the host VME processor when the first
byte of data is loaded in the FIFO. In many cases, the interrupt handling (task switching)
overhead exceeds the time required for the complete loading of the FIFO, so that the VME host
may never actually need to wait for the microcomputer to complete loading the FIFO. The INT3
input to the MC68153 bus interrupter is connected to the FIFO output ready. If the TPRO-VME
is used to generate interrupts, then MC68153 Control Register 3 (offset 7) and MC68153 Vector
Register 3 must be programmed correctly by the users program. The interrupt level selected
should match the level configured with P4 and P5. Bit assignments for MC68153 Control
Register 3 are shown in Table 6.10. (To use interrupts, the user should consult documentation
for the MC68153 Bus Interrupter Module, and read and understand the programming
information.)
Typically, the INT3 interrupts are disabled after the first interrupt from a time stamp while the
bytes are read from the FIFO. If not, a new interrupt is generated for each of the remaining 9
bytes. Remember that the interrupt occurs when the first byte of the 10 bytes is written to the
FIFO. The programmer should check the FIFO OUTPUT READY for “0” (asserted) before
reading each of the following 9 bytes. To disable their inputs, the INT0 and INT1 inputs to the
MC68153 are tied to a pull-up resistor. INT2 is disabled in software unless otherwise instructed
in a manual for the custom version. See the interrupt driven programming example. Remaining
MC68153 INT inputs are not connected. The user may connect them to the on-board pulse
rates to generate periodic interrupts without event processing overhead.
6-6
Synchronizable Timecode Generator User Manual
TPRO-VME/TSAT-VME
Spectracom Corporation
Table 6.10—MC68153 Interrupt Control
Register
Bit
Bit
Bit
Bit
Bit
Bit
Bit
Bit
7
6
5
4
3
2
1
0
N/U
N/U
N/U
IRE
N/U
L2
L1
L0
X
X
X
W
X
W
W
W
The least-significant, 3-bit field of the interrupt control register determines the level at which an
interrupt is generated.
Table 6.11—Control Register Interrupt Level
L2
L1
L0
IRQ Level
0
0
0
Disabled
0
0
1
IRQ1*
0
1
0
IRQ2*
0
1
1
IRQ3*
1
0
0
IRQ4*
1
0
1
IRQ5*
1
1
0
IRQ6*
1
1
1
IRQ7*
The IRE field (Bit 4) must be set (high level) to enable the bus interrupt request associated with
the control register. If this bit is cleared a VMEbus interrupt will not be generated.
Vector Register 3 (offset F) is an eight-bit register within the MC68153 that the user must
program with the interrupt vector number associated with the TPRO-VME interrupt service
routine.
This appendix of this manual contains two demonstration programs. The first program
illustrates the TPRO-VME operating in the non-interrupt mode using the longword time reads.
The second program shows the TPRO-VME operating in the interrupt mode, using 100PPS
output signal from J1 as a source of external event pulses.
6.12 Setting Propagation Delay Correction
The user may set the propagation delay to compensate for propagation delay between the time
code source and the TPRO-VME location. The default setting is “0”. The propagation delay is
programmed by sending a wake-up byte to the TPRO-VME command offset, then sending one
command byte for each propagation delay digit to the toe command offset, and then sending a
“go” command to restart with the new propagation delay. After power-up, allow nine seconds to
pass before setting the propagation delay. Remember to delay at least 100 µS between
sending each command byte. Table 6.12 shows the command sequence for setting the
propagation delay.
Synchronizable Timecode Generator User Manual
6-7
TPRO-VME/TSAT-VME
Spectracom Corporation
Table 6.12—Propagation Delay Programming Protocol
Byte
High Nibble
Low Nibble
0
F
0 (wake-up command)
1
3
BCD for 10³ µS digit
2
2
BCD for 10² µS digit
3
1
BCD for 10¹ µS digit
4
0
BCD for 10º µS digit
5
E
0 (“go” command)
For example, to set a propagation delay correction value of 1234 µS, the sequence “F0 31 22
13 04 E0” is sent. For negative propagation delay settings, add 10000 µS to the desired value.
For example, to set –500 µS use a setting of 9500 µS.
6.13 Presetting Time
For applications in which code input is not used, the user can preset the TPRO-VME time to a
predetermined value. If the user does not preset a time, a default preset of 0 days through
seconds is used. If code input is connected to the TPRO-VME, it will override the preset time
unless the DISABLE RESYNC command has been sent to the TPRO-VME. As each digit is set,
the corresponding digit is set in the TPRO-VME’s internal time-set buffer. When the GO
command (E0) is received, the time set buffer is copied to the clock. At least 100 µS should be
allowed between sending each time set command byte. The command bytes should be sent to
the command register (offset hex 11).
Table 6.13—Time Initialization Programming Protocol
Byte
High Nibble
Low Nibble
0
F
0 (ZERO time set buffer commands)
1
5
BCD for 100s of days digit
2
6
BCD for 10s of days digit
3
7
BCD for 1s of days digit
4
8
BCD for 10s of hours digit
5
9
BCD for 1s of hours digit
6
A
BCD for 10s of minutes digit
7
B
BCD for 1s of minutes digit
8
C
BCD for 10s of seconds digit
9
D
BCD for 1s of seconds digit
0
E
0 (GO command)
For example, to set time to “123 days 01 hours 23 minutes 45 seconds”, the sequence “F0 51
62 73 80 91 A2 B3 C4 E0” is sent.
6.14 External 1PPS Time Synchronization (Option –M)
A 1PPS reference input option allows a 1 pulse-per-second TTL pulse (usually from a GPS
receiver) to be used for oscillator disciplining. TPRO-VMEs that are configured for this option
6-8
Synchronizable Timecode Generator User Manual
TPRO-VME/TSAT-VME
Spectracom Corporation
use the code input for clock time set and disciplining, if it is preset, and automatically switch to
the 1PPS if the input code is not preset.
Because only minor time (fractions of a second) can be initialized from the 1PPS input, the
TPRO-VME needs information from the user to set the days through seconds major time. The
user obtains this information from the GPS receiver (typically over a serial data link), and should
then calculate the day, hour, minute and second that the next 1PPS pulse will occur. This
information should be formatted into a sequence of 9 data bytes (one per digit) followed by a
SET NEXT 1PPS TIME command. The user should send the 10-byte sequence to the
TPRO-VME command port at least once after the TPRO-VME jam syncs to the 1PPS signal.
The loss-of-sync status will be asserted after the jam sync until the NEXT 1PPS TIME SET
commands are performed. If using 1PPS input, the user can simply check the loss-ofsynchronization bit periodically to see if the SET NEXT 1PPS TIME command sequence needs
to be performed. If the user does not set major time, the TPRO-VME continues to count from
the last major time (or “0” if starting from power-on reset). At least 100 µS should be allowed
between sending each byte in the sequence.
Table 6.14—1PPS Time Initialization Programming Protocol
Byte
High Nibble
Low Nibble
0
5
BCD for 100s of days digit
1
6
BCD for 10s of days digit
2
7
BCD for 1s of days digit
3
8
BCD for 10s hours digit
4
9
BCD for 1s of hours digit
5
A
BCD for 10s of minutes digit
6
B
BCD for 1s of minutes digit
7
C
BCD for 10s of seconds digit
8
D
BCD for 1s of seconds digit
9
4
C (SET NEXT 1PPS TIME
command)
For example, to set next 1PPS time to “123 days 01 hours 23 minutes 45 seconds”, the
sequence “51 62 73 80 91 A2 B3 C4 D5 4C” is sent.
6.15 Disabling and Re-enabling Code Input
Table 6.15 gives the two commands used to tell the TPRO-VME to ignore code—i.e., not to
synchronize to it even if there is a sync error—or to enable re-synchronizing the on-board clock
to the input code (the default).
Table 6.15—Sync Control and Reset
Command Byte
Command
4D
Enable Re-sync
4E
Disable Re-sync
6.16 Handlers
Handlers and drivers are available for TPRO-VME for SunOS, other Unix variants, and other
operating systems.
Synchronizable Timecode Generator User Manual
6-9
TPRO-VME/TSAT-VME
6-10
Spectracom Corporation
Synchronizable Timecode Generator User Manual
TPRO-VME/TSAT-VME
Spectracom Corporation
7 Preventive Maintenance
7.1
Necessary Maintenance
7.1.1 Oscillator Aging Adjustment
The oscillator aging adjustment for the TPRO-VME corrects for the effects of aging on the
natural crystal oscillator frequency to insure that the undisciplined frequency of the 1MHz
oscillator is 1.000000 MHz ±10 Hz.
This preventive maintenance should be performed once every 2 years. A digital frequency
counter with 1PPM or better accuracy and 1Hz or better resolution (be sure that the counter is
calibrated), and a trimmer capacitor adjustment tool (non-metallic screwdriver) are required. For
units with a custom crystal oscillator, consult the oscillator data sheet for adjustment method.
Put the TPRO-VME on a card extender and connect a calibrated frequency counter to the 1
MHz signal at P1 Pin 20; use P1 Pin 19 for ground. Before powering up the system, disconnect
the time code input and/or external 1PPS input to the board so that the oscillator is
undisciplined. Then, power the system up and wait at least five minutes for the on-board crystal
oven temperature to stabilize. Then adjust C9 for the frequency specified above. Power down
the system, leaving time code and 1PPS disconnected, and re-install the TPRO-VME without
the extender. Because some systems may have extremely high airflow, which affects the
crystal temperature, power up the system and recheck the frequency after five minutes.
If the frequency with the board installed is outside the tolerance given above, it may be
necessary to bias the frequency setting when extended to reach the desired tolerance when
installed.
When frequency adjustment is completed, re-attach the time code input or 1PPS for normal
operation.
7.1.2 IRIG-B Output Adjustment
With the TPRO-VME at approximate operating temperature, adjust R108 for zero crossover
discontinuity at the transition from large to small amplitude cycles. This adjustment ensures that
the sine wave phase is in proper lock to the amplitude modulation signal.
The remaining R104, R112 and R113 adjustments are seldom needed in the field. Output
amplitude adjustment is made with R104. R112 adjusts waveform distortion (triangle vs. sine),
and R113 adjusts wine waveform symmetry.
7.2
Optional Preventive Maintenance
7.2.1 Oscillator Aging Adjustment
The oscillator aging adjustment for the TPRO/TSAT-VME corrects for the effects of aging on the
natural crystal oscillator frequency to insure that the undisciplined frequency of the 10 MHz
oscillator is 10.000000 MHz ±10 Hz.
This preventive maintenance, although optional, should be performed once every 2 years.
Synchronizable Timecode Generator User Manual
7-1
TPRO-VME/TSAT-VME
Spectracom Corporation
7.2.1.1 Necessary Equipment
1. A digital frequency counter with 1 PPM or better accuracy and 1 Hz or better resolution
(make certain that the counter is calibrated).
2. A trimmer capacitor adjustment tool (non-metallic screwdriver). If you have a custom crystal
oscillator in your unit, consult the oscillator data sheet for adjustment method.
CAUTION:
Electronic equipment is sensitive to Electrostatic
Discharge (ESD). Observe all ESD precautions and
safeguards prior to and during calibration.
7.2.1.2 Procedure
1. Power down the system.
2. Connect a calibrated frequency counter to the 1 MHz signal at JP9 Pin 4. (Use JP10 Pin 3
for ground.)
3. Before powering up the system, disconnect the time code input and/or the external 1PPS
input to the board so that the oscillator is undisciplined.
4. Power up the system and wait at least five minutes for the on-board crystal oven
temperature to stabilize. Adjust the oscillator’s on-board trimmer for 1MHz ±1Hz.
5. Power down the system and reconnect any disconnected inputs.
7-2
Synchronizable Timecode Generator User Manual
TPRO-VME/TSAT-VME
Spectracom Corporation
8 Troubleshooting
8.1
The program has trouble talking to the TPRO-VME
Try to run versions of the Spectracom demo programs (modified as little as possible) to reduce
the possibility that what appears to be a hardware problem is really a software problem. If your
program crashes due to a bus error when trying to access the TPRO-VME the problem may be:
•
The configured board address does not agree with what your program uses
•
You are using the wrong window address for the address mode (A16, 24, A32) being used
•
You are performing D32 longword transfers to addresses other than Base+14 and Base+18
8.2
Bad Data from the D32 Ports
If your program does not crash, but receives “crazy” data (e.g., illegal BCD, etc.) from the D32
ports your problem may be:
•
You are using an address that maps into memory or into a different VMEbus device.
•
You are using a base address that maps into both the TPRO-VME and another VMEbus
device.
•
You are accessing high order bits at Base+14 before freezing & reading low order bits at
Base+18.
•
You forgot that unused bits may be “0” or “1”
•
You are reading data (especially if there are many zeros) before the TPRO-VME has
synchronized to the input code. Remember that there is an approximate 20-second delay
from power on before the TPRO-VME jam syncs to the input code.
•
You issued a TIME SET command sequence with invalid values.
8.3
Bad Data from the FIFO Port
If your program does not crash, but has invalid data (e.g., illegal BCD, etc.) from the FIFO your
problem may be:
•
Your code does not check the FIFO OUTPUT READY bit in the STATUS REGISTER for “0”
before reading each byte from the FIFO. If your data contains “FF” or seems to slip (hours
show up where you expected minutes, etc.) this is very likely the reason.
•
You are reading data (especially if there are many zeros) before the TPRO-VME has
synchronized to the input code. Remember that there is about a 20-second delay from
power on before the TPRO-VME jam syncs to the input code.
•
You performed a TIME SET command sequence with invalid values.
•
You are using an address that maps into memory or into a different VMEbus device.
Synchronizable Timecode Generator User Manual
8-1
TPRO-VME/TSAT-VME
•
Spectracom Corporation
You are using a base address that maps into both the TPRO-VME and another VMEbus
device.
8.4
Interrupt Crashes
•
Check that the configured IRQ level matches the level programmed into bus interrupter.
•
Check that there are no empty slots in the IACKIN/IACKOUT daisy chain between the
INTERRUPT CONTROLLER (usually in the CPU board) and the slot occupied by the
TPRO-VME.
•
Check that the host interrupt vector is correctly initialized
•
Check that you are disabling INT3 while reading the FIFO
8.5
Board Never Syncs to Input Code or 1PPS
If the “loss of sync” status bit is “0” (indicating an error), loss of sync should be asserted in many
cases. Its assertion does not mean that there is a fault in the board.
•
If the loss-of-signal LED (red) is on, the TPRO-VME does not see enough signal amplitude.
Check signal amplitude and connections.
•
Check that both the “+” (signal) and “–“ side of the input code are connected. Remember
that the input is differential for common mode noise rejection.
•
If using 1PPS, is there a good 1PPS? Has a SET NEXT 1PPS TIME command sequence
been performed?
•
Is the time code carrier frequency stable to ±100 PPM? Does it make periodic large (> 5µS)
time jumps? It is very likely that tape playback will have high frequency error unless a
calibrated servo track has been used to accurately control speed.
8.6
Before You Contact Spectracom
•
Try to exhibit the problem in as reduced (fewest boards in the system) a configuration as
you can.
•
Run Spectracom examples, modified as little as possible, to ascertain that your problem is
not a programming error.
•
Have the board in front of you when you call. If this is not possible, have the serial number
(marked on the board) and firmware version (marked on the EPROM U44) ready.
•
Be prepared to answer questions about your host CPU and its address windows—especially
if the product had been working when using a different CPU.
•
Be prepared to interact with the board using a debugger running on your host. Be familiar
with its command and syntax.
8-2
Synchronizable Timecode Generator User Manual
TPRO-VME/TSAT-VME
Spectracom Corporation
9 Options and Accessories
9.1
Common Options
9.1.1.1 -D
9-digit LED Display (days through seconds) front panel .3” digit height
9.1.1.2 -32P2
Connector option—eliminates 54-bit output on VME P2 connector
9.2
Options—TPRO-VME
9.2.1.1 -MX5
Sync to 1 PPS Output
9.2.1.2 -MJ5
1 PPS input on J5 connector
9.3
Options—TSAT-VME
9.3.1.1 TRIM-CAB-D-D-100
This cable acts as an extension cord for a board that is using the Trimble GPS Receiver. It
consists of a 100’ cable with DB-15 connectors (one male, one female) on the ends. It connects
to a board on one end, and to the standard TRIM-CAB-STD cable on the other end. It does not
connect directly to the Trimble GPS Receiver.
9.3.1.2 GPS Optic Isolator
The GPS Optic Isolator system combines a GPS receiver/antenna, a fibre optic transmitter, a
fibre optic receiver, and a standard Spectracom GPS timing board. The satellite information
that is received via the GPS antenna is passed to a fibre optic transmitter via an extension
cable. The fibre optic transmitter converts the signal and feeds it to a fibre optic receiver, which
then converts the data back and sends it to a standard GPS timing board that can be controlled
via a graphical user interface on standard PC. All of this is possible while the GPS Receiver
and the actual timing board are up to 500 meters away.
Synchronizable Timecode Generator User Manual
9-1
TPRO-VME/TSAT-VME
9-2
Spectracom Corporation
Synchronizable Timecode Generator User Manual
TPRO-VME/TSAT-VME
Spectracom Corporation
10 Driver Support
Please contact your sales representative for information about Spectracom’s bus-level timing
board driver support for Windows, Linux, VxWorks, and a variety of other platforms. You may
also visit our website at www.spectracomcorp.com to download datasheets and manuals.
Synchronizable Timecode Generator User Manual
10-1
TPRO-VME/TSAT-VME
10-2
Spectracom Corporation
Synchronizable Timecode Generator User Manual
REVISION HISTORY
Revision Level
Description
A
First Spectracom conversion of legacy KSI documentation.
B
Corrected references from TPRO to TSAT in Section 6.5. Added
sections 6.6 and 6.7 to correspond with Tables 6.5 and 6.6. Added
sections 6.8, 6.9, 6.10.
Spectracom Corporation
95 Methodist Hill Drive
Rochester, NY 14623
www.spectracomcorp.com
Phone: US +1.585.321.5800
Fax: US +1.585.321.5219