1
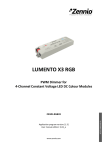
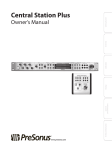
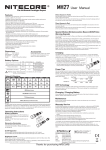
KNX Dimmer RGBW - User Manual
Item No.: LC-013-004
1. Product Description
With the KNX Dimmer RGBW it is possible to control of RGBW, WW-CW LED or 4 independent channels
with integrated KNX BCU. Simple Timer and Flashing: timed ON/OF Sequences. Full functionality with
KNX commissioning software as of version ETS3.0 - Plugin for commissioning available.
2. Specifications
external power supply
channels/max power output
KNX operating voltage
KNX power input
PWM frequency
max. wire cross-section
Dimensions (L x W x H)
12-24V DC
4 x 2,5A (90W/12V) oder (180W/24V)
29VDC
145mA
150, 300, 488 oder 600Hz adjustable
max. 2,5mm²
157 x 44 x 22 mm
weight
102g
3. Description
1. Control of RGBW, WW-CW-LED or 4 independent channels.
2. External power supply required (12 or 24 VDC).
3. LED test function.
4. KNX BCU integrated.
5. Color and brightness control of the channels
6. Custom ON/OFF: possibility of enabling upto to 4 different ON/OFF controls per channel
7. Simple Timer and Flashing: timed ON/OFF sequences
8. Scenes/Sequences: possibility of enabling up to 10 different scenes/sequences per channel, or a custom sequence
9. Full functionality with KNX commissioning available
10. with programming button and programming LED
4. Connection/Buttons
1. KNX Connector
2. KNX programming and internal test LED
3. KNX programming button
4. Test button
5. LED control terminal block
6. External power supply
7. Test and reversed polarity indicator LED
KNX programming button: short button press to set the programming mode. If this button is held
while plugging the device into the KNX bus, it goes into safe mode.
KNX programming and internal test LED: the red LED indicates programming mode. When the
device goes into safe mode, it blinks red every 0.5 seconds. The blinking blue LED indicates internal
test.
Test button: it tests the functioning of channels connected to the device. Push and hold for 3
seconds to get in/out of the testing mode.
Test LED and polarity: tricolored LED that indicates which channel (red=channel 1/R, green=channel
2/G, blue=channel 3/B, qhite=channel 4/W) is being tested.
Orange light indicates reverse polarity in external power supply.
Recommended installation:
NOT recommended:
Vertical position.
If there is not any other possibility,
install terminal block up (see fig.)
5. CONFIGURATION
5. ETS PARAMETRISATION
To begin with the parameterisation process of LUMENTO X4 it is necessary, once the ETS program has
been opened, to import the database of the product (LUMENTO X4 RGBW application program).
Next, the device should be added to the project where desired. And then, one rightclick on the device
will permit selecting „Edit parameters“, in order to start the configuration.
5.1. DEFAULT CONFIGURATION
This section shows the default device configuration the parameter edition starts from.
The following communication objects appear:
Dimming: a 4-bit object destined to step-dimming the general brightness (luminosity) level. Steps
(upwards or downwards) of 1%, 2%, 3%, 6%, 12%, 25%, 50% and 100% are possible.
Precise Dimming: a 1-byte object destined to perform a precise dimming over the general brightness
level, by setting a concrete percentage value.
On/Off: a 1-bit object destined to perform a general switch-on or switch-off of the LED strip. A switchon order through this object will recover in any case the color that was active prior to the switch-off,
with either the maximum luminosity (100%) or with the luminosity level it had before the switch-off
(depending on the On Light Level parameter; see section 3.2).
Dimming Speed 1: a 1-byte object that allows modifying, in runtime, the
speed of the “Smooth 1” dimming (see section 3.2).
Dimming Speed 2: similar to Dimming Speed 1, but referred to the “Smooth 2” dimming.
RGB Color: 3-byte object that permits selecting a particular colour by precisely specifying the luminosity level of each output channel (R, G and B). Therefore, each of the three bytes is related to one
specific channel. Note that dimming through this object sets the luminosity value for W to 0%
When entering the parameter edition of LUMENTO X4 RGBW for the first time, the following window
will be shown:
As seen in Figure 5, the parameterisation window is divided into two main tabs, which will be explained in detail in the next sections:
General:
permits parameterising global features of the device.
Functions:
permits enabling and configuring specific functions of the device.
5.2. GENERAL WINDOW
This section of the parameter edition allows setting several global features of LUMENTO X4 RGBW:
PWM frequency: the working frequency of the LED regulator. The available values are: 150, 300, 488
and 600 Hz. The default frequency is 488 Hz.
Smooth Dimming: the time LUMENTO X4 takes to perform soft luminosity transitions. Two different
smooth transition modes are available (Smooth 1 and Smooth 2). The times here refer to the complete
transition, from 0% to 100%, and the permitted values are from 3 to 65535 tenths of a second.
Both parameters are 10 (i.e., 1 second), by default.
The Smooth Dimming Times 1 and 2 can be decreased (although not increased) in runtime, via the
„Dimming Speed 1“ and „Dimming Speed 2“ communication objects, respectively. Please refer to Table
1 for the relationship between the most common speed values and their associated dimming times.
(*) The minimum dimming time is actually 3 tenths of a second.
Example:
Let the parameterised time for the Smooth Dimming Time 1 be equal to 20 seconds. At a given time
during the execution, the smooth dimming is required to be performed in half the time, so this time
becomes 10 seconds. To achieve this, the value 50% should be sent to the „Dimming Speed 1“ object.
If the original time were to be reduced to the fourth part (from 20 to 5 seconds) it should be “75%” the
value to be sent to the mentioned object. Sending the value “0%” through „Dimming Speed 1“ will
recover the original smooth dimming time 1 (20 seconds)
Smooth dimming from/to values other than 0% - 100% (on-off ) is also performed at the same speed,
so the time required to carry it out will always be proportional to (and lower than) that parameterised
under “Smooth Dimming Time”.
Example:
Let the parameterised value for the „Smooth dimming time 1“ be 10 seconds (“100”). A global
switch-on order is then sent when the output is off, so it will take 10 seconds to reach the maximum
brightness level (if the „Dimming“ parameter has been configured as “Smooth 1”). However, if the LEDs
were already at a brightness percentage of 50%, the time required to reach the full brightness (100%)
will be 5 seconds (one half of the 10 seconds parameterised).
Three more parameters are shown next, grouped as “Dimming Times”:
Precise Dimming: this field can be used to define whether transitions commanded through both the
general and the channel-dependent “Precise Dimming” objects, and also through the 3-byte Color
RGB object (in other words, dimming orders performed by sending a certain luminosity value, in
percentage) should be At once (immediate), Smooth 1 (a progressive transition, according to the
defined Smooth Time 1) or Smooth 2 (a progressive transition, according to Smooth Time 2).
Dimming: defines whether step-by-step transitions (i.e., through the 4-bit Dimming objects, both the
global object and those referring to each channel independently) should be Smooth 1 (a progressive
transition will be performed, according to the defined Smooth Time 1) or Smooth 2 (progressive transition according to the defined Smooth Time 2).
On/Off: permits defining the transition type (At once, Smooth 1 or Smooth 2) that will apply to the
switch-on or switch-off orders.
Note: smooth dimming is intended to let the user appreciate a progressive change in the luminosity
level, with the option to interrupt it once the desired level is reached. Therefore, this function is typically linked to a pushbutton that, once released by the user, stops the smooth dimming that began
when it was pressed. Because of this, it is advisable to parameterise a dimming step of 100%, so a sole
long press (instead of successive long presses) is enough to step through all the available light levels
and to stop at the most comfortable one.
Finally, apart from the desired dimming times, the following parameters are shown:
On Light Level: sets the desired level of luminosity for the switch-on orders received through the
global On/Off object. In other words, it permits setting whether the LEDs will acquire the maximum
brightness level (“100%”) or the one they had prior to the switch-off (“Previous”) whenever a switchon order arrives. On the very first switch-on, the luminosity will be set at 100% (and the
colour will be white).
Note: on a global switch-on, the LED module recovers the colour it had prior to the switch-off,
although the luminosity itself will turn maximum or not depending on the option selected for this
parameter. Apart from the exception of the first switch-on (which will imply white color and full luminosity), in the particular case of performing the switch-on after having set, accidentally or not, all three
channels to zero through their respective dimming (or precise dimming) objects, the color acquired
on the switch-on will as well be white (and the luminosity, maximum).
Max Light Level (%): defines the maximum effective brightness, in percentage (from 5% to 100%), that
can be applied to the channels through a dimming order. If this parameter is set to a value other than
100%, a proportional reduction of the luminosity will apply. However, for coordination and update
purposes, LUMENTO X4 will always send to the KNX bus the theoretical luminosity value, between 0%
and 100%.
Example:
Let the value of this parameter be “70%”. In such case, dimming orders for a luminosity of 100% will
actually set the luminosity to 70% (although the status object will in fact show the value “100%”).
Analogously, orders for a luminosity of 50% will actually set it to 35% (although the status object will
show “50%”).
Independent Channel Control (RGBW):
enabling this option brings up 12 communication objects that make it possible to switch on/off each
channel independently (“[X] On/Off”), as well as to control their luminosity levels separately (“[X]
Dimming” and “[X] Precise dimming”). If after sending a control order to an individual channel (precise
dimming, step dimming, dimming stop order, etc.) an additional global dimming order (precise or by
steps) is also sent, the last colour proportion will be taken as the new base for the global regulation.
Example:
Assume that the initial colour is (20, 0, 60, 10). A precise dimming order is then sent to the blue
channel (“[B] Precise Dimming” = 50%), so the new base colour becomes (20, 0, 128, 10). If a global
dimming to the four channels is then sent (for example, “Precise dimming” = 25%), the resulting
colour will be (10, 0, 64, 5).
Error Identification: this option displays two 1-bit communication objects to report anomalous behaviours that may arise when LUMENTO X4 is working:
„Error: Overheating“. Object through which LUMENTO X4 notifies it is exposed to an excessive
temperature (higher than 90ºC), by sending the value „1“. In that moment, LUMENTO X4 will reduce
the brightness level of the channels to 50% (only if their current level is higher) and the working
frequency will be set to its minimum value (150 Hz). When the temperature is again lower than 80ºC,
LUMENTO X4 will send the value „0“ through this object, thus showing the end of this event and it will
recover the brightness and frequency values it had before the error. If 15 minutes after the beginning
of the Overheating error the temperature is still not lower, LUMENTO X4 will directly switch off its
output, for safety reasons.
Note: take into account that, even if the error identification has not been enabled by parameter, the
overheating protection is always enabled, although in that case the bus will not be notified.
„Error: External Voltage“.
Object through which LUMENTO X4 notifies that the received external power is incorrect, due to
any of these events: too low voltage, total absence of power (source disconnected) or inversion in
the polarity of the power supply (this is also visually notified by the Test indicator, which turns on in
orange). When LUMENTO X4 detects any of these anomalous situations, it sends the value „1“ through
this object. When the event finishes, it sends a „0“.
5.3. FUNCTIONS
LUMENTO X4 RGBW offers a set of different functions (see Figure 6), which may be selectively
enabled, depending on the requirements of the KNX system.
The available functions are detailed next.
5.3.1. STATUS OBJECTS
This function allows enabling a 1-bit status object („On/Off Status“) and a 1-byte status object („Luminosity (Status)“), responsible for reporting the general state of the output at any time, thus updating
other devices in the KNX system, if required.
Send On/Off=1 when:
sets when the value „1“ (on) is sent through the „On/Off (Status)“ object to the bus, being the following
options possible:
Luminosity is not equal to 0%:
when the brightness level gets to a value different from 0%, the object „On/Off (status)” will be send
the value “1”. The value „0“ will be only sent when the luminosity reaches 0%.
Luminosity is equal to 100%:
the „On/Off (Status)“ object will only send the value „1“ when the brightness level gets equal to 100%.
The value „0“ will be only sent when the luminosity reaches 0%.
The ON/OFF status object is sent in any case after the reception of an ON/OFF order through the
analogous control object.
Send Luminosity when the LEDs are Dimming:
this option allows selecting whether to send the brightness status of the output (through the „Luminosity (Status)“ object) or not (default option). If enabled, the following field will be also shown:
Minimum Time Between Status Sending:
sets the minimum time (in seconds) between consecutive brightness values sent to the bus through
the „Luminosity (Status)“ object. This restriction applies to smooth dimming.
Independent Status Objects:
activates eight additional communication objects which report the state of each channel, independently and at any time. These objects are „[X] On/Off (Status)“ and „[X] Luminosity (Status)“,
which behave analogously to the general status objects.
5.3.2. COLOR SELECTION OBJECTS
Enabling this function brings up two new communication objects: “Direct color” (1 byte) and “Color
shift” (1 bit).
Direct Color: it is a 1-byte communication object that permits directly selecting one of the 22 colours
of the predefined palette. It works similarly to „Scene“ objects. Every predefined colour is associated to
a certain number (from 1 to 22), as shown in Table 2.
If one of these values (decremented by 1) is written to the „Direct color“ object, the LED module will
change to the corresponding colour immediately (regardless of the dimming types –At once, Smooth
1 or Smooth 2– parameterised under the General screen).
Table 2. Predefined colour palette.
Color Shift:
a 1-bit object that lets the user trigger an automatic scan through the entire colour palette, making it
possible to stop the scan as soon as the desired colour is found.
This object is supposed to be combined with a “hold and release” push button, so that pressing it (the
value “1” is sent) starts the scan, and releasing it (the value “0” is sent), stops it.
Figure 7. Colour scan
The color scan takes place according to the steps shown in Figure 7, however the starting point will
not necessarily always be the same; instead, the closest point to the current colour will be adopted as
the initial stage.
The complete cycle takes 15 seconds and it does not affect the current luminosity at all, so no colour
scan will take place if all the channels have been set to 0%.
Note: the color scan will be interrupted not only on the reception of the value “0” through the “Color
shift” object, but also on the arrival of any valid order through the following objects:
“Scenes/Sequences” (1 byte), “Block” (1 bit), “Start/stop sequence” (1 bit) and “Direct color” (1 byte).
5.3.3. CUSTOM ON/OFF
Once enabled, this function offers up to 4 additional ON/OFF controls, independently customisable:
The following parameters can be set for each of the custom ON/OFF controls:
Off Action:
sets the action to be run over the LED module when LUMENTO X4 receives the value “0” through the
“Custom ON/OFF” 1-bit object. This can consist in a change in the luminosity (“Luminosity”, which will
display a new parameter to set the desired value) or a colour change, being possible to select a specific colour from the predefined palette (“Predefined color”, which displays a drop-down list with all the
possible values; see Table 2) or a manually defined colour (“RGBW Color”, which will permit inserting
numeric values –from 0 to 255– for every colour component: R, G, B or W).
Off Type:
sets the desired dimming type for the switch-off of the LED module:
At once, Smooth 1 and Smooth 2.
On Action:
sets the action that will be executed on the LED module when LUMENTO X4 receives the value „1“
through the „Custom On/Off X“ 1-bit object. Analogously to the “Off action” mentioned above, a
luminosity or colour change is possible, as well as state-recovery switch on (“Last color”), so that
whenever LUMENTO X4 receives a „0“ through the corresponding „Custom On/Off“ object, it saves
into memory the value of the current colour of the LED module. After that, when the ON order arrives
(“Custom On/Off” = 1), LUMENTO X4 will set the LED module back to the previous colour.
Example:
Suppose that Custom On/Off control number 2 is parameterised with “Off Action” = “Blue” and “On
Action” = “Last color”, and that at a certain time the active colour of the module is yellow. A switch-off
order (value “0”) then arrives through the “Custom On/Off 2” object, so the LEDs will turn blue (Off
Action), prior to which LUMENTO X4 stores in memory the colour of the LED module that was active
before the switch-off (yellow). When a new switch-on order (value “1“) is received, the LEDs will light
again in the colour stored before the switch-off (yellow).
On Type:
sets the desired dimming type for the switch-on of the LED strip: At once, Smooth 1 or Smooth 2.
5.3.4. SIMPLE TIMER
This function allows performing a switch-on of the LED module connected to LUMENTO X4 and a later,
automatic (timed) switch-off, being also possible to insert delays. The time length, the luminosity level
and the switch-on type can also be parameterised.
This function may be useful when a switch-on (of a certain duration, i.e., the LEDs will be automatically
switched off afterwards) is required, for example, upon movement detection.
On Delay:
this parameter sets the time LUMENTO X4 will wait since the reception of the Timer ON order (“Simple
Timer” = 1) and the actual switchon of the LED module. This value must be set in tenths of a second
(e.g. for a delay of 2.5 seconds, typing “25” is required). If no delay is needed, this field
must remain zero.
Off Delay:
this parameter sets the time to be waited between the reception of the Timer OFF order (“Simple
Timer” = 0) and the actual switch-off of the LED module. Works similarly to the On Delay.
On Duration:
this parameter sets the time the LED module will stay on before switching off again. A 0 in this field
means endless, i.e., no timing is applied to the switch-on.
In other words, the behaviour of the simple timer is as follows:
When LUMENTO X4 receives a „1“ through the „Simple Timer“ communication object, an ON order is
sent to the output, applying the On Delay (if parameterised). The output stays on, depending on the
On Duration, and then turns off (unless this duration has been parameterised with “0”).
When LUMENTO X4 receives a „0“ through the „Simple Timer“ communication object, the output is
switched off with the corresponding Off Delay (if parameterised).
Multiply:
allows progressively increasing (multiplying), in runtime, the On Duration time or the On/Off delays of
the output. Two situations are distinguished:
No Multiply:
• If the On delay count is already running, it will be reset every time a new
“1” is received through the “Simple Timer” object.
• If the output has already been activated and the On Duration time is counting, it will be reset whenever a new “1” is received.
• If the Off delay count is already running, it will be reset every time a new
“0” is received.
Multiply:
• If the On delay count is already running and the value “1” is received several times through the “Simple Timer” object, then the actual delay time will be “n” times the parameterised time, being “n” the
number of times the value “1” is received.
• If the output has already been activated and while the On Duration time is counting the value “1” is
received several times, then the actual duration will be “n” times the parameterised time, being “n” the
number of times the value “1” is received.
• If the Off delay count is already running and the value “0” is received several times, then the actual
delay time will be “n” times the parameterised time, being “n” the number of times the value “0” is
received.
Note: the multiply option may result particularly useful under parameterisations with no ON and OFF
delays. Nevertheless, as already explained and as the following example shows, these delay times, if
parameterised with a value other than 0, do also admit multiplication.
Example:
Let the following be parameterised: On Delay = 3 seconds; Off Delay = 3 seconds, On Duration = 5 seconds. The graphs bellow reflect some possible situations if the values “0” or “1” are received from the
(which is represented as →0 and →1), respectively for the cases of having the “multiply” option enabled
and disabled.
With no multiplication:
With multiplication:
On Color:
sets the colour desired in the LEDs during the ON state. Either a predefined color (see Table 2) or a
customized color (by manually configuring each of the RGBW colour components) can be selected.
On Type:
sets the dimming type to be applied during the timed switch-on of the LED module, being the possible options: At once, Smooth 1 and Smooth 2. See section 3.2 for the parameterisation of the dimming
types.
5.3.5. FLASHING
This function allows executing ON-OFF-ON-OFF sequences in the LED module, where it is possible
to parameterise the length of the ON/OFF stages. Moreover, the number of repeats can be set by
parameter, as well as the luminosity for the “on” state and the final luminosity of the LEDs after the last
repetition.
The intermittence will start when LUMENTO X4 receives a „1“ through the „Flashing“ object and stops
after executing all the configured repetitions (endless repetition is possible by setting the value “0” in
the corresponding box, as shown later). It is possible to stop the flashing at any time, by sending the
value „0“ through the „Flashing“ object, or by sending any other control order that affects the output
(like an on/off, a sequence, etc.). If, during the flashing execution, LUMENTO X4 receives a new order
to start the flashing sequence („Flashing“ = 1), it will be reset no matter what the current stage of the
sequence is.
These are the parameters that can be configured for the flashing function:
On Duration:
sets the length of “ON” stages of the flashing sequence, i.e. the time the channels will remain on before
turning off again.
Off Duration:
sets the length of “OFF” stages of the flashing sequence, i.e. the time the channels will remain off
before turning on again.
Number of Repetitions:
defines the number of times the ON/OFF sequence will be repeated when the flashing function is triggered. For an unlimited number of repeats, the value “0” should be typed here (the sequence will be
repeated until the reception of an order to deactivate the flashing).
On Color:
sets the colour to be adopted by the LEDs during the “on” stages. Either a predefined color (see Table 2)
or a customized color (by manually defining each of the RGBW colour components) can be selected.
Final Color:
sets the colour to be adopted by the LEDs once the last flashing sequence ends, as well as when the
“Flashing” = 0 order is received. Either a predefined color (see Table 2) or a customized color (by manually defining each of the RGBW colour components) can be selected.
5.3.6. SCENES/SEQUENCES
This function allows defining different scenes, which consist in a specific light ambient or a dimming
sequence, so they can be triggered when the corresponding value is received from the bus through
the “Scenes/Sequences” 1-byte object.
The „Start/Stop Sequence“ 1-bit object will be displayed to allow re-executing the last sequence played (by writing the value „1“) or stopping the current sequence in execution („0“).
Note: the “Start/Stop Sequence” object only applies to dimming sequences, and has no effect over
static scenes. Moreover, after a download from ETS (partial or complete), if the value „1“ is sent through
this object, the triggered sequence will be the first one that was parameterised, unless it is of the
„Fixed Color“ type; in such case the first one different from this type will be executed.
LUMENTO X4 RGBW allows configuring up to ten scenes/sequences, which can be individually enabled
from “Scenes/Sequences” in ETS.
For each of them, the following configurable fields are available:
Scene/Sequence Number: indicates the scene/sequence identifying number (from 1 to 64) whose
reception (decreased by 1, according to the KNX standard) through the “Scenes/Sequences” object will
make the device apply the configuration to the LED module.
Scene/Sequence Type: selects the desired action for each enabled scene/sequence:
Fixed Color.
The scene will consist in setting the LED module to a specific color when the „Scenes/Sequences“ object is received with the configured scene number. Either a predefined color (see Table 2) or a custom
color (by manually setting the RGBW colour components) can be selected. If „Fixed Color“ is selected,
besides running the scene it will be also possible to save it: if the device receives a scene save order
(values 128-191 through the mentioned object), the current luminosity levels of the LED module will
be saved, so when the same scene is executed again, the colour acquired by the LEDs will be the one
that was saved (and not the originally parameterised in ETS).
Finally, if “Fixed Color” is selected, the “Dimming type” parameter will also be shown, making it possible
to choose an At once, Smooth 1 or Smooth 2 dimming for this action.
Luminosity.
The scene execution will in this case consist in changing the luminosity level, without changing the
active colour. This option displays two new parameters: Luminosity (which sets the desired level, from
0 to 255) and Dimming Type (which sets the desired transition type: At once, Smooth 1 or Smooth 2).
Predefined Sequence.
Three different pre-set sequences are available: Colorful, Cool colors and Warm colors.
Every sequence consists of 5 steps (smooth transitions between different colours) of a particular time
length. They behave cyclically, so when the last step of the sequence finishes, it automatically starts
over from the first step. The default duration of every cycle is 1 minute, being possible to modify it
through the “Time” textbox (the typed value must be in the range [1...255] minutes).
Note: LUMENTO X4 will proportionally modify the action time of every step of the sequence according
to the parameterised cycle time. The Luminosity Sending field is intended to set when LUMENTO X4
will send the KNX bus the brightness status objects, being the following options available:
• Send Continuously:
the brightness level will be continuously sent through the „Luminosity (Status)“ object (only if the
“Send Luminosity when LEDs are dimming” parameter has been enabled from the Functions screen),
restricted to the parameterized minimum time for values sent consecutively.
• Don’t Send:
No matter if the status sending option is enabled or not under the Functions tab, no status object will
be sent to the KNX bus during the execution of the sequence.
The next three tables show the predefined color patterns (and the action times) of the three
sequences:
Sequence 1: „Colorful“
Sequence 2: „Cool colors“
Sequence 3: „Warm Colors“
Custom Sequence.
Selecting this option will make it possible to customise sequences of up to 5 steps/actions, by setting
the following parameters:
• Cyclic:
“Yes” will define a cyclic sequence (after the last parameterised step, the sequence will start over),
while “No” will define a non-cyclic sequence (in such case, there is also the possibility of triggering
–after the last step of the sequence– another parameterised sequence).
• Luminosity Sending:
this parameter can be set to Send continuously (during the light dimming, the brightness level will
be sent to the KNX bus through the “Luminosity (Status)” object (as well those corresponding to
the individual channels, if enabled), only if the option to send statuses has been activated from the
Functions screen) or to Send when sequence ends (the brightness level of the output will be sent to
the bus once the last step of the sequence finishes, no matter if the option to send the status objects
during the dimming is enabled or not from the General screen). However, in both cases, the status
objects need to be enabled by parameter (see section 3.3.1). Note that the minimum time parameterised for sending the status objects will apply.
For every step, the following parameters can be configured:
• Color:
sets the desired colour for the LED module (either RGBW or predefined).
• Dimming Type:
At once, Smooth 1, Smooth 2 or Equal to action time. If the latter is selected, the dimming will be
carried out gradually, switching from the current level to the new one by taking the time defined for
the „Time“ field.
• Time:
sets the time length of the step (i.e., the time LUMENTO X4 will wait before running the next step), in
seconds. The steps (or actions) will be executed in order. Thus, when LUMENTO X4 receives the Scene
number that triggers the sequence, the first configured step will be executed.
Moreover, if the sequence is cyclical, once the last step finishes, the sequence will be automatically
executed again from the beginning.
An example of custom sequence configuration is shown in Figure 13, where the first three steps of
Sequence 1 have been parameterised.
5.3.7. BLOCK
This function permits locking the output of the device; i.e., disabling the control of the LED module.
LUMENTO X4 will lock the output when it receives a „1“ through the „Block“ 1-bit communication
object, which is displayed after enabling this function. From that moment, any action being executed
will be stopped and the LED module will maintain the colour and luminosity it had when the lock
order arrived.
While locked, any order received from the KNX bus will be ignored by the device, i.e., the output
will perform no actions. LUMENTO X4 will unlock the output when the value „0“ arrives through the
„Block“ object. The LEDs will still maintain the colour they had before receiving the lock order.
No luminosity change commands received during the lock state will be taken into account by the
output, not even after the unlock event.
5.3.8. START-UP
This function permits setting the desired state to be applied to the module when the device starts
up. A default or a custom configuration may be selected. If the default configuration is chosen, the
LEDs will stay off after a download from ETS.
On the other hand, after a bus voltage recovery the luminosity will be the same as before the bus
power failure. Under a custom configuration, it is possible to customise the state of the LED module
after a bus voltage recovery and after a download from ETS.
The following parameters can be configured:
Initial Status (on bus voltage recovery):
sets the initial status the LED module will adopt when the bus power failure situation ends or after a
download from ETS.
Last:
the LED module will recover the same colour and brightness level it had before the bus power failure.
Note that this option does not apply after a download (the LEDs will stay off ).
Off:
the LEDs will always be initially off.
On:
the LEDs will always be initially on, lighting in the colour defined through the “Initial Color” parameter, which can be an RGBW color or a predefined color (see Table 2).
Status Sending:
by enabling this parameter („Yes“), the state of the LED module will be sent to the KNX bus on a
power recovery or after a download, thus updating other devices in the KNX system that may need it.
When enabled, a new parameter is shown: „Delay“. This field sets the time (in seconds) that LUMENTO
X4 waits until it transmits the status objects. To get an immediate transmission (no delay), this field
should remain zero. The start-up state transmission is performed through the „On/Off (Status)“ and
„Luminosity (Status)“ communication objects (and the analogous objects referred to the separate
channels, if enabled). Note that the status objects need to stay enabled (see section 3.3.1).
Note:
bus power failures do not turn the LED module off, unless the external power supply is also affected
by the failure.
6. Wiring Diagram
7. Safety warnings
7.1. To avoid installed the product in minefield, strong magnetic field and high voltage area.
7.2. To ensure the wiring is correct and firm avoiding short circuit damages to components and
cause fire.
7.3. Please install the product in a well ventilated area to ensure appropriate temperature
environment.
7.4. The product must be worked with DC constant voltage power supply.
Please check the consistence of input power with the product, if the output voltage of the
power comply with that of the product.
7.5. Connect the wire with the power on is forbidden. Ensure proper wiring first then check to
ensure no short-circuit, then power on.
7.6. Don‘t repair it by yourself whenever an error occur. Contact the supplier for any inquiry.
7.7. Do not connect mains voltage (230V) or any other external voltages to any point of the bus. Connecting an external voltage might put the entire KNX system at risk.
7.8. Make sure during the installation that there is always sufficient insulation between the mains voltage 230V and the bus or the extension inputs.
7.9. When overheating protection is active, the device will decrease the luminosity level (50%) and control frequency. For further information, please read the user manual.
7.10.The voltage of the power supply connected to LUMENTO will never exceed the voltage required for the load, which is specified by the manufacturer. Not following this recommendation would mean a risk for the installation.
“Reboot” shows the cases where an object is assigned a certain value by the application program after a bus power failure. In case the value of such assignment
can be parameterised, √ is shown in column “P”. Objects showing a hyphen (-) are not assigned a particular value and therefore can be assumed to maintain
their previous value after the failure or with the corresponding updated value in case they depend on external elements (sensors, etc.). Moreover, if the object
is sent (or is there an option to send it) to the bus (write or read requests) after a bus failure, the marks (W) or (R) will be shown, respectively for transmissions or
read requests.
“1st boot” shows the cases where an object is assigned a certain value by the application program after a device download or a full reset. In case the value
of such assignment can be parameterised, √ is shown in column “P”. Objects showing a hyphen (-) are not assigned a particular value and therefore can be
assumed to be initialised with the value “0” or with the corresponding updated value in case they depend on an external element (sensors, etc.). Moreover, if
the object is sent (or is there an option to send it) to the bus (write or read requests) after a download or a device reset from ETS, the marks (W) or (R) will be
shown, respectively for transmissions or read requests.
Functional range”
shows the values that, with independence of any other values permitted by the bus according to the object size, may be of any use or have a particular meaning because of the specifications or restrictions from both the KNX standard or the application program itself.
ANNEX I. COMMUNICATION OBJECTS
ANNEX I. COMMUNICATION OBJECTS