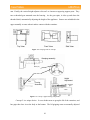
1
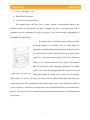
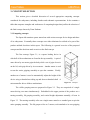
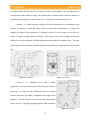
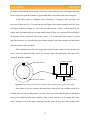
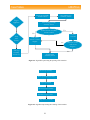
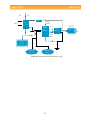
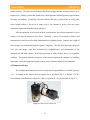
2. Adjust height of the top assembly to fit container to open
3. Place the container on the bottom plate of the opener
4. Activate appliance by pressing a ‘start’ button found on the side of the housing
5. Take container out of the container opener
6. Open another container/unplug the appliance
4.1.3 Logistics of the product
Once the user has placed the jar/bottle in the Open-Aid, it will open the container
automatically after pushing a ‘start’ button that will be found in its housing. When the user
activates the appliance, an automated series of steps will start the opening of the container.
Notice that every time the product is turned on, the grips at the top and bottom assembly will be
reset to their initial position at the maximum radial outer diameter.
First, the top assembly motor is started. This action will move the top assembly grips
radially inward until the lid/cap is held secured. The motor will then stop when the contact
switch located on the grip is pressed due to the contact force between the grips and the lid/cap.
At this same time, the bottom assembly motor will be started and the bottom grips will start
moving radially inward. At this point of the logistics, the following two scenarios may occur.
The first case is fairly similar to the top assembly action. A time count will start when a
contact switch located at the bottom grip is pressed due to the contact force between the grips
and the bottom of the container. The function of the count is to account for the amount of torque
being applied (twisting time) in order to open the container. If, after one second, there is no
presence of hall effect sensor 2 and hall effect sensor 1 is still sensed, the radial plate did not
move at all. Thus, the bottom assembly motor will be turned off in order to avoid overloading
16