1
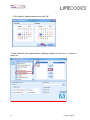
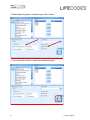
MATCH IT!® DNA Software Quick
Reference Guide
For Use with IMMUCOR® LIFECODES® HLA SSO Assays
For In Vitro Diagnostic Use
1
LC1497.1 (08/15)
®
This manual was produced for use with the MIDNA MATCH IT! DNA Software
888623
Please address all questions, comments, and requests for additional copies to the address below:
Immucor Transplant
Diagnostics, Inc.
550 West Ave
Stamford, CT 06902 USA
Authorized Representative:
Immucor Medizinische Diagnostik GmbH
Adam-Opel-Strasse 26A
Rodermark 63322 Germany
Phone: (+49) 6074-84 20 -0
European Technical Service: +32/3 385 47 91
IMMUCOR® MATCH IT! ® andLIFECODES® are trademarks of Immucor, Inc.
Luminex® is a trademark of Luminex Corporation
2
LC1497.1 (08/15)
Intended use
LIFECODES MATCH IT! DNA Software v1.2 is an optional accessory to aid in the
evaluation of test results from Immucor Transplant Diagnostics LIFECODES HLA SSO kits
for use with Luminex®. Due to the complex nature of HLA Testing, qualified laboratory
personnel must review any results to assure correctness.
About this guide
This guide provides basic instructions for utilizing the MATCH IT! ® DNA Software
888623 in conjunction with the following LIFECODES DNA SSO Assays:
HLA-A SSO Typing Kit
628911
HLA-A eRES SSO Typing Kit
628913
HLA-B SSO Typing Kit
628915
HLA-B eRES SSO Typing Kit
628917
HLA-C eRES SSO Typing Kit
628921
HLA-DRB1 SSO Typing Kit
628923
HLA-DRB1 eRES SSO Typing Kit
628925
HLA-DRB 345 SSO Typing Kit
628927
HLA-DQA1/B1 SSO Typing Kit
628930
HLA-DPA1/B1 SSO Typing Kit
628936
HLA-DQB1 SSO Typing Kit
628929
HLA-DQA1 SSO Typing Kit
628931
HLA-DPB1 SSO Typing Kit
628935
HLA Null Allele SSO Typing Kit
628939
Refer to the User’s Manual for MATCH IT!® DNA Software for additional information. This
guide is not intended to replace the user manual.
3
LC1497.1 (08/15)
Related Documentation
The documents below contain additional information related to, or referenced by this
guide.
®
MATCH IT! DNA User’s Manual (LC1504CE)
LIFECODES HLA-SSO Typing Kits Product Insert (LC1436IVD/CE)
LIFECODES HLA Null Allele SSO Typing Kit (LC1437CE)
Limitations
Refer to related documentation for limitations.
4
LC1497.1 (08/15)
Importing the Lot Specific EXP file:
With the software open – click the Lot Information Import button on the home screen:
Navigate to the appropriate EXP file and click Open:
5
LC1497.1 (08/15)
Automated Batch Setup
Note: To use this feature, import the appropriate template into the Luminex software and
the appropriate EXP file into MATCH IT! ®
1.
2.
3.
4.
5.
6.
Click the Automated Batch Setup button on the homescreen.
Select IS 2.3 or xPONENT.
Enter a Batch Name
Enter user initials in Operator.
Choose a Test Type: HLA-A, HLA-B, HLA-CeRes, etc.
Choose the appropriate Lot ID. Assay Name should automatically populate
with the Lot ID.
7. Enter a Start Position (well location on plate).
8. Choose the Luminex instrument to which the batch is to be submitted from the
dropdown list under Current Luminex Connection and verify that Luminex
Connection Status is Available.
9. To load a pre-saved Sample List, click Get Sample List File. The user may type
directly into the columns as well.
10. To submit the batch to Luminex, click Submit Batch to Luminex.
At this point, the batch will be ready for selection in the Luminex Software.
6
LC1497.1 (08/15)
Importing a Batch CSV File:
With the software open – click the Batch Import button on the homescreen:
Navigate to the desired CSV file and click Open:
7
LC1497.1 (08/15)
Opening a Batch:
From the home screen select the desired batch from the Assay grid and double click the
row.
Analyzing a Sample:
After selecting a batch from the home screen, the analysis window will load in the
Results screen with the first sample from the batch selected.
Batch Listing with first sample highlighted
and loaded in the results screen. Clicking on
a sample will load it into the results screen.
Sample status is updated to Completed with the clicking of the ‘Completed’ button –
available to Supervisors and Lab Technicians.
Once analysis is complete, sample status can be updated to Approved by clicking the
‘Approve’ button (available only to Supervisor user).
8
LC1497.1 (08/15)
Reporting a Sample:
Individually:
A sample report can be created directly from the result screen toolbar by clicking the
‘Reports’ tab. The user can then select the type of report. Clicking any report will load a
preview of the report in a separate window.
By Batch:
Multiple reports can be generated by using the Batch Reporting screen – accessed by
clicking the Reporting button on the home screen.
1. Click calendar button to select date range
9
LC1497.1 (08/15)
2. Set dates for desired samples and click ‘OK’
3. After batch lists load selected batch, Highlight samples and click the ‘>’ to move to
report list.
10
LC1497.1 (08/15)
4. Select Reporting Option and what type of file to Save.
5. Click the printer button to create the requested reports.
11
LC1497.1 (08/15)