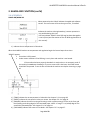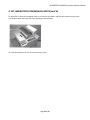
1
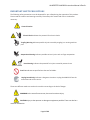
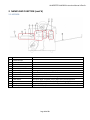
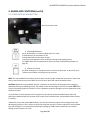
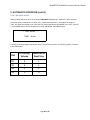
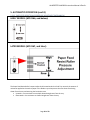
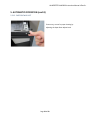
AL-MEISTER ALM3222 Instruction Manual <Rev.2> AL-MEISTER ALM3222 Instruction Manual Thank you very much for purchasing the FUJIPLA ALM3222 Auto Laminator. Due to the possibility of damage and for personal safety reasons only trained personnel should operate this machine! Please read through this manual carefully before operation. Please keep this manual and refer to it whenever necessary. Ver 1.1 [US] Ver 2 by Brian Jennett (includes Ver 1.2 [US]) 11/6/13 Rev by Brian Jennett: 11/22/13, 11/27/13, 12/2/13, 12/9/13, 12/17/13, 3/10/14, 3/20/14, 3/27/14, 4/4/14, 6/6/14, 6/26/14, 7/7/14, 8/12/14, 8/26/14, 10/16/14, 1/23/15, 2/26/15, 5/8/15, 6/29/15 Page 1 of 63 AL-MEISTER ALM3222 Instruction Manual <Rev.2> Contents SPECIFICATIONS ............................................................................................................................................ 4 MAIN FEATURES ............................................................................................................................................ 5 IMPORTANT SAFETY PRECAUTIONS.............................................................................................................. 6 INSTALLATION ............................................................................................................................................... 7 REQUIREMENTS OF PAPER TO BE LAMINATED ............................................................................................ 8 RECYCLING INFORMATION ........................................................................................................................... 9 INCLUDED COMPONENTS ........................................................................................................................... 10 2. NAMES AND FUNCTIONS ........................................................................................................................ 11 2-1. EXTERIOR ......................................................................................................................................... 11 2-2. INTERIOR .......................................................................................................................................... 12 2-3. OPERATION PANEL........................................................................................................................... 13 2-4. LCD DISPLAY ..................................................................................................................................... 14 2-5. OTHER SWITCHES AND BUTTONS .................................................................................................... 16 3. INSTALLATION ......................................................................................................................................... 18 3-1. INSTALLING THE ALM3222............................................................................................................... 18 3-2. SET FEEDER TRAY ............................................................................................................................. 18 3-3. SET EXIT TRAY .................................................................................................................................. 18 3-4. SET WASTE COLLECTION BOX .......................................................................................................... 19 3-5. CONNECT POWER CORD .................................................................................................................. 19 4. SET LAMINATION FILM/MANUAL MODE ................................................................................................ 20 5. AUTOMATIC OPERATION ........................................................................................................................ 33 5-1. WARM UP ........................................................................................................................................ 33 5-2. SETTINGS .......................................................................................................................................... 35 5-2-1. SET TEMPERATURE ................................................................................................................... 35 5-2-2. SET SPEED ................................................................................................................................. 36 5-2-3. SET TRIMMER MARGIN............................................................................................................. 37 5-2-4. MODE MENUS .......................................................................................................................... 39 5-2-5 SET COUNT................................................................................................................................. 41 5-2-6. MARGIN SET ............................................................................................................................. 43 5-2-7. CUT ADJUST .............................................................................................................................. 44 5-2-8. FINE MODE ADJUST .................................................................................................................. 46 Page 2 of 63 AL-MEISTER ALM3222 Instruction Manual <Rev.2> 5-2-9. PAPER FEED ADJUST (SOFTWARE) ............................................................................................ 47 5-2-10. TOTAL COUNT ......................................................................................................................... 48 5-2-11. CHECK FILM INFO.................................................................................................................... 49 5-2-12. PAPER FEED RESIST ROLLER PRESSURE ADJUSTMENT (MECHANICAL) .................................. 50 5-2-13. PAPER SKEW ADJUST .............................................................................................................. 52 5-3. SET PAPER ........................................................................................................................................ 53 5-4. START OPERATION ........................................................................................................................... 55 5-5. ECO MODE (Power Saving Mode) .................................................................................................... 56 5-6.TERMINATE LAMINATION................................................................................................................. 56 6. LONG MODE ............................................................................................................................................ 57 7. TROUBLESHOOTING/ERROR MESSAGES................................................................................................. 58 8. CLEANING THE HEAT ROLLERS ................................................................................................................ 63 Page 3 of 63 AL-MEISTER ALM3222 Instruction Manual <Rev.2> SPECIFICATIONS Model ALM3222 Minimum Feeder Tray Capacity Paper Width Finished & Trimmed Width Paper Length Operating Temperature Operating Speed (in. per min.) Finished Size (W x L) and Trimming Methods Processing Speed Maximum Laminated Thickness Exit Tray capacity Warm-up Time Power Source Power Consumption Dimensions (W x L x H) Weight Environmental Restrictions Accessories Maximum 200 pages (20# copy paper), less for thicker paper 1 13” 8-1/8” 13” 8-9/16” 20” in normal mode, unlimited length in “LONG MODE” 6-1/2” 270F 170F 68 20 Letter (8.5” x 11”); With Margin: 8.74" X 11.24"; Without Margin: 8.5" X 11". Double Letter (11” x 17”); With Margin: 11.24" X 17.24"; Without Margin: 11" X 17" Digital Paper (12” x 18”) With Margin: 12.24" X 18.24"; Without Margin: 12" X 18" 200 sheets/hour at 8.5” long 16mil (.016”) (including film thickness) 200 pages (20# copy paper laminated with 5mil film), less for thicker paper Approx. 5-7 minutes AC 120V 60 Hz 1200W, 10A 50.0"(W) X 23.6"(D) X 43.3"(H) with Stand, Feeder Tray, Feeder Tray Extension and Exit Tray installed. Laminator : 97 LBS; Stand : 52.9 LBS Within the range of 32F to 86F (68 +/- 40F recommended)/an altitude below 6600'. Box 1: Feeder Tray -- Extension Feeder Tray -- Exit Tray -- Power Cord Box 2: Stand -- Assembly instructions for stand -- Screws and tool for assembling stand-- Waste collection box. The ALM3222 is spec’d for 16 mil maximum paper/film thickness. This table shows maximum paper stock thickness given the thickness and number of sheets of film used: Available film thicknesses (MIL) 1.2 1.5 3 5 MIL 14.8 14.5 13 11 ALM3222 Absolute Maximum Paper Thickness Table One-sided lamination Two-sided lamination MAXIMUM PAPER THICKNESS: MAXIMUM PAPER THICKNESS: METRIC METRIC COVER INDEX MIL COVER INDEX (gsm) (gsm) 120# 180# 312 N/A 114# 170# 309 13 105# 158# 286 105# 158# 286 10 90# 135# 245 100# 150# 271 6 40# 60# 162 Page 4 of 63 AL-MEISTER ALM3222 Instruction Manual <Rev.2> MAIN FEATURES The AL-MEISTER ALM3222 is a fully automatic hot laminator that will feed, laminate, cut and trim around all four sides of paper. Once threaded and set up properly, place printed paper on the Feeder Tray and press the [START] button for full automatic operation. 1. Laminating Size/Laminating Film: Letter/Double Letter/Digital sized paper can be laminated automatically. The film is specially produced. Glossy and matte types are available. 2. Finish with, or without margin: With margin: The ALM3222 will trim leaving a 0.11” margin of film outside the edge of the paper. The paper is completely encapsulated to enhance durability and resistance to liquids. Without margin: The ALM3222 will trim laminated paper to the paper size. The surface of the paper is protected with the edges exposed. 3. Feeds 200 sheets automatically: Automatic feeding of up to 200 sheets on the tray enables fully automatic operation. 4. Speedy Lamination: Any manual preparatory tasks that were needed in traditional encapsulation are now unnecessary. It takes only 3 minutes to laminate 10 sheets of letter size paper. 5. Eco Mode saves power consumption: For more details, see ECO MODE (Power Saving Mode). Page 5 of 63 AL-MEISTER ALM3222 Instruction Manual <Rev.2> IMPORTANT SAFETY PRECAUTIONS The following safety precautions must be observed for your safety during the operation of this product. Please read the cautions and warnings carefully. Please keep this manual and refer to it whenever necessary. General Caution Electric Shock Indicates the potential for electric shocks. Tangling Warning Indicates possible injuries caused by tangling in a rotating machine part. Amputation Warning Indicates possible serious injuries such as finger amputation. Heat Warning Indicates the potential for injuries caused by extreme heat. Don’t Do Indicates unspecified acts that are forbidden. Unplug immediately Indicates a dangerous situation. Unplug the ALM3222 from the wall outlet and call for service. These two different words are used on the machine according to the level of danger. WARNING In the case of incorrect use, there can be serious injury. CAUTION Injury to the operator or damage to equipment possible. There can also be a machine malfunction. Page 6 of 63 AL-MEISTER ALM3222 Instruction Manual <Rev.2> INSTALLATION To avoid fire, electric shock, or any danger, do not install the machine in a place like: In direct sunshine or near an air conditioner. In an extremely humid/dry area. In an extremely cold area. In/near a heating appliance or extremely hot area. In an extremely dusty area. On an uneven or shaky floor. POWER SUPPLY/GROUND WIRE 1. Use the appropriate power supply. Always connect to AC120V. Unstable voltage may cause electric shock, fire, or damage to the machine. Always avoid using multiple outlet connections. 2. Pay attention to the amperage. Unless the amperage is enough, it may cause fire or malfunction. A dedicated circuit is highly recommended. 3. Ensure a ground connection is correctly made to avoid any danger or electrical problems. Do not alter the power cord. 4. Handle power cord with care. Do not set the machine on the power cord. Do not pull the power cord forcibly. Do not place the machine near heated equipment. Damage to the power cord may cause fire, electric shock or damage to the machine and the operator. Page 7 of 63 AL-MEISTER ALM3222 Instruction Manual <Rev.2> REQUIREMENTS OF PAPER TO BE LAMINATED Always follow these instructions for safe operation. 1. What to wear In order to avoid any possible danger • Do not wear neck-ties or necklaces that are loose. • Do not wear loose clothes. If entangled, turn off the power or unplug immediately. • Be careful that your hair does not get caught in the machine. 2. Operation • Always close the covers. • When you are in a closed room, ventilate well. • Do not spill water on the machine or handle it with wet hands. • Do not leave the machine during operation. The socket outlet should be installed near the equipment and be easily accessible. 3. in an emergency • If a malfunction occurs switch off and/or unplug immediately. • Contact your dealer or the DryLam Tech-Line for assistance. • Do not attempt to disassemble/repair /alter the machine yourself without authorization. 4. Others In order to avoid serious personal injury or damage to the machine: • Do not use the machine for any other purposes than what it was designed for. • Do not put heavy items on the machine or subject it to physical abuse. • Always unplug the machine before moving it. • Remember that the laminated objects can be very hot. • Machine may be damaged when incorrectly used. • Do not drop metal items such as paper clips or staples inside the machine. • Do not remove the covers from the machine or otherwise defeat the safety switches. • Never alter or modify the machine. • Do not remove caution labels from the machine. • Always use our exclusive AL-ROLL lamination film. Page 8 of 63 AL-MEISTER ALM3222 Instruction Manual <Rev.2> REQUIREMENTS OF PAPER TO BE LAMINATED (cont’d) Do not laminate: • Money or valuable securities. • Paper with staples. • Magnets or magnetic documents. • Flammable paper or material that is affected by heat such as vinyl chloride or polyethylene. • Unique and irreplaceable documents. • Paper thicker than 0.4mm including film thickness. • Paper that discolors and changes in quality with heat such as thermal papers and crayoned pictures. • Paper that contains a lot of moisture. • Items other than paper (magnets, vinyl, etc.) • Paper that is curved or has creases. CLEANING OF EXTERIOR Be sure that the machine is unplugged. Before cleaning the machine turn off the power and let the machine cool down. Wipe off stains with a soft cloth. When stains are persistent use a firmly squeezed soft cloth soaked in a small quantity of water or detergent. Wipe off the residue of detergent with a cloth soaked in water. USEFUL INFORMATION – FILM END This model has a function that gives caution that the film will end soon. The final few feet of film has either black colored film or the black colored tape on the film. Please note when doing continuous lamination, that one or two sheets may be laminated with the black tape when film runs out. Therefore, in order to avoid this problem, please check the remaining film amount on the display from time to time. It is recommended to provide extra prints when laminating. RECYCLING INFORMATION This is a serviceable electronic device which contains components which should be replaced at the end of their effective lives. You can help control emerging risks by disposing of the electronic device separately from your domestic waste. Electric and electronic devices marked with a crossed out waste bin indicate that these products should not be disposed of together with domestic waste as there may be a severe impact on the environment as well as human health due to the possibly of hazardous materials. Page 9 of 63 AL-MEISTER ALM3222 Instruction Manual <Rev.2> INCLUDED COMPONENTS Please check all these components are included. ALM3222 Feeder Tray Feeder Tray Extension Exit Tray Power Cord Wastebasket Stand Stand Assembly Instructions Tool for assembling Stand Screws for assembling Stand Page 10 of 63 AL-MEISTER ALM3222 Instruction Manual <Rev.2> 2. NAMES AND FUNCTIONS 2-1. EXTERIOR 1 2 3 4 5 6 7 8 9 Stand Lower Tension Controller Controller Knob Feeder Tray Lamination Handle Upper Tension Controller Film Cover Trimmer Cover Exit Tray 10 11 12 13 14 15 16 17 Skew Control Knob Feeding Control Knob Feeder Operation Panel Trimmer Adjustment Knobs Power Switch AC Inlet Waste Collection Box Page 11 of 63 AL-MEISTER ALM3222 Instruction Manual <Rev.2> 2. NAMES AND FUNCTION (cont’d) 2-2. INTERIOR A B C D 1 2 3 4 5 6 7 8 SECTIONS Feeder Section Lamination Section Cutter Section Trimmer Section COMPONENTS Feeder Tray Extension Feeder Tray Feeder Roller Paper Feed “Resist” Roller Heat Rollers Cutter Unit Trimmer Unit Exit Tray FUNCTION For longer double letter and digital paper size laminations. Tray for letter size paper. Picks paper from feeder tray and feeds it to the lamination section. Prevents multiple sheets from entering lamination section. Laminates upper and lower film to paper with heat and pressure. Cuts front and back of the film (leading and trailing edges). Cuts sides of paper (operator and non-operator sides of the machine). Tray for finished paper. Page 12 of 63 AL-MEISTER ALM3222 Instruction Manual <Rev.2> 2. NAMES AND FUNCTION (cont’d) 2-3. OPERATION PANEL START Press to start operation. STOP Press to stop operation. RESET Press to return to the operation mode and to reset the counter. SCROLL (UP) Press to raise cursor or the set value. SCROLL (DOWN) Press to lower cursor or the set value. MODE Press to select MODE (menus) setting. TEMP/SPEED Press to select temperature or speed setting menus. Hold continuously to see the current temperature. POWER LAMP Indicates the power is on. READY LAMP Indicates that the set temperature has been achieved. ECO LAMP Lights during power saving mode. ERROR LAMP Lights when an operation error occurs. To aid in servicing note the error message that is generated on the LCD display. LCD DISPLAY Shows status of settings, operation and errors. Page 13 of 63 AL-MEISTER ALM3222 Instruction Manual <Rev.2> 2. NAMES AND FUNCTION (cont’d) 2-4. LCD DISPLAY POWER ON/WARM UP When powered up the LCD will indicate the model and software version. The next screen will show the type of film, if installed. Indicates the machine is being heated up, however operation is not possible during this time. LCD may indicate “READY” when RFID tag has been damaged or is not in place (see information on film roll RFID tag elsewhere in this manual). 1) Indicates the set temperature in Fahrenheit. When the ALM3222 reaches set temperature and regulation begins the buzzer beeps three times. “READY” appears: If machine is fully heated. Under certain conditions if the RFID tag is not in place and machine is not heated. If the machine has been properly threaded it is ready to be run in automatic mode. If the machine has not been threaded, or if you are unsure that it has been, the START button should NOT be pressed. To set the film and thread the machine see chapter 4 starting on page 16. 1) [TEMP] indicates the set temperature in Fahrenheit. See chapter 5-2-1 on page 28. 2) [SPEED] indicates the set speed in inches per minute. See chapter 5-2-2 on page 29. 3) [MARGIN] indicates that the trimming and cutting is with or without margin of film on the front and back (leading and trailing edges) of the laminated paper. NOTE: A “margin” is a (sealed) edge of film around the laminated paper. See chapter 5-2-5 on page 34. 4) [FINE MODE] indicates the status of Fine Mode. See chapter 5-2-7 on page 37. Page 14 of 63 AL-MEISTER ALM3222 Instruction Manual <Rev.2> 5) [SET COUNT] indicates number of the papers to be processed. See chapter 5-2-5 on page 34. Page 15 of 63 AL-MEISTER ALM3222 Instruction Manual <Rev.2> 2. NAMES AND FUNCTIONS (cont’d) 2-5. OTHER SWITCHES AND BUTTONS Open the trimmer cover. 1) Manual MOVE Switch Use to set/feed film or to take out paper when it is stuck To feed forward, turn the switch to left. To feed backward, turn the switch to right. * Set the trimmer adjuster to Film Set position during the threading process. The MOVE switch will not operate after some errors (see troubleshooting chapter on page 47). 2) Manual CUT Switch Use when setting film or cutting film which is stuck in the laminator. It only works once. *It does not work when a cutting error has occurred. NOTE: The manual MOVE switch works most any time in manual mode, except after some errors. After some errors it may be necessary to press RESET to clear the error which will restore the MOVE switch. CAUTION: Whenever using the MOVE switch it is important to account for all film going into the machine, particularly during the threading process. If film does not exit the discharge in less than 5 seconds STOP! Film may be accumulating within the machine. If this is allowed to continue, damage to interior components of the machine will occur. *If you believe an excess amount of film has gone into the machine release the MOVE switch. Raise the Lamination Handle and pull the film back out the front of the lamination area. Use the MOVE switch to assist, if necessary. *Whenever you use the manual MOVE Switch, even for a brief moment, always move enough film out the discharge to grab on to. Then, always cut the film by using the manual CUT button and pull the cut film/paper from the discharge. This must be performed before pressing the START button, otherwise errors and/or damage to the machine may result. Page 16 of 63 AL-MEISTER ALM3222 Instruction Manual <Rev.2> *After the film waste has been pulled from the discharge the machine is ready to be run in automatic mode. Do NOT run the MOVE switch again unless CUT is performed immediately afterward. Page 17 of 63 AL-MEISTER ALM3222 Instruction Manual <Rev.2> 3. INSTALLATION 3-1. INSTALLING THE ALM3222 Allow an area about 18”' around the machine and trays for operation. *Read the safety instructions about the installation carefully. Always contact the DryLam Tech-Line if there are any questions or concerns during installation. 3-2. SET FEEDER TRAY Attach the tray by pointing the feeder tray downward. 1) 2) * When you laminate materials in double letter and digital paper sizes set the extension tray on the feeder tray as shown. 3-3. SET EXIT TRAY Attach the exit tray firmly in the holes. Select upper or lower holes according to the thickness of the finished product. Page 18 of 63 AL-MEISTER ALM3222 Instruction Manual <Rev.2> 3. INSTALLATION (cont’d) 3-4. SET WASTE COLLECTION BOX Install the waste collection box just underneath the film waste outlet to collect trimming and cutting scrap. 3-5. CONNECT POWER CORD Connect power cord to the machine firmly. Do not turn the power on yet. Page 19 of 63 AL-MEISTER ALM3222 Instruction Manual <Rev.2> 4. SET LAMINATION FILM/MANUAL MODE 1. AL-ROLL film is the exclusive lamination film for ALM3222. Always use a combined set of upper and lower film together (even if using one-sided film) from the same box. Prior to loading film inspect the rolls for possible shipping damage. Lower film roll must have a valid RFID tag installed and loaded towards the nonoperator side of the machine. ATTENTION: If this tag is not in place or it has been damaged the machine will not heat up, or run in automatic mode. Do not install damaged or “shifted (telescoped)” rolls of film on the ALM3222. These rolls may have been damaged in shipment. The two sheets of film will not overlap each other properly and will causes operational problems. 2. Open the cover at the trimmer. Adjust both the left and right levers to the FILM SET position. Leave this the cover open for the next steps. Always make sure that the levers are at the film set position when threading. Otherwise, the threading card will get caught on the trimmer blades. Damage to the trimmer blades and jamming of film may occur. Page 20 of 63 AL-MEISTER ALM3222 Instruction Manual <Rev.2> 4. SET LAMINATION FILM/MANUAL MODE (cont’d) 3. Open the Feeder Cover and Film Cover. NOTE: Components on the inside of the machine get very hot. Always be careful. 4. Loosen the two tension controllers, if necessary. Set the upper roll of film in the upper mandrel holders. Align the black tape on the film roll with the black dot on the mandrel holder. Page 21 of 63 AL-MEISTER ALM3222 Instruction Manual <Rev.2> 4. SET LAMINATION FILM/MANUAL MODE (cont’d) NOTE: If the film roll(s) are incorrectly loaded adhesive may contact the heat rollers or other interior components and cause damage. 5. Remove the lower Film Guide Bar. Push the bar to one side to compress the spring and pull the other end out of the machine. 6. The lower film roll contains an RFID tag in the left end of the core. Handle this roll carefully! This tag is a printed label adhered to a cap and placed in the end of the core. This cap/tag must be placed carefully towards the non-operator side of the machine. NOTE: RFID tag location for lower roll Page 22 of 63 AL-MEISTER ALM3222 Instruction Manual <Rev.2> 4. SET LAMINATION FILM/MANUAL MODE (cont’d) 7. Pull about 8-10” of the film off the roll. Loosen the two tension controllers, if necessary. Place the film roll in the lower mandrel holders firmly and carefully (with the RFID tag at the non-operator side). Place the removable rotating idler bar in place. Lay the end of the film back on top of the film roll. NOTE: If the film roll(s) are incorrectly loaded adhesive may contact the heat rollers or other interior components and cause damage. NOTE: RFID tag location for lower roll. Page 23 of 63 AL-MEISTER ALM3222 Instruction Manual <Rev.2> 4. SET LAMINATION FILM/MANUAL MODE (cont’d) 8. Raise the Lamination Handle to the OPEN position to separate the heat and pull rollers for threading. 9. Pull the upper film off the roll. Pull it down and over the upper rotating idler bar. Bring the end of the film down until it just touches the lower film. This should overlap both heat rollers by a few inches. 10. Bring the lower sheet of film up and over the upper sheet of film. There should now be two sheets of film crossing the heat rollers and overlapping each other by about 6-8”. Page 24 of 63 AL-MEISTER ALM3222 Instruction Manual <Rev.2> 4. SET LAMINATION FILM/MANUAL MODE (cont’d) 11. Using an 11” long (by 8.5” wide) threading card (DryLam part number 964202), push both sheets of film between the rollers (and into the ‘nip’). Holding the card level continue to push both sheets of film all the way through the machine. There should only be 1” of threading card exposed at the fronts of the rollers at this time. If the threading card will not pass a point about 4” into the machine it is likely being stopped by the film guides on the Cutter Unit. The threading card MUST pass yet another 4”, or so, beyond that point before the lamination handle is lowered and before the motors are run. HINTS FOR EASIER THREADING: 1) Loosen the tension controllers. 2) Turn the film rolls to add “slack” to the film web. 3) “Aim” the threading card either up, or down, to allow it to enter the full 11” length. This is extremely important as machine damage may otherwise result if loose film were to “wrap” up or tear off inside the machine, or if the threading card were to be jammed up against interior components of the machine. 12. Do NOT lower the Lamination handle at this time. Page 25 of 63 AL-MEISTER ALM3222 Instruction Manual <Rev.2> 4. SET LAMINATION FILM/MANUAL MODE (cont’d) 13. Turn on the power switch. The heat rollers should begin to get hot. If they do not, check that the RFID tag is in place on the lower film roll, that it is facing the non-operator side of the machine and was not damaged during the installation. 14. Push the Manual MOVE Switch towards the exit of the machine. The threading card and film should start to move. If they do not move DO NOT LOWER THE LAMINATION HANDLE. Carefully push the trailing edge of the threading card firmly at the lamination roller area to make the leading edge of the card engage the rollers near the exit. In one or two seconds the threading card, along with two sheets of film should exit the discharge. If the card and film to do not exit the machine within 5 seconds STOP! Film could be accumulating within the machine. If this is allowed to continue damage to the machine will occur! Page 26 of 63 AL-MEISTER ALM3222 Instruction Manual <Rev.2> 4. SET LAMINATION FILM/MANUAL MODE (cont’d) If the threading card and film do not emerge from the discharge within 5 seconds pull the threading back out of the nip and repeat the threading process from step 6. If the machine is not threaded properly damage to interior components will occur. 15. After most of the threading card and film web emerge from the discharge lower the Lamination Handle. STOP! Do not go any further until the READY light is on AND the machine is fully heated. 16. It is very important to run the machine in “manual mode” (using the MOVE switch) and observe the film as it exits the discharge. It should be well laminated (clear) and free of wrinkles. If wrinkles are observed adjust the tension controller knobs slightly on the film rolls. If the film is curled this could be an indication that the tension of one of the film rolls is tighter than the other. Film must exit the machine flat, clear and free of wrinkles before being put into automatic mode (pressing the START button). If there is curl during manual mode there may be curl during automatic mode which will likely produce errors and possibly damage interior components the machine. Page 27 of 63 AL-MEISTER ALM3222 Instruction Manual <Rev.2> 4. SET LAMINATION FILM/MANUAL MODE (cont’d) 17. Adjustment of tension controllers There are four (4) tension controllers- two for the lower film roll and two for the upper film roll. The purpose of the tension controllers is to apply a resistance, or "drag" on the film rolls which forces the film lay flat on the heat rollers and thereby eliminates creases and bubbles in the lamination. It is recommended that the right side and left side controllers on each roll be adjusted with the same amount of tension. The top pair of controllers versus the bottom pair of controllers may vary slightly only to eliminate "curl" in the laminated piece. If the laminated piece curls upward loosen the two upper controllers and/or tighten the two bottom controllers. If the exiting laminated piece curls downward, do the opposite and make the lower controllers looser than the upper controllers. Tension controllers (upper) Tension controllers (lower) 18. Again, after the laminator has "warmed-up" and the READY light is on, use the manual MOVE switch to run film (by itself, no paper) out of the laminator. Observe these samples for clarity and freedom from wrinkles. When all of the bubbles, wrinkles and creases disappear from the lamination and the film is lying flat on the heat rollers the machine is ready to be run in “automatic mode”. If lamination defects are not disappearing in a reasonable amount of film footage (3 or 4 feet), slightly increase tension on the controllers (equally). See Step 17. Page 28 of 63 AL-MEISTER ALM3222 Instruction Manual <Rev.2> 4. SET LAMINATION FILM/MANUAL MODE (cont’d) 19. Test for film curl. This is important. If film will not exit the machine in a “flat” state there may be jams and wraparounds occurring when the machine is run in “automatic mode”. 1inch Upper side Lower side If not already done, push the manual MOVE switch forward until about one (1) foot of film has exited the laminator. Then, using a pair of scissors cut the laminated film at a point approximately three (3) inches out from the laminator. Be sure to identify the upper side of the film from the lower side of the film. NOTE: The laminator is not ready for automatic mode if film is hanging out the discharge. Always press the CUT button and pull the waste of out the machine to ready for automatic mode. Page 29 of 63 AL-MEISTER ALM3222 Instruction Manual <Rev.2> 4. SET LAMINATION FILM/MANUAL MODE (cont’d) n i 7 9 . 1 20. Hold the film vertically about 2 inches from the cut side. Look at the film from the side. Within 1/2 inch 1/2inches Lower side •If the curl is less than 1/2'' from the vertical plane, there is no need to adjust. Upper side Over 1/2 inch •If the curl is more than 1/2" to the lower side, tighten the two upper tension controllers with half turn. Lower side Over 1/2 in. •If the curl is more than 1/2" to the upper side, loosen the two upper tension controllers with half turn. Upper side Page 30 of 63 AL-MEISTER ALM3222 Instruction Manual <Rev.2> 4. SET LAMINATION FILM/MANUAL MODE (cont’d) Minimizing the curl may avoid problems as shown below. If film is allowed to curl it will curl up or down into interior areas of the machine. This will results in errors and possible damage to the machine. The proper tension set with new film rolls will likely be too great as film rolls get smaller with use. Too much tension will result in noise, poor performance and increased wear on the heat rollers. Also, as film rolls reduce in diameter due to use, curling may begin. If curling is allowed to continue film may curl back up inside the ALM3222 and causes jams and wraparounds. If so, re-adjusting the tension controllers may be necessary. Other results of poor tension controller settings: A) The corner of the laminated film is folded. B) Lamination scrap comes out with laminated film. C) Errors appear on the display. In these cases remove the jammed film. Follow the trouble shooting procedures of the instruction manual. Page 31 of 63 AL-MEISTER ALM3222 Instruction Manual <Rev.2> 4. SET LAMINATION FILM/MANUAL MODE (cont’d) 21. When film is properly overlapped, there are no wrinkles or bubbles, and film exits without curl press the CUT button and pull the waste out of the discharge of the ALM3222. 22. Close the Feeder Cover, Film Cover and Trimmer Cover. Page 32 of 63 AL-MEISTER ALM3222 Instruction Manual <Rev.2> 5. AUTOMATIC OPERATION 5-1. WARM UP CAUTION: Automatic mode should not be performed until the machine has been set up properly in Manual Mode. See page 17 for details. 1. Connect the power cord to the wall socket. Turn on the power switch. The POWER lamp lights up. 2. Buzzer beeps. These displays appear for a few seconds: ALM3222 Ver A01.1 Software version appears. -----A 38mic. LEFT : 80% FILM INFO ------ 320mm Film Info display appears. (Or, CHECK FILM error will appear if RFID tag is damaged, or not in place.) ------ WARM UP TEMP = ------ 210 Page 33 of 63 AL-MEISTER ALM3222 Instruction Manual <Rev.2> Warm Up display appears. Page 34 of 63 AL-MEISTER ALM3222 Instruction Manual <Rev.2> 5. AUTOMATIC OPERATION (cont’d) 5-2. SETTINGS 5-2-1. SET TEMPERATURE On the “READY” screen press TEMP./SPEED button once. * The default is set at 210F. This is only a power on default and may not be proper for some paper stocks and thicknesses of film. Press UP or DOWN button to set temperature. Temperature can be set OFF, and between 170F and 270F in 10F increments. The temperature display blinks. Press TEMP./SPEED button to confirm the temperature. This table shows an example of temperature settings for different film and paper thicknesses. It also pays to experiment with different temperatures and speeds to achieve quality laminations. Film thickness 1.5mil 3mil – 4mil 5mil Copying paper 210F - 40"/min 220F - 40" /min 230F - 40"/min Page 35 of 63 Thicker paper 220F - 40" /min 230F - 40" /min 240F - 40" /min AL-MEISTER ALM3222 Instruction Manual <Rev.2> 5. AUTOMATIC OPERATION (cont’d) 5-2-2. SET SPEED 1. On the “READY” screen press TEMP./SPEED button twice. * The default is set at 40 ipm. This is only a power on default and may not be proper for some paper stocks and thicknesses of film. 2. Press UP or DOWN button to set speed. 3. The speed can be set by 4"/min increments. 4. The speed display blinks. Press TEMP./SPEED button to confirm the speed. 5. Press TEMP./SPEED button again to return to the previous display. Page 36 of 63 AL-MEISTER ALM3222 Instruction Manual <Rev.2> 5. AUTOMATIC OPERATION (cont’d) 5-2-3. SET TRIMMER MARGIN CAUTION: Do not adjust the Trimmer Levers or Adjustment Knobs while the machine is running or film is in the Trimmer Unit. 1. Open the trimmer cover. 2. Adjust both the left and right levers to set either with or without margin. 3. The lever should be fixed in the appropriate groove firmly. 1) Without margin (without laminated frame) 2) With margin (with laminated frame) 3) Without margin (without laminated frame) 4) With margin (with laminated frame) 5) FILM setting position *1 and 2) for letter size and double letter size widths *3 and 4) for digital paper size widths NOTES: When setting film, always set the lever in #5 (Position of Film Set). Otherwise the threading card used for film setting may cause damage to the trimmer blades and will not exit the ALM3222 properly. Do not move the levers when the ALM3222 is running or when there is film remaining in the trimmer unit. Page 37 of 63 AL-MEISTER ALM3222 Instruction Manual <Rev.2> 5. AUTOMATIC OPERATION (cont’d) 4. After the levers have been set the cut can be further “fine-tuned” by using the Trimmer Adjustment Knobs (2). 5. Loosen (1) locking knob and adjust the Trimmer Adjustment Knob (2). Repeat for the other side. After adjustment is complete tighten locking knob (1). 6. Close the cover. Page 38 of 63 AL-MEISTER ALM3222 Instruction Manual <Rev.2> 5. AUTOMATIC OPERATION (cont’d) 5-2-4. MODE MENUS Press MODE button. The Mode Menu screen will appear: ---- MODE --->SET COUNT MARGIN SET CUT ADJUST FINE MODE PAPER FEED ADJUST TOTAL COUNT FILM INFO Move cursor to your choice by using UP or DOWN button. Note that some menu choice are below the current screen. Simply curser down below the last line to view them. Press MODE button again to view or alter the parameter. Or, do nothing to return to operation screen. MODE MENU PARAMETERS: [SET COUNT] Set the number of sheets you wish to laminate. See section 5-2-5. NOTE: Defaults to FREE after power outage. [MARGIN SET] Laminate and make cuts either with, or without a margin of film on both the leading and trailing edges of sheets. See section 5-2-6. NOTE: Defaults to MARGIN: YES after power outage. Page 39 of 63 AL-MEISTER ALM3222 Instruction Manual <Rev.2> 5. AUTOMATIC OPERATION (cont’d) [CUT ADJUST] Adjusts the cutting positions of the leading and trailing edges of sheets. See section 5-2-7. NOTE: These settings are retained in memory after a power outage. [FINE MODE] Hides any “dwell line” that may be present. See section 5-2-8. NOTE: This setting is retained in memory after a power outage. [PAPER FEED ADJUST] Works in conjunction with the Paper Feed Resist Roller Pressure Adjust knob (see section 5-2-12) to provide compatibility for difficult to feed paper stocks and toner. See section 5-2-9. NOTE: This setting is retained in memory after a power outage. [TOTAL COUNT] Total Count indicates the accumulated number of laminations since the RESET button was pushed. NOTE: This number is retained in memory after a power outage. See section 5-2-10. [FILM INFO] Displays information about the film currently in the machine. See section 5-2-11. NOTE: Information only- nothing to retain. Page 40 of 63 AL-MEISTER ALM3222 Instruction Manual <Rev.2> 5. AUTOMATIC OPERATION (cont’d) 5-2-5 SET COUNT Select SET COUNT. ---- SET COUNT ---FREE NOTE: Defaults to FREE after power outage. Press UP or DOWN button to enter numeric values. You can set from 1 to 200 sheets. An unspecified number of laminations is displayed as FREE. The ALM3222 will laminate all sheets on the tray. Change the value, or do nothing to return to the operation screen. After changing the number do nothing to retain the setting and return to the operation screen. Or, press the MODE button to retain the setting and return to the operation screen quickly. Page 41 of 63 AL-MEISTER ALM3222 Instruction Manual <Rev.2> Example of setting 100 sheets: ---- READY ---TEMP: 210 SPEED: 40 MARGIN: YES F10 SET COUNT: 0/100 In the above example: 0: finished number/100: set value NOTE: Lamination errors will not affect the count. Example of setting FREE: ---- READY ---TEMP: 210 SPEED: 40 MARGIN: YES F10 SET COUNT: FREE When you select FREE all the papers on the feeder tray will be laminated. NOTE: A “Feeding Error” will occur after the last sheet has been drawn from the Feed Tray in “FREE” or if the SET COUNT is higher than the number of sheets on the tray. This is normal. Page 42 of 63 AL-MEISTER ALM3222 Instruction Manual <Rev.2> 5. AUTOMATIC OPERATION (cont’d) 5-2-6. MARGIN SET Select MARGIN SET. ---- MARGIN SET --->YES NO NOTE: Defaults to YES after power outage. Press UP or DOWN button to turn MARGINS on (YES) or off (NO). Your choice is retained during this power on session. Optional: Press MODE button to return to operation screen. Page 43 of 63 AL-MEISTER ALM3222 Instruction Manual <Rev.2> 5. AUTOMATIC OPERATION (cont’d) 5-2-7. CUT ADJUST This function adjusts the cutting positions at both the leading, and trailing edges of the paper. NOTE: These settings are retained in memory after a power outage. NOTE: These settings only affect the leading and trailing edge cuts. They do not affect the side cuts made by the Trimmer Unit. NOTE: It is recommended to read and record the present values shown on the display before adjusting. It may be helpful if it is necessary to set back to a past value. NOTE: Each ALM3222 has its own Cut Adjust values. The numbers seen are relative only to this particular machine and not to anything in the “real world”. 1. Select Cut Adjust from the Mode display. ---- CUT ADJUST --->F: 0.012inch B:-0.004inch 2. Press TEMP/SPEED button to toggle between F and B. F: cutting position at the front end (leading edge) B: cutting position at the back end (trailing edge) Do nothing to return to the operation screen. 3. Or, set one or both values using the UP/Down buttons. On versions prior to 2.2 adjustment can be done between: F and B: - 0.400" to + 0.400" On ver 2.2 and ver 3 adjustment can be done between: F: -.200 to 1.200 B: -1.200 to +.200 Do nothing to retain the settings and return to the operation menu. Page 44 of 63 AL-MEISTER ALM3222 Instruction Manual <Rev.2> 5. AUTOMATIC OPERATION (cont’d) HINT: The more positive (higher) the number the more margin of film around the paper will remain. The maximum margin is approximately ¼”. The more negative (lower) the number the closer to the paper cuts will occur (including the possibility of cutting into the paper itself). 4. Or, press MODE button to quickly return to the operation screen. Page 45 of 63 AL-MEISTER ALM3222 Instruction Manual <Rev.2> 5. AUTOMATIC OPERATION (cont’d) 5-2-8. FINE MODE ADJUST When enabled and set to one of three setting FINE MODE addresses the “dwell line” which can be an issue with certain combinations or paper, print, speed and temperature. “Fine Mode” attempts to “hide” the dwell line making it less noticeable. For fastest speed leave FINE MODE in the “OFF” position. 1. Press MODE and use the cursor buttons to select FINE MODE. Press MODE again. ---- FINE MODE ---TIME: 10 ms 2. Select the setting by again moving the cursor. The processing volume and finishing quality are shown in the table below. FINE Processing Volume Reduction of Dwell Line OFF 4 1 F10 3 1 F20 2 2 F30 1 3 Page 46 of 63 AL-MEISTER ALM3222 Instruction Manual <Rev.2> 5. AUTOMATIC OPERATION (cont’d) 5-2-9. PAPER FEED ADJUST (SOFTWARE) PAPER FEED ADJUST is a parameter that adjusts the aggressiveness of the feeding section to enhance compatibility of varying paper stocks. This should be utilized in conjunction with the Paper Feed Resist Roller Pressure Adjust (MECHANICAL) knob under the Feed Tray (see section 5-2-11). 1. Press MODE and use the arrow buttons to select PAPER FEED ADJUST parameter. Press MODE again. ---- PAPER FEED ADJUST ---VALUE: 10 2. Adjust the value using the up and down arrows. The factory default is 0. The range is: Ver 2.2 and prior +10 to -10 in increments of 1 Ver 3 +20 to -20 in increments of 1 If paper/toner is difficult to separate and feed use a more positive (higher) value. This will run the feeder a longer amount of time after the leading edge of paper has passed the Feeder Sensor. Use a more positive value in cases where paper does not reach the film in time (and “LAMINATION ERROR” errors result). If paper is very easy to separate and feed use a more negative (lower) value. This will make the Feeder less aggressive. A lower value should be used if: Certain lamination defects occur including, but not limited to, jamming of the leading edge of paper occurs at the film. This might be seen as any, or part of the leading edge of a sheet paper folded over within the film. Frequent “PAPER JAM” errors occur. Skewing of paper is observed occurring on the paper tray. Page 47 of 63 AL-MEISTER ALM3222 Instruction Manual <Rev.2> 5. AUTOMATIC OPERATION (cont’d) 5-2-10. TOTAL COUNT 1. Press MODE and use the cursor buttons to select TOTAL COUNT. Press MODE again. ---- TOTAL COUNT ---123456789 2. Select TOTAL COUNT from MODE menu. The accumulated number of laminations is shown. Counts up to 99999999 until counter is reset. Do nothing to return to the operation screen. Or, press MODE to quickly return to the operation screen. OPTIONAL: While on this screen press RESET button to return the counter to “0”. Page 48 of 63 AL-MEISTER ALM3222 Instruction Manual <Rev.2> 5. AUTOMATIC OPERATION (cont’d) 5-2-11. CHECK FILM INFO 1. Press MODE and use the cursor buttons to select FILM INFO. Press MODE again. ---- FILM INFO ---A 38mic. 320mm LEFT: 80% This display appears along with the following information: Film thickness Film width Remaining film If film information is not available the display shows “xxx” rather than numerals: ---- FILM INFO ---x xxmic. xxxmm LEFT: xxx% This will be the case when a valid RFID tag in not in its proper position or an invalid tag is used. See section 4 for more information on RFID tags. Page 49 of 63 AL-MEISTER ALM3222 Instruction Manual <Rev.2> 5. AUTOMATIC OPERATION (cont’d) 5-2-12. PAPER FEED RESIST ROLLER PRESSURE ADJUSTMENT (MECHANICAL) EARLY MODELS (MC #166, and below): LATER MODELS (MC #167, and later): The Paper Feed Resist Roller Pressure Adjust knob located under the Feed Tray controls the amount of resistance applied to the stack of paper in the feeder tray to keep more than one sheet from being drawn from the tray and entering the lamination area. Upwards = more resistance to multiple sheets being drawn from the tray. Downwards = less resistance to sheets being drawn from the tray. Page 50 of 63 AL-MEISTER ALM3222 Instruction Manual <Rev.2> PROCEDURE: 1. Loosen the Paper Feed Resist Roller Pressure Adjust knob and adjust in small 1/8” increments (or, about one mark at a time on appropriate labels) as follows: a. If too many sheets are being fed at once loosen and slide the knob upwards. b. If sheets are slow to enter, or will not enter at all (enough that “LAMINATION ERROR”, or other similar errors occur) loosen and slide the knob downward. 2. Tighten the knob. HINT: If sheets are not being pulled off the tray completely (with “FEEDER ERROR” or “LAMINATION ERROR” displayed, adjust the knob downward. If more than one sheet is drawn in consistently, move the knob upwards. Try small adjustments of 1/8”, or less, until the optimum setting is found for the paper stock being laminated. This adjustment should be performed in conjunction with the Paper Feed Adjust (Software) parameter in the menu. See section 5-2-8 for more details. HINT: When “Lamination Error” and “Feeder Error” appear frequently adjust this knob downward slightly (in small 1/8” increments). For best results use this adjustment along with the Paper Feed Adjust parameter in the Mode Menu. HINT: This is a compatibility adjustment. There is no “perfect” or “standard” setting. Different paper stocks and toners will have different characteristics. Experimentation is key. It is better to have the occasional sheet NOT drawn off the tray (i.e. adjustment knob set too high) than it is to have too many sheets drawn from the tray and jamming within the machine (i.e. adjustment knob set too low). Page 51 of 63 AL-MEISTER ALM3222 Instruction Manual <Rev.2> 5. AUTOMATIC OPERATION (cont’d) 5-2-13. PAPER SKEW ADJUST If necessary, correct for paper skewing by adjusting the Paper Skew Adjust knob. Page 52 of 63 AL-MEISTER ALM3222 Instruction Manual <Rev.2> 5. AUTOMATIC OPERATION (cont’d) 5-3. SET PAPER 1. Loosen knobs and adjust the paper guides according to paper size. Always use the reference marks and set the paper in the center of the tray Letter Size Digital Size (Double letter) 2. Press the edge of the feeder tray downward. Keep pressing it while loading paper. Page 53 of 63 AL-MEISTER ALM3222 Instruction Manual <Rev.2> 5. AUTOMATIC OPERATION (cont’d) 5-3. SET PAPER (cont’d) 3. Place paper in the feeder tray correctly. * The picture shows how to set letter size. 4. Release your hand from the tray. The spring action will push the paper upwards towards the feeder roller. Paper is set. Do not push the paper further. * If necessary, attach the extension tray for double letter and digital paper sizes. Page 54 of 63 AL-MEISTER ALM3222 Instruction Manual <Rev.2> 5. AUTOMATIC OPERATION (cont’d) 5-4. START OPERATION 1. Make sure Lamination Handle is down in the Laminate position. 2. Check the settings. 3. Make sure READY lamp is on. NOTE: Do not press the START button until the machine has been threaded. See sections above on the proper threading process. Otherwise, damage to the machine can occur. 4. Press the START button. Operation starts. 5. Press STOP button during the operation to stop the lamination. * NOTE: The STOP button is not an emergency stop. Lamination will stop when the process is done. If emergency stop is required simply open the Feeder, or switch off the power switch. FILM END AL-ROLL Film has a special feature that allows the end of the film roll to be detected. The last 20" of each roll of film is colored in black. When this black “leader” passes the Cutter Sensor an error is displayed and operation stops. Remove and discard the partially laminated sheet and install new film. Page 55 of 63 AL-MEISTER ALM3222 Instruction Manual <Rev.2> 5. AUTOMATIC OPERATION (cont’d) 5-5. ECO MODE (Power Saving Mode) ECO MODE enters when the machine is idle and any buttons on the operation panel* have not been pressed in the past 15 minutes. *This does not apply to the “MOVE” switch. A buzzer will sound 1 minute before entering ECO MODE. ECO MODE will be deactivated by pressing any button, the 15 minute timer then starts again. 1) Current temperature. 2) ECO MODE temperature goal (140F). 5-6.TERMINATE LAMINATION 1. Make sure the lamination has finished. 2. Turn off Power Switch. 3. Disconnect the power plug. Page 56 of 63 AL-MEISTER ALM3222 Instruction Manual <Rev.2> 6. LONG MODE All model ALM3222 auto laminators, regardless of programming version, feature LONG MODE capability. In Long Mode there is no limit to the length of paper that the machine will laminate. To utilize LONG MODE function, the ALM3222 is started in this manner: 1. Turn the ALM3222 off. 2. Hold the START button. 3. While holding the START button turn the ALM3222 on. 4. After a few seconds LONG MODE will be seen on the LCD. 5. Release the START button. 6. LONG MODE remains active as indicated on the LCD until the machine is shut off and restarted normally. In LONG MODE leading and trailing edge cuts will always be made according to the size of paper (just like in “Standard Mode” with its 20” paper limit). However, in LONG MODE there is no limit to the length of paper that will be laminated (beyond the 20” standard mode limit). Some special considerations must be made when working in LONG MODE: In the event of a mis-feed or skew operation will continue non-stop. Therefore, it is mandatory that an operator be present at all times to monitor operation. If a malfunction occurs (paper jam, or otherwise) and the operator does not switch off the POWER switch severe damage to the machine could occur. In proportion to the length of paper being laminated there is the likelihood that paper will ‘skew’ within the machine, particularly if an operator is not monitoring paper feed from the tray. This will affect the performance of the Cutter and Trimmer Units and, in the event of significant skewing, damage may occur to the paper being laminated or to the machine. Cutting and trimming accuracy will be reduced according to the amount of any skewing. There are no alarms/errors in LONG MODE in regards to paper length. In LONG MODE, be sure to provide extra prints and test the paper before the actual production begins. Page 57 of 63 AL-MEISTER ALM3222 Instruction Manual <Rev.2> 7. TROUBLESHOOTING/ERROR MESSAGES Problem ●Laminated sheet is not discharged. On the display: DISCHARGE ERROR or LAMINATION ERROR, Check if: Laminated paper is stuck in the lamination section, the trimmer section and/or the cutter section. Some useful tips. ●”CUTTING ERROR” Page 58 of 63 Solution [1]Open the Feeder cover. Cut the upper and lower film just below the guide roll. Turn the operation lever to OPEN position. Hold the cut film firmly. Pull it out toward you. Press RESET button. When the laminated sheet in the machine cannot be taken out, and/or the problem is not solved, turn off the power and contact your dealer or the DryLam Tech-Line.[2] Check if the film waste is stuck in the trimmer unit.[3] Open jam the trimmer cover. Remove the film waste. [4] To remove the film waste around the cutter unit, first turn off the power and pay attention not to touch the cutter blade. The lamination rollers get very hot. Be careful that your fingers or clothes do not get caught in the rollers. Do not touch the cutter unit Do not dismantle. Be careful that your fingers do not get cut. Flatten the papers before lamination. If the laminated film has a curl, adjust the film tension. Empty the waste box periodically. The remaining film waste in the waste box may pile up and cause problems around the trimmer unit. Open the dark gray trimmer cover. Then, place your finger into the hole of the upper flap and pull upwards raise it. Observe is film/paper has accumulated in this area. If so, free it and pull it up and out the top of the flap, close the cover, press RESET and press the Manual Cut Switch. Then, pull the loose film out from the flap. If the error is solved be certain that the top flap (with finger hole) is placed back in the ‘down’ position, then close the silver top flap. If the error is not solved, please contact your dealer or the DryLam Tech-Line. Page AL-MEISTER ALM3222 Instruction Manual <Rev.2> ●”FEEDING ERROR” No paper on the tray to feed. Paper is thick and smooth on its surface. The rollers cannot ‘grab’ the paper. Less than 2” of paper is being pulled before this error occurs. Paper guides are restricting the movement of paper. The surface of Feeding Rollers is not clean. Paper is stuck between feeding section and lamination section. ●”PAPER JAM” Do not confuse with “PAPER STUCK” Film/paper is stuck at Cutter section or Trimmer section. Paper is longer than 20” (see Specifications section) Paper is within spec length but, a second sheet of paper has been pulled in underneath the first sheet of paper that the error occurred on. The second sheet of paper is blocking the feeder sensor. Double cutting, too? ●”DISCHARGE ERROR” Film and/or paper is emerging Page 59 of 63 This error is often caused by SET COUNT set to “FREE” and no paper on the tray. Press RESET to clear the error, place paper on the tray and try again. To eliminate this each time the tray runs out go into MODE | SET COUNT and set this number less than or equal to the number of sheets placed on the tray. Remove the paper. Slightly lower the position of Paper Feed Resist Roller Pressure Adjust about 1/8”, or one mark on the label. See section #5-212. PAPER FEED RESIST ROLLER PRESSURE ADJUSTMENT (MECHANICAL) Ruffle the sheets on the tray. Press RESET button to clear error and start again. Widen Paper Guides about 1/16”. Press RESET button to clear error and try again. Remove paper. Open Feeder Cover. Wipe off the stains on the Feed Roller with soft cloth. Press RESET button to clear error. Open Feeder Cover. Remove all the stuck paper. Press RESET button to clear error. CAUTION: The lamination rollers get very hot. Follow the instructions for the problem. Laminated sheet is not discharged. Use shorter paper or, place ALM3222 into “LONG MODE” to laminate longer sheets. Reset the stack of paper on the feeder tray. Press RESET to clear the error and start again. Make a small upward adjustment to the Paper Feed Resist Roller Pressure adjust knob (see #5-2-12. PAPER FEED RESIST ROLLER PRESSURE ADJUSTMENT (MECHANICAL). Check Cutter sensor- should be at ~330-400 (unthreaded, cutter installed) and ~265-275 (Cutter Unit removed). Threshold at 48. If cutter installed value is lower than cutter removed value, check film guides on Cutter Unit. Before pressing START use the CUT AL-MEISTER ALM3222 Instruction Manual <Rev.2> ●”LAMINATION ERROR” (NOTE: While diagnosing this problem understand that it is better that the occasional sheet of paper does not enter the feeder rather than several sheets at once). from the discharge as the START button is being pressed. button and pull waste from the discharge. Then START. Laminated film has a curl and has either curled UP into the area between the cutter and trimmer units. Or, DOWN into the waste basket. [1] Press RESET button. [2] Cut the upper and lower film between heat shoe and guide roll. Press Manual Feed Switch to BACKWARD. Remove (unthread) the film and paper. Review step 20, page 29 in the ALM3222 Instruction Manual to adjust the film curl. Too much resistance on the paper tray. Try lowering the Paper Feed Resist Roller Pressure adjust knob about 1/8” (see #5-2-12. PAPER FEED RESIST ROLLER PRESSURE ADJUSTMENT (MECHANICAL) . Do not lower too far or multiple sheet feeding may occur. Press RESET to clear the error and try again. If this error persists they may be a compatibility issue with the paper stock and/or toner being used. [1] Follow the instructions for the problem. Remove the film and laminated sheet in the machine using the MOVE switch with discretion (see warnings about same). If the error is not solved, switch off the ALM3222 and contact your dealer or the DryLam Tech-Line. CAUTION: The lamination rollers get very hot. Be careful that your fingers or clothes do not get caught in the rollers. Be careful that your fingers do not get cut. Do not dismantle. Open trimmer Cover. Remove all the lamination scrap. Press RESET button to clear error. Be careful that your fingers do not get cut. Lamination Handle to LAMINATE position (6 o’clock position). Press RESET button to clear error. Be certain the machine is properly threaded (*) and try again. * If the machine is not properly threaded as per instructions damage to the ALM3222 could result. Load new film rolls and thread as per instructions. CAUTION: The lamination rollers get very hot. Press RESET button to clear error. Due to the second sheet covering the More than 2” of paper was pulled off the tray (and, past the Feeder Sensor) but did not reach the Cutter Sensor in the proper amount of time. Paper may, or may not, have reached the film (i.e. lamination section). Paper is stuck in the Lamination section or the Cutter section. Lamination scrap is stuck in the trimmer section. Lamination handle is in the OPEN (9 o’clock) position. Film rolls have run out. A second sheet of paper was Page 60 of 63 AL-MEISTER ALM3222 Instruction Manual <Rev.2> pulled in at least 2” by friction from the actual sheet of paper that the error occurred on. This second sheet covered the Feeder Sensor during the time that the first sheet was processed. If film/paper of any length is seen emerging from the back of the machine after this error: ●”PAPER STUCK” Do not confuse with “PAPER JAM”. Paper is stuck in feeder section, cutter (lamination) section or trimmer section. The section where the paper is stuck is indicated as an error number on LCD as follows: 1 - Feeder section 2 - Lamination section 3 - Trimmer section Lamination scrap is stuck in trimmer section. ●”FILM ERROR” Check if the lower film roll (with RFID tag) is placed correctly in the lower position with the RFID tag to the non-operator side of the machine. ●”COVER OPEN” This error could be either the Feeder or the Trimmer upper flap and cover. ●”OVERHEAT” ●”TEMP. SENSOR BREAK” Page 61 of 63 feeder sensor the ALM3222 assumed the first sheet was longer than machine specifications allow. This was actually a multiple feed. Raise the Paper Feed Resist Roller Pressure Knob about 1/8” to resist the multiple feed (see #5-2-12. PAPER FEED RESIST ROLLER PRESSURE ADJUSTMENT (MECHANICAL). Press RESET to clear the error and try again. The threading process may not have been completed (see instructions). To complete: move the film further forward using the MOVE switch until no paper is in the film. Then, press the CUT button and pull the waste from the rear of the machine. See instructions for complete details of this threading process. Press RESET to clear the error and try again. Open the feeder and trimmer covers. Remove all the stuck sheets in the machine. Follow the instruction for the problem : ●Laminated sheet is not discharged. Press RESET button to clear error. In case the error is not solved, switch off and contact your dealer or the DryLam Tech-Line. Open trimmer cover. Remove all the lamination scraps. Press RESET button to clear the error. Be careful that your fingers do not get cut. The machine will not heat or operate without a valid RFID tag in place. The tag may be missing or it may have been damaged in shipment or installation. Try a different box of film. Close the open cover. Press RESET button to clear the error and try again. Turn off the power. Then turn on the power. The problem will be solved in most cases, If the problem is not solved, contact your dealer or the DryLam Tech-Line. Turn off the power. Contact your dealer or the DryLam Tech-Line. Do AL-MEISTER ALM3222 Instruction Manual <Rev.2> ●”TEMP. SENSOR POSITION” A sudden drop in roller temperature was detected. ●”TEMP. SENSOR SHORT CIRCUIT” ●”LAMI MOTOR ERROR” ●Other Errors than the above mentioned. ●CUTTER DOES NOT CUT WELL Lamination scrap is stuck in trimmer section. ●TRIMMER DOES NOT CUT WELL ●LEFT AND RIGHT MARGIN IS NOT EQUAL Check the Feed Tray. Check if the trimmer adjustment levers are correctly set. Is paper skewed within the film area? ●CREASES APPEAR IN LAMINATED FILM Tension controller(s) not set properly? ●COMMUNICATION ERROR Involves the RFID tag reader/writer. This error is often followed by a number: Page 62 of 63 not dismantle. Inspect temperature sensor. Possible wrap around of film on the roller. Or, build up of debris on the sensor caused it to be moved away from the roller. If the problem occurs frequently, contact your dealer or the DryLam Tech-Line. Turn off the power. Contact your dealer or the DryLam Tech-Line. Do not dismantle. Turn off the power. The problem will be solved in most cases. If the problem occurs frequently, contact your dealer or the DryLam Tech-Line. Switch off and contact your dealer or the DryLam Tech-Line Do not dismantle. Open Trimmer Cover. Remove all the lamination scrap. Be careful that your fingers do not get cut. Adjust the feed adjustment knob. Adjust the trimmer adjustment levers. Then, fine-tune the trimming amount using the trimmer adjustment knobs. Adjust for skewing on the Feed Tray. Run the machine in “Manual Mode” (use the “MOVE” switch). Run laminated film only out the discharge and check for wrinkles. Adjust tension controllers as necessary. 20: Time out error 01: Invalid command 02: Specified counter error 03: Received data error 04: Data error 05: RFID write error (ch1) 06: RFID write error (ch2, does not apply to the ALM3222) Be certain that the RFID tag is in place and directly in contact with the non-operator side of the frame. See more about the RFID system elsewhere in this manual. If the problem occurs frequently, contact your dealer or the DryLam Tech-Line. AL-MEISTER ALM3222 Instruction Manual <Rev.2> 8. CLEANING THE HEAT ROLLERS With continuous use the heat rollers will accumulate adhesive and dirt. It is recommended that you periodically inspect them for adhesive build-up. Suggested solvents are: Rubbing alcohol (isopropyl 70%, or higher) Goof-Off®, Acetone Poly-Off® These products are available locally. NOTE: Be sure the laminator is cool before cleaning with alcohol. (end) Page 63 of 63