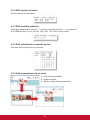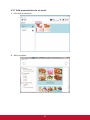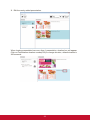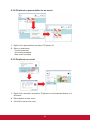
1
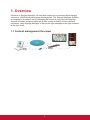
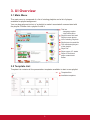
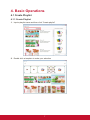
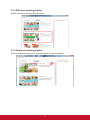
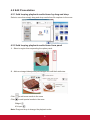
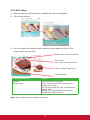
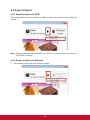
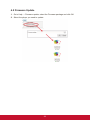
Signage Manager
Software User Manual
Thank you for choosing ViewSonic
With over 25 years as a world leading provider of visual solutions, ViewSonic
is dedicated to exceeding the world’s expectations for technological
evolution, innovation, and simplicity. At ViewSonic, we believe that our
products have the potential to make a positive impact in the world, and we
are confident that the ViewSonic product you have chosen will serve you
well.
Once again, thank you for choosing ViewSonic !
Contents
1. Overview
1.1 Content management Overview.................................................... 1
2. Installation
2.1 Minimum system requirements..................................................... 2
2.2 Setup process............................................................................... 2
3. UI Overview
3.1 Main Menu..................................................................................... 3
3.2 Template List................................................................................. 3
3.3 Presentation Editor........................................................................ 4
3.4 Schedule Editor............................................................................. 5
3.5 Event Editor................................................................................... 5
3.6 User Operation Flow..................................................................... 6
4. Basic Operations
4.1 Create Playlist............................................................................... 7
4.1.1 Create Playlist........................................................................................7
4.1.2 Edit from existing playlist........................................................................8
4.1.3 Duplicate existing playlist.......................................................................8
4.2 Edit Presentation........................................................................... 9
4.2.1 Add looping playback media items by drag and drop............................9
4.2.2 Add looping playback media items from panel.......................................9
4.2.3 Edit image............................................................................................10
4.2.4 Edit video.............................................................................................12
4.2.5 Edit PowerPoint file..............................................................................13
4.2.6 Edit Logo..............................................................................................14
4.2.7 Edit Widget...........................................................................................14
4.2.8 Adding Ticker.......................................................................................15
4.2.9 Edit text................................................................................................17
4.2.10 Switch theme and Toggle logo display...............................................18
4.2.11 Adding background music..................................................................18
4.2.12 Switch between presentations...........................................................18
4.3 Edit Schedule.............................................................................. 19
4.3.1 Edit text................................................................................................19
4.3.2 Edit weekly schedule............................................................................20
4.3.3 Edit monthly schedule..........................................................................20
i
4.3.4 Edit schedule for a specific period.......................................................20
4.3.5 Add presentations to an event ............................................................20
4.3.6 Schedule priority .................................................................................21
4.3.7 Add presentations to an event ............................................................22
4.3.8 Duplicate a presentation to an event ...................................................24
4.3.9 Duplicate an event ..............................................................................24
4.3.10 Adding trigger event...........................................................................25
4.4 Export Playlist.............................................................................. 26
4.4.1 Export playlist via USB.........................................................................26
4.4.2 Export playlist via Network ..................................................................26
4.4.3 Player association................................................................................28
4.5 Firmware Update......................................................................... 29
Other Information
Customer Support............................................................................. 30
ii
1. Overview
Welcome to Signage Manager, an easy and simple way to manage digital signage
content for ViewSonic digital signage media players. The Signage Manager software
is designed to be easy to use by leveraging the power of your personal computer.
Anyone with basic computer skills can quickly create or modify content playback
schedules, using Signage Manager to deliver the right message to the right audience
at the right times.
1.1 Content management Overview
1
2. Installation
2.1 Minimum system requirements
Windows Vista, 7 or 8 Operating System
.DirectX 9
.NET Framework 4
2.6 GHz CPU
2 GB of system memory
20 GB hard drive space
2.2 Setup process
Run the installer and follow the step by step instructions. Close the installer to finish
installation.
2
3. UI Overview
3.1 Main Menu
The main menu is composed of a list of existing playlists and a list of players
available for playlist assignment.
You can drag players into/out of a playlist to make it associated/ unassociated with
the playlist. Double click a playlist to edit it.
3
Tool bar
-Language option
-Help information
Playlist name field and
Playlist create button
List of existing Playlists
4
Playlist preview and info
5
6
The associated players
of the playlist
Player list
7
Player name, IP, status
8
Player IP field and
player search/add
button
1
2
3.2 Template List
Template list contains all the presentation templates available to start a new playlist.
3
1
Template filter
2
Available templates
3.3 Presentation Editor
Presentation editor allows you to edit all the media content: text, pictures and video
in a presentation.
1
Volume control
2
Screen off control
3
Switch presentations
4
Expand/Hide tool menu
5
Editing zone
6
Zoom or Fit options
7
Change content
8
Confirm/Cancel change
9
Expand/Hide media list
10
Media list for this zone
11
Add more media files
12
Media information
Thumbnail
File name
Options
It also allows you to save the playlist, export the playlist to players/USB, or enter
schedule editor if you need to schedule the playback.
4
1
Back to Main menu
2
Edit Playlist Schedule
3
Save and export
4
5
Select export target
(player or USB)
Discard all changes
6
Editing zone
3.4 Schedule Editor
Schedule Editor helps you create flexible playlist containing multiple presentations
which will play automatically according to pre-defined events (time slots).
1
Add event schedule
2
Existing events
3
Event information
Time slot
Event Day/Date
Event Type
Add new presentation
to current event
Existing presentations
in current event
Presentation
information
Thumbnail
Duration
4
5
6
3.5 Event Editor
Event Editor lets you define how and when you want the event to take place.
1
Name of the event
2
Event type
3
Recurrence type
4
Day picker for weekly event
5
Time slot
6
Day picker for monthly event
7
Day picker for specific day event
5
3.6 User Operation Flow
Start Signage Manager
Already
have
playlist?
NO
Create new
playlist
Yes
Select template
Select from existing playlist
Edit
presentation
Edit
Schedule
Export to
Player
6
Add more
presentation
4. Basic Operations
4.1 Create Playlist
4.1.1 Create Playlist
1. Input a playlist name and then click “Create playlist”
2. Double click a template to make your selection
7
4.1.2 Edit from existing playlist
Double click on an existing playlist to edit.
4.1.3 Duplicate existing playlist
Click on Duplicate button of an existing playlist to copy the playlist.
8
4.2 Edit Presentation
4.2.1 Add looping playback media items by drag and drop
Select a zone then simply drag and drop media from file explorer to the zone.
4.2.2 Add looping playback media items from panel
1. Select a region then expending the option panel.
2. Add new image/video/powerpoint/widget and edit their attributes.
Click
to add more media to the zone
Click
to add special media to the zone:
Widget
A/V input
Note: Drag and drop to change the playback order.
9
4.2.3 Edit image
1. Move mouse around the template, editable area will be highlighted.
2. Click to start editing.
3. You can replace the default image, zoom-in/out and adjust the focus. Click
confirm when you are done.
Browse other media to replace it
Zoom-in/out
(Tip: mouse wheel also works)
Drag to change image focus
Confirm/Cancel
Configurable options
Duration
Options
Playback duration (seconds)
Display option
Crop ( default option which allows user to
change focus freely )
Fit ( fit image inside the zone and maintain its
aspect ratio)
Stretch ( fill image inside the zone without
maintaining its aspect ratio)
Note: Use mouse wheel to quickly zoom-in/out.
10
4. Playback duration and other options can be configured from Option dialog, to
launch the Option dialog:
• double click on media item
• click right mouse button and select Option.
Note: To select multiple items, click the first item, press and hold down the Ctrl key,
and then click the next item.
11
4.2.4 Edit video
1. Add video files to a region, a video thumbnail will show in the region.
2. Choose to fit inside the region or stretch video to the region.
: Fit inside
: Stretch
Note: Only ONE zone is allowed to contain video files.
Note: Double click the video to preview the playback in Windows application.
Configurable options
Display
Options
Fit/Stretch
12
4.2.5 Edit PowerPoint file
1. Add powerpoint file to a zone and click on the item to start editing.
2. Choose to fit inside the zone or stretch PowerPoint to the zone.
: Fit inside
: Stretch
Note: Export PowerPoint slides (in static only) if you have PowerPoint
2003/2007/2010/2013 installed in same computer.
Note: Double click the file to edit in PowerPoint
Configurable options
Display
Options
Fit/Stretch
Unspecified slide duration
Playback duration for each slide (seconds)
13
4.2.6 Edit Logo
1. Click on LOGO icon to edit LOGO (LOGO only supported in limited Templates).
2. You can replace the image, zoom-in/out and adjust the focus. Click confirm when
you are done.
4.2.7 Edit Widget
Add widget files to a region and click on the item to start editing.
Configurable options
Common
Options
Playback duration: seconds
Options
Clock
Color: background color
foreColor: text color
timeFormat : 12h/24h
Calendar
timeFormat : 12h/24h
Weather
RSS
Webpage
Align: right/center/left
Cities: type city name listed in http://www.worldweatheronline.com/country.aspx
Scale : C/F
Key : worldweather online API Key
Urls: RSS URL
Writing direction:Right to Left/Left to Right
URL: website URL
14
4.2.8 Adding Ticker
Choose one of the empty templates to
use ticker
in the Tools panel, check Ticker to
enable it
Select a preferred ticker mode from one
of the options:
• Personal text:
to display text content from a .txt file
• Widget:
to display a widget in the ticker zone
(ex. RSS widget or custom widgets)
Configurable options
File
Options
Path to the .txt file
Duration
Playback duration in seconds
Size
The text size of the ticker
Available options: small/normal/large
Transition effect of the ticker
Available options:
Static: no transition effect between lines
Crawl: ticker crawls from right to left
Scroll: ticker scrolls up
Effect
Background color
Select ticker zone background color from color palette
Background opacity
Level of transparency of the ticker background
Text color
Select text color from color palette
Writing direction
Left to right/Right to left
15
After enabling the ticker, you can:
1. Change the location of the ticker to Bottom or Top
2. Adding more .txt file or widgets to the zone
16
4.2.9 Edit text
1. Editable text will get highlighted with yellow box when hovering on it. Click the
text to start editing.
2. Expand option to change font type, size and color.
3. If the text belongs to a text group, changing its style would affect on all text in the
same group.
17
4.2.10 Switch theme and Toggle logo display
Expand Tools panel to toggle logo display and choose a different color theme.
Toggle Logo
display
Change color theme
in one click
4.2.11 Adding background music
Background music only works with image/PowerPoint presentation. If presentation
contains video, an information message will show up to ask user to remove video
from presentation before adding background music.
Toggle
background
music
Click edit to open music
playlist menu to add/remove
background music
4.2.12 Switch between presentations
If more than one presentation exist in same event schedule, switching between
presentations can be done by the switch as shown below.
18
4.3 Edit Schedule
Click Edit schedule to enter schedule editor.
4.3.1 Edit text
1. Click Add event schedule
2. Edit the event schedule
3. Select template
4. Edit the newly added presentation
1. Specify event name
2. Choose an event type
• Presentation
• Screen off
3. Select recurrence type and the day
4. Select the playing period
• All day
• Specific time slot
19
4.3.2 Edit weekly schedule
Check/uncheck the weekdays:
4.3.3 Edit monthly schedule
Enter days separated by comma “,” or period connected by dash “-“, for example: 1,
5, 9, 15-18 will play on 1st, 5th, 9th, 15th, 16th, 17th, 18th of each month.
4.3.4 Edit schedule for a specific period
Pick start and end day form the calendar
4.3.5 Add presentations to an event
1. Click Add presentation
2. Select template
3. Edit the newly added presentation
20
4.3.6 Schedule priority
Default presentation
Specific day(s) 1
Monthly 1
Weekly 1
Specific
day(s) 2
Monthly 2
Weekly 2
Default presentation is the initial schedule which is defaulted to play 24/7.It has
lowest priority, will be surpass whenever there are overlapping with other schedule.
As shown on diagram above, specific day(s) event has the highest priority of
playback when schedules are overlapping, Monthly schedule has 2nd highest priority
then it's weekly schedule.
Among same recurrence type, newly added schedule takes higher priority ( e.g.
Weekly 2 is the newly added schedule )
21
4.3.7 Add presentations to an event
1. Click Add presentation.
2. Select template.
22
3. Edit the newly added presentation.
When looping presentation has more than 1 presentation, duration box will appear.
Click on Presentation duration number(300) to change duration, default duration is
300 seconds.
23
4.3.8 Duplicate a presentation to an event
1. Right click a presentation and select "Duplicate to"
2. Select a destination:
- Current schedule
- An existing schedule
- New event schedule
4.3.9 Duplicate an event
1. Right click a schedule and select "Duplicate or click duplicate button of a
schedule"
2. Edit schedule of new event
3. Click OK to save new event
24
4.3.10 Adding trigger event
Enable event trigger and add trigger to current presentation
Trigger Event lets you to add event trigger into presentation, the trigger source can
be touch button event and motion sensor event from ePoster, or input event from
GPIO board.
Trigger Event Editor
1
2
3
4
5
6
7
Name of the trigger event
Trigger type: simple trigger or motion sensor
Schedule up to 10 simple triggers
Advanced: control for simple trigger
Advanced: control button light effect
Advanced: option to disable interrupt for the trigger
Advanced: option to disable loop back to default presentation
25
4.4 Export Playlist
4.4.1 Export playlist via USB
Click export button and click Export to USB, and then select the correct location for
export.
Note: Signage Manager will remember your action, so next time you only need to
click ‘Save’ to export.
4.4.2 Export playlist via Network
1. Click export button and click Export to player.
26
2. Scan devices on your network or add them by typing their IPs.
Note: If a player is already associated with another playlist, it will not show in this list,
please search by its IP address.
3. Select devices for export.
4. After export, the selected players will be associated with this playlist.
5. Exporting status displays in main menu as well:
27
4.4.3 Player association
After export, the players are associated with the playlist and will be listed under the
playlist in the main menu.
You can also assign player to playlist by dragging player and drop to playlist in the
main menu.
Drag and dropto add
Associated players
28
4.5 Firmware Update
1. Go to Help → Firmware update, select the Firmware package and click OK
2. Select the player you need to update.
29
Other Information
Customer Support
For technical support or product service, see the table below or contact your reseller.
NOTE: You will need the product serial number.
Country/Region
Website
T = Telephone
C = CHAT ONLINE
Email
Australia
New Zealand
www.viewsonic.com.au
AUS= 1800 880 818
NZ= 0800 008 822
[email protected]
Canada
www.viewsonic.com
T (Toll-Free)= 1-866-463-4775
T (Toll)= 1-424-233-2533
[email protected]
Europe
www.viewsoniceurope.com
www.viewsoniceurope.com/uk/support/call-desk/
Hong Kong
www.hk.viewsonic.com
T= 852 3102 2900
[email protected]
India
www.in.viewsonic.com
T= 1800 419 0959
[email protected]
Korea
ap.viewsonic.com/kr/
T= 080 333 2131
[email protected]
Latin America
(Argentina)
www.viewsonic.com/la/
C= http://www.viewsonic.com/la/
[email protected]
soporte/servicio-tecnico
Latin America
(Chile)
www.viewsonic.com/la/
C= http://www.viewsonic.com/la/
[email protected]
soporte/servicio-tecnico
Latin America
(Columbia)
www.viewsonic.com/la/
C= http://www.viewsonic.com/la/
[email protected]
soporte/servicio-tecnico
Latin America
(Mexico)
www.viewsonic.com/la/
C= http://www.viewsonic.com/la/
[email protected]
soporte/servicio-tecnico
Nexus Hightech Solutions, Cincinnati #40 Desp. 1 Col. De los Deportes Mexico D.F.
Tel: 55) 6547-6454 55)6547-6484
Other places please refer to http://www.viewsonic.com/la/soporte/servicio-tecnico#mexico
Latin America
(Peru)
www.viewsonic.com/la/
C= http://www.viewsonic.com/la/
[email protected]
soporte/servicio-tecnico
Macau
www.hk.viewsonic.com
T= 853 2870 0303
[email protected]
Middle East
ap.viewsonic.com/me/
Contact your reseller
[email protected]
Puerto Rico &
Virgin Islands
www.viewsonic.com
T= 1-800-688-6688 (English)
C = http://www.viewsonic.com/
la/soporte/servicio-tecnico
[email protected]
[email protected]
Singapore/
Malaysia/
Thailand
www.ap.viewsonic.com
T= 65 6461 6044
[email protected]
South Africa
ap.viewsonic.com/za/
Contact your reseller
[email protected]
United States
www.viewsonic.com
T (Toll-Free)= 1-800-688-6688
T (Toll)= 1-424-233-2530
[email protected]
30