1
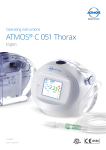
McGRATH ®
Video Laryngoscope Series 5 HLDi
Operator’s Manual
Doc No:
505-100-008
Revision 1.1
21st August 2009
McGRATH®
Video Laryngoscope
Series 5 HLDi
Operator’s Manual
Revision 1.1
21st August 2009
Document Number
505-100-008
Contents
1
Introduction
2
1.1
Description
2
1.2
Accessories and Part Numbers
2
1.3
Specifications
3
1.4
Regulatory
3
2
Functional
4
2.1
Unpacking and Inspection
4
2.2
Batteries
5
2.3
Fitting the Battery
5
2.4
Fitting the CameraStick™
6
2.5
Blade Fitting
7
2.6
Blade and Monitor Adjustment
8
2.7
Standby - Switching On / Off
2.8
Using the Laryngoscope
10
3
Cleaning and Decontamination
11
3.1
Decontamination of McGRATH® Series 5 HLDi Devices
11
3.2
Disinfection
14
3.3
Drying and Storage
15
3.4
Sterilization
16
3.5
Disposal of Intubation Blades
16
3.6
Handling and Product Preservation
16
3.7
Environmental
16
4
Maintenance
17
5
Troubleshooting, Replacement Parts & Repair
18
6
Warranty
20
9
1
Introduction
1.1
Description
1.3
Laryngoscope Assembly
Size
200mm x 50mm x 150mm
Weight
0.28kg
Power
AA 1.5V Battery
For information regarding battery life, refer to section 2.2 of this manual
Light source High intensity LED fibre
Display
Colour LCD (1.7” diagonal)
Camera
VGA
Protection IPx7
Materials
Durable medical grade rubber, thermoplastics and stainless steel
This device and packaging are latex free
The McGRATH® Series 5 HLDi Video Laryngoscope (“the McGRATH®”) is a device
designed to aid the intubation of the trachea. A rigid laryngoscope blade restrains the
tongue, allowing a clear view of the larynx and entrance to the trachea. The need
to provide a guaranteed airway is fundamental to an anaesthesiologist’s task prior to
an operation. Paramedics, Emergency Department Consultants and General
Practitioners may also be required to insert a tracheal tube to keep the airway open in
an unconscious patient.
The McGRATH® incorporates a light source and miniature camera within the
CameraStick™ assembly to view the larynx during the procedure of intubation. The
image is displayed on an LCD screen mounted to the handle of the device.
Disposable Intubation Blade
Size
110mm x 12mm x 15mm
Material
Medical grade optical polymer
Packaging Packaged sterile for single use only
This device and packaging are latex free
A single AA 1.5V battery mounted within the handle powers the camera, display and light.
The disposable sterile blade covers the CameraStick™/light assembly.
1.2
Accessories and Part Numbers
UNDER NO CIRCUMSTANCES SHOULD ANY OTHER TYPE OF
LARYNGOSCOPE BLADE BE USED WITH THIS MEDICAL DEVICE
DO NOT OPEN ANY SEALED PART OF THE DEVICE UNDER ANY
CIRCUMSTANCES.TO DO SO WILL IMPAIR THE PERFORMANCE OF
THE DEVICE AND PATIENT SAFETY AND INVALIDATE THE WARRANTY
The McGRATH® is not supplied with batteries or with disposable intubation blades –
blades should be purchased separately from your distributor or agent.
McGRATH® Intubation Blades (Carton of 30) 550-006-000
McGRATH® Series 5 HLDi Video Laryngoscope 505-000-000
McGRATH® Maintenance Kit
500-070-005
McGRATH®
Video Laryngoscope
Series 5 HLDi
Specifications
1.4
Regulatory
This product complies with EN 60601-1 and EN 60601-1-2 safety standards. The CE
mark indicates that it meets the requirements of European Council Directive 93/42/EEC
concerning medical devices.
Aircraft Medical Limited operates an approved Quality Management System in
accordance with BS EN ISO 13485.
“McGrath” is a registered trademark of Aircraft Medical Limited.
“Aircraft” is a registered trademark of Aircraft Medical Limited.
“CameraStick” is a trademark of Aircraft Medical Limited.
Only personnel trained in and licensed to perform intubation with a laryngoscope may
use this device.
Operator’s Manual
Revision 1.1
21st August 2009
The user must contact the distributor to arrange responsible disposal and compliance
with Waste Electrical and Electronic Equipment regulations as locally applicable, and
any similar future environmental regulation applicable (including but not limited to
Directives 2002/95/EC and 2002/96/EC as implemented in the Territory).
Document Number
505-100-008
CAUTION : FEDERAL (USA) LAW RESTRICTS THIS DEVICE TO SALE BY OR ON
THE ORDER OF A LICENSED PRACTITIONER
2
3
2
Functional
2.1
Unpacking and Inspection
2.2
The device is powered by a single AA battery. For safety reasons, the batteries are not
supplied with the unit. The McGRATH® will accept any AA battery. The McGRATH®
will give longer use with lithium batteries. We do not recommend the use of Zinc
Chloride batteries due to limited life.
Unpack the McGRATH® and check for any visible signs of damage that may have
occurred during shipment. In the event of signs of damage do not use the laryngoscope,
and inform your local agent or distributor.
The packaging should contain the following items:
CameraStick™ Module
Batteries
TIME
Up to 3 hours
Handle Module
Up to 3 hours
Up to 2.25 hours
Up to 1.5 hours
Up to 0.75 hours
0 hours
Lithium
2.3
The McGRATH® is supplied in a non-sterile state. It will be necessary to decontaminate
the laryngoscope according to local requirements before use on a patient. (See section
3.1)
Nickel Metal Hydride
(NiMH rechargeable,
2700 mA-h)
Alkaline
Unbranded
Zinc Chloride
Fitting the battery
Unscrew the Top Cap as per the diagram below and insert battery with positive terminal
upwards. Replace Top Cap.
The laryngoscope blade (purchased separately) is supplied in a sterile state. Ensure
that handling precautions are taken in accordance with local, national and harmonised
standards.
McGRATH®
Video Laryngoscope
Series 5 HLDi
Operator’s Manual
Revision 1.1
21st August 2009
Document Number
505-100-008
4
5
2.4
2.5
Fitting the CameraStick™
Blade Fitting
Remove the protective labels from the contact strips on the rear of the CameraStick™
and from the end of the CameraStick™.
The McGRATH® is designed to be
used only with McGRATH® Disposable
Intubation Blades.
Release the safety catch by pulling out and rotating, then slide the CameraStick™ into
the clamp at the bottom of the handle module. Return the safety catch to the upright
position. It should be possible to hear the ratchet tooth ‘clicking’as the CameraStick™
passes through the clamp.
These blades are packaged and
supplied sterile and MUST be
disposed of after each patient use.
Ensure that the CameraStick™ slides smoothly through the clamp whilst still requiring
a reasonable amount of force to deflect the ratchet tooth.
FAILURE TO RELEASE THE SAFETY CATCH WHEN FITTING THE
CAMERASTICK™ WILL LEAD TO DAMAGE TO THE HANDLE
To fit the blade, remove the blade from
sterile packaging and slide over the
CameraStick™. The blade is fully located
when the blade clip is firmly latched to
the CameraStick™.
Safety catch rotated
Safety catch
ENSURE THAT LOCAL HANDLING PROCEDURES ARE FOLLOWED AT
ALL TIMES WHILST HANDLING STERILE DEVICES
CHECK THAT THE BLADE IS CORRECTLY FITTED TO THE
CAMERASTICK™ BEFORE USING ON A PATIENT
McGRATH®
Video Laryngoscope
Series 5 HLDi
Operator’s Manual
Revision 1.1
21st August 2009
McGRATH® BLADES MUST ONLY TO BE USED WITH A McGRATH®
SERIES 5 VIDEO LARYNGOSCOPE. DO NOT ATTEMPT TO USE ANY
OTHER LARYNGOSCOPE BLADE WITH THIS EQUIPMENT
IF THERE IS ANY EVIDENCE THAT THE STERILE BARRIER ON THE
BLADE PACKAGING HAS BEEN BREACHED, DO NOT USE THE BLADE
DO NOT PUT LIQUID ON THE CAMERASTICK™ OR ON INTERNAL
SURFACES OF THE BLADE
Document Number
505-100-008
6
7
2.6
2.7
Blade and Monitor Adjustment
The length of the CameraStick™ may be adjusted for operation by sliding laterally
through the clamp. The ratchet tooth grips the blade at 3 different length settings.
STANDBY - Switching on / off
The Laryngoscope is switched on by pushing the STANDBY button.The LED on the
monitor will light up to show that power is applied to the system. Switch the equipment
to standby by pushing the STANDBY button. Ensure that the equipment is always
switched to standby after use to preserve the charge in the battery. When the unit is
switched on, the device automatically checks the charge state of the battery. If the
battery has sufficient charge to operate, the LED on the monitor illuminates continuously.
When the device battery requires to be changed, the LED will begin to flash to indicate
that the battery charge is low. When this occurs, it is recommended that the battery is
changed IMMEDIATELY, as the device will only remain operational for a short period of
time in this condition.
LED on - battery OK
LED flashing - check battery
The monitor may be rotated in a horizontal and vertical plane for best viewing angle.
135 degrees
90 degrees
McGRATH®
Video Laryngoscope
Series 5 HLDi
Operator’s Manual
Revision 1.1
21st August 2009
Document Number
505-100-008
8
THE MONITOR HAS POSITION STOPS AT THE ENDS OF ITS TRAVEL.
DO NOT FORCE THE MONITOR BEYOND THESE POINTS
9
2.8
Using the Laryngoscope
The laryngoscope should be turned on as detailed in section 2.7. A bright light should
appear at the tip of the CameraStick™, and an image on the screen at the top of the
handle.
3
Cleaning and Decontamination
3.1
Decontamination of McGRATH® Series 5 HLDi Devices
WARNING: DO NOT AUTOCLAVE THIS DEVICE
WARNING: ENSURE THE DEVICE IS COMPLETELY DRY BEFORE USE
Anesthesia should be induced according to the anesthesiologist’s preference.
WARNING: ALWAYS ENSURE THE BATTERY IS REMOVED BEFORE
DECONTAMINATION
The tip of the laryngoscope blade should be inserted into the mouth in the midline,
superior to the tongue, and rotated towards the larynx in a sagittal plane until the
epiglottis is visible. Either direct vision, along the superior surface of the blade, or
indirect vision via the camera, can be used to guide the laryngoscope tip toward the
larynx. Care should be taken, as with conventional laryngoscopy, that the blade does
not make contact with the teeth.
WARNING: THIS DEVICE SHOULD NOT UNDERGO DECONTAMINATION
OR DRYING PROCESSES ABOVE 60°C
WARNING: IT IS THE RESPONSIBILITY OF THE USER TO ENSURE THAT
THE CLEANING PROCESS, AS IT IS ACTUALLY PERFORMED, ACHIEVES
THE DESIRED RESULT
The tip of the blade should be guided into the vallecula. Further rotation, and/or minimal
force applied along the long axis of the handle, should lift the epiglottis and allow a
view of the glottis. Again, either direct or indirect vision can be used to view the glottis.
Once the glottic opening has been correctly identified, a correctly sized tracheal tube
can be passed between the vocal cords. A bougie or a malleable introducer may be
used to assist the passage of the tracheal tube. If a malleable introducer is used, we
recommend that a “hockey stick”curve be made at a point about 5cm from the tip of
the tracheal tube. The laryngoscope can then be carefully withdrawn by reversing the
process described above. Confirmation of the correct placement of the tracheal tube
should be both visual, and by the use of capnography.
WARNING: AFTER ANY CLEANING / DISINFECTION / STERILIZATION
PROCESS ENSURE THAT THE DEVICE HAS NO DAMAGE OR LOOSE
PARTS AND OPERATES CORRECTLY
WARNING: ANY TRAYS OR CONTAINERS THAT ARE USED IN ANY OF
THE PROCESSES BELOW SHOULD BE INSPECTED FOR VISIBLE SOIL
AND MUST BE CLEANED BEFORE USE
WARNING: CHEMICALS AND EQUIPMENT RECOMMENDED IN
THIS DOCUMENT MUST BE USED IN ACCORDANCE WITH THE
MANUFACTURER’S INSTRUCTIONS FOR USE AND LOCAL HANDLING
PROCEDURES
These instruction have been prepared to provide decontamination and sterilization
instructions for the McGRATH® Series 5 HLDi Video Laryngoscope. These methods
were developed using standard equipment and practices common to global healthcare
facilities, using the guidance given in AAMI TIR 12 (Designing, Testing, Labelling
Reusable Medical Devices for Reprocessing in Health Care Facilities: A Guide for Device
Manufacturers) and ISO 17664:2004 (Sterilization of medical devices Information to be
provided by the manufacturer for the processing of resterilisable medical devices).
McGRATH®
Video Laryngoscope
Series 5 HLDi
Operator’s Manual
Revision 1.1
21st August 2009
Document Number
505-100-008
10
3.1.1
The device should be decontaminated after each patient use.
3.1.2
Dispose of all chemicals used in accordance with manufacturer’s guidelines.
3.1.3
General Information for Disinfection and Sterilization of Medical Devices
Thorough cleaning and rinsing are vital for the decontamination of the product. The
purpose of cleaning and rinsing is to remove all visible soil and to reduce the number of
particulates, microorganisms, and pyrogens. Thorough rinsing is important for removing
any residual cleaning agents from the medical devices.
The decontamination methods have been validated by Aircraft Medical together with
external, independent experts and companies. Other decontamination methods may be
suitable but must be validated by the user of the device before use.
11
3.1.4
Before Cleaning
•
Remove battery and replace Top Cap.
If Visible Soiling is present
•
•
Immerse both parts of the device for a minimum of five (5) minutes
in enzymatic detergent
Use cleaning brushes to remove additional soil as necessary, taking care not to
scratch optical surfaces
•
•
•
•
Scrub crevices and around hinged/mating surfaces with a brush
Rinse thoroughly with warm water
Check instruments for visible soil. Repeat cleaning if soil is visible
If the soiling persists the device may be immersed in an ultrasonic bath for
ten (10) minutes in a warm enzymatic detergent solution to help loosen
any particulate
•
Separate the Handle and CameraStick™. Rotate safety catch so that it is
in the out position to aid cleaning.
Cleaning Procedure
•
•
•
•
•
3.1.5
Immerse the cleaning cloth in the enzymatic detergent solution and wring
thoroughly
Wipe all surfaces thoroughly ensuring that detergent solution comes
into contact with all surfaces
Periodically rinse the cloth in clean water and repeat the above steps
Surfaces should be carefully hand-dried using a cloth or industrial hot air
dryer or placed into a drying cabinet
Safely dispose of cleaning materials
Manual Cleaning
Cleaning Equipment required:
•
•
Video Laryngoscope
Series 5 HLDi
•
Operator’s Manual
McGRATH®
Revision 1.1
21st August 2009
Document Number
505-100-008
12
A warm water/detergent solution at correct dilution such as ENZOL®
A clean, disposable, absorbent, non-shedding cloth for application of
detergent solution
A clean, disposable, absorbent, non-shedding cloth for wiping product
(Aircraft Medical recommends the use of a ultra-absorbent microfiber cloth)
WARNING: ALWAYS ENSURE THE BATTERY IS REMOVED BEFORE
CLEANING
13
3.2
Disinfection
Manual Disinfection
Preparation for Disinfection
•
It is important that the battery is removed from the device, the Top Cap
is replaced, the unit separated and adequate cleaning be performed prior
to disinfection per the procedure detailed in this manual
Disinfection
•
All irritant disinfectant residues should be removed before the item is
reused and care should be taken when rinsing to ensure that items are not
re-contaminated during this procedure. Receptacles and containers used
to contain devices should be cleaned before use
Disinfection Equipment required
•
•
•
•
•
•
A receptacle (with a lid) which can be disinfected and with sufficient capacity
to immerse the item fully
A means to contain or extract any irritant vapours
A solution of freshly prepared chemical disinfectant, at the manufacturer’s
recommended concentration such as Cidex OPA
A receptacle which can be sterilized or disinfected to contain rinse water
Sterile clean water to rinse items after chemical disinfection
A clean, disposable, absorbent, non-shedding cloth or mechanical
drying facility (Aircraft Medical recommends the use of an ultra-absorbent
microfiber cloth)
Disinfection Procedure
•
•
•
•
•
•
•
•
•
3.3
Liquid chemical disinfectants can be supplied ready to use or may
require mixing with an activator. Alternatively it may need accurate dilution to
an in-use strength as per the manufacturer’s instructions
Ensure that the disinfectant receptacle is clean and dry
Wearing appropriate personal protective equipment, to include impervious
gown, Nitrile or Butyl gloves, face mask/shield or face shield, fill the receptacle
with sufficient prepared disinfectant solution so as to ensure complete
immersion of the item to be processed
Carefully immerse the item in the solution in such a way as to displace any
trapped air within the item; it is important to ensure that the solution reaches
all surfaces
Place the lid on the receptacle and leave for the recommended time. Follow
manufacturer’s recommended soak times:
Cidex OPA – 12 minutes @ 25°C Metricide OPA – 12 minutes @25°C
Cidex Plus – 20 minutes @ 25°C Metricide – 45 minutes @ 25°C
Cidex – 45 minutes @ 25°C
Metricide 28 – 90 minutes @ 25°C
Remove the item from the solution, drain into receptacle before transferring to
clean rinse receptacle
Rinse thoroughly with sterile water of suitable microbiological quality
Remove item from rinse solution and drain
Carefully hand-dry using clean, absorbent, non-shedding cloth or industrial
hot air dryer or place into drying cabinet
Drying and Storage
The device must be completely dry before use. Aid drying by placing the handle, with
the top removed on a drying spike so that the opening is facing downwards to aid
drainage. Place the Top Cap and CameraStick™ on a drying tray so that they are
suspended to aid drainage.
A drying cabinet is suitable to aid drying time.
McGRATH®
Video Laryngoscope
Series 5 HLDi
Storage of the device once decontaminated
Store the device in a clean container, covered
to prevent airborne contamination.
Operator’s Manual
Revision 1.1
21st August 2009
Document Number
505-100-008
14
15
3.4
Sterilization
4
Preparation for Sterilization
4.1
•
3.4.1
3.4.2
Ethylene Oxide Sterilization
•
Sterilize as instructed in the STERRAD User Manual (the standard
cycle contains no user variables)
STERIS V-Pro® Sterilization
•
3.5
The device is compatible with EtO sterilizing processes
STERRAD 100®, 200®, NX® Sterilization
•
3.4.3
It is important that the battery is removed from the device, the Top Cap
is replaced, the unit disarticulated and adequate cleaning be performed prior
to sterilization per the procedure detailed in this manual
Sterilize as instructed in the STERIS V-Pro User Manual (the standard
cycle contains no user variables)
Disposal of Intubation Blades
The intubation blade must be disposed of after each procedure. The blade must be
disposed of in accordance with standard departmental practices.
3.6
Handling and Product Preservation
Ensure that care is taken at all times while handling the device. If the device is dropped, it
is recommended that you check for any visible signs of damage. If the device is showing
no signs of damage but is not functioning refer to the Troubleshooting Section.
It is also recommended that the battery is removed from the device and the device
returned to its original packaging when not required for use.
Avoid leaving unattended in situations where it may be misused or damaged.
McGRATH®
3.7
Video Laryngoscope
Series 5 HLDi
Operator’s Manual
Revision 1.1
21st August 2009
Document Number
505-100-008
16
Environmental
Maintenance
Inspection
The device should be inspected at regular intervals for:
• visible signs of external damage • scratches or defects on the lens of the CameraStick™ • signs of deterioration of the LCD display
• build-up of material on contact strips on CameraStick™ and contact pin
area of Handle
4.1.1
4.1.2
Product checks
Additionally, at six month intervals the following should be checked by a qualified
technician:
• check for signs of oxidization on electrical contacts
• perform the functional checks
In the event of problems the device must be returned to the distributor for repair or
exchange.
Maintenance Kit
Lens Cleaning Procedure
Every few months, or if the image on the screen becomes blurred, cloudy or obstructed,
clean the camera lens with a conical foam swab. (Dipping the swab in IPA will help
shift stubborn dirt).
Contact Cleaning Procedure
Every few months, or if the image is flickering or the battery life is short, clean the
electrical contact points with the cleaning solution sachets found in this kit, using a
simple 2-step process. Firstly open the sachet marked “Cut & Polish” (1) and wipe
down the contact points firmly. Then open the sachet marked “IPA” (2) and wipe down
the contact points firmly. This will remove dirt and carbon build up on the product. The
contact points are located:
•
•
In the battery cap and in the handle
The bottom, top and contact point side of the CameraStick™
For re-ordering Kit use Part Number: 500-070-005
Operating Conditions:
Storage & Transport Conditions:
• 10ºC to 40ºC ambient
• 10ºC to 40ºC ambient
• Relative Humidity 10% to 50%
• Relative Humidity 10% to 90%
• Atmospheric Pressure 700h Pa to 1060 hPa
• Category 2 Pollution Degree 2
Decontamination and Drying Condition:
• 60ºC Maximum
17
5
Troubleshooting, Replacement Parts & Repair
Any other faults will require to be diagnosed by an authorised repair centre. The device
must only be diagnosed, repaired and serviced by an official Aircraft Medical Limited
distributor or agent.
Distributor Contact Details:
Poor picture quality
The image displayed on the screen is blurred or fuzzy
• Check for fogging on the intubation blade. Remove the blade and check that
the image is clear and bright. If necessary wipe the camera lens at the end of
the CameraStick™ as per maintenance kit instructions
• Check that the CameraStick™ is fully inserted in the blade and that the blade
has latched to the CameraStick™
• Clean the contact strips on the CameraStick™ and the contact pins on the
handle clamp using Maintenance Kit
The image on the screen flickers or has lines across it
When switched on, there is
no display on the screen.
Is the battery charge
LED illuminated?
The LED is not illuminated
•
•
•
Check that the battery is inserted in the correct orientation. (refer to
section 2.3)
Replace battery
Check for oxidization on the battery contacts and, if required, clean the
contacts using Maintenance Kit
LED Flashing
The LED flashing indicates that the battery requires changing.
•
Change the battery
• Check that the battery is fully charged
• Remove battery and check battery for oxidization
• Clean the contact strips on the CameraStick™ and the contact disc of the
Top Cap using Maintenance Kit
• Use of Pin Pusher
• Push the contact pins
in and out using the Pin Pusher,
as shown, for 2-3 seconds
•
Push the ground contact
pin using the teeth of the
Pin Pusher. Slide in and out
for 2-3 seconds
•
Push the ratchet mechanism
using the Pin Pusher as lever
on the clamp area for 2-3 seconds
The LED is illuminated
•
Video Laryngoscope
•
Series 5 HLDi
Operator’s Manual
McGRATH®
Revision 1.1
21st August 2009
Check the LEDs situated at the end of the CameraStick™ module. If these
are not lit there may be oxidization of the CameraStick™ or CameraStick™
clamp contact strips / pins. Clean using Maintenance Kit
The unit may be receiving no signal from the camera. This also may be
caused by oxidization of the CameraStick™ or CameraStick™ clamp. Clean
using Maintenance Kit
If none of the above achieves positive results, return the unit to your local distributor
or agent for repair.
If none of the above achieves positive results, return the unit to your local dealer
for repair.
Loose or poorly fitting components
If any components become loose, physically damaged or fit poorly, under no
circumstances use the equipment and return the unit to your local distributor or agent
for repair or replacement.
Document Number
505-100-008
18
19
6
Warranty
Aircraft Medical Limited warrants that the device supplied is, on leaving the factory,
free from defects in materials or workmanship. This warranty is valid only if the product
is supplied to the end user by an Aircraft approved distributor or agent and has been
maintained in accordance with procedures documented in the Operator’s Manual.
If failure occurs from manufacturing defects within 12 months of purchase, Aircraft
Medical will repair or replace the defective item.
McGRATH®
Video Laryngoscope
Series 5 HLDi
Operator’s Manual
Revision 1.1
21st August 2009
Document Number
505-100-008
20
21
McGRATH ®
Video Laryngoscope Series 5 HLDi
Operator’s Manual
Designed & manufactured by:
Aircraft Medical Ltd
10 Saint Andrew Square
Edinburgh
EH2 2AF
United Kingdom
Tel: +44 131 718 6042
Fax: +44 131 718 6100
www.aircraftmedical.com
‘McGrath’ and ‘Aircraft’ are registered trademarks of Aircraft Medical Ltd
‘CameraStick’ is a trademark of Aircraft Medical Ltd
International patents pending.
Copyright Aircraft Medical 2009.
Doc No:
505-100-008
Revision 1.1
21st August 2009