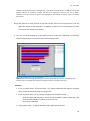
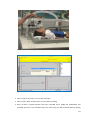
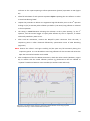
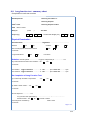
1
V.1, June 2014 Manual of Infant Lung Function Tests Version 1.0 June 2014 Ah-Fong Hoo,1,2 Sooky Lum,1 Jöerg Mattes,3 Janet Stocks1 1 Respiratory, Critical Care & Anaesthesia Section (Portex Unit), UCL Institute of Child Health, 2 Respiratory Medicine Unit: Great Ormond Street Hospital for Children NHS Foundation Trust, London, England, UK and 3 NSW infant Lung Function Centre, Newcastle, Australia 0 V.1, June 2014 Conditions of use This work is licensed under a Creative Commons Attribution-NonCommercialNoDerivatives 4.0 International License. Under the following terms: ATTRIBUTION — You must give appropriate credit, provide a link to the license, and indicate if changes were made. You may do so in any reasonable manner, but not in any way that suggests the licensor endorses you or your use. NONCOMMERCIAL — You may not use the material for commercial purposes. NODERIVATIVES — If you remix, transform, or build upon the material, you may not distribute the modified material. NO ADDITIONAL RESTRICTIONS — You may not apply legal terms or technological measures that legally restrict others from doing anything the license permits. Copyright of all materials including photos and illustrations remain with the authors. 1 V.1, June 2014 Conditions of Use By using the manual, you confirm that you have read and accept the following conditions of use and that you agree to comply with them. You may use the manual solely for your own personal, non-commercial use and you may not use the information contained in the manual except as provided for in these conditions of use. The manual is not for commercial exploitation. You may not decompile, dissemble or create derivative works from the manual. If you do not agree to these conditions of use, you must not use the manual. Disclaimer The accuracy, completeness, adequacy or currency of the manual is not warranted or guaranteed. We do not guarantee that the manual is free from errors or omissions. Your use of the manual is at your own risk. The data in the manual are not intended as and does not constitute advice of any nature. The manual is not intended to be, and must not be, relied upon in the performance and interpretation of infant lung function testing. This manual is not intended as, and must not be used or relied upon as, a user manual for CareFusion MasterScreen™ BabyBody Plethysmograph or any other similar devices. Summary of Manual The details included in this manual are based on assessments of infant lung function using the CareFusion MasterScreen™ BabyBody Plethysmograph with RVRTC v 4.67 as currently performed in two well-established laboratories in the UK and Australia. Such practices may need to be modified in other institutions. Hospital/institute ethics, safety and hygiene regulations must always be adhered to, and assessments only carried out by suitably qualified staff who have ideally spent at least 6 months training in a specialised centre. The authors have no commercial interest in this product and have received no funding from the manufacturer to produce this manual. It should be noted that the current CareFusion infant pulmonary function testing system was developed over 10 years ago and as such does suffer from various limitations which will be highlighted where relevant, together with recommendations as to how best to overcome these problems until such time that the software is upgraded. 2 V.1, June 2014 It should be noted that the BabyBody device is not designed to assess partitioned lung volumes, and that although a program has been included to assess plethysmographic airways resistance, such measurements are not currently valid in infants, as will be discussed below. The contents of this manual cannot substitute for reading the extensive literature in this field including that recommended in the reading list provided. In the event of noting any errors, please contact us so that amendments can be made ([email protected]; [email protected]; [email protected] ) It should be noted that two qualified investigators, at least one of whom is clinically qualified and both of whom are fully trained in basic/advanced life support skills, MUST be present at all times during infant lung function testing. Changes to the Manual With subsequent upgrades of software and equipment, the manual will inevitably require updating at regular intervals. It is the users’ responsibility to check for such updates. However, please note that the content of the manual may be out of date at any given time, and we are under no obligation to update it. No Reliance on Information The content of the manual is provided for general information only. It is not intended to amount to advice on which you should rely. You must obtain professional or specialist advice before taking, or refraining from, any action on the basis of the content of the manual. We make no representations and provide no warranties, express or implied, in relation to the information in the manual including (without limitation) as to the validity, reliability, accuracy, completeness, or correct translation, of the manual itself, and of material contained therein; there is no warranty of the results to be obtained from the use of the manual provided and we make no warranties of merchantability or fitness for a particular purpose or use. We offer the manual as-is and as-available and we make no representations, warranties or guarantees, whether express or implied, that the content of the manual is accurate, complete or up-to-date. By using the manual you hereby release and forever waive any and all claims you may have against UCL, or the providers of data contained in the manual for any losses or damages that might be sustained in connection with your use of the manual. 3 V.1, June 2014 Limitation of Liability Nothing in these conditions of use excludes or limits our liability for death or personal injury arising from our negligence, or our fraud or fraudulent misrepresentation, or any other liability that cannot be excluded or limited by English law. To the extent permitted by law, we exclude all conditions, warranties, representations or other terms which may apply to the manual or any content in it, whether express or implied. We will not be liable to any user of the manual for any loss or damage, whether in contract, tort (including negligence), breach of statutory duty, or otherwise, even if foreseeable, arising under or in connection with: use of, or inability to use, the manual; or use of or reliance on any content displayed on the manual. Please note that we only provide the manual for domestic and private use. You agree not to use the manual for any commercial or business purposes, and we have no liability to you for any loss of profit, loss of business, business interruption, or loss of business opportunity. We will not be liable for any loss or damage caused by a virus, distributed denial-ofservice attack, or other technologically harmful material that may infect your computer equipment, computer programs, data or other proprietary material due to your use of the manual or to your downloading of any content on it, or on any website linked to it. Acknowledgements Production of this manual would not have been possible without the contributions of numerous individuals who have worked in our infant lung function laboratories including: Matthias Henschen, Georg Hulskamp, Anne Cantarella, Henrik Ljungberg, Amit Gupta, Jo Chittenden, Robyn Hankin, Muriel Albiez, Alicia Bolton, Deeba Ahmed, Lena Thia, Thanh Diem Nyugen, Lucy Brennan, Jane Chudleigh and Joanne Miles. 4 V.1, June 2014 Contents Condition of use ……………………………………………………………………………………………………….… 1 Disclaimer / Summary of Manual ……………………………………………………………………………..… 2 Acknowledgements……………………………………………………………………………………………………… 4 Table of Contents ……………………………………………………………………………………………………….. 6 List of Figures ……………………………………………………………………………………………………………. 13 List of Tables …………………………………………………………………………………………………………….. 18 List of Abbreviations / Symbols ………………………………………………………………………………… 19 Commonly used Conversion Factors …………………………………………………………………….…… 22 Glossary of Terms …….….…………………………………………………………………………………………… 22 Recommended Reading List ….………………………………………………………………………………… 185 List of Appendices …………………………………………………………………………………………………… 193 5 V.1, June 2014 Table of Contents 1 Special considerations when assessing lung function in infants ............................ 23 1.1 Introduction ................................................................................................................. 23 1.2 Developmental changes which may impact on assessments...................................... 23 1.2.1 Background ....................................................................................................... 23 1.2.2 Dynamic elevation of end-expiratory level ...................................................... 24 1.2.3 Influence of the upper airways ......................................................................... 24 1.3 Sleep state, sedation, and duration of the testing procedure .................................... 25 1.3.1 Studies in unsedated infants ............................................................................ 25 1.3.2 Sedation ............................................................................................................ 25 1.3.3 Duration of testing and need to prioritise which techniques to use ............... 26 1.4 Which infants can be tested? ...................................................................................... 26 1.5 Equipment requirements ............................................................................................ 27 1.6 Leaks and dead space .................................................................................................. 27 2 Brief Theoretical Background to Selected infant LFTs ........................................... 29 2.1 Introduction: Which test when? .................................................................................. 29 2.2 Tidal breathing ............................................................................................................. 29 2.3 Respiratory Mechanics ................................................................................................ 31 2.3.1 Introduction ...................................................................................................... 31 2.3.2 Passive Respiratory Mechanics......................................................................... 32 2.4 Plethysmographic assessments of lung volume .......................................................... 35 2.5 Plethysmographic assessments of airways resistance ................................................ 38 2.6 Rapid Thoraco-abdominal Compression (RTC or forced expiratory manoeuvres) ..... 38 2.6.1 Partial forced expiratory manoeuvres (Tidal RTC) ........................................... 39 2.6.2 Methodological considerations for tidal RTC manoeuvres .............................. 40 2.6.3 The Raised Volume Technique ......................................................................... 41 2.6.3.1 Analysis and Reporting of RVRTC Results .................................................................... 42 2.6.3.2 Advantages and Limitations of the RVRTC .................................................................. 43 2.7 The role of lung function tests in clinical management of infants .............................. 44 2.7.1 What is Normal? ............................................................................................... 44 2.8 Bronchodilator Responsiveness .................................................................................. 45 3 Setting up an infant lung function laboratory....................................................... 47 3.1 Ambient conditions ..................................................................................................... 47 6 V.1, June 2014 3.2 Equipment and apparatus ........................................................................................... 47 3.2.1 Masterscreen BabyBody Plethysmograph (CareFusion) ............................... 47 3.2.2 Resuscitation trolley and suction apparatus .................................................... 48 3.2.3 Basic accessories for lung function tests .......................................................... 48 3.2.3.1 Face masks ................................................................................................................... 48 3.2.3.2 Therapeutic putty ........................................................................................................ 49 3.2.3.3 Balloon shutters........................................................................................................... 49 3.2.4 Additional accessories when undertaking forced expiratory manoeuvres ...... 49 3.2.4.1 RTC jacket and bladder ................................................................................................ 49 3.2.5 Specific accessories for the Raised Volume Squeeze ....................................... 50 3.2.5.1 Neopuff Infant T-piece Resuscitator (Fisher Paykel Healthcare) ............................. 50 3.3 Preparation for testing ................................................................................................ 52 3.3.1 Laboratory set up and equipment .................................................................... 52 3.3.1.1 Equipment specifications ............................................................................................ 52 3.3.1.2 The Masterscreen BabyBody Plethysmograph ........................................................ 52 3.3.1.3 LabManager Interface ................................................................................................. 53 3.4 Preparation prior to performing equipment calibration ............................................. 55 3.4.1 Displaying quality control criteria ..................................................................... 55 3.4.2 Setting up essential criteria for test programs ................................................. 55 3.4.3 Tidal breathing program settings ..................................................................... 55 3.4.3.1 Sampling frequency for tidal breathing ....................................................................... 55 3.4.3.2 Setting technical criteria for tidal breathing................................................................ 57 3.4.3.3 Contents of tidal breathing result table ...................................................................... 58 3.4.4 Passive respiratory mechanics (Crs and Rrs) program settings.......................... 59 3.4.4.1 Sampling frequency for passive respiratory mechanics .............................................. 59 3.4.5 Setting technical criteria for single occlusion test (SOT) .................................. 60 3.4.6 Contents of passive mechanics result table ..................................................... 61 3.4.7 Plethysmography program settings.................................................................. 62 3.4.7.1 Sampling frequency for FRCpleth ................................................................................... 62 3.4.7.2 Setting criteria for the FRCpleth occlusion ..................................................................... 63 3.4.7.3 Contents of FRCpleth result table................................................................................... 64 3.4.8 Tidal RTC program settings ............................................................................... 65 3.4.8.1 Sampling frequency for tidal RTC ................................................................................ 65 7 V.1, June 2014 3.4.8.2 Setting measurement criteria for tidal RTC manoeuvres ............................................ 65 3.4.8.3 Setting quality control criteria for tidal RTC manoeuvres ........................................... 66 3.4.8.4 Setting the reservoir pressures for tidal squeeze manoeuvres ................................... 67 3.4.8.5 Setting criteria for the tidal RTC occlusion .................................................................. 68 3.4.8.6 Setting safety criteria for tidal squeeze manoeuvre ................................................... 69 3.4.8.7 Setting criteria for assessment of jacket transmission ................................................ 70 3.4.8.8 Contents of tidal RTC result table ................................................................................ 71 3.4.9 Raised volume RTC program settings ............................................................... 72 3.4.9.1 Sampling frequency for Raised Volume RTC ............................................................... 72 3.4.9.2 Setting the measurement criteria for Raised Volume RTC manoeuvres ..................... 72 3.4.9.3 Setting the jacket trigger for Raised Volume RTC ....................................................... 73 3.4.9.4 Setting safety criteria for Raised Volume RTC ............................................................. 73 3.4.9.5 Contents of Raised Volume RTC result table ............................................................... 74 3.4.10 CareFusion Masterscreen database ................................................................. 75 3.4.10.1 Creating a patient record............................................................................................. 75 3.4.10.2 List of Function keys associated with [Patient data] program .................................... 78 3.4.11 Preparation and calibration of the Babybody Masterscreen system ........... 78 3.4.11.1 Assembling the PNT components and balloon shutter ............................................... 79 3.4.11.2 System warming up ..................................................................................................... 79 3.4.11.3 Checking the condition of box seal .............................................................................. 80 3.4.11.4 Preparation and calibration of the pneumotachometer ............................................. 81 3.4.11.4.1 Volume calibration .................................................................................................... 81 3.4.11.5 Preparation for the calibration of the plethysmograph .............................................. 87 3.4.11.5.1 Ambient conditions ................................................................................................... 87 3.4.11.5.2 Calibration of the plethysmograph ........................................................................... 88 3.4.11.5.3 Shutter balloon test .................................................................................................. 91 3.4.11.6 Order of tests ............................................................................................................... 94 4 Infant preparation .............................................................................................. 95 4.1 Infant factors ............................................................................................................... 95 4.1.1 Health status ..................................................................................................... 95 4.1.2 Age range .......................................................................................................... 95 4.2 Organising lung function appointments ...................................................................... 95 4.2.1 Parental information ........................................................................................ 95 4.3 Preparing for lung function tests ................................................................................. 96 8 V.1, June 2014 4.3.1 On the day before the tests .............................................................................. 96 4.3.2 On arrival to the Lung Function Lab ................................................................. 96 4.3.2.1 Consent ........................................................................................................................ 96 4.3.2.2 Clinical examination..................................................................................................... 97 4.3.2.3 Anthropometric measurements .................................................................................. 97 4.3.2.3.1 Body weight .............................................................................................................. 97 4.3.2.3.2 Crown-heel length..................................................................................................... 97 4.3.2.3.3 Head circumference .................................................................................................. 98 4.3.3 Records and documentation ............................................................................ 98 4.3.3.1 Questionnaire relevant to lung function tests ............................................................ 98 4.3.3.2 Lung function summary sheet ..................................................................................... 99 4.4 Sedation ....................................................................................................................... 99 4.4.1 Contra-indications for sedation ........................................................................ 99 4.4.2 Potential risk factors ......................................................................................... 99 4.4.3 Sedation dosage.............................................................................................. 100 4.4.4 Personnel administrating sedation ................................................................. 101 4.4.5 Level of sedation ............................................................................................. 102 4.4.6 Handling of infant following of sedation ........................................................ 102 4.4.7 Classification of sleep state ............................................................................ 103 5 Infant lung function data collection ....................................................................104 5.1 Apparatus - safety issues ........................................................................................... 104 5.1.1 PNT support bar .............................................................................................. 104 5.2 Measurements of tidal breathing (TB) parameters ................................................... 107 5.2.1 Application of face mask and PNT .................................................................. 107 5.2.2 To start tidal breathing (TB) data recording ................................................... 108 5.3 Passive respiratory mechanics: total respiratory compliance (Crs) and resistance (Rrs) .. ................................................................................................................................... 113 5.3.1 To start data collection for passive respiratory mechanics ............................ 113 5.4 Measurements of plethysmographic lung volume (FRCpleth) ..................................... 113 5.4.1 Prior to FRCpleth recording ............................................................................... 114 5.4.2 Selecting mask dead space for FRCpleth measurements.................................. 114 5.4.3 To start airway resistance recording .............................................................. 115 5.4.4 To start FRCpleth data recording ...................................................................... 116 9 V.1, June 2014 5.5 Measurements using the tidal RTC technique .......................................................... 118 5.5.1 Application of the RTC jacket .......................................................................... 119 5.5.2 To start tidal RTC data recording .................................................................... 120 5.5.3 Assessing jacket compression pressure transmission .................................... 123 5.6 Measurements using the Raised Volume RTC technique.......................................... 125 5.6.1 Raised Volume forced expiratory manoeuvres .............................................. 125 5.6.1.1 Raised Volume RTC equipment set-up ...................................................................... 125 5.6.1.2 To start raised volume RTC data recording ............................................................... 126 5.7 Bronchodilator challenge – settings for “Pre and post medication”......................... 130 5.7.1 Measurements pre- and post bronchodilator challenge................................ 130 5.7.1.1 Baseline measurements prior to bronchodilator challenge ...................................... 130 5.7.1.2 Preparation and measurements post administration of bronchodilator .................. 131 5.8 On completion of tests .............................................................................................. 132 5.8.1 Post-test phone call to parents ...................................................................... 132 5.8.2 Hygiene / infection control / cleaning and disinfecting equipment ............... 132 5.8.2.1 Hand hygiene ............................................................................................................. 133 5.8.2.2 Cleaning and disinfecting at end of test session ....................................................... 133 5.8.2.2.1 Apparatus, accessories and surfaces ...................................................................... 133 5.8.2.2.2 PNT and balloon shutter ......................................................................................... 133 6 Data interpretation and management ................................................................135 6.1 Preparation for data analyses.................................................................................... 135 6.1.1 Setting printer / “screen-dump” function ...................................................... 136 6.1.2 Retrieving and identifying stored data for analysis ........................................ 136 6.2 Analysis and reporting of tidal breathing data .......................................................... 139 6.2.1 Main outcomes ............................................................................................... 139 6.2.2 Data evaluation ............................................................................................... 139 6.2.3 Criteria for acceptability ................................................................................. 141 6.2.4 Reporting results............................................................................................. 141 6.3 Analysis and reporting of passive respiratory mechanics data ................................. 142 6.3.1 Main outcomes ............................................................................................... 142 6.3.2 Data evaluation ............................................................................................... 142 6.3.3 Criteria for acceptability ................................................................................. 143 6.3.4 Reasons for invalid trials ................................................................................. 145 10 V.1, June 2014 6.3.4.1 Examples .................................................................................................................... 145 6.3.5 Reporting results............................................................................................. 150 6.4 Analysis and reporting of plethysmographic FRC data .............................................. 151 6.4.1 Main outcomes ............................................................................................... 151 6.4.2 Criteria for acceptability ................................................................................. 151 6.4.3 Data evaluation ............................................................................................... 152 6.4.4 Examples of invalid trials ................................................................................ 156 6.4.5 Reporting results............................................................................................. 161 6.5 Analysis and reporting of tidal RTC data ................................................................... 162 6.5.1 Main outcomes ............................................................................................... 162 6.5.2 Criteria for acceptability ................................................................................. 162 6.5.3 Data evaluation ............................................................................................... 162 6.5.4 Examples of invalid trials ................................................................................ 165 6.5.5 Transmission of jacket pressure (Pj) ............................................................... 168 6.5.6 Reporting results............................................................................................. 169 6.6 Analysis and reporting of Raised Volume RTC data .................................................. 170 6.6.1 Main outcomes ............................................................................................... 170 6.6.2 Criteria for acceptability ................................................................................. 171 6.6.3 Data evaluation ............................................................................................... 171 6.6.4 Examples of invalid trials ................................................................................ 173 6.6.5 Reporting results............................................................................................. 178 6.7 Interpreting results: the role of reference equations ............................................... 179 6.7.1 Reference equations - anthropometry ........................................................... 179 6.7.2 Reference equations – lung function results .................................................. 179 6.8 Data back-up, storage and export ............................................................................. 183 7 Recommended Reading List ...............................................................................185 7.1 Background reading and review articles ................................................................... 185 7.2 Sedation and sleep state ........................................................................................... 185 7.3 Equipment Specifications and signal processing ....................................................... 186 7.4 Methodological papers relating to infant LF tests..................................................... 186 7.4.1 Tidal breathing ................................................................................................ 186 7.4.2 Passive Respiratory Mechanics....................................................................... 186 7.4.3 Plethysmography ............................................................................................ 186 11 V.1, June 2014 7.4.4 Tidal and raised volume RTC........................................................................... 187 7.5 Interpretation of data and reference equations ....................................................... 187 7.6 Recent applications of infant LF tests in clinical research using CareFusionTM BabyBody Masterscreen equipment .......................................................................................... 188 7.7 Applications in clinical research using other ILFT equipment ................................... 189 7.8 Assessment of bronchodilator responsiveness using ILFTs ....................................... 190 7.9 Examples of epidemiological research applications .................................................. 190 7.9.1 Reviews ........................................................................................................... 190 7.9.2 Wheeze ........................................................................................................... 190 7.9.3 Preterm delivery ............................................................................................. 190 7.9.4 Prospective cohort studies (classic) ................................................................ 191 7.9.5 Recent cohort studies ..................................................................................... 191 8 Appendices ........................................................................................................193 8.1 List of manufacturers................................................................................................. 193 8.2 CareFusion’s guidelines for Sterilisation and Disinfection ........................................ 194 8.3 MasterscreenTM system Function icons / keys .......................................................... 195 8.4 An example of parental information leaflet .............................................................. 196 8.5 Example of a Consent form for a research study ...................................................... 198 8.6 Questionnaire – background information ................................................................. 200 8.7 Questionnaire for GOSH CF Referral ......................................................................... 204 8.8 Lung function test - summary sheet .......................................................................... 212 8.9 An example of infant lung function report ................................................................ 213 8.10 Backing up | making a copy of the CareFusion BabyBody system Database ............ 215 8.11 CareFusionTM Masterscreen BabyBody Equipment ................................................... 224 12 V.1, June 2014 List of Figures Figure 1. Figure 2. Figure 3. Figure 4. Figure 5. Figure 6. Figure 7. Figure 8. Figure 9. Figure 10. Figure 11. Figure 12. Figure 13. Figure 14. Figure 15. Figure 16. Figure 17. Figure 18. Figure 19. Figure 20. Figure 21. Figure 22. Figure 23. Figure 24. Figure 25. Figure 26. Figure 27. Figure 28. Figure 29. Figure 30. Figure 31. Figure 32. Figure 33. Figure 34. Dynamic elevation of lung volume........................................................................... 24 Patterns of tidal flow-volume loops ......................................................................... 30 Time-based trace of tidal volume and flow. ............................................................ 31 An airway occlusion at end-inspiration in infants invokes the Hering-Breuer reflex resulting in inhibition of inspiration and prolongation of expiratory time. ............. 33 Schematic diagram of equipment used for passive mechanics using the occlusion technique in infants ................................................................................................. 34 Assessment of passive respiratory mechanics using the single-breath occlusion technique. ................................................................................................................ 34 Schematic diagram of infant plethysmography. ...................................................... 36 Screen display of plethysmographic FRC recording. ................................................ 37 A and B: partial expiratory flow volume manoeuvres derived from the tidal Rapid Thoraco-abdominal compression (RTC) technique. ................................................. 39 Comparison of partial flow-volume loops in health and disease......................... 41 Forced expiratory manoeuvres using the raised volume technique. .................. 42 CareFusionTM Masterscreen BabyBody Plethysmograph ..................................... 47 Rendell Baker Soucek face masks of different sizes ............................................ 48 Various sizes of RTC (squeeze) jacket, bladder and large-bore tubing for infant forced expiratory manoeuvres............................................................................. 50 Left: a Neopuff Infant Resuscitator; right: a T-piece tubing. ............................ 50 A straight connector is inserted to the Neopuff T-piece resuscitation tubing .... 51 Apparatus set up for the raised volume RTC manoeuvres. ................................. 51 LabManager screen display of the suite of lung function testing programs. ...... 53 The standard layout of the CareFusion system screen display. ........................... 54 Screen display showing menu bar options .......................................................... 56 The setting of sampling frequency for tidal breathing program.......................... 56 Modification of graphic display for tidal breathing data ..................................... 57 Screen display showing selected variables from the [Contents of table] tab...... 58 A maximum of 5 trials (or Acts) are usually permitted for each sub-set of tests. 59 The preferred settings for the inflation duration of the shutter balloon for single occlusion test. ...................................................................................................... 60 Settings for the regression line for the SO data analysis ..................................... 61 Variables selected for online display in the result window (top right). ............... 62 Selecting the sampling frequency for airway resistance and FRCpleth data collection ............................................................................................................... 63 Recommended settings for FRC occlusion. .......................................................... 64 Selected FRCpleth variables for display in the result window ................................ 65 Program menu for setting criteria for tidal RTC measurements ......................... 66 The “Measurement” menu displays the recommended criteria. ........................ 66 [Settings: reservoir pressure] menu enables an appropriate pressure to be selected prior to each trial ................................................................................... 68 “Trigger settings” for jacket inflation for the tidal RTC manoeuvres................... 69 13 V.1, June 2014 Figure 35. Figure 36. Figure 37. Figure 38. Figure 39. Figure 40. Figure 41. Figure 42. Figure 43. Figure 44. Figure 45. Figure 46. Figure 47. Figure 48. Figure 49. Figure 50. Figure 51. Figure 52. Figure 53. Figure 54. Figure 55. Figure 56. Figure 57. Figure 58. Figure 59. Figure 60. Figure 61. Figure 62. Figure 63. Figure 64. Figure 65. Figure 66. Figure 67. The “synchronized” option is the preferred mode for the jacket inflation mechanism ........................................................................................................... 69 The recommended default settings for safety alerts during tidal RTC manoeuvres.......................................................................................................... 69 The recommended default settings for the assessment of jacket pressure transmission ......................................................................................................... 71 Selected tidal RTC variables for display in the result window ............................. 71 [Measurement] criteria settings for the Raised Volume RTC. ............................. 72 The “Manual” mode for triggering jacket inflation is preferred for the Raised Volume RTC manoeuvre. ..................................................................................... 73 Default settings for safety criteria for the Raised Volume RTC technique .......... 74 Selected Raised Volume RTC variables for display in the result window ............ 74 LabManager V4 [Main group] [Patient Data] page .............................................. 75 An example of an existing patient file being retrieved ........................................ 76 Test directory showing a list of data saved in the Masterscreen database. The red circle indicates [Info] button.......................................................................... 77 [Save] button in the [Test Information] panel is highlighted by the red circle ... 77 Screen option allowing the user to accept and save the modified data. The red circle highlights the Exit button ........................................................................... 78 Assembling PNT components and balloon shutter to CareFusion sensor. .......... 79 The BabyBody Masterscreen system main interface. The [Lab 4] icon is indicated by the red circle.................................................................................................... 80 [Start up] page with automatic real-time count down of 20 minutes of system warm up time ....................................................................................................... 80 [Calibrations] tab showing software options ....................................................... 81 BabyBody measuring systems .............................................................................. 82 Correct fitting of the PNT into the sensor housing. ............................................. 82 [F8] is indicated by the red circle ......................................................................... 83 [Settings] menu offering options for pump strokes............................................. 83 Screen display of the initial 3 pairs of pump strokes, representing inspiratory/expiratory efforts. ............................................................................. 84 Acceptable volume calibration of the PNT. ......................................................... 85 Unsatisfactory volume calibration ....................................................................... 86 Window displaying ambient conditions. .............................................................. 88 Ensure that the rubber stopper is firmly in place prior to box calibration .......... 89 [Box calibration] icon indicated by the red circle ................................................ 89 A period of 2-3 minutes are required for the closed box to “stabilise”............... 90 Box calibration: examples of recorded trials of half-life time constant (in seconds) .......................................................................................................... 90 Option for [Shutter balloon test] is highlighted by red circle .............................. 92 Shutter balloon test program............................................................................... 92 Visual check: shutter balloon inflation................................................................. 93 An error message indicating that a fault has been detected during the shutter balloon test, possibly due to a leaking balloon or poor fit of the tube connection between the shutter and control panel ............................................................... 93 14 V.1, June 2014 Figure 68. Figure 69. Figure 70. Figure 71. Figure 72. Figure 73. Figure 74. Figure 75. Figure 76. Figure 77. Figure 78. Figure 79. Figure 80. Figure 81. Figure 82. Figure 83. Figure 84. Figure 85. Figure 86. Figure 87. Figure 88. Figure 89. Figure 90. Figure 91. Figure 92. Figure 93. Figure 94. Figure 95. Figure 96. Figure 97. Figure 98. Figure 99. Figure 100. Figure 101. Illustration showing some parts of the Babybody system, including the control panel and 2-part support bar for the PNT ......................................................... 105 A face mask connected to the PNT is applied over the nose and mouth of a 2month old sleeping infant (left) and a 1-year old infant (right) ......................... 105 The screen display for FRCpleth data and results ................................................. 107 A sleeping infant breathing through face mask and PNT .................................. 108 Reminder to perform PNT volume calibration................................................... 108 Evidence of a leak around the face mask........................................................... 109 Window A illustrates marked volume drift due to leak around the face mask. 110 Time-based tidal breathing trace after drift correction (upper left window).... 111 Program option for saving tidal breathing measurement ................................. 112 An example of data from an infant in whom flow limitation is evident during tidal breathing. ........................................................................................................... 112 A young child undergoing FRCpleth assessment .................................................. 114 A drop down panel listing different mask sizes and corresponding dead space 115 Recording of plethysmographic airway resistance ............................................ 116 The screen shows a stable box volume signal and regular tidal breathing prior to the onset of an airway occlusion for FRC measurements.................................. 117 An infant undergoing tidal RTC manoeuvre. ...................................................... 118 Screen display for tidal RTC. ............................................................................... 119 Schematic diagram showing the inflatable bladder, securely held in place by the outer jacket, connected to the pressure reservoir tank by a large-bore tubing 120 Position of the large-bore tubing and connection to the RTC jacket................. 121 Menu for setting the reservoir pressure at the start of each tidal RTC trial...... 121 Display of V’maxFRC results from an acceptable test. ........................................... 123 An example of assessment of jacket pressure transmission during RTC. .......... 124 Schematic diagram showing the apparatus set up for performing the Raised Volume manoeuvres .......................................................................................... 126 RVRTC apparatus se up for RVRTC manoeuvres. ............................................... 127 Time-based trace showing 5 passively inflated breaths and timing of jacket compression during a raised volume RTC manoeuvre ...................................... 128 Screen display at completion of a raised volume manoeuvre. .......................... 129 A spacer with modified fittings for the face mask, bronchodilator inhaler and the Neopuff T-piece.................................................................................................. 130 Select [Medication] from the menu bar: note the drop –down menu .............. 131 The balloon shutter with its metal tip covered before soaking in liquid. .......... 134 Off-line data review and/or analysis of tidal breathing data ............................. 135 Tidal Breathing menu enabling retrieval of stored data for review and/or reanalysis............................................................................................................ 137 Test directory showing stored data according to test data/time and type of measurements, as indicated by the red rectangular box .................................. 137 The red circle indicates the 2 trials or Acts of tidal breathing data saved to the database ............................................................................................................. 138 Graphic displays of tidal breaths. ....................................................................... 139 Off-line analysis of tidal breathing parameter. .................................................. 140 15 V.1, June 2014 Figure 102. Figure 103. Figure 104. Figure 105. Figure 106. Figure 107. Figure 108. Figure 109. Figure 110. Figure 111. Figure 112. Figure 113. Figure 114. Figure 115. Figure 116. Figure 117. Figure 118. Figure 119. Figure 120. Figure 121. Figure 122. Figure 123. Figure 124. Figure 125. Figure 126. Figure 127. Figure 128. Figure 129. Figure 130. Figure 131. Figure 132. Figure 133. Figure 134. Figure 135. Figure 136. Figure 137. Figure 138. Note coefficient of variability (CV) of tidal breathing data. ............................... 140 Summary of tidal breathing parameters. ........................................................... 141 Passive mechanics data obtained using the single occlusion technique. .......... 143 For clarity, a single technically acceptable trial obtained using the SO technique is illustrated. ....................................................................................................... 144 Results table for passive mechanics................................................................... 144 Relaxed expiratory phase from 3 single occlusion trials. ................................... 145 An invalid example of SO test due to active expiratory phase. ......................... 146 SO test: active expiration following release of airway occlusion....................... 146 SO data: regression line for the calculation of rs. ............................................. 147 The same SO trial in Figure 109 is reproduced here in both panels, where modifications to the regression line have been made to fit a linear portion. ... 147 An example of an early inspiratory effort made by the infant following the release of the brief airway occlusion ................................................................. 148 Edit the duration of occlusion via the [Settings: Occlusion] menu .................... 148 Screen display illustrating the effect of glottic activity on the expiratory “limb” during a SO trial.................................................................................................. 149 Examples of Pao plateau recorded during SO measurements. ........................... 150 Options for viewing FRC breaths........................................................................ 151 Indications of a leak around the face mask. ...................................................... 152 Infant plethysmographic FRC measurement – see text for details.................... 153 EEL was observed to be lower following the release of airway occlusion, when compared to that established prior to onset of occlusion................................. 154 Examples of FRC recordings. .............................................................................. 155 This screen display shows an invalid FRC trial from a 1-year old infant. ........... 156 FRC data with evidence of glottic activity and possible mask leak. ................... 157 Menu for setting FRC regression slope. ............................................................. 158 Construction of the regression slope using 80% of each plotted FRC breath. .. 159 Glottic activity observed during the 3rd respiratory cycle (represented in green) while FRC data were recorded. .......................................................................... 159 FRC results when the [Regression analysis for FRC] was adjusted to exclude the upper and lower18%. ......................................................................................... 160 Additional technically satisfactory FRC data to support values for reporting. .. 161 Screen display of tidal squeeze data .................................................................. 163 An example of a technically acceptable tidal RTC curve .................................... 164 Tidal RTC curve – evidence of flow limitation .................................................... 165 Examples of partial FEFV curves that are unacceptable .................................... 166 Example of distortion due to severe glottic narrowing or closure .................... 166 Effect of mild-moderate glottic activity on tidal RTC curve ............................... 166 An example of delayed attainment of PEF due to a late rise time. ................... 167 An unacceptable jacket pressure transmission check. ...................................... 168 This volume-time trace shows the calculation of FEV0.4 following a raised volume RTC manoeuvre. In this example, forced expiration was completed by 0.7 s. .. 170 RVRTC flow-volume curve illustrating flow partitions in relation to FVC .......... 170 A screen display showing a technically acceptable RVRTC manoeuvre............. 172 16 V.1, June 2014 Figure 139. Figure 140. Figure 141. Figure 142. Figure 143. Figure 144. Figure 145. Figure 146. Figure 147. RVRTC trials may be viewed individually (left panel) or as trend of composite trials (right panel). .............................................................................................. 172 A technically valid RV trial from an infant with airway obstruction. ................. 173 Raised volume FEFV curve with transient narrowing of the glottis or larynx during forced expiration .................................................................................... 174 Example of a raised volume FEFV curve obtained following late jacket compression (window A).................................................................................... 174 Effect of delayed jacket inflation during a RV manoeuvre ................................ 175 An example of a technically unacceptable RVRTC curve. .................................. 176 Overlaying 2 raised volume RTC trials for comparison of results ...................... 177 The “blip” at the end of the RVRTC curve (windows A and B) may bias FVC measurement, and hence calculations of FEVt and FEF%. .................................. 178 The red circle in the right upper quadrant indicates the “Merge” function icon .... ............................................................................................................................ 183 17 V.1, June 2014 List of Tables Table 1. Summary of face mask dead space Table 2. Range of flows in infants during tidal breathing and forced expiratory manoeuvres Table 3. Dosage of sedation used for lung function tests Table 4. Sleep state classification Table 5. Equipment specific prediction equations Table 6a. Adjusted prediction equations for RVRTC outcomes taking length into account Table 6b. Adjusted prediction equations for RVRTC outcomes taking age into account 18 V.1, June 2014 List of abbreviations, symbols and conversion factors Abbreviation/ Symbol Description Unit ATPS saturated with water vapour at ambient temperature and barometric pressure ATS American Thoracic Society BDR bronchodilator responsiveness bpm breaths per minute BPD broncho-pulmonary dysplasia BTPS saturated with water vapour at body temperature (37 C) and ambient barometric pressure C degree in Celsius cm centimetre cmH20 centimetre of water Crs compliance of the total respiratory system mLkPa1 CV Coefficient of Variation % CF Cystic Fibrosis EEL end-expiratory level EEV elastic equilibrium volume ERS European Respiratory Society FEVt forced expired volume measured at “t” seconds after exhalation has begun (e.g., FEV0.5) mL FEF% forced expired flow measured after x% of FVC has been exhaled (e.g., FEF75) mLs1 FEF25-75 flow measured during the mid portion of the forced expiration when 25 to 75% of the FVC has been exhaled mLs1 FVC forced vital capacity mL FRC functional residual capacity (i.e., ‘resting’ lung volume at end expiration) mL FRCpleth FRC assessed using the body plethysmograph mL GA gestational age weeks HBR Hering-Breuer (inflation) reflex Hz hertz (unit of frequency) hPa hectapascal (10 hPa = 1 kilopascal) mL 19 V.1, June 2014 Abbreviation/ Symbol Description kPa kilopascal Kg kilogram L litre LF lung function min minute mL millilitre MOT multiple occlusion technique mmHg millimetre of mercury O2 oxygen % P pressure kPa; cmH2O Palv alveolar pressure kPa; cmH2O Pao pressure at the airway opening (i.e., mask; mouth and nose) kPa; cmH2O PEEP positive end expiratory pressure kPa; cmH2O PEFV partial forced expiratory flow-volume (curve) Pel elastic recoil pressure kPa; cmH2O Pinf airway inflation pressure kPa; cmH2O PIP positive inspiratory pressure kPa; cmH2O Pj jacket pressure kPa PMA post-menstrual age weeks PNA postnatal age Weeks; months; decimal years cPNA postnatal age corrected for gestation Weeks; months; decimal years PNT pneumotachometer/ pneumotach Pbox box (plethysmographic) pressure QC quality control Raw resistance of the airways kPaL1s Reff effective resistance of the airways kPaL1s RDS respiratory distress syndrome REM rapid eye movement RR respiratory rate Unit kPa min1 20 V.1, June 2014 Abbreviation/ Symbol Description Unit Rrs resistance of the total respiratory system kPaL1s RTC rapid thoraco-abdominal compression RVRTC raised volume RTC RV residual volume SO / SOT single occlusion technique sRaw specific airway resistance: Raw multiplied by FRCpleth kPa.s sReff specific effective airway resistance: Reff multiplied by FRCpleth kPa.s s seconds SpO2 pulsatile oxygen saturation % tau; time constant s rs time constant of the respiratory system s t time min; s tE expiratory time s tI inspiratory time s tPTEF time taken to reach peak tidal expiratory flow s tPTEF:tE ratio of the time taken to reach peak tidal expiratory flow in relation to total expiratory time TLC total lung capacity mL V’ flow mLs1 V volume mL VB or Vbox plethysmographic box volume ∆Vbox change in box or plethysmographic volume mL Vex total expired volume mL Vinf inflation volume mL VPEF expired volume up to tidal peak flow mL VT tidal volume mL Z-score standard deviation (SD) score ∆ delta / ’Change in’ mL; L 21 V.1, June 2014 Commonly used conversion factors in infant LFT Pressure 1 cmH2O = 0.098 kPa Pressure 1 mmHg = 0.133 kPa Compliance 1 mLcmH2O1 = 10.2 mLkPa1 Resistance 1 cmH2OL1s = 0.098 kPaL1s Glossary of terms Term Definition Coefficient of variability (CV) = (standard deviation/mean) x 100 Compliance (C) A measure of distensibility, i.e., change in volume per unit change in pressure: (mLkPa1) C Jacket pressure transmission (Pao-j) a) absolute change in pressure at the airway opening (Pao) during a brief airway occlusion before (P1) and during (P2) a squeeze manoeuvre i.e., Pao-j = (P2P1) b) when expressed as a percentage: ( Resistance (R) ) A measure of pressure required to move gas/gases at a flow of one litre per second (kPaL1s) rs time constant of the respiratory system ( z-score (or standard deviation score) ( ) ( ) (s) ) 22 V.1, June 2014 1 Special considerations when assessing lung function in infants 1.1 Introduction Marked developmental changes in respiratory physiology occur during the first years of life which affect both the measurement and interpretation of lung function in infants and young children. There are also major differences in how lung function is measured in infants when compared with older subjects. These differences relate mainly to sleep state, sedation, ethical issues, posture and the need to miniaturise and adapt equipment for measurements in small subjects who tend to be preferential nose breathers and who cannot be asked to undertake special breathing manoeuvres. These issues have been described in detail previously (see recommended reading list: section 7) and are only summarised below. The following sections provide basic essential background and physiology relating to infant lung function testing; experienced individuals who are familiar with these may wish to move on to section 3. 1.2 Developmental changes which may impact on assessments 1.2.1 Background When undertaking infant LFTs a basic understanding of developmental physiology is essential. For example, in contrast to adults, the vagally mediated Hering-Breuer inflation reflex (HBR) is physiologically active over the tidal range during the first year of life. Tonic and phasic vagal stretch receptors in the lungs and airways are exquisitely sensitive to changes in resting lung volume and, as discussed below, infants modulate both expiratory time and flow during the first months of life, to maintain an adequate resting lung volume (i.e. functional residual capacity: FRC). While this ability to modulate resting lung volume dynamically may be physiologically beneficial to the infant, it can complicate attempts to assess respiratory function, especially those outcomes that are dependent on a stable end-expiratory level (EEL). Thus, while the active HBR allows assessment of passive respiratory mechanics (section 2.3.2) in infants during tidal breathing in a way that is not feasible in older subjects, the associated variability of EEL may impede assessment and interpretation, not only of resting lung volumes but also of respiratory mechanics and forced expiratory flows (FEF), all of which are highly volume-dependent. Developmental changes in respiratory rate and mechanics may also have significant effects on the interpretation of longitudinal changes for various indices, such as timed forced expired volumes (FEVt). 23 V.1, June 2014 1.2.2 Dynamic elevation of end-expiratory level The highly compliant (floppy) chest wall in young infants results in minimal outward elastic recoil, such that the lungs tend to recoil to a much lower volume in relation to total lung capacity (TLC) than in older subjects. The subsequent instability of functional residual capacity (FRC) and tendency for small airway closure during tidal breathing (due to the low transpulmonary pressure at end-expiration), during the first 6-12 months of life, are partially compensated for by dynamic elevation of the end-expiratory level (EEL), i.e. the tendency for the infant to take the next breath in before elastic equilibrium volume (EEV) is reached. This may be achieved by vagally mediated upper airway narrowing or diaphragmatic modulation of expiratory flow to slow (brake) lung emptying, and/or a rapid respiratory rate (short expiratory time) (Figure 1). A fall in EEL may be observed during brief apnoeic periods. Young infants also sigh periodically (when inspiration is 2-3 times greater than observed during regular tidal breathing. This may alter ventilation distribution and interfere with data collection for techniques such as the multiple breath inert gas washout. Figure 1. Dynamic elevation of lung volume 1.2.3 Influence of the upper airways Infants are preferential nose breathers, with nasal resistance representing approximately 50% of total airway resistance (Raw). Changes in lower Raw as a result of disease or therapeutic interventions may therefore be masked, especially if there has been a recent upper respiratory tract infection (URTI). Infant LFTs should therefore be postponed for at least 3 weeks after the onset of any respiratory infection. Since the nose also acts as an efficient filter, comparatively 24 V.1, June 2014 less aerosolised material (whether delivered as a challenge or a therapeutic intervention) may reach the lung than in a mouth-breathing adult. 1.3 Sleep state, sedation, and duration of the testing procedure A representative, stable end-expiratory level is essential for reproducible measures of FRC, respiratory mechanics and maximum flow at FRC (V’maxFRC) and can normally only be achieved if the child is in quiet, rather than rapid eye movement (REM), sleep. Since the duration of quiet sleep epochs is inversely proportional to postmenstrual age (PMA = gestational + postnatal age) and may last <10 minutes in a preterm infant, this can present a real challenge when undertaking measurements in very young or immature infants. Details of how to assess sleep state are provided in section 4.4.7 1.3.1 Studies in unsedated infants Sedation is generally contraindicated for LFTs in newborn infants. Successful measurements using a full range of tests can usually be achieved during natural sleep after a feed in infants up to at least 44 weeks PMA. With patience and time set aside for a more extended testing period, tidal breathing patterns and passive mechanics can be assessed in unsedated infants up to 3-4 months postnatal age, whereas forced expiratory manoeuvres and plethysmography generally require sedation. 1.3.2 Sedation The hospital-specific protocol for sedation should always be followed. Although not currently available in the USA (section 4.4.3), sedation for infant lung function tests (LFTs) has usually been achieved using oral (or rectal) chloral hydrate in doses of 50 to 100 mg/kg, the maximum dose should not exceed 1 gram (irrespective of body weight). When prescribing the sedation, factors to be taken into considered are: a) the age of the infant, b) estimated test duration, and c) the complexity of the tests selected for the study protocol. The prescriber should always aim for the lowest dosage of sedation that facilitates completion of data collection. With the exception of a small proportion of “high-risk” children (e.g., those with known or suspected upper airway obstruction in whom sedation is generally contra-indicated due to the risk of exacerbating symptoms) chloral hydrate has been shown to have an excellent safety record and has been administered to thousands of infants worldwide without adverse side effects. 25 V.1, June 2014 Although some research ethics committees have voiced concerns about healthy infants being recruited for research studies that require sedation, others consider it unethical to sedate vulnerable infants with respiratory disease unless results can be interpreted properly by reference to those in healthy controls (see recommended reading, section 7). Chloral sedation is best administered via a syringe although the bitter taste of chloral hydrate may cause infants to spit it out or cry. In addition, both onset (between 15-90 minutes) and duration of sleep are somewhat unpredictable, such that investigators rarely have more than 45 minutes in which to collect the required lung function data. 1.3.3 Duration of testing and need to prioritise which techniques to use Given the time required to obtain fully informed parental consent and for the infant to fall asleep, parents may need to spend 3 to 4 hours in the infant LFT laboratory. This may limit their ability or willingness to attend for repeat measurements at intervals of less than 6 months. Caution with respect to repeated sedation also limits the frequency with which serial LFTs can be performed, potentially limiting their clinical usefulness in individual infants. Given the limited period of sleep that may be induced by sedative agents such as chloral hydrate, important decisions need to be made regarding which tests should be prioritised on any given occasion according to either the suspected underlying pathophysiology or research question. Certain tests, such as plethysmographic lung volumes, should be performed prior to those involving forced expiration. 1.4 Which infants can be tested? In general, it is recommended that all babies are tested when clinically stable and asymptomatic; testing is deferred for several weeks after any respiratory infection or exacerbation (see section 4.1.1). Any evidence of upper airway obstruction represents a high risk situation where sedation is contraindicated. Acute wheezing or symptoms following chronic lung disease of prematurity may also put the child at increased risk. Details of risk assessment and safety measures that are essential in every infant LFT lab are summarised in section 4.4. Reference equations with which to interpret results obtained using the CareFusionTM BabyBody device are only available for white full-term infants of European descent 26 V.1, June 2014 between 3-105 weeks of age. There is some evidence that results may differ in infants of other ethnic origins. Plethysmographic assessments of FRC have not been validated in infants < 4kg, and such measurements may be unreliable due to poor signal to noise ratio. Tidal breathing and passive mechanics may be feasible in smaller babies provided that the XS pneumotach (PNT) is used (Figure 52). Forced expiratory manoeuvres, using tidal RTC or “squeeze” technique, have been applied in preterm babies from ~ 2 kg body weight; both the tidal and raised volume RTC have been used in infants born at term gestation from 4-6 weeks postnatal age, who are at least 2 kg in weight. 1.5 Equipment requirements Users and potential purchasers of infant lung function equipment must ensure that it meets the basic requirements specified by the European Respiratory Society-American Thoracic Society (ERS-ATS) Task Force (including the ease with which it can be cleaned between every subject), and that results are interpreted in relation to appropriate equipment-specific reference equations, or healthy controls studied with identical equipment (see section 6.7 and section 7.5). The selected device also must be appropriate for the intended measurement conditions and body size. The BabyBody device has not been validated for use in infants receiving assisted ventilation. Given the time-consuming nature of these investigations and the impossibility of repeating measurements in the event of equipment failure, attention to detail with respect to calibration, regular maintenance of equipment and a good supply of spare parts are even more essential when assessing infants than when testing older subjects. (For further information, see section 3 and Appendix 8.1 for details of equipment and suppliers, and section 7 for recommended reading list). 1.6 Leaks and dead space An oro-nasal mask is generally required when undertaking infant LFTs. This may significantly increase equipment dead space with subsequent increases in tidal volume (VT) and potential elevation of the end-expiratory level. Air leakage around the face mask are a common source of error, but can be difficult to identify and will invalidate all measurements. Therapeutic putty may be used to create an airtight seal between the face and the mask and minimise dead space 27 V.1, June 2014 although some investigators prefer to use an air-filled cushioned mask, particularly in very young and unsedated infants. Whatever the approach, operators must be vigilant at all times to avoid the serious errors caused by air leakage. Warning signs include low VT, drift of the VT signal or failure of the EEL to return to baseline after a brief airway occlusion (see section 5.2.2 for details). 28 V.1, June 2014 2 Brief Theoretical Background to Selected infant LFTs 2.1 Introduction: Which test when? The choice of which test or combination of tests to undertake must be guided not only by the clinical condition or specific research question being investigated, but also by the expertise of the operators. Those less familiar with the undertaking of ILFTs will inevitably take longer, have a higher failure rate and find it more difficult to complete a complex protocol within the limited time that the infant remains in quiet sleep. As a general rule it is better to start by mastering the art of high quality, leak-free assessments of tidal breathing and passive mechanics before proceeding to more complex assessments such as plethysmographic FRC or forced expiratory manoeuvres. Similarly, it is strongly advised that the operator is highly skilled in obtaining reliable measures of maximum flow at FRC (V’maxFRC) using the tidal squeeze technique before attempting the more complex raised volume technique, which requires considerable coordination within and between operators. Needless to say, attempts to assess bronchodilator response should never be undertaken until the operator is confident that accurate reproducible measurements are possible at baseline. The order of testing will be dictated to some extent by which outcomes are seen to be most relevant in each particular case. However, it should be noted that tests involving forced expiratory manoeuvres should ideally be performed after those of passive mechanics or resting lung volumes since the application of thoraco-abdominal pressure or lung inflations may affect respiratory mechanics or FRC. 2.2 Tidal breathing Accurate measurement of tidal breathing is fundamental to most infant LFTs. Although superficially appearing to be one of the simplest investigations to undertake, such measurements and their interpretation are in fact highly complex. Patterns of tidal flowvolume loops can yield potentially important information about the likely site of obstruction (Figure 77). Peripheral airway narrowing generally produces a concave pattern of the expiratory flow-volume loop, with peak tidal flow occurring early in expiration. This pattern probably reflects a reduction in post-inspiratory diaphragmatic activity, or laryngeal braking in the presence of a prolonged τrs due to elevated airway resistance. Flattening of the expiratory limb is suggestive of a fixed extra-thoracic airway obstruction, whereas marked convexity of the volume axis may reflect physiologic braking of expiratory flow. A pattern of inspiratory fluttering may be associated with laryngo-malacia, whereas stiff lungs (low compliance and high elastic recoil) may be reflected by a relatively small VT, with high peak flow and rapid lung 29 V.1, June 2014 emptying. However, considerable caution is required when interpreting such loops due to marked natural physiologic variability within and between children, particularly during early infancy. Figure 2. Patterns of tidal flow-volume loops Legend: A) normal; B) flow limitation or airway obstruction; C) laryngeal braking or fixed intra-thoracic obstruction; D) fixed extra-thoracic obstruction; E) reduced compliance (i.e., rapid lung emptying due to stiff lungs or increased elastic recoil); F) marked expiratory grunting may occur in the presence of decreased functional residual capacity or stiff lungs to increase the expiratory time constant. Attempts to quantify such patterns have resulted in various descriptions of the tidal flow pattern, such as the time to peak tidal expiratory flow as a ratio of total expiratory time (tPTEF:tE) (Figure 3). This index (sometimes referred to as the tidal breathing ratio) may be reduced in the presence of airway obstruction and has been shown to be a valuable outcome measure in various epidemiologic studies investigating early determinants of airway function. However, tPTEF:tE is only distantly related to airway function and, as with most tidal breathing parameters, conveys mixed information on the interaction between control of breathing and airway mechanics, thereby requiring cautious interpretation, especially within individual infants and children. It has not been found to be discriminative in infants with cystic fibrosis (CF) or those recovering from broncho-pulmonary dysplasia (BPD). Full details of data collection and quality control criteria for tidal breathing analysis are presented in sections 5.2.2 and 6.2.3. 30 V.1, June 2014 Figure 3. Time-based trace of tidal volume and flow. Legend: In addition to tidal volume (VT) and respiratory rate, the following parameters are often calculated from recordings of tidal breathing: tidal expiratory (Exp) and inspiratory (Insp) volume and flow; inspiratory (tI) and expiratory time (tE); total breath time (tTOT); and tidal breathing ratio (tPTEF:tE) 2.3 Respiratory Mechanics 2.3.1 Introduction Beyond the neonatal period, most respiratory disorders are characterised by airway obstruction and narrowing, which result in increased work of breathing due to increased airway resistance, hence reduced air flow. Reductions in airway calibre may occur not only due to obstruction associated with secretions, inflammation, airway wall thickening, or increased bronchial smooth muscle tone but also as a result of reduced lung or chest wall elasticity, a lack of alveolar tethering or increased airway wall compliance, all of which are associated with increased resistance or reduced flows and volumes during forced expiratory manoeuvres. Assessments of respiratory mechanics can provide an indication of lung and chest wall stiffness and of airway calibre or obstruction, and hence of the effort that is required to ventilate the lungs (work of breathing). Compliance is calculated as the change in lung volume (V) per unit change in pressure (P), that is: C = ∆V/∆P and measures the ‘stiffness’ of the lungs; Resistance, which reflects the patency of the airways, is calculated as the pressure required to drive flow (V’): R = ∆P/∆V’. Hence, to assess respiratory mechanics it is necessary to record changes in pressure and flow, with volume usually obtained by integrating flow (V = Flow × time). While flow and volume are usually measured using some type of flow sensor (PNT) at the airway opening, pressure 31 V.1, June 2014 changes can be measured in a variety of ways, which will determine exactly which outcome is measured. For example, if the resistance of the airways is to be measured in isolation, then a measure of pressure changes between the alveoli and airway opening (obtained during plethysmography) is required. By contrast, when the occlusion technique is used to measure total respiratory compliance, the sum of pressure changes across the chest wall, lungs, and airways are measured, such that the resistance and compliance of the total respiratory system are assessed. Since compliance increases as the lungs grow (whereas resistance decreases), results are sometimes standardised for lung size by expressing them as specific compliance (sC = C/FRC) or specific resistance (sR = R × FRC). 2.3.2 Passive Respiratory Mechanics Measurements of passive respiratory mechanics (compliance, resistance, and τrs) are potentially possible if a state of relaxation can be induced in the respiratory system. In contrast to older subjects, in whom this is very difficult to achieve without extensive training, the vagally mediated HBR is active within the tidal volume range throughout the first two year of life, which has allowed widespread assessment of passive respiratory mechanics in infants and young children. Although significant changes in Rrs have been reported among infants with airway disease, the major role of these measurements is probably with respect to assessing compliance in conditions in which there is likely to be restrictive pulmonary changes (e.g., respiratory distress syndrome, broncho-pulmonary dysplasia, pulmonary hypoplasia and cardiac disease with pulmonary over-perfusion). The occlusion technique for measuring passive respiratory mechanics is based on the ability to invoke the HBR by performing brief intermittent airway occlusions during spontaneous tidal breathing. Activation of vagally mediated pulmonary stretch receptors when the airway is occluded above FRC leads to inhibition of inspiration and prolongation of expiratory time (Figure 4). 32 V.1, June 2014 Figure 4. An airway occlusion at end-inspiration in infants invokes the Hering-Breuer reflex resulting in inhibition of inspiration and prolongation of expiratory time. Legend: tE: expiratory time during tidal breathing; tE,occ: expiratory time during an occluded breath. Provided there is no respiratory muscle activity and rapid equilibration of pressures across the respiratory system during airway occlusion (as shown by the presence of a pressure plateau at the airway opening, Figure 4), alveolar pressure and hence elastic recoil of the respiratory system can be measured at the airway opening. By relating this recoil pressure to the volume in the lungs above the passively determined end-expiratory volume at time of airway occlusion, or to the air flow occurring on release of the occlusion, the compliance and resistance of the respiratory system can be measured. The most commonly used approach for which commercially available equipment is available is the single-breath, or single-occlusion (SO), technique (Figure 105). When using this technique, resistance, compliance, and the passive time constant of the respiratory system (τrs) can be calculated from a single airway occlusion (Figure 104). Since the time constant = volume/flow, τrs can simply be derived from the flow-volume relationship during a passive expiration, which frequently follows the release of a brief airway occlusion. Compliance of the total respiratory system (Crs) is calculated by relating the volume above the passively determined ‘elastic equilibrium volume’ (EEV; as determined by the equal and opposite recoil pressures of the lung and chest wall) at the moment of airway occlusion to the elastic recoil pressure measured during occlusion (Figure 6 and section 6.3.2). 33 V.1, June 2014 Figure 5. Schematic diagram of equipment used for passive mechanics using the occlusion technique in infants Because infants frequently dynamically elevate FRC (Figure 1) and may breathe in slightly earlier than usual after occlusion, it is necessary to extrapolate the linear portion of the flowvolume plot to zero flow in order to estimate the appropriate volume change when calculating Crs. Since τ = Rrs × Crs, respiratory resistance (Rrs) can simply be derived as τ/Crs. Figure 6. Assessment of passive respiratory mechanics using the single-breath occlusion technique. Legend: The volume of air in the lung above the passively determined end-expiratory level (i.e., ΔV) is calculated by extrapolating the linear portion of the descending flow-volume curve to zero flow (i.e., Vx). During periods of no air flow (i.e., airway occlusion) and in the presence of complete respiratory muscle relaxation, as seen by the attainment of a pressure plateau, pressures equilibrate and the elastic recoil pressure of the respiratory system can be measured at the airway opening (ΔP). Respiratory system compliance can then be calculated as ΔV/ΔP. Similarly, by relating ΔP to ΔF, respiratory resistance is calculated. The optimal duration of airway occlusion is a compromise between ensuring sufficient time for pressure equilibration to occur, while making the occlusion brief enough to allow passive expiration after its release. A minimum occlusion time of 400 msec and a maximum occlusion 34 V.1, June 2014 time of 1.5 seconds in which to attain a pressure plateau lasting at least 100 msec has been recommended. Results are usually expressed as the mean of three to five valid measurements. Valid measurements depend on the following three fundamental assumptions, i.e., that: there is complete relaxation of the respiratory system during both the occlusion and the subsequent expiration; pressure at the face mask equilibrates rapidly and hence represents alveolar pressure both compliance and resistance remain constant throughout the expiratory phase over the tidal range such that the lung can be treated as a single compartment model, with a single value of rs With persistence, these conditions can be achieved in the majority of healthy infants during quiet sleep, but they are more difficult to satisfy in infants with severe airway disease, in whom pressure equilibration may not occur rapidly enough in the presence of severe airway obstruction or a rapid respiratory rate, and in whom the respiratory system can rarely be described by a single time constant, due to heterogeneous distribution of any airway obstruction or interstitial lung disease. It should also be remembered that results from the single-occlusion technique reflect the combined mechanics of the entire respiratory system (chest wall, lungs, and airway), which may reduce the ability to detect subtle changes in lung and airway function in those with respiratory disease. Full details of data collection and analysis and quality control criteria are presented in sections 3.4.4, 5.3 and 6.3. 2.4 Plethysmographic assessments of lung volume Measurements of lung volume are essential for accurate interpretation of respiratory mechanics, and may be a valuable means of defining normal lung growth. However, the only lung volume that can be measured routinely in infants is the resting lung volume at end expiration, i.e., the functional residual capacity (FRC). This does not provide information on the number and size of alveoli nor the surface area available for gas exchange. Furthermore, the ability of the lung to expand to fill available space after surgical repair may limit the clinical value of measuring lung volume in young children with congenital lung hypoplasia. Reduced FRC due to restrictive lung disease may be found in young children with rare lung conditions (e.g., interstitial lung disease or hypoplasia) but this pattern is more common in children with 35 V.1, June 2014 disorders that affect the chest wall, or in those with surfactant deficiency or atelectasis due to conditions such as respiratory distress syndrome (RDS). The commonest abnormality of lung volume during infancy is that associated with airway obstruction, wherein both hyperinflation (due to dynamic elevation of lung volume in the presence of an elevated airway resistance and a long rs) and gas trapping (due to peripheral airway closure) result in elevated FRC values in wheezy infants and those with diseases such as CF. The principles of plethysmography (which assesses total thoracic gas volume, including any gas trapped behind closed airways) are identical for infants and older subjects. Infants are not able to cooperate in the special breathing manoeuvres required to reach either residual volume (RV) or total lung capacity (TLC), and although attempts have been made to obtain such measures by combining the raised volume technique with body plethysmography these are not in common use. Assessments of plethysmographic lung volume (FRCpleth) in infants (Figure 7; Figure 78) have been widely used in both clinical and epidemiologic research. Figure 7. Schematic diagram of infant plethysmography. Legend: measurements of plethysmographic functional residual capacity are made while the infant sleeps within the plethysmograph and makes respiratory efforts against a closed shutter. Plethysmographic assessments of FRC are based on Boyle’s law which states that, for any given mass of gas at a fixed temperature, the product of pressure and volume remains constant, i.e., P1 x V1 = P2 x V2, where 1 and 2 refer to the initial and final conditions of the mass of gas. Assessments of FRCpleth are made while the sleeping infant lies within the closed plethysmograph (a relatively airtight chamber which can record minuscule changes in pressure 36 V.1, June 2014 due to changes in the infant’s lung volume). By calibrating the plethysmograph in terms of volume change using a calibrated syringe (see section 3.4.11.5.2), changes in lung volume can be recorded through the breathing cycle or during breathing efforts against a closed shutter. The infant breathes through a face mask attached to a PNT which records air flow (and hence tidal volume) in and out of the lungs. The PNT, which includes a pressure transducer to assess pressure changes at the airway opening (Pao), is attached to a balloon shutter that, when closed, temporarily prevents any airflow (see Figure 66 and section 3.4.11.5.3). In the absence of airflow, pressures equilibrate throughout the respiratory system such that changes in alveolar pressure can be measured directly at the airway opening. Once a stable EEL has been established, the shutter is closed for up to 10 seconds, thereby enclosing a fixed mass of gas within the lungs, the volume of which can be calculated by applying Boyle’s law. During this period, the infant continues to make breathing efforts against the occlusion (Figure 8). This causes cyclic expansion and compression of the fixed gas volume. Figure 8. Screen display of plethysmographic FRC recording. Legend: Window A shows time-based trace for FRCpleth data. The graphical presentation of changes in box volume and changes in pressure at the airway opening for the 3 respiratory efforts recorded during the occlusion are shown in window B. Since the initial pressure (P1) in the lungs at time of the occlusion is known to approximate atmospheric (i.e., barometric) pressure, and both the changes in lung volume and change in alveolar pressure can be measured (from changes in ‘box’ volume (∆VB) and pressure changes at the airway opening (∆Pao) respectively: Figure 8), the initial volume (V1) can be calculated. 37 V.1, June 2014 After correction for apparatus dead space and any volume inhaled above the EEL at the time of the occlusion, V1 equates to FRC. Thus in its simplest form: FRCpleth = (∆VB/∆Pao) x barometric pressure The reader is directed towards detailed descriptions of plethysmography to grasp a fuller understanding of the basic principles involved, the underlying assumptions and the various correction factors that must be applied to ensure accurate assessments (section 7.4.3). Full details of data collection, quality control criteria for measuring and analysing FRCpleth data in infants are presented in sections 5.4.4 and 6.4. 2.5 Plethysmographic assessments of airways resistance Although plethysmographic assessments of airways resistance have proven to be a valuable outcome measure in infants in the past, this was at a time when infant plethysmography traditionally used a heated rebreathing system to provide respired gas under BTPS conditions to avoid thermal artefacts when assessing Raw. Concerns about potential infection risks, accumulation of CO2 during rebreathing, and the need to make the technique more widely available prompted a search for alternative solutions. Regrettably, initial attempts to apply ‘electronic thermal compensation’ when calculating Raw in infants, as in the current CareFusion BabyBody system, have proved disappointing, with physiologically implausible results in both healthy infants and those with lung disease (section 7.4.3). This suggests that algorithms that are more sophisticated may be required to cope with the added complexities of undertaking these measurements in such small, nose-breathing subjects. Consequently, although the technique for collecting data for Raw has been included in this manual (section 5.4.3), its use is not recommended until further refinements to software have been implemented and fully validated. 2.6 Rapid Thoraco-abdominal Compression (RTC or forced expiratory manoeuvres) Spirometry, whereby the subject inspires to TLC and exhales forcefully to RV, is the most frequently used method for measuring airway function in older subjects. By substituting voluntary effort with externally applied pressure to the chest and abdomen to force expiration, it has been possible to adapt these measurements for sleeping infants. 38 V.1, June 2014 2.6.1 Partial forced expiratory manoeuvres (Tidal RTC) Partial expiratory flow volume (PEFV) curves can be produced by wrapping a jacket around the infant’s chest and abdomen, and inflating this at the end of tidal inspiration to force expiration. The resultant changes in air flow (and hence volume) are recorded through a PNT attached to a face mask, through which the infant breathes (Figure 9, Figure 82, Figure 84). This technique is referred to as the “squeeze”, or tidal rapid thoraco-abdominal compression (RTC), technique. The maximal forced expired flow at FRC (V'maxFRC), which is a measure of forced expired flows (FEF) at low lung volumes (i.e., similar to FEF75 in older children), is the most commonly reported parameter derived from this technique (Figure 9). As detailed in the reading list (section7.4.4), standardised guidelines regarding data collection and analysis for tidal RTC have been published, as have sex-specific collated reference data (section 7.5). The tidal RTC technique has been used widely in clinical and epidemiological research studies, with reductions in V'maxFRC being identified in babies born to mothers who smoke during pregnancy and in those with airway disease. Interpretation of results may, however, be confounded by several factors, as discussed below. Figure 9. A and B: partial expiratory flow volume manoeuvres derived from the tidal Rapid Thoraco-abdominal compression (RTC) technique. Legend: Jacket pressure usually commences at approximately 30cm H2O and is increased in increments of 5-10cm H2O until further increments elicit no further increase in V'maxFRC (i.e., when maximum flow at FRC is attained). EEL, end-expiratory level. 39 V.1, June 2014 2.6.2 Methodological considerations for tidal RTC manoeuvres For accurate and reproducible V'maxFRC data, it is essential that: any leaks around the face mask are eliminated the jacket is fitted correctly Note: during data collection, if the jacket was re-fitted, the test should re-start with a reservoir pressure (Pr) of 2 or 3 kPa a stable and representative EEL is established before forcing expiration flow limitation is achieved An initial Pr of 2 to 3 kPa is usually selected (the lower starting Pr of 2 kPa is advisable when testing a preterm or very young infant) and applied at the end of tidal inspiration, with the aim of transmitting approximately 1.0 to 1.5 kPa to the pleural space. The Pr is subsequently increased in increments of 0.5 to 1.0 kPa until further increases do not elicit any further increase in forced expired flow at FRC. The “optimal” reservoir or jacket pressure varies considerably from child to child (generally between 2.0 to 8.0 kPa), depending not only on jacket efficiency, but also on the underlying respiratory mechanics. Far lower jacket pressures are required to achieve flow limitation in infants with airway disease than healthy subjects. It is advisable to check intermittently the changes in Pao during RTC (i.e., transmission of jacket pressure: section 5.5.3 and section 6.5.5), particularly when using high jacket pressures (Pj) in healthy infants (maximum Pao during RTC should not exceed 3 kPa). Measurements are repeated until 3 technically acceptable and reproducible manoeuvres have been obtained at optimal jacket pressure. Since minor fluctuations in EEL can have marked effects on V'maxFRC, it is recommended that V'maxFRC be reported as the mean of the three highest technically acceptable results. Measures of forced flow and volume reflect the integrated output of lung and airway mechanics and, as such, cannot be used to locate airway obstruction at any particular airway generation or anatomic location. Nevertheless, since V'maxFRC is measured at low lung volumes, it is believed to reflect primarily airway calibre upstream (i.e., distal) to the airway segment subjected to flow limitation. This makes it a useful measure of intra-thoracic airway function in infants, in whom nasal resistance composes a large portion (~50%) of total resistance. As in older subjects, both the shape of the loop and the numeric values derived contribute to the interpretation of results (Figure 10). 40 V.1, June 2014 Figure 10. Comparison of partial flow-volume loops in health and disease. Legend: A) In a healthy newborn infant, maximal flow at FRC (V'maxFRC) is 92 mLs1. B) In an infant of similar age and weight, but with evidence of airway obstruction, much lower flows are recorded and the descending portion of the expiratory flow-volume loop has a characteristically scooped-out shape (concave to the volume axis). 2.6.3 The Raised Volume Technique Despite the popularity of the tidal RTC, its value when assessing either baseline airway function or bronchial responsiveness may be limited by the dependence of reported values of V'maxFRC on resting lung volume, which may be unstable in infants, particularly in the presence of disease or following interventions. The RTC technique has therefore been modified to allow measurements over an extended volume range using what has become known as the raised volume rapid thoracic-abdominal compression (RVRTC) technique (Figure 11, Figure 89, Figure 90). The RVRTC allows the infant's lungs to be inflated toward TLC before rapid inflation of the jacket initiates forced expiration from this elevated lung volume, with the manoeuvre ending when the infant reaches residual volume (RV) (Figure 11). Application of 3-5 augmented breaths, using medical air, to induce a respiratory pause before forcing expiration generally overcomes the problem of infants inspiring before full expiration to RV has been achieved. 41 V.1, June 2014 Figure 11. Forced expiratory manoeuvres using the raised volume technique. Legend: A) Time-based trace: after an initial period of tidal breathing, a pre-set, standardised intermittent positive pressure of 30 cmH2O is applied at the airway opening to inflate the lungs toward total lung capacity. In this example, the jacket is inflated at the end of the sixth augmented breath to force expiration from increased lung volume. B) Flow-volume curve obtained during passive and forced expiration from increased lung volume. As with most infant lung function tests, the clinical utility of the RVRTC technique within individual infants has yet to be established. However, several studies have indicated that RVRTC may be more discriminative than tidal RTC for distinguishing the effects of respiratory disease on airway function. Although there is insufficient evidence to produce firm guidelines, an ATSERS Task Force has produced a consensus statement that provides preliminary recommendations pertaining to equipment, study procedures, and reporting of data for the RVRTC, based on what is perceived to be current best practice (section 7.4.4). 2.6.3.1 Analysis and Reporting of RVRTC Results The values that are most commonly reported from the RVRTC include FVC - forced vital capacity from the applied inflation pressure (e.g., FVC30) FEV0.4/0.5/0.75 - forced expired volume at 0.4; 0.5 or 0.75 seconds 42 V.1, June 2014 FEF75% - forced expiratory flow at 75% of expired FVC FEF25%–75% - forced expiratory flow between 25% and 75% of expired FVC It should be noted that despite common use of the term FVC for the total volume expired during the raised volume technique, this does not necessarily equate to measures in older subjects, because infants have been observed to take a sigh at the end of an inflation to 30 cmH2O, demonstrating that TLC has not actually been attained. Calculations of FEV1, and to a lesser extent, FEV0.75 are rarely feasible in young infants (except in the presence of marked airway obstruction) due to the rapid lung emptying and short forced expiratory time (FET) that occurs during early life. There is a marked negative age dependency of FEVt/FVC ratios during infancy and early childhood, such that results cannot be interpreted unless appropriate reference equations are used. Preliminary collation of RVRTC data from healthy infants (3–149 weeks) studied in the United States, London, and Brazil, all of whom were measured using similar custom-built equipment and techniques, showed an encouraging degree of overlap. However, more recent data collected with the CareFusion equipment shows the need for equipment-specific normative data and/or availability of a contemporary control group (section 7.5). 2.6.3.2 Advantages and Limitations of the RVRTC FEF% can only be reliably reported if a valid assessment of FVC is available. Underestimation of FVC (with concomitant overestimation of FEF%) will occur if the child breathes in before RV has been reached. By contrast, underestimation of FVC because of failure to deliver the specified inflation pressure, or because of accumulation of gas in the stomach during the lung inflations, will result in underestimation of both FEVt and FEF%. Failure to reach flow limitation by using too low a jacket pressure may have minimal effect on FVC, but will underestimate both FEVt and FEF. The raised volume technique is technically more demanding than partial flow-volume manoeuvres. Extensive training and dedicated personnel who can ensure precision with respect to timing and inflation pressures are essential to assure accurate results since - leaks around the face mask occur more easily during positive pressure inflations some children, particularly those with severe airway disease, will not relax sufficiently or will consistently inspire before RV is reached, thereby invalidating calculations of both FVC and FEF% 43 V.1, June 2014 repeated inflations may result in accumulation of gas in the stomach, which will be uncomfortable for the child and invalidate the results (see above) the lung inflations required during RVRTC may also affect subsequent measures of lung function, such that important decisions need to be made regarding the order of tests within a protocol finally, considerable caution is required in infants who are oxygen-dependent, in whom repeated lung inflations and subsequent hypocarbia might lead to prolonged apnoea 871 906 9060 2.7 The role of lung function tests in clinical management of infants The clinical usefulness of any lung function test within an individual infant will be enhanced if serial measures can be undertaken. However, the frequency with which LFTs can be repeated during infancy is limited by the need for sedation and the time-consuming nature of the tests. When requesting such LFTs, it is essential that the choice of tests is based on the question to be answered and knowledge of the suspected underlying pathophysiology, rather than simply on the equipment that happens to be available. Interpretation of results should take into account previous risk factors including preterm delivery, intrauterine growth retardation and treatment during the neonatal period. 2.7.1 What is Normal? Reliable interpretation of pulmonary function results relies on the availability of appropriate reference data to help distinguish between health and disease. The use of inappropriate reference equations can lead to serious errors in diagnosis. Although clinicians in respiratory medicine have become familiar with the concept of expressing lung function as percent predicted ([observed/predicted] *100), where the predicted value is derived from reference equations, this does not take into account the variability between healthy subjects which varies according to age and the outcome under investigation (section 7.5). Expression of lung function results as Z-scores (or Standard Deviation [SD] score) is therefore preferable. The Z-score is a mathematical combination of the percent predicted and the between-subject variability to give a single number that accounts for age- and height-related lung function variability expected within comparable healthy individuals. The upper and lower limits of normal (ULN and LLN) are conventionally defined as Z-score of ±1.64, a range that encompasses 90% of healthy subjects. However, due to increased uncertainty regarding reliability of reference ranges for infants and the fact that multiple LFTs are often used in the assessment, these limits may be set at ±1.96 Zscores to encompass 95% of the healthy population. Z-scores are useful for tracking changes in 44 V.1, June 2014 lung function with growth or treatment, as they allow comparison of lung function results obtained with different techniques. They can be converted into percentiles (−1.96 to +1.96 Zscores are equivalent to 3rd to 97th percentiles, respectively), which is easier for parents to grasp. Particular caution is required when interpreting results that lie close to the somewhat arbitrary “cut-offs” between health and suspected disease, especially when results are limited to a single test occasion. As with all tests, LFTs should be seen as only one part of the whole clinical picture. When selecting reference data with which to interpret clinical lung function results from an infant or young child, it is essential to ensure that the selected reference equations are appropriate for the age and body size of the individual being studied and that they were derived using appropriate statistical techniques from a large number of healthy infants (at least 100) who were studied using identical techniques and equipment. The need for sedation and the duration of tests have limited the number of healthy infants who can be studied at any one centre. While international collaborative efforts led to the publication of sex-specific reference data for V'maxFRC during infancy that proved appropriate at the time for custom-built equipment, the development of commercially available devices for infants appears to have introduced some bias, necessitating the development of equipment-specific equations for infant LFTs before clinical studies in individual infants can be interpreted properly (Lum et al 2010, Nguyen et al 2013: section 7.5). 2.8 Bronchodilator Responsiveness An observed change in baseline airway tone upon inhalation of a bronchodilator (e.g., Albuterol, also known as Salbutamol) is referred to as bronchodilator responsiveness (BDR). The limits of normal range of BDR defined as ± 1.96 Z-scores from the mean have been described in healthy infants using the RVRTC technique (Goldstein et al 2001: section 7.8). Based on these data, an abnormal (i.e., positive) BDR was defined as a percentage increase in FEV0.5 of greater than 13%, or in FEV25-75 of greater than 24%. There is a decline in BDR with age and an increase in tobacco smoke-exposed healthy infants (Goldstein et al 2001: section 7.8). In infants with recurrent wheeze, an increase in BDR was associated with shorter body length for age (Debley et al 2012: section 7.8) but no association was observed with established asthma risk factors. 45 V.1, June 2014 Normally in infants, bronchodilator agents are therapeutically inhaled during tidal breathing via a spacer. However, the RVRTC associated BDR protocol utilises an inflation pressure (25cmH2O) to deliver the Albuterol/Salbutamol via a spacer. Therefore, the clinical relevance of a positive BDR for the diagnosis or prediction of asthma, as well as predicting a therapeutic response to bronchodilators, is currently uncertain and requires longitudinal data. 46 V.1, June 2014 3 Setting up an infant lung function laboratory 3.1 Ambient conditions the room where lung function testing is conducted should have a very stable floor and walls to minimise the effect of vibrations since the infant equipment, particularly the plethysmograph, is designed to measure pressure signals of very small magnitude and is therefore highly sensitive to any vibrations The plethysmograph must be protected against direct sunlight and moisture a room temperature of 20-25C should be maintained using a thermal controlled device or air-conditioning doors and windows should be kept shut during test procedures to reduce noise and minimise disturbance or fluctuations in ambient pressure, particularly during data collection for FRCpleth subdued lighting and quiet ambience should be maintained to encourage the infant to fall and remain asleep 3.2 Equipment and apparatus 3.2.1 Masterscreen BabyBody Plethysmograph (CareFusion) Figure 12. CareFusion TM Masterscreen BabyBody Plethysmograph Customers may purchase a Masterscreen system (Figure 12) comprising different components according to their requirement: for instance, tidal breathing and passive mechanics package with or without the plethysmograph, and/or including the tidal Squeeze and/or Raised Volume Squeeze programs (Figure 12; see Appendix for supplier: section 8.1). 47 V.1, June 2014 3.2.2 Resuscitation trolley and suction apparatus Besides the resuscitation trolley containing age appropriate drugs and instruments (e.g., laryngoscopes, endotracheal tubes, bag and mask, suction tubing, etc), the followings are also essential within the infant LFT lab Suction apparatus Pulse oximeter (SpO2 monitor) Oxygen and medical air supply 3.2.3 Basic accessories for lung function tests Whichever test is undertaken, appropriate size face masks are essential when collecting data. Therapy putty is also required to create an air-tight seal between the mask and the infant’s nose and mouth. 3.2.3.1 Face masks Figure 13. Rendell Baker Soucek face masks of different sizes Available in sizes 0, 1 and 2 and suitable for infants weighing 2-15 kg (Figure 13and Table 1) (see Appendix for supplier: section 8.1) Ideally the masks should be transparent and, if either plethysmography or the Raised volume RTC technique are being undertaken, must be firm to avoid distortion or dissipation of the pressure signal during pressurisation ( e.g., the infant’s own respiratory efforts against the airway occlusion during FRC measurements, or application of external pressure during the RVRTC) 48 V.1, June 2014 Table 1 summarises the dead space of an assortment of face masks (up to but not including any space occupied by the pneumotach) as assessed by water displacement when empty and after lining each mask with a rim of therapy putty as would be used during testing (effective dead space). Table 1. Summary of face mask dead space Rendell-BakerSoucek face masks Total dead space by water displacement (mL) Effective dead space by water displacement (mL) Suitable for infants weighing Size 0 10 5 2–4 kg Size 1 15 7.5 4–6 kg Size 2 20 10 6–15 kg 3.2.3.2 Therapeutic putty The putty is used to line and cushion the rim of face mask to facilitate an air-tight seal when applied over the nose and mouth. Selection of a suitable consistency is vital to ensure that the putty can be easily moulded to achieve a good seal, but does not become so ‘runny’ when warmed during use that it seeps towards the infant’s nose, mouth or eyes (see Appendix for supplier). 3.2.3.3 Balloon shutters These are available from the manufacturer (see Appendix for supplier: section 8.1) and are necessary to effect airway occlusions during data collection for passive respiratory mechanics, plethysmographic FRC, partial and raised volume forced expiratory flow-volume curves. 3.2.4 Additional accessories when undertaking forced expiratory manoeuvres 3.2.4.1 RTC jacket and bladder The jacket, including the inflatable inner bladder, should cover as much of the chest and upper abdomen as possible (5.5.1, Figure 84). When purchasing the BabyBodyMaster screen system with the ‘Squeeze’ (RTC) software program, 3 sizes (XXS, XS, S) of jackets: each a nonstretchable, width-adjustable band with Velcro and zipper fastenings together with inflatable bladders, and a large-bore tubing (for connection to the bladder) will be provided by manufacturer for performing the RTC or Squeeze manoeuvres (Figure 14; see Appendix for supplier: section 8.1). 49 V.1, June 2014 Figure 14. Various sizes of RTC (squeeze) jacket, bladder and large-bore tubing for infant forced expiratory manoeuvres 3.2.5 Specific accessories for the Raised Volume Squeeze In addition to the squeeze jacket/ bladder and large-bore tubing, an infant T-piece resuscitator is required during the raised volume squeeze manoeuvres – see below. 3.2.5.1 Neopuff Infant T-piece Resuscitator (Fisher Paykel Healthcare) This apparatus allows a pre-determined peak inspiratory (or inflation) pressure (PIP) to be set. In accordance to international consensus (ATS/ERS guideline, 2005: section 7.4.4), a PIP of 30 cmH2O is recommended for the raised volume forced expiratory manoeuvres. (see Appendix for supplier: section 8.1) Figure 15. Left: a Neopuff Infant Resuscitator; right: a T-piece tubing. 50 V.1, June 2014 The cap (for “PEEP” function) from the T-piece resuscitator tubing is removed (Figure 15, right; Figure 16, left). One end of the T-piece resuscitator tubing is inserted to a straight connector (15M-15M; Figure 16) (see Appendix for supplier: section 8.1), while the opposite end is connected to the PNT in readiness for data collection using the RVRTC technique (Figure 17) . Figure 16. A straight connector is inserted to the Neopuff T-piece resuscitation tubing Figure 17. Apparatus set up for the raised volume RTC manoeuvres. Legend: This illustration shows the Neopuff Resuscitator connected to a supply of medical air (via the green tubing), and the T-piece tubing connecting the Neopuff device to the PNT and face mask. 51 V.1, June 2014 3.3 Preparation for testing 3.3.1 3.3.1.1 Laboratory set up and equipment Equipment specifications The ERS/ATS infant lung function Task Force has published specifications for equipment used for infant testing and quality control criteria associated with signal processing and data handling (Frey, 2000: section 7.3). All equipment and attachments must be fully patient isolated and comply to international safety standards (note: external devices such as USB or other portable drives may not comply with such regulations). An important consideration for infant testing is that the flow sensor, or PNT, should be a low-resistance, low dead space device with linearity appropriate for the age of the child. In addition, the PNT should be heated to body temperature during calibration and over the duration of testing in order to avoid condensation, since any moisture in the sensor would distort signals collected. If the “squeeze” or forced expiratory manoeuvres are to be undertaken, the PNT should have a linear range appropriate for the high flows observed during such manoeuvres and age/weight of the infant (Table 2). All surfaces and components must be easily decontaminated or cleaned with appropriate instructions provided by the manufacturer (Appendix: section 8.2) or according to local hospital guidelines (section 5.8.2.2). Table 2. Range of flows in infants during tidal breathing and forced expiratory manoeuvres Flow range (mL/s) Infant weight, kg Tidal breathing Tidal RTC Raised volume RTC <2 0100 0200 0500 24 0200 0500 01000 410 0300 01000 03000 1015 0400 01500 03000 3.3.1.2 The Masterscreen BabyBody Plethysmograph The commercially available Masterscreen BabyBody Plethysmograph (v4.5 - v4.67a) (Figure 12; see Appendix for supplier: section 8.1) was developed and introduced following recommendations from the ATS/ERS task force on infant LFTs (section 7.3) When closed, the plethysmograph allows clear vision and easy access to the infant During calibration and data collection, it is not advisable to use/include the following objects within the plethysmograph 52 V.1, June 2014 – air conditioning or a fan – compressible and fluffy objects (e.g., cellular blanket and/or soft toys, since isolated pockets of air may lead to poor equilibration within the plethysmograph resulting in sub-optimal or multiple time constants) Data should only be recorded and saved when the infant is sleeping quietly, has adapted to the mask /PNT and is breathing regularly 3.3.1.3 LabManager Interface The LabManager [Main Group] tab shows the available suite of software programs (Figure 18), namely: - tidal breathing (TB) - plethysmographic functional residual capacity (FRCpleth) - respiratory system resistance (Rrs) and compliance (Crs) [using the single and double occlusion techniques] - the tidal Squeeze, or tidal RTC program, and - the raised volume (RV) Squeeze, or RVRTC program Figure 18. LabManager screen display of the suite of lung function testing programs. Legend: The menu bar at the bottom of the page shows various tab sheets. The standard layout of the software program screen is shown in Figure 19. 53 V.1, June 2014 Figure 19. The standard layout of the CareFusion system screen display. – acting as a measure of safety and quality control, the [Monitor window] monitors the infant’s breathing pattern, hence his/her well-being. As soon as the mask and PNT are placed over the infant’s airway opening, click on [F1] immediately to start the monitoring process (the recording is not stored); – the [Menu bar] allows access to the command menus where default settings may be selected or edited; – the [Icon bar] comprises icons which are used to activate sequences and “function” of the measurement program. The user operates or activates a certain aspect of the program by clicking on a specific function icon (numbered from 1 to 10). Alternatively, the corresponding Function keys (F1 to F10) on the computer keyboard may be used instead: e.g., clicking on the [F2] icon on the monitor screen is the same as pressing on the function key [F2] on the keyboard and so on; – the [Status bar] displays information such as: a) current phase of program at time of use; b) duration of time spent within a test program (e.g., how long the plethysmograph has been closed while collecting FRC data), and c) % of data storage space already filled this is informative to the user in terms of planning the sequence of data collection, e.g., [save] the data already recorded before starting a new sub-set of data collection; 54 V.1, June 2014 – the [online graphic windows] display data in different graphical formats, which are dependent upon the programs used at time of data acquisition (e.g., Figure 70, Figure 75); – the result window shows lung function parameters and selected quality control criteria set by the users. 3.4 Preparation prior to performing equipment calibration 3.4.1 Displaying quality control criteria During data recording, in addition to the online display of calculated values for the main outcomes for each test, several other outputs relating to quality control should also be displayed; these allow comparison of data collected within and between centres (e.g., total number of manoeuvres [of which, number of successful trials] per test, or transmission of jacket pressure). In addition, quality control settings for each individual trial facilitate selection of the “best” data. Many of these quality control features are required when summarising data for publications, therefore such data should be saved and stored in a database or data-sheets. 3.4.2 Setting up essential criteria for test programs Prior to equipment calibration and data collection, it is essential to undertake several important procedures to ensure that each of the MasterscreenTM system programs are suitably customised, e.g., set / review the sampling speed set / review criteria for airway occlusion and data collection set/ review the content list of lung function results and quality control features for display on screen Failure to do this may invalidate all subsequent data collection! 3.4.3 Tidal breathing program settings 3.4.3.1 Sampling frequency for tidal breathing Open the program by double clicking on [Tidal Breathing Analysis] (Figure 18) To check/set the sampling frequency – from the menu bar, click on [Program] > [Modify settings] 55 V.1, June 2014 – back to the menu bar, click on [Settings] >[modify] > [Evaluation and Display] (Figure 20) – Select the option for [100 Hz] (Figure 21) Figure 20. Screen display showing menu bar options Figure 21. The setting of sampling frequency for tidal breathing program. Legend: Options for criteria which are related to analysis and quality control are also displayed. 56 V.1, June 2014 3.4.3.2 Setting technical criteria for tidal breathing Figure 21 shows settings for the criteria for online analysis, including [Select number of breaths in on-line evaluation]: set to 50, thus enabling analysis and display of results for up to 50 tidal breaths per trial [Number of highest and lowest values to delete]: in this example (Figure 21), the number is set to 5. This means that, during online analysis, for each trial or epoch of data (maximum: n=50), the breaths that have tidal volume (VT) within the highest 5% and lowest 5% of the overall mean VT will be eliminated, so that only those breaths that lie between the 5th and 95th percentile of the total number of breaths will be considered valid and results calculated from these Note: The CareFusion’s default setting for [Number of highest and lowest values to delete] is 25, which means only the number of breaths that fall between the 25th and 75th percentile (i.e., the middle 50 percent) of total number of breaths recorded during one trial are accepted by the software as “valid” for final analysis. Provided that relatively stable tidal breathing recording is obtained while the infant is in relaxed sleep and breathing regularly, the default for [Number of highest and lowest values to delete] may be set at 5 or 10, allowing 80%-90% of the data to be analysed with further consideration of other quality control criteria (e.g., mask leak). For clarity of online data display in the lower right window (Figure 23 B), users are advised to modify the (red) vertical axis to read 50%-100% for the parameter Vpef (expiratory volume up to tidal peak flow as a % of total expired volume (Vex)) so that the (red) symbols representing Vpef%Vex are not visible (Figure 23: A and B). This is because Vpef%Vex is not a useful outcome. A B Figure 22. Modification of graphic display for tidal breathing data Legend: For clarity, the red vertical axix for vpef/vex (panel B: right lower graphic window) has been adjusted to show only Tpef/Tex data, since the variable Vpef/Vex is not a useful outcome. Panel A shows the manufacturer’s default setting, displaying both Tpef/Tex and Vpef/Vex data. 57 V.1, June 2014 3.4.3.3 Contents of tidal breathing result table To review or edit the list of variables (parameters) displayed in the result table (top right hand window) Go to menu bar: click on [Program] and [Modify settings]. Click on [Settings] from the menu bar, select [modify] >[Parameter list] > [Contents of Table] Browse through the list of available variables and select relevant ones for display (Figure 23) Click on the [Accept] button to save contents and [OK] to exit Figure 23. Screen display showing selected variables from the [Contents of table] tab. Legend: The variables selected will be displayed in the result window (indicated by red rectangle and red circle, respectively). NOTE: Each run or epoch of data collected is known as “trials” or “Acts” A maximum of 5 trials /Acts are permitted in tidal breathing, Resistance/Compliance and FRC programs; whereas > 5 trials are possible in the Tidal and Raised Volume Squeeze programs Data related to each trial or act are represented by different colours (Figure 24) 58 V.1, June 2014 Figure 24. A maximum of 5 trials (or Acts) are usually permitted for each sub-set of tests. Legend: Right: the trials/acts are represented by different colour “smarties” or “buttons”. Left: The screen display shows two trials of tidal breathing data with results, which are indicated by the blue and red buttons (marked by the red circles). 3.4.4 Passive respiratory mechanics (Crs and Rrs) program settings It has previously been mentioned (section 3.3.1.3) that the “Double occlusion” (DO) technique is also available for the assessment of passive mechanics of the respiratory system but such assessments do not add further information to measurements obtained using the single occlusion (SO) technique (Goetz et al, 2000: section 7.4.2). To avoid prolonging the test session, it is not recommended to use both the Do and SO techniques to assess to Crs and Rrs, therefore only the SO technique will be discussed below. 3.4.4.1 Sampling frequency for passive respiratory mechanics Double click on [Baby Res/Compliance] to open program (Figure 18) The sampling speed for this program is set automatically to 100 Hz NOTE: It should be recognised that when using a higher sampling speed, the duration available for each epoch or trial is shortened for data collection. However, using a low sampling frequency may lead to loss of signal fidelity, such as signal “clipping” or non-linear distortion of recorded signals (Frey 2002,ERJ: section 7.3). In general, it is recommended to set sampling rate at a higher frequency than the minimum acceptable rate to allow for different measurement conditions during the testing procedure (e.g., during a “Squeeze” manoeuvre, although tidal breathing is recorded initially to ensure a stable end-expiratory baseline, this is subsequently followed by a forced expiration when flows will be considerably higher). 59 V.1, June 2014 3.4.5 Setting technical criteria for single occlusion test (SOT) To access the [Settings] menu, click on [Program] from the menu bar > [Modify]; click on [Settings] from the menu bar > [Settings] Figure 25 shows the [Settings: Occlusion] menu which illustrates the timing and duration of the shutter balloon for the SOT and technical criteria for identifying an acceptable pressure plateau at the airway opening, with [Setting: Evaluation & Display] menu showing the criteria to define the expiratory portion of the flow-volume curve over which linear regression should be performed to determine rs (Figure 26) Figure 25. The preferred settings for the inflation duration of the shutter balloon for single occlusion test. Legend: The criteria for defining a satisfactory pressure plateau at the airway opening during a brief airway occlusion. 60 V.1, June 2014 Figure 26. Settings for the regression line for the SO data analysis Legend: The regression line is set to emcompass 50% of the linear expiratory portion, the minimal acceptable correlation coefficient for the slope from which rs is calculated . 3.4.6 Contents of passive mechanics result table To review and/or edit (Figure 27) the list of variables displayed in the results table Go to menu bar: click on [Program] > [Modify settings]. Return to the menu bar, click on [Settings] > [modify] >[Parameter list] > [Contents of Table] Browse through the list of variables and select relevant ones for display (Figure 27) Click on the [Accept] button to save contents and [OK] to exit 61 V.1, June 2014 Figure 27. Variables selected for online display in the result window (top right). Legend: values of Crs and Rrs are reported, whereas weight adjusted tidal volume (VT), the volume intercept (Vic), information regarding the time constant (rs), pressure plateau (P1) are quality control criteria used to evaluate the acceptability of the single occlusion flow-volume curve. 3.4.7 Plethysmography program settings Previously in section 2.5, it has been mentioned that currently it is not recommended for sReff data to be reported due to inadequate validation. Further clarification is required regarding the impact of the application of electronic thermo-compensation on the recorded sRaw data from infants. 3.4.7.1 Sampling frequency for FRCpleth To view (or edit) the setting of sampling frequency – go to the menu bar: click on [Program] > [Modify settings]; return to the menu bar, click on [Settings] > [Common] (Figure 28) Select the option for [100 Hz] and click on [OK] to confirm (Figure 28) 62 V.1, June 2014 Note: a sampling speed of 200 Hz is recommended when measuring infants/young children with a rapid respiratory rate, or if the user intends to collect sRaw data for future validation. Figure 28. Selecting the sampling frequency for airway resistance and FRCpleth data collection 3.4.7.2 Setting criteria for the FRCpleth occlusion It is vital to set up the appropriate criteria for the duration of balloon inflation – go to menu bar, click on [Program] > [Modify settings]; return to menu bar, select [Settings] > [FRC] (Figure 29) The appropriate criteria are shown in Figure 29. In this example, within the panel relating to [Dead space], it can be seen that in a previous test, a size 2 mask had been selected and used for data recording (total mask dead space: 20 mL, effective mask dead space: 10 mL; also see section 5.4.2) When the shutter balloon is activated (by clicking on [F3]) - – The balloon is set to inflate at the end of an inspiration, this is because Infants and young children tend to tolerate airway occlusion better at a higher lung volume (endinspiration) rather than at lower lung volume (end expiration) – The balloon is set to deflate automatically: (a) after a maximum airway occlusion time of 10 seconds or (b) after 3 complete respiratory efforts have been detected during airway occlusion. The latter, set as an “additional open conditions” (indicated by the red rectangle in Figure 29), means that in younger infants who have a higher respiratory rate, the shutter balloon will deflate automatically as soon as 3 respiratory cycles (inspiratory and expiratory swings) have been completed, even though the duration of the airway occlusion is < 10 s 63 V.1, June 2014 10 to 15 breaths should be recorded after the release of airway occlusion to allow reestablishment of a stable EEL (a younger infant usually requires a longer period to resume stable EEL) Figure 29. Recommended settings for FRC occlusion. Legend: Note the “additional open conditions” for terminating the airway occlusion. 3.4.7.3 Contents of FRCpleth result table In order to review or edit the list of variables displayed in the result table (top right hand window, Figure 28) Go to menu bar: click on [Program] and [Modify settings]; return to the menu bar, click on [Settings] > [modify] > [Parameter list] > [Contents of Table] Browse through the list of variables and select relevant ones for display (Figure 30) Click on the [Accept] button to save contents and [OK] to exit 64 V.1, June 2014 Figure 30. Selected FRCpleth variables for display in the result window Once the plethysmograph has been calibrated, airway resistance and FRC measurements are undertaken with the box closed. Prior to lowering the hood, a brief airway occlusion is made manually during tidal breathing to check that the mask seal is air-tight. Data collection is started by recording an epoch of tidal breathing until the box volume signal becomes stable, then activating an airway occlusion (by clicking on [F3]) to continue with collection of FRC data (section 5.4.4). During data collection, BTPS correction is applied to flow, and hence volume, signals. A drift correction is also applied. 3.4.8 Tidal RTC program settings From the [LabManager] [Main group] screen, open the program by double clicking on [Tidal Squeeze] icon (Figure 18) 3.4.8.1 Sampling frequency for tidal RTC This test is programmed to automatically data collect at the minimal acceptable sampling speed of 200 Hz 3.4.8.2 Setting measurement criteria for tidal RTC manoeuvres Along the menu bar, click on [Program] and select [Modify settings] Return to the menu bar, click on [Settings] > [Measurement] (Figure 31 and Figure 32) 65 V.1, June 2014 Figure 31. Program menu for setting criteria for tidal RTC measurements Figure 32. The “Measurement” menu displays the recommended criteria. Legend: The maximum compression time, indicated by the red circle, may be edited by the user according to the individual infant’s background history. 3.4.8.3 Setting quality control criteria for tidal RTC manoeuvres The criteria shown in the [Validation: Measurement] panel (Figure 32) are related to quality control – 66 V.1, June 2014 – [Pj threshold, relative to Pr] – the difference between Pj and Pr should not exceed 50%, as that would indicate a leak occurring along the conduit from the reservoir to the jacket bladder – [Pj stability] – the mean Pj measured during jacket inflation should be relatively consistent; ≥ 80% consistency can be expected in the absence of a leak between the large-bore tubing and jacket bladder – [Volume expired at PEF relative to VT] (VPEF/VT) – jacket inflation at end inspiration should rapidly force expiration such that peak expiratory flow (PEF) is achieved before 30% of VT has been exhaled. The analysis of V’maxFRC may be distorted if VPEF/VT is >30% (Section 6.5.2). NOTE: – The jacket inflation during a squeeze manoeuvre is automatically released after a preset defined duration between 2 to 3 seconds – The maximum jacket compression time should be set to at least 2.0 seconds (Note: the default is 1.2 s which is insufficient for some infants to complete forced expiration. In older infants or young children, and those with airway obstruction, the [Max. compression time] may need to be greater than 2 s) 3.4.8.4 Setting the reservoir pressures for tidal squeeze manoeuvres The setting of reservoir pressure during data collection is enabled by clicking on [F6] (“setting for pressure”) In general, a Pr of 3 kPa is selected to start the tidal squeeze test (Figure 33) and this is increased by 1 kPa for each subsequent squeeze manoeuvre until flow limitation is achieved (maximum increment is limited to 2 kPa between consecutive trials). However, in the case of a young or preterm infant being tested, an initial Pr of 2 kPa may be more appropriate and pressure increased more gradually, for example by 0.5 kPa rather than 1 kPa for subsequent manoeuvres, particularly if there is evidence of airway obstruction 67 V.1, June 2014 Figure 33. [Settings: reservoir pressure] menu enables an appropriate pressure to be selected prior to each trial 3.4.8.5 Setting criteria for the tidal RTC occlusion During a squeeze manoeuvre, the jacket may be triggered to inflate to force flow. The program permits the user to select either the [Synchronized] or [Manual] mode To select an option, go to the menu bar: select [Program] > [Modify settings]; return to the menu bar: select [Settings] > [Trigger settings] (Figure 34) Click on the radio button labelled [Synchronized] (Figure 35) For the tidal squeeze manoeuvres, the [Synchronized] option mode is preferable. During data collection, once the [F3] icon is triggered (or pressing the [space bar]), the jacket will inflate automatically at end-inspiration of the next tidal breath If the [Manual] mode was chosen as the default setting, jacket inflation will occur whenever the operator clicks on [F3] icon. Therefore, the exact timing of triggering jacket inflation at end-inspiration of a tidal breath is vitally crucial in order to obtain technically acceptable partial forced expiratory flow-volume curves (see Section 6.5.2 for quality control criteria) 68 V.1, June 2014 Figure 34. “Trigger settings” for jacket inflation for the tidal RTC manoeuvres Figure 35. The “synchronized” option is the preferred mode for the jacket inflation mechanism 3.4.8.6 Setting safety criteria for tidal squeeze manoeuvre To check / edit safety criteria, go to the menu bar: click on [Program] > [Modify settings]; return to the menu bar: select [Settings] > [warnings] Figure 36. The recommended default settings for safety alerts during tidal RTC manoeuvres Figure 36 shows the recommended default settings for safety alerts during the partial forced expiratory manoeuvres. Whenever concerns regarding the infant’s breathing pattern or the apparatus are detected, warning messages will be displayed in the monitor window 69 V.1, June 2014 – [Minute ventilation] – a relatively low threshold is set so that an immediate warning is displayed if the infant’s minute ventilation drops (this may also indicate that a mask leak is present) – [No signal warning delay] – if a flow signal is not detected, a warning message is displayed after the duration of time set as default – [Jacket pressure warning threshold] – a low threshold (e.g., 0.2 kPa) is set to ensure that if a rise in Pj is detected at times when jacket inflation has not been triggered, a warning message appears to alert the operator of an “unexpected rise in Pj” – [Occlusion warning threshold] – similarly, a low threshold (e.g., 0.2 kPa) is set to ensure that if an unexpected rise in Pao is detected even though no shutter occlusion has been triggered, the warning message “Airway may be occluded” is displayed, to avoid a potential risk of an accidental airway occlusion 3.4.8.7 Setting criteria for assessment of jacket transmission The magnitude of jacket pressure that is transmitted to the intra-thoracic structures during a squeeze manoeuvre varies between infants. In order to assess Pj transmission, it is necessary to measure Pao (P1) during a static airway occlusion at end-tidal inspiration, followed by jacket inflation at the optimal Pj while maintaining the airway occlusion to record a second Pao (P2). The difference between these pressure plateaux (P2 – P1) represents the Pj transmission (Pao-j), which should generally be ~ 2 kPa except for infants with marked airway obstruction, in whom flow limitation is achieved at lower pressures The default settings for assessing jacket transmission are shown in Figure 37 [Occlusion time before jacket compression] – This may be set between 0.2 and 1.5 seconds. The ideal occlusion time depends on how rapidly alveolar pressure equilibrates throughout the respiratory system during an airway occlusion (which is achieved by the inflation of the shutter balloon). During the first year of life, healthy infants may achieve pressure equilibration after an airway occlusion within ~0.51.0 s, whereas older infants and those with airway disease may require longer. However, if the duration of airway occlusion is too long, the infant may make an inspiratory effort before jacket-inflation occurs [Jacket compression time] – the program allows the jacket inflation to be set between 0.4 and 3 seconds 70 V.1, June 2014 [Max. change in Pao] – for the Pao plateau during an airway occlusion to be accepted as a “stable” plateau, the maximal change in value between the start and end of the plateau should not exceed 15% [Max. Pao standard deviation] – the lowest SD is set for the Pao plateau obtained during an airway occlusion to ensure identification of a stable Pao plateau Figure 37. The recommended default settings for the assessment of jacket pressure transmission 3.4.8.8 Contents of tidal RTC result table To review and/or edit the list of variables displayed in the results table Go to the menu bar: click on [Program] > [Modify settings] Return to the menu bar, click on [Settings] > [modify] >[Parameter list] > [Contents of Table] Browse through the list of variables and select relevant ones for display (Figure 38) Click on the [Accept] button to save contents and [OK] to exit Figure 38. Selected tidal RTC variables for display in the result window 71 V.1, June 2014 3.4.9 Raised volume RTC program settings From the [LabManager] main group page, open the program by double clicking on [Raised Volume RTC] icon (Figure 18) 3.4.9.1 Sampling frequency for Raised Volume RTC Similar to the Tidal RTC test, the Raised Volume RTC is also programmed to automatically data collect at the minimal acceptable sampling speed of 200 Hz. 3.4.9.2 Setting the measurement criteria for Raised Volume RTC manoeuvres The process of setting up the measurement criteria for the Raised Volume RTC manoeuvres is the same as for tidal RTC trials –see section 3.4.8 Figure 39 shows the measurement settings for Raised Volume RTC, which are largely similar to those set for tidal RTC manoeuvres, the only difference being a slightly longer duration (i.e., 3 s) selected for [Max. compression time] In older infants/ young children, and those with airway obstruction, the default setting for [Max. compression time] may need to be longer than 3 s to ensure complete exhalation Figure 39. [Measurement] criteria settings for the Raised Volume RTC. Legend: These criteria are similar to those set for tidal RTC manoeuvres, with the exception for [Max. compression time], which is set to 3 seconds (highlighted by the red circle). 72 V.1, June 2014 3.4.9.3 Setting the jacket trigger for Raised Volume RTC In contrast to the tidal RTC, the [Manual] mode is preferred for the raised volume manoeuvres (Figure 40) Technically acceptable “full” forced expiratory flow-volume curves require perfect coordination between the two operators: operator A executes and completes 3-5 passive lung inflations; when instructed by operator A, operator B manually triggers jacket inflation by clicking on [F3] icon (or firmly pressing down and releasing the space bar rapidly) just as the inspiratory flow-volume curve of the final inflated breath is about to cross zero flow (allowing a few nano-seconds for jacket bladder to fill and aiming to effect chest compression to force flow at “end-inspiration”, i.e., when operator A releases the manual occlusion over the end of the Neopuff T-piece to end lung inflation) Figure 40. The “Manual” mode for triggering jacket inflation is preferred for the Raised Volume RTC manoeuvre. 3.4.9.4 Setting safety criteria for Raised Volume RTC Similar safety default settings for tidal RTC (section 3.4.8.6) are applicable for the Raised Volume RTC manoeuvres (Figure 36 and Figure 41) 73 V.1, June 2014 Figure 41. Default settings for safety criteria for the Raised Volume RTC technique 3.4.9.5 Contents of Raised Volume RTC result table To review and/or edit the list of variables displayed in the results table Go to the menu bar: click on [Program] > [Modify settings] Return to the menu bar: click on [Settings] > [modify] >[Parameter list] > [Contents of Table] Browse through the list of parameters and select relevant ones for display (Figure 42) Click on the [Accept] button to save contents and [OK] to exit Figure 42. Selected Raised Volume RTC variables for display in the result window 74 V.1, June 2014 3.4.10 CareFusion Masterscreen database Prior to calibrating the PNT and the plethysmograph (“Box”), it is advisable to create an electronic “Patient record” within the Masterscreen system database. This helps to avoid the potential error of collecting and storing lung function data into a wrong Patient record file in the database 3.4.10.1 Creating a patient record double click on [Patient Data] icon (Figure 18) to create (or indeed to retrieve) a patient record a) If this is the infant’s first test occasion, a new folder or record can be created by entering his/her details; other relevant comments may also be added: such as clinical diagnosis, name of operator/ investigator, and clinician performing the infant’s clinical examination prior to testing (Figure 43). Click on [F10] to save and exit Figure 43. LabManager V4 [Main group] [Patient Data] page b) If the infant has been tested previously, his/her record can be retrieved by entering either the name or a known specific number allocated to the infant (e.g., hospital number or study number). Amend and enter updated weight and length measurements, and any other relevant information (e.g., name of user / investigator) Click on [F10] to save and exit (Figure 44). 75 V.1, June 2014 Figure 44. An example of an existing patient file being retrieved nd Legend: Notice the 2 sheet with the heading “Test Directory” (shown by the red rectangle), indicating test data had previously been collected and stored In order to proceed with the Calibration process, it is necessary to type in the infant’s current weight and length; if these are not available prior to calibrating the equipment, estimated anthropometric values may be entered. However, it is vital that the estimated values are corrected as soon as the infant has been weighed and length measured, before analysis of lung function data, as each epoch of lung function data will be saved with weight and length measurements entered prior to testing To edit or update the weight/length values – click on “Test Directory” page or [F3] to view the list of lung function data that had been saved to the database (Figure 44) Select/highlight the appropriate line of data by inspecting data/time and type of data saved. Click on [Info] button (Figure 45) View data in the drop-down [Test Information] panel (Figure 46). Edit or update data as necessary, click on [Save], and select [Yes] to accept or [No] to reject the modified data (Figure 46 and Figure 47). 76 V.1, June 2014 Figure 45. Test directory showing a list of data saved in the Masterscreen database. The red circle indicates [Info] button Figure 46. [Save] button in the [Test Information] panel is highlighted by the red circle 77 V.1, June 2014 Figure 47. Screen option allowing the user to accept and save the modified data. The red circle highlights the Exit button Click on the [X] button (circle in red, Figure 47) to exit this page To view the whole directory of data, click on [F8] which toggles between [compressed mode] and [detailed mode] Click on [F10] to exit [Patient Data] and return to the LabMan4 main interface (Figure 18) 3.4.10.2 List of Function keys associated with [Patient data] program F1 = [Current patient] – click on [Function key 1], or tap [Enter] key twice, to retrieve current or last patient’s folder F2 = [Search patient] - click on [Function key 2] to access [Patient Directory] F3 = [This button changes between the windows]: toggles between [Patient data] and [Test Directory] F8 = toggles between [compressed mode] and [detailed mode] F9 = [Save data entered; program not exited] F10 = [Save data entered and exit program] 3.4.11 Preparation and calibration of the Babybody Masterscreen system Careful calibration of the equipment, including safety checks, is performed prior to each test session. The Babybody MasterscreenTM system, with apparatus such as the PNT having been 78 V.1, June 2014 inspected, assembled and inserted into the sensor housing, requires 20 minutes “warming up” time to ensure thermal equilibration is achieved. 3.4.11.1 Assembling the PNT components and balloon shutter Before assembling the apparatus, inspect and ensure that all the components are dry and in particular, that the PNT resistive mesh screen is free of any dust or dirt particles. It is advisable to handle the PNT screen only by its ridge Check that the PNT screen is correctly positioned between the PNT parts. Once assembled, the complete PNT is slotted in to the sensor (i.e., pressure transducer housing) (Figure 48: a and b). It is vital that the 2 pressure ports on the PNT are in direct contact with the pressure ports within the pressure transducer housing (Figure 48b) Note that the balloon shutter has a bevelled or sloped end; insert this end to the PNT (Figure 48c) away from the patient side (Figure 53) In addition, check that the clear shutter tubing is firmly fitted to both the metal tips at the control panel and the shutter, and that the PNT/pressure transducer lead is correctly slotted into the control panel (Figure 48 c) Figure 48. Assembling PNT components and balloon shutter to CareFusion sensor. Legend: a) It is essential to ensure that the PNT resistive screen is free from dirt and that all the PNT components and the pressure ports are dry. b) The PNT screen is fitted snugly between the PNT parts in readiness to be connected to the sensor; it is vital that the pressure ports are aligned correctly. c) The bevelled end of the balloon shutter is inserted to the PNT securely. Check that the balloon shutter tubing and PNT electrical lead are connected appropriately to the control panel. 3.4.11.2 System warming up Switch on computer and enter the password click on [LAB 4] icon to open [LabManager] interface (Figure 49) 79 V.1, June 2014 Figure 49. The BabyBody Masterscreen system main interface. The [Lab 4] icon is indicated by the red circle The [Start up] [System check] page opens and kick-starts the count-down of 20-minutes duration allowing the MasterscreenTM System to reach thermo-equilibration (Figure 50). This step is essential prior to calibrating the PNT and Box Ensure that the PNT is in situ correctly in the sensor housing Figure 50. [Start up] page with automatic real-time count down of 20 minutes of system warm up time Once the 20-minute “warming” period is completed, the software opens to the [LabManager V4.67a] [Main group] tab (Figure 18) 3.4.11.3 Checking the condition of box seal While waiting for the system to reach thermal equilibration, check the rubber seal around the Plexiglas hood for cracks, scratches or other damage Once the hood is lowered to close the box, check that the magnetic seal is strong and firm 80 V.1, June 2014 NOTE: a simple test to check the tightness of the seal is to gently attempt to push through the corner of a sheet of paper around the perimeter of the closed box. The paper will only pass through if the seal is inadequate 3.4.11.4 Preparation and calibration of the pneumotachometer Calibration, also known as static response, describes a predictable relationship (normally linear) between the electrical output of the pressure transducer and the magnitude of the physical parameters over the full range of the physical change. The PNT, with the balloon shutter in situ (Figure 48), is calibrated using a calibrated, operator controlled syringe (or “pump”) to deliver a known volume (e.g., 100mL), which is differentiated to yield a flow signal The solid state pressure transducer used to measure changes in airway opening pressure (Pao) is extremely stable and not calibrated on a regular basis Equipment calibration is conducted under identical conditions to those when data are collected: for example, with air-conditioning switched on if that is in use during testing to control ambient temperature From the [LabManager V4.67a] [Main group] screen (Figure 18), select and open the [Calibrations] tab (Figure 51) Figure 51. [Calibrations] tab showing software options 3.4.11.4.1 Volume calibration Click to open [Volume calibration] (Figure 51) select [BabyBody S] for infants weighing ≥ 3 kg (Figure 52) 81 V.1, June 2014 Figure 52. BabyBody measuring systems S (=small PNT): maximal flow range 1500 mL/s; suitable for infants >3kg; XS (=extra small PNT): maximal flow range 800 mL/s; suitable for infants < 3kg Adjust and fix the support bar holding the PNT in a suitable position and connect the 100 mL calibrated syringe or pump (Figure 53) Figure 53. Correct fitting of the PNT into the sensor housing. Legend: Left, the schematic symbol (red circle) indicates “patient side”, where the face mask should be connected to the PNT. Right, the calibrated syringe is fitted to the “patient side” of the PNT. Note: while calibrating the PNT: a) perform syringe/ pump strokes at ~30/min; b) avoid grasping/holding the barrel of the syringe to prevent warming the barrel and the air within If necessary, click on [F8] icon to adjust or reset “zero flow” (Figure 54) 82 V.1, June 2014 Figure 54. [F8] is indicated by the red circle Figure 55. [Settings] menu offering options for pump strokes Click on [Settings] from the menu bar (Figure 55): notice that the choices of [3] and [6] have been selected for [Discarded strokes] and [Valid strokes], respectively Ensure that the correct volume (0.1 L) has been selected for the calibration pump/syringe. Click on [OK] to accept the setting 83 V.1, June 2014 Click on [F1] and start the volume calibration by delivering regular pump strokes (~ 30 per minute) backwards and forwards, ensuring that each stroke is complete to the full 100 mL volume, i.e., from impact to impact (see Figure 56) Figure 56 shows the screen display of the initial 3 pairs of pump strokes (representing inspiratory and expiratory respiratory efforts) which will be discarded according to the default option in [Settings] (Figure 55) Figure 56. Screen display of the initial 3 pairs of pump strokes, representing inspiratory/expiratory efforts. The volume calibration ends automatically after the pre-set number (i.e., 6 pairs) of pump strokes have been delivered (Figure 57) The new calibration (or correction) factors (column “New”: Figure 57), together with previously saved data (column “Old”: Figure 57), are displayed to the upper right window Note that when calibration is repeated, data for the initial (or previous) calibration within the same occasion will now be displayed as “Old” with the repeat (current) calibration data in column “New” Although a pump stroke volume within 2% of 100mL (i.e., between 98-102mL) is acceptable, it is preferable to strive to get volume signals calibrated to within 1% of 100 mL (i.e., between 99-101 mL) 84 V.1, June 2014 Provided that volume calibration is performed using the same calibration volume and PNT that had been used as in the previous test, very similar quality checks should be displayed on screen between the “New” and “Old” columns (Figure 57). If a different PNT is used, a larger difference is likely to be observed on the first calibration – save the initial calibration factors and repeat the procedure until values do fall within 1-2% of 100 mL (see Legend for Figure 57). To repeat the calibration procedure, click on [F9] > [save] and restart To end, click on [F10] to save the final calibration data and exit program Figure 57. Acceptable volume calibration of the PNT. Legend: Six pairs of complete, and regular, 100 mL pump strokes were delivered. To assess the quality of the calibration, the user should concentrate on the display shown under ‘New’. CorrIN is calculated as the ratio of the reference (calibration) volume (i.e., 100mL)/measured inspired volume, and CorrEX as the ratio of the reference volume/measured expired volume. In this example, no correction is required for inspiratory volumes, but the measured expired volume is fractionally higher than 100mL and is thus adjusted by multiplying by 0.991. With repeated calibrations within the same occasion, the user should aim to achieve %Old (change from the previous calibration) for CorrIN and CorrEX to read between 99% and 101%, i.e., within 1% of the reference volume (100 mL). The repeatability of the calibration process is assessed from ‘Q IN’ and ‘Q EX’ which represent the coefficient of variation (calculated from the [(Mean/SD) x100] of the 6 calibration stroke volumes during inspiration and expiration respectively. If Q exceeds 1.0%, the user will be prompted to repeat the calibration. In practice, provided complete and regular strokes are delivered, much lower values of Q are recorded as shown above (compare these values with those displayed during unsatisfactory calibration inFigure 58). Please note, for these parameters expressing results as % of ‘OLD’ is not helpful since, if, prior 85 V.1, June 2014 calibration has been extremely repeatable (e.g., in the above example: Q EX is < 0.08%) then even the slightest increase in variability to 0.22% will lead to an apparent increase in the CoV to 261%! Therefore, users are advised to ignore data displayed in the [%Old] column for the Q and CalVol parameters. Note: Any moisture or dust particle on the PNT resistive mesh screen and pressure ports will affect the quality of PNT calibration. In addition, methods use to clean/disinfect the PNT screen may also change its properties. The user will be prompted by a drop-down panel to repeat the calibration if incomplete and/or irregular pump strokes have been delivered (Figure 58) Figure 58. Unsatisfactory volume calibration Legend: Note screen message instructing the user to repeat calibration due to incomplete pump strokes, which are evident both from the histogram and the very high values for Q Summary If Corr is greater than 2% but less than 5%, repeat calibration with regular, complete pump strokes and avoid heating the syringe, but: If Corr is greater than 5% in presence of apparently complete strokes: – check for leaks and dirt/stains, ensure correct assembly of PNT components and pump volume setting (i.e.,100 mL; section 3.4.11.1) – then repeat calibration If Q is greater than 1, repeat calibration with regular pump strokes 86 V.1, June 2014 Once the calibration has been completed satisfactorily, click on [F10] > [save] new data and exit program Once the volume calibration for the PNT has been successfully completed, the Masterscreen system is ready for lung function assessments, namely: tidal breathing parameters, passive mechanics, and, if desired, the tidal volume and raised volume forced expiratory manoeuvres. These measurements are performed with the Box opened. The following sections describe the preparation of the plethysmograph if assessment of the resting lung volume (FRC) is also required. 3.4.11.5 Preparation for the calibration of the plethysmograph The body plethysmograph (or “box”), which has an internal volume of 98 litres when empty, is calibrated using an internal calibrated pump which delivers known cyclical volume changes (8 mL) to calibrate plethysmographic pressure in terms of volume and step changes to assess the mechanical half-life time constant () of the box, i.e., the duration it takes for an induced square wave box signal to decay to half its initial value The box should be maintained between 7-10 seconds to ensure the box is neither too “leaky” nor too airtight (which cause loss of fidelity or instability of the box signal respectively) Check that an appropriate actual or estimated body weight is entered in the [Patient data] record (assuming a mean body density of 1 kgL1 of the infant’s weight will be subtracted from the original box volume for the purpose of calculating the calibration factor). For the same reason, items such as the pulse oximeter and “squeeze” jacket (in use during data collection) should also be placed within the Box during calibration NOTE: If an estimated weight has been used at the time of box calibration, once the infant has arrived in the Lab and weighed, the investigator should edit and enter the actual weight in the [Patient Data] page before LF testing begins. Alternatively, an estimated value for weight can be corrected later (section 3.4.10.1 and Figure 44) 3.4.11.5.1 Ambient conditions From the [Calibrations] tab (Figure 51), click to open [Ambient conditions] (Figure 59) 87 V.1, June 2014 Figure 59. Window displaying ambient conditions. Legend: Data saved on previous test occasion, as indicated by the red circle, are shown along the left column Record the barometric pressure, room temperature and relative humidity on relevant test questionnaire; alternatively, press [PrtScn] key (see section 6.1.1 for further information) to print a paper copy and store in the infant’s document folder. Click [F10] to save and exit Note: - Barometric pressure: usually 700 – 1100 hpa - Room temperature: maintained between 20-25 C - Relative humidity: usually 30 -55% Details of the ambient conditions are used to formulate the correction factors for calculating recorded FRC values Since incorrect or imprecise ambient data are likely to result in incorrect measured FRC results, ambient condition data must be checked prior to each test session. Ambient conditions may be checked using basic home weather stations. 3.4.11.5.2 Calibration of the plethysmograph Ensure that doors and windows are closed to minimise draughts and noise (i.e., similar to conditions during data collection) The plethysmograph should not be exposed to direct sunlight or source of heat (e.g., a radiator) Check that relevant apparatus (e.g., pulse oximeter, RTC jacket) or other items (a small blanket) that are required during data recording are included within the Box 88 V.1, June 2014 Note: check that the rubber stopper is firmly in place sealing the opening for the RTC large-bore tubing (Figure 60), i.e., no leak to the body plethysmograph. Figure 60. Ensure that the rubber stopper is firmly in place prior to box calibration Lower the hood to close the box with care Select and click on [Box Calibration] to open program (Figure 61) Figure 61. [Box calibration] icon indicated by the red circle Follow the instruction on screen and allow 2-3 minutes for the box to stabilise (Figure 62) 89 V.1, June 2014 Figure 62. A period of 2-3 minutes are required for the closed box to “stabilise” Box calibration program will automatically proceed once the 2-minute waiting time has elapsed three trials of box calibration will be activated automatically and results displayed graphically and numerically (Figure 63) Figure 63. Box calibration: examples of recorded trials of half-life time constant (in seconds) Legend: Left panel - satisfactory box calibration with a median of 8.7 s. Right panel - presence of a siginificant box leak during calibration; median 3.6s. The process of calibration involves - – the assessment of the ½ time constant of the box: i.e., the time it takes for a change in the box signal to decay to half its initial value (used to determine a specific magnitude of box leakage to ensure stability of the box signal while retaining its integrity) 90 V.1, June 2014 – the calculation of a calibration factor for changes in plethysmographic pressure by delivering known cyclical volume changes using an internal calibrated sine pump and measuring the resultant change in box signal of the 3 trials, the median value of the ½ time constant (acceptable range: 7-10s) is selected but this value is not used for any calculation. In Figure 63, the left panel shows the box was calibrated satisfactorily, whereas the example in the right panel illustrates a box leak during calibration the lowest value (i.e., lowest coefficient of variability or best quality) of the quality factor for body box pressure (QPB) is selected, and the correction factor for body box pressure (KPB) calculated and applied subsequently to the recorded FRC data NOTE: During calibration, ambient pressure fluctuations caused by opening, closing or slamming of doors, vibrations (drilling, banging), etc, will cause disturbance to the calibration signals resulting in a high QPB and incorrect correction factor for body box pressure. Criteria for acceptability: KPB: acceptable value = 1 0.25 QPB: acceptable value <3% NOTE: - If QPB is ≥ 3%, repeat box calibration; - If QPB is consistently >3%, contact the CareFusion service engineer - If the box calibration is satisfactory, press [PrtScn] to print a copy of the results (Figure 63) and file with the infant’s test document NOTE: once the [F10] icon has been activated and data saved, the screen display will no longer be available for printing Click [F10] to ‘Save and exit program’ If the box calibration is unsatisfactory, click [F9] to either [save] or [cancel] results before repeating the calibration process 3.4.11.5.3 Shutter balloon test This procedure is performed to check the efficiency and integrity of the latex balloon The [Shutter balloon test] is available in the following programs – – [Baby-Res/Compliance] 91 V.1, June 2014 – [Baby Bodyplethysmography] – [Squeeze] – [Raised Volume Squeeze] Open any one of these programs. From the menu bar, select and activate [shutter balloon test]. For the purpose of demonstration, Figure 64 has been derived from the [Baby Bodyplethysmography] program NOTE: This procedure MUST NOT be performed while face mask with PNT and shutter are applied over the infant’s face. Instead, the shutter should be detached from the PNT and held away from the face while the shutter balloon test is carried out. Figure 64. Option for [Shutter balloon test] is highlighted by red circle Figure 65. Shutter balloon test program Legend: Left: Click on [Start] button to activate shutter balloon test. Right: Satisfactory balloon test with stable balloon inflation pressure being sustained during test procedure 92 V.1, June 2014 Figure 66. Visual check: shutter balloon inflation Legend: Left: Shutter with latex balloon connected to PNT. Right: Activating the shutter balloon test results in inflation of the balloon, effecting a brief airway occlusion during testing. The test results are acceptable if the balloon inflation pressure is stable over 45 milli-second, and over two trials (Figure 65) It is useful to visually observe the balloon inflation during the test procedure to ensure full inflation of the balloon (Figure 66). If the balloon shows irregular “bulging” (indicating a “weakness”), replace the complete shutter as it is likely to rupture during data recording and disrupt the test session If the balloon test is not acceptable at the initial trial (Figure 67), check the fit of the tubing between the shutter and Control panel to exclude possible leak and/or replace the balloon shutter. Repeat the test procedure Figure 67. An error message indicating that a fault has been detected during the shutter balloon test, possibly due to a leaking balloon or poor fit of the tube connection between the shutter and control panel Once the plethysmograph has been calibrated and balloon shutter checked, the Masterscreen system is ready for the assessment of FRCpleth, in addition to the other tests 93 V.1, June 2014 3.4.11.6 Order of tests Recordings of tidal breathing, passive respiratory mechanics data and/or plethysmographic FRC should always be performed prior to forced expiratory manoeuvres to avoid the potential effect of jacket placement and repeated chest compressions Tidal squeeze manoeuvres should be performed before the raised volume manoeuvres for the following practical reasons – – the identification of optimal jacket pressure (at which flow limitation is evident) for individual infants, which is to be used during the raised volume manoeuvres, is achieved during the tidal squeeze manoeuvres (sections 5.5.2, 5.5.3) – the magnitude of jacket transmission pressure (section 5.5.3) is assessed during tidal squeeze manoeuvres – the effect of deep inflation on airway mechanics during the raised volume manoeuvres in infants is unclear – the augmented inflations delivered to the infant during the raised volume manoeuvres could influence V’maxFRC measurements, had the tidal squeeze been performed after the raised volume procedure – by performing the tidal RTC prior to RVRTC, the number of lung inflations that the child is exposed to, and hence the risk of gastric distension is minimised. 94 V.1, June 2014 4 Infant preparation 4.1 Infant factors 4.1.1 Health status Lung function measurements are performed when infants are well and free from upper or lower respiratory tract infection for at least 3 weeks. However, in a patient with a clinical diagnosis such as CF, who has frequent recurrence of respiratory exacerbation, it may be pragmatic to assess the infant when clinically stable and not currently exacerbated. When healthy infants are recruited and measured as control subjects, the initial assessments should be made prior to any history of lower respiratory illness, and follow-up tests deferred for at least 3 weeks after an upper or lower respiratory tract infection. 4.1.2 Age range Lung function assessments can be carried out in infants up to approximately 2 years of age. Once they have begun crawling or walking, they are potentially at greater risk of harming themselves while drowsy following administration of chloral sedative both before, and following, the tests. Thus, parents should be advised accordingly to observe the child carefully for 12-24 hours after sedation. The Masterscreen system will accommodate a young child weighing up to ~ 14 kg. However, the user needs to consider which tests are required: for instance, whether the plethysmograph needs to be closed for FRC measurements. 4.2 Organising lung function appointments Except for infants born preterm or those with clinical conditions who remain in hospital, most tests are arranged by telephone, on an out-patient basis, at a time likely to coincide with the infant’s daytime nap and feeding pattern 4.2.1 Parental information An information leaflet outlining the lung function tests, and the need for sedation, is given to the parents (see example: section 8.4) Further information and discussion about the tests are often conducted via the phone between the lung function team members and the parents, who are encouraged to ask questions about the tests 95 V.1, June 2014 In addition, information regarding the fasting regime associated with chloral sedation (see section 4.4.3) is also discussed with the parents, i.e., the infant should not be given any food or milk 4 hours (breast milk or water up to 2 hours) before lung function tests 4.3 Preparing for lung function tests 4.3.1 On the day before the tests The parents are contacted to check that the infant is free from respiratory symptoms to remind them of the fasting regime (see above) to remind them that it would be helpful to try to keep the infant awake while travelling to the Lab 4.3.2 On arrival to the Lung Function Lab 4.3.2.1 Consent For clinical tests, parental informed consent is obtained. This is usually considered adequate although it varies according to the policy of local hospitals For research studies or when conducting tests that are deemed to have no direct benefit to the infant, parents are formally requested to sign 3 copies of the consent form according to the recommendation of the Ethics Committee; commonly one copy is given to the parents, the 2nd and 3rd copies are each filed in the hospital medical notes and Lab records, respectively Note: Chloral hydrate sedation is only given after parental consent has been obtained Written parental consent is also essential for the collection and storage of biological samples, e.g., urine sample for cotinine assay to determine exposure to tobacco smoke. Regardless of whether collected during clinical or research testing, if the lung function data are intended to be stored and used later for reporting in scientific journals, or presented at conferences and meetings, it is likely that ethics approval and written informed consent from parents will be required. This is best obtained prospectively. Note: Depending on individual institutions and their locations, notification to the Human Ethics Committees may be required for granting a waiver if lung function data are to be audited retrospectively for reports or publications. A formal application and approval may be needed should the data be used retrospectively within research settings. 96 V.1, June 2014 4.3.2.2 Clinical examination Once the infant has settled after arriving to the lab, his/her baseline vital signs – oxygen saturation, heart rate and respiratory frequency – are checked and documented. A physical examination, including chest auscultation, is carried out by a paediatrician or a trained sedation nurse practitioner to ensure physical well-being of the infant and that there are no contraindications to chloral hydrate sedation. Care must be taken to identify, occasionally, an infant who is otherwise well, but presents with an elevated heart rate that is likely to be associated with an undetected, or unreported, fever. In this instance, the tests must be deferred. Examination details should be documented in the test questionnaire and lung function summary sheet (see section 8.8). 4.3.2.3 Anthropometric measurements Since respiratory function parameters are closely related to body size, it is essential to obtain accurate weight and length on every test occasion to aid interpretation of lung function data. 4.3.2.3.1 Body weight Shortly after arriving to the LF Lab, the infant is weighed naked at least twice using a pair of electronic digital scales (Seca). When two consistent readings have been obtained, the value is reported in kilograms to 3 decimal places as the test weight (Gaultier et al 1996: section 7.2). This is used to calculate the dosage of chloral sedation as well as the correction factor for plethysmographic studies. Note: The scales should be checked at least yearly for accuracy and re-calibrated if necessary by appropriate personnel (e.g., a biomedical engineer or the manufacturer) 4.3.2.3.2 Crown-heel length Using a calibrated infant stadiometer (Harpenden measuring table: see Appendix: section 8.1), the infant’s crown-heel length is measured by 2 persons, usually at the completion of lung function tests while the infant remains slightly drowsy The infant is positioned along the mid-line of the stadiometer. One person gently but firmly holds the infant such that the crown of his/her head is touching the mid-line of top plate of the stadiometer, whilst the second person gently depresses the infant’s knees to fully extend the legs 97 V.1, June 2014 The sliding footplate is adjusted to rest firmly against the (upright) soles of the feet The crown-length length is read off a counter once the footplate has been locked into position This procedure is repeated at least twice, with the crown-heel length being reported (to 1 decimal place) as the mean of two measurements which are within 0.5 cm of each other Note: Accuracy of the stadiometer should be checked weekly using metal rods measuring 40, 60, and 80 cm in lengths, respectively 4.3.2.3.3 Head circumference This measurement should be obtained with a device that is non- stretchable, e.g., a disposable paper tape or tailor’s measuring tape From the most prominent part of the forehead (often 1-2 fingers above the eyebrow), wrap the tape snugly around to the widest part of the back of the head Aim to measure the widest circumference around the head Measure the head circumference at least twice, and record the largest head circumference measurement to 1 decimal place (in cm) 4.3.3 Records and documentation As per the local policy and Data Protection Act, all records and documentation should be labelled (a specific test / hospital number should be allocated to each subject) and stored appropriately. Electronic media containing patient data should be treated similarly. The length of time such records and documentation needs to be stored will depend on local policy, e.g., for 18-25 years. 4.3.3.1 Questionnaire relevant to lung function tests Examples of these questionnaires are presented in Appendix sections 8.6 and 8.7. Briefly, information documented should include Background information - infant and family – Gestational age – Birth weight and length z-score and/or centile – Clinical diagnosis: e.g., cystic fibrosis – Family history of asthma and atopy – Ethnicity Factors that may influence lung function data 98 V.1, June 2014 – prior history of surgery involving the respiratory system – prior history of respiratory illness; treatment / medications – passive exposure to cigarette smoke 4.3.3.2 Lung function summary sheet This one-page “at a glance” summary sheet is completed on each test occasion (section 8.8). Information recorded includes - – weight and length at time of test – outcome of clinical examination – vital signs readings: pre-sedation and during test duration – type and amount of sedation given; route administered – arousal state/condition of infant prior to leaving the Lab 4.4 Sedation Although it is possible to assess some aspects of lung function in young infants during natural sleep following a feed, it is difficult to perform more complex tests such as plethysmographic lung volume and forced expiratory manoeuvres in infants greater than 44 weeks post-menstrual age without some form of sedation. A single dose of chloral hydrate, or the derivative triclofos sodium elixir (sections 1.3.2 and 4.4.3), is usually required to induce ~30-45 minutes of sleep to facilitate lung function data collection. It is advisable to schedule the test to coincide with the time when a daytime nap is expected. 4.4.1 Contra-indications for sedation A careful assessment with detailed history and a clinical examination is vital to identify potential risk factors for chloral hydrate sedation and suitable subjects for sedated tests. 4.4.2 Potential risk factors To establish suitability for sedation, prior assessments to identify risk factors include – relative immaturity (e.g., < 44 weeks PMA) due to instability of the control of breathing particularly during REM sleep which occurs more frequently during early postnatal life, especially those born preterm poor weight gain / somatic growth developmental status 99 V.1, June 2014 current health status or medical condition physical status (including the airway; past history of partial airway obstruction, constant snoring, respiratory pauses during sleep or sleep apnoea) facial dysmorphism (e.g. midface hypoplasia in Apert’s or Crouzon’s syndrome) predisposing to obstructive sleep apnoea current and previous medication (including any allergies) past medical or surgical problems (including any associated with previous sedation or anaesthesia) Besides ascertaining information regarding a young infant’s gestational and postnatal ages, it is also important to question parents closely regarding any relevant symptoms including “noisy” breathing or “snoring” and posture adopted during sleep, history of episode of cyanosis or breath-holding, or difficulty in swallowing during feeding. Although obstructive apnoea is rare in healthy infants, presence of respiratory illness such as respiratory syncytial virus infection can trigger an increase in the frequency and duration of apnoea during sleep. Healthcare professionals delivering sedation and care for the infant should have knowledge of assessment of infants basic and/or advanced life support skills training and practical experience in effective delivery technique of the chosen sedation and monitoring sedative effect understanding of sedation drug pharmacology and applied physiology competency in observing clinical signs, such as airway patency, breathing rate and depth, pulse, pallor and cyanosis, and depth of sedation ability to monitor, identify and respond to complications with immediate management, including paediatric life support and recovery care During sedation and throughout the lung function test procedure, there must be immediate access to resuscitation and monitoring equipment. 4.4.3 Sedation dosage Both chloral hydrate and triclofos sodium are metabolised to trichloroethanol – the former has an unpleasant taste and may cause gastric irritation; triclofos is more palatable but is slower and less potent (660 mg chloral hydrate is pharmacologically equivalent 1 g triclofos). Vomiting, respiratory complications and paradoxical reactions may occasionally occur. The dosage 100 V.1, June 2014 prescribed is dependent upon the infant’s age and condition, and may be given orally or rectally. The standard dose of chloral hydrate for LFT is 50-100 mgkg1 body weight (section 1.3.2; Table 3; Gaultier et al, 1996: section 7.2) and is administered with informed parental consent. NOTE: chloral hydrate syrup is no longer available in USA Table 3. Dosage of sedation used for lung function tests Test age Chloral hydrate * Triclofos sodium < 44 weeks PMA none given none given Between 4-11 weeks 50 – 60 mgkg1 75 – 90 mgkg1 Between 12 weeks – 2 years 50 – 100 mgkg1 75 – 150 mgkg1 *660 mg of chloral hydrate is pharmacologically equivalent to 1 g of triclofos sodium The maximum dosage given at any one occasion is 1 G of chloral hydrate or 1.5 G of triclofos sodium. It has been reported that use of chloral hydrate or triclofos sodium does not affect the strength of the HBR or respiratory parameters in infants (Tepper et al, 1986; Jackson et al, 1991; Rabbette et al, 1991: section 7.2). The Infant Lung Function Laboratory at the Great Ormond Street Hospital (GOSH) for Children NHS Foundation Trust/ UCL Institute of Child Health complies with the clinical guidelines 112 with respect to sedation in children, published by the National Institute for Health and Care Excellence (NICE) in 2010 (NICE Guideline Development Group, 2010: section 7.2). 4.4.4 Personnel administrating sedation Before administering the sedation, confirm and record the time of last food and fluid intake in the healthcare record. Safety and success depends upon skill and judgement. The sedation practitioners should be trained in sedation techniques. They should be competent to consent, and/or prescribe and administer sedative drugs, understand the pharmacology of the agents used and be capable of providing Paediatric Basic Life Support and preferably Paediatric Advanced Life Support. In some laboratories, a paediatrician performs the clinical examination of the infant, and prescribes the sedation according to the infant’s age and size. Informed and/or signed parental consent may be obtained by a trained physiologist, nurse or technician who then administers 101 V.1, June 2014 the sedation, provided that the infant’s clinical examination is normal and that his/her baseline SpO2 and vital signs are within expected values. 4.4.5 Level of sedation The different levels of sedation stated in the NICE document are based on the original definitions of the American Society of Anesthesiologists (ASA), and the level required to be achieved for lung function tests is equivalent to the description of “moderate” level in the NICE 2010 guidelines (section 7.2), i.e., ”Moderate sedation: Drug-induced depression of consciousness during which patients are sleepy but respond purposefully to verbal commands (known as conscious sedation in dentistry …..) or light tactile stimulation (reflex withdrawal from a painful stimulus is not a purposeful response). No interventions are required to maintain a patent airway. Spontaneous ventilation is adequate. Cardiovascular function is usually maintained.” 4.4.6 Handling of infant following of sedation Being able to obtain satisfactory data depends on careful handling and minimal disturbance to the infant Once he/she has been weighed and clinical examination completed, the infant should be dressed in light and loose-fitting clothing to avoid restriction to chest movements; check and remove any solid or hard items (e.g., zippers, necklaces, belts, buttons) to ensure these are not between the jacket bladder and the infant’s chest/abdomen, which may cause discomfort during RTC manoeuvres Check and document baseline SpO2, heart rate and respiratory frequency prior to administering chloral hydrate sedation Dim lighting and noise reduction to encourage sleep Maintain room temperature between 20-25C in order to avoid– – body cooling particularly when studying young infants (especially those who are preterm) – a change in cardiorespiratory activity that is associated with small increase in body temperature as soon as the infant has fallen asleep - 102 V.1, June 2014 – immediately commence continuous monitoring of SpO2, heart rate and respiratory frequency – minimal and gentle handling – keep noise level to minimum – constantly observe the infant’s behavioural and sleep patterns Never leave the infant unattended 4.4.7 Classification of sleep state Data recording should be confined to consecutive periods of quiet, non-rapid eye movement (non-REM; stage 1) sleep. Classical behavioural criteria (Table 4) established by Prechtl in 1974 (section 7.2) are used to assess sleep state at one-minute intervals, with quiet sleep being determined by the absence of eye movements, relaxed and stable posture with regular breathing. Table 4. Sleep state classification Criteria Quiet sleep Active sleep Rapid and/or slow eye movements None Present Facial grimaces None Present Respiration Regular Irregular Body movements relaxed; stable posture frequent Startles Occasionally Frequent 103 V.1, June 2014 5 Infant lung function data collection 5.1 Apparatus - safety issues 5.1.1 PNT support bar Before attempting to apply the PNT and face mask to an infant, the user must become familiar with the function of the 2-part support bar that carries the pressure sensor for the PNT (Figure 68). The support bar, and hence the PNT and mask, can be locked into position by tightening the locking mechanism (by turning the rotating knob) once its appropriate position has been ascertained. The underside of the support bar must always be supported before loosening the locking mechanism in order to avoid any possibility of the support bar with the PNT and mask falling onto the infant’s face The locking mechanism (held from the underside by the user) can be partially loosened to allow movement and adjustment of part A and/or part B of the support arm to achieve an optimal position so that the mask/PNT may be best fitted over the infant’s nose and mouth, taking care not to press too hard over the bridge of the nose (this will increase upper airway resistance) or depress the chin In practice, the safest way for the user to re-apply or adjust the placement of the PNT/mask while it is already secured on the infant’s face is to position the back of his/her left wrist beneath the 2-part support arm and simultaneously with the same (left ) hand, hold the PTN/mask firmly while using the right hand to unlock the rotary knob (anti-clockwise); an assistant could then hold the 2-part support arm firmly and gently place a hand over the infant’s forehead for additional protection, while the user loosens the putty from the face all round the rim of the mask to ease the removal of the mask/PNT gently away from the face, or re-position the mask Once the best fit of the mask/PNT has been obtained, rotate the knob clockwise to tighten the locking mechanism (but not so tightly that it cannot be loosened quickly should the infant wake unexpectedly) such that no weight is directly exerted over the infant’s face. The user can now adjust the putty that is around the rim of the mask to create a leak-free seal 104 V.1, June 2014 Figure 68. Illustration showing some parts of the Babybody system, including the control panel and 2-part support bar for the PNT As soon as the infant falls asleep, the pulse oximeter is attached (preferably to the left foot) and continuous vital signs (SpO2 and heart rate) are monitored. The infant is placed in the standard supine position in the BabyBody “carry tray”. With a neck roll and small pads/pillows, the neck is extended and shoulders supported (Figure 69). Figure 69. A face mask connected to the PNT is applied over the nose and mouth of a 2-month old sleeping infant (left) and a 1-year old infant (right) While the infant is in quiet, non-rapid eye movement (non-REM) sleep, the face mask, lined with putty around the rim, is applied over the nose and mouth (Figure 69). Gently press down around the rim of putty to create an air-tight seal with the face before commencing data collection. Throughout the data collection period, observe the infant’s sleep state and vital sign recording. If the infant is observed to be in REM or active sleep, data collection should be terminated and 105 V.1, June 2014 the session recommenced when the infant returns to non-REM, quiet sleep. Similarly, if the respiratory pattern becomes irregular, data collection should stop and restart when regular respiratory pattern resumes. Continue to observe that the infant’s respiratory efforts is normal and that optimal oxygen saturations are maintained at all times; remove the face mask immediately if upper airways patency is potentially adversely affected. NOTE: depending on the type of putty used, it may be helpful to mix a putty of a firmer consistency with one that is softer to achieve the “ideal” consistency to create an optimal mask seal. It is not recommended to use a putty that is too soft and pliable (at room temperature), since its consistency will soften further during the test duration due to increased temperature (body heat). Throughout the test duration, careful monitoring is necessary to check that the putty has not become too soft, which potentially may result in partial blockage of the infant’s nostrils or mouth within the mask cavity. From time to time, gentle re-adjustment of the PNT/mask may be required during testing. However, take care to avoid waking the infant. The BabyBody Masterscreen system displays 4 windows during data collection, data review and analysis. Figure 70 illustrates a screen display during assessments of FRCpleth: “window A” shows a time-based recording of flow (V’), volume (V), changes in box volume (VB) during spontaneous breathing and pressure changes at the airway opening (Pao) and VB during an airway occlusion “window B” displays tidal volume (mL) against time in seconds “window C” shows a table of results and quality control variables, both online during the test procedure and also offline when data are reviewed and/or reanalysed. The variables chosen to be displayed may be customised by the user/investigator (section 3.4) “window D” displays the phase relationship between changes in Pao (kPa) and changes in VB (mL) for each respiratory effort during the period of the airway occlusion. In this example, 3 complete respiratory cycles were recorded while the shutter balloon was inflated (effecting an airway occlusion)(“windows A” and “D”). Following balloon deflation, a spontaneous sigh-like big breath was observed followed by regular tidal breathing (“window A”) 106 V.1, June 2014 Figure 70. The screen display for FRCpleth data and results 5.2 Measurements of tidal breathing (TB) parameters In general, measurements of TB parameters are recorded with the plethysmograph opened. However, if FRCpleth is part of the data collection protocol, then the plethysmograph may be closed during recording of TB parameters. This facilitates stabilisation/thermal equilibration of the plethysmograph, thus reducing the subsequent “waiting” time after switching to the plethysmography program once TB collection is completed. The process of setting or reviewing the sample frequency and contents of result table has been described in section 3.4.7 Check that all program settings are correct (section 3.4.7) A list of Function keys are available in Appendix section 8.3 5.2.1 Application of face mask and PNT The mask/PNT unit is carefully and gently placed over the infant’s nose and mouth, then delicately mould or press down on the putty around the mask rim to create an airtight seal with the face (Figure 71) 107 V.1, June 2014 Figure 71. A sleeping infant breathing through face mask and PNT 5.2.2 To start tidal breathing (TB) data recording Double click on the [Tidal Breathing] program icon (Figure 18) to open it The programm will start with a reminder to perform volume calibration (Figure 72). If calibration was performed and acceptable, click [OK] and proceed to data collection. This message will also appear at the start of off-line analysis - click on [OK] to proceed Figure 72. Reminder to perform PNT volume calibration. Legend: Although this is automatically prompted at program start prior to data collection, it will also appear during off-line analysis. The infant’s name/test number will be displayed along the top of the window, as indicated by the red rectangle box. At the start of a test session (typically, in tidal breathing 108 V.1, June 2014 program), it is a good practice to double check the infant details to avoid collecting tidal breathing and all subsequent LF data into a wrong record file. At the start of program, “Flow/Volume zero adjustment” is automatically performed by the software. If infant or mask/PNT position has been changed at all during data collection, click on [F8] to re-zero flow/volume setting as the solid state transducer is very sensitive to position Click on [F1] (“Start of tidal breathing registration”) to begin data recording Record at least 5-10 regular breaths to establish a stable end-expiratory level (EEL) before performing a test occlusion to check that the mask/face seal is air-tight If a mask leak is evident (Figure 73, the recording must stop; the mask and PNT re-positioned (or removed and re-applied) over the nose and mouth and sealed with the putty. The “test” occlusion must be repeated to check for leaks Click on [F2] to stop a trial or epoch; e.g., after 30-50 breaths During online recording, a slight drift in tidal breathing is observed due to differences in the humidity and temperature of inspired and expired air (baseline EEL; Figure 73). This can be distinguished from the effect of a mask leak by observing the poor overlay of flow-volume loops despite an apparent regular EEL and a VT of 3.6 mL/kg (Figure 74, windows B and C) when compared to the regular overlay of flow-volume loops in the absence of a mask leak shown in Figure 75 (lower left window) Figure 73. Evidence of a leak around the face mask Legend: This screen display, obtained as a “screen-dump” during data recording, shows a time-based trace of tidal breathing. Following a brief airway occlusion, it can be seen that “EEL 2” failed to return to the pre-occlusion baseline. The step-up in EEL is indicative of a leak around the face mask. 109 V.1, June 2014 Once the mask with PNT have been re-applied and a leak-free seal is secured over the infant’s nose and mouth, record 1-2 trials or epochs of data, each consisting of ~30-50 tidal breaths (depending on requirement or study outcome) As recording of each trial is completed, the program software applies a drift correction factor to the data and calculated results are displayed online At the completion of the initial trial with a test occlusion, click on [F2] and the [~] symbol (red circle, Figure 75) to view the drift corrected data. In this example, the stable EEL post occlusion suggested that the mask seal was air-tight. Click on [F9] to save this trial and continue to record more tidal breathing data Figure 74. Window A illustrates marked volume drift due to leak around the face mask. Legend: Although there was an apparently “stable” upward EEL (window A), the corresponding poorly overlaid flow-volume loops (window B) and a tidal volume of 3.6 mL/kg (window C) are strongly suggestive of a leak around the mask. The red vertical axis for vPEF/vEX has been modified to “hide” this variable. 110 V.1, June 2014 Figure 75. Time-based tidal breathing trace after drift correction (upper left window). Legend: Invalid breaths are displayed as blank symbols (lower right graphic window); the valid breaths (solid blue symbols) are used for analysis and to construct the “curve averaging” (lower left window). To review each dataset, click on [F2] (“Calculate and display trial results”) or [F7] (“Display of final results”)(Figure 75) NOTE: the expected range for tidal volume adjusted for body weight (VT/kg) is ~ 7-14 mL/kg. If values are 5-6 mL/kg, a mask leak is likely to be present, although a “normal” VT/kg does not necessarily exclude a mask leak (e.g., an erroneously low weight entered for the infant) If necessary, click on [F1] to continue data recording Once sufficient satisfactory data have been collected, click on [F10] (“Save data and exit program”); alternatively, click on [F9] (“New start of complete measurement”); follow instruction on the screen when prompted: [Save measurement?] (Figure 76). Click on the [Yes] button to save data to database otherwise all data recorded thus far will be deleted! A new test or trial will commence once the operator has clicked on [Yes] or [No] button. In all instances, once sufficient data have been collected, click on [F10] to save and exit program 111 V.1, June 2014 Figure 76. Program option for saving tidal breathing measurement During the first 2 years of life, mean tPTEF/tE ratio of 26.7% (range: 12% 64%) has been reported (Nguyen et al 2013: section 7.5). Figure 77 illustrates data recorded from an infant, in whom flow limitation was evident during tidal breathing (mean tPTEF/tE = 12%); marked concavity of the expiratory flow-time curve was noticeable. Figure 77. An example of data from an infant in whom flow limitation is evident during tidal breathing. 112 V.1, June 2014 5.3 Passive respiratory mechanics: total respiratory compliance (Crs) and resistance (Rrs) In this manual, only the single occlusion (SO) technique will be described; this program allows simultaneous calculation of Crs, Rrs and the expiratory time constant The process of setting or reviewing the sample frequency and contents of result table has been described in sections 3.4.4.1 and 3.4.6 Check that all program settings are correct (section 3.4.5) A list of Function keys are available in the Appendix section 8.3 5.3.1 To start data collection for passive respiratory mechanics Click on [F1] (“Start of tidal breathing registration”) Once a stable EEL is achieved following a recording of 5-8 regular breaths, the [F3] key (“Start measurement with next breath”) will be illuminated Click on [F3] to activate inflation of the shutter balloon to perform a brief airway occlusion at end inspiration Data collection will stop automatically when ≥ 5 breaths have been recorded after release of airway occlusion Click on [F7] (“Display results”); briefly review quality of flow-volume curve and results If results are satisfactory, click on [F10] (“Save data and exit program”) otherwise Click on [F9] (“New start of complete measurement”) - follow instruction on the screen when prompted: [Save measurement?]. A new test or trial will commence once the operator has clicked on [Yes] or [No] button. Continue recording until sufficient data have been collected, click on [F10] to save and exit program Mean results from 3 technically satisfactory SO trials are reported 5.4 Measurements of plethysmographic lung volume (FRCpleth) The infant FRCpleth program allows simultaneous recording of specific airway resistance (sRaw) and FRCpleth during each trial (or Act). As in older subjects, measurements of FRCpleth and airway resistance (Raw) can only be recorded while the plethysmograph is closed. 113 V.1, June 2014 5.4.1 Prior to FRCpleth recording A brief period of 2-3 minutes is required to allow the interior ambience of the plethysmograph to stabilise and reach thermal equilibration before data recording commences. The process of setting or reviewing the sample frequency and contents of result table has been described in sections 3.4.7.1 and 3.4.7.3 Check that all program settings are correct (section 3.4.7.2) A list of Function keys are available in the Appendix section 8.3 Figure 78. A young child undergoing FRCpleth assessment 5.4.2 Selecting mask dead space for FRCpleth measurements Double click on [Bodyplethysmography] to open program (Figure 18) A drop-down menu appears allowing the investigator to select the correct mask size (and dead space) intended for use during data collection (Figure 79). The effective dead space (i.e. 50% of total mask dead space will be subtracted when calculating FRC values (section 7.3) Click [OK] to exit 114 V.1, June 2014 Figure 79. A drop down panel listing different mask sizes and corresponding dead space 5.4.3 To start airway resistance recording Click on [F1] (“Start of watch”) to display flow signal in the top [Monitor /Safety] panel NOTE: Unless the mask and PNT have been moved or re-positioned, there is no need to re-set zero baseline for flow/volume (via [F8] icon) Click on [F2] (“Start resistance measurements”) to begin recording The screen display allows the user to observe the box volume signal, which gradually becomes stable (i.e., no further upward drift) indicating thermal equilibrium has been reached within the box (Figure 80) 115 V.1, June 2014 Figure 80. Recording of plethysmographic airway resistance Legend: The box volume signal (shown in turquoise), which initially drifts upwards progressively becomes stable ~ 16 seconds after commencement of data recording, indicating thermal equilibration has been achieved. The upper right window displays results for the effective airway resistance (R eff), which is one of many ways of calculating Raw (Kirkby et al 2010 ERJ: section 7.4.3) 5.4.4 To start FRCpleth data recording As soon as the box volume signal has become stable (Figure 80), double-check that the infant remains in quiet sleep Click on [F3] (“Start FRC measurement”) to activate inflation of the shutter balloon (and hence start of airway occlusion) to measure FRC (Figure 81). Note: Although infrequently, at this part of the test when the infant wakes suddenly, immediate attention / action is required to prevent distress - the box needs to be opened quickly and the 2-part support arm loosened (while being safely supported by the user) and the PNT/mask being remove from the face. The user should stand right against the side of the plethysmograph in a position close to the infant, ensuring that he/she does not roll or fall off the plethysmograph table. Data recording will stop automatically after the set number of breaths (e.g., 15 breaths as shown in Figure 81) following the release of airway occlusion 116 V.1, June 2014 To terminate the recording earlier, click on [F6]; activating [F7] (“Calculate/display results”) will display FRC and airway resistance results for the specific trial or act To continue and proceed to the next trial, click on [F2]: continue recording until the box volume signal is observed to be stable (record a few more breaths if airway resistance data are required [Figure 80]), before clicking on [F3] to collect FRC data (as mentioned above; Figure 81) Provided that sufficient good quality data have been collected, click on [F10] (“save and exit program”) Gently lift the hood to avoid disturbing or waking the infant The mean value from 3-5 technically satisfactory trials is reported from each test occasion Figure 81. The screen shows a stable box volume signal and regular tidal breathing prior to the onset of an airway occlusion for FRC measurements. Legend: The real time (window A) indicate that 3 respiratory efforts were recorded during the airway occlusion of ~7 seconds; window D demonstrates perfect phase relationship (no ‘looping’) between changes in box volume and airway opening pressure during airway occlusion. Note: Due to limited software memory (higher sampling frequency required in infants compared to adults due to the high breathing frequency and software for the Babybody device yet to be upgraded to 64 bit), it is not always possible to record more than 2 trials per test, especially when testing older infants. Since 3-5 valid trials are required for reporting (section 6.4.5), at times it is necessary to save the recorded FRC data after every 2 trials by 117 V.1, June 2014 clicking on [F9] and continue to data collect until sufficient measurements have been acquired (also see section 5.4.4) If there was evidence of mask leak or PNT leak at any time, stop data collection so that the problem may be rectified – open the box, re-adjust or remove and re-position the mask to create a good mask seal: – Click on [F8] to re-set zero baseline for flow/volume signal – perform a test occlusion after a stable EEL has been established to the mask seal – lower the hood to close the plethysmograph – while waiting for thermal equilibration, record more tidal breathing data or move on to collect Respiratory system Resistance/Compliance data before switching to [Babybodypleth] program to continue with FRC data collection – remember to open the plethysmograph briefly at least every 15 minutes to clear any accumulated expired carbon dioxide 5.5 Measurements using the tidal RTC technique In spontaneously breathing infants, partial expiratory flow-volume (PEFV) curves can be obtained by rapidly applying an external pressure to compress the thorax and abdomen using the rapid thoraco-abdominal compression (RTC) technique, also known as the “Squeeze” technique, at the end of a normal tidal inspiration (Figure 82 and Figure 83). The main outcome measure of interest is the maximal flow at functional residual capacity (V’maxFRC) (Figure 82) The process of setting or reviewing the sample frequency and contents of result table has been described in section 3.4.8 Check that all program settings are correct (sections 3.4.8.3 and 3.4.8.7) A list of Function keys are available in the Appendix: section 8.3 Figure 82. An infant undergoing tidal RTC manoeuvre. 118 Legend: Left, the sleeping infant breathing through a face mask and PNT, with a jacket fitted snugly around the thorax and abdomen for the tidal squeeze manoeuvre. Right, this diagram illustrates a PEFV curve, together with its preceding tidal breath. The calculation of V’ maxFRC is shown. Figure 83. Screen display for tidal RTC. Legend: The x-y plot of the PEFV curve (window B) is derived from the data displayed as a time-based trace in window A. Results, together with key quality control outcomes are summarised in window C, while the relationship between jacket pressure (Pj) shown as circles, and resultant flow at FRC (shown as squares) is displayed in the Trend window. Note that during the first 4 trials (or Acts), no flows at FRC are displayed since this infant inspired early on these occasions before the previously established EEL (i.e., FRC) had been reached (see section 3.4.8.5 for further details) 5.5.1 Application of the RTC jacket the infant lies in the standard supine position, with the head supported and neck and shoulder slightly extended, over the open jacket Place the inflatable bladder gently over the chest and abdomen so that it may be encased within the outer jacket by fastening the Velcro strips at the front (Figure 84 and Figure 85) Check that there is no solid or hard objects between the jacket bladder and the infant’s chest/abdomen ( e.g., zippers, necklaces, belts, buttons) The arms remain outside the jacket to avoid any restriction (splinting) of chest movement Gently adjust the jacket to bring it around the infant’s chest and abdomen The jacket should extend from the level of axillae to the symphysis pubis and should fit the infant’s thorax snugly, while allowing sufficient space at the sternum to accommodate insertion of at least 3-4 adult fingers (allowing inflation of the bladder during testing). 119 However, a fitting that is too loose means much higher jacket pressures are needed, due to poor transmission of jacket inflations. Figure 84. Schematic diagram showing the inflatable bladder, securely held in place by the outer jacket, connected to the pressure reservoir tank by a large-bore tubing 5.5.2 To start tidal RTC data recording Select “Squeeze” in the LabMan main program page (Figure 18) Click on [F1] to continue monitoring breathing pattern display in the [Monitor] window Ensure that one end of a large bore tubing is connected to the opening situated next to Control panel (linking it to the reservoir tank), while the remaining end is connected to the inflatable jacket (Figure 85) Click on [F6] (“setting for pressure”) to set a new reservoir pressure (Pr) (Figure 86). In general, 3 kPa is selected to start the tidal squeeze test, unless a young preterm infant is being measured in which case, 2 kPa may be used as the initial P r to obtain a partial forced expiratory flow-volume (PEFV) curve 120 Figure 85. Position of the large-bore tubing and connection to the RTC jacket Figure 86. Menu for setting the reservoir pressure at the start of each tidal RTC trial Click on [F8], if necessary, to re-set PNT zero flow Click on [F2] (“Start measurement”) to start data recording Once at least 5 regular breaths have been recorded and a stable EEL established, and provided that the Pr has reached the pre-set value, [F3] icon will be illuminated (in yellow) 121 indicating that both the software and hardware systems are ready for the user to exercute a RTC manoeuvre Click on [F3] to activate automatic jacket inflation, which is synchronised to occur at endinspiration of the next breath (Figure 87, window A) Jacket inflation results in compression of the chest and abdomen and is held until the forced expiration is complete or the next inspiration commences. As soon as expiratory (positive) flow crosses zero and switches to inspiratory (negative) flow, the reservoir pressure is automatically vented to atmosphere and the jacket bladder deflated The PEFV curve and results are displayed (Figure 87, windows B and C, respectively) For subsequent trials, click on [F6] to increase Pr by 1.0 kPa (or 0.5 kPa, if testing preterm or very young infants; maximum increment is limited to 2 KPa between consecutive trials) If there is evidence of airway obstruction (scooped expiratory FV loop etc) , Pr may be increased more gradually by 0.5 kPa instead of 1 kPa Repeat the entire manoeuvre until flow limitation is achieved (i.e., no further increase in V’maxFRC with increasing Pr) The lowest Pr that elicited the highest (and reproducible) V’maxFRC at the point of flow limitation is termed the optimal Pr and will be utilised for the raised volume squeeze manoeuvres The manoeuvre to assess Pj transmission should always be performed using the optimal Pr (see section 5.5.3). If the measured Pao during the RTC exceeds 3 kPa, a lower Pr producing an optimal V’maxFRC (Pao-J < 3 kPa) will be used for the raised volume manoeuvres. The mean V’maxFRC calculated from 3 (minimum 2) technically acceptable and reproducible trials (within 10% variability or 10 mL/s of each other) will be reported NOTE: – the maximum Pr available is 17 kPa (but rare that Pr of >10-12 kPa is required provided that the squeeze jacket is fitted appropriately) – During a RTC manoeuvre, dissipation of pressure occurs between the magnitude of pressure set to be delivered from the reservoir (Pr) and that measured at the jacket (Pj) due to the increased volume of the system once the reservoir is opened to the large bore tubing and bladder. Hence the value for Pj is lower than that for Pr. However, the difference between Pj and Pr should not exceed 50% as this is indicative of a leak between the reservoir and the jacket bladder, which would invalidate the trial results 122 Figure 87. Display of V’maxFRC results from an acceptable test. Legend: This screen display shows results of 3 reproducible PEFV curves, with window A showing a th real-time trace from the 11 trial, illustrating jacket inflation pressure of 6.8 kPa (achieved using a Pr of 9kPa) which resulted in a V’maxFRC of 164 mL/s, is similar to V’maxFRC achieved when a Pr of 7 and 8 kPa had been used, resulting in Pj of 5.3 and 6.0 kPa respectively (window C and trend window). 5.5.3 Assessing jacket compression pressure transmission During forced expiratory manoeuvres, the magnitude of jacket compression pressure transmitted to the intra-thoracic structures (i.e., driving pressure) varies between infants. It is therefore important to assess the Pj transmission to assist data interpretation and quality control. Click on [F6] to set the reservoir pressure at which flow limitation occurred Click [F5] to select [Jacket transmission] mode Click [F3] to initially activate inflation of the shutter balloon to produce a brief airway occlusion (resulting in rise in Pao: P1), followed by an automatic jacket inflation to effect a squeeze manoeuvre while airway occlusion is maintained (notice a 2nd rise in Pao: P2) The trial stops automatically after several tidal breaths have been recorded following the deflation of the jacket (Figure 88) 123 Figure 88. An example of assessment of jacket pressure transmission during RTC. Legend: The time-based trace in window A illustrates the change in pressure measured at the airway opening during a brief airway occlusion prior to (P1), and during (P2) jacket inflation The jacket transmission is calculated by subtracting P2 from P1 (delta P2P1); results are displayed in the results window as absolute value (Pao-J) and as percentage (Pjtr%) NOTE: in healthy infants, it has been recommended that Pao-j should be at least 2 kPa (but should not exceed 3 kPa) (Sly et al 2000; section 7.4.4), whereas it may be < 2kPa in infants with airway disease in whom flow limitation is achieved at lower intra-thoracic pressures At least one technically satisfactory trial to assess transmission pressure should be obtained When sufficient data have been recorded, click on [F10] to [Save and exit program] NOTE: If the intention is to continue with the Raised Volume RTC manoeuvres, provided that the placement of the PNT/mask and the seal remain satisfactory, only the balloon shutter needs to be carefully removed without waking the infant. This is carried out in readiness for the Neopuff T-piece to be connected to the PNT for passive lung inflation during the RVRTC manoeuvres. 124 5.6 Measurements using the Raised Volume RTC technique Despite being a popular method for assessing airway function during infancy, the tidal RTC technique has several potential limitations, including uncertainty regarding extent to which flow limitation can be ascertained in healthy infants. In order to overcome these potential limitations, the tidal RTC technique has been modified such that lung volume is raised towards total lung capacity (TLC) prior to applying external compression pressure to force flows, enabling the recording of “full” forced expiratory flow-volume (FEFV) curves, similar to those produced by older children and adults, in infants. The theoretical background (section 2.6.3) and the process of setting or reviewing the sample frequency and contents of result table have been described in sections 3.4.9.1 and 3.4.9.5, respectively Check that all program settings are correct (section 3.4.9.2) A list of Function keys are available in the Appendix: section 8.3 5.6.1 Raised Volume forced expiratory manoeuvres This test requires 2 operators – one of whom is responsible for delivering positive inflation pressure to inflate the infant’s lungs towards total lung capacity (TLC), while the other triggers the mechanism to inflate the jacket at the appropriate time to effect a raised volume RTC manoeuvre. Technically, this is a more demanding method and it is essential to – maintain an airtight seal between the mask and the face during the procedure, and prevent any upper airway compression during application of high inflation pressures 5.6.1.1 Raised Volume RTC equipment set-up The Raised Volume (RV) manoeuvres are performed following completion of the tidal RTC test, and the equipment set-up is shown in Figure 17, Figure 89 and section 2.6.3 The optimal reservoir pressure determined for each individual infant during the preceding tidal RTC manoeuvres, at which the best V’maxFRC were determined, will be used for the RV manoeuvres It is important therefore not to disturb or alter the jacket fitting prior to performing the RV manoeuvres (otherwise Pao-J will need to be re-assessed using the Tidal RTC program with the newly fitted jacket in situ) 125 Figure 89. Schematic diagram showing the apparatus set up for performing the Raised Volume manoeuvres 5.6.1.2 To start raised volume RTC data recording Maintain continuous monitoring of the infant’s vital signs Select “Raised Volume Squeeze” in the LabMan main program page (Figure 18) Click on [F6] (“Change reservoir pressure”) to set the optimal reservoir pressure (P r) as determined during the preceding tidal RTC manoeuvres. If the required Pr is > 5 kPa, click on the [Advance] button to allow appropriate Pr setting Gently and carefully remove the balloon shutter from the PNT/mask unit (which is already applied to the infant) Turn on the medical air supply at a flow of ~812 L/min to the NeopuffTM Infant the Resuscitator system. Prior to connecting the Neopuff T-piece/connector to the PNT/mask (already in place over the infant’s airway opening) (Figure 90), it is vital to check that the PIP is set appropriately at 30 cmH2O (2.94 kPa): this can be done by closing off one end of the Neopuff T-piece and intermittently occluding the “PEEP” end to read off the PIP setting from the Neopuff system (Figure 15). Prior to commencing RV manoeuvres, the medical air flow needs to be titrated and checks made at each test session to ensure that, in accordance to consensus (section 7.4.4), lung volume is augmented using PIP of 30 cmH2O Note: The larger the expected FVC, the higher the medical air flow should be set such that the infant is not being inflated too slowly (as he/she may start to actively breathe in before full inflation) or too rapidly (difficult to trigger the squeeze on time). However, if medical air flow is set >10 L/min, care must be taken to check that PIP does not exceed 30 cmH2O. 126 Click on [F1] to begin monitoring breathing pattern display in [Standby] panel; if necessary, perform an occlusion test to confirm satisfactory mask seal Click on [F2] to start tidal breathing recording; as soon as the reservoir pressure reaches the pre-set level, [F3] icon is illuminated Insert the straight connector with the Neopuff T-piece to the PNT (see Figure 16, Figure 17 and Figure 90) Observe the infant’s respiratory cycles, initiate lung inflation at the start of tidal inspiration until volume signal crosses zero flow; release the inflation to allow passive expiration Figure 90. RVRTC apparatus se up for RVRTC manoeuvres. TM Legend: The photo shows the Neopuff resuscitator (left) connected to the T-piece and straight connector, which are inserted to the PNT to enable intermittent delivery of 3-5 augmented breaths at a positive inflation pressure of 30 cmH2O to raise or extend lung volume towards total lung capacity prior to forced expiratory manoeuvre. Intermittent inflations and subsequent emptying of the lungs are achieved by repeated occlusions of the Neopuff T-piece opening (see Figure 90) using the thumb, at a rate approximating the infant’s respiratory frequency (i.e., if inflation is held for 1 second, and expiration takes 1 second, this corresponds to a rate of ~ 30 breaths/minute, whilst a 2 second occlusion would equate to ~ 15 breaths /minute While augmenting the lung volume towards total lung capacity (TLC), observe the timebased flow volume signals in the upper left window; hold each inflation until volume and Pao signals reach a “plateau” (denoting maximal inflation to pre-set PIP) before releasing the 127 occlusion at the T-piece opening to allow spontaneous (passive) expiration to FRC (Figure 91) Allow full exhalation of each passive expiration before repeating the next inflation in order to avoid introducing “PEEP” Repeat the procedure to deliver 3-5 augmented sigh-like breaths prior to the 2nd operator clicking on [F3] to activate jacket inflation just before (~10-50 ms) lung inflation is released to force expiration The timing is crucial between releasing the occlusion at the T-piece opening by the 1st operator, and the manual trigger of rapid jacket inflation by the 2nd operator, to obtain technically satisfactory FEFV curves After each RV manoeuvre, remove the Neopuff T-piece connector from the PNT; a respiratory pause is often observed followed by spontaneous onset of tidal breathing (Figure 91) NOTE: observe the infant’s vital signs carefully; his/her SpO2 may fall transiently during the respiratory pause. It is not advisable to start lung inflations for the next RV trial unless the SpO2 has returned to baseline and is stable After completion of the first RVRTC manoeuvre, check the online results (window C, Figure 92) to confirm that the actual inflation pressure (Pij) delivered to the last inflated or “squeeze” breath was between 2.793.09 kPa (see sections 6.6.2 and 6.6.3) Figure 91. Time-based trace showing 5 passively inflated breaths and timing of jacket compression during a raised volume RTC manoeuvre 128 NOTE: If Pij is 2.8 kPa or >3.1 kPa, then the air-flow to the Neopuff system must be adjusted accordingly, after ensuring that the Neopuff T-piece connector has been disconnected from the PNT/mask. Check the Neopuff PIP setting repeatedly while adjusting the medical air flow (section 5.6.1.2). Re-connect the Neopuff T-piece to the PNT/mask and continue data collection. Since the recorded data fail to meet quality control criteria (due to inappropriate Pij), the operator may choose to discard the data (click on [F9] and the [No] option for “Saving data” prior to starting new measurements. Figure 92. Screen display at completion of a raised volume manoeuvre. Legend: The “squeeze” manoeuvre was undertaken when the last or “squeeze” breath (window A) was inflated with a PIP (Pij) of 2.95 kPa and the inflated breath volume (Vij) was 167.6 mL (window C). The corresponding forced expired flow-volume curve, shown in window B, is also graphically represented in window D by the blue symbols (solid square =FEV+FVC in mLs, left vertical axis; solid circle=jacket pressure in kPa, right vertical axis). At the completion of each RV trial, check the Pij to ensure optimal lung inflation was achieved; reproducible ViJ values between trials indicate that the “squeeze” breaths pertaining to each trial were similar in volume (i.e., similar magnitude of lung inflation) Aim for three (minimum 2) acceptable FEFV curves that are reproducible (FVC and FEV0.4 or FEV0.5 within 10% variability) 129 Once sufficient data have been collected, click on [F10] to confirm “save and exit program” 5.7 Bronchodilator challenge – settings for “Pre and post medication” There may be occasions where an investigator wishes to assess the effect of a therapeutic drug, e.g., lung function measurements at baseline and post administration of bronchodilator (BD) agent via a spacer inhaler (section 2.8). The following section describes the procedure of performing bronchodilator challenge using the RV technique. At each RV test session, the aim is to obtain 3 technically satisfactory trials (section 5.6.1.2). However, if bronchodilator responsiveness (BDR) is a major outcome for the study, in order to ensure completion of tests, a pragmatic step would be to obtain 2 RV FEFV curves of good quality at baseline and post BD administration. 5.7.1 Measurements pre- and post bronchodilator challenge While setting up the equipment for RV manoeuvres (section 5.6.1.1), check to ensure that the spacer inhaler is the correct fit for the face mask; if it is, there would be no need to remove the face mask when the baseline RV data collection has been successfully completed, otherwise modifications or a different type of spacer may be required. A spacer can be modified to fit the face mask at one end and the inhaler and Neopuff T-piece at the other end Figure 93. A spacer with modified fittings for the face mask, bronchodilator inhaler and the Neopuff T-piece. 5.7.1.1 Baseline measurements prior to bronchodilator challenge Open the [Raised Volume Squeeze] program from the LabMan main group interface Maintain continuous monitoring of the infant’s vital signs Along the menu bar, click on [Medication] From the drop-down menu, select [Pre] to denote “Baseline” test (Figure 94) Proceed to perform the raised volume squeeze manoeuvres as described in section 5.6.1.2 130 Once 2-3 trials of good quality has been collected, click [F10] to save and exit program Gently detach the PNT from the face mask Note the infant’s vital signs (SpO2, heart rate and respiratory frequency) Figure 94. Select [Medication] from the menu bar: note the drop –down menu 5.7.1.2 Preparation and measurements post administration of bronchodilator Re-open the [Raised Volume Squeeze] program and from the menu bar, select [Medication] (Figure 94) Enter details of the bronchodilator (BD) agent (e.g., Albuterol/Salbutamol) and dosage; select the radio button [post] to denote data being collected following administration of BDl (Figure 94) Modify the medical air flow and the Neopuff PIP setting to read 25 cmH2O Attach the spacer inhaler (with the bronchodilator agent in situ) to the face mask and deliver 2 puffs of Salbutamol to the infant Remove inhaler device, connect the Neopuff T-piece and occlude the PIP opening to provide one inflation with 25 cm H2O Record and monitor changes in vital signs every minute for 10 mins 131 Aim for an increase in infant’s heart rate by more than 10%. In order to achieve this, administration of a further 2 inhalations every 2 minutes (maximum: another 6 puffs) may be required Document the time of BD administration/s Re-adjust the Medical air flow and the Neopuff system to deliver PIP at 30cm H2O (i.e., in readiness to re-start RV manoeuvres post BD) Continue to record and monitor changes in vital signs every minute and re-assess lung function using the RV manoeuvres at 30cm H2O of lung inflations (section 5.6.1.2) Once 2-3 trials of good quality have been collected, click [F10] to save and exit program 5.8 On completion of tests Remove the face mask/PNT and jacket Continue monitoring of vital signs until the infant is fully awake If the infant is an in-patient, he/she is escorted back to the ward and handed back to the ward staff If the infant had attended as an out-patient, he/she is offered a drink/feed; provided this is well tolerated and he/she is awake and stable as assessed by a trained personnel (Paediatrician/Research Fellow/ Nurse/Physiologist according to local policy), the infant is discharged home with parents Parents are reminded to be diligent in observing and caring for their infant once leaving the Lab and for the remainder of the day of the test, since he/she may remain drowsy for several hours and their movements uncoordinated (“wobbly”) when crawling or walking A post-test information sheet is given to the parents containing advice / reminder to parents regarding management of infant post sedation name of sedation administered contact details of Lab personnel anthropometric measurements (useful for other care-givers) 5.8.1 Post-test phone call to parents If attended as an out-patient, a phone call is made to the parents within 24 hours to check on the wellbeing of the infant and answer any further questions parents may have 5.8.2 Hygiene / infection control / cleaning and disinfecting equipment General hygiene and disinfecting/cleaning of equipment and linen should conform to policies of local institution. The following sections are guidelines 132 5.8.2.1 Hand hygiene Hand hygiene is the single most important way of reducing cross-infection and should be carried out using liquid soap before and after patient contact Alcohol gel is widely available as an alternative to hand washing to reduce bacterial load on visibly clean hands 5.8.2.2 Cleaning and disinfecting at end of test session 5.8.2.2.1 Apparatus, accessories and surfaces A hard-surface cleaner/wipes/disinfectant, recommended by the Infection Control Team of the local institution, is used to clean the – interior and exterior of the plethysmograph, including the baby tray and its resting surface – stadiometer and weighing scales – NeopuffTM resuscitator – Pule oximeter and the oxygen saturation probe – Computer, keyboard and resting top – all working surfaces are also cleaned/wiped discard the used putty and the single-use T-piece tubing and connector high temperature method is used to disinfect the face mask the squeeze jacket and bladder (NB: place a stopper to close off the connector opening first) are washed in hot soapy water, rinsed well and hung up to dry NOTE: the bladder supplied by CareFusion may need to be discarded after use, or retained strictly for single patient use only the measuring tape (for assessing head circumference) is also washed in hot soapy water, rinsed well and hung up to dry used linen is bagged and sent to designated laundry a hard-surface cleaner/wipes/disinfectant is use to clean the infant cot and mattress 5.8.2.2.2 PNT and balloon shutter Remove the PNT from the sensor housing and disassemble into its component parts; and disconnect the balloon shutter from its tubing Wash the balloon shutter (note: remember to cover the metal tip first), the 2 PNT components and the mesh screen with hot soapy water (Figure 95) 133 Rinse under cold running tap water and shake off excess water Soak the PNT components and balloon shutter in 0.5% concentration of terralin® protect solution (a disinfectant for medical devices; see Appendix for supplier: section 8.1) for at least 1 hour Figure 95. The balloon shutter with its metal tip covered before soaking in liquid. Legend: The shutter with the dissembled PNT comprising 2 white components, and the resistive mesh screen. After ≥ 1 hour, remove all the components from the solution and rinse under cold running tap water, shake off excess water and leave to dry in room air (21°-25° C) or dry rapidly using compressed air jet NOTE: – 0.5% concentration of this solution is made up by adding 5 mL of Terralin® protect solution to 1 litre cold tap water or 1 mL per 200 mL of tap water – For a list of terralin® protect solution contact time against various types of organisms, including MRSA and TB, please see Appendix and website http://www.schulke.co.uk/product/_/43/terralin-protect/ (accessed 01 Nov 2013) – Terralin®solution when diluted for use is active for 24 hrs. It may be disposed of by pouring it down the sink followed by running cold tap water to rinse off any around the sink / plug hole Guidelines provided by CareFusionTM for sterilising and disinfecting apparatus are available in the Appendix: section 8.2. 134 6 Data interpretation and management 6.1 Preparation for data analyses Although results of online lung function analysis are displayed throughout data collection period, it is advisable to inspect the data carefully after completion of the test session, since off-line data review enables analysis to be modified or refined in accordance to quality control criteria, thus improving quality of results. In general, the definitive or final results should be printed and stored with the infant’s documents. In order to prepare for a clinical report, both lung function results and anthropometric measurements are expressed as Z- or SD scores using appropriate reference equations (section 6.7 and see section 8.9 for an example of infant lung function report]. When reviewing lung function data, it is crucial to ascertain whether data have been acquired: a) during periods of quiet sleep when respiratory pattern was stable, and b) without the presence of a mask or PNT leak (Figure 96). Figure 96. Off-line data review and/or analysis of tidal breathing data Legend: The upper left window shows regular breathing pattern and stable EEL before and after the test occlusions, indicating data were collected while the infant was in relaxed, quiet sleep and that no mask/PNT leak was detected. to review or analyse stored data, go to [LabMan / Main groups] screen (Figure 18) and open [Patient Data] – retrieve the appropriate folder by keying in either the test ID number or infant’s name 135 – check that all details on [Patient Data] screen are correctly entered, especially values for weight and length (Figure 44). Save any amendments made. – click and open [Test Directory]. If an infant has been measured on more than one occasion, the CareFusion relational database groups the stored data according to the test date in a chronological manner, thus users may identify the required dataset easily according to the test date (Figure 98) – check that the correct weight and length measurements are attributed to each line of data collected on the same test occasion; otherwise, carefully edit weight and length measurements (section 3.4.10.1, Figure 44 and Figure 46) – [Save] and exit [Patient Data] – This last patient folder viewed will be held as “current” in the database, enabling the retrieval of lung function data set for this infant for review / analysis NOTE: click on [F8] to condense the [Patient Data] page and with the [Test Directory] displayed on the same page. A printed copy is useful for cross-checking the infant’s test “history” and detail regarding type of data collected 6.1.1 Setting printer / “screen-dump” function Data and/or results displayed on screen can be either printed as paper copy or electronically “screen-dumped” onto a WORD document by pressing the [Print SCrn] key To “enable” printer function (i.e., “disable” the [screen-dump] function): go to the LabManager main page (Figure 18); from the menu bar, click on [Option] and check that [Printer] option is “ticked” To “disable” the printer function (i.e., “enable” the [screen-dump] function): go to the menu bar, click on [Option] and make sure that [Printer] option is not “ticked”. NOTE: To screen-dump a screen display, open a new WORD sheet (in the background) while reviewing/analysing data; go to the selected screen display, press [PrtScrn] key, return to the WORD sheet and “paste” (hold down [Ctrl] and press [V]) the screen display electronically to the WORD sheet. Remember to return printer function to “enable” mode once document is completed. 6.1.2 Retrieving and identifying stored data for analysis From [LabMan/Main group], open the required test program, e.g., [Tidal Breathing Analysis] (Figure 18) Go to Menu bar, click on [Program] > [Reanalyze old measurement] (Figure 97) 136 Figure 97. Tidal Breathing menu enabling retrieval of stored data for review and/or reanalysis From the [Test Directory], click on (and highlight) the required sub-set of data according to test date/time and type (e.g., TIDA [for tidal]) (Figure 98) Click on [OK] to open and display the selected data Figure 98. Test directory showing stored data according to test data/time and type of measurements, as indicated by the red rectangular box During data recording, the software applies a drift correction to the tidal breathing data as each trial is completed, and displays the online analysis in the upper right window on (Figure 99) Click on the colour trial button (Figure 99) one at a time, to perform off-line inspection and application of quality control criteria to each trial of tidal breathing 137 Figure 99. The red circle indicates the 2 trials or Acts of tidal breathing data saved to the database If appropriate, click on [F9] to save the [modified data]; go to [Program]>[Reanalyse old measurement] and select another sub-set of stored data from [Text Directory] to review/analyse repeat the procedure until all the data have been reviewed/analysed click on [F10] to [save and exit] To continue on to review and analyse another dataset, open the appropriate test program (e.g., [Res-Compliance] or [Tidal Squeeze]), retrieve the appropriate stored data from [Test Directory] as described above 138 6.2 Analysis and reporting of tidal breathing data 6.2.1 Main outcomes – respiratory rate (RR) – tidal volume (VT) – time to peak tidal expiratory flow as a percentage of total expiratory time (tPTEF%/tE) (Figure 100: left panel) Figure 100. Graphic displays of tidal breaths. Legend: Left: This window shows flow versus time for 21 tidal breaths (grey curves) with the ‘mean’ flow-time data shown in black. Right: This panel displays the same 21 breaths as flowvolume loops, with the ‘mean’ indicated in black. 6.2.2 Data evaluation The Tidal Breathing software identifies tPTEF%tE and the expiratory volume up to tidal peak flow (VPEF) as a percentage of total expiratory volume (Vex) as the 2 key parameters. Since the shapes of tidal flow-volume loops, hence tPTEF%tE and VPEF%Vex, show large variability, in order to avoid the possibility of bias one outlier could introduce to the average values, the software program uses the following procedure to eliminate outliers: – during data collection, continuous analysis is being performed using the last 20 breaths according to size – the upper and lower 25% of values are eliminated and only the mid 50% of value are considered “valid” NOTE: see section 3.4.2 for more details regarding CareFusion’s default settings for online tidal breathing analysis, and modifications that individual LF laboratory may adapt with respect to breath selection (i.e., adjust setting to deselect the upper and lower 5% or 10% of data), and graphic screen display of variables such as tPTEF%tE and Vpef%Vex – mean results reported by the program are calculated only from the valid values 139 – only individual breaths with valid tPTEF%tE and VPEF%Vex are used in the construction of “curve averaging” (Figure 100 and Figure 101) data can be viewed in 2 ways, as illustrated in Figure 101; to toggle between the screen displays, click on the small graphic symbol at the top right hand corner (red circle, upper left window; Figure 101) Figure 101. Off-line analysis of tidal breathing parameter. Legend: Data can be viewed as flow versus time (left panel, upper left window) and flow and volume time-base trace (right panel, upper left window). Clicking on the small symbol (circle in red) allows the user to toggle between the display modes. Figure 102. Note coefficient of variability (CV) of tidal breathing data. Legend: The recommended coefficient variability of VT should be <10% of VT. Window A shows that Act 2 comprised 30 breaths with VT-CV of 9.51, which is within 10% of mean VT. However, in this example, when the last tidal breath from the same Act is deselected (open square symbol, window B), value of VT-CV improved (=2.94), while other parameters remain similar. The improvement in the VT-CV may be because the first, or the last, breath is often an incomplete tidal breath. Although it is not necessary to deselect the last breath in this instance, as the breathing pattern was regular, this approach may be helpful in other cases. 140 6.2.3 Criteria for acceptability – no evidence of mask leak (Figure 96 and Figure 101) – VT - CV is 10% (where CV is calculated as the (mean/SD) x 100) 6.2.4 Reporting results – mean values of the main outcomes (Figure 99 and Figure 102) are calculated from ~20-60 valid breaths – VT-CV and VT/kg are included in the Result table as quality control indicators (Figure 102; section 6.2.3) – Table 5 shows examples of ‘average’ values of tidal volume (as well as Crs and FRC) when expressed as a simple ratio of body length or weight at specific ages throughout the first 2 years of life NOTE: For tidal breathing, with the exception of VTn which indicates total number of valid breaths for each trial and comined number of breaths, the first results column (although labelled as “Best”) displays the “mean” values calculated using data from the 2 trials (Figure 103) Figure 103. Summary of tidal breathing parameters. Legend: A total of 55 valid tidal breaths are analysed and values summarised as “mean” (tabulated in the column labelled “Best”). VT-CV and VT/kg, highlighted in the red circle, are listed for quality control purposes. Table 5. Examples of ‘average’ values of tidal volume, compliance and FRC when expressed as a simple ratio of body length or weight at specific ages throughout the first 2 years of life Age Weight Length (wks) (kg) (cm) VT (mL/kg) VT (mL/cm) Crs Crs FRCp (mL/kPa/kg) (mL/kPa/cm) (mL/kg) FRCp (mL/cm) 8 5.3 57.5 9.1 (1.0) 0.83 (0.09) 11.5 (1.3) 1.05 (0.12) 15.6 (3.5) 1.43 (0.32) 13 6.3 61.0 9.1 (1.0) 0.92 (0.09) 11.5 (1.3) 1.17 (0.14) 16.3 (3.2) 1.67 (0.33) 26 8.0 67.5 9.1 (1.0) 1.08 (0.11) 11.6 (1.4) 1.38 (0.17) 17.0 (3.0) 2.03 (0.35) 52 10.1 75.5 9.5 (1.1) 1.25 (0.15) 12.3 (1.6) 1.64 (0.22) 17.9 (2.8) 2.40 (0.37) 100 12.3 86.0 10.1 (1.4) 1.45 (0.2) 13.8 (2.0) 2.98 (0.29) 19.4 (2.8) 2.78 (0.39) Data are expressed as mean (SD). Note: with the exception of tidal volume and compliance during the first 6 months of postnatal life, none of these ratios are constant, therefore even in appropriately grown infants, this would lead to significant misinterpretation if the ‘average ratio’ for each outcome were adopted for use as a “reference” or “normal” value during the first 2 years of life (from Nguyen et al 2013). 141 6.3 Analysis and reporting of passive respiratory mechanics data As mentioned in section 3.4.4, only data collected using the single occlusion technique will be discussed Data may be identified and retrieved for review and analysis as described in section 6.1.2 Ensure data were collected during periods of quiet sleep and no leak was evident 6.3.1 Main outcomes – total respiratory compliance (Crs) – total respiratory resistance (Rrs) 6.3.2 Data evaluation As described in section 2.3.2, the airway occlusion techniques for assessing passive respiratory mechanics are based on the ability to invoke the Hering Breuer (Inflation) Reflex (HBR) in infants and young children when lung volume is held above the end-expiratory level Provided rapid equilibration can be reached during brief periods of no flow, the relaxation pressure at the airway opening represents alveolar pressure, which in turn represents the summed elastic recoil pressure of the lung and chest wall during periods of muscle relaxation The algorithms for calculating total compliance and resistance of the respiratory system are – Crs = Volume mL/kPa Pressure Crs,SO = Rrs = Vext mL/kPa P1 where Vext is the extrapolated expiratory portion of the flow/volume loop to zero flow and P is the mean pressure at the airway opening during relaxation (shown by a plateau) against an end-inspiratory occlusion (Figure 104) t i meconst ant kPa/L/s Crs Rrs,SO = Trs 0.38 kPa/L/s Crs where 0.38 is the resistance of the apparatus (Rapp), and rs (shown as the solid red line in Figure 104) is volume/flow as calculated from the regression of the descending expiratory portion of the flow/volume loop 142 Figure 104. Passive mechanics data obtained using the single occlusion technique. Legend: Left pane shows a flow-volume trace: the portion between Vol%A and Vol%B indicates the limits of linear regression analysis for calculation of flow/volume regression line (rs); default setting set to analyse over 55% - 5% volume of the expired breath; back extrapolation of rs to zero flow indicating pseudo-flow at moment of airway occlusion; forward extrapolation of rs to zero flow represents the volume to which the infant would have exhaled passively if a premature inspiratory effort had not occurred (i.e., EEV); Vic: volume intercept, representing the extent to which functional residual capacity is dynamically elevated; Vext: extrapolated expired volume, i.e. the volume of air in the lung at moment of occlusion above the passively determined EEV; Veocc:.expired volume after release of the occlusion. Right panel shows a pressure-time trace: P1 represents the mean pressure plateau measured at the airway opening during airway occlusion, indicating the elastic recoil pressure at time of occlusion. 6.3.3 Criteria for acceptability – no evidence of leak during data collection – flow/volume curves have an expiratory portion in which a linear regression line (i.e., a single time constant) through 50% of expired volume (program default preset to analyse over the range 55%–5% volume remaining in the lung above the EEL: see section 3.4.5 and Figure 104) that can be fitted with a coefficient of determination (r2) of at least 0.99 – a relaxed pressure plateau at the airway opening; i.e., pressure plateau maintained for at least 100 ms with a SD of 10 Pa and a deviation between start and end of this period of < 2% – the occlusion is held for ≥ 400 ms to obtain a satisfactory pressure plateau, with a maximum occlusion time of 1500 ms 143 Figure 105. For clarity, a single technically acceptable trial obtained using the SO technique is illustrated. Legend: The result table is enlarged and displayed in Figure 106. Figure 106. Results table for passive mechanics. Legend: The main outcomes are Crs and Rrs, the other variables displayed in the table are outcomes that reflect quality control criteria (shown in red rectangles) with respect to acceptability of the trials or acts. 2 Trials 1-3 have met the criteria for acceptability, i.e., r ≥0.99; duration of pressure plateau (tplat)=100 ms with SD 10 Pa; deviation between start and end of the duration of pressure plateau (d%P1) < 2%; linear regression line (rs)=50% of Veocc (i.e., Vol%AVol%A). For trial 4: although the pressure plateau fulfilled the 2 criteria for a relaxed plateau, the r was <0.99 over 50% expiratory portion. This trial was de-selected and final results calculated using trials 1-3 only for reporting. Note: value for VT/kg and RR should be similar to that obtained previously during tidal breathing, and during subsequent tests, on the same test occasion; a VT/kg < 5-6 mL/kg may be attributable to a mask leak 144 6.3.4 Reasons for invalid trials In situations whereby assumptions are not valid, especially when measuring infants with lung or airway disease, e.g., poor pressure plateau at the airway opening during occlusion due to poor equilibration Modulation of the expiratory flow-volume curve by laryngeal braking, or alinearity of the flowvolume curve due to respiratory disease Following an end-inspiratory airway occlusion, infants often inspire earlier than usual on the subsequent breath, invalidating the calculation of time constant of the respiratory system due to shortened expiratory phase (Figure 112) A “linear” expiratory flow-volume curve does not necessarily indicate relaxation of respiratory muscles or the presence of a single passive time constant, since a linear descending slope could represent either balanced respiratory muscle activity or reciprocal changes in compliance and resistance as lung volume decreases Analysis of the “passive” time constant is limited to the linear portion of the flow-volume curve, when any muscle activity has supposedly been inhibited; consequently Rrs measurement may reflect the dimensions of the airways under passive conditions but cannot reflect the dynamic changes that normally occur throughout the breath, thus this may limit the clinical value of Rrs measurements within individual infants 6.3.4.1 Examples a) Acceptable trials The three SO trials shown in Figure 107 fulfilled the criteria listed in section 6.3.3. The relaxed expiratory phase indicated a singe rs and comprised 50% of Veocc (note: relaxed Pao plateau not shown). The Crs and Rrs results are reported as mean values. Figure 107. Relaxed expiratory phase from 3 single occlusion trials. 145 b) Alinear or active expiratory phase Both Figure 108 and Figure 109 show examples of active and/or non-linear expiratory phase following release of airway occlusion – please see figure legends for details. Figure 108. An invalid example of SO test due to active expiratory phase. Legend: Although the Pao plateau obtained during the same trial fulfilled the quality control criteria (see inset for measurements), the expiratory phase was active and the portion with regression line was markedly reduced. This trial is not acceptable for calculation of results Figure 109. SO test: active expiration following release of airway occlusion Legend: In this example, both the expiratory phase and the P ao plateau (see inset for results) appeared satisfactory. However, active breathing (or “push”) towards the end of expiration was evident. To avoid the alinear portion, adjust the linear regression portion to avoid the “push” at end expiration for rs calculation, taking care not to include the early expiratory portion following end of airway occlusion; minimum linear portion should be ≥ 40%. Provided that there was at least one or two other trials at the same test which are technically acceptable and have similar results to the example shown here, this trial might be included in the calculation of final results for Crs and Rrs. 146 c) Multiple time constants Figure 110 and Figure 111 shows an expiratory flow-volume portion from the same SO data. Although a regression line for the calculation of rs was fitted automatically over the “correct” expiratory portion (55%5% of Veocc) by the software program, it can be seen from Figure 110 that, in fact, the expiratory “limb” beneath the regression line was not linear. In Figure 111, two approaches were used to determine rs by adjusting the regression line (note: click on the adjusted regression line to re-calculate r2 value). However, besides obtaining different values for rs (i.e., multiple rs), neither of the approaches attempted met the quality control criteria (see figure legend) and this trial should, therefore, be deselected from final calculation. Figure 110. SO data: regression line for the calculation of rs. Legend: The regression line was fitted automatically by the program according to the default settings (section 3.4.5). However, it can be seen that the expiratory “limb” over the regressed portion was not linear. Figure 111. The same SO trial in Figure 109 is reproduced here in both panels, where modifications to the regression line have been made to fit a linear portion. Legend: In each example, by manually selecting Veocc portion that is “linear”, not only the Veocc portion may be unacceptably small (< 30%), the rs re-calculated (obtained by clicking on the regression line) would be entirely different according to the two approaches. This trial should be deselected from calculations due to alinearity and absence of a single time constant. 147 d) Early inspiratory effort post airway occlusion Figure 112. An example of an early inspiratory effort made by the infant following the release of the brief airway occlusion Figure 112 illustrates a single occlusion trial whereby, following the release of the brief airway occlusion, the infant inspired early (see EEL prior to occlusion and over the last 2-3 recorded breaths). This may occur due to the fact that: a) the default for the duration of airway occlusion is slightly too long. If this was so, shortening the [Max. occlusion time] may help (Figure 113); b) the infant is not in relaxed, quiet sleep Figure 113. Edit the duration of occlusion via the [Settings: Occlusion] menu Legend: Shortening or lengthening the occlusion time accordingly may facilitate the acquisition of technically satisfactory SO data (also see paragraph “d” above). 148 e) Glottic activity The screen display illustrated in Figure 114 shows the distorted expiratory flow-volume curve when the infant narrowed or partially closed his/her glottis/larynx. Despite a satisfactory Pao plateau during the occlusion, there was a large volume intercept (Vic/kg; >5 mL/kg) which further suggests that expiration was not passive and thus, rs cannot be ascertained reliably. The trial is not acceptable. Figure 114. Screen display illustrating the effect of glottic activity on the expiratory “limb” during a SO trial f) Pao plateau Infants with airway disease may require a slightly longer duration for pressure to equalise within the lungs during an airway occlusion, therefore when testing such infants, the [Max. occlusion time] may need to be increased (Figure 113). Conversely, if frequent early inspiratory effort was occurring during SO measurement, check to ensure that the default for [Max. occlusion time] is not too long (Figure 113). Examples of both a poor and relaxed plateaux at the airway opening are illustrated in Figure 115. 149 Figure 115. Examples of Pao plateau recorded during SO measurements. Legend: Left panel: no relaxed Pao plateau observed during occlusion suggesting poor pressure equilibration within the lungs and/or expiratory effort during the occlusion. Right panel: Pao rises rapid and smoothly during an occlusion indicating rapid pressure equilibration within the lungs, enabling the recording of relaxed plateaux at the airway opening. 6.3.5 – Reporting results mean values for Crs and Rrs are calculated and reported from 35 technically acceptable manoeuvres – in exceptional cases, reproducible results may be reported from 2 trials 150 6.4 Analysis and reporting of plethysmographic FRC data Currently, sReff results are not yet considered to be reliable (section 2.5), therefore only analysis of FRCpleth data will be discussed. Figure 116 illustrates the various options of viewing the FRC breaths, with the view in window B being the most useful. Figure 116. Options for viewing FRC breaths. Legend: By clicking on the symbols (red circle; window A), the 3 FRC breaths can be viewed in different formats: A) composite; B) individual respiratory efforts after drift correction; C) individual respiratory efforts before drift correction. 6.4.1 Main outcomes – FRCp 6.4.2 Criteria for acceptability no evidence of leak during data collection During airway occlusion: – the flow signal should remain zero (i.e., no flow) – volume trace stable without fluctuation – no obvious decay in Pao (which is an indication of leak) (Figure 117) – if the % delta EEL: pre and post occlusion (d-EEL%) is > 15% following the release of airway occlusion, it usually indicates a leak NOTE: It takes longer for EEL to settle after a FRC occlusion of up to 10s compared to the brief ~1 s occlusion used for test occlusion or SO technique. Ideally, d-EEL% should be 1012%; repeat FRC collection so that results from different trials with varying dEEL% may be compared. Occasionally dEEL% of up to ~20% is observed in the absence of any 151 apparent leak simply because it has not been possible to record sufficient breaths post occlusion. Provided data supported by other trials, such data may be acceptable. If a mask leak is confirmed, open the plethysmograph carefully without waking the infant, adjust or reposition the mask/PNT to eliminate mask leak before continuing with further FRC data collection. (Once the plethysmograph is closed, while waiting for thermal equilibration to occur, if necessary more tidal breathing or Crs/Rrs data may be recorded before proceeding to collect FRC data) Figure 117. Indications of a leak around the face mask. Legend: These include a fall in Pao during occlusion and a persistent step-up of volume baseline following occlusion. – when plotted graphically, changes in Pao and changes in VB (vertical and horizontal axes, respectively) should be in phase. i.e., the signals changing proportionally to form a diagonal slope with no “looping” (Figure 118, window D) – each “act” or trial should comprise a minimum of 2 occluded breaths (each breath comprising a full inspiratory and expiratory effort), as depicted by the downward and upward swings of the Pao trace, with at least 2 peaks after the initial pressure plateau during occlusion, from which FRC values are reproducible (within 5%) 6.4.3 Data evaluation In order to assess plethysmographic FRC accurately, the relationship between VB and Pao, measured during airway occlusion, must be in phase when plotted graphically (Figure 118, window D). If these signals are not in phase, there may be poor equilibration between the change in alveolar pressure (Palv) and Pao, presence of glottis activity, a leak around the face mask, or less commonly a leak in the plethysmograph. 152 Figure 118. Infant plethysmographic FRC measurement – see text for details Figure 118 shows a technically acceptable FRC measurement from a 10 month old infant (section 6.4.2). Over the duration of the airway occlusion (~7 s), the flow and volume signals were constant (window A); following the release of the airway occlusion, the EEL returned to the pre-occlusion baseline suggesting a good mask seal (i.e., no leak; window B). It is common for infants to make a larger (sigh-like) inspiratory effort immediately after the balloon shutter is released, as seen in this example. Window D displays good phasing (“closed” loops) between changes in Pao and changes in VB measured during airway occlusion for the 3 inspiratory and expiratory efforts that the infant made against the closed shutter. The three FRC measurements (denoted as FRCp 0 [blue], FRCp 1 [red] and FRCp 2 [green] in window D) for this trial are reproducible and a mean of 160.7 mL is reported (window C). Note: On occasions, the last inspiratory-expiratory effort may be incomplete (due to end of airway occlusion after 10s) can lead to distortion and may need to be excluded. Occasionally, a lower EEL may be observed following the release of airway occlusion when compared with that established prior to onset of the occlusion (Figure 119; see details in figure legend). 153 Figure 119. EEL was observed to be lower following the release of airway occlusion, when compared to that established prior to onset of occlusion. Legend: The difference in EEL, pre- and post occlusion, can be seen in Window B (d-EEL% = 9%; window C). In infants, the resting lung volume is dynamically modulated (e.g., spontaneious PEEP to raise lung volume) according to the individual’s immediate needs. During airway occlusion, the sustained distension of the lungs stimulates the pulmonary stretch receptors, which mediate the Hering-Breuer inflation reflex, temporarily reducing the frequency of respiratory rate and increasing relaxation of the respiratory muscles such that, following release of airway occlusion, a more relaxed (lower) EEL may be observed as demonstrated in this example. Two examples of FRC measurements, recorded from a 3-month old infant, are shown in Figure 120. When plotted graphically, Pao and VB for individual respiratory efforts, measured during airway occlusion, were in phase in both examples. The benefit of setting the default for airway occlusion to be released (i.e., shutter balloon to be deflated) 154 Figure 120. Examples of FRC recordings. Legend: Examples A and B illustrate FRC data from a 3-month old infant who made 3 complete respiratory (i.e., inspiratory and expiratory) efforts against the closed shutter. Example B shows how individual efforts can be excluded if necessary, although for this particular trial, it would not be required. after 3 breaths have been detected (or after a maximum occlusion time of 10 s) is that should Pao and VB phasing for one of the occluded breaths be unacceptable (e.g., due to glottic activity) and will need to be deselected from calculation, the mean FRC value from the trial remains acceptable provided that the 2 remaining loops are in phase and reproducible. 155 However, if the default had been set to release the occlusion after only 2 occluded breaths have been detected, and only one Pao versus VB loop was satisfactory, then this trial would not be considered eligible for reporting. 6.4.4 Examples of invalid trials a) PNT and/or mask leak Figure 121 displays FRC measurements (Act 2) in a 1-year old infant. As can be seen in window A, during the period of airway occlusion, Pao recording appears as expected, depicting 3 respiratory efforts undertaken by the infant against the closed shutter. However, on careful inspection both the flow and volume signals are unstable suggesting a leak from the PNT. Figure 121. This screen display shows an invalid FRC trial from a 1-year old infant. Legend: The unstable flow and volume signals (window A) are suggestive of a leak from the PNT, and the marked upward shift (delta 32%) in EEL post occlusion (windows B and C) indicates a mask leak. Variable FRC results were obtained from the 3 individual respiratory cycles against the closed shutter (window D) When compared to the pre-occlusion tidal volume baseline, a marked upward shift in EEL post occlusion (d-EEL: 32%) was noted indicating a leak around the face mask (windows B and C). The individual FRC values for the 3 respiratory cycles against the closed shutter are inconsistent (window D). In the presence of PNT and mask leaks, this trial is not acceptable as FRC results are unreliable. 156 b) Glottic activity Figure 122. FRC data with evidence of glottic activity and possible mask leak. Figure 122 illustrates FRC data (Act 1, blue trial button) in a 3-month old infant: regular breaths with a stable EEL at the start of data were recorded (window A). The airway occlusion ended (i.e., shutter balloon deflated) after 3 respiratory cycles had been detected; this was followed by a sigh breath and ~ 10 tidal breaths before tidal volume and EEL apparently returned to pre occlusion status. However, on review (window B), d-EEL% were >20% (window C) suggesting a mask leak (which may have been caused by the resultant effort of the sigh breath). The phase relationship or the slope for the regression lines (Pao versus VB) for the 3 respiratory efforts against the closed shutter were not similar (window D, Figure 122; compare with window D, Figure 120). As can been seen in Figure 122 (window D), with the exception of a good phase relationship for FRCp 0, (blue loop), both FRCp 1 (red) and FRCp 2 (green) showed “opened“ loops (red circle; Figure 122, window D), which are likely to be due to glottic activity. Values calculated for FRCp 1 and FRCp 2 separately were ~8% smaller than that calculated for FRCp 0. Unless additional trials with similar results had been recorded to support FRC value from this trial, then it would not be advisable to report FRC based on this trial: a) mean FRC from a minimum 2 (ideally 3-5) trials are recommended for reporting; b) evidence of mask leak and glottis activity during data collection. 157 c) FRC regression slope The setting for [Regression analysis for FRC] can be accessed from the menu bar - click on [Program] > [Modify settings]; return to the menu bar, click on [Settings] > [FRC] (Figure 123, window A) The recommended default setting for [Regression analysis for FRC] is 10% (Figure 123, window B), which means that the regression line (hence the slope) is derived after excluding the first and last 10% of the individual VB/Pao slope, i.e. encompasses 10-90% of the effort. This enables the slow changes that occur at end expiration (Pao “plateau”) which could distort results, especially in the presence of marked VB drift to be exclude. (Figure 124) Figure 123. Menu for setting FRC regression slope. Legend: Window A shows [Settings] menu for FRC program; [Regression analysis for FRC] may be edited in the panel (circle in red) shown in window B. 158 Figure 124. Construction of the regression slope using 80% of each plotted FRC breath. Legend: The recommended default for [Regression analysis for FRC] is 10%, i.e., the 10% of the top and bottom of each plotted FRC breath are excluded. These portions are indicated by the black markings in this example. Figure 125 illustrates an example of the effect of glottic narrowing during data collection as shown by FRCp 2 with poor phasing or “looping” (window D). Consequently, the regression slope was skewed to the left in comparison to slopes for FRCp 0 and FRCp 1 (see figure legend for more details). rd Figure 125. Glottic activity observed during the 3 respiratory cycle (represented in green) while FRC data were recorded. Legend: The default for the regression slopes for Act 1 and Act 2 was 10%. As can be observed, there was a good mask seal (d-EEL=7) during FRC data collection. Window D shows that good phasing for FRCp 0 and FRCp 1; by contrast, due to glottic narrowing, FRCp 2 was “looping” and its regression slope was skewed more to the left compared to those for FRCp 0 and FRCp 1. Note that the FRC calculated for FRCp 2 is also considerably larger by comparison. In the presence of glottic activity, ΔPao will underestimate ΔPalv, leading to overestimation of FRC. 159 Although it is tempting to eliminate the FRCp 2, and simply report the mean FRC using FRCp 0 and FRCp 1, which showed good phasing when Pao was plotted against VB, the difference between FRC values for these breaths was greater than 10% (Figure 125). The 1st breath (in blue), visually, appeared to have the best phasing (FRC=231 mL) During off-line analysis for Act 2, the [Regression analysis for FRC] was edited to 5% and 15% on separate occasions, in attempts to modify the regression slope. However, these options did not improve the fit of the regression line When the [Regression analysis for FRC] was further adjusted to 18%, in order for the regression line to avoid the “looping” (Figure 126), the slope improved NOTE: It must be emphsised that with the [Regression analysis for FRC] edited to 18%, the regressed portion becomes somewhat smaller (Figure 126), though the slope obtained seem appropriate. This approach is not recommended unless additional data are available to support or validate results (Figure 127 – see legend for further details). Figure 126. FRC results when the [Regression analysis for FRC] was adjusted to exclude the upper and lower18%. Legend: The regression line now appeared to fit more appropriately, with FRC values that were more reproducible 160 Figure 127. Additional technically satisfactory FRC data to support values for reporting. Legend: Panel A show data for Act 1, prior to the accompanying Act 2 (which is shown in Figure 125, and in Figure 126 following modification to the FRC slopes); additional trial was recorded and illustrated in panel B. Notice that mean FRC values from both panels A and B are similar to that shown in Figure 126 (after modification was made to the regressed portion for the slopes, and whether FRCp 2 was included or deselected from final calculation: i.e., 221.0 mL or 217.5mL, respectively). 6.4.5 Reporting results mean FRCpleth should be calculated and reported from 3-5 technically acceptable trials in exceptional cases, FRCpleth may be reported from 2 reproducible, acceptable trials (each comprises at least 2 respiratory efforts with good phasing and are reproducible to within 5% of each other) 161 6.5 Analysis and reporting of tidal RTC data In addition to the usual time-based, flow-volume and result windows, the tidal and raised volume forced expiratory programs display a “trend window” offering the user an overview of all trials performed, including Pj transmission assessment (Figure 88). 6.5.1 Main outcomes – V’maxFRC Secondary outcomes include: – Optimal Pr at which flow limitation was identified (i.e., with increasing Pr, no further increase in forced flows is elicited). The optimal Pr is used for RV squeeze manoeuvres – Pj transmission (as a quality control assessment) 6.5.2 Criteria for acceptability – no evidence of leak during data collection – Rapid rise time at start of forced expiration with the peak forced expiratory flow being attained before 30% of tidal volume has been expired – Length of Pj compression time sufficiently long enough to fully complete forced expiration – forced expiration should be a smooth curve and continue beyond FRC – jacket transmission pressure should be ≥ 2 kPa (except in infants with marked airway obstruction, in whom flow limitation may be established at lower pressures) 6.5.3 Data evaluation While data collection is in progress, the online analysis calculates and displays the 3 ‘best’ partial forced expiratory flow-volume (PEFV) curves (in colour) with the “best” V’maxFRC; shown both as the highest and the mean value in the results table (Figure 128). Other PEFV curves with lower V’maxFRC are automatically de-selected (shown in grey) and PEFV curves that did not meet the quality control criteria are indicated as blank symbols in the trend window (Figure 128). However, it should be noted that the 3 curves automatically selected by the program software as the “best” due to the numeric value of V’max are not necessarily technically acceptable. It is therefore essential to review and/or modify the analysis off-line. It is possible to re-select and re-evaluate any of the PEFV curves that are valid but shown in grey (since these are not one of the top 3 manoeuvres with the highest V’maxFRC) in the trend 162 window. However, since a maximum of 3 curves can be displayed at any one time, one or more of the curves shown in colour must first be de-selected (click on either the circle or square symbol relating to a specific trial with the right mouse button), before re-selecting and displaying an alternative previously unselected trial. This is done by using the left mouse button, and clicking on either the grey circle or square that is associated with a particular trial. To focus on a specific PEFV curve, click with the left mouse button on the corresponding symbol which will then be identified by a black line (Figure 128: identified as “Trial 5 of 10”, indicated by the red circle in the trend window) and the PEFV curve on view in window B in blue as are the corresponding symbols. The first two trials are represented by blank symbols (Figure 128, trend window) indicating that these are technically unacceptable (in this case due to early inspiratory effort); no results are calculated from these trials and they therefore cannot be re-selected. Figure 128. Screen display of tidal squeeze data Legend: Time-based signals are displayed in window A, with the 3 “best” forced expiratory flowvolume curves and results shown in windows B and C. In the trend window, the circles indicate Pj and square symbols represent the corresponding V’ maxFRC; the 3 “best” curves selected by the software are displayed in colour (blue, red and green), the grey symbols represent trials that have met quality control criteria but do not have the highest V’ maxFRC, the blank symbols indicate trials that are technically unacceptable and no results are calculated from these (see main text for more details). 163 Figure 129 shows a PEFV curve that fulfills quality control criteria (section 6.5.2), with respect to stability of EEL, both pre and post squeeze, VT/kg within the expected range, rapid achievement of peak expiratory flow and adequate jacket pressure transmission. It is also informative to observe the shape of expiratory “limb”. The example in window B (Figure 129) shows the expiratory phase of the forced V’-V curve to be convex (Pr = 5 kPa, Pj ~3.8 kPa and V’maxFRC 91 mL/s, which were similar to results from the previous trial: see trend window), whereas the following trial from the same infant (Figure 130) obtained using Pr of 6 kPa showed the expiratory curve becoming slightly concave in shape, and V’maxFRC was 87 mL/s (i.e., indicating slight negative flow dependence). Figure 129. An example of a technically acceptable tidal RTC curve Legend: For clarity, only one partial forced expiratory flow-volume curve is selected, with V’maxFRC being 91 mL/s (window C). Trend window: the symbols displayed in grey are tidal squeeze manoeuvres that are valid but currently de-selected from calculation/display, whereas the blank square and circle are data from a manoeuvre that is invalid or technically unacceptable; the circles represent Pj and the squares the corresponding V’maxFRC. The blue square and circle represent the currently displayed flowth volume curve in window B (also in blue), and it was the 6 of a total of 7 manoeuvres for this test (showed by red oval in the trend window). As seen from window C, EEL-s% of <5 suggests that baseline EEL was stable prior to onset of jacket inflation and after the squeeze manoeuvre. The EEL (window A) returned to baseline relatively quickly indicating an leak-free mask seal; VT/kg was within the expected range of 7-14 mL/kg (window C): an additional “clue” that there was no mask leak during data collection. The peak forced expiratory flow (PEF) was achieved before 30% of V T had been exhaled (window B); result for jacket transmission (window C) is displayed in both absolute value (Pao-j = 2.34 kPa) and relative % efficiency (Pjtr% = 61.7%). 164 Figure 130. Tidal RTC curve – evidence of flow limitation Legend: This example (trial 7 of 7) is derived from the same set of data as illustrated in Figure 129. In comparison with the previous example (trial 6 of 7; Figure 129), an increase of 1 kPa of reservoir pressure (0.7kPa Pj) did not elicit further increase in V’maxFRC and the shape of the expiratory curve was no longer convex but becoming concave, suggesting flow limitation had been achieved. 6.5.4 Examples of invalid trials Some examples of technically unsatisfactory partial forced expiratory flow-volume curves are shown in Figure 131 – see legend for description. The two examples in Figure 132 and Figure 133 show forced expiratory flows that were interrupted by glottic activity. In Figure 132 (left panel), severe glottic activity during the 12th trial (Act 2: red square in the right panel) distorted the FEFV curve, with V’maxFRC being 19% lower than that for Act 1 (11th trial: blue square, right panel) which was obtained at the same Pr (central panel) and also lower than 3 of the previous curves (trials 6, 8 and 10: all represented by grey squares: right panel) obtained at lower Pr. In this example, Act 2 should be de-selected and excluded from final calculation. 165 Figure 131. Examples of partial FEFV curves that are unacceptable Legend: This composite illustration shows: A) early inspiratory effort during the forced expiratory phase, such that there is no flow at FRC; flow distortion due to narrowing or closure of the glottis or larynx during the early (B), mid (C) or late (D) portion of forced expiration Figure 132. Example of distortion due to severe glottic narrowing or closure Figure 133. Effect of mild-moderate glottic activity on tidal RTC curve Legend: Compared to the example in Figure 132, this partial FEFV curve was mild to moderately interrupted by glottic narrowing during early phase of expiration. Notice the fluctuations on the expiratory flow signal, which may reflect presence of airway secretions mobilised during the manoeuvres. Figure 133 shows a PEFV curve that was mild to moderately interrupted by glottic narrowing during early phase of expiration. The interruption to forced flow occurred shortly after the 166 start of forced expiration and appeared to resume “normal” flow half way through expiration such that the remaining flow-volume curve overlaid with two other curves (Act 1 [blue; Pr 7 kPa] and Act 3 [green; Pr 8 kPa]; see trend window and result table) that were technically acceptable. V‘maxFRC derived from Act 2 (133 mL/s) is well within 10% or 10 mL/s of values from either Act 1 or Act 3. In this example, because 2 other technically satisfactory and reproducible curves, with a mean V‘maxFRC of 128.5 mL/s, are available in addition to Act 2, it would be feasible to include Act 2 in the final calculation of mean V‘maxFRC. Note: it can be seen from the trend window that, besides the 3 Acts that were selected (shown in colours), a further 3 manoeuvres with increasing Pr were undertaken but without further increase in forced flow. Late rise time Provided that the jacket is inflated rapidly at end inspiration, PEF is generally achieved before 30% of VT has been exhaled. A delay in achieving PEF (i.e., VPEF/VT > 30% VT, Figure 134) may lead to a distorted calculation of V’maxFRC. Thus, the trial should be invalidated. Figure 134. An example of delayed attainment of PEF due to a late rise time. Legend: The original partial FEFV curve is shown in blue (left lower window), with PEF being achieved >30% of tidal volume of the breath prior to the squeeze manoeuvre. The superimposed FEFV curve with a rapid jacket rise time (in brown) illustrated that V’ maxFRC for the blue FEFV curve is likely to be overestimated due to the late rise time. 167 6.5.5 Transmission of jacket pressure (Pj) As mentioned previously, it is important to include Pj transmission (Pao-j) as a quality control assessment and this should be at least ~2 kPa in healthy infants (section 5.5.3), in whom every effort is required to achieve flow limitation to avoid underestimating maximal forced expiratory flows. By contrast, flow dependence may be achieved at lower Pao-j in infants with airway disease or obstruction (Figure 10, section 5.5.3). In contrast to the example shown in Figure 88 which illustrates a technically acceptable Pj transmission manoeuvre, Figure 135 demonstrates a similar assessment that failed to meet quality control criteria, due to a mask leak following the inflation of RTC jacket during an airway occlusion. The presence of the Pao plateau (P1) suggests that the mask seal was satisfactory when the occlusion was made initially. Figure 135. An unacceptable jacket pressure transmission check. Legend: Following a stable EEL, a Pao-j manoeuvre was triggered; a step-up in EEL was observed following the release of airway occlusion (window A). During airway occlusion, although there was rapid pressue equilibration and a satisfactory P ao plateau (P1) initially, during jacket inflation, there nd was a 2 rise in Pao but this was not sustained to a plateau (window B) due to a mask leak. This may be associated with an increase in mouth pressure within the mask. This trial therefore is not valid. Note that despite the failure to meet quality control criteria, a value of 1.95 kPa was displayed for Pao-j (window C). Note: The mask will need to be re-applied to establish a leak-free seal before continuing with data collection. If under pressure to complete the study protocol e.g. due to restlessness of infant, it could be inferred from this Pj transmission check that adequate Pj has been transmitted for this study. 168 6.5.6 Reporting results – mean V’maxFRC calculated from the 3 (minimum 2) technically acceptable reproducible curves i.e., within 10% or 10 mL/s (whichever is greater) of the next highest value, is reported. Note: as FRC is an unreliable landmark and varies with deadspace, sleep state and breathing pattern, reporting mean V’maxFRC (rather than “Best”) is recommended. 169 6.6 Analysis and reporting of Raised Volume RTC data 6.6.1 Main outcomes – FVC obtained using 30 cmH2O of lung inflation pressure (FVC30) – FEV0.4/0.5/0.75 – FEF25-75 and FEF75 The calculation of FEVt and FEF% is illustrated in Figure 136 and Figure 137. Figure 136. This volume-time trace shows the calculation of FEV0.4 following a raised volume RTC manoeuvre. In this example, forced expiration was completed by 0.7 s. Figure 137. RVRTC flow-volume curve illustrating flow partitions in relation to FVC 170 6.6.2 Criteria for acceptability – no evidence of leak during data collection – Pinf pre-set at 30 cm H2O (2.94 kPa); acceptable range: within 5% of 30cm H2O (i.e., 2.79 to 3.09 kPa, or 28.5 to 31.5 cm H2O) – Pr used = optimal reservoir pressure ascertained during tidal RTC manoeuvres – for the “squeeze” breath: precise synchrony of jacket inflation (operator 1) with the ending of lung inflation (operator 2) is crucial so that there is a rapid rise time at start of forced expiration – Pj compression time (at least 1 second to ensure complete forced exhalation) – forced expiration should continue beyond FRC with a smooth expiratory curve 6.6.3 Data evaluation The raised volume squeeze window display is similar to that for the tidal Squeeze program (Figure 128). An example of a raised volume FEFV curve that has fulfilled the quality control criteria (section 6.6.2) is provided in Figure 139. Data in window A shows that after establishment of a stable baseline EEL, lung inflation was initiated. Each augmented sigh-like breath was held until volume and Pao achieved stable plateaux to ensure lung volume is fully extended to pre-set PIP of 30 cmH2O, prior to forcing flow using optimal Pr (determined during tidal RTC manoeuvres) from raised lung volume. The stable zero flow crossing across the augmented breaths indicated that the expiratory duration was sufficient to allow for complete emptying before the start of the next lung inflation (i.e., taking care not to introduce PEEP). However, in some younger infants who are not “relaxed”, several rapid lung inflations initially may assist inhibition of inspiratory effort; these should be followed by augmented breaths with longer expiratory time to prevent introduction PEEP prior to executing a RVRTC manoeuvre. The raised volume FEFV curve in window B illustrates that PEF was achieved rapidly and expiration continued beyond FRC. For quality control purposes, it is important to check the precise pressure delivered at the airway opening, rather than the set pressure, for the “squeeze breath” (Pij). This is because small differences in Pij will result in significant differences in FVC, FEVt and FEF%. For the RV curve shown in Figure 138, the Pij was 2.89 kPa (< 2% deviation from 2.94 kPa or 30 cm H2O). 171 Figure 138. A screen display showing a technically acceptable RVRTC manoeuvre. Figure 139. RVRTC trials may be viewed individually (left panel) or as trend of composite trials (right panel). th Legend: Left panel (window A1) shows time-based data of the 4 trial; right panel (window A2) illustrates data plotted as volume (mL) versus time (s) of valid or selected trials. th This example shows that, due to irregular tidal breathing at the start of the 4 trial (window A1), several more breaths were recorded to ascertain a stable EEL prior to raising lung volume towards TLC before the RVRTC manoeuvre. Ideally, data recording should be continued until spontaneous tidal breathing is re-established post RVRTC manoeuvre. However, limited software memory led to cessation of data recording during the respiratory pause (window A1). Hence, continuous monitoring of vital signs throughout the test duration is important allowing constant observation of the infant’s wellbeing. As illustrated in Figure 139 (window A1: 4th trial denoted by red symbols), time-based data are usually displayed for a specific trial by clicking on either the square or round symbol which corresponds to the individual RVRTC trial in the trend window 172 However, by clicking on [F7], the time-based screen can be switched to display a composite of valid trials as shown in window A2 (Figure 139). In this example, for clarity, only 2 valid trials are displayed. The optimal Pr was set at 9.0 kPa. For the 2nd (blue symbols) and 4th trial (red symbols) respectively, the recorded Pr were 8.8 and 8.9 kPa; Pij 2.89 kPa and 2.84 kPa, and Vij 592 mL and 617 mL, for the respective “Squeeze” breath. Another example of a valid raised volume FEFV curve, is shown in Figure 140 from an infant with airway obstruction, in whom a typically concave shape was observed in the expiratory flow-volume curve, with complete flow limitation at lower lung volumes (no increase in expiratory flow observed during the RVRTC when compared with that during passive deflation for the final 30% of expiration). Figure 140. A technically valid RV trial from an infant with airway obstruction. Legend: The left upper window shows recording of a respiratory pause (~3 s) following the RVRTC manoeuvre, followed by spontaneous onset of tidal breathing. 6.6.4 Examples of invalid trials a) Glottic activity Figure 141 displays a raised volume FEFV curve (Act 2, in red) distorted mid-flow due to transient narrowing of the glottis or larynx during forced expiration. Although forced expiratory flow appeared to resume rapidly (good overlay with curve derived from Act 1 173 shown in grey), and this incident did not significantly affect FVC or FEV0.4 calculations, it resulted in marked underestimation of FEF% values (see accompanying result table). Figure 141. Raised volume FEFV curve with transient narrowing of the glottis or larynx during forced expiration Legend: see text for details. b) Asynchrony between timing of lung inflation and jacket compression Figure 142 (window B) shows a flow-volume curve with a marked delay in jacket compression, such that forced expiration commenced after > 50% of the raised lung volume had already been exhaled. On reviewing the time-based traces in window A, it appears that lung inflation was released early (notice the shorter duration of inflation when compared to previous augmented breaths) causing the 2nd operator to mis-time jacket inflation. Figure 142. Example of a raised volume FEFV curve obtained following late jacket compression (window A) Legend: Due to the late jacket compression, the onset of forced expiration was severely delayed (window B). 174 Figure 143. Effect of delayed jacket inflation during a RV manoeuvre Legend: Although the delay in jacket inflation was minimal (180 ms; window A), it nevertheless resulted in forced expiration occurring after ~25% of the raised lung volume had been exhaled (window B). Figure 143 provides another example of FEFV curve resulting from a delay in jacket compression. From the time-based traces, the volume plateau suggested relaxation and good timing with respect to lung inflation. However, there was a minimal delay of 180 ms in the onset of jacket inflation which resulted in a marked delay in forced expiration. c) Delay in releasing lung inflation Time-based data in Figure 144 (window A) shows relaxed augmented breaths prior to RVRTC. When RTC was triggered on the 4th inflated breath, lung inflation was maintained a fraction too long i.e. poor synchrony between investigators such that forced expiration was delayed. Consequently, the FEFV curve was “displaced” to the right (window B). This trial is not technically valid. 175 Figure 144. An example of a technically unacceptable RVRTC curve. Legend: window A, the observed plateaux for the inflated breaths and at airway opening suggest good relaxation of the respiratory system during passive inflation. When jacket inflation was th triggered (4 inflated breath), there was a minimal delay in terminating lung inflation. Consequently, the FEFV curve was “displaced” to the right (window B). Figure 145 (window A) shows another example (grey FEFV loop and results from Act 1 (blue in trend window)) of poor synchrony albeit less marked than in Fig 144. Although values derived from Act 1 are within 10% of those from the well-synchronised manouevre in Act 2, the delayed onset of forced expiration and increased pressurisation may lead to over-estimation of FVC and distortion of FEV and FEF values. 176 Figure 145. Overlaying 2 raised volume RTC trials for comparison of results Legend: The raised volume FEFV curve in red (Act 2) is technically valid with good synchrony between releasing lung inflation and onset of jacket compression. Comparison of values (window C) confirmed that results from Act 1 are likely to be erroneous and therefore should be excluded. d) “Blip” at the end of an expiratory flow-volume curve Overall, the example in Figure 146 is technically valid but for the fact that at the end of the expiratory V’-V curve, there was some active expiratory effort. Since this may potentially overestimate the value of FVC (and hence FEVt and FEF%), caution is recommended when deciding whether the FEFV curve should be included or de-selected from final calculation of results (see Legend for Figure 146). 177 Figure 146. The “blip” at the end of the RVRTC curve (windows A and B) may bias FVC measurement, and hence calculations of FEVt and FEF%. Legend: Window B, the RVRTC curve in window A (denoted in red; i.e., Act 2) is shown overlaying with the RV curve in grey (Act 1) obtained during the same test session. FVC for Act 2 could potentially be assessed in 2 ways – a) when forced expired flow first appeared to reach zero flow (indicated by the brown vertical line; FVC=499 mL), b) FVC= 524 mL when forced expired flow continued and subsequently crossed over zero flow (marked by the dark blue vertical line). Note that the RV curve from Act 1 proceeded smoothly to zero flow (thus considered a technically acceptable curve) with FVC being 494 mL (Window C), which was similar to FVC for Act 2a (499 mL). In order to compare FEVt and FEF% results based on FVC calculated for Act 2a and Act 2b separately (as shown above), Act 1 is used as a proxy for Act 2a. As can be seen in Window C, although results for FEVt for Act 1 and Act 2b are comparable, the differences between FEF75 and FEF25-75 are 25% and 4%, respectively. This demonstrates that caution is necessary when reviewing or auditing data. 6.6.5 Reporting results In contrast to tidal RTC, when mean V’maxFRC is reported due to potential variability of FRC (EEL), – FVC, FEVt and FEF% from the “best” technically acceptable Raised Volume FEFV curve, i.e., that with the highest sum of FVC and FEV0.4 – In all, for quality control purposes, there should be 3 (minimum 2) valid curves that are reproducible (results from the 2 highest within 10% of each other) 178 6.7 Interpreting results: the role of reference equations 6.7.1 Reference equations - anthropometry Growth restriction may have an adverse influence on lung function, and affect interpretation of results. Therefore, as part of any clinical report it may be helpful to document height and weight adjusted for sex and age using WHO reference equations published by Cole et al (2011, 2012: Appendix: section 7.5) 6.7.2 Reference equations – lung function results In order to identify the nature and severity of any underlying pathophysiology in an individual, it is essential to have a clear idea of what range of values to expect in a healthy child of similar age, sex, body size, and ethnic group. Consequently, reliable interpretation of pulmonary function results relies on the availability of appropriate reference data to help distinguish between health and disease. The use of inappropriate reference equations and misinterpretation, even when potentially appropriate equations are used, can lead to serious errors in both under- and over-diagnosis, with its associated burden in terms of financial and human costs. It is important to remember that lung function results from healthy individuals and those with respiratory symptoms or disease often overlap to such an extent that a result within the normal range does not exclude disease. Similarly, while abnormal lung function results are often associated with symptoms and disease, they may simply be “atypical” and must always be interpreted in the light of all other clinically relevant information. Clinicians in respiratory medicine have become familiar with the concept of expressing lung function as percent predicted, ([observed/predicted]*100), where the predicted value is derived from reference equations. The median predicted value is 100%, and any deviation from 100% indicates an offset from the predicted value. A better approach to reporting lung function measures is to express results as Z-scores (or SD scores). The Z-score is a mathematical combination of the percent predicted and the between-subject variability to give a single number that accounts for the age- and height-related lung function variability expected between comparable healthy individuals. The upper and lower limits of normal (ULN and LLN) are conventionally defined as Z-score of ±1.64, a range that encompasses 90% of healthy subjects. However, due to increased uncertainty regarding reliability of reference ranges for infants and young children and the fact that multiple PFTs are often used in the assessments, these limits may be set at ±1.96 Z-scores to encompass 95% of the healthy 179 population. Unlike percent predicted, where each outcome has a different threshold for “abnormality”, the same cut-off of ±1.64 or ±1.96 Z-scores applies across all pulmonary function indices. Z-scores are useful for tracking changes in lung function with growth or treatment, as they allow comparison of lung function results obtained with different techniques. An increasing number of clinical research studies are now reporting infant lung function as Z-scores. Regardless of whether Z-scores or % predicted are used to express results, the age-specific normal range should always be included in the lung function report. Particular caution is required when interpreting results that lie close to the somewhat arbitrary “cut-offs” between health and suspected disease, especially when results are limited to a single test occasion. As with all tests, LFTs should be considered as only one part of the whole clinical picture. As mentioned earlier, marked biases between predicted values can occur due to alterations in equipment and protocol, differences in population characteristics, the statistical methods applied, or simply be caused by sampling error due to too few healthy children being tested. When selecting reference data with which to interpret clinical lung function results from an infant or young child, it is essential to check how appropriate these data are with respect to whether the same equipment, technique, quality control and methods of analysis were used equations were derived from a comparable and sufficiently large population, with even distribution of age and body size The need for sedation and the duration of studies limit the number of healthy infants who can be studied at any one centre. While international collaborative efforts led to the publication of sex-specific reference data for V'maxFRC during infancy that proved appropriate at the time for custom-built equipment (Hoo et al, 2000: section 7.5), the development of commercially available devices for infants appears to have introduced some bias, necessitating the development of equipment-specific equations for infant LFTs before clinical studies in individual infants can be interpreted properly. During recent years it has been shown that when using the CareFusion equipment, previously published reference values for plethysmographic lung volumes (Hulskamp et al 2003: section 7.5) and both the tidal or raised volume RTC technique (Lum et al 2010: section 7.5) are inappropriate and can lead to serious errors in interpretation. Equipment specific reference 180 equations for tidal breathing outcomes, passive respiratory mechanics and plethysmographic FRC have recently been published (Nguyen et al 2013: section 7.5), as has a correction factor for forced expiratory flows and volumes (Lum et al 2010: section 7.5). Users of the CareFusion Masterscreen BabyBody device are strongly recommended to use these equations (see Table 5). However, it should be noted that these equations have been derived from White infants of European descent and may not be applicable to infants of other ethnic origin. An example of a report comprising serial measurements in a young child with CF is included in the Appendix: section 8.9. Lung function results have been expressed as Z-scores according to the recommended reference ranges that are included in Table 5 and Tables 6 A and B. Table 5. Equipment specific prediction equations (Nguyen et al 2013) Predicted value RSD RR, min 2.588 +(1876.034 / L) + (38.906 / A) 0.718 + (267.256 / L) + (2.222 / A) VT, mL 38.347 + (1.128 x L) + (0.204 x A) + (3.688 x W) 2.403 + (0.015 x L) + (0.118 x A)+(0.136 x W) 3.231 0.320 84.904 + (2.470 x L) + (0.429 x A) 3.975 + (0.170 x L) + (0.143 x A) Ln Rrs, kPaL s * 0.094 + (84.877 / L) 0.203 + (2.966 / L) FRCpleth, mL 130.225+(3.711 x L)+(0.515 x A)+(0.187 x A x M) 12.657 + (0.526 x L) 1 Ln tPTEF/tE, % * Crs, mLkPa 1 1 Abbreviations: L = length in cm; A = age in weeks; W = weight in kg; M = male (male =1 and female = 0); RSD = residual standard deviation; Ln = natural log; RR=respiratory rate; VT=tidal volume; tPTEF/tE=time to reach peak tidal expiratory flow as a ratio of total expiratory time; Crs and Rrs= compliance and resistance of the respiratory system, respectively, FRCpelth=plethysmographic functional residual capacity. * Legend: tPTEF/tE and Rrs are expressed as log transformed, therefore to calculate Z-scores for tPTEF/tE and Rrs, the measured values should be natural log transformed before subtracting the predicted values divided by the RSD using values presented above. 181 Table 6a: Adjusted prediction equations for RVRTC outcomes taking length into account (Lum et al 2010) Adjusted zFVC = zFVC(Jones) + (0.057 x length, cm) – 3.90 Adjusted zFEV0.5 = zFEV0.5(Jones) + (0.058 x length, cm) – 3.83 Adjusted zFEF75 = zFEF75 (Jones) + (0.037 x length, cm) – 1.94 Adjusted zFEF25-75 = zFEF25-75 (Jones) + (0.040 x length, cm) – 1.94 Adjusted V’maxFRC = zV’maxFRC (Hoo) + (0.074 x length, cm) – 4.17 Table 6b: Adjusted prediction equations for RVRTC outcomes taking age into account (Lum et al 2010) Adjusted zFVC = zFVC(Jones) + (0.018 * age, weeks) – 0.538 Adjusted zFEV0.5 = zFEV0.5(Jones) + (0.018 * age, weeks) – 0.341 Adjusted zFEF75 = zFEF75 (Jones) + (0.010 * age, weeks) – 0.347 Adjusted zFEF25-75 = zFEF25-75 (Jones) + (0.011 * age, weeks) – 0.491 Adjusted V’maxFRC = zV’maxFRC (Hoo) + (0.020 * age, weeks) – 0.355 Abbreviation: z: Z-score Legend: As published reference data for RVRTC (Jones et al, AJRCCM 2000) were inappropriate for data collected using the Carefusion equipment, application of an adjustment factor may minimise errors in the interpretation of RVRTC data. Age and length contributed equally and significantly to these models. After adjusting for length or age, addition of the other variable did not add significantly to the model, and length was chosen in preference to age to prevent any bias due to restricted growth when applying such equations to children with lung disease. 182 6.8 Data back-up, storage and export Apart from being able to retrieve lung function data from the BabyBody LabMan relational database to review and analyse data, the [Merge] function software (Figure 147) enables the following - Figure 147. The red circle in the right upper quadrant indicates the “Merge” function icon 3. frequent backing-up of the BabyBody LabMan database by exporting data to a storage media (e.g., a portable hard drive or server) to ensure protection / safety of the data collected over time 4. data may be exported periodically from the database in electronic format and displayed in Microsoft [Notepad] or [Excel] format for data checking or cleaning prior to transferring to statistical packages, e.g., SPSS/IBM software, for analysis 5. once the CareFusion infant data are “merged” out, the exported data may be saved (and stored) to a different format (such as in Microsoft Excel worksheets), from which the users can transfer or import these data electronically to their own specific or customised database, facilitating secure storage of lung function data with other relevant details such as background and clinical history 6. being able to transfer data electronically between databases or Excel worksheets eliminates the potential risk of typographic errors and greatly reduces the time that would have required to undertake data entry manually 183 NOTE: For more information and furher details regarding the “Merge” function, please see Appendix section 8.10. 184 7 Recommended Reading List ** key papers 7.1 Background reading and review articles ** Rosenfeld M, Allen J, Arets BH, et al. An official American Thoracic Society workshop report: optimal lung function tests for monitoring cystic fibrosis, bronchopulmonary dysplasia, and recurrent wheezing in children less than 6 years of age. Ann Am Thorac Soc 2013;10(2):S1S11. ** Stocks J, Hislop AA, Sonnappa S. Early lung development: lifelong effect on respiratory health and disease. Lancet Respir Med 2013. Stocks J, Lum S. Pulmonary function tests in infants and preschool children. In: Wilmott RW, Boat TF, Bush A, et al., eds. Kendig's disorders of the respiratory tract in children. Philadelphia, P.A., USA: Elsevier, 2012:169-210. Stocks J, Thia L, Sonnappa S. Evaluation and use of childhood lung function tests in cystic fibrosis Curr Opin Pulm Med 2012;18:602-608. Narang I, Bush A. Early origins of chronic obstructive pulmonary disease. Semin Fetal Neonatal Med 2012; 17(2):112-118. Pike K, Pillow JJ, Lucas JS. Long term respiratory consequences of intrauterine growth restriction. Semin Fetal Neonatal Med 2012; 17(2):92-98. Lum S, Bush A, Stocks J. Clinical pulmonary function testing for children with bronchopulmonary dysplasia Pediatr Allergy, Immunol Pulmonol 2011;24(2):77-88. 7.2 Sedation and sleep state NICE Guideline Development Group. Sedation in children and young people: sedation for diagnostic and therapeutic procedures in children and young people . http://www nice org uk/nicemedia/live/13296/52130/52130 pdf; Issued: December 2010; NICE clinical guideline 112 (accessed: 08/02/2014). Gaultier C, Fletcher ME, Beardsmore C, et al. Respiratory function measurements in infants: measurement conditions. Working Group of the European Respiratory Society and the American Thoracic Society. Eur Respir J. 1995;8(6):1057-1066. Jackson EA, Rabbette PS, Dezateux C, et al. The effect of triclofos sodium sedation on respiratory rate, oxygen saturation, and heart rate in infants and young children. Pediatr Pulmonol. 1991;10(1): 40-45. Rabbette PS, Dezateux C, Fletcher ME, et al. Influence of sedation on the Hering-Breuer inflation reflex in healthy infants. Pediatr Pulmonol. 1991;11(3):217-222. Tepper RS, Morgan WJ, Cota K, et al. Physiological growth and development of the lung during the first year of life. Am Rev Respir Dis. 1986;134(3):513-519. Prechtl HF. The behavioural states of the newborn infant (a review). Brain Res 1974; 76(2):185-212. 185 7.3 Equipment Specifications and signal processing Frey U, Reinmann B, Stocks J. The infant lung function model: a mechanical analogue to test infant lung function equipment. Eur Respir J 2001; 17(4):755-764. Reinmann B, Stocks J, Frey U. Assessment of an infant whole-body plethysmograph using an infant lung function model. Eur Respir J 2001; 17(4):765-772. Frey U, Stocks J, Sly P, et al. Specification for signal processing and data handling used for infant pulmonary function testing. ERS/ATS Task Force on Standards for Infant Respiratory Function Testing. Eur Respir J 2000; 16(5):1016-1022. Frey U, Stocks J, Coates A, et al. Specifications for equipment used for infant pulmonary function testing. ERS/ATS Task Force on Standards for Infant Respiratory Function Testing. Eur Respir J 2000; 16(4):731-740. 7.4 Methodological papers relating to infant LF tests 7.4.1 Tidal breathing Bates J, Schmalisch G, Filbrun D, et al. Tidal breath analysis for infant pulmonary function testing. Eur Respir J 2000;16:1180-1192 7.4.2 Passive Respiratory Mechanics Hoo AF, Lum S, Goetz I, et al. Influence of jacket placement on respiratory compliance during raised lung volume measurements in infants. Pediatr Pulmonol 2001;31:51-58 Gappa M, Colin AA, Goetz I, et al. Passive respiratory mechanics: The occlusion techniques. Eur Respir J 2001;17:141-148 Goetz I, Hoo AF, Lum S, et al. Assessment of passive respiratory mechanics in infants: double versus single occlusion? Eur Respir J 2001; 17(3):449-455. Stocks J, Sly PD, Morris MG, et al. Standards for infant respiratory function testing: what(ever) next? Eur Respir J 2000; 16(4):581-584. 7.4.3 Plethysmography Kirkby J, Stanojevic S, Welsh L, et al. Reference equations for specific airway resistance in children: the Asthma UK initiative. Eur Respir J. 2010;36(3):622-629 Broughton S, Rafferty GF, Milner AD, et al. Effect of electronic compensation on plethysmographic airway resistance measurements. Pediatr Pulmonol. 2007;42(9):764-772. Erratum in: Pediatr Pulmonol. 2008;43(1):104 Subbarao P, Hulskamp G, Stocks J. Limitations of electronic compensation for measuring plethysmographic airway resistance in infants. Pediatr Pulmonol. 2005; 40(1):45-52. Stocks J, Godfrey S, Beardsmore C, et al. Plethysmographic measurements of lung volume and airway resistance. ERS/ATS Task Force on Standards for Infant Respiratory Function Testing. Eur Respir J 2001; 17(2):302-312. 186 Coates AL, Peslin R, Rodenstein D, et al. Measurements of lung volume by plethysmography. Eur Respir J 1997; 10(6):1415-1427 7.4.4 Tidal and raised volume RTC Lum S, Stocks J. Forced expiratory manoeuvres. In: Merkus P, Frey U, eds. Paediatric lung function: ERS Journals Ltd, 2010:46-65. ATS/ERS statement: raised volume forced expirations in infants: guidelines for current practice. Am J Respir Crit Care Med 2005; 172(11):1463-1471 Lum S, Hoo AF, Stocks J. Influence of jacket tightness and pressure on raised lung volume forced expiratory maneuvers in infants. Pediatr Pulmonol 2002;34:361-368 Lum S, Hoo AF, Stocks J. Effect of airway inflation pressure on forced expiratory maneuvers from raised lung volume in infants Pediatr Pulmonol 2002;33:130-134 Hoo AF, Lum SY, Goetz I, et al. Influence of jacket placement on respiratory compliance during raised lung volume measurements in infants. Pediatr Pulmonol 2001; 31(1):51-58. Sly P, Tepper R, Henschen M, et al. Standards for infant respiratory function testing: Tidal forced expirations. Eur Respir J 2000;16:741-748 7.5 Interpretation of data and reference equations Stocks J, Kirkby J, Lum S. How to avoid misinterpreting lung function tests in children: a few practical tips. Paediatr Respir Rev (2014). http://dx.doi.org/10.1016/j.prrv.2014.02.001. ** Nguyen TT, Hoo AF, Lum S, et al. New reference equations to improve interpretation of infant lung function. Pediatr Pulmonol 2013; 48(4):370-380. Stanojevic S, Quanjer PH, Miller RM, et al. The Global Lung Function Initiative: dispelling some myths of lung function test interpretation. Breathe; 9, 463-474 (2013). ** Stanojevic S, Wade A, Stocks J. Reference values for lung function: past, present and future. Eur Respir J. 2010;36(1):12-19. ** Lum S, Hoo AF, Hulskamp G, et al. Potential misinterpretation of infant lung function unless prospective healthy controls are studied. Pediatr Pulmonol 2010; 45(9):906-913. ** Stocks J, Modi N, Tepper R. Need for healthy control subjects when assessing lung function in infants with respiratory disease. Am J Respir Crit Care Med. 2010;182(11):1340-1342 Cole TJ, Wright CM, Williams AF. Designing the new UK-WHO growth charts to enhance assessment of growth around birth. Arch Dis Child Fetal Neonatal Ed 2012; 97(3):F219-F222. Cole TJ. The development of growth references and growth charts. Ann Hum Biol 2012; 39(5):382-394. Cole TJ, Williams AF, Wright CM. Revised birth centiles for weight, length and head circumference in the UK-WHO growth charts. Ann Hum Biol 2011; 38(1):7-11. Hülskamp G, Hoo AF, Ljungberg H, et al. Progressive decline in plethysmographic lung volumes in infants: physiology or technology? Am J Respir Crit Care Med. 2003;168(8):10031009. 187 Hoo AF, Dezateux CA, Hanrahan J, et al. Sex-specific prediction equations for V'maxFRC in infancy: A multi-center collaborative study. Am J Respir Crit Care Med 2002;165:1084-1092 Jones M, Castile R, Davis S, et al.Forced expiratory flows and volumes in infants. Normative data and lung growth. Am J Respir Crit Care Med 2000; 161(2 Pt 1):353-359. 7.6 Recent applications of infant LF tests in clinical research using CareFusionTM BabyBody Masterscreen equipment ** Hoo AF, Gupta A, Lum S, et al. Impact of ethnicity and extreme prematurity on infant pulmonary function. Pediatr Pulmonol 2014;49:679-687 ** Nguyen TT, Thia LP, Hoo AF, et al. Evolution of lung function during the first year of life in newborn screened cystic fibrosis infants. Thorax 2013, Sep 26. doi: 10.1136/thoraxjnl-2013204023. [Epub ahead of print] ** Hoo AF, Thia L, Nguyen TD, et al.Lung function is abnormal in 3 month old infants with cystic fibrosis diagnosed by newborn screening. Thorax 2012;67:874-881 Borrego LM, Stocks J, Leiria-Pinto P, et al. Lung function and clinical risk factors for asthma in infants and young children with recurrent wheeze. Thorax 2009;64(3):203-209 Stocks J, Coates AL, Bush A. Lung function in infants and young children with chronic lung disease of infancy: The next steps? Pediatr Pulmonol 2007;42(1):3-9 Lum S, Gustafsson P, Ljungberg H, et al. Early detection of cystic fibrosis lung disease: multiple-breath washout vs. raised volume tests. Thorax 2007;62: 341-347 Lum S, Hulskamp G, Merkus P, et al.Lung function tests in neonates and infants with chronic lung disease: forced expiratory maneuvers. Pediatr Pulmonol 2006;41(3):199-214 Hulskamp G, Pillow JJ, Dinger J, et al. Lung function tests in neonates and infants with chronic lung disease of infancy: functional residual capacity. Pediatr Pulmonol 2006;41(1):122 Gappa M, Pillow JJ, Allen J, et al. Lung function tests in neonates and infants with chronic lung disease: Lung and chest-wall mechanics. Pediatr Pulmonol 2006;41(4):291-317 Baldwin D, Pillow JJ, Stocks J, et al. Lung function tests in neonates and infants with chronic lung disease: Tidal breathing and respiratory control in infancy. Pediatr Pulmonol 2006;41:391-419 Schmalisch G, Wilitzki S, Roehr CC, et al. Development of lung function in very low birth weight infants with or without bronchopulmonary dysplasia: longitudinal assessment during the first 15 months of corrected age. BMC Pediatr 2012; 12: 37. Roehr CC, Wilitzki S, Opgen-Rhein B, et al. Early lung function testing in infants with aortic arch anomalies identifies patients at risk for airway obstruction. PLoS ONE 2011; 6: e24903. Kozlowska WJ, Bush A, Wade A, et al. Lung function from infancy to the preschool years after clinical diagnosis of cystic fibrosis. Am J Respir Crit Care Med 2008; 178: 42-49. Hoskote AU, Castle RA, Hoo AF, et al. Airway function in infants treated with inhaled nitric oxide for persistent pulmonary hypertension. Pediatr Pulmonol 2008; 43: 224-235. 188 7.7 Applications in clinical research using other ILFT equipment Peterson-Carmichael S, Rosenfeld M, Ascher SB, et al. Survey of Clinical Infant Lung Function Testing Practices. Pediatr Pulmonol 2014;49: 126-131 Debley J, Stanojevic S, Filbrun AG, et al. Bronchodilator responsiveness in wheezy infants and toddlers is not associated with asthma risk factors. Pediatr Pulmonol 2012; 47: 421-428 Spoel M, van den Hout L, Gischler SJ, et al. Prospective longitudinal evaluation of lung function during the first year of life after repair of congenital diaphragmatic hernia. Pediatr Crit Care Med 2012; 13: e133-e139. Rosenfeld M, Ratjen F, Brumback L, et al. Inhaled hypertonic saline in infants and children younger than 6 years with cystic fibrosis: the ISIS randomized controlled trial. JAMA 2012; 307: 2269-2277. Prendergast M, Rafferty GF, Milner AD, et al. Lung function at follow-up of infants with surgically correctable anomalies. Pediatr Pulmonol 2012; 47: 973-978. van der Zalm MM, Uiterwaal CS, Wilbrink B, et al. The influence of neonatal lung function on rhinovirus-associated wheeze. Am J Respir Crit Care Med 2011; 183: 262-267. Pillarisetti N, Williamson E, Linnane B, et al. Infection, inflammation, and lung function decline in infants with cystic fibrosis. Am J Respir Crit Care Med 2011; 184: 75-81. Filbrun AG, Popova AP, Linn MJ, et al. Longitudinal measures of lung function in infants with bronchopulmonary dysplasia. Pediatr Pulmonol 2011; 46: 369-375. Drysdale SB, Wilson T, Alcazar M, et al. Lung function prior to viral lower respiratory tract infections in prematurely born infants. Thorax 2011; 66: 468-473. McEvoy C, Schilling D, Peters D, et al. Respiratory compliance in preterm infants after a single rescue course of antenatal steroids: a randomized controlled trial. Am J Obstet Gynecol 2010; 202: 544-549. Davis SD, Rosenfeld M, Kerby GS, et al. Multicenter evaluation of infant lung function tests as cystic fibrosis clinical trial endpoints. Am J Respir Crit Care Med 2010; 182: 1387-1397. Colin AA, McEvoy C, Castile RG. Respiratory morbidity and lung function in preterm infants of 32 to 36 weeks' gestational age. Pediatrics 2010; 126: 115-128. Ranganathan S, Linnane B, Nolan G et al. Early detection of lung disease in children with cystic fibrosis using lung function. Paediatr Respir Rev 2008; 9: 160-167. McEvoy C, Schilling D, Spitale P, et al. Decreased respiratory compliance in infants less than or equal to 32 weeks' gestation, delivered more than 7 days after antenatal steroid therapy. Pediatrics 2008; 121: e1032-e1038. Linnane BM, Hall GL, Nolan G, et al. Lung function in infants with cystic fibrosis diagnosed by newborn screening. Am J Respir Crit Care Med 2008; 178: 1238-1244. Broughton S, Sylvester KP, Fox G, et al. Lung function in prematurely born infants after viral lower respiratory tract infections. Pediatr Infect Dis J 2007; 26: 1019-1024. Yemen S, Gaston B. Lung function test results in normal infants: a COPSAC sequel. J Allergy Clin Immunol 2009; 123: 658-659. Bisgaard H, Loland L, Holst KK, et al. Prenatal determinants of neonatal lung function in high-risk newborns. J Allergy Clin Immunol 2009; 123: 651-657, 657. 189 Friedrich L, Pitrez PM, Stein RT, et al. Growth rate of lung function in healthy preterm infants. Am J Respir Crit Care Med 2007; 176: 1269-1273. 7.8 Assessment of bronchodilator responsiveness using ILFTs Goldstein AB, Castille RG, Davis SD, et al. Bronchodilator responsiveness in normal infants and young children. Am J Respir Crit Care Med 2001,164:447–454 Debley J, Stanojevic S, Filbrun AG, et al. Bronchodilator responsiveness in wheezy infants and toddlers is not associated with asthma risk factors. Pediatr Pulmonol 2012; 47(5): 421–428 7.9 Examples of epidemiological research applications 7.9.1 Reviews Harding R, Maritz G. Maternal and fetal origins of lung disease in adulthood. Semin Fetal Neonatal Med 2012; 17: 67-72. Greenough A. Long term respiratory outcomes of very premature birth (<32 weeks). Semin Fetal Neonatal Med 2012; 17: 73-76. Jones M. Effect of preterm birth on airway function and lung growth. Paediatr Respir Rev 2009; 10 Suppl 1: 9-11. Stocks J. Late lung disease in bronchopulmonary dysplasis - lessons learned from lung function testing. Eur Paediatr 2008; 2: 31-34. Stocks J, Coates A, Bush A. Lung function in infants and young children with chronic lung disease of infancy: The next steps? Pediatr Pulmonol 2007; 42: 3-9. 7.9.2 Wheeze Pike KC, Rose-Zerilli MJ, Osvald EC, et al. The relationship between infant lung function and the risk of wheeze in the preschool years. Pediatr Pulmonol 2011; 46: 75-82. Borrego LM, Stocks J, Leiria-Pinto P, et al. Lung function and clinical risk factors for asthma in infants and young children with recurrent wheeze. Thorax. 64(3):203-9, 2009 Bisgaard H, Loland L, Holst KK, et al. Prenatal determinants of neonatal lung function in highrisk newborns. J Allergy Clin Immunol 2009; 123: 651-657, 657. Yemen S, Gaston B. Lung function test results in normal infants: a COPSAC sequel. J Allergy Clin Immunol 2009; 123: 658-659 7.9.3 Preterm delivery Friedrich L, Stein RT, Pitrez PM, et al. Reduced lung function in healthy preterm infants in the first months of life. Am J Respir Crit Care Med 2006;173(4):442-447. Friedrich L, Pitrez PM, Stein RT, et al. Growth rate of lung function in healthy preterm infants. Am J Respir Crit Care Med 2007;176: 1269-1273. Sanchez-Solis M, Garcia-Marcos L, Bosch-Gimenez V, et al. Lung function among infants born preterm, with or without bronchopulmonary dysplasia. Pediatr Pulmonol 2012;47(7):674681. 190 McEvoy C, Venigalla S, Schilling D, et al. Respiratory function in healthy late preterm infants delivered at 33-36 weeks of gestation. J Pediatr 2013;162(3):464-469. Latzin P, Roth S, Thamrin C, et al. Lung volume, breathing pattern and ventilation inhomogeneity in preterm and term infants. PLoS One [Electronic Resource] 2009;4(2):e4635. Schmalisch G, Wilitzki S, Roehr CC, et al. Development of lung function in very low birth weight infants with or without bronchopulmonary dysplasia: longitudinal assessment during the first 15 months of corrected age. BMC Pediatrics 2011;12:37. Filbrun AG, Popova AP, Linn MJ, et al. Longitudinal measures of lung function in infants with bronchopulmonary dysplasia. Pediatr Pulmonol 2011;46(4):369-375. Fakhoury KF, Sellers C, Smith EO, et al. Serial measurements of lung function in a cohort of young children with bronchopulmonary dysplasia. Pediatrics 2010;125(6):e1441-1447. 7.9.4 Prospective cohort studies (classic) Stern DA, Morgan WJ, Wright AL, et al. Poor airway function in early infancy and lung function by age 22 years: a non-selective longitudinal cohort study. Lancet 2007;370(9589):758-764. Turner SW, Palmer LJ, Rye PJ, et al. The relationship between infant airway function, childhood airway responsiveness, and asthma. Am J Respir Crit Care Med 2004;169(8): 921927. Martinez FD, Morgan WJ, Wright AL, et al. Diminished lung function as a predisposing factor for wheezing respiratory illness in infants. N Engl J Med 1988;319(17):1112–1117. Haland G, Carlsen KC, Sandvik L, et al. Reduced lung function at birth and the risk of asthma at 10 years of age. N Engl J Med 2006;355(16):1682–1689. Morgan WJ, Stern DA, Sherrill DL, et al. Outcome of asthma and wheezing in the first 6 years of life: follow-up through adolescence. Am J Respir Crit Care Med 2005;172(10):1253-1258. 7.9.5 Recent cohort studies Mullane D. Turner SW. Cox DW. Goldblatt J. Landau LI. le Souef PN. Reduced infant lung function, active smoking, and wheeze in 18-year-old individuals. JAMA Pediatrics 2013;167(4):368-73. van der Gugten AC. Uiterwaal CS. van Putte-Katier N. Koopman M. Verheij TJ. van der Ent CK. Reduced neonatal lung function and wheezing illnesses during the first 5 years of life. Eur Respir J 2013;42(1):107-15. van Putte-Katier N. van der Gugten AC. Uiterwaal CS. de Jong BM. Numans ME. Kimpen JL. Verheij TJ. van der Ent CK. WHISTLER study group. Early life lung function and respiratory outcome in the first year of life. Eur Respir J 2012;40(1):198-205. Bisgaard H. Jensen SM. Bonnelykke K. Interaction between asthma and lung function growth in early life. Am J Respir Crit Care Med 2012;185(11):1183-9. van Putte-Katier N. Koopmans M. Uiterwaal CS. de Jong BM. Kimpen JL. Verheij TJ. Numans ME. van der Ent CK. WHISTLER study group. Relationship between parental lung function and their children's lung function early in life. Eur Respir J 2011;38(3):664-71. 191 Latzin P. Roosli M. Huss A. Kuehni CE. Frey U. Air pollution during pregnancy and lung function in newborns: a birth cohort study. Eur Respir J 2009;33(3):594-603. Devulapalli CS, Carlsen KC, Haland G, et al. Severity of obstructive airways disease by age 2 years predicts asthma at 10 years of age. Thorax 2008; 63: 8-13. 192 8 Appendices 8.1 List of manufacturers Masterscreen BabyBody Plethysmograph - CareFusion, UK/Global http://www.carefusion.com/medical-products/respiratory/cardio-pulmonarydiagnostics/pulmonary-function-testing/LFT-complete-testing/masterscreen-babybodyand-pediatric.aspx Face masks (Rendell Baker: size 0, 1, 2) - Supplied by Carefusion when purchasing Masterscreen BabyBody System - Also available via http://www.intersurgical.co.uk/products/reprocessable-anaestheticmasks#rendell-baker-silicone-masks Balloon shutters - CareFusion, UK/Global Squeeze jackets (small, medium, large), bladders and large-bore tubing - Supplied by Carefusion when purchasing Masterscreen BabyBody System Neopuff Infant Resuscitator with T-piece tubing - Fisher Paykel Healthcare - http://www.fphcare.com/products/neopuff-infant-resuscitator/ Straight connector (15M-15M) for the Neopuff T-piece tubing http://www.intersurgical.co.uk/products/connectors#15mm-straight-connectors Therapy putty - Patterson medical https://www.pattersonmedical.co.uk/app.aspx?cmd=get_item&id=1216 Harpenden Infant Measuring Table http://www.anthropometer.com/inf.php) Seca weighing scales http://www.seca.com/en_us/products/all-products.html#/?category=23 Terralin disinfectant products terralin® protect – a cleaner and disinfectant for surfaces and medical devices http://www.schulke.co.uk/product/_/43/terralin-protect/ 193 8.2 CareFusion’s guidelines for Sterilisation and Disinfection 194 8.3 MasterscreenTM system Function icons / keys Test modules Tidal breathing module Crs / Rrs module Plethysmographic module Tidal Squeeze module RV Squeeze module F1 [Start of tidal breathing registration] [Start display of tidal breathing] [Start of watch] [Standby] [Standby] F2 [Calculate and display of trial results] [Start measurement] [Start resistance measurements] [Start measurement] [Start baseline measurement] [& Reanalyse old measurement] [Start of FRC measurement] [Trigger maneuver] [Trigger maneuver] F4 [& Reanalyse old measurements] [show trial results] [Show trial results] F5 [Read & ASCII files] [measure pressure transmission] [Pressure transmission results] [Undo manual changes] [Calculate/display trial result] [setting for pressure] [Change reservoir pressure]* F3 F6 F7 [Display of final results] [Calculate parameter and show result] [Calculate/display result] [show Results] [Reanalyse] F8 [Flow/vol zero adjustment] [Flow/vol zero adjustment] [Flow/vol zero adjustment] [Flow/vol zero adjustment] [Flow/vol zero adjustment] F9 [New start of complete measurement] [New start of complete measurement] [New start of complete measurement] [New start of complete measurement] [New start of complete measurement] F10 [Save data and exit program] [Save data and exit program] [Save data and exit program] [Save data and exit program] [Save data and exit program] * a) default setting: maximum Pr of 5 kPa, b) click on [Advance] button to edit Pr up to a maximum of 17 kPa 195 8.4 An example of parental information leaflet 196 197 8.5 Example of a Consent form for a research study Great Ormond Street Hospital for Children NHS Trust & Institute of Child Health Research Ethics Committee REC Number: 09H071314 Consent Form for PARENTS OR GUARDIANS of Children Participating in Research Studies Early detection of lung disease in infants with Cystic Fibrosis diagnosed by newborn screening NOTES FOR PARENTS OR GUARDIANS 1. Your child has been asked to take part in a research study. The person organising that study is responsible for explaining the project to you before you give consent. 2. Please ask the researcher any questions you may have about this project, before you decide whether you wish to participate. 3. If you decide, now or at any other stage, that you do not wish your child to participate in the research project, that is entirely your right, and if your child is a patient it will not in any way prejudice any present or future treatment. 4. You will be given an information sheet which describes the research project. This information sheet is for you to keep and refer to. Please read it carefully. 5. If you have any complaints about the way in which this research project has been or is being conducted, please, in the first instance, discuss them with the researcher. If the problems are not resolved, or you wish to comment in any other way, please contact the Head of the Research and Development Unit, Institute of Child Health, 30 Guilford Street, London WC1N 1EH or if urgent, by telephone on 0207 905 2179. Please initial boxes 1. I confirm that I have read and understand the information sheet dated 29/05/2009 (version 3) for the above study. I have had the opportunity to consider the information, ask questions and have had these answered satisfactorily 2. I understand that my participation is voluntary and that I am free to withdraw my child at any time without giving any reason, without his/her medical care or legal rights being affected 3. I understand that relevant sections of my child’s medical notes and data collected during the study, may be looked at by individuals from regulatory authorities or from the NHS Trust, where it is relevant to taking part in this research. I give permission for these individuals to have access to my child’s records, and to use relevant information in subsequent scientific publications in a way that ensures neither I nor my child can be identified. 4. I agree to my GP being informed of my child’s participation in the study. 5. I agree for my child to take part in the above study. Rec No. 09H071314 Version 1, dated 09/02/09 page 1 of 2 198 Early detection of lung disease in infants with CF diagnosed by newborn screening ________________________________ _______________ ___________________ Name of Parent/Guardian Date Signature Relationship to child ________________________________ ________________ ___________________ Name of Person taking consent Date Signature When completed, 1 copy for family; 1 copy for researcher site file; 1 (original copy) to be kept in medical notes NOTES FOR THE RESEARCHER It is your responsibility to ensure that the parents/guardians and child (if mature enough) understand what the research project involves, both theoretically and practically. You must allow sufficient time to do this. You must make the judgement of whether or not the child can understand the project. Age alone is not important. Make sure that the relatives or child can contact you if they have additional questions. A copy of this completed form must be placed in the patient's clinical records and a copy must be kept by you with the research records. If there are any unforeseen ethical problems with this study you must inform [a representative of the sponsor] and follow this up in writing. Rec No. 09H071314 Version 1, dated 09/02/09 page 2 of 2 199 8.6 Questionnaire – background information Subject No: Hospital Number:______________________ Subject ID: NHS number:___________________________ Date Questionnaire for GOSH CF referral Background Information Baby’s Surname: Date of birth: First name: Birth weight: kg Sex: Male / Female Estimated date of delivery: Child’s address: Gestational age: weeks days Date of test 1: Date of test 2: Date of test 3: Mother’s first name: Mother’s last name: Mother’s DOB: Mother’s email: Father's first name: Father’s last name: Father’s DOB: Father’s email: Telephone no: Home Mum’s work Mum’s mobile Dad’s work Dad’s mobile other Social history Does the child’s natural mother have parental responsibility? Yes / No / Not sure Mother’s most recent job (Title / description, state if self-employed) ____________________________________________________________ [coding: ] Father’s most recent job (Title / description, state if self-employed) ____________________________________________________________ [coding: ] Page 1 of 4 200 Subject No: Hospital Number:_______________________ Subject ID: NHS number:___________________________ Date Years mother spent in full time education after the age of 16: Mother's ethnic origin Father's ethnic origin White/British White/British White/Irish White/Irish Other White Other White Black-Caribbean Black-Caribbean Black-African Black-African Black-other Black-other White-Black-Caribbean White-Black-Caribbean White-Black-African White-Black-African White-Asian White-Asian Other mixed Other mixed Pakistani Pakistani Bangladeshi Bangladeshi Indian Indian Chinese Chinese Other Asian Other Asian Other Other Number of siblings: Number of older siblings: Day care: No Yes, Nursery Yes, Child Minder Age when started (months) Recruitment centre Date of recruitment Referring LCFC Consultant Date of referral GOSH Consultant Local Paediatrician Name: GP's name: Address: Practice address: Telephone no: Practice tel no: Page 2 of 4 201 Subject No: Hospital Number:______________________ Subject ID: NHS number:__________________________ Date Date of diagnosis: Genotype (if, and when known) Mutation one Mutation two Presentation Mode(s) of Presentation Sweat Test Result Repeat Sweat Test Result Asymptomatic Positive Positive Meconium ileus Negative Negative Failure to thrive/malabsorption Borderline Borderline Recurrent chest infections Not Done Not Done Recurrent wheezy episodes Prolonged jaundice - - Biochemical abnormalities Cl Cl Rectal Prolapse Na Antenatal bowel pathology Osmol 2+ Na 2+ Osmol Family history Screening Recorded Diagnosis/Diagnoses, including CF and any congenital abnormalities: Significant neonatal history (if admitted for special care, document reason) Duration Exclusively breastfed (weeks) Number of respiratory admissions before diagnosis: Number of respiratory admissions between diagnosis and before first RFTs: URTI LRI Has a doctor diagnosed upper airway obstruction in your child? Yes No Not sure Page 3 of 4 202 Subject No: Hospital Number:_______________________ Subject ID: NHS number:___________________________ Date Family medical History: Does anyone in your family have cystic fibrosis? None Mother Father Sister Brother Half-sibling Grandmother Grandfather Aunt Uncle Niece Nephew Cousin Family history of atopy: Have any of the people below been diagnosed with the following by a doctor? Mother Father Sister Brother Half-sibling Asthma Wheezing Eczema Hay Fever Additional information: Source of information: Are there any reasons for exclusion from study? History of apnoeic episode Neonatal lung disease Upper airway pathology Heart, lung, renal disease Failure to thrive Parental psycho-social reasons Lack of Understanding Does your child have any other disease congenital or acquired? Yes No If so, what is the other problem? Page 4 of 4 203 8.7 Questionnaire for GOSH CF Referral a) Information from parent at first visit (page 1 of 4) 204 a) Information from parent at first visit (page 2 of 4) 205 a) Information from parent at first visit (page 3 of 4) 206 a) Information from parent at first visit (page 4 of 4) 207 b) Information from parent at subsequent visit (page 1 of 4) 208 b) Information from parent at subsequent visit (page 2 of 4) 209 b) Information from parent at subsequent visit (page 3 of 4) 210 b) Information from parent at subsequent visit (page 4 of 4) 211 8.8 Lung function test - summary sheet Completed on each test occasion GOS Hospital No: Referring Consultant: Dr. Referring Hospital: Child’s name: DOB: Referring Hospital number: Male / Female Study no: (test # ) Test date: Weight (kg) Crown-Heel length (cm) Physical Examination Clinician name: ………………………..……… Signature: …………………….………… Wheeze: Yes Crackles: No Was overall physical examination normal? Yes Yes No No Comments: Cough swab taken? Yes Comments: No __ Sedation: Chloral Hydrate ……………….. mg given orally/rectally at ……………….. hrs Any observed adverse effects from sedation No Yes Comments: Pre-sedation: oxygen saturation: ………….. % RR: …….… bpm Heart rate: ……….. bpm Post sedation: oxygen saturation: ………….. % RR: ….…… bpm Heart rate: ……….. bpm On Completion of Lung Function Test (a) Is infant fully arousable / responsive? Yes No Comments: (b) Taken a Feed / Drink? Yes No Comments: Time of departure: ……………. hrs Lung function tests performed by : ……………………… / ……………………… Present at tests: Yes Post test phone call made by: No parents / relative Date & Time: Comments: Page 1 of 1 212 8.9 An example of infant lung function report Lung Function Laboratory, Level 1, Morgan Stanley Clinical Building Telephone 020 7405 9200 ext: 0404 INFANT LUNG FUNCTION REPORT GOSH Consultant Dr CW GOSH No. 12345 Measurements Age (corrected for GA) NAME BW SEX female Test 1: 21/05/2012 DOB 08/01/2012 Test 2: 23/01/2013 Study No. 53239 Gestational age 41 w + 1 d Test 3: 12/11/2013 Expected range 20.3 weeks 1.1 years 1.9 years Weight 2.1 z (5.2 kg) 1.8 z (7.4 kg) 2.0 z (8.8 kg) ±2 z-score Length 1.0 z (61.2 cm) 1.5 z (71.0 cm) 2.2 z (78.0 cm) ±2 z-score SpO2, % 96 97 97 >94 Lung function parameters Lung clearance index (LCI)1 FRCMBW, z-score1 FRCpleth, z-score 2 FEV0.5 z-score 3 FVC z-score 3 FEF25-75 z-score 3 2.2 z (8.7) 0.6 z (7.4) 0.9 z (7.4) ±2 z-score 1.5 z (16 mLkg–1) 0.7 z (18 mLkg–1) 1.1 z (19 mLkg–1) 0.8 z (19 mLkg–1) 1.9 z (18 mLkg–1) 1.2 z (20 mLkg–1) ±2 z-score ±2 z-score 0.7 z (216 mL) 0.5 z (262 mL) 0.5 z (371 mL) ±2 z-score 1.1 z (254 mL) 0.2 z (366 mL) 0.6 z (524 mL) ±2 z-score –1 0.7 z (462 mLs ) 0.8 z (412 mLs ) –1 –1 0.4 z (596 mLs ) ±2 z-score Results expressed as z- (or SD) score with absolute values in parentheses. Abbreviations: LCI: lung clearance index; FRC: functional residual capacity; MBW: multiple breath insert gas washout method; pleth: (whole body) plethysmography; FEV0.5: forced expired volume at 0.5s; FVC: forced vital capacity; FEF25-75: forced expired flow between 25-75% of expired FVC. References: 1 Lum et al 2013; 2 Nguyen et al 2013; 3 Lum et al 2010 Forced expiratory flow-volume curve Dashed lines represent the upper and lower limits of the normal range (ULN & LLN) from healthy infants Page 1 of 2 213 GOSH Consultant Dr CW GOSH No. 12345 Diagnosis: Cystic fibrosis NAME BW SEX female DOB 08/01/2012 Study No. 53239 Gestational age 41 w + 1 d th Test Date: 12 November 2013 Comments: BW’s parents reported that she has been well since her last lung function (LF) tests. She was asymptomatic and her clinical examination was normal. However, her weight and length have remained on the lowed limits of normal ranges. Throughout the duration of her LF assessments, her SpO2 and vital signs were stable. Summary of lung function follow-up: On this test occasion, BW’s lung clearance index (LCI: an indication of ventilation inhomogeneity and hence early lung disease) was within normal limits. Her resting lung volumes (FRC), obtained using the MBW (FRCMBW) and plethysmographic (FRCpleth) techniques, were within the expected ranges. There was no evidence of pulmonary hyperinflation or gas trapping. Results from the raised volume technique (infant spirometry) suggested that her forced expired volumes (FEV0.5: a measure of central and peripheral airway function, and FVC: a measure of lung volume) and forced expired flows (FEF25-75: an indicator of airway obstruction) were normal. Compared to her 1-year old lung function measurements, her LCI has remained stable and there was an improvement in her FEV0.5 and FEF25-75 z scores. Overall, BW’s lung function was normal on this test occasion. Further follow-up will be arranged when BW is 3.54 years of age. Reported by xxx, 13th November 2013 Page 2 of 2 214 8.10 Backing up | making a copy of the CareFusion BabyBody system Database It is advisable for the users of the CareFusion BabyBody equipment to regularly create, or back-up, a copy of the Lab4 database (DB): e.g., weekly, or monthly. The main reason is to safe-guard the lung function datasets, combined with the Patient details, collected over time. The computer hard-drive may fail unexpectedly resulting in loss of the database, or the [DB] program may crash during data collection; the availability of a back-up [DB] could then be utilised to enable continuation of lung function measurements. The CareFusion BabyBody measuring system identifies with the program named as [DB] as the active database, and as Patient record and lung function measurements are created, these are continuingly being stored in C:\Lab4\DB. For this reason, there should never be more than one folder with the name [DB] in C:\Lab4 However, for the purpose of storing or backing up a copy of [DB] in C:\Lab4, it is necessary to name the back-up copy of [DB] with a recognisable name: e.g., [DBBackup] or [DB_copy29March2014], such that the active program continue to be named as [DB] NB: in the unexpected event of a DB crash, the active [DB] would need to be re-named (e.g., DB_old) and the back-up copy renamed as [DB] (in order for it to act as the “active” DB; a Patient Data record would need to be created before proceeding to continue data collection) A back-up copy of [DB] may initially be create in C:\ and subsequently be copied or transferred to a separate storage media for safe-keeping using a USB pen or potable hard-drive Since there is no need to have multiple copies of “older” versions of [DB] back-up, previous copies may be deleted periodically 215 CareFusion [Merge] program The [Merge] function enables: a) the patient details and lung function data in digital (not numerical) format to be extracted from C:\Lab4\DB b) the merging of data that have been extracted in to a separate Lab4\DB for the purpose of between centre|observer audit and/or quality control check c) the safe storage of the “merged out” or extracted data at regular intervals Merging data out of an existing Lab4 database Step 1. The user needs to identify - where are the data stored? [Source data base] - where are the data being transferred or “merged” to? [Destination data base] A new “Destination” folder (either in a USB pen or portable hard-drive) must be created to which the extracted or “merged out” data may be downloaded Name the folder appropriately so that it is easily recognisable: e.g., [Merged data_29March2014], or [Data Backup_week 13] Step 2. Check to see whether the [Merge5] icon is on your computer desktop If not, go to C:\Lab4 and scroll down the list of application files Identify | select and highlight the file [Merge5.exe] > right mouse click (rmc) > create a shortcut of this file and place it on the computer Desktop Step 3. To extract or merge out lung function combined with patient test data, click on the [Merge5.Lnk] icon and enter the password (obtain password from CareFusion personnel) (Figure A) 216 Figure A. Illustration showing [Merge5] icon on computer desktop, and password sign-in The [Database Utility – Merge v5] menu is displayed (Figure B) Figure B. [Data Utility] menu The user must define the [Source data base] and [Destination data base] The process of locating the [Destination data base] folder is shown in Figure C (see legend) Three options are available when attempting to extract data from C:\Lab4\DB: i. merge out a block of data according to dates, e.g., 01/01/2013 to 01/12/2013 217 ii. merge out data from one single subject|patient (use the ID number entered on Patient Data record) iii. merge out all the data from C:\Lab4\DB (see Figure D and legend) Figure C. To select the [Destination] folder – go to [Destination data base]: click on [select] to access the drop down [Open] menu.Under [Drives]: click on [] to select the drive and location where a new folder had previously been created to allow extracted data to be downloaded to Figure D. Options of the [Merge] function: (i) extracting data collected over a period of time by entering specific dates, or (ii) extracting dataset/s belonging to one individual infant by entering the subject ID, or (iii) extracting all data from the entire Lab4\Database by leaving the “date” and “patient” boxes blank Once the [Merge] option has been decided upon, and the appropriate entry made (e.g., “dates”, “patient ID” or leaving cells blank), the [Merge] procedure may be carried out 218 Since the [Destination] is a newly created folder (i.e., not an existing database), to merge out data to the [Destination] folder (hence creating a [Destination data base]), the user needs to click on [Create database] to complete the task A computer screen display will provide information such as the number of datasets have been extracted Check the [Destination data base] and a series of files (merge.log, xx.DAT, xx.IDX, xx.LCK) should be visible These extracted data may be “merged in” to another Lab4\DB The “Merge out” procedure may be performed regularly (e.g., weekly) as a “back-up” routine, allowing data to be stored securely Figure E. This summarises the data “merge out” process. Merging data with an existing Lab4 database The procedure for merging data with a Lab4 database is similar to merging data out, with the exception that, in this instance, the [Destination data base] will be C:\Lab4\DB, and the [Source data base] would be in a drive connect with a USB pen or portable hard-drive. 219 Caution: If there are stored data in the [Destination data base], i.e., C:\Lab4\DB, DO NOT click on [Create data base] since this action will delete the existing database and create a new database, into which the data from the external drive will be merged in. CareFusion [Export] program The [Export] function enables: a) the lung function data to be extracted from C:\Lab4\DB in numerical format b) the exported data to be viewed either as a text file using [WordPad] or worksheet using [Excel] program c) periodic audit (e.g, success or failure rate of a certain test), or transfer of results to a log sheet or customised database Step 1. While performing off-line data review, once the analysis has been finalised, the letters [OK] plus the initials of the person analysing the dataset (e.g., OK AFH) should be entered in the cell named “Smoker” in the [Test Information] section (Figure F, lower panel). This is needed for each sub-set of data, denoted by date and time, within the [Text Directory] (Figure F, upper panel) Figure F. Enabling the export of lung function data from the Babybody Lab4 database. Legend: The user should enter [OK] together with initials of the person responsible for the final analysis (illustrated in brown rectangle) for each sub-set of data within the [Text Directory]. 220 Step 2. Check to see whether the [Sq_expt] and [Rc_exprt] icons are on your computer desktop If not, go to C:\Lab4 and scroll down the list of files Identify, select and highlight the application file [Sq_expt.exe]; create a shortcut of this file onto your Desktop Repeat the same procedure and create a shortcut for the application file [Rc_exprt.exe] on your Desktop Step 3. [Rc_exprt.lnk] - this icon/file enables the user to download numerical values from the test data collected using the following two programs: a) Tidal breathing b) Resistance / Compliance Double click on the [Rc_exprt.Lnk] icon will open up a new window; clicking on [F1] will start the process of exporting the lung function datasets from the Database in in Wordpad format, which can be opened and read as Excel worksheet Once the downloading process is completed, go to C:\Lab4\DB Click on the column [Date modified] to search for [RC.001], [Tidal.001] files denoted by the date when the download is made Select and highlight the [RC.001], [Tidal.001] files one at a time > right mouse click> [Open]> select [Excel] from list (see Figure E) to read results in Excel worksheet 221 Figure F. Illustration showing the process of selecting a [text] file and displaying results in an Excel worksheet [Sq_expt.Lnk] – this icon/file enables the user to download numerical values from the test data using the following three programs: a) Bodyplethysmograph b) tidal Squeeze c) raised volume Squeeze Repeat the process by clicking on the [Rc_exprt.Lnk] icon and [F1] to export lung function datasets (see above) Step 4. Once the downloading process is completed, go to C:\Lab4\DB Click on the column [Date modified] to search for [PLSQ001.txt] file denoted by the date when the download is made; a summary of the download is denoted by the file [SUM001.txt.] Select and highlight the [PLSQ001.txt] file > right mouse click> [Open]> select [Excel] from list (see Figure E) to read results in Excel worksheet NOTE: The user can either select and open the files to view the lung function with patient data on the CareFusion computer, or save the files to a USB pen or portable hard-drive and view the data on another computer with Microsoft and/or Statistical software. 222 Once the data are downloaded and saved to a storage media, the user may then select and transfer the relevant parameters from [Excel] worksheet to a statistical software package LIMITATION of the export programs a) These programs will download or export the entire datasets in the Lab4\DB in numerical format each time an “export” is performed b) It is not possible to export by selecting, for instance, a block of data according to test dates or study ID numbers, or one single dataset c) Following each session of data export, the user needs to “clean” the data by displaying and reading data via [Wordpad] or [Excel] software in order to select (or delete) rows of relevant data according to subject ID and test dates 223 8.11 CareFusionTM Masterscreen BabyBody Equipment 1) Software programs Tidal breathing Parameters o Tidal Volume (VT) o Respiratory Rate (RR) o Inspired/Expired Times (tI, tE) o Time to peak flows (tPTEF, tPTEF/tE) Passive mechanics (single and double occlusion techniques) o Compliance of the respiratory system (Crs) o Resistance of the respiratory system (Rrs) o Time constant of the respiratory system (rs) Body Plethysmography o Functional Residual Capacity (FRCpleth) o Airway resistance (SReff) – NB: needs further validation Rapid thoraco-abdominal compression (RTC) or Squeeze technique o Maximal flow at FRC (V’maxFRC) Raised volume rapid thoraco-abdominal compression (RVRTC) or raised volume Squeeze technique o Forced Expiratory volume at 0.4 to 1.0 sec (FEV0.4, FEV0.5 etc.) o Forced Expiratory Flows at defined lung volumes (FEF25) o Forced vital capacity (FVC) 2) System components a) Hardware All transducers are solid state piezo-resistive sensors 224 BabyBody “Box” Internal volume 98 L Box Pressure transducer (calibrated in terms of volume change): – range ± 80mL at 1000 hPa – resolution 0.04 mL – accuracy 1%± Pneumotachometer (PNT) / Flow sensor: Paed-PT “S” Flow range ± 1500 mL/s Flow resolution 1 mL/s Flow accuracy ±3% Volume resolution Dead space 0.1 mL 1.7 mL Dead space including shutter Resistance 4.3 mL 0.38 kPa/L*s Sensor for pressure at airway opening range: ± 5 kPa resolution: 0.003 kPa accuracy ± 2% Shutter (for airway occlusion) latex inflatable balloon pressure: 0.9 bar balloon volume: 0.7 ml; silent; easy to clean; dead space [added to PNT]: 2.6 mL accuracy ± 2% Reservoir for Squeeze (RTC) pressure container: 55 L compressed air supply by built-in compressorpressure range: 1 – 17 kPa; safety valve: 20 kPa Rate of rise of jacket pressure speed of valve opening ~ 10 ms speed of transmission to jacket ~ 100 ms to reach 95% of final pressure 225 Adjustable squeeze jackets: 3 sizes available for newborn to ~ 2 year old children (~2-14 kg) b) Software WINDOWS® based software. Jaeger Lab4® software package controls data acquisition and analysis. All data are stored in a Jaeger Lab4® specific database. Data from a single patient or a defined group of patients can be merged out and imported into other databases. On-line data sampling and reanalysis for each infant lung function program module is based on the structured Jaeger® screen display, which allows easy orientation and software control. All signals may be viewed on the computer screen in real time. Specific displays (e.g. plateau of pressure at airway opening (Pao) during airway occlusions for passive mechanics, flow-volume loop in RTC, changes in Pao vs. changes in box volume during FRCpleth measurement) may be enlarged to facilitate viewing for quality control. Results are available and displayed on-line instantaneously, and are automatically saved on an interim basis during the testing procedure. The user is prompted to save the data definitively when leaving the specific program or study. Calibration parameters, and BTPS factors are stored with each saved data set performed. Signals may be reanalysed later, as all raw data are stored on the hard disk. While data can be ‘excluded’ if technically unsatisfactory, they are never deleted. The user can always revert to the original data and/or automated analyses. This allows previously excluded data to be “re-examined”, modified and recalculated if necessary and provides considerable scope for training and quality control checks. 226 A database holds the patients’ personal and demographic data together with details of prevailing measurement conditions and results of the tests. As an option for scientific evaluation, measurement signals from the BabyBody programs can (in parallel to the measurements) be fed into a second, independent analysis program (Jscope), stored as ASCII files, and then reloaded either to Jaeger Lab4® or other ASCII based programs for analysis and comparison. This feature permits direct comparison of the algorithms used within the Jaeger Babybody software with previously validated infant lung function software. NB: the Jscope file can be found in C:\Lab4. 3) Major strengths The system provides an user-friendly interface, which is consistent throughout all programs and is thus easy to operate. The system is designed for routine use. A range of conventional infant lung function techniques is available. Modular format, additional or follow-up tests can be added to relational database. Equipment and software were developed in accordance with ATS/ERS consensus statements. All data (including “invalid” data sets) are stored and available for later reanalysis. Key parameters are displayed on-line as a trend, allowing visualisation of the stability of breathing patterns and/or attainment of reproducible results during data collection. Measurements in term and spontaneously breathing preterm neonates (e.g., from ~2 kg) are feasible Software has been cross-validated against existing, previously validated programs. 227 Equipment and software can be tested in vitro with the use of a “dummy” or mechanical lung. The equipment is CE-marked and FDA approved. The software continuously monitors respiratory effort (providing PNT/face mask are connected to the infant and software program has been activated). It also provides a warning message if respiratory effort is absent. 4) Limitations Data summary within the program currently reflects routine adult clinical applications rather than the requirements of neonatal/paediatric research. Automated generation of reports need further work. Appropriate reference equations need to be adopted and uploaded. Software currently in “32 bit”; thus limiting the duration of data recordings and there are inconsistencies between different programs. Specific airway resistance (sReff) not validated (appears to discriminate poorly between health and disease; improved algorithm needed). 228