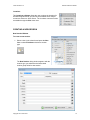
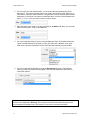
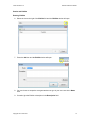
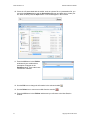
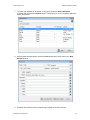
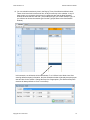
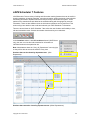
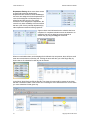
1
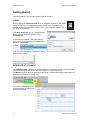
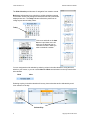
JAVS Scheduler 7.0 1 Software Instruction Manual Copyright JAVS 1981-2010 JAVS Scheduler 7.0 Software Instruction Manual Table of Contents Introduction to JAVS Scheduler 7.0 ......................................................................4 Getting Started......................................................................................................5 Login .................................................................................................................5 Interface at a glance..........................................................................................5 Creating a new session ...................................................................................10 New Session Window .................................................................................. 10 Parties and Exhibits ..................................................................................... 12 Entering Exhibits..........................................................................................12 Entering Parties ........................................................................................... 14 Auto Schedule ............................................................................................. 19 JAVS Scheduler 7 Features................................................................................ 20 Changing and Adding Schedule Information ...................................................22 Reschedule a Session .................................................................................22 Copy To ....................................................................................................... 24 Delete A Schedule .......................................................................................25 Session Properties .......................................................................................26 Search Tool ..................................................................................................... 36 Utilities............................................................................................................. 45 User Preferences .........................................................................................45 Print Schedule ............................................................................................. 47 Change Password .......................................................................................47 Show/Hide Columns ....................................................................................48 Sort by Order ...............................................................................................49 Undockable Windows .................................................................................. 51 View Layouts ...............................................................................................51 Configure Shortcuts ..................................................................................... 52 Menu Items .........................................................................................................54 File Menu ........................................................................................................54 Edit Menu........................................................................................................54 Copyright JAVS 1981-2010 2 JAVS Scheduler 7.0 Software Instruction Manual View Menu ......................................................................................................55 Tools Menu ..................................................................................................... 56 Help Menu....................................................................................................... 56 Appendix-A .........................................................................................................57 Activation.........................................................................................................57 Online Activation..........................................................................................57 Phone Activation..........................................................................................58 15 Day Trial Period ......................................................................................60 Appendix B .........................................................................................................61 Help Menu....................................................................................................... 61 Was this manual helpful? E-mail comments to [email protected] 3 Copyright JAVS 1981-2010 JAVS Scheduler 7.0 Software Instruction Manual Introduction to JAVS Scheduler 7.0 JAVS Scheduler 7 is a scheduling tool used to schedule court cases, meetings, educational classes and any other type of event that shares facilities and requires organization of the facility. In conjunction with JAVS AutoLog 7, JAVS Scheduler 7 will provide the end user with features such as an easy to use GUI (Graphical User Interface) that includes the location of the scheduled event, a calendar as well as party and staff information. From JAVS Scheduler 7, a user can view a sessions’ schedule, change session properties and print session logs from current or previous sessions. The user can create new sessions, reschedule dates, edit existing sessions and add new party and presentation information. Different calendar views are available to the user, including single day, day by times, week, work week and month views. JAVS Scheduler will allow you to: Create and edit session schedules on any day at any available time in any location View session Information, view pre-scheduled sessions and print the information Provides the means for adding parties and exhibits to scheduled sessions View session schedules by location Ability to schedule sealed sessions With JAVS Scheduler 7, session information is stored in an ODBC compliant database shared by JAVS AutoLog 7 and contains information for every person or presentation that has ever been a part of a session . All information entered in JAVS Scheduler will be available in the JAVS AutoLog 7 interface and ready to use for your next scheduled event. Copyright JAVS 1981-2010 4 JAVS Scheduler 7.0 Software Instruction Manual Getting Started This section will help you get started using JAVS Scheduler 7. LOGIN Double click on the JAVS Scheduler 7 icon to launch the application. The Login dialog box appears. The Login dialog allows multiple users to schedule and maintain sessions for scheduled events to occur. (The users and locations are set up during installation). In the User Name field, type your assigned User Name and your assigned Password in the Password field. If more than one location exists(JAVS Server), then choose the location from the Location field pull down. Press Login. Your user name will appear at the bottom right of the Scheduler window. INTERFACE AT A GLANCE The JAVS Scheduler 7 interface is designed with ease of operation in mind. JAVS Scheduler offers several views to the user for their convenience in session scheduling. The Month view gives the user a full look at the month’s session schedules by Name and/or by Department (Department Filtering only). All views can maintain the side calendar window for easy month to month navigation. 5 Copyright JAVS 1981-2010 JAVS Scheduler 7.0 Software Instruction Manual The Single Day By Order view displays the most information about a session. This view has a row of default data fields in which the user can view schedules and session information. Information columns can be customized through the Show/Hide Columns command. (see Show/Hide Columns) The Show/Hide Columns command will allow the user to view any or all of the available columns. The Auto Fit Columns checkbox, if checked, will try to fit all columns into the current view without using a scrollbar to view all the columns Copyright JAVS 1981-2010 6 JAVS Scheduler 7.0 Software Instruction Manual The Single Day By Times view will give the user a view of an entire day’s schedules in increments of time of day. The Work Week view will show the user the selected week of schedules from Monday to Friday by time of day. 7 Copyright JAVS 1981-2010 JAVS Scheduler 7.0 Software Instruction Manual The Week view will show the user the selected week of schedules from Sunday to Saturday by time of day. Each view will allow the user to view the schedules by individual locations or by All Locations in the site if multiple locations exist. (JAVS Server) The Today button is available in all views and will set the calendar to today’s date. Today will be indicated by an orange day bar (Single Day By Times, Week and Work Week) or by an orange square around the date (Month view). Today Button Single Day By Times, Week and Work Week View (Orange Day Bar) Month View (Orange Square) Copyright JAVS 1981-2010 8 JAVS Scheduler 7.0 Software Instruction Manual The Side Calendar provides ease of navigation from month to month. Bold dates indicate there is a schedule or multiple schedules entered for that date. Screen size settings will determine how many months are displayed at a time. The Today indicator will also be present as an orange square around today’s date. Today Click once and hold on the date bar and a pull down menu will allow you an alternate way to choose the month in which you wish to schedule a session. You can navigate the side calendar by selecting a date in the side calendar or using the scroll wheel on your mouse, or you can use the Next and Back arrows located on the top month of the side calendar. Back Next Selecting any day in the side calendar will set any view to that date and be indicated by a teal color selection of the day. Selected Day 9 Copyright JAVS 1981-2010 JAVS Scheduler 7.0 Software Instruction Manual Locations: This Locations pulldown allows the user to select the locations for scheduled appointments, and will only be available when multiple courtrooms exist on a JAVS Server. The Locations command is also accessible through the View menu item. CREATING A NEW SESSION New Session Window To create a new session: 1. Select a date in the calendar and press the New icon or select File>New and select a session type. The New Session dialog window appears with the session type you selected and all associated session group fields for that session. Copyright JAVS 1981-2010 10 JAVS Scheduler 7.0 Software Instruction Manual 2. You can enter your own session Name, or use the number auto-generated by JAVS Scheduler 7. The number consists of the year, month, day and time of day. Each time a new session is started, JAVS Scheduler 7 will generate a unique number based on these parameters. If more than one session is scheduled within 1 minute, JAVS Scheduler will add a “-1,-2, etc.” to the end of the number to keep it unique. 3. Enter the Name of the session you are scheduling in the Name field. Next, you can enter the title of the session, if any, in the Title field. 4. You can change the Session Type by using the Type pull down. Since different Session Types can have different Group fields, if a type you select has a different set of group fields, then only those fields which are the same will retain entered party information. 5. You can change the Department by using the Department pull down. If Department Filtering is used, only those users assigned to the selected department will be able to access this session. Administrator Note: Since an Administrator has all security rights, they will be able to change a session to any department. Warning: This could prevent those users who belong only to the current department assignment for the session to not be able to access this session. 11 Copyright JAVS 1981-2010 JAVS Scheduler 7.0 Software Instruction Manual Parties and Exhibits Entering Exhibits 6. Select the Icon to the right of the Exhibit field and the Exhibits window will open. 7. Press the Add icon and the Exhibit window will open. 8. You can choose to accept the auto-generated text or type in your own name in the Name field. 9. If needed, give the Exhibit a description in the Description field. Copyright JAVS 1981-2010 12 JAVS Scheduler 7.0 Software Instruction Manual 10. If there is a file associated with the exhibit, such as a picture file or a presentation file, you can select the Browse button and the Open dialog will open and allow you to locate your file. When located, press the Open button. Your file will appear in the File field. 11. Press the OK button in the Exhibit window and your exhibit with its description will appear in the Exhibits window. Three other icons now become available. 12. Use the Edit icon to change the information in the selected exhibit. 13. Use the Delete icon to remove an exhibit from the sess ion. 14. Press the OK button in the Exhibits window and you will return to the New Session window. 13 Copyright JAVS 1981-2010 JAVS Scheduler 7.0 Software Instruction Manual Entering Parties Parties are assigned to a Session Group and can belong to multiple Session Groups. Any name that appears in any of the group fields belong to that group, so the party’s name could appear in more than one of the group fields. Parties associated with the case will be entered through the group fields. You can enter the name of the party by directly typing in the appropriate group field. If more than one name is to be typed, place a semi-colon between each name. 1. Type in a name or names in one of the group fields. Session Groups 2. If you wish to add personal information at this time you can double-click on one of the names and the Party Information window will open. (see Session Properties). Copyright JAVS 1981-2010 14 JAVS Scheduler 7.0 Software Instruction Manual 3. If you have personal default parties already set, you can press the Load Default Parties button and your personal parties will be loaded. (see User Preferences). 4. If some parties are already in the database, you can find them by pressing the Search button to the right of the field. The Available Parties window will open. This window will show a list of parties that have already been assigned to this group. 5. Select a party and press the Insert button, or simply double-click on the party. The party will be pushed from the list to the group field. 6. To search for a specific name in this group, type in the name or part of the name in the Search Field and press the Search button. 15 Copyright JAVS 1981-2010 JAVS Scheduler 7.0 Software Instruction Manual 7. To search the database for all parties, in any group, select the Search All Parties checkbox and then press the Search button. This will give you a list of all parties that have a party assignment. 8. When finished selecting parties, press the Close button and you will return to the New Session window. 9. All parties are entered into their respective group fields in the same manner. Copyright JAVS 1981-2010 16 JAVS Scheduler 7.0 Software Instruction Manual 10. Press the Add to Schedule button in the New Session window and the New Schedule window will open. 11. If applicable, select the courtroom with the Location pull-down. (JAVS Server only) 12. The Start and Stop time fields will be populated with the selected date and the current time of day with a duration of 15 min. Change the date with the Month pull-down or the time with the Time Select Cells. Hours Minutes 17 Copyright JAVS 1981-2010 JAVS Scheduler 7.0 Software Instruction Manual 13. You can schedule sessions by time in the Day by Times, Work Week and Week views. These views have time increments of time of day for each day in the calendar. In any of these views, you can double click a time for a particular date and the New Schedule window will show that time and date. (This method will give you a blank Session Type, so you will have to choose the session type from the Type pull-down in the New Session window). In this scenario, we will double click on November 17 at 11:00 am in the Week view. After entering default and party information, the New Schedule window will already have the proper date and time for the session. Change the Stop time if appropriate. (The Start and Stop time duration will always default at 15 min. increments). Copyright JAVS 1981-2010 18 JAVS Scheduler 7.0 Software Instruction Manual Auto Schedule The Auto Schedule function allows the user to schedule a session at a specific time and date and have the session automatically start and stop through the AutoLog 7 interface. To create an Auto Schedule: 1. Use the Auto Start/Stop pull downs to select an auto function. The choices for automatically starting are; No Auto Start, On Time, 5 minutes early, 10 minutes early and 30 minutes early. The choice for automatically stopping a session is No Auto Stop and On Time. Auto Start Auto Stop 2. After all appointment information has been entered, press the Add to Schedule button in the New Schedule window. JAVS Scheduler will return to the current calendar view with the newly scheduled appointment with a timer icon indicating an auto schedule. This session is now ready to be used in JAVS AutoLog 7 and will appear in the Scheduled Today tool in the AutoLog 7 interface. 19 Copyright JAVS 1981-2010 JAVS Scheduler 7.0 Software Instruction Manual JAVS Scheduler 7 Features JAVS Scheduler 7 has a variety of editing and information tracking features that can be useful in keeping schedules, changing schedules, removing schedules, adding personnel to the schedule and finding information on parties who have been previously entered into the system. These parties can be searched out and added to the schedules along with changing their personal information. There are also different views in which these operations can be performed. This section will go into detail on how to edit and maintain your JAVS Scheduler 7 information. There are several views in JAVS Scheduler 7 that allow the user freedom and flexibility to view, edit and reschedule cases. Choose the calendar view that suits your needs best. In the Locations selector, with All Locations selected (JAVS Server only), the user can view and edit schedules for all locations or individual locations in that particular site. Note: Administrators have the “View_All_Departments” security right, so they will be able to access all sessions in any view. Sessions that can be viewed by department user. (Own Department). Sessions that cannot be viewed by department user. (Other Departments) Copyright JAVS 1981-2010 20 JAVS Scheduler 7.0 Software Instruction Manual Department filtering allows users have access to specifically assigned departments. Departments are created in JAVS SiteManager and users are assigned to those departments. A user can be assigned to all departments or a select few and are set up by your JAVS technician. Once assigned to a department, the user will only have availability to those sessions that are a part of their particular department(s), other department sessions will be grayed out.. A green check mark indicates that the schedule has been completed. A completed schedule cannot be deleted or rescheduled, but can be added as a new schedule on another day by using the Copy To command. When more schedules than can be displayed in the Month view are present, there will be a small down arrow at the bottom of the day cell. Clicking the arrow will take you to the Single Day by Order view so all schedules for that day can be viewed. In the Week, Work Week and Single Day By Time views, this arrow will be present in each day that has a schedule outside of the current view. Pressing the arrow will advance the view to show you more schedules for that given day. 21 Copyright JAVS 1981-2010 JAVS Scheduler 7.0 Software Instruction Manual CHANGING AND ADDING SCHEDULE INFORMATION Once a New Schedule has been created, all the information pertaining to that schedule can be edited. Holding your mouse pointer over a schedule will show a pop-up window with the session number and start and stop times. By selecting a schedule and right clicking will show a drop down menu. These commands are alternately available for editing schedule properties, rescheduling or copying schedules to another day or deleting schedules. Reschedule a Session The Reschedule command will allow the user to move a schedule to another day and/or time of day. To reschedule a session: 1. Select a scheduled to be changed. 2. Do one of the following: A. Select the menu item File>Reschedule. B. Right click on the selected schedule and select Reschedule. C. Press the Reschedule button located on the Schedule toolbar. Copyright JAVS 1981-2010 22 JAVS Scheduler 7.0 Software Instruction Manual 3. The Edit Schedule window for the selected session will open. 4. You can change the location of the scheduled session by using the Location pull down. (JAVS Server only). 5. Change the Day and Times using the Date/Time pull downs or highlight a cell and type in the information. Date/Time pull downs Auto Times 6. Click on the Date pull down and a calendar will appear. Select the new date for the rescheduled session. Selecting the Today icon will set the date to the current day. 7. If Auto Start or Auto Stop is desired, use the Auto Times pull downs to set the appropriate auto times. 23 Copyright JAVS 1981-2010 JAVS Scheduler 7.0 Software Instruction Manual 8. Click on the Time pull down and a time bar will appear. You can select any time in the AM/PM hours rows as well as select increments of 5 minutes in the minutes rows. To set hours only, double-click a time in the AM/PM rows. 9. Once the new times and dates have been set, press the Add to Schedule button and the th changes will be reflected in the current view. This schedule has been moved from the 18 th to the 19 . Rescheduling can also be achieved through dragging schedules from day to day or time to time in the different views: Month View: From the month view you can select and drag a schedule to any other day in the view. That schedule will now be scheduled for that day at the time of day it was originally scheduled. Week, Work Week, Day by Times: From these views you can drag any schedule to any day in the view as well as place it on a day in 15 min. increments of time of day. Copy To The Copy To command will allow the user to copy a schedule that is already completed to another day, as well as schedule multiple days for the same session. To copy a schedule to another day: 1. Select a schedule to copy to another day. 2. Do one of the following: A. Select the menu item Edit>Copy to. B. Right click on the selected schedule and select Copy to. C. Press the Copy to button located on the Schedule toolbar. Copyright JAVS 1981-2010 24 JAVS Scheduler 7.0 Software Instruction Manual 3. The New Schedule window will open with the current date and time. 4. Change the schedule information as needed and press the Add to Schedule button and the changes will be reflected in the current view. This schedule has been copied from the th th 16 and added to the 19 . Delete A Schedule The Delete Schedule command will allow the user to delete a schedule that has not been completed. To delete a schedule: 1. Select a schedule to delete. 2. Do one of the following: A. Select the menu item Edit>Delete. B. Right click on the selected schedule and select Delete. C. Press the Delete button located on the Schedule toolbar. 25 Copyright JAVS 1981-2010 JAVS Scheduler 7.0 Software Instruction Manual 3. A Delete Confirmation message will appear. Select Yes, and the schedule is removed from the calendar. Note: Schedules that have already been completed cannot be deleted. Session Properties The Properties command will allow the user to add parties and exhibits and edit session information. To Edit Session Properties: 1. Select a schedule to edit session information. 2. Do one of the following: A. Select the menu item File>Properties. B. Right click on the selected schedule and select Properties. C. Press the Properties button located on the Schedule toolbar. 3. The Session Properties window will open. Copyright JAVS 1981-2010 26 JAVS Scheduler 7.0 Software Instruction Manual 4. You can change the session name by typing directly in the Name field. If this is a new name, all related sessions will also be re-named. If the name is an existing one, only the selected session’s name will be changed and become associated with the existing session. 5. You can change the session title by typing directly in the Title field. This will also change the title of all related sessions. 6. You can change the Session Type by using the Type pull down. This will only change the session type of this session. Since Session Types can have different Group fields, if a type you select has a different set of group fields, then only those fields which are the same will retain the party information. 7. You can change the Department by using the Department pull down. This will change the Department of all related sessions. Administrator Note: Since an Administrator has all security rights, they will be able to change a session to any department. Warning: This could prevent those users who belong only to the current department assignment for the session to not be able to access this session. 27 Copyright JAVS 1981-2010 JAVS Scheduler 7.0 Software Instruction Manual 8. You can change the Exhibit information or add new exhibits by using the Edit button to the right of the Exhibit field. 9. The Exhibits window will open. 7. You can add a new exhibit to the session by pressing the Add icon and the Exhibit window will open. 8. You can choose to accept the auto-generated text, or type in your own exhibit name in the Name field. Since there are already 2 auto-generated exhibit names in this session, AutoLog 7.0™ will generate the next successive number. 9. If needed, give the Exhibit a description in the Description field. Copyright JAVS 1981-2010 28 JAVS Scheduler 7.0 Software Instruction Manual 10. If there is a file associated with the exhibit, such as a picture file or a presentation file, you can select the Browse button and the Open dialog will appear and allow you to locate your file. When located, press the Open button. Your file will appear in the File field. 11. Press the OK button in the Exhibit window and your new exhibit with its description will appear in the Exhibits window. 29 Copyright JAVS 1981-2010 JAVS Scheduler 7.0 Software Instruction Manual 12. You can edit the information for an existing exhibit by selecting the exhibit to be edited and pressing the Edit icon , or simply double click the exhibit to be edited. 13. The Exhibit window for the selected exhibit will open 14. Type directly in the Name field to make any changes. Copyright JAVS 1981-2010 30 JAVS Scheduler 7.0 Software Instruction Manual 15. Modify the Description field by typing directly in the Description field. 16. You can attach a file to the exhibit by using the Browse button and navigating to where the file is located. 17. Press the OK button and you will return to the Exhibits window. 18. An exhibit can be removed from a session (if it hasn’t been logged) by using the Delete icon located on the Exhibits toolbar. 19. Select the Exhibit to be removed and press the Delete icon. 20. A Delete Confirmation screen will appear. Select Yes to remove the Exhibit. 31 Copyright JAVS 1981-2010 JAVS Scheduler 7.0 Software Instruction Manual 21. Press the OK button in the Exhibits window and you will return to the Session Properties window with any changes made to the exhibits field. 31. All party information in the Group fields is accessed in the same way. You can add a new party to any field by typing directly in the group field. Ensure there is a semi-colon between each name. 32. If the Party already exists in the database, Scheduler 7 will try to auto-fill the field by showing you a list of names to choose from. 33. Use the Load Default Parties button if you already have your personal defaults set. (see User Preferences). Copyright JAVS 1981-2010 32 JAVS Scheduler 7.0 Software Instruction Manual 34. You can also add parties to a group by selecting the Search button to the right of the group field. The Available Parties window will open. This window will show a list of parties that have been pre-assigned to this group 35. Select a party and press the Insert button, or simply double-click on the party. The party will be pushed from the list and added to the group field. 33 Copyright JAVS 1981-2010 JAVS Scheduler 7.0 Software Instruction Manual 36. To search for a specific name in this group, type in the name or part of the name in the Search Field and press the Search button. 37. To search the database for all parties, in any group, select the Search All Parties checkbox and then press the Search button. If a party is part of another group and is assigned to a new group, that party will now belong to both groups. 38. When finished editing parties, press the Close button and you will return to the Session Properties window. Copyright JAVS 1981-2010 34 JAVS Scheduler 7.0 Software Instruction Manual 39. If all properties have been edited for this session, press the Save button and the new session data will be saved to the database. Back to: Entering Parties Search Tool 35 Copyright JAVS 1981-2010 JAVS Scheduler 7.0 Software Instruction Manual SEARCH TOOL JAVS Scheduler 7 provides many options for searching for sessions. The Search Tool is a tab located next to the Schedule tab. When the tab is selected, the Schedule display will change to the Search Tool. The Search tool allows you to search in multiple categories with specific or partial search criteria as well as filters to narrow your search. You can also choose how far back in time you wish to search. The top part of the Search Tool contains the Criteria Field, the Category Selector and the Time Filter pull-down. Criteria Field Category Selector Time Filter Since All Fields is all that is selected, pressing the Search button at this point would yield results of all sessions, 30 days back, in the database being found. The Time Filter will allow for searching in increments of time. Copyright JAVS 1981-2010 36 JAVS Scheduler 7.0 Software Instruction Manual The Filter Results section of the Search Tool will allow you to set multiple filters to drill down your results. There are three filters that can be used at any one time and the filters are set from left to right. The filters set at this point are Name, Date and Location. Filter 1 Filter 2 Filter 3 Each filter list contains the same filters, so any combination of available filters can be used to narrow your search. The Bottom section of the Search Tool is the Search Results field. Any session that meets the criteria and filters set for the search will appear in this pane. There are icons that will become available when a session is selected from this list that will allow you the same functions as the Logged Today Tool, with the ability to print, publish, edit the session log, change session properties, view the session and start the session. There is also a Show/Hide columns that will allow you to view any column information that is available to the session. (see Show/Hide Columns) 37 Copyright JAVS 1981-2010 JAVS Scheduler 7.0 Software Instruction Manual Search-Detailed Operation cont. To search for a session: 1. Select the Search Tool tab and the Search tool will appear in place of the Schedule Display. 2. Press the Search button and all the sessions and related sessions, 30 days back, in the database will appear in the Search Results list. 3. We can simplify the search if we know certain information about the session. Type in a session name in the Criteria field and press the Search button. 4. The Search Results field will now only contain one session with the session name you typed in the criteria field. Since we searched by the category of All Fields, any session that contained the exact criteria string, in any of the information fields, would show in the Results Field. Copyright JAVS 1981-2010 38 JAVS Scheduler 7.0 Software Instruction Manual To better understand how the Search Tool works, a session has been created with all information fields filled in. This will allow us to search for one session with parameters we can compare. We’ll start with an Arraignment session with a session Name of SRCHTOOL. The session will have a title of State vs Wilson and belong to the Default Department. All of the Party and Exhibit fields have also been filled in. This session was started and logged with events, notes, exhibits and parties in AutoLog and then the session was ended. We will search for this session in the Search Tool. 39 Copyright JAVS 1981-2010 JAVS Scheduler 7.0 Software Instruction Manual 1. In the JAVS Scheduler Search Tool, select Session Type in the Category Selector. 2. When the Search button is pressed, all sessions and related sessions, 30 days back, that have been assigned a Session Type will appear in the Search Results. 3. Since we assigned our session as an Arraignment type, it will be in the Search Results list. All other sessions, 30 days back will also appear if the session contains a session type. Copyright JAVS 1981-2010 40 JAVS Scheduler 7.0 Software Instruction Manual 4. In the Criteria Field, type Arraignment and press the Search button. 5. The results will now show all sessions, 30 days back, that have a session Type of Arraignment. Since we assigned our session as Arraignment, it will be in the Search Results list. 6. With the same category of Session Type and the Criteria field of Arraignment, select the date the session was performed in the Filter 2 section. (Hint: use the column sort in filter 2 to bring the latest date to the top of the list). 7. Select the date the session was performed and the Search Results field will be narrowed down to those sessions that have been completed on this date. Our session is in the Search Results field along with another session that was performed on the same day, with the Session Type of Arraignment. With limited information we narrowed our search to two sessions. 41 Copyright JAVS 1981-2010 JAVS Scheduler 7.0 Software Instruction Manual Using our sample session we will now look for a session that contains a particular party. 1. We are looking for a witness, with the name of “Keisha”. We also know that the session was performed within the last week and the department is the Default Department . Using this information, select Witness in the Category selector and type in “Keisha” in the Criteria text field and press the Search button. 2. The Search Results field will populate with all sessions and related sessions, 30days back, that have a witness with a name “Keisha”. Copyright JAVS 1981-2010 42 JAVS Scheduler 7.0 Software Instruction Manual 3. Since we know that the department was the Default department, select the Department filter in the Filter 3 pull down. 4. Select Default Department from the Filter 3 list. 5. The Search Results field has been narrowed to one session. This session meets the criteria of a witness named Keisha that was part of a session 30 days back or less that was completed in the Default Department. 6. We can verify that this is the correct session by selecting the Session Properties icon located on the Search Results toolbar. 43 Copyright JAVS 1981-2010 JAVS Scheduler 7.0 Software Instruction Manual 7. The Session Properties for that session will open, and the name Keisha Thomas is a witness in this session. (see Session Properties-Detailed). 8. We can now contact Keisha by double-clicking on her name and the Party Information window for that party will open. 9. We now have available to us, the party’s name, address, phone number and e-mail. Copyright JAVS 1981-2010 44 JAVS Scheduler 7.0 Software Instruction Manual UTILITIES User Preferences The user Preferences command is available through the menu item Edit>User Preferences. This command will allow you to set your personal defaults for JAVS Scheduler 7. To set User Preferences: 45 1. Select the menu item Edit>User Preferences. 2. The User Preferences window will open. 3. The Party Defaults tab will allow you to set your party defaults. These parties will show up in the new schedule window when you press the Load Default Parties button. 4. Select a Group from the left hand column and a list of parties will appear on the right. 5. For a selected group, set a check next to the parties name to make that party a default for that group. When the Load Default Parties button is pressed in the New Session window, Mia Taylor will be set as the Bailiff. Copyright JAVS 1981-2010 JAVS Scheduler 7.0 Software Instruction Manual 6. The User Profile tab is for your personal information. Multiple Addresses, Phone Numbers and multiple E-mails can be a part of this information. 7. Use the Add, Edit and Delete buttons to edit your personal information. 8. When Add or Edit is activated, the edit window for the selected tab will open. 9. Type in the appropriate information and set whether the information is the Primary information. Press OK and the information has been updated. Copyright JAVS 1981-2010 46 JAVS Scheduler 7.0 Software Instruction Manual 10. The Miscellaneous tab will allow the user to set 2 view commands, Show Schedules by Order and Show Completed Schedules. 11. Check Show Schedules by Order if you plan to use the Sort by Order command. This will hide any views that are not used in this function. Only the Month view and the Single Day by Order views will be available. (see Sort by Order). 12. Check Show Completed Schedules if you want to see all completed schedules in any of the calendar views. 13. When finished setting your personal defaults, press the OK button and your personal defaults have been changed. Back to: Entering Parties Session Properties Print Schedule The Print Schedule command will allow the user to print a complete schedule for any given month (Month View), week (week view), work week (Work Week view), day (day by times or day by order). The print command will print all sessions in the view and place each different session on a separate page. Select your view and use the menu command File>Print Schedule or press the Print icon located on the main toolbar. Change Password You can change your personal password by selecting the menu item Edit>Change Password. To change a user’s password: 1. Select the Menu Item Edit>Change Password. 2. The Change Password window will open. 3. Type in your current password and then your new password. Confirm your new password and press the Save button. Changes will only take effect the next time you login. 47 Copyright JAVS 1981-2010 JAVS Scheduler 7.0 Software Instruction Manual Show/Hide Columns The Show/Hide Columns function will allow the user to view any available information column associated with a session. The Show/Hide Columns command is located in the Schedule tabSingle Day by Order or in the Search tab on the Results Field toolbar. To show or hide columns: 1. Select the Show/Hide Columns icon. 2. The Show/Hide Columns window will open. 3. Check or un-check the columns you wish to see and press OK. The Auto Fit Columns checkbox, if checked, will try to fit all columns into the current view without using a scrollbar to view all the columns. Example: Auto Fit Off with multiple columns. A scroll bar is provided to scroll to each column. Auto Fit On with the same columns, No scroll bar is available and the columns are compressed to fit on screen. Click and drag the columns to set the column order. You will see red arrows indicating where the column will drop. Note: Auto Fit Columns is best used with a minimum number of columns. If columns have large amounts of information, the Auto Fit Columns tend to compress the information to fit on screen. Back To: Interface at a Glance) Copyright JAVS 1981-2010 Search Tool 48 JAVS Scheduler 7.0 Software Instruction Manual Sort by Order JAVS Scheduler 7 gives the user the ability to sort the schedule list by any order they choose. Along with normal column sorting using the sort arrow for each column, JAVS Scheduler 7 allows you to pick any schedule in the list and place it in any order you wish. Sort by order only works in the Month View and the Single Day by Order view. If you plan to use the Sort by Order command, you can disable the views that are not applicable by selecting the menu item Edit>User Preferences-Miscellaneous tab. Check the Show Schedules by Order checkbox and press OK. The non-applicable views will be hidden. To sort schedules by order: 1. In the Schedule tab, Press the Show/Hide Columns icon located on the Search tabResults Field toolbar or the Single Day by Order view in the Schedule tab. The Show/Hide Columns window will open.. 2. Check the Order checkbox and press OK. 49 Copyright JAVS 1981-2010 JAVS Scheduler 7.0 Software Instruction Manual 3. Click and drag the Order column to the far left of the columns and release. You will see red arrows indicating where the column will drop. (This step only places the Order column as the first column and is unnecessary for the Sort by Order to work.) 4. Select the Order header and the Up/Down arrow icons will become active. 5. Select any schedule in the list you wish to change its order. 6. Use the Up/Down arrows to place the schedule where you want it to fall in the list. We have moved session 2009-10-10 10.28 from the second position in the list up to the first position in the list. 7. Repeat this action until all schedules are in the order you wish. Back to: User Preferences Copyright JAVS 1981-2010 50 JAVS Scheduler 7.0 Software Instruction Manual Undockable Windows JAVS Scheduler 7 allows the user to arrange the tool windows or tabs to any layout you choose. By selecting the particular windows header bar or tab, the window can be pulled from its current location and placed in another location. Double clicking the header or tab will also undock that window to the previously positioned location or upper left of the screen if it has never been moved. There are two methods for moving and sizing windows: Docked Method: The docked method will allow you to use the docking controls to lock a window into place once it has been moved. By selecting the window header or tab, move the window to the area of the screen you want and roll over the docking controls. The controls will allow you to go left, right, up or down and a highlighted area will appear indicating where the window will be positioned. If you position over the center of the docking control, the window will be placed as a tab in that particular window. The windows can be resized by holding the mouse pointer over the edge of a window until the pointer turns into a resize cursor. Click and drag to the size you want. Undocked method: The undocked method will allow the user to move a tool window or tab to any position on the screen and be free floating. By selecting the window header or tab, move the window to the area of the screen you want and release the mouse, the window has been repositioned. NOTE: Double-clicking on a window header will re-dock the window to the last docked position. Conversely, double-clicking on a docked window header will place it in the last free floating position. View Layouts Once the windows have been re-positioned, use the View>Save Layout command to personalize your specific layout. Once saved, the layout will appear in the menu item View>Layouts and can be recalled at anytime. 51 Copyright JAVS 1981-2010 JAVS Scheduler 7.0 Software Instruction Manual Configure Shortcuts JAVS Scheduler 7 gives the user the ability to map the keyboard with shortcuts for their most used commands with user configurable hotkeys. Once configured, the programmed keys will be saved for each windows user. To configure the keyboard for shortcuts: 1. Select the menu item View>Configure Shortcuts and the Configure Shortcuts window will open. The Configure shortcuts window is categorized into 2 tools. Each category has a tree structure with related commands for that tool 2. Select the command from a tree structure you wish to set a hot key for. Copyright JAVS 1981-2010 52 JAVS Scheduler 7.0 Software Instruction Manual 3. Use the Shortcut pull down to choose the keystroke or combination of keystrokes for the command. Press the Close button. 4. The command is ready to be used with the new shortcut. 5. You can set the keyboard back to the JAVS default by pressing the Reset button. (Warning: This action cannot be un-done). 6. When finished setting your shortcuts, press the Close button. 53 Copyright JAVS 1981-2010 JAVS Scheduler 7.0 Software Instruction Manual Menu Items: Most of the commands that are available on the interface as icons are also available through the Menu Items. Not all menu items are icon commands and some menu items will have will have the same command. FILE MENU: The File menu will allow you to schedule a new session, reschedule an existing schedule, Change schedule properties, print the schedule of sessions, login and close the program. File>New: Opens the New Session window. File>Reschedule: Opens the Edit Schedule window. File>Properties: Opens the Session Properties window. File>Print Schedule: Opens the Report window. File>Login: Opens the Login window. File>Exit: Closes JAVS Scheduler 7. EDIT MENU: The Edit menu will allow you reschedule and delete session schedules, set your personal preferences and change your password. Edit>Copy To: Opens the Edit Schedule window. Edit>Delete: Removes any selected schedule. Edit>User Preferences: Opens the User Preferences window. Edit>Change Password: Opens the Change Password window. Copyright JAVS 1981-2010 54 JAVS Scheduler 7.0 Software Instruction Manual VIEW MENU: The View menu contains all of the views available in JAVS Scheduler 7 as well as interface layouts, keyboard and toolbar functions. View>Calendar: Shows or hides the side calendar. View>Today: Selects Today’s date in the calendar views. View>Single Day by Order: Shows any selected day in a list view. View> Single Day by Time: Shows any selected day in a time of day view. View>Work Week: Shows any selected work week in a time of day view. View> Week: Shows any selected week in a time of day view. View>Month: Shows 30 days in a calendar view. View>Refresh: Allows the user to update any changes to the database made outside of their station. View>Locations: allows user to view schedules by location. View>Save Layout: Allows the user to save any interface layout. View>Layouts: Allows the user to recall any saved layout. View>Configure Shortcuts: Allows the user to configure keyboard shortcuts for common commands. 55 Copyright JAVS 1981-2010 JAVS Scheduler 7.0 Software Instruction Manual TOOLS MENU The tools menu is available to the Schedule tool. These commands relate to any selected incomplete schedule in any view. Tools>Schedule-Properties: Opens the Session Properties window. Tools>Schedule-Reschedule: Opens the Edit Schedule window. Tools>Schedule-Copy To: Opens the Edit Schedule window. Tools>Schedule-Delete: Removes any selected in-complete schedule. Tools>Schedule-Move Schedule Up: Moves selected schedules up using Sort by Order. Tools>Schedule- Move Schedule Down: Moves selected schedules down using Sort by Order. Tools>Schedule- Show/Hide Columns: Allows the user to view any information column available to a schedule. HELP MENU The Help menu will give you information about the version of Scheduler 7 as well as gives you access to JAVS Scheduler 7 interactive user manual in PDF format. Help>Scheduler Manual: Opens the User Manual PDF file. Help>About: Opens the About screen. (See Appendix B) Copyright JAVS 1981-2010 56 JAVS Scheduler 7.0 Software Instruction Manual Appendix-A ACTIVATION The JAVS software set requires that each user to activate the software before it can be used. There are three ways to activate the software; Online Activation, Phone Activation and a 15 day trial period. The first time Scheduler 7 is launched an activation message will appear with three choices. Online Activation Select Online Activation and press Next. Enter the Serial Number and Password provided on the Installation CD. Observe case sensitivity. 57 Copyright JAVS 1981-2010 JAVS Scheduler 7.0 Software Instruction Manual After entering the Password and Serial Number press the Finish button and the JAVS Scheduler 7 login screen will appear. Type in your user name and password and Scheduler is ready to use. Phone Activation Select Phone Activation and press Next. Copyright JAVS 1981-2010 58 JAVS Scheduler 7.0 Software Instruction Manual A contact screen will appear with the JAVS help desk phone number. Contact the JAVS help desk with the number provided, and give the Pin Number to the help desk technician. The JAVS help desk will then provide you with the appropriate activation code for your particular system. Type this number in the Activation Code field and press Finish. All numbers are case sensitive. The JAVS Scheduler 7 login screen will appear. Type in your user name and password and Scheduler is ready to use. 59 Copyright JAVS 1981-2010 JAVS Scheduler 7.0 Software Instruction Manual 15 Day Trial Period Select the Run Trial and press the Next button. You will get a message indicating how many days are left on your trial period. Press OK and the Scheduler 7 login screen will appear. Type in your User Name and Password and Scheduler is ready to use. Copyright JAVS 1981-2010 60 JAVS Scheduler 7.0 Software Instruction Manual Appendix B HELP MENU The Help menu item contains selections for the JAVS Scheduler Manual and an About information screen. The JAVS Scheduler Manual selection opens the JAVS Scheduler User Manual in PDF format. The User Manual is a comprehensive look at JAVS Scheduler features, and step by step instructions on how to use the many functions. There are also links within the manual which will guide you from section to section. The JAVS Scheduler User Manual is also available for download at http://galileo.javs.com. The About selection will provide information about the version of JAVS Scheduler, Libraries, Platform and other pertinent information about your JAVS AutoLog system. This information is useful when calling the JAVS HelpDesk.: 1-877-JAVS HLP (528-7457). 61 Copyright JAVS 1981-2010