1
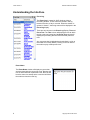
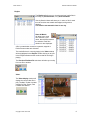
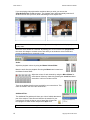
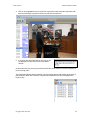
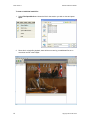
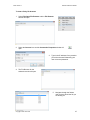
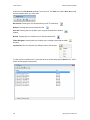
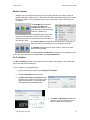
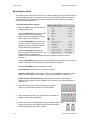
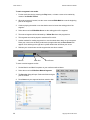
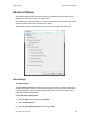
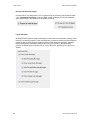
JAVS Viewer 7.1 2 Software Instruction Manual Copyright JAVS 1981-2010 JAVS Viewer 7.1 Software Instruction Manual About This Manual This manual will provide a comprehensive look at the JAVS Viewer 7 and Viewer 7 Pro software applications. The first part of the manual will cover Viewer 7 and its features followed by Viewer 7 Pro features in the second half of the manual. Viewer 7 Pro features will only be available to you if you have purchased the application and have activated the software. (See Appendix A). By clicking on any item in the Table of Contents, will take you to that page number of the manual. The manual will also reference other JAVS Suite 7 software application manuals due to the interactivity between all JAVS Suite 7 products. Familiarize yourself with all of the Suite 7 manuals for a better understanding of how AutoLog interfaces with each of them. System Requirements PC HARDWARE REQUIREMENTS MINIMUM REQUIREMENTS Windows XP sp3 or greater Microsoft .Net Framework 3.5 sp1 Pentium 4 2GHz equivalent or better 1GB RAM 800MB HDD space 10/100 Network Adapter RECOMMENDED REQUIREMENTS Windows XP sp3 or greater Microsoft .Net Framework 3.5 sp1 Pentium Core2Duo 2GHz equivalent or better 2GB RAM 5GB HDD space 10/100/1000 Network adapter Ati Radeon graphics Copyright JAVS 1981-2010 3 JAVS Viewer 7.1 Software Instruction Manual Table of Contents Introduction to Viewer 7 .....................................................................................6 Interface at a Glance...........................................................................................7 Understanding the Interface ..............................................................................8 Event Log.........................................................................................................8 Event Notes .....................................................................................................8 Playlist..............................................................................................................9 Video ................................................................................................................9 Audio..............................................................................................................10 Additional Files ............................................................................................. 10 JAVS Viewer 7 Operation .................................................................................11 Viewing a Session .........................................................................................12 To view a Session Log: ............................................................................. 12 To view an individual media file: .............................................................. 14 To view a file by file browser: ...................................................................15 Motion Controls............................................................................................. 17 Go To Position...............................................................................................17 Monitoring the Audio ....................................................................................18 User Settings..................................................................................................... 19 View Menu......................................................................................................19 View>Stretch video to fit ...........................................................................19 View>Always on Top .................................................................................20 View>Layouts............................................................................................. 20 View>Configure Shortcuts ........................................................................20 Keyboard Shortcuts ......................................................................................20 Edit Menu ....................................................................................................... 22 Use Video Overlay ..................................................................................... 22 Menu Items........................................................................................................23 4 Copyright JAVS 1981-2010 JAVS Viewer 7.1 Software Instruction Manual Viewer 7 Pro Introduction ................................................................................ 26 Viewer 7 Pro Features ......................................................................................27 Play Speed ..................................................................................................... 27 Mark In/Mark Out ........................................................................................... 27 Foot Pedal Operation ....................................................................................29 Advanced Options ............................................................................................33 Video Settings ...............................................................................................33 Use Video Overlay ..................................................................................... 33 Re-open last video file played .................................................................. 34 Log Events Filter........................................................................................ 34 Appendix A........................................................................................................35 Viewer 7 Pro Activation ............................................................................... 35 Online Activation .......................................................................................35 Phone Activation .......................................................................................36 Index File........................................................................................................37 Was this manual helpful? E-mail comments to [email protected] Copyright JAVS 1981-2010 5 JAVS Viewer 7.1 Software Instruction Manual Introduction to Viewer 7 The JAVS Viewer 7 application will provide the end user the ability to view session media along with session event logs, session notes and play list files. Viewer 7 will also allow the user to mute or adjust individual audio channels. Viewer 7 has controls for play, pause, Fast Forward and Rewind as well as shuttle capabilities. Viewer 7 will have the ability to run in multiple instances and will be able to open multiple file types based on Windows Media Player default file types. Viewer 7 will display a list of exhibits that are attached to any AutoLog 7 Session. Any file in the list will require a host application to launch the file. JAVS Viewer 7 Features: View session media files from JAVS Recorder 7. Open JAVS J VL files published from JAVS AutoLog 7 or Publisher 7. Event log linked to the media. Launch exhibit files from the interface. Operate JAVS Viewer like a VCR, with general motion control commands. JAVS Viewer 7 Pro Features: Mark In and Mark Out commands for segment editing. Foot Pedal controls for transcribing. Play speed for motion control with pitch correction. Go To Position allows for playing media based on time of day Ability to save and delete layouts as well as overwrite existing layouts. Audio channel control commands. Keyboard shortcuts for audio channels on/off. Index File allows for repair of non-finalized media files 6 Copyright JAVS 1981-2010 JAVS Viewer 7.1 Software Instruction Manual Interface at a Glance JAVS Viewer 7 is a session viewing application designed to work hand in hand with all of the JAVS Suite 7 applications. JAVS Viewer 7 interface is divided into multiple tools for ease of operation and customizing your personal workflow. 1. Event Log: Displays the log for the selected session with time stamps for each event. Clicking on any of the events will cause the viewer to play back from that time stamp of the recorded media file. 2. Event Notes: Displays the session notes, public and private, which relate to each event in the log. 3. Audio: Displays the 5 channel audio playback in VU meter style. Mute and level adjustments for each channel are available. 4. Playlist: Displays the sequence and duration of each media file associated to the session log that will be played. 5. Additional Files: Displays any exhibits that are associated to the session. 6. Video: Displays the video media file that is currently being played. Controls such as Play, Stop, Pause, Skip, Seek and motion controls are available for media manipulation. Copyright JAVS 1981-2010 7 JAVS Viewer 7.1 Software Instruction Manual Understanding the Interface Event Log: The Event Log is created in JAVS AutoLog during a Recording Session. These events are placed in the log based on the time of day it occurred. When the session is opened in Viewer 7, these log events will be displayed in the Event Log display. There are two columns in the Event Log Display; Time and Event Text. The Time column will display the time at which the log event was entered and the Event Text column will display the proceeding that was entered at that particular time. Any event text that is highlighted and underlined is a link to the media file currently loaded. Clicking on the link will set the media to play at that specific time. Event Notes: The Event Notes window will display any notes that are associated with the current log event. Because the note is associated with a particular event, that note will have the same time stamp as the event and will follow the media as does the event log. 8 Copyright JAVS 1981-2010 JAVS Viewer 7.1 Software Instruction Manual Playlist: The Playlist will allow you to view the sessions’ media files in two ways, by Session Name, or by Show All Media. View by Session Name will show you, in order, a file for each time the session was started and stopped, along with its duration. This session was started 3 times in one day. Show All Media will allow you to view all of the files, by file name, that are associated to the session. Each files’ duration is also displayed. A file is created when a session is paused, stopped or Public/Private modes are activated. The media file that is currently playing in the Video window will be highlighted in the Playlist. Double clicking on any file in the Playlist will advance the media to that file and begin playing. The Previous File/Next File selections will allow you to skip from one file to another. Video: The Video display window will display the current video file in play. The Main Toolbar includes controls for Play, Pause, Fast Forward and Rewind. Copyright JAVS 1981-2010 9 JAVS Viewer 7.1 Software Instruction Manual If you are playing video with smaller resolutions than you wish, you can use the View>Stretch Video To Fit command . The playback video will automatically stretch to fit whatever screen size you have, while maintaining the files aspect ratio. Note: Video resolutions that are stretched larger than their original size will display as poorer quality video. Above the video window is a seek bar. By holding your cursor over the blue progress bar, the cursor will change to a search cursor and allow you to shuttle the video forward and reverse by dragging your mouse left or right. Audio: Adjust the playback volume by using the Master Volume Slider. Mute the audio from the playback file using the Mute button located over the Master Volume Slider. Adjust the volume of each channel by using the Mixer Sliders for each channel. Mute any channel by pressing the round icon above each slider. It will turn red when muted. There is an additional audio meter provided for your convenience. This meter is located in the menu item View>Audio. Additional Files: The Additional Files window will show you a list of exhibits that were a part of the session. These files are linked to the session for your convenience. Double clicking on any of these files will open the host program or select the file and press the Open icon. Note: You must have the host application installed on your computer to view these files. 10 Copyright JAVS 1981-2010 JAVS Viewer 7.1 Software Instruction Manual JAVS Viewer 7 Operation Viewer 7 can be used to view single media files or a playlist of media files associated with JAVS AutoLog 7 sessions (JVL files). JVL files are created when a session is published from JAVS AutoLog 7 or Publisher 7. These files include the log events from a session and any notes associated with those events as well as exhibits. When files are published, they can exist on CD, DVD or a network folder. Below is an example of the file structure for a published session. Session JV002 was published to a folder, JV Media. Within that folder, a session folder is created for session JV002. Inside that folder, all of the media for the session is stored as well as a folder is created called Extra Files, which houses the exhibits associated with the session. With Viewer 7 you can view the entire session or just an individual media file. Copyright JAVS 1981-2010 11 JAVS Viewer 7.1 Software Instruction Manual Viewing a Session To view a Session Log : 1. Double click on the Viewer 7 Icon on your desktop. Viewer 7 will open. 2. Select File>Open Log and locate the JVL file for the session you wish to view and press Open. 3. Viewer 7 will open the session with the event log present in the display. 12 Copyright JAVS 1981-2010 JAVS Viewer 7.1 Software Instruction Manual 4. Click on any highlighted event in the Event Log and the video and audio associated with that event will begin to play and continue to play from that point on. 5. If log notes are associated with an event, they will be displayed for each event in the Event Notes window. As the media files play, the log event list will follow the media, based on the time stamping of the current log event. The Playlist will indicate which media file is currently being played and display the duration of that media file. When the current file completes its duration the next file in the playlist will begin to play. Copyright JAVS 1981-2010 13 JAVS Viewer 7.1 Software Instruction Manual To view an individual media file: 1. Select File>Open Media and locate the file for the session you wish to view and press Open. 2. Since this is a single file playback, there will be no event log, no additional files or no more than one file in the Playlist.. 14 Copyright JAVS 1981-2010 JAVS Viewer 7.1 Software Instruction Manual To view a file by file browser: 1. Select File>Open File Browser and the File Browser window will open. 2. Select the Connect icon and the Connection Properties window will open. 3. Type in the IP address of any recorder you wish to browse followed by your user name and password. 4. The File Browser for the selected recorder will open. 5. Navigate through the folders until you have found the file you are looking for. Copyright JAVS 1981-2010 15 JAVS Viewer 7.1 Software Instruction Manual At the top of the File Browser window is a row of icons. The View icon and the Save As icon will become available when you select a file. Disconnect: Pressing this icon will disconnect your SFTP connection. Refresh: Pressing this icon will refresh the view. Save As: Pressing this icon will allow you to copy the selected file to another location. Review: Pressing this icon will allow you to view the selected file. Folder Navigator: Pressing this icon will allow you to navigate up through the folder structure. Layout View: This icon will allow you different views in the browser. To view any file in JAVS Viewer 7, select the file to be viewed and press the Review icon. JAVS viewer will now play the selected file. 16 Copyright JAVS 1981-2010 JAVS Viewer 7.1 Software Instruction Manual Motion Controls Whether you are viewing a session log or an individual media file, the motion controls for playback will be the same. Viewer 7 works like a VCR with commands for Play, Fast Forward, Rewind and Pause. These commands can be found on the Main Toolbar as well as in the Play Menu. The Play Menu item also has commands for Next and Previous File skipping. This is only useful when viewing multiple files from a session log. Press the Play icon and the video will begin playing and the Play icon will change to a Pause icon. Conversely, pressing the Pause icon will pause the video and the icon will change to Play. The Fast Forward command will put the video into 2 times play as well as provides pitch correction so you can discern the audio. The Rewind command puts the video reverse. There is no audio playback during rewind. The Previous File and Next File commands are for skipping from file to file. This will be reflected in the playlist when viewing All Media Files. Go To Position The Go To Position will allow you to select in a time position in the playlist or select a day and time of day and play from that point. To go to a position in the playback fole: 1. Once a session log is opened, select Play>Go To Position. 2. The Go To Position window will open. 3. The Move To Position in Playlist selection will allow you to select a time position in the duration of the session. The field provides Hours:Minutes:Seconds:Milliseconds. 4. The Move To Date/Time selection will allow you to select a date and time of day the session was in progress. Copyright JAVS 1981-2010 17 JAVS Viewer 7.1 Software Instruction Manual Monitoring the Audio JAVS AutoLog can record audio in stereo or on 5 different channels and each channel can be selected independently and monitored in several ways. JAVS follows AAERT standards for recording audio, which places key individual’s microphones in the courtroom on separate channels for easier discernment. To change audio monitor settings: 1. Select the Audio menu item and choose a monitoring preference. Selecting Audio>Left will allow the user to hear the audio on the left side of the speaker system or headsets and monitor all left channel key microphones. Selecting Audio>Right will allow the user to hear the audio on the right side of the speaker system or headsets and monitor all right channel key microphones. Selecting Audio>Stereo will allow the user to hear the audio on both sides of the speaker system or headsets with separation of key individual microphones on their respective sides of the stereo recording. Selecting Audio>Mono will allow the user to hear the audio on both sides of the speaker system or headsets with no separation of key individual microphones. Selecting Audio>Mute will mute the Master Volume. All Channels On will allow you to un=mute all channels. Channel 1/Channel 2 are commands to mute or un-mute individual channels. If a multi channel card is installed in your recorder, you will see the addition of channels 3-5. Isolate Channel 1/Isolate Channel 2 are commands to isolate only the selected channel. If a multi channel card is installed in your recorder, you will see the addition of channels 3-5. 2. Select the output level for individual channels you wish to monitor by using the audio sliders in the Audio window. 3. Use the Mute buttons at the Top of each slider to eliminate unwanted sounds. Red indicates Mute. 4. Overall audio levels can be adjusted by using the Master Slider. This will adjust the volume of all channels and can also be muted by selecting the Speaker icon above the slider. 18 Copyright JAVS 1981-2010 JAVS Viewer 7.1 Software Instruction Manual User Settings View Menu Viewer 7 has several user configurable settings. The View menu item allows the user to change the way they want their interface to look and feel. The View menu item allows the user to display any or all of the operating windows available in Viewer 7. A check mark will set that particular window to open. View>Stretch video to fit: This menu item will allow the user to fill the viewer screen at their particular screen resolution. Note: Video resolutions that are stretched larger than their original size will display as poorer quality video. Copyright JAVS 1981-2010 19 JAVS Viewer 7.1 Software Instruction Manual View>Always on Top: This menu item will set the Viewer window to always be the fore-front window. View>Save Layout: This menu item will allow the user to save any window layout they choose. You can also save over an existing name. View>Delete Layouts: This menu item gives the user the ability to delete any user created layout. View>Layouts: This menu item will allow the user to recall any saved layout available to them. Viewer 7 windows can be arranged to suite your particular needs and then saved through the View>Save Layout command. View>Configure Shortcuts: menu item gives the user the ability to map the keyboard with shortcuts for their most used commands with user configurable hotkeys. Once configured, the programmed keys will be saved for each windows user. Keyboard Shortcuts Although viewer commands can be configured to any keyboard shortcut, a default set of shortcuts pertaining to audio channels have been provided by JAVS. All Channels On Channel 1 Channel 2 Channel 3 Channel 4 Channel 5 Isolate Channel 1 Isolate Channel 2 Isolate Channel 3 Isolate Channel 4 Isolate Channel 5 Ctrl+6 Ctrl+1 Ctrl+2 Ctrl+3 Ctrl+4 Ctrl+5 Ctrl+Shift+1 Ctrl+Shift+2 Ctrl+Shift+3 Ctrl+Shift+4 Ctrl+Shift+5 These commands are found in the Audio menu item. 20 Copyright JAVS 1981-2010 JAVS Viewer 7.1 Software Instruction Manual To configure the keyboard for shortcuts: 1. Select the menu item View>Configure Shortcuts and the Configure Shortcuts window will open. The Configure shortcuts window is categorized into 3 tools. Each category has a tree structure with related commands for that tool 2. Select the command from a tree structure you wish to set a hot key for. 3. Use the Shortcut pull down to choose the keystroke or combination of keystrokes for the command. Press the Close button. Copyright JAVS 1981-2010 21 JAVS Viewer 7.1 Software Instruction Manual 4. The command is ready to be used with the new shortcut. 5. You can set the keyboard back to the JAVS default by pressing the Reset button. (Warning: This action cannot be un-done). 6. When finished setting your shortcuts, press the Close button. Edit Menu Use Video Overlay The Use Video Overlay option routes the video to the video card’s processor instead of the computer’s processor. This tool is useful when video does not play correctly. Use this option for troubleshooting to correct for video playback when issues arise between certain video cards and computer motherboards. This option is available through the Edit>Options Menu item. To use the video overlay option: 1. Select the Edit menu item and choose Options. 2. Select the Advanced tab. 3. Select the Use Video Overlay checkbox and press OK. 22 Copyright JAVS 1981-2010 JAVS Viewer 7.1 Software Instruction Manual Menu Items File Menu Viewer 7: The File menu allows you to open and close media as well as close the program. Viewer 7 Pro: Provides the addition of the “Recently Opened” command. This will allow you to open any of the last 5 files previously opened. Edit Menu Viewer 7: the Edit menu Provides the option for video overlay. Viewer 7 Pro: This menu will provide you with commands for marking and saving segments as well as foot pedal and interface options. Copyright JAVS 1981-2010 23 JAVS Viewer 7.1 Software Instruction Manual View Menu Viewer 7: The View menu will allow you to display the working windows in Viewer 7 as well as how the video is displayed. The View menu will also allow you to recall and to save multiple layouts, and configure your keyboard for your most commonly used commands. Viewer 7 Pro: Provides the addition of viewing or hiding the Play Speed window. Play Menu Viewer 7: The Play menu will allow you to control the motion of the playback video as well as Go to Position and file skipping if multiple files are available. Viewer 7 Pro: Provides the addition of the Play Segment command for playing marked segments. 24 Copyright JAVS 1981-2010 JAVS Viewer 7.1 Software Instruction Manual Audio Menu The Audio menu allows you to choose how you monitor your audio. If a multi channel card is installed in your recorder, you will see the addition of channels 3-5. Tools Menu The Tools menu allows you to open any selected file in the Additional Files list. You must have the host application installed on your computer to open any of these files. The Tools menu also contains menu commands for the playlist icons, which include, Show All Media and the ability to skip from file to file. These are the same commands as in the Play menu. Help Menu The Help menu contains the Viewer 7 manual in PDF format and an About screen which will give you important information about the application. Activation for Viewer Pro is available in the Help menu. This menu item will not be present in Viewer Pro. Copyright JAVS 1981-2010 25 JAVS Viewer 7.1 Software Instruction Manual Viewer 7 Pro Introduction The JAVS Viewer 7 Pro application will provide you with the same features as Viewer 7. Viewer 7 Pro will allow you to set mark in and mark out times, and save the segment to a file for later retrieval. Viewer 7 Pro has controls for play, pause, fast forward and rewind as well as shuttle and speed capabilities. Viewer 7 Pro will allow the transcriber to control the media files via JAVS foot pedal controllers, with reverse, forward and play functions and has a programmable automatic backstep function when the play pedal is released. Viewer 7 Pro requires you to have Viewer 7 installed and an Activation Code to reveal the Viewer 7 Pro features. (See Appendix A) Viewer 7 Pro Features Control Playback speed from .1 to 1.9 times play speed with pitch correction. Mark In/Mark out capabilities for editing and playing segments. Foot pedal control with configurable back step function. 26 Copyright JAVS 1981-2010 JAVS Viewer 7.1 Software Instruction Manual Viewer 7 Pro Features Along with all of the features of Viewer 7, Viewer 7 Pro adds enhanced motion control features along with limited editing features. Viewer 7 Pro also provides foot pedal control of the media for the transcription process. Play Speed: JAVS Viewer 7 Pro provides speed control with pitch correction for discernable audio at various speeds. The Play Speed window will allow you to control the playback speed by means of a slider. Moving the Speed Slider all the way to the left is the slowest speed, and all the way to the right is the fastest speed that can be achieved with discernable pitch control. Setting the slider to the middle (Normal) will put the playback speed at 1 times play speed. The speed is indicated in the window. The window can be accessed through the View>Play menu item. Use the Blue links provided to set the speed with one click. Slow: .1 times play speed. Normal: 1 times play speed. Fast: 1.9 times play speed. Mark In/Mark Out: JAVS Viewer 7 Pro provides commands for marking start and stop points in the media. Once marked, the segment can be played or saved to another file for later retrieval. These commands are located in the menu items Edit and Play. Copyright JAVS 1981-2010 27 JAVS Viewer 7.1 Software Instruction Manual To mark a segment in the media: 1. Put the media into play by pressing the Play button, or locate a scene to be marked by means of the Shuttle Control. 2. When the segment is located, use the menu command Edit>Mark In to set the beginning point of the segment. 3. Continue playing the media or use the shuttle control to locate the ending point of the segment. 4. Select the menu item Edit>Mark Out to set the ending point of the segment. 5. The marked segment will be indicated by a Yellow Bar above the progress bar. 6. This segment can now be played or saved as a file to disk. 7. Another method for marking segments is to use the shuttle bar to drag out your segment. Place your cursor over the area just above the progress bar and an Arrow Cursor will appear. Click and drag to the right and a yellow duration bar will follow your cursor. 8. Release your mouse button and the segment has now been created. Mark In Mark Out Arrow Cursor To save a marked segment to disk: 1. Set the Mark In and Mark Out points on your media as outlined above. 2. Select the menu item Edit>Save Marked Segment. 3. The Save As dialog will open. Select the folder and give your file a name. 4. Press Save and your segment has been saved to disk. 28 Copyright JAVS 1981-2010 JAVS Viewer 7.1 Software Instruction Manual To play a marked segment: 1. Set the Mark In and Mark Out points on your media as outlined above. 2. Select the menu item Play>Play Segment. 3. The media will begin playing, starting at the Mark In point and continuing until it reaches the Mark Out point and will then stop. Foot Pedal Operation : Viewer 7 Pro is designed for ease of use for the transcriber and provides hands free control of the media by use of a foot pedal controller. Viewer 7 Pro currently supports three foot pedal types, the JAVS TU-60 serial control foot pedal, the JAVS TU-65 USB control foot pedal and the Infinity USB control foot pedal. All foot pedals function in the same manner with Play, Rewind and Fast Forward functionality. Connecting the foot pedal There are two types of connections for the JAVS foot pedal controllers, USB and serial (RS232) connections. For the TU-65 and the Infinity series foot pedals, connect the USB cable from the back of the foot pedal to the USB connector on your computer. For the TU-60 foot pedal, connect the RS-232 connector from the back of the foot pedal to a COM port on your computer. COM port 1 is recommended. Copyright JAVS 1981-2010 29 JAVS Viewer 7.1 Software Instruction Manual To control the media using a foot pedal 1. Select the menu item Edit>Options and the Foot Pedal Configuration window will open. 2. Under the Pedal Type pull-down select the type of foot pedal you are currently using. 3. If a TU-60 is selected, a Select Com Port pull down will appear. Set the COM port pulldown to the port you are connected to. 30 Copyright JAVS 1981-2010 JAVS Viewer 7.1 Software Instruction Manual 4. In the Pedal Assignments section, select the pedal assignment most convenient to your particular operation. 5. Set the Back Step duration by using the Back Step pull down. This function can be set from 0 to 10 seconds. When the Play pedal is released, the media will jump back by the amount you have set in this pull down. 6. Check the Enable Foot Pedal check box and press the OK button. 7. Open a session log (.jvl) or a media file (.wmv, .asf) by using the File>Open Log menu command. Copyright JAVS 1981-2010 31 JAVS Viewer 7.1 Software Instruction Manual 8. Press and hold the Play pad on the foot pedal and the media will begin to play. When the foot pad is released, the Progress bar will step backwards by the amount in seconds set by the Backstep pull-down. 9. Press the Fast Forward pad on the foot pedal and the media will go into the fast forward mode until released. When released, Viewer 7 Pro will go into the Pause mode. ] 10. Press the Rewind pad on the foot pedal and the media will go into the rewind mode until released. When released Viewer 7 Pro will go into the Pause mode. 32 Copyright JAVS 1981-2010 JAVS Viewer 7.1 Software Instruction Manual Advanced Options The Advanced Options has several options that let you determine how the session log is displayed as well as allows options for Video Overlay. Also included in the Advanced Options is a choice for whether you want Viewer 7 Pro to open the last file viewed and to play from the point you left off. Advanced Options are accessed through the menu item Edit>Options-Advanced Tab. Video Settings Use Video Overlay The Use Video Overlay option routes the video to the video card’s processor instead of the computer’s processor. This tool is useful when video does not play correctly. Use this option for troubleshooting to correct for video playback when issues arise between certain video cards and computer motherboards. To use the video overlay option: 4. Select the Edit menu item and choose Options. 5. Select the Advanced tab. 6. Select the Use Video Overlay checkbox and press OK. Copyright JAVS 1981-2010 33 JAVS Viewer 7.1 Software Instruction Manual Re-open last video file played Check this box if you want Viewer 7 Pro to open the last file viewed by just launching Viewer 7 Pro. If Remember last Point is checked, when viewer is opened, the last file viewed will open and advance to the last place in the media you left off. Log Events Filter All JAVS session logs have system messages to let the user know what state AutoLog is in at the time of a recording session. These messages tell you when a session has been started or paused as well as mode changes, public private and other important messages. Although these messages are important, sometimes they can get in the way of the transcribing process. Un-checking any of these boxes to remove them from displaying in the Event Log window. 34 Copyright JAVS 1981-2010 JAVS Viewer 7.1 Software Instruction Manual Appendix A Viewer 7 Pro Activation If you have purchased the JAVS Viewer 7 Pro application, you will need to activate the software to begin using your Viewer Pro features. To activate Viewer 7 Pro, select the menu item Help>Activate Viewer Pro features. There are two ways to activate the software; Online Activation and Phone Activation. Online Activation Select Online Activation and press Next. Enter the Serial Number and Password provided on the Installation CD. Observe case sensitivity. After entering the Password and Serial Number press the Finish button. You will need to close and re-launch Viewer to be able to use the Pro Features. Copyright JAVS 1981-2010 35 JAVS Viewer 7.1 Software Instruction Manual Phone Activation Select Phone Activation and press Next. A contact screen will appear with the JAVS help desk phone number. Contact the JAVS help desk with the number provided, and give the Pin Number to the help desk technician. The JAVS help desk will then provide you with the appropriate activation code for your particular system. Type this number in the Activation Code field and press Finish. All numbers are case sensitive. After entering the Activation Code, press the Finish button. You will need to close and relaunch Viewer to be able to use the Pro Features. 36 Copyright JAVS 1981-2010 JAVS Viewer 7.1 Software Instruction Manual Index File JAVS Viewer provides a file indexing utility, which will repair files that have not been finalized. Problems can occur during recording such as a power loss or hardware failure. Although these incidents are rare, important media may need to be recovered. If a file opens in Viewer but will not seek using the Seek Bar, you can use the Index File command to repair the non-finalized file. Note: you cannot index a file that exists on the recorder. You must publish or move the file manually to your local computer. Select the menu item File>Index File and the Index File window will open. Press the Browse button and locate the file on your local computer. Select the file and press Open. The File Path field will show the file. Press the Index File button and a green progress bar will appear. When finished, close the Index File window and your file has been repaired and ready to play in JAVS Viewer 7. Copyright JAVS 1981-2010 37