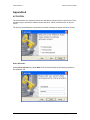
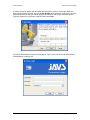
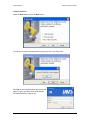
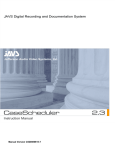
1
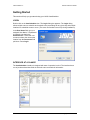
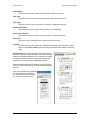
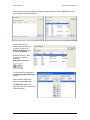
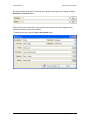
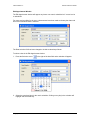
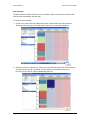
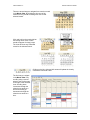
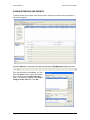
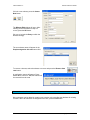
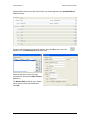
Manual Version CS20071129-5 CaseScheduler 2.2 1 Software Instruction Manual Copyright JAVS 1981-2008 CaseScheduler 2.2 Software Instruction Manual Introduction to CaseScheduler 2.0 ........................................................................ 4 Getting Started ...................................................................................................... 5 Login .................................................................................................................. 5 Interface at a glance .......................................................................................... 5 Creating a new case .......................................................................................... 8 New Case Window ......................................................................................... 8 Adding Contacts to a Case .......................................................................... 10 Scheduling the Date and Time ..................................................................... 16 Edit Appointment Window ............................................................................ 18 Auto Schedule .............................................................................................. 20 CaseScheduler Features..................................................................................... 22 Navigating CaseScheduler .............................................................................. 22 Changing and adding case Information........................................................... 29 Adding Witnesses and Exhibits ....................................................................... 30 Adding Attorneys, defendants and plaintiffs .................................................... 34 Reschedule case ............................................................................................. 35 Find Case ........................................................................................................ 41 Case History .................................................................................................... 44 Utilities................................................................................................................. 47 Publish Case.................................................................................................... 47 Edit Users and Site Information....................................................................... 50 Users Tab ........................................................................................................ 51 Site Information Tab ........................................................................................ 54 Print Schedule ................................................................................................. 56 Undockable Windows ...................................................................................... 59 Load Default Tool Arraingment........................................................................ 59 Configure Shortcuts......................................................................................... 60 Import Case Data............................................................................................. 62 Case Management System Import Specification ................................................ 64 Copyright JAVS 1981-2008 2 CaseScheduler 2.2 Software Instruction Manual Appendix-A.......................................................................................................... 71 Activation ......................................................................................................... 71 Online Activation .......................................................................................... 71 Phone Activation .......................................................................................... 72 15 Day Trial Period ...................................................................................... 74 Appendix B .......................................................................................................... 75 Help Menu ....................................................................................................... 75 Was this manual helpful? E-mail comments to [email protected] 3 Copyright JAVS 1981-2008 CaseScheduler 2.2 Software Instruction Manual Introduction to CaseScheduler 2.0 CaseScheduler is a scheduling tool primarily used in courtroom applications in conjunction with JAVS AutoLog 6.0. CaseScheduler will provide the end user with features such as an easy to use GUI (Graphical User Interface) that includes the location of the scheduled case, a calendar, the defendant, plaintiff, attorney’s and court staff information. From CaseScheduler, a user can view a case’s schedule history, future trial dates, and the current status of a case. The user can create new cases, reschedule dates, edit existing cases, add new attorneys and defendants, exhibits and witnesses. Different calendar views are available to the user, including single day, week and month views. CaseScheduler will allow you to: Create and edit case schedules on any day at any available time View Case Information, view pre-scheduled cases and history of cases already tried Provides the means for adding a witness list and exhibit list to scheduled cases With CaseScheduler, a history will be created for every Judge, Clerk, Bailiff, Attorney, Plaintiff, and Defendant that has ever been a party member in a courtroom. All information entered in CaseScheduler will be available in the JAVS AutoLog 6.0 interface and ready to use for your next scheduled court proceeding. Copyright JAVS 1981-2008 4 CaseScheduler 2.2 Software Instruction Manual Getting Started This section will help you get started using your JAVS CaseScheduler. LOGIN Double click on the CaseScheduler icon. The Login dialog box appears. The Login dialog allows multiple users to schedule and maintain court proceedings for any given day and multiple locations for scheduled events to occur. (The users and locations are set up during installation). In the User Name field, type your assigned User Name. If a password is required, type that in the Password field. If more than one courtroom exists, then choose the location from the Courtroom field pull down. Press Login. INTERFACE AT A GLANCE The CaseScheduler interface is designed with ease of operation in mind. The interface has a row of pre-determined data fields in which the user can view their information.. 5 Copyright JAVS 1981-2008 CaseScheduler 2.2 Software Instruction Manual Case Number: This field is for the case number that will be used in the court records. Case Title: This field is for the name of the case that will be used in the court record. Case Type: This field is for the type of case that is to be held in a particular courtroom. Plaintiff, Defendant: These fields are for the name(s) of the plaintiffs or the defendants. Prosecution, Defense: These fields are for the name(s) of the prosecution or defense attorneys. Start Time: This field is for the scheduled case’s month, day and time of day. Location: This field is to show the location for a scheduled appointment, and will only be visible when you select All Locations (which will only be available when multiple courtrooms exist). CaseScheduler has a calendar view window which allows the user to choose a day to schedule a case from a scrolling calendar. Bold dates indicate there is a schedule or multiple schedules entered for that date. Screen size settings will determine how many months are displayed at a time. Selecting the blue right and left arrows will scroll the month view up or down for scheduling on other months throughout the year. Click once and hold on the date bar and a pull down menu will allow you to choose the month in which you choose to schedule a case. Copyright JAVS 1981-2008 6 CaseScheduler 2.2 Software Instruction Manual The Locations window allows the user to view scheduled cases for all courtrooms or locations. All courtrooms, or locations, will appear in the Locations window. By selecting a courtroom name, the user can view the cases that are scheduled for that courtroom. 7 Copyright JAVS 1981-2008 CaseScheduler 2.2 Software Instruction Manual CREATING A NEW CASE New Case Window To create a new case, press the New Case button or select Case > New Case. The New Case dialog window appears. Enter the case number of the proceeding you are scheduling in the Case Number field. Next, you can enter the name of the case, if any, in the Case Title field. Copyright JAVS 1981-2008 8 CaseScheduler 2.2 Software Instruction Manual The Case Type pull-down will give choices of case types. Select a type that is appropriate for the proceeding you are scheduling. The Department selection pull down in the New Case dialog allows the user to select the department that the case will be a part of. Select the appropriate department for your case. 9 Copyright JAVS 1981-2008 CaseScheduler 2.2 Software Instruction Manual Adding Contacts to a Case To enter a Plaintiff, Prosecution, Defendant and Defense, press the Edit button to the right of each field. Press the Edit button to the right of the Plaintiff field to enter a new Plaintiff, or to find an existing Plaintiff, in the database. The Edit Plaintiffs screen will open. To create a new Plaintiff, press the Create New button. Copyright JAVS 1981-2008 10 CaseScheduler 2.2 Software Instruction Manual The Edit Contact window will appear. Enter all the information you wish to keep on record for that particular plaintiff and press OK. The new Plaintiff will appear in the Edit Plaintiffs window. You may add more names by pressing the Create New button and entering the information for additional Plaintiffs, or you can search the database for existing Plaintiffs. To find a name that has already been entered into the database, press the Search button and a list of available Plaintiffs and Defendants will appear. You can limit your search results by typing all or part of a name in the Search All Plaintiffs/Defendants field and pressing Search. Select the name you want to add to the case and press the Add to this case button. 11 Copyright JAVS 1981-2008 CaseScheduler 2.2 Software Instruction Manual The new Plaintiff will appear in the Edit Plaintiffs window. When finished with Plaintiff entries press the OK button. The New Case window will appear with the name of the newly entered plaintiff(s). Press the Edit button to the right of the Prosecution field. The Edit Prosecution Attorney screen will appear. Copyright JAVS 1981-2008 12 CaseScheduler 2.2 Software Instruction Manual Press the Create New button to enter the name of the prosecuting attorney you will be scheduling. After pressing the Create New button, the Edit User screen will appear. Enter the contact information for the assigned attorney and press OK. The new Attorney will appear in the Edit Prosecution Attorneys window. You may add more names by pressing the Create New button and entering the information for additional Attorneys, or you can search the database for existing Attorneys. 13 Copyright JAVS 1981-2008 CaseScheduler 2.2 Software Instruction Manual To find a name that has already been entered into the database, press the Search button and a list of available Attorneys will appear. You can also limit your search results by typing all or part of a name in the Search All Attorneys field and pressing Search. Select the name you want to add to the case and press the Add to this case button. The new attorneys will appear in the Edit Prosecution Attorneys window. When finished with Attorney entries, press the OK button. The New Case window will appear with the name of the newly entered Attorneys. Copyright JAVS 1981-2008 14 CaseScheduler 2.2 Software Instruction Manual Use the Edit button to the right of each field, and repeat the same process for adding or finding Defendant and Defense entries. When all entries have been made, the prosecution and defense personnel will appear in the appropriate fields in the New Case window. To schedule this case, select the Save and Schedule button. 15 Copyright JAVS 1981-2008 CaseScheduler 2.2 Software Instruction Manual Scheduling the Date and Time The Day/Location View for the current day will appear. From this window there are many options for scheduling a case which will be covered in more detail later in this manual. For this example, the schedule will be set for today for Courtroom 2. Select the column for Courtroom 2. Place your mouse starting at 8am then click and drag for the time interval you wish to schedule. This schedule will be set for Courtroom 2 from 8am to 10am on Wednesday, May 3rd. Copyright JAVS 1981-2008 16 CaseScheduler 2.2 Software Instruction Manual When the mouse button is released, the Edit Appointment window will open. You can change the time and date the case is scheduled along with the location of the scheduled case. For more details on the Edit Appointment window, see the Edit Appointment Window section of this manual. Press OK to confirm the appointment and you will return to the Schedule for Case (XYZ). At this point you may add more days and times for the particular case or press Save to confirm the appointment. CaseScheduler will return to the Single Day view with the newly scheduled appointment in the case list for the current day. This case is now ready to be used in JAVS AutoLog and will appear in Cases Scheduled Today view in the AutoLog interface. 17 Copyright JAVS 1981-2008 CaseScheduler 2.2 Software Instruction Manual Edit Appointment Window The Edit Appointment window will appear any time a new case is scheduled or if a case is to be re-scheduled. For more precise editing for the user, enhancements have been made to the way the dates and time for the scheduled case is selected. The Date selection field has been changed to include a calendar pull down. To select a date in the Edit Appointment window: 1. Press the Selection arrow to the right of the date field and a calendar will appear. 2. Select the month and day for the case’s schedule. Clicking on any day in the calendar will highlight and select that day. Copyright JAVS 1981-2008 18 CaseScheduler 2.2 Software Instruction Manual 3. Pressing the Today button will schedule the case for the current day. 4. To navigate to a different month, press the right or left arrows to increment or decrement the calendar month. 5. You can also select a month by clicking once on the month title and a pull down will appear, allowing the user to select the month for the case’s schedule. 19 Copyright JAVS 1981-2008 CaseScheduler 2.2 Software Instruction Manual Auto Schedule The Auto Schedule function allows the user to schedule a case at a specific time and date and have the case automatically start and stop. To create an Auto Schedule: 1. Create a new case. Refer to the New Case section of this manual. Once the Save and Schedule button is pressed, the Day/Location View for the current day will appear 2. Select the column for Courtroom 2. Place your mouse starting at 8am then click and drag for the time interval you wish to schedule. For this example, the schedule will be set for Courtroom 2 from 8am to 10am on Wednesday, May 3rd. Copyright JAVS 1981-2008 20 CaseScheduler 2.2 Software Instruction Manual 3. When the mouse button is released, the Edit Appointment window will open. You can change the time and date the case is scheduled along with the location of the scheduled case. The choices for automatically starting are; No Auto Start, Auto Start, 5 minutes early, 10 minutes early and 30 minutes early. The choice for automatically stopping a case is Stop and no Auto Start. The Auto Start Completed and Auto Stop Completed are not selections and will display in the cases schedule after the Auto Start and Auto Stop schedule is complete. 4. Press OK to confirm the appointment and you will return to the Schedule for Case (XYZ). At this point you may add more days and times for the particular case or press Save to confirm the appointment. CaseScheduler will return to the Single Day view with the newly scheduled appointment in the case list for the current day. This case is now ready to be used in JAVS AutoLog and will appear in the Cases Scheduled Today list in the AutoLog interface. The icon next to the case will show a small clock to indicate an Auto Schedule. 21 Copyright JAVS 1981-2008 CaseScheduler 2.2 Software Instruction Manual CaseScheduler Features CaseScheduler has a variety of editing and information tracking features that can be useful in keeping schedules, changing schedules, removing schedules, adding personnel to the schedule and finding information on people who have been previously entered into the system. These people can be searched out and added to the schedules along with changing their personal information. There are also different views in which these operations can be performed. This section will go into detail on how to edit and maintain your CaseScheduler information. NAVIGATING CASESCHEDULER There are several views in CaseScheduler that allow the user freedom and flexibility to view, edit and reschedule cases. The Single Day view is the default view for CaseScheduler and allows the user to select any day in any month and see a list of schedules for any selected day and for any courtroom. With All Courtrooms selected in the Locations window, you can see that for May 3rd there are cases scheduled for both courtrooms 1 and 2. All days that have a BOLD date on the calendar are days that have scheduled cases. Copyright JAVS 1981-2008 22 CaseScheduler 2.2 Software Instruction Manual Clicking on individual days in the calendar will update the case list to reflect that days scheduled cases. Shift>Select for multiple consecutive days. The example shows a 3 day schedule for May 2nd through May 4th. Ctrl>Click to view multiple non-consecutive days. The example shows a 3 day schedule for May 2nd, May 4th and May 8th. The Work Week view has two separate ways of viewing the scheduled cases depending on whether the user is looking at a Single Location or All Locations. 23 Copyright JAVS 1981-2008 CaseScheduler 2.2 Software Instruction Manual When All Locations is selected, the view stays in the list view and shows all the scheduled cases for the selected week for each courtroom. If a Single Location is selected, CaseScheduler switches to a single week view (Monday through Friday) with time of day increments for that location. Copyright JAVS 1981-2008 24 CaseScheduler 2.2 Software Instruction Manual By selecting any day, Monday through Friday, of any week, in any month will show the schedules for that week of that month. The Week view has two separate ways of viewing the scheduled cases depending on whether the user is looking at a Single Location or All Locations. When All Locations is selected, the view stays in the list view and shows all the scheduled cases for the selected week for each courtroom. The week view extends through Saturday and Sunday of the selected week. 25 Copyright JAVS 1981-2008 CaseScheduler 2.2 Software Instruction Manual If a Single Location is selected, CaseScheduler switches to a single week view (Monday through Sunday) of scheduled case blocks for each day. The Month view has two separate ways of viewing the scheduled cases depending on whether the user is looking at a Single Location or All Locations. Copyright JAVS 1981-2008 26 CaseScheduler 2.2 Software Instruction Manual When All Locations is selected, the view stays in the list view and shows all the scheduled cases for the selected month for each courtroom. If a Single Location is selected, CaseScheduler switches to a single month view of schedu led case blocks for each day of the month. 27 Copyright JAVS 1981-2008 CaseScheduler 2.2 Software Instruction Manual There are several ways to navigate from month to month in the Month View. By clicking the day area of the calendar for any month will change the view to that selected month. Click and hold on the month title bar and a drop down menu of each month will appear for large jumps. The view will show any scheduled cases for the selected month. Clicking on the blue right and left arrows will update the view by consecutive months at a time. The final way to navigate in the Month View is by scrolling using a mouse wheel or the scroll arrows to the right of the calendar view. Scrolling down increments through the calendar one week at a time and scrolling up decrements through the calendar one week at a time. Copyright JAVS 1981-2008 28 CaseScheduler 2.2 Software Instruction Manual CHANGING AND ADDING CASE INFORMATION Once a New Case has been scheduled, all the information pertaining to that case can be edited. By clicking anywhere in the row for a given case brings up an editable case information screen. In this example, select the row that has case CR101 and the case information screen will appear. There are 2 tabs associated with the selected case. The Case Information tab, which allows the user to change the Case Type, the Case Title, Department, and the Scheduled Date. Also, there are Prosecution, Defense, Plaintiff, Defendant, Witness and Exhibit fields for adding or editing users and contacts. The Case History tab shows a list of dates a case has been started and logged. 29 Copyright JAVS 1981-2008 CaseScheduler 2.2 Software Instruction Manual ADDING WITNESSES AND EXHIBITS To add a witness to the current case, select a case in the Day view and the case properties for that case will appear. Press the Edit button to the right of the Witness field and the Edit Witnesses window will open. If the witness exists in the database, you can press the Search button, choose the witness from a list and press the Add to this case button. The witness will appear in the People assigned to this case field. Press OK. Copyright JAVS 1981-2008 30 CaseScheduler 2.2 Software Instruction Manual If this is a new witness, press the Create New button. The Witness Edit window will open. After entering all the information to keep on record, press the OK button. (Be sure to include the Party to which the witness belongs). The new witness name will appear in the People assigned to this case name field. To remove a witness, select the witness to remove and press the Remove from case button. A confirmation screen will appear. Press Yes or No to confirm. If Yes, the witness will be removed from the case. Once a witness has been logged, a witness cannot be removed from the case. More witnesses can be added by creating new contacts or by searching the database for existing contacts. When all witnesses are assigned to the case, press the OK button. 31 Copyright JAVS 1981-2008 CaseScheduler 2.2 Software Instruction Manual CaseScheduler returns to the Day View and the new witness appears in the Available Witness List for that case. To add or edit information for a particular witness, select the Edit button next to the Witness field. The Edit Witnesses window will open. Select the witness you wish to change information for and press the Edit Contacts Info button. The Witness Edit window will open. Delete, add or edit any existing information and press OK. Copyright JAVS 1981-2008 32 CaseScheduler 2.2 Software Instruction Manual Exhibits can be added to the case through the Case Information tab. Exhibits can be electronic files or physical objects that are noted in the Exhibit dialog. To add an exhibit to the current case, press Edit button next to the Exhibit field. The Exhibits window will open. Press the Create New button The Exhibit Info. window will appear. CaseScheduler will automatically assign an exhibit number pertaining to the party assignment. Use this name or enter the name for the exhibit, any notes that pertain to that exhibit and assignment; press OK. The exhibit will appear in the Exhibit List for the selected case. You can add or edit information for a particular exhibit by selecting the exhibit and pressing the Edit button. The Exhibits window will open. Delete, add or edit any existing information and press OK. 33 Copyright JAVS 1981-2008 CaseScheduler 2.2 Software Instruction Manual Exhibits and witnesses have been added to the case CR101 and are now a part of that case. You can delete exhibits by using the Remove from case button. If an exhibit has been logged, it cannot be removed from the case. A list of witnesses or exhibits can be printed using the Print Witnesses or Print Exhibits buttons, and will be sent to a local or network printer, or can be printed in PDF format. ADDING ATTORNEYS, DEFENDANTS AND PLAINTIFFS If attorneys, defendants and plaintiffs were not entered during the New Case process, they can be added in the Case Information window for that case by pressing the edit button to the right of each respective field. Refer to the Creating a New Case section of this manual for adding users and contacts. Copyright JAVS 1981-2008 34 CaseScheduler 2.2 Software Instruction Manual RESCHEDULE CASE There are several ways to reschedule a case in CaseScheduler. To reschedule a case, select the case and press the Reschedule Case button or select Case>Reschedule Case. The Schedule For Case ID window will open. The default view is Day View with all courtrooms on the current day with time of day increments. In this view, cases can be moved in the current courtroom to reschedule a new time of day for that case or can be moved to other courtrooms and a new time of day. 35 Copyright JAVS 1981-2008 CaseScheduler 2.2 Software Instruction Manual In this example, Case 202-fgu for Courtroom 2 will be moved from 8am to 2pm for Thursday May 4th. Click on the case and drag it to 2pm for that courtroom. The second method is to double click on Case 202-fgu and an Edit Appointment dialog box will open. The Location, Start and End times can be changed. When the new schedule has been completed, press the Save button in the lower right corner of the screen. The new time is reflected for that case in the Cases Scheduled list. Copyright JAVS 1981-2008 36 CaseScheduler 2.2 Software Instruction Manual There are two other views in the Reschedule Case window that can be used for rescheduling a case. The Week View, which shows the week in which the scheduled case exists from Monday through Sunday, allows the user to move or edit schedules within a given week. Just as in the Day View, schedules can be dragged to new locations or double-clicked for the Edit Appointment dialog. 37 Copyright JAVS 1981-2008 CaseScheduler 2.2 Software Instruction Manual The Month View, which shows the month in which the selected case exists from the first of the month to the end of the month, allows the user to move or edit schedules within a given month. Just as in the Day and Week Views, schedules can be dragged to new locations or doubleclicked for the Edit Appointment dialog. In all three views, Day, Week and Month, case information is displayed at the left side of the window along with the existing scheduled date(s) for that case. Also, in all three views the user has the ability to delete a schedule or add a new schedule. Copyright JAVS 1981-2008 38 CaseScheduler 2.2 Software Instruction Manual Another way to edit and reschedule a case would be through the Case Information window. When in the Single Day View, pressing the edit button to the right of the Scheduled Date(s) field for a selected case will also open the reschedule case dialog. The user can use the same conventions for editing and rescheduling a case just as if you had pressed the Reschedule Case button. 39 Copyright JAVS 1981-2008 CaseScheduler 2.2 Software Instruction Manual When in the week or month views, by selecting a case and using Case>Case Properties, the Case Properties window will open. From here you can add, delete or edit case information just as if you were in the Single Day View. Copyright JAVS 1981-2008 40 CaseScheduler 2.2 Software Instruction Manual FIND CASE The Find Case feature of CaseScheduler is useful when the user wishes to find a specific case. The Find Case feature will locate cases based on key letters or numbers for search criteria. 1. Press the Find Case button or select the menu item Case>Find Case. 2. The Find Case window will open. 3. Press the Search button and all the cases in the database will appear in the results list. 4. Type in a partial case number and select the “starts with” variable. Press the Search button and only a case that starts with that case number will be found. 5. Select the “contains” variable and upon pressing the search button, any case that contains the entered text in the search field will be found. 6. Type in a specific case number and select the “starts with” variable. Press the Search button and the specific case is found. 41 Copyright JAVS 1981-2008 CaseScheduler 2.2 Software Instruction Manual 7. As a Case Number is selected, the data will drilldown through the Date, Courtroom, and finally Case Properties fields. 8. Select the desired Case Number and the date(s) of the case are displayed in the Date field. 9. Select the appropriate Date and the applicable courtrooms are displayed for that date in the Courtroom field. 10. Select the appropriate Courtroom and properties for the case are displayed in the Case Properties field. Copyright JAVS 1981-2008 42 CaseScheduler 2.2 Software Instruction Manual Press the Add To A Schedule button and the Schedule For Case ID window will open. The user can use the same conventions for editing and rescheduling a case just as if you had pressed the Reschedule Case button. The Find Case dialog also provides the ability to publish a selected case by selecting the Publish Case button. Follow the procedure for publishing a case in the Utilities section of this manual. 43 Copyright JAVS 1981-2008 CaseScheduler 2.2 Software Instruction Manual CASE HISTORY Any case that has been logged by JAVS AutoLog will have a case history. This history will consist of the Case Number, the Location and Dates the case was logged and other information that pertains to that case. To view a list of cases that have a history associated with them, select a location or all locations and press the History tab above the Locations dialog. In any view, Day, Week or Month, the list of cases will be only those cases which have been logged. In the Single Day view, select a case from the list. Select the Case History tab and then select a date you wish to see the history for. The Case Log Information field will have information about the case. Copyright JAVS 1981-2008 44 CaseScheduler 2.2 Software Instruction Manual To see a history of the selected date, press the Case Log button and the Case Log Report window will open. There are Filter options available to suit the needs of your history report. A typical Case Log Report has the information that was entered in the Case Properties dialog along with the current days Event Log. 45 Copyright JAVS 1981-2008 CaseScheduler 2.2 Software Instruction Manual To see a full history of the selected case, press the Case History Log button. The Case History Log Report window will open. There are Filter options available to suit the needs of your history report, plus the ability to select all logged sessions for the selected case or a range of dates for the selected case. Copyright JAVS 1981-2008 46 CaseScheduler 2.2 Software Instruction Manual Utilities PUBLISH CASE The Publish Case function allows the user to publish cases to CD, DVD or a network folder. The published case will consist of the audio/video media for the case and a CVL file, which when launched, will open JAVS CaseViewer. You can view the case with the options chosen for public and private information and the case log. To publish a case: 1. Select a case from a schedule view. 2. Select Case>Publish Case and the Publish Wizard main screen will open. 3. Select Next and the Case Selection Criteria window will appear. You can choose to publish only the current case, a specific date for that case or the entire case history for that case. A case history means that a case has been logged more than once on different dates and times. 4. Press the Next button when the Case Selection Criteria has chosen. 47 Copyright JAVS 1981-2008 CaseScheduler 2.2 Software Instruction Manual 5. The Select Files window will appear. You can choose to include Public and Private case information. The Options section se if you want to include the case log and public and private notes. 6. Press Next and the Select Action window will appear. You can choose to want to publish on CD, DVD or to a Network Share folder. Copyright JAVS 1981-2008 48 CaseScheduler 2.2 Software Instruction Manual 7. When Network Share is selected, you will be prompted to select a folder for the media to be copied to. 8. After selecting the media or folder, press the Next button and the copy and burn process will begin. There will be a status bar to inform you of the progress. When the process is finished, the Completed screen will appear. Press the Finish button and your files are ready to view. For more information about viewing cases, see the JAVS CaseViewer user manual. 49 Copyright JAVS 1981-2008 CaseScheduler 2.2 Software Instruction Manual EDIT USERS AND SITE INFORMATION The edit users and site information is a utility tool used to add and edit users, assign passwords and apply user types and user templates to users. (This utility requires the Edit Users And Staff user right to be able to use the utility. Your Administrator can provide you with specific rights). To launch the Edit Users and Site Information utility: 1. Select Tools>Edit Users and Site Information and the Edit Users and Site Information window will open. There are two tabs associated with the window, the Users tab and the Site Information tab. Copyright JAVS 1981-2008 50 CaseScheduler 2.2 Software Instruction Manual USERS TAB In the left hand column is a list of all the users in the current database. They are listed by User ID, Last Name and First Name and can be sorted by clicking on the respective header. 1. Select a user from the list and the right hand side of the window will show the personal information for the user, the user’s password and the assigned User Class and User Template. 2. You can change a user’s information by highlighting the fields to change, and typing the information. To add a new user: 1. Press the Add New User button and the Enter New User ID window will open, Type in the new ID and press the OK button. (If a user already exists, a Duplicate Name notice will appear. Select a new ID until successful). 51 Copyright JAVS 1981-2008 CaseScheduler 2.2 Software Instruction Manual 2. The newly created user ID will appear in the Users list and a blank information page will appear. 3. Type in the personal information for the new user. Copyright JAVS 1981-2008 52 CaseScheduler 2.2 Software Instruction Manual Edit Users and Site Information cont. Password, User Class and Template For a user to be able to log in to JAVS AutoLog, they must first be assigned a password, a user class and user template. JAVS has created a default set of User Classes and Templates to assign to new users or re-assign to pre-existing users. For Example: If the new user is a judge, he can be assigned a User Class of Judge with a Template of Judge Advanced. The Password is hidden for the user’s privacy. This Judge would have JAVS AutoLog and JAVS CaseScheduler advanced user rights. Templates and User Classes are generally set up by JAVS or your Administrator. Users and Group rights should be available through your Admistrator. 53 Copyright JAVS 1981-2008 CaseScheduler 2.2 Software Instruction Manual SITE INFORMATION TAB The site information tab allows the user to add or delete Case Types and Departments. JAVS provides a default list of case types to choose from, and a Default department. To add a case type: 1. Press the Add Case Type button and the Add New Case Type window will open. Type in the new case type and press the OK button. 2. The new case type will appear in the Case Types list and will be available in the Case type pull-down in the New Case dialog. Copyright JAVS 1981-2008 54 CaseScheduler 2.2 Software Instruction Manual To delete a case type: 1. Select the Case Type to be deleted and press the Delete Case Type button. A Delete Case Type confirmation window will appear. 2. Press Yes to delete and No to cancel. To add a department: 1. Press the Add Department button and the Add New Department window will open. 2. Type in the new department and press OK. 3. The new department will appear in the departments list and will be available in the Department pull-down in the New Case dialog. To delete a department: 1. Select the department to be deleted and press the Delete Department button and a Delete Department confirmation window will appear. Select Yes to delete and No to cancel. 55 Copyright JAVS 1981-2008 CaseScheduler 2.2 Software Instruction Manual PRINT SCHEDULE CaseCsheduler has the ability to print the schedule for one day-one location, one day-multiple locations, multiple days-one location and multiple days-multiple locations. Refer to the Navigating CaseScheduler section of this manual on page 16. (Only consecutive days can be printed). To print a schedule: 1. Select a view, Single Day, Work Week, Week or Month. 2. Select a location or All locations. 1. Select a day, week or month you wish to print the schedule for. (This Example will use Single Day View, Courtroom 1 and October 25th for the day of schedules to print. There are 10 schedules on October 25th, 2006 in Courtroom 1). 4. Select the menu item Case>Print Schedule or press the toolbar Print Schedule button. Copyright JAVS 1981-2008 56 CaseScheduler 2.2 Software Instruction Manual 5. A Print Preview window will open with a list of schedules for that day. 6. Select File>Page Setup and the Page Setup window will open. 57 Copyright JAVS 1981-2008 CaseScheduler 2.2 7.Press the Printer button and press OK. Software Instruction Manual to select the printer you wish to use. Select your printer 8.In the Print Preview window select the menu item File>Print or press the Print button and the case schedule will be printed. 9.When printing is complete, press the Close button Copyright JAVS 1981-2008 to return to CaseScheculer. 58 CaseScheduler 2.2 Software Instruction Manual UNDOCKABLE WINDOWS AutoLog 6.2 allows the user to arrange the tool windows or tabs to any layout you choose. By selecting the particular windows header bar or tab, the window can be pulled from its current location and placed in another location. Double clicking the header or tab will also undock that window to the previously positioned location or upper left of the screen if it has never been moved. There are two methods for moving and sizing windows: Docked Method: The docked method will allow you to use the docking controls to lock a window into place once it has been moved. By selecting the window header or tab, move the window to the area of the screen you want and roll over the docking controls. The controls will allow you to go left, right, up or down and a highlighted area will appear indicating where the window will be positioned. If you position over the center of the docking control, the window will be placed as a tab in that particular window. The windows can be resized by holding the mouse pointer over the edge of a window until the pointer turns into a resize cursor. Click and drag to the size you want. Undocked method: The undocked method will allow the user to move a tool window or tab to any position on the screen and be free floating. By selecting the window header or tab, move the window to the area of the screen you want and release the mouse, the window has been repositioned. LOAD DEFAULT TOOL ARRAINGMENT Occasionally, windows could be adjusted for size or moved to a different position. The Load default Tool Arrangement function will allow the user to set the CaseScheduler window arrangement back to the default setting. To set the window arrangement back to the default setting: 1. Select View>Load Default Tool Arrangement and the CaseScheduler window arrangement will re-set to the default arrangement. 59 Copyright JAVS 1981-2008 CaseScheduler 2.2 Software Instruction Manual CONFIGURE SHORTCUTS JAVS CaseScheduler gives the user the ability to map the keyboard with shortcuts for their most used commands with user configurable hotkeys. Once configured, the programmed keys will be saved for each windows user. To configure the keyboard for shortcuts: 1. Select the menu item View>Configure Shortcuts and the Configure Shortcuts window will open. 2. Select the command you wish to set a hot key for. Copyright JAVS 1981-2008 60 CaseScheduler 2.2 Software Instruction Manual 3. Use the Shortcut for selected command pull down to choose the keystroke or combination of keystrokes for the command. Press the Close button. 4. The command is ready to be used with the new shortcut. 5. You can set the keyboard back to the JAVS default by pressing the Load Defaults button. (Warning: This action cannot be un-done). 61 Copyright JAVS 1981-2008 CaseScheduler 2.2 Software Instruction Manual IMPORT CASE DATA The JAVS architecture supports importing Case Management System data by use of either a comma-separated-value file (i.e. CSV) or an Extensible Markup Language file (i.e. XML). Data is written to these files in a predefined format, and then processed by an import library wizard incorporated into the CaseScheduler application. The import procedure features moderate data validation, pre- and post-processing batch-file options and self-managed log files that provide detailed analysis of the import process, offering details as to the success and/or failure of the job currently being performed. The Import feature requires that the .cvl and the .xml files be in the proper format before schedules can be imported into CaseScheduler. These format requirements are outlined in the Case Management Import Specifications in this manual. To import a schedule: 1. Select Tools>Import Case Data and the JAVS Case data import wizard welcome screen will open. 2. Select the Next button and the wizard will allow you to use the Browse button or type in the file path and file name for the file you want to import. Press the Browse button. Copyright JAVS 1981-2008 62 CaseScheduler 2.2 Software Instruction Manual 3. Locate the .xml or .csv file for schedule import and press the Open button. 4. The file will appear in the specified file field. Press the Next button to start the import. 5. A progress bar will appear showing the status of the import. Press the Open Log File button and to determine what errors, if any, occurred. Press the Finish button and the imported schedules will appear in CaseScheduler at the date and time specified in the file. 63 Copyright JAVS 1981-2008 CaseScheduler 2.2 Software Instruction Manual Case Management System Import Specification CaseScheduler 2.x 1.0 Introduction The purpose of importing, in most cases, is to reduce the amount of data entry by court clerks or management personnel in having to maintain two separate case systems. Most often, courtmanagement software is functionally different from case logging, which is what the JAVS architecture achieves by design. Importing records generally involves providing master caselevel information, such as the Case Number and Case Title, and scheduling information, such as the location and time of the appointment. Additional information can also be imported that details witness and/or plaintiff/defendant information. By minimizing data entry tasks in maintaining two systems, both systems can then co-reside with each other and help streamline the day-to-day tasks of court personnel. 2.0 File Specification When creating files to be imported from an external source, there are one of two file formats that are accepted by the import wizard. Both formats are detailed and discussed in the following sections. 2.1 CSV Formats Comma-separated value files are text files which have one or more records (i.e. lines) of data that represent certain types of case information. They can be automated by a hosting case management software system, or user generated by use of a text editor application. They can also be generated using most spreadsheet applications, saving the spreadsheet information using the common CSV format, where each spreadsheet column represents a field within the record. Each record within a data file represents one of seven different record types. Each record type follows a predefined format, allowing fields of data to be separated by commas. All records have required fields, meaning they will not be processed unless the minimum amount of information is present for the record. Some records also have additional optional fields of information that, although not critical to the operation of the data being imported, assists the system in categorizing and providing additional information about the case being scheduled. Each record, however, must have placeholders for the field, regardless of whether data is supplied for that field. Each record is preceded with an identifier at the beginning of each row in column 1, defining the format of the fields that follow in that row. The identifiers are either fixed, 3-digit numbers, or fixed record labels. Note that record labels are varying in length depending on the record being represented, and are not case-sensitive. Each of the record types is discussed, along with their formatting characteristics, in the following tables. Copyright JAVS 1981-2008 64 CaseScheduler 2.2 2.1.1 Software Instruction Manual Case Master Record Record Description Record Required Column Required Number Field 1 Yes 2 Yes 3 Yes 4 No 5 No 6 No 7 No 8 No Case Master Record This is the main record type for which cases are defined. For every case imported to the JAVS database, at least one of these records must exist before any other records will be allowed for importing. It need only be imported once to define a case, but may be included as many times as desired across multiple days. Subsequent imports will attempt to update information contained in the most recent import for cases already existing in the database. Yes Field Name Record Identifier Case Number Case Title State County City Department Case Type Format Description ASCII (Fixed) ASCII (Max: 50) ASCII (Max: 250) ASCII (Max: 10) ASCII (Max: 50) ASCII (Max: 50) ASCII (Max: 50) ASCII (Max: 50) Must be either “101” or “Case Master” Unique Case ID assignment Examples: 101, 06RD112501,State vs. John Doe,KY,Jefferson,Louisville,Family Justice,Criminal Jury Trial CASE MASTER,06RD112502,John Doe vs State,KY,,,,Civil Jury Trial 2.1.2 Case Schedule Record Record Description Record Required Column Required Number Field 1 Yes 2 3 Yes Yes Case Schedule Record This record specifies and schedules a predefined case to a predefined resource for one or more days. Yes – If scheduling cases for a predefined resource. Field Name Record Identifier Case Number Location Format ASCII (Fixed) ASCII (Max: 50) Numeric (Max: 3) Description Must be either “102” or “Case Schedule” Unique Case ID assignment JAVS System ID for a given location (1-255) Format: MMDDYYYY Format: HHMM (Military Time) 4 Yes Schedule Date ASCII (Max: 250) 5 No Schedule Time ASCII (Max: 10) 6 No Judge: Last Name ASCII (Max: 50) 7 No Judge: First Name ASCII (Max: 50) 8 No ExternalIDKey ASCII (Max: 50) CMS Record Identifier (If Applicable) Examples: 102,06RD112501,1,11262006,900,Wapner,George,gwapner01 CASE SCHEDULE,06RD112502,2,11262006,900,Simoa,Ki,ksimoa59 2.1.3 Plaintiff Record and Defendant Record Record Description Record Required 65 Plaintiff Record This record details information about one or more plaintiffs assigned to a case. No Copyright JAVS 1981-2008 CaseScheduler 2.2 Column Number 1 2 3 4 5 6 7 8 9 10 11 12 13 14 15 Required Field Yes Yes Yes No Yes Yes No No No No No No No No No Software Instruction Manual Field Name Record Identifier Case Number External ID Key Prefix First Name Last Name Suffix Address1 Address2 City State Zip Phone1 Phone2 Email Format Description ASCII (Fixed) ASCII (Max: 50) Numeric (Max: 25) ASCII (Max: 15) ASCII (Max: 50) ASCII (Max: 50) ASCII (Max: 10) ASCII (Max: 50) ASCII (Max: 50) ASCII (Max: 50) ASCII (Max: 10) ASCII (Max: 10) ASCII (Max: 14) ASCII (Max: 14) ASCII (Max: 50) Must be either “103” or “Plaintiff” Unique Case ID assignment CMS Record Identifier (If Applicable) Examples: 103,06RD112501,06RD112501PL01,,John,Doe,,101 Some St,,Louisville,KY,40223,0001112222,, PLAINTIFF,06RD112502,06RD112502PL01,Dr,John,Smith,,101 Some St,,Louisville,KY,40223,0001112222,, The Defendant Record matches the plaintiff in every way, except for the first column which identifies the record type, as presented here: Record Description Record Required Column Required Number Field 1 Yes … … Defendant Record This record details information about one or more defendants assigned to a case. No Field Name Record Identifier … Format ASCII (Fixed) … Description Must be either “104” or “Defendant” … Examples: 104,06RD112501,06RD112501DF01,Dr,John,Smith,,101 Some St,,Louisville,KY,40223,0001112222,, DEFENDANT,06RD112502,06RD112502DF01,,John,Doe,,101 Some St,,Louisville,KY,40223,0001112222,, Copyright JAVS 1981-2008 66 CaseScheduler 2.2 Software Instruction Manual Plaintiff Representative Record and Defendant Representative Record Record Description Record Required Column Required Number Field 1 Yes 2 3 4 5 6 7 8 9 10 11 12 13 14 15 Yes Yes No Yes Yes No No No No No No No No No Plaintiff Representative Record This record details information about one or more plaintiff representatives assigned to a case. No Field Name Format Record Identifier ASCII (Fixed) Case Number External ID Key Prefix First Name Last Name Suffix Address1 Address2 City State Zip Phone1 Phone2 Email ASCII (Max: 50) Numeric (Max: 25) ASCII (Max: 15) ASCII (Max: 50) ASCII (Max: 50) ASCII (Max: 10) ASCII (Max: 50) ASCII (Max: 50) ASCII (Max: 50) ASCII (Max: 10) ASCII (Max: 10) ASCII (Max: 14) ASCII (Max: 14) ASCII (Max: 50) Description Must be either “105” or “Plaintiff Representative” Unique Case ID assignment Maps Internally as JAVS UserID Examples: 105,06RD112501,06RD112501PLREP01,,Jay,Walker,,998 Some St,,Louisville,KY,40223,0001112222,, PLAINTIFF REPRESENTATIVE,06RD112502,06RD112502PL01,,Bob,Arrow,,999 Some St,,Louisville,KY,40223,0001112222,, The Defendant Representative Record matches the plaintiff representative in every way, except for the first column which identifies the record type, as presented here: Record Description Record Required Column Required Number Field 1 Yes … … Defendant Representative Record This record details information about one or more defendant representatives assigned to a case. No Field Name Record Identifier … Format ASCII (Fixed) … Description Must be either “106” or “Defendant Representative” … Examples: 106,06RD112501,06RD112501PLREP01,,Jay,Walker,,998 Some St,,Louisville,KY,40223,0001112222,, DEFENDANT REPRESENTATIVE,06RD112502,06RD112502PLREP01,,Bob,Bay,,,,,,,, 67 Copyright JAVS 1981-2008 CaseScheduler 2.2 2.1.4 Software Instruction Manual Witness Record Record Description Record Required Column Required Number Field 1 Yes 2 Yes 3 No 4 Yes 5 Yes 6 No 7 No 8 No 9 No 10 No 11 No 12 No 13 No 14 No 15 No Witness Record This record details information about one or more plaintiff representatives assigned to a case. No Field Name Record Identifier Case Number Prefix First Name Last Name Suffix Address1 Address2 City State Zip Phone1 Phone2 Email External ID Key Format ASCII (Fixed) ASCII (Max: 50) ASCII (Max: 15) ASCII (Max: 50) ASCII (Max: 50) ASCII (Max: 10) ASCII (Max: 50) ASCII (Max: 50) ASCII (Max: 50) ASCII (Max: 10) ASCII (Max: 10) ASCII (Max: 14) ASCII (Max: 14) ASCII (Max: 50) Numeric (Max: 25) Description Must be either “107” or “Witness” Unique Case ID assignment CMS Record Identifier (If Applicable) Examples: 105,06RD112501,06RD112501WIT01,,Jay,Walker,,998 Some St,,Louisville,KY,40223,0001112222,, PLAINTIFF,06RD112502,06RD112502PL01,,Bob,Bay,,999 Some St,,Louisville,KY,40223,0001112222,, 2.2 XML Formats An XML document is a text document made up of a sequence of characters. It is a well-formed document that conforms to a set of rules similar to the following: One and only one root element exists for the document. However, the XML declaration, processing instructions, and comments can precede the root element. Non-empty elements are delimited by both a start-tag and an end-tag. Empty elements may be marked with an empty-element (self-closing) tag, such as <IAmEmpty />. This is equal to <IAmEmpty></IAmEmpty>. All attribute values are quoted, either single (') or double (") quotes. Single quotes close a single quote and double quotes close a double quote. Tags may be nested but must not overlap. Each non-root element must be completely contained in another element. The document complies to its character set definition. The charset is usually defined in the xml declaration but it can be provided by the transport protocol, such as HTTP. If no charset is defined, usage of a Unicode encoding is assumed, defined by the Unicode Byte Order Mark. If the mark does not exist, UTF-8 is the default. Element names are case-sensitive. For example, <Step> ... </Step> <Step> ... </step> Copyright JAVS 1981-2008 - a well-formed matching pair - not a well-formed matching pair 68 CaseScheduler 2.2 Software Instruction Manual One of the primary reasons companies utilize XML is because the careful choice of tag and node names for XML elements convey the meaning of the data in the markup thus increasing human readability while retaining the rigor needed for software parsing. To that end, the JAVS import wizard acknowledges such tag and node descriptors, and complies with a predefined XML schema. Most XML editing applications or processing hosts force the XML document definitions to adhere to the schema layout, thus only processing the file if it conforms to the predefined format. Schema details are available from the JAVS Engineering Team upon request. 3.0 External Processing It is foreseeable that third party vendors may desire a managed means of executing external function prior to a file being processed, as well as following execution to perform cleanup or some other pertinent function. The JAVS Import architecture provides for this as follows. 3.1 Pre-Import Processing Pre-import processing is handled external to the JAVS CaseScheduler application via means of a batch command file, PreImport.bat. This file, if found, is executed prior to the import wizard being activated. CaseScheduler processing is suspended until the batch file is finished, allowing the synchronous process to be completed. The location for the file must reside in the same folder as the CaseScheduler plug-in: C:\Program Files\JAVS\JAVSAppHost\Plugin\CaseScheduler 3.2 Post-Import Processing Post-import processing is handled external to the JAVS CaseScheduler application via means of a batch command file, PostImport.bat. This file, if found, is executed after the import wizard has completed processing and has been acknowledged by the user. CaseScheduler processing is suspended until the batch file is finished, allowing the synchronous process to be completed. The location for the file must reside in the same folder as the CaseScheduler plug-in: C:\Program Files\JAVS\JAVSAppHost\Plugin\CaseScheduler 4.0 Log File Specification Each execution of the Import Wizard generates a log file in the same location as the source file being imported. The log file details the entire validation and import process, identifying records that failed to meet the criteria as specified in section 2 of this document. Through this file, end users or technicians can obtain details to what, if any, records were rejected. A sample of the lhe log file format is displayed below: 69 Copyright JAVS 1981-2008 CaseScheduler 2.2 Software Instruction Manual 11/22/2006|10:59:55 AM|Import File = C:\ CaseScheduler\Import Test I.csv 11/22/2006|10:59:55 AM|*********************************************** 11/22/2006|10:59:55 AM|Starting Validation 11/22/2006|10:59:55 AM|*********************************************** 11/22/2006|10:59:55 AM|Checking input file exists 11/22/2006|10:59:55 AM|Opening input file 11/22/2006|10:59:55 AM|Finished input File 11/22/2006|10:59:55 AM|Processed 16 Records. 11/22/2006|10:59:55 AM|Status = Success 11/22/2006|10:59:55 AM|Processed 5 Master Cases with 0 errors 11/22/2006|10:59:55 AM|Processed 11 Case Schedules with 0 errors 11/22/2006|10:59:55 AM|Import File = C:\CaseScheduler\Import Test I.csv 11/22/2006|10:59:55 AM|*********************************************** 11/22/2006|10:59:55 AM|Starting Import 11/22/2006|10:59:55 AM|*********************************************** 11/22/2006|10:59:55 AM|Checking Database 11/22/2006|10:59:55 AM|Checking input file exists 11/22/2006|10:59:55 AM|Opening input file 11/22/2006|10:59:55 AM|Cannot schedule case, start time has already expired on line 2 11/22/2006|10:59:55 AM|User not found for id 1001 11/22/2006|10:59:55 AM|Case already scheduled for date, Record Ignored. Line 5 11/22/2006|10:59:55 AM|User not found for id 1002 11/22/2006|10:59:55 AM|Case already scheduled for date, Record Ignored. Line 8 11/22/2006|10:59:55 AM|Case Does Not Exist. (Case Number IMP04) line 10 11/22/2006|10:59:55 AM|User not found for id 1001 11/22/2006|10:59:55 AM|User not found for id 1001 11/22/2006|10:59:55 AM|User not found for id 1001 11/22/2006|10:59:55 AM|User not found for id 1001 11/22/2006|10:59:55 AM|User not found for id 1001 11/22/2006|10:59:55 AM|Finished input File 11/22/2006|10:59:55 AM|Processed 24 Records. 11/22/2006|10:59:55 AM|Status = Success 11/22/2006|10:59:55 AM|Processed 5 Master Cases with 0 errors 11/22/2006|10:59:55 AM|Processed 11 Case Schedules with 4 errors Sample JAVS Import Log File Format Copyright JAVS 1981-2008 70 CaseScheduler 2.2 Software Instruction Manual Appendix-A ACTIVATION The JAVS software set requires that each user activate the software before it can be used. There are three ways to activate the software; Online Activation, Phone Activation and a 15 day trial period. The first time CaseScheduler is launched an activation message will appear with three choices. Online Activation Select Online Activation and press Next. Enter the Serial Number and Password provided on the Installation CD. 71 Copyright JAVS 1981-2008 CaseScheduler 2.2 Software Instruction Manual After entering the Password and Serial Number press the Finish button and the JAVS CaseScheduler login screen will appear. Type in your user name and password and CaseScheduler is ready to use. Phone Activation Select Phone Activation and press Next. Copyright JAVS 1981-2008 72 CaseScheduler 2.2 Software Instruction Manual A contact screen will appear with the JAVS help desk phone number. Contact the JAVS help desk with the number provided, and give the Pin Number to the help desk technician. The JAVS help desk will then provide you with the appropriate activation code for your particular system. Type this number in the Activation Code field and press Finish. The JAVS CaseScheduler login screen will appear. Type in your user name and password and CaseScheduler is ready to use. 73 Copyright JAVS 1981-2008 CaseScheduler 2.2 Software Instruction Manual 15 Day Trial Period Select the Run Trial and press the Next button. You will get a message indicating how many days are left on your trial period. Press OK and the CaseScheduler login screen will appear. Type in your User Name and Password and CaseScheduler is ready to use. Copyright JAVS 1981-2008 74 CaseScheduler 2.2 Software Instruction Manual Appendix B HELP MENU The Help menu item contains selections for the CaseScheduler Manual and an About information screen. The CaseScheduler Manual selection opens the CaseScheduler User Manual in PDF format. The User Manual is a comprehensive look at CaseScheduler features, and step by step instructions on how to use the many functions. The CaseScheduler User Manual is also available for download at http://galileo.javs.com. The About selection will provide information about the version of CaseScheduler, Libraries, Platform and other pertinent information about your JAVS AutoLog system. This information is useful when calling the JAVS HelpDesk.: 1-877-JAVS HLP (528-7457). 75 Copyright JAVS 1981-2008