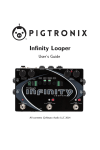
1
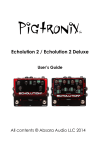
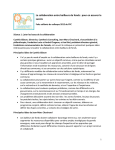
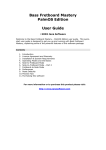
Pigtronix
OFO Disnortion
User’s Guide
All contents © Pigtronix 2006
tm
Index
Welcome………………………………………………………………..…
Anatomy of the OFO………………………………………………….
Getting Started…………..…………………………………………….
Guided Tour…………..…….……………………………………………
Using the OFO Disnortion + EP-1 Envelope Phaser……
Limited Warranty…………………………………………….………
Safety Precautions…………………………..………………………..
Welcome!
Thank you for entering the realm of Pigtronix. Your OFO is a professional
quality, 100% analog distortion pedal that features three original Pigtronix
effects. The “Overdrive” and “Fuzz” effects in this pedal are wired in parallel,
allowing you to blend two separate distortion sounds for a remarkable range of
thick yet articulate sounds. There is also a frequency doubling, “Octava”
circuit, wired in series before the Overdrive and Fuzz. Each of these three
effects can be used independently or in any combination.
In keeping with Pigtronix tradition. The controls on the OFO have been tuned
to provide the fattest possible tone and widest range of musical possibilities.
The OFO will accept instrument or line level signals, making it a suitable effect
for guitars, basses, keyboards, turntables, laptops, studios, amplified brass and
wind instruments… you name it.
Our OFO was born out of a passion for versatile, expressive musical effects; it
is built to last and designed to inspire.
We hope it will provide you with years of creative satisfaction.
Peace,
Pigtronix
Anatomy of the OFO
The Interface:
Jacks
1.
IN – Effect Input - Plug instrument in here
2.
DC POWER 9-15VOLTS – Power input. We strongly recommend that you
use only the 15-Volt, negative tip power supply that came with your
Pigtronix OFO. Using the wrong power supply could result in a damaged
pedal.
*note: The OFO is able to run on 9-Volts, however, for best performance
please just use 15-Volts at all times.
3.
CLEAN – Your clean signal is always present at this jack. When the unit is
powered up. This feature can be used as a side-chain source and also is
ideal for direct recording, as you may wish to track both a clean and a
distorted sound at the same time.
*note: When using the OFO in conjunction with the Pigtronix EP-1, be sure
to connect the OFO Clean output to the EP-1’s trigger input. This will allow
your clean signal to control the EP-1’s envelope follower, regardless of
how much distortion you pile on.
4.
OUTPUT – Effect output – to amp, mixer, recording desk, etc.
Overdrive Controls
5.
LEVEL – This dial sets the output volume of the Overdrive.
6.
GAIN – This dial sets the amount of gain in the Overdrive. Since the
Pigtronix Overdrive is touch sensitive, you can set the gain control higher
than you might on a different pedal and still achieve soft distortion by
playing softly. With the gain set all the way counter-clockwise, the
Overdrive circuit will act as a clean booster.
7.
TONE – This dial sets the cutoff frequency for the Overdrive. Unlike most
overdrive tone knobs, this control is bypassed when it is fully clockwise. As
the tone control is turned counterclockwise, more high frequencies will be
filtered out of the Overdrive sound. You may wish to set this control higher
than you would on an standard overdrive pedal
OVERDRIVE FOOTSWITCH/LED – This footswitch engages the Overdrive.
When the Overdrive is on, the LED above the footswitch will shine blue.
Fuzz Controls
8.
LEVEL - This dial sets the output volume of the Fuzz.
9.
GAIN – This dial sets the amount of gain in the Fuzz. Though not as
drastically touch sensitive as the Overdrive, the Pigtronix Fuzz will still
react to your playing dynamics at high gain settings. With the gain set all
the way counter-clockwise, the Fuzz circuit will act as a clean booster.
10. SHAPE – This 6-way rotary switch allows you to select any one of six
different filters for the Fuzz.
1= Full Range
2= F.A.T. (Mid Boosted)
3= Smooth
4= Treble
5= Mid Scoop
6= Bass
11. FUZZ FOOTSWITCH/LED - This footswitch engages the Fuzz. When the Fuzz
is on, the LED above the footswitch will shine red.
Octava Controls
12. LEVEL – This dial sets the output volume of the Octava. This control is
only active when the Octava is used by itself. When the Octava is used
in conjunction with Overdrive and/or Fuzz, the Octava Level control is
bypassed.
13. FILTER – This dial sets the cutoff frequency of the signal going into the
Octava (and the Fuzz/Overdrive when the Octava is in use). As the tone
control is turned counterclockwise, more high frequencies will be filtered
when the Octava is in use. This is similar to turning down the tone knob on
your guitar. This control is bypassed when it is fully clockwise.
14. OCTAVA FOOTSWITCH/LED - This footswitch engages the Octava. When the
Octava is on, the LED above the footswitch will shine green.
Getting Started
Basic Hook Up
1.
Unpack your OFO and place it on a flat, stable surface.
2.
Make sure you are using the 15-Volt DC (negative center) power supply
that came with your Pigtronix OFO. The OFO will work with 9 OR 12
Volts DC (negative center) but this is not recommended.
Plug the power cord into the 9-15VDC jack on the back of the OFO and
then plug the power adaptor into an electrical socket.
The OFO is now powered up. To turn the device off, unplug it from the
wall or turn off the power going to the socket that the power supply is
plugged into.
Because of the complex switching that is necessary to make the OFO do
all that it does, true bypass was not possible in this design. The OFO
must be powered up for audio to pass through the pedal. When the unit
is bypassed, there is no degradation of the audio signal.
We recommend that you do not leave your OFO powered up for long
periods of time when it is not in use.
3.
Plug your instrument into the “IN” jack and plug your Amplifier into the
“OUT” jack as shown above.
Guided Tour
The following steps guide you through the sonic palette of OFO and show you
how to get at the range of tones that it has to offer.
1.
Set all of the OFO’s controls to the 3:00 position with all three LEDs turned
off. The SHAPE control should be set to #1. Make sure the volume knob on
your guitar is all the way up and that your amp is turned on and set to a
reasonable playing volume.
Overdrive
2.
Turn on the Overdrive, the blue LED should light up. Play softly at first,
gradually playing harder and harder. Notice how the Overdrive responds to
how hard you play. Even greater dynamics can be achieved using your
guitar’s volume knob. Depending on the strength and type of the pickups in
your guitar, the Overdrive LEVEL control should be set between 12:00 and
3:00 to give you a volume boost.
3.
Explore the range of each of the Overdrive controls. Most people prefer to
keep the TONE control nearly all the way up, as this will give you the most
natural sound. Notice how turning the GAIN all the way down and the
LEVEL all the way up gives you a clean boost sound.
4.
When you have explored the Overdrive’s controls, return them to the 3:00
position and turn off the Overdrive.
Fuzz
5.
Turn on the Fuzz circuit, the red LED should light up. Play softly at first,
gradually playing harder and harder. Notice how the FUZZ responds to how
you play. Depending on the strength and type of pickups in your guitar, the
Fuzz LEVEL control should be set between 12:00 and 3:00 to give you a
volume boost.
6.
With the LEVEL and GAIN still set to 3:00, cycle through the six different
filters available from the SHAPE switch. Notice how each of the six filter
shapes gives the fuzz a different voice.
7.
Explore the range of each of the Fuzz controls. Notice how turning the
GAIN all the way down and the LEVEL all the way up gives you a clean
boost sound.
8.
When you have explored the Fuzz controls, return them to the 3:00
position and turn off the Fuzz.
Octava
9.
Turn on the Octava circuit, the green LED should light up. Using the neck
pickup on your guitar, play some single note lines, gradually playing higher
and higher up the neck. Notice how the Octava responds to what you play.
10. Now try some power chords using the bridge pickup.
11. Now, play an open E major chord. The Octava will remain stable with
major chords. Next, play an open E minor chord. As you will quickly notice,
the Octava becomes unstable with some chords and sonic carnage sets in.
12. Explore the range of the Octava TONE control. Notice how as you play
higher up on the neck, the octave up sound becomes more pronounced.
The classic Hendrix Octavia sound can be achieved by using the neck
pickup on your axe, and rolling off either the Octava TONE control or the
tone control on your guitar or a combination of the two. This sound is most
pronounced when you play above the 9th fret.
COMBINATIONS (now the real fun begins!)
Overdrive + Octava
13. Return the Octava controls to 3:00 and turn on the Overdrive so that both
the blue and green LEDs are on. The Overdrive/Octava sound is unique to
the Pigtronix OFO. Dig it. Play low, play high. Notice the increased sustain
and knarly yet expressive grind of this combination.
Fuzz + Octava
14. Turn off the Overdrive and turn on the Fuzz so that both the red and green
LEDs are on. The Fuzz/Octava sound has been available in the past, but
the range of textures offered by the Fuzz’s SHAPE control presents and
unrivaled palette of sonic possibilities.
Overdrive + Fuzz
15. Return all of the controls to the 3:00 position. Turn off the Octava and set
the Fuzz shape control to #4, the Treble filter. By itself, the treble fuzz is
thin and cutting (this sounds amazing with a VOX AC30). Listen to the
Treble fuzz by itself for a moment.
16. Now kick in the Overdrive so that the blue and red LEDs are on. Notice how
all of your low end is injected back into the sound by the Overdrive. Your
high strings will sing with Treble Fuzz and your low strings will grind with
Overdrive. Bring the Overdrive TONE knob back to 11:00 and listen.
17. Put the Overdrive TONE knob back up to 3:00 and then cycle through the
different Fuzz shapes. Try Fuzz shape #5, then #3, then #2, then #1. On
Bass, Fuzz shape #6 plus Overdrive is devastating.
Overdrive + Fuzz + Octava
18. Now for the whole enchilada! Make sure all of the controls are at 3:00 and
set the fuzz SHAPE switch to #2, the F.A.T. filter. Now Turn on all three
effects so that the blue, red and green LEDs are on. This is the sound of
DISNORTION. Enjoy!
Using the OFO Disnortion + EP-1 Envelope Phaser
Here is the recommended way to rig up the Pigtronix OFO and EP-1:
Limited Warranty
Your Pigtronix effect pedal comes with a 1 year limited warranty on parts and
workmanship. During the warranty period we will repair or replace, at our
option, defective parts or pedals free of charge, and return them to the owner.
Warranty service does not include damaged, modified, or misused pedals and
such pedals will be subject to a standard repair charge.
What we will not do: Pay for shipping or transportation charges from you to us,
or pay for any international shipping charges.
What you must do: First, contact us directly via email and describe the
problem to us. If the problem cannot be resolved we will have you send your
pedal directly to us for servicing.
How to contact us for warranty service:
Email: [email protected]
Warranty Limitations: This warranty does not cover defects resulting from
improper or unreasonable use, accident, unauthorized tampering or
modifications; and, warranty shall be considered void if OFO chassis has been
opened. Please consult the instructions and warnings in this manual for proper
use. Warranty is only valid if your OFO has been properly registered within 30
days of original purchase date, and upon warranty registration, will be valid for
12 months from original purchase.
To validate your 1-year, limited
warranty, please register your EP-1,
within 30 days of purchase, on the
web at:
www.pigtronix.com/warranty
Safety Precautions
Please be sure to observe these precautions. The safety precautions listed
below are intended to ensure your safety whenever you use the equipment.
NEVER OPEN THE CASE – Never try to separate the two pieces of the chassis
from one another and/or modify the equipment. Opening this device will
effectively void the warranty.
STOP USE IN CASE OF PROBLEM – Stop using the equipment if ever you should
notice smoke or a strange odor coming from it. Contact your original dealer or
nearest authorized service provider for service.
AVOID HIGH TEMPERATURES & HEAT BUILD UP – Never cover AC adaptor with
cloth or other objects. Built up heat creates a danger of equipment
deformation and fire. Do not expose the OFO to direct sunlight, heating
devices, or other extreme temperatures.
USE SPECIFIED POWER ADAPTOR ONLY – Be sure to use only the 15-Volt DC
Adapter that came with your Pigtronix EP-1 and is specified in this user’s guide.
DO NOT EXPOSE TO WATER/BEER – To reduce the risk of fire or electric shock,
do not expose your OFO to rain or moisture. If water gets inside the unit, turn
off the power supply and consult your dealer or nearest authorized service
provider.
Final Notes
Years of work have gone into making this pedal a reality. We would like to
thank the following people for their help along the way:
Howard Davis, Steve Spano, Lisa Rickmers, The Bethke and Koltai Families,
Verne Andru, Matt Smith, Hugh Pool, Maroon 5, Soulive, Dave Burnett, Nate
Mars, Craig Brodhead, Ed Supple, Analogman, Sky, Candy, Sam and B-Dawg.
The PIGTRONIX OFO Disnortion was designed by Howard “Mick” Davis and David
Koltai during the fall of 2005 in Brooklyn, NY.
That is it folks, now go have fun with your new Disnortion pedal!
Peace,
Dave Koltai & Brian Bethke
Pigtronix