1
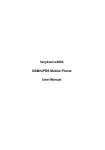
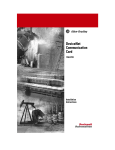
QUICK REFERENCE
DeviceNet™ Configuration Terminal
BULLETIN 193
DeviceNet™ Configuration Terminal
CATALOG NUMBER 193-DNCT
2
DeviceNet™ Configuration Terminal
IMPORTANT
Bill of Material
For complete information, see the DeviceNet configuration Terminal
User Manual, Publication Number 193-UM009A-EN-P, available at
the Rockwell Automation Literature Library:
http://literature.rockwellautomation.com
Your 193-DNCT product package includes the following items:
Item
193-DNCT
193-CB1
193-QR002_-EN-P
Description
DeviceNet Configuration Terminal
1 m DNCT Cable with color-coded bare leads
DeviceNet™ Configuration Terminal Quick Reference
Quantity
1
1
1
Accessories
Description
1 m DNCT Cable with color-coded bare leads
1 m DNCT Cable with microconnector (male)
Door mount bezel kit
Mini-Mini-Micro Tee for connection to ArmorStart
5-pin connector
Catalog No.
193-CB1
193-CM1
193-DNCT-BZ1
1485P-P1R5-MN5R1
1787-PLUG10R
Key Descriptions
Escape Key. Exit a menu or cancel a change.
Select key. Select a value or digit or screen choice.
Increment key. Scroll through options, increase a value, or toggle a bit.
Decrement key Scroll through options, decrease a value, or toggle a bit
Enter key. Enter a menu, enter a mode or enter a value.
Scroll left or right keys. Scroll left or right through a value.
Shift key. Small values (yellow text) on top of keys are entered when after the shift key.
…
Used to enter numbers.
Used to enter a decimal place for a number.
Used to negate a numeric value
Programmable function keys. See DeviceNet Configuration Terminal Setup Menu description.
Used to add a sign character when editing a value.
Programmable Reset key. See DeviceNet Configuration Terminal user manual.
DeviceNet is a trademark of the Open DeviceNet Vendors Association (ODVA). Allen-Bradley and DeviceLogix are trademarks of Rockwell Automation.
DeviceNet™ Configuration Terminal
Shifted Key
Descriptions
3
The following table describes the alternate functionality of each key when it is pressed after the shift
key
Key
Combination
The letter A. Used to enter values in hexadecimal.
The letter B. Used to enter values in hexadecimal.
The letter C. Used to enter values in hexadecimal.
The letter D. Used to enter values in hexadecimal.
The letter E. Used to enter values in hexadecimal.
The letter F. Used to enter values in hexadecimal.
Copy function. Used to copy Class, Instance, and/or Attribute data to the clipboard.
Available on screens displaying a small “C” in the upper right.
Exponential function. Used to enter values in exponential notation
Paste function. Used to paste Class, Instance, and/or Attribute data from the clipboard.
Available on screens displaying a small “P” in the upper right.
Help function. Invoke help information for the current screen.
Powerup
The DeviceNet™ Configuration Terminal is shipped so that when it is placed on the network for the
first time, it will automatically set its baud rate to that of the traffic on the network, and then assign
itself an unused network address. On power up, the following screen is displayed:
Baud = Fixed baud Rate
Auto = AutoBauding
Actual Baud Rate
Actual Terminal Address
Adrs = Fixed HIM MacID
Auto = Auto Addressing
Note that there is a 10-second powerup delay programmed at the factory. The above screen will
appear for at least 10 seconds on initial powerup. The powerup delay can be modified in theTerminal
Setup screen described in the following section. Once the baud rate is determined and a network
address has been set, the terminal will display the “Network Who” screen which displays a list of all
devices on the network.
Note: If the terminal fails to enter the “Network Who” screen, after approximately 20 seconds, it is
because it could not determine the network baud rate due to lack of traffic on the network. Pressing
the ESC key will allow the user to enter the Terminal Setup screen so that a fixed baud rate and
network address can be set for the terminal.
Note: To go directly to the Terminal Setup screen, press and hold the ESC key during powerup.
4
Terminal Setup
DeviceNet™ Configuration Terminal
Enable = Auto addressing on power up
Disable = Use fixed network address.
Enable = AutoBaud enabled
Disable = Use fixed Baud Rate
Fixed Baud Rate setting
Fixed Address setting OR the
starting address for auto address
determination
Powerup delay in seconds
To scroll through the items on the screen, press the SEL key. To change the value of a selected item,
press the Increment or Decrement key. To commit the new value for use, press the Enter (return
arrow) key. To exit this screen, press the ESC key.
Network Who
Screen
The terminal searches for all devices on the network and reports the devices it has found on the
Network Who screen. Use the Increment or Decrement key to scroll through devices. Press Enter
(return arrow) to invoke the “Device Choices” menu.
Searching at this Address
Device Address
Currently selected device
“-“ = Device is not faulted
“~” = Device is faulted
Device Choices
Menu
This menu allows the user to choose what operation is to be performed for the selected device. The
terminal only displays choices that are appropriate for the selected device. The Increment and
Decrement keys allow the operator to scroll through the selections. The Enter key will advance to
the selected operation.
Currently selected operation
Version: Displays Version information for the selected device.
Params: Provides access to configuration and status parameters for the selected device. Allows the
operator to search for parameters that are not at factory defaults.
Copy Cat: Upload and store complete device configurations, including DeviceLogix™ programs to
the programming terminal’s memory. Download stored device configurations from the
programming terminal memory to the selected device.
DeviceNet™ Configuration Terminal
5
Tools: Provides access to Node Commissioning functions, the Class Instance Attribute editor, and the
real time graphing function.
Advanced: Provides access to the DeviceLogix™ editor, DeviceNet IO message timing information,
ZIP configuration, and local input and output status display.
Scanner: If the selected device is a DeviceNet scanner, provides access to simple scanner
configuration values, and access to the scan list.
Parameter
Monitoring and
Editing
Parameters can be accessed by groups, or a numbered list of all parameters that can be accessed. The
Parameter Screen displays all information for a single parameter. From the Parameter Screen,
parameter values can be monitored or edited. Scrolling through a parameter list is accomplished by
pressing the Increment or Decrement keys from the Parameter Screen. Parameters can also be
accessed by entering a parameter number with the numeric keys while in the Parameter Screen. The
parameter screen has the following format:
Press “Shift Copy” to copy parameter
Class, Instance, Attribute info to the
clipboard
Parameter Number
Parameter Name
Parameter Value
Parameter Units
A parameter help string, minimum value, maximum value
and default value are scrolled across the screen here
Parameter values are continuously updated.
Change a parameter value by first pressing the SEL key and then modifying the selected value.
1) Press the SEL key to
select the value
2) The Increment and Decrement keys increment or decrement the value when it
is selected. An edit box will appear when a key is pressed.
OR
Enter a number from the numeric keypad. An edit box will appear when a key is
pressed.
Pressing the Enter key will write the new value to the selected device. When a parameter value is
selected, pressing the ESC key will deselect the parameter value and allow you to move within the
parameter list or group.
Bit-enumerated parameters are displayed and modified as follows:
6
DeviceNet™ Configuration Terminal
1) Press the SEL key to select a
bit to change.The selected bit
name is displayed here
Press the “<” (scroll left) or “>” (scroll right) to
select the next bit
2) Press the Increment (or 0) or Decrement (or 1) key or to toggle the bit value
Pressing the Enter key will write the new value to the selected device. When a parameter value is
selected, pressing the ESC key will deselect the parameter value and allow you to move within the
parameter list or group. Pressing the ESC key will delete all changes that you made and revert to the
previous settings.
DeviceNetTM
Configuration
Terminal Setup
Menus
The 193 DeviceNet Configuration Terminal often refers to itself as a “HIM” (Human Interface Module).
When “This DNet HIM” is chosen from the “Network Who” screen, the following HIM Choices Menu
appears:
Displays version information
Displays the HIM Setup Menu
(shown below)
Allows the user to perform
Faulted Node Recovery for
nodes that fail the Dup Mac
ID test
Displays a DeviceNet communication
error log
Displays and latches Network Diagnostic information such as
Baud Rate, Bus Voltages, Bus Loading characteristics and
CAN errors
The HIM Setup menu allows the user to configure many of the programming terminal features.
Invokes the Terminal Setup screen
described above
Auto Display setup enables the
display of up to 4 parameter
values from one of more devices
at powerup
Sets up the 5 security passwords:
1 primary and 4 secondary
passwords. Primary passwords
enable/disable all editing
functions Secondary passwords
enable/disable editing of the
features presented by the terminal
Configures the operation of the User
Keys: F1, F2, F3, F4 and Reset
Adjust the screen contrast
DeviceNet™ Configuration Terminal
193-CB1 Physical
Connections
7
The 193-CB1 cable that ships with the Configuration Terminal has a plug connection to the terminal
on one end, and color coded bare leads on the other end. The cable’s bare leads are wired to a
DeviceNet connector according to the following table.
Signal
VCan_L
Drain
Can_H
V+
Function
Common
Signal Low
Shield
Signal High
Power Supply
Color
Black
Blue
Non-insulated
White
Red
Troubleshooting
Condition
DNCT does not operate when power is applied, No
text or backlight on display
Possible Cause
Check for proper wiring of the 5 pin DeviceNet connector
Check for 24V DC on the DeviceNet Network
DNCT powers up, but never continues past the
"PowerUp" Screen
Password is set, and then forgot
Verify that the DNCT cable is plugged in to the unit
Verify that there is traffic on the DeviceNet Network.
Press the ESC key. At the Terminal Setup screen, disable "Auto Baud"
and manually adjust the baud rate
Using RsNetworks for DeviceNet, find the DNCT on the network, and
set parameter 2 - "Password Override" to override. This will
temporarily override the password in the DNCT. The old password can
then be viewed and changed from the DNCT. The password is only
overridden until the DNCT is powered down
Publication 193-QR002A-EN-P - November 2006
PN 40754-657-01
Copyright ©2006 Rockwell Automation, Inc. All Rights Reserved. Printed in USA.