1
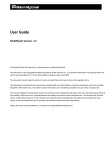
Pool Mirror for HA3969U Systems Application Note Abstract This application note describes how to mirror user data from one HA3969U system to another through the Pool Mirror feature, and in the event of a disaster, how to recover data from the target system when data loss occurred on the source system. Copyright © 2015 Storageflex Inc. All rights reserved. Storageflex is a registered trademark of Storageflex Inc. All other marks and names mentioned herein may be trademarks of their respective owners. The information contained herein is subject to change without notice. The content provided as is, without express or implied warranties of any kind. Table of Contents Product Models Covered by This Document ............................................... 3 HA3969U Family of Unified Storage Systems ............................................. 4 Setting up Pool Mirror and Recovering Data upon Disaster ...................... 5 Procedure Overview ............................................................................................... 5 Step 1: Preparing the Environment ....................................................................... 5 Step 2: Creating a Pool Mirror Pair...................................................................... 6 Step 3: Recovering the Source Data from the Target System ................................. 8 Appendix: Customizing Pool Mirroring Schedule......................................10 2 Setting up Pool Mirror for HA3969U systems Product Models Covered by This Document This document applies to the following product models: HA3969U Systems For more information about deduplication (dedupe), compression, virtualization, snapshot, remote replication, ZFS, backup, storage, network-attached storage (NAS), file sharing and WORM (Write Once, Read Many) folder, please read the user manual. 3 Setting up Pool Mirror for HA3969U systems HA3969U Family of Unified Storage Systems IT environments often feature multiple types of storage infrastructures to accommodate various types of data and achieve different service levels. The scattered boxes for DAS (Direct-Attached Storage), SAN (Storage Area Network), and NAS (Network-Attached Storage) configurations often lead to poor utilization and complicated management. Storageflex HA3969U brings a thorough solution to simplify the situation: it simultaneously serves file and block-based applications on a unified storage platform, and features easy management, optimized resource utilization, high availability, flexible scalability, and competitive price/performance. In addition, HA3969U offers a comprehensive set of advanced software features at no additional costs. HA3969U systems help businesses effectively meet diverse and changing data demand while staying within budget. 4 Setting up Pool Mirror for HA3969U systems Setting up Pool Mirror and Recovering Data upon Disaster To mitigate a disaster's impact on business continuity, data loss and downtime have to be minimized. The built-in Pool Mirror function on HA3969U helps users perform real-time data replication between two different systems. When the primary system goes down, the standby system, which features exactly the same data, can seamlessly take over services at minimized downtime. Mirroring is conducted on storage pool basis. Users need to establish a pool mirror pair between two HA3969U systems (the source and the target) and start syncing user data. When a disaster hits the source system, resulting in the loss of important user data, users can recover the original data from the target system by importing the mirrored pool. Note: Pool Mirror over WAN is not supported, meaning the feature is only available for HA3969U systems located within the same LAN. Procedure Overview 1. Prepare two HA3969U systems, the source and the target, with identical hard drive configurations. 2. Create a pool mirror pair and start syncing user data between the source and the target. 3. Monitor the source system to see if a disaster has affected important data. 4. If data on the source system requires recovering, disconnect the pool mirror pair. 5. Import data from the target system’s mirrored pool to the source system to recover the original data. Step 1: Preparing the Environment 1. In the source HA3969U system, specify or create a storage pool that is going to be mirrored to the target system. 2. Prepare the target HA3969U system that meets the following conditions: The target and the source systems must be of the same model. The target and the source systems must contain identical hard drive configuration. For example, if the source storage pool consists of six 1TB hard drives, the target system must be installed with six 1TB hard drives as well. There should be no storage pool created on the target system. The target and the source systems should NOT share the same host name. To configure the host name, log in to the web interface of HA3969U, and then go to Configuration > System > Host Settings. Both systems should be connected to the same LAN. 5 Setting up Pool Mirror for HA3969U systems 3. Note down the IP address of the target system. Step 2: Creating a Pool Mirror Pair 1. Log in to the web interface of the source system, go to Backup > Pool Mirror, and then click Add to create a pool mirror task. Note: If you want to set the connection timeout period for all your pool mirror tasks, click Options to configure the timeout period. 2. The Pool Mirror configuration window will appear. Specify the parameters: A. Select the storage pool to be mirrored from the Pool drop-down menu. B. Enter the IP address of the target system in the IP address field, and select or deselect the checkbox to decide whether to pause ongoing mirroring tasks when the source system is busy with other I/O operations. 6 Setting up Pool Mirror for HA3969U systems C. Schedule the mirror task. Real-time backup: Mirroring will occur continuously. Note that while this option is the safest of all, it consumes system resources and thus might lead to performance degradation. Backup daily at: Mirroring will occur on a daily basis at the specified time. Customize: Allows users to customize mirroring schedule. For more details on this option, refer to the Appendix section at the end of this document. 3. Click Next to view the summary of the pool mirror schedule. Click Back to modify or OK to confirm. 4. The new pool mirror task will appear in the list. When the sync process starts, the progress will also be shown in the list. 7 Setting up Pool Mirror for HA3969U systems Step 3: Recovering the Source Data from the Target System 1. If you suspect a disaster might have hit the source system, check the delta (differences) between the source HA3969U system and the target HA3969U system in the Pool Mirror list. If the percentage value shows there is a big difference between the source and the target systems, it is very likely that the source data might have been damaged. Click Explorer at the top-right corner and navigate to the pool to see if the original data has been damaged. 2. If the source data does need recovering, the existing pool mirror pair must be disconnected first. Log in to the web interface of the source system, go to Backup > Pool Mirror, select the pool mirror pair, and click the Delete button to disconnect the link between the source and the target systems. Note: Disconnecting the link between the paired systems will not delete the actual data. 8 Setting up Pool Mirror for HA3969U systems 3. Go to Storage > Pool, select the pool that needs recovering, and click Import. 4. The mirrored pool should appear in the list of available pools. Select the pool, double-check the member drive configuration in the Member Drives section, and click Import to start importing the mirrored backup data into the source pool. 5. When the import process is complete, check whether the source pool is fully recovered: A. Check the pool list to confirm that the original pool has been restored. B. Also, click Explorer at the top-right corner and navigate to the source pool to check the contents of the imported pool. 9 Setting up Pool Mirror for HA3969U systems Appendix: Customizing Pool Mirroring Schedule 1. If the Customize option has been selected when scheduling a pool mirror task, the Edit Schedule window will appear. 2. Specify the basic options: A. Enter the optional description in the Description field to give the schedule a short description. B. Choose any of the following from the Start Time drop-down menu to specify when to repeat a scheduled task: Daily: The task will be scheduled to run every day. Weekly: The task will be scheduled to run on specified days of a week. After this option is chosen, select the checkboxes in the Schedule Weekly Tasks to specify the day(s) you want. 10 Setting up Pool Mirror for HA3969U systems Monthly: The task will be scheduled to run on the selected day of a month. After this option is chosen, do the following: 1. Choose the time from the drop-down menus next to Start Time. 2. Select Day of the month(s) and choose a date ranging from 01 to 31, or select The of the month(s) and choose from the drop-down menus to specify a day as the start date (such as first Monday). 3. Click Select Month and select the month(s) in which the task will be scheduled to run. By default, all months are selected. C. 3. Specify the hour and minute of a day to run the task using the two drop-down menus next to Start Time. Click Advanced to set the advanced scheduling options. 11 Setting up Pool Mirror for HA3969U systems A. To set the start date and end date, click in the Start Date and End Date fields, and then choose the dates from the calendar pop-ups. B. The Repeat section, once selected, allows you to configure the duration of the backup job. Every: Depending on your choices, the mirroring task will be scheduled to run every few hours or minutes. Until: Specifies when to stop an ongoing mirroring task. If Time is selected, the task will run until the specified moment. If Duration is selected, the task will run for the specified period of time. 4. Click Next to view the summary of your mirroring schedule. Click Back to modify or OK to confirm. 5. The new pool mirroring schedule will appear in the list. 12