1
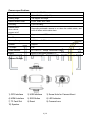
Instructions with the button /interface /indicators
Name
Function
GPS Interface
GPS Signal input
Instruction
Connect the GPS module to the camera for GPS
signal
1. Connect the voltage transformer cable to supply
USB Interface
1.For camera power
power to turn on the camera.
source.
2. Connect the voltage transformer cable to supply
2.Used to adjust the
power to charge the camera.
view angle of
3. Connect the unit to the computer with USB cable
camera.
to adjust the view angle for of the unit before fixing
the camera.
HDMI Interface
SOS Button
Full HD video output
HDMI is for HD video output (default read-only)
Pressed button to
Press SOS button under recording to lock the files
lock the files
and protect them from cycle covering.
1.Boot indication
Indicators
2.Charging indication
3.Recording
indication
1. Blue indicator turns on means the battery is
charging, and when fully charged, the camera will
turn off.
2. Red indicator turns on when booting.
3. Red indicator flash when recording.
Insert the TF card to the card slot with the metallic
pins side towards the front of the camera. Then lock
TF Card Slot
Memory card slot
the slot with the screw. Seal the screw with a “Clarifi”
fragile label to secure the TF card. (Authorized
personnel only)
When the red indicator stops flash during recording
RESET
Reset function
and the unit crashes press the RESET button to
restart
5 /16