1
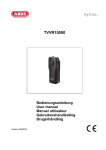
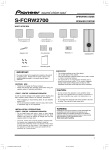
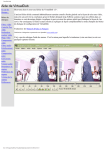
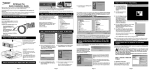
Hyperview Cam HC-200
User Manual
www.hyperviewcam.com
(English)
www.hyperviewcam.de
(Deutsch)
Ver. 150904
Tecell Elektronik
Thank you for purchasing HyperviewCam HC-200.
This manual contains important safety information, product description and instructions to use HC-200
The latest version of this guide can be downloaded from the website www.hyperviewcam.de
Before using the product, please read the contents of this manual!
Technical or editorial errors and improvements are possible.
The product and its properties can be modified to the user without prior notice at any time.
Warranty and Support
The webpage and call center address information: http://www.hyperviewcam.com
User can also download the most actual information from this website.
HyperviewCam camera is provided with 2 years warranty.
Copyright and Trademark
This document is protected by copyright and all rights are protected by law.
Any part of this document without the prior written consent of us cannot be duplicated, copied, modified, and
translated except for the case of permitting by the Copyright.
Input: 13,8-12V DC
10R-04.1382
Content
1 Safety and Precautions
2 Included components
3 Optional Components
4 Camera components
5 Installation
6 Configuration commands
7 Configuration of the camera - manually
8 Configuration application
9 Operation
10 Camera modes
11 Export of live videos
12 Memory capacity
13 Playing of individual video files
14 VideoStitcher: Player mode
15 VideoStitcher: Recovery of defective Videos
16 VideoStitcher: Stitcher mode
17 VideoStitcher: Usage
18 VideoStitcher: Optimization of calibration parameters
19 Specifications
1 Safety and Precautions (1/2)
If you do not comply with the following contents,
Warning
it may
cause damage
to thecontent,
user. it may
If you do
not comply
to following
Warning cause damage
to users and goods!
Power
Power supply
Do not use the damaged or converted power cable, to use
only the cable provided from manufacturer. It can cause
vehicle damage and injury to the user by fire or explosion
accidents.
Use Rated voltage of the car only.
Do not use it by arbitrarily connect the power cable. Fire
or malfunction may occur.
Installation
Installation
Do not install at the places having high humidity or highly
flammable liquid or gas. Explosion or fire may be caused.
Do not keep inside of a vehicle under direct sunlight and
expose it to high temperatures. This can be the cause of a fire
or malfunction.
Do not install at the field of driver’s vision. It can interfere
the driver’s vision and may occur the accident.
Plug in the USB cable and video cable correctly. Otherwise, fire
or malfunction may occur.
Use
Usage
Keep away from highly flammable and explosive gases and liquids.
This may cause an explosion or fire sit up.
Do not insert metal or flammable substances at the slot of memory
card or the code. Electric shock or fire may be caused.
Do not operate with wet hands. This may cause an electric shock.
Do not leave the products and accessories around babies and children.
Swallow small accessories can cause serious injury or even death.
Do not cover the operating product with a cloth. By heating, a fire or a
malfunction may occur.
Do not control the black box on driving. It can cause accidents.
1 Safety and Precautions (2/2)
Installation
Management
Do not install always power randomly. Damage of the
product and car may occur. Please get advice from the
professional installer for assistance.
Do not leave the product and accessories around pets. Explosion or
malfunction may occur due to the debris of pets.
Use
If you are not using the product for an extended period of time, do
not leave it while the power cable is connected to the product.
Fire or malfunction may occur.
Do not add excessive force onto the product and the
lens. This may cause a malfunction.
Do not move it while the products is being plugged to the cigar
jack or cable. Fire or electric shock may result.
Do not use awl or a sharp object to the product. This
may cause a malfunction.
Do not spray water or wax directly on the product.
Electric shock or malfunction may be caused.
If you are using a black box for a long time, it may cause
burns due to the temperature generated inside.
Do not disassemble, modify the product. Please ask
check and repair to the A/S center so that you prevent
damage, loss of data.
Note
Note!
Product features and manual can be changed for enhancement the
quality and functions without prior notice.
Some or all of the user manual can not be copied without
permission.
We are not responsible for damage by data or product loss in all
other cases, such as the accidents, or failure of the product.
2 Provided Components and Parts
Components
1) Holder with self adhesive tape
2) Hyperview Cam HC-200
3) Video output cable
(3m long)
5) Mini CD incl.:
- Hyperviewcam VideoStitcher/Player
- Setup Programm
- User manual (EN and DE)
※ Product’s components can be changed for enhancement the
quality and functions without prior notice.
4) Power Cable
(3m long)
6) MicroSD Card Adapter
7) MicroSD card
8) Printed user manual (DE)
3 Optional Components
SD-Card to USB Adapter
Video-Ausgangskabel
(4-pole-RCA)
GPS-Receiver
Optional parts you can purchase from your HypervievCam supplier or www.hyperviewcam.com
4 Camera
1
1 Big Blue Button
Short press: Manual Recording Video
Long press: Camera Power ON / OFF
Function Buttons
2
3
5 Power connector (DC 13,8-12V)
Connect the power cable.
(Car Cigarette lighter Socket)
6 External TV/Monitor output
Use provided monitor
cable to see live videos
on external device
4 3 2
4
Short: MIC REC ON / OFF
Long: Voice (beep) ON / OFF
Short: Manual recording
Long: Parking mode entry / release
Long: SD FORMAT entry
5 6 7
7 GPS slot
Connect optional HC-200
GPS receiver into this slot.
Soundspeaker
camera voice informs about camera
status
Cooling Grille
This grid allows natural air circulation and
cooling of the camera and
should never be covered or the airflow must not
be prevented!
Two HD - Cameras
For two synchronised Video channels
(left and right channel)
5 Installation (1/2)
Identify appropriate place for the camera
Insert the MicroSD card into camera
● In most cases is the best place behind the mirror in
area cleaned by wipers.
Nottice by wipers cleaned area!
Camera should not obstruct driver view!
Camera can be mounted hanging on windshield
or reversely on armature.
Insert micro SD card always with the gold color contacts
facing down, towards “SD CARD IN”!
5 Installation (2/2)
Join the camera and the holder.
2.1 Mount
camera
hanging
or inversely,
2.2 staying
Insert the power
cable jack
into camera.
Optionally you can connect
With provided TV cable also
external monitor to see
Videos* live.
*With the command tvout:x; //x: 0, 1 (wide,
narrow) you can set how wide will be video
provided on Tvout slot
*)
When using the camera with empty internal battery, internal camera battery needs about 1
hour of camera operation to be sufficiently charged, to enable camera to properly close actual
video, when sudden power interupption occur,.
Notice by wipers cleaned area on the
windscreen. Find a suitable location for
the camera. Remove the protective strip
from the adhesive foil and attach the
bracket with the camera on 2.1 the
windscreen or 2.2 inversely on the armature.
Insert cigarette lighter jack into
cigarette lighter slot.
Camera recognise quick increase of
voltage and turns On automatically.
Camera records video when camera
voice says “Normal recording” or
“Normal mode” enabled“.
The camera battery is charged* if after
the power interruption, the camera
voice says: "Because of instable power
supply the camera shuts down."
6 Configuration
Nr.
Bedeutung
Beispiel
Wertebereich
Standardwert
1
Soundspeaker volume
spk:8;
1-8
6
2
Microphone sensitivity
mic:6;
1-6
6
3
G-Sensor sensitivity
gsensor:2;
1-5
3
4
Movement recognition sensitivity
motion:2;
1-3
2
5
Permanent recording
normalsave:1;
0 oder 1
1
6
Activate front LED-light when recording
secureled:0;
0 oder 1
0
7
LED1 and LED2 in Parkmode active in Sec.
parkled:0;
0, 5-10
5
8
Rotate recorded videos
rotate:0;
0 normal, 1 opposite
0
9
Videocompression left camera (Mbps)
Camera0:8;
4-12
8
10
Videocompression right camera (Mbps)
Camera1:8;
4-12
8
9
Setup Date and Time
rtc:2014-02-24-00-18-10;
yyyy-mm-dd-hh-mm-ss
actual PC time
10
see date&time in videos
disp_date:1;
0 or 1
1
11
see G-Sensor values in videos
disp_sensor:0;
0 or 1
0
12
see GPS-coordinates in videos
disp_gps:0;
0 or 1
0
13
see Speed (per GPS calcualted)
disp_speed:0;
0 or 1
0
14
Light sensitivity (only default value)
night_brightness:5;
5
5
15
select Videoformat on connector
tvout:1
0 or 1
1 (narrow)
16
Power Off Voltage
poffvol:117;
11,0 – 12,3V
117
17
Parking Voltage
parkvol:125;
12,4 – 13,1V
125
HyperviewCam works in two main modes: 1) driving mode and 2) parking mode.
After switching on, the camera is always in the driving mode.
1) In driving mode:
1.1) when default setting or "normal save: 1;" runs the "Permanent recording" (permanent, the camera permanently takes 1-minute videos)
1.2) when "normal save: 0;" is "Permanent Recording" disabled (camera takes videos only when button pressed or g-sensor activates recording)
1.3) user can press button and so start manual recording (-30 till +15 seconds from pressing the button) and take one 45 seconds long video
1.4), G-sensor can activate 1 video recording (camera takes 1 Video -30 till +15 sec. from vibration)
By long pressing the key 3, the user can enable the "parking mode". (for this mode is permanent power supply required)
2) In the Park Mode:
2.1) motion detection starts one video recording (-30 till +15 sec.)
2.2) user can manually start recording -30 till +15 sec. video
2.3) G-sensor can activate recording of one -30 till +15 sec. video due to vibration
7 Configuration of the Camera – manually
Example for the setting of:
Volume, G-sensor sensitivity, date and time and
the broader video on the video output jack.
In a text editor program write following commands and parameters. (see example)
(Filecoding: ANSI, Filename: tnn_config.txt, Directory: root of microSD-Card)
Save the commands in a txt file named: "tnn_config.txt" into the root directory on the microSD memory card.
Insert the memory card into the camera and turn on the camera.
Each time, when camera power on, it looks after "tnn_config.txt" file in the root directory of the memory card.
If tnn_config.txt file present, camera executes existing commands and then deletes tnn_config.txt" file.
Please note:
Do not forget at the end of each line to put the character "; "!
Misspelled commands are ignored by the camera.
The file "tnn_config.txt" is not deleted until all configuration commands have been executed.
It is not necessary to apply all existing commands each time. Use only those commands that you need.
"RTC" - command configures the date and time and is subject of automatical change. For example, when the camera's internal battery is
empty, the camera loses the set date and time. At next start of the camera, the camera automatically configures the date and time on the basis
of the last recorded videos in the memory card so the order of the videos, remain maintained based on the date and time.
Alternatively, you can use HyperviewcCam setting program, which creates "tnn_config.txt" file and saves it under C:.
(Install from attached MiniCD or download it from http: www.hyperviewcam.de)
8 Configuration application
Configuration program produces tnn_config.txt file and places it on the "C:" partition.
Not necessary commands you can delete in an editor.
Then copy the tnn_config. txt file on the microSD memory card, insert the memory card into the camera and start the camera.
After the start, camera looks every time in the root directory of the memory card, if the file is tnn_condfig.txt available, it executes the
commands and when configuration is finished, camera deletes the file tnn_config.txt on microSD Card.
9 Operation
Turn on the camera:
Plug the power cord into the camera.
Plug the other side of the power cord into the 12V DC cigarette socket.
(Camera do not operate with 24V DC!)
When the camera power supply is quickly increased by more than 1V, the camera
automatically turns on. (Camera detects the fast rise of voltage!)
After power On, the camera starts in normal mode saying “Normal recording" and it
continuously takes 1 min. long video pairs (channel L and R).
You can now e.g .:
- Press the button1 (T1) or key 3 (T3), then "Manual recording" is triggered.
- Press T3 and hold to switch to “Parking mode” or back to “normal mode”.
- Short-Press T2, so that the microphone is switched on/off.
- Long-Press T2, so the voice announcements are turned off/on.
- Long-press T4 to begin formatting the memory card. Short-press T4 button again to confirm
the formatting process, or press any other key to not to begin formatting.
With the command "Save normal = 0;" in “Driving mode” you can disable permanent
recording. Then camera records 1 video only when video recording is activated manually by
pressing the button 1 or 3 or when G-sensor activates video recording.
With the command "normal save = 1;" you can activate the function "Permanent Recording"
in driving mode again.
When you take completely new camera into operation, check that the internal battery is
charged! Turn the camera on and after about 10 seconds, unplug the power cord out of the
camera. If the battery is charged, then you can hear the camera voice telling: "Unstable
power supply. Camera turns off. If you don’t hear this message, charge the camera by using
it for about 1 hour. After approx. 1 hour, internal battery should be enough charged to
allopw camera to complete actual video and say that it turns off because of instable power
supply.
T4
oben
T3
T2
Button 1
10 Camera modes
1) Driving mode:
After switching on, the camera is in driving mode. In this mode, the function "Permanent Record"
is activated: This is the default setting. Also after the execution of command "normal save: 1;"
the camera takes continuously 1 min. long videos on (left and right video).
After execution of the command "Save normal: 0;“ then video recording of (-30 to +15 sec.) videos is
only activated manually, by presing the button 1 or 3 or by G-sensor.
Videos are stored in the folder “normal”.
In Chapter 12 you can read about the maximum size of each folder.
2) Parking mode:
Long-Press key 3 to change between Normal mode and Parking mode.
In parking mode, video recording will be triggered by:
- Motion: When image changes sufficiently rapid the camera detects motion and activates the
recording of the video. The motion sensitivity can be set by the command "motion = 2;“ [in range 1-3].
- Vibration: When the vehicle is vibrating, the G-sensor can, depending on the selected sensitivity,
detect vibration, then recording of video (-30 to +15 sec.) is activated. Sensitivity of the G sensor means
"Gsensor: 3;" [in range 1-5]. Those videos are saved in the folder "parking".
a) Manual recording:
After pressing button 1 or 3, the camera saves a 45-second video, which started 30 seconds before
pressing a button and ends 15 seconds after the button is pressed.
The user can start "Manual Recording“at any time.
Those videos are saved in the folder "user".
b) Event Recording:
Is activated by G-sensor, when a vibration activates recording. The G-sensor has 5 sensitivity levels and
can by changed for example with "Gsensor: 1;".
Those videos are saved in the folder "event".
T4
oben
T3
T2
Button 1
11 Exporting Live-videos
Connect the camera with the monitor/TV using the enclosed video cable.
1
2
3
4
Plug RCA plug in a monitor.
•
Use only the enclosed original cable, otherwise the connected devices may not operate properly and cause damage.
External GPS
12 Memory capacity
Depending on whether the function "Permanent Record" by command "normalsave" [1 or 0]
is enabled or not, the space on the microSD card will be divided accordingly.
In driving mode and permanent recording state (normalsave = 1;) 4 directories are partitioned: Normal/Event/Parking/Manual in the ratio
6:2:1:1. Approximately 10% of the memory can not be used for videos. With 16 GB microSD card, it looks something like this:
Größe der SD MicroKarte
bei 16 GB
Ordnername
Ordnergröße
Normal
8700 MB
Videokompression
bei 8 Mbps
bei 6 Mbps
bei 4 Mbps
145
217
290
Videomodus
Event
Parking
2900 MB
1450 MB
Zeitliche Videospeicherkapazität [Min.]
96
48
145
70
193
96
Manual
1450 MB
48
70
96
Da jedes Video eine Minute lang ist, entspricht Minuten-Angabe gleich Anzahl der L-R-Videopaare
Standardwerte sind fett markiert.
Ordnername
Ordnergröße
Normal
8700 MB
Speichergröße
Video- kompression
bei 6 Mbps
32 GB
16 GB
8 GB
290
217
145
Videomodus
Event
Parking
2900 MB
1450 MB
Zeitliche Videospeicherkapazität [Min.]
193
96
145
70
96
48
Manual
1450 MB
96
70
48
Da jedes Video eine Minute lang ist, entspricht Minutenangabe gleich Anzahl der L-R-Videopaare
Above directory-limitations are relevant only for camera, it means camera don’t put more videos into particular directory. If directory
is full, camera delete oldest video pair, before storing new video pair. With 16 GB memory card and video compression standard
8Mbps, about 145 "normal" video (L and R channel) are stored. Camera can store double more videos on 32 GB microSD card.
When disabling “Permanent recording” with command “normalsave = 0;" camera will format memory card and establish only 3
directories on microSD card: Event/Parking/Manual (Directory “Normal” is disabled, because of no permanent recording) with the
ratio 4: 3: 3. With config command "normalsave = 1;" camera will reformat the memory card and form 4 partitions incl. normal
directory for permanent recording videos.
Please note! During each formatting process or mode change by command "normalsave=[0:1];" all data on microSD card (incl. Videos)
will be deleted! Move your important videos on another storage medium prior to changing the configuration using the "normalsave".
13 Playing individual video files
1
2
Insert the microSD card from the camera into PC. If necessary, use the
supplied card adapter.
PC recognizes the memory card as a new partition and
opens a window to the directory "camera".
Click on directory “camera” to see other directories.
3
You can select a left or right video file. The player
automatically selects the appropriate L or R video file and
play them together, then the next in chronological order.
Please note that every single HD video file can be more
than 60 MB in size and therefore player requires
appropriate performance of the PC and sufficient RAM.
Bitte beachten:
4
event: by G-sensor activated recordings
normal: “continuous recording"
parking: motion detection + G-sensor activated recordings
user: manually activated recordings (press the button)
Make a backup of important files as soon as possible!
It could occure any problem with the memory card (eg. camera can
not read memory card) or formatting the memory card incl. loss of
data is necessary (when useing command “normalsave”).
14 VideoStitcher: Player Mode
1
2
3
4
5
6
7
17
8
19
18
9
10 11
12
13
1 Switch to Player mode when in the Stitcher mode
2 Switch to Stitcher mode when in the Player mode
3 Check if new software version is available
4 Settings (select language, enable/disable automatic updates)
5 License information
6 Online user manual
7 Volume
8 Open/Close Menu part
9 Shift right video vertically till adjusted to left video
10 Select type of overlapping (“Left” is recommended)
11 Adjust overlapping (move videos left-right till adjusted
12 Select folder with dual Videos (L and R video)
14
15
13
14
15
16
17
18
19
20
21
22
23
21
20
23
22
16
Select single video pair
Select folder with stitched videos (single files)
Select single stitched video
Slider for position in the video
Go to previous video
Play
Pause/Play
Stop
Go to next video
Repeating On/Off
Switch between: Repeating “All videos” or “1 Video”
15 VideoStitcher: Recovery of defective videos
1 2
In Player mode, can Videostitcher repair defective videos. See icon 1 and 2.
Repaired videos have no sound, but can be played normally and exported into one good stitched file.
For example, you use completely new camera and the internal battery is not charged or after long time internal battery no more works. When
suddenly power interrupt occur (engine turned off -> camera power supply is interrupted), camera is not able to properly close video before it
turns off. Then last recorded video remains unusable.
Therefore, every time when user select directory with videos, player checks if videos in selected directory are ok. If not, defective videos are
marked red and also icon 2 appears. If user select particular red video then also icon 1 appears.
After clicking the icon
only selected video red pair will be repaired*.
After clicking the icon
all red video pairs in deirectory will be repaired.*.
*) Repaired means: From red (faulty) video pair (L and R video), an additional, blue (repaired) video pair is produced with the suffix "_fix" and
stored in the same folder. The defective red video couple receives the suffix "_bad" and is no longer visible in the Player list. (is in Windows
Explorer as "_bad.mp4" file visible). If there is no more space available on the disk for new videos, the application asks the user to define where
repaired videos should be saved.
16 VideoStitcher: Stitcher Mode
1
See Video-Player Mode
2
Stop
3 4 5 6
7 8 9
10 11
12 13 14
1 Open video
2 File name
3 Select size 100, 75, 50 or 25% of the recorded video as an input video size
for video editing (100% recommended)
4 For size selected under 3, recommended output video size in pixels while
maintaining the side ratio (fewer pixels cause loss of quality in the video)
5 Confirm to use recommended video output size in pixels
6 It is also possible to enter other pixel size for width/vertical
7 Adjust optimal overlapping of videos
8 Adjust the angle "L" and "R" cameras (0 is recommended)
9 Vertical adjustment of right video
10 “Radial” corrects fish-exe distortion, “None” means no correction.
11 Select type of overlapping of videos (“Left” is recommended)
12 Select to which video (L or R) contrast and brightness apply
13 Adjust contrast
14
15
16
17
18
19
15
16
17 18 19
20 21
22 23 24 25
Adjust brightness
Left click on the "K1" or other to set +/- changing step
Enter parameters numerically or adjust with "+" and “-”
Select which video affect calibration settings
Import/Export calibration parameters as Zip file
Left-click: Reset current calib. values to initial values.
Right-click at 100% scale (3): Calculate and propagate current calib.
parameters at 100% also for 75%, 50% and 25% scaling.
20 Export current video scene as PNG image
21 Cut current video format from 4 sides
22 Stop exporting stitched video
23 Disable/enable sound in exported video
24 Export stitched video
25 Shows the progress of the video export to
17 VideoStitcher: Usage
1 Installation
The HyperviewCam VideoStitcher requires at least Microsoft .NET Framework 4 on PC to function properly. Before installing the
VideoStitcher, install the Microsoft .NET Framework 4 or higher if it is not already on your PC.
Windows8 already comes with the Microsoft .NET Framework.
The free "NET Framework 4" can be found by googling on the www.microsoft.com website.
The supplied CD contains the HyperviewCam VideoStitcher Installer, which installs the VideoStitcher on your WinXP, Win7, Win8
system.
2 Usage
The VideoStitcher opens after starting in the Player- or in Stitcher-mode.
After the opening of the program click on the icon
for Player- or on the icon
for Stitcher-mode.
When program is closed it saves current settings. Next time Videostitcher starts again with the last settings.
For each camera is necessary to adjust one time individual height adjustment and the overlay.
2.1 In Player mode:
Select directory where dual videos are placed. If available select also directory with stitched videos. Start a video by clicking the video
and optionally also click the Play button.
Always first make height adjustment of right video, then adjust overlay.
In Player mode, no fish-eye corrections can be carried out.
You can pause a dual video with the button "Pause“, then go to stitcher mode by pressing
and there adjust options and export
current video, then come back to player, to the same video frame (the same position in video).
2.2 In Stitcher mode:
In Stitcher mode always first press Reset button to activate the existing default correction, overlapping and calibration parameters.
Then set for your camera individual optimal combination of height adjustment and overlapping .
Now you can also select most interesting scene and adjust optimal contrast.
You can export current scene as a png image or export into specified directory with or without sound current dual-video into into single-file
video.
In Player mode, in the window “Stitched videos” you can select directory where stitched videos are. After selecting directory, stitched
videos are listed and can be selected and played.
18 VideoStitcher: Optimisation of calibration parameters
In Stitcher mode you can improve existing calibration parameters by yourself:
1) Export the existing standard parameters as ZIP file by pressing "Export", so you will create your backup of standard parameters.
2) Set ithe input video scaling (in %) to 100%.
3) Open a video, which shows some regular rectangular structure (grid, ceramic plates, house storefront with vert./hor. lines, etc.)
4) Under “Undistortion method” select "None"
2)
5) Adjust both videos to fit vertically by using “Vertical offset”
6) Select left or right camera and optimize the parameters (FCX, CCX, FCY, etc.).
By clicking on a parameter name (eg K1), parameter value field frame
becomes green. Then you can adjust the changing step
4)
Use proper value for Overlapping.
7) Once you have your optimal parameters found for 100%, right-click
On Reset button set those parameters as new standard parameters
5)
and to propagate those new parameters also to 75, 50 and 25% scalings.
ZIP file with the current standard parameters can be downloaded from
our website www.hyperviewcam.com
6)
9) If the new parameters are after all not better, you can easily import old parameters as ZIP file
with button "Import". Just press “Import”-button, select directory and relevant ZIP file.
10) If you think your calibrations parameters are
better than standard parameters you received
with the stitcher, then please send us zip file with
exported parameters and we will publish it on our
web page allowing other users to download those
parameters.
19 Specifications
Model name
Hyperview Cam HC-200
Colour / Dimension / Weight
Schwarz / 107x59x29mm / 88g
Memory
Micro SD
up to 32 GB
normal (mit/ohne ständige Aufnahmen)
Recording mode
event
manual
1280x720p x2, 30 fps
parking
Recording angle
left camera: 120°, right camera: 120°, together: ~200°
Video
1280x720 (L/R each)
Sound
Built-in microphone
Built-in soundspeaker
HD 1280x720p 30fps
mono
1
Acceleration sensor (g-sensor)
driving-mode
Acceleration sensor (g-sensor)
parking-mode
level I: 3.2G, level II: 2.8G, level III: 2.4G (standard), level IV: 2.0G, level V:
1.6G
Power supply
12V DC (11,1V till 13,8V)
Power consumption
max. 2W
Operating temperature
/Storage temperature
Operation: -10°C~70°C / Storage: -20°C~85°C
Live Video Output
Through TV-out socket with the supplied RCA cable
(two video width setup with the command "tvout")
level I: 1.6G, level II: 1.4G, level III: 1.2G, level IV: 1.0G, level V: 0.8G
www.hyperviewcam.com