1
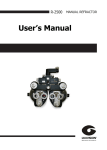
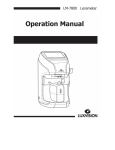
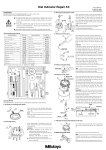
USER’S MANUAL PUPILOMETER
PM 200
Notification
Dear Users,
Thank you for your purchase of PM 200 Pupilometer. Please take time to read our
user’s manual carefully before use.
This guarantees you to make full use of this unit and prolongs the operation life of
this unit.
Content
1.
Function Introduction .....................................................................................4
2.
Name of Parts ...............................................................................................5
3.
Operation ....................................................................................................11
4.
Maintenance ................................................................................................16
5.
Specifications ..............................................................................................17
1. Function Introduction
1.
Uses
PM 200 is a digital precision optical instrument used to measure stance between
human pupils in the process of optometry for fitting ectacles.
2.
Characteristics
This device is designed in a scientific and reasonable way, integrating technologies
on optics, mechanism, electricity and microcomputer into whole.
• Using an optical method to realize hairspring orientation which places the
mechanical orientation
• Adopting a full-digital design to effectively eliminate error optometrist’s artificial
measurement, thus allowing objective and precise measurement of patient’s
pupuillary distance
• Save energy for low power design
• A flexible baffle design convenient for storage which avoids possible
embarrassment in operation.
4
2. Name of Parts
2.1
Description of the Front Panel (as shown in Fig.1)
8. Nose Bearer
4. Display
Window
10. Observation
Window
3. Lens Pupil
Measuring Key
2. Right Pupil
Measuring Key
1. Reset
6. Pupillary distance
Conversion Key
7. Measuring State
Transition Key
5. Memory key
9. Measuring
Window
Fig. 1
1. Reset
Press this key to actuate the device. In the process of measurement, pressing
the key will enable measured data of the device to be reset to the initial status.
2. Right Pupil Measuring Key
It is used to measure right pupillary distance. Pressing outer side of the key
will make pupillary distance pointer move towards nose bearer. At this time,
the right eye pupillary distance and binocular pupillary distance reduce in
numerical value, and then every pressing of the key allows pointer of the
pupillary distance to move 0.5mm and Right data reduce by 0.5mm.
Pressing inner side of the key will make the pupillary distance pointer move
5
in opposite direction of the nose bearer. Now numerical value of the pupillary
distance increases, and every pressing of the key will enable the pupillary
distance pointer to move 0.5mm, with Right data being increased by 0.5mm.
3. Left Pupil Measuring Key
It is used to measure left pupillary distance. Pressing outer side of the key
will make pupillary distance pointer move in opposite direction of the nose
bearer. At this time, the left eye pupillary distance and binocular pupillary
distance rise in numerical value, and then every pressing of the key allows
pointer of the pupillary distance to move 0.5mm and Left data increase by
0.5mm. Pressing inner side of the key will make the pupillary distance pointer
move towards the direction of the nose bearer. Now numerical value of the
pupillary distance decreases, and every pressing of the key will enable the
pupillary distance pointer to move 0.5mm, with Left data being reduced by
0.5mm.
4. Display Window (as shown in Fig. 2)
It displays the measured numerical value of pupillary distance and some other
relevant information.
1. Binocular Pupillary Distance
4. Reading of Binocular Pupillary Distance
3. Left Eye
Pupillary Distance
2. Right Eye
Pupillary Distance
6. Reading of Left Eye
Pupillary Distance
5. Reading of
Right Eye
Pupillary Distance
11. Left Eye
Measuring State
9. Binocular Measuring State
10. Right Eye Measuring State
8. Memory State
7. Display Value of
Optic Distance
Fig. 2
Note
When reading information on the display window, the Right value denotes the distance
between center of nose bridge and right eye pupillary distance, and the Left value
denotes the distance between center of nose bridge and left eye pupillary distance.
PD value stands for the distance between left eye pupil and right eye pupil. The unit
is mm.
6
Important Matters
Information on the reading display window do not appear simultaneously, instead,
they will appear only when you need to measure a given state.
5. Memory Key
It is used to store the current data. Press the key once to save the data and
press again to cancel the saving. During the saving, the device’s function
of measuring pupillary distance is deactivated, lighting source inside the
device switches out and the device does not shut off automatically.
6. Pupillary Distance Conversion Key (TDIS)
It is used to conduct conversion of measured value of pupillary distance at
different optic distances of 30cm ~ ∞.
7. Measuring State Transition Key (BIN)
Monocular pupil measurement of left or right pupil is realized by pressing
this key, there by making conversion of left or right pupil measurement and
simultaneous binocular pupils measurement available.
8. Nose Bearer
A testee’s bridge rests on the nose bearer so that the device and position
of the testee’s pupil is fixed.
9. Measuring Window
The working window of the testing personnel.
10.Observation Window
Two windows provided for a testee to stare at the target with His (her) eyes.
7
2.2
Description of Rear Panel (as shown in Fig.3)
5. Forehead
Bearer
2. Baffle Switch
1. Baffle
3. Battery Box
4. Preset Screw
Fig. 3
1. Baffle
It is located at bottom of the instrument. For operation, turn on the switch
and then lay down the baffle to separate observer and testee.
2. Baffle switch
It may move up and down to draw in and lay down the baffle.
3. Battery box
Two battery boxes are available at the bottom of the device, one on the left
side and the other on right side, each with 2 pieces of 5# AA batteries.
4. Preset screw
It is located under the baffle, which is visible only after the baffle is laid down.
The specification is English standard 1/4”, a camera tripod can be fixed for
the convenience of user.
8
5. Forehead bearer
The testee’s forehead reasts on the forehead bearer so that the position of
his pupils is fixed.
2.3
Viewed from the Measuring Window (as shown in Fig.4)
Pupillary Distance Pointer
The widths in the observation windows of the device are 0.45mm vertical black
lines, one in the left window and the other in the right window. Pressing measuring
keys of the left and right pupils will make the pointer move on the reflecting light
dot of the human pupil, thus permitting measurement of the pupillary distance.
Pupillary distance pointer
Observation window
Fig. 4
Important Matters
When the single-face pupillary distance pointer reaches the maximum or minimum
range of measurement (maximum value 41.5mm as shown in Fig.5 a or 22mm
as shown in Fig.5b) after pressing left or right pupillary distance measuring key
to move the pupillary distance pointer, the area of measuring window outside the
range of measurement becomes black. At this time, the pupillary distance pointer
is invisible in the measuring window and can be observed only after adjusting the
left or right measuring key of pupillar distance in reverse.
9
Black area
Black area
Observation window
Fig.5a (It is the state of the observation window
when pupillary distance pointer reaches 41.5mm)
Observation window
Black area
Black area
Observation window
Fig.5b (It is the state of the observation window
when Pupillary distance pointer reaches 22mm)
2.4
Viewed from the Observation Window (as shown in Fig.6)
Target to be stared at
In the middle of an eyeball-shape circle in the center of the device’s inner visual
field, there is a green target image surrounded with a bright ring. A testee should
stare at the target with both eyes.
10
Measuring window
Bright ring
Target to be
stared at
Green area
Fig. 6
3. Operation
This is a high-tech intelligent instrument, which is very easy to operate. Please operate
it according to the following procedures, thus you can get measured data easily
and rapidly.
3.1
About Battery
Before using the device, please put 4 pieces or 2 pieces of 5# AA batteries into
its battery box.
Warning:
•
Only high energy alkali battery is applicable, and please do not use common
acidic one so as to avoid leak age of battery liquid which may cause damage
to the device.
•
Be care about the polarity of the battery when replacing it.
•
Properly dispose of the used battery to avoid environmental pollution.
11
3.2
About Baffle
Open the baffle (as shown in Fig. 7)
Push the baffle switch in
the arrow direction, thus
the baffle can be opened.
Fig. 7
3.3
Start-Up (as shown in Fig.8)
Press RESET key to make the start-up of the device initialized. After that a microprocessor in the device sets and right pupillary distance pointers at the middles
of the left and right measuring windows, and the data on the corresponding digital
liquid crystal display windows are shown as follows respectively: LEFT 31.5mm,
RIGHT 31.5mm and PD 63mm, where, optic distance is set as ∞ and BIN as
the state of simultaneous binocular measurement. Then you are able to conduct
measurement.
Fig.8 (It is the state of start-up and display window
when binocular pupillary distance is measured)
3.4
Measurement of Binocular Pupillary Distance (as shown in Fig.8)
3.4.1 Start-up
The initialized setting of the device is just the binocular pupillary distance for
measuring ∞ optic distance.
12
3.4.2 Put the nose bearer lightly on testee’s nose bridge and keep the device in a
horizontal state.
3.4.3 Let the testee stare at the staring target of the device.
Important Matters
In the process of measurement (and the measurement of monocular pupillary distance
described in the following section), to achieve precise data of measurement and make
process of measurement easily and quickly, the tester should remind the testee to
always stare at the Staring Target in a level state, without moving his (her) eyeballs.
3.4.4 The tester observes the reflecting bright dot on the testee’s pupil through
measuring window. Press the Left and Right Pupils Measuring Keys, the left and
right pupillary distance pointers will coincide the reflecting bright dots of the
testee’s left and right pupils, respectively. The datum shown in the display window
is just the measured pupillary distance.
3.5
Measurement of Monocular Pupillary Distance (as shown in Fig. 9a and 9b)
3.5.1 Start-up. The initialized setting of the device is just the binocular pupillary distance
for measuring ∞ optic distance.
3.5.2 Press Measuring State Transition Key (BIN) to choose mode of measurement,
and it will indicate on the lower right corner of the display window. When L is
shown, it means only left pupillary distance will be measured, and R for measuring
right pupillary distance.
3.5.3 Put the nose bearer lightly on the testee’s nose bridge and keep the instrument
in a horizontal state.
3.5.4 Let the testee to stare at the Staring Target of the device.
3.5.5 The tester observes the reflecting bright dot on the testee’s pupil through measuring
window. Press the Left or Right Pupil Measuring Key, the left or right pupillary
distance pointer will coincide the reflecting bright dot of the testee’s left or right
pupil, respectively. The datum shown in the display window is just the measured
pupillary distance.
Fig.9a (It is the state of the display window
when right eye pupillary distance is measured)
13
Fig.9b (It is the state of the display window
when Left eye pupillary distance is measured)
Important Matters
When measuring right eye pupillary distance, the right observation window is in the
state of measurement, and left observation window becomes the following state:
immeasurable area is black and measurable area is black-white strip, and then
pupillary distance pointer is invisible (as shown in Fig. 10a).
Pupillary distance pointer
Black area
Observation window
Black-white strip area
Black area
Fig.10a (It is the state of the observation window
when Right eye pupillary distance is measured)
When measuring left eye pupillary distance, the left observation window is in the state
of measurement, and the right observation window becomes the following state:
immeasurable area is black and measurable area is black-white strip, and then pupillary
distance pointer is invisible (as shown in Fig. 10b).
14
Black-white strip area
Black area
Pupillary distance
pointer
Black area
Observation window
Fig.10b (It is the state of the observation
window when Left eye pupillary distance is measured)
3.6
Memory of the Measured Data (as shown in Fig. 11)
Press MEM Key to store the measured data so as to avoid change of the
measured data due to misoperation of some other key.
Fig.11
3.7
Conversion of Pupillary Distance at Different Optic Distances
(as shown in Fig. 12)
Press Pupillary Distance Conversion Key (TDIS) to get the pupillary distance
conversion values at different optic distances such as 30cm, 35cm, 40cm, 50cm,
65cm, 1m, 2m and ∞.
Fig.12
Note:
The optic distances shown in the figure do not appear in the display window simultaneously.
It just shows the optic distance whose pupillary distance needs to be converted.
15
Example:
If you want to convert the pupillary distance at 40cm optic distance when the
measured infinite far left or right monocular pupillary distance is 32.5mm and binocular
pupillary distance 65mm (as shown in Fig.13a), press Pupillary Distance Conversion
Key (TDIS) to choose the optic distance 40cm which needs to be converted, and
the converted values show that left or right monocular pupillary distance is 30.5mm
and binocular pupillary distance 61mm (as shown in Fig.13b).
Fig.13a
Fig.13b
Important Matters
The pupillary distance actually measured by the PM 200 is the pupillary distance
at the distance of ∞ far target, and pupillary distances at the distances of other targets
are obtained through calculation, only for reference.
4. Maintenance
4.1
It has been precisely adjusted before delivery. Please do not dismantle it so as
to keep it precise.
4.2
It shall be stored and used in an indoor well-conditioned dry place.
4.3
As a high-tech product, the device shall be prevented from Vibration or impact.
4.4
Keep it clean and do not touch surface of its window glass. Fingerprint, dust
or stain should be cleaned with absorbent cotton dipped with mixed solution
of alcohol and ether.
4.5
Any corrosive chemical is forbidden for cleaning it.
4.6
In case of malfunction, do not dismantle it by yourself. Please contact the local
sales agent or the manufacturer for help.
4.7
Provided there is no display on the display window after startup, please check
the polarity of the battery to see if it is well placed and electrified.
16
5. Specifications
Binocular pupillary distance
44 ~ 83mm
Left or right pupillary distance
22 ~ 41.5mm
Binocular pupillary distance
45 ~ 82mm
Left, right pupillary distance
22.5 ~ 41mm
Indication error
≤ 5mm
Rounding error
≤ 0.5mm
Distance of target
30cm ~ ∞
Power source
Voltage: DC 3V
Specification: 5#AA battery
Quantity: 2 or 4 pieces
Time for automatic shut-off
1 and a half minute after stopping
operation
Size
219mm(L) X 169mm(W) X 64mm(H)
Weight
0.6kg
17
LUXVISION is not responsible or liable for indirect, special or consequential damages arising out of or in
connection with the use or performance of the product or damages with respect to any economic loss,
loss of property, loss of revenues or profits, loss of enjoyment or use, costs of removal or installation or
other consequential damages of whatsoever nature. Some states do not allow the exclusion or limitation
of incidental or consequential damages. Accordingly, the above limitation may not apply to you.
Every effort has been made to ensure the accuracy of this manual. However, LUXVISION, makes no
warranties with respect to the documentation and disclaims any implied warranties of merchantability
and fitness for a particular purpose. LUXVISION, Inc. shall not be liable for any errors or for incidental or
consequential damages in connection with the furnishing, performance, or use of this manual or the examples
herein. The information in this document is subject to change without notice.
18