1
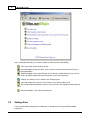
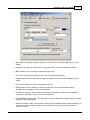
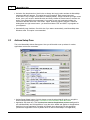
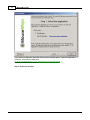
User Manual
© 2003 Software River Solutions, Inc.
MouseMojo
Introduction
Welcome to MouseMojo. We hope that this manual will help
you get started quickly and answer some of the questions
you might have about MouseMojo.
MouseMojo Help
© 2003 Software River Solutions, Inc.
All rights reserved. No parts of this work may be reproduced in any form or by any means - graphic, electronic, or
mechanical, including photocopying, recording, taping, or information storage and retrieval systems - without the
written permission of the publisher.
Products that are referred to in this document may be either trademarks and/or registered trademarks of the
respective owners. The publisher and the author make no claim to these trademarks.
While every precaution has been taken in the preparation of this document, the publisher and the author assume no
responsibility for errors or omissions, or for damages resulting from the use of information contained in this
document or from the use of programs and source code that may accompany it. In no event shall the publisher and
the author be liable for any loss of profit or any other commercial damage caused or alleged to have been caused
directly or indirectly by this document.
I
MouseMojo Help
Table of Contents
Part I Introducing MouseMojo
2
1 Why do you
...................................................................................................................................
need MouseMojo?
3
2 Requirements
................................................................................................................................... 3
3 How to buy
...................................................................................................................................
MouseMojo
4
Part II Explaining the user interface
4
1 Main MouseMojo
...................................................................................................................................
Pane
4
2 Settings Pane
................................................................................................................................... 5
3 Actions Setup
...................................................................................................................................
Pane
7
4 Signatures...................................................................................................................................
and Clipboard Pane
8
Part III Creating and modifying actions and
applications
9
1 Configuring
...................................................................................................................................
a new application
9
2 Assigning...................................................................................................................................
Actions to an Application manually
10
3 Using the...................................................................................................................................
Actions Setup Wizard
10
Part IV FAQ - Frequently Asked Questions
13
1 How do I ...................................................................................................................................
pause MouseMojo temporary?
14
2 How do I ...................................................................................................................................
use my keyboard instead of right mouse button for activation?
14
3 Can I disable
...................................................................................................................................
the on-screen display?
14
4 Can I use...................................................................................................................................
my scanned signature image to sign my emails?
14
5 What is the
...................................................................................................................................
difference between [none] and Default action?
15
Index
16
© 2003 Software River Solutions, Inc.
Introducing MouseMojo
1
2
Introducing MouseMojo
Welcome to MouseMojo. A new way of using your mouse that allows you to quickly and seamlessly
perform the most common tasks.
Why do you need MouseMojo?
Requirements
How to buy MouseMojo
© 2003 Software River Solutions, Inc.
3
1.1
MouseMojo Help
Why do you need MouseMojo?
Sign your emails with a simple mouse move
MouseMojo can be set up to insert different kinds of signatures with a simple mouse move. The signatures
could be plain text, HTML, image or any other type of content.
Different signatures can be connected to different mouse movements so that you can sign your personal and
business emails differently every time.
Insert any content anywhere in no time.
In addition to plain text - MouseMojo supports any kind of content from any application. Simply copy the
content to your clipboard and press "Import from Clipboard" button from MouseMojo Signatures and
Clipboard pane. The content will be saved and ready to be posted anywhere you like simply by moving your
mouse.
Change the way you use your computer
Forget about different kinds of shortcuts and third party signature and clipboard managers. Use your
computer naturally - simply move your mouse in one of the eight directions and an action associated with tha
movement and application will be executed. It will become a second nature to you after just a few days. You
will wonder why you could not do this before.
Multiple action options
As already mentioned - MouseMojo can paste different kinds of content into many applications as well as
open web pages, directories, documents, start applications and simulate most useful keyboard shortcuts.
Each application can have a different set of actions
MouseMojo can detect the application you are using and change it's behaviour to your preference. For
example - while browsing the internet - moving your mouse to the right could simulate pressing of the
"Forward" button in your browser. Same movement could insert your personal signature if you are writing an
email or start your favorite MP3 player if you do it anywhere else.
Absolutely configurable!
You can configure MouseMojo any way you like. In addition to changing your actions - you can change many
other aspects of MouseMojo as well. For example - you could change the default on-screen display settings
or disable it altogether. Mouse sensitivity as well as "Action Key" can be changed to your preference.
1.2
Requirements
MouseMojo will run on following operating systems - Windows 95, Windows 98, Windows Me,
Windows 2000 and Windows XP.
A pointing device (mouse, trackball or any other) is required.
© 2003 Software River Solutions, Inc.
Introducing MouseMojo
4
There is no other specific requirements for MouseMojo.
1.3
How to buy MouseMojo
You can buy MouseMojo for only $27.95. You will get free minor upgrades and email support as well.
To buy MouseMojo, please go to http://www.softwareriver.com/html/buy_mousemojo.html
Please follow the "Order Now" link and follow the instructions to complete your purchase.
A confirmation email will be sent to you containing the Serial Number that you must enter to register
your application.
When you start MouseMojo - a window will pop up that allows you to enter your name and your
serial number. Then click on the "Register" button to complete your registration. Alternatively this dialog can be shown either from the about dialog or directly from the main menu.
If you have any questions about your purchase, please contact us at [email protected]
2
Explaining the user interface
In this section we will help you to quickly become familiar with MouseMojo user interface.
Main MouseMojo Pane
Settings Pane
Actions Setup Pane
Signatures and Clipboard Pane
2.1
Main MouseMojo Pane
This is the main MouseMojo pane.
© 2003 Software River Solutions, Inc.
5
MouseMojo Help
Items on this pane will allow you to easily navigate to other sections of MouseMojo.
- View online help. Shows this help window.
- Show MouseMojo interactive demo. Click to open an interactive demo that will help you
start using MouseMojo.
- Start MouseMojo Actions Setup Wizard. Click to start the wizard that will help you set up
your actions for different applications and movements in just three easy steps.
- Change you Settings. Click to switch to the "Settings" pane.
- View and manage your Actions. Click to switch to the "Actions Setup" pane.
- Set up Signatures and Clipboard content. Click to switch to the "Signatures and Clipboard"
pane.
- About MouseMojo. Click to show the about box.
2.2
Settings Pane
This is the MouseMojo Settings pane. It allows you to change some of the general MouseMojo
preferences.
© 2003 Software River Solutions, Inc.
Explaining the user interface
6
· Show Notification Display checkbox. Check or uncheck this box to enable/disable the on-screen
display.
· Font Name drop down box. Select the font type you want to use for your Notification Display.
· Bold checkbox. Check to make the selected font style bold.
· Font Color drop down box. Select the text color for the Notification Display.
· Display Delay slider. Use this slider to change the length of time that on-screen display will stay
visible.
· Font Size drop down box. Use it to change the font size.
· Background Color drop down box. Select the background color for the notification display.
(available only if transparent option is not enabled)
· Transparent check box. Check this box if you want your notification window to have transparent
background. (This option may not work on some systems)
· Test Notification Display button. Click this button to test your Notification Display settings. A sample
notification display will appear.
· Detection Sensitivity slider. Use this slider to change the MouseMojo sensitivity while detecting your
mouse motion. More sensitive means that you will have to move your mouse less in order to
execute an action.
© 2003 Software River Solutions, Inc.
7
MouseMojo Help
· Activation Key drop down box. Use this box to change the key(s) used to activate the MouseMojo
movement detection process. This option has only two settings. Right mouse button and
CTRL+SHIFT keys. If Right mouse button is selected (default) - simply hold down your right mouse
button, move your mouse in desired direction and finally release the mouse button to execute the
action (if any assigned for that movement). If you prefer to use your keyboard to initiate the
movement detection select the CTRL+SHIFT option. When this option is selected - instead of
holding down the right mouse button - you should hold down CTRL and SHIFT keys together on
your keyboard.
· Automatically start checkbox. Check this box if you want to automatically start MouseMojo when
Windows starts. This option is recommended.
2.3
Actions Setup Pane
This is the MouseMojo Actions Setup pane. Here you will be able to set up actions for various
applications and mouse movements.
· Actions Setup Wizard button. Click this button to start the wizard that will guide you trough the
actions setup process step-by-step. Click here for more information about this wizard.
· Application drop down box. This drop down box contains all applications you have configured for
use with MouseMojo and "All Applications" entry that is the default and applies to all applications.
Switching from one application to another will instantly show the actions for that application.
(mmtutor.exe application is there by default and it is used for MouseMojo Tutor application)
© 2003 Software River Solutions, Inc.
Explaining the user interface
·
8
- Click this button to add new application. A dialog containing all currently running applications
will appear. Simply select the application you whish to configure.
- Click this button to remove the currently selected application. The "All Applications" item
cannot be removed. Removing an application will reset it's actions to default ("All Applications")
actions.
· Directional sections. Each section represents a specific mouse movement. There is eight possible
directions MouseMojo can use. Each section contains the following:
- Label - This is the label for the action selected. Used in on-screen display. (you can click this label
to rename it)
- Action: A more descriptive action name describing the action to be performed.
- Change Action button. Click this button to change the action for the particular movement. A popup
menu will appear that will allow you to select among various types of actions.
·
TIP: Clicking on the action label allows you to change it. On screen display will then show
this label when it is executed.
2.4
Signatures and Clipboard Pane
This is the MouseMojo Signatures and Clipboard Pane in a simple text mode (slightly different for
arbitrary clipboard content). It allows you to manage your signatures and clipboard items.
· Add New button. Click this button to create a new item. (signature or any other content)
© 2003 Software River Solutions, Inc.
9
MouseMojo Help
· Delete button. Click this button to delete the selected item. Note that this operation will warn you if
that item is in use by any action. Deleting a signature that is used by one or more actions will reset
the actions that were using it to [none].
· Rename button. Click this button to rename your item. Your actions that use this signature will be
renamed automatically.
· Import From Clipboard button. Click this button to import the clipboard content into the current item.
The pane will change slightly for these items and it will display a preview bitmap or sample plain
text if the imported data contains it.
When you change the text of an item - it will be saved automatically.
NOTE: Items imported from the clipboard such as HTML items will be displayed in a slightly
different pane containing a plain text version or the bitmap image of the item (if the item
contains such data). May of the imported clipboard items will contain several different data
formats. For example - importing an item from your word processor might contain a native
word processor data, HTML version of the data, plain text version of the data and Rich Text
version of the data. While MouseMojo will try to extract the sample text for your preview - all
item parts and formats will be kept in tact and be used as if you had just copied it to the
clipboard.
3
Creating and modifying actions and applications
In this section we will help you with creating and modifying actions and applications that are used with
MouseMojo.
Configuring a new application
Assigning Actions to an Application manually
Using the Actions Setup Wizard
3.1
Configuring a new application
You can easily configure a new application with MouseMojo either from the Actions Setup Pane or as
a part of the Actions Setup Wizard .
To add a new application from the Actions Setup Pane - simply click on the
button.
A window will appear listing all currently running applications. If the application you want to configure
is not currently running, please start it and then click on the
"Refresh" button.
Select the application you want to add and click on the "OK" button.
That's all - the application will be appended to the list of your applications. Now you are ready to
© 2003 Software River Solutions, Inc.
Creating and modifying actions and applications
10
assign actions to it.
If you are using the wizard - first wizard screen will ask you if you want to create an action for all
applications or a specific application.
If you select a specific application - the application selection window will appear allowing you to select
among running applications.
It does not matter if the application was already listed in MouseMojo or not.
3.2
Assigning Actions to an Application manually
Assigning actions "manually" involves only a few mouse clicks.
From the Actions Setup Pane - simply select the application you want to assign the action for
(click here for more information about configuring a new application ), decide on the mouse direction
you want to use (clearly indicated with the arrow image) and then click on the "Change Action" button.
A popup menu will appear allowing you to select among various actions. If an action needs additional
information, you will be presented with an input dialog allowing you to enter the data or select files
and folders.
After assigning a new action a default label and action name will be displayed on the screen.
To remove a specific action and not use the default action - select [none] from the Change Action
menu. To make sure that a certain application is going to execute a default action for some events make sure that these movements have "Default" as their action type. "Default" means that the action
assigned to "All Applications" will be executed.
FAQ : What is the difference between [none] and Default action?
TIP: Action label is used in on-screen display. You can change it simply by clicking on it and
entering a new one.
3.3
Using the Actions Setup Wizard
Actions Setup Wizard allows you to assign actions to an application (or all applications) in three easy
steps. Once you become familiar with the Actions Setup Pane - you will find that it is much faster to
configure your actions directly from there. Assigning Actions to an Application manually
Step 1 - Select the application.
© 2003 Software River Solutions, Inc.
11
MouseMojo Help
If you want to configure an action that will be used as a default action - select All Applications.
Otherwise, select Specific Application
(a dialog will appear allowing you to select among running applications )
Click on the Next button to continue.
Step 2 - Select the direction
© 2003 Software River Solutions, Inc.
Creating and modifying actions and applications
Select the direction that will trigger your action. The arrows indicate the direction.
Step 3 - Select the action to be executed
© 2003 Software River Solutions, Inc.
12
13
MouseMojo Help
Here you will be able to select among various actions from the drop down box. The panel below the
action type will change depending on the action selected and contain options for that particular action.
For example - if you select Start an Application as your action - the panel will contain a clickable text
that will allow you to select the application you wish to start.
That's all - simply click on the Finish button to complete the wizard. If the action you have
selected already exists for that application - you will be prompted to confirm the change.
NOTE: While new plain text signatures can be set up from within the wizard - advanced
clipboard items can be imported only from the Signatures and Clipboard Pane . Once imported
- you will be able to select it as any other item in the wizard.
4
FAQ - Frequently Asked Questions
The frequently asked questions should help you to quickly find answers to most common
questions.
© 2003 Software River Solutions, Inc.
FAQ - Frequently Asked Questions
14
How do I pause MouseMojo temporary?
How do I use my keyboard instead of right mouse button for activation?
Can I disable the on-screen display?
Can I use my scanned signature image to sign my emails?
What is the difference between [none] and Default action?
4.1
How do I pause MouseMojo temporary?
To temporary pause MouseMojo and stop detecting the mouse motions - select "Pause MouseMojo"
menu item from the main menu or tray icon popup menu. To resume the detection - select "Resume
MouseMojo" from the same menu.
MouseMojo system tray icon at the bottom of your screen has black and white colors while
MouseMojo is active . Red
color is used to indicate that MouseMojo has been temporary
disabled.
4.2
How do I use my keyboard instead of right mouse button for
activation?
If you prefer to use your keyboard to start the mouse movement detection - simply open the
Settings Pane and select CTRL+SHIFT from the activation key drop down box. This will switch your
activation key to SHIFT+CTRL. If you do this you have to hold both keys simultaneously while
performing your action.
4.3
Can I disable the on-screen display?
Definitely! Open your Settings Pane and uncheck the "Show Notification Display" checkbox.
4.4
Can I use my scanned signature image to sign my emails?
Yes. Simply open your scanned signature with your browser or word processor, select it and copy it
to the clipboard by pressing CTRL+C. Then click on the "Import From Clipboard" button in
© 2003 Software River Solutions, Inc.
15
MouseMojo Help
MouseMojo Signatures and Clipboard pane .
Note that any other type of content can be imported into MouseMojo using this procedure.
4.5
What is the difference between [none] and Default action?
[none] - is indication that no action should be performed for specific application regardless of the "All
Applications" settings. Set an application action to Default to execute a default action for that
movement.
NOTE: Obviously, while changing actions for "All Applications", the Default option is disable
since "All Applications" actions are the Default.
© 2003 Software River Solutions, Inc.
Index
Index
-IImport from clipboard
Introduction
2
-AActions Setup Pane 7
Actions Setup Wizard
10
Add new action 7
Add new application 9
Assign actions to an application manually.
-M10
Main 4
Main Pane 4
Modifying Actions
-B-
-P-
Buy
Preferences
4
-Cclipboard 8
Configure application
Creating Actions 9
8
9
5
-RRequirements
3
9
-S-
-DDefault vs. [none] explanation.
15
-FFAQ 13
Can I disable the on-screen display?
14
Can I use my scanned signature to sign my
emails? 14
How to pause MouseMojo temporary.
14
I want ot use my keyboard instead of right
mouse button?
14
What is the difference between [none] and
Default action?
15
Features 3
Frequently Asked Questions 13
-HHow do I? 13
How to buy. 4
© 2003 Software River Solutions, Inc.
Settings
5
Settings Pane 5
Setup Actions 7, 10
signatures 8
Signatures and Clipboard Pane
System Requirements 3
8
-UUI 4
User Interface
4
Using the Actions Setup Wizard
10
-WWhy do you need MouseMojo?
3
16