1
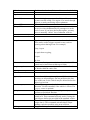
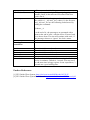
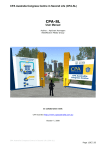
Creating a Tour with the Guided Tour System
Skye Gears
Dec 17, 2007
This document gives you a step-by-step instruction as how a vehicle-based guided
tour may be created using a software system called Guided Tour System. This system
is created and distributed by the Guided Tour Company. Interested readers are
encouraged to visit their Second Life (SL) location below for a test ride and more
information. At the time of purchase, (late October 2007), a GTS system with a 6person balloon ride was priced at L$4,600.
Guided Tour Company: secondlife://Mocha/238/74/32
Before we talk about how to create a guided tour, one needs to know a few key
concepts within the system. There are two main concepts: the concept of a tour
“vehicle” and the concept of a tour “base”. A tour vehicle gives a tour to its
passengers. A tour base generates tour vehicles periodically, therefore repeating the
tour automatically. The way it works is that the base will store all of the necessary
information to generate a new working tour vehicle. Once a tour vehicle is generated,
it can be used to carry Avatars to visit places and give appropriate commentaries
along the way.
There are a few different types of vehicles and bases that one can have. A standard
type of vehicle is a “Guided Car”. The current version (4.0) is a half-egg-shelf design
future-looking blue guided car. This guided car carries two passengers. A fancier
version that AIAI has purchased is a “Balloon Vehicle” that accommodates up to 6
Avatars. The default “tour base” is a blue-coloured prim, but you can alter it to any
shape as you like as long as it is not a flexi prim.
Once rendered in SL, you can adjust the position and angle of the balloon and the
base, but be careful to make sure that they are upright and the base is preferably
placed on even grounds. Once you have created your own version of the vehicle and
base, you can choose to alter their names to reflect your own tour’s identity. The next
sections will show in details how this can be done.
0. HOW-TO Create a Tour using the Guided Tour System (GTS)
This document is written based on GTS 4.0. The software is constantly updated and
new versions can be obtained from its company SL site [1].
There are 3 main steps to create a guided tour:
1. Create a script for the guided tour – this gives a generic script that enables you
to use any types of vehicle to give a tour;
2. Install and test your script using a tour vehicle – this enables a selected vehicle
(e.g. a guided car or balloon) to give a tour based on a script;
3. Install your vehicle to the tour base and package it for use – this enables a
prepared tour-ready vehicle permanently saved in the base and can be regenerated automatically. This step also enables you to package the tour for
future use.
These 3 main steps are now described in details in the following subsections.
1. Creating a script for the guided tour
A script is an instruction sheet that tells the vehicle where to go, how long to pause
and what to say to the passengers on the way, etc. It gives a list of travel points where
the vehicle will follow sequentially (by default), messages to be displayed to the
passengers, and actions to be taken by the vehicle.
There are two ways to generate the script – (1) by using the HUB provided by GTS or
(2) by written manually. If this is the first time for you to generate a tour, it is useful
to use the HUB just to get a feel of it. Otherwise, generate the tour manually is proved
to be more accurate and efficient.
1.1 Creating a script using the HUB
From the Inventory, find the “tour maker HUD 4.0” with “camera position HUD vers
2” as a description and follow the instructions below:
1. Decide a location (preferably a flat ground) where you would like to put the
“tour base” where the tour will start.
2. Wear the HUB with your avatar. A small wooden panel with green colour inprints reads “The Guided Tour Company” will now be appeared on the top left
hand side of your screen.
3. Type “clear” in the chat window to clear out all previous HUB memories.
4. Say a welcome message to your passengers now, if you like.
5. Move to a first travel point where you would like the vehicle to move from its
starting base.
6. Click the HUB to mark this first travel point that you would like the vehicle to
travel to from its initial position;
7. Move your Avatar to a next travel point and click the HUB again to mark this
new travel point. You can “chat” as many messages as appropriate between
travel points and they will be delivered to the passengers between those travel
points.
8. Repeat step 7, until you have marked a final travel point.
9. After you have marked the final travel point, type “save” to save all of your
travel points.
10. Open the “chat history” window and copy the script onto a new “Note Card”.
You have now just produced a working script for the tour. An example script
is placed in Figure 1 for your reference. In this sample script, the vehicle will
go up to approximately 44 meters high from its original position.
11. Note: while producing the travel points, take care not to allow the vehicle to
“cross” any physical objects, such as buildings, structures; or to land below the
ground level, or the vehicle may crash or not functioning well.
12. Note: this simple method will not allow the vehicle to cross Sim boundaries, to
see how to do this, see the next subsection 1.2.
[6:44] tour maker HUD 4.0: <65.100,22.815,23.295>/<45.811,24.783,18.387>
[6:44] tour maker HUD 4.0: <65.100,22.815,44.778>/<45.652,24.799,40.550>
Figure 1: A script that allows a vehicle to go up to height = 44.778 meters
1.2 Advanced Method: creating a script manually
By creating a script manually, the tour can be defined more accurately. However, to
do this, one must understand the internal representation of the GTS HUD language.
Figure 2 gives an example travel point that has been used in a GTS script.
<65.100,22.815,23.295>/<45.811,24.783,18.387>
Figure 2: An Example Travel Point
This travel point is described using the format below:
<X, Y, Z>/<P1, P2, P3>
The values of X, Y, Z represent the 3D positions of the vehicle in SL. The value of
P2, P2 and P3 record GTS internal values where the camera of the vehicle should look
at. Currently, the camera function does not work well and the camera of the vehicle
will in general look in the direction of travel that is desirable, so this information is
omitted here.
Tips on making a good tour:
1. Identify the intended points of interest where visibility is good.
2. Travel points should be high enough to avoid collision with buildings and
structures.
3. Maintain constant height.
4. Travel in straight lines and along Sim boundaries to get maximum
visibility without having to cross the Sims too many times.
5. Avoid crossing the Sim too many times to improve the stability of the tour.
6. If one has to cross the Sims to another region, make sure to allow
appropriate distance from the Simline. The GTS manual recommended
under 2m and 5m from the Simline before crossing; and between 20-25m
and 20-30m after crossing. Our experiments suggest that a combination of
7/23m meters distance for before and after the crossing works well.
7. For Sim crossing, add delayed time after crossing to ensure a smooth
crossing. This is enabled by the “$,pulse,??” command; where ?? Is –x, +x,
-y, +y, depending on whether you are crossing west, east, south or north.
Figure 3 gives an example Sim crossing script that is crossing the Simline
to the west.
<4.0,112.0,60.0>/<2.0,97.0,60.0>
$,pulse,-x,
$,simwait,3.0,
$,pause,2.0,
Figure 3: A Sample Sim Crossing Script going west
You have now created a basic Sim crossing working script. To provide more
advanced features on tour script writing, the reader is encouraged to read Appendix I.
2. Install and test your script using a tour vehicle
This enables a selected vehicle (e.g. a guided car or balloon) to give a tour based on a
script. To do this, follow the 4 steps below:
1. Render your tour base and your vehicle on the ground.
2. Adjust your vehicle (e.g. Balloon), then type in “/198SetPos” in the chap
window, to fix the position of the vehicle;
3. Open the “content” of the vehicle and drag-and-drop your script into this
content.
4. You can now “sit” in the vehicle and test your script. You can refine the script
and retest it using a new vehicle using step 3, until you are happy with it.
5. This method enables the test script to survive only one ride, while enabling
other people to use the tour vehicle normally. To permanently save the script
in the tour vehicle, see Subsection 3.
3. Install your vehicle to the tour base and package it for use
This step enables you to save a working vehicle back to the base and so can be regenerated and therefore repeat the tour periodically.
1. Render your tour base at a desirable starting location of your tour. Drag-anddrop the desirable tour script onto the “content” of the desirable vehicle;
2. On the SL menu, select “Tools/Save object back to object contents” to save
this script back to vehicle;
3. “Take” (and thus package) and save the vehicle back to your Inventory;
4. Drop the packaged vehicle back to the “content” of the tour base and remove
any other unwanted existing vehicle packages;
5. On the SL menu, select “Tools/Save object back to content” to save the script
back to the base;
6. To alter the names of the vehicle and base, click “Edit” on these two objects to
alter their names.
7. To save a copy of the tour base, use “take copy” option on the tour base to
take a copy back to your inventory for safe keeping.
You have now created a customised tour base that is functional and will repeat the
tour periodically.
Appendix I: Advanced Commands
These commands allow you to further customise your guided tour. Take care not to
place any space between commands.
Sound Commands:
SL sound files are limited to 10 seconds. Sounds are
played from the vehicle.
## sound-file
###
Start playing the sound in the “sound-file” in a loop
Stop playing the sound.
$,playUUIDsound,uuid,
Play a sound file just once. The sound file should be
stored in your Inventory and not in the vehicle. Right
click on it and use menu to copy its UUID into the
clipboard then paste in command (ctrl-v).
Preload a sound in client cache. This increases the
chances for the sound to be played correctly and at
correct time. Place this instruction several lines before
play.
Set sound level for playing sounds: minimum is 0.0,
maximum is 1.0.
$,loadUUIDsound,uuid,
$,SndLevel,0.6,
Timing Commands:
$,pause,12.5,
$,speed,10.0,
$,tempo,3.0,
Set a pause of 12.5 seconds.
Set the speed of the vehicle
Set the time in seconds between each text being
“whispered” to the passengers.
Flight commands:
$,tiltON,
$,tiltOFF,
$,rotON,
$,rotOFF,
$,massfact,0.3,
$,prec,2.0,
$,engine,2,
$,engine,1,
$,engine,0,
$,relative,
Set vehicle to tilt when going up or down.
Set vehicle to stay flat when going up or down.
Allow vehicle to rotate during flight (default)
Prevent vehicle to rotate during flight
Change the mass factor of vehicle for rotation damping;
lower values give more nervous turning.
Set precision of travel line, applies to engine #1 only.
When reaching a travel point, e.g. within 2 meters, the
vehicle will slow down before travelling to the next
travel point. When precision value is low, e.g. 2.0
meters, the travel line is more accurate. When the
precision value is high, corners may be cut.
Switch to engine #2. This is a non-physics engine that
can go through objects and is very precise, but its
movement is not smooth.
Switch to engine #1. This is the default engine.
Switch to an external engine. An extra engine script
must be provided in the vehicle. External engines are
sold separately by GTS.
Switch to the relative coordinates mode.
$,absolute,
Switch to the absolute (Sim) coordinates mode. (default)
Physics commands:
$,phantON,
$,phantOFF,
$,tempOFF,
Turn vehicle phantom to avoid collisions. Note that
avatars can still collide. Use engine #2 to travel through
objects; or make conflicting objects phantom.
Turn vehicle solid.
Turn vehicle no longer temporary on rez. Cause vehicle
to survive when abandoned by its passengers or at the
end of a tour. If you have chosen this option, you may
have to manually “delete” lots of abandon vehicles.
Interface commands:
$,say,chan,text
Say the “text” using communication channel “chan”.
This can be used to trigger external events, such as
opening a door during a tour. For example,
$,say,1,open
is equivalent to typing,
/1open
$,shout,chan,text
$,regionsay,chan,text
In chat.
Shout “text” using communication channel “chan”. The
sound can be heard from within up to 100m.
Say “text” using communication channel “chan” and to
be heard within the entire Sim.
Misc Commands:
$,give,obj,
$,unsit,<x,y,z>,
$,plugin,xxxx
$,anim,name,
$,arm,
$,debug,
Cause the vehicle to give an object “obj” from its
inventory to all passengers. Do not put this as the last
line of the tour, as the vehicle may be deleted before the
object is given out.
Unsit all passengers and push them in the <x,y,z>
direction. Useful command, if the vehicle is a boat. The
<x,y,z> vector is optional.
This allows you to use your own plug-in scripts, xxxx, to
perform a specialised function.
Cause all pose balls containing animation name to
switch to it. This command will only work, if using the
special pose ball script provided in the standard vehicle.
Set vehicle to explode on collision by adding special
scripts into it. This command activates those scripts
making explosion possible at the next collision.
Toggle the debug model ON/OFF where the vehicle will
$,GOTO,lineX,
$,choose,_x,
tell its owner what it is doing.
Change the execution logic of the script by going to line
number, lineX, in the note card. First line of the note
card is line 0.
For tours with forks. Imagine you have 3 tour notes in
the vehicle: t1, _At2 and _At3, where t1 is the first tour
and _At2 and _At3 are the following forked tours. By
adding the command:
$,choose,_A
, at the end of t1, the passengers are prompted with a
menu at the end of tour1; with the choice of tour t2 and
t3 to choose from. The tour will continue with tour1, if
the passenger choose to “ignore” the choice menu.
Crossing Sim
boundaries:
$,pulse,+x
$,pulse,-x
$,pulse,+y
$,pulse,-y
Cross the simline east bound.
Cross the simline west bound.
Cross the simline north bound.
Cross the simline south bound.
$,simwait,3.0
To allow the vehicle to wait after crossing the Simline,
before it continues. Default is 1 second. You may need
to add more time in laggy regions. In our experiences, 3
seconds are a good waiting time.
Further References:
[1] GTS Guided Tour System: http://slurl.com/secondlife/Mocha/185/32/25
[2] GTS Guided Tour System User Manual. http://www.hudbook.net/GTSmanual.pdf