1
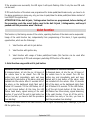
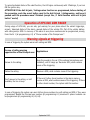
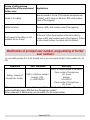
HPS 846 USER MANUAL N e w g e n e r a t i o n C A N B U S / A n a l o g C a r a l a r m a n d A n t i h i - j a c k s y s t e m , i n t e g r a t e d G S M p a g e r , w i t h o p t i o n a l P A T R O L L I N E r e m o t e c o n t r o l s September 2013. Operation with OEM remote control ALARM ARMING Push closing button of OEM remote control of the vehicle. The arming will be confirmed by the followings: Blinker flashing based on closing features of the vehicle 1 beep (if it is programmed) Arming of the LED on the dashboard Activation of electric engine immobilization (if it was connected) Activation of module hyperfrequency etc.) outputs (optional ultrasonic sensors, CDL closes the doors ALARM DISARMING Push opening button of OEM remote control of the vehicle. The disarming will be confirmed by the followings: Blinker flashing based on opening features of the vehicle 2 beeps (if it is programmed) Disarming of the LED on the dashboard Deactivation of electric engine immobilizer (if it was connected) Deactivation of module outputs (optional ultrasonic sensors, hyperfrequency etc.) CDL opens the doors September 2013. Operation with optional PATROLLINE remote control ALARM ARMING Push Nr. 3 closing button of the PATROLLINE remote control. The arming will be confirmed by the followings: - Blinker flashing (if it is programmed) 1 beep (if it is programmed) Arming of the LED on the dashboard BUTTON 1: Activation of electric engine immobilization (if it was connected) BUTTON 2: Activation of module outputs (optional ultrasonic sensors, hyperfrequency etc.) Panic function CDL closes the doors (if it was connected) Disarming Siren exclusion Turn OFF the siren sound during the triggering cycle - BUTTON 3: Arming Ultrasonic exclusion ALARM DISARMING Push Nr. 1 opening button of the PATROLLINE remote control. The disarming will be confirmed by the followings: Blinker flashing (if it is programmed) 2 beeps (if it is programmed) Disarming of the LED on the dashboard Deactivation of electric engine immobilization (if it was connected) Deactivation of module outputs sensors, hyperfrequency etc.) CDL opens the doors (if it was connected) (optional ultrasonic Special functions of the optional PATROLLINE remote control HPS 846 device defaulty doesn’t contain remote controls, maximum 4 pieces PATROLLINE remote control can be memorized only optionally. PATROLLINE remote controls use 2,4 GHz technology uniquely in Europe. Thanks to this innovative technology, PATROLLINE remote controls with the alarm are able for 2 ways communication. Therefore it is possible, that with special application of the remote control buttons the last did procedure can be controlled. Unique application of the 2 ways communication provides the opportunity, that different feedbacks of the remote control LED show, that the connection created or not between the remote control and the alarm: - LED is fix ON: If each button of the remote control was used, the LED of the remote control is fix ON, showed that the alarm discovered the remote control. September 2013. - LED flashes quickly: If the distance is too big between the alarm and the remote control, and the alarm doesn’t sense the remote control signal at pushing of each button, the LED flashes quickly. - LED 4 slow flashings: If you have to change battery in the remote control, after pushing of each button the LED immediately flashes 4. With help of PATROLLINE remote control you can check, that the car alarm was armed, or it is in disarmed status. (Status of the alarm can be checked only with that PATROLLINE remote control, with which the alarm was disarmed or armed latest!) Push Nr. 1 (opening) and Nr. 3 (closing) button of the remote control in same time, at this time LED of the remote control signs armed or disarmed status of the alarm in big distance too from the car: - LED flashes quickly: The alarm was armed with this PATROLLINE remote control. - LED is OFF: The alarm was disarmed with this PATROLLINE remote control. Operation of the optional PATROLLINE transponder The optional PATROLLINE transponder can be used to the following functions: Passive engine block function: At disarming of the alarm the function activates and check presence of the transponder. If the alarm doesn’t sense signal of the transponder, according to the writing in Passive engine block paragraph, the car can’t be started. If the alarm senses again signal of the transponder, it enables starting of the vehicle. At this time the transponder and LED of the alarm signs sensation of the transponder with flashing. Antiagression function: At turning ON of the ignition key the function activates and check presence of the transponder. If the alarm doesn’t sense signal of the transponder, it blocks the engine according to the writing in Antiagression paragraph. If the alarm senses again signal of the transponder, it enables starting of the engine. At this time the transponder and LED of the alarm signs sensation of the transponder with flashing. Anti hi-jack function: In car with started engine the function activates, and check presence of the transponder. If the alarm doesn’t sense signal of the transponder, it blocks the engine according to the writing in Anti hi-jack paragraph. If the alarm senses again signal of the transponder, it enables starting of the engine. At this time the transponder and LED of the alarm signs sensation of the transponder with flashing. Attention! These functions are disarmed defaulty. To arming of the functions please contact with the installer! September 2013. Neutral time, armed status After the alarm was armed with the OEM remote control or with PATROLLINE remote control, the alarm will arm in the next 10 seconds, what is signaled by the fix light of the dashboard LED. During this time, if each sensor will be tested, the alarm will sign it with blinker flashing (number of the blinker flashing shows cause of the triggering, as table shows it in “Alarm memory” paragraph.) LED on the dashboard signs with flashing, that the system is ready to react with acoustic-optic signal for each triggering cause. If the alarm signs same triggering cause five times, it excludes automatically this safety function. Triggering After the inhibition time, the alarm will be in armed status. The alarm reacts with optic-acoustic signal for each triggering event, it makes to operate the horn, or siren and it makes to flash the blinkers. Time of the triggering cycle is 30 seconds. If the alarm activates triggering from same cause at 3 consecutive times, the system will exclude that sensor or module, which caused the triggering. After it the other sensor and the engine block function (if it was connected) stay still active. To stop the triggering without disarming of the alarm, push Closing button of the OEM remote control or Nr. 2 (panic) button of PATROLLINE remote control! To stop the triggering and disarm the alarm, push Opening button of the OEM remote control or Nr. 1 (opening) button of PATROLLINE remote control! Panic triggering After the inhibition time, if Nr. 2 (panic) button of PATROLLINE remote control or closing button of the OEM remote control will be pushed, the alarm will trigger till 30 seconds (beep/acoustic signal). To stop the triggering, push again Nr. 2 (panic) button of PATROLLINE remote control or closing button of the OEM remote control. Attention! You have to activate the panic function to operate it. Ask help of the installer to the activation! Ultrasonic/Hyperfrequency/OEM shock sensor exclusion This function is necessary in order to you can leave dogs or cats in the car without triggering of the alarm. In active status of the function, other sensors of the alarm operate, only the interior protection and the OEM shock sensor not. After closing, during inhibition time, push closing button of the OEM or PATROLLINE remote control to disarm operation of the ultrasonic / hyperfrequency / OEM shock sensor. The alarm signs exclusion of the ultrasonic / hyperfrequence / OEM shock sensor with 3 blinker flashings and 3 beeps. Attention! The ultrasonic / hyperfrequence / OEM shock sensor exclusion is valid for only one triggering cycle! If you disarm the alarm with the OEM or PATROLLINE remote control, the system automatically goes back to the original status, and at the next arming every sensors of the alarm will operate. September 2013. OEM shock sensor exclusion with optional PATROLLINE remote control This function is that the alarm doesn’t trigger for vibrations concerning the car. In active status of the function other sensors of the alarm operate, only the OEM shock sensor not. After closing, during inhibition time, push Nr. 2 and 3 button of PATROLLINE remote control in same time to disarm the OEM shock sensor. The alarm signs exclusion of the shock sensor with 5 blinker flashings and 5 beeps. Attention! The OEM shock sensor exclusion is valid for only one triggering cycle! If you disarm the alarm with the OEM or PATROLLINE remote control, the system automatically goes back to the original status, and at the next arming OEM shock sensor of the alarm will operate. Attention! This function can be used only with the optional PATROLLINE remote control, not with OEM remote control of the car! Operation with optional wireless opening sensor Optional PATROLLINE wireless opening sensors can be memorized for HPS 846 device. With help of them opening sensation of buildings (e.g. garage), or door of camper can be solved in near of the vehicle, in which HPS 846 device is installed. In case of cracking of the garage door or camper door, HPS 846 alarm installed into the vehicle will trigger. These sensors can be memorized in 2 safety zones of HPS 846 alarm: maximum 24 pieces in zone 1., maximum 8 pieces in zone 2. Difference between the two zones is, that sensors memorized in zone 2. (similar to the ultrasonic) can be disarmed temporarily with twice pushing of closing button of the remote controls. Exclusion of horn/siren With help of the OEM remote control and PATROLLINE remote control it is possible to be excluded the horn or siren function. In case of usage of OEM remote control: At disarmed alarm (CDL opened), turn ON and OFF the ignition key for 3 times and within 30 seconds push the OEM remote control to close the CDL. At this time, the central unit will sign only with blinker flashing, if triggering cause happens on the car. IGNITION KEY On Off On Off On Off CDL opened (LED OFF) 1. 2. Push closing button of the OEM remote control within 30 seconds 3. In case of usage of PATROLLINE remote control: After arming of the alarm, within the 10 seconds inhibition time, push Nr. 2 (panic) button of PATROLLINE remote control, from this time, the device signs the triggering only with blinker flashing. 4 beeps and 4 blinker flashings confirm the exclusion. September 2013. Attention! The horn/siren exclusion is valid for only one triggering cycle! If you disarm the alarm with the OEM or PATROLLINE remote control, the system automatically goes back to the original status, and at the next arming it reacts again with beep and acoustic signals for each triggering cause. Automatic rearming If the alarm was disarmed with OEM remote control of the vehicle, but the doors wasn’t opened, within 15 seconds CDL closes back automatically the doors, and in same time the alarm will be armed. Attention! In those cars, in which there isn’t automatic CDL closing back function, ask the installer to program automatic rearming function of the alarm! If it is programmed, automatic rearming function of the alarm will operate, but CDL will be closed, if the alarm was connected for it at installation! After programming of automatic rearming function of the alarm, this function will operate with the optional PATROLLINE remote controls too according to the above mentioned! Status memory If the armed alarm will be disconnected from its connector, after the reconnection it stays in armed status, protected the car further. Passive engine block Function description: if somebody tries to hijack the vehicle – also with its own keys – the engine can’t be started, the alarm gives optical signal (hazard arms). The passive engine block can be released with optional PATROLLINE transponder or with the secret pushbutton or with PIN code. This function is disarmed defaulty. To arming of the function, please contact with the installer. Anti hi-jack function The alarm is able to immobilize the engine while the engine is ON, if somebody hijacks the car. Th is function is disarmed defaulty. Arming of the function can be happened only based on request of the client with writing declaration. To arming of the function, please contact with the installer. Antiagression function The alarm is able to immobilize the engine also in that case, if somebody hijacks the car together with its own keys. This function is disarmed defaulty. Arming of the function can be happened only based on request of the client with writing declaration. To arming of the function, please contact with the installer! September 2013. Alarm memory If the central unit records one or more triggering causes, after disarming of the alarm, it signs the triggering causes at opening of the driver’s door, or at pushing of the anti hi-jack pushbutton, through LED of the alarm. To verify type of triggering, check number of flashings of the LED with the below table. TRIGGERING CAUSE Nr. flashing of the LED 1 DOORS OPENING (WITH CAN-BUS SIGNAL) AND TRIGGERING BY ADDITIONAL INPUT (BLUE/WHITE WIRE INPUT) 2 DRIVER’S DOOR OPENING WITH MECHANICAL KEY (WITH CAN-BUS SIGNAL) 3 BONNET OPENING (WITH CAN-BUS SIGNAL) 4 TRUNK OPENING (WITH CAN-BUS SIGNAL) 5 IGNITION PROTECTION (WITH CAN-BUS SIGNAL, OR THROUGH THE GREEN/BLACK WIRE) 6 SHOCK SENSOR 7 ULTRASONIC SENSOR 8 ADDITIONAL INPUT (BLUE WIRE) 9 ADDITIONAL SENSOR (BLUE/RED WIRE INPUT) 10 ADDITIONAL ALARM INPUT (GREEN/BLACK WIRE) 11 TRIGGERING OF OEM ALARM (WITH CAN-BUS SIGNAL) 12 RADIO OPENING SENSOR, OR MOVING SENSOR 13 BONNET OPENING (WITH ANALOG SIGNAL) 14 GAS SENSOR 15 RADIO FREQUENCY DISTURBING PIN code The PIN code is that the user can disarm the alarm, even if the remote control or the alarm go wrong or the battery discharge in the remote control. PIN code emergency switching OFF function of the alarm, dependent on alarm programming, has 3 types operating opportunities, which are the followings: September 2013. 1. 2. 3. PIN code emergency switching OFF with ignition key (it is OEM setting of the alarm). PIN code emergency switching OFF with usage of brake pedal/hand brake (this function can be used after programming of the alarm). PIN code emergency switching OFF on ignition key ON, automatically (this function can be used after programming of the alarm). In boxes of the alarms can be found an envelop, which contains the SECRET PIN code. Only the user can open this envelop. Every alarm has different PIN code! We suggest for the user because of the perfect safety to change the original set PIN code for a new, own one. Please follow the next instructions in the followings chapters. If you have got any further problem with the PIN code, please look for only your importer! Open only by the USER!!! Usage of the PIN code is necessary, when the remote control was lost, or the battery was flat, or the alarm went wrong, but the device is in armed status. Dependent on equipment of the cars, it can be necessary to change the PIN code emergency switching OFF operation, for example in that case, if the vehicle is equipped with “START & GO” system, in this case we suggest to program the alarm for the 2. or 3. emergency switching OFF operating mode instead of the default setting of the PIN code emergency switching OFF function! Only importer of PATROLLINE and his contracted partners can do the programming of the alarm, because special software and hardware is necessary to it! 1. PIN code emergency switching OFF with ignition key (it is default setting of the alarm) The PIN code is a 3-figures number (e.g. 1-2-3). If you would like to use the PIN code, do the following instructions with ignition key of the vehicle: At armed alarm, open the driver’s door with mechanical key. The alarm starts trigger, at this time turn ON the ignition key, and turn OFF the ignition key as many time as first digit of the PIN code. During turning ON the ignition key the LED is ON, after the first digit you have to wait to switch OFF the LED. After it immediately turn ON and OFF the ignition key as many time as the second digit. After the LED switching OFF, turn ON and OFF the ignition key as many time as the third digit. If the procedure was successful, the alarm disarms. If the procedure was unsuccessful, the alarm stays in armed status, and triggers, at this time you have to restart the PIN code emergency switching OFF procedure from first digit giving of the PIN code. September 2013. 2. PIN code emergency switching OFF with usage of brake pedal/hand brake (this function can be used after programming of the alarm) At armed alarm, open the driver’s door with mechanical key. The alarm starts trigger, at this time turn ON the ignition key, and push/draw the brake pedal/hand brake as many time as first digit of the PIN code (the brake pedal/hand brake operate with CAN-BUS signals not in every car types, therefore they can be used for PIN code emergency switching OFF not in every cars!) During push/draw of the brake pedal/hand brake the LED is ON, after the first digit you have to wait to switch OFF the LED. After it immediately push/draw the brake pedal/hand brake as many time as the second digit. After the LED switching OFF push/draw the brake pedal/hand brake as many time as the third digit. If the procedure was successful, the alarm disarms. If the procedure was unsuccessful, the alarm stays in armed status, and triggers, at this time you have to restart the PIN code emergency switching OFF procedure from first digit giving of the PIN code. 3. PIN code emergency switching OFF on ignition key ON, automatically (this function can be used after programming of the alarm) At armed alarm, open the driver’s door with mechanical key. The alarm starts trigger, at this time turn ON the ignition key, and the transponder identifies the default key, and through the CAN-BUS network, the alarm will be disarmed automatically. ATTENTION! If the Anti hi-jack / Antiagression function are programmed, before starting of the procedure, push the secret button used to the Anti hi-jack / Antiagression, and keep it pushed until the procedure wasn’t finished! Modification of the PIN code Modification of the PIN code is necessary, if the client wants to modify the default PIN code for a personalized PIN code. Attention! We suggest for the user because of the perfect safety to change the original set PIN code for a new, own one. To modify the PIN code, do the following instructions with ignition key of the vehicle: At disarmed alarm, turn ON and OFF the ignition key as many time as first digit of the PIN code. During turning ON the ignition key the LED is ON and after the first digit you have to wait to switch OFF the LED. After that immediately turn ON and OFF the ignition key as many time as the second digit. After the LED switching OFF, turn ON and OFF the ignition key as many time as the third digit. After it the LED flashes some times. Turn ON and OFF the ignition key as many time as first digit of the new PIN code, while the LED flashes. During turning ON the ignition key the LED is ON and after the first digit you have to wait to switch OFF the LED. After it immediately turn ON and OFF the ignition key as many time as second digit of the new PIN code. After the LED switching OFF, turn ON and OFF the ignition key as many time as third digit of the new PIN code. September 2013. If the procedure was successful, the LED signs it with quick flashing. After it only the new PIN code can be used! If PIN code function of the alarm was programmed for brake pedal/hand brake mode, you have to do the above procedure on same way, only you have to push/draw the brake pedal/hand brake instead of turn ON/OFF the ignition key! ATTENTION! If the Anti hi-jack / Antiagression function are programmed, before starting of the procedure, push the secret button used to the Anti hi-jack / Antiagression, and keep it pushed until the procedure wasn’t finished! Valet function This function is, that during service of the vehicle, operating functions of the alarm can be suspended. Usage of the valet function has, independently from programming of the alarm, 3 types operating opportunities, which are the followings: 1. Valet function with anti hi-jack button. 2. Valet function with ignition key. 3. Valet function with usage of brake pedal/hand brake (this function can be used after programming of PIN code emergency switching OFF function of the alarm). 1. Valet function usage with anti hi-jack button: Activation of the valet function: At disarmed alarm, sit into the car. All doors of the vehicle have to be closed! Turn ON the ignition key and immediately push and keep pushed anti hi-jack button of the alarm, what was installed into the vehicle. After 10 seconds LED of the alarm on the dashboard starts flash and it flashes till 5 seconds. Till the LED flashes, let off the anti hi-jack button! At this time the LED flashes twice slowly, signed arming of the valet function. If you let off the anti hi-jack button too early or too late, you have to start the procedure from starting! Deactivation of the valet function: At disarmed alarm, sit into the car. All doors of the vehicle have to be closed! Turn ON the ignition key and immediately push and keep pushed anti hi-jack button of the alarm, what was installed into the vehicle. After 10 seconds LED of the alarm on the dashboard starts flash and it flashes till 5 seconds. Till the LED flashes, let off the anti hi-jack button! At this time the LED flashes four times slowly, signed disarming of the valet function. If you let off the anti hijack button too early or too late, you have to start the procedure from starting! To remind activated status of the valet function, the LED signs continuously with 2 flashings, if you turn ON the ignition key. September 2013. 2. Valet function usage with ignition key (this function operates, even if the PIN code emergency switching OFF function is programmed for the 3. operating opportunity, for the PIN code emergency switching OFF on ignition ON, automatically operation): Activation of the Valet function: At disarmed alarm, turn ON and OFF the ignition key as many time as first digit of the PIN code of the alarm. During turning ON the ignition key the LED is ON, and after the first digit you have to wait to switch OFF the LED. After it immediately turn ON and OFF the ignition key as many time as the second digit. After the LED switching OFF, turn ON and OFF the ignition key as many time as the third digit. The LED flashes some times signed arming of the valet function. Deactivation of the Valet function: Turn ON and OFF the ignition key as many time as first digit of the PIN code of the alarm. During turning ON the ignition key the LED is ON, and after the first digit you have to wait to switch OFF the LED. After it immediately turn ON and OFF the ignition key as many time as the second digit. After the LED switching OFF, turn ON and OFF the ignition key as many time as the third digit. After it the valet function will be in disarmed status. To remind activated status of the valet function, the LED signs continuously with 2 flashings, if you turn ON the ignition key. 3. Valet function usage with brake pedal/handbrake (this function operates too, if the PIN code emergency switching OFF function is programmed for the 2. operating opportunity, for the PIN code emergency switching OFF with usage of brake pedal/hand brake operation): Activation of the Valet function: At disarmed alarm, turn ON the ignition key, and push/draw the brake pedal/hand brake as many time as first digit of the PIN code (the brake pedal/hand brake operate with CAN-BUS signals not in every car types, therefore they can be used for valet function not in every cars!) During push/draw of the brake pedal/hand brake the LED is ON, after the first digit, you have to wait to switch OFF the LED. After it immediately push/draw the brake pedal/hand brake as many time as the second digit. After the LED switching OFF push/draw the brake pedal/hand brake as many time as the third digit. The LED flashes some times, signed arming of the valet function. Deactivation of the Valet function: Turn ON the ignition key, and push/draw the brake pedal/hand brake as many time as first digit of the PIN code. During push/draw of the brake pedal/hand brake the LED is ON, after the first digit you have to wait to switch OFF the LED. After it immediately push/draw the brake pedal/hand brake as many time as the second digit. After the LED switching OFF push/draw the brake pedal/hand brake as many time as the third digit. After it the valet function will be in disarmed status. September 2013. To remind activated status of the valet function, the LED signs continuously with 2 flashings, if you turn ON the ignition key. ATTENTION! If the Anti hi-jack / Antiagression function are programmed, before starting of the procedure, push the secret button used to the Anti hi-jack / Antiagression, and keep it pushed until the procedure wasn’t finished (except the „1. Valet function with anti hi-jack button” mode)! Operation of HPS 846 GSM PAGER During usage of HPS 846, you can ask, get warning for your phone about the extant triggerings, armed / disarmed status of the alarm, opened status of the vehicle CDL, flat of the vehicle battery with calling and/or SMS. In memory of the alarm 4 user phone numbers can be programmed, among them the Nr 1 (at programming: A1) is “Phone number of the Principal user”. Warning signals at triggering In case of triggering the system warns with calling and SMS: In case of calling warning opportunities of the Principal user: Applications: Answer to the calling. Hear the sounds in the car (if the optional microphone was installed), until it hangs up. Receive a SMS, what contains cause of the triggering. Refuse the calling. Receive a SMS, what contains cause of the triggering. Don’t answer to the calling, or isn’t available, the line is busy. If there isn’t other stored number in the alarm memory, receive a SMS, what contains cause of the triggering. If there is other stored number, the system calls this number. In case of triggering the system can warn further phone numbers too with calling and SMS, if they were programmed. Beside the Principal user number (at programming A1) maximum 3 phone numbers can be programmed (at programming A2, A3, A4): September 2013. In case of calling warning opportunities of the programmed further users: Applications: Answer to the calling. Hear the sounds in the car (if the optional microphone was installed), until it hangs up. Receive a SMS, what contains cause of the triggering. Refuse the calling. Receive a SMS, what contains cause of the triggering. Don’t answer to the calling, or isn’t available, the line is busy. If there isn’t other stored number in the alarm memory, receive a SMS, what contains cause of the triggering. If there is other stored number, the system calls this number. Modification of principal user number, programming of further user numbers You can modify number (A1) of the Principal user or you can program further 3 user numbers (A2, A3, A4): Operation Setting, changing of Principal user number. SMS command 1234 P=+36(phone number) Example: 1234 P=+36201234567 SMS reply S/N=x (x: default number of the alarm) Phone number of Principal user (A): Armed Example: S/N=000123 Phone number of Principal user (A): Armed Within 10 minutes from receiving of the reply SMS the HPS 846 waits confirmation of the phone number modification sent in SMS from the „Principal user number”. If the number sent in SMS is wrong, you can modify it for the correct number. September 2013. Confirmation of Principal user number. 1234 ENQ? Armed Hps 846 Chosen car code: =x (x: code of the car set at installation) Test mode: Disarmed Example: Armed Hps 846 Chosen car code: = 3B Test mode: Disarmed Programming of further 3 user number: Operation SMS command SMS reply Setting, changing of 2., 3., or 4. user number. 1234 A2=+36(phone number) 1234 A3=+36(phone number) 1234 A4=+36(phone number) Example: 1234 A2=+36201876543 Number x =Armed Hps846 (x: serial number of the user: 2, 3, or 4) Example: Number 2 =Armed Hps846 Modification of PIN code of the SMS command In the SMS commands the „1234” number is default password of the alarm, which enables SMS command of the alarm. This password can be modified. Attention! After modification of the password need to use the new password in every SMS commands! Modification of the password is possible according to the followings: Operation Changing of password. SMS command 1234 PASS=(new password) Example: 1234 PASS=9999 SMS reply Password: changed Attention! The new password can be only 4 digits! September 2013. Checking of the alarm status It’s possible to check disarmed or armed status of the alarm from far through SMS command: Operation Request of alarm armed or disarmed status SMS command 1234 ST? SMS reply Status of alarm: Armed Status of alarm: Disarmed It’s possible to arm and disarm the alarm through SMS according to the followings: Operation SMS command Alarm arming 1234 ST=ON Alarm disarming 1234 ST=OFF SMS reply The alarm arms, and sends the following reply SMS: Alarm armed The alarm disarms, and sends the following reply SMS: Alarm disarmed Attention! This function arms or disarms the CDL only, if CDL command of the alarm happens through CAN-BUS (E.g.: in Toyota vehicles), or command wires of the CDL are connected. Checking of battery level HPS 846 alarm continuously monitors the battery level, considering 10.5 V set threshold. When the battery level go down to this threshold, the device checks the status in every 30 seconds for 5 times, if nothing changes, the device send a SMS “BATTERY LOW” to A1 and A2 numbers. According to the followings you can set the threshold and you can set Nr. 3., 4. user numbers too (A3, A4) for warning of low battery level: September 2013. Operation SMS command SMS reply Low battery voltage warning (set minimum value)V Setting minimum value Battery (real voltage value of the of battery voltage battery)V to warning of low Example: battery level. Low battery voltage warning 10.4V Battery: 12.5V It’s possible to program the Nr. 3 and 4 numbers (A3, A4) for warning of low battery level. Number x =Battery voltage low 1234 VB(x)=ENA Armed (x is position of the chosen (x is position of the chosen user user number, 3, or 4) Enable battery check in number, 3, or 4) Example: case of 3. user number. Example: 1234 VB3=ENA Number 3 =Battery voltage low Armed Number x =Battery voltage low 1234 VB(x)=DIS Disarmed (x is position of the chosen Disable battery check in (x is position of the chosen user user number, 3, or 4) case of 3. user number. number, 3, or 4) Example: Example: 1234 VB3=DIS Number 3 =Battery voltage low Disarmed 1234 VB=(set minimum value) Attention: in case of decimal number, write period not comma, and the minimum value can’t be lesser, than 9! Example: 1234 VB=10.4 ENGINE CUT OFF from phone With help of the alarm from far you can stop (block) engine of the car through SMS command, if the engine block function was connected: Operation Activation of engine cut off (engine block). Deactivation of engine cut off (engine block). SMS command YOU CAN ASK THE NECESSARY CODE FROM THE INSTALLER FOR WRITTEN DECLARATION YOU CAN ASK THE NECESSARY CODE FROM THE INSTALLER FOR WRITTEN DECLARATION September 2013. SMS reply The alarm stops the engine (engine block arms), and it sends the following reply SMS: Engine closed: Armed The alarm makes the engine startable (engine block disarms), and it sends the following reply SMS: Engine closed: Disarmed Alarm maintenance Our alarms are sophisticated systems. The reliability as well as time life may be furthermore incremented just adopting some precautions such as: Battery changing: Open box of the remote control, remove the old battery, and put the new. Take into consideration the polarity, what is located on side of the battery. Use lithium battery (CR 2032 in case of the optional PATROLLINE remote control). Suggested the battery changing in every 2. years. Vehicle cleaning: should you clean the vehicle via high-pressure beams (hydro beam or similar), please protect the siren prior to commence cleaning. The alarm warranty will be cancelled if water is detected into the alarm. Main maintenance: All repairs must be carried at PATROLLINE assistance centers. Alarm systems pampering by non authorized personnel may invalidate alarm feasibility as well as your vehicle safety. Note: Patrolline Kft 8000 Székesfehérvár, Királysor 30. Tel/Fax: +36/22-317-367, +36/22-503-078 E-mail: [email protected] Web: www.canbusriaszto.hu, www.patrolline.eu September 2013.


![上戸田公民館だより5月号[PDFファイル/614KB]](http://vs1.manualzilla.com/store/data/006696130_2-2dc066e190e651c2cf720e8af474f353-150x150.png)