1
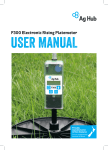
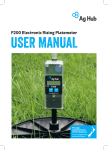
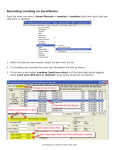
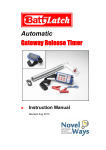
F100 Electronic Rising Plate Meter User Manual
The Electronic Rising Plate Meter provides farmers with a reliable and accurate method of
measuring pasture within a given range. It provides a valuable tool for maintaining consistency
in the measurement of pasture when undertaken by more than one person by providing a
benchmark to reduce variations in visual assessments.
It has been widely used in the dairy industry for a number of years and more recently in sheep,
beef and deer enterprises. Currently the FARMWORKS Plate Meter is sold in over fourteen
countries including Australia, Chile, Argentina, Uruguay, Mexico, USA, Canada, United Kingdom,
South Africa, China and Japan.
In New Zealand it is used by both farmers and consultants to provide pasture height and density
for determining feeding regimes for given classes of stock
The F100 Electronic Plate Meter is made up of the following components; metal shaft, handle
with inner tube, a black tube to which the black plastic plate is attached and one electronic
counter. The metal shaft is graduated into 0.5cm grooves (a click).
1. Assembling the Rising Plate Meter
2. Operating the Electronic Counter
3. Taking Paddock Readings (The Pasture Walk)
4. Using the Correct Measuring Technique
5. Current New Zealand Dairy Equations
6. Replacing the Battery.
7. Caring For Your Plate Meter
8. Component Parts
9. Retrofitting an Electronic Counter to a Manual Plate Meter
10. Trouble Shooting
FARMWORKS Plate Meter F100
September 11
1. Assembling the Rising Plate Meter
Normally the Plate Meter will come already assembled and will only require two steps to complete
ready for use, as follows:
1.1
1.2
Screw the inner tube of the yellow handle onto the threaded top of the graduated
shaft
Screw on the black plastic plate to the lower end of the black tube.
If you are retro-fitting an electronic counter to a Manual Plate Meter then follow the steps
outlined under section 9, “Retrofitting the Electronic Counter to a Manual Plate Meter”.
2. Operating the Electronic Counter
2.1.
Switching On and Off
The Electronic Plate Counter is switched on and off using the toggle
switch at the back of the unit. Off is in the ‘up’ position. When the
unit is off there are no numbers displayed on the LCD screen.
2.2.
The Front Display Buttons
There are two buttons on the front of the unit labelled ‘Avg - replace
with “height”/Reset’ and ‘Count’. When the unit is first switched on
the display will show the model number then the total pasture height
in ½ cm’s. It will also alert you with 3 short beeps and flash up “Low”
if the battery is low.
Note: 1 click= 0.5cm
2.2.1
The number of readings is displayed when ‘Count’ button is pressed. The display will
show a ‘c’ on the left side and the count on the right. This will return to total height again
after 2 seconds.
2.2.2
The average cover is shown by pressing the ‘Avg/Reset’ button. The display will return to
show the total pasture height after 2 seconds. – this doesn’t apply for the F100
2.2.3
The reset button is used to start all numbers again. This is normally done at the end of a
paddock once the readings are recorded. To reset press and hold down the ‘Avg - replace
with “height”/Reset’ button for 3 seconds. The counter will sound with 2 short beeps.
This alerts that it has reset.
FARMWORKS Plate Meter F100
September 11
2.3
Start Up Options – Prior To Taking Readings
There a simple start up option which should be addressed before starting a new walk. This is
best done prior to leaving the shed to start a pasture walk.
Zero Calibration
To ensure the Plate Meter accurately measures the compressed height of pasture, the
counter must be calibrated. This requires setting a base level of zero so measurements
can be benchmarked against this. If the counter does not return to zero after each
"plonk" it will not record the measurement and the counter will not beep.
If the counter is removed from the black tube or receives a severe knock it may jump a
groove on the steel shaft which will put the counter out of calibration. It will need to be
reset.
To do this, work through the following steps:
2.3.1
Ensure the plate is fully down (hold by the handle with the plate off the
ground) and the unit is switched off.
2.3.2
Hold down the ‘Count’ button while switching the unit on. The display will show
‘CAL’ then ‘:0’ or possibly a number other than zero.
2.3.3
When correctly calibrated the last digit should flicker between 0 and 1. If it
does not, then turn the small blue or stainless shank (which holds the cog
at
the back of the unit) with a screw driver. This is the potentiometer which
records the movement on the large steel shaft. Make sure you turn the shank
within the cog and it is not moving the large steel shaft. As you turn you will
see the numbers increasing or decreasing. Adjust the reading until the last
digit of the display flickers between 0 and 1.
2.3.4
After the unit has been zeroed, fully extend the plate and check the figure
reads 50 which is 50 ½ cm’s which is the maximum read height. This confirms
measurement accuracy. (Pot integrity)
2.3.5
Switch the unit off then on when you have finished.
2.3.6
Test the zero calibration by raising the plate and replacing it several times. A
beep should sound and the height displayed as the plate falls. If it does not,
repeat the steps above and retest.
If the calibration fails to hold then the potentiometer, which the cog drives is
probably faulty and will need replacing. This can occur with excessive wear
often compounded by dust and dirt entering the dry bearing.
3. Taking Paddock Readings (The Pasture Walk)
It is recommended you take a notebook, piece of paper or a Farm Map. You can
also pre write down the paddock numbers or names in the order that you will do
the walk. This will enable you to record each paddock height/cover for later
calculating your covers.
3.1
3.1.1
3.1.2
How to Take Paddock Readings
Switch the unit on using the toggle switch at the back.
Reset by pressing and holding the ‘Avg - replace with “height”/Reset’
button for 3 seconds. The counter will sound with 2 short beeps signifying
that the reset is complete.
FARMWORKS Plate Meter F100
September 11
3.1.3
Walk across the paddock taking readings every few paces. You will hear
a beep
every time a reading is stored. The average height is immediately
recalculated and displayed. The number of samples (plonks) to be taken
should range between 20 and 40 per paddock however this will be
determined by the variance existing in the cover. Plonks need to be taken
on a regular basis e.g. every five paces to even out any variations,
however avoid stock camp areas, tracks or uncharacteristic areas. The
greater the variability the greater the number of plonks you should take.
The unit will sound with 2 short beeps at 29 plonks and 1 long beep at 30
plonks. This lets the user know that they have done enough plonks to
obtain an accurate measurement.
3.1.4
If you need to negotiate an obstacle (e.g. fence or creek) switch the unit
off so that no readings are taken if the plate moves. On the other side of
the obstacle, switch the unit back on and continue taking readings.
3.1.5
This unit is fitted with an undo feature. This is for use either when an
inaccurate reading is taken or if you reset the counter and then realise that
you did not record the reading. To undo simply turn the counter off then
turn the unit back on holding the ‘Avg - replace with “height”/Reset’
button. The unit will turn on with 2 short beeps and the word ‘UNDO’ will
flash up then just carry on.
Note: Please note, this is one step only.
3.1.6
When you have completed the paddock, your average height in clicks will
be displayed.
3.1.7
Write down the average height.
3.1.8
Repeat instructions 2 to 5 until you have completed every paddock.
3.1.9
Switch the unit off using the toggle switch at the back.
3.1.10 When you return from the walk you will need to calculate the Average
Cover with a calculator, spreadsheet or computer program like P-Plus
Pasture Covers. See equations in section 5.
FARMWORKS Plate Meter F100
September 11
4. Using the Correct Measuring Technique
Differences in Rising Plate Meter measuring technique can alter pasture covers by as much as
600 kgDM/ha. This can be the difference between thinking there is adequate or even surplus
pasture available and all is well, or pasture deficit and urgent action is required.
All pasture measurement techniques require calibration to convert the actual reading to dry
matter. The technique that is used when walking around the farm taking the measurements
needs to be the same as that used to calibrate the Rising Plate Meter. This technique is to place
the plate on top of the pasture with no downward force, and then push the shaft to ground level making sure the plate is vertical when the shaft hits the ground.
Taking measurements by holding the Plate Meter 10cm or more above the top of the pasture and
plunging the plate onto the pasture will give lower, incorrect readings. This is because the
downward force of the plate compresses the pasture more than occurred when the calibrations
were down, giving a lower average height and cover readings.
These two techniques are illustrated below.
4.1.
Incorrect Technique
4.1.1
The Plate Meter is held above the pasture and plunged
in one movement onto the pasture.
4.1.2
The higher the plate is held and the greater the
force applied, the lower the reading will be.
4.2.
Correct Technique
4.2.1. Place the plate on top of the pasture with as little pressure as possible.
4.2.2. Push the shaft down to ground level with the shaft vertical.
Using the correct technique, no
differences have been found in the
readings between the FARMWORKS
Electronic Plate Meter and any of the
mechanical Plate Meters. However,
operators using the incorrect technique
will get lower readings with any Plate
Meter than those using the correct
technique.
FARMWORKS Plate Meter F100
September 11
5. Current New Zealand Dairy Equations
The F100 does not have the ability to store or retain any formulas but for your convenience the
following are the equations promoted by Dexcel for dairy pastures since May 2001.
Months
Rising Plate Meter Equations
Dairy Pastures
Winter (April-Sept)
Plate Meter Reading x 140 + 500
October
Plate Meter Reading x 115 + 850
November
Plate Meter Reading x 120 + 1000
December
Plate Meter Reading x 140 + 1200
Equations may
change without
notice and are
influenced by
February
Plate Meter Reading x 185 + 1200
seasonal
differences. If you
are unsure of the
March
Plate Meter Reading x 170 + 1100
current equation
contact Dexcel or
your local
consultant. There
are also different equations suited to summer, wet and irrigated pasture which are not recorded
here.
January
Plate Meter Reading x 165 + 1250
Sheep and Beef pastures differ in density to dairy pastures and will therefore require different
equations. Meat & Wool are currently researching appropriate equations for their industry. If
you are unable to obtain a formula we suggest that you use the factory default formula that is
built into the counter. It is set at Plate meter reading x 140 +500. - remove
FARMWORKS Plate Meter F100
September 11
6. Replacing the Battery.
A single 9V battery powers the F100. This should at least be a super heavy duty type or
better still an alkaline version. If the battery is getting low the unit will alert with 3 short beeps
and the word “Low” will flash on the screen. To replace the battery, loosen the screw
underneath the front membrane 3 to 5 full turns (do not remove). Pull out the battery retainer
from the bottom of the case, and replace the battery. Push the battery retainer back into the
case as far as it will go and hold it firm with your thumb and re-tighten up the screw.
There is no need to remove the plate meter from the shaft to replace the battery.
7. Caring For Your Plate Meter
7.1
Avoid getting the counter wet. The counter is in a robust case which
is water proof, however, as it is an electronic device try to avoid getting
the counter saturated.
7.2
Keep the shaft clean. The shaft can get a build up of dirt which affects
the accuracy of the Plate Meter as the shaft will not run smoothly, and
more force is required to take a reading. Clean the shaft with a poly pad
or similar. Do not use lubricant as this will build up inside the black outer
shaft.
7.3
Remember to check the counter is switched off between cover
walks. The switch is easily left on which will waste the battery.
FARMWORKS Plate Meter F100
September 11
8. Component Parts
If your Plate Meter is damaged or you require replacement parts please refer to the diagram below to
identify the correct part. In general all components are readily replaceable by the user except for the
potentiometer, membrane, or components within the counter. Contact FARMWORKS to discuss
repair your options.
M6 X 12 Button
Socket Screws
Metal Shaft
¼ x 1¼ Flat Washer
Back case with battery
retainer inserted
Handle Inner Tube
Yellow Handle
Black Tube
4 M4 x9 Flat
Washer and ½ Pan
Head Pozi P/ks
Saddles
Cog attached to
Potentiometer on case
Potentiometer
Clear Front Cover
Membrane (keypad)
Battery Retainer Inserted
FARMWORKS Plate Meter F100
September 11
Black Plastic Plate
9. Retrofitting an Electronic Counter to a Manual Plate Meter
An electronic counter can be attached to most manual
Meters with little or no modification. However it is
that care be taken to ensure it is correctly attached and
ensure smooth operation.
Plate
essential
aligned to
Remove all existing mechanical counters from the Plate
applicable).
Meter (if
Check that a cog is attached to the small shank on the
the counter. To attach a cog to the shank of the counter
USE EXCESSIVE PRESSURE. It is best to heat the cog in
of water prior to pressing onto the shaft.
back of
DO NOT
a hot cup
Lay the Electronic Plate Counter face down on a flat surface so that the cog is to your left.
Turn the cog on the counter anti-clockwise (to the left) until it stops.
Hold the Plate Meter with the handle to the left. The slit in the shaft where the cog fits should
face toward you.
Make sure the metal shaft is fully closed to the bottom end of the black tube. If you
have difficulty keeping the plate closed we suggest that you bind some tape around
the large washer and the bulb of the black tube.
Place the black tube with the steel shaft inserted
onto the back of the counter, fitting the Cog into the
slit of the tube. The Cog should be situated mid-way
in the slit in the black tube.
Place the single saddle plastic bracket onto the black tube, aligning the holes in the
bracket with the holes in the back of the counter.
Place a screw and washer
in each side of the clip
and half tighten; making
sure that the Cog is not
too close or too far away
from the metal shaft,
tighten the four screws.
The metal shaft should
move freely inside the
black tube. Turn it to
make sure it moves easily
in all positions. If it
sticks then either the black tube or metal shaft may be damaged, bent or corroded and may need
replacing, or it is not correctly aligned on the counter.
Attach the plastic plate by screwing on to the bulb of the black tube.
Place the Plate Meter in an upright position on a hard surface to check the plate closes
fully.
IMPORTANT: Before attempting your first pasture walk follow the instructions for “Zero
Calibration” under Start up Options in Section 2.3.1
FARMWORKS Plate Meter F100
September 11
10. Trouble Shooting
All repairs are to be send to
Apollo Electronics
4 Lombard Street
Palmerston North. Ph 06 3551497
A fixed fee applies, Please call to get current repair cost and send a crossed cheque in with counter.
10.1. There is no visual display>>
Check
The Counter is turned on
The battery is not flat
If you have just changed a battery you may
have damaged the battery snap (clip to top of
the battery)
Resolution
Replace battery
Service – send to Apollo Electronics
10.2. The counter does not "beep" when taking a reading>>
If it doesn’t beep this means the counter does not know where the bottom is - therefore does not
record the "plonk"
Check
The counter can become
uncalibrated if it receives a
knock and the cog jumps a
notch on the metal shaft
Resolution
Zero calibrate.
To do this, work through the following steps:
a. Ensure the plate is fully down (when holding by the handle
and the plate is off the ground) and the unit is switched
off
b. Hold down the ‘Count’ button while switching the unit on.
The display will show ‘CAL’ then ‘:0’ or possibly a number
other than zero.
c. When correctly calibrated the last digit should flicker
between 0 and 1. If it does not, then turn the small blue
or stainless shank (which holds the cog
at the back of
the unit) with a screw driver. This is the potentiometer
which records the movement on the large steel shaft.
Make sure you turn the shank within the cog and it is not
moving the large steel shaft. As you turn you will see the
numbers increasing or decreasing. Adjust the reading until
the last digit of the display flickers between 0 and 1
d After the unit has been zeroed, fully extend the plate and
check the figure reads 50 which is 50 ½ cm’s which is the
maximum read height. This confirms measurement
accuracy. (Pot integrity)
e Switch the unit off then on when you have finished.
f
Test the zero calibration by raising the plate and replacing
it several times. A beep should sound and the height
displayed as the plate falls. If it does not, repeat the steps
above and retest.
If the calibration fails to hold then the potentiometer, which
the cog drives through the shaft is probably faulty and will
need replacing. This can occur with excessive wear often
compounded by dust and dirt entering the dry bearing. You
will need to send the Counter in to Apollo Electronics, 4
Lombard Street, Palmerston North for service and repair.
FARMWORKS Plate Meter F100
September 11
Check
Ensure the cog is not slipping on the blue/stainless
shaft
Resolution
Replace the Potentiometer or Cog.
Send to Apollo Electronics, 4 Lombard
Street, Palmerston North for repair.
The cog has wound off
Replace - Request a spare cog from
Apollo Electronics, 4 Lombard Street,
Palmerston North
Potentiometer damaged. The Potentiometer is the
blue part that drives the cog
NB: Under no circumstances should you apply CRC
or a light oil to the potentiometer. It is a dry
bearing and any lubricant will render the
potentiometer useless)
Service - Send to Apollo Electronics
4 Lombard Street
Palmerston North
Check the metal shaft is coming right back into the
base of the black
tube. Ensure there is no grass or soil build-up
preventing it from doing so. Also check the large
washer at the bottom of the shaft is not catching
on the bottom of the plate.
Clean the Plate Meter
Check the cog is running smoothly on the shaft. If
the counter is mounted too close to the metal
shaft there will be quite a lot of
friction when taking a reading. If
the counter is mounted too far away from the
metal shaft; the cog is liable to jump a notch
easily.
Re-assemble the Plate Meter
10.3. Cog becoming worn >>
Check
Not aligned correctly on the shaft
Resolution
Re-align the cog or replace the cog
(Order online)
10.4. The counter continuously beeps and eventually turns off>>
Check
This is due to a low battery. The counter requires a
given level of power to complete the counts (beeps)
and calculations. If the battery doesn't have
sufficient power it will continuously beep to warn
you. Remember if you turn the counter off for a
few minutes it may recover slightly but the problem
will not go away. The counter will flash up low
battery when it is turned on and beep 3 times.
FARMWORKS Plate Meter F100
September 11
Resolution
Replace the battery
10.5. Plate Meter not running freely>>
Check
Metal shaft is bent
Grass or soil build-up inside the black tube
Flutes on steel shaft have become filled with grass
or soil
Resolution
Straighten or request a replacement
part from Apollo Electronics, 4
Lombard Street, Palmerston North
Clean the Plate Meter
Clean the Plate Meter
10.6. Front Panel (membrane) problems>>
Check
Buttons not clicking or activating
Resolution
Service - membrane needs
replacing. Send to Apollo Electronics,
4 Lombard Street, Palmerston North
for service and repair.
10.7 Battery Retainer keeps falling out>>
Check
The counter screws have not been tightened
sufficiently
Resolution
Make sure the centre screw is retightened after the battery is replaced
or ensure the battery retainer is
properly clicked into place.
Should you require assistance with setting up your Plate Meter or with installing the
software
FARMWORKS Systems - Technical Support
Email: [email protected]
Tel: 0900 55512
Fax: 06 323 1371
49 Manchester Street
PO Box 433, Feilding
New Zealand
Or visit www.farmworkssystems.co.nz
A number of papers have been written on various aspects of the use of the Rising Plate
Meter. The following references may be of interest to users.
1. Lincoln University Dairy Farm (LUDF) Fielday in Dairy Exporter January 2005
2. Rising Plate Meter Ready Reckoner DEXCEL Pasture Growth & Quality
3. Pasture production of northern dairy farms. G.J. Piggot, 1997. Proceedings of the New
Zealand Grassland Association 59: 103-106 .Refer Dexcel Website
4. Talking the same language - a New Standardised System of Pasture Assessment -Norm
Thomson, DRC, Robyn Hainsworth and Mark Blackwell - Livestock Improvement Advisory
5. Same RPM equation all-year if irrigated – Dairy Exporter January 2005
FARMWORKS Plate Meter F100
September 11
These papers are available on the DEXCEL website or from the relevant publications.
Optional P-Plus PastureCovers Software Program
11.1 What is P-Plus PastureCovers?
This is a computer software program which can be purchased as an option with your F100
Electronic Rising Plate or the Electronic Counter. By entering the average pasture height
recorded with the F100 electronic counter, it provides the user a number of reporting options
often required to meet feed allocations. Such reports include pasture covers on date, cover over
time, the feed wedge and growth rates. Below is an example of the screen layout of the P-Plus
PastureCovers program. Full mapping options are also available.
FARMWORKS Plate Meter F100
September 11
Other products sold by FARMWORKS SYSTEMS Ltd
In addition to the Electronic Rising Platemeter FARMWORKS provides other tools for the farmer
* P-PLUS FARM MANAGEMENT SOFTWARE
A fully functional farm production and mapping program for detailed farm management
information. P-Plus consists of a suite of modules including MAPPING, PADDOCK, STOCK, FEED
FORECASTER-BUDGET. Other modules are under development including INDIVIDUAL ANIMAL. –
remove we are not doing
The PASTURECOVERS module is provided free with the purchase of either the electronic counter
or the electronic rising platemeter. (F200,F300 and F400 only) – to be added
* PHOENIX
Phoenix Gateway and Phoenix Power Budget is an easy to use financial programme developed by
AgData Australia. As Australia's leading supplier of financial system AgData have over 20 years
experience in the field. Phoenix has been specifically configured for New Zealand conditions. In
time FARMWORKS plan to integrate aspects of P-Plus with Phoenix.
All software prices include 60 days free telephone support from date of registration.
FARMWORKS operates an 0900 55512 Support Line for ongoing technical support.
* GPS MAPPING
Using state of the art equipment, highly accurate farm maps can be drawn with accuracy down to
0.5 metres or less. Features mapped can include fencelines, tracks, shelter, troughs, drainage or
any other asset. These maps can provide significant cost savings in terms of fertiliser, spray and
cultivation inputs as areas measured are not reliant on contractor estimates.
* DIGITISED MAPPING
Digitised photography provides an alternative where accuracy is not as critical. Farm Maps can
be - remove
* DESIGN SERVICES – SUBDIVISION
* COMMUNICATION WHITEBOARDS
Laser etched whiteboards provide a valuable communication tool in a variety of situations. With
custom designs of farm maps and or grid designs permanently engraved into a hard wearing
whiteboard these can form the centre for recording the day to day farm tasks. Ideal for the dairy
shed, workshop or office.
•
NOTE – Services available in New Zealand Only. Software may be subject to individual
Country licencing arrangements.
Visit our website www.farmworkssystems.co.nz to see more about our products.
Whilst every effort has been made to ensure accuracy, neither FARMWORKS SYSTEMS Limited nor any employee of the company,
shall be liable on any ground whatsoever to any party in respect of decisions or actions they may make as a result of using this
information. FARMWORKS reserves the right to make changes without notice to any product specification to improve reliability,
function or design. E & OE. FARMWORKS, P-Plus and Ag-Hub are registered Trade Marks of FARMWORKS SYSTEMS Limited.
Copyright © FARMWORKS systems Limited 2011. All rights reserved.
FARMWORKS Plate Meter F100
September 11