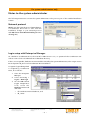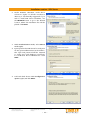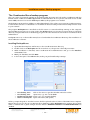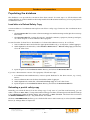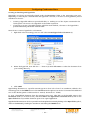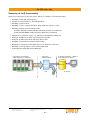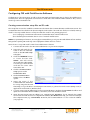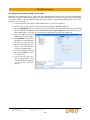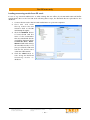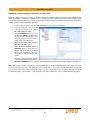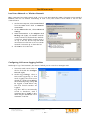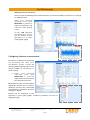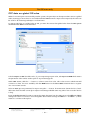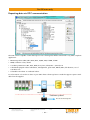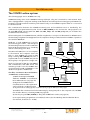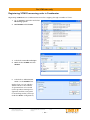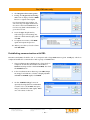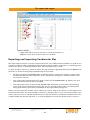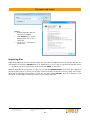
1
2010 V. 001 Installation and system administration Technical data is subject to change without notice. ISO 9001 certified. TD-231B Timken® and Where You Turn® are registered trademarks of The Timken Company. © 2010 The Timken Company 12-10 Technical data is subject to change without notice. ISO 9001 certified. TD-231B Timken® and Where You Turn® are registered trademarks of The Timken Company. © 2010 The Timken Company 12-10 Contents Introduction................................................................. 1 Measuring system................................................................. 29 About this document................................................................ 1 Selecting instrument(s).......................................................... 30 Document Outline.................................................................... 1 Optional configuration settings............................................ 31 General remarks on system structure.......................... 3 Hyperlinks setup................................................................. 31 Condmaster Nova Administrator............................................... 4 SQL Server 2005 Express Edition.............................................. 4 Data.......................................................................................... 4 LinX........................................................................................... 5 Additional software................................................................... 5 Program location...................................................................... 5 Notes to the system administrator.............................. 6 Network protocol...................................................................... 6 Communication with SAP software.................................... 33 Alarm types....................................................................... 34 Setting up alarms via e-mail and cell phone...................... 34 Exporting alarm information to other programs................ 36 User defined transducer types........................................... 39 Colored Spectrum Overview settings................................ 42 CondID® memory tags...................................................... 43 Managing historical data......................................... 46 Login setup with Enterprise Manager....................................... 6 Storage information................................................. 48 Database setup with Enterprise Manager................................. 7 Storage information in Measuring point data....................... 49 Installing the programs ............................................... 8 Editing multiple measuring points in one go........... 50 Condmaster Nova 2010............................................................ 8 The OIS online system............................................. 51 SQL Server 2005 Express Edition . ........................................... 9 Summary of LinX functionality............................................... 52 LinX......................................................................................... 13 Checklist for getting started with OIS................................... 54 Hardware key driver for USB................................................... 13 Installing LinX....................................................................... 54 The Condmaster Nova backup program................................. 14 Upgrading LinX ................................................................ 57 Installing Backup46.exe...................................................... 14 Running LinX and Condmaster on separate computers.............. 57 Installation check list............................................................... 15 Adjusting the Windows Firewall settings.............................. 60 Creating your databases............................................ 16 Assigning a static IP address to the LinX server.................... 61 Editing database information.................................................. 18 Configuring OIS with Field Service Software........................ 62 Testing database connections................................................. 18 Creating communication setup files on SD cards.............. 62 Creating database connections for online systems................. 19 Creating measurement setup via SD cards........................ 64 Other functions under Database connections......................... 19 Loading measuring results from SD cards.......................... 65 Archiving function................................................................... 20 Updating Commander Unit firmware via SD cards............ 66 Populating the database............................................ 21 Local Area Network vs. Wireless Network......................... 67 Load data via Reload Safety Copy.......................................... 21 Reloading a partial safety copy............................................... 21 Load data via update from earlier Condmaster versions.................22 Safety copying with the Bulk copy function............... 22 Creating a user register............................................. 23 Configuring LinX server logging facilities.......................... 67 Viewing the LinX server log............................................... 68 Registering Commander Units in Condmaster Nova............ 69 Using FSS to set Commander Units in service mode ........... 70 Entering and leaving service mode................................... 70 Configuring Commander Units.......................................... 72 Configuring Condmaster Nova................................... 24 Viewing the Commander Unit event log............................ 73 Logging in ............................................................................. 24 Updating Commander Unit firmware in service mode..............73 Setting the date format........................................................... 24 Configuring shock pulse measurements............................ 74 Selecting units of measurement.............................................. 25 Configuring vibration measurements................................. 75 Machine and measuring point numbering system.................. 25 Configuring analog in measurements................................ 76 Changing the numbering system . ..................................... 26 Configuring analog out channels....................................... 76 Transducer register................................................................. 28 Connecting a Commander Unit to a laptop computer...........77 Technical data is subject to change without notice. ISO 9001 certified. TD-231B Timken® and Where You Turn® are registered trademarks of The Timken Company. © 2010 The Timken Company 12-10 Transferring data with OPC Data Access................................. 78 Configuring CondmasterWEB ................................. 93 Additional configuration for OPC....................................... 78 Exporting and importing Condmaster files.............. 94 Importing data via OPC communication................................. 79 OPC data as a user defined measurement......................... 79 OPC data as a global OIS value . ........................................... 81 Exporting data via OPC communication................................. 82 The VCM20 online system......................................... 83 Registering VCM20 measuring units in Condmaster............... 84 Establishing communication with DBL ................................... 85 The DAQ program on the VCM20 computer ......................... 86 Starting Database Link (DBL) ................................................. 87 Configuring the VCM20 units................................................. 87 The CMS online system.............................................. 89 Making an export file............................................................ 95 Export file format.................................................................. 96 Importing files....................................................................... 98 Accepting data for import..................................................... 99 Condmaster Nova modules.................................... 100 Configuring third-party antivirus software............. 101 Norton Internet Security 2008.............................................101 McAfee Internet Security Suite 2008...................................102 F-Secure Internet Security 2008...........................................103 OIS Configuration Chart........................................ 104 Registering CMS measuring units........................................... 89 LinX Configuration Chart...................................... 105 Configuring the CMS communication program...................... 91 Timken Software License Agreement.................... 106 Condmaster Nova online system functions . ............................ 92 Technical data is subject to change without notice. ISO 9001 certified. TD-231B Timken® and Where You Turn® are registered trademarks of The Timken Company. © 2010 The Timken Company 12-10 Introduction Introduction About this document This document is a guide to the structure, installation and setup of the Condmaster Nova system from a system administrator point of view. Maintenance engineers, technicians, mechanics and other end users working with Condmaster on a frequent basis, please refer to the ‘Working with Condmaster Nova’ user guide, document no. 71920, the contents of which applies to the most common applications, setups, uses and problems. NOTE: Depending on your measuring equipment and the contents of your Condmaster license, you may not be able to access all of the menu options, settings etc. described in this document. Document Outline This document begins with an overall description of system structure. It then describes how Condmaster and auxiliary programs are installed. It goes on to cover the setup of databases and how to fill them with data, followed by an explanation of backup routines and the creation of a user register. The configuration of Condmaster Nova to suit user needs is then described. Finally, there are sections covering the installation and setup of various Timken online systems. Technical data is subject to change without notice. ISO 9001 certified. TD-231B Timken® and Where You Turn® are registered trademarks of The Timken Company. – 1 – © 2010 The Timken Company 12-10 Technical data is subject to change without notice. ISO 9001 certified. TD-231B Timken® and Where You Turn® are registered trademarks of The Timken Company. – 2 – © 2010 The Timken Company 12-10 System structure General remarks on system structure Condmaster Nova 2010 is a further developement of Condmaster Nova 2008. Users of Condmaster Nova 2008 simply install Condmaster Nova 2010 in a new Condmaster directory and use the safety copy made with Condmaster Nova 2008 to transfer their data. The directory containing Condmaster Nova 2008 can be deleted after Condmaster Nova 2010 is configured and running. On the installation disk, you’ll find the following: • Condmaster Nova AdministratorUser and database register, file name admin46.exe • Condmaster Nova Main program, file name pro46.exe • MSDE / SQL Server Database management system for Condmaster data • LinX Communication program, available only to users of the OIS online system • Hardware key drivers for copy protection of the software in networks and auxiliary programs for the communication with various online systems. Condmaster Nova 2010 uses the Microsoft SQL Server 2005 database management system. An existing version of SQL Server 7.0 or later, used with Condmaster Pro version 2-5, can also be used for Condmaster Nova. Users running Windows Vista need SQL Server 2005. If your current database management system installation is running well, there is no need to update it. The installation of a new Condmaster Nova consists of three parts: 1. Program installation in different localities 2. Creation of databases and connections to the databases 3. Loading of data into the databases Condmaster Nova directory Condmaster Nova Administrator • User(s) Communication program (Microsoft) MDAC SQL Server 2005 Condmaster Nova Auxiliary files • Data SQL Server directory Install Condmaster Nova Timken® and Where You Turn® are registered trademarks of The Timken Company. – 3 – Database 2 Database 3 The Microsoft program SQL Server handles all databases. A limited version is included on the Condmaster installation CD. An existing version may be used instead. It must be SQL Server 7.0 or later. The new Condmaster Nova is ”empty”. Data are input last. Technical data is subject to change without notice. ISO 9001 certified. TD-231B Database 1 © 2010 The Timken Company 12-10 System structure Condmaster Nova Administrator Condmaster Nova directory The Condmaster Nova Administrator program has three tasks: • Create a new SQL Server database. This can also be done with the Enterprise Manager, see page 7. Condmaster Nova Administrator • User(s) • Create a connection between a Condmaster Nova user and one or more SQL Server database(s). This gives the administrator who logs into Condmaster Nova access to the database. • Register other users and, at the same time, connecting them to databases. Condmaster Nova Auxiliary files SQL Server 2005 Express Edition For further information on MSDE versions of SQL Server, please visit www.microsoft.com. Condmaster Nova cannot function unless SQL Server version 7, 2000 or 2005 (or later) is running and the necessary connections to the database(s) have been made. At least one database is required, another for the demonstration program if used. SQL Server directory SQL Server 2005 Database 1 Database 2 Database 3 SQL Server 7 and 2000 can manage databases of up to 2 GB, while the 2005 version can handle up to 4 GB. If the amount of data in your system exceeds these limits, either delete some of the measurement data or upgrade to a full-scale SQL Server version. Data Data are input after the installation of all programs and after creating databases and connections. Data may come from two sources: • A new Condmaster Nova installation requires background data, i.e. reports used for printing/display, bearing catalogue, standard comments, standard symptoms and symptom groups. These are located in a file in safety copy format which the installation will place in the Condmaster Nova directory. The file is copied into the new database with the function Reload safety copy in Condmaster. • Condmaster users who update Condmaster®Pro 2-5 also use the safety copy. When updating from older versions, please contact Timken Instrument. Technical data is subject to change without notice. ISO 9001 certified. TD-231B Timken® and Where You Turn® are registered trademarks of The Timken Company. – 4 – © 2010 The Timken Company 12-10 System structure LinX Users working with the OIS online system need to install LinX, a communication software handling all messages between the Condmaster database and the OIS Commander Units. Included in this installation is also the service program FSS (Field Service Software), the graphical user interface to LinX , also used for field service and support. Additional software The program Backup46.exe creates a database backup file on the SQL Server, for network users with automatic backup routines, see page 14. Program location The programs on the Condmaster Nova installation CD are installed in different locations. In a network installation, these locations are four different computers: the work station, an SQL server, a LinX server and a file server: SQL server File server LinX server Install Condmaster Nova Install SQL Server 2005 Install LinX More workstations Workstation Please note: Using an SQL server with automatic back-up routines which runs the SQL Server program and contains the databases is a great advantage. Time and time again, valuable Condmaster Nova data have been lost because users neglect making safety copies and try to run Condmaster Nova on ”inherited” computers with minimum capacity. The communication program MDAC is used by Condmaster and installs itself automatically with the operating system. Technical data is subject to change without notice. ISO 9001 certified. TD-231B Timken® and Where You Turn® are registered trademarks of The Timken Company. – 5 – © 2010 The Timken Company 12-10 For system administrators only Notes to the system administrator The following instructions concern the system administrator. They are not part of the standard installation routine. Network protocol MDAC uses the network protocol Named Pipes. If Condmaster Nova fails to start after the installation, change to your network protocol with SQL Server Client Network Utility (file name cliconfg.exe). Login setup with Enterprise Manager As a default in Condmaster Nova, the user ID for SQL Server is ”sa”, no password. The Condmaster user selects a name for the Condmaster Nova database directory. If this is not acceptable, databases must instead be created by the system administrator, who assigns access IDs and passwords prior to the Condmaster Nova installation. To register a login identity which is accepted by Condmaster Nova, do as follows: 1. Start the Enterprise Manager. 2. Select Security > Logins > New login 3. On the SQL Server L o g i n P ro p e r t i e s form, select the Database Access tab and mark • all Condmaster Nova databases, and • db_owner. Technical data is subject to change without notice. ISO 9001 certified. TD-231B Timken® and Where You Turn® are registered trademarks of The Timken Company. – 6 – © 2010 The Timken Company 12-10 For system administrators only Database setup with Enterprise Manager Databases for Condmaster Nova must have the property ”DBO use only”: 1. Start Enterprise Manager. 2. On the form below, mark the database and select Properties: 3. Click the Options tab on the Properties form and tick the DBO use only check box (right). To gain access to the databases, the Condmaster Nova user will need to know • the SQL user ID • the SQL password • the SQL server name • the names of the databases open to them Technical data is subject to change without notice. ISO 9001 certified. TD-231B Timken® and Where You Turn® are registered trademarks of The Timken Company. – 7 – © 2010 The Timken Company 12-10 Installation routine - Condmaster Nova 2010 Installing the programs Now that you know a bit about the Condmaster system structure, you’re ready to install your new program. The installation procedure is straightforward and will not take long. Full information about hardware and software requirements can be found on the cover of the Condmaster Nova 2010 installation disk. Condmaster Nova 2010 1. Insert the installation CD. The installer wizard opens an installation menu (right). 2. Click the Install Condmaster Nova link. 3. Click NEXT in the Welcome to... window. 4. The installer wizard displays license information. Mark I accept the terms..., then click NEXT. 5. In the Custom Setup window, select your language. This will be the Condmaster Nova user interface language. 6. In the list of programs, an icon illustrates the default installation option for each of the programs. To change the default, click on the arrow for a popup menu of other installation options (right). Note: the CMS, DBL for VCM, and LinX programs are only present on the list if your Condmaster license includes the CMS, VCM or OIS online systems. 7. By default, Condmaster Nova is installed in the C:\Program files\Condmaster Nova 2010 folder, automatically created by the installation wizard. Should you prefer the program installed elsewhere, click CHANGE and browse to the desired location. To find out the amount of hard disk space available, click the SPACE button. 8. Click NEXT. Technical data is subject to change without notice. ISO 9001 certified. TD-231B Timken® and Where You Turn® are registered trademarks of The Timken Company. – 8 – © 2010 The Timken Company 12-10 Installation routine - SQL Server 9. When you’re satisfied with your installation settings, click INSTALL to start the installation process. Unless you have de-selected Hardware key drivers for USB (Microdog) installation in the list of programs (see screenshot under no. 5 above), the MicroDog and NetDog... window (right) will be displayed during the installation process. Follow these steps: 10. Uncheck the box Parallel Dog Driver under Driver Installation (right). 11. Click Install Driver to continue. 12. Click EXIT to finish the Condmaster installation process. At this point, the new Condmaster Nova contains no data and can only work when SQL Server is running. Start SQL Server first and check that it is active: 1. Open the Control panel. 2. Select Administrative tools > Computer management > Services and applications to verify that the server is up and running. For information on how to create databases and fill them with data, please see ‘Creating your databases’, page 16, and ‘Populating the database’, page 21. SQL Server 2005 Express Edition SQL Server 2005 Express Edition is a free and redistributable version of SQL Server. If an earlier version of SQL Server (SQL Server 7 or 2000) is already installed and running well, you don’t have to replace it. NOTE: Condmaster Nova will not work with SQL Server 6.5 or earlier. ”SQL” stands for ”Structured Query Language” and is used to query and process data in the database. 1. In the installer wizard menu, click the Install SQL Server 2005 Express Edition link. 2. After you’ve agreed to the licensing terms, click NEXT. 3. Confirm installation of the software components by clicking INSTALL. 4. Move through the installation wizard with NEXT. 5. Under Registration information, input your name and company name (the latter is optional). Make sure the Hide advanced configuration options check box is unticked. Click NEXT. Technical data is subject to change without notice. ISO 9001 certified. TD-231B Timken® and Where You Turn® are registered trademarks of The Timken Company. – 9 – © 2010 The Timken Company 12-10 Installation routine - SQL Server 6. Under Feature selection, make these selections (right). A default installation directory is automatically suggested. If you wish to install SQL Server elsewhere, use the BROWSE button to go to the desired location, where the installation files will be placed. Click NEXT. 7. Under Authentication mode, select Mixed mode (right). 8. Input a password to SQL Server for use by user id “sa” (system administrator) and confirm it. This login and password will be required to create users and database connections in Condmaster Nova Administrator. Click NEXT. 9. Tick both check boxes under Configuration options (right) and click NEXT. Technical data is subject to change without notice. ISO 9001 certified. TD-231B Timken® and Where You Turn® are registered trademarks of The Timken Company. – 10 – © 2010 The Timken Company 12-10 Installation routine - SQL Server 10. Next, input your selections for Error and Usage Report Settings and click NEXT. 11. Click INSTALL to start the installation process (right): Next, the so called surface area of SQL Server needs configuration. The surface area is about security; the smaller the surface area, the fewer ways to maliciously attack the server. In the interest of security, the default installation therefore disables most features, including one you’ll need to change. 12. To configure the surface area, click the Surface Area Configuration Tool link (right): For Condmaster to work with SQL Server 2005, the use of named pipes is required. Named pipes is a protocol used by MDAC to transfer data between unrelated processes in a client/server network environment. Technical data is subject to change without notice. ISO 9001 certified. TD-231B Timken® and Where You Turn® are registered trademarks of The Timken Company. – 11 – © 2010 The Timken Company 12-10 Installation routine - SQL Server 13. Enable the TCP/IP and Named Pipes feature (right), then click OK to save the settings. SQL Server 2005 installation is now complete. If you’re a local administrator on the computer, you can verify that the SQL Server is active: 14. Open the Control panel. 15. Select Administrative tools > Computer management > Services and applications (see below): 16. Check that the Status column for SQL Server says Running. Finally, you need to set up a new SQL Server database in Condmaster Nova Administrator: 17. Open Condmaster Administrator, select the Database connections form and click NEW to create a new database. 18. The server name of the new database is “.\ sqlexpress” (right). 19. Under SQL Password, input the password you assigned to user id “sa”during SQL Server installation (see page 10). 20. Move through the forms with NEXT, naming the new database and database connection and assigning database access to existing users. Technical data is subject to change without notice. ISO 9001 certified. TD-231B Timken® and Where You Turn® are registered trademarks of The Timken Company. – 12 – © 2010 The Timken Company 12-10 Installation routine - Hardware key driver 21. Click FINISH to create the database. 22. Click the CONNECT button to verify that the database connection works (right). Server name, SQL Server 2005 Express Edition The SQL Server 2005 Express Edition: server name is always “.\sqlexpress”. LinX This installer option is available only for users whose Condmaster license includes OIS. For LinX installation instructions, please see the ‘OIS online system’ section in this manual. Hardware key driver for USB For a licensed program version (i.e. not a demo version) you need a hardware key for each PC on which you want to run Condmaster Nova. USB hardware keys and the earlier hardware keys SPM 91263 for printer port can be used on computers running under XP. For WIndows Vista, only the USB hardware key will work. In a network, hardware keys can be moved between different work stations. Moreover, you can run Condmaster Nova on client stations without hardware key if the user access level is limited to ”read only” access. The maximum of simultaneous users depends on your Condmaster Nova license. The demonstration version, limited to 33 measuring points, works without the hardware key. It has a time limit of 30 days. If your Condmaster license requires a hardware key and and none is in place, Condmaster will display an error message on login. Technical data is subject to change without notice. ISO 9001 certified. TD-231B Timken® and Where You Turn® are registered trademarks of The Timken Company. – 13 – © 2010 The Timken Company 12-10 Installation routine - Backup program The Condmaster Nova backup program This is an option for networks running an automatic backup program, and only used in combination with the limited version of SQL Server 2000 supplied with Condmaster Nova. In case you use a full scale version of SQL Server 2000, version 7.0 or version 2005 Express Edition, this program is not needed. The backup program works in addition to and independently of the safety copy routine in Condmaster Nova. It transfers the contents of a database to a file which can be accessed by an automatic backup function used in your network. The program Backup46.exe is installed on the file server. It is started and kept running on the computer running SQL Server. There is no setup, unless the Backup directory is missing. You must then set a backup directory using the File menu in the backup program. All other instructions are made in Condmaster Nova Administrator. Backup46.exe is not on the installer menu, but is found under the Condmaster directory after installation of the Condmaster software. Installing Backup46.exe 1. Open Windows Explorer and browse to the Condmaster Nova directory. 2. Double click on the Backup46.exe file. From here on, the process is basically automatic. 3. When installation is finished, start Condmaster Nova Administrator and go to the Database connections form. 4. Mark your database and click EDIT. 5. In the lower part of the Edit window, make your preferred backup settings: • • • • First backup, date: First backup, time: Backup interval (days): Name of backup file: Click on the arrow to get the calendar and select a date. Input time, e.g. “23” for 23:00:00 Input e.g.’1’ for everyday backup Input a file name (and a path) Unless you input the path to another location, the file is placed on the C:\ drive of the SQL Server computer. Repeat the process for all your Condmaster Nova databases. When Backup46.exe is running, the program name is marked with a green triangle and the buttons MANUAL BACKUP and RELOAD BACKUP are enabled. Technical data is subject to change without notice. ISO 9001 certified. TD-231B Timken® and Where You Turn® are registered trademarks of The Timken Company. – 14 – © 2010 The Timken Company 12-10 Installation check list Installation check list Single user PC Install on the PC in the following order: 1. Microsoft Internet Explorer 7 / 2000 / 2005 2. Microsoft Data Engine, SQL Server 2005 Express Edition 3. Condmaster Nova 4. USB hardware key driver PC network with SQL server SQL server Databases File server Condmaster Nova directory SQL Server must operate under Windows XP or Vista. On the SQL server, install: 1. Microsoft Internet Explorer 7 2. Microsoft Data Engine (SQL Server 2005 Express Edition) On the first work station, install: 1. Condmaster Nova, new installation 2. USB hardware key driver Repeat this installation on the all work stations. Work station More work stations Getting started 1. Start the program SQL Server. It must be running when starting a Condmaster program. 2. Start Condmaster Nova Administrator. Log in with SYSTEM. Create a database and a database connection. 3. Start Condmaster Nova. Log in with SYSTEM. New program: Use Reload safety copy under System and load the BasicData.001 file from the Condmaster Nova directory (or DemoData.001 for a demonstration program). Update from version 2-5, Nova 2006 or Nova 2008: Use the Reload safety copy function under System. 4. Use the functions under System to configure the program. Technical data is subject to change without notice. ISO 9001 certified. TD-231B Timken® and Where You Turn® are registered trademarks of The Timken Company. – 15 – © 2010 The Timken Company 12-10 Databases and connections Creating your databases Your first task after the installation of Condmaster is to create access to a database(s) with Condmaster Nova Administrator. In this process, both the database itself in SQL Server and the connection between Condmaster and the database will be created and named. Once a database exists, you can register users and create connections between these users and the database (see page 19). Please note: In a network environment, the administrator may not allow others to create databases using Condmaster Nova Administrator. As an alternative, the network administrator him/herself may instead create databases using SQL Enterprise Manager. If this is the case, all you need to do in Condmaster Nova Administrator is to create a connection (“shortcut”) to an existing database and grant user(s) access to it (please see point 5 ff below). 1. Start SQL Server. This program must be running when you start Condmaster Nova Administrator or Condmaster Nova. 2. Start Condmaster Nova Administrator. 3. At this stage, there’s only one signature, SYSTEM, with no password. Write the signature and click LOGIN. Two forms showing the user register in the foreground and the database connections in the background are then displayed (below). 4. Click NEW on the Database Connections form to either create a database or to connect to an existing database. Technical data is subject to change without notice. ISO 9001 certified. TD-231B Timken® and Where You Turn® are registered trademarks of The Timken Company. – 16 – © 2010 The Timken Company 12-10 Databases and connections 5. Create new causes the SQL Server to create a database. At the same time, you connect this new database to one or more registered users. Select existing is used to give a user access to an already existing database. The only difference in the procedure is that you name the database when you create a new one, otherwise you select an existing database name from a list. Select either Create new... or Select existing... and click NEXT (you can go backwards and forwards with the BACK and NEXT buttons). A note on server names In a single user installation, where Condmaster and SQL Server are running on the same PC, the SQL Server name is always (Local) (right) for versions 7.0 and 2000, and “.\sqlexpress” for SQL Server 2005. In a network installation, where SQL Server is running on a separate server, (Local) must be replaced with the name of the SQL server. The server name is shown when you click the SQL SERVER button in the Database connections form in Condmaster Nova Administrator. 6. Input the correct server name for your installation. 7. For SQL Server 7 and 2000, the default SQL user ID is ”sa”, which stands for system administrator. You have full ownership of the databases used by Condmaster Nova. By default, ”sa” has no password. For SQL Server 2005, the user ID and password are the ones you assigned when installing SQL Server (see page 10). Click NEXT to accept these settings. 8. Next, input the name of the new database (right) and click NEXT. 9. In the next form, assign a name to the database connection, i. e. the shortcut to the database (by default, Condmaster Nova Administrator suggests the database name also for the connection). This name will appear on the list of database connections. Technical data is subject to change without notice. ISO 9001 certified. TD-231B Timken® and Where You Turn® are registered trademarks of The Timken Company. – 17 – © 2010 The Timken Company 12-10 Databases and connections 10. The master signature SYSTEM normally has access to all Condmaster Nova databases. Once you have registered other users, they will be listed on the User register form. Double click on the user names to select or unselect the users which will have access to this particular database (right). 11. The database and connection names and the list of Condmaster users with database access are displayed before the database is created. You can move backwards with <-Back and make changes if needed. Click FINISH when the inputs are satisfactory. Editing database information From the Database connections form in Condmaster Nova Administrator, you can edit the information that was input when creating the database. 1. In the Database connections form, mark your database and click EDIT. 2. Edit as required and click SAVE. Testing database connections From the Database connections form in Condmaster Nova Administrator, you can also test that the database connection works properly. 1. In the Database connections form, mark your database and click EDIT. 2. Click CONNECT for a message on the connection status. Technical data is subject to change without notice. ISO 9001 certified. TD-231B Timken® and Where You Turn® are registered trademarks of The Timken Company. – 18 – © 2010 The Timken Company 12-10 Databases and connections Creating database connections for online systems The database connections are listed in the Database connections form. A normal Condmaster Nova database is configured for measurements from handheld instruments, including data loggers. In order for an online system to know where to store its measuring results, one database must be explicitly identified as the receiver of the measurement data. In the example form below, the PM12 database has been created and identified as the one intended for data delivered from online monitoring units in the VCM20 system. To create a database connection for your online system, do as follows: 1. From the Condmaster Nova PC, start Condmaster Nova Administrator and select the Database connections form. 2. Mark the database intended for online measurement data and click CMS or VCM20. Each individual database can be connected to one or more of these online systems, but a specific online system can only be present on one database at any given time. The marking(s) for online system is only visible from this PC. For further instructions on the setup of online systems, please see page 51 ff. Other functions under Database connections The EDIT button opens the connection form for the marked database. DELETE removes the marked database connection, but not the database itself. Before using this button, you must edit each connected user in the User register and unmark their link to this database. The SQL SERVER button displays server information and a list of all databases on this server. Technical data is subject to change without notice. ISO 9001 certified. TD-231B Timken® and Where You Turn® are registered trademarks of The Timken Company. – 19 – © 2010 The Timken Company 12-10 Databases and connections Archiving function The archiving function is used to speed up graphics and retrieval of data from the database. Enabling this function means old measuring results will be stored in an archive rather than in the database, alleviating the work load of the Database Link. This may be justified in cases of very large databases containing many vibration measurements, e.g. in VCM systems. What is considered “old” measuring assignments depends on the complexity of your assignments and the size allocated per assignment (4) in the database. Complex measuring assignments such as e.g. EVAM consume more space than many others, and when the data space is exceeded, assignments start being transferred to the archive. 1 2 3 4 Archiving settings are made in Condmaster Nova Administrator: 1. In the Database Connections form, mark the database for which archiving is to be enabled and click the Edit button. The Edit form is displayed. 2. Click the Archive settings button (1). The Archive settings form is displayed. 3. Click the Use file archive for old measuring results check box (2) to enable the archiving function. 4. Enter a directory path for this particular database archive (3). The archive folder should be empty and the folder name must be unique for each database using the archiving function. 5. The default value (250-500 kB) under Max allocated data space... (4) is sufficient in most cases and does not normally need to be changed. 6. Click SAVE to save your archive settings and close the form. Condmaster safety copies also include the contents of the file archive. Technical data is subject to change without notice. ISO 9001 certified. TD-231B Timken® and Where You Turn® are registered trademarks of The Timken Company. – 20 – © 2010 The Timken Company 12-10 Databases and connections Populating the database The database is set up and the connections have been tested - the next step is to fill the datase with meaningful data. It can be loaded from the newly installed Condmaster Nova directory or from your previous Condmaster version. Load data via Reload Safety Copy A new installation of Condmaster Nova places two files in safety copy format into the Condmaster Nova directory: • The DemoData.001 file contains a few measuring points with measuring results (plus the necessary basic data). • The BasicData.001 file contains the reports, standard comments, symptoms, bearing catalogue, etc. which are part of the Condmaster Nova program. To transfer either of these files to the database of a licensed Condmaster version, do as follows: 1. Start Condmaster Nova and select the appropriate database (e.g. ”Cond_Nova”) when logging in. 2. Under System in the menu bar, select Database Maintenance > Reload safety copy (see below). Close all other forms. 3. Input the path to the Condmaster Nova directory and select the BasicData.001 file. If you use a demonstration version of the program, follow these steps: 1. In Condmaster Nova Administrator, create a special database for the demo version, e.g. “Cond_ Demo”. 2. Start Condmaster Nova and select this database when logging in. 3. Under System in the menu bar, select Reload safety copy. Close all other forms. 4. Input the path to the Condmaster Nova directory and select the DemoData.001 file. Reloading a partial safety copy Normally, you reload all data (1) from the safety copy. If only some of your files need restoring, you can make a selection: Basic data (= component and measuring point data, measuring unit and channel settings if any), Measuring results (including alarms and comments), or Own selection. The latter choice activates the MARK/UNMARK button (2) – only marked files are loaded. The button INFORMATION (4) allows you to check the file version and contents (5). To reload, click the START button (3). Change disks as requested. Technical data is subject to change without notice. ISO 9001 certified. TD-231B Timken® and Where You Turn® are registered trademarks of The Timken Company. – 21 – © 2010 The Timken Company 12-10 Populating the database Load data via update from earlier Condmaster versions If you’re a user of an older Condmaster version, your databases contain lots of data that is easily transferred to the new Condmaster Nova database. From Condmaster®Pro 2-5, Nova 2006 or Nova 2008 To update Condmaster Pro 2-5, Nova 2006 or Nova 2008 to Condmaster Nova 2010: 1. In Condmaster Pro 2-5, Nova 2006 or Nova 2008, go to System in the menu bar and select Database Maintenance > Safety copy to create a backup file of your Condmaster Pro data. The default file name for the backed up data is Pro46a.001(right). 2. In Condmaster Nova 2010, go to System in the menu bar and select Database Maintenance > Reload Safety copy. This includes the user register with all your configurations and database connections. Purely as a safeguard: keep your old Condmaster Pro/Nova directory intact until you can verify that Condmaster Nova 2010 is operating correctly. To update from older versions of Condmaster, please contact Timken Instrument. Safety copying with the Bulk copy function The Bulk copy function in Condmaster Nova and SQL Server offers a way to create a compressed safety copy version of the database. This has obvious advantages: safety copying takes less time and occupies less storage space. To activate the Bulk copy function, follow these steps: 1. S t a r t C o n d m a s t e r Administrator. Nova 2. Open the File menu in the upper left corner and select BULK COPY settings (right). 3. Set Use Bulk Copy to Yes and click OK to save. Technical data is subject to change without notice. ISO 9001 certified. TD-231B Timken® and Where You Turn® are registered trademarks of The Timken Company. – 22 – © 2010 The Timken Company 12-10 User register Creating a user register After you’ve created one or more databases and database connections for the user SYSTEM, it’s time to complement the user register with more Condmaster users (if any). This is also done in Condmaster Nova Administrator. From here, you can also edit SYSTEM and other users and assign passwords. To create new users, follow these steps: 1. Select the User register form in Condmaster Nova Administrator and click NEW. 2. For each Condmaster Nova user, enter a signature, a password (optional) and a name. 3. The user’s database access level is determined by the Modify... setting. Yes allows the user to make changes to the contents of the database, e.g. enter measuring points or delete alarms. 4. In a network, the same signature can be given to more than one user. If this is the case, you must give each signature a unique Password (see above) for the system to be able to distinguish between them. 5. Under Communication, select Yes if the user will be working with portable instruments. 6. Setting Backup to Yes enables the user to make a safety copies. When No is set for all the above choices , the user has ”Read only” access and will be able to work with Condmaster from a PC without a hardware key. 7. The Import/Export (Tree) option implies that the user will be able to copy basic measuring point data and measuring results from the Measuring point tree in Condmaster Nova to a file format that can be imported by Condmaster. 8. For Graphics/Measuring results, you can speed up the graphics functions, especially for online measuring points with a very large number of accumulated measuring results, by entering Show results from short time memory (100 latest) as a default setting. Show all results can be selected later, while the graphs are actually on the screen. 9. A list of available database connections is shown in the lower part of the form. Use the MARK/ UNMARK button (or double click on the database connections) to open connections for this user. 10. The default settings for the SQL user ID and password are normally not changed. 11. Use the CONNECT button to test the link to the databases. Mark each database in turn and click CONNECT. After registration, users are listed with signature and name on the main User register form. Technical data is subject to change without notice. ISO 9001 certified. TD-231B Timken® and Where You Turn® are registered trademarks of The Timken Company. – 23 – © 2010 The Timken Company 12-10 Configuring Condmaster Nova Configuring Condmaster Nova When starting a new Condmaster Nova it is advisable to continue with the user manual which contains step by step instructions. Users familiar with older Condmaster versions will find a few changes in Settings, but the basic setup is still made under SYSTEM in the menu bar. Logging in When you log into Condmaster Nova with signature (and password), a list of database connections (1) linked to your signature is presented. Select one of them and click OK. 1 Setting the date format Date and time formats are imported from the active settings made on the Control panel of your pc. If you prefer a different setting for Condmaster, select Date format under System in the menu bar, then select separator and date format in the Date format window (1). Technical data is subject to change without notice. ISO 9001 certified. TD-231B Timken® and Where You Turn® are registered trademarks of The Timken Company. – 24 – © 2010 The Timken Company 12-10 Configuring Condmaster Nova Selecting units of measurement Select System/Settings in the menu bar. In this window, you can select metric or Imperial units for length and temperature and Hz or CPM for vibration measurement: 1 2 Vibration frequencies are normally given in Hz (Hertz = cycles per second). The alternative is cpm (cycles per minute, i.e. Hz * 60). The setting affects the presentation of vibration spectra. The recommendation is to use Hz. Independently of this setting, you can toggle between Hz and cpm in the spectrum display. When you change the settings under Measuring System, all data stored are recalculated accordingly. Working mode This setting (1) only applies to users of portable measuring devices. As an OIS user, you don’t have to worry about the options. More information is available in document no. 71920, ‘Working with Condmaster Nova’. Alarm settings Marking ‘Overwrite alert with alarm’ (2) will delete an earlier YELLOW alert when the measuring value exceeds the level for RED alarm. When not marked, both alarms will be saved. Machine and measuring point numbering system The definition of the format for machine and measuring point numbers is your most important decision. Once you have registered a format and stored machine and measuring point data that implement this format, it can be difficult to make changes without having to re-enter part of the data. Please read the help texts for examples. After clicking on System/Numbering system, select the Basic menu option. Advanced is used only in case you must make changes in an existing system, see overleaf. Normally, there is an established numbering system for the machines in a plant. Use the same format in Condmaster Nova. If you do not have such a system, discuss the issue with your Timken representative and, above all, with those who receive your machine condition reports – the number format must be easily recognized by all. Technical data is subject to change without notice. ISO 9001 certified. TD-231B Timken® and Where You Turn® are registered trademarks of The Timken Company. – 25 – © 2010 The Timken Company 12-10 Configuring Condmaster Nova Entering the format is easy. In the format field, each letter or number in the machine number is represented by a ”C”, each separator position by ”-”. The measuring point digits are represented by ”M”. 1 2 3 4 In the Low field, type the lowest letters and/or numbers you want to allow in each position. Also type the actual separator character(s) you want to use in the separator positions of the format, e.g. “/”. Low = 0, high = 9 allows numbers only in that position. Low = 3, high = 6 allows 3, 4, 5, 6 only in that position. Low = 0, high = Z allows numbers or letters in that position. You can even use the SPACE key as lowest number. Changing the numbering system The Numbering system > Advanced menu option allows you to make changes in the existing format for component and measuring point numbers. Very important: Back up your database before making any changes. It is a requirement that all components and measuring points in your database conform with the current format, meaning there must be a character in each of the format positions. If you have merged databases with compatible but not identical formats, you must edit all diverging numbers before you can make the general change. You will get a warning and a list of the diverging points, if there are any. Technical data is subject to change without notice. ISO 9001 certified. TD-231B Timken® and Where You Turn® are registered trademarks of The Timken Company. – 26 – © 2010 The Timken Company 12-10 Configuring Condmaster Nova Making the changes At the start, the current number format is shown at the top of the display (2): 4 2 5 1 6 3 The list of components and measuring points under the tabs (3) show the status after each change in the format, before the final result of all changes made is activated by clicking the START button (4). START edits the database and closes the function unless there are conflicts resulting in fault messages. You work with one position at a time. Positions can be either inserted, moved, or deleted. After clicking OK in the Modify form (5), the result is displayed in the main form. The format display (2) is updated while you are editing. The table below it shows the format before a change (left column) and your editing instructions (right column). In the example above (5), the character ‘O’ is added to the numbering system in position 7. The DELETE button (6) is activated when you mark the last change on the list. Click NEW (1) to open the Modify form, where changes to the numbering system are made. Use the Type of change pulldown menu to select the type of change you wish to make: Insert, Move or Delete: • Insert: adds one position to your format. Select the number part (Position) on line 2, input the position and the character to be inserted, then the lowest and highest number allowed in that position (please see (5) above). All following positions are moved one step to the right. Technical data is subject to change without notice. ISO 9001 certified. TD-231B Timken® and Where You Turn® are registered trademarks of The Timken Company. – 27 – © 2010 The Timken Company 12-10 • • Configuring Condmaster Nova Move: changes the place of one position in the format to another, without changing the characters written in that position. ”Move” first creates a vacant place in the position you state, e.g. 3 for third position, by pushing this and all following positions to the right. It then fills this space with the position you want to move, which creates a vacancy in that place. This vacancy is filled by pushing all following positions to the left. Thus, when you move first position to second position, nothing changes. When you move it to third it appears in second position. Moving back to front is a bit easier: the moved position actually goes to the place you input. Delete: Removes a position and its contents, and moves all following positions up one step. Edit the numbering system: • Move creates a vacant position, • fills it with the position to be moved, • then closes the vacancy left by that. • Checklists in the Advanced form (see (3) on preceding page) are updated to show the present state of component and measuring point numbers. Click OK when you have finished one step. Click START on the main form to execute the changes. Transducer register This is a register for vibration transducer types and their sensitivity. Machine Evaluators and OIS normally use the SLD transducer SLD244, with a nominal output of 10 mV/m/s2. Machine Tester instruments use transducers TRV22/23. For the Machine Evaluators, you can use any vibration transducer with voltage output. To register: 1. In the Condmaster menu bar, select System > Transducers. 2. Click NEW (1): 1 9 2 3 4 5 3. 6 7 Technical data is subject to change without notice. ISO 9001 certified. TD-231B 8 Timken® and Where You Turn® are registered trademarks of The Timken Company. – 28 – © 2010 The Timken Company 12-10 Configuring Condmaster Nova 4. Enter a transducer name (2). 5. Select the transducer type (3), e. g. (Acceleration for an accelerometer) and output type (voltage). This puts ”mV/m/s2” behind the sensitivity field. 6. Enter the sensitivity (5). If the transducer is specified in mV/g/s2, divide the output figure by 9.81 to convert the gravity/s2 to m/s2. 7. Enter the min. and max. frequency (6). 8. Enter the min. and max. bias range (= working voltage (7)). This data is needed for TLT error message display in case of short circuit or interruption in the transducer line. 9. Enter the settling time (8). This is the time between sending a ”Measure” command to the transducer and the actual recording of the transducer output, allowing the measuring circuits to stabilize. 10. Click OK to save. When you create a vibration measuring point, you have to select one of the registered transducers. The first one on the list comes up by default, together with the sensitivity entered in this register. Thus, your standard transducer should be first on the list. You can enter its actual sensitivity (see its calibration card), then you do not have to edit the default value. Please note: Condmaster Nova uses the transducer sensitivity registered under the measuring point. This data is not changed if you edit the transducer register. Measuring system The Measuring system menu option under System in the menu bar is used to activate all measuring techniques and all instruments for which Condmaster Nova will be used. From here, a form is also accessible where passwords for the Cond-ID identification tags can be set. Technical data is subject to change without notice. ISO 9001 certified. TD-231B Timken® and Where You Turn® are registered trademarks of The Timken Company. – 29 – © 2010 The Timken Company 12-10 Configuring Condmaster Nova Selecting instrument(s) Once you have selected the measuring technique (see previous page), the technique window is displayed for selection of instruments to use with the technique: 1 Activate technique and instrument: 4 11.Mark checkbox (1). 12.Double click instrument (2). 2 5 13.Mark checkbox (3). 14.For Machine Tester, select COM or USB port and Version no. 15.For the Machine Evaluators, select USB or a COM port and adjust Baud rate if needed. 16.Input a default value for number of peaks to save. 3 17.Click OK. 18.Repeat steps 2 – 7 to select more instruments. 19.Set default instrument (4). 20.Click SAVE (5). The forms for selecting instrument differ slightly, depending on what is activated. In all cases you must mark the checkboxes Use the measuring technique (1) and Select instrument (3). You can activate more than one instrument for each measuring technique. When several instruments are active, you may want to select a default instrument (4), which is then automatically proposed when you create a new measuring point. The default instrument, if any, is marked with an ‘*’ (asterisk) in the list of measuring techniques and selected instruments (see screen dump on preceding page). Please note: The Machine Evaluator instruments can be connected to a COM port or to a USB port. To use a USB port, the following applies in terms of USB drivers: • Machine Evaluator: USB driver installation on your pc is required regardless of operating system. The USB driver is found on the service CD delivered with the Machine Evaluators. For the Machine Evaluator instruments, a SETTINGS button leads to a menu where you select the data to be transmitted to the Machine Evaluators on downloading a round. You can select ‘Number of results’ or ‘Number of days’ for a) Measuring results, b) SPM Spectrum results, c) EVAM results and (d) Orbit results, in each case max. 100. Technical data is subject to change without notice. ISO 9001 certified. TD-231B Timken® and Where You Turn® are registered trademarks of The Timken Company. – 30 – © 2010 The Timken Company 12-10 Configuring Condmaster Nova Optional configuration settings On the preceding pages, we have covered the minimum configuration required to start using Condmaster Nova. There are, however, further options which you may want to take advantage of. Hyperlinks setup Hyperlinks are used to link documents of any kind and/or picture files to Condmaster, making them easily accessible from within Condmaster. Hyperlinked documents can be opened from the Graphical Overview, from the measuring point tree and from Comments. To start using hyperlinks, follow these steps: 1. In the menu bar, select System > Settings. 2. In the Settings window, click on the Hyperlinks tab, then click the ADD button: 1 2 3 4 5 6 3. Under Description (1), input a descriptive name for the type of document you wish to be able to hyperlink to. 4. Click the “...” (2) button under Name of executable file to browse for the “.exe” (executable) file for this type of document. 5. Under Working directory, browse (3) to the folder where you plan to store the hyperlinked documents. 6. The Parameters field (4) is automatically filled out by Condmaster, but can be edited if the file type´s original application requires it. 7. Under File mask (5), input the file extension for the document type (e.g. “*.doc” for a Word file, “*.xls” for an Excel file etc., where the asterisk represents any file name). To test that the setup works, click OPEN FILE (6), browse for an existing file of the format in question and click OPEN. The file should now open in its original application, which you can then close. Also close the Add window with the SAVE button. On the Hyperlinks tab are also the buttons Export to file and Import from file. Use these buttons e.g. in case you wish to transfer your hyperlinks settings to or from another pc. Technical data is subject to change without notice. ISO 9001 certified. TD-231B Timken® and Where You Turn® are registered trademarks of The Timken Company. – 31 – © 2010 The Timken Company 12-10 Configuring Condmaster Nova Creating and working with hyperlinks Hyperlinks are always automatically placed under the Documents folder in the measuring point tree. Depending on what object is marked when the hyperlink is created, a shortcut to the hyperlink is placed elsewhere in the tree: • • Creating a hyperlink within an opened subfolder, i.e. marking one of the objects contained in the folder, places a shortcut to the hyperlink in the folder in question. If instead you create a hyperlink with the subfolder itself marked, a shortcut to the hyperlink is placed immediately above the marked folder. Here’s how to create a hyperlink to a document: 1. Right click in the measuring point tree and select Create/Hyper link to document (1): 1 2. Name the hyper link, then click the “...” button (2) under File name to select the document from your working directory. 2 3 3. Click SAVE. Hyperlinking documents to a specific measuring point is done in the form of an attachment, added to the measuring point via the NEW button in the Comments window (please see section ‘Comment with additional text’ in the ‘Working with Condmaster Nova’ manual, document no. 71920). To open a hyperlinked document from the measuring point tree, right click on the hyperlink name in the Documents folder (or on the short cut), and select Edit. In the Hyper link to document window, click on the Open folder button (3) and the document opens in its original application. Hyperlinked documents can also be opened from the Graphical Overview by clicking on the Open folder symbol, and from Comments by marking the attachment and clicking the OPEN button. Technical data is subject to change without notice. ISO 9001 certified. TD-231B Timken® and Where You Turn® are registered trademarks of The Timken Company. – 32 – © 2010 The Timken Company 12-10 Configuring Condmaster Nova Communication with SAP software Specific functions are required in the SAP software for the communication to work properly. These functions are not provided by SPM Instrument AB, only a protocol description of the functions as seen from Condmaster. Z_Condmaster is the function that has to be implemented in SAP software in order to use the SAP function in Condmaster. Condmaster calls function Z_Condmaster in SAP and transfers the information shown above. Condmaster SAP Measuring point number, Char (30) Alarm date and time, DateTime User, Char (8) Alarm type, Char (255) ID_MEASURING_POINT ID_ALARM_DATE ID_USER ID_ALARM_TYPE ‘User’ is the Condmaster operator logged in when the message is sent. SAP creates a work order and Condmaster reads the order number (ED_ORDER_ID) from SAP and also an error message (IS_RETURN, if the parameter is empty there is no error in SAP). To delete an alarm in Condmaster, SAP creates a text file named SAP_OrdersDone. txt and there sets the following parameters: Work order number, Char (12) Date and time in following format YYYYMMDDHHMMSS Comment code, Char (4) and free text starting and ending with #. If any enter signs are added then | is the divider. Example 1234567820040504111213BD01#Free text and a line break | in the row# 12345678 order number 2004-05-04 is the date and 11:12:13 is the time BD01 is the standard comment code. The file can be saved anywhere, locally or on the server. The path has to be set in Condmaster. When the user opens the alarm list window, Condmaster reads the file and deletes the alarm. A comment is set against the measuring point, containing work order number, alarm type and free text. Condmaster measuring point numbers and Standard Comment codes are available to SAP software via a command to the SQL server that controls the Condmaster data base. Technical data is subject to change without notice. ISO 9001 certified. TD-231B Timken® and Where You Turn® are registered trademarks of The Timken Company. – 33 – © 2010 The Timken Company 12-10 Configuring Condmaster Nova Alarm types Alarm types are are a way to briefly describe what action(s) should be taken when a reading is high enough to cause an alarm; for instance “Lubricate and measure again”, “Plan replacement ASAP”, etc. Alarm types show up on the alarm list and in alarm e-mails sent to designated receivers (see section ‘Setting up alarms via e-mail and cell phone’). To create, edit or delete alarm types, follow these steps: 1. In the Condmaster menu bar, select System > Settings. 2. Click the Alarm types tab: 3. Add, edit or delete alarm types as required. Setting up alarms via e-mail and cell phone This function sends selected alarms on selected components/measuring points via e-mail to stated addresses, according to a user defined weekly schedule set up via the measuring point tree. The e-mails can be rerouted to cell phones with SMS capability via messaging services. Here’s the setup process: 1. In the Condmaster menu bar, select System > Settings, then click the Alarm e-mail tab (1): Technical data is subject to change without notice. ISO 9001 certified. TD-231B Timken® and Where You Turn® are registered trademarks of The Timken Company. – 34 – © 2010 The Timken Company 12-10 Configuring Condmaster Nova 1 2 3 2 4 5 3 2. 3. 4. 5. Input the company mail server name (2). If settings made in your mail server require it, also input your user name (4) and a password (5). The default setting for Sender (E-mail address) may be edited if required (3). Then go to the measuring point tree, right hand click and select Create > Alarm mail: 6 7 8 6. Name the alarm e-mail (6). 7. Input the e-mail addresses of one or more recipients, one address per line (7). Alarms occuring during the periods of your choice will be sent to everyone on this list. 8. Click on the Measuring points tab, then click ADD to select measuring points from the measuring point tree. Multiple measuring points may be selected by holding down CTRL on your keyboard while clicking. When done with your selection, click OK. 9. Now create a calendar: click on the Week calendar tab. In the dropdown list below the calendar, select a day, then input your normal working hours under From and To, respectively (8). Click the ADD button. Condmaster automatically moves to the next day and assumes your working hours are the same - if this is the case, all you have to do is repeatedly click the ADD button to copy this information to the rest of the week. Technical data is subject to change without notice. ISO 9001 certified. TD-231B Timken® and Where You Turn® are registered trademarks of The Timken Company. – 35 – © 2010 The Timken Company 12-10 Configuring Condmaster Nova 10. To suspend the alarm e-mails during vacation periods, click on the Vacations tab. In the lower part of the form, use the calendars under the To and From dropdown lists to input a vacation period, then click the ADD button. Repeat the process to input multiple vacation periods. 11. Click on the Techniques tab to select your alarm type settings. 12. Click SAVE. Exporting alarm information to other programs When work orders are created and managed in a program other than Condmaster, individual alarms on the Condmaster alarm list can be exported to that program, either as a text file or an SQL table. Export as text file To configure alarm export in text file format, follow these steps: 1. In the Condmaster menu bar, select System > Settings, then click the Alarm export tab: 1 2 3 4 5 2. Select an Export file type (1). This example illustrates settings for text file export. 3. Tick the Export to AMOS checkbox (2) if you’re exporting to AMOS. 4. Input the path to the folder where Condmaster will read work order information returned from the maintenance program (3). 5. Input the path to the folder where you want Condmaster to save the alarm information later read by the maintenance program (4). 6. If you want standard comments on the measuring point to be included in the exported information, tick the Use standard comment checkbox (5). NOTE: you may want to create a special standard comment (under Registers > Standard comments in the Condmaster menu bar) for use in connection with alarm export. 7. Click OK to save your settings. Technical data is subject to change without notice. ISO 9001 certified. TD-231B Timken® and Where You Turn® are registered trademarks of The Timken Company. – 36 – © 2010 The Timken Company 12-10 Configuring Condmaster Nova Export as database table To export the same information as an SQL table instead, do as follows: 1. Select SQL table under Export file type (1): 1 2 3 4 2. Input the name of the server where the SQL database receiving the exported information resides (2). 3. Input the name of the database (3). 4. Input a User ID and, if required to access the database, a SQL password. 5. Input the name of the database table storing the exported information (4). 6. Test that the database connections work by clicking the CONNECT buttons. The actions above only define the file type and locations. The actual creation of the text file is done by marking an alarm in the Alarm list and clicking the ALARM EXPORT button: If you’re exporting in text file format, the result is a file named ‘x.spm.export’, where x represents a serial number (‘1.spm.export’, ‘2.spm.export’ etc). The content is as follows: Technical data is subject to change without notice. ISO 9001 certified. TD-231B Timken® and Where You Turn® are registered trademarks of The Timken Company. – 37 – © 2010 The Timken Company 12-10 Configuring Condmaster Nova [ALARM] CondmasterIdentity= e.g. 8559 Measuring point number= e.g. A-100.03 AlarmType=Level alarm: e.g. LR/HR AlarmDate= e.g. 20100528125526 User= e.g. SYSTEM If you open an export text file in Notepad for instance, it might look something like this: Notepad Once the text file has been imported to the maintenance system and the work order is closed in that system, another text file containing the following information should be sent back to Condmaster: [WORKORDER] CondmasterIdentity= e.g. 8559 WorkOrderID= e.g.123ABC WorkOrderNo= e.g. 121212 WorkOrderCreated=e.g. 20100528125526 WorkOrderCompleted= e.g. 20100528125526 StandardCommentCode=e.g. AE01 WorkOrderComment= Any free text added by the user Whenever the user opens the Alarm list, Condmaster looks for return files ending with ‘.tospm’. If such a file is found, the alarm in question is completed with the work order comment and deleted from the alarm list. NOTE: The layout of the return file must conform with the above, and the file extension must be ‘.tospm’, or Condmaster will be unable to find it. If you’re exporting a database table, the content is as follows: C_AlarmID C_CompNo C_MpNumber C_AlarmDateTime C_AlarmType C_User In return, Condmaster expects the following: WorkNo WorkComment WorkDate C_StdComCode ErrorMessage Technical data is subject to change without notice. ISO 9001 certified. TD-231B Timken® and Where You Turn® are registered trademarks of The Timken Company. – 38 – © 2010 The Timken Company 12-10 Configuring Condmaster Nova User defined transducer types Condmaster offers the possibility to measure on other types of transducers besides shock pulse and vibration, e.g. pressure transducers. This feature is called user defined transducers. To use a user defined transducer on a measuring point, the following applies: • The measuring assignment may only use OIS as a measuring device • Works for EVAM measurements only • All user defined transducers being used on various measuring assigments on the same measuring point must be of the same unit of measurement (e.g. Bar) Here’s how to set up a user defined transducer: 1. Under System > Settings, click the Transducer types tab: 1 2. Mark a row in the table and click the EDIT button. 3. Input Name and Unit for the new transducer type. 4. Make sure the new transducer type is marked with a tick (1), then click OK to close the form. 5. Go to System > Transducers and click NEW: Technical data is subject to change without notice. ISO 9001 certified. TD-231B Timken® and Where You Turn® are registered trademarks of The Timken Company. – 39 – © 2010 The Timken Company 12-10 Configuring Condmaster Nova 2 6. The new, user defined transducer type shows up as an option in the Transducer type dropdown list (2). 7. The unit input in step 3 above (Bar) is shown under Nominal sensitivity. Please note that for user defined transducers, only Voltage output is allowed. 8. Register one or more transducers of the user defined type. Using the user defined transducer Measuring point register When a user defined transducer is used on an OIS measuring channel, the Spectrum unit and Time signal unit parameters must be set to the unit which was input in step 3 (Bar): Technical data is subject to change without notice. ISO 9001 certified. TD-231B Timken® and Where You Turn® are registered trademarks of The Timken Company. – 40 – © 2010 The Timken Company 12-10 Configuring Condmaster Nova For filtering of results, RMS, Peak and Peak to Peak are the only options available. Crest, Kurt, Skew etc. cannot be selected. Condition parameters based on the new transducer can be selected for the measuring assignment: Spectrum Measuring results and spectrums are displayed with the unit set up (Bar etc.) for the new transducer: Technical data is subject to change without notice. ISO 9001 certified. TD-231B Timken® and Where You Turn® are registered trademarks of The Timken Company. – 41 – © 2010 The Timken Company 12-10 Configuring Condmaster Nova Colored Spectrum Overview settings The Colored Spectrum Overview is a three-dimensional view of all spectrums under a particular measuring assignment. Its purpose is to simplify the process of identifying in spectrums the patterns and trends which indicate damages. The behavior of the Colored Spectrum Overview can be controlled through settings available under System > Settings > Miscellaneous tab > EDIT button: For further information regarding the functionality of the Colored Spectrum Overview, please refer to the ‘Working with Condmaster Nova’ user guide, document no. 71920. Technical data is subject to change without notice. ISO 9001 certified. TD-231B Timken® and Where You Turn® are registered trademarks of The Timken Company. – 42 – © 2010 The Timken Company 12-10 Configuring Condmaster Nova CondID® memory tags CondID are intelligent memory tags storing all the information needed for an instant condition measurement with any Timken data logger. No rounds or preparations are required - you can measure any time in any order, then upload the results to Condmaster Nova. Via radio transponder, the CondID tags send: • Measuring point number and name • All measuring techniques and their basic input data • The measuring results from the previous reading When you want to start using CondID tags, your first step is to activate CondID: 1. Under System in the Condmaster menu bar, select Measuring system. 2. In the Measuring system form, double click the CondID row. 3. Mark the Use this technique check box: The CondID identification tags are now ready for reading/writing. Tags can be programmed with passwords. These are downloaded into a datalogger (same procedure as for measuring rounds). A password in the READ column only means the tag has write protection. When the data logger is loaded with measuring points from Condmaster Nova, the program will automatically transfer all necessary codes. For an open system without password there is no setup for tags. For a system with the extra password protection, you have to input the passwords. Everything else is an automatic part of the downloading procedure. You can use all available measuring techniques together with the tags, including checkpoints. They are initiated through a first WRITE command in the data logger. The measuring points must then be uploaded to Condmaster Nova. After that, the measuring point in the measuring point register will show a tag button (1), leading to the CondID (2) form where you can disable the link to the tag in case it gets lost or is used elsewhere: Technical data is subject to change without notice. ISO 9001 certified. TD-231B Timken® and Where You Turn® are registered trademarks of The Timken Company. – 43 – © 2010 The Timken Company 12-10 Configuring Condmaster Nova 1 2 In the Graphical Overview, ”tagged” measuring points are marked with a tag icon: 3 If it shows a red dot (3), the tag memory could not accommodate all data. In such a case, data will be left out, starting with a shortened measuring point name. Next, the checkpoint text is shortened/left out, then User defined 2 is left out and others, working rear to front. The ID tag menu will show the used number of bytes (one byte = one character). In case of memory trouble, edit the measuring point. You may be able to cut down on redundant information: - Use short measuring point names and short texts for checkpoints. - Many measuring techniques being used on the same measuring point may require more memory than what’s available. If so, try to distribute the measuring techniques between two measuring points. - Use as few characteras as possible to define Measured quantity for User defined. Keep the result display format ”##.#” to a minimum. Technical data is subject to change without notice. ISO 9001 certified. TD-231B Timken® and Where You Turn® are registered trademarks of The Timken Company. – 44 – © 2010 The Timken Company 12-10 Configuring Condmaster Nova Assigning and editing CondID passwords All tags are safeguarded and can only be read with Timken instruments. In addition, you can set (and change) READ and WRITE passwords in Condmaster Nova. These passwords are automatically sent to the data logger and tag when downloading measuring points. Cond-ID passwords consist of numbers (1 - 65000 or blank). A maximum of five sets of passwords can be stored (see below). To assign passwords to your Cond-ID tags, do as follows: 1.Go to Measuring system under System in the menu bar. 2.Mark CondID and click the EDIT button. This opens the CondID form: 1 3. The Passwords table has five lines with four columns. The first column is for READ protection. When your instrument has this password, it can read the tag and also write to it, unless a second WRITE password is input in the second column. You can, for instance, give your READ password to the user of another Condmaster Nova. If he sets it on this menu, he will be able to read your tags, but without your WRITE password he cannot write to them. 4. The third column, On write, is used to change the password. In the example above, there is a second set of passwords on line 2. The On write column on this line shows ”1”, i. e. it refers to line 1. The instrument can contact the tag with both sets of passwords. However, when it writes to a tag having the passwords ”33” and ”678” (from line 2), it will write the passwords ”123” and ”231” (from line 1). After all tags have thus changed password, the old password can be deleted from line 2. 5. To input or change passwords, click on the EDIT button (1). The text you input appears in the Comment column. The TRANSFER button can be used if you want to load a data logger with passwords (but not, as yet, measuring points). Connect the instrument to the COM port as when downloading measuring points. Please note: The menu shown here is the only place where the passwords are set (and visible). The exchange of passwords between instrument and tag does not require any action on behalf of the user. Technical data is subject to change without notice. ISO 9001 certified. TD-231B Timken® and Where You Turn® are registered trademarks of The Timken Company. – 45 – © 2010 The Timken Company 12-10 Condmaster Nova Managing historical data At some point in time, it may become necessary to decrease the amount of data in the Condmaster database. The Manage historical data function has been developed to allow the system administrator to delete data from the database in a controlled manner. The function offers the possibility to select instrument(s), measuring technique(s) and, finally, what measuring points should be deleted. NOTE: The removal of data from the database via this function is permanent. The data cannot be retreived at a later time. We therefore strongly recommend that a safety copy be made first. It should also be noted that using this function does not in fact decrease the size of the database. Its size will remain unchanged until enough new data to exceed it earlier size have been saved to tha database. To delete information from the database, follow these steps: 1. Under the System option in the menu bar, select Database maintenance > Manage historical data. The Manage Historical Data guide is displayed: 1 2 4 3 5 2. In the Instrument (1) and Technique (2) dropdown lists, select instrument(s) and measuring technique(s) eligible for deletion. 3. In the resulting list (3), select one or more measuring points. Holding down the <SHIFT> key on your keyboard, adjacent rows may be selected. Click-and-drag may also be used to select multiple rows. 4. Click the RETRIEVE SIZE button (4) to update the list with more information about the measuring results. 5. Click the NEXT button (5) to go to the next page of the Manage Historical data guide (screen shot overleaf): Technical data is subject to change without notice. ISO 9001 certified. TD-231B Timken® and Where You Turn® are registered trademarks of The Timken Company. – 46 – © 2010 The Timken Company 12-10 Condmaster Nova 4 1 2 3 6. Enter a Delete data prior to date (1). 7. Next, decide whether to delete all data older than that date, or have Condmaster Save 1 measuring result every hour, day, week, month or year (2) and remove the rest. If you opt to save measuring results, you can also select to have them averaged. However, averaging can only be done with ISO2372 measuring results and results from user defined measuring assignments. 8. Tick the Remove comments checkbox (3) to have all comments made prior to the date set up. Left unticked, no comments will be removed. 9. Click the DELETE DATA button (4) to start deleting your selection of data. Technical data is subject to change without notice. ISO 9001 certified. TD-231B Timken® and Where You Turn® are registered trademarks of The Timken Company. – 47 – © 2010 The Timken Company 12-10 Condmaster Nova Storage information Storage information is a function which delivers information about the amount of space occupied by a certain measuring point or measuring technique in the Condmaster database. This is a convenient way for the system administrator to find out whether it is reasonable to continue measuring according to the current setup of measuring assigments. In case the database needs to be made smaller for performance reasons, for example, this function will tell what consumes the most memory space. Under System in the Condmaster menu bar, a complete overview of the storage required by all measuring points and techniques is available (see below), while storage information for individual OIS measuring points is also available in the Measuring point data form. To view storage information for all measuring points and techniques,follow these steps: 1. Under System > Database maintenance, select Storage information. 2. In the Storage information window, select All or a specific instrument in the Instrument dropdown list (1): 1 3 4 2 3. In the resulting list (2), each measuring technique set up on a measuring point is accounted for on a separate row. Hence, a single measuring point can appear on several rows. 4. Select one or more measuring points in the list. Holding down the <SHIFT> key on your keyboard, adjacent rows may be selected. Click-and-drag may also be used to select multiple rows. 5. Click the RETRIEVE SIZE button (3) to update the list with the number of measuring results and their actual size in Mb (Megabytes) per measuring point. For OIS measuring points, the theoretical size is also displayed (not applicable to other measuring devices). The theoretical size is a computation based on the configurations made on the measuring assignments in terms of the number of lines in spectrum, settings for short and long time memory, measuring intervals etc. Please note that measurement conditions and triggers are not included in this computation. 6. If there is a need to decrease the size of the database, you can click the DELETE DATA button, in which case the Manage historical data form is opened. For information on this function, please see page 46. Technical data is subject to change without notice. ISO 9001 certified. TD-231B Timken® and Where You Turn® are registered trademarks of The Timken Company. – 48 – © 2010 The Timken Company 12-10 Condmaster Nova Storage information in Measuring point data For OIS measuring points, the theoretical memory usage can also be seen in the Measuring point data form: Again, the theoretical size is based on settings made on the measuring assignment. It represents the amount of space required providing all measurements are in fact carried out according to the setup. If for some reason they are not, it will obviously reflect on the memory usage. Technical data is subject to change without notice. ISO 9001 certified. TD-231B Timken® and Where You Turn® are registered trademarks of The Timken Company. – 49 – © 2010 The Timken Company 12-10 Condmaster Nova Editing multiple measuring points in one go It is possible to edit multiple measuring points at one time. Select the desired measuring points from the measuring point tree by holding down the CTRL key and clicking each of the measuring points in turn, then right click and select Edit (or select them from the Graphical Overview). In the bottom right corner of the Measuring Point Data form are now tabs for each of the selected measuring points and a “...” button (1): 1 Click the “...” button to display a menu of options. To make or change a setting that will impact all the measuring points, select Multi change measuring points. The tabs of all measuring points affected by the the change will be light blue in color and the number of measuring points affected will blink, next to the “...” button. When editing something that can only be applied to the current measuring point, that tab will be light blue while the other tabs remain white in color. NOTE: this function applies to the user SYSTEM only, and should be used with great caution so as not to corrupt database contents. Technical data is subject to change without notice. ISO 9001 certified. TD-231B Timken® and Where You Turn® are registered trademarks of The Timken Company. – 50 – © 2010 The Timken Company 12-10 For OIS users only OIS Commander Unit Commander Unit Commander Unit SD SD SD Measurement modules LinX Server / FSS Condmaster Nova SQL Server The OIS online system The OIS measurement and control units are called Commander Units. Each Commander Unit is equipped with a user selected combination of modules for shock pulse, vibration and/or analog measurement. The units operate independently of each other, and an OIS system may contain any number of these units. The Commander Units are connected via a standard Ethernet network, communicating with the SQL Server database via the communication software LinX. LinX LinX is dedicated to triggering, controlling and filtering measurements and data. It handles all messages between the database and one or more Commander Units, assignment/setup files, global values, status/ analog outputs, alarm delay and acts as OPC Server/Client. LinX may be run from the Condmaster PC, but for performance reasons, installing it on a dedicated LinX server is the preferred strategy. Servers are often more powerful than workstations, are normally under more supervision and are rarely turned off. If the LinX computer loses power, the Commander Unit will start buffering measurement data on its SD card, which might take some time to transfer to LinX once it’s up again. Once the Commander Units are registered in Condmaster, measuring assignments for OIS are set up here and saved to the database, where LinX collects them and breaks them up into tasks to be carried out by the Commander Units. At this time, OIS, LinX and Condmaster all run under the 32-bit and 64-bit Professional, Business, Ultimate or Enterprise editions of Windows XP, Windows Vista or Windows 7. It is not a requirement that all computers involved run under the same operating system; for instance, the Condmaster PC may run under Windows XP while the LinX PC runs Vista. FSS The Field Service Software (FSS) is the graphical user interface to the communication software, used to configure OIS. Technical data is subject to change without notice. ISO 9001 certified. TD-231B Timken® and Where You Turn® are registered trademarks of The Timken Company. – 51 – © 2010 The Timken Company 12-10 For OIS users only Summary of LinX functionality LinX is an essential part of the OIS system. Below is a summary of LinX functionality: • Handling of task files and setup files • Transfer of measurements to the SQL database • Handling of global values • Handling of status outputs and alarm delay when the system is online • Handling of filtering of measuring results: - does the filtering configured under Advanced settings in Condmaster - checks whether RPM is within the limits defined in Condmaster • Calculation of symptom values, e.g. unbalance, misalignment, BPFO etc. • Acting as an OPC server when exporting data from OIS • Acting as an OPC client when importing data to OIS • Handling of Field Service Software functionality • Buffering of measuring results when there is no database connection • Handling of analog outputs on the Commander Units • Communication with LinX Service Manager 1) Conditions and triggers; “What and when to measure” 2) Filtering; “What to keep” LinX Commander Unit Technical data is subject to change without notice. ISO 9001 certified. TD-231B 3) Graphical filtering; “What to show and when to alarm” Database LinX Timken® and Where You Turn® are registered trademarks of The Timken Company. – 52 – Condmaster © 2010 The Timken Company 12-10 For OIS users only Controlling the quality and amount of measurement data When running the OIS online system, Condmaster offers several ways to control data quality as well as the amount of measurement data saved to database. There are three different levels on which to control what is measured, saved to the Condmaster database and displayed on screen: 1) Commander Unit level: This is where measurement conditions and triggered measurements are handled. They are used to ensure that readings are taken only when required and at exactly the right time. If conditions and/or triggers are not fulfilled, no measurement will take place. 2) LinX level: LinX handles filtering of the measurement results received from the Commander Unit. The purpose is to dispense with insignificant information. Readings filtered out at this level are not saved to the database. 3) Condmaster level: Graphical filters are handled by Condmaster and are applied only to readings stored in the database. Graphical filtering only affects what is displayed on screen and when alarms are raised, i.e. all readings remain in the database, whether displayed or not. Implementing stringent settings for measurement conditions and/or triggers and filtering options may cause no measuring results at all being saved to database. If this is the case, Condmaster can be set up to notify you by means of a system alarm. If such an alarm is raised, you should examine your conditions, triggers and filter settings as a first measure. This can be done using the Measuring and storing logic overview. Conditions, triggers, filtering options and Measuring and storing logic are all accessed via the Measuring point data form, or via the Graphical Evaluation. Before installation When you begin installation of the OIS components, having the following information about your network infrastructure at hand is helpful. Collect it from your network administrator. • Is there a DHCP server? • Is there a DNS server and if so, what is its IP address? • What do Local Area Network (LAN) addresses look like on the LAN segments used? • What netmasks are used on those LANs? • Can I assign a static IP address to LinX and if so, which one? • Do I have to use a gateway and if so, what is its IP address? Technical data is subject to change without notice. ISO 9001 certified. TD-231B Timken® and Where You Turn® are registered trademarks of The Timken Company. – 53 – © 2010 The Timken Company 12-10 For OIS users only Checklist for getting started with OIS Use this list as a guide to help you do things in the right order and if you run into problems, double check it to make sure you’ve done everything on the list correctly. 1) 2) In Condmaster Nova Administrator, create a database to hold the OIS measuring results (see page 16 about the creation of databases). Fill your OIS database with data using the Reload safety copy function in Condmaster (see page 21) 3) 4) 5) 6) 7) 8) 9) 10) 11) If Condmaster and LinX are to reside on different computers, set up database communication and folder sharing on the LinX computer (see page 57) Make network connection settings on the LinX computer (see page 67) Install and start the LinX communication program (see below) Adjust your firewall settings to not block OIS traffic (see page 60) Ensure that the LinX server uses a static IP address (see page 61) In Field Service Software (FSS), create setup files on SD cards and establish communication with the Commander Units (see page 62) Configure the LinX server log settings in FSS (see page 67) In Condmaster, activate OIS as an instrument used for measurement (see page 30) Register Commander Units in Condmaster (see page 69) 12) 13) Also in Condmaster, set up transducers for OIS under Online > OIS System Overview > select a Commander Unit, click Edit and go to the Transducers tab Create measuring points and measuring assignments in Condmaster (see under ‘Measuring Points’ and ‘Measuring Techniques’ in the ‘Working with Condmaster Nova’ user guide, document no. 71920) Installing LinX LinX is required for communication between the OIS online measuring units and the Cond-master database. It may be installed on a separate computer or on the one where Condmaster resides. The LinX files are placed in a dedicated LinX directory. Note 1: Before you go ahead with the LinX installation, make sure Condmaster Nova is properly installed and started. Note 2: Also make sure that no power save settings are activated on the LinX computer (done via the Power Options in the Windows Control panel). The reason being that if the LinX computer goes into power save mode, communication with the Commander Units is interrupted and no measuring results are transferred to LinX. 1. Start the Condmaster Nova installer and click on LinX in the installer menu. 2. Click on the upper ”...” button and browse to the location of the Condmaster directory. This is required for LinX to be able to find the database information file (“database.dat”) which is located in the Condmaster directory. If this directory is located on a different computer, you may have to manually input the full network path, including the server/computer name. 3. Next, you need to create a directory for the LinX files. Under LinX directory, input the path to and name of the directory. For all practical purposes, we recommend that you name the directory “Linx” (the path might then be something like this: “C:\Linx”). If this directory doesn’t already exist, the installer will create it for you. Technical data is subject to change without notice. ISO 9001 certified. TD-231B Timken® and Where You Turn® are registered trademarks of The Timken Company. – 54 – © 2010 The Timken Company 12-10 For OIS users only 4. Click on INSTALL. 5. When installation is finished, go to the new LinX directory on the LinX server and double click on the Linx_Setup.exe file. 6. In the LinX setup window then displayed, click the Change link at the bottom of the form and select Install server (right). 7. In the Install server window, browse to your LinX directory, select the Linx_Service.exe file and click OPEN (right). 8. Back in the LinX setup window, click the “...” button and browse to the Database.dat file in the Condmaster directory (right). 9. In the Select database dropdown list, all databases listed in the Database.dat file are listed. Select a database designated for OIS measuring results from this list. 10. Click TEST CONNECTION to verify that the database connection works. 11. Click OK to confirm your settings. 12. Reboot the computer for the settings to take effect. Technical data is subject to change without notice. ISO 9001 certified. TD-231B Timken® and Where You Turn® are registered trademarks of The Timken Company. – 55 – © 2010 The Timken Company 12-10 For OIS users only 13. You’ll now find a new icon in the lower right corner of your desktop; the LinX Service Manager program (right): 14. This program is used to view the status of the LinX service and that of the Commander Units. To start the LinX service, either double click on the LinX Service Manager icon and click on the START button, or right click on the icon and select LinX Server - Start. Installation is now complete. 15. From LinX Service Manager, you can view the contents of the local LinX event log by clicking the LOG MESSAGES button (see also page 68 about viewing the log from FSS). This view of the log is updated in realtime, i.e. every time you click the LOG MESSAGES button. 16. OIS accepts global values, either via OPC or from Commander Units within the OIS system. For each of the 32 available channels in OIS, one global value may be set up. Via the GLOBAL VALUES button, you can view the latest value for each of these (right). The list is updated in realtime, i.e. every time you click the GLOBAL VALUES button. 17. Also available in LinX Service Manager is the STATUS button; click that to view the status of all Commander Units with a working network connection to LinX. For instructions on the setup of LinX to work with the OIS measuring units, please see Creating communication setup files on SD cards, page 62 ff. Technical data is subject to change without notice. ISO 9001 certified. TD-231B Timken® and Where You Turn® are registered trademarks of The Timken Company. – 56 – © 2010 The Timken Company 12-10 For OIS users only Upgrading LinX Follow these steps to update the LinX firmware: 1. Open LinX Service Manager from the task bar and stop LinX. 2. Close FSS and LinX Setup if these applications are running. 3. Right click on the LinX icon in the task bar and select Exit. 4. Download the LinX_xxx.zip file from timken.com/Condmaster 5. Extract the files to the LinX directory. 6. Start LinX Service Manager. 7. Start LinX from the LinX Service Manager. NOTE: When you’ve done a LinX upgrade, make sure you also have the latest version of Commander Unit firmware and Condmaster software. Also, you may have to reconfigure the Windows Firewall settings (see page 60). Running LinX and Condmaster on separate computers When LinX and Condmaster are run on separate computers, follow the instructions below to set up communication between LinX and the Condmaster database and tell LinX which network connection to use. On the Condmaster PC: 1. Start Condmaster Nova Administrator. 2. In the Edit form, replace the default server name “(Local)“ with the network name of the computer (e.g. “TKRws086”). NOTE: users running SQL Server 2005 Express Edition, input “<computer name>\sqlex- press”. 3. Click SAVE, then exit Condmaster Nova Administrator. 4. Next, you need to grant LinX access rights to the Condmaster directory (folder) where the database.dat file resides, or LinX won’t know where to save measurement data. This is called folder sharing. NOTE: We advise you to contact your network administrator for a discussion about security issues before implementing folder sharing. Follow these steps to set up folder sharing in Windows XP: Technical data is subject to change without notice. ISO 9001 certified. TD-231B Timken® and Where You Turn® are registered trademarks of The Timken Company. – 57 – © 2010 The Timken Company 12-10 For OIS users only 5. Open Windows Explorer and browse to the Condmaster folder. 6. Right click on the Condmaster folder, select Properties and click on the Sharing tab (right). 7. Select the Share this folder option (right). 8. Retain the default name for the shared resource, here “Condmaster” (right). 9. Also leave the default setting “Maximum allowed” (right). 10. Click the PERMISSIONS button (right). 11. In the Permissions for... window, click the ADD button. 12. In the Select Users, Computers, or Groups window, click the OBJECT TYPES button (below). 13. Under Object types, make sure Computers is selected and click OK (below). Technical data is subject to change without notice. ISO 9001 certified. TD-231B Timken® and Where You Turn® are registered trademarks of The Timken Company. – 58 – © 2010 The Timken Company 12-10 For OIS users only 14. Back in the Select Users, Computers, or Groups window, click the ADVANCED button. 15. Click FIND NOW (right). 16. In the list at the bottom of the window, select the computer where LinX resides and click OK. Please note that steps 10-12 must be repeated for all computers running LinX. 17. Back in the Select Users, Computers, or Goups window again, all LinX servers should now be on the list of object names (right). 18. Click OK. 19. In the Permissions for... window, the selected computer(s) are now listed. Mark each one in turn and tick the Read > Allow check box (right). 20. Click OK to close the remaining windows. Technical data is subject to change without notice. ISO 9001 certified. TD-231B Timken® and Where You Turn® are registered trademarks of The Timken Company. – 59 – © 2010 The Timken Company 12-10 For OIS users only Adjusting the Windows Firewall settings The Windows Firewall comes with the Windows 7, Vista or XP operating systems. It keeps a computer network secure from intrusions from outside the network. A typical firewall might control what ports are open to traffic, what protocols may be used and in which direction (in or out). It may also ensure that traffic comes from acceptable domain names and IP addresses (for more information on IP addresses, see below). To adjust your firewall settings to accept OIS traffic, follow these steps: 1. Open the Control Panel and select Windows Firewall. 2. Click the Exceptions tab. 3. Click the ADD PROGRAM button and browse to the LinX directory. Double click on Linx_ Service.exe to add it to the list of programs that will not be blocked by the firewall. Click OK. 4. Repeat the process to add FSS.exe to the list as well. 5. Check that the above programs are now listed under Programs and Services and make sure their check boxes are ticked. Click OK to finish. NOTE: When upgrading your LinX to a newer version, the above procedure may have to be repeated. The LinX software has been tested and verified to work correctly with the Norton Internet Security 2008, McAfee Internet Security Suite and F-Secure Internet Security 2008 firewalls. For information on the necessary configuration measures for these firewalls, please see Appendix A, Configuring third-party antivirus software. Technical data is subject to change without notice. ISO 9001 certified. TD-231B Timken® and Where You Turn® are registered trademarks of The Timken Company. – 60 – © 2010 The Timken Company 12-10 For OIS users only Assigning a static IP address to the LinX server IP (Internet Protocol) addresses are assigned to both the LinX server and the Commander Units. They are unique numbers used by electronic devices in a network to identify and communicate with each other. IP addresses are assigned by the network administrator and may be static or dynamic. Usually, servers are assigned static addresses, whereas workstations often use dynamic ones. Although OIS can be run using dynamic IP addresses for the Linx server and Commander Units, the recommendation is to use static IP addresses. Change the settings for IP addressing in your LinX computer this way: 1. Open the Control Panel and select Network Connections. 2. Right click on Local Area Connections and select Properties. 3. Mark Internet Protocol (TCP/IP) on the list and click the PROPERTIES button (right). 4. Select Use the following IP address (right). 5. Under IP address, input the IP address assigned to the LinX server, along with a Subnet mask and Default gateway, both obtained from your network administrator. Please make sure that values entered are correct. Using incorrect values may impair performance and in some cases disable communication altogether. 6. Click OK to finish. When creating a setup file for a Commander Unit, this LinX IP address is saved to the SD card so that if communication has been lost, the buffered data will later find its way to the server. For information on the setup of IP addresses for Commander Units, please see Creating communication setup files on SD cards, page 62. Technical data is subject to change without notice. ISO 9001 certified. TD-231B Timken® and Where You Turn® are registered trademarks of The Timken Company. – 61 – © 2010 The Timken Company 12-10 For OIS users only Configuring OIS with Field Service Software Configuration of the LinX server as well as the Commander and measuring units is done in the Field Service Software, FSS. This is the graphical user interface to LinX and comes with the LinX installation. Also, various event logs can be viewed in FSS. Creating communication setup files on SD cards The setup files are used to establish communication between the Commander Units and the LinX server. The Commander Units have built-in SD (Secure Digital) card readers. SD cards are flash (non-volatile) memory cards for use in portable devices. In OIS, SD cards are used for two primary purposes: 1) For setting up communication between Commander Units and the LinX server 2) For buffering measurement data in case of network malfunctions NOTE: For optimum performance, we strongly recommend that you only use SD cards delivered from Timken. Using inferior quality SD cards may cause equipment failure and loss of data. Here’s how to set up SD cards for OIS from Field Service Software: 1. Connect the SD card to the SD card reader/writer on your LinX computer. 2. Start FSS and mark the top node in the tree structure. Click on the SD card setup tab (right). 3. Click the REFRESH button to locate the SD card. NOTE: FSS will search among all removable media, so be sure you select the SD card and not some other removable unit. 4. Click the Communication setup option under Commander Unit. PUMP_ROOM 5. Under Communication Setup, select the Basic option. 6. I nput the name of the Commander Unit which will be set up using this SD card. Generally, it’s a good idea to use descriptive unit names, e.g. based on unit location (Pump room) or applications measured on (Exhaust fans). 7. If you’re using static IP addressing for the Commander Units, unselect the Use DHCP checkbox and input the Commander Unit IP address; otherwise, leave the checkbox ticked. 8. Input the LinX server static IP address (e.g. 148.123.4.167). Exception: If your network has a DNS server and the LinX server uses a dynamic IP address (Use DHCP checked), you must instead input the computer name (e.g. LINXADMIN). However, the recommendation is to use a static IP address (see page 61). Technical data is subject to change without notice. ISO 9001 certified. TD-231B Timken® and Where You Turn® are registered trademarks of The Timken Company. – 62 – © 2010 The Timken Company 12-10 For OIS users only Depending on the size and complexity of your corporate network, you may also need to input information under the Advanced communication setup option. If your network is large and your Commander Units are dispersed across several subnets, additional IP address information is required. Consult your network administrator for help on this issue. Multicast is a special protocol enabling communication between a single sender and multiple receivers (i.e. Commander Units) on a network. It works much like a conference telephone call; only those invited to join the call will hear what the speaker says (cf. with broadcast, where the message is being sent without any knowledge of who is listening, or watching, as is the case e.g. in television). By telling the Commander Unit on which IP address to listen for messages, it won’t matter from where the message originates. The multicast IP address is used for all messages and will generally not have to be changed, unless there are network addressing conflicts. If you need to input multicast IP information, follow steps 9-13 below, otherwise go straight to bullet no. 13. 9. Under Communication Setup, click the Advanced communication setup option (right). 10. Untick the Use Default checkbox and input the default Multicast IP address, obtained from your network administrator. There is normally no need to change this address. 11. Repeat the procedure for IP Subnet Mask and IP Gateway. 12. If your Ethernet switch is configurable (check with your network administrator), ticking the Full Duplex checkbox will conserve bandwith while transferring measurement and other data across the network to and from the Commander Units. Full duplex means data are transferred in both directions at the same time. The opposite is half duplex, meaning data can be sent both ways but only in one direction at a time. To implement full duplex, the switch or router to which the Commander Unit is connected must also be configured for full duplex. 13. Click SAVE to save the setup file, named setup.txt, to the SD card. The SD card is now ready to be inserted into the Commander Unit SD card reader in order to establish communication with LinX. The communication setup information is then written to the database, causing the Commander Units to show up as Unregistered Commander Units in Condmaster. For information on how to register them, see ‘Registering Commander Units in Condmaster’, page 69. Technical data is subject to change without notice. ISO 9001 certified. TD-231B Timken® and Where You Turn® are registered trademarks of The Timken Company. – 63 – © 2010 The Timken Company 12-10 For OIS users only Creating measurement setup via SD cards Normally, the Commander Unit is online and gets updated measurement tasks from LinX automatically whenever a change to the measuring point is made in Condmaster. For situations where OIS is used offline, e.g. onboard ships, a laptop computer with LinX may be used to download the updated task file from the database onto an SD card. 1. Connect the SD card to the SD card reader/writer on your LinX computer. 2. In FSS, mark the top node in the tree structure and click the SD card setup tab. 3. Click the REFRESH button to locate the SD card. The name of the Commander Unit associated with this SD card will be displayed under Commander Unit > Name. NOTE: FSS will search among all removable media, so be sure you select the SD card and not another removable unit. 4. Click the Measurement setup option button (right). 5. Click SEARCH to browse the database for a task file newer than the one currently used by the Commander Unit. The name of the measurement task file is sequence.txt. 6. If a newer task file is detected by LinX, click SAVE to save it to the SD card. 7. Insert the SD card into the SD card reader of the Commander Unit in question for automatic task file update. Technical data is subject to change without notice. ISO 9001 certified. TD-231B Timken® and Where You Turn® are registered trademarks of The Timken Company. – 64 – © 2010 The Timken Company 12-10 For OIS users only Loading measuring results from SD cards In case of e.g. network malfunctions or when running the unit offline, the Commander Units will buffer measurement data on the local SD card. Following these steps, the buffered data are uploaded to the database: 1. Connect the SD card to the SD card reader/writer on your LinX computer. 2. S t a r t F S S a n d m a r k the top node in the tree structure. Click on the SD card setup tab (right). 3. Click the REFRESH button to locate the SD card. The name of the Commander Unit associated with this SD card will be displayed under Commander Unit > Name. NOTE: FSS will search among all removable media, so be sure you select the SD card from the list, and not some other removable media. 4. Click the SAVE button to start saving the buffered measuring results to database. Technical data is subject to change without notice. ISO 9001 certified. TD-231B Timken® and Where You Turn® are registered trademarks of The Timken Company. – 65 – © 2010 The Timken Company 12-10 For OIS users only Updating Commander Unit firmware via SD cards Firmware update files are available for download from the Timken website (timken.com/condmaster, file name cupackage_x, where x is a running version number) and should be saved to the Firmware files folder (found under the LinX directory) on the LinX computer. Once the files are downloaded, the SD card can be used to update Commander Unit firmware: 1. Connect the SD card to the SD card reader/writer on your LinX computer. 2. Start FSS and mark the top node in the tree structure. Click on the SD card setup tab (right). 3. Click the REFRESH button to locate the SD card. NOTE: FSS will search among all removable media, so be sure you select the SD card and not some other removable unit. 4. Under Commander Unit, click the Firmware Update option. 5. Under Firmware Update, click the REFRESH button. FSS will now display any information available about the firmware version(s currently in the Firmware files folder. 6. Select the latest firmware version from the dropdown list and click the UPDATE FIRMWARE button to transfer the firmware from the Firmware files folder to this SD card. Note: When the SD card is connected to a Commander Unit, it reads the firmware files, then some of the files are automatically removed. If the same SD card is connected to yet another Commander Unit, the update process will fail because of the missing files. Hence, to use a single SD card for firmware upgrade of several Commander Units, you’ll need to go through the steps above between every Commander Unit upgrade. Technical data is subject to change without notice. ISO 9001 certified. TD-231B Timken® and Where You Turn® are registered trademarks of The Timken Company. – 66 – © 2010 The Timken Company 12-10 For OIS users only Local Area Network vs. Wireless Network Many computers have dual network cards, one for Local Area Networks (LAN), oftentimes using standard Ethernet, and one for wireless networking. In such a case, FSS needs to know which to use for OIS communication. 1. On the LinX computer, select Control Panel from the Start menu. Click on Network connections. 2. On the Advanced menu, select Advanced settings. 3. Under Connections on the Adapters and Bindings tab (right), all available network cards (connections) are listed. The “default” connection, which will be used by LinX, is on top of the list. Use the up and down arrow buttons in the form to move a certain network connection up or down this list. 4. Click OK to close the form. Configuring LinX server logging facilities LinX keeps a log of OIS activities, the extent of which you can control via settings in FSS. 1. Start FSS, mark a LinX server on the list and click the Configure LinX tab (right). 2. Under Log Settings, select a LinX event log priority, i.e. how much logging the LinX server should do, ranging from Debug, where basically every activity will be logged, to Low where only the most critical activities are logged. Log files will be automatically saved to database, with a maximum limit of 10 Mb of data, which may be distributed over a maximum of 10 files. Technical data is subject to change without notice. ISO 9001 certified. TD-231B Timken® and Where You Turn® are registered trademarks of The Timken Company. – 67 – © 2010 The Timken Company 12-10 For OIS users only Viewing the LinX server log The LinX server event log is accessible via FSS: 1. Mark a LinX server on the list and click the View LinX log tab (right). 2. Click REFRESH to fetch the logs from the server for FSS display. 3. Use the SAVE button to save the log under a name and location of your choice. 4. The BROWSE button is used to search for files previously saved to disk. 5. For practical reasons, large log files are divided into smaller sections. Using the Sections dropdown list, you can select a certain section for display. If the dropdown list is empty, there are no sections (i.e. a small file). 6. Use the SEARCH button to search for a certain term in the log file. For instance, if your’e looking for log entries concerning database problems, you might input “Database” as your search argument. NOTE: the search is case sensitive (entering “Database” will locate entries containing “Database”, but not those containing “database”. 7. Use the checkboxes (Date, Time, Level etc.) to select which columns you want to display in the log list, then click REFRESH to apply your selection. 8. Under Filter, use the IP adress dropdown list to select one or more specific Commander Unit log(s) for viewing. Click the ADD or CLEAR buttons to edit the list of IP addresses and click APPLY to view your selection. Technical data is subject to change without notice. ISO 9001 certified. TD-231B Timken® and Where You Turn® are registered trademarks of The Timken Company. – 68 – © 2010 The Timken Company 12-10 For OIS users only Registering Commander Units in Condmaster Nova One result of establishing communication between the Commander Units and the LinX server(s) using the SD card is that the Commander Units are displayed as unregistered units in Condmaster. As unregistered Commander Units cannot be part of a measuring assignment, you need to step through the straightforward procedure of changing their status to Registered: In Condmaster, select System > Measuring system in the menu bar. Select any one of the measuring techniques where OIS is a registered instrument and click EDIT. In the form shown, mark the OIS line in the instrument list and click SELECT. Click SETTINGS. In the Settings window, click the Unregistered commander units folder. Mark each of the unregistered units in turn and click REGISTER for each one. This moves them from the Unregistered... folder to the Registered commander units folder. 7. When all unregistered units are registered, click CLOSE to finish. 1. 2. 3. 4. 5. 6. NOTE: Using the NEW button, new Commander Units may be created from here, but it is recommended that you to create them via the SD Card Setup functionality in Field Service Software (FSS) instead (see page 62). If you do create them from Condmaster, you still need to also create them in FSS and their respective names must then match exactly, or LinX will consider them to be different units. If for instance there’s a Commander Unit named Boiler_Pumps created in Condmaster and another named Boiler Pumps created in FSS, then LinX will treat the two as separate units. Technical data is subject to change without notice. ISO 9001 certified. TD-231B Timken® and Where You Turn® are registered trademarks of The Timken Company. – 69 – © 2010 The Timken Company 12-10 For OIS users only Using FSS to set Commander Units in service mode Normally, measuring assignments are set up in Condmaster and sent to the Commander Units in the form of task files, meaning no configuration of the Commander and monitoring units is required in FSS. However, it is possible to configure individual Commander Units and set up single measurements for individual channels using the Service mode feature in FSS. Setting a Commander Unit in service mode means that the entire unit is set offline, stopping measurement on all channels. The current task file is overridden by the parameters input by the user. The service mode can be useful when calibrating equipment or for troubleshooting a Commander Unit and its channels, for instance if suspicious readings show up in Condmaster. Or, you may want to test a different type of measurement to see the results before implementation on all measuring points. You may also want to have immediate verification that a corrective maintenance measure has had the desired effect without having to wait for the next time a measurement is scheduled in the task file. Entering and leaving service mode Here’s how to enter service mode: 1. Start FSS and mark the Local computer in the device tree (right). At this point, you’ll be able to see the monitoring units under each Commander Unit, but you can’t expand them to view the channels. 1. Click the Service tab (available only when marking Local computer in the list of devices). 2. Click SEARCH to locate all Commander Units available in your network. 3. In the resulting list of Commander Units, select one and click the SERVICE button to set it in service mode. It is also possible to enter service mode by selecting any Commander Unit visible in the device tree and clicking ENTER SERVICE MODE on the View Unit Status tab (i.e. without having to use the SEARCH function first). NOTE 1: When you select a Commander Unit registered under any other than the local LinX computer in the device tree, the local computer will ”take over” that Commander Unit for the duration of your work in service mode. Therefore, the selected unit will show up under Local computer instead. Commander Units under service are marked ”Service Mode”. NOTE 2: The Commander Unit remains in service mode until you issue a ”Leave service mode” command, or until you exit FSS. As no measuring results are saved while the unit is in service mode, you should take care not to leave the unit in this mode by mistake. Technical data is subject to change without notice. ISO 9001 certified. TD-231B Timken® and Where You Turn® are registered trademarks of The Timken Company. – 70 – © 2010 The Timken Company 12-10 For OIS users only 4. In the device tree, the monitoring units now have little ”+” signs in front and so can be expanded to access individual channels. Mark the selected Commander Unit, or its monitoring units, to access their respective configuration functions. For more information on these functions, please see the following pages. 5. To leave service mode, mark the serviced Commander Unit and click the View Unit Status tab, then click LEAVE SERVICE MODE (see above). The unit will now reboot and go back online. This process will take a couple of minutes, during which the unit is not visible in the device tree. Any configuration settings made in service mode are written to the local SD card and will override the current task file from Condmaster. 6. Click REFRESH to update the tree and confirm that the unit is no longer in service mode. There’s nothing stopping you from having multiple Commander Units in service mode at any given time, but there’s no ”multiselect” function so you must enter (and leave) service mode for the units one by one. Running several Commander Units in service mode simultaneously can be practical, for instance for easy comparison of identical (or nearly identical) measurements between two or more Commander Units. Technical data is subject to change without notice. ISO 9001 certified. TD-231B Timken® and Where You Turn® are registered trademarks of The Timken Company. – 71 – © 2010 The Timken Company 12-10 For OIS users only Configuring Commander Units In some situations, it may be more convenient to configure a Commander Unit with communication information without using the SD card, for instance if the unit is in a remote or hard-to-reach location. This can be done when the unit is in service mode. The procedure is equivalent to the one described under Creating communication setup files on SD cards (page 62). 1. Mark a Commander Unit in the device tree and click the Configure unit tab. The Basic setup options are displayed by default. From the Basic setup, you can change the unit name and tell it to connect to a different LinX server. You can also set, and read, the Commander Unit time (please see below). NOTE: changing the name of a Commander Unit while in service mode means it will show up as unregistered in Condmaster when the unit goes back online. The Commander Unit contains four status outputs, which can be tested via FSS when the unit is in service mode. 2. To test a status output, check the Output X checkbox in the lower left corner of the window (right). If the output works properly, the corresponding light in the FSS window will light up. 3. When you tick the Advanced setup option, more communication settings appear on the Configure Unit tab (right, framed in red). Please see page 63 for information on the settings available under Advanced setup. Technical data is subject to change without notice. ISO 9001 certified. TD-231B Timken® and Where You Turn® are registered trademarks of The Timken Company. – 72 – © 2010 The Timken Company 12-10 For OIS users only Viewing the Commander Unit event log While in service mode, you many also view the Commander Unit event log: 1. Mark a Commander Unit in the device tree and click the View Unit Log tab (right). 2. Click REFRESH to get a display of the event log. The Commander Unit log can also be viewed from the OIS System Overview under the Online menu in Condmaster. Updating Commander Unit firmware in service mode Firmware update files are available for download from the Timken website (timken.com/condmaster, file name cupackage_x, where x is a running version number) and should be saved to the Firmware files folder (found under the LinX directory) on the LinX computer. Once the files are downloaded, they can be transferred to the Commander Unit while it is in service mode: 1. Mark a Commander Unit in the device tree and click the Unit File Transfer tab (right). 2. Click the REFRESH button. FSS will now display any information available about the firmware version(s) currently in the Firmware files folder. 3. Select the latest firmware version from the dropdown list and click the UPDATE FIRMWARE button to transfer the firmware from the Firmware files folder to the SD card of this Commander Unit. Technical data is subject to change without notice. ISO 9001 certified. TD-231B Timken® and Where You Turn® are registered trademarks of The Timken Company. – 73 – © 2010 The Timken Company 12-10 For OIS users only Configuring shock pulse measurements Service mode offers the possibility to set up dBm/dBc, LR/HR and SPM Spectrum measurements. Options for each technique are basically the same as in Condmaster. Measurement results are immediately displayed in FSS, but are not saved to database. However, the Commander Unit will always “remember” the latest reading for display. 1. Expand the device tree so you can see all monitoring units under your selected Commander Unit. 2. Also expand the Timken monitoring unit folder and mark the desired channel (below). The Configure Measurement tab is displayed. 3. Under Measurement Parameters, select a measurement technique from the Techniques dropdown list (dBm/dBc, LR/HR or SPM Spectrum). More information on each of the measuring techniques can be found in the Condmaster Nova user manual (document number 71920). dBm/dBc measurement: Uncheck the Use default value checkbox and input the Mean diameter and RPM of the bearing measured on (right). Click CALCULATE to get a dBi value. Click MEASURE to perform a single measurement and view the result directly in FSS. LR/HR measurement: Uncheck the Use default value checkbox and input the Mean diameter and RPM of the bearing measured on. Click CALCULATE to obtain a Norm value (right). Click MEASURE to perform a single measurement and view the result directly in FSS. Technical data is subject to change without notice. ISO 9001 certified. TD-231B Timken® and Where You Turn® are registered trademarks of The Timken Company. – 74 – © 2010 The Timken Company 12-10 For OIS users only SPM Spectrum measurement: Please consult the ‘Working with Condmaster Nova’ user manual (71920) for information on settings for SPM Spectrum. Input your selected settings and click MEASURE to perform a single measurement and view the result directly in FSS. In FSS, SPM Spectrum m e a s u re m e n t re s u l t s can be viewed as FFT spectrums or as time signal graphs (right). Configuring vibration measurements FSS options for vibration measurement are essentially the same as in Condmaster; please consult the ‘Working with Condmaster Nova’ user manual (71920) for information on these settings. 1. I n p u t y o u r s e l e c t e d settings and click MEASURE to perform single measurement and view the result directly in FSS. a Measurement results are immediately displayed in FSS, but are not saved to database. However, the Commander Unit will always “remember” the latest reading for display. Results can be displayed as FFT spectrums or time signal graphs. Condition parameters can also be displayed (right). Technical data is subject to change without notice. ISO 9001 certified. TD-231B Timken® and Where You Turn® are registered trademarks of The Timken Company. – 75 – © 2010 The Timken Company 12-10 For OIS users only Configuring analog in measurements The Measurement type for analog measurement is channel dependent: • 4-20 mA for channels 1 - 8 • 1-10 V for channels 9 and 10 Following channel selection, FSS automatically sets this parameter. 1. Click MEASURE to perform a single measurement and view the result directly in FSS. Configuring analog out channels For analog out channels, configuration via FSS implies setting the channel output value. 1. Input an output value for the selected channel. 2. Click the SET button to set the channel output value. Technical data is subject to change without notice. ISO 9001 certified. TD-231B Timken® and Where You Turn® are registered trademarks of The Timken Company. – 76 – © 2010 The Timken Company 12-10 For OIS users only Connecting a Commander Unit to a laptop computer Communication with the Commander Units normally takes place over a network, where the various devices are connected via a network switch, hub or router. However, you can connect a Commander Unit directly to a laptop equipped with LinX and FSS. This possibility is useful for example for troubleshooting purposes. All the functions described in this chapter are available also when connected directly to a Commander Unit. NOTE 1: To connect your laptop to a Commander Unit, a crossover Ethernet cable must be used. Do not use the standard straight-through cable otherwise used, as this will cause communication problems. Contact your network administrator to make sure you’re using the right kind of cable. NOTE 2: As you’re not connected to a network with a DNS server to handle dynamic IP addresses, you’ll need to use a static IP address. For more information on IP addresses, please see page 61. Technical data is subject to change without notice. ISO 9001 certified. TD-231B Timken® and Where You Turn® are registered trademarks of The Timken Company. – 77 – © 2010 The Timken Company 12-10 For OIS users only Transferring data with OPC Data Access OPC Data Access is a vendor independent technical specification defining standard communication interfaces for the exchange of data between automation hardware and software. The OPC standards, developed and maintained by the OPC Foundation, are based on client/server technology and provide plug-and-play connectivity. Included in the LinX software is an OPC server which can be used to export and import measurement and other data, e.g. to or from a PLC or SCADA system. For export from OIS, you need an OPC client (numerous are available for free download on the Internet, e.g. at www.opcconnect.com/freecli.php), and for import to OIS, an OPC server is required to supply the input data. OPC Client How it works - in short Group The OPC client application creates an instance of the server component and, within that instance, the client can add OPC groups. Each OPC group, in turn, can contain a set of OPC items (sometimes also referred to as ‘tags’), which are also created by the client. You can think of OPC groups as containers organizing the underlying OPC items. OPC items represent connections to data sources within the server, such as process parameters, control variables, measurement data etc. An item may appear in more than one group, but only once within a given group. Associated with each item are three attributes: Value, Quality and Time Stamp. Item Item Item Item The OPC client can receive data upon request, or subscribe to the items in the group. When subscribing, the OPC server automatically transfers data, either in user specified intervals or whenever they’re updated. The user interface may vary greatly between different OPC client software and therefore cannot be displayed here. However, the basic steps needed for the setup of OPC communication are: 1. 2. 3. 4. Download and install the OPC client software of your choice. In the OPC client software, identify your OPC server (which is on your LinX computer). Define an OPC group and set its properties, e.g. the update rate. Within that group, select one or more items found on the specified OPC server (i.e. the parameter you wish to import). For information on how this is done in your OPC client software, please consult the support options available from the supplier. NOTE: OPC clients and servers may reside on the same or separate network nodes. When separate, the OPCEnum.exe software must be installed in the ...\Windows\System32 directory on both client and server. The purpose of OPCEnum.exe is to allow OPC clients to connect to a remote computer where OPC server(s) are installed and ask for a list of available OPC servers. From that list, you’ll select an OPC server to establish communication with (step 2 in the list above). The OPCEnum.exe file normally comes with your OPC client software, or it can be downloaded from the OPC Foundation website. Additional configuration for OPC Because stringent default security settings in Windows limit access to OPC requests on the computer, configuration of your Windows Firewall and the DCOM functionality is required for OPC to work. DCOM is a Microsoft technology for communication among software components distributed across networked computers. You may think of it as an application in its own right. For configuration instructions for computers running under Windows XP (Service Pack 2 or later) and Windows Vista, please refer to this OPC Foundation document (also available on the Condmaster installation disk): Using OPC via DCOM with XP SP2 Technical data is subject to change without notice. ISO 9001 certified. TD-231B Timken® and Where You Turn® are registered trademarks of The Timken Company. – 78 – © 2010 The Timken Company 12-10 For OIS users only Importing data via OPC communication Via the LinX server, Condmaster is capable of OPC data import, e.g. from PLC, DCS or SCADA systems. This requires the registration of one or more OPC servers to which the Linx server will connect as a client asking for the data. There are two ways to import OPC data: • As a user defined measurement, e.g. temperature, flow, pressure, load etc. • As a global value, e.g. RPM, digital input or process parameters enabling conditional measurements OPC data as a user defined measurement Like any user defined measurement, OPC data imported this way allows the setup of alarm limits, trending etc. It is implemented via System > Measuring system in the menu bar. Select the User defined measuring technique, click EDIT and select OPC as your instrument: Open the Measuring point data form, add User defined as a technique and select OPC as measuring device: Technical data is subject to change without notice. ISO 9001 certified. TD-231B Timken® and Where You Turn® are registered trademarks of The Timken Company. – 79 – © 2010 The Timken Company 12-10 For OIS users only You’ll now find a new measurement device tab named OPC in the Measuring point data form: Click the “...” buttons on the OPC tab to select an OPC server and an OPC item (process parameter) to import. If the list of OPC servers is empty, click the NEW button to register a new OPC server. When registering a new OPC server, the Time bias setting need not be used unless the OPC server implements a different time than the OPC client. The OPC server timestamp is always UTC (Coordinated Universal Time), meaning you may have to compensate for time zones and/or daylight saving time using the Time bias setting. The Update interval setting on the OPC tab is the interval at which LinX will request the OPC data item from the OPC server. The Offset and Gain settings are used for conversion of incoming OPC data. Default settings are Offset = 1 and Gain = 1, which means no conversion takes place. Technical data is subject to change without notice. ISO 9001 certified. TD-231B Timken® and Where You Turn® are registered trademarks of The Timken Company. – 80 – © 2010 The Timken Company 12-10 For OIS users only OPC data as a global OIS value When for instance rpm is measured by another system, the rpm value can be imported into OIS as a global value, meaning you won’t have to use a dedicated OIS RPM channel for input. Once imported, the value can be used for all measuring techniques on all OIS units. To import OPC data as a global value in OIS, you must first create that global value from the OIS system overview under Online in the menu bar: Tick the Import as OPC checkbox. Also, if you’re importing an rpm value, tick Import as RPM which means the parameter value can be used as rpm for any measuring point. Under OPC server, click the “...” button to select a server from a list. This is the server to which LinX will connect as a client. If none is available, click the NEW button in the Select OPC server window to register one or more OPC servers. Select an Item (process parameter) for import using the “...” button. The LinX server obtains the list of available items from the OPC server upon request. Presenting available items may take a few seconds if the list is long. Input an Update interval for LinX to request the OPC data item from the OPC server. The Offset and Gain settings are used for conversion of incoming OPC data. Default settings are Offset = 1 and Gain = 1, which means no conversion takes place. Technical data is subject to change without notice. ISO 9001 certified. TD-231B Timken® and Where You Turn® are registered trademarks of The Timken Company. – 81 – © 2010 The Timken Company 12-10 For OIS users only Exporting data via OPC communication The LinX server is capable of OPC data export. The following data will be transferred to any OPC compliant application: • Measuring values: dBm, dBc, HDm, HDc, LR,HR, LUB, COND, CODE • RPM, condition colour, alarms • Condition parameters: VEL, ACC, DISP, Crest, Curt, Skew, NL1 - 4, Peak, P-P • Calculated symptom values: unbalance, misalignment, gear mesh, BPFO, BPFI, felt vibartion, out of roundness etc. • Selectable raw values or evaluated values. For information on how this is done in your OPC client software, please consult the support options available from the supplier. LinX Commander Unit Database Condmaster OPC Server Ethernet Customer systems OPC Client Technical data is subject to change without notice. ISO 9001 certified. TD-231B Timken® and Where You Turn® are registered trademarks of The Timken Company. – 82 – Process Control System © 2010 The Timken Company 12-10 For VCM users only The VCM20 online system The following pages are for VCM20 users only. VCM20 measuring units use the EVAM measuring technique. They are connected via a PC network. Each unit is equipped with a computer working under Windows and running the measuring program DAQ. This program is already installed on delivery and started locally on the VCM20 computer when it is connected to the PC network. The communication between the VCM20 measuring unit and Condmaster Nova is handled by the communication program Data Base Link, shown as DBL (VCM20) on the shortcut list. This program is set up using DBL Setup. The program files, DBL..exe, DBL_200_1.exe and DBL_Setup.exe, are located in the Condmaster Nova directory. The measuring task for a VCM20 channel, called an assignment, is set up in Condmaster Nova. DAQ receives the measuring assignment file assign.ini from the computer running Condmaster Nova and DBL. It produces the result file Result.ini. DAQ runs on each VCM20 unit. It controls the measuring procedure, and will repeat the measuring instructions until Condmaster Nova sends new instructions (i. e. somebody edits the measuring point data). Data Base Link (DBL) runs on one computer in the network. This computer stores the path to each VCM20 unit, input in DBL Setup. Starting DBL (VMC20) will start a separate DBL for each VCM20 unit, but the whole group is recognized as a single user. DAQ DAQ DAQ DBL The host computer for DBL also runs MDAC and communicates with SQL Server. The measuring results from the VCM20 units are transferred via DBL and MDAC to the database assigned for VCM results. SQL Server DBL DBL MDAC Condmaster Nova Checklist, Condmaster Nova workstation - VCM20 units communication 1) Mark the designated VCM20 database “VCM20” in Condmaster Nova Administrator (see page 19). MDAC Condmaster Nova 2) Register the VCM20 units in Condmaster Nova. This registration can be made in Condmaster Nova at any time before setting up the communication program DBL (see next page). 3) Establish the communication link in DBL Setup by setting the path to the computer in the VCM20 unit and the directory containing DAQ (see page 85). 4) Start the program DBL (VCM20) to bring the VCM20 units online (see page 87). 5) Set up measuring assignments in Condmaster Nova (see the ‘Working with Condmaster Nova’ user manual, document no. 71920) Technical data is subject to change without notice. ISO 9001 certified. TD-231B Timken® and Where You Turn® are registered trademarks of The Timken Company. – 83 – © 2010 The Timken Company 12-10 For VCM users only Registering VCM20 measuring units in Condmaster Registering VCM20 units in Condmaster Nova involves stepping through a number of forms: 1. Go to System in menu bar and select Measuring system. 2. Mark EVAM and click EDIT: 3. Tick the box Use this technique: 4. Mark the line VCM20 and click SELECT. 5. Tick the box ”Select instrument” on the VCM20 form. On this form, you can edit the default values for the number of spectrum lines to be saved (comes up when creating an assignment) and the storing time for measuring results (comes up under the Online configuration). Technical data is subject to change without notice. ISO 9001 certified. TD-231B Timken® and Where You Turn® are registered trademarks of The Timken Company. – 84 – © 2010 The Timken Company 12-10 For VCM users only 6. Click Registered measuring units. 7. Initially, the Registered measuring units form is empty. Click the NEW button to register units (right). For the measuring unit number, you can select any four digit number. Letters are not allowed. VCM20 units do not have any hard coded numbers, so your choice is free. 8. From the Type dropdown list, select the type of measuring unit, either 8 or 24 channels (right), then click OK. 9. To register more units, click NEW again and repeat the process. 10. When you’re done, close the forms with OK/SAVE. Establishing communication with DBL Data Base Link (DBL) should be run on a computer with a large RAM memory (min. 64 Mbyte). This host computer handles the communication with a group of VCM20 units. 1. Start Condmaster Nova Administrator from the host computer. Check that the database intended for EVAM measuring results is marked VCM20, else click the VCM20 button. 2. In the Condmaster Nova directory, start DBL Setup. An empty form with two columns is displayed, Unit and Path to VCM20 (right). Click NEW. 3. On the VCM20 Settings form now opened, the dropdown list under Unit contains a list of all VCM20 units presently not identified to DBL (right). Mark one of the units on this list. Technical data is subject to change without notice. ISO 9001 certified. TD-231B Timken® and Where You Turn® are registered trademarks of The Timken Company. – 85 – © 2010 The Timken Company 12-10 For VCM users only 4. Under VCM20 path, use the ”...” button to browse to the directory on the VCM20 computer where the DAQ program resides, open it and mark the file DAQ. 5. Repeat this sequence until all VCM20 units are listed with their path to DAQ (right). When you click SAVE, DBL Setup will terminate. 6. From this computer, start the program DBL(VCM20). This program must be running to get data from the VCM20 units into the database. The DAQ program on the VCM20 computer The measuring program DAQ runs on the VCM20 computer. You can connect monitor and keyboard to the computer, in case you have to reload or reconfigure the program. During operation, DAQ produces a continuous log of the measuring operations. Under Configure in the upper left corner there is a form which, in the first window, shows the DAQ directory on the hard disk. The path to this directory is set in DBL_Setup. The DAQ directory contains the program DAQ, the assignment file assign. ini sent by Condmaster Nova and the measuring result file result.ini, which is transferred to the database. The next form contain four value settings: • Delay time, ms: the interval in milliseconds between supplying a voltage to the transducers and starting the measurement. • Comp. factor: a compensation factor for the VCM20 circuit board, default = 1. The actual compensation factor is printed on the circuit board and is set here prior to delivery. • Min. TLT (V) and Max. TLT (V): Limits for the transducer DC output bias voltage. It must correspond to the specifications for the transducer type used. A voltage below the min. value produces the TLT fault message ”Possible transducer line short circuit”, while a voltage above the max. value produces the TLT fault message ”Possible transducer line interrupt”. The OK button stores changes while the DEFAULT button sets default values. Technical data is subject to change without notice. ISO 9001 certified. TD-231B Timken® and Where You Turn® are registered trademarks of The Timken Company. – 86 – © 2010 The Timken Company 12-10 For VCM users only Starting Database Link (DBL) The communication program Database Link (option DBL(VCM20) on the Condmaster Nova program menu) must be running on the host computer for the VCM20 units. It splits into separate programs, one for each VCM20 unit identified in the DBL Setup. You will get an icon for each of these programs on the active programs bar at the bottom of your screen. The Database link form presents a continuous log of the traffic between VCM20 unit, the database, and Condmaster Nova (right). Under Setup you can pause the communication. There are no other settings. While measuring results are being transferred, they appear in the measuring result window. You can scroll the message window at the bottom of the form and click on a assignment result message to display the list of results in the Measured data portion of the window (right). NOTE: when a green message is marked, Measured data will remain blank - only Assignment messages will be displayed. To look at the log of a different VCM20 unit when several DBL programs are running, click on the DBL program icon to select the VCM unit number you wish to see. Please note: The measuring program DAQ on the VCM20 computer will remain passive while DBL is off. It will not repeat the last assignment and accumulate measuring results. Configuring the VCM20 units To configure the VCM20 measuring units, follow these steps: 1. In Condmaster Nova, go to Online in the menu bar and select CMS on line menu. The form then displayed lists all registered CMS and VCM20 measuring units (right). 2. Click on ”...” and select Configuration. Technical data is subject to change without notice. ISO 9001 certified. TD-231B Timken® and Where You Turn® are registered trademarks of The Timken Company. – 87 – © 2010 The Timken Company 12-10 For VCM users only 3. Under Storing interval, input an interval in minutes for storing measurement values in the database (see below). For instance, a measuring unit might measure every 20 minutes but only send a reading to the database once every two hours. 4. Tick the box Save on alarm. This ensures that if a reading exceeds an alarm limit, you’ll get an alarm in Condmaster regardless of the setting under 3) above. Please note: A measuring assignment for a VCM20 channel, made in the measuring point register, is always connected with an rpm channel. The assignment can only be saved if the rpm channel is registered on this form. It is advisable to input the rpm channel information immediately after installing the hardware. Technical data is subject to change without notice. ISO 9001 certified. TD-231B Timken® and Where You Turn® are registered trademarks of The Timken Company. – 88 – © 2010 The Timken Company 12-10 For CMS users only The CMS online system The following pages are for CMS users only. Working with the CMS system requires the following order of actions: 1) Register the CMS measuring units in Condmaster Nova 2) Configure and start the CMS communication program 3) Configure the CMS system in Condmaster Nova The database intended for CMS data must be marked CMS in Condmaster Nova Administrator (see page 19). It must be also accessible from the computer which has the CMS system(s) connected to its COM port(s). Registering CMS measuring units Here’s how to register CMS measuring units in Condmaster Nova: 1. From System in the menu bar, select Measuring system. 2. From here, the following measuring techniques will be selected for use: SPM LR/HR, ISO 2372, User defined 1 and 2 (right). 3. Double click on each of the above measuring techniques in turn. This opens a new window for selection of the technique and the instrument(s) that will be used (right). 4. For each of the selected measuring techniques, tick the Use the measuring technique box (right). Also, select the CMS system number(s)connected to this computer (CMS1, CMS2 etc.) and click the SELECT button. Technical data is subject to change without notice. ISO 9001 certified. TD-231B Timken® and Where You Turn® are registered trademarks of The Timken Company. – 89 – © 2010 The Timken Company 12-10 For CMS users only 5. Tick the Select instrument box on the CMS form, then click REGISTERED UNITS (right). 6. Initially, the form Registered measuring units is empty. Click the NEW button to input units. 7. The measuring unit number is the address set by dip switches in the measuring unit itself. Type the number, then select the measuring unit type on the drop down menu. Click OK. 8. To register more CMS units, click NEW again and repeat the process. 9. When you’re done, close the forms with OK/SAVE. Technical data is subject to change without notice. ISO 9001 certified. TD-231B Timken® and Where You Turn® are registered trademarks of The Timken Company. – 90 – © 2010 The Timken Company 12-10 For CMS users only Configuring the CMS communication program The Condmaster Nova online functions for the CMS system are accessible only when the CMS communication program is correctly configured and running. To configure the communication program: 1. When you use a Condmaster Nova demonstration version, it contains an ”artificial” CMS System. To access it, mark the icon, select Properties and then Shortcut. 2. Under Target, enter “ /cmsdemo” (NOTE: space before ‘/’) . Condmaster Nova can handle up to nine different CMS systems, each with up to 240 measuring units. How many of these systems can be connected to the same computer depends on the number of COM ports. When using a telephone connection, all can be addressed from the present work station. Use the MARK button to mark the connected CMS system. If you have a modem connection to the CMS system, click the telephone icon. Under the CMSx tab, set the following: • the contact interval, 1 to 1440 minutes. It takes more than one minute to contact all measuring units and transfer the measuring results to the database, so ”1 minute” means as fast as possible. • The COM port this CMS System is connected to. • the Baud rate. Checking the box Log alarms to printer produces a running print-out of all alarm messages. Technical data is subject to change without notice. ISO 9001 certified. TD-231B Timken® and Where You Turn® are registered trademarks of The Timken Company. – 91 – © 2010 The Timken Company 12-10 For OIS / VCM / CMS users only Condmaster Nova online system functions Now that the OIS / VCM / CMS communication program(s) have been configured and started, the online functions in Condmaster are accessible for configuration. The status of the connected measuring units is displayed and each type may be configured (below). Technical data is subject to change without notice. ISO 9001 certified. TD-231B Timken® and Where You Turn® are registered trademarks of The Timken Company. – 92 – © 2010 The Timken Company 12-10 CondmasterWeb Configuring CondmasterWEB CondmasterWEB is a module that provides read-only access to Condmaster data via Internet. To use the module, it must be included in your Condmaster licence. Also, your PC needs an Internet connection via an appropriate Internet Explorer version (5.0 or later). CondmasterWEB installs as a service on the server computer and can be accessed from the client browser via LAN or Internet, normally through port 5790 (default). The server computer requires Windows NT or higher and the client requires Microsoft Explorer 6.0 or higher. To install CondmasterWEB, follow these steps: 1. In the Condmaster Nova directory, double click on the Web46setup.exe file. The Condmaster WEB setup window is displayed (right). 2. To establish the connection between the web module and your “normal” Condmaster, input the path to the Condmaster directory. 3. The Port number is set to 5790 by default. If another port is to be set, please contact your system administrator. 4. CondmasterWEB will automatically log you out after a certain time of inactivity. Under Time out (user), set the number of minutes for the system to wait before automatic logoff. 5. Input your web address. 6. Click the Change link in the lower left corner of the form and select Install service. The installation program will install CondmasterWeb in your Condmaster folder. Technical data is subject to change without notice. ISO 9001 certified. TD-231B Timken® and Where You Turn® are registered trademarks of The Timken Company. – 93 – © 2010 The Timken Company 12-10 File export and import 1 Export / Import: • Right hand click in the tree structure to reach the functions (1). Export is active when an item in the tree is marked. Exporting and importing Condmaster files The export/import function is used to transport data from one Condmaster Nova database to another. You can export complete folders (including the tree structure inside the folder), components, or measuring points. You have the option of exporting the basic data, the measuring results, or both. To open the export function, you mark an item in the tree structure, right hand click and select Export from the menu (1). There are three preprogrammed export file formats: • All data: Creates the file EXPORT1.001. By default, this file contains the complete contents of the marked item. When the file is imported, it can overwrite the existing tree structure and the items this structure contains. • Only component and measuring point setup: Creates the file EXPORT2.001. By default, tree structure and measuring results are not included. • Only measuring results: Creates the file EXPORT3.001. By default, tree structure and measuring point setup are not included. This means that you can only import the results to an existing measuring point with the same name and number as the exported measuring point. Please note: the export file formats can be edited, see section “Export file formats” in this chapter. This includes the file names. The extension 001 is common for all export files. To save several export files to the same location, you have to edit the name but must not alter the extension. Overwrite commands have to be confirmed when the data are imported, so your existing data base cannot be altered unless you want it. Technical data is subject to change without notice. ISO 9001 certified. TD-231B Timken® and Where You Turn® are registered trademarks of The Timken Company. – 94 – © 2010 The Timken Company 12-10 File export and import 1 4 2 3 6 5 Export: • Select export setup (1). If required, edit file name (2), input date (3). • Click ”...” (4) to edit (5), create (6) export setup. Making an export file Three export file setups are stored in Condmaster Nova. To these you can add your own, see next page. The desired setup is select from the pull down menu (1). You can edit the suggested export file name (2). To save several files to the same disk you must use different file names, else you overwrite without getting a warning. When exporting selected measuring results, you input the date or the date interval (3). Clicking on the button ”...” (4) opens the list of saved export setups. The button EDIT (5) opens the marked setup for editing. With NEW (6) you can create a new setup. Technical data is subject to change without notice. ISO 9001 certified. TD-231B Timken® and Where You Turn® are registered trademarks of The Timken Company. – 95 – © 2010 The Timken Company 12-10 File export and import 1 2 3 4 5 6 7 Export setup Export file format The buttons NEW and EDIT open the setup window for export files. 1. Name: An export setup saved under a new name will appear on the select list. 2. Export folders and short-cuts: The tree structure of the marked folder will be exported. This applies to ”own folders” containing aliases. On importing, you are asked to name a new folder which will contain the exported folder and its structure. Components and measuring points 3. Export setup: This is the data from the component and measuring point registers, including the configuration of CMS and VCM channels, if any. In case of conflicts with an existing continuous monitoring system, you will be asked to edit the CMS and VCM data before importing. 4. Export present criteria: This exports the result of the criteria calculations (mean values, standard deviations). In the receiving program, the measuring points concerned will be listed as having an ”imported criterion”. 5. Import, always new component/measuring point: Disables the overwrite function and blanks out the next two choices. Each component (measuring point) is renumbered on importing. 6. Import, overwrite existing setup: Enables the overwrite function. The decision to overwrite can then be made on importing. 7. Import: Suggest exported number ...: In connection with overwriting, the exported number appears in the data entry field for the number of the imported item . It still has to be confirmed. Technical data is subject to change without notice. ISO 9001 certified. TD-231B Timken® and Where You Turn® are registered trademarks of The Timken Company. – 96 – © 2010 The Timken Company 12-10 File export and import 8 9 10 11 Export setup Standard comments and work descriptions can be exported only as far as they are connected with exported measuring points or components. The identifier is the code. Items with a new code will be imported to the receiving data base, while items with identical codes will be overwritten. 8. Export, setup: Exports the standard comments and work descriptions. 9. Import, overwrite: On importing, the overwrite is automatic. 10. Export: Measuring results, comments, alarms: Four alternatives can be selected (pull down): none, all, date, date interval. Date requires a date input, with the present date set as default. All measuring results, etc. from that 24 hour period will be exported. For Date interval, a from and a to date is input. 11. Export: Default file name: when used, both the destination and the file name must be input. The file extension will be automatically set to ”.000” when the export file is created. Technical data is subject to change without notice. ISO 9001 certified. TD-231B Timken® and Where You Turn® are registered trademarks of The Timken Company. – 97 – © 2010 The Timken Company 12-10 File export and import 1 2 3 4 5 Import: • Right hand click in the tree structure for Import. • Click IMPORT (1) to accept displayed file (2), or (3) to select file. • Click (4) for information window (5). Importing files Right hand clicking in the tree structure opens the menu with the Import function. Insert the disk with the exported file and click the IMPORT button (1). Alternatively, you can open a search menu with the button ”...” (3). When you have found the file, mark it and click OPEN on that menu. When in doubt about the contents of a file, you can click the INFORMATION button (4) to get a display of the export file setup (5). It shows you the type of data in the file (see the two previous pages). The components and measuring pointing the file you can first see after clicking IMPORT. There is no danger to your data base: no data import is carried out before you confirm each item. Technical data is subject to change without notice. ISO 9001 certified. TD-231B Timken® and Where You Turn® are registered trademarks of The Timken Company. – 98 – © 2010 The Timken Company 12-10 File export and import 5 1 2 4 3 Accepting data: • Click on an item, mark it with (1). Items with text in italics must be edited before they can be imported. Accepting data for import Imported components and measuring points can only replace existing items when overwriting is enabled in the export setup. If not, numbers and names as displayed in italics. This means that the number must be changed. Changing names is optional. When components with measuring points are imported, it is sufficient to change the component number – the measuring point number is then automatically edited. To accept or edit an item, it must first be marked. Click on the item in the list, then click the button MARK/ UNMARK (1). Click EDIT (2) to change numbers and names in the edit window (3). The button SEARCH (4) displays a list of the components already existing in your data base. When the item is a) marked (blue marker in front), b) labelled in normal print, and c) not tagged with a red fault icon, it can be imported. A pencil icon shows, that an existing item will be overwritten. Red fault icons flag for conflicts and prevent import until the conflict is solved by editing and the red icon disappears. When the list is ”clean”, click the button IMPORT (5). Technical data is subject to change without notice. ISO 9001 certified. TD-231B Timken® and Where You Turn® are registered trademarks of The Timken Company. – 99 – © 2010 The Timken Company 12-10 Condmaster Nova modules Condmaster Nova modules The Condmaster Nova platform includes the measuring techniques Vib ISO 2372, two user defined measurements (data input as analogue voltage or current, or manual), and Checkpoint (free text describing maintenance activity), all for unlimited use. It also has a runtime counter for the operating hours of a machine. All additions to the platform functions are ordered from the list below, for either unlimited or limited use. Modules can be bought at any time as update files. Module Art no. Unlimited use / Art no. Limited use Goes with instruments/system T2001 A2011 Machine Tester Machine Evaluator VCM CMS OIS x x x x x x x x + BMU x Platform PRO120 / - - - x dBm/dBc MOD130 / MOD230 x LR/HR and Lubmaster MOD131 / MOD231 x + BMU SPM Spectrum MOD132 / MOD232 x + BMU Vibration ISO 10816 MOD133 / MOD233 x FFT with symptoms MOD134 / MOD234 EVAM and time signal MOD135 / MOD235 x 2 channel simult. vibration MOD136 / MOD236 x Run up/coast down, bump test MOD137 / MOD237 Orbit analysis MOD138 / MOD238 x 12800 lines, 40 kHz MOD139 / - - MOD182 / - - - Web and e-mail alarms MOD183 / - - - x x x SAP link MOD184 / - - - x x Rule Based Evaluation, RBE MOD181 / - - - x x AMOS link MOD185 / - - - x Plant Performer MOD186 / - - - x OIS MOD187 / - - - Order Tracking MOD188 / - - - Colored Spectrum Overview MOD189 / - - - x x x x x x x x x x x x x x x x x x x x x x x x x x x x x x x x x x x x x x x x x x MOD190 / - - - Technical data is subject to change without notice. ISO 9001 certified. TD-231B x x Online, CMS HD x x x x x Timken® and Where You Turn® are registered trademarks of The Timken Company. – 100 – © 2010 The Timken Company 12-10 Appendix A - For OIS users only Configuring third-party antivirus software The LinX software for OIS has been tested and verified to work correctly with the Norton Internet Security 2008, McAfee Internet Security Suite and F-Secure Internet Security 2008 firewalls. Please see below for information on how to configure these firewalls for OIS traffic. Norton Internet Security 2008 1. Start Norton Internet Security. 2. In the menu on the left, click on Personal Firewall > Program Control (see below). 3. Click the ADD button, then browse for the following files to add them to the list of programs accepted by Norton: • FSS.exe • Linx_Service.exe 4. Grant the two applications Custom Internet access. 5. Save your settings. Technical data is subject to change without notice. ISO 9001 certified. TD-231B Timken® and Where You Turn® are registered trademarks of The Timken Company. – 101 – © 2010 The Timken Company 12-10 Appendix A - For OIS users only McAfee Internet Security Suite 2008 Follow these steps to configure McAfee for OIS traffic: 1. Start McAfee Security Center. 2. In the menu structure on the left, click Configure > Internet & Network. 3. Under Firewall protection is enabled, make sure the Yes option is selected and click the ADVANCED button. 4. In the menu, click Program Permissions (see below). 5. Click ADD ALLOWED PROGRAM and add the following programs to the list: • FSS.exe • Linx_Service.exe 6. Under Action, click Allow Outbound-Only Access for the FSS program, and click Allow Access for the LinX Service program. Technical data is subject to change without notice. ISO 9001 certified. TD-231B Timken® and Where You Turn® are registered trademarks of The Timken Company. – 102 – © 2010 The Timken Company 12-10 Appendix A - For OIS users only F-Secure Internet Security 2008 The Internet shield in the F-Secure firewall needs to be set up to accept all traffic: 1. Start F-Secure Internet Security 2008. 2. In the menu on the left, click on Internet Shield (see below). 3. Click the Change... links on the right to change the settings according to the picture above. 4. Next to Applications allowed/denied, click Configure... (see above). 5. Click the ADD button, then browse for the FSS.exe and Linx_Service.exe files in the LinX directory to add them to the list of programs allowed. 6. For each of the two applications, set Allow for both Inbound... and Outbound connections, then click OK to save your settings: Technical data is subject to change without notice. ISO 9001 certified. TD-231B Timken® and Where You Turn® are registered trademarks of The Timken Company. – 103 – © 2010 The Timken Company 12-10 Appendix B - For OIS users only OIS Configuration Chart Obtain the foillowing information: • Unique IP address for each OIS unit • Netmask for LAN used • DNS server IP address ( if available) 1) Create the communication setup file on 1) Create the communication setup file on the SD card using the gathered data the SD card using the gathered data 2) Configure the OIS using LinX DNS 2) Configure the OIS using LinX IP name (LinX config scenarios L1 and L3) address (LinX config scenario L2) Technical data is subject to change without notice. ISO 9001 certified. TD-231B Timken® and Where You Turn® are registered trademarks of The Timken Company. – 104 – © 2010 The Timken Company 12-10 Appendix B - For OIS users only LinX Configuration Chart DHCP client in LinX PC will register leased IP addresses with DNS service. 1) Configure the OIS with LinX host name (OIS config scenario i1) 1) Register the LinX IP address manually No DNS service. in your DNS service 1) Configure the OIS with the LinX IP 2) Configure the OIS with LinX DNS name address (OIS config scenarion i2) (OIS config scenario i1) Technical data is subject to change without notice. ISO 9001 certified. TD-231B Timken® and Where You Turn® are registered trademarks of The Timken Company. – 105 – © 2010 The Timken Company 12-10 Timken Software License Agreement This is a legal agreement between you, the end user, and SPM Instrument AB. This License Agreement applies to the copy of the software program(s) and all software material included in the delivery that you, the end user, are now taking into use. By opening the media package or installing or using the software, you are agreeing to be bound by these terms and conditions. If you do not agree to them, promptly return the unopened media package and accompanying material for a full refund. Grant of license SPM Instrument AB grants you the right to have one installation of the software on a single computer standing alone or acting as a network server. You may use upgrade software only to replace or enhance your earlier-licensed version of the software. If use of the software is authorized under an Additional License, SPM Instrument AB grants you the right to make one additional authorized use of the earlier-licensed software. To assist you in using the software, you may either make a copy of the software solely for archival purposes, or transfer the software to a single hard disk provided that you keep the original solely for archival purposes. You must include all copyright notices on the archival copy. If the software is pre-installed on the hard disk of a computer, any accompanying media constitute the archival copy. You may not use, copy, modify, or transfer your right to use the software or accompanying material, or any copy of either, except as expressly provided in this License Agreement. All rights not expressly granted are reserved by SPM Instrument AB or its suppliers. Termination of license You may terminate this License at any time by destroying the software, archival copy and accompanying material. SPM Instrument AB may terminate this License Agreement if you fail to comply with its terms and conditions; upon such termination you shall destroy the software, archival copy and accompanying material. Other restrictions You may not rent or lease the software, but you may transfer all your rights on a permanent basis, provided you transfer all copies of the software, including your most recent upgrade and all prior versions, and accompanying material, and the recipient agrees to the terms of this License Agreement. Export is subject to the requirements and restrictions of applicable laws and requirements, including but not limited to the Export Administration Regulations of the United States of America. You may not reverse engineer, decompile or disassemble the software, except to the extent such acts may not be prohibited by law in the country of use. You may configure the software for your own use, but not otherwise modify it or merge it into another program unless in support of your authorized use. Copyright © SPM Instrument AB 2006. All rights reserved. No part of this manual may be reproduced, transferred, or copied, in any form or by any means, without written permission by SPM Instrument AB. Reservations This manual describes the product at the time stated above. The contents of this manual may be altered without notice and may not be regarded as a commitment from SPM Instrument AB. SPM Instrument AB takes no responsibility for possible errors or discrepancies in this manual. Trademark Condmaster and Condmaster Pro are registered trademarks of SPM Instrument AB. Other company and product names which may occur in this manual are trademarks or registered trademarks of the respective owners. Limited Warranty SPM Instrument AB warrants that the software will perform under normal use substantially in accordance with the accompanying material for a period of three (3) months from the date of receipt. SPM Instrument AB warrants the media on which the software is furnished to be free from defects in materials and workmanship under normal use for a period of three (3) months from the date of receipt. This Limited Warranty is void if failure of the software has resulted from accident or misuse. No other warranties. SPM Instrument AB disclaims all other warranties, either expressed or implied, including but not limited to implied warranties of merchantability and fittness for a particular purpose, with respect to the software. There is no warranty by SPM Instrument AB or any other party or person that the functions contained in the software will meet your requirements or that the operation of the software will be uninterrupted or error-free. You assume all responsibility for the selection of the software to achieve your intended results, and for the installation, use and results obtained from it. No liability for consequential damages. To the maximum extent permitted by applicable law, SPM Instrument AB and its suppliers and any other party or person shall not be liable for any damages whatsoever (including, without limitation, damages or losses of business profits, lost savings, business interruption, loss of business information or data, or other pecuniary loss) arising out of the use of or liability to use this software, even if SPM Instrument AB or its suppliers or the other party or person has been advised of the possibility of such damages. Technical data is subject to change without notice. ISO 9001 certified. TD-231B Timken® and Where You Turn® are registered trademarks of The Timken Company. – 106 – © 2010 The Timken Company 12-10