1
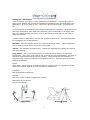
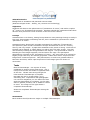
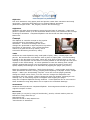
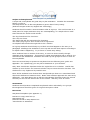
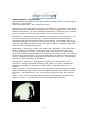
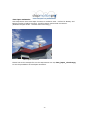
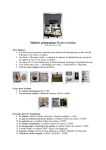
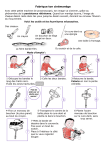
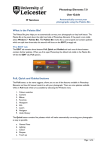
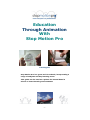
Education Through Animation With Stop Motion Pro Teaching Kit Stop Motion Pro is a great tool for schools, incorporating a range of subjects and key learning areas. This guide can be used as a primer for lesson ideas in school or home learning environments. -1- Index: Benefits of animation for students in a learning environment ..................... 3 Using Stop Motion Pro in an educational environment ...................................... 3 Setting up a workspace ............................................................................... 4 Sharing resources in a classroom .................................................................. 5 Editing and distribution of animation ............................................................. 6 Project / lesson plans................................................................................. 7 Animation Basics ........................................................................................ 8 Flipbooks..................................................................................................10 Scripts and Storyboards .............................................................................11 Object animation - Introduction ...................................................................13 Object animation – Intermediate..................................................................14 Object animation – Advanced ......................................................................15 Object animation – Advanced 2 ...................................................................16 Time-lapse animation .................................................................................18 Other Teaching resources ...........................................................................19 Appendix 1. .................................................................................................20 -2- Benefits of animation for students in a learning environment Animation offers many opportunities for students to explore relationships between Art, Science, English and Technology in a creative way. Now more than ever a creative approach to learning is being practiced in schools the world over. Animation in education has been popular since the mid sixties, with the advent of super-8 film. The creative nature of combining skills in English, Art, movement and technology in animation has long been recognized, providing students with an ideal environment in which to learn. Stop Motion Pro continues this tradition of learning through self-expression in animation for the digital age. The course notes and lesson plans in this guide hope to assist schools in incorporating animation into their curriculum. Students should be able to build self-confidence through making short animation projects, while learning new skills and reinforcing educational goals in other subject areas. Using Stop Motion Pro in an educational environment Stop Motion Pro can be used for a wide range of activities by virtually any age group. Some reasons for incorporating animation and Stop Motion Pro into an education curriculum: Art – Animation relies on stylized representation of form and movement. Animation provides a unique way to enhance skills gained in visual art training, combining them with other subject areas. English – Animation is commonly used to tell a story; creative writing skills are used to develop plots and stories for short animations. Science – Stop Motion Pro includes a time-lapse function that can be used for practical science experiments. These include plants growing, cloud formations and human movement. Technology – Stop Motion Pro works on a computer. While the interface is easy to learn it offers depth for senior students, integrating computers into different subject areas. Stop Motion Pro is a standard tool for the animation industry. Students will be exposed to the latest tools for creating stop motion animation. History – Animation has a rich history dating from Prehistoric cave paintings through to the latest in 3D and stop motion technology. Stop Motion Pro can be used to explore and experiment with animations interesting past. Media Studies – Stop Motion Pro is often used with a video or digital still cameras. Skills in camera work, lighting, editing and sound recording can all be incorporated into classroom activities. The activities and projects outlined in this document cover all these areas and more. -3- Setting up a workspace Guide to setting up a space in your classroom for animation. It would be useful if teachers set aside a few minutes to familiarize themselves with the Stop Motion Pro application. It is very easy to use - follow the “Quick start tutorial” in Stop Motion Pro. An environment for animation need not be complicated or expensive. Stop Motion Pro has been designed to work with many different types of hardware; it is highly likely that your school already has some or all of the following tools that can be used to make animations: A small corner or desk can be used to set up an animation area. The following ideas for workspaces are recommended: Diorama – See the diagram below for a typical “diorama” setup. This arrangement can be used for most of the exercises in this guide. Tripod – The standard animation tool. Tripods are essential for holding the camera still while filming. Copy stand – many schools may have one of these tucked away in a storeroom somewhere. They were often used in the 70’s and 80’s for presentations, and have a standard tripod thread that will fit any camera. Copy stands are still available; a tripod pointing a camera vertically will substitute for one. Great for animating sand, beads and flipbooks. Lights Desk lamps, halogen lights or ambient light (for indoor work it is a good idea to be away from outdoor light as this can fluctuate in brightness) Computer Microsoft Windows based PC Camera Web cam, video camera or digital still camera Alternative Input devices Document Scanner Copy stand Diorama setup -4- Sharing resources in a classroom Animation does not require huge resources. Students can work in groups, taking turns on equipment. A class of 20 could be split into four groups of 5 or so children. Two groups can develop script ideas while two other groups get familiar with the software and animated movement. This can then be rotated. Students can capture a few frames of their name at the start of each animation they make. This makes identifying work for group discussion easy. Students can form larger groups to work on bigger projects. An animation could require large full-scale sets to be built, models constructed etc. Students can take turns using the camera, software and animation process. Using live actors interacting with animated objects provides the opportunity to use live actors for animation. -5- Editing and distribution of animation How your students can keep their work and use it in other projects. Stop Motion Pro will export animations in a variety of file formats. These (such as AVI) are compatible with many other software applications, such as “Hyperstudio” and “KidPix”. For editing and addition of soundtracks students can use applications such as “Premiere” or “Edit Studio 2”. With the right combination of hardware and editing software it is possible to output to videotape. It is also quite simple to export a small reference copy of animation done in Stop Motion Pro to a floppy disk. Students can then playback their work on virtually any PC. Information about these processes can be found in the Stop Motion Pro tutorial exercises under “Exporting your animation”. -6- Project / lesson plans These can be incorporated into a longer course on animation or used individually. They can be modified to suit different age ranges. They are designed to bring an understanding of animation to students, while integrating other learning areas such as History, Science, Art, English and Technology. These exercises include: Animation Basics Background to animation and practical exercise ideas Flipbooks Low-tech animation using paper pads and pencils create short narratives and study movement. Introduce Stop Motion Pro by filming flipbook animation Scripts and Storyboards A script and a storyboard are great way to plan animation. Visualize the animation before you film it. Use Stop Motion Pro to film storyboards to get an idea of story timing. Object animation - Introduction Bring real world objects to life using Stop Motion Pro, different materials and techniques. Object animation - Intermediate Experimentation with different techniques, building models and sets. Anything can be animated – even people! Object animation - Advanced Movement study. Animation often exaggerates real life movement for humor and characterization. Real movement is a great aid to animators, learn how to observe and translate movement into animation. Object animation – Advanced 2 Lip sync. Learn the process of matching movement and audio using Stop Motion Pros’ “Rotoscope” function. Other techniques are also explored using this unique tool. Time Lapse Animation Use Stop Motion Pros Time Lapse function to condense time. Perfect for Botany and Biology studies of plants growing, cloud formation and animal movement. -7- Animation Basics Background to animation and practical exercise ideas (Relevant subject areas – History, Art, Science and Technology) Objectives Students will discover the phenomena of “persistence of vision”, and make a replica 19th Century toy illustrating the principle. Students should also understand that these devices were precursors to the invention of the movie film camera. Concept Animation has a rich history, dating from prehistoric cave paintings through to today’s high tech 3D animation simulating real life; this is credited to a phenomenon called “persistence of vision”. Animation history begins with a simple mechanical toy called the “Thaumatrope”. This optical toy was in wide circulation in Europe and America in the 19th Century. The toy was very simple - a paper disc attached to two pieces of string. Each side of the disk had a drawing, a classic being one side a bird, the other a cage. The disk was twirled by twisting the strings between the fingers. This produced an effect of blending the two images together; the bird was in the cage. This perceptual phenomenon is known as the “persistence of vision”. Our eyes hold on to images for slightly longer than they are actually projected. Rather than a blur we perceive the images as a continuous picture. This phenomenon is used to its greatest effect in television and films, where rapid sequences of still images give the illusion of movement. Tasks Build a Thaumatrope. Use a piece of heavy cardboard to produce some paper discs. Use a hole punch to make two holes on opposite sides of the disc. Thread some string though the holes and the Thaumatrope is complete. Recreate the bird in a cage effect, or try something else. Experiment with photographs cut out from magazines, on one side of the disc stick the photograph of a celebrity, on the other draw in glasses, a beard, hat or whatever comes to mind. The image on the right shows a completed Thaumatrope. Share the completed Thaumatropes among the students. Assessment Each student should produce a single or multiple Thaumatropes. -8- Resources Heavy cardboard, hole punch, marking pens or pencils, scissors. Old magazines could also be used for novelty effects. Further work in the area of animation history could involve students researching and making such mechanical toys as the “Phenakistoscope”, “Zoetrope” and “Praxinoscope” -9- Flipbooks Low-tech animation using paper pads and pencils create short narratives and study movement. Introduce Stop Motion Pro by filming flipbook animation (Relevant subject areas – Art, English, Science and Technology) Objectives Students will make short animations using the most basic of materials – paper and pencils. A perfect follow up to the Animation Basics lesson, this introduces the concept of timing to animation. Completed flipbooks can be turned into films using Stop Motion Pro. Concept The flipbook is a similar concept to the popular commercial form of animation called “cel animation”. A series of drawings with minor changes are presented in rapid sequence to produce the illusion of movement. This concept has been refined to a great art form by Disney, and a successful advertising medium by many. Tasks Students can make flipbooks using small pads of plain, white, unlined paper and pencils. Old workbooks could also be used in place of paper pads. The first drawing is made on the last page of the pad. When the next page is flipped onto it, the next drawing in the sequence can be made. It will be possible to see through the new piece of paper to the first drawing. It is then possible to trace the drawing with a slight change. Repeat this process over several pages. Using the thumb to control the speed, display the drawings as an animation by flipping the pages (see picture). Ideas for animating in flipbooks: “Stick figure Olympics” - Using simple stick figures make animations of them running, jumping and competing in Olympic events. “Shape Morph” – Make your first drawing a square. Over the next ten pages gradually change the shape into a flower, over the next ten change the shape back into something else, like a horse, continue doing this with new shapes, following the ten drawing rule, an interesting rhythm will appear when flipping the pages. Swap the completed flipbooks among students. These flipbooks can be converted to short animations using Stop Motion Pro to capture the individual drawings. Assessment Students should produce a completed flipbook. Encouragement should be given for original concepts or ideas. Resources Paper pads (or recycle by using old workbooks), pencils, colored marker pens etc. Diorama or Copy stand set up Stop Motion Pro Relevant tutorial in Stop Motion Pro: “Introduction to animation” - 10 - Scripts and Storyboards A script and a storyboard are great way to plan animation. Visualize the animation before you film it. Use Stop Motion Pro to film storyboards to get an idea of story timing. (Relevant subject areas Art, English and Technology) Students should consider a short animation idea as a group. This could consist of a small part of a longer production they are contemplating, or a simple idea in itself. Some themes for stories could include... The dog that danced for his dinner The crazy car chase The aliens that ask the astronauts for directions The child trying to get a slice of cake from a high bench An elephant that thinks she might like to be a chicken As a group students should firstly try to flesh out what happens in the story in a paragraph. Challenge the students to come up with an idea that requires no dialogue to explain what is happening. Try to focus on visual story telling. Once students have an outline of the story, it is time to show visually through drawings what is happening. This process is called storyboarding and is used for live action films and animations. Students can break up into groups of three to work on the storyboards. There are several ways to present a storyboard use the following as a guide. See appendix 1 for a photocopy you may like to distribute to your students. Story idea: Imelda the elephant thinks she might like to be a chicken. Imelda has dressed up as a chicken and visits the chicken coup to meet the other chickens. The chickens are very frightened by Imelda’s size. Once all the students have finished their storyboards pin them on a noticeboard and discuss the differences between them. Notice how students approach the same story differently. Use Stop Motion Pro to film the storyboards (film each frame for several seconds) to see how the stories flow on the screen. Will they work as a film? Assessment Students should produce completed storyboards either individually or in groups. Encouragement should be given for original concepts or ideas. Resources Storyboard templates (see appendix 1). Diorama or Copy stand set up Stop Motion Pro Relevant tutorial in Stop Motion Pro: “Introduction to animation” - 11 - Sample Storyboard “Imelda the Elephant” Imelda looks at her chicken She adjusts her chicken outfit in the mirror beak Imelda heads outside Establishing shot of the Close up of Imelda hurrying Chicken 1 looks up at the chicken coup towards the chickens noise Close up of Imelda coming Chicken 1 and Chicken 2 Imelda arrives at the chicken straight at the camera look up - alarmed coup – chickens are scared - 12 - Object animation - Introduction Bring real world objects to life using Stop Motion Pro, different materials and techniques. (Relevant subject areas – Art and Technology) Objectives Students will experiment with objects to create a simple animated film that explores movement. Basic controls in Stop Motion Pro will be used to create short animations. Students will develop an appreciation of timing in animation. Concept Animation is the art of movement. Using animation techniques it is possible to “bring things to life”. Tasks Set up a Diorama or Copy stand (see “Setting up a workspace”). Collect a range of objects rocks pebbles, feathers, sticks, buttons, paper, pipe cleaners, rubber bands, bottle tops or any other small objects around the classroom. Position them in the diorama setting and start Stop Motion Pro. While capturing frames, move the objects across the set. Students can produce examples of the following: - An object moving quickly across the set - An object moving slowly across the set - Make the object enter the scene and move about in an erratic way. - Make two objects approach each other from opposite directions and avoid each other. - Make several objects enter the set and react to each other – They could dance, circle, make patterns or appear to argue. Let your imagination go! Once everyone has created some animation, review the work as a group. Observe and discuss the different ways students approached the task. Did different objects result in different animation timing? Assessment Students should produce examples of the tasks outlined above using Stop Motion Pro. It should be reinforced that this is all experimental and all work is valuable as a learning process. Resources Diorama or Copy stand set up Stop Motion Pro Odds and ends around the classroom Relevant tutorial in Stop Motion Pro: “Introduction to animation” - 13 - Object animation – Intermediate Experimentation with different techniques, building models and sets. Anything can be animated – even people! (Relevant subject areas – Art, Technology, Dance) Students should be trying different mediums for animation. Students can experiment with animating clay (plasticine or plastalina) toys (such as Leggo, blocks, cars) found objects or themselves. Up to three different workstations could be set up for rotating groups. Alternatively these activities could be set up one after another. Workstation 1: Diorama setup (see “Setting up a Workspace” in this document) - can be used for animating clay and or toys. Using Stop Motion Pro students should experiment with the timing and movement of the objects. For example: Make a car slow down gradually to a stop, then quickly accelerate off. Build a castle out of leggo or blocks while taking two frames each time a piece is added. Integrate a giant soft drink can with an animated clay figure. Workstation 2: Camera on a tripod (see “Setting up a Workspace” in this document). Clear a space in the classroom set the camera up on a tripod so that it can see a number of students or “Actors”. Students in front of the camera can move slowly while other students use Stop Motion Pro to capture one frame at a time. Try walking across in front of the camera. Use your animated actors to create a humorous dance routine. Experiment filming in long shots and switching to close-ups. This animation technique is often reffered to as “Pixillation”. Workstation 3: Camera on a copystand (see “Setting up a Workspace” in this document) – used for animating drawings, sand, beads, or cutouts. Students can experiment with different materials on a flat surface. Using Stop Motion Pro to animate: Sand and beads – use a paintbrush to move the grains of sand into people or animal shapes and animate them. Explore the liquid effect of transforming shapes from one to another. For example frog to cat, cat to sparrow, sparrow to bee, bee to person etc. Cutout – Cut out faces and objects (such as cars) from magazines. Animate them under the camera. Try cutting out your own drawings and using these. Sa nd animation - 14 - Object animation – Advanced Movement study. Animation often exaggerates real life movement for humor and characterization. Real movement is a great aid to animators, learn how to observe and translate movement into animation. (Relevant subject areas – Art, Technology, Dance) A classic example of movement is the “bouncing ball” familiar to all new animators. The concept is fairly simple - animate a bouncing ball. A first idea would be to simply animate the ball cycling through an equal number of incremental steps, like this: However this is not natural. Students should try animating this using clay on a copy stand layout. As the ball reaches the height of its trajectory it slows down, the force of gravity starts to make it fall. The ball falls quickly and squashes slightly when it hits the ground, bouncing back up again. Analyzing a ball bouncing and exaggerating the physical effects slightly reveals the following pattern: Students should try animating this process. How would a heavier ball bounce? Animate different types of balls bouncing. Use the examples included on the Stop Motion Pro CD to load into the rotoscope to study the movement. Using the Markers tool space out the bounce steps on the main Stop Motion Pro screen. Assessment Students should produce bouncing ball examples of the following. Equal spacing of a bouncing object. Bouncing ball with slowing trajectory and the squashing of the ball when it hits the ground. Animate a heavy object that does not bounce. Students should also use the “Rotoscope” and “marker” tools in Stop Motion Pro Resources Copy stand set up (see “setting up a workspace”) Stop Motion Pro and example files (from the Stop Motion Pro CD) Relevant tutorials in Stop Motion Pro: “Introduction to animation” “Rotoscope” and “Markers” - 15 - Object animation – Advanced 2 Learn the process of matching movement such as walking using Stop Motion Pros’ “Rotoscope” function. Other techniques are also explored using this unique tool. (Relevant subject areas – Art and Technology) Objectives Students will experiment animationg using some of the advanced tools in Stop Motion Pro. Students will develop an ability to use live action footage as a reference and inspiration when animating. Concept Using Stop Motion Pro’s “Rotoscope” students will be able to utilize live action footage as an aide in animating. Tasks Set up a Diorama or Copy stand (see “Setting up a workspace”). Using the media of choice (a cut out figure, sand animation, claymation etc). Open Stop Motion Pro and select “open project”. The “settings” window will open, select “still image capture” and set the pixel dimensions to 320 x 240. Click OK. The Open file window will appear. Using the tutorial files that come on the Stop Motion Pro CD, open Teaching_Kit /Walking_test/muybridge.SMP. This is a Stop Motion Pro file we have created that demonstrates the use of live action footage as an assistant for animation. Play the animation using the controller on the main toolbar. Locate the slider on frame 1. Now click on the Rotoscope button. A file window will appear. Select the file fast_walk_big.avi. click the “sync” button on the Rotoscope. This is from a famous photographer, Eadweard Muybridge who pioneered the art of sequential photography in the 1800’s. We have used this footage as a guide for our pipecleaner character. Step through the animation one frame at a time to see how the movement matches. Open Stop Motion Pro and start a new project. Click on the “Rotoscope” button. Using a sample file from the Stop Motion Pro CD (try “cat.avi”) load this into the Rotoscope. It is possible to change the file in the Rotoscope using the “file” menu at the top of its window. You will notice that you have a live action film clip in the Rotoscope. Capture one frame in Stop Motion Pro, this will enable the “onion skinning” button. Click on the onion skinning button to open the onion skinning window. You can toggle between the stored frame or the cat footage in the rotoscope using the buttons on the onionskinning window. Animate using clay, pipecleaners or whatever you have at hand. Explore the other files included on the CD, such as elephant.avi, sneak.avi and slow_sad_walk.avi. The rotoscope will take any AVI file, so advanced students will be able to make their own. Please refer to the tutorial on the rotoscope in Stop Motion Pro for information on creating rotoscope files. Our pipe cleaner character was screwed onto a thin sheet of Medium Density Fibreboard (MDF). Plywood could be used. See how we drilled holes for locating the feet. - 16 www.stopmotionpro.com Assessment Students should Resources Diorama or Copy stand set up Stop Motion Pro Odds and ends around the classroom Relevant tutorial in Stop Motion Pro: “Introduction to animation” - 17 - Time-lapse animation Use Stop Motion Pros time-lapse function to condense time. Perfect for Botany and Biology studies of plants growing, cloud formation and animal movement. (Relevant subject areas – Science and Technology) Time-lapse animation Please look at the sample film on the Stop Motion Pro CD, time_lapse_clouds.mpg to see the possiblities of timelapse animation. - 18 - Appendix 1. - -