1
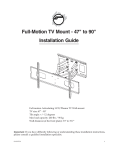
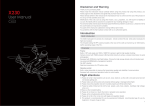
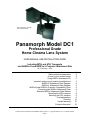
AK8Pro-S Compatible Projectors
Projector Brand / Model
Holes
Screws
Spacers
Notes
Digital Projection Avielo Spectra
1
M4x25
3/8 (3)
Epson 7500, 9500, 9700
2
M4x30
5/8” (4)
Epson 31000, 61000
3
M4x30
5/8” (4)
InFocus IN81, IN82, IN83
4
M6x30
5/8” (3), 1/8”
(3), 3/8” (2)
Optoma HD80, HD81
5
M4x30
5/8” (3)
Optoma HD86
7
M4x30
3/8 (4)
Optoma HT7, HD82, HD8200
6
M6x25
5/8” (4)
Panasonic AE4000
8
M4x25
5/8” (4)
Sim2 C3X (and similar models)
10
M6x30
1/8” (3),
3/8” (3)
Sim2 Domino (and similar models)
11
M6x30
5/8” (4)
Projector Brand / Model
Holes
Screws
Spacers
Notes
Anthem LTX300, LTX500
2
M5x40
5/8” (4)
Flip plate over for correct attachment point orientation.
JVC RS15, RS35, HD 550, HD950
2
M5x40
5/8” (4)
Flip plate over for correct attachment point orientation.
JVC RS1, RS2, HD1, HD100
1
M5x40
5/8” (4)
Remove feet to expose mounting holes.
Marantz 11S2, 15S1
18
M5x30
5/8” (4), 1/8” (4)
Flip plate over for correct attachment point orientation.
Planar 8130, 8150/Runco LS
19
M4x30
5/8” (4)
Planar 7170
20
M4x30
5/8” (4), 1/8” (4)
*Support Chains Required,
Maximum screw depth of 10 MM
Projection Design Model 3, Optix
8
M6x30
5/8” (4)
(Standard zoom lens only)
Projection Design Helios
8
M6x30
5/8” (4)
*Support Chains Required
Sony VPL-VW50, VW60, VW85
12
M5x30
5/8” (3)
Sony VPL-VW70, 90
21
M5x30
5/8” (3)
Sony VPL-VW100, VPL-VW200
14
M5x30
5/8” (3)
Use 5/8” + 1/8” for three holes and 3/8” + 3/8” for remaining
– all holes using ¾” total.
Front hole–proj., 1/8” spacer, plate, 3/8” spacer, mount
Back holes–proj., 3/8” spacer, plate, 1/8” spacer, mount
AK8Pro-L Compatible Projectors
*Support Chains Required
CONNECTING THE AK8PRO ATTACHMENT PLATE
(Chief RPA000 mount and Phillips screwdrivers required)
1. Position the projector bottom-up, feet removed. Consult the Attachment Plate Diagram for plate
orientation, hole positions, and required screws and spacers for your projector model. Insert and
tighten each screw through an appropriate silver washer and lock washer, the designated holes in the
Attachment Plate, then through any required spacers and finally into the projector ceiling mount
holes.
Panamorph DC1 User Manual and Installation Guide, Version 1.1, copyright February, 2011. All rights reserved.
Page 6