1
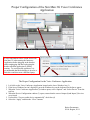
Kaiser Permanente
Sim Man 3G
Operations
Manual
Mark Meyer, MD FAAEM
Darin Bowers, MA
(Revised Sept 2011)
This page is intentionally left blank
KP Sim Man 3G Operations Manual (Dec 2011)
Table of Contents
Table of Contents
3
Sim Man 3G
Quick Start Guide for Sim Man 3G
Proper Configuration of 3G's Voice Conference Application
In-depth 3G User's Guide
Sim Man 3G GUI Orientation
Participant Orientation to 3G and Touch Screen Monitor
Displaying Radiology Images During a Scenario
Importing Scenarios into Sim Man 3G
Importing Media Files into Sim Man 3G
Sim Man 3G Inventory
Sim Man 3G Check In/Check Out Form
5
6
7
11
12 & 13
14
15
16
17
18
3
This page is intentionally left blank
4
Quick Start Guide for Sim Man 3G
Checklist for the Start-up of 3G
1.
2.
3.
4.
5.
6.
Plug in Sim Man 3G
Close the drain valve on the posterior upper right leg (perpendicular-closed, parallel-open)
Turn on Sim Man 3G (the startup process will take 2-3 minutes)
Turn on the laptops (Instructor Laptop and Patient Monitor Laptop)
Log onto the laptops (password = SimMan3G)
Attach the mouse, webcam, and microphone/headset to the Instructor Laptop (This must
be done before the 3G software application is opened)
7. Open the Logitech software and adjust the angle of the webcam (Close the Logitech
software once finished)
8. Once Sim Man 3G begins breathing and blinking his eyes (and the LED over his power
button is green), start the Instructor Application on the instructor laptop
9. Select the appropriate manikin from the list; do not select virtual manikin
10. Once the next screen opens, double left click on “Start Instructor Mode Scenario”
11. Select the appropriate scenario from the list
12. Go to the patient monitor laptop and start the Patient Monitor Application
13. Select the appropriate manikin from the list; do not select virtual manikin
Checklist for the Shutdown of 3G
1.
2.
3.
4.
5.
6.
7.
8.
Left click the “Main Setup” button on the patient monitor screen
Select “Shutdown Monitor”, and then “Really Shutdown”
Shutdown the patient monitor laptop like any other computer
Close the Instructor Application on the instructor laptop by selecting “File” and “Exit”
If a window asks you to if you would like to quit without saving, select yes
Shutdown the instructor laptop like any other computer
Press the power button on the manikin and wait 30 seconds
When the LED over the power button turns off, open the air compressor drain valve on the
upper right leg
9. Unplug the manikin and store the equipment in accordance with local policies
Kaiser Permanente
SCAL Region, 2011
5
Proper Configuration of the Sim Man 3G Voice Conference
Application
2
1
4
It is not uncommon to have sound issues with
Sim Man 3G when starting the Instructor
Application before plugging in the headset
and/or unplugging and then replugging the
headset when the application is already
running. To avoid possible problems, it is
recommended that the debriefing is saved to a
flash drive and shown on a different laptop.
3
5
6
The Proper Configuration for the Voice Conference Application
1. Left click on the Voice Conference Application located on the lower Windows bar (1)
2. If the lower Windows bar isn’t displayed, press the Windows key on the keyboard for the bar to appear
3. When the Voice Conference Application (2) window opens, select “Options” and “Select Device” from the
tool bar
4. When the Device Configuration window (3) opens, ensure that the correct Output (4)and Input (5) devices
are selected
5. Uncheck the “Use new audio device automatically” check box (6)
6. Select the “Apply” and then the “Close” buttons
Kaiser Permanente
SCAL Region, 2011
6
User’s Guide For SimMan 3G (Nov 2010)
Starting the Manikin and Laptops (Page 1/4)
Webcam Setup
1. The webcam can be connected to either the
Patient Monitor PC or the Instructor PC. By
default, the profile is setup to connect to the
Patient Monitor PC. Changing this profile
requires going into the profile editor and
creating a new profile.
2. Plug in the USB webcam to the Patient
Monitor laptop if you wish to record the
scenario. Once the camera is plugged in,
double click the Logitech QuickCam icon on
the desktop (Fig.1). Once the QuickCam
toolbar opens, select the Quick Capture button
(Fig.2). You will have an image of what your
camera will record. Adjust the orientation of
the camera to your liking and close out the
Logitech window and toolbar.
Fig 1
Fig 2
3G Start-Up
1. If not using secretions during the scenario,
close the air tank drain valve on the right leg
(adding fluid to the reservoir for secretions is
explained in a later section). Fig. 3
2. The valve is closed when the valve indicator
points perpendicular to the long axis of the leg.
The valve is open when the valve indicator
points parallel to the long axis of the leg (The
valve should be opened when filling the fluid
reservoir and at the end of each day’s
simulation session). Fig. 4
3. Plug in the power cord for the manikin
underneath the skin flap on the lower right side
of the manikin’s stomach area (Fig. 5). The
manikin can theoretically run on batteries for 4
hours, but connecting the manikin to power
between scenarios is recommended.
4. Turn on the manikin by pressing the power
Fig 5
button to the far left of the power cord outlet
(Fig. 5)
5. Leaving the manikin powered on for more than
>4 hours (even if connected to power) may
cause connectivity problems. It is
recommended that the laptops and manikin are
shut down between am and pm sessions.
Manikin
Status
Fig 3
Closed
Open
Battery
Status
Fig 4
Battery
Charging
Indicator
7
User’s Guide For SimMan 3G (Nov 2010)
Starting the Manikin and Laptops (Page 2/4)
3G Start-Up (Continued)
6. Once the power button has been pressed, the
manikin will blink twice and go through its
startup protocols. The manikin acts as the
server of the wireless network needs approx 23 minutes to startup. You will know the
manikin has finished when it starts to breath,
has spontaneous eye blinking, and the manikin
status light turns green. You are now ready to
connect to the laptop computers.
7. At this time turn on the Instructor laptop and
the Patient Monitor laptop (you can
differentiate the two laptops by the labels on
lower left side of the laptop lid and the lower
left side of the opened laptop [Fig.4]).
Fig 4
Instructor PC Setup
1. Once the laptop is powered on, you must login
to each computer. Type in the password
“SimMan3G” (case sensitive)
2. Plug in the headset to the Instructor laptop.
The headset has two plugs; one for the
microphone and one for the headphones. If
you do not use the headset, mute the sounds on
the instructor laptop to avoid feedback. When
you plug in the microphone/headphones, you
may see the “Audio System Event” box (Fig.
5). Choose the microphone icon and press OK.
3. Click the “Instructor Application” icon (Fig.
6) and the “Select Manikin” box (Fig.7) will
open. When using the software but not the
manikin, choose the virtual manikin. If
running scenarios, click on the manikin named
in a format like SimMan3glltp”
4. Once connected to the manikin, click on the
Start Instructor Mode Scenario button (Fig.8)
Fig.5
Fig.6
Fig.7
Fig.8
8
User’s Guide For SimMan 3G (Nov 2010)
Starting the Manikin and Laptops (Page 3/4)
Instructor PC Setup (Continued)
5. By default, you will be taken to the Default
Scenarios. If you wish to run a scenario “on the
fly”, you can select either Healthy patient 3G or
Healthy patient classic (Fig.9). To run a scenario
that you created, or imported from another person,
select My Scenarios from the drop down menu on
the left side of the screen towards the top
6. Double click on the scenario you wish to run and
the simulator GUI will open. We recommend
Fig.10
using SimMan “Classic View” as this similar to
Classic SimMan, SimBaby, and SimNewB
(Fig.10). SimMan 3G View can be used as well
(Fig.11). By default, the scenario will be paused.
If you wish to run the scenario at this time, press
the space bar or select the Start session button.
Fig.9
Fig.11
Patient Monitor Setup
1. Once the laptop is powered on, you must login to
each computer. Type in the password
“SimMan3G” (case sensitive)
2. Click the “Patient Monitor” icon (Fig. 12) and the
“Select Manikin” box (Fig.13) will open. When
using the software but not the manikin, choose the
virtual manikin. If running scenarios, click on the
manikin named in a format like SimMan3glltp”
3. The patient monitor should now appear on the
Patient Monitor PC. It functions exactly like the
monitor for the rest of the “sim family”
Fig.12
Fig.13
Debriefing after a Scenario
1. Click on the “End Session” button in the lower
left corner of the GUI and the “End Session” box
(Fig.14) will appear. You have multiple choices at
this time:
2. Click “Save Session” if saving for debriefing on
another laptop
3. Click “Debrief” to debrief on the Instructor PC.
4. Click “Start new session” to start a new scenario
without saving
5. Click “Quit” to close the instructor application.
Fig.14
9
User’s Guide For SimMan 3G (Nov 2010)
Shutting down the Manikin and Laptops (Page 4/4)
1. At the Patient Monitor laptop, scroll the mouse icon to the Main Setup button on
the lower right hand side of the screen. Left click the button, another window will
pop up, and select “Shutdown Monitor” from this window. Another window will
pop up again and select “Really shutdown”. The patient monitor program will
now close. Turn off the laptop as you would any other computer.
2. At the Instructor laptop, scroll the mouse icon to the upper left hand side of the
screen. Select File, and Exit. A window will pop up asking you if you want to
quit without saving. Select Yes. The instructor application will now close. Turn
off the laptop as you would any other computer.
3. At the manikin, press the power button located on the lower left side of the
manikin’s stomach. Wait about 30 seconds and the manikin should power down.
4. Open up the air tank drain valve on the backside of the upper right leg (Figs.3&4
on page 1) You will hear a rush of air.
5. Store your manikin as appropriate with the policies of your facility.
**If you have fluid inside your manikin for secretions, you will need to drain this
before you turn off power to the manikin (Explained further in another section).
10
7a
7b 7c
SimMan 3G GUI Orientation
2
3
1
4
8a
8b
11 12
13
10
1.
2.
3.
4.
5.
6.
7.
8c
5
6
9
Respiratory & Airway Control
Instructor Monitor Control
Cardiac Rhythm Control
Circulation & Fluid Control
Eyes Control
Sounds & Vocal Control
Event Windows
a. ABC
b. Miscellaneous
c. Medication
*
8. Trends
a. History
b. Future
c. Parameters
9. Debrief Log
10. Scenario Control
11. Running Trends
12. Running Handlers
13. Trend & Handler Control
* Press the “Speak” button on the GUI or press and hold F5 to talk for SimMan.
When the “Speak” button turns green, your voice is being transmitted to SimMan
11
Orienting Simulation Participants to Sim Man 3G – 15 minutes
1. Take the time to do a thorough orientation. If participants do not know the limitations of the simulator and what
represents abnormal, they will be less likely to respond to critical cues. You may do a less thorough orientation
depending on the training level of participants and the complexity of the case.
2. ALWAYS USE GLOVES WHEN TOUCHING SIMMAN!!! OUR SKIN OILS CAN DAMAGE HIS SKIN
3. If there is a critical cue, be sure to cover it in your orientation. E.g. if a case involves a pneumothorax, be sure the
physician has the opportunity to hear what it sounds like when one lung is down.
4. The biggest limitation of the simulator is what is defined as responsive vs. unresponsive. We all know what a real
unresponsive patient looks like, but SimMan 3G is always cold, pale, and does not move. Remind participants that as
long as SimMan 3G responds to cues with a verbal response, than he is responsive. The moment he no longer
speaks, he is by definition, unresponsive.
5. Start at the head and work down. Consider using ABC approach so that you cover all the critical features of SimMan
3G.
HEAD
a. Eyes – Eyes blink, eye lids can be half open, closed, one open and one closed. Pupils accommodate to light and the size
of his pupils are adjustable
b. Fluids – Sweat from forehead, tears, runny nose, droll/froth from mouth, and fluid from ears
c. Intubation – if connected to CO2 tank, remind them to use EZCAP
d. Tongue edema, oropharyngeal edema, trismus,
e. Laryngospasm is possible – remind them not to force tube past cords to avoid damaging mannequin.
f. Soft teeth can be changed out for hard teeth
NECK
a. Decreased cervical range of motion
b. Cricothyrotomy possible
c. Carotid pulses – remember all pulses require firm pressure to “activate” sensors.
CHEST
a. Speakers for heart sounds, lung sounds are major limitation and participants should be given opportunity to hear
normal vs. abnormal. Giving all participants time to listen is time-consuming but usually worthwhile. If time is
short, limit demo to physicians
b. The auscultation feature of Sim Man 3G will stop all internal noise except for body sounds that can be ascultated
c. Lung speakers- be sure to demo: normal, wheezes, rales/ronchi, and what absent sounds are like. Recommend one side
set as normal and the other abnormal and cycle participants through both
d. Heart sounds are limited in value and would recommend against diagnosis or critical actions being based on abnormal heart
sounds.
e. Needle thoracostomy possible bilaterally
f. Monitor leads – 4 chest leads, these will send signal to wherever the leads are connected in addition to touch screen
monitor
g. Defibrillation,etc.
i. There are 2 contacts for attaching adaptors for electricity. Participants should actually charge and deliver shock and pace
ii. There are metal discs (kept in tool bag) that can be used if you wish to use defibrillator paddles
ABDOMEN
a. Bowel sounds are possible – again demo the speaker if necessary.
b. Fluid tank can be filled and Foley catheter can be placed. Urination is possible if fluid tank is filled
c. Male or female genitalia can be used.
EXTREMITIES
a. “Wet arm” – RUE is only location for IV access (The IV is already started and no additional IV access is possible with
3G). IV access can be used for IV fluids and medications.
b. Pulses- Bilateral radial, Left arm brachial, bilateral femoral, bilateral popliteal, pedialis, and tibialis.
c. Speaker in L antecubital fossa can be used for manual BP measurement- this requires calibration with laptop and unless
12
you are particularly interested in this skill, would not recommend using it.
Updated 12/11
Touch Screen Monitor Orientation
This monitor may function differently than
monitor used in the participants’ clinical care
area and can therefore, become an additional
challenge during the scenario.
1
It is therefore important to go over the
function of this monitor BEFORE starting any
scenarios. You should be ready to help them
during the scenario if they are struggling
with the monitor.
2
3
ZOOM
4 5
1. Attach cardiac leads and then touch here
2. Connect SimMan or SimBaby pulse
oximeter. Waveform & reading will occur
without touching screen. Be sure to cover
loss of waveform due to displacement of
pulse oximeter vs. BP which is too low i.e.
“Saturation Signal Low”
3. Connect BP cuff and touch here. Once
cuff attached, press “Start/Stop” on lower
menu bar and BP will be displayed
4. Press “12 Lead ECG” and this will be
displayed
5. Press double right arrows to open
additional menu bar with options noted
below
6. The radiology button displays images if
they have been included in the scenario.
If not, a request will come to the GUI
operator for a study.
6
13
Displaying Radiology Images during Scenarios
(Sim Man 3G Only)
1
1. Left click the “File” drop down menu in the left
upper corner of the GUI (figure 1)
2. Select “Transfer media files.” This will open
the “Media Files” window (figure 2)
2
Figure 1
3
Figure 2
3. Select the appropriate media
tab – in this case, “Radiology”
will be used
4. Select the “Add files” button.
This will open the “Open”
window (figure 3) which allows
you to choose the type of
radiology image.
4
5
Figure 3
6
Figure 4
7
8
9
5. Select the file folder with the desired
image – in this case, “Normal Pelvis”.
Then choose the desired image in that
folder
6. Once the file has been selected, it will
be shown in the “Transfer media files”
window (figure 4)
7. The selected file will be also be
displayed in the “Preview window”
8. To send the file immediately to the
patient monitor, keep the “Show
immediately when transfer” box
checked and select “Transfer to
learner’s monitor” (If the box is
unchecked, participants will have to
manually bring up the radiology on the
patient monitor)
9. Select “Close” when done
14
Importing Scenarios into Sim Man 3G
(Vista Computers)
1. Right click the Start
button and select Explore
from the menu
2. Double left click
SimMan3G
3. Double left click
Documents
4. Double left click
SimMan3G
5. Double left click
userdata
6. Double left click
scenarios
7. Copy and paste the imported scenarios to the window on
the right side of the screen
8. You can now run the scenarios with the Instructor
Application software
15
Importing Radiology, etc.. into Sim Man 3G
(Vista Computers)
1. Right click the Start
button and select Explore
from the menu
2. Double left click Program Files
3. Double left click Laerdal Medical
4. Double left click Sim Man 3G
5. Double left click ri
6. Double left click userdata_common
(you will have a choice of media, vocal
sounds, or X-ray folders)
7. Double left click X-ray, etc…
8. Double left click the appropriate
folder to contain your media
9. Copy and paste the imported media
to the window on the right side of the
screen
10.Your imported media is ready for the
next time you run a scenario
16
SIM MAN 3G
4-
2-
1-patient
monitor
w/ cords
unit w/
tubing
5- blood
concentrate
3635- IM
2gown
6- Arm
11
-black
handle
Cricothyroid
tape
34
10
gray
belt
Head
phones
38-
pneumothorax
bladders
1-Sim
Man 3G
9-fluid fill
fill unit
w/tubing
scenarios
w/wheels
3-
instructor
pc w/
cords
8- blood
7-
6-board
camera
w/ stand
37-patch
12-guide
cable
/references
large tool
set
Drain
w/blue
tubing
3- B/P
cuff w/
cords
5-Power
Cord
pads
13-
33- arm
shirt
adapter
4-Gray
Cable
32-defib
14-
16-logitech
electrode
pants
cd
15boxers
31- sm
tool set
30
-Inline
fluid
filters
29-
28-
27-
B/P
case
teeth
gray
cord
26-
25-
24-Lg
O-rings
neck
skin
Black
cord
23perineum
22-
21-
pleura
/chest
drain
genitals:
Penis /
Vagina
20-
19-
18-
wounds
probe
interface
kit
17
logitech
guide
pulse
ox
17
Sim Man 3G
1
6
4
2
1
2
6
3
33
9
10
38
11
37
36
35
5
8
5
34
3
7
12
32
4
13
31
30
14
29
28
27
23
25
26
Date:
Checked out to:
Checked in by:
Checked out by:
Checked in to:
Inventory:
Inventory:
Verified by:
Verified by:
Comments:
Returning on:
20 – Pulse Ox
21 – Genitals
Penis
Vagina
22 – Pleura / Chest
Drain
23 – Non Gender
Perineum
24 – Large Black Cord
25 – Neck Skin
26 – O-rings (yellow)
27 – Gray Cord
28 – Teeth
29 – B/P case
30 – In-line Fluid
Filters
31 – Small tools
32 – Defib electrode
33 – Arm Adapter
34 – Pneumothorax
bladders
35 – IM pads
36 – Large Tools
37 – Patch Cable
38 – Cricothyroid Tape
(green)
Not Pictured :
Lubricant
Drug Binder
21
18
19
15
17
16
Check In:
Date:
(Accessory Box continued)
22
24
Check Out:
SimMan 3G ( 1 of 2 ):
1 – SimMan 3G
2 – Gown
3 – B/P Cuff
4 – Gray Cable
5 – Power Cord
6 – Arm Drain
(attached blue
tubing)
Accessory Box ( 2 of 2 ):
1 – Patient Monitor w/
power cord
2 – Instructor PC w/
power cord
3 – Headphones
4 – Camera w/stand
5 – Blood Concentrate
6 – Board w/wheels
7 – SimMan Scenarios
8 – Blood Fill Unit w/
pink tubing
9 – Fluid Fill Unit w/
blue tubing
10 – Gray Belt
11 – Black handle
12 – Guide/references
13 – SimMan Shirt
14 – SimMan Pants
15 – SimMan Boxers
16 – Logitech CD
17 – Logitech Guide
18 – Probe Interface
19 – Wounds Kit
20
SimMan 3G ( 1 of 2 ):
1 – SimMan 3G
2 – Gown
3 – B/P Cuff
4 – Gray Cable
5 – Power Cord
6 – Arm Drain
(attached blue
tubing)
Accessory Box ( 2 of 2 ):
1 – Patient Monitor w/
power cord
2 – Instructor PC w/
power cord
3 – Headphones
4 – Camera w/stand
5 – Blood Concentrate
6 – Board w/wheels
7 – SimMan Scenarios
8 – Blood Fill Unit w/
pink tubing
9 – Fluid Fill Unit w/
blue tubing
10 – Gray Belt
11 – Black handle
12 – Guide/references
13 – SimMan Shirt
14 – SimMan Pants
15 – SimMan Boxers
16 – Logitech CD
17 – Logitech Guide
18 – Probe Interface
19 – Wounds Kit
(Accessory Box continued)
20 – Pulse Ox
21 – Genitals
Penis
Vagina
22 – Pleura / Chest
Drain
23 – Non Gender
Perineum
24 – Large Black Cord
25 – Neck Skin
26 – O-rings (yellow)
27 – Gray Cord
28 – Teeth
29 – B/P case
30 – In-line Fluid
Filters
31 – Small tools
32 – Defib electrode
33 – Arm Adapter
34 – Pneumothorax
bladders
35 – IM pads
36 – Large Tools
37 – Patch Cable
38 – Cricothyroid Tape
(green)
Not Pictured :
Lubricant
Drug Binder
Verified by:
Verified by:
Comments:
[email protected] / OC Staff Education /18March 2010
This page is intentionally left blank
19