1
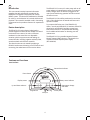
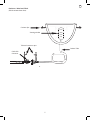
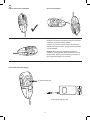
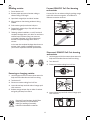
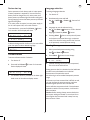
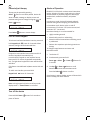
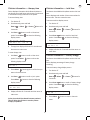
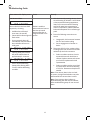
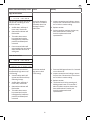
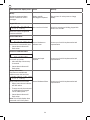
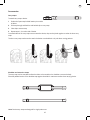
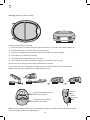
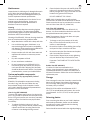
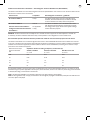
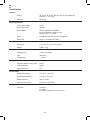
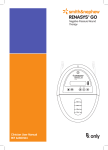
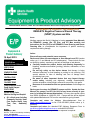
Alberta Health Services, news and recommendations about clinical equipment and products. EQUIPMENT & PRODUCT INFORMATION RENASYS Negative Pressure Wound Therapy (NPWT) System and Kits Issue Medigas reports that Smith & Nephew is issuing amended User Manuals for RENASYS pumps (Go, EZ Plus, and EZ Max models) and Instructions for Use (IFU) for all RENASYS Foam Dressing and Gauze Dressing Kits, to re-emphasize the importance of patient monitoring requirements during therapy. Action 10 April 2015 Information ZONES/Sites Clinical Areas Affected: NORTH ZONE ALL sites EDMONTON ZONE ALL sites CENTRAL ZONE ALL sites CALGARY ZONE Foothills Medical Centre South Health Campus SOUTH ZONE Brooks Health Centre Medicine Hat Regional Hospital ALL clinical areas (including Community Services, Home Care, Seniors Health, Long Term Care, Ambulatory Care) Contact: Ensure all users and potential users are aware. Review and follow the amendments to User Manuals and IFU (vendor notice, pp. 1-2, and Manual and IFU attachments). These include, but are not limited to, patient monitoring, and lack of blockage or leak alarms: Carefully monitor the patient, device and dressing frequently for bleeding, exudate accumulation (pooling), infection, maceration, or loss of therapy. Do not rely solely on the device alarms that therapy is being delivered effectively or that bleeding or pooling is not occurring. Pay special attention to risks of bleeding and loss of therapy when considering home use. Be aware of other important factors that may impact therapy and/or safety, including port alignment, exudate characteristics, canister orientation, tubing height, removal of wound filler, skin grafts. Be aware of circumstances that can prevent alarms for blockages or leaks. Review your inventory for RENASYS pumps and kits. Update the User Manual (for pumps), and IFU (for kits) for any items currently in your area, by printing the relevant attachments. You may also request copies from Smith & Nephew at 1-800-876-1261. Pumps and kits will be shipped with updated Manuals and IFU from the manufacturer, going forward. Complete and return the Medigas Acknowledgement form to [email protected] or fax 1-416-365-0092 (vendor notice, p. 4, attached). Complete and return the attached E&P Advisory Response Form to [email protected] or fax# 403-955-9981. If you are not a user of these products, no response is required. Holly Meyer, MSc, Director - AHS Product Quality and Safety, Phone: 403-955-9923 [email protected] Wound Management Smith & Nephew Inc. 2280 Argentia Road Mississauga, Ontario L5N 6H8 Canada T 905 813 7770 F 905 813 7775 www.smith-nephew.com February 26, 2015 DEVICE CORRECTION RENASYS™ Devices Amended User Manuals / Instructions for Use Dear Customer: Following a recent review of post marketing surveillance information regarding our RENASYS range of Negative Pressure Wound Therapy (NPWT) devices, Smith & Nephew is issuing a Device Correction Notice to announce the implementation of amended User Manuals for the RENASYS Go (66800164), RENASYS EZ Plus (66800697) and RENASYS EZ Max (66801309) devices and amended Instructions for Use (“IFU”) for the RENASYS Foam & Gauze Dressing Kits to re-emphasize the importance of patient monitoring requirements during negative pressure wound therapy. PLEASE NOTE THAT THIS CORRECTION DOES NOT REQUIRE ANY RETURN OF RENASYS NPWT PRODUCTS. The User Manuals / IFU amendments will remind customers that the dressing is to be checked regularly to ensure that pooling is not occurring beneath the dressing and remind users not to rely solely on the device alarms to ensure that therapy is being effectively delivered. The essential elements of the revised User Manuals / IFU are provided in this letter and the amended User Manuals / IFU are available upon request. The revised User Manuals / IFU will include the following “Important information” section: Important information Monitoring NPWT Carefully monitor the patient, device and dressing frequently, to determine if there are any signs of bleeding, exudate accumulation (pooling), infection, maceration, or loss of Negative Pressure Wound Therapy (NPWT). The frequency should be determined by the clinician based on individual characteristics of the patient and wound. NPWT devices are not designed to detect or issue an alarm condition based on the presence of bleeding or pooling. These conditions may only be detected by frequent monitoring. Special attention to the risks of bleeding or loss of NPWT should be considered when prescribing for use in the Home Environment. Page 1 of 3 NPWT may be impacted by various conditions related to system configuration, set-up and individual characteristics of the patient and wound (e.g. exudate characteristics, patient anatomy). Alignment of the port to the opening in the drape, use of a bridging technique and choice of dressing configuration based on wound characteristics may impact NPWT vacuum delivery over the course of therapy. Exudate volume, viscosity and consistency may influence fluid removal or occlusion formation. A full canister, incorrect canister orientation and device/tubing height relative to the wound can contribute to loss of NPWT and exudate accumulation within the wound, which could lead to maceration, infection, or unrecognised bleeding. Monitor the wound for infection and ensure that all wound filler is removed at each dressing change to reduce the risk of infection. Skin grafts should be closely monitored to ensure NPWT is being delivered. The revised User Manuals / IFU will also include the following “Cautions” for blockage alarms and leak alarms: Caution – Lack of Blockage alarm: If partial blockage occurs, the change in pressure status detected by device may not be significant enough to trigger alarm activation. Over time if blockage reaches point of full occlusion, complete blockage alarm will activate. Blockage formation within the wound dressing will not be detected by the system as it has occurred outside of the monitored vacuum circuit, but can affect pressure status at the wound. Appropriately frequent monitoring of wound dressing is recommended to confirm adequate delivery of therapy. In the event of heavy or viscous drainage, drainage with sediment or when blood is present, regular monitoring and more frequent dressing changes may be required. If a complete blockage is present in the system, but an air leak occurs between blockage and device, the alarm may not activate. Ensure all connections are secure and no air leaks are present in system. Potential sources of air leaks include: Misplaced or worn O-ring on the RENASYS GO device inlet port, located between the device and canister Partially inserted in-line bacterial overflow guard on the RENASYS EZ/EZ PLUS/EZ MAX devices Tear in Soft Port Misplaced or worn O-ring within the quick click connector (between the Soft Port and canister tubing) Cracked or damaged canister Caution – Lack of Leak alarm: Under specific circumstances, a significant air leak may occur in system without device activating a high flow/leak alarm. This may be due to partial blockage between source of air leak and device, prohibiting detection of the leak by device, resulting in no alarm activation. Potential sources of blockage include: Physical occlusion in wound dressing (coagulated blood or purulent material in filler, compacted filler, high volume viscous fluid) Physical occlusion in tubing (kink in canister tubing, clot in tubing) Soft Port aperture misaligned to dressing opening. Check wound dressing regularly to ensure it is fully compressed and firm to the touch. Page 2 of 3 *smith&nephew RENASYS™ GO Negative Pressure Wound Therapy *smith&nephew RENASYS™ GO Negative Pressure Wound Therapy 300ml 200ml 100ml 50ml Clinician User Manual REF 66800164 only w EN Clinician User Manual only Table of contents Introduction4 Starting therapy 13 Device description 4 Pause/adjust therapy 14 Features and functions 4 Lock or unlock the keypad 14 Important information Monitoring NPWT Turn off the device 14 7 Modes of operation 14 Indications for use 7 Clinician information – therapy time 15 Clinician information – total time 15 Clinician information – battery charge 15 Battery power 16 Troubleshooting guide 18 Contraindications7 Warnings 7 Precautions8 Physician orders 9 Glossary of symbols 10 Dressing changes 11 Canister selection 11 Installing canister 12 Removing or changing canister 12 Connect RENASYS Soft Port dressing and canister 12 Accessories25 Maintenance27 Device replaceable components 27 Storage27 Returning device 27 Electromagnetic compatibility 28 Specifications29 Disconnect RENASYS Soft Port dressing and canister 12 Caution statements 30 Device start up 13 Limited warranty 31 Software version 13 Global customer assistance Language selection 13 xxx EN Introduction The RENASYS GO runs on AC mains power with an AC power adaptor or internal battery power. The internal battery charges when the device is plugged into AC mains power both during operation and when turned off and not in use. This user manual contains important information regarding the safe and effective operation of the RENASYS™ GO Negative Pressure Wound Therapy (NPWT) system. This device (REF 66800164) is intended for use by or on the direction of a trained and licensed physician. This manual is intended to aid in the training of personnel and to provide a reference for experienced users. The RENASYS GO should be positioned no more than 19in or 50cm higher than the wound and face user's/ operator's location. For proper and effective use of the RENASYS GO device, use only with RENASYS GO canisters, RENASYS dressing kits and RENASYS ancillary componentry. Refer to instructions for use provided with dressing kits for additional information on dressing use and maintenance. Device description The RENASYS GO suction device is designed to provide Negative Pressure Wound Therapy to a closed environment over a wound, in order to evacuate exudates from the wound site to a disposable container, which may promote wound healing via removal of fluids, including irrigation and body fluids, wound exudates and infectious materials. The RENASYS GO is a portable Negative Pressure Wound Therapy (NPWT) device. It is designed to be used with Smith & Nephew power supply (REF 66800161). The closed environment is created by applying a RENASYS sterile wound dressing to the wound site and connecting the sealed wound to the suction device. Features and functions User interface Status/alarm indicator Power button Display screen Battery status indicator Start/pause therapy and select Up and down selectors Keypad lock O-ring Inlet port 4 Audio pause EN Canisters • 300ml and 750ml (300ml canister shown here) Canister clips 300ml 200ml Viewing window 100ml 50ml Tethered connector caps Canister Tube Quick click connector ! 50ml 100ml 200ml 300ml 5 EN Proper use/correct orientation Incorrect orientation X X *smith&nephew GO RENASYS™ Pressure Wound Negative Therapy Negative Pressure Therapy ephew *smith&n ™GO RENASYS Wound ✓ Negative Therapy *smith&nephew O RENASYS™G Pressure Wound RENASYS™ GO device may also be used in a horizontal orientation, with device facing upward. Negative Therapy ew *smith&nephS™GO RENASYPressure Wound However, to maximize canister volume and optimize canister over-capacity alarm, upright device orientation is recommended. Caution: When device is operating in horizontal orientation, facing upward, alarm functionality may be compromised. Monitor wound dressing to ensure it is fully compressed and firm to the touch. Power inlet and power supply ephew *smith&n O RENASYS™G Pressure Wound Negative Therapy AC mains power inlet Power supply with DC cord 6 EN Important information Monitoring NPWT Contraindications Use of RENASYS GO is contraindicated in the presence of: • Untreated osteomyelitis • Exposed arteries, veins, organs or nerves • Necrotic tissue with eschar present • Malignancy in wound (with exception of palliative care to enhance quality of life) • Non-enteric and unexplored fistulas • Anastomotic sites Carefully monitor the patient, device, and dressing frequently to determine if there are any signs of bleeding, exudate accumulation (pooling), infection, maceration, or loss of Negative Pressure Wound Therapy (NPWT). The frequency should be determined by the clinician based on individual characteristics of the patient and wound. NPWT devices are not designed to detect or issue an alarm condition based on the presence of bleeding or pooling. These conditions may only be detected by frequent monitoring. Warnings Special attention to the risks of bleeding or loss of NPWT should be considered when prescribing for use in the Home Environment. 1. Carefully monitor patients for signs of bleeding, which may lead to interruption in therapy and hemodynamic instability. If such symptoms are observed, immediately discontinue therapy, take appropriate measures to control bleeding, and contact treating clinician. NPWT may be impacted by various conditions related to system configuration, set-up and individual characteristics of the patient and wound (e.g. exudate characteristics, patient anatomy). Alignment of the port to the opening in the drape, use of a bridging technique and choice of dressing configuration based on wound characteristics may impact NPWT vacuum delivery over the course of therapy. Exudate volume, viscosity and consistency may influence fluid removal or occlusion formation. A full canister, incorrect canister orientation and device/tubing height relative to the wound can contribute to loss of NPWT and exudate accumulation within the wound, which could lead to maceration, infection, or unrecognized bleeding. 2. Patients suffering from difficult hemostasis or who are receiving anticoagulant therapy have an increased risk of bleeding. During therapy, avoid using hemostatic products that, if disrupted, may increase the risk of bleeding. 3. Do not use directly on exposed blood vessels or organs. Sharp edges such as bone fragments must be covered or removed prior to initiating therapy, due to risk of puncturing organs or blood vessels drawn closer under the action of negative pressure. Monitor the wound for infection and ensure that all wound filler is removed at each dressing change to reduce the risk of infection. 4. NPWT has not been studied on pediatric patients. Patient size and weight should be considered when prescribing the device. Skin grafts should be closely monitored to ensure NPWT is being delivered. 5. Foam or gauze must not be tightly packed or forced into any wound area. Over-packing may interfere with distribution of NPWT evenly across the wound. This may decrease the ability of the wound to properly contract and permit exudate to remain in wound. Review Contraindications, Warnings & Precautions before use. Indications for use 6. In the event defibrillation is required, disconnect device from wound dressing prior to defibrillation. Remove wound dressing only if its location will interfere with defibrillation. RENASYS™ GO is indicated for patients who would benefit from a suction device (Negative Pressure Wound Therapy), as it may promote wound healing via removal of fluids, including irrigation and body fluids, wound exudates and infectious materials. 7. Device is not MRI compatible. Do not bring device into MRI suite. Prior to entering MRI suite, disconnect device from dressing. Dressing can remain intact on patient. Appropriate wound types include: • Chronic • Acute • Traumatic • Sub-Acute and dehisced wounds • Ulcers (such as pressure or diabetic) • Partial-thickness burns • Flaps and grafts 8. Device is unsuitable for use in areas where there is danger of explosion (e.g., hyperbaric oxygen unit). 7 EN 9. When operating, transporting or disposing of device and accessories, there is risk of infectious liquids being aspirated or contamination of device assembly through incorrect use. Universal precautions should be observed whenever working with potentially contaminated components or equipment. 7. In the event a patient with spinal cord injury experiences autonomic dysreflexia, discontinue use of NPWT and immediately seek medical assistance. 8. When treating enteric fistulas, do not place NPWT dressing in direct contact with exposed bowel. Cover the wound bed, including fistula opening, with non-adherent gauze or with one layer of saline moistened gauze. During the course of treatment patient’s fluid levels must be closely monitored. 10. Device and canister kits are provided non-sterile and should not be placed within a sterile field. Precautions 9. Avoid use of circumferential dressings except in cases of oedema or heavily exuding extremities, where this technique may be necessary to maintain a seal. Consider using multiple drapes to minimize risk of decreased distal circulation. Regularly assess distal pulses, and discontinue therapy if changes in circulation are detected 1. More frequent device and wound dressing monitoring, should be taken for patients who are or may be: • Suffering from infected blood vessels • Receiving anticoagulant therapy or platelet aggregation inhibitors, in addition to patients with intrinsic coagulation problems such as low platelet counts • Actively bleeding or have friable blood vessels or organs • Suffering from difficult wound hemostasis • Untreated for malnutrition • Noncompliant or combative • Suffering from wounds in close proximity to blood vessels or delicate fascia 10. Monitor patient for any signs of local or systemic infection. Infected wounds may require more frequent dressing changes. As NPWT is not intended to directly treat infection, if there are any signs of systemic infection or advancing infection at wound area, contact treating clinician immediately. 11. If multiple pieces of foam or gauze are needed to fill the wound profile, count and record how many pieces are present to ensure all pieces are removed at a dressing change to minimize the risk of retention and possible infection. When monitoring patients for delivery of therapy, ensure wound dressing is free of air leaks, fully compressed and firm to the touch. 12. NPWT should remain on for duration of treatment. The length of time a patient may be disconnected from device is a clinical decision based on individual characteristics of patient and wound. Factors to consider include location of wound, volume of drainage, integrity of dressing seal, assessment of bacterial burden and patient’s risk of infection. 2. As a condition of use, device should only be used by qualified and authorized personnel. User must have necessary knowledge of the specific medical application for which NPWT is being used. 3. For patients with high risk of bleeding use 300ml canister. Ensure the 300ml canister viewing is checked frequently for signs of bleeding. 13. Do not use a dressing kit with breached or damaged packaging. 14. Use of NPWT presents a risk of tissue in-growth. Tissue in-growth may be reduced by reducing therapy pressure, using a wound contact layer or increasing the frequency of dressing changes. 4. In the event of heavy or viscous drainage, drainage with sediment or when blood is present, regular monitoring and more frequent dressing changes may be required to reduce the risk of interruption of therapy, maceration, infection, and ensure proper exudate removal. 15. NPWT should not be painful. If patient reports discomfort, consider reducing pressure setting and use of a wound contact layer. Pressure setting is a clinical decision based on individual characteristics of patient and wound. Factors to consider include location of wound, volume of drainage and integrity of dressing seal. 5. Underlying structures, such as bone, tendons, ligaments and nerves should be covered with natural tissue or a non-adherent dressing layer prior to applying the NPWT dressing to ensure protection and minimize the risk of damage from direct contact with the dressing. 16. Maintain regular monitoring of device and wound site during therapy to ensure therapeutic treatment and patient comfort. 6. To minimize the risk of bradycardia, do not place NPWT in proximity to the vagus nerve. 8 EN 17. Device is only to be used with Smith & Nephew authorized components. Use of any other products have not been proven safe and effective with RENASYS™ GO device. 28.As with all adhesive products, apply and remove dressing carefully from sensitive or fragile skin to avoid blistering and skin stripping, especially after frequent dressing changes. Use of skin sealant may assist with protection of periwound skin. 18. Ensure canister tubing and RENASYS Soft Port are installed completely and without any kinks to avoid leaks or blockages in vacuum circuit. Position device and tubing appropriately to avoid risk of a trip hazard. Device and system tubing should be positioned no more than 19 inches or 50cm higher than the wound to ensure optimization of therapy and prevent therapy interruption. 29.If patient must be disconnected, the ends of the RENASYS Soft Port and canister tubing should be protected using tethered caps to avoid leakage of fluid and cross contamination. Physician orders Prior to placement of RENASYS GO, the medical professional treating the wound must assess how to best use the system for an individual wound. It is important to carefully assess wound and patient to ensure clinical indications for Negative Pressure Wound Therapy (NPWT) are met. 19. When bathing or showering patient must disconnect from device, protecting both ends of RENASYS Soft Port tubing using tethered caps. Ensure aeration disc located near quick click connector is free of moisture before reactivation of therapy to ensure proper alarm functionality and prevent interruption in therapy. All orders should include: • Wound location, size and type • Smith & Nephew wound dressing kit • Pressure settings • Frequency of dressing changes • Adjunctive dressings 20.If any liquids penetrate device, discontinue use and return to your Smith & Nephew authorized provider for service. 21. CT scans and x-ray have the potential to interfere with some electronic medical devices. Keep device out of x-ray or scanner range. 22.Use caution if device is used in the presence of a flammable anesthetic mixture with air or with oxygen or nitrous oxide. 23.AC mains power can only be removed by disconnecting power cord or AC power adaptor. Take care in positioning the device to allow access to cord receptacle. 24.If power cord is damaged, wires are frayed or exposed, do not use power cord. Contact your Smith & Nephew representative for a replacement cord. 25.Canisters should be changed at least once a week, whenever there is a change in patient or in the event that canister contents reach maximum volume indication (300ml or 750ml fill line). Do not wait for the canister over-capacity alarm to activate to change canister. 26.Canisters kits are single use devices. Do not reuse. 27. Do not apply SECURA™ No-sting barrier film wipes directly to open wounds. SECURA No-sting barrier film is flammable. Use in a well ventilated area. Avoid using around flames and sources of ignition Keep out of reach of children. For external use only. 9 EN Glossary of symbols Keypad lock Locks keypad to restrict accidental adjustment of therapy. When activated, the light will illuminate solid blue. Power Turns device ON and OFF. Battery indication Shows status of device battery life. Audio pause Pauses alarm for approximately 2-3 minutes. When activated the light will illuminate and flash yellow. Up selector Allows pressure setting to be increased and scroll through menu options. If a new alarm occurs, the audio pause will cancel. (This feature available with software version 0.66 and later). Down selector Allows pressure setting to be decreased and scroll through menu options. Start/pause therapy and select Starts or pauses therapy. It is also used to confirm settings within therapy. Equipment Classification Isolation type BF applied part Single Use Do not reuse European Representative CSA International Classification Keep Dry Lot Number EU: Not for general waste Storage Temperature Serial Number Refer to instruction manual/booklet Date of Manufacture Product Catalogue Number Caution: Follow instructions for use Manufacturer CE Mark Do not use if package is damaged MR MRI Unsafe 10 only Caution: U.S. Federal law restricts this device to sale by or on the order of a physician EN Dressing changes Canister selection Refer to instructions for use provided with dressing kits for additional information on dressing use and maintenance. Device is to be used with RENASYS™ GO 300ml or 750ml canisters. RENASYS GO canisters use an integral two stage bacterial filter for protection of device against overflow and spread of aspirated micro-organisms. 1. Foam dressings should be changed every 48 to 72 hours after the initial application of therapy. If no leak is present and the patient is comfortable, subsequent dressing changes should occur no less than 3 times per week. Canisters are designed for single patient use. Do not re-use. Canisters are provided non-sterile and should not be used in a sterile field. 2. Gauze dressings should be changed 48 hours after the initial application of therapy. If no leak is present and the patient is comfortable, subsequent dressing changes should occur 2–3 times per week. Canisters should be changed at least once a week, whenever there is a change in patient or in the event the canister contents reach maximum volume indication (300ml or 750ml fill line). Do not wait for alarm activation to change canister. 3. In the event of heavy or viscous drainage, drainage with sediment or when blood is present, regular monitoring and more frequent dressing changes may be required. Canisters may have to be changed regularly within single-patient treatment episodes if exudate levels are high. Check canisters regularly to monitor exudate levels, ensuring they are below maximum volume indication (300ml or 750ml fill line). 4. When dressing a wound involving a difficult to seal anatomy or exposure to external moisture, frequent inspection of dressing is recommended to ensure a seal is maintained. Ensure wound dressing is fully compressed and firm to the touch. Check canister for any signs of cracks or damage. If noted, discard and replace canister. Ensure canister viewing window is checked frequently for signs of bleeding. 5. Ensure all wound filler material placed in the wound has been removed before redressing the wound. If foam dressing adheres to the wound, apply saline into the wound dressing and let it set for 15–30 minutes before gently removing the foam. Appropriately discard used wound dressings observing your institution’s protocol for medical waste handling. For patients with high risk of bleeding, use 300ml canister. 6. As with all adhesive products, apply and remove dressing carefully from sensitive or fragile skin to avoid skin stripping, especially after frequent dressing changes. Use of skin sealant may assist with protection of periwound skin. 7. Monitor patient for any signs of local or systemic infection by checking dressing frequently. Infected wounds may require more frequent dressing changes. As NPWT is not intended to directly treat infection, if there are any signs of systemic infection or advancing infection at wound area, contact treating clinician immediately. 11 EN Installing canister Connect RENASYS™ Soft Port dressing and canister 1. Ensure device is off. Connect Soft Port to canister tubing by pushing orange quick click connectors together. An audible click indicates connection is secure. 2. Remove paper tape around canister tubing to release tubing to full length. 3. Open both orange clips on sides of canister. 4. Align canister so that viewing window is facing forward. 5. Push canister gently over device inlet port. 6. Engage both canister clips. Clips will click when properly engaged. 7. Following canister installation, to verify functional complete blockage alarm, turn device on and insert tethered cap of canister tubing into connector to simulate a blockage. A functional device will activate a complete blockage alarm within 5 minutes. In the case that complete blockage alarm does not activate, check canister installation and contact your Smith & Nephew authorized representative. Note: Do not cover aeration disc. Disconnect RENASYS Soft Port dressing and canister 1. Hold orange quick click connector above wound to help ensure exudate does not leak from tubing. *smith&nephew RENASYS™ GO Negative Pressure Wound Therapy *smith&nephew RENASYS™ GO Negative Pressure Wound Therapy *smith&nephew RENASYS™ GO Negative Pressure Wound Therapy *smith&nephew RENASYS™ GO 2. Turn device off. Negative Pressure Wound Therapy 3. Disconnect canister tubing from Soft Port. 300ml 300ml 300ml 200ml 100ml 200ml 100ml 200ml 100ml 50ml 50ml 50ml Removing or changing canister 1. Hold orange quick click connector above wound to help ensure exudate does not leak from tubing. 2. Turn device off. 3. Disconnect canister tubing from Soft Port. 4. Insert tethered cap into both sides of orange quick click connector. 5. Release orange canister clips on sides of canister and gently pull away from device. 4. Insert tethered cap into both sides of orange quick click connector. Disposal of used canisters should follow facility protocols or local ordinances relating to handling of potentially infected or biohazardous materials. 12 EN Device start up Language selection Device operates on both battery and AC mains power. To change language selection: If battery operation is required for first use of device, battery must be charged from AC mains power until battery status top indicator light illuminates solid green. During charging process the battery status top indicator light will flash green. 1. Turn device off. 2. Simultaneously press and hold Up To activate device, press and hold Power for 2 seconds. Device display will show: W e l c o m e S t a r t i n g + Power buttons for 2 3. Language can now be selected using button Up and Down buttons to scroll to desired language, followed by Select V X . X X 4. Pressing Select button. button at this point will power on the device at a preset 80mmHg in continuous mode, if the device is being used for the first time, or the previously entered pressure setting. S t a n d b y ► 1 0 0 mmH g If device is being used for the first time, the user will be given the option to select desired language: Starting therapy ►E n g l i s h D a n s k 1. Select prescribed pressure setting using Up Software version and Down 2. Press Select To access software version of a device: buttons. button to start therapy. C o n t i n u o u s ► 1 0 0 mmH g 1. Turn device off. 2. Press and hold Power 3. Finished dressings should be fully compressed, button for 2 seconds. firm to the touch and leak free. Device display will show: W e l c o m e S t a r t i n g + Select seconds. If AC mains power is required, connect power supply to the AC mains power inlet, on the side of device. Setting pressure level is a decision that the healthcare provider must make based on an individual assessment of the particular wound. V X . X X 3. The software version is provided on the lower right- 40-120mmHg is recommended therapeutic pressure range. hand corner of the welcome display screen. In the event you have a wound that is difficult to seal, you may increase the pressure setting to achieve desired negative pressure at the wound bed. Device will show set pressure level. If device detects operation outside of the set pressure, it will result in alarm activation. Caution: Before starting therapy ensure that device and system tubing are located no more than 19in or 50cm higher than the wound and is away from any direct sources of heat. 13 EN Pause/adjust therapy Modes of Operation RENASYS™ GO offers both continuous and intermittent modes. Selection of therapy mode setting is a clinical decision based on physician judgment, wound type, exudate level, exudate consistency and patient comfort. Therapy may be paused by pressing Select button once. When paused, device will show a standby message on display screen and pressure setting can be changed using Up Down and In continuous mode, device will maintain selected pressure setting without stopping until switched off. buttons. In intermittent mode, device cycles on and off in increments of 5 minutes “ON” (active vacuum) and 2 minutes “OFF” (no vacuum). S t a n d b y ► 1 0 0 mmH g Press Select Intermittent therapy is not recommended for: button to restart therapy. • Highly exudating wounds Lock or unlock keypad • Wounds with tunnels or undermining To lock user interface when device is active, press and • Wounds in difficult areas where maintaining a seal is problematic hold Keypad Lock button for 2 seconds. When • Patients who experience pain during intermittent therapy activated, the light will illuminate solid blue. To change therapy between continuous and intermittent mode: K e y p a d L o c k e d ► 1 0 0 mmH g If keypad on user interface has not been used for 15 minutes, keypad will automatically lock. 1. Turn device off. In active mode, if keypad on user interface has not been used for 15 minutes, keypad will automatically lock. The light above keypad lock button will illuminate solid blue. 2. Simultaneously press and hold (This feature is available with software version 0.66 and later). 3. Use Up Down or Down Press the Select button for 2 seconds. buttons for buttons to scroll button to confirm. Once therapy is started, display screen will show which mode of therapy has been selected. K e y p a d A c t i v e ► 1 0 0 mmH g Note: Locking keypad only locks row of keys under display screen — Power Button is not locked. Turn off the device Press and hold Power + Power between continuous and intermittent mode. To unlock user interface, press and hold Keypad Lock + Select 2 seconds. button for 2 seconds to power off device. 14 EN Clinician information — therapy time Clinician information — total time Device displays information which allows clinicians to see therapy time (total hours and minutes of continuous or intermittent therapy) delivered to the patient. This feature is available with software version 0.66 and later. Device displays total number of hours accumulated in active mode. This time cannot be reset. To access therapy time: To access total time display screen: 1. Turn device off. 1. Turn device off. 2. Simultaneously press and hold Down + Select + Power buttons for 2. Simultaneously press and hold 2 seconds. Down 3. Use Down to show the following 3. Press Down display screen: T o t a l x x x x x then return to main menu. main menu. Clinician information — battery charge button to scroll to "clear time" option. Press Select This feature is available with software version 0.66 and later. button to show the following display screen: Device displays percentage of battery charge remaining. A c t i v e 2. Press Select To access battery charge display screen: button again to confirm that you 1. Turn device off. want to clear active time. 3. Use Down Press Select T i m e H 4. Display will show for 5 seconds and then return to To reset therapy time: C l e a r ►T i m e ? to show the following display screen: m 4. Therapy time display will show for 5 seconds and 1. Use Down buttons for button to scroll to "total time" option. Press Select A c t i v e T i m e x x x x x H , x x + Power 2 seconds. button to scroll to "show time" option. Press Select + Select 2. Simultaneously press and hold Down button to scroll to "yes" option. + Select + Power buttons for 2 seconds. button to show the following 3. Press Down display screen: button to scroll to "battery charge" option. Press Select A c t i v e T i m e C l e a r e d to show the following display screen: 4. Display will show for 5 seconds and then return to B a t t e r y x x x % main menu. 4. Press Select Active time should be cleared between patients. This will allow the clinician to monitor patient therapy compliance. menu. 15 C h a r g e button to return to the main EN Battery power Device can be used on battery power to allow greater user mobility. A fully charged battery will last up to 20 hours. During therapy, if battery level is low, the device can be plugged into AC mains power without interrupting therapy. Battery will recharge while therapy continues to be delivered. Battery status indication RENASYS™ GO contains a lithium ion rechargeable battery. There are several battery level indicators on RENASYS GO device: Indicator B a t t e r y F u l l ► 1 0 0 mmH g Battery level Action Battery is fully charged and has up to 20 hours active therapy remaining. Battery status top indicator will illuminate solid green. No action required. Battery has up to 10 hours active therapy remaining. Battery status top indicator will flash green. No action required. Battery has up to 6 hours active therapy No action required. remaining. Battery status top indicator will flash green and battery status bottom indicator will illuminate solid amber. A t t e n t i o n L o w B a t t e r y Battery has up to 3 hours active therapy remaining. Battery status bottom indicator will illuminate solid amber. Audible alarm will beep 2 times every 30 seconds. Audio alarm can be paused by pressing the audio pause button on user interface. Plug device into AC mains power to charge battery. R E C H A R G E V . L o w B a t t e r y Battery has up to 1 hour active therapy remaining. Battery status bottom indicator will flash amber. Audible alarm will beep 3 times every 10 seconds. Device should be plugged into AC mains power to charge battery and ensure continued delivery of therapy. ! ! R E C H A R G E ! ! E X . L OW B A T T E R Y Battery has only 2 minutes of active therapy remaining. Battery status bottom indicator will flash amber. Audible alarm will sound continuously for 2 minutes. Device should be plugged into AC mains power or therapy will discontinue. ! ! ! ! ! ! 16 EN Indicator ! ! ! ! R E C H A R G E N OW ! B A T T E R Y F A I L C h a r g i n g ►1 0 0 mmH g ! B A T T E R Y F A I L E D ►1 0 0 mmH g This feature is available with software version 0.66 and later. Battery level Action After 2 minutes in an extremely low battery charge state, device will power off. Plug device into AC mains power. When plugged into AC mains power display screen will show “Charging” message and battery status top indicator will flash green. No action required. Device may take up to 3 hours to charge. If battery unit within device has failed to charge, display screen will show “Battery Failed” message and battery status bottom indicator will flash amber. Therapy will only be delivered if plugged into AC mains power. Device will not operate on battery power. Note: This will only display when connected to AC mains power. Contact your Smith & Nephew authorized representative. Caution: Keep device away from direct heat sources during charging. 17 EN Troubleshooting Guide Alarm status with display screen Cause Remedy Low Vacuum Alarm ! ! ! ! WA R N I N G L OW V A C U U M Vacuum level is lower than NPWT set point by >15mmHg. • Audible alarm will beep 3 times every 10 seconds. • Status/alarm indicator light will flash amber. Device is unable to achieve selected vacuum level due to internal device malfunction or a significant leak in the system. • Secure engagement of canister to device 3. Disconnect Soft Port from canister tubing at orange quick click connector and insert tethered cap into both connectors. A U D I O P A U S E D L OW V A C U U M • Pressing audio pause button will pause audible alarm for approximately 2-3 minutes. ! ! ! ! 2. Ensure the following connections are secure: • Orange quick click connector between Soft Port and canister tubing • Once corrected, alarm will automatically reset and status/ alarm indicator will return to solid green. ! ! ! ! 1. With device actively creating vacuum, check wound dressing for air leaks. Look for loose or decompressed dressing appearance, listen for air movement around dressing and feel for areas less compressed or cooler in temperature. Address identified leaks with transparent film or adhesive gel patch. • If alarm condition continues, there is a potential issue with the device or canister. Replace canister and contact your Smith & Nephew authorized representative. T H E R A P Y S T O P L OW V A C U U M • Device will stop delivering therapy after pausing alarm 5 times, without addressing condition. • If alarm condition resolves, an air leak is present within the wound dressing or Soft Port. Reassess and replace as needed. Note: If low vacuum alarm is due to a leak in system, the high flow/leak alarm may also activate while low vacuum alarm is active. Note: If over vacuum alarm indicator is illuminated along with low vacuum indicator, follow troubleshooting steps for over vacuum alarm. 18 EN Alarm status with display screen Cause Remedy Device has detected a high vacuum condition potentially due to line blockage or device malfunction. 1. Inspect connections and tubing to ensure they are free of obstructions. Ensure there are no kinks in canister tubing. Device has reached high vacuum level (>235mmHg). 1. Press and hold power button for 2 seconds to turn device OFF. High vacuum alarm ! ! ! ! WA R N I N G H I G H V A C U U M Vacuum level is higher than NPWT set point by >15mmHg for more than 30 seconds. • Audible alarm will beep 3 times every 10 seconds. • Status/alarm indicator will flash amber. • This audio alarm cannot be paused and must be investigated by healthcare provider immediately and corrected. 2. Replace canister. 3. If alarm condition continues, device may have malfunctioned. Contact your Smith & Nephew authorized representative. • Once corrected, alarm will automatically reset and status/ alarm indicator will return to solid green. Over vacuum alarm ! ! ! ! T H E R A P Y S T O P O V E R V A C U U M ! ! T H E R A P Y S T O P ! ! R e s t a r t D e v i c e The system has encountered an excessively high vacuum (of >235mmHg). • Vacuum safety switch will operate and device will stop delivering therapy. 2. Inspect connections and tubing to ensure they are free of obstructions. Ensure there are no kinks in canister tubing. 3. Replace canister. • Audible alarm will beep 3 times every 10 seconds. 4. Turn device back ON by pressing and holding power button for 2 seconds. If alarm condition continues, device may have malfunctioned. Contact your Smith & Nephew authorized representative. • Status/alarm indicator will flash amber. • This audio alarm cannot be paused and must be investigated by healthcare provider immediately and corrected. 19 EN Alarm status with display screen Cause Remedy Complete blockage/canister over-capacity ! ! ! ! 1. Check canister. If contents have reached maximum volume indication (300ml or 750ml fill line), replace canister. WA R N I N G B L O C K A G E / F U L L Device detects a complete blockage in vacuum circuit. There is no negative pressure at wound site. • Audible alarm will beep 3 times every 10 seconds. • Status/alarm indicator will flash amber. There is a complete blockage in system; this includes a canister where contents have exceeded maximum volume capacity or in the instance that the internal canister filter is covered with exudate. • Once corrected, alarm will automatically reset and the status/alarm indicator will return to solid green. ! ! ! ! 3. Disconnect Soft Port from canister tubing at orange quick click connector. Insert tethered cap into Soft Port connector. Allow air to flow freely into canister. • If alarm condition continues, there is a potential issue with the device or canister. Replace canister and contact your Smith & Nephew authorized representative. • If alarm condition resolves, a blockage is present within the Soft Port. Reassess and replace as needed. A U D I O P A U S E D B L O C K A G E / F U L L • Pressing audio pause button will pause audible alarm for approximately 2-3 minutes. ! ! ! ! 2. Inspect connections, tubing and Soft Port aeration disc (located on Soft Port, near the orange quick click connector) to ensure they are free of obstructions. Ensure there are no kinks in canister tubing. Caution: Do not wait for alarm activation to change canister. At point of alarm activation, canister contents have exceeded maximum volume capacity, potentially impacting device alarm functionality. T H E R A P Y S T O P B L O C K A G E / F U L L • The device will stop delivering therapy after pausing alarm 5 times, without addressing condition. Note: Device and canister should be kept in an upright orientation to optimize canister overcapacity alarm functionality while maximizing canister volume. 20 EN Alarm status with display screen Cause Remedy Caution – Lack of alarms: If partial blockage occurs, the change in pressure status detected by device may not be significant enough to trigger alarm activation. Over time if blockage reaches point of full occlusion, complete blockage alarm will activate. Blockage formation within wound dressing will not be detected by system as it has occurred outside of monitored vacuum circuit, but can affect pressure status at the wound. Appropriately frequent monitoring of wound dressing is recommended to confirm adequate delivery of therapy. In the event of heavy or viscous drainage, drainage with sediment or when blood is present, regular monitoring and more frequent dressing changes may be required. If a complete blockage is present in the system, but an air leak occurs between blockage and device, the alarm may not activate. Ensure all connections are secure and no air leaks are present in system. Potential sources of air leaks include: • Misplaced or worn O-ring on the device inlet port, located between the device and canister • Tear in Soft Port • Misplaced or worn O-ring within the quick click connector (between the Soft Port and canister tubing) • Cracked or damaged canister 21 EN Alarm status with display screen Cause Remedy High flow/leak alarm ! ! ! ! WA R N I N G L E A K Device detects a significant leak in the system. • Alarm will beep 3 times every 10 seconds. • Status/alarm indicator will flash amber. • Once corrected, alarm will automatically reset and status/ alarm indicator will return to solid green. ! ! ! ! A U D I O L E A K There is a significant leak in the system. This could include an air leak around the dressing or a poor seal at one of the connectors between the dressing, Soft Port, canister or device. 1. With device actively creating vacuum, check wound dressing for air leaks. Look for loose or decompressed dressing appearance, listen for air movement around dressing and feel for areas less compressed or cooler in temperature. Address identified leaks with transparent film or adhesive gel patch. 2. Ensure the following connections are secure: • Orange quick click connector between Soft Port and canister tubing • Secure engagement of canister to device 3. Disconnect Soft Port from canister tubing at orange quick click connector and insert tethered cap into both connectors. P A U S E D • Pressing audio pause button will pause audible alarm for approximately 2–3 minutes. • If alarm condition continues, there is a potential issue with the device or canister. Replace canister and contact your Smith & Nephew authorized representative. • If alarm condition resolves, an air leak is present within the wound dressing or Soft Port. Reassess and replace as needed. Note: An air leak may result in a pressure drop occurring within the system. As a result, the low vacuum alarm may also activate while the high flow/leak alarm is active. 22 EN Alarm status with display screen Cause Remedy Caution – Lack of alarms: Under specific circumstances, a significant air leak may occur in system without device activating a high flow/leak alarm. This may be due to partial blockage between source of air leak and device, prohibiting detection of the leak by device. As a result, alarm will not activate. Over time, if blockage reaches point of full occlusion, the complete blockage alarm will activate. Read complete blockage/canister over-capacity alarm troubleshooting for instruction on locating the system blockage. Check wound dressing regularly to ensure it is fully compressed and firm to the touch. Inactive alarm This feature is available with software version 0.66 and later. ! ! A t t e n t i o n I N A C T I V E Device has been left in standby mode for longer than 15 minutes. • Alarm will beep 2 times every 30 seconds. • Status/alarm indicator will flash amber. ! ! Device has been left in standby mode without any keys being pressed for longer than 15 minutes. A U D I O P A U S E D I N A C T I V E • Pressing audio pause button will pause audible alarm for 15 minutes. • Alarm can only be paused once. 23 Either select pressure setting and start therapy or turn device OFF until therapy is required. EN Alarm status with display screen Cause Remedy Battery partially discharged or depleted. Plug unit into AC mains power to charge battery. User interface is locked. Unlock by pressing and holding keypad lock button for 2 seconds. Internal hardware or software error. Contact your Smith & Nephew authorized representative. Service and repair required. Contact your Smith & Nephew authorized representative. Internal hardware failure. Contact your Smith & Nephew authorized representative. Battery See battery status and alarm section of manual for screen messages. Keypad lock on K e y p a d L o c k e d ► 1 0 0 mmH g When lock is active, keypad will illuminate solid blue. Device failed alarm ! ! ! ! D E V I C E P l e a s e F A I L E D R e t u r n Device has an unrecoverable error. • Status/alarm indicator will flash amber. Device not calibrated alarm ! ! ! ! D E V I C E N O T C A L I B R A T E D Device will not operate. • Alarm will beep 3 times every 10 seconds. • Status/alarm indicator will flash amber. Battery failed alarm This feature is available with software version 0.66 and later. ! ! B A T T E R Y F A I L E D ► 1 0 0 mmH g Battery within device has failed. • Battery status bottom indicator will flash amber. • Therapy can only be continued by keeping device plugged into AC mains power. • Status/alarm indicator will flash amber. Note: This will only display when connected to AC mains power. 24 EN Accessories Carry straps To attach carry strap to device: 1. Feed end of open strap behind location pin on side of device. 2. Pull strap through and feed the end behind clip on carry strap. 3. Close clip to secure strap. 4. Repeat steps 1-3 on other side of device. Once both sides of the carry straps are connected to device, they can be joined together to make the short carry strap. The short carry strap can be used to attach the device to a wheelchair or IV pole when moving patients. ephew *smith&n O RENASYS™G Pressure Wound Negative Therapy ephew *smith&n O RENASYS™G Pressure Wound Negative Therapy ephew *smith&n O RENASYS™G Pressure Wound ephew *smith&n O RENASYS™G Pressure Wound Negative Therapy Negative Therapy Shoulder and extension straps The carry strap can be extended to allow the device to be carried on the shoulder or across the body. Place the padded section of the shoulder strap against shoulder for maximum comfort when carrying device. Note: Device carry straps are designed for single patient use. 25 EN Carry bag (available for 300ml canister) To place the device into the carry bag: 1. Open the zipper on both sides of bag and place face down on a flat surface with viewing flaps on top. 2. Place device face up on the open bottom section of the bag. 3. Pull front of the bag over top of the device and feed both parts of one zipper together. 4. Close zipper on the other side of the bag. 5. Once fitted ensure canister tubing can move freely. 6. Excess tubing can be coiled and placed in the pouch on the back of the carry bag. Flaps on the front of the bag provide privacy and discretion for the user. On rear of the bag, there is a belt loop, should the user wish to wear RENASYS™ GO around their waist. Note: Device carry bag is designed to be a single patient use item. Negative Therapy hew *smith&nep RENASYS™GO Pressure Wound *smith&nephew RENASYS™ GO Negative Pressure Wound Therapy Lifting top flap allows access to device user interface. Belt loop Belt Loop Canister tubing Tubing Pouchpouch Lifting bottom flap allows the canister to be viewed. Note: Device and canister should remain in an upright orientation to maximize canister volume and optimize complete blockage/canister over-capacity alarm. 26 EN Maintenance 2. Inspect device for visible signs of damage before each use. If device has been dropped or shows signs of damage, do not use. Return damaged device to your Smith & Nephew authorized representative. Clean the device inlet port and carefully slide new inlet port O-ring onto device inlet port; checking that any rolling of the O-ring is corrected once it is located in the groove of the inlet port. DO NOT LUBRICATE THE O-RING! There are no serviceable parts in the device. Do not attempt to open device housing. Contact your Smith & Nephew authorized representative or distributor if service is required. NOTE: Smith & Nephew does not offer a plastic removal tool to be used with the RENASYS GO device. Plastic removal tools may be purchased from vendors such as Golem Gear (SKU GG_Yellow Pick). Cleaning Adherence to facility directives concerning hygiene is of prime importance. The instructions supplied with all cleaning agents as well as sterilization and/or disinfection units must be followed. Odor filter (REF 66800061) To minimize unpleasant odors from RENASYS GO devices, it is recommended that the device odor filter be replaced between each patient use. Note: The presence of device odor does not impact the functionality of the device. Cleaning of the RENASYS™ GO outer housing should be done in accordance with the guidelines below: • Wipe down device surface with a damp soft cloth. • Use a mild cleaning agent, disinfectant, or an antimicrobial agent and ensure its compatibility with plastics. Follow manufacturer’s guidelines for use of cleaning or disinfectant agents. • Dampen another soft cloth with clean water and wipe down all surfaces to remove any excess solution. • Dry with a separate soft cloth. • Do not use solvents or abrasives. • Do not immerse any part of RENASYS GO in fluid, directly spray any cleaner onto device or use a wet cloth that is dripping fluid. No fluids should be allowed to enter device. If any liquids penetrate device, contact your local distributor. To change or verify the presence of the odor filter, turn the device over and lay it on a soft surface, to avoid damage. 2. Remove the Pozidriv® screw holding the rear flap and open the flap to reveal the odor filter. 3. Remove the two odor filter elements and replace with 2 new odor filter elements. 4. Close the door flap and insert screw, tightening only until the door flap is flush with the case. Precaution: TAKE CARE NOT TO OVER-TIGHTEN SCREW! Rubber feet (REF 66800611) If a rubber foot has become detached or is missing, it may be replaced. Use a small quantity of cyanoacrylate adhesive to reattach the rubber foot to the base of the device. Rubber feet can be obtained as replacement parts. Device replaceable components (As performed by appropriately trained personnel) Storage Prior to storage for more than 2 months, ensure that the battery is fully charged. Some battery discharge may occur in storage. During long-term storage, recharge the battery every 10 months. RENASYS GO replaceable components including the Inlet O-ring, odor filter and rubber feet may be purchased through Smith & Nephew. Contact your Smith & Nephew authorized representative or distributor for more information. RENASYS GO should be stored between 0–25°C (32–77°F) for optimal battery performance, but can be stored between -10–55°C (14–31°F) for short periods of time. Inlet O-ring (REF 66800603) To ensure the canister seal is secure, the device inlet port O-ring should be replaced after each patient use as the O-ring can become worn over time, potentially creating a source of air leak that may impact alarm functionality. 1. 1. Returning device Prior to returning the device to your Smith & Nephew authorized representative, device must be cleaned according to the steps outlined under the cleaning section of this user manual. To replace the device inlet port O-ring, the existing O-ring must be carefully removed using a plastic removal tool, ensuring that the inlet connector is not damaged during removal. Device should be returned within the original packaging. 27 EN Electromagnetic compatibility RENASYS™ GO (REF 66800164) This equipment has been tested and found to comply with the limits for medical devices to IEC 60601-1-2-2001. These limits and test levels are intended to provide reasonable safety with regard to electromagnetic disturbances when the device is used in a typical medical installation. This equipment generates, uses and can radiate radio frequency energy and, if not installed and used in accordance with the instructions, may cause harmful interference to other devices in the vicinity. However, there is no guarantee that interference will not occur in a particular installation. Guidance and manufacturer’s declaration - electromagnetic immunity The device is intended for use in the electromagnetic environment specified below. The customer or the user of the device should assure that it is used in such an environment. Immunity test IEC 60601 test level Compliance level Electromagnetic environment – guidelines Floors should be wood, concrete or ceramic tile. If floors are covered with synthetic material, the relative humidity should be at least 30% Electrostatic discharge (ESD) IEC 61000-4-2 ±6 kV contact ±8 kV air ±6 kV contact ±8 kV air Electrical fast transient/burst IEC 61000-4-4 ±2 kV for power supply lines ±2 kV for power supply lines Surge IEC 61000-4-5 ±1 kV differential mode ±2 kV common mode ±1 kV line to line ±2 kV line to earth Mains power quality should be that of a typical commercial or hospital environment Voltage dips, short interruptions and voltage variations on power supply input lines IEC 61000-4-11 <5% UT (>95% dip in UT) for 0.5 cycle 40% UT (60% dip in UT) for 5 cycles 70% UT (30% dip in UT) for 25 cycles <5% UT (>95% dip in UT) for 5 sec >95% for 10ms Mains power quality should be that of a typical commercial or hospital environment. If the user of the device requires continued operation during power mains interruptions, it is recommended that the device be powered from an uninterruptable power supply or battery ±1 kV for input/output lines Mains power quality should be that of a typical commercial or hospital environment Not applicable 60% for 100ms 30% for 500ms >95% for 5000ms NOTE UT is the a.c. mains voltage prior to application of the test level Power frequency (50/60Hz) magnetic field IEC 61000-4-8 3 A/m 3 A/m Conducted RF IEC 61000-4-6 3 Vrms 150 kHz to 80 MHz 3 Vrms Radiated RF IEC 61000-4-3 3 V/m 80 MHz to 2.5 GHz 3 V/m Power frequency magnetic fields should be at levels characteristic of a typical location in a typical commercial or hospital environment Portable and mobile RF communications equipment should be used no closer to any part of device, including cables, than the recommended separation distance calculated from the equation applicable to the frequency of the transmitter. Recommended separation distance: d = 1.2 √P d = 1.2 √P (80 MHz to 800 MHz) d = 2.3 √P (800 MHz to 2.5 GHz) NOTE 1: At 80 MHz, the higher frequency range applies. NOTE 2: These guidelines may not apply in all situations. Electromagnetic propagation is affected by absorption and reflection from structures, objects and people. a. Field strengths from fixed transmitters, such as base stations for radio (cellular/cordless) telephones and land mobile radios, amateur radio, AM and FM radio broadcast and TV broadcast cannot be predicted theoretically with accuracy. To assess the electromagnetic environment due to fixed RF transmitters, an electromagnetic site survey should be considered. If the measured field strength in the location in which the device is used exceeds 3V/m, the device should be observed to verify normal operation. If abnormal performance is observed, additional measures may be necessary, such as reorienting or relocating the device. b. Over the frequency range 150 kHz to 80 MHz, field strengths should be less than 3 V/m. 28 where P is the maximum output power rating of the transmitter in watts (W) according to the transmitter manufacturer and d is the recommended separation distance in meters (m). Field strengths from fixed RF transmitters, as determined by an electromagnetic site survey, a should be less than the compliance level in each frequency rangeb. Interference may occur in the vicinity of equipment marked with the following symbol: EN Guidance and manufacturer’s declaration – electromagnetic emissions RENASYS™ GO (REF 66800164) The device is intended for use in the electromagnetic environment specified below. The customer or the user of the device should assure that it is used in such an environment. Emissions test Compliance Electromagnetic environment – guidelines RF emissions CISPR 11 Group 1 The device uses RF energy only for its internal function. Therefore, its RF emissions are very low and are not likely to cause interference in nearby electronic equipment. RF emissions CISPR 11 Class B Harmonic emissions IEC 61000-3-2 Not Applicable Voltage fluctuations/flicker emissions IEC 61000-3-3 Comply The device is suitable for use in all establishments other than domestic and those directly connected to the public low-voltage power supply network that supplies buildings used for domestic purposes. WARNING: The device should not be used adjacent to or stacked with other equipment and that if adjacent or stacked use is necessary, the device should be observed to verify normal operation in the configuration in which it will be used. Recommended separation distances between portable and mobile RF communications equipment and the device. The device is intended for use in an electromagnetic environment in which radiated RF disturbances are controlled. The customer or the user of the device can help prevent electromagnetic interference by maintaining a minimum distance between portable and mobile RF communications equipment (transmitters) and the device as recommended below, according to the maximum output power of the communications equipment. Rated maximum output power of transmitter (W) Separation distance according to frequency of transmitter (m): 150 kHz to 80 MHz d = 1.2√P 80 MHz to 800 MHz d = 1.2√P 800 MHz to 2.5 GHz d = 2.3√P 0.01 0.12 0.12 0.23 0.1 0.38 0.38 0.73 1.0 1.2 1.2 2.3 10 3.8 3.8 7.3 100 12 12 23 For transmitters rated at a maximum output power not listed above, the recommended separation distance d in meters (m) can be estimated using the equation applicable to the frequency of the transmitter, where P is the maximum power rating of the transmitter in watts (W) according to the transmitter manufacturer. NOTE 1: At 80 MHz and 800 MHz, the separation distance for the higher frequency range applies. NOTE 2: These guidelines may not apply in all situations. Electromagnetic propagation is affected by absorption and reflection from structures, objects and people. 29 EN Specifications Pressure Setting 40, 50, 60, 70, 80, 90, 100, 120, 140, 160, 180, 200mmHg: tolerance +/- 10 mmHg Maximum 200mmHg Power requirements Device input voltage 21 VDC Device input power 36 Watts Mains adapter Smith & Nephew REF 66800161 Input: 100–240VAC, 50/60HZ, 0.9A Output: 21VDC, 1.71A, 36W Fuses Internal electronic fuse, not user changeable Power cord Length: 4.5m maximum (Class I) Dimensions 7 x 8.3 x 3.5in. / 175 x 210 x 85mm Weight 2.4lbs / 1.1 kg Operating time ~ 20 hours (therapy) Type Lithium ion Charging time ~ 3 hours Battery Safety protection Protection against electric shock Class I Patient protection Type BF Ingress protection IP2X Environmental Storage and transport 14 to 131°F / -10 to 55°C Operational temperature 41 to 95°F / 5 to 35°C Relative humidity 30% to 70% RH Atmospheric pressure 700 mbar to 1,060 mbar Compliance Standards UL 60601-1 IEC 60601-1 IEC 60601-1-2CAN/CSA C22.2 No. 601.1 30 EN Caution statements In order to ensure safe and proper performance, the following conditions must be met: • All assembly, operation, adjustment, modification, maintenance and/or repair should be carried out by qualified personnel authorized by Smith & Nephew. • No modification of this equipment is allowed. • If using Class I Power Supply (REF 66800161): To avoid the risk of electric shock, this equipment must only be connected to a supply mains with protective earth. • Use only the AC mains power cord provided with the device to prevent the potential for electrical shock hazard. • If power cord is damaged, wires are frayed or exposed, do not use power cord. Contact your Smith & Nephew representative for a replacement cord. • If the device is damaged, the performance could be affected; Do not use the device. Contact your Smith & Nephew authorized representative. • When necessary, the device may be isolated from AC mains power by removing the detachable AC mains power adapter cord. • The electrical installation of the room must comply with the appropriate electrical wiring standards. • The product must be used in accordance with this user manual and all applicable labeling. Failure to comply with these conditions will void any pertinent warranties. This user manual is not intended as a guarantee or warranty. It is intended only as a guide. For medical questions please consult a physician. For additional product information, or a specific product question, please refer to the numbers listed in the NPWT Customer Care Details section of this user manual. 31 EN LIMITED WARRANTY; LIMITATION OF REMEDIES/LIABILITY: Device RENASYS™ NPWT electromechanical devices (inclusive of the power cord and power supply) The Smith & Nephew negative pressure wound care electro-mechanical device (“Device”) is warranted against defects in workmanship and materials for the warranty period specified below (“Warranty Period”). Smith & Nephew reserves the right to discontinue any Device or change any Device’s specifications or designs from time to time. For any Device that fails to meet the foregoing warranty, this warranty provides and is restricted to replacement or repair (onsite service not included) as elected by Smith & Nephew in its sole discretion. If Smith & Nephew replaces a Device under this warranty and requests Customer to return the Device that was replaced, Customer will be invoiced, at Smith & Nephew’s then current list price, for the replacement Device if Customer does not return the replaced Device within thirty (30) days after Smith & Nephew’s shipment of the replacement Device. This warranty does not cover and is voided by any of the following: (i) a warranty claim not made within the first to occur of expiration of the Warranty Period or thirty (30) days following the failure of the Device to perform as warranted; (ii) a Device packaged or labeled by someone other than Smith & Nephew or its authorized agents; (iii) a Device not used in compliance with the specifications, instructions or claims for use of the Device; (iv) a Device used in conjunction with disposables, accessories or any other products not specified for use with the Device; (v) a Device used in conjunction with expired or reprocessed disposables, accessories or other products specified for use with the Device; (vi) modification of the Device; (vii) damage due to misuse, reprocessing, alteration, unauthorized repair or negligent handling or damage due to lack of care by the owner, user, or handler of the Device including but not limited to storage, handling or cleaning; and (viii) any other damage inflicted to a Device by the owner, user or handler. This warranty applies only to the original buyer from Smith & Nephew or its authorized distributor and is not transferable. THIS WARRANTY IS THE SOLE WARRANTY OF SMITH & NEPHEW. ALL OTHER WARRANTIES OF ANY KIND OR DESCRIPTION WHATSOEVER, INCLUDING WARRANTIES OF MERCHANTABILITY, SATISFACTORY QUALITY AND FITNESS FOR A PARTICULAR PURPOSE, EXPRESSED OR IMPLIED, ARE EXCLUDED TO THE FULLEST EXTENT PERMITTED BY LAW. Warranty Period Two (2) years from date of delivery to original buyer CUSTOMER’S SOLE REMEDY, AND SMITH & NEPHEW’S SOLE LIABILITY, FOR ANY CLAIM WILL BE THE REPAIR OR REPLACEMENT BY SMITH & NEPHEW AS PROVIDED FOR IN THIS WARRANTY. EXCEPT FOR THIS LIMITED LIABILITY OF SMITH & NEPHEW, SMITH & NEPHEW UNDER NO CIRCUMSTANCES WILL BE LIABLE FOR ANY (A) CLAIM, FOR DAMAGES OR OTHERWISE, WHETHER ARISING FROM BREACH OF CONTRACT, TORT (INCLUDING NEGLIGENCE) OR OTHERWISE, AND WHETHER OR NOT BASED ON OR FLOWING DIRECTLY, INDIRECTLY OR AS A CONSEQUENCE OF A WARRANTY CLAIM, BREACH OF CONTRACT, A TORT, BREACH OF LAW, OR ANY OTHER CAUSE OR LEGAL THEORY, OR (B) DIRECT, INCIDENTAL, CONSEQUENTIAL OR SPECIAL DAMAGES, LOSSES OR EXPENSES ARISING FROM THIS AGREEMENT OR ITS PERFORMANCE OR LACK THEREOF, OR IN CONNECTION WITH THE SALE OR USE OF, OR INABILITY TO USE, THE DEVICE, INCLUDING BUT NOT LIMITED TO, LOSS OF PROFIT OR ANTICIPATED SAVINGS, LOSS OF ANTICIPATED PROFIT, COST OF COVER FOR REPLACEMENT OR ALTERNATIVE PRODUCT, ECONOMIC LOSS, LOSS OF DATA, WASTED EXPENDITURE OR LOSS OF REPUTATION OR GOODWILL. 32 EN Global customer assistance For more information regarding RENASYS™ GO, or for additional customer assistance, please refer to Smith & Nephew customer care center details below: Australia Smith & Nephew Pty Ltd. 315 Ferntree Gully Road PO Box 242 Mount Waverley Victoria 3149 Tel: +61 3 8540 6777 Fax: +61 3 9544 5086 Austria Smith & Nephew GmbH Concorde Business Park C3 Österreich A-2320 Schwechat Tel: +43 1 70 79102 Fax: +43 1 70 79101 [email protected] Belgium Smith & Nephew SA-NV Hector Henneaulaan 366 1930 Zaventem Tel: +32 2 702 2911 Fax: +32 2 702 2904 [email protected] Canada Smith & Nephew Inc. 2250 Alfred Nobel Boulevard St. Laurent, Quebec H4S 2C9 Tel: 1 800 463 7439 Fax: 1 800 671 9140 Denmark Smith & Nephew A/S Slotsmarken 14 2970 Hoersholm Tel: +45 4580 6100 Fax: +45 4580 6151 [email protected] Finland Smith & Nephew Oy Äyritie 12 C 01510 Vantaa Tel: +358 (0)207 866 300 Fax: +358 (0)207 866 320 France Smith & Nephew SAS Espace Novaxis 25 Blvd. Marie et Alexandre Oyon 72019 Le Mans Cedex 2 Tel: (33) 02 43 83 23 23 Fax: (33) 02 43 83 24 18 [email protected] Germany Smith & Nephew GmbH Wound Management Osterbrooksweg 71 D-22869 Schenefeld Tel: +49 (040) 87 97 44 0 Fax: +49 (040) 87 97 44 375 [email protected] Ireland Smith & Nephew Healthcare Ltd. Healthcare House 101 Hessle Road Hull HU3 2BN Customer Care: 01276 9700 Fax: 01276 4970 [email protected] 24hr Clinical Support: 1800 303622 Italy Smith & Nephew Wound Management Via de Capitani, 2A 23864 Agrate Brianza (MB) Tel: 800 393 060 (numero verde attivo 8.30-18.00) 039 6094224 Fax: 039 6094274 Centro Assistenza Clienti: [email protected] Japan Smith & Nephew Wound Management Tokyo Warehouse Center C-3F 3-5-1, Rinkai-cho, Edogawa-ku, Tokyo 134-0086 Japan Tel: 81-03-5667-2166 xxx EN Netherlands Smith & Nephew B.V. Postbus 525 2130 AM Hoofddorp Bezoekadres: Kruisweg 637 2132 NB Hoofddorp Tel.: 020-654 39 99 Fax: 020-654 20 99 [email protected] New Zealand Smith & Nephew Limited PO Box 442 Shortland Street Auckland 1140 Tel: +64 9 828 4059 Fax: +64 9 820 2866 Norway Smith & Nephew A/S Postboks 224 1379 Nesbru Besøksadresse: Nye Vakåsvei 64 1395 Hvalstad Tel: +47 66 84 20 20 Fax: +47 66 84 20 90 [email protected] Portugal Smith & Nephew, Lda. Parque Tejo EN 10, Km 131 2625-445 Forte da Casa Tel: +351 21 446 0650 Fax: +351 21 446 0679 South Africa Smith & Nephew (Pty) Ltd. PO Box 92 Pinetown 3600 Tel: +27 (0)31 242 8111 Fax: +27 (0)31 242 8120 Spain Smith & Nephew SAU Fructuós Gelabert 2 y 4 08970 Sant Joan Despí Barcelona Tel: +34 93 373 73 01 Fax: +34 93 373 7453 Sweden Smith & Nephew AB Kråketorpsgatan 20 PO Box 143 431 22 Mönldal Tel: +46 31 746 58 00 Fax: +46 31 87 05 32 Switzerland Smith & Nephew AG Glutz Blotzheim-Strasse 1 4502 Solothurn Tel: +41 32 624 56 60 Fax: +41 32 624 56 81 Turkey Smith & Nephew Ltd. Şti. Orkide Sokak NO:8/E Bahçeköy 34473 Istanbul Turkey Tel: +90 212 226 22 55 Fax: +90 212 226 44 47 [email protected] United Arab Emirates Smith & Nephew FZE Level 4 National Bank of Abu Dhabi Building Dubai Health Care City PO Box 9715 Dubai Tel: +971 4 429 9111 Fax: +971 4 429 9100 United Kingdom Smith & Nephew Healthcare Ltd. Healthcare House 101 Hessle Road Hull HU3 2BN Customer Care: 01482 673848 Fax: 01482 222206 [email protected] 24hr Clinical Support: 1800 9155394 United States Smith & Nephew, Inc. 970 Lake Carillon Drive St. Petersburg, FL 33716 Tel: 1 800 876 1261 Fax: 727 392 6914 [email protected] xxx Smith & Nephew, Inc. 970 Lake Carillon Drive, St. Petersburg, FL 33716, USA Smith & Nephew Medical Ltd. Hull HU3 2BN England www.smith-nephew.com www.globalwoundacademy.com Customer Care Center 1 800-876-1261 T 727-392-1261 F 727-392-6914 66800753 only ©2014 Smith & Nephew ™Trademark of Smith & Nephew Certain marks Reg. US Pat. & TM Off. PI04116 12/2014 0 40565 1 2544 2