1
't lntnsducti*n
$afety pre*autions should bre taken against electrie appliances
in places including medi*al instituticns, schocls aner residential
districts, where people usu*lly stay fcr a long tirne, to prevent
pctients, babies and senior citize ns lrom *xposure to liigh
ele*trornagnetie waves.
An electromagnetic wave sirnply ntcans the wave motion of the
el€rjlroifi agn*tic fi eld iHM f ).
The change in electric fieil1s produce$ rnagnetic fields, and the
change in rnagnetic fields *sn also generate electric fields. The
ftuctuation of conelation betw*un *elch othen is known as
"electromagnetic wavesn, vrhich is a forrn of energy similar to
light and heat that can be transmitted either by radiation in the
air or by an eleclric conCuctor.
It is sugge*t*d that rearrangements should be made in families
and wcrk lsca{icns where electromagnetic fields are detected
the strongest in tir"der to avoici prol*nged exposure to excessive
electrornagnetic fi elds.
3 Features
Uses three internal orthogonal sensors to test a wide
range of ELF magnetic fields, independent of
measurement angle
Application
This meter is appiied to measuring electromagnetic fields
of extremely loi,v frequency {HLF} of 30 to 2000H2.
It is capable of measuring the electrornagnetic field
radiation intensity that ls prorJuced from electric
transmission equipment, power line, microwave oven, air
conditioner, refri gerator, com p uter monitor, video/aud io
device and so forlh.
The magnetic field unit is Testa (T), Gauss (G),
milli-Gauss (nrG) or nricro-Testa {,u T).
t T:10,S00 G
n 1 G:1 ,000 mG
1 # T:10 mG
,
;";;;; ;ilneil;;l;
a
a
DisplaymicroTesla(uT)ormilliGauss(mG)units'.
Data hold (HOLD) . maximum Hotd(MAX)and minimum
Hold(MlN)function. .
,.,' . ,.
,
a
I
a
fr"
.
The tester is designed to provide uder a quick, reliable and
easy way to measure magnetic field radiation levels
around power lines, home appllances and industrial
devices.
The tester is a cost-effective hand-held instrument that
was designed and calibrated t"
radiation at different bandwidths from 30HZ {o2}AAHZ.
o
a
a
3
Aulo range or manual range select mode.
Datalogging capacity with Memory Size : S00 data sets
or 9999 data sets(192D).
USB PC interface (192D).
Time and calencjar function.
Low battery indication'ltfl".
Over load display "OL".
Auto power Offtunrtion .
4
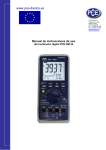
ldentifying Fart*
{}
1 LCD
display.
2. Power key.
3. maximunr Hold and
5
Measurehnent Frocedures
lF t"y turn on the meter, press,,.{},-:key
Press '
again
to turn OFF the meter.
minimum l'{old key.
4" Data l-ioid kev.
5. Record daua and Setup
function left key.
Rang* anej Setup
function up key.
7. Reading and $etup
function right key.
8. Setup function key.
L Units and $etup function
dcwn key.
10. f;ntdr key.
11. Calibrate point for Triple
S.
.*s
&m**
**s
ffiffi..-*8
ffi',ffi$
axis.
we
w
I
s
#,
"12. External power DC gV.
13. U$B interface
(Tri{"1s2D).
14. Tripcd mounting screw^
1S. Sattery c0v0r.
Press
6tT
-
key to seiect milli-gauss (mG)or micro-tesla
(pT) unit.
Position the front of the meter to measure the
electromagnetic waves.
Read the measured value. When manual range select
mark, The display of "Ol-"
mode, LCD will shown fts
on the highest position indicates there is an overload on
S
the reading. Press R*rw to seiect a higher range for
measurement again.
This nreter dispiays the default rralue
i:,;
triaxial total
magnetic field readinq, press ffin*u to independent
three single-axis magnetlc field readings and triaxial total
nragnetic field reading.
To permanently lock and keep the reading displayed on
*
the LCD, press
*Ps
or
press
So
again to unlock.
To retain the maximum and rninimum value, press
$-"*
g
ffi
Sffilsy
and the reading value displayed on the LCD
will keep updating to the maximum value. Press again to
ffi
setect minimum value, press and hotd down
2 seconds to exit the maximum and minimum
iir
-**
ffi.
nu,
mode .
$ur* to the ;Tagil'Jii: int'.jffer*i]cll *i il:q er;uirpilffia;lt field
factors, this magnetic field rneter could display a reading
value that is lower than 0.5mG prtor ta measuring. This is
not a malfunction of the tester.
V{iih the tester in hariC, rnfivd slowly towards to the otrject
under measursment ur:til it is physically touched.
6
a
Notice how the fietd intensity increases as you mCIve
closer ta the object.
lf the polver of object was turned aff cluring ilre
measurernent, the reading of tester slioulcJ return to zero,
unless there is the erecirunragnetic fronr other $olrcss are
Clock $etup
This meter clock to introduce 24 hour tirne.
orurrWkey
d*tected-
to ctock se tting mode (1.SET).
#
##rf'f
:%
#_
trT{} tr{}$" $ f.f
H*{
ffi
Press
ffi|or"
press
ffiol. Wnu,
Press
W$n*,
ffi$#
T
I
ss
n"u to setect option to adjust.
to change the digit.
to store the setup, exit the mode.
7
'
Auto power off
,j:"*.ffi*'again
sET}
{2
t,l
setup
I
lo auio power ofl time setting
mode
.
Continuity data logging setup
,r"""
8*u,
again to continue dala rogging inte,uar
setting mode (3.sET).
*
ffi%ffi& *$ #
ffi%
{} {}
htfi4
nfi.nff
UU.UU
HH
ffi
fleet,*
Press. W,sSs1 {i;**JKey to change the auto pr:wer off
ttme.
.
.
Press
ffil
Press ftWlasy to $iilre tir* setup, exit th*
s8ilH$
nrode.
Press ${ff.Wor
5
Thrs meter the auto power orl lrme detault value is
po*"r. u:ti]ii""l"
rninutes, for cancettation
ti-r"
00MM.
"uto
""i
ffiffi
wor
"r
i
n
p65s
[t"y
Ndtt
sg
cdll,@, key to select option to adjust.
li{$fsll
tiJro,*H}kuy to change
the value.
to store the setup, exit lhe mods.
Clear dai;t logger
l0Clear all data togger memory
$weryt&ry
pressW**,
again to crear daia rogger menrory for
last record sefiing nlode (4.$[T).
o
PressffiWnuu again to clear data logger memory for all
record setting mode. (5.SET)
ffi
#
ffi
W tu tu
ffi
ffi
ffi ffiffi
ffi M *,$
%ffL
#$
fi
$:Hifi\
ffiooy
Press
record.
press
ta clear clata lcgger memory for last
.
o
Pres$W
key to clear data logger memory for all
record.
m**,
to ctear riata logger rnemory for rast
resc;-d and exit the nrode.
press
Wn*,
to store the setup, exit tlre mode.
't
.
t Single data meffi'?*ry
mou,
. Fress
each tinre to store the display reading
and rnemory location in memory.
t?Viewlng tr*gged reacing eontrol key
.
ffi
Press W.*#,J kgy tlr viuw logged readings nrode. Press
&
or
V
ffi
key to scroiltlrrcugh ihe readiirgs,
Presswkey
to exit this ntode.
t
3
.
*
.
".
o
*
n
.
"
.
.
n
.
.
Specifications
Dieplay: 4 digits Triple LCD display, .
RanEe:2A12Q012000mG,2/20/200ptT.
Resolution: A.Urcin mG or 0.001/0.01/0,1 ptT.
Frequency response: 30Hz to 2000H2.
$ensor: Triple Axis (X, Y, Z).
Accuracy: 20 mG /2pTt13.0%+30dgt) at 50H:il60H2.
t(2.5%+Sdgt) at 50Hz/60H2.
1(5%+Sdgt) at 30Hz/2000H2.
Over load: LCD display "OL""
$arnple rate: 2.5 times per second.
Battery:9V NEDA 1604. IEC 6F22or JIS 006P.
Battery life; Approximate 100 hours.
Operating temperature & humidity: 5tto 40"C,below
BO% RH.
Storage temperature & humldity: -10'C to 60'C, below
70%.
Weight: About 2309.
Dimensions:173(L).80(W).32(H)mm.
Accessories: User's manual, 9V battery, Carrying
case.(MlNl USB 4P(MALE)to USB A Type cable, CD disk
192D)
t 4 Hattery
replasernent
l SSafety Precaution
For cleaning the instrument use a soft dry cloth. Never use
a wet cloth, solvents or water, etc.
Operation Aititude: Up to 2000M.
Operating Environment: lndoors use. This instrument has
been tlesigned for being used in an environment of
poilution degree 2.
iffi
" appears on the LCD, ptease
lf the symbot "
ace the batterv lmmedi
n
n
"
.
Turn off the instrurnent.
Cpen lhe bat1ery cover aird rr: mclve the Lrattery.
Replace with four-UV ltIDA i604. IEC 6F2Z or JtS 006p
size battery.
lnslall the battery rtover.
1
7$ottware installation
"
.
ExternalAC to DC adapter: Voltage
gVDc(8*14Veslv1axi
Supply current
:
:.300mAcc
Sccket : pin Pcsitive, Ciround Casing External
Diametsr 6.3m;"n internal Diameter 2.0 mm
.
.
'
n
u
t
S
92D)
Please put the CD in the PC that will be connected to this
meter.
Please select the USB driver that will be installed, such as
E:\TM-1 92D\PL-2303 Driver lnstaller.exe (windows 2000
SP4/windows XP SP2), click twice on the left key of the
mouse to install the USB driver.
Select the SETUP.EXE i.e., E:\TM-192D\SETUP.EXE and
installs the desktop icon
Tack out the CD from PC after completed the installation
of the desktop icon.
Use the USB cable to connect the meter and computer
according to the drawing.
Select the desktop icon (TM-192) and click twice on left
key of the mouse to run tlre procedure.
tSCxtennal SC Pnwsr
n
(1
Note
\{=/
lro'
W
Caution: this symbol indicates that equipment
and its accessories shall be subject to a
separate collection and correct disposal