1
Stl
l,l
IA
PLAYETI
everg Lling r"ol
Gontents
Brief Presentation --,,---------,
- -. ---.-.-..---, ----.-.-- ---.-.---.- --.----.--.-. -.
Packing list - i
RequiredSystem=-- -- 5
Appearance &Buttons--**6
Buttons on remote control ------------7
..- -. g
lnstallationbeforeuseOperation introduction--..System Function-----,------------- -- -- -*- -PhotoFunction
__ _
VideoFunction
__ p
Music Function
1g
Calendar Function
U
Setup Function
15
Hecord Function
--- 15
Card Function
- 15
Product Specification -- 16
Troubleshooting
- fi
ServiceTerms
-' - 19
Tips -- 20
Blaze Video Magic Converting software
-*---11
11
11
21
I
use
Please read this agreement before
t:T'lll"lli
rit;
@ ;1 ^,*[::;:11 "'l Hlll"lli
il,' ililJ
its ass.clareu uurrrporrr'r'
i:T"lffi'ffi
""'"tl*J'-rrii i'pe!i::f :g:f*'::ily"ll:1::
and benefits for
iltt'iight
will re
softwarg
The product includes licensed
lt:T,-t-Yi"
,ffi
I[. J' i"1' :il';"#;:,
';i'1ffi
i
**,
p;ffv
i'
r
e
sole & exclusive owner,
the software.
'ownership
il ;;iii;h;d
abnormalwav'
refresh the device firmware through
reverse-etgi;ii'g
ttJ
counter-assembling
to
related
party if the third party *ttpitl-nt ugttement
partial, your device access
theihird party comptetety or in
Itr'ilrrir,,.
I
"'tf
.l{thedeviceisdamagerl,suctrasdamagedpowercableorplug'or
.
software and code in the device'
to transfer to the third
. The device and permission a-g;ement is allowed
terms When you transter
will
generate hot'
equipments which would
ol connectgr
ouitet' adaptor and other .parts
electricat
pr.tect
the
'Please
device close to
place
the
please
uni
well so as to avoid
"tt"ion'
oower suPP|Y lor easy operation'
devices and accessones'
long time
when thunder or unusing for
adaptor
'Please unplug the
. Do not dismantle the device at improper purposes
. Do not make
workable' please refer
. lf there is blot, please use soft fabric to wipe ' if not
operation'
io it t intttr.tion in cautions for
close to radiator'heater or other
'Please do not install tnt'Ot'ilt
'Ft.ut. ,tt tt t designated
Do Make Sure
.
USER MANUAL
be voluntarilY terminated'
mportant sa{ety instruction
not responsible for the
. Please read the user manual before use' we aredamage' program
hardware
.p"rtir.,which caused by directly
*itrn
damage'
tifus, system collaose or indirect
there is a serial No' ior converting
this
of
care
'
'Please take
keep well of the serial No'
'please
software named " Blaze
the lost
we are not resPonsible {or
. Please be noted the cautions'
to operate the device'
' Please follow the user manual
closing to the water'
by
. i,itrtt Ot not use the device
poriiuiritv of.flre or electronic shock'
iuruqt,'fot,
"ti''l"tf
;ffi;
''d;
caution: in order
to reouce-ine
il;;;;t;rii*pose
the device to rain or humiditv'
please askthe
or dr6p on the floor'
suffering from splash, o*ntillu*p'
professionais to check it '
Notice
ol drop' so please
.This device is fragile and cannot withstand the collision
use'
keep it in smooth places durino
.This device cannot resist
'Jittt*
moisture or the liquid sPlash'
and easily damaged
it
glasses'
.ffi"slr"ee"n'oiinu ottitttr-cD) is made of .the
affected by
easilv
to
be
stuff'
lr*rstO if affected by unusual force or edge
screen to avoid
.The device is with LCD Oopruv, pLur. ddnot press the
randomlv' butin order to avoid
supports pullins and insertins
carO olglfer equipments'
the static and other ou'nug' io Vo" "*o.W
inserting/pulling out the
before
tirst
tnt'po*tt
off
we suggest cutting
memorY card'
suggest using
. ln order to guarantee the displaying quality' we strongly
.[T[1X9;,
.
with soft rabric and
thenrrrripe
ii Sllfl #lXJ3l clean, please Gut orr power rirst chemical to avoid damaoe'
gasoline or other
alcohol,
*ith
it
*ipt
l. .J
3D
illltT'-xtnll [taYti
to work in normal, please do not
o*tntuttJpfu.r, also do not place the device
.ln
order
il;ffi;;t
storage.
I
ry,
lt^li,::ll'
sunlight places'
accident'
avoid
to
ihe device in bad shock environment
not ol
normal'
is
it
use'
during
neat
stishtiv
possiotv
in moist
o-r
'il;'&i;;mav
malfunction.
'ii}lii'ir-t.,
charge.it one time every
use the device in a long time'please
iswith built in battery' it cannot
two months for protection,as the divice
time'
be placed at low voltage for long
permitted to have 1rom Lco fan'"el manufacturer' it is
understand it'
please
kindlv
use'
it
wtren
tino
;tteen, if vou
after press
onlv
saved
be
.;h,
itttins will be available to
" on/0fi" on
button
the
or
device
the
on
" switch on/off" button
remote control
'AV OUT does not support 3D output'
(Distinguish
.The device does not supported LiSg Oitf which without oTG
t
be supported)
itwon'
earth'
tothe
method: lf USB lD is not connected
files into
r*mal work, ptease put the 2D' 3D photo/video
fodler'3D
2DPH0T0
photo
to
2D
carO'bave
..ttrtp.rOitS iolder in Sb
place will cause abnormal display'
etc'Wrongly
tolder
SOvlOE0
,lOtoti.
.lt cannot support and ,r.ogni'u tnititename if overlong' lf the file format
short as
ilit.nnot work, please check its tilename'.keep it as such as
symbol'
especial
contain
cannot
portioL.'nr* the filename
as possible'
etc, please make the lilename as short
.
il ;ffirtiltnt
;;i; ;;;;
;r;;..iltJ
';;';;;;;.
;;;;ffi,
67SSV;a-O-*
f
of
Statement
I
this
.We are not responsible for the editing errors or omission in
manual.
user
prior notice as the
without
reserve the rioht to amend the specification
nrorluct is in the process of upgrading'
to end-user'
*ntrntt may be amended without prior notice
'We
'in.
without our
. lt is not allowed to copy, reprint, distribute the user manual
permission.
and agree to t0llow the
have read above agreement in detail
clauses and terms'
.i;; ;h
I
I
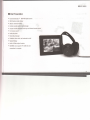
Brief Presentation
. Auto stereoscopic 7" 800.480 digital screen
. 3Dl2D picture video display
.
.
.
.
3Dl2D conversion freely
Perlect invisible stylish bracket design
Unique invisible sensitive touch key and inlrared remote control
Hi-fi stereo sound
o Audio play back
o
Becordin0 message
o
o
Calendar, alarm clock, and automatic on/off
Special Display
. Audio & Video output function
. SD/MMC card, support OTG USB disk and
connection to computer
USER MANUAL
.
T
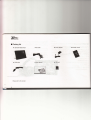
Packing list
a
3D Multi-Media Player
t)
AV cable
%
I
USB cable
Please re{er to the real set.
i
User manual
<) PowerAdapter
C
*
I
SD card
i
Remote control
I
I
.
Required sYstem
Desktop and laptop
r Windows 2000,Windows XP,Windows Vista
r The minimum configuration: Pentium 300MHz'128M'RAM
.
least
The host computer has one USB sl0t at
USER MANUAL
MIYm
I
Appearance, buttons function
1. Auto Stereoscopic 3D LCD Panel(2D compatible)
2. Charging indicator (suitable for some models)
3. Convertible from 2D to 3D or 3D to2D.
4. Turn up the volume(up key)
5" Previous and Next
6. Turn down volume(down key)
7. Menu
8. Play/pause
9. Back
10.
11.
1
2.
13.
14.
15.
16.
17.
18.
19.
20.
21.
22.
23.
[6
LefVRight trumpet
Power on/oft Lock
Hole for hanging
Switch on/off
lnvisible bracket
Flip down casing for SD card and USB port
Flip down casing for Audio out &Video out
MIC and out DC Port
Earphone Jack
AV output
Microphone
Power-in Jack
MMC and SD card slot
USB interface
@
@
@
@
@
@
@
@
I
I
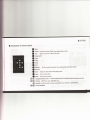
lntroduction of remote control
G}
I
Mute
2Dl3D
0 ESC
;
Back t0 main menu 0r back to last menu.
Power on/off
{r
Photo
€
Video
G
Conversion between 2D&3D when playing video or photo'
Music
s
Time
Q
Rec-Play
E Recorder
can start recording by press HEC at any working m0de except Menu interface.
photo'
@ Zoom Enlarge or reduce picture when playing
0 Menu
s
ac
@c
@
@@
Setup
Enter / Exit the menu.
Set for some {unctions
Direction LefUPrevious song RighVNext song
Ente(0K) conlirm the opti0n
Forward, Backward
in menu, and proceed to next, meanwhile, it is:PLAY/PAUSE
USER MANUAL
I
3
3
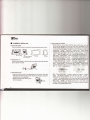
lnstallation before use
Power supply and Charging
.
Pull out the bracket
Pull the invisible bracket out along the corresponding direction as slot,
@MEffi
pull out
to
rigtrt <
Then twist g0 desees
to t}le back side
3
trort
side
"
on the device, it will be on working. Please do not touch the touch board
until the touch board light is ofi after 6-7 seconds, if press " switch
on/off
again, tie system will be off, if you do not use the device for a
while, press "Switch on/off
button l0 shut down, it iust consumes a
liltle electricity . But you must press "switch on/off" button to turn the
device on as the button of "on/off" on remote control cannoi turn the
device on.So the operation process for making the device on is: Allocate
"Power 0n/off lock"
"unlock" , then press "switch on/off on
the device, then the device will be on. lf you want the device 0fi, you can
press " Switch on/off on the device and " 0n/off" on lhe remole
control t0 shut down , but it is not for completely off, press " Power On/off
lock" to "lock" lor completely off.
"
Side side
Get the power on
Connect power adapter to the power jack on the
port of cable to AC socket.
Power on/off lock is the master switch for power. When power lock was
set in the lock position, the device wiil shut down completely and n0
working except charging. In the condition 0f long-distance transportation
0r non-use long time, suggest aliocating it to lock. The device is ready for
working after "unlock" , then press "Switch on/off
button slightly
"
to
devace, and connect the other
"
"
lr+
ffif,Uffio*
V
lnsert memory card
.lnsert the memory card to corresponding slot smoothly (front
.
side
downwards.) Be noted that don't insert the SD card wrongly t0 avoid poor
connection and non-recognition.
Please avoid drawing the memory card
out during playing.
.
lock' located t0 unlock and pressed " switch
" the device is working now ,then you can use " on/off"
bution on the remote control to turn it on 0r shut down. But if use
"0n10ff" 0n remote control t0 shui down, the device is still running
at heavy current, only the LCD monitor and parts of components off.
When press " 0nlOff" 0n remote control t0 turn it on again, the
screen of device will be light shorily.This standby condition is mainly
lor sleep or non-display in short time.
After " Power 0n/off
on/off
I
. The indicator will be 0n durin0
charging fto matter it works or not, when
charging is complete, the indicator will be off.
I
3
m
USER MANUAL
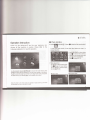
Connect the device to computer or USB
lf you want to transfer files via computer, please
use USB cable to connect
the device and computer.
.Turn the device
on
. Use USB cable t0
connect the device and your comouter.
.ltwillappearihe,pti'n
.,Computer','an;
of
please
choose "computer,, for operation.
;USB;
;nthescreen,
r*l
Notice:Please make sure the DC adaptor been
connected well t0
provide enough power before you connect
the device anO computei
3 Windows@2000, Xp and Vista',
li does not need exrra inslailail0n driving software
when you instail above
systcm t0 y0ur c0mputer or laptop. Windows
has built in driving
software t0 support the device, when the device
connectio your pC and
laptop successfurry, the device wirr recognize the
device as a new and
removable disk appeared on your pC.
a:
30
-
*uLTl-ilu,I pllYtx
'lrir|?jffff:Jl.,;J'j *H::-
to the removable
3
Oist<
lng
to trans#tcard
u-T9* removabre disk wi,
appear 0n
of the device, you can
move the data
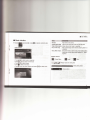
Safely remove the device
.Chooseffi
in tool list for removal.
.Then it will
appear a window for
safe removal
. Remove the
device from your pC.
.
I
0peration instruction
Fower on the device,you'll see the user menu.you can
choose all the functions in system. Flease refer to the
I
USER IIANUAL
Photo interface
o Chooseffi
and
click@
@
or press
directly on the remote control
t0 enter into photo browse, it will show 16pcs photo per screen to
{ollowing explanation for specific operation.
preview the photo.
.
u*eOOO
to choose photo.
. Clickl$ to back to Menu interface.
. Click@to
see chosen Photo,and
play the photo automatically.
" Click@
c
When play picture
U*
OO
Click
O
to skim up/down Photo"
to_enter inlo menu intertace,
and use Q)@ to choose Proiect.
thrn click @ to enter.
to choose the target interface, then
use the t0uch keypad on lhe device
Pleasibe notsd the target icon will be turned bigger after being recognized,
so please holrl on iill it turned bigger, or the button will be failed.
Use the navigation keypad,
@@C O
click@ to enter into this interface, 0r
Nolice:lt's better t0 use remote csntI0l, for operation if using touch key, just choose
corresponding key, here d0 fiot state it in details.
to convert2D/30.
M
M
r
Transition Mode
mffi
r
Picture Mode
r
Background Music
W
r
r
Rotation
I
3
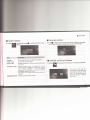
Video interface
and press
Choose
or press
B
. Use O(i for selecting video
. Presi@-to play the selected '
. Press @ to convert 2Dl3D
. Press (O to back to last menu
3
During video is playing
. PressOO to adiust volume
'Press@Q
Transition mode
lnterval time between two Photos.
Appearing mode of next photo
Mode
=Photo
Rotation
Rotate photo or non Rotation
=
Full screen or Auto Fit
Background Music
0n /0ff background music(Back ground music repeating
mode is depending 0n the set of rnusic playing mode)
Etfect
Choose Photo display effect
@on remote control {or video
it will be presented with a video lisi.
Effects
=
lnterval time
@
to PlaY next video
I
I
3
Music interface
Choose
MENU..a.,
and press@ or press@ 0n remote control to enter
I
i.': rlri.lu :lril.r':.::ri:i
.*q[1ryWW..ei**3i::ti*S**xi:r;:xrsrlg::qsixxr
Random
Play based on the device
Sequential rotative playing
Play the music from first to last one, loop play back.
Always play current song in repeating
Single rotative playing
music interface.
USER MANUAL
Play current song
Play current s0ng and it will stop playing after it is
complete
Set as Alarm music
Set current music as alarm music, i{ you want to select
music alarm or other alarm music ,please go
to
segment
r
. Press@Qto select music in music list
. Press@to play or pause currenl music
. Press@@to adjust volume
. Press$to back to last menu
. Press@ to g0 into menu interface and press
Mark statement
Flaying Status
, ,',,,*s.S&,
@@
Playing music and running ilme
Music playing status
to select music
-iI
-
"Alarm"
.;;;,
3
. PressOOto
and time interface
Choose
and
press "catendar,, 0n remote control to enter
m
:ME-I\fllt:,,:'
calendar and time interface.
Alarm
. PressQQtoenter
3
Press
Q
for menu interface and use
@@
for option, press
@
When Alarm set
as "0n"
,it will appear a mark ol
on the lnterface
"time" in-
terhce orhckto full screen inteface
.
choose time for set alarm and press@to go to
Press@@ for selecting time ,then press@ tor #tting
Alarm time
Set time oi Alarm as your needs
Repeat
From Monday to Friday, Saturday, Each day iust
alarm, please set it as you desired
Alarm Music
Set Alarm music
for executing.
Set Time and Date
.Press
O to select "SetTime and Date" and press
,,y6"-or; N*0,,*for
adjustyear, date and time,then press
@ t0 select
@eeeQt
savlng it or not
3
Mffi
Set Time and Date
The device provides several alarms t0 fit your needs.
I4
tt:
l:a
!
I
USER MANUAL
Recording function
%
:
MENU
STATEMENT
Language
Choose language wtrich provided in the system
0n/0ff Timing
Set the iime
Depth of Field
Sot
{or Power 0n/0ff
depth (range from 1 io 5) as you want.recommend
.
3 or 4 level.
Upgrading
software
Download upclating s0{tware 0f " anything elf" {!'Je ilill
provide it for ysu if necessary) and save it t0 SD card then
press
"
S0rlware upgrading"
, il lviil be upgraded
aut0maiically. A,ter upgra'liflg, the device will be restarted
auiomatically and back t0 main menu'
process o{
l\otice:Please keep charging the device during
L,Pgrading,
ljpgnding soltanreversron
No
Sh0w the cu rre nt software ver si0n
r
c
USB disk and SD card intedace
Choose
!!!tand
press
Disk'
@ tor ilre selection of SD Card and USB
kd
The system u"ill read
the
documents once You select the
ccrresponding card,You would
erijoy the pnito'video/music
from SD card till it is back to
main menu
.
!
r
I
Troubleshooting
connect to
lt can not be read out and recognized when
.
AC adaptor and has been staned' il
The device has been connected t0
PC again' and select "PC"
st'art the device and connect to
;;i ;il;;
on the screen.
exist,
.PleasemakesurePCoperationsystemisfittingthe..requirement0fthe
o{ "product profile" in the manual'
refer to the
;;;i;;;lfu
The device could not be started
Whether you
'
;j;;;;"*;-k;
.
.
I
press
"
iiswitch on/oft
slightly t0 start the device'
Low battery or full batten'?
low battery' please recharge the
l-he device can't be stirted when
will be on during charging )
light
device by adaptor (The instruction
upgrading
po*.,
during
off
ttf,.i
Wt
.
will be
?
iuir[l,p[*.
f
I
push " power on/o{f lock " .t0 ".lock" or not?
"tr" " po*er onrott t-octr" to " unlock" ' then
ii;;;;t';'i-tr,lt
ot'it""-iitNs
sent back the device
upsrading'
t0 our
the upsradins
lor software re-
.
iirili i.
other USB Ports are available'
ls USB Port on working?
board user manual
lf not, please reter t0 y0ur PC and main
,
recognize content in memory
anO
-pr'.tqvideo
iiioilo
have been saved to conespondinq 2D'30
can
saved t0 wrong lolders'the content
photo,video
2D,3D
not be recognized.
see if the
,
pc
ttuttrp
irro*tirt
Please do operation as following
USB interface well or not?
. Whether the device connecis to PC-nO
please reter to tne usei"man"-t
device connects to the PC well'
MAC PC USB pori?
Does the device connect t0 correct
use port 6t trllc
ptease do n,t c'nnet irrJ
virus?
memory card and USB disk contains
device can noi
i:iih; ;ffiry .it,i i'o usa oitx infected virus'the
card and USB disk
.
io
;;;"r;ffi-does not match the probably it will cause system
roi o. liiprrved normally, also
breakdown.
illing.
ie-ptug USB cable
device
is inserted correctlyt0 the slot
Please make sure the mem0ry card
device requirement'the content may
. W#il;;il;;
company
"s*tni
photo/video/'music from SD card and
The device can not recognize the
USB disk
the
. Please make sure the memory card (SD/MMC)is compatible with
.
.
PC cannot recognize the device
.
PC
Please make sure:
the lollowing
please
.read problems still
lf you meet any problems during operation'
lhe
lf
problems'
to'tolve
information or refer to ,r., **uui
or contact us directly'
please consult with 1lo'itto*' service ienter
r
USER MANUAL
kevboard,
r''J ,t*,
itl
ul
*""
f::,1
tv
,**o
i>1
bv
ffJ,o*ruo
r
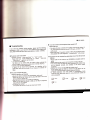
lf you can cancel the files from USB flash disk or memory card
directly?
No,please connect the device t0 pC first and cancel the files trorn
USB
flash and memory card.
r
The information and data you set,such as the setting of play time interval,
background music, OSD, volume etc, is back to previous condition of setup
software to do {ormat conversion. ln the meantirne, the device
support and read out long file name and special symbol.So suggests
name within 20 letters.
r
Because of the device particularity, it only supporls converting
2D
and 3D to 3D.But the device cannot read 0ut the files property il
not save the files as stipulation to save 3D ph0t0 t0 3DpH0T0 fo
The two methods of setting your personalized information:
. Press the button
o{
" 0n/0ff" 0n ihe remote control, then your
pers0nalized information and data will be saverl aut0matically
a{ter the
device was off totally.
. Press the button
" switch 0n/0ff,, on the device, then your
personalized information and data wiil be saveci automatically
t00 after
the device was off totally.
2D photo to 2DPH0T0 folder,please save the
t0
/0f{"
to
The device can not play after saved new files,and occur ,,system
halt,,
Because the compatible file lormat oi video,photo,music are limiied,
the device cannot support all formals. lf it happeneri, please use the
length & width raiio conversion s0 as t0 get best 3D etfect.
r
Why are some interfering stripe appeared occasionally when play photo,video?
There are some black border and the 3D effect is poor when
photo/i/ideo,why does it happen?
ln order to gain best 3D effect during 2D display , ii is better to
horizontal images to rich screen due to 3D displaying particulr
Suggest using the converting software we provided io do {ormat
then
It is ars not easy to happen acluaily,if it happened,please press the
button
of 2Dl3D to eliminate the inlerlere.
r
r
slightly which.on the device. you can restart
the device again.
r
correctly.
How can I do if the operation and action is no response like system
halt
ll some wrong operation happened and resulted in system halt,please
,,unlock',
push the power
" lock" ,and re-push power
press "switch 0n
Afterthe device worked for a while,the SD capacity is getting less
resulted in less available storage capacity ,why does it happen?
The device has the function o{ message recording and playing.
Al
it can only play the newesi messagc, all the recoding files will be
s
the folder of DCIM\100C0ACH in SD card. Kindly suggest y0u t0
to
so
2Dl3D
corresponding folders,so that the device can recognize and
of
r
Why are some lines appearing in the images and somes 3Dvideo
not be converted to 3D when you play 2D, 3D photo and video?
PC to clear uncessary files.
I
Content in the attached SD card
r
r
Dem0 files:There are some 3D/2D videos and photos in the attached SD card
for your reference.
Photo/Audio/lideo convefiing software. lt is customized software,please c6py and
install the
software to P0,the software's serial No. is in the last page ol user manual, please
keep both ol
them well.lt supports WinXP/2000//ista and only for authorized user, ii cannot be
released to
public,or the law troubled will be taken by the user.
Statement.
We are not liable lor the editing errors 0r omission in the user manual.
We reserve the rights to amend the specification without prior notice as the product
is in the process o{
upgrading.
The contents may be amended without prior notice for end_user.
It is not aliowed t0 copy, reprint, distribute without our permission.
You must have read the above agreement in detail and agree to follow the
clauses and terms.
USER MANUAL
Tips
The best viewing distance is 60-200cm
You may feel eye strain,swimmy or uncomfortable if you have never seen the
glasses free 3D products because of accustomed 2D viewing habit before, it will
be eliminated after viewing it {or a while according t0 y0ur adaptability. Please do
not worry about it and use it securely as there is no any influence to health.
After started the device, please do not touch the invisible touch-key to avoid
button failure until the touch*key is off in 6-7 seconds.
Blaze \Iideo Magic
Converting software
I
Please read this agreement before use
has the
The software is third parly authorized software and our company
rights'
all
reserve
company
party
our
and
authorization.Third
transfer
ownership and benefit.
3
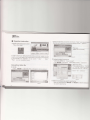
lnstallation instruction
Please click below icon for starting installation
ffi*'**'
dF
sddhrrycb@ekffib
ffi-a
r::r:il,;em
Statement
.Wearenotresponsibleforeditingerrorsoromissioninthisusermanual.
. Because the software is going to be upgraded, we reserve the rights to
upgrade the software without prior notice.
. The contents may be amended without prior notice to end-user'
. lt is not permitted t0 transfer the software to other third parties or release
picfure
'l
3 After select the language, it will
appear a picture as " picture
2"
for
guide installation
to public without our paper permission.
. Thi software can be used on different computers, but only workable 0n
onecomputerwhenuseatonetime,iftheserialNo'isl0stitwillbenot
workable for you, we are not liable for your lost.
.You must have read above agreement in detail and
agree
t0 follow the
pictlre
clauses and terms.
c
a
This instruction contains two segments:
installation and operation instruction.
Magic" will be saved to SD card which is
complimentary to the device, please copy and save the
"Blaze Video
*
software to your computer and install it as per the
installation instruction.
After click
lM&
picture 3
"
2
Next", it will
" license agreement" as "picture
I
3
After chose"l acceptthe agreement",
click "Next" to continue installation,it will appear installation
access as "picture4 "
c
After chose installed folder, please
click "Nexi",it will appear a picture
as
3
ll setup is completed,it will appear
a picture of
USER MANUAL
"click tinish to exit setuP"
to finish installation as below picture.
"Picture 5"
Lomdebnq he Blaze Ydm Magi(
!iln shHd&akr'6ildorP
cs;c th#&rbnusdlrda*@F
oMsbi'nr&
r;+ seon,,*e'@-'tud,.h
lieikd *ie
tFidtkb{6
aMhb''HBD€
@-.---
- -:l;Gl
2.O
Picture 5
Picture 4
3
After chose "Next" to finish setup,
it will aPPear "ready to install"
picture as "Picture 6"
3 After click "install" ,it will appear
a picture of " installing and extracting
files" as
After you click"
tinish"
your computer'
,the so{tware is setup and saved io
"Picture 7"
Afterinstallation,youcanuse..BlazeVide0magic..t0d0corresponding
tile converting.The c0nverting instructi0n as following'
picture 6
picture
7
3E t{IrTr-l,tE0ti FLAY[8
i
I
3
.
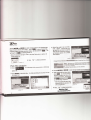
Operation instruction
Double click below icon to starl
"Blaze Video Magic"
Select the Video files you wantto convert,click ,,0pen,, (you
can add
files),files will be added to the converting software as below ,,picture
5,,
.
Files were
added well successfully.
ln order to ensure your rights and get best service, you shourd register
first,The
serial No. is in the rast page of user manuar,which is onry used on ,ne
c0mpuier
at one time.After your
"Photo" to
be
registration, you can
convefi ,,Video,, ,, Music,,
the compatible format.
pioture 5
3
Settlng the output format of file
. Select AVI-MPEG4 in "output
format,,
. Click
it will appear "Video 0utput setting,, as picture 6
EU,
Video format setting:
Converting Video file
3
Add file
. Click
"W"
There are two resolutions, "220.
and " 640"384 ". select one ol
recommend youto use "720-4A2,'
to.add video files, it will appear a box as picture 4
'Click "ok"
to finish it
l:.
l:picture 7
3
Select the destination you want to save the file
' Step.3 foroutputaccess,use
and
you want to save the file.
@I
@I
to selectthe
t.
X
3
3
File converting
'
set "0k" you can do video converting' click .
status'
nefow picture 'i8" vrill sh0w c0nverting
the bution of &ffffi will change
After
toffi
. When the pr0gress
Click
USER MANUAL
picture 11 will
to add Audio iiles, following Dialog box as
W
be poPPed.
for conversion'
at the same tirne
box as pictui'e 9'wiil
rate gett0 100%, f0li0wing Dialog
be popPed oul
*, --
@ffi@
tl
I
I
\t'll
l-**_l
| ! _r,t.l
Picture
Picture 8
3 Click "0K"
.
Select files for conversion,
!
click "0pen"
(several files can be added at one
picture
iles into the c0nversion software as f ollowing
12 to finish files addition"
tir.l'i.
tm"stin5rEd I
pritfrt
f
I
I
to finish conversion'
Audio Files Conversion
c
W
{or selecting
"MusiiConversion PurPose"
as following Picture 10.
Ctick
.
r,s
ir
li
,ai
.r
*
trlitx
picture 13
Picture 12
',r6!i!'*j"{lLll:i:lli ' W
0utput format selection
the'Menu will be de{aulted
t0 r.;ir,:*-' xur.r:r
0s
The software in
output The softu'rare will
defaultdifferent..Audiooutput,,byselectingdifferent0utputformat.
30 lluLll.x,nla
pLlYlR
ThroughWandWtoselectstoragelocationforthespecifiedfiles.
Audio files
ffi
status
conv-ersion
show
will
toolbars
'ffie
Progress
as tollowing picture 13'
be turned to be W
When f inished all the above steps
'
Click
to convert
same time
ffi
'
will
box as picture 14
.When the progress rate getto 100%' {ollowing Dialog
Select files need to be converted'
(several files can
OPen" (severalfilescan
click
rlick ""Open"
ffi;ruqf
ne
I
aOOeO
at one time) to Put
the
riresaddltion
will be PoPPed out.
picture 17
a Click "0K"
to finish converston'
. 0utput Format Selection
Photo {iles converslon
.i
@W
,
box as picture 16 will
to add Photo files' the following Dialog
be PoPPed out
c
lover this resoluto'ii
All pictures over 1 6M Pixel must be
maximum Pixel is 16M'better to set L[
:
at 1 024x768 or 800x60.
and
EI
to select storase
i9:{I1o-r-l[.:":H
When finished all the above steps'
click
ffi
to convert Picture'
Proorilffiolbars will show the
.
status of conversion
timeffiwill
'
,
at the same
turnedlobe
as the following
1
I
ffi
Plclure'
Whenthe Progress rate getto 100%'
{ollowing Dralog box as Picture 19
will be PoPPed out
3 cIE :o!(' !o:t!ls!
picture
-
ior this software
i iry io ,trrrt only an options {or this software )
i
3 Throushwl
picture 1 5.
Click
ril:ii'i:.
-
a format
nr.urt, tnr'.uppo,tive
j*{;i 5.oe5tn
;;;wforselectingphotoconVersionasfollowing
3
$sq"&8
-:t:"i
itl ai
=ii'li'::tXii(only
Notice
:;i6frd:-:ri::r'.:'
.:ffi,#;ffi;ffi-_&gr
1
5
picture
1
6
&;a{:&i&i&i*.-
yt1r1-,--,'.l!14-jl-r*r
i*;*rr:3
tilliis;cr;::r, 1!*9&
L{&li{&i
picture 18
qalrvcrsiorl
BlazeVideo Magic
SIN:STSBDDSAHOYD4
l-" *"*1
Lgl
picture l9